
Instruction Manual
70” 4K Ultra HD Android TV - BP700USG9200

CONTENTS
General Safety 4
Installation 8
Wall Mounting Instructions 9
Controls and Connections 10
Remote Control 12
Initial Setup 15
Android TV - Home Screen 20
Google Play Store 21
Google Assistant 22
Inputs 23
Settings 24
Network 25
Channel Menu 26
Device Preferences
About & Time Settings 27
Input Settings 28
Power Settings 29
Picture Settings 30
Sound Settings 31
Home Screen & Screen Saver 32
Google Assistant Settings 33
Parental Control 34
PVR (Personal Video Recorder) 35
FAQs 36
Specifications 38
Customer Helpline Last Page

4
Read this manual thoroughly before you start using the TV.
Store this manual, the completed warranty card, your receipt and the product packaging.
The safety precautions instructions reduces the risk of fire, electric shock and injury when
correctly complied to.
Please follow all instructions and take notice of all warnings.
The lightning flash with symbol within the
triangle is intended to warn you of a
non-insulated dangerous voltage in the
product’s enclosure that could be of
sucient magnitude to generate a risk of
electric shock to persons.
The exclamation point within the triangle
is intended to warn you to the presence
of important operating and maintenance
instructions in the documents included with
the product.
The lightning flash symbol within the triangle is intended to warn you of
non-insulated dangerous voltage the product’s enclosure that could be of
sucient magnitude to generate a risk of electric shock to persons.
• Using Cabinets or stands recommended by the manufacturer of the television.
• Only using furniture that can safely support the Products.
• Ensure the Product is not overhanging the edge of the supporting furniture.
• Do not place the product on a high furniture without securing both the furniture
and the product to a stable support.
• Do not place the product on cloth or other conductive materials.
• Warn children of the dangers of climbing on furniture to reach the television
or its controls and to call for an adult to assist.
IMPORTANT INFORMATION
The cover (or back) of the unit should
not be removed to prevent risk of electric
shock.
This unit must be serviced by a qualified
service personnel only.
GENERAL SAFETY

5
Installation
Please follow instruction when installing this product in accordance with the instruction
manual. This product must be positioned in a suciently stable location, it can be
potentially hazardous due to falling and can cause injury, particularly to children if it
positioned incorrectly.
• Before installing this TV set, make sure your outlet voltage corresponds to the voltage
stated on the product rating label
• Do not use a damaged power cord, plug or loose outlet. Doing so may cause an
electric shock.
• Do not plug several devices into the same outlet. Doing so may cause the outlet to
overheat and start a fire. Make sure the outlet is readily accessible during operation
of the equipment.
• Do not bend, twist or kink the power cord excessively.
• Do not allow anything to rest on or roll over the power cord and antenna cable.
Doing so may cause a fire or an electric shock.
• Do not run the power cord near heat-producing appliances such as radiators, stoves or
irons. The excessive heat could melt the insulation and expose live wires, resulting in
fire or electric shock.
• Unplug this TV during lightning storms or when unused for long periods of time.
Not doing so may result in fire or electric shock.
• Do not cover the ventilation openings of the product with items such as newspapers,
tablecloths, curtains etc or insert objects into the slots available on the products.
As this could result in the product temperature rising and could cause a fire.
• If you notice any unusual odors or smoke around the unit, immediately disconnect the
unit from the outlet and contact the service center. Failure to do so may result in fire
or electric shock.
• When not using the unit for long periods of time or when you are moving the unit
please ensure to disconnect the power cord from the wall socket.
• Do not expose this appliance to rain or moisture as it may result in fire or an
electric shock hazard
• Do not tamper or change or modify the product in any way.
• Only use Accessories outlined and recommended by the manufacturer.
• Please do not expose the product to splashing or water contact
• Please do not place any object on top of the product including objects filled with liquids
such as vases.
• Danger of explosion if battery is incorrectly placed. Replace with same or equivalent type.
IMPORTANT INFORMATION
GENERAL SAFETY (CONT.)

6
If a television is not positioned in a suciently stable location, it can be potentially
hazardous due to falling. Many injuries, particularly to children, can be avoided by taking
simple precautions such as:
• Using cabinets or stands recommended by the manufacturer of the television.
• Only using furniture that can safely support the television.
• Ensuring the television is not overhanging the edge of the supporting furniture.
• Not placing the television on tall furniture (for example, cupboards or bookcases)
without anchoring both the furniture and the television to a suitable support.
• Not standing the television on cloth or other materials placed between the television
and supporting furniture.
• Educating children about the dangers of climbing on furniture to reach the television
or its controls.
It is STRONGLY RECOMMENDED that you ANCHOR this product.
Toppling furniture and TV’s can cause serious injury or death.
TO HELP AVOID ANY SERIOUS OR FATAL INJURY, WE STRONGLY RECOMMEND THAT THIS
PRODUCT BE PERMANENTLY FIXED TO THE WALL OR OTHER SUITABLE SURFACE. FIXING
DEVICES ARE NOT INCLUDED SINCE DIFFERENT SURFACE MATERIALS REQUIRE DIFFERENT
ATTACHMENTS. PLEASE SEEK PROFESSIONAL ADVICE IF YOU ARE IN DOUBT WHAT
FIXING DEVICE TO USE.
WARNING!
GENERAL SAFETY (CONT.)
• Please beware that Dust could accumulate over time on the unit and cause it to generate
heat and or deteriorate insulation, which in turn may result in an electrical fire.
• The product is not intended for use by persons (including children) with reduced physical,
sensory or mental capabilities, or young children of any age, They must be supervised
product by a person responsible for their safety.
• Batteries from the remote control must be only removed by an adult, the adult must
ensure to keep them out of reach of infants and children. Seek medical attention
immediately if a child has swallowed a battery.
• Batteries (battery pack or batteries installed) shall not be exposed to excessive heat such
as sunshine, fire or the like.
• To maintain the product do not use any chemical or cleaning agent or wet cloth, please
only ensure to utilize a dry cloth to wipe it down from marks or dust and only after
unplugging the product from the power socket.
• Please ensure to contact our call center for any repair or service required for the products.
• Make sure to always carry TV from the sides, always be sure to have assistance by another
person. Do not carry the TV from the middle.

7
This symbol indicates that the appliance has double insulation between the
dangerous mains voltage and the parts accessible to the user. In the event of
repairs use only identical spare parts.
Please make sure upon positioning this product, the place is:
• Not wet or damp and Well ventilated
• Away from direct sunlight or heaters.
• Away from splashes or food.
• Protected from excessive dust or grease.
• Do not install this equipment in a confined space such as a bookcase or similar unit.
• Do not install the TV set near heat sources such as radiators, stoves or other audio
visual equipment that produce heat.
• Do not place containers with liquids, if liquid falls inside the products it may result in
short-circuit, fire or electric shock.
• Do not place small metallic objects on top of the unit. Metal object falls inside the
product it may result in short-circuit, fire or electric shock.
• Do not use or store flammable or combustible materials near the unit. Doing so may
result in fire or explosion. Do not place any naked flame sources, such as lit candles,
cigarettes or incense sticks on top of the TV set.
• The antenna must be installed away from high-voltage power line,
• Please contact an antenna professional installer to install the antenna to avoid
incorrect installation which could result in fire, electric shock or serious injury.
• Install the unit at a reasonable distance from the wall to ensure sucient ventilation.
• If mains plug or an appliance coupler is used as the disconnect device, the disconnect
device shall remain readily operable.
GENERAL SAFETY (CONT.)
“HDMI, the HDMI logo and High-Definition Multimedia
Interface are trademarks or registered trademarks of
HDMI Licensing LLC.”

8
Install the stand as described below, or if you want to mount it to a wall, please contact a
professional installer.
Please ensure the TV is not plugged into the wall socket and furthermore we recommend
to get another person to assist in the following task.
Attaching the stand
Step 1
Place a soft cushioned material on top of a flat surface to prevent damaging the screen
panel. Then place the TV screen flat on top, with the screen side facing down, as
illustrated on the right.
Step 2
Align the stand leg to the installation point, as illustrated below.
Step 3
Tighten the screws (supplied) with a screwdriver to ax the stand to the panel, as
illustrated on the right.
CAUTION!
Do not apply excessive force as this may damage the screw holes.
INSTALLATION

9
Wall-Mounting Instructions
Please ensure the TV is not plugged into the wall socket and furthermore we recommend
to get another person to assist in the following task.
• We recommend you use a professional installer as we assume no liability for any eventual
damage to the product or injury to yourself if you mount the TV on your own.
NOTE: If you are wall-mounting the TV, this should be done by a qualified installer.
INSTALLATION (CONT.)
BACK OF TV
VESA PATTERN: 400(w) x 200(h) mm
400
200

10
CONTROLS AND CONNECTIONS
Channel Up / Up (menu)
Channel Down / Down (menu)
Long Press - Standby
Short Press - Select
Volume Up/
Right (menu)
Volume Down/ Left (menu)

11
1. USB INPUT
2. HDMI 1 / ARC
3. HEADPHONE PORT
4. RJ45 (ETHERNET)
5. OPTICAL
6. 2X USB INPUT
7. HDMI 3
8. HDMI 4
9. HDMI 2
10. MINI AV INPUT
11. ANTENNA (RF)
USB connection
Insert a USB storage device into the USB port to record, playback of video/music/photo.
CONTROLS AND CONNECTIONS
BOTTOM PORTS
SIDE PORTS
4 5 6 7 8 9 10 11
1 2 3

12
REMOTE CONTROL

13
REMOTE CONTROL (CONT.)
1. POWER: Turn the TV on/o.
2. INPUT: Open Input menu (DTV, HDMI1, HDMI2, etc)
3. Open Netflix
4. Open YouTube
5. Start recording DTV Channel
(must have USB drive inserted)
6. STOP: Stop multimedia playback, Recording and
Timeshift mode
7. MUTE: Turn the sound on or o
8. REWIND: Rewind playback in multimedia/timeshift mode
9. FASTFORWARD: Fastforward playback in multimedia/timeshift mode
10. PLAY/PAUSE: Play/Pause playback in multimedia/timeshift mode
11. TEXT: Teletext Mode
12. GUIDE: Display electronic TV guide in DTV mode
13. ASPECT: Adjust Aspect ratio of the TV
14. ARROWS: Navigate on-screen menu, OK to confirm selection
15. RETURN: Return to previous menu
16. HOME: Open Android TV home page
17. MENU: Open or close on-screen menu
18. Start a voice search or speak to Google Assistant
19. VOLUME: Increase or decrease TV volume
20. CHANNEL: Next or previous TV channel
21. NUMBERS: Direct access to desired channels
22. INFO: Display channel information
23. Jumps to last viewed channel
24. Operations according to the prompt within menu
or while watching TV.

14
REMOTE CONTROL (CONT.)
Using the Remote Control
• Do not mix old and new batteries in the remote
• Do not use dierent types of battery
• If you do not intend to use the unit for a long time, please remove batteries from the
remote to avoid accident.
• Keep batteries away from children and pets.
• Never throw batteries into a fire.
• Do not drop, or impact the remote control as it void warranty immediately.
• The remote control operate at a range of 5 to 6M eectively
• Do not expose the remote control sensor to a bright light.
How to open back of remote control to replace batteries
1. Look for the hole at the back side, bottom of the remote.
Use this hole to either place your nail (if long enough) to open or
another thin object to pop open the cover.
2. Place/Replace the batteries making sure that the 2x AAA batteries
(included) polarities (+/-) match the battery compartment polarities (+/-).
3. When closing the back cover, place the top side edge of the back
cover in first, then the bottom side (where the opening hole is) when
pushed in will click shut.

15
INITIAL SETUP
For the first initial setup, on screen setup wizard will guide you through setting up your TV.
Please follow according to onscreen guide to setup your TV correctly.
Be sure to follow the below prompts to pair your Bluetooth remote control. After the pairing is
successful, you can now operate the TV.
Use the buttons to select system language, then press OK/SELECT to confirm.

16
INITIAL SETUP (CONT.)
Iif you just want to use your TV normally, please select “SKIP”
To connect your Android Smartphone to your TV, Select “Continue”.
Press to select your Wi-Fi you wish to connect to, enter the password and then confirm
to connect.
By accepting the Google Terms of Service to improve the product experience, Select “ACCEPT”
to proceed with this condition.

17
INITIAL SETUP (CONT.)
Select “YES” if you want your location identified on your ANDROID TV. (Note: Select “YES” if
you want google to inform you on weather more accurately based on location).
By Agreeing and selecting “YES”, you agree to automatically send diagnostic information to
Google to help improve your Google experience.
18
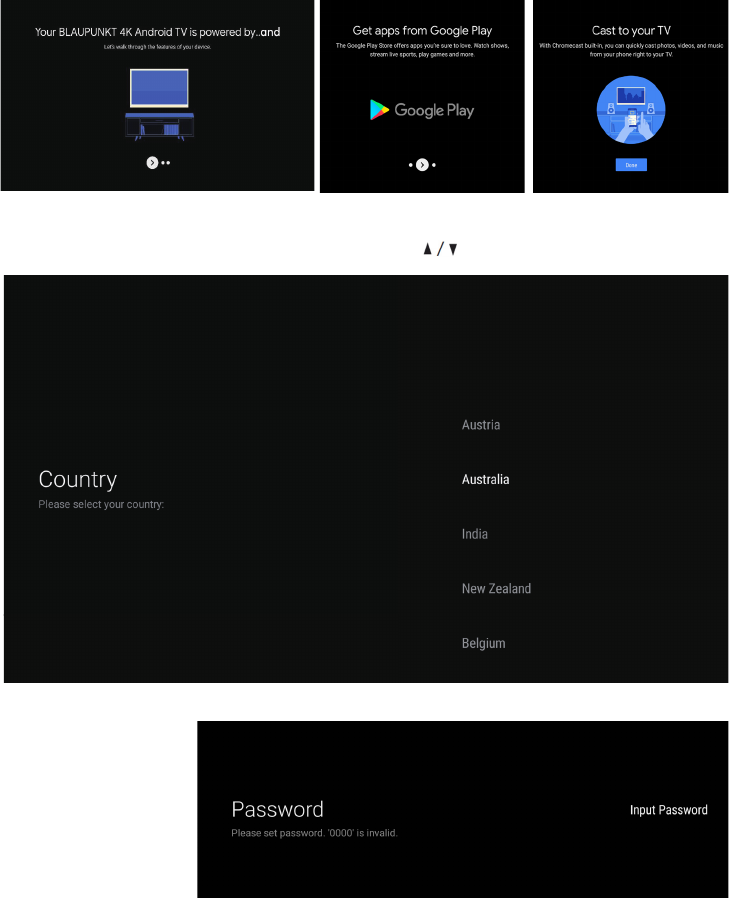
INITIAL SETUP (CONT.)
Informational screens will now appear, you can scroll through steps by press “RIGHT” directional
button to continue.
Select the country you are using the device in with the directional buttons.
Used to set a password
of your TV for security
purposes.
NOTE: make sure to
save the password,
as you can then refer
to password when
required.

19
INITIAL SETUP (CONT.)
Please be sure in this step, select “HOME” if you are using this TV for use at home.
Make sure to confirm once you have selected “HOME”.
Let this device be detected as a Google Cast device and allow Google Assistant and other
services to wake this device up to respond to Cast commands, even when on standby and
the screen is o.
Select the TimeZone you are using the device in with the directional buttons.
Make sure to select “SCAN” to auto tune your TV to search for local DTV channels.
NOTE: Please make sure Antenna (RF) cable is plugged into the ANT IN port located on back
of TV. (refer to page 11 TV ports - #10).

20
ANDROID TV - HOME SCREEN
Once you have completed initial setup, you will now enter the ANDROID TV home screen.
1. Open Google Assitant to start a voice search.
2. Selected the Multi-dot red circle to have access to all your applications.
Pre-installed applications are available for you in this row, select “Google Play Store”
If you wish to search and download additional apps optmised for Android TV.
3. NOTIFICATION: here will display all notifications relating to anything on
your ANDROID TV.
4. INPUTS: Select this if you want to adjust your TV Input, Example: DTV, HDMI 1, HDMI 2.
5. NETWORK: This will display what network connectivity, Wi-Fi or ETHERNET.
6. SETTINGS: Select this if you want to access TV settings.
7. TIME: Displaying current time.
8. Each row past this point will display recommended content from the apps you
already have installed.
8
3 4 5 6 7
2
1

21
GOOGLE PLAY STORE
To have access and to download
applications from the Google Play Store,
you must sign in with a Gmail account.
Once you open Google Play Store, you
will be prompted to sign in or create a
new account.
Once you have signed in, you will be brought to the below page, scroll through the list of
applications available for download OR go to the search button, and search via entering Text
or speaking to Google Assistant via your remote control.

22
You now have access to Google Assistant via the (#1 on page 20) or by pressing (Google
Assistant) button on your remote control to commence.
GOOGLE ASSISTANT
Whats the weather today?
Allow for the voice box to appear at the bottom of your TV screen, stating: “Listening” then
speak clearly towards the top of your remote control for Google Assistant to hear you. Once
Google Assistant understands, what you have requested will be actioned.

23
INPUT MENU
To access INPUT menu, either select INPUT (#4 on page 20) via the HOME screen or press the
SOURCE button on your remote control to have quick access to INPUT menu.
The options that are AVAILABLE will be highlighted, PORTS that are not in use, you will not be
able to access.

24
SETTINGS
To access SETTINGS menu, select SETTINGS (#6 on page 20) via the HOME screen.

25
NETWORK & INTERNET
To access NETWORK menu, select WIFI icon (#5 on page 20) via the HOME screen or go
into Settings (#6 on page 20) menu and go down and select Network & Internet.

26
CHANNEL MENU
To access CHANNEL menu, select SETTING icon (#6 on page 20) via the HOME screen.
Then go down and select “CHANNEL”.
Channels
Display the scan sub-menu based on dierent channel installatino modes.
Antenna - Set the signal type to antenna, when set to antenna the TV can now receive digital
broadcasting signals.
Auto Update Channel - Enable or disable, allows your TV to automatically update if any
changes made to scanned DTV channels.

27
DEVICE PREFERENCES - ABOUT
TIME
To access ABOUT menu, select
SETTING icon (#6 on page 20) via
the HOME screen. Then go down and
select “ABOUT”.
To access DATE & TIME menu, select
SETTING icon (#6 on page 20) via the
HOME screen. Then go down and select
“DATE & TIME”.

28
INPUT SETTINGS MENU
To access INPUT SETTINGS menu,
1. Select SETTING icon (#6 on page 20) via the HOME screen.
2. Select “Device Preferences”
3. Then go down and select “INPUTS”.

29
POWER SETTINGS MENU
To access POWER SETTINGS menu,
1. Select SETTING icon (6) via the HOME screen.
2. Select “Device Preferences”
3. Then go down and select “POWER”.
Sleep Timer - Options of O, 10 mins, 20 mins, 30 mins, 40 mins, 50 mins,
60 mins, 90 mins and 120 mins to auto turn o your TV.
Picture O - Turn o your display (recommended not to select this option.
No Signal Auto Power O - Turns your TV o if no signal is detected.

30
PICTURE SETTINGS MENU
To access PICTURE SETTINGS menu,
1. Select SETTING icon (6) via the HOME screen.
2. Select “Device Preferences”
3. Then go down and select “PICTURE”.
Picture Mode - Options to choose from - Standard, Vivid, Sport, Movie, Game,
Energy Saving, User.
HDR - The default setting for HDR is ON this will allow you to enjoy the full eects
of HDR (High Dynamic Range).

31
SOUND SETTINGS MENU
To access SOUND SETTINGS menu,
1. Select SETTING icon (6) via the HOME screen.
2. Select “Device Preferences”
3. Then go down and select “SOUND”.
Sound Style - Options to choose from - Standard, Vivid, Sports, Movie, Music, News, User.
Speakers - TV Speakers or External Speaker
(This will force the TV to output sound through the chosen option).
Digital Output - Auto, Bypass, PCM, Dolby Digital Plus, Dolby Digital.
(It is recommended to select AUTO, as this will automatically detect quality
of sound being procued by content).

32
HOME SCREEN
SCREEN SAVER
To access HOME SCREEN menu,
1. select SETTING icon (#6 on page 20)
via the HOME screen.
2. Select “Device Preferences”
3. Then go down and select
“HOME SCREEN”.
To access SCREEN SAVER menu,
1. select SETTING icon (#6 on page 20)
via the HOME screen.
2. Select “Device Preferences”
3. Then go down and select
“SCREENSAVER”.

33
GOOGLE ASSISTANT
To access GOOGLE ASSISTANT menu,
1. Select SETTING icon (#6 on page 20) via the HOME screen.
2. Select “Device Preferences”
3. Then go down and select “GOOGLE ASSISTANT”.
Accounts will only be accessible if you have connected a Gmail account via the “Google Play
Store”. A Gmail account is needed in order to download and install applications via the “Google
Play Store”.

34
PARENTAL CONTROL
To access PARENTAL CONTROL menu,
1. Select SETTING icon (#6 on page 20) via the HOME screen.
2. Select “Device Preferences”
3. Then go down and select “CHANNEL”.
4. Select “Parental Control”
From here you have the option to select and create a new password to lock the channels
you want to lock.
Note: please make sure to store/save password somewhere you can access at a later date.
Forgetting password, you may need to factory reset TV to use again.
Channels Blocked - Block specific channels to restrict use.
Program Restrictions - You can restrict specific programs on a TV channel can be blocked
Inputs Blocked - Block a TV port input to restrict use.
Change PIN - Change existing PIN selected when first entering this menu.

35
PVR (PERSONAL VIDEO RECORDER)
To access RECORDING menu, (PVR)
1. While watching Live TV, press “MENU” on remote control.
2. “TV Options” will appears, Press “DOWN” arrow on remote control to go to
“RECORD” menu (as image shown below)
IMPORTANT - You must have a USB Drive inserted into the USB Port of the TV to in order to
use any of these “RECORD” functions. (Must be FAT32 format)
Start Recording - Select “Start Recording” to start recording the channel you are
currently viewing on Live TV.
Record List - Select “Record List” to view all previous recordings.
Device Info - Select “Device Info” to view information about your
storage device.
Schedule List - Select “Schedule List” to see future programs you have
scheduled to record.
Time Shift Mode - Select “Time Shift Mode” and switch on to enable
Pause/rewind/play of Live TV.

36
GENERAL PROBLEMS WITH TV SET
FAQS

37
FAQS
MY REMOTE CONTROL ISN’T PAIRING WITH MY ANDROID TV?
If your remote control is not pairing or becomes disconnected, please make
sure to go on the Smart home of your Android TV:
1. Press SETTINGS Icon
2. Select “REMOTES & ACCESSORIES”
3. Select “ADD ACCESSORY”
4. Follow the onscreen instructions to pair your remote. Once you detect
your Bluetooth Remote control, Press OK on remote control to select
it and pair.
If it doesnt connect, try the process again until it pairs, otherwise contact our
call centre: info@ayonz.com
NOTE: You can still using your Remote control without pairing, only cannot use
the “GOOGLE ASSISTANT” Feature until paired.
ANDROID TV REMOTE CONTROL - APP
If you want to control your TV via your Smart device. Search for:
“ANDROID TV REMOTE CONTROL” app and download. Once following
prompts to connect your Smart device to your Android TV, you will then be
able to have 100% control of your TV from your smartphone with the
Google Assistant feature enabled.
TURN OFF SUBTITLES ON LIVE TV?
To turn o subtitles on your Android TV, while watching Live TV:
1. Press “MENU” on your Remote Control
2. Go right and select ADVANCED SETTINGS
3. Go down and select SUBTITLE
4. Switch all choices of subtitles to OFF
Once all options for subtitle are switched o, then you can exit and continue
watching Live TV!
If the Subtitle persists to appear, you may need a software update or for further
assistance please contact our customer support centre at info@ayonz.com

38
SPECIFICATIONS
Operating System Android TV 9.0
HDR (High Dynamic Range) Ye s
Resolution 3840 x 2160
Display Colours 1.07 Billion
Contrast ratio: 4000:1
Aspect Ratio 16 : 9
Refresh Rate 60Hz
ETHERNET / WiFi Yes/ 802.11 b/g/n/ac
Multimedia Playback
Format under
USB Mode
Movie: MPEG, TS, TRP, TP, MP4, MOV, 3GPP, 3GP, AVI, MKV,
ASF, DIVX, FLV, SWF, RM, WEBM
Music: MPEG1, MPEG2, VORBIS, LPCM, FLAC, DTS LBR, DTS
XLL, DRA,
Photo: JPEG, PNG, BMP, MPO, GIF
Power Source 100-240V 50/60Hz
Power Consumption 220W
USB 5V
---
max. 500mA
Dimensions
With stand: 1563 × 317 × 974 mm (w x d x h)
Without stand: 1563 × 69 × 899 mm (w x d x h)
Weight
Net: 20.5 kg
Gross: 29.5 kg
Accessories
1 x Instruction Manual 2 x AAA Batteries
1 x Remote Control 2 x TV Stands with Screws
1 x Warranty Card
39
THIS PAGE HAS
BEEN LEFT BLANK
ON PURPOSE.

CUSTOMER SUPPORT:
info@ayonz.com
DISTRIBUTED BY:
Ayonz Pty Ltd
