
FLEX
STRETCHWRAPPER
MANUAL
Models
HPS/ LPS Flex Stretchwrapper
Revision Date - February 15, 2016
Machine Manual
Revision 3.0
To Navigate Contents:
In Acrobat Choose View> Navigation Panes >
Make sure Bookmarks are Checked
(May vary slightly depending on your version of Acrobat)
4750 County Road 13 NE
Alexandria, MN 56308
Phone: (901) 888-4170
Toll Free: (800) 333-6556
FAX: (901) 365-1071
© 2016 Pro Mach. All Rights Reserved.
Section 106 of the 1976 Copyright Act forbids any party other than the author (Pro Mach) to: Reproduce owned work
in copies or phonorecords, to prepare derivative works based upon the work; to distribute copies or phonorecords of
the work to the public by sale or other transfer of ownership, by rental or lease. Copyright protection subsists from the
time the work is created in fixed form. The copyright in the work of authorship immediately becomes the property of
the author who created the work (Pro Mach.) Only the author or those deriving their rights through the author can right-
fully claim copyright.
Liability Waiver
The information in this manual is subject to change without notice and does not represent a commitment on the part
of Pro Mach and assumes no responsibility for any errors that may appear in this manual. In no event will Pro Mach
or its employees, partners, contracted workers/ companies or any association who participates in the writing of this
manual be liable for technical or editorial omissions made herein; nor for direct, indirect, special, incidental, or conse-
quential damages resulting from the use or defect of this manual.

Orion Machine Manual
Revision 3.0 HPS/ LPS Flex Stretchwrapper
15 February 2016 Table of Contents
Page I
Table of Contents
Chapter 1: Introduction and Safety
Introduction. . . . . . . . . . . . . . . . . . . . . . . . . . . . . . . . . . . . . . . . . . . . . . . . . . . . . . . . . . . .1-1
About this Manual . . . . . . . . . . . . . . . . . . . . . . . . . . . . . . . . . . . . . . . . . . . . . . . . . .1-2
Copyright Notice . . . . . . . . . . . . . . . . . . . . . . . . . . . . . . . . . . . . . . . . . . . . . . . . . . .1-2
Flex Series Warranty . . . . . . . . . . . . . . . . . . . . . . . . . . . . . . . . . . . . . . . . . . . . . . . . . . . .1-3
Safety. . . . . . . . . . . . . . . . . . . . . . . . . . . . . . . . . . . . . . . . . . . . . . . . . . . . . . . . . . . . . . . . .1-4
System Safety Recommendations. . . . . . . . . . . . . . . . . . . . . . . . . . . . . . . . . . . . . .1-5
Hazard Messages . . . . . . . . . . . . . . . . . . . . . . . . . . . . . . . . . . . . . . . . . . . . . . . . . .1-6
Operation Safety . . . . . . . . . . . . . . . . . . . . . . . . . . . . . . . . . . . . . . . . . . . . . . . . . . .1-7
Maintenance Safety. . . . . . . . . . . . . . . . . . . . . . . . . . . . . . . . . . . . . . . . . . . . . . . . .1-8
Lockout and Tagout Recommendations . . . . . . . . . . . . . . . . . . . . . . . . . . . . . . . . .1-9
Electrical System . . . . . . . . . . . . . . . . . . . . . . . . . . . . . . . . . . . . . . . . . . . . .1-9
Pneumatic and Vacuum Systems . . . . . . . . . . . . . . . . . . . . . . . . . . . . . . . . . . . . .1-10
Installation and First Time Power Up . . . . . . . . . . . . . . . . . . . . . . . . . . . . . . . . . . . . . .1-11
Unloading. . . . . . . . . . . . . . . . . . . . . . . . . . . . . . . . . . . . . . . . . . . . . . . . . . . . . . . .1-11
Inspection . . . . . . . . . . . . . . . . . . . . . . . . . . . . . . . . . . . . . . . . . . . . . . . . . . . . . . .1-12
Machine Installation. . . . . . . . . . . . . . . . . . . . . . . . . . . . . . . . . . . . . . . . . . . . . . . .1-12
Assembly Procedure . . . . . . . . . . . . . . . . . . . . . . . . . . . . . . . . . . . . . . . . . . . . . . .1-13
Chapter 2: System Description
Machine Specifications . . . . . . . . . . . . . . . . . . . . . . . . . . . . . . . . . . . . . . . . . . . . . . . . . .2-1
Utilities . . . . . . . . . . . . . . . . . . . . . . . . . . . . . . . . . . . . . . . . . . . . . . . . . . . . .2-1
Standard Speed . . . . . . . . . . . . . . . . . . . . . . . . . . . . . . . . . . . . . . . . . . . . . .2-1
Drive . . . . . . . . . . . . . . . . . . . . . . . . . . . . . . . . . . . . . . . . . . . . . . . . . . . . . . .2-1
Control Features. . . . . . . . . . . . . . . . . . . . . . . . . . . . . . . . . . . . . . . . . . . . . . 2-1
Film Delivery . . . . . . . . . . . . . . . . . . . . . . . . . . . . . . . . . . . . . . . . . . . . . . . . .2-1
Structural Features . . . . . . . . . . . . . . . . . . . . . . . . . . . . . . . . . . . . . . . . . . . .2-2

Machine Manual Orion
HPS/ LPS Flex Stretchwrapper Revision 3.0
Table of Contents 15 February 2016
Page II
Chapter 3: System Operation
Operating Procedures . . . . . . . . . . . . . . . . . . . . . . . . . . . . . . . . . . . . . . . . . . . . . . . . . . .3-1
How to Start and Shut Down Your Wrapping System . . . . . . . . . . . . . . . . . . . . . . .3-1
POWER SWITCH . . . . . . . . . . . . . . . . . . . . . . . . . . . . . . . . . . . . . . . . . . . . .3-1
START AND EMERGENCY STOP SWITCHES. . . . . . . . . . . . . . . . . . . . . .3-1
Loading The Film. . . . . . . . . . . . . . . . . . . . . . . . . . . . . . . . . . . . . . . . . . . . . . . . . . .3-2
Universal Go-To Buttons. . . . . . . . . . . . . . . . . . . . . . . . . . . . . . . . . . . . . . . . . . . . . . . . .3-3
Run Screens . . . . . . . . . . . . . . . . . . . . . . . . . . . . . . . . . . . . . . . . . . . . . . . . . . . . . . . . . . .3-4
Run Screen . . . . . . . . . . . . . . . . . . . . . . . . . . . . . . . . . . . . . . . . . . . . . . . . . . . . . . .3-4
Security Settings Screen . . . . . . . . . . . . . . . . . . . . . . . . . . . . . . . . . . . . . . . . . . . . .3-6
Wrap Setting Screens . . . . . . . . . . . . . . . . . . . . . . . . . . . . . . . . . . . . . . . . . . . . . . . . . . .3-7
Wrap Settings Screen . . . . . . . . . . . . . . . . . . . . . . . . . . . . . . . . . . . . . . . . . . . . . . .3-7
Menu Screens . . . . . . . . . . . . . . . . . . . . . . . . . . . . . . . . . . . . . . . . . . . . . . . . . . . . . . . . . .3-9
Menu Screen . . . . . . . . . . . . . . . . . . . . . . . . . . . . . . . . . . . . . . . . . . . . . . . . . . . . . .3-9
Jogging Screen . . . . . . . . . . . . . . . . . . . . . . . . . . . . . . . . . . . . . . . . . . . . . . . . . . .3-10
Carriage Jog Screen . . . . . . . . . . . . . . . . . . . . . . . . . . . . . . . . . . . . . . . . . . . . . . .3-12
Recipe Screen. . . . . . . . . . . . . . . . . . . . . . . . . . . . . . . . . . . . . . . . . . . . . . . . . . . .3-14
Production Data Screen. . . . . . . . . . . . . . . . . . . . . . . . . . . . . . . . . . . . . . . . . . . . .3-15
Recipe Viewing Screen . . . . . . . . . . . . . . . . . . . . . . . . . . . . . . . . . . . . . . . . . . . . .3-16
Machine Settings Screens. . . . . . . . . . . . . . . . . . . . . . . . . . . . . . . . . . . . . . . . . . . . . . .3-17
Machine Settings Screen. . . . . . . . . . . . . . . . . . . . . . . . . . . . . . . . . . . . . . . . . . . .3-17
Main Drive Screen . . . . . . . . . . . . . . . . . . . . . . . . . . . . . . . . . . . . . . . . . . . . . . . . .3-19
Reinforce Wrap Setup . . . . . . . . . . . . . . . . . . . . . . . . . . . . . . . . . . . . . . . . . . . . . . 3-20
Timers Screen . . . . . . . . . . . . . . . . . . . . . . . . . . . . . . . . . . . . . . . . . . . . . . . . . . . .3-21
Machine Setup Screen . . . . . . . . . . . . . . . . . . . . . . . . . . . . . . . . . . . . . . . . . . . . .3-23
Start Delay Screen. . . . . . . . . . . . . . . . . . . . . . . . . . . . . . . . . . . . . . . . . . . . . . . . .3-24
Factory Defaults Screen . . . . . . . . . . . . . . . . . . . . . . . . . . . . . . . . . . . . . . . . . . . .3-25
Multistretch Settings Screen . . . . . . . . . . . . . . . . . . . . . . . . . . . . . . . . . . . . . . . . .3-26
The VFD Parameters Screen . . . . . . . . . . . . . . . . . . . . . . . . . . . . . . . . . . . . . . . .3-28
S Insta-Cut Screen . . . . . . . . . . . . . . . . . . . . . . . . . . . . . . . . . . . . . . . . . . . . . . . .3-30
Diagnostics Screens . . . . . . . . . . . . . . . . . . . . . . . . . . . . . . . . . . . . . . . . . . . . . . . . . . .3-32
Diagnostics Screen . . . . . . . . . . . . . . . . . . . . . . . . . . . . . . . . . . . . . . . . . . . . . . . .3-32
The Inputs Screens . . . . . . . . . . . . . . . . . . . . . . . . . . . . . . . . . . . . . . . . . . . . . . . .3-33
The Outputs Screens. . . . . . . . . . . . . . . . . . . . . . . . . . . . . . . . . . . . . . . . . . . . . . .3-34
The VFD Diagnostics Screen . . . . . . . . . . . . . . . . . . . . . . . . . . . . . . . . . . . . . . . .3-35
HMI Setup . . . . . . . . . . . . . . . . . . . . . . . . . . . . . . . . . . . . . . . . . . . . . . . . . . . . . . .3-36
Fault History Screen . . . . . . . . . . . . . . . . . . . . . . . . . . . . . . . . . . . . . . . . . . . . . . .3-38
Flex Dashboard Remote Viewing . . . . . . . . . . . . . . . . . . . . . . . . . . . . . . . . . . . . . . . . .3-39
Setting up Dashboard Remote Viewing. . . . . . . . . . . . . . . . . . . . . . . . . . . . . . . . .3-39
Information & Alarm Messages. . . . . . . . . . . . . . . . . . . . . . . . . . . . . . . . . . . . . . . . . . .3-41
Message Displays . . . . . . . . . . . . . . . . . . . . . . . . . . . . . . . . . . . . . . . . . . . . . . . . .3-41
Alarm Displays. . . . . . . . . . . . . . . . . . . . . . . . . . . . . . . . . . . . . . . . . . . . . . . . . . . .3-45
Chapter 4: Troubleshooting
Troubleshooting. . . . . . . . . . . . . . . . . . . . . . . . . . . . . . . . . . . . . . . . . . . . . . . . . . . . . . . .4-1

Orion Machine Manual
Revision 3.0 HPS/ LPS Flex Stretchwrapper
15 February 2016 Table of Contents
Page III
Chapter 5: Maintenance
Maintenance . . . . . . . . . . . . . . . . . . . . . . . . . . . . . . . . . . . . . . . . . . . . . . . . . . . . . . . . . . .5-1
Motor Maintenance . . . . . . . . . . . . . . . . . . . . . . . . . . . . . . . . . . . . . . . . . . . . . . . . .5-1
Reducer Oil Change . . . . . . . . . . . . . . . . . . . . . . . . . . . . . . . . . . . . . . . . . . . . . . . .5-1
Tower Raceways Maintenance . . . . . . . . . . . . . . . . . . . . . . . . . . . . . . . . . . . . . . . .5-2
Chain Maintenance . . . . . . . . . . . . . . . . . . . . . . . . . . . . . . . . . . . . . . . . . . . . . . . . .5-2
Proximity Sensor Adjustment. . . . . . . . . . . . . . . . . . . . . . . . . . . . . . . . . . . . . . . . . .5-3
Cleaning The Stretch Rollers. . . . . . . . . . . . . . . . . . . . . . . . . . . . . . . . . . . . . . . . . .5-5
Preventative Maintenance Schedule . . . . . . . . . . . . . . . . . . . . . . . . . . . . . . . . . . . .5-6
PM Intervals . . . . . . . . . . . . . . . . . . . . . . . . . . . . . . . . . . . . . . . . . . . . . . . . .5-6
HPS LPS Standard Series. . . . . . . . . . . . . . . . . . . . . . . . . . . . . . . . . . . . . . . . . . . .5-6
5,760 Loads or one month . . . . . . . . . . . . . . . . . . . . . . . . . . . . . . . . . . . . . .5-6
17,280 Loads or three months.. . . . . . . . . . . . . . . . . . . . . . . . . . . . . . . . . . .5-6
All H&L Heavy Duty (Ring Bearing) Series . . . . . . . . . . . . . . . . . . . . . . . . . . . . . . .5-7
5,760 Loads Or One Month . . . . . . . . . . . . . . . . . . . . . . . . . . . . . . . . . . . . .5-7
17,280 Loads or three months.. . . . . . . . . . . . . . . . . . . . . . . . . . . . . . . . . . .5-7
34,560 Loads or 6 months. . . . . . . . . . . . . . . . . . . . . . . . . . . . . . . . . . . . . . .5-7
Chapter 6: Electrical Prints and Mechanical Drawings
Electrical Prints . . . . . . . . . . . . . . . . . . . . . . . . . . . . . . . . . . . . . . . . . . . . . . . . . . . . . . . .6-1
Mechanical Drawings. . . . . . . . . . . . . . . . . . . . . . . . . . . . . . . . . . . . . . . . . . . . . . . . . . . .6-2

Machine Manual Orion
HPS/ LPS Flex Stretchwrapper Revision 3.0
Table of Contents 15 February 2016
Page IV

Orion Machine Manual
Revision 3.0 HPS/ LPS Flex Stretchwrapper
15 February 2016 List of Figures
Page I
List of Figures
Chapter 1: Introduction and Safety
Fork Tube Access Sticker . . . . . . . . . . . . . . . . . . . . . . . . . . . . . . . . . . . . . . . . . . .1-11
Chapter 2: System Description
Chapter 3: System Operation
Loading the Film . . . . . . . . . . . . . . . . . . . . . . . . . . . . . . . . . . . . . . . . . . . . . . . . . . .3-2
The Run Screen. . . . . . . . . . . . . . . . . . . . . . . . . . . . . . . . . . . . . . . . . . . . . . . . . . . .3-4
The Security Settings Screen . . . . . . . . . . . . . . . . . . . . . . . . . . . . . . . . . . . . . . . . .3-6
The Wrap Settings Screen. . . . . . . . . . . . . . . . . . . . . . . . . . . . . . . . . . . . . . . . . . . .3-7
The Menu Screen . . . . . . . . . . . . . . . . . . . . . . . . . . . . . . . . . . . . . . . . . . . . . . . . . .3-9
The Jogging Screen. . . . . . . . . . . . . . . . . . . . . . . . . . . . . . . . . . . . . . . . . . . . . . . .3-10
The Carriage Jog Screen. . . . . . . . . . . . . . . . . . . . . . . . . . . . . . . . . . . . . . . . . . . .3-12
The Recipe Screen . . . . . . . . . . . . . . . . . . . . . . . . . . . . . . . . . . . . . . . . . . . . . . . .3-14
The Production Data Screen . . . . . . . . . . . . . . . . . . . . . . . . . . . . . . . . . . . . . . . . .3-15
The Recipe Viewing Screen . . . . . . . . . . . . . . . . . . . . . . . . . . . . . . . . . . . . . . . . .3-16
The Machine Settings Screen . . . . . . . . . . . . . . . . . . . . . . . . . . . . . . . . . . . . . . . .3-17
The Main Drive Screen . . . . . . . . . . . . . . . . . . . . . . . . . . . . . . . . . . . . . . . . . . . . . 3-19
The Reinforce Setup Screen . . . . . . . . . . . . . . . . . . . . . . . . . . . . . . . . . . . . . . . . .3-20
The Timers Screen . . . . . . . . . . . . . . . . . . . . . . . . . . . . . . . . . . . . . . . . . . . . . . . .3-21
The Machine Setup Screen . . . . . . . . . . . . . . . . . . . . . . . . . . . . . . . . . . . . . . . . . .3-23
The Start Delay Screen . . . . . . . . . . . . . . . . . . . . . . . . . . . . . . . . . . . . . . . . . . . . .3-24
The Factory Defaults Screen. . . . . . . . . . . . . . . . . . . . . . . . . . . . . . . . . . . . . . . . . 3-25
The Multistretch Screen. . . . . . . . . . . . . . . . . . . . . . . . . . . . . . . . . . . . . . . . . . . . .3-26
The VFD Parameters Screen . . . . . . . . . . . . . . . . . . . . . . . . . . . . . . . . . . . . . . . .3-28
The S Insta-Cut Screen . . . . . . . . . . . . . . . . . . . . . . . . . . . . . . . . . . . . . . . . . . . . .3-30
The Diagnostics Screen. . . . . . . . . . . . . . . . . . . . . . . . . . . . . . . . . . . . . . . . . . . . .3-32
The Inputs Screen . . . . . . . . . . . . . . . . . . . . . . . . . . . . . . . . . . . . . . . . . . . . . . . . .3-33
The Outputs Screen. . . . . . . . . . . . . . . . . . . . . . . . . . . . . . . . . . . . . . . . . . . . . . . .3-34
The VFD Diagnostics Screen . . . . . . . . . . . . . . . . . . . . . . . . . . . . . . . . . . . . . . . .3-35
The HMI Setup Screen . . . . . . . . . . . . . . . . . . . . . . . . . . . . . . . . . . . . . . . . . . . . .3-36
The Fault History Screen. . . . . . . . . . . . . . . . . . . . . . . . . . . . . . . . . . . . . . . . . . . .3-38
Setting the IP Address. . . . . . . . . . . . . . . . . . . . . . . . . . . . . . . . . . . . . . . . . . . . . .3-39
Flex Dashboard . . . . . . . . . . . . . . . . . . . . . . . . . . . . . . . . . . . . . . . . . . . . . . . . . . .3-40
Chapter 4: Troubleshooting
Chapter 5: Maintenance
The Multistretch Screen. . . . . . . . . . . . . . . . . . . . . . . . . . . . . . . . . . . . . . . . . . . . . .5-3
Proximity Sensor Adjustment. . . . . . . . . . . . . . . . . . . . . . . . . . . . . . . . . . . . . . . . . .5-4


Orion Machine Manual
Revision 3.0 HPS/ LPS Flex Stretchwrapper
15 February 2016 Introduction and Safety Contents
Page I
Introduction and Safety Contents
Introduction. . . . . . . . . . . . . . . . . . . . . . . . . . . . . . . . . . . . . . . . . . . . . . . . . . . . . . . . . . . .1-1
About this Manual . . . . . . . . . . . . . . . . . . . . . . . . . . . . . . . . . . . . . . . . . . . . . . . . . .1-2
Copyright Notice . . . . . . . . . . . . . . . . . . . . . . . . . . . . . . . . . . . . . . . . . . . . . . . . . . .1-2
Flex Series Warranty . . . . . . . . . . . . . . . . . . . . . . . . . . . . . . . . . . . . . . . . . . . . . . . . . . . .1-3
Safety. . . . . . . . . . . . . . . . . . . . . . . . . . . . . . . . . . . . . . . . . . . . . . . . . . . . . . . . . . . . . . . . .1-4
System Safety Recommendations. . . . . . . . . . . . . . . . . . . . . . . . . . . . . . . . . . . . . .1-5
Hazard Messages . . . . . . . . . . . . . . . . . . . . . . . . . . . . . . . . . . . . . . . . . . . . . . . . . .1-6
Operation Safety . . . . . . . . . . . . . . . . . . . . . . . . . . . . . . . . . . . . . . . . . . . . . . . . . . .1-7
Maintenance Safety. . . . . . . . . . . . . . . . . . . . . . . . . . . . . . . . . . . . . . . . . . . . . . . . .1-8
Lockout and Tagout Recommendations . . . . . . . . . . . . . . . . . . . . . . . . . . . . . . . . .1-9
Pneumatic and Vacuum Systems . . . . . . . . . . . . . . . . . . . . . . . . . . . . . . . . . . . . .1-10
Installation and First Time Power Up . . . . . . . . . . . . . . . . . . . . . . . . . . . . . . . . . . . . . .1-11
Unloading. . . . . . . . . . . . . . . . . . . . . . . . . . . . . . . . . . . . . . . . . . . . . . . . . . . . . . . .1-11
Inspection . . . . . . . . . . . . . . . . . . . . . . . . . . . . . . . . . . . . . . . . . . . . . . . . . . . . . . .1-12
Machine Installation. . . . . . . . . . . . . . . . . . . . . . . . . . . . . . . . . . . . . . . . . . . . . . . .1-12
Assembly Procedure . . . . . . . . . . . . . . . . . . . . . . . . . . . . . . . . . . . . . . . . . . . . . . .1-13

Machine Manual Orion
HPS/ LPS Flex Stretchwrapper Revision 3.0
Introduction and Safety Contents 15 February 2016
Page II

1.
Page 1-1
Orion Machine Manual
Revision 3.0 HPS/ LPS Flex Stretchwrapper
15 February 2016 Introduction and Safety
Introduction and Safety
Introduction
Thank you for choosing Orion stretch-wrapping equipment. It is a wise choice, which will
benefit your company now and in the future.
Orion uses a unique combination of functional, rugged steel structure and sophisticated
control systems to offer equipment high in durability and low in maintenance require-
ments. Our advance control systems mean that Orion equipment can be operated safely
and efficiently without the need for special operator expertise.
Please read this manual carefully and keep it handy. Following these simple operating
instructions will insure the safe and efficient performance of this machine while simple
maintenance procedures will guarantee a long and productive life of the equipment.
Note:
This manual covers standard features of the machine. Certain
options may not be fully covered due to their unique application.
Every effort has been made to ensure document accuracy how-
ever, Orion Packaging retains the right to change specifications
without notice.
In order to acquire more information about custom made features of your machine and to
provide quicker service, the following information is required when making an inquiry:
1. Model HPS/ LPS Flex Stretchwrapper
2. Serial Number (See sticker on electrical cabinet)
3. Built in Alexandria Minnesota, USA

Machine Manual Orion
HPS/ LPS Flex Stretchwrapper Revision 3.0
Introduction and Safety 15 February 2016
Page 1-2
About this Manual
Orion is committed to helping you maximize the productivity of your system. This manual
is specifically designed for your packaging system, to assist you in the operation and
maintenance of your new equipment. Please take the time to familiarize yourself with the
contents of this manual.
• Section 1 is the Introduction and Safety section. This section discusses safety, lock
out/ tag out, hazard messages, and installation information.
• Section 2 is the System Description section. This section discusses machine specifica-
tions. A Machine Layout Drawing is found at the end of this section.
• Section 3 is the System Operation section. This section describes the operator control
panels, the Human Machine Interface, and operational procedures.
• Section 4 is the Troubleshooting section. A Troubleshooting chart is found in this sec-
tion.
• Section 5 is the Maintenance section. In this section you will also find a suggested
maintenance schedule including a maintenance log. Assembly drawings conclude this
section.
Copyright Notice
© 2016 Pro Mach
Section 106 of the 1976 Copyright Act forbids any party other than the author (Pro Mach) to:
Reproduce owned work in copies or phonorecords, to prepare derivative works based upon
the work; to distribute copies or phonorecords of the work to the public by sale or other trans-
fer of ownership, by rental or lease.
Copyright protection subsists from the time the work is created in fixed form. The copyright
in the work of authorship immediately becomes the property of the author who created the
work (Pro Mach.) Only the author or those deriving their rights through the author can right-
fully claim copyright.

Orion Machine Manual
Revision 3.0 HPS/ LPS Flex Stretchwrapper
15 February 2016 Introduction and Safety
Page 1-3
Flex Series Warranty
Effective January 1, 2013- For all products in the Flex Series, Orion provides an industry leading warranty from
the delivery date of its products to be free from defects in materials and workmanship as described below. This
warranty assumes that normal service will be performed by the user.
Flex Turntable Style Machines including LPS, LPD, LPA, HPS, HPD and HPA are warranted for Five (5)
Years from the date of the machine shipment on all standard components, both electrical and mechanical, and
the structure to free from defects in material and workmanship. During the warranty period Orion will, at its
option, either repair or replace the failed component.
Flex Rotary Tower Machines including RTD and RTA are warranted for Four (4) Years from the date of
shipment on all standard components, both electrical and mechanical, to be free from defects in material and
workmanship. Structural components manufactured by Orion are warranted to be free from defects in material
and workmanship for a period of Five (5) years. During the warranty period Orion will, at its option, either
repair or replace any failed component.
Components not manufactured by Orion specified by the customer and that are other than Orion Packaging Sys-
tems standard brand are warranted by Orion to the extent that they are warranted by Orion's supplier of these
items.
The polyurethane pre-stretch rollers on the FLEX-HPD/LPD/HPA/LPA models carry a Lifetime Warranty
and are guaranteed to be free from defects in material and workmanship, and to perform to Orion standards in
Orion film delivery systems which have been properly maintained. Rollers are not warranted against physical
damage, corrosion, abuse, or negligence. The lifetime warranty does not apply to the rollers used on LPE model
and these are covered under the Five (5) Year portion of this warranty instead. Wear parts such as e.g. belts,
fuses, light bulbs, circuit breakers, brakes, motor brushes, slip ring brushes, etc. are excluded from this warran-
ty.
DAMAGE IN TRANSPORT
Damage in transport is the responsibility of the carrier and is not covered under our warranty.
FREIGHT CHARGES
There will be no freight charges for warranty parts that are ordered for shipment via UPS regular ground service
from Orion. Any other method of shipment, (UPS red/blue, Federal Express, common carrier, etc.) will be at
the expense of the customer/distributor.
PARTS RETURN POLICY
For most components valued at under $300 list price, Orion does not require that the defective component be
return ed. All defective components valued at $300 or more list price must be returned to Orion in Alexandria,
MN. It is at Orion's sole discretion as to whether any given component must be returned, regardless of its value,
for the purpose of determination
of warranty status and the nature of the defect. Furthermore, confirmation that the part does not need to be re-
turned must be provided by Orion at the time of order placement.
IMPORTANT EXCLUSIONS
EXCEPT AS STATED HEREIN, ORION MAKES NO OTHER WARRANTY, EXPRESSED OR IMPLIED
AND IN NO EVENT SHALL BE LIABLE FOR INCIDENTAL OR CONSEQUENTIAL DAMAGES. ORI-
ON MAKES NO WARRANTY AS TO FITNESS OF EQUIPMENT FOR PARTICULAR PURPOSE. ORION
NEITHER ASSUMES NOR AUTHORIZES ANYONE ELSE TO ASSUME FOR IT, ANY OTHER OBLI-
GATION OR LIABILITY RELATING TO ITS EQUIPMENT. THIS WARRANTY DOES NOT APPLY TO
DAMAGE TO EQUIPMENT WHICH, IN THE JUDGMENT OF ORION, HAS BEEN SUBJECT TO IN-
CORRECT VOLTAGE SUPPLY, NORMAL WEAR AND TEAR, TO MISUSE, NEGLECT, OR HAS BEEN
REPAIRED OR ALTERED BY UNAUTHORIZED PERSONNEL. DEFECTIVE PARTS MUST BE RE-
TURNED TO ORION, FREIGHT PREPAID, WITHIN 14 DAYS OF SHIPMENT OF THE REPLACEMENT
PART, EXCEPT FOR COMPONENTS VALUED AT UNDER $300 LIST PRICE UNDER THE CONDI-
TIONS STATED ABOVE. DEFECTIVE PARTS MUST BE RETURNED IN THEIR ORIGINAL STATE
ALONG WITH A FULLY COMPLETED ORION WARRANTY PARTS RETURN FORM. DEFECTIVE
PARTS THAT HAVE BEEN DISASSEMBLED, DAMAGED DURING REMOVAL, OR OTHERWISE
TAMPERED WITH, WILL NOT BE COVERED UNDER WARRANTY, UNLESS OTHERWISE STATED
IN WRITING. ORION'S SOLE OBLIGATION UNDER THIS WARRANTY WILL BE TO PROVIDE RE-
PAIRS TO COMPONENTS OR REPLACEMENT PARTS, F.O.B. ORION'S POINT OF SHIPMENT EX-
CEPT AS STATED ABOVE. ALL ASPECTS OF THE ABOVE STATED WARRANTY AND
PROCEDURES RELATED TO ORDERING PARTS UNDER WARRANTY WILL BE UPHELD WITH NO
EXCEPTIONS.
Made with pride in the USA www.orionpackaging.com

Machine Manual Orion
HPS/ LPS Flex Stretchwrapper Revision 3.0
Introduction and Safety 15 February 2016
Page 1-4
Safety
Orion's stretch wrappers should be operated with caution and common sense as any other
industrial equipment. To prevent injury and/or electrical shocks, careful operation of the
machine and awareness of its many automatic functions is required.
Note:
All electrical power and compressed air must be disconnected prior
to all inspection, maintenance or repair work.
At Orion, we are committed to building quality packaging and material handling equip-
ment. To achieve this, our machines must be efficient, easy to maintain, and safe to oper-
ate.
Before attempting to operate the equipment, become familiar with the safety recommen-
dations and operational components of your HPS/ LPS Flex Stretchwrapper. You should
also become familiar with the technical information pertaining to components used within
the system, including their operating and safety features. This information is located in the
Vendor Data Manual and in other literature supplied with the equipment. To maximize
machine safety and efficiency you must operate the machine correctly and comply with
the safety features described.
Stay alert and remember: Safety is the responsibility of everyone who operates or ser-
vices your BEC system.

Orion Machine Manual
Revision 3.0 HPS/ LPS Flex Stretchwrapper
15 February 2016 Introduction and Safety
Page 1-5
System Safety Recommendations
Safeguarding personnel that operate and/or maintain automated equipment is the primary
consideration. Because it is very dangerous to enter the operating space (work envelope)
of a machine during operation, adequate safeguards must be in place and safety precau-
tions must be observed.
The following general precautions are recommended for all personnel who perform sys-
tem operation or maintenance.
• Do lockout-tagout procedures whenever you do maintenance and repair work.
• All personnel who repair, maintain, or operate the equipment need to know the loca-
tion of all EMERGENCY STOP buttons.
• Do not operate the equipment with any of the safety guards removed.
• Do not wear neckties, loose clothing, or long loose-hanging hair around any equip-
ment.
• Observe and follow the DANGER, WARNING, and CAUTION messages throughout
this manual, in vendor manuals, and displayed on the equipment.
• DO NOT use steps or stands that allow anyone to reach over guards.
• Personnel should attend all available safety and operational training courses.
• Personnel should know and follow the recommended safety procedures whenever
they must enter the packaging systems motion area.
• Personnel should not enter the packaging system while control power is "ON".
• Personnel should not power up the system if someone is in the working path of the
machine
• The system should be powered down when not in use.
• Personnel should pay special attention to all the posted warnings and cautions located
on any devices. Observe all safety and/or precautionary steps and procedures when
working with the system.
• Personnel should keep the system clean to make it easier to spot hazards.

Machine Manual Orion
HPS/ LPS Flex Stretchwrapper Revision 3.0
Introduction and Safety 15 February 2016
Page 1-6
Hazard Messages
Notations appear on pages of this manual to alert the reader to important messages regard-
ing a significant hazard for personnel or equipment. These messages convey three levels
of risk as defined below. Failure to observe these instructions can result in death, serious
injury, damaged equipment, or loss of product or production.
DANGER Denotes the possibility of serious injury or death to personnel.
WARNING
Denotes the possibility of potential injury or damage to equipment.
CAUTION Denotes the possibility of damage to product or an interruption of produc-
tion.

Orion Machine Manual
Revision 3.0 HPS/ LPS Flex Stretchwrapper
15 February 2016 Introduction and Safety
Page 1-7
Operation Safety
The following safety precautions are recommended for all personnel who will operate this
HPS/ LPS Flex Stretchwrapper.
• Operators should immediately report unsafe working conditions to a supervisor.
• The operator should understand the function of the entire system including all external
devices and equipment that interact with the system.
• Before starting operation, the operator should understand the complete task that the
system is designed to accomplish.
• The operator should know the location and functional status of all devices (switches,
sensors, control signals) that can cause the system to move.
• The operator should know where each EMERGENCY STOP button is located for
both main and external control devices. Do not hesitate to use them in an emergency.
• The operator should make sure all safety devices are functioning and periodically
checked for proper operation.
• The operator should ensure that all personnel are outside the system before starting
operation.
• The operator should never enter, or allow others to enter the system during automatic
operation.

Machine Manual Orion
HPS/ LPS Flex Stretchwrapper Revision 3.0
Introduction and Safety 15 February 2016
Page 1-8
Maintenance Safety
The following safety precautions are recommended for all personnel who are responsible
for the maintenance or service this HPS/ LPS Flex Stretchwrapper.
• Personnel should ensure that all safety devices are functioning and periodically
checked for proper operation before performing maintenance.
• Before performing any maintenance, service, or inspection inside the main control
panel, the power source should be turned off and locked out.
• Maintenance should be performed on the system with the power OFF. Lockout and tag
out procedures should be followed to protect personnel from injury and to indicate the
equipment is being serviced.
• Place a lock on the main electrical disconnect, as shown below, while performing
maintenance.
• Personnel should pay careful attention to all devices that may be powered or capable
of motion, such as conveyors and pneumatic devices.
• Release or block all stored energy devices (hydraulic or pneumatic) that may present a
danger when working with the system. Before working with pneumatic devices, shut
off the air supply and purge the air lines.
• Be aware when removing a servomotor or brake that the associated mechanical part
will fall unless supported in some manner.
• Use only specified replacement parts. Never use non-specific fuses that have not been
specified. Potential fire and/or damage may result.
• Before restarting the system, ensure personnel are not in the system and that the sys-
tem and external devices are operating properly.

Orion Machine Manual
Revision 3.0 HPS/ LPS Flex Stretchwrapper
15 February 2016 Introduction and Safety
Page 1-9
Lockout and Tagout Recommendations
Electrical System
(See OSHA 1910.147 & OSHA 1910.333 (b)(2) for exception to procedures)
To avoid hazards of electrical shock or other personal injuries, the main power disconnect
for the system and any other separate sources of power for the system shall be locked out
& tagged as a safety precaution during entry and maintenance to the system.
To accomplish this, set the Main Power Disconnect operating handle to the "OFF" posi-
tion and install a personal locking device through the padlock hole on the operating han-
dle. Attach a Danger tag to the handle containing a statement prohibiting unauthorized
operation of the disconnect and removal of the tag signed by the individual responsible for
locking out the system. If several personnel are performing maintenance, each individual
shall install a lockout device and tag.
A qualified person shall verify that the equipment is de-energized by:
1. Operating controls to verify equipment cannot be restarted.
2. Using test equipment to test circuits and electrical parts that will be exposed to person-
nel.
Stored electric energy that might endanger personnel shall be released by discharging the
circuits. Check appropriate equipment manuals on exact procedures.
To re-energize equipment, a qualified person shall conduct tests and visual inspections, as
necessary, to verify that all tools, electrical jumpers, shorts, grounds, and other such
devices have been removed, so that equipment can be safely energized. Personnel exposed
to the hazards associated with re-energizing equipment shall be warned to stay clear of
equipment. Each lock and tag shall be removed by the person who applied it or under their
direct supervision. A visual determination that all personnel are clear of the equipment
shall be accomplished before the operating handle on each Main Power Disconnect is
placed to the "ON'' position.

Machine Manual Orion
HPS/ LPS Flex Stretchwrapper Revision 3.0
Introduction and Safety 15 February 2016
Page 1-10
Pneumatic and Vacuum Systems
To avoid hazards of moving mechanisms, pinch points and other personal injuries, the
main compressed air supply valve for the system shall be locked out & tagged as a safety
precaution during entry and maintenance to the system.
1. To accomplish this, turn the Main Air Supply valve to the "OFF" position and install a
personal locking device through the padlock hole on the valve handle.
2. Also attach a Danger tag to the handle containing a statement prohibiting unautho-
rized operation of the disconnect and removal of the tag signed by the individual
responsible for locking out the system.
If several personnel are performing maintenance, each individual shall install a lockout
device and tag. Qualified personnel shall vent any stored or accumulated air in pneumatic/
vacuum devices before working on them. Check appropriate equipment manuals on exact
procedures.
To re-supply compressed air to the equipment, a qualified person shall conduct visual
inspections, as necessary, to verify that mechanisms are properly connected, as well as all
tools and other objects have been removed so that equipment can safely operate. Personnel
exposed to pneumatic/vacuum hazard areas shall be warned to stay clear of equipment.
Each lock and tag shall be removed by the person who applied it, or, under their direct
supervision. A visual determination that all personnel are clear of the equipment shall be
accomplished before the main air supply valve is turned to the “ON'' position.

Orion Machine Manual
Revision 3.0 HPS/ LPS Flex Stretchwrapper
15 February 2016 Introduction and Safety
Page 1-11
Installation and First Time Power Up
Unloading
Machine can be easily unloaded and transported by a forklift with a minimum capacity of
2500 lbs.
1. Carefully insert the forks into the lifting tubes to the maximum possible depth.
Depending on the model, a forklift access may be either at the tower end of the
machine frame, the tower end or both. Look for the forklift tube access stickers shown
below.
2. Lift the machine (or other part of system) only to the necessary height to move it with
no bouncing or friction on the floor.
3. Sit the machine down assuring uniform contact with the floor, which is necessary to
ensure correct and smooth operation.
Figure 1 - 1
Fork Tube Access
Sticker

Machine Manual Orion
HPS/ LPS Flex Stretchwrapper Revision 3.0
Introduction and Safety 15 February 2016
Page 1-12
Inspection
1. Remove all packing and supporting additions - these may include the blocks under the
carriage and the restraining bar over the table.
Note:
When removing the packing materials covering the machine, care
must be taken not to cut any of the electrical wires and/ or polyure-
thane covering on the film carriage rollers.
2. Perform a visual inspection of the electrical and mechanical parts for loosened joints
and / or broken connections. Any suspected shipping damage must be reported imme-
diately to the freight carrier. Any transport damage cannot be claimed to Orion Pack-
aging Inc.
Items that are vulnerable to damage and must be inspected are as follows:
• Motors and transmissions
• Junction boxes
• Electrical conduits
• Proximity and limit switches
• Photocells
3. Check around the tower to ensure that there is no crippling of the movable parts i.e.
casters, center axle or drive assembly.
4. Verify the following:
• Check wires and conduits for crushed sections or loose fittings.
• Verify the film carriage to be sure that it is correctly aligned with the tower
• Verify the tension on the lift belt.
• Verify all the dials and knobs on the control panel for smooth action.
Machine Installation
• After the visual inspection has been completed, the electrical power and the com-
pressed air (Optional) shall be connected as specified on the diagrams supplied with
the machine.
• An electrical diagram is provided with each machine in the envelope attached to the
panel box.
• Make sure the machine is on a level surface.
• Orion Packaging insist on a dedicated circuit be used for this wrapper. Extension cords
are not allowed and can void your warranty.

Orion Machine Manual
Revision 3.0 HPS/ LPS Flex Stretchwrapper
15 February 2016 Introduction and Safety
Page 1-13
Assembly Procedure
Note: The structural frames of the machine have to be installed on a lev-
eled floor. The base deviation from vertical must not exceed 1/4" on
the distance of 10 feet (angle: 0 degrees 6').
Move the wrapper into its final position. If the wrapper is to be secured to the floor, we
recommend that the wrapper base section be bolted to the floor by the 1/2" concrete floor
anchors (leg & shield or expandable type-Red Heads).

Machine Manual Orion
HPS/ LPS Flex Stretchwrapper Revision 3.0
Introduction and Safety 15 February 2016
Page 1-14


Machine Manual Orion
HPS/ LPS Flex Stretchwrapper Revision 3.0
System Description Contents 15 February 2016
Page II

2.
Page 2-1
Orion Machine Manual
Revision 3.0 HPS/ LPS Flex Stretchwrapper
15 February 2016 System Description
System Description
Machine Specifications
Utilities
• 115 / 1ph / 60hz 20 Amp Service
Standard Speed
• 16 Rpm Variable Tower Speed Vfd Controlled Motor**
Drive
• Heavy Duty Chain Drive
• Electronically Adjustable Acceleration/deceleration And Running Speeds (At Vfd)
• Positive Alignment Feature (True Home Position)
Control Features
• Nema 12 Control Panel
• User Friendly Interface
• IP Address is Modifiable for Networking
• Easy to Use Icon Based Interface
• Web-based Production Data Dashboard
• Optional Wireless Connection to the PLC/ HMI
• Downloadable VFD Parameters
• Variable Speed Film Carriage Up/ Down Control
• Film Carriage Manual Jog Functionality
• Photocell For Automatic Load Height Detection
• Main Drive Jogging
• Variable Speed Main Drive
• Semi-automatic Reinforce Wrap Feature
• On-Screen Interactive Troubleshooting Guide
Film Delivery
• Instathread Full Corner Compensating Powered Film Drive.
• 260 % Stretch From The Factory. 20" Film Tension Delivery System. **optional 30"
• Full Authority, Corner Compensating, Vfd Powered Prestretch
• Electronic Film Tension Control Adjustment On The Panel < Or = 90 Ga Film Capac-
ity. Higher Gauge Film Requires A Heavy Film Upgrade.
• Film Carriage Elevator Drive
• Variable Frequency Drive Motor

Machine Manual Orion
HPS/ LPS Flex Stretchwrapper Revision 3.0
System Description 15 February 2016
Page 2-2
Structural Features
• Structural Steel Construction Throughout
• Easy Access To All Components
• Limited Proprietary Parts For Ease Of Maintenance
Visit our Website At www.orionpackaging.com

Orion Machine Manual
Revision 3.0 HPS/ LPS Flex Stretchwrapper
15 February 2016 System Operation Contents
Page I
System Operation Contents
Operating Procedures . . . . . . . . . . . . . . . . . . . . . . . . . . . . . . . . . . . . . . . . . . . . . . . . . . .3-1
How to Start and Shut Down Your Wrapping System . . . . . . . . . . . . . . . . . . . . . . .3-1
Loading The Film. . . . . . . . . . . . . . . . . . . . . . . . . . . . . . . . . . . . . . . . . . . . . . . . . . .3-2
Universal Go-To Buttons. . . . . . . . . . . . . . . . . . . . . . . . . . . . . . . . . . . . . . . . . . . . . . . . .3-3
Run Screens . . . . . . . . . . . . . . . . . . . . . . . . . . . . . . . . . . . . . . . . . . . . . . . . . . . . . . . . . . .3-4
Run Screen . . . . . . . . . . . . . . . . . . . . . . . . . . . . . . . . . . . . . . . . . . . . . . . . . . . . . . .3-4
Security Settings Screen . . . . . . . . . . . . . . . . . . . . . . . . . . . . . . . . . . . . . . . . . . . . .3-6
Wrap Setting Screens . . . . . . . . . . . . . . . . . . . . . . . . . . . . . . . . . . . . . . . . . . . . . . . . . . .3-7
Wrap Settings Screen . . . . . . . . . . . . . . . . . . . . . . . . . . . . . . . . . . . . . . . . . . . . . . .3-7
Menu Screens . . . . . . . . . . . . . . . . . . . . . . . . . . . . . . . . . . . . . . . . . . . . . . . . . . . . . . . . . .3-9
Menu Screen . . . . . . . . . . . . . . . . . . . . . . . . . . . . . . . . . . . . . . . . . . . . . . . . . . . . . .3-9
Jogging Screen . . . . . . . . . . . . . . . . . . . . . . . . . . . . . . . . . . . . . . . . . . . . . . . . . . .3-10
Carriage Jog Screen . . . . . . . . . . . . . . . . . . . . . . . . . . . . . . . . . . . . . . . . . . . . . . .3-12
Recipe Screen. . . . . . . . . . . . . . . . . . . . . . . . . . . . . . . . . . . . . . . . . . . . . . . . . . . .3-14
Production Data Screen. . . . . . . . . . . . . . . . . . . . . . . . . . . . . . . . . . . . . . . . . . . . .3-15
Recipe Viewing Screen . . . . . . . . . . . . . . . . . . . . . . . . . . . . . . . . . . . . . . . . . . . . .3-16
Machine Settings Screens. . . . . . . . . . . . . . . . . . . . . . . . . . . . . . . . . . . . . . . . . . . . . . .3-17
Machine Settings Screen. . . . . . . . . . . . . . . . . . . . . . . . . . . . . . . . . . . . . . . . . . . .3-17
Main Drive Screen . . . . . . . . . . . . . . . . . . . . . . . . . . . . . . . . . . . . . . . . . . . . . . . . .3-19
Reinforce Wrap Setup . . . . . . . . . . . . . . . . . . . . . . . . . . . . . . . . . . . . . . . . . . . . . . 3-20
Timers Screen . . . . . . . . . . . . . . . . . . . . . . . . . . . . . . . . . . . . . . . . . . . . . . . . . . . .3-21
Machine Setup Screen . . . . . . . . . . . . . . . . . . . . . . . . . . . . . . . . . . . . . . . . . . . . .3-23
Start Delay Screen. . . . . . . . . . . . . . . . . . . . . . . . . . . . . . . . . . . . . . . . . . . . . . . . .3-24
Factory Defaults Screen . . . . . . . . . . . . . . . . . . . . . . . . . . . . . . . . . . . . . . . . . . . .3-25
Multistretch Settings Screen . . . . . . . . . . . . . . . . . . . . . . . . . . . . . . . . . . . . . . . . .3-26
The VFD Parameters Screen . . . . . . . . . . . . . . . . . . . . . . . . . . . . . . . . . . . . . . . .3-28
S Insta-Cut Screen . . . . . . . . . . . . . . . . . . . . . . . . . . . . . . . . . . . . . . . . . . . . . . . .3-30
Diagnostics Screens . . . . . . . . . . . . . . . . . . . . . . . . . . . . . . . . . . . . . . . . . . . . . . . . . . .3-32
Diagnostics Screen . . . . . . . . . . . . . . . . . . . . . . . . . . . . . . . . . . . . . . . . . . . . . . . .3-32
The Inputs Screens . . . . . . . . . . . . . . . . . . . . . . . . . . . . . . . . . . . . . . . . . . . . . . . .3-33
The Outputs Screens. . . . . . . . . . . . . . . . . . . . . . . . . . . . . . . . . . . . . . . . . . . . . . .3-34
The VFD Diagnostics Screen . . . . . . . . . . . . . . . . . . . . . . . . . . . . . . . . . . . . . . . .3-35
HMI Setup . . . . . . . . . . . . . . . . . . . . . . . . . . . . . . . . . . . . . . . . . . . . . . . . . . . . . . .3-36
Fault History Screen . . . . . . . . . . . . . . . . . . . . . . . . . . . . . . . . . . . . . . . . . . . . . . .3-38
Flex Dashboard Remote Viewing . . . . . . . . . . . . . . . . . . . . . . . . . . . . . . . . . . . . . . . . .3-39
Setting up Dashboard Remote Viewing. . . . . . . . . . . . . . . . . . . . . . . . . . . . . . . . .3-39
Information & Alarm Messages. . . . . . . . . . . . . . . . . . . . . . . . . . . . . . . . . . . . . . . . . . .3-41
Message Displays . . . . . . . . . . . . . . . . . . . . . . . . . . . . . . . . . . . . . . . . . . . . . . . . .3-41
Alarm Displays. . . . . . . . . . . . . . . . . . . . . . . . . . . . . . . . . . . . . . . . . . . . . . . . . . . .3-45

Machine Manual Orion
HPS/ LPS Flex Stretchwrapper Revision 3.0
System Operation Contents 15 February 2016
Page II

3.
Page 3-1
Orion Machine Manual
Revision 3.0 HPS/ LPS Flex Stretchwrapper
15 February 2016 System Operation
System Operation
Operating Procedures
How to Start and Shut Down Your Wrapping System
Note: Do not use extension cords. Plug your Flex Stretch-wrapper directly
into an outlet.
POWER SWITCH
Located on the panel door, the lockable power switch has two settings:
• ON - connects a power source to the machine.
• OFF - disconnects the power source.
START AND EMERGENCY STOP SWITCHES
• Press the START button to gain Control Power prior to starting.
•The START switch is used to start the cycle once the load is available.
• The cycle may be stopped at anytime by pressing the E-STOP button.
The FLEX series machines are engineered to give the operator different levels of opera-
tion, the front panel or USER settings, and MENU DRIVEN parameters. The menu driven
parameters offer even more flexibility and security.

Machine Manual Orion
HPS/ LPS Flex Stretchwrapper Revision 3.0
System Operation 15 February 2016
Page 3-2
Loading The Film
The film roll can be loaded on the carriage mandrel from either end of the roll. When
using tacky film, please verify that the tacky surface of the film is inward on the load.
1. Press in the E-stop.
2. Swing up the top mandrel spool.
3. Put the roll of film on the bottom mandrel.
4. Install the top mandrel on top of the roll to prevent upward movement.
5. Press the latch down and pull out on the carriage door to open the carriage. The film
carriage is equipped with a magnetic switch that detects when the carriage threading
door is open. When opened, it will set off an alarm on the HMI and prevent the car-
riage from moving.
6. Pass the roped tail of the film through opening.
7. Close the carriage door. Ensure the latch clicks shut properly.
8. When the film feeding is completed, release the E-stop.
9. For machines without a fence, press the Start button once to reset control power. If
your machine has a fence, the multistretch will reset as soon as the E-stop is released.
10. Peel off the first few winds of the film (multistretch will run due to displacement of
the dancer roller) and fix the film end onto the load-or film clamp if so equipped.
11. The system is now ready to begin the first wrapping cycle.
12. Press and hold the Start button for the amount of time set in the machine settings to
start the machine.
Figure 3 - 1
Loading the Film

Orion Machine Manual
Revision 3.0 HPS/ LPS Flex Stretchwrapper
15 February 2016 System Operation
Page 3-3
Universal Go-To Buttons
The buttons in the chart below are found throughout most HMI screens. The buttons allow
the user to easily navigate back to any of the screens.
Table 3-1. The Universal Go-To Button Descriptions
STATE 1 DESCRIPTION
The Info icon displays information about each button on the HMI screen that you are
currently viewing.
Press this button to go to the Run Screen. The icon will illuminate in green when the
screen is currently active.
Press this button to go to the Wrap Settings Screen. The icon will illuminate in green
when the screen is currently active.
Press this button to go to the Menu Screen. The icon will illuminate in green when
the screen is currently active.
Press this button to go to the Machine Settings Screen. The icon will illuminate in
green when the screen is currently active.
Press this button to go to the Diagnostics Screen. The icon will illuminate in green
when the screen is currently active.
Press this button to go to the Security Settings Screen.

Machine Manual Orion
HPS/ LPS Flex Stretchwrapper Revision 3.0
System Operation 15 February 2016
Page 3-4
Run Screens
Run Screen
This is the Run screen used for primary functions of the machine. The red block in the
Orion block logo will travel the perimeter of the logo showing the position of the turntable
in relation to the home proximity sensor.
Figure 3 - 2
The Run Screen
Table 3-2. The Run Screen Button Descriptions
STATE 1 DESCRIPTION STATE 2
Press and hold this button to start the machine. This must be held until the Start
Delay timer is complete to start the machine.
Press this button to pause the wrap cycle. When paused, the Carriage and Main
Drive will stop, and will wait for the Resume Cycle button to be pressed before
resuming the wrap cycle.
Orion Machine Manual
Revision 3.0 HPS/ LPS Flex Stretchwrapper
15 February 2016 System Operation
Page 3-5
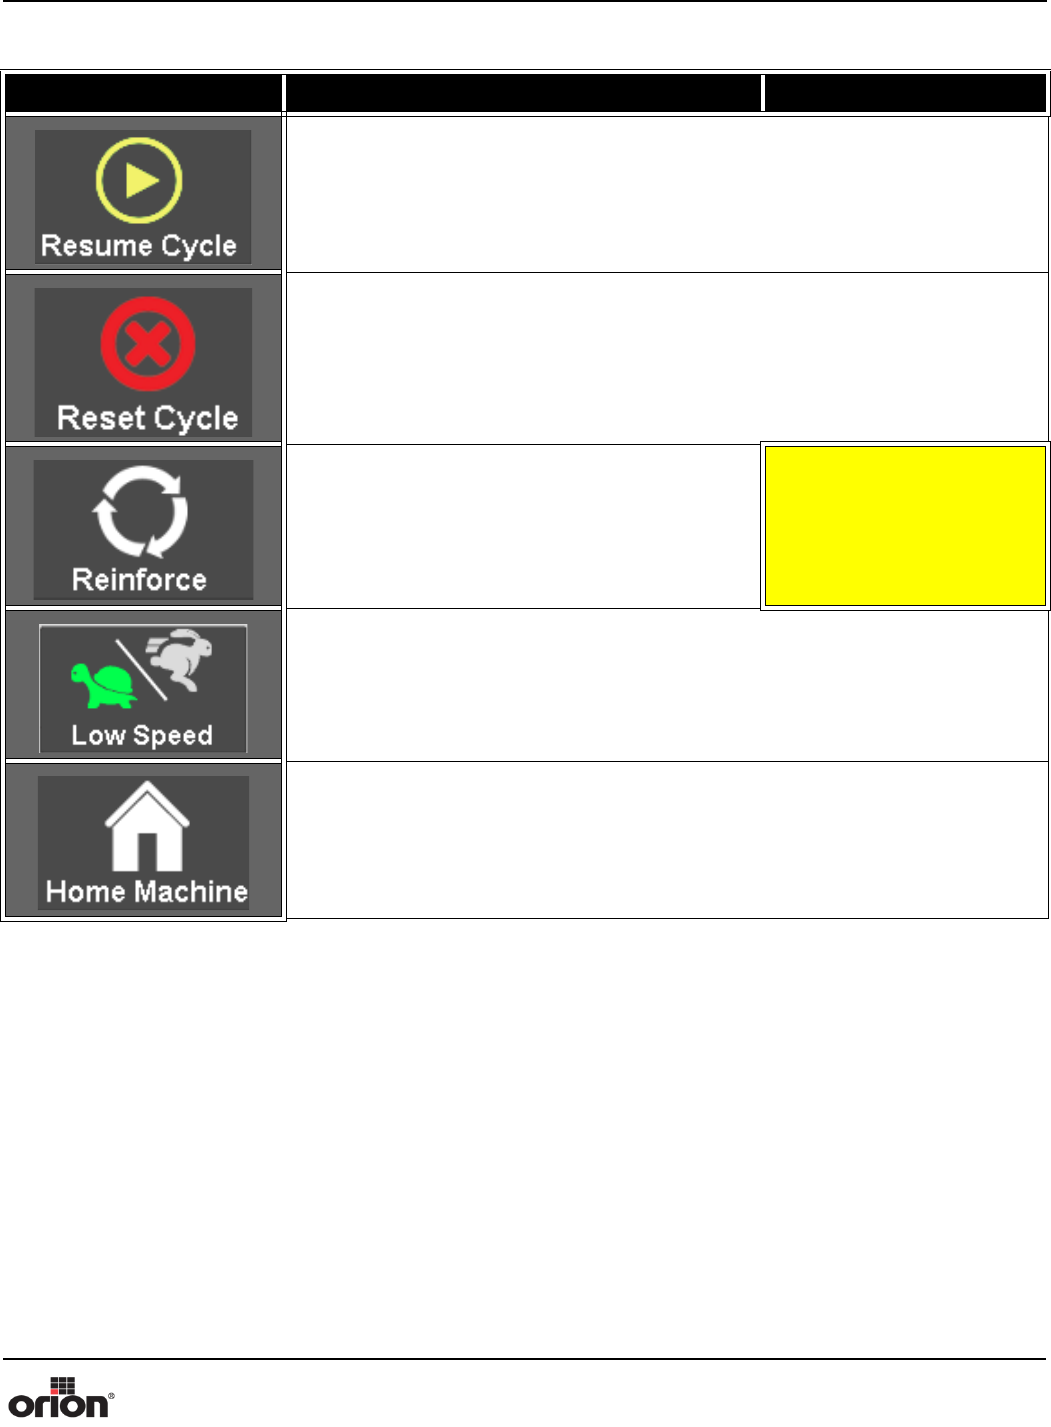
Press this button to resume the wrap cycle, if the cycle is currently paused.
Press this button to either stop the current wrap cycle or reset any displayed faults.
Press this button to apply the predefined reinforce-
ment wraps to the load. If the Reinforcement Wraps
value is set to zero, reinforcement wraps will be
applied as long as the Reinforce button is pressed.
REINFORCING
Press this button to toggle between High Speed and Low Speed operation. When
High Speed is selected, the Main Drive will travel at the predefined High Speed
value during the wrap cycle. When Low Speed is selected, the Main Drive will
travel at the predefined Low Speed value during the wrap cycle.
Press this button to send the machine to its Home Position. When pressed, the Car-
riage will travel to its bottom limit, and the Main Drive will travel to its predefined
End of Cycle Position.
Table 3-2. The Run Screen Button Descriptions (Continued)
STATE 1 DESCRIPTION STATE 2

Machine Manual Orion
HPS/ LPS Flex Stretchwrapper Revision 3.0
System Operation 15 February 2016
Page 3-6
Security Settings Screen
This is the Security Settings screen. This screen allows you to choose the default security
setting used after the login expires.
Figure 3 - 3
The Security Settings
Screen
Table 3-3. The Security Settings Screen Button Descriptions
STATE 1 DESCRIPTION
NO LOGIN
Press this button to set the Default Security level to 'No Login'. When selected, the
machine will automatically log out on powerup, or after the logout timer has
expired.
USER LEVEL
Press this button to set the Default Security level to 'User'. When selected, the
machine will automatically log in to the User security level on powerup, or after the
logout timer has expired.
MAINTENANCE LEVEL
Press this button to set the Default Security level to 'Maintenance'. When selected,
the machine will automatically log in to the Maintenance security level on powerup,
or after the logout timer has expired.
ADMIN LEVEL
Press this button to set the Default Security level to 'Administrator'. When selected,
the machine will automatically log in to the Administrator security level on
powerup, or after the logout timer has expired.

Orion Machine Manual
Revision 3.0 HPS/ LPS Flex Stretchwrapper
15 February 2016 System Operation
Page 3-7
Wrap Setting Screens
Wrap Settings Screen
Note: To adjust the wrap settings, you must be logged in. Press the login
button in the bottom left corner of the screen. Enter ADMIN then
press the checkmark, then X to close the keypad.
This is the Wrap Settings screen. This screen allows you to set the number of top and bot-
tom wraps and the speed percentage of the carriage up and down travel. You may also
choose wrap pattern options such as, Wrap Bottom First, Wrap Top First, Low Speed/
High Speed, Unstable Load Enabled or Disabled, Autoheight Enabled or Disabled, or
Film Fault Enabled or Disabled. You can view each pattern settings on the Recipe View-
ing Screen, see “Recipe Viewing Screen” on page 3 - 16.
Figure 3 - 4
The Wrap Settings
Screen
Table 3-4. The Wrap Settings Screen Button Descriptions
STATE 1 DESCRIPTION STATE 2
TOP WRAPS
Press this button to set the number of top wraps applied to the load. Parameters are
1-20.
BOTTOM WRAPS
Press this button to set the number of bottom wraps applied to the load. Parameters
are 1-20.

Machine Manual Orion
HPS/ LPS Flex Stretchwrapper Revision 3.0
System Operation 15 February 2016
Page 3-8
CARRIAGE UP SPEED
Press this button to change the speed of the carriage on the upward move, in terms
of percentage. Min - 5% Max - 100%
CARRIAGE DOWN
SPEED
Press this button to change the speed of the carriage on the downward move, in
terms of percentage. Min - 5% Max - 100%
WRAP BOTTOM FIRST
Press this button to select the Wrap Bottom First wrap sequence. When selected, the
wrapper will apply the bottom wraps first. When complete, the Carriage will travel
to the top of the load and apply the top wraps. When complete, the Carriage will
travel to the bottom and complete the cycle.
WRAP TOP FIRST
Press this button to select the Wrap Top First wrap sequence. When selected, the
Carriage will immediately travel to the top of the load and apply the top wraps.
When complete, the Carriage will travel to the bottom, apply the bottom wraps, and
complete the cycle.
WRAP UP ONLY
Press this button to wrap up only. The machine will wrap to the top, then stop the
cycle.
LOW SPEED SELECTED
Press this button to toggle between High Speed and
Low Speed operation. When High Speed is selected,
the Main Drive will travel at the predefined High
Speed value during the wrap cycle. When Low
Speed is selected, the Main Drive will travel at the
predefined Low Speed value during the wrap cycle.
HIGH SPEED
SELECTED
UNSTABLE LOAD
DISABLED
Press this button to enable or disable the Unstable
Load wrap cycle. When enabled, the Main Drive will
travel at Low Speed until the wrapper has completed
one top wrap. After one top wrap is completed, the
Main Drive will travel at High Speed for the remain-
der of the cycle. If Low Speed is selected, the Main
Drive will travel at Low Speed for the entire cycle.
UNSTABLE LOAD
ENABLED
AUTOHEIGHT
DISABLED
Press this button to enable or disable the Autoheight
photoeye. When enabled, the Carriage will travel up,
during the wrap cycle, until the Autoheight photoeye
no longer sees a load. It will continue to travel until
the Autoheight Delay time is complete. When dis-
abled, the Carriage will travel up, during the wrap
cycle, until it reaches the Top Limit sensor.
AUTOHEIGHT
ENABLED
FILM FAULT DISABLED
Press this button to enable or disable the End of Roll
or Broken Film fault. When disabled, the wrap cycle
will continue even if the film has broken or there is
no film left on the roll.
FILM FAULT ENABLED
Table 3-4. The Wrap Settings Screen Button Descriptions (Continued)
STATE 1 DESCRIPTION STATE 2

Orion Machine Manual
Revision 3.0 HPS/ LPS Flex Stretchwrapper
15 February 2016 System Operation
Page 3-9
Menu Screens
Menu Screen
This is the Menu screen. This screen allows you to navigate the HMI screens.
Figure 3 - 5
The Menu Screen
Table 3-5. The Menu Screen Button Descriptions
STATE 1 DESCRIPTION
JOGGING Press this button to go to the Jogging Screen. See “Jogging Screen” on page 3 - 10.
RECIPES Press this button to go to the Recipes Screen. See “Recipe Screen” on page 3 - 14.
PRODUCTION DATA
Press this button to go to the Production Data Screen. See “Production Data Screen”
on page 3 - 15.

Machine Manual Orion
HPS/ LPS Flex Stretchwrapper Revision 3.0
System Operation 15 February 2016
Page 3-10
Jogging Screen
This is the Jogging Screen. This screen allows jogging of each component of the machine.
Figure 3 - 6
The Jogging Screen
Table 3-6. The Jogging Screen Button Descriptions
STATE 1 DESCRIPTION
Press this button to move the machine to the home position.
Press this button to jog the main drive (turntable/ tower) in the direction of normal
operation. The main drive moves until the operator releases the jog button.
Press this button to jog the carriage upwards. The carriage move slowly upwards
until the operator releases the jog button.

Orion Machine Manual
Revision 3.0 HPS/ LPS Flex Stretchwrapper
15 February 2016 System Operation
Page 3-11
Press this button to jog the carriage downwards. The carriage move slowly down-
wards until the operator releases the jog button.
Press this button to reset faults. If you press this button while the machine is run-
ning, the machine will abort the current wrap cycle.
Table 3-6. The Jogging Screen Button Descriptions (Continued)
STATE 1 DESCRIPTION

Machine Manual Orion
HPS/ LPS Flex Stretchwrapper Revision 3.0
System Operation 15 February 2016
Page 3-12
Carriage Jog Screen
This is the Carriage Jog Screen. You can set the Carriage Up and Down Speeds, as well as
jog the carriage up or down.
Figure 3 - 7
The Carriage Jog
Screen
Table 3-7. The Carriage Jog Screen Button Descriptions
STATE 1 DESCRIPTION
CARRIAGE UP SPEED %
Press this button to modify the Carriage Up Speed, in terms of percentage. Min -
5% Max - 100%
CARRIAGE DOWN
SPEED %
Press this button to modify the Carriage Down Speed, in terms of percentage. Min -
5% Max - 100%
Press this button to jog the carriage upwards. The carriage move slowly upwards
until the operator releases the jog button.
Press this button to jog the carriage downwards. The carriage move slowly down-
wards until the operator releases the jog button.

Orion Machine Manual
Revision 3.0 HPS/ LPS Flex Stretchwrapper
15 February 2016 System Operation
Page 3-13
Press this button to reset faults. If you press this button while the machine is run-
ning, the machine will abort the current wrap cycle.
Table 3-7. The Carriage Jog Screen Button Descriptions (Continued)
STATE 1 DESCRIPTION

Machine Manual Orion
HPS/ LPS Flex Stretchwrapper Revision 3.0
System Operation 15 February 2016
Page 3-14
Recipe Screen
This is the Recipe screen. This screens allows the user to select different wrap recipes
quickly. Changes made to a recipe are saved to the active recipe.
Figure 3 - 8
The Recipe Screen
Table 3-8. The Recipe Screen Button Descriptions
STATE 1 DESCRIPTION STATE 2
SELECT RECIPE #
Press a recipe button to choose between the different
recipe wrap settings. Changes made to a recipe are
saved to the active recipe. If you attempt to change to
a different recipe while the wrapper is loading, then
the new recipe you select will display as loading and
will only change once the current wrap cycle is com-
plete.
RUNNING RECIPE 1
LOADING RECIPE 1
VIEW ALL RECIPES
Press this button to go to the Recipe Viewing screen. See “Recipe Viewing Screen”
on page 3 - 16.

Orion Machine Manual
Revision 3.0 HPS/ LPS Flex Stretchwrapper
15 February 2016 System Operation
Page 3-15
Production Data Screen
This is the Production Data screen. This screen displays the lifetime cycles and shift
cycles. You may also reset the shift cycle counter.
Figure 3 - 9
The Production Data
Screen
Table 3-9. The Production Data Screen Button Descriptions
STATE 1 DESCRIPTION
LIFETIME CYCLES This display shows the number of cycles the machine has run, in total.
SHIFT CYCLES
This display shows the number of cycles the machine has run since the last shift
cycle reset.
RESET SHIFT CYCLES Press this button to reset the shift cycle counter to zero.

Machine Manual Orion
HPS/ LPS Flex Stretchwrapper Revision 3.0
System Operation 15 February 2016
Page 3-16
Recipe Viewing Screen
This is the Recipe Viewing screen. This screen allows you to view each recipe settings.
This is helpful for a quick glance at each recipe’s parameters.
Figure 3 - 10
The Recipe Viewing
Screen
Table 3-10. The Recipe Viewing Screen Button Descriptions
STATE 1 DESCRIPTION
RECIPE Press the recipe name to edit the name of the recipe.
PREVIOUS Press this button to go to the previous Recipe View screen.
NEXT Press this button to go to the next Recipe View screen.
BACK Press this button to go back to the Recipe screen.

Orion Machine Manual
Revision 3.0 HPS/ LPS Flex Stretchwrapper
15 February 2016 System Operation
Page 3-17
Machine Settings Screens
Machine Settings Screen
This is the Machine Settings Screen. This screen allows access to each of the machine set-
ting adjustments.
Figure 3 - 11
The Machine Settings
Screen
Table 3-11. The Machine Settings Screen Button Descriptions
STATE 1 DESCRIPTION
MAIN DRIVE
Press this button to go to the Main Drive Screen. See “Main Drive Screen” on
page 3 - 19.
REINFORCE
Press this button to go to the Reinforce Screen. See “S Insta-Cut Screen” on page 3 -
30.
TIMERS Press this button to go to the Timers Screen. See “Timers Screen” on page 3 - 21.
MACHINE SETUP
Press this button to go to the Machine Setup Screen. See “Machine Setup Screen” on
page 3 - 23.
FACTORY DEFAULTS
Press this button to go to the Factory Defaults Screen. See “Factory Defaults
Screen” on page 3 - 25.
MULTISTRETCH
Press this button to go to the Multistretch Screen. See “Multistretch Settings Screen”
on page 3 - 26.

Machine Manual Orion
HPS/ LPS Flex Stretchwrapper Revision 3.0
System Operation 15 February 2016
Page 3-18
VFD PARAMETERS
Press this button to go to the VFD Parameters Screen. See “The VFD Parameters
Screen” on page 3 - 28.
INSTA-CUT
Press this button to go to the Insta-Cut Screen. See “S Insta-Cut Screen” on page 3 -
30.
Table 3-11. The Machine Settings Screen Button Descriptions (Continued)
STATE 1 DESCRIPTION

Orion Machine Manual
Revision 3.0 HPS/ LPS Flex Stretchwrapper
15 February 2016 System Operation
Page 3-19
Main Drive Screen
This is the Main Drive screen. This screen allows adjustment of the Main Drive (turntable
or rotary arm drive.)
Figure 3 - 12
The Main Drive
Screen
Table 3-12. The Main Drive Screen Button Descriptions
STATE 1 DESCRIPTION
HIGH SPEED
Press this button to modify the High Speed value, in terms of hertz. This value
determines the speed at which the Main Drive will travel during the wrap cycle
when High Speed is selected. Min - 8 Hz Max - 27 Hz
LOW SPEED
Press this button to modify the Low Speed value, in terms of hertz. This value deter-
mines the speed at which the Main Drive will travel during the wrap cycle when
Low Speed is selected. Min - 27 Hz Max - 55 Hz
Press this button to send the machine to its Home Position. When pressed, the Car-
riage will travel to its bottom limit, and the Main Drive will travel to its predefined
End of Cycle Position.

Machine Manual Orion
HPS/ LPS Flex Stretchwrapper Revision 3.0
System Operation 15 February 2016
Page 3-20
Reinforce Wrap Setup
This is the Reinforce Wraps Setting Screen. This screen allows the user to set the number
of reinforce wraps that are applied when the reinforce button on the Run Screen is pressed.
Figure 3 - 13
The Reinforce Setup
Screen
Table 3-13. The Reinforce Wraps Screen Button Descriptions
STATE 1 DESCRIPTION
REINFORCE WRAPS
Press this button to set the number of reinforce wraps that are applied when the
enable reinforce wraps button is pressed on the Run screen.

Orion Machine Manual
Revision 3.0 HPS/ LPS Flex Stretchwrapper
15 February 2016 System Operation
Page 3-21
Timers Screen
This is the Timers Screen. This screen allows adjustment of the timers involved in the
machine cycle. See the Table below for descriptions and parameters of each setting.
Figure 3 - 14
The Timers Screen
Table 3-14. The Timers Screen Button Descriptions
STATE 1 DESCRIPTION
AUTOHEIGHT DELAY
Press this button to modify the Autoheight Delay value, in terms of milliseconds.
This value determines the amount of time that the Carriage will continue to travel
up during the wrap cycle after the Autoheight photoeye no longer detects a load.
This is used to adjust the amount of overlap on the top of the load. Min - 0 ms Max
- 10000 ms
TENSION ENGAGE
DELAY
Press this button to modify the Tension Engage Delay value, in terms of millisec-
onds. This value determines the amount of time, at the beginning of the wrap cycle,
that the Multistretch will pay out film at normal speed before applying tension. This
is to keep film from pulling out of the clamp or away from the load. Min - 0 ms Max
- 10000 ms
FILM FAULT DELAY
Press this button to modify the Film Fault Delay value, in terms of milliseconds.
This value determines the amount of time, during a wrap cycle, that the Multistretch
must be inactive before triggering an End of Film Roll or Broken Film fault. Min - 0
ms Max - 10000 ms

Machine Manual Orion
HPS/ LPS Flex Stretchwrapper Revision 3.0
System Operation 15 February 2016
Page 3-22
SLOWDOWN DELAY
Press this button to modify the Slowdown delay timer. This value determines the
position at which the Main Drive will slow down to jog speed at the end of a wrap
cycle.
Table 3-14. The Timers Screen Button Descriptions (Continued)
STATE 1 DESCRIPTION

Orion Machine Manual
Revision 3.0 HPS/ LPS Flex Stretchwrapper
15 February 2016 System Operation
Page 3-23
Machine Setup Screen
This is the Machine Setup Screen. This screen is used when setting up the initial machine
configuration. The technicians who assembled you machine already set the type of
machine you have on this screen. You will not need to make any changes on this screen in
day-to-day use.
Figure 3 - 15
The Machine Setup
Screen
Table 3-15. The Machine Setup Screen Button Descriptions
STATE 1 DESCRIPTION STATE 2
SELECT S MODEL
Press this button to select model S. If S is selected
and the machine is actually an A or a D model, the
revologic tooth counting is de-activated.
S MODEL SELECTED
SELECT TURNTABLE
Press this button to select that the machine is a turn-
table machine.
TURNTABLE
SELECTED
SELECT ROTARY ARM
Press this button to select that the machine is a
rotary arm machine.
ROTARY ARM
SELECTED
INSTA-CUT DISABLED
Press this button to activate or de-activate Insta-
Cut.
INSTA-CUT ENABLED
DEFAULT SECURITY Press this button to go to the Security Settings Screen.
START DELAY Press this button to go to the Start Delay Screen.
FACTORY DEFAULTS Press this button to go to the Factory Defaults Screen.

Machine Manual Orion
HPS/ LPS Flex Stretchwrapper Revision 3.0
System Operation 15 February 2016
Page 3-24
Start Delay Screen
This is the Start Delay screen. On this screen, you may set the amount of time, in millisec-
onds that the start button must be pressed before the machine starts.
Figure 3 - 16
The Start Delay
Screen
Table 3-16. The Start Delay Screen Button Descriptions
STATE 1 DESCRIPTION
START DELAY
Press this button to modify the Start Delay value, in terms of milliseconds. This
value determines the amount of time that the Start pushbutton must be pressed
before the machine will start. Min - 500 ms Max - 5000 ms
BACK Press this button to go to the Machine Setup screen.

Orion Machine Manual
Revision 3.0 HPS/ LPS Flex Stretchwrapper
15 February 2016 System Operation
Page 3-25
Factory Defaults Screen
This is the Factory Defaults Screen. This screen allows authorized users to go back to the
factory default settings.
Figure 3 - 17
The Factory Defaults
Screen
Table 3-17. The Factory Defaults Screen Button Descriptions
STATE 1 DESCRIPTION
RESTORE FACTORY
DEFAULTS
Press this button to delete the currently entered factory settings and replace them
with the original factory default settings. This will replace all Wrap Settings,
Machine Settings, and Recipes with the factory default parameters.
RESTORE DEFAULT
NETWORK SETTINGS
Press this button to restore default network settings to the machine.

Machine Manual Orion
HPS/ LPS Flex Stretchwrapper Revision 3.0
System Operation 15 February 2016
Page 3-26
Multistretch Settings Screen
This is the Multistretch Settings (MIB) screen. This page is useful primarily to repair per-
sonnel when troubleshooting the machine.
Figure 3 - 18
The Multistretch
Screen
Table 3-18. The Multistretch Screen Button Descriptions
STATE 1 DESCRIPTION
ZERO TRIM
Press this button to modify the Zero Trim datapoint, in terms of milliamps. This
value determines at which point the Multistretch will begin paying out film as the
dancer bar is deflected. This value should be .5 mA higher than the Hall Effect Sen-
sor reading with the dancer bar at rest. Min - 3.mA Max - 8 mA
GAIN
Press this button to modify the Gain datapoint, in terms of percentage. This value
sets percentage of deflection of the dancer bar that is required for the Multistretch to
pay out film at maximum speed. Min - 10% Max - 100%
FILM TENSION
Press this button to modify the Film Tension datapoint, in terms of percentage. This
value limits the maximum speed at which the Multistretch will pay out film, which
creates tension. Min - 0% Max - 100%
HALL EFFECT SENSOR
This displays the current dancer bar Hall Effect Sensor reading, in terms of milli-
amps.
MODIFY SETTINGS
Press this button for access to modify the Zero Trim or Gain datapoints.
The Multistretch is disabled while modifying the datapoints.

Orion Machine Manual
Revision 3.0 HPS/ LPS Flex Stretchwrapper
15 February 2016 System Operation
Page 3-27
APPLY SETTINGS
Press this button to accept the current Zero Trim and Gain datapoints and apply
them to the Multistretch. When complete, the drive will be enabled again.
Table 3-18. The Multistretch Screen Button Descriptions (Continued)
STATE 1 DESCRIPTION

Machine Manual Orion
HPS/ LPS Flex Stretchwrapper Revision 3.0
System Operation 15 February 2016
Page 3-28
The VFD Parameters Screen
This is the VFD Parameters screen. On this screen, you can identify the horsepower for
each drive or transfer VFD parameters from the PLC to the VFD’s.
Figure 3 - 19
The VFD Parameters
Screen
Table 3-19. The VFD Parameters Screen Button Descriptions
STATE 1 DESCRIPTION
NOT IDENTIFIED
Displayed if the machine cannot automatically identify the size of VFD currently
installed. In this case, the VFD size must be manually selected before downloading.
1/2 HP IDENTIFIED Displayed if the machine identifies the current VFD as half horsepower drive.
1 HP IDENTIFIED Displayed if the machine identifies the current VFD as a one horsepower drive.
SELECT VFD SIZE
If the machine cannot automatically identify the size of the VFD, press this button
to manually select the size of VFD currently installed.
1/2 HP SELECTED Displayed if the current VFD is manually selected as a half horsepower drive.
1 HP SELECTED Displayed if the current VFD is manually selected as a one horsepower drive.
DOWNLOAD MAIN
DRIVE
Downloads the default Main Drive VFD parameters from the PLC to the VFD.
DOWNLOAD CARRIAGE Downloads the default Carriage VFD parameters from the PLC to the VFD.

Orion Machine Manual
Revision 3.0 HPS/ LPS Flex Stretchwrapper
15 February 2016 System Operation
Page 3-29
DOWNLOAD
MULTISTRETCH
Downloads the default Multistretch VFD parameters from the PLC to the VFD.
DOWNLOAD ALL VFD'S Downloads the default VFD parameters from the PLC to the VFD.
Table 3-19. The VFD Parameters Screen Button Descriptions (Continued)
STATE 1 DESCRIPTION

Machine Manual Orion
HPS/ LPS Flex Stretchwrapper Revision 3.0
System Operation 15 February 2016
Page 3-30
S Insta-Cut Screen
This is the S Insta-Cut screen. This screen allows adjustments to the timing and speed set-
ting associated with the Insta-Cut on the HPS or LPS machines, if so equipped.
Figure 3 - 20
The S Insta-Cut
Screen
Table 3-20. The Insta-Cut “S” Screen Button Descriptions
STATE 1 DESCRIPTION STATE 2
INSTA- CUT ENABLED
Press this button to toggle between Insta-Cut On or
Insta-Cut Off. This allows the operator to disable the
Insta-Cut function.
INSTA-CUT DISABLED
INSTA-CUT PUNCH
POSITION
Press this button to modify the Insta-Cut Punch Position. This is the tooth count
position at which the Insta-Cut puncher activates to punch a hole in the film.
INSTA-CUT PUNCH
DWELL
Press this button to modify the Insta-Cut Punch Dwell. This is the amount of teeth
that the Insta-Cut puncher will stay activated to create a hole in the film.
INSTA-CUT BRAKE
POSITION
Press this button to modify the Insta-Cut Brake Position. This is the tooth count
position at which the Multistretch will stop paying out film, which causes the film
to tear. Min - (Insta-Cut Punch Position + Insta-Cut Punch Dwell)
INSTA-CUT TEAR
DURATION
Press this button to modify the Insta-Cut Tear Duration. This is the amount of teeth
that the Main Drive will continue to travel at the predefined Insta-Cut Speed before
slowing down to Jog Speed and stopping at home.

Orion Machine Manual
Revision 3.0 HPS/ LPS Flex Stretchwrapper
15 February 2016 System Operation
Page 3-31
INSTA-CUT SPEED HZ
Press this button to modify the Insta-Cut Speed. This is the speed at which the Main
Drive will travel during the Insta-Cut sequence.
This indicator will glow green when the Insta-Cut puncher is active.
Table 3-20. The Insta-Cut “S” Screen Button Descriptions (Continued)
STATE 1 DESCRIPTION STATE 2

Machine Manual Orion
HPS/ LPS Flex Stretchwrapper Revision 3.0
System Operation 15 February 2016
Page 3-32
Diagnostics Screens
Diagnostics Screen
This is the Diagnostics screen. This screen allows navigation to each of the Diagnostic
Screens.
Figure 3 - 21
The Diagnostics
Screen
Table 3-21. The Diagnostics Screen Button Descriptions
STATE 1 DESCRIPTION
INPUTS
Press this button to go to the Inputs Screen.
See “The Inputs Screens” on page 3 - 33.
OUTPUTS
Press this button to go to the Outputs Screen.
See “The Outputs Screens” on page 3 - 34.
VFD’S
Press this button to go to the VFD’s Screen. See “The VFD Diagnostics Screen” on
page 3 - 35.
HMI Press this button to go to the HMI Screen. See “HMI Setup” on page 3 - 36.
TROUBLESHOOTING
Press this button to display the interactive troubleshooting guide. You can press
links on the first page to view the help topic needed. Maintenance information is
also included at the end of the guide.
FAULT HISTORY
Press this button to go to the Fault History Screen.
See “Fault History Screen” on page 3 - 38.

Orion Machine Manual
Revision 3.0 HPS/ LPS Flex Stretchwrapper
15 February 2016 System Operation
Page 3-33
The Inputs Screens
This is the Inputs screen. This screen shows the status of the machine inputs. There is
another screen similar to this for displaying output status.
Figure 3 - 22
The Inputs Screen
Table 3-22. The Input Screen Button Descriptions
STATE 1 DESCRIPTION
Grey represents an inactive input. Green represents an active input.

Machine Manual Orion
HPS/ LPS Flex Stretchwrapper Revision 3.0
System Operation 15 February 2016
Page 3-34
The Outputs Screens
This is the Outputs screen. This screen shows the status of the machine outputs. There is
another screen similar to this for displaying input status.
Figure 3 - 23
The Outputs Screen
Table 3-23. The Output Screen Button Descriptions
STATE 1 DESCRIPTION
Grey represents an inactive output. Green represents an active output.

Orion Machine Manual
Revision 3.0 HPS/ LPS Flex Stretchwrapper
15 February 2016 System Operation
Page 3-35
The VFD Diagnostics Screen
This is the VFD Diagnostics screen.This screen allows you to view the diagnostics infor-
mation about each VFD.
Figure 3 - 24
The VFD Diagnostics
Screen
Table 3-24. The VFD Diagnostics Screen Button Descriptions
STATE 1 DESCRIPTION
SERIAL NUMBER This displays the serial number of the selected VFD.
MODULE ID This displays the Module ID of the selected VFD.
DRIVE STATE This displays the current Drive State of the selected VFD.
CARRIAGE Press this button to select the Carriage input view.
TURNTABLE Press this button to select the Turntable input view.
MULTISTRETCH Press this button to select the Multistretch input view.
Gray represents an inactive input. Green represents an active input.

Machine Manual Orion
HPS/ LPS Flex Stretchwrapper Revision 3.0
System Operation 15 February 2016
Page 3-36
HMI Setup
This is the HMI Setup Screen. This screen allows you to choose the HMI language, set the
screen brightness, adjust the network settings, calibrate the touchscreen touch points, and
set the date and time.
Figure 3 - 25
The HMI Setup
Screen
Table 3-25. The HMI Setup Screen Button Descriptions
STATE 1 DESCRIPTION
ENGLISH Press this button to switch the HMI text to English.
ESPANOL Press this button to switch the HMI text to Spanish.
BRIGHTNESS
Use the slider to adjust the brightness of the HMI screen. Slide to the right to
increase the brightness. Slide to the left to decrease the brightness.
TOUCH CALIBRATION
Press this button to go to the touch calibration screen. This is used to set the align-
ment of the touch screen. There are multiple targets to press to align the screen.
NETWORK SETTINGS
When logged in as an Administrator, you can edit the IP Address, Subnet Mask,
Gateway, or Node number. Press save, when done editing. If you are not logged in
with the correct credentials, these settings are read-only.

Orion Machine Manual
Revision 3.0 HPS/ LPS Flex Stretchwrapper
15 February 2016 System Operation
Page 3-37
Press this button to save the Network Settings. If you navigate away from the screen
without saving, the entered network settings will not take effect.
TIME AND DATE
Press the numbers to edit the time and date. The format is hours (01-24), minutes
(0-59), seconds (0-59). The date is set by year (####), month (1-12), and day (1-31).
Table 3-25. The HMI Setup Screen Button Descriptions (Continued)
STATE 1 DESCRIPTION

Machine Manual Orion
HPS/ LPS Flex Stretchwrapper Revision 3.0
System Operation 15 February 2016
Page 3-38
Fault History Screen
This is the Fault History screen. The screen displays the faults and the time they occurred.
Figure 3 - 26
The Fault History
Screen
Table 3-26. The Fault History Screen Button Descriptions
STATE 1 DESCRIPTION
ANY DISPLAY
The displays on this screen cannot be altered on this screen. These displays show
the Fault History Log.

Orion Machine Manual
Revision 3.0 HPS/ LPS Flex Stretchwrapper
15 February 2016 System Operation
Page 3-39
Flex Dashboard Remote Viewing
Setting up Dashboard Remote Viewing
Your new flex machine has the capability of remotely viewing the status from your com-
puter browser on the same network. You will need your network administrator to advise
what IP address should be used for your flex machine.
1. Press Login to log into Admin level security.
2. Enter the user password. Press Enter.
3. Press Diagnostics.
4. Press HMI.
5. Enter the IP network settings approved by your system administrator.
6. Press Save (Disk Icon.)
7. On the back of the HMI, connect an ethernet cord to the Eth IF2 connector. Route to
your network router.
8. On your computer bowser connected to the same network, enter the IP address you
assigned to the flex machine then /dashboard.asp.
9. Example: 192.168.1.2/dashboard.asp
(Continued on Next Page)
Figure 3 - 27
Setting the IP
Address
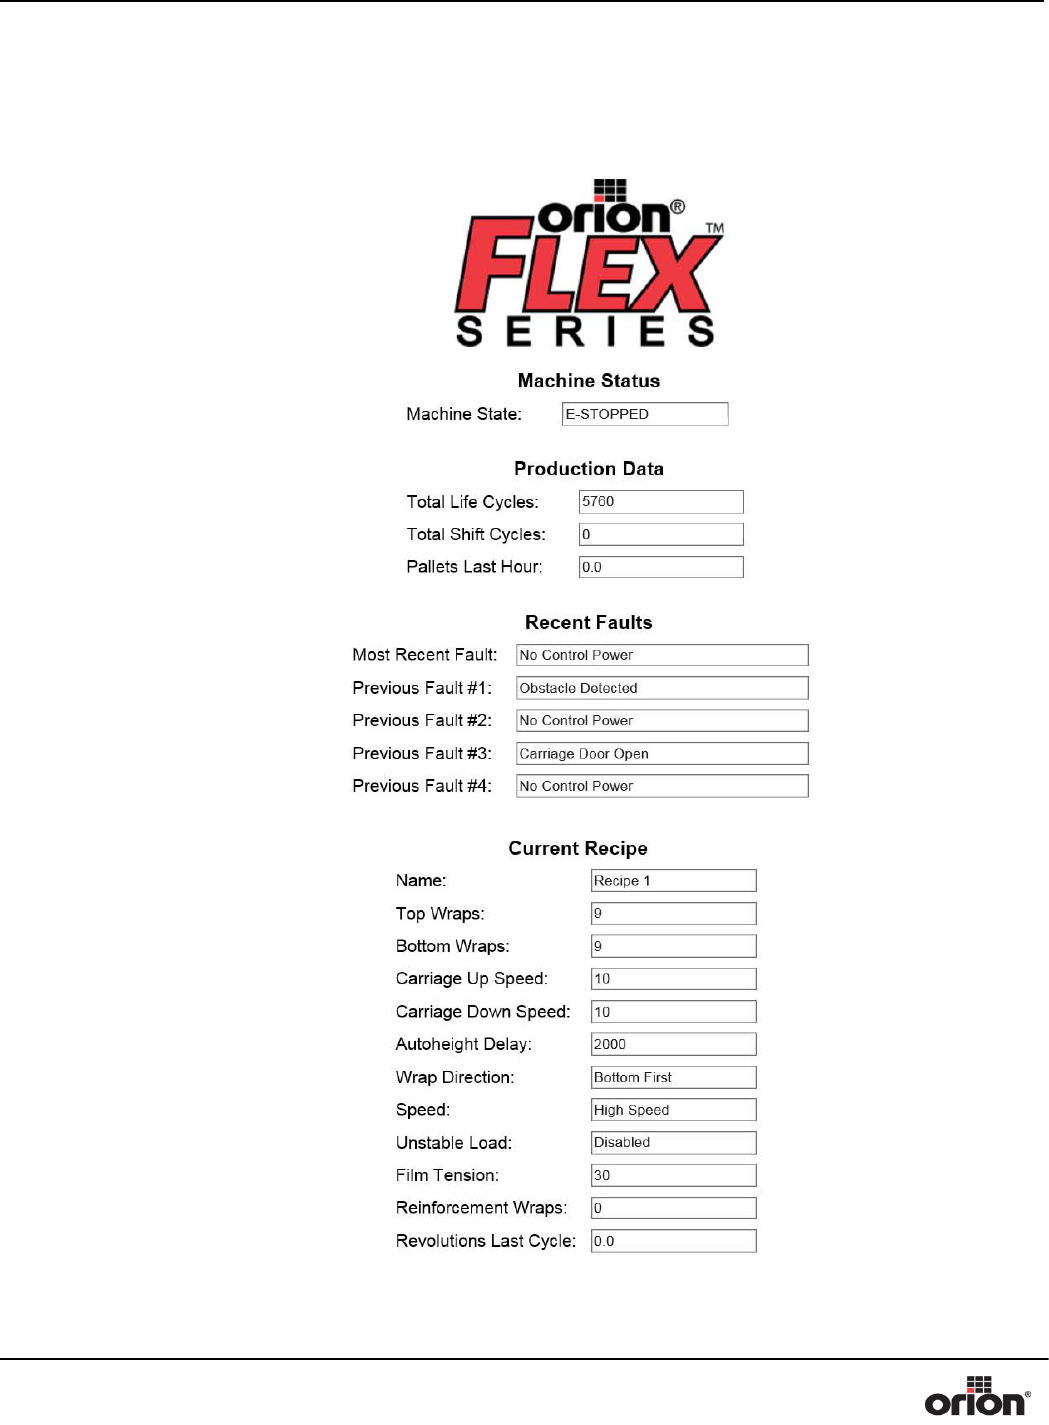
Machine Manual Orion
HPS/ LPS Flex Stretchwrapper Revision 3.0
System Operation 15 February 2016
Page 3-40
10. Once the correct address is entered followed by /dashboard.asp, the dashboard will
display.
11. This screen allows you to view the Status of your machine, the Production data,
Recent Faults, and Current Recipe running.
Figure 3 - 28
Flex Dashboard

Orion Machine Manual
Revision 3.0 HPS/ LPS Flex Stretchwrapper
15 February 2016 System Operation
Page 3-41
Information & Alarm Messages
The message and alarm displays are divided into two separate charts in this section.
• Message Displays - Various non-critical status messages
• Alarm Displays - Operation critical alarms/faults
Message Displays
The messages in this section are the various non-critical status messages. These messages
are for informational purposes. For critical alarms, see “Alarm Displays” on page 3 - 45.
Note:
Not all messages in this list are applicable to your machine. The
alarm messages on you machine may vary based on machine
options.
Table 3-27. The Information and Alarm Displays
MESSAGE DESCRIPTION CORRECTION
MACHINE SETUP
REQUIRED - SELECT
MACHINE OPTIONS
The machine setup parameters are not set.
See “Machine Setup Screen” on
page 3 - 23.
APPLYING TOP
WRAPS The machine is currently applying the top wraps.
This is for informational pur-
poses only. No correction neces-
sary.
END OF FILM ROLL
OR BROKEN FILM
The film has broken or the roll ran out.
Re-load a new roll if out. If bro-
ken, monitor the film. Replace
roll if problem persists. See trou-
bleshooting chart for broken film
troubleshooting tips.
CYCLE ENDING
The cycle is ending.
This is for informational pur-
poses only. No correction neces-
sary.
CYCLE PAUSED
The cycle is paused.
Resume, when ready. Press the
resume button on the Run
screen.
E-STOP PRESSED
The E-stop button is currently pressed.
Release the E-stop button to
allow operation. Press Start to
reset control power, then press
and hold start for the amount of
time set up in the parameters.

Machine Manual Orion
HPS/ LPS Flex Stretchwrapper Revision 3.0
System Operation 15 February 2016
Page 3-42
CARRIAGE GATE
OPEN The carriage gate is currently open.
Close the carriage to allow oper-
ation. Check the interlock
switch.
HOMING MACHINE
The machine is homing.
Allow the machine to home prior
to starting.
LOW AIR PRESSURE
The machine pneumatic pressure is low.
Check the pneumatic supply.
Ensure 80 PSI is available.
PRESS START BUTTON
TO RESET CONTROL
POWER
The machine is not reset.
Press Start to reset control power
prior to starting.
MOVING TO BOTTOM
OF LOAD The carriage is moving to the bottom of the load.
This is for informational pur-
poses only. No correction neces-
sary.
MOVING TO TOP OF
LOAD The carriage is moving to the top of the load.
This is for informational pur-
poses only. No correction neces-
sary.
CARRIAGE
OBSTACLE DETECTED
- CLEAR & PRESS
RESET
The obstacle detection is tripped.
See “Loading The Film” on
page 3 - 2.
READY TO WRAP -
PRESS & HOLD START
BUTTON
The machine is reset and ready to run.
Press and hold the start button
for the amount of time set in the
parameters to start the machine.
APPLYING
REINFORCEMENT
WRAPS
Reinforce wraps are currently being applied.
Once the reinforce wraps are
completed, the machine will
continue its cycle.
TOWER OBSTACLE
DETECTED The tower has an obstruction.
Check for a mechanical bind.
Clear the cause of the fault.
Reset and restart, when ready.
APPLYING BOTTOM
WRAPS The bottom wraps are currently being applied.
This is for informational pur-
poses only. No correction neces-
sary.
WRAP CYCLE IS
COMPLETE The wrap cycle is now complete. Remove the load, when ready.
Table 3-27. The Information and Alarm Displays (Continued)
MESSAGE DESCRIPTION CORRECTION

Orion Machine Manual
Revision 3.0 HPS/ LPS Flex Stretchwrapper
15 February 2016 System Operation
Page 3-43
CLAMIPING &
CUTTING FILM The machine is now in the clamp and cut cycle.
This is for informational pur-
poses only. No correction neces-
sary.
INITIALIZING
The machine is initializing.
There is a brief initialization
sequence once the machine is
reset. Allow the machine to ini-
tialize prior to starting.
LIGHT CURTAIN
BLOCKED The light curtain is blocked (if equipped.)
Clear the obstruction from the
light curtain to allow operation.
SAFETY SYSTEM NOT
READY The safety controller is not ready to run.
Allow the safety system to ini-
tialize prior to running.
FAULTS EXIST
Faults currently exist.
Correct the cause of the fault.
Press reset to reset the fault con-
dition once the cause is cor-
rected.
CARRIAGE MOVING
UP TOO SLOWLY
The carriage is moving upward too slowly.
Check for the cause of the car-
riage not moving correctly.
Check the belt drive behind the
back panel. Check for a jam or
obstruction on the track.
CARRIAGE MOVING
DOWN TOO SLOWLY
The carriage is moving downward too slowly.
Check for the cause of the car-
riage not moving correctly.
Check the belt drive behind the
back panel. Check for a jam or
obstruction on the track.
BRUSH AND CUTTER
NOT HOME The brush and cutter are not home.
Cycle the brush and cutter.
Check why the brush and cutter
can’t reach the home position.
MULTISTRETCH VFD
NOT READY
The indicated VFD is not ready to run.
Check the fault code on the VFD
display in the electrical cabinet.
See VFD manual for fault code
information.
MAIN DRIVE VFD NOT
READY
CARRIAGE VFD NOT
READY
Table 3-27. The Information and Alarm Displays (Continued)
MESSAGE DESCRIPTION CORRECTION

Machine Manual Orion
HPS/ LPS Flex Stretchwrapper Revision 3.0
System Operation 15 February 2016
Page 3-44
DOWNLOADING VFD
PARAMETERS -
PLEASE WAIT
The VFD parameters are transferring to the
VFD’s from the PLC.
Wait until the process is com-
pleted.
X2X
COMMUNICATION
FAULT - PRESS E-STOP
TO CLEAR FAULT
There is an X2X communication fault, press and
release the E-stop button to clear the fault.
Contact Orion Packaging if
problem persists.
RS485
COMMUNICATION
FAULT - PRESS E-STOP
TO CLEAR FAULT
There is an RS485 communication fault, press
and release the E-stop button to clear the fault.
Contact Orion Packaging if
problem persists.
MODIFYING
MULTISTRETCH
SETTINGS
The stretch settings modification is in progress.
Allow the settings to complete
prior to start-up.
Table 3-27. The Information and Alarm Displays (Continued)
MESSAGE DESCRIPTION CORRECTION

Orion Machine Manual
Revision 3.0 HPS/ LPS Flex Stretchwrapper
15 February 2016 System Operation
Page 3-45
Alarm Displays
The messages in this section are the various critical status messages. For non-critical
alarms, see “Message Displays” on page 3 - 41.
Correct the condition and press the Fault Reset button to clear the message and continue
machine operation. A description of these messages appears on the following pages.
Note:
Not all messages in this list are applicable to your machine. The
alarm messages on you machine may vary based on machine
options.
Table 3-28. The Information and Alarm Displays
MESSAGE DESCRIPTION CORRECTION
NO CONTROL POWER
Control Power is not present.
Press the Control Power reset
button prior to starting the
machine.
CARRIAGE GATE
OPEN DURING CYCLE The carriage gate opened during the cycle.
Check for the cause of the
unlatch. Re-latch and restart,
when ready.
END OF ROLL OR
BROKEN FILM
The film has broken or the roll ran out.
Re-load a new roll if out. If bro-
ken, monitor the film. Replace
roll if problem persists. See trou-
bleshooting chart for broken film
troubleshooting tips.
CARRIAGE MOVING
UP TOO SLOWLY
The carriage is moving upward too slowly.
Check for the cause of the car-
riage not moving correctly.
Check the belt drive behind the
back panel. Check for a jam or
obstruction on the track.
CARRIAGE MOVING
DOWN TOO SLOWLY
The carriage is moving downward too slowly.
Check for the cause of the car-
riage not moving correctly.
Check the belt drive behind the
back panel. Check for a jam or
obstruction on the track.
CARRIAGE DOOR
OPEN The carriage door is currently open.
Close the carriage door to allow
operation.
LOW AIR PRESSURE
The machine pneumatic pressure is low.
Check the pneumatic supply.
Ensure 80 PSI is available.
BRUSH AND CUTTER
NOT HOME The brush and cutter are not home.
Cycle the brush and cutter.
Check why the brush and cutter
can’t reach the home position.

Machine Manual Orion
HPS/ LPS Flex Stretchwrapper Revision 3.0
System Operation 15 February 2016
Page 3-46
OBSTACLE DETECTED
The tower has an obstruction.
Check for a mechanical bind.
Clear the cause of the fault.
Reset and restart, when ready.
MULTISTRETCH VFD
NOT READY
The indicated VFD is not ready to run.
Check the fault code on the VFD
display in the electrical cabinet.
See VFD manual for fault code
information.
MAIN DRIVE VFD NOT
READY
CARRIAGE VFD NOT
READY
X2X
COMMUNICATION
ERROR
There is an X2X communication fault, press and
release the E-stop button to clear the fault.
Contact Orion Packaging if
problem persists.
RS485
COMMUNICATION
ERROR
There is an RS485 communication fault, press
and release the E-stop button to clear the fault.
Contact Orion Packaging if
problem persists.
Table 3-28. The Information and Alarm Displays (Continued)
MESSAGE DESCRIPTION CORRECTION


Machine Manual Orion
HPS/ LPS Flex Stretchwrapper Revision 3.0
Troubleshooting Contents 15 February 2016
Page II

4.
Page 4-1
Orion Machine Manual
Revision 3.0 HPS/ LPS Flex Stretchwrapper
15 February 2016 Troubleshooting
Troubleshooting
Troubleshooting
This troubleshooting chart details problems you may encounter with your Flex series
stretchwrapper along with the cause and solution. If the problem(s) cannot be solved after
consulting this section and/or appropriate sections of this manual, call Orion at
(800) 333-6556.
Table 4-1. Troubleshooting Chart
PROBLEM POSSIBLE CAUSE SOLUTION
Control Panel / Error
Messaging -
No Control Power / E-stop Is
Flashing
E-Stop circuit is activated. E-stop
is depressed.
Perform E-Stop reset sequence.
1. Reset all safety's (close carriage door,
l a t c h c a r r i a g e s a f e t y s w i t c h b a r [ RT o n l y ] .
2. Pull E-Stop to the OUT
position.
3. Press Green Start Button.
4. Press Cycle Reset button on screen.
Safety Photocells not aligned.
Photocell
alignment (RT models and Table
machines with safety fencing)
Photocell lights should change
state when objects block, then
unblock photocells.
Re-align
photocells with their respective reflectors,
then perform an E-Stop Reset.
Wiring in the
E-stop circuit is compromised.
Perform continuity Check on all
wiring in the e-stop circuit.
Refer to the electrical schematic for wir-
ing layout and wire numbers.
Components in the E-Stop circuit
have failed. Test components
individually including contact
bodies.
Refer to the electrical schematic for wir-
ing layout and wire numbers.
Stored Values Revert To Zero
Or
Unusable Settings.
High voltage spike or voltage
brownout below 100 VAC has
occurred. With a meter, observe
voltage at the main power switch
on the control panel during a wrap
cycle.
1. Remove all household extension cords.
2. Move machine to a different power out-
let.
3. Have an electrician verify site power
supply.

Machine Manual Orion
HPS/ LPS Flex Stretchwrapper Revision 3.0
Troubleshooting 15 February 2016
Page 4-2
Turntable / Tower
Rotation-
Turntable / Tower Will Not
Stop In The Correct Position.
(Table Does Stop At End Of
Cycle-but In Wrong Position
Turntable end of cycle positioning
counter value is set incorrectly.
Observe the Turntable end of
cycle positioning counter value on
the HMI.
Refer to the factory default settings value
list.
Slow Down Position for Tower /
Turntable Timer is adjusted too
high. Observe the Slow Down
Position for Tower /Turntable
Timer value on the HMI.
Refer to the factory default settings value
list.
Table / Tower preset speeds are
set incorrectly. The table / turnta-
ble is overhauling and the drive
can not stop the load fast enough.
Check the value of the SP-2-SP-3
and SP-4 parameters on the Table
/ Tower VFD. Ensure that they are
set within correct values.
Refer to the factory default settings value
list.
Table / Tower deceleration value
is set incorrectly. The table / turn-
table is overhauling and the drive
can not stop the load fast enough.
Check the value of the DEC
parameter on the Table / Tower
VFD. Ensure that it is set within
the Orion factory default values.
Refer to the factory default settings value
list.
Component failure.
Check error message on the Table / Tower
VFD display.
Refer to the supplied VFD user manual for
error message. Replace if needed.
Table 4-1. Troubleshooting Chart (Continued)
PROBLEM POSSIBLE CAUSE SOLUTION

Orion Machine Manual
Revision 3.0 HPS/ LPS Flex Stretchwrapper
15 February 2016 Troubleshooting
Page 4-3
Turntable / Tower Will Not
Stop In The Correct Position.
(Table Does Not Stop Until E-
stop Is Depressed Or Power Is
Removed)
Table Sprocket tooth count in the
global setup screen is set incor-
rectly-for instance; a 96 tooth set-
ting is chosen for a machine
shipped with a 112 tooth sprocket
or vice-versa.
Verify the machine type against the set-
tings screen. Note: Standard E and D
models are shipped with 96 tooth table
sprockets, only A and HD (heavy duty)
models are shipped with a 112 tooth
sprocket.
Refer to the Initial machine setup instruc-
tions to toggle the table tooth count set-
tings. Reminder-password is required.
Revo-logic™ sensor is mis-
aligned with the table / tower
driven sprocket.
Verify the gap setting between the Revo-
logic™ sensor and the driven sprocket.
Readjust if needed.
Check the pulse count input on the PLC
for an LED indication as each tooth passes
in front of the Revo-logic™ sensor.
Revo-logic™ sensor has failed.
Check for 24VDC at the sensor. Check for
24VDC Switching on the return wire to
PLC at the sensor.
No VDC Switching out? Replace sensor.
Wiring in the Revo-logic™ sen-
sor circuit has failed.
Run a continuity test on wiring from the
sensor to the PLC and 24VDC supply
rails.
No continuity on any wire? Repair or
replace wiring.
True Home sensor has failed.
Check for 24VDC at the sensor. Check for
24VDC Switching on the return wire to
PLC at the sensor.
No VDC Switching out? Replace sensor.
Wiring in the True Home sensor
circuit has failed.
Run a continuity test on wiring from the
sensor to the PLC and 24VDC supply
rails.
No continuity on any wire? Repair or
replace wiring.
Special Extended Mast,
Split-base Or Any Models With
The Mast Shipped Disconnected
From The Base
Revologic™ and True Home sen-
sor wires crossed during final
assembly on-site.
Wire numbers should match at the M12
quick disconnects. The connectors for
both the Revologic™ and the True Home
sensors can physically interchange.
If the wire numbers do not match, Swap
the M12 quick disconnect connectors
located in the lower part of the tower.
Table 4-1. Troubleshooting Chart (Continued)
PROBLEM POSSIBLE CAUSE SOLUTION

Machine Manual Orion
HPS/ LPS Flex Stretchwrapper Revision 3.0
Troubleshooting 15 February 2016
Page 4-4
Turntable / Tower Rotates
Inconsistently-(Table / Tower
Turns With A Jerking Motion)
Current Limiter in the rotation
VFD is activating.
Check for a mechanical bind in the rota-
tion mechanicals, such as: worn bearing(s)
or casters, incorrectly tensioned chain,
worn chain, alignment issues etc.
Identify and repair or replace worn parts.
VFD parameter settings are
incorrect.
Review the parameter settings in the VFD.
Refer to the supplied VFD Manual for
procedure.
Refer to the VFD manual and the Orion
parameter settings sheet supplied with the
machine for maximum frequency settings.
Machine's supply voltage is too
low.
Check AC voltage (at the On-Off switch
terminals) while the machine is running
under load.
If voltage drops below 115, the supply is
not strong enough to run the machine cor-
rectly. Contact plant electrician. Do not
use household extension cords with the
machine.
Loose connections in the rotation
circuit.
Remove power from machine. Check for
loose connections in the rotation circuit
such as; Primary supply to the rotation
VFD, Secondary supply from the VFD to
the drive motor and all connections in
between.
Re-seat all loose connections. Tighten
connections correctly.
Motor Failure.
Perform motor test per motor manufac-
turer's recommendations.
Replace motor as needed.
Reducer Failure.
Remove rotation reducer-separate motor
from reducer. Rotate input shaft and check
for binding.
Replace reducer as needed.
Table 4-1. Troubleshooting Chart (Continued)
PROBLEM POSSIBLE CAUSE SOLUTION

Orion Machine Manual
Revision 3.0 HPS/ LPS Flex Stretchwrapper
15 February 2016 Troubleshooting
Page 4-5
Turntable / Tower Will Not
Rotate
No control Power / E-Stop Condi-
tion.
E-Stop button is Flashing or Green Start
button is not illuminated.
Perform E-Stop Reset (pull E-Stop button
to the out position then press the Green
Start button so that it is Illuminated. Press
Cycle reset on the Touchscreen.
Machine is in Cycle Pause.
Observe the Cycle Pause Icon on the Run
Screen. If it is illuminated, the machine is
in a Pause state.
Press Resume to resume wrapping.
VFD parameter settings are incor-
rect.
Review the parameter settings in the VFD.
Refer to the supplied VFD Manual for
procedure.
Refer to the VFD manual and the Orion
parameter settings sheet supplied with the
machine for maximum frequency settings.
Blown Fuse.
Locate Table / Tower rotation control
fuse. Remove fuse and check continuity.
Bad Fuse? Replace with correct type.
VFD Error.
Check the status of the table / tower motor
controller (VFD) for error message.
Refer to the VFD manual supplied with
the machine for error messaging solutions.
Open circuit to the motor.
Check wire continuity from VFD to
Motor.
Repair or replace open wiring.
Motor Failure.
Perform motor test per motor manufac-
turer's recommendations.
Replace Motor as needed.
Table 4-1. Troubleshooting Chart (Continued)
PROBLEM POSSIBLE CAUSE SOLUTION

Machine Manual Orion
HPS/ LPS Flex Stretchwrapper Revision 3.0
Troubleshooting 15 February 2016
Page 4-6
Carriage Lift
(Up & Down)
Carriage Will Not Move Up Or
Down (In Either Manual Mode
Or During An Auto Wrap
Cycle)
Carriage Speeds set below 5%.
Check the numerical value of the carriage
up and down speeds on the touchscreen.
Password may be required depending on
the Security Settings.
Increase the carriage up and down speeds
on the touchscreen to above 5%.
Carriage Travel limit strikers set
improperly.
Check the physical positions of the travel
limit strikers.
1. Set the Up Travel limit striker to the
highest wrapping requirement position
within the machine's capability or a jam
may occur.
2. Position the Bottom travel striker to the
lowest wrapping requirement level within
the machine's capability or a false Belt
Error may occur.
Lift Belt Error (Visible obstruc-
tion) has occurred.
Check for a physical obstruction in the
carriage toward travel path and Lift Belt
Error shown on the touchscreen.
If there is an actual obstruction, refer to
the "Carriage Obstacle Detect Error
Recovery" inset in your manual.
VFD parameter settings are
incorrect.
Review the parameter settings in the VFD.
Refer to the supplied VFD Manual for
procedure.
Refer to the VFD manual and the Orion
parameter settings sheet supplied with the
machine for maximum frequency settings.
Table 4-1. Troubleshooting Chart (Continued)
PROBLEM POSSIBLE CAUSE SOLUTION

Orion Machine Manual
Revision 3.0 HPS/ LPS Flex Stretchwrapper
15 February 2016 Troubleshooting
Page 4-7
Carriage Lift
(Up & Down)
Carriage Will Not Move Up Or
Down (In Either Manual Mode
Or During An Auto Wrap
Cycle)
A False (No visible obstruction)
lift belt error has occurred.
Remove upper-rear access panel on the
back of the mast. Observe the position of
the lift belt roller switch at the top, inside
of the mast. The belt should be between
the metal frame and the switch's roller
lever. The lever roller should be activated.
If the belt is placed incorrectly, re-set belt
so that it is between the frame and the
switch's lever roller. The switch may need
to be re-positioned as to not give a false
signal.
Current Limiter in the carriage lift
VFD is activating.
Check for a mechanical bind in the car-
riage lift mechanicals, such as, worn belt
wheel bearings incorrectly aligned belt or
carriage safety cam-locks.
Identify and repair or replace worn parts.
Maximum speed setting on the
VFD is incorrect.
Review the maximum frequency parame-
ter settings in the VFD. Refer to the sup-
plied VFD Manual for procedure.
Refer to the VFD manual and the Orion
parameter settings sheet supplied with the
machine for maximum frequency settings.
Machine's supply voltage is too
low.
Check AC voltage (at the On-Off switch
terminals) while the machine is running
under load.
If voltage drops below 115, the supply is
not strong enough to run the machine cor-
rectly. Contact plant electrician. Do not
use household extension cords with the
machine.
Loose connections in the carriage
lift circuit.
Remove power from machine. Check for
loose connections in the carriage lift cir-
cuit such as; Primary supply to the Lift
VFD, Secondary supply from the VFD to
the drive motor and all connections in
between.
Re-seat all loose connections. Tighten
connections correctly.
Table 4-1. Troubleshooting Chart (Continued)
PROBLEM POSSIBLE CAUSE SOLUTION

Machine Manual Orion
HPS/ LPS Flex Stretchwrapper Revision 3.0
Troubleshooting 15 February 2016
Page 4-8
Carriage Lift
(Up & Down)
Carriage Will Not Move Up Or
Down (In Either Manual Mode
Or During An Auto Wrap
Cycle)
Blown Fuse.
Locate carriage lift control fuse. Remove
fuse and check continuity.
Bad Fuse? Replace with correct type.
Motor failure.
Perform motor test per motor manufac-
turer's recommendation.
Replace Motor as needed.
Reducer failure.
Remove Carriage Lift reducer-separate
motor from reducer. Rotate input shaft and
check for binding
Replace reducer as needed.
Carriage Will Not Move Up Or
Down
(In Auto Wrap Cycle Only-but
Works Fine In Manual Mode).
Auto-height photocell positioned
incorrectly.
Check the position of the Auto-height
photocell. Make sure it is aimed at the
load. If the load is too short for the photo-
cell to see, the carriage will not move up-
this is normal.
Re-Aim the photocell correctly.
Auto-height sensor has failed.
Check for 24VDC at the sensor. Check for
24VDC switching on the return wire to
PLC at the sensor.
No VDC Switching out at the sensor?
Replace sensor.
Wiring in the Auto-height sensor
circuit has failed.
Run a continuity test on wiring from the
sensor to the PLC and 24VDC supply
rails.
No continuity on any wire?= repair or
replace wiring.
Table 4-1. Troubleshooting Chart (Continued)
PROBLEM POSSIBLE CAUSE SOLUTION

Orion Machine Manual
Revision 3.0 HPS/ LPS Flex Stretchwrapper
15 February 2016 Troubleshooting
Page 4-9
Carriage Is Jammed At The
Top Of The Mast. (Carriage
Will Not Move Up Or Down)
Carriage bottom travel switch did
not activate correctly, possibly
sticking.
Belt is tangled around drum. Belt is
wrapped backwards or twisted.
Check switch by manually activating
(wiggling) the roller tip. If the switch does
not activate and release it's input on the
PLC correctly, replace the switch. The belt
will need to be removed and re-wound
correctly. The carriage will need to be
brought down manually. Refer to the
"Carriage Obstacle Detect Error Recov-
ery" inset in your manual.
Carriage bottom travel striker is
set too low for switch to activate
properly.
Belt is tangled around drum. Belt is
wrapped backwards or twisted.
Raise the bottom limit striker so that the
carriage travel switch activates it's PLC
input before the carriage physically hits
the machine's framework. The belt will
need to be removed and re-wound cor-
rectly. The carriage will need to be
brought down manually. Refer to the
"Carriage Obstacle Detect Error Recov-
ery" inset in your manual.
Film Feed / Stretch Functions
No Power Feed
No control -power / E-Stop condi-
tion.
E-Stop button is flashing or green start
button is not illuminated
Perform E-Stop reset sequence.
1. Reset all safety's (close carriage door,
l a t c h c a r r i a g e s a f e t y s w i t c h b a r [ RT o n l y ] .
2. Pull E-Stop to the OUT position.
3. Press Green Start Button.
4. Press Cycle Reset button on screen.
Film is threaded incorrectly.
Compare film with threading diagram on
top of carriage.
Re-thread film carriage.
VFD parameter settings are
incorrect .
Review the parameter settings in the VFD.
Refer to the supplied VFD Manual for
procedure.
Refer to the VFD manual and the Orion
parameter settings sheet supplied with the
machine for maximum frequency settings.
Table 4-1. Troubleshooting Chart (Continued)
PROBLEM POSSIBLE CAUSE SOLUTION

Machine Manual Orion
HPS/ LPS Flex Stretchwrapper Revision 3.0
Troubleshooting 15 February 2016
Page 4-10
Film Feed / Stretch Functions
No Power Feed
Zero or Gain settings for the hall
effect (Film Feed Trigger) are
incorrect.
Observe the feedback value of the hall
effect located on the touchscreen.
Re-set the ZERO and GAIN values
according to the film feed setup instruc-
tions in the manual. ZERO setting should
be a value of at least ten above the hall
effect feedback value to operate properly.
Maximum speed setting on the
VFD is incorrect.
Review the maximum frequency parame-
ter settings in the VFD. Refer to the sup-
plied VFD Manual for procedure.
Refer to the VFD manual and the Orion
parameter settings sheet supplied with the
machine for maximum frequency settings.
hall effect device is positioned
incorrectly.
Check to make sure hall effect device is
not touching the dancer bar cam.
Adjust the hall effect-to-cam gap is cor-
rect... approx 16th of an inch gap.
Dancer bar cam is positioned
incorrectly.
Make sure the cam rotates in such a way
as to create a gap between the hall effect
device and the cam itself.
Adjust the cam correctly.
hall effect sensor has failed.
Check for 24VDC at the sensor. Check for
variable 24VDC on the return wire to PLC
at the sensor.
No variable VDC out? Replace sensor.
Open circuit from the hall effect
device to the analog input card.
Check wire continuity from hall effect
device to the analog input card.
Repair or replace open wiring.
Analog I.O. card has failed.
Check the hall effect feedback value on
the MIB screen. If the hall effect value
increases with dancer movement, but the
analog I.O. card toes not fluctuate voltage
out, then the analog I.O. card has failed.
Replace analog I.O card.
Open circuit from the PLC analog
card to the VFD analog input.
Check wire continuity from the PLC ana-
log card output to the VFD analog input.
Repair or replace open wiring.
Open circuit from the stretch VFD
to the film feed motor
Check wire continuity from the stretch
VFD outputs to the film feed motor.
Repair or replace open wiring.
Table 4-1. Troubleshooting Chart (Continued)
PROBLEM POSSIBLE CAUSE SOLUTION

Orion Machine Manual
Revision 3.0 HPS/ LPS Flex Stretchwrapper
15 February 2016 Troubleshooting
Page 4-11
Film Feed / Stretch Functions
No Power Feed
Motor failure.
Perform motor test per motor manufac-
turer's recommendations.
Replace Motor as needed.
Film Feed Runs Or Creeps
Continuously
MIB values at the touchscreen are
out of calibration.
Observe the feedback value of the hall
effect located on the touchscreen.
Re-set the ZERO and GAIN values
according to the film feed setup instruc-
tions in the manual. ZERO setting should
be a value of at least ten above the hall
effect feedback value to operate properly.
Hall effect device is positioned
incorrectly.
Check to make sure hall effect device is
not touching the dancer bar cam.
Adjust the hall effect-to-cam gap is cor-
rect… approx 16th of an inch gap.
Dancer bar cam is positioned
incorrectly.
Make sure the cam rotates in such a way
as to create a gap between the hall effect
device and the cam itself.
Adjust the cam correctly.
Hall effect device has failed
Perform tests mentioned above.
If this does not resolve the issue, replace
the hall effect device.
Minimum speed setting on the
VFD is incorrect.
Review the minimum frequency parame-
ter settings in the VFD. Refer to the sup-
plied VFD Manual for procedure.
Refer to the VFD manual and the Orion
parameter settings sheet supplied with the
machine for minimum frequency settings.
Film Breakage Issues
Film Breaks Inside The
Carriage (Usually Between The
Rubber Stretch Rollers)
Incorrect gauge / type film is
being used for the application.
Review the film's stretch capability. The
film used should be able to effectively
stretch 280% at ambient temperatures.
Remove any film that does not comply
with the machine's requirements or,
change the stretch sprocket on the
machine to stretch below the film's fatigue
value.
Film is damaged.
Observe the edges and sides of the roll for
damage from handling.
Replace improper film with film in good
condition.
Table 4-1. Troubleshooting Chart (Continued)
PROBLEM POSSIBLE CAUSE SOLUTION

Machine Manual Orion
HPS/ LPS Flex Stretchwrapper Revision 3.0
Troubleshooting 15 February 2016
Page 4-12
Film Breakage Issues
Film Breaks Inside The
Carriage (Usually Between The
Rubber Stretch Rollers)
Film is wound incorrectly.
Film may be wound incorrectly from the
manufacturer. Look for heavy, raised
stripes along the feed axis of the film. This
is known as "gauge banding".
Replace improper film with film in good
condition.
Film core is damaged or incor-
rectly sized.
The film core should fit the machine's film
mandrels. Cores that are too small or dam-
aged can cause the film to not rest in the
correct position.
Replace improper film with film in good
condition.
Film roll sets too low in relation
to the feed rollers.
Look for film traveling under the bottom
edge of the trailing rubber roller.
Adjust the bottom film mandrel to allow
the bottom edge of the film to run cor-
rectly on the trailing rubber roller.
Film mandrel drag or resistance is
not allowing the film to unwind
properly.
Look for excessive wear under the bottom
mandrel.
Lubricate the bottom and center of the
mandrel. Replace worn parts.
Film carriage aluminum "pres-
sure" rollers are mis-aligned with
the rubber rollers. Film is slipping
across the rollers.
With the film removed from the carriage,
look for an inconsistent gap between the
aluminum and rubber rollers-top and bot-
tom on both sides of the rubber rollers.
Using the socket head cap screws, re-align
the aluminum rollers to the rubber rollers.
Set the gap between the aluminum and
rubber rollers so that there is only a slight
rotational resistance between the rollers.
Aluminum pressure rollers are
damaged.
Carefully review the aluminum rollers for
cuts or nicks. Any raised spots can dam-
age the film and propagate a tear.
Polish the affected areas with a fine abra-
sive until the protrusions are leveled or
replace with a new part.
Table 4-1. Troubleshooting Chart (Continued)
PROBLEM POSSIBLE CAUSE SOLUTION

Orion Machine Manual
Revision 3.0 HPS/ LPS Flex Stretchwrapper
15 February 2016 Troubleshooting
Page 4-13
Film Breakage Issues
Film Breaks Inside The
Carriage (Usually Between The
Rubber Stretch Rollers)
Rubber rollers are damaged
Carefully review the rubber rollers for
cuts or nicks. Any raised spots can dam-
age the film and propagate a tear.
Raised spots can be carefully shaved or
sanded smooth but if the surface showing
craters or holes so that the surface is not
level, then the roller needs to be replaced.
Film Is Breaking Between The
Last Aluminum Roller And The
Load
Film tension is set too high.
Film runs through the carriage properly
and there are no sharp corners on the load,
but the film still breaks.
Lower the film tension value at the touch-
screen.
Zero or Gain settings for the hall
effect (Film Feed Trigger) are
incorrect.
Observe the feedback value of the hall
effect located on the touchscreen.
Re-set the ZERO and GAIN values
according to the film feed setup instruc-
tions in the manual. ZERO setting should
be a value of at least ten above the hall
effect feedback value to operate properly.
Tension spring is too heavy for
the application.
Film carriage appears to be calibrated cor-
rectly and film appears to be correct. Film
still breaks or damages a light load with
the film tension set at values below 10%.
Replace the standard tension spring with
the light duty tension spring (supplied
with the machine).
Film roll sets too low in relation
to the feed rollers.
Look for film traveling under the bottom
edge of the trailing rubber roller.
Adjust the bottom film mandrel to allow
the bottom edge of the film to run cor-
rectly on the trailing rubber roller.
Sharp edges are cutting the film
Observe the load. See if the film break
starts at any one sharp edge.
Options are:
1. Correct the load if possible.
2. Reduce the film tension at the touch-
screen.
3. Change film type used.
4. Reduce the prestretch ratio.
Table 4-1. Troubleshooting Chart (Continued)
PROBLEM POSSIBLE CAUSE SOLUTION

Machine Manual Orion
HPS/ LPS Flex Stretchwrapper Revision 3.0
Troubleshooting 15 February 2016
Page 4-14
Film Is Breaking Between The
Last Aluminum Roller And The
Load
Pallet greatly overhangs the load.
Observe the load. See if the film break
starts at the corners of the pallet.
Options are:
1. Reduce the film tension at the touch-
screen.
2. Reduce the stretch ratio.
3. Do not wrap the pallet with the load.
Raise the bottom position striker.
Film is damaged.
Observe the edges and sides of the roll for
damage from handling.
Replace improper film with film in good
condition.
Film is wound incorrectly.
Film may be wound incorrectly from the
manufacturer. Look for heavy, raised
stripes along the feed axis of the film. This
is known as "gauge banding".
Replace improper film with film in good
condition.
Stretch chain and / or belt geome-
try is incorrect. Out of alignment
components can cause feed drag.
Remove film carriage cover. Look for
loose chain and / or belt. Look for the belt
pulleys and the chain sprockets to be in
correct alignment.
Adjust as needed by repositioning the
combination sprocket-pulley.
Intermittent break in the cabling
between the carriage and the con-
trol panel.
Observe the film feed during a cycle. If
the film only breaks when the carriage is
in a certain spot in it's travel, then continu-
ity is suspect.
Perform a continuity check on all wiring
pertaining to the carriage while jogging
the carriage up and down. If a break in
continuity occurs, repair or replace the
cable.
Table 4-1. Troubleshooting Chart (Continued)
PROBLEM POSSIBLE CAUSE SOLUTION

Orion Machine Manual
Revision 3.0 HPS/ LPS Flex Stretchwrapper
15 February 2016 Troubleshooting
Page 4-15
"A" Model Specific Issues
Film Clamp Not Operating
Properly. (Opening And Closing
Inconsistently)
Clamp close delay timer at the
touchscreen is incorrect for the
application.
Look for the clamp to close smoothly, but
at the wrong time.
Observe the factory preset value on the
settings screen. Re-adjust the clamp close
delay timer as needed.
Air pressure to the machine is too
low.
Observe the pressure gauge at the pressure
regulator behind the lower rear access
panel.
Air supply to the machine should be 80
PSI @ 3CFM.
Air cylinder flow controls are set
incorrectly.
If the regulator shows correct pressure, the
flow controls are suspect.
Check the flow controls by manually acti-
vating the clamp jog function on the
touchscreen. Adjust the flow controls on
the clamp cylinders so that they operate
smoothly.
Air lines are pinched or
obstructed.
observe all 1/4 inch polyflow tubing.
Remove any obstruction. Correct any
pinched lines.
Debris or condensation is in the
air lines.
Purge the air filter / regulator.
If water appears, then condensation is in
the air lines. Correct the water issue, then
purge the air lines by manually jogging
the clamp until no water remains.
Break in the wiring to the clamp
solenoid.
There is DC voltage at the clamp PLC out-
put, but no voltage at the clamp solenoids.
Locate and repair break in the signal wir-
ing between the PLC and solenoids.
Clamp solenoids are defective
There is DC voltage at the clamp sole-
noids but the solenoids do not activate.
Replace the clamp solenoids.
Dual air passage is leaking.
Rotate the table manually with a load
positioned on the table. Listen for any air
leaks as the table rotates.
If leakage is suspect, replace dual air pas-
sage.
Table 4-1. Troubleshooting Chart (Continued)
PROBLEM POSSIBLE CAUSE SOLUTION

Machine Manual Orion
HPS/ LPS Flex Stretchwrapper Revision 3.0
Troubleshooting 15 February 2016
Page 4-16
Film Cutter/ Brush Arm Not
Operating Properly
Brush extend timer at the touch-
screen is incorrect for the applica-
tion.
Look for the arm to activate smoothly, but
at the wrong time.
Observe the factory preset value on the
settings screen. Re-adjust the brush extend
timer as needed.
Air pressure to the machine is too
low.
Observe the pressure gauge at the pressure
regulator behind the lower rear access
panel.
Air supply to the machine should be 80
PSI @ 3CFM.
Air cylinder flow controls are set
incorrectly.
If the regulator shows correct pressure, the
flow controls are suspect.
Check the flow controls by manually acti-
vation of the cutter jog function on the
touchscreen. Adjust the flow controls on
the clamp cylinders so that they operate
smoothly.
Air lines are pinched or
obstructed.
observe all 1/4 inch polyflow tubing.
Remove any obstruction. Correct any
pinched lines.
Debris or condensation is in the
air lines.
Purge the air filter / regulator.
If water appears, then condensation is in
the air lines. Correct the water issue, then
purge the air lines by manually jogging
the cutter/ brush until no water remains.
Break in the wiring to the cutter
solenoid.
There is DC voltage at the cutter PLC out-
put, but no voltage at the cutter/ brush
solenoid.
Locate and repair break in the signal wir-
ing between the PLC and solenoids.
Cutter / brush solenoids are defec-
tive
There is DC voltage at the cutter / brush
solenoids but the solenoids do not acti-
vate.
Replace the cutter/ brush solenoids.
Table 4-1. Troubleshooting Chart (Continued)
PROBLEM POSSIBLE CAUSE SOLUTION

Orion Machine Manual
Revision 3.0 HPS/ LPS Flex Stretchwrapper
15 February 2016 Troubleshooting
Page 4-17
Film Cutter Not Cutting Film
Load not positioned properly.
Look for underhung loads, or loads that
are not centered on the table or in the
proper wrap zone (RT only). The rear side
of the load must be in line with the pallet
stop for the clamp, brush and cutter to
work properly.
Re-center the load to the proper position
on the table (or wrap zone on RT
machines).
Brush extend timer at the touch-
screen is incorrect for the applica-
tion.
Look for the arm to activate smoothly, but
at the wrong time.
Observe the factory preset value on the
settings screen. Re-adjust the brush extend
timer as needed.
Cutter wire is loose.
Check for wavy or bent cutter wire. The
wire expands as it is heated. If the wire is
not straight and under tension, then it will
not be in the correct position to cut prop-
erly.
If wire is loose or bent, repair or replace
the wire.
Blown Fuse.
Locate hot wire control fuse. Remove fuse
and check continuity.
Bad Fuse? Replace with correct type.
Table 4-1. Troubleshooting Chart (Continued)
PROBLEM POSSIBLE CAUSE SOLUTION

Machine Manual Orion
HPS/ LPS Flex Stretchwrapper Revision 3.0
Troubleshooting 15 February 2016
Page 4-18

Orion Machine Manual
Revision 3.0 HPS/ LPS Flex Stretchwrapper
15 February 2016 Maintenance Contents
Page I
Maintenance Contents
Maintenance . . . . . . . . . . . . . . . . . . . . . . . . . . . . . . . . . . . . . . . . . . . . . . . . . . . . . . . . . . .5-1
Motor Maintenance . . . . . . . . . . . . . . . . . . . . . . . . . . . . . . . . . . . . . . . . . . . . . . . . .5-1
Reducer Oil Change . . . . . . . . . . . . . . . . . . . . . . . . . . . . . . . . . . . . . . . . . . . . . . . .5-1
Tower Raceways Maintenance . . . . . . . . . . . . . . . . . . . . . . . . . . . . . . . . . . . . . . . .5-2
Chain Maintenance . . . . . . . . . . . . . . . . . . . . . . . . . . . . . . . . . . . . . . . . . . . . . . . . .5-2
Proximity Sensor Adjustment. . . . . . . . . . . . . . . . . . . . . . . . . . . . . . . . . . . . . . . . . .5-3
Cleaning The Stretch Rollers. . . . . . . . . . . . . . . . . . . . . . . . . . . . . . . . . . . . . . . . . .5-5
Preventative Maintenance Schedule . . . . . . . . . . . . . . . . . . . . . . . . . . . . . . . . . . . .5-6
HPS LPS Standard Series. . . . . . . . . . . . . . . . . . . . . . . . . . . . . . . . . . . . . . . . . . . .5-6
All H&L Heavy Duty (Ring Bearing) Series . . . . . . . . . . . . . . . . . . . . . . . . . . . . . . .5-7

Machine Manual Orion
HPS/ LPS Flex Stretchwrapper Revision 3.0
Maintenance Contents 15 February 2016
Page II

5.
Page 5-1
Orion Machine Manual
Revision 3.0 HPS/ LPS Flex Stretchwrapper
15 February 2016 Maintenance
Maintenance
Maintenance
All general information about machine maintenance is based on normal machine working
conditions: indoor, moderate dust and low moisture environment, and maximum rotation
of 15 RPM. They should be regarded as guidelines, reviewed and corrected according to
requirements of actual use and conditions.
Motor Maintenance
The drive motors require little maintenance. Simply blow out debris with compressed air
on a regular basis.
Reducer Oil Change
All external cap screws and plugs on the reducing transmission should be checked for
tightness after the first week. It is recommended to change the oil every six months or at
least 1800 hours of operation, whichever comes first. When adding or changing oil, the
transmission should never be filled above the oil level mark indicated, because leakage
and overheating may occur. Below is the list of the type of lubricant that should be used.
List of recommended reducer oils:
Note:
For most applications, Mobil One Synthetic 75/90 gear lube is a pre-
ferred lubricant.
Table 5-1. Recommended Reducer Lubricants
MANUFACTURER LUBRICANT
American Oil Co. American Cyl Oil no: 196-L
Cities Service Oil Co. Citgo Cyl Oil 100-5
Gulf Oil Corp. Gulf Senate 155
Mobil Oil Corp. Mobil 600 W Suer-r Cyl. Oil
Philips Oil Corp. Andes S 180
Texaco Inc. 624 + 650T Cyl.Oil
Shell Oil Co. Velvata Oil J82
Union Oil of Cal. Red Line Worm Gear Lube 140

Machine Manual Orion
HPS/ LPS Flex Stretchwrapper Revision 3.0
Maintenance 15 February 2016
Page 5-2
Tower Raceways Maintenance
The film distributor (carriage) is sliding on the plastic guides attached behind its back
plate. The section of the tower on which the plastic guides move (raceways) should be
cleaned and re-greased approximately every 600 hours of machine operation.
Note:
If the machine works in a dusty and corrosive environment, the race-
ways should be re-greased more often (at least every 100 hours).
Chain Maintenance
To clean the stretch chain, wipe it with an oily cloth once a service.quarter.
When machine is working in a dusty and damp environment, it may be necessary to repeat
the cleaning operation more often.
Regarding chain lubricants please use the most common chain lubricants on the market.
With time, the chain will tend to stretch.
The tower is equipped with automatic chain tensioner and does not need any adjustment.
Note:
First chain tension inspection must be done after the first two weeks
of machine usage.

Orion Machine Manual
Revision 3.0 HPS/ LPS Flex Stretchwrapper
15 February 2016 Maintenance
Page 5-3
Proximity Sensor Adjustment
Occasionally the Feed Back Proximity Sensor may need some adjustment. The position of
the feed back proximity sensor against the cam is shown in Figure 5 - 1.
1. Power down machine.
2. Remove the carriage cover.
3. Unbolt the two nuts holding the proximity switch.
4. Turn the Proximity sensor to create the gap between the cam and the front side of
proximity sensor about 1/8.”
5. Tighten on the nuts securing the Proximity Sensor.
6. Put the cover back on.
7. Power up machine.
8. To adjust the multistretch settings, you must be logged in. Press the login button in the
bottom left corner of the screen
9. Enter the password then press the X to close the keypad.
10. Press the Machine Settings button.
11. Press the Multistretch button to go to the Multistretch Screen.
12. Press the Modify Settings button.
13. Adjust the Zero Trim to .5 mA over the current Hall Effect Sensor reading shown on
the screen.
(Continued on Next Page)
Figure 5 - 1
The Multistretch
Screen

Machine Manual Orion
HPS/ LPS Flex Stretchwrapper Revision 3.0
Maintenance 15 February 2016
Page 5-4
14. If not satisfied repeat the procedure.
Figure 5 - 2
Proximity Sensor
Adjustment

Orion Machine Manual
Revision 3.0 HPS/ LPS Flex Stretchwrapper
15 February 2016 Maintenance
Page 5-5
Cleaning The Stretch Rollers
The film carriage requires the most attention when cleaning. The film carriage requires
regular cleaning even if there are no product spills into the carriage area. Absolutely DO
NOT use wash down methods on the film carriage.
• As the film goes though the rollers, a static charge develops from the film and pulls air
borne dust and contaminants into the rollers. The glue that is impregnated to the film,
called Tackifier, traps these contaminants to the rollers. Finally, the aluminum pres-
sure rollers on the threading gate press the debris into the rollers causing the rubber
rollers to glaze.
• If the rollers become glazed, the film may slip, causing film shear, thus causing film
payout to be inconsistent or cause the film to tear regularly. This is completely normal
under continued use and occurs on every stretch wrapper made-no matter who the
manufacturer is.
• The rubber rollers are recommended to be cleaned at every 2000 hours of running. Do
not clean the rollers more than once a month unless special circumstances demand.
This can cause the rollers to dry out. The cleaning requires only a stiff nylon bristle
brush, rubbing alcohol (only)*, and compressed air. The procedure is as follows.
CAUTION
This procedure should only be performed by qualified service personnel.
1. Raise carriage to chest height.
2. Disconnect power from the machine.
3. Remove the film from the carriage.
4. Open the threading gate.
5. With the brush wet with rubbing alcohol, lightly scrub both rubber rollers while rotat-
ing them. The goal is to just get any debris out of the rollers.
Note:
Rubbing alcohol is recommended because it is light enough to pen-
etrate the rubber and it evaporates quickly.
6. After the entire rollers' surface has been cleaned, apply compressed air to the rollers to
dry quickly.
7. Re-apply power.
8. Re-load film as discussed earlier.

Machine Manual Orion
HPS/ LPS Flex Stretchwrapper Revision 3.0
Maintenance 15 February 2016
Page 5-6
Preventative Maintenance Schedule
PM Intervals
PM Intervals are based on an average usage of a 16 hour production day.
All general information about machine maintenance is based on normal machine working
conditions: indoor, moderate dust and low moisture environment, and maximum rotation
of 15 RPM. They should be regarded as guidelines, reviewed and corrected according to
requirements of actual use and conditions.
HPS LPS Standard Series
5,760 Loads or one month
• Inspect rubber stretch rollers. Clean as needed per instructions in manual.
• Inspect belt condition. Adjust as needed.
17,280 Loads or three months.
• Inspect under turntable. Clean debris as needed.
• Inspect turntable support casters for good condition.
• Inspect turntable chain. Apply a light coating of lubricant per instructions in manual.
• Inspect prestretch chain and belt. Tension as needed. Apply a light coating of lubricant
per instructions in manual.
Table 5-2. PM Frequency
FREQUENCY PERIOD DESCRIPTION
12 LPH (Hour)
96 LPS (Shift)
192 LPD (Day)
5760 LPM (Month)
17,280 LP3M (3Months)
34,560 LP6M (6Months)

Orion Machine Manual
Revision 3.0 HPS/ LPS Flex Stretchwrapper
15 February 2016 Maintenance
Page 5-7
All H&L Heavy Duty (Ring Bearing) Series
5,760 Loads Or One Month
• Inspect rubber stretch rollers. Clean as needed per instructions in manual.
• Inspect belt condition. Adjust as needed.
17,280 Loads or three months.
• Inspect under turntable. Clean debris as needed.
• Inspect turntable support casters for good condition.
• Inspect turntable chain. Apply a light coating of lubricant per instructions in manual.
• Inspect prestretch chain and belt. Tension as needed. Apply a light coating of lubricant
per instructions in this manual.
34,560 Loads or 6 months.
• Lubricate ring bearing per instructions in this manual.

Machine Manual Orion
HPS/ LPS Flex Stretchwrapper Revision 3.0
Maintenance 15 February 2016
Page 5-8

Orion Machine Manual
Revision 3.0 HPS/ LPS Flex Stretchwrapper
15 February 2016 Electrical Prints and Mechanical Drawings
Page I
Electrical Prints and Mechanical Drawings
Electrical Prints . . . . . . . . . . . . . . . . . . . . . . . . . . . . . . . . . . . . . . . . . . .6-1
Mechanical Drawings . . . . . . . . . . . . . . . . . . . . . . . . . . . . . . . . . . . . . . .6-2

Machine Manual Orion
HPS/ LPS Flex Stretchwrapper Revision 3.0
Electrical Prints and Mechanical Drawings 15 February 2016
Page II

6.
Page 6-1
Orion Machine Manual
Revision 3.0 HPS/ LPS Flex Stretchwrapper
15 February 2016 Electrical Prints and Mechanical Drawings
Electrical Prints and Mechanical
Drawings
Electrical Prints


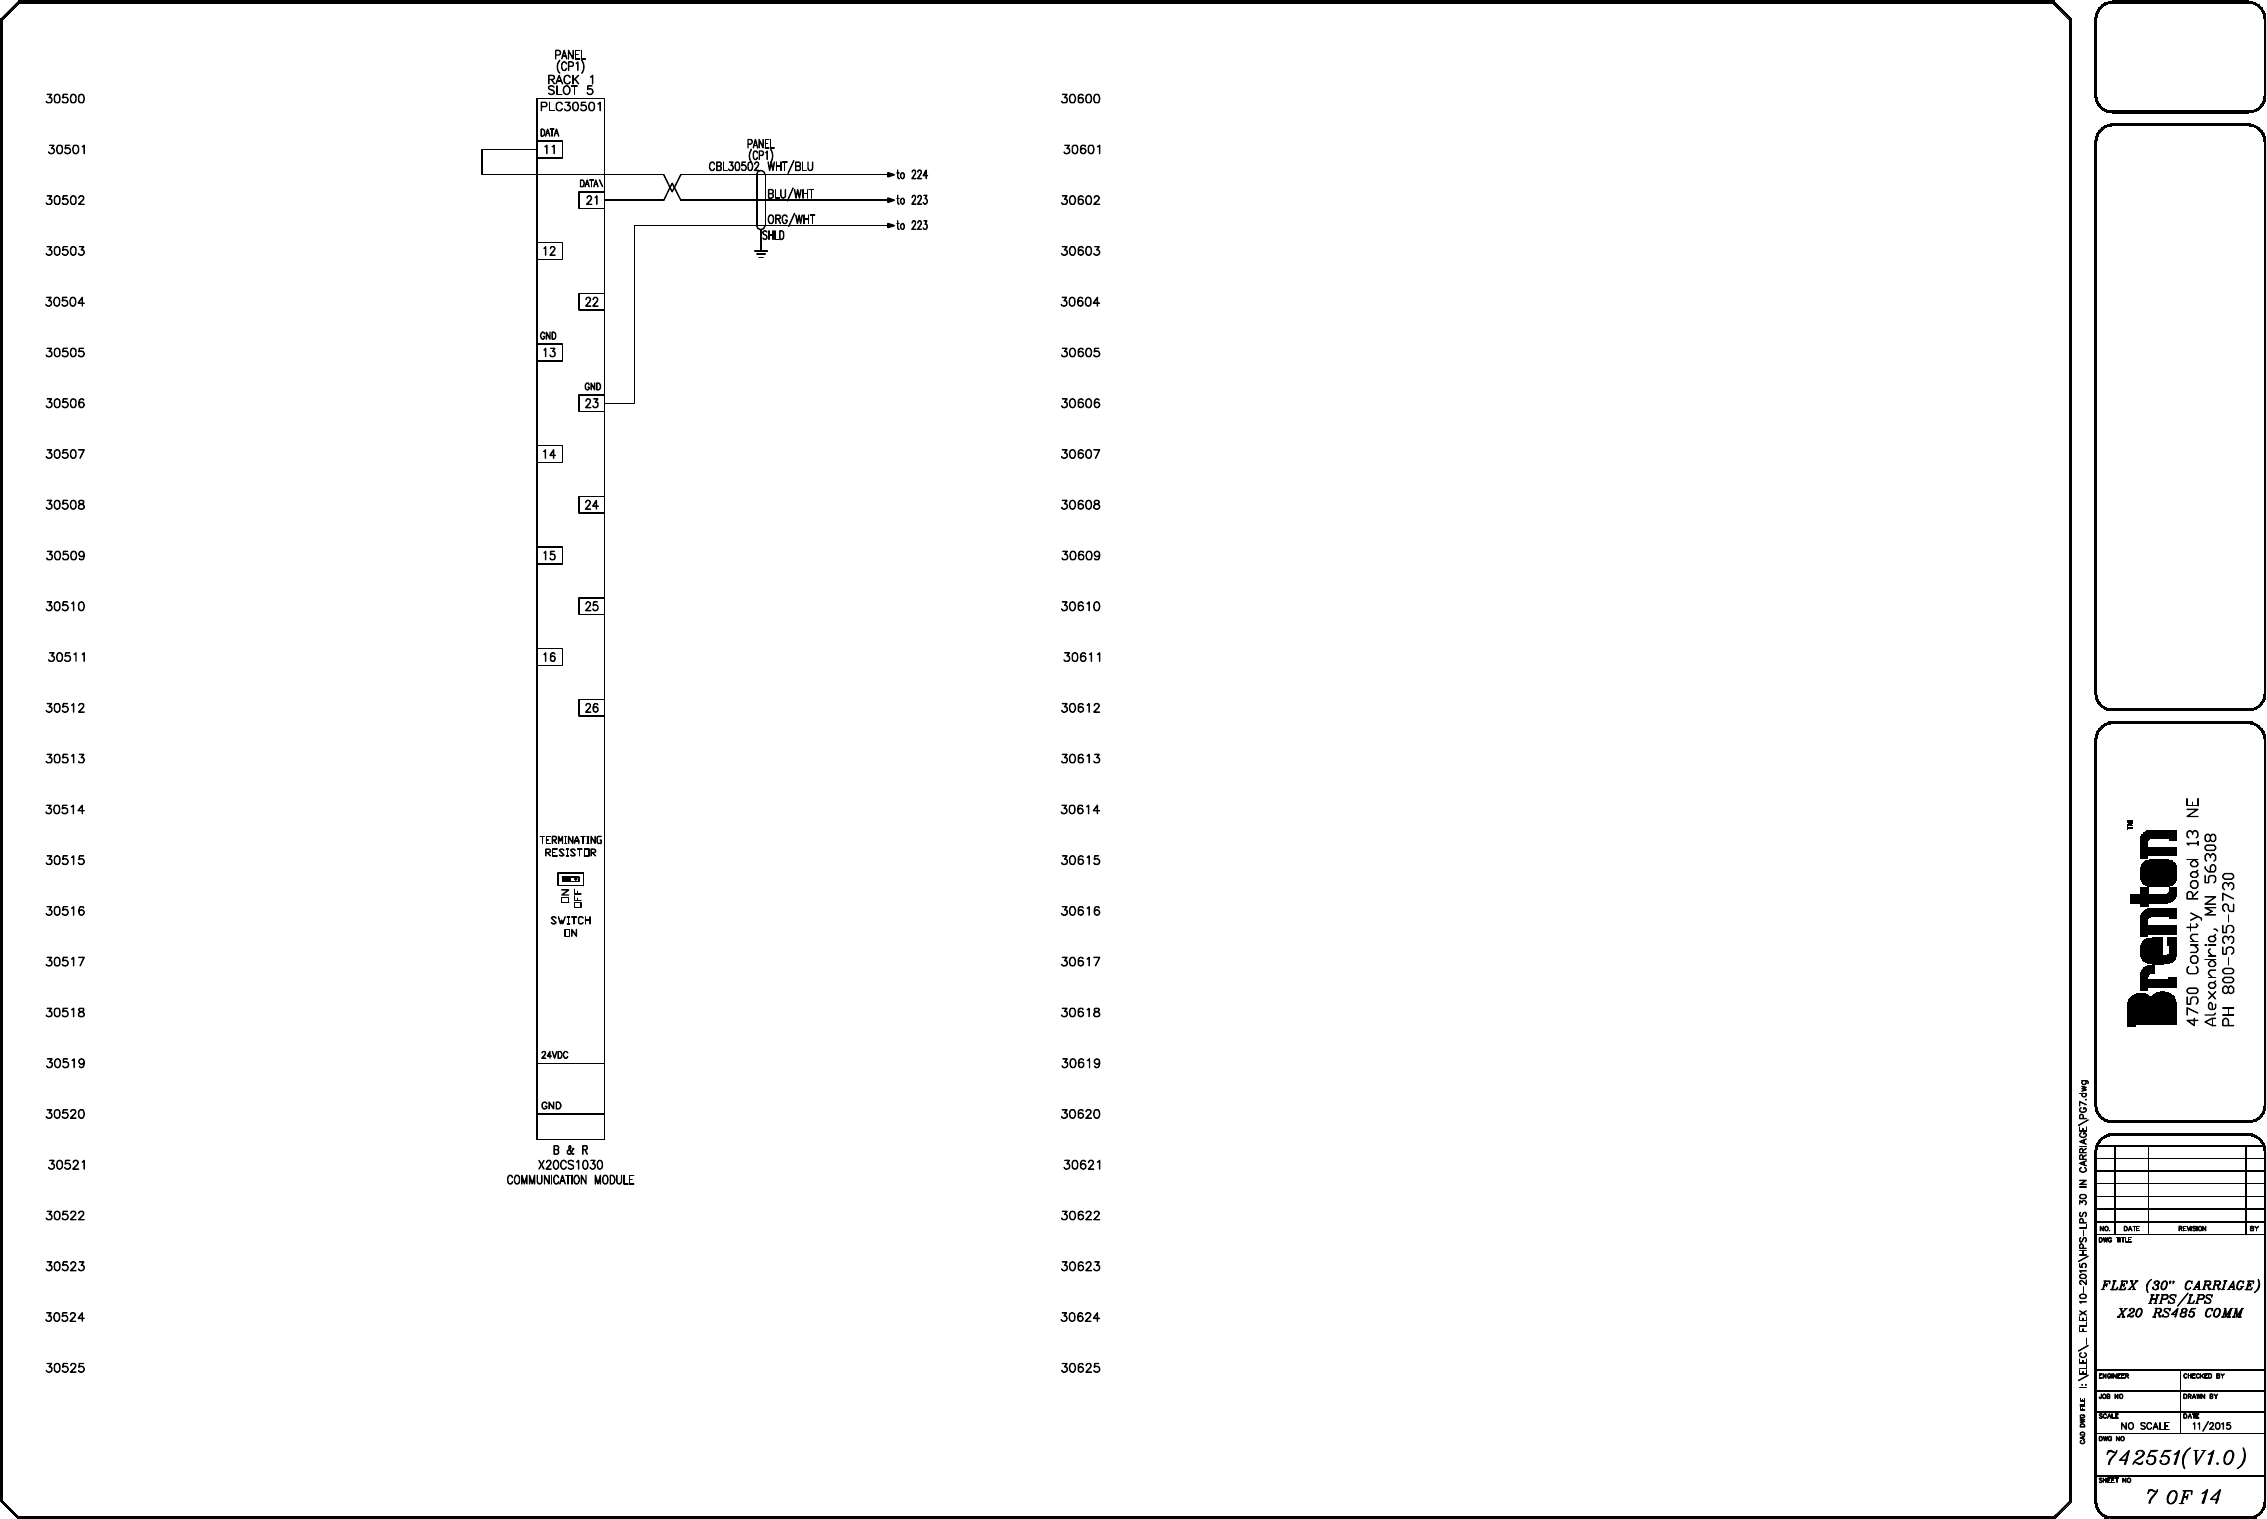


G
R


G
R


Machine Manual Orion
HPS/ LPS Flex Stretchwrapper Revision 3.0
Electrical Prints and Mechanical Drawings 15 February 2016
Page 6-2
Mechanical Drawings
Download the mechanical drawings for your particular model on the Orion Webpage.
http://www.orionpackaging.com/landing/flex-manual-download-S/
