
DVDFab 13 User Manual
DVDFab 13 User Manual

DVDFab 13 User Manual
DVDFab Software Inc. 2023/11/9
目录
DVDFab 13 User Manual ..................................................................................................................................... 1
Copyright and Disclaimer ................................................................................................................................ 1
1. Introduction .................................................................................................................................................. 2
2. Update DVDFab ............................................................................................................................................. 3
2.1 Live Update .......................................................................................................................................... 3
2.2 Traditional Update ............................................................................................................................... 5
3. Startup DVDFab 13 ........................................................................................................................................ 6
4. Authorize/Deauthorize DVDFab 13 ............................................................................................................ 7
5. Main Interface ............................................................................................................................................. 12
5.1 Skin Settings ...................................................................................................................................... 13
5.2 Help Menu ......................................................................................................................................... 13
5.3 Side Menu ......................................................................................................................................... 21
6. Three Main Modes ..................................................................................................................................... 22
6.1 Copy mode ........................................................................................................................................ 22
6.1.1 Introduction of Copy Mode ........................................................................................................ 22
6.1.2 How to use the products in Copy mode ..................................................................................... 29
6.2 Ripper Mode ..................................................................................................................................... 40
6.2.1 Introduction of Ripper Mode ..................................................................................................... 40
6.2.2 How to use the products in Ripper Mode .................................................................................. 51
6.3 Creator Mode .................................................................................................................................... 56
6.3.1 Introduction of Creator Mode .................................................................................................... 56
6.3.2 How to use the products in Creator Mode ................................................................................. 60
7. Common Settings ........................................................................................................................................ 65
7.1 General .............................................................................................................................................. 65
7.1.1 General ................................................................................................................................... 66
7.1.2 Cloud Backup .......................................................................................................................... 67
7.1.3 Profiles .................................................................................................................................... 67
7.1.4 A/V Codec ............................................................................................................................... 69
7.1.5 Meta ....................................................................................................................................... 70
7.1.6 Cinavia .................................................................................................................................... 70
7.1.7 Remote ................................................................................................................................... 74
7.1.8 Sound ...................................................................................................................................... 74
7.1.9 Network .................................................................................................................................. 75
7.1.10 UniFab .................................................................................................................................. 76
7.2 Drives................................................................................................................................................. 77
7.2.1 Drives ...................................................................................................................................... 77
7.2.2 Read ........................................................................................................................................ 77
7.2.3 DVD/Blu-ray Write .................................................................................................................. 78
7.2.4 Hybrid Disc.............................................................................................................................. 79
7.3 DVD .................................................................................................................................................... 80
7.3.1 DVD Protection ....................................................................................................................... 80
7.3.2 DVD Copy ................................................................................................................................ 81
7.3.3 PathPlayer ............................................................................................................................... 82
7.4 Blu-ray ............................................................................................................................................... 84
7.4.1 Blu-ray Protection ................................................................................................................... 84
7.4.2 Blu-ray Copy ............................................................................................................................ 85
7.4.3 BDInfo ..................................................................................................................................... 86
7.5 Streams ............................................................................................................................................. 87
7.5.1 Audio ...................................................................................................................................... 87
7.5.2 Subtitle
................................................................................................................................... 88
7.6 Conversion ......................................................................................................................................... 89
7.6.1 Convert ................................................................................................................................... 89
7.6.2 Output .................................................................................................................................... 91

DVDFab 13 User Manual
DVDFab Software Inc. 2023/11/9
7.6.3 PSP .......................................................................................................................................... 91
8. Update of This User Guide .......................................................................................................................... 93

DVDFab 13 User Manual
DVDFab Software Inc. 2023-11-09
1
Copyright and Disclaimer
This User Guide is intended for users, customers or Software Review Specialists to get to know the all-new
DVDFab 13 software and, is free from DVDFab Software Inc. All rights reserved. Any attempt to use it for
any commercial purpose is strictly prohibited. This publication shall not be, even partially, reproduced,
redistributed, nor retransmitted in any form or by any means electronic, mechanical, photocopying,
recording, or otherwise without the prior written permission of DVDFab Software Inc.

DVDFab 13 User Manual
DVDFab Software Inc. 2023-11-09
2
1. Introduction
Welcome to DVDFab Software Inc., the leading software vendor dedicated to providing the world
top-notch DVD/Blu-ray/4K UHD Blu-ray copying, burning, ripping, cloning, authoring and video conversion
solutions for over 16 years. As the 13
th
generation product succeeding DVDFab 12, the all-new DVDFab 13
features All-New Flat Design which is Plain and Simple.
. Totally Redesigned User Interface. Everything at a Single Glance.
. Float-in prompt windows make sure you shall never feel disturbed nor miss anything important.
. Task Queue now is integrated into the main window. Checking real-time task status is much easier.
. Utilities panel is relocated, sorted and made spacious. Every tool is right under your nose.
The disruptive innovations and incremental improvements combined instill one simple belief into users’
minds – the all-new DVDFab 13 is the best DVDFab since the original DVDFab back in 2003, and it will
present users a much better user experience they could have never dreamed of.

DVDFab 13 User Manual
3
DVDFab Software Inc. 2023-11-09
3
2. Update DVDFab
Depending on the different versions users may have installed, the ways to update to DVDFab 13 also vary:
2.1 Live Update
Live update can be only realized from inside the program itself, which means only users already installed
DVDFab 13 can use this method to keep their installed versions up-to-date. To do that, follow the steps
below:
1.Click the triangle button near the top right corner of Main Interface, and then from the drop-down
menu click Check for Update;
2.Once a newer version is detected, click the
button to download the update package;

DVDFab 13 User Manual
4
DVDFab Software Inc. 2023-11-09
4
3. When the download finishes, the program will begin to install.
Downloading the Update Package

DVDFab 13 User Manual
5
Update Package Downloaded
4.The installation shall be finished in just a few seconds. When it’s done, click the desktop shortcut
icon to start up the new version.
Note that, due to network reasons, the Live Update might occasionally fail to detect the new version.
When this occurs, users can also use the traditional way to make the update.
2.2 Traditional Update
For users who are still with DVDFab 12 or even the outdated DVDFab 11 and DVDFab 10, to upgrade to
the latest DVDFab 13, they have to go the traditional way. For that purpose, simply visit DVDFab official
website at http://www.dvdfab.cn/download.htm to download the installer of the newest DVDFab 13,
and then follow the setup wizards to perform the installation on your computer.

DVDFab 13 User Manual
DVDFab Software Inc. 2023-11-9
6
3. Startup DVDFab 13
Before launching DVDFab 13, make sure your internet connection works fine, because DVDFab 13 shall
depend on your internet network to access the server so that it can work normally. After the installation
process finishes, click the DVDFab 13 desktop shortcut icon. When the Startup Screen pops up, users can
see on the screen that the software is accessing the server information. This might take a couple of
seconds, depending on your internet speed. Just wait until it finishes.
Other Info on the Startup Screen: DVDFab logo, trademark, software version, release date, vendor, and
vendor’s website.
Note: If your computer is not internet connected, DVDFab 13 cannot access the server information. In
that case, you will see a popup window like below. When this happens, you can only use the free version
HD Decrypter.

DVDFab 13 User Manual
DVDFab Software Inc. 2023-11-9
7
4. Authorize/Deauthorize DVDFab 13
Similar to DVDFab 12, DVDFab 13 still uses the online verification method for authorization. To remind
you: authorizing DVDFab 13 requires a live internet connection, so check your Firewall or anti-virus
software settings to make sure they do not block DVDFab 13 from accessing the internet. Besides, before
authorization, make sure you are already a member at DVDFab Member Center; otherwise, go Create an
Account first.
4.1.1 Upon DVDFab 13 startup, click the "Authorize" button on the popup window which asks you to "Buy
Now", "Authorize" and "Try"; if you’ve already skipped that window, don’t worry. At the main interface,
click the icon near the top right corner, and then from the drop-down menu, click the “Authorize”
tab to popup the Authorization Window;
4.1.2 Enter your registered e-mail and password at DVDFab Member Center, and then click the
"Authorize" button to proceed;

DVDFab 13 User Manual
DVDFab Software Inc. 2023-11-9
8
4.1.3 If the information you entered is correct, you shall see all the license information of the product(s)
you've purchased, and then just click "Start DVDFab" to use the product(s);

DVDFab 13 User Manual
DVDFab Software Inc. 2023-11-9
9
4.1.4 To deauthorize DVDFab 13 on your current PC, click the "Deauthorize" tab from the dropdown Help
menu;

DVDFab 13 User Manual
DVDFab Software Inc. 2023-11-9
10
4.1.5 Enter your password and then click the "Deauthorize" button to proceed. As suggested, you can
also deauthorize all your current PCs at the Member Center.

DVDFab 13 User Manual
DVDFab Software Inc. 2023-11-9
11

DVDFab 13 User Manual
DVDFab Software Inc. 2023-11-09
12
5. Main Interface
Compared with the previous generation, the main interface of the reinvented DVDFab 13 is very concise:
On the left the Side Menu, where users can switch among the 3 major modules (the Copy module, the
Ripper module, the Creator module), Utility Tools UHD Drive Tool plus 4
freewares including DRM Removal for Apple, BDInfo, BDFix and File Transfer) and the Task Queue
Manager which includes Processing, Finished and Archived.
Note: Video Converter has been replaced to UniFab All-In-One now. Users who have DVDFab Video
Converter can use UniFab Video Converter for free.
At the bottom left corner, you can see the Save to selection box, where you can choose your optical drive
or a location from computer hard disk drive to save the final output files;
Sitting in the center of the Main Interface is the primary Source Adding button;
At the top right corner, users can see a triangle button which opens the Help Menu;
To the left of the triangle button is a T-Shirt icon which opens the Skin Settings panel.

DVDFab 13 User Manual
DVDFab Software Inc. 2023-11-09
13
5.1 Skin Settings
At the Skin Settings panel, users can select from a dozen of predesigned skins to make their DVDFab 13
look special. Those skins are full of modern, fashionable and stylish elements. New skins will be constantly
added through the course of upcoming new releases. The Skin Settings panel can pop up by clicking the
T-shirt icon near the top right corner of the main interface.
Skin Settings Panel
5.2 Help Menu

DVDFab 13 User Manual
DVDFab Software Inc. 2023-11-09
14
Clicking on the Triangle Button near the top right corner of the Main Interface, users can see a drop-down
menu, which we officially call it the Help Menu.
5.2.1 Common Settings: this tab leads to the Common Settings panel, which we shall talk about in the
following chapters.

DVDFab 13 User Manual
DVDFab Software Inc. 2023-11-09
15

DVDFab 13 User Manual
DVDFab Software Inc. 2023-11-09
16
5.2.2 Open Recent: this tab allows users to quickly add a source from their recently added list;
5.2.3 Authorize: this tab leads to the Authorization Window.

DVDFab 13 User Manual
DVDFab Software Inc. 2023-11-09
17
5.2.4 Deauthorize: this tab leads to the Deauthorization Window.
5.2.5 License Info: this tab opens the License Info window where users can check the current status of all
their paid DVDFab products.

DVDFab 13 User Manual
DVDFab Software Inc. 2023-11-09
18
5.2.6 Member Center: this tab take users to Member Center page to check the products they have.
5.2.7 Online Help: this tab takes users to the DVDFab online tips page.
5.2.8 Feedback: click this tab if are experiencing some difficulties with DVDFab 13. It is suggested that
you describe your problems in great details, so that our developers can troubleshoot efficiently and get
back to you in time. Note that your DVDFab logs will be attached if you use this form.

DVDFab 13 User Manual
DVDFab Software Inc. 2023-11-09
19
5.2.9 Check for Update: click this to see if there is a new update available. Note that this requires a live
internet.
5.2.10 What’s new: this tab take users to see the new products released.
5.2.11 Open Log Folder: click this to open the log directory where all the log files are located.

DVDFab 13 User Manual
DVDFab Software Inc. 2023-11-09
20
5.2.12 About: this window shows software version, publisher, publisher’s portal site, and etc.

DVDFab 13 User Manual
DVDFab Software Inc. 2023-11-09
21
5.3 Side Menu
The Top Menu is for users to switch DVDFab modules, utilities tools and task queue manager. In DVDFab
13, with the capacity to run multiple modules at the same time, it is now much easier to switch to another
module even if there are already one or more tasks running in the current module.

DVDFab 13 User Manual
DVDFab Software Inc. 2023-11-09
22
6. Three Main Modes
6.1 Copy mode
6.1.1 Introduction of Copy Mode
The name of this button varies, in Copy tool, it is called Mode Switcher, which leads to Mode Panel. You
cam select and set Full Disc, Main Movie, Customize, Split, Merge, Clone/Burn, to DVD, to Blu-ray, UHD to
Blu-ray, Blu-ray to UHD at this place.
In this place, you can use the DVDFab products including DVD Copy, Blu-ray Copy and UHD Copy, DVD to
Blu-ray Converter, Blu-ray to DVD Converter, Blu-ray to UHD Converter and UHD to Blu-ray Converter. You
can input DVD, Blu-ray disc and 4k UHD at this place and then output to blank disc directly or save as
ISO/Folder on HDD.

DVDFab 13 User Manual
DVDFab Software Inc. 2023-11-09
23
To use the product, firstly you need to Add the Source. There are two buttons, one sitting at
the top left corner of the main interface right under the DVDFab Logo, the other housed at the central of
the Operation Window. Besides, if you don’t want to use the Add buttons to load your sources, you can
simply drag and drop them directly into the main interface for the same purpose.
In Copy mode, after insert the source, you may see the Title, Runtime, Chapter, Audio and the Subtitle of
the source, and you can set it per your need. You can Choose Other Titles,. At the bottom of the surface,
you may see the output path and the Start button. You can search Movie/TV by click the magnifier icon.
In Advanced Settings, appears when the source is loaded, and lies to the left of the Preview button.

DVDFab 13 User Manual
DVDFab Software Inc. 2023-11-09
24
For Search function. If the info it shows in DVDFab 13 does not match the Meta Info of your Movie or TV
show, you may click and try to change the title or the year of the source to match them.
Meta Info or Metadata includes the title, runtime, audio/video formats, genre, director, actors and soon
of a movie disc. With all such information preserved in the output NFO files, your media server, such as
Plex, Kodi, Emby or DVDFab Movie Server can better recognize, sort and organize the imported movies or
TV Shows.
As for Save to, refers to the destination of the resulting backup. The default target in Copy and
Creator options is your optical drive . You can click or to output
DVD/Blu-ray movie folder or ISO image file respectively to save on your computer HDD, or you can also
save the output backup directly to DVDFab Movie Server by clicking the little triangle button to select
DVDFab Movie Server from the dropdown menu; in Ripper option, the default destination is a directory
located on your computer C:\ drive, you can click to change a preferred location, click to upload
the converted videos directly to social networks including YouTube, Vimeo and Facebook, or save them
directly to DVDFab Movie Server or your mobile phones by the dropdown menu.
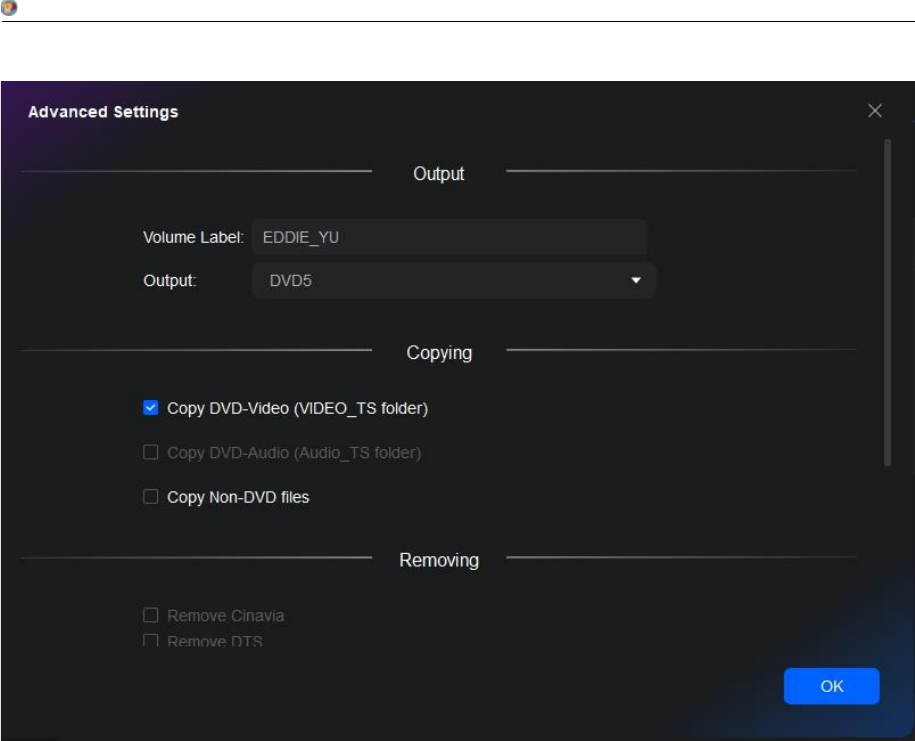
Advanced Settings in Copy tools, including DVD Copy and Blu-ray Copy, it has the following settings as
shown below:
DVDFab 13 User Manual
DVDFab Software Inc. 2023-11-09
25
Advanced Settings panel when the source is DVD

DVDFab 13 User Manual
DVDFab Software Inc. 2023-11-09
26
Advanced Settings panel when the source is Blu-ray
If, during the copy, you want to add your own subtitle, just click the Subtitle section and then click the Add
External Subtitle tab, which shall pop up the subtitle editing window, shown as below. Here, click the
folder icon to load the subtitle file from your PC hard drive, and then decide the relevant
properties such as the Language, Size, Font, Color, Character Sets, and Style, etc. Users can preview the
real effect as they determine each of the properties at the Sample section.
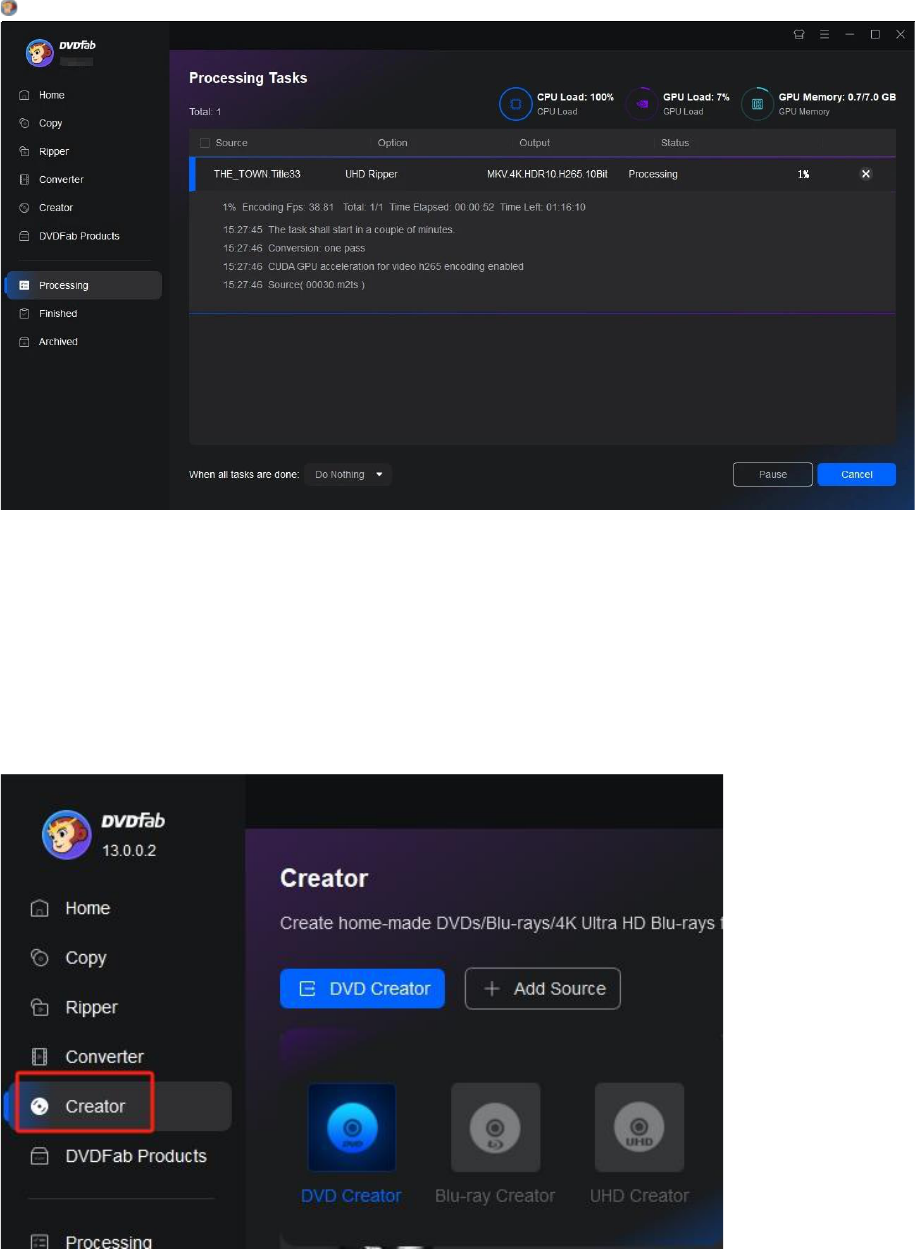
Task Queue Manager
Compared to ver 10, the Task Queue Manager in DVDFab 13 is no longer a separate window, but inlayed
into the Side Menu bar. However, most of its functions remain the same as ver 10. From the Side Menu,
users can open the all-new Task Manager, which shows all the Processing Tasks, Finished Tasks and
Archived Tasks in one place, the detailed stats of each task, ready to start, processing, wait in queue,
success, failed, cancelled, not processed, exit unexpectedly, etc., are all available at a quick glance.

DVDFab 13 User Manual
DVDFab Software Inc. 2023-11-09
27
Users can freely add new tasks into the Task Queue Manager, meaning, even there is currently one task in
progress or more tasks, you can still load new sources in the same module or other modules and then add
the new tasks; Users now can freely switch between the Task Queue Manager window and the main
operation window;
A. Processing Task
The Processing Task list is the place where all the currently being processed and those still waiting to be
processed tasks are displayed. If users want to add new tasks, they can simply click the tabs to choose any
desired module to add the new task, without intervening the currently being processed tasks. Note that the
newly added tasks shall be waiting in this list, at the bottom.
Users can select a certain task from the Processing Task list to delete it or to put it into the Archive Task
list.
Explanations of some task stats:
Ready to Start: means that you have done the settings and editing related to that task, however you have
not yet triggered the task; and you can still change relative settings and editing before hit the Start button
from the main operation window; once hitting the Start window, that task status shall be immediately
switched into Processing, and if you’ve started multiple tasks at one time, only the one at the top of the
list shall be labeled as Processing, others will be tagged as Wait in Queue.
Processing: means that task has been started and currently in progress; at this point, changing settings
and editing related to that task are no longer possible.
Wait in Queue: means that task is currently waiting for to be processed, which shall begin immediately
after the previous task gets finished; at this point, changing settings and editing related to that task are no
longer possible.
Success: means that task has already finished successfully.
Failed: means that task has failed.

DVDFab 13 User Manual
DVDFab Software Inc. 2023-11-09
28
Cancelled: means that task has been manually cancelled by user.
B. Finished Task
Finished Task is the place where all the successfully completed tasks are saved.
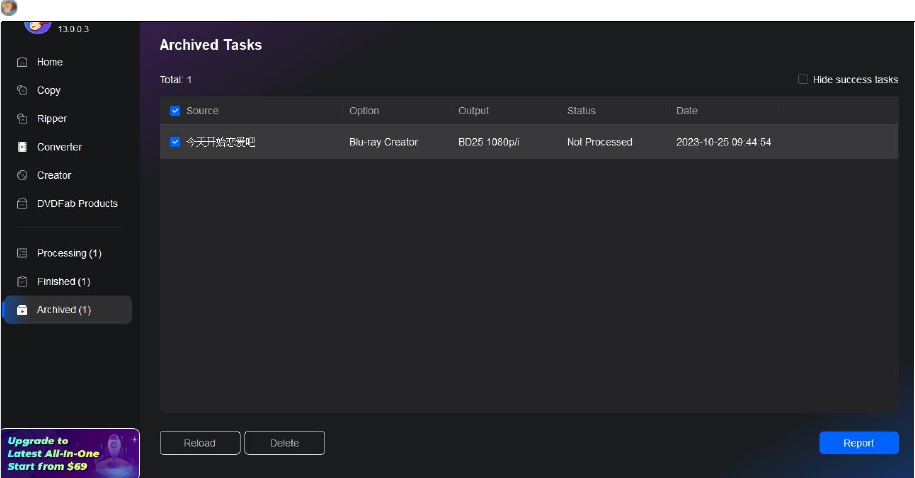
C. Archived Task
Archived Task is the place where failed, crashed and unexpectedly exited tasks are saved, including your
detailed custom settings you set up last time. You can reload these tasks from here directly without doing
from all scratch. Depending how each task was processed, users might be able to see Success, Failed, or
Exited Unexpectedly under the status tab.
DVDFab 13 User Manual
DVDFab Software Inc. 2023-11-09
29
Explanations of some task stats:
Success: means that the task is finished successfully, only those success events that have been completed
when a crash happens on the following tasks from the Current Task will be saved here.
Failed: means that the task was failed.
Exit Unexpectedly: means the program exited unexpectedly in the middle of that task, leaving the task
unfinished; it will be saved by default in the Archived Task list, where users can redo it next time opening
DVDFab.
Not Processed: means that task was not processed due to the program crashed or unexpected exit when
processing the previous tasks, or users manually saved that task to the Archived Task.
To the latter three circumstances, users can also select the task(s) and click the Reload button near the
bottom left corner of the Task Queue window. Once users redo a certain task from the Archived Task list,
that task will be moved to the Processing Task list.
6.1.2 How to use the products in Copy mode
6.1.2.1 How to use DVD Copy
Step 1: Launch DVDFab and load the DVD source.
Open DVDFab 13 and choose the Copy option. Insert your DVD into the optical drive, or navigate to it through the Add button.
If the source is an ISO or a folder, you can simply drag and drop the file onto the main page.

DVDFab 13 User Manual
DVDFab Software Inc. 2023-11-09
30
Step 2: Select a Copy mode and customize the output DVD.
Click the Copy mode as needed. Then choose the output DVD size (DVD-9/5). You can also define the volume label and change
other copy options. Finally, select your output directory as a blank disc, ISO file, or folder.
Step 3: Start to copy DVDs free and fast.
Tap the Start button to copy DVDs with lightning speed and top quality. You can cancel the process at any time, set your PC to
automatically shut down, hibernate, exit the program, or do nothing at the end of the process.

DVDFab 13 User Manual
DVDFab Software Inc. 2023-11-09
31
6.1.2.2 How to use Blu-ray Copy
Step 1: Launch DVDFab and load the source Blu-ray.
Free download, run DVDFab 13, and opt for the Copy module when it runs. Insert the BD disc into the attached Blu-ray drive.
You can also click the Add button or drag&drop an ISO file or folder onto the main UI.
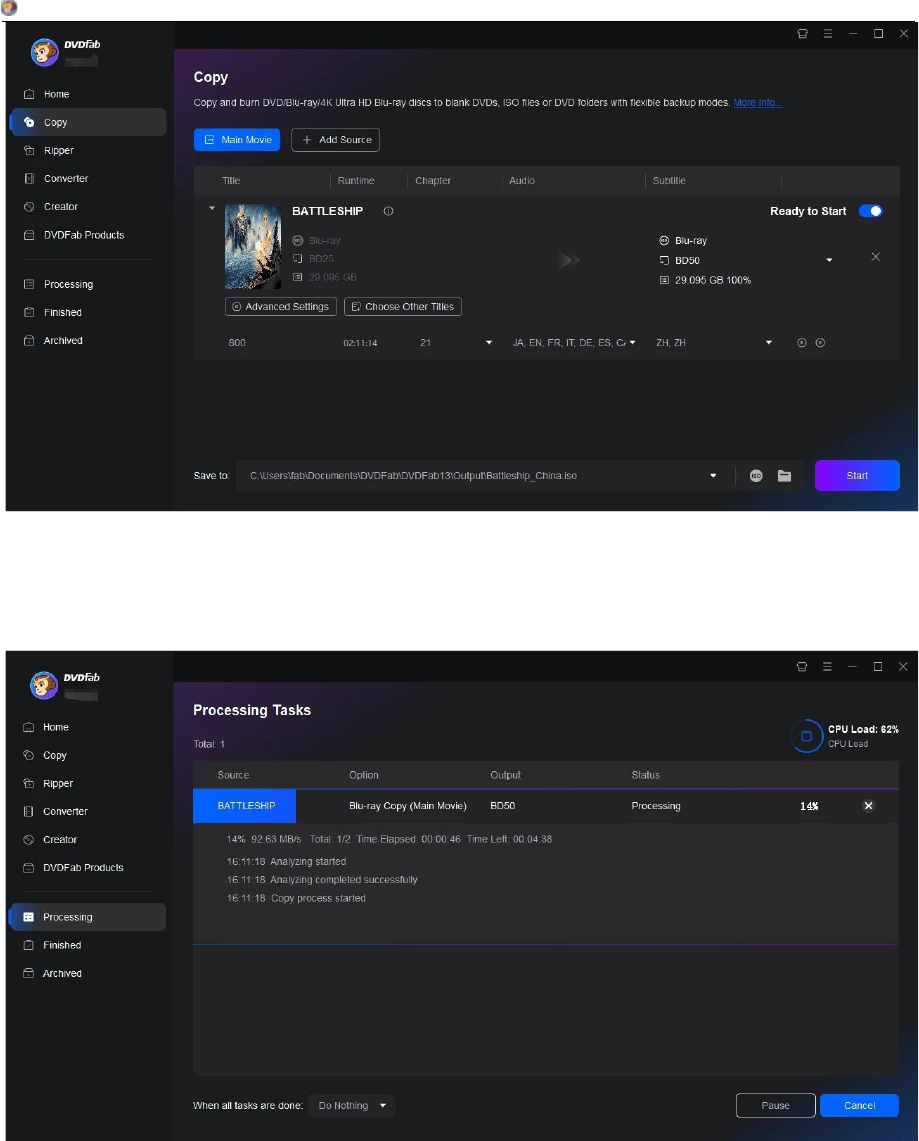
Step 2: Choose one copy mode and customize the output Blu-ray.
Move to the left pane, click the Copy Mode switcher, and choose your desired one. Then define the volume label and output
size. BD-50, BD-25, BD-9, or BD-5 will be up to you.
DVDFab 13 User Manual
DVDFab Software Inc. 2023-11-09
32
Step 3: Start to copy Blu-rays.
Select your output directory as a blank disc, ISO file, or folder, and click the Start button. You can get detailed progress
information or cancel the Blu-ray copy task anytime you like.
6.1.2.3 How to use UHD Copy
Step 1:Download and install the 64-bit version of DVDFab 13
Only the 64-bit version of DVDFab 13 contains the UHD Copy module, so make sure you download and install the correct
version of DVDFab 13 onto your PC;

DVDFab 13 User Manual
DVDFab Software Inc. 2023-11-09
33
Step 2:Launch DVDFab 13 and go to the Main Movie/Full Disc/Clone mode of Copy module
Launch DVDFab 13, navigate to the Main Movie/Full Disc/Clone mode under the Copy module. As of now, only the Main
Movie/Full Disc/Clone mode supports the 4K Ultra HD movies, but more backup modes shall be supported through the future
update course;
Step 3:Load the source 4K Ultra HD source to copy
Load the 4K Ultra HD source (a disc, ISO file or folder), click the wrench icon behind the 4K UHD logo to choose your preferred
output size, then at the Save to section, choose the output destination, and finally, click the Start button to let go of the copy
process.

DVDFab 13 User Manual
DVDFab Software Inc. 2023-11-09
34
6.1.2.4 How to use DVD to Blu-ray Converter
Step 1: Load DVDFab DVD to Blu-ray Converter, and load the source
Double click DVDFab 13, and choose Copy from the option bar. After, click on Copy Mode Switcher and choose To Blu-ray.
Insert the DVD disc you want to convert to Blu-ray into the optical drive, or navigate to it with the Add button on the main
page. If the source is an ISO file or folder, you can simply drag and drop it into the main page.
Step 2: Personalize the output Blu-ray
Choose the titles, chapters, audio tracks and subtitles you want, and click the Wrench icon to customize your menu and tweak
other settings.

DVDFab 13 User Manual
DVDFab Software Inc. 2023-11-09
35
Step 3: Start to Convert the DVD to Blu-ray
After selecting the output directory, click the Start button to begin the process of converting your DVD to Blu-ray. You can see
detailed progress info throughout the process.
6.1.2.5 How to use Blu-ray to DVD Converter
Step 1: Launch DVDFab Blu-ray to DVD Converter, and load the source
Double click DVDFab 13, and opt for Copy from the option bar when it runs. Then click the copy mode switcher to choose To
DVD.
Insert the BD you want to convert to DVD into the external Blu-ray drive, or navigate it through the Add buttons on the main
UI if it is already in. When it is an ISO file or folder, you can simply drag and drop it into the main UI for loading.

DVDFab 13 User Manual
DVDFab Software Inc. 2023-11-09
36
Step 2: Personalize the output DVD
Now you can choose the titles, chapters, audio tracks and subtitles you want, and you can also click the Wrench icon to
customize your menu and tweak other settings.
Step 3: Start to Blu-ray to DVD
After selecting the output directory, you can click the Start button to start the process of converting Blu-ray to DVD. You can
see the detailed progress info during the process.

DVDFab 13 User Manual
DVDFab Software Inc. 2023-11-09
37
6.1.2.6 How to use Blu-ray to UHD Converter
Step 1: Select the source file to be converted
Launch Blu-ray to UHD Converter and choose the target source file for conversion.
Step 2: Configure conversion parameters and start conversion
Select from various options to determine the output format/quality, processing mode, and video quality.

DVDFab 13 User Manual
DVDFab Software Inc. 2023-11-09
38
Step 3: After conversion, the file will be exported
When your standard BD file has been converted to 4K UHD Blu-ray, the output files will be exported.
6.1.2.7 How to use UHD to Blu-ray Converter
Step 1: Download and install the 64-bit version of DVDFab 13
Only the 64-bit version of DVDFab 13 contains the UHD to Blu-ray Converter module, so make sure you download and install
the correct version of DVDFab 13 onto your PC.

DVDFab 13 User Manual
DVDFab Software Inc. 2023-11-09
39
Step 2: Load the UHD Blu-ray to the Copy module
Go to ‘Copy’ module, click the ‘+Add’ button to load the source 4K Ultra HD Blu-ray (disc/ISO/folder), tab the copy mode
switcher and choose ‘To Blu-ray’ profile.
Step 3: Customize output Blu-ray and start to convert
Select your desired titles, audio tracks, subtitles, output size, file destination, menu mode and playback mode. Once done, hit
‘Start’ and wait for the final product.

DVDFab 13 User Manual
DVDFab Software Inc. 2023-11-09
40
6.2 Ripper Mode
6.2.1 Introduction of Ripper Mode
In this place, you can use the DVDFab products including DVD Ripper, Blu-ray Ripper and UHD Ripper.
You may also see the Title, Runtime, Chapter, Audio and Subtitle of the source. You can Choose Other Titles,
set the Profile, Video Quality, Advanced Settings, Video Edit and Trim the video or Preview, Delete the
Title.
The Advanced Settings, or the wrench button appears when the source is loaded, and is next to the

DVDFab 13 User Manual
DVDFab Software Inc. 2023-11-09
41
Video Edit button in the Source Info bar. You can click Advanced Settings button to preset the video, audio
and subtitle parameters, if necessary.
a) Video Settings:In this section, you can change video codec, encoding method, resolution, and frame
rate; set video quality, bit rate, output size, and bits/pixel; choose deinterlacing or not; split by chapter or
not.
b) Audio Settings:Similar to video settings, at the Audio section, you can preset audio codec, sample
rate, audio channel, bit rate, volume, and determine whether to output both AAC and AC3 audio tracks.

DVDFab 13 User Manual
DVDFab Software Inc. 2023-11-09
42
c) Subtitle Settings: this section lets you decide how to deal with the subtitles during the ripping or
converting process. Choices vary from one case to another: extract to idx/sub file, direct render to video,
depending on how many subtitle streams you want to keep, what profile you choose and, what device
you are going to view the resulting video on.
d) 3D Settings:3D settings section will be activated only if you choose a 3D profile from the profile
library. In this section, you can choose 3D format from Anaglyph, Split Screen, Two separate files and Two
video streams in one file; set values for Gain and Visual Depth.

DVDFab 13 User Manual
DVDFab Software Inc. 2023-11-09
43
Right next to the wrench button in the main interface of the Ripper module, aka the Advanced Settings
button, is the Video Edit button, the one looks like a pencil. This button leads to the Video Edit Window,
formerly known as the Video Edit Settings panel in version 11 and version 12. However, in version 13, the
Video Edit window is completely redesigned from scratch, introducing some long-awaited features and
delivering a much better user experience.
(1) Crop
The Crop function lets users decide which part of the display area should be kept in the converted result,
which is especially helpful when the source video has large portion of black bars around.

DVDFab 13 User Manual
DVDFab Software Inc. 2023-11-09
44
Rotation: It allows users at the popup panel to rotate the video 90 degrees clockwise or counter clockwise,
mirror left and right and mirror up and down.
Crop Aspect Ratio: vary from Auto, Original (means not be cropped at all), 4:3, 16:9, Full Screen,
Letterbox and Pan & Scan to Customize.
Distance to Edge: Increase or decrease the values of Top, Bottom, Left and Right with the triangle button
and the inverse triangle button or just type in the real value at the given four text boxes to specify how to
deal with the display area. After that, the width and height of the output display area will be changed
correlatively. Besides, you can also crop it at the Source displaying part manually.
(2) Effect
The Effect function can allow you adjust the brightness, contrast and saturation via the three sliding bars
respectively, or by directly entering the values at the three boxes behind.
(3) Watermark

DVDFab 13 User Manual
DVDFab Software Inc. 2023-11-09
45
Depending on your preference, you can plant a watermark into your video, with a string of texts or a
picture of your favorite.
To add a string of texts, you can click “Text” and type your wanted texts. You can see the texts at both
the Source and Output Preview windows. Besides the font, size, color, style and transparency that you
can freely adjust, you can also decide which part of the screen your texts will stay, simply by dragging the
text box at the Source Preview window to reposition.
To add a picture, click “Pic” to select your preferred image from your computer hard drive. Like the text
watermark, you can adjust the transparency of the image, and drag it at the Source Preview window for
relocation.
(4) Subtitles

DVDFab 13 User Manual
DVDFab Software Inc. 2023-11-09
46
If it’s necessary to add your own external subtitles, you can click on the “Add Subtitles” button, and then
choose the
subtitles file from your HDD. Based on your needs, you can decide the subtitles properties, such
as font, size, style, language, position on the screen, etc. You can also set the delay time so that the
subtitles can match the playback perfectly.
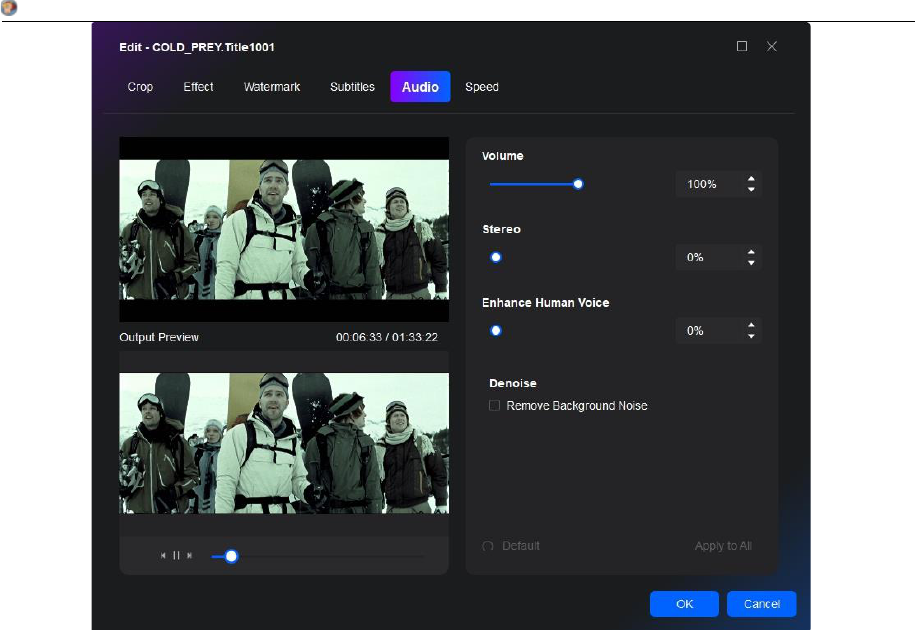
(5) Audio
DVDFab 13 User Manual
DVDFab Software Inc. 2023-11-09
47
You can adjust the Volume and Stereo or enhance human voice via the sliding bars respectively, or by directly
entering the values at the three boxes behind. To use the Denoise function, you can check the option
“Remove Background Noise”.
e.6 Speed

DVDFab 13 User Manual
DVDFab Software Inc. 2023-11-09
48
You can set the video playback speed to 0.25x, 05x, 0.75x, 1x, 1.25x, 1.5x, 1.75x, 2x and 3x.
Right next to the Video Edit button in the main interface of the Ripper module, is the Trim button, the one
looks like a scissors.
The new Trim feature in version 13 makes it easier for users to cut off the unwanted clip duration
from the video that being edited.
Step1: Click the time point you want to trim.
Step2: Click the scissors icon to trim the video.
Step3: Don’t forget to save trimed video.

DVDFab 13 User Manual
DVDFab Software Inc. 2023-11-09
49
In Ripper tool, you can choose the profile to convert the files. You may click the little down-triangle
button and click Choose Other Profile.
When you click the Profile Switcher, the program will direct you to the Profile Library. This Profile Library
stores a ton of predesigned profiles targeting at a great variety of video formats and devices made by
almost all the popular manufacturers worldwide. They are well organized based on the manufacturers or
video formats. You can easily find and select the one you need.
The greatest benefit of these pre-configured conversion profiles is that developers have run tens, if not
hundreds, of times of tests, just to make sure they produce the device-ready videos flawlessly. This is to
say, if you don’t really know what video formats your device support, or you simply are not tech-savvy
enough to figure out what those parameters are all about, then you can just select the profile here to
convert your DVDs, Blu-rays, 4K UHD Blu-rays or videos to watch on your target devices. As our developers
have done all the research, so you don’t have to.
At the bottom right corner of each profile lays a blank five star. You can click to color it, meaning this

DVDFab 13 User Manual
DVDFab Software Inc. 2023-11-09
50
colored profile is the one you use at a regular basis, and by coloring it, you have added it into your Favorite
profile lists available at the Personal area. Next time you start a new task, you just need to go to the
Personal area and select it. Of course, you can also unmark a profile to remove it from your Personal
collections.

DVDFab 13 User Manual
DVDFab Software Inc. 2023-11-09
51
6.2.2 How to use the products in Ripper Mode
6.2.2.1 How to use DVD Ripper
Step 1: Launch DVDFab and load the DVD source.
Run DVDFab 13 and select the Ripper option. Insert your DVD disc into the optical drive or navigate to it via the Add button. If
the source is an ISO file or a folder, simply drag and drop it onto the workspace.

DVDFab 13 User Manual
DVDFab Software Inc. 2023-11-09
52
Step 2: Choose one profile and customize the output DVD video.
Click "Choose Other Profile" to select an output format. Options are available to select audio tracks and subtitles, set video
and audio parameters, and more.
Step 3: Start to rip DVDs for free and fast.
Save your video on your HDD, Mobile device, or upload it to YouTube. Click the Start button, and the actual DVD ripping
process will be clearly shown.

DVDFab 13 User Manual
DVDFab Software Inc. 2023-11-09
53
6.2.2.2 How to use Blu-ray Ripper
Step 1: Launch DVDFab and load Blu-ray disc/ISO/folder
Run DVDFab 13 and opt for the Ripper module. Insert BD into the external Blu-ray drive, navigate it through the Add button,
or drag and drop an ISO file or folder onto the main UI.
Step 2: Choose one profile and customize the output video.
Click Choose Other Profile to select your desired profile. Select the titles, audio tracks, and subtitles you want to retain. Turn
to the 'Advanced Settings' and built-in 'Video Editor' to customize the output video.

DVDFab 13 User Manual
DVDFab Software Inc. 2023-11-09
54
Step 3: Start to rip a Blu-ray
Save your video on your HDD, Mobile device, or upload it to YouTube. Click the Start button, and the free Blu-ray Ripper will
promptly begin ripping Blu-ray and show detailed progress information.
6.2.2.3 How to use UHD Ripper
Step 1: Launch DVDFab 11 and load the 4K Ultra HD Blu-ray to the Ripper module
After downloading and installing the latest 64-bit version of DVDFab 11, launch the program and navigate to the Ripper
module, and then load the 4K Ultra HD Blu-ray source.

DVDFab 13 User Manual
DVDFab Software Inc. 2023-11-09
55
Step 2: Select a preferred conversion profile and customize necessary parameters
Click the Profile Switcher to select your preferred one from the available 6, which are exclusively made for the UHD Ripper,
namely, the MKV Passthrough, M2TS Passthrough, MKV.4K.H265.10bit, M2TS.4K.H265.10bit, MP4.SDR and MKV.SDR. Then
depending on which profile you choose, you may have varying options to customize detailed settings.
Step 3: Start the conversion process
When everything is set right, click the Start button to begin the conversion process. You have the option to cancel the task
anytime during the process, and you can also set your PC to automatically shut down, exit program, hibernate or do nothing
when the task is done.
DVDFab 13 User Manual
DVDFab Software Inc. 2023-11-09
56
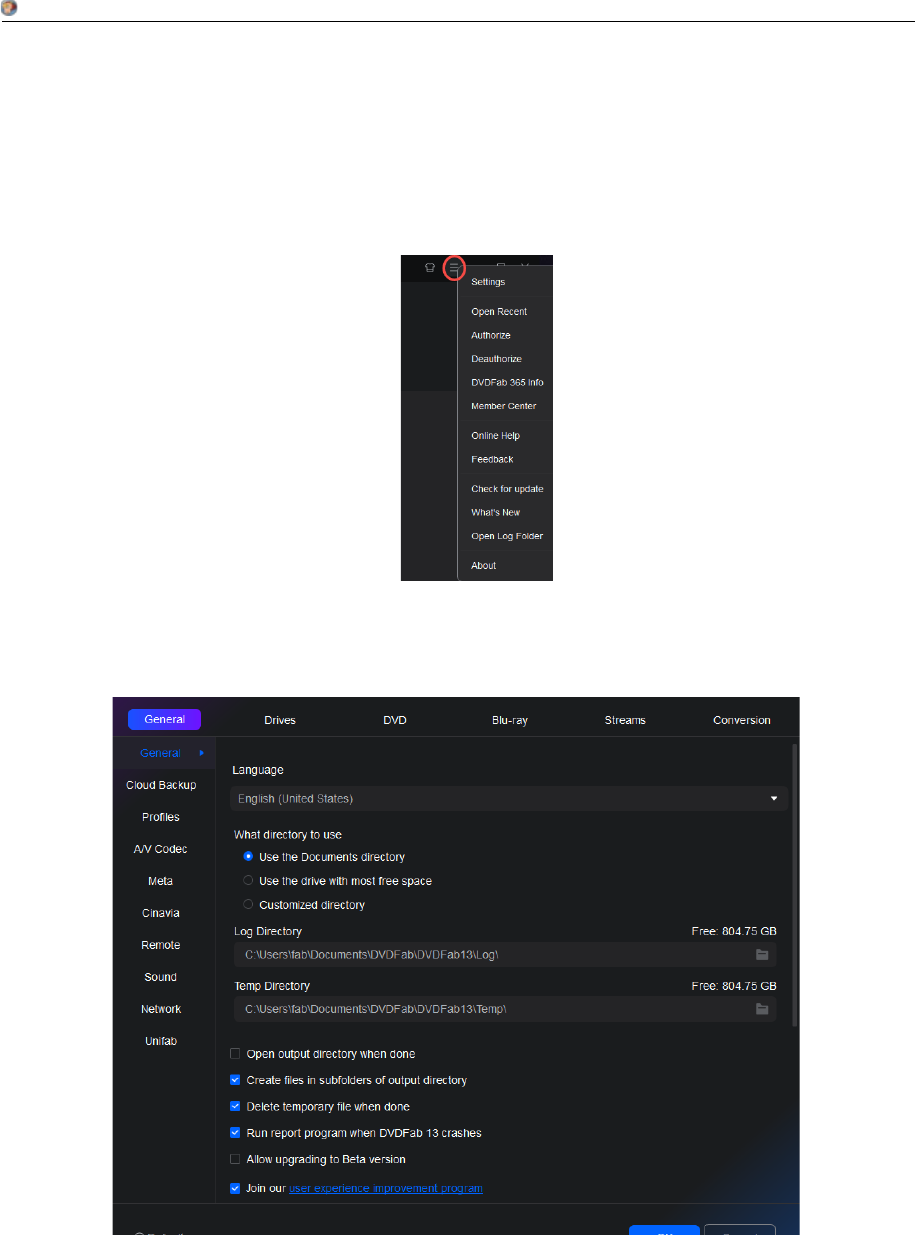
6.3 Creator Mode
6.3.1 Introduction of Creator Mode
There is also Mode Switcher same as Copy mode. You can switch to use DVD Creator, Blu-ray Creator and
UHD Creator. You can create DVD disc/ISO/folder from any popular video format and make your own
DVD/BD menu via stylish templates & customized options.

DVDFab 13 User Manual
DVDFab Software Inc. 2023-11-09
57
In Creator mode, you may also rename the title, set the Audio, Subtitle, Advanced Settings, Menu Settings,
Preview the file, also Search Movie/TV, Delete title and Save to different path per your need.
As for Menu Settings, it can be supported by DVD Creator and Blu-ray Creator.
Here in DVD Creator

DVDFab 13 User Manual
DVDFab Software Inc. 2023-11-09
58
Here is Blu-ray Creator
Advanced Settings in Creator tools, it has the following settings as shown below:
Burn to DVD:

DVDFab 13 User Manual
DVDFab Software Inc. 2023-11-09
59
Burn to Blu-ray:
Burn to UHD:

DVDFab 13 User Manual
DVDFab Software Inc. 2023-11-09
60
6.3.2 How to use the products in Creator Mode
6.3.2.1 How to use DVD Creator
Step 1: Launch DVDFab and load the source videos.
Run DVDFab 13 and select the Creator > DVD Creator module. Load your video with the Add button on the main page or by
simply dragging and dropping the file onto the main page.
Step 2: Customize your DVD and create a DVD menu.
After loading the source video, click Advanced Settings and choose the output size and quality you prefer. You can also click
Menu Settings to select and customize your menu.

DVDFab 13 User Manual
DVDFab Software Inc. 2023-11-09
61
Step 3: Start burning DVDs for free and fast.
Select the output directory in Save to Part, and click the Start button to begin creating your DVD. This DVD Creator will provide
detailed progress information throughout the process.
6.3.2.2 How to use Blu-ray Creator
Step 1: Launch DVDFab Blu-ray Creator software and load the source
Double-click DVDFab 13 and opt for Creator module when it runs. Click the creator mode switcher to choose Blu-ray Creator.
Drag & drop or ‘+Add ’ the source video(s) onto the main UI.

DVDFab 13 User Manual
DVDFab Software Inc. 2023-11-09
62
Step 2: Customize your Blu-ray with bulit-in templates
Click the wrench icon (Advanced Settings) to choose output size and quality, and the Set Menu icon (Menu Setting) to
customize Blu-ray menu from the given templates.
Step 3: The last one click to burn Blu-ray easily
After selecting output directory from the Save to option, click Start to create Blu-ray from videos. You can see the detailed
progress info during the Blu-ray burning process. For more info, click
For more knowledge about burning Blu-ray, please click Burn Anything (MP4, MKV, AVI, DVD, Blu-ray, etc.) to Blu-ray Discs.

DVDFab 13 User Manual
DVDFab Software Inc. 2023-11-09
63
6.3.2.3 How to use UHD Creator
Step 1: Download and install the 64-bit version of DVDFab 13
Only the 64-bit version of DVDFab 13 contains the UHD Creator module, so make sure you download and install the correct
version of DVDFab 13 onto your PC;
Step 2: Launch DVDFab 13 and go to the UHD Creator module
Launch DVDFab 13, navigate to the UHD Creator. Then drag & drop the videos with or without HDR10/Dolby Vision contents
into the main interface.

DVDFab 13 User Manual
DVDFab Software Inc. 2023-11-09
64
Step 3: Start the authoring procedure
After loading the source videos, select an output destination and then hit the Start button to trigger the processing procedure.
DVDFab 13 User Manual
DVDFab Software Inc. 2023-11-09
65
7. Common Settings
To open the Common Settings window, you need to click the Help Button with the inverse triangle icon
available at the top right corner of Main Interface.
7.1 General

DVDFab 13 User Manual
DVDFab Software Inc. 2023-11-09
66
A lot of basic settings can be preset here.
7.1.1 General
Language: Choose the language you use or are familiar with to be the display language.
What directory to use: Use the Documents directory, use the drive with most free space, customized
directory.
Log Directory: the default location for the DVDFab 13 log file is:
C:\Users\xxx\Documents\DVDFab\DVDFab13\Log\
Temp Directory: the default location for the DVDFab 13 log file is:
C:\Users\xxx\Documents\DVDFab\DVDFab13\Temp\
Open output directory when done: Automatically open the containing folder where results are located
after the tasks are finished.
Create files in subfolders of output directory: Automatically create a subfolder containing the output file in
the output directory when the task is done.
Delete temporary directory when done: The place where DVDFab saves the temp files during each task if
you check this open, the file will be deleted automatically.
Run report program when DVDFab 13 crash: The report can be better check the crash problem.
Allow upgrading to Beta version: this feature will make Beta versions available to you.
Join our user experience improvement program: You determine whether to enable this option or not. But
DVDFab is always open to suggestions, feedbacks and advices to make our software better.
Shut down the main interface: Upon this action, you can let the program minimize to system tray or exit
itself or ask me before exiting or minimizing program.
CPU cores running for DVDFab 13: You can configure your CPU cores to run for DVDFab, which can be set
up to 4 cores.
Move program icon to systray when minimizing the main surface: You can choose to move program icon to
system tray or not when you minimize it.
Add Auto-play handler(Optionally, start DVDFab 13 when DVD/Blu-ray Disc inserted): Enable this feature,
DVDFab 13 will auto start itself and access the disc whenever you insert a disc in your disc tray.
Add context menu to open video source by DVDFab 13: This option will make DVDFab appear in the
context menu when you right click on the video file on your local disk.
Allow running multiple instances of DVDFab 13: Literally, this means, by enabling this option, more than
one threads of DVDFab can be run simultaneously.
Prevent standby/hibernation/screen saver when processing: This means when you are during a task,
system will prevent itself from switching into power saving and sleep mode, at the same time, screen
saver ceases to work, too.
Check for on-the-fly decrypter automatically: DVDFab will auto-detect the other decrypting software’s
possibly running on background and will alert users to close them for more reliable performances of
DVDFab.
Check for DMA automatically: When this option is active, DVDFab will auto-check if your system is in DMA
mode, if not, which means PIO transfer mode is enabled, there will be a pop-up window with a button
allowing you to assert DMA mode for optical drives and hard discs.
'Reset DMA' button right behind allows users to check DMA status at other times instead of upon startup,
e.g. system will probably switch to PIO mode especially after dealing with a dirty or scratched disc, which
can be noticed by the obvious slowdown in reading/writing speed. At this point, you can click this button

DVDFab 13 User Manual
DVDFab Software Inc. 2023-11-09
67
and then reboot your PC to make sure DMA mode is enabled.
7.1.2 Cloud Backup
Cloud Backup saves all your configuration settings to the cloud, so that you can quickly recovery them
from the cloud when you install DVDFab products on another computer.
7.1.3 Profiles
For better viewing experience, you can specify different default profile for mobile device and home theater,
you can set the video quality, speed and file size, output format, etc.

DVDFab 13 User Manual
DVDFab Software Inc. 2023-11-09
68
(Set Profiles for DVD)
(Set Profiles for Blu-ray)

DVDFab 13 User Manual
DVDFab Software Inc. 2023-11-09
69
(Set Profiles for UHD Blu-ray)
7.1.4 A/V Codec
Settings on this page refer to the applied video decoder and encoder per different sources
(H.264/VC1/MPEG2).
Disable all GPU codes for decoding and encoding: If your computer is powerful enough, you can disable all
the GPU codec’s to pursue a most dependable processing.
Video Decoder: Currently, there are Software, CUDA, DXVA, AMD APP, Intel Quick Sync and Core AVC
available for H.264 source; Software, CUDA, DXVA, AMD APP, and Intel Quick Sync available for VC1 and

DVDFab 13 User Manual
DVDFab Software Inc. 2023-11-09
70
MPEG2 source; only Software, CUDA and Intel Quick Sync are available now for the H.265 video sources.
Video Encoder: A program which uses pre-defined algorithms to encode, or compress audio or video data
for storage or transmission use. Currently, Software, CUDA and Intel Quick Sync are available both on
H.264 and H.265 video sources.
Hardware Info: DVDFab can analyze your computer hardware information and give you a very clear idea
about what your computer is capable of as far as hardware acceleration is concerned.
Enable Lightning-Recoding when applicable (accelerate H.264 software decoding and encoding):
Lightning-Recoding is a homebrew technology by DVDFab applie in Blu-ray Copy Full Disc and Main Movie
modesto considerably enhance the converting speed when it comes to compress H264 video.
Note: GPU acceleration and Lightning-Recoding are not expected to be applied simultaneously.
Enable Lightning-Shrink when applicable: DVDFab Lightning-Shrink takes the advantages of NVIDIA's CUDA
hardware acceleration or Intel Quick Sync, to significantly cut down the time you spend on ripping or
converting Blu-ray movies, shockingly to be within an hour.
Codec Information: Here shows the capability of your Graphic Chipset and supported video codec’s of
your system.
7.1.5 Meta
Meta Info is a brand-new feature introduced in two of the DVDFab Blu-ray related products, Blu-ray Copy
and Blu-ray Ripper, to be more specific. The primary goal of this feature is to gather all the Meta
information of Blu-ray discs, including title, chapter, runtime, audio, subtitle, etc., which can be achieved
by DVDFab customers manually editing and uploading via the DVDFab client.
If users want to become a Meta Info contributor, they will need to check the two options here.
7.1.6 Cinavia

DVDFab 13 User Manual
DVDFab Software Inc. 2023-11-09
71
Cinavia is a protection for movies in theaters and on DVD & Blu-ray discs. It consists of a multi-level
watermark that is embedded in the audio track and, while being theoretically transparent (not-audible)
for the listener, it is supposed to resist various transformations of the audio stream like re-compression,
analog playback & record, re-sampling, limited pitch shift, etc. The base levels are analog, but on the top
level there’s the watermark payload that contains some restrictions regarding the playback environment.
DVDFab has a permanent and complete Cinavia removal solution to both DVDs and Blu-rays, which
is currently the best solution available on the marketplace. The solution consists of two products, DVD
Cinavia Removal and Blu-ray Cinavia Removal. The former is integrated in DVD Copy the Main Movie mode
for the time being, while the Blu-ray counterpart is integrated in three products, including the Blu-ray
Copy, Blu-ray Ripper, and Blu-ray to DVD Converter, of which, the Blu-ray Copy only supports the Main
Movie mode.
As the newly released DVD and Blu-ray titles are more likely to come with the Cinavia watermarks, the
supported titles are also being constantly updated. DVDFab will take the shortest time to support a new
title as soon as it is released.
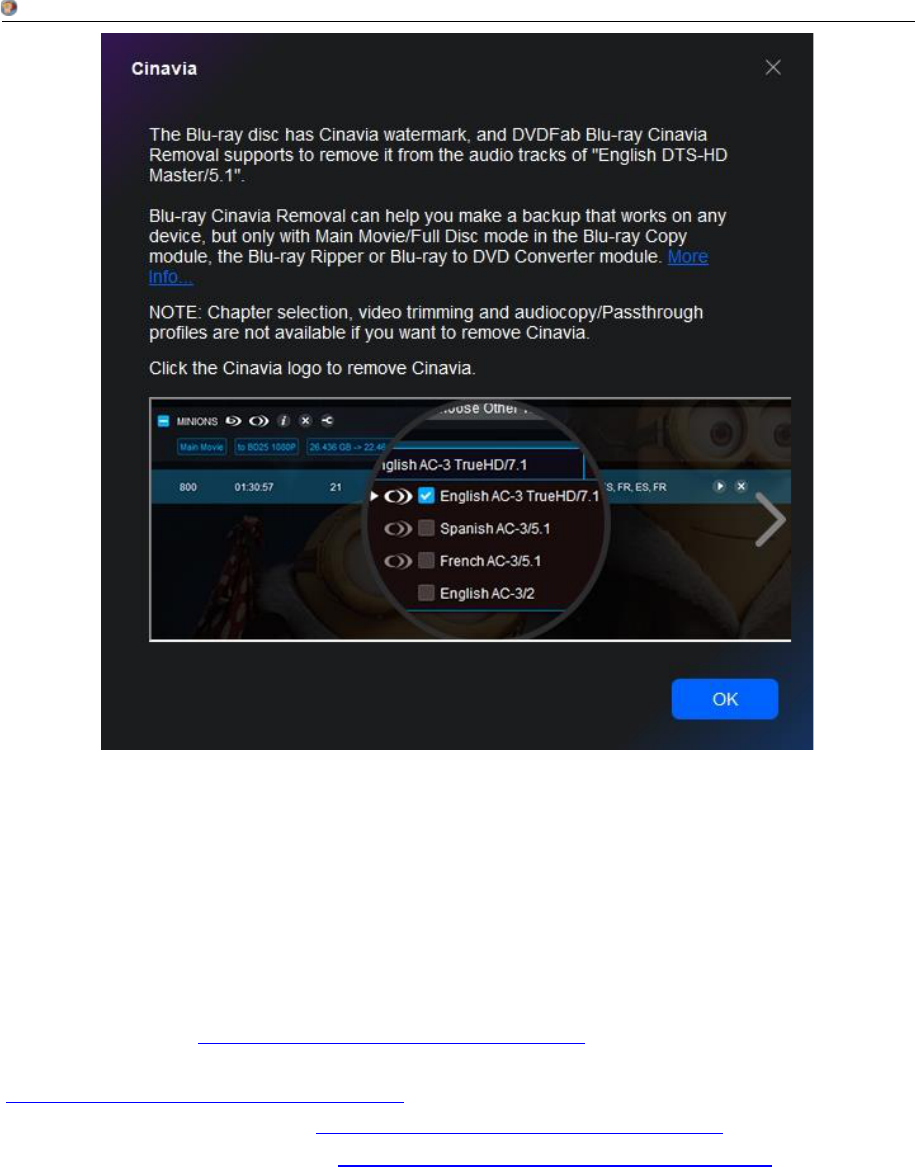
Enable Cinavia Removal: to remove the Cinavia encryptions on a DVD or Blu-ray, users must first enable
this feature at the Common Settings panel, otherwise, DVDFab might not be able to detect whether or
not a disc is infected with Cinavia. By enabling this option, when a Cinavia infected disc is detected, DVDFab
will popup an alert, the one shown as below:
DVDFab 13 User Manual
DVDFab Software Inc. 2023-11-09
72
Delete temporary Cinavia repair data when done: during the Cinavia removal process, DVDFab will
download the repair data from DVDFab server and save it on user’s hard drive. When this option is enabled,
DVDFab will automatically delete that repair data. If not, the repair data will stay on user’s hard drive,
which could eat up the free space on that hard drive quickly.
Temporary Directory: the place where DVDFab stores the Cinavia repair data on user’s hard drive. The
path can be relocated, and users also can manually empty the folder to delete the repair data.
For more information:http://blog.dvdfab.cn/cinavia-protection.html
Checkout the supported titles here (being constantly updated):
http://forum.dvdfab.cn/forumdisplay.php?f=66
Guide of removing Cinavia on DVDs:http://www.dvdfab.cn/dvd-cinavia-removal.htm
Guide of removing Cinavia on Blu-rays:http://www.dvdfab.cn/blu-ray-cinavia-removal.htm
How to use DVD/Blu-ray/UHD Cinavia Removal, here we take Blu-ray Cinavia Removal for example
Step 1:Launch DVDFab Blu-ray Copy, and load the source Blu-ray
Launch DVDFab 13, navigate to Blu-ray Ripper, and insert the target disc into the Blu-ray drive for DVDFab to
access, or simply drag and drop the source into the main UI for loading if it is an ISO file. If the disc is protected
by Cinavia, a window with the message (see above) will appear.

DVDFab 13 User Manual
DVDFab Software Inc. 2023-11-09
73
Step 2:Select the Cinavia protected audio track to remove the protections
At the Audio selection box, select the Cinavia affected audio track and at the same time click on the Cinavia
logo until there is a red slash across it. Choose the output size as BD 50 or BD 25 and then choose an output
path to start the backup process. If you are working with Blu-ray to DVD Converter, you could personalize the
output DVD playback including the playback menu, playback mode, volume label, etc.
Step 3:Start Cinavia removal task
Click the Start button to send DVDFab the execution command. Once the backup is started, all you can do now
is to wait. The Cinavia watermark will be completely and permanently removed from the audio track, leaving
you a lossless DTS-HD audio track that equalizes the original quality on the genuine disc.

DVDFab 13 User Manual
DVDFab Software Inc. 2023-11-09
74
7.1.7 Remote
DVDFab Remote is a mobile application that works on both iOS and Android platforms. The idea behind
this handy mobile app is to keep users timely updated with the task status information from DVDFab
client if they have something else to do, while DVDFab client is doing its own job, so that they don’t have
to sit near the computer screen all the time and watch the task to be completed. We will talk about this
mobile app further in Chapter 10.
7.1.8 Sound
Choose your ideal sound for alerting when event, successor failure of a task happens.

DVDFab 13 User Manual
DVDFab Software Inc. 2023-11-09
75
7.1.9 Network
Confirm how DVDFab is connected to a live internet: Directly connect to internet or use your own proxy
settings.

DVDFab 13 User Manual
DVDFab Software Inc. 2023-11-09
76
7.1.10 UniFab
UniFab offers complete AI-based audio and video conversion, compression, editing and enhancement
solutions.

DVDFab 13 User Manual
DVDFab Software Inc. 2023-11-09
77
7.2 Drives
7.2.1 Drives
Specify the drives which should be processed.
7.2.2 Read
I/O Mode:
the AUTO
mode you
Choose the mode for reading drives among AUTO, ASPI, SPTI and Passkey. To the great extent,
mode is recommended. However, when reading error occurs, you can try to switch it to the
need.

DVDFab 13 User Manual
DVDFab Software Inc. 2023-11-09
78
Reading Error Control
Ask retry/ignore/abort when reading error: Enable this option, system will pop up a window asking you
how to deal with the reading error encountered.
Ignore reading errors automatically: Choose this option, system will ignore the encountered reading errors
without the pop-up window mentioned above.
Retry times: Select the timestoretry to read the optical drive when reading error occurs, which can be up
to 10 times.
Skip sectors after a reading error: There may be some reading errors resulted from your seriously damaged
source DVD/Blu-ray disc, which couldn't be handled with. This time, you can skip the scratched sectors of
the source disc, and the skipped sectors can be up to 64.
Cache Control: An optimized source reading mechanism developed by DVDFab Software Inc, which can
greatly develop the efficiency of reading drive and writing data.
Blu-ray-File Reading Mode: To avoid the inconvenience of inserting a third-party driver, an internal UDF
2.50 parser is introduced by DVDFab Blu-ray Copy to read Blu-ray discs.
Do not eject source disc when finished copying: By default, system will eject the original disc when copying
phase completes, disable it if you want to keep the source in the drive.
7.2.3 DVD/Blu-ray Write

DVDFab 13 User Manual
DVDFab Software Inc. 2023-11-09
79
Burning Engine: Currently, there are DVDFab Burning Engine, VSO Burning Engine, Nero Burn ROM and
Imgburn available. However, Nero Burn ROM is not available as the option for Blu-ray burning engine.
Write Speed: Choose reasonable burning speed according to your write drive and blank media’scapability.
Keep in mind: the slower in speed, the better in quality.
DVD/Blu-ray Writable Media Size: 4300 MB for DVD-5 and 8100 MB for DVD-9 are recommended. The
recommended size for BD-25 is 23000 MB, and for BD-50 size is 43000 MB. Users also can customize the
size. Bear in mind: Burning too close to the disc edge might increase the potential of playback issue.
Write type of DVD-R Media: Three options are available: Auto, SAO writing and Packet writing. Choose
Auto, the engine determines how to write the data to the output media; Choose SAO(Session-at-once)
writing, the burning engine will copy only one sector of a source once and take possession of 13MB of
memory for the coupling information; Choose Packet writing, the engine will burn the entire source disc
once for all, which is faster, more effective, and also of high space utilization compared to SAO writing.
Overwrite rewritable media automatically: Check this option to allow system overwrites the rewritable
media automatically.
Verify disc when burning finishes: This additional feature serves as a checksum whether or not the disc is
burnt properly.
Do not eject source disc when finished copying: By default, system will eject the original disc when copying
phase completes, disable it if you want to keep the source in the drive.
Set booktype to DVD-ROM (only for DVD+R/RW media): Some standalone players are friendlier with
DVD-ROM booktype, click this option to make the resulting disc more compatible. Note that not all drives
support this feature.
7.2.4 Hybrid Disc

DVDFab 13 User Manual
DVDFab Software Inc. 2023-11-09
80
Theoretically, a Hybrid disc could refer to:
1). A disc that contains both DVD-Video and DVD-Audio content or SACD content. (More accurately called
a universal or AV DVD. The DVD-Audio standard allows this. The SACD standard does not officially allow
video, so it's unclear what a given SACD player will do with a hybrid SACD+DVD-Video disc.) Other
variations of this hybrid would be a disc with both DVD-Audio and SACD content, or a disc with all three
formats.
2). A disc with two layers, one that can be read in DVD players and one that can be read in CD players.
(More accurately called a legacy or CD-compatible disc.)
3). A disc containing one BD layer as well as two DVD layers, with a total capacity of 33.5 GB (25 GB + 8.5
GB). The disc follows the “ Blu-ray Disc, Hybrid Format” specifications provided by the Blu-ray Disc
Association. The disc has a blue laser along with two layers like ordinary DVD laser. The Blu-ray and DVD
layers are separated by a semi-reflective film that reflects blue light while it allows the red light to pass
through the DVD layer underneath.
Note: Only certain kind of drive can read both layers of a hybrid disc, and to play the hybrid disc requires a
certain player.
DVDFab offers a solution by enabling the preset as far as hybrid disc is involved: which layer is meant to
be automatically recognized by DVDFab upon inserting the disc, CD, DVD, HD-DVD or Blu-ray?
7.3 DVD
7.3.1 DVD Protection

DVDFab 13 User Manual
DVDFab Software Inc. 2023-11-09
81
Remove CSS, RC, RCE, APS, UOPs, structure protection:
In order to copy the DVD disc, all these different copy protection systems are to be removed.
Sidenote on UOPs (User Operation Prohibitions): A form of use restriction used on video DVD discs and
Blu-ray discs. Most DVD players and Blu-ray players prohibit the viewer from performing a large majority
of actions during sections of a DVD that are protected or restricted by this feature, and will display the no
symbol or a message to that effect if any of these actions are attempted. It is used mainly for copyright
notices or warnings, such as an FBI warning in the United States, and "protected" (i.e., "unskippable")
commercials.
Remove RCE, specify the disc's region code: To remove the 'RCE - Region Code Enhancement', you will be
required to choose the correct region code at a pop-up window. The region code usually can be found on
the original DVD package.
Remove layer break: When compressing a DVD-9 size content to fit on a DVD-5 blank disc in Main Movie,
Full Disc, Customize, Customize Split or Merge mode, this option is supposed to be enabled, while DVDFab
will ignore this setting and preserve the original layer break when it comes to Clone mode.
Enable Cloud Decryption Service: DVDFab will read the decryption data stored in Cloud Decryption Service
for any new protections on DVD/Blu-ray, which will greatly improve the source reading and decryption
process and save users’ time.
7.3.2 DVD Copy
The settings here apply to all the copy modes of DVD Copy.

DVDFab 13 User Manual
DVDFab Software Inc. 2023-11-09
82
Create dvdid.xml that can be used by Windows Media Center: This checkbox allows the user to specify
whether a small disc ID file will be written along with the output folders. The file allows other applications
to automatically find cover art and other information about the title on the internet, e.g. Windows Media
Center.
Title Assignment Setting: if possible, put more titles on disc 1 or disc 2 as you prefer.
Default CGP: You can choose Black Screen or FabCom to replace the titles that are not be copied.
7.3.3 PathPlayer
What's PathPlayer?
PathPlayer can identify all the playable contents on a DVD disc to pave the way for a blazing fast
decryption. It gives DVDFab the ability to copy DVD content only allowed to be played on a real DVD
player. In this way, DVDFab will ignore unplayable content which may contain copy protections.
How PathPlayer works?
PathPlayer works like a real DVD player, it follows every play path of a DVD, checking everything that you
can access on a DVD player with a remote controller. When PathPlayer finishes, DVDFab can know all the
content that a real DVD player will read. The copy protection exists in the unplayable DVD content,
DVDFab will not read it when copying.

DVDFab 13 User Manual
DVDFab Software Inc. 2023-11-09
83
Disable PathPlayer:
Since PathPlayer may need several minutes to open a DVD, if you know the disc is not copy protected, you
can disable it to save time.
Enable PathPlayer when necessary:
DVDFab will not enable PathPlayer in normal cases when opening a DVD. Once DVDFab detects a reading
error when copying DVD, it will ask user to restart DVDFab to reopen the DVD using PathPlayer. In this way,
DVDFab has the ability of opening DVD as fast as before, and uses PathPlayer when really necessary. If the
reading error is encountered more than a minute or two into the copy process it will save time to use the
default ("Always Enable") option below.
Always Enable PathPlayer (Default): Improvements in PathPlayer and reductions in the scanning time have
allowed this to become the default option. This option gives DVDFab the most information about your
DVD and will usually result in a better, more reliable backup copy. You can still set the other two options
(above) if desired. PathPlayer must be in “ Full Disc” mode for the "Jump To..." navigation features to be
active.
Navigation (DVD menu needs to be preserved): This feature gives user the ability to determine where to
start playing DVD, whether from the first menu or the main title. And it also enables users to remove the
unwanted PGC parts.
Scan BOVs (Button Over Video):
Button Over Video (BOV) is a feature seen more and more on recent DVDs. The purpose of BOV is basically
to make a transition from your main movie to some extra that is in another VTS. One good example is the
white rabbit feature in The Matrix. Other examples are Bambi II, Stuart Little 2, Spiderman and Men in

DVDFab 13 User Manual
DVDFab Software Inc. 2023-11-09
84
Black II.
Scan cells lasting less than 300 seconds:
DVDFab scans the title VOBs for BOVs. To speed things up and not waste time scanning parts of the VOB
that are unlikely to contain buttons, DVDFab only scans cells that are of small to average duration. The
preferences allow you to adjust the maximum duration of cells which will be scanned for BOVs. Default
value is '300', which is a cell time of 5 minutes.
Scanone VOBU every 30 VOBUs:
Set it to 1 to scan every VOBU in the selected cells (slowest but safest). Set it to a higher number to
by-pass some VOBUs within a cell. In any event, for safety, the first and last VOBU of every cell in the VTS
is scanned. Our tests show the default setting of 30 is reasonable. At this setting, the first VOBU is
scanned, then 30 are missed, then another is scanned, then another 30 are by-passed, until the cell ends,
at which time the last VOBU is scanned. Default value is '30', which is about 15 seconds of video. Check for
multiple sets of BOVs in the same cell (like Easter Eggs):
This checkbox option tells PathPlayer to check for additional BOVs when it finds one set in a cell. This is
found only rarely on certain discs for unusual features (like Easter eggs). This deeper analysis takes
additional time, so the default is unchecked for faster PathPlayer analysis. You can enable the feature by
checking the box if you think there are features like this on your disc.
7.4 Blu-ray
7.4.1 Blu-ray Protection
Make sure that "Remove AACS, BD+, RC, BD-Live, UOPs" options are enabled, or the source will not be
accessible due to these different protections.

DVDFab 13 User Manual
DVDFab Software Inc. 2023-11-09
85
Remove AACS (Advanced Access Content System):
The Advanced Access Content System (AACS) is a standard for content distribution and digital rights
management, intended to restrict access to and copying of the next generation of optical discs and DVDs.
The specification was publicly released in April 2005 and the standard has been adopted as the access
restriction scheme for HD DVD and Blu-ray Disc (BD).
Remove BD+/Remove BD+ Firmware Warning:
BD+ is a component of the Blu-ray Disc Digital Rights Management system. It was developed by
Cryptography Research Inc. and is based on their Self-Protecting Digital Content concept.
Remove RC (Region Code):
Blu-ray Discs are digitally encoded with a "region code" (A, B, or C, sometimes referred to as 1, 2, or 3),
which allows the disc to play only in a Blu-ray player with the same region code.
Remove BD-Live:
Some of BD-Live content are AACS encrypted, and the backup disc you are watching it without decryption.
Remove UOPs (User Operation Prohibitions): Please see above DVD part.
Remove CCI (Copy Control Information): A two-byte flag included in digital television streams that allows
content owner and cable operators to specify how content can be copied. CCI is define as part of the 5C
copy protection specification devised by DTCP working group back in 1998, and later defined as part of
the FCCs Plug and Play agreement in 2003.
Hide PS3 update files: As the protections embedded in the source Blu-ray have been removed after the
source reading, there is no need to update the firmware of your PS3 for playing the output file. So, we
suggest you enable this option.
7.4.2 Blu-ray Copy

DVDFab 13 User Manual
DVDFab Software Inc. 2023-11-09
86
Enable full scan: Since the logic of scanning just search 10% of full disc, which is not very accurate. If you
want to get the perfect and accurate result, please enable this fullscan function.
AVCHD (BD5/BD9) Compatibility Settings:
Create restrict compatible AVCHD folder structure (without certificate folder): If you play the disc that you
ripped in stand-alone player, please enable this radio button.
Create software player friendly AVCHD folder structure (with certificate folder): If you play the disc that
you ripped in software player, please enable this radio button.
Encoding Settings: Determine whether you want to perform the task with your computer capability is fully
utilized but receive a comparatively normal video quality, or you prefer a comparatively lower speed with
excellent video quality, it’s all your call.
7.4.3 BDInfo

DVDFab 13 User Manual
DVDFab Software Inc. 2023-11-09
87
Blu-ray Information refers to the video and audio technical specification from a Blu-ray movie disc,
including disc size, playlist content, as well as stream codec and bit rate details.
Why do we need BDInfo report?
Upon finishing a Blu-ray backup process, some users may want to know the detailed information on the
Blu-ray title they have just backed up, which may include the bit rate and codec information on both
audios and videos. This can be done by some third-party tools which may require an extra amount of time,
long or short, to process some additional analysis, which means inconvenience to most of users. This is
when and where DVDFab BDInfo feature kicks in, to make this BD info collection process drastically short.
7.5 Streams
This part defines how DVDFab 13 preselects Audio track(s) and Subtitle stream(s) after analyzing sources.
7.5.1 Audio

DVDFab 13 User Manual
DVDFab Software Inc. 2023-11-09
88
You can let DVDFab preselect audio tracks based on language or audio format. Every DVD is different so
verify that the pre-selected tracks contain the audio tracks you want on your backup.
7.5.2 Subtitle
You can let DVDFab preselect subtitles based on the specific language. Make sure the subtitles selected
are for the main movie and not a commentary or other bonus feature. You can override these
pre-selections at the Operation Window where the subtitle selection box appears. You can also choose to
not pre-select any subtitle track by ticking the top radio button.

DVDFab 13 User Manual
DVDFab Software Inc. 2023-11-09
89
7.6 Conversion
7.6.1 Convert
This page contains some settings that apply to DVD/Blu-ray Ripper.
Always display the forced subtitle: Forced subtitle usually refers to a foreign or alien language, or a sign,
flag, or other text in a scene is not translated in the localization and dubbing process.
Enable “Turbo CPU” for maximum CPU usage: The “Turbo CPU” is a speedup tool which can rearrange the
task priority and set the task that are more important to be proceed early.
Memory amount used for converting: There are five options for users to select the ideal way DVDFab 13
uses your PC's memory: Auto, Fast Speed, Standard, High Quality and Max. Usually, Auto is the
recommended and also the most appropriate choice, which can adjust the usage of your PC's memory
according to the source and the current settings. If you choose Fast Speed, the conversion speed will be
much faster than the normal speed, but you may pay for it by making a compromise at the output quality;
if you choose High Quality, you can get a much better quality video, but the conversion will slow down
and the output size will be bigger than the source to possess bigger memory amount; if you choose
Standard, then the video conversion will be performed with the standard speed and there won't be much
obvious quality degradation working with DVDFab 13; Note that "MAX" may not produce the fastest
speed; each PC system will be different so try each setting to see the result.

DVDFab 13 User Manual
DVDFab Software Inc. 2023-11-09
90
This page contains some settings that apply to DVD/Blu-ray Ripper.
Always display the forced subtitle: Forced subtitle usually refers to a foreign or alien language, or a sign,
flag, or other text in a scene is not translated in the localization and dubbing process.
Enable “Turbo CPU” for maximum CPU usage: The “Turbo CPU” is a speedup tool which can rearrange the
task priority and set the task that are more important to be proceed early.
Memory amount used for converting: There are five options for users to select the ideal way DVDFab 13
uses your PC's memory: Auto, Fast Speed, Standard, High Quality and Max. Usually, Auto is the
recommended and also the most appropriate choice, which can adjust the usage of your PC's memory
according to the source and the current settings. If you choose Fast Speed, the conversion speed will be
much faster than the normal speed, but you may pay for it by making a compromise at the output quality;
if you choose High Quality, you can get a much better quality video, but the conversion will slow down
and the output size will be bigger than the source to possess bigger memory amount; if you choose
Standard, then the video conversion will be performed with the standard speed and there won't be much
obvious quality degradation working with DVDFab 13; Note that "MAX" may not produce the fastest
speed; each PC system will be different so try each setting to see the result.
CD Size: Customize the size of a CD when converting so that the files produced will fit in the desired space.
Scale Method: Provides three choices to zoom in/out the video, namely, zoon in a low-definition video to a
high-definition video or zoom out a high-definition video to a low-definition video. Choose Fast, the process
will be speeded up with speed several times faster than normal, but you may get a video inferior to the
source; choose Good, both the processing speed and quality are ensured; choose Best, you will get a
better-quality video compared with the source, but the processing slows down.
Crop automatically: This checkbox allows you to turn the cropping function on or off by default. You can also
set this manually using the buttons on the Crop Settings page as you set up a conversion.
Audio Downmix from multichannel to stereo: Switch the multichannel to one stereo among Stereo, Dolby
ProLogicⅡ and Dolby ProLogic.
Default Frame rate/Audio Channel: Set the default Frame rate and Audio Channel to be the same as source

DVDFab 13 User Manual
DVDFab Software Inc. 2023-11-09
91
or specified in profile.
7.6.2 Output
Define how to name the output file, based on DVD Source, Blu-ray Source or File Source and how to
manipulate keywords.
7.6.3 PSP

DVDFab 13 User Manual
DVDFab Software Inc. 2023-11-09
92
This page controls the way of creating PSP file name, orderly or randomly. If you click the “ Default” button
at the bottom Common Settings window, all the settings will reverse back to factory settings.

DVDFab 13 User Manual
DVDFab Software Inc. 2023-11-09
93
8. Update of This User Guide
DVDFab Software Inc. reserves all the rights to update, and change this User Guide per special needs
without notice to users, and customers.
