
FactoryTalk Historian Machine
Edition Series B Configuration
Guide
Catalog Number 1756-HIST2G Series B
User Manual
Original Instructions

Important User Information
Read this document and the documents listed in the additional resources section about installation, configuration, and operation of this equipment before you install,
configure, operate, or maintain this product. Users are required to familiarize themselves with installation and wiring instructions in addition to requirements of all
applicable codes, laws, and standards.
Activities including installation, adjustments, putting into service, use, assembly, disassembly, and maintenance are required to be carried out by suitably trained
personnel in accordance with applicable code of practice.
If this equipment is used in a manner not specified by the manufacturer, the protection provided by the equipment may be impaired.
In no event will Rockwell Automation, Inc. be responsible or liable for indirect or consequential damages resulting from the use or application of this equipment.
The examples and diagrams in this manual are included solely for illustrative purposes. Because of the many variables and requirements associated with any particular
installation, Rockwell Automation, Inc. cannot assume responsibility or liability for actual use based on the examples and diagrams.
No patent liability is assumed by Rockwell Automation, Inc. with respect to use of information, circuits, equipment, or software described in this manual.
Reproduction of the contents of this manual, in whole or in part, without written permission of Rockwell Automation, Inc., is prohibited.
Throughout this manual, when necessary, we use notes to make you aware of safety considerations.
WARNING: Identifies information about practices or circumstances that can cause an explosion in a hazardous environment, which may lead to personal
injury or death, property damage, or economic loss.
ATTENTION: Identifies information about practices or circumstances that can lead to personal injury or death, property damage, or economic loss.
Attentions help you identify a hazard, avoid a hazard, and recognize the consequence.
IMPORTANT: Identifies information that is critical for successful application and understanding of the product.
These labels may also be on or inside the equipment to provide specific precautions.
SHOCK HAZARD: Labels may be on or inside the equipment, for example, a drive or motor, to alert people that dangerous voltage may be present.
BURN HAZARD: Labels may be on or inside the equipment, for example, a drive or motor, to alert people that surfaces may reach dangerous temperatures.
ARC FLASH HAZARD: Labels may be on or inside the equipment, for example, a motor control center, to alert people to potential Arc Flash. Arc Flash
will cause severe injury or death. Wear proper Personal Protective Equipment (PPE). Follow ALL Regulatory requirements for safe work practices and for
Personal Protective Equipment (PPE).
The following icon may appear in the text of this document.
Tip: Identifies information that is useful and can help to make a process easier to do or easier to understand.
Rockwell Automation recognizes that some of the terms that are currently used in our industry and in this publication are not in alignment with the movement toward
inclusive language in technology. We are proactively collaborating with industry peers to find alternatives to such terms and making changes to our products and content.
Please excuse the use of such terms in our content while we implement these changes.
2 1756-UM106H-EN-E - June 2024 Rockwell Automation, Inc.
Contents
Overview................................................................................................................................................................................................................................................. 13
Features...................................................................................................................................................................................................................................................................................13
Benefits....................................................................................................................................................................................................................................................................................14
Distributed FactoryTalk Historian architecture................................................................................................................................................................................................................14
FactoryTalk and Logix integration......................................................................................................................................................................................................................................15
FactoryTalk licensing............................................................................................................................................................................................................................................................ 15
License points for the data transfer.......................................................................................................................................................................................................................16
FactoryTalk Historian ME product number....................................................................................................................................................................................................................... 16
Hard disk................................................................................................................................................................................................................................................................................. 16
Before you begin....................................................................................................................................................................................................................................................................16
Additional resources..............................................................................................................................................................................................................................................................17
Get started..............................................................................................................................................................................................................................................18
System connectivity.............................................................................................................................................................................................................................................................. 18
Software and hardware requirements for FactoryTalk Historian ME...........................................................................................................................................................................19
Upgrade or reinstall the firmware......................................................................................................................................................................................................................................19
Differences between upgrade and reinstallation.................................................................................................................................................................................................20
Collect the module-related information.................................................................................................................................................................................................................20
Back up the module...................................................................................................................................................................................................................................................20
Prepare the module for the upgrade or reinstallation........................................................................................................................................................................................20
Upgrade or reinstall the firmware of your Historian module............................................................................................................................................................................. 21
(Optional) Download ControlFLASH or ControlFLASH Plus......................................................................................................................................................................... 21
(Optional) Install ControlFLASH or ControlFLASH Plus................................................................................................................................................................................21
Download the module firmware kit..............................................................................................................................................................................................................22
Upgrade or reinstall the module firmware..................................................................................................................................................................................................22
Updates and application notes................................................................................................................................................................................................................................23
Set up your ControlLogix environment.............................................................................................................................................................................................................................24
Install the module in the chassis...................................................................................................................................................................................................................................... 24
Install FactoryTalk Historian ME Client Tools...................................................................................................................................................................................................................25
Install FactoryTalk Historian ME Management......................................................................................................................................................................................................25
Install FactoryTalk Historian ME Rule Editor......................................................................................................................................................................................................... 27
Install FactoryTalk Historian ME Logix Designer Module Profile........................................................................................................................................................................27
(Optional) Install FactoryTalk Historian SE patch.................................................................................................................................................................................................28
EDS files....................................................................................................................................................................................................................................................................... 28
Rockwell Automation, Inc. 1756-UM106H-EN-E - June 2024 3
Access the FactoryTalk Historian ME webpage...............................................................................................................................................................................................................28
Log on to FactoryTalk Historian ME........................................................................................................................................................................................................................28
Log out of FactoryTalk Historian ME...................................................................................................................................................................................................................... 29
View the module information................................................................................................................................................................................................................30
System status........................................................................................................................................................................................................................................................................30
Status....................................................................................................................................................................................................................................................................................... 31
Module information..................................................................................................................................................................................................................................................... 31
System status...............................................................................................................................................................................................................................................................31
System utilization.......................................................................................................................................................................................................................................................32
Point statistics............................................................................................................................................................................................................................................................32
Module identity...................................................................................................................................................................................................................................................................... 33
Module information.................................................................................................................................................................................................................................................... 33
Network settings.........................................................................................................................................................................................................................................................34
Security configuration...............................................................................................................................................................................................................................................34
Client connections......................................................................................................................................................................................................................................................35
System utilization..................................................................................................................................................................................................................................................................35
System statistics...................................................................................................................................................................................................................................................................36
Network manager....................................................................................................................................................................................................................................................... 37
Snapshot and archive................................................................................................................................................................................................................................................38
Snapshot and archive counters....................................................................................................................................................................................................................38
Archive files.......................................................................................................................................................................................................................................................42
View data............................................................................................................................................................................................................................................... 45
Define search criteria.......................................................................................................................................................................................................................................................... 45
Export data.............................................................................................................................................................................................................................................................................47
View current data..................................................................................................................................................................................................................................................................47
View archive data................................................................................................................................................................................................................................................................. 47
View trends............................................................................................................................................................................................................................................................................ 48
Display points on the trend......................................................................................................................................................................................................................................49
Display the vertical bar on the trend.....................................................................................................................................................................................................................49
Zoomthetrend............................................................................................................................................................................................................................................................50
Reset the trend............................................................................................................................................................................................................................................................51
Remove points from the trend................................................................................................................................................................................................................................. 51
Change views..........................................................................................................................................................................................................................................................................51
Filter search results data......................................................................................................................................................................................................................................... 52
Arrange columns.........................................................................................................................................................................................................................................................52
4 1756-UM106H-EN-E - June 2024 Rockwell Automation, Inc.
Refresh views..............................................................................................................................................................................................................................................................52
Set start and end times............................................................................................................................................................................................................................................53
Bad quality data....................................................................................................................................................................................................................................................................53
Manage points........................................................................................................................................................................................................................................54
Recommendations related to managing points..............................................................................................................................................................................................................54
Add points using the Add Points Wizard page................................................................................................................................................................................................................54
Discover tags...............................................................................................................................................................................................................................................................54
Create points...............................................................................................................................................................................................................................................................56
Review results............................................................................................................................................................................................................................................................. 57
Add points using the Add Individual Points page...........................................................................................................................................................................................................58
Manage individual points using the Edit Points page....................................................................................................................................................................................................59
Create points...............................................................................................................................................................................................................................................................59
Edit points....................................................................................................................................................................................................................................................................60
Rename points............................................................................................................................................................................................................................................................ 60
Delete points............................................................................................................................................................................................................................................................... 60
Define point attributes......................................................................................................................................................................................................................................................... 61
General...........................................................................................................................................................................................................................................................................61
Exception filtering......................................................................................................................................................................................................................................................64
Compression filtering.................................................................................................................................................................................................................................................64
Snapshot value............................................................................................................................................................................................................................................................65
Configure scan types........................................................................................................................................................................................................................................................... 66
Configure Trigger Input and Output points......................................................................................................................................................................................................................67
Configure Trigger Input points.................................................................................................................................................................................................................................67
Configuration example: Trigger Input points..............................................................................................................................................................................................69
Configure Output points............................................................................................................................................................................................................................................70
Configuration example: Output points..........................................................................................................................................................................................................71
Manage shortcuts..................................................................................................................................................................................................................................................................72
Create shortcuts to the local chassis.....................................................................................................................................................................................................................72
Create shortcuts to a remote controller................................................................................................................................................................................................................73
Edit shortcuts..............................................................................................................................................................................................................................................................74
Delete shortcuts..........................................................................................................................................................................................................................................................75
Tag naming conventions...........................................................................................................................................................................................................................................75
Use scan classes...................................................................................................................................................................................................................................................................75
Create scan classes................................................................................................................................................................................................................................................... 76
Edit scan classes........................................................................................................................................................................................................................................................76
Rockwell Automation, Inc. 1756-UM106H-EN-E - June 2024 5
Delete scan classes....................................................................................................................................................................................................................................................76
Collect and store data........................................................................................................................................................................................................................... 77
Collect data.............................................................................................................................................................................................................................................................................77
Access the data collection information..................................................................................................................................................................................................................77
Start and stop the data collection..........................................................................................................................................................................................................................78
View the data storage information................................................................................................................................................................................................................................... 78
FactoryTalk Historian ME storage capacity...........................................................................................................................................................................................................80
Filter data................................................................................................................................................................................................................................................................................81
Exception filtering......................................................................................................................................................................................................................................................83
Compression filtering.................................................................................................................................................................................................................................................85
Transfer data to FactoryTalk Historian SE or PI servers.....................................................................................................................................................................88
Data transfer prerequisites................................................................................................................................................................................................................................................ 88
Configure the data transfer................................................................................................................................................................................................................................................89
Start the data transfer........................................................................................................................................................................................................................................................ 90
Stop the data transfer.........................................................................................................................................................................................................................................................90
View data transfer statistics..............................................................................................................................................................................................................................................90
Add points to the data transfer..........................................................................................................................................................................................................................................91
Remove points from data transfer.....................................................................................................................................................................................................................................91
View the data transfer information...................................................................................................................................................................................................................................92
Check the data transfer status in the system log......................................................................................................................................................................................................... 93
Data transfer considerations..............................................................................................................................................................................................................................................93
Administer the module.......................................................................................................................................................................................................................... 95
Manage users.........................................................................................................................................................................................................................................................................95
Create users................................................................................................................................................................................................................................................................ 95
Modify users................................................................................................................................................................................................................................................................ 96
Remove users..............................................................................................................................................................................................................................................................96
Change user passwords............................................................................................................................................................................................................................................ 96
Reset passwords......................................................................................................................................................................................................................................................... 97
Reset the default admin password......................................................................................................................................................................................................................... 97
View groups............................................................................................................................................................................................................................................................................97
Manage time...........................................................................................................................................................................................................................................................................98
View and edit the current time............................................................................................................................................................................................................................... 99
Considerations for using an NTP server as the time source................................................................................................................................................................ 100
Verify time synchronization.....................................................................................................................................................................................................................................101
Set the time zone...................................................................................................................................................................................................................................................... 101
6 1756-UM106H-EN-E - June 2024 Rockwell Automation, Inc.
Clock drifts.................................................................................................................................................................................................................................................................102
Battery clock..............................................................................................................................................................................................................................................................102
Configure system settings.................................................................................................................................................................................................................................................102
Change the module name....................................................................................................................................................................................................................................... 102
Configure network settings.....................................................................................................................................................................................................................................103
Upload files to the module................................................................................................................................................................................................................................................105
File types.................................................................................................................................................................................................................................................................... 106
Manage the uploaded files...................................................................................................................................................................................................................................... 107
Back up and restore configuration files.........................................................................................................................................................................................................................107
View the backup status and perform backup.....................................................................................................................................................................................................108
Download the backup file to a client computer................................................................................................................................................................................................. 108
Upload the backup file to the module..................................................................................................................................................................................................................109
Restore the module from the backup file............................................................................................................................................................................................................109
Why restoring PI Server ID?..........................................................................................................................................................................................................................110
Check and restore the module name.....................................................................................................................................................................................................................111
Use the system log............................................................................................................................................................................................................................................................... 111
System log related issues........................................................................................................................................................................................................................................ 112
Repair archives using safe mode..................................................................................................................................................................................................................................... 112
Repair the time setting.............................................................................................................................................................................................................................................113
Restore and reset module-related settings.....................................................................................................................................................................................................................113
Restore the module's defaults.................................................................................................................................................................................................................................114
Reset the security mode.......................................................................................................................................................................................................................................... 114
Reset the Web Diagnostics password....................................................................................................................................................................................................................115
Close and start the module................................................................................................................................................................................................................................................115
Shut down the module..............................................................................................................................................................................................................................................115
Reboot the module.................................................................................................................................................................................................................................................... 116
Restart the module....................................................................................................................................................................................................................................................116
Manage security.................................................................................................................................................................................................................................... 117
Configure security................................................................................................................................................................................................................................................................ 117
Configure system timeout........................................................................................................................................................................................................................................ 117
Configure how to log on to the module.................................................................................................................................................................................................................117
Log on using the FactoryTalk Directory with FactoryTalk Historian ME...............................................................................................................................................118
Understand privileges for user groups....................................................................................................................................................................................................... 119
Configure where to use the secure communication protocol (HTTPS)............................................................................................................................................................121
Manage security trusts.......................................................................................................................................................................................................................................................123
Rockwell Automation, Inc. 1756-UM106H-EN-E - June 2024 7
Default trusts............................................................................................................................................................................................................................................................. 124
User-defined trusts...................................................................................................................................................................................................................................................124
Create trusts for the data transfer.............................................................................................................................................................................................................124
Create trusts for FactoryTalk Historian clients........................................................................................................................................................................................ 125
Edit trusts...................................................................................................................................................................................................................................................................126
Delete trusts...............................................................................................................................................................................................................................................................126
Integrate the module into a FactoryTalk environment with FactoryTalk Directory................................................................................................................................................ 126
Integration prerequisites.........................................................................................................................................................................................................................................126
Register the module in the FactoryTalk Directory..............................................................................................................................................................................................127
Add the Historian ME module in the PI SDK Utility...................................................................................................................................................................................127
Register the Historian ME module in the FactoryTalk Administration Console...................................................................................................................................127
Create users in the FactoryTalk Administration Console..................................................................................................................................................................................128
Configure secure groups in the FactoryTalk Administration Console.............................................................................................................................................................129
SNMP community strings................................................................................................................................................................................................................................................... 129
Enable SNMP...............................................................................................................................................................................................................................................................129
Create SNMP community strings............................................................................................................................................................................................................................130
Delete SNMP community strings............................................................................................................................................................................................................................130
Use the Rule Editor............................................................................................................................................................................................................................... 131
View the default point discovery rule file.......................................................................................................................................................................................................................131
Create point discovery rule files.......................................................................................................................................................................................................................................131
Define point discovery rules..............................................................................................................................................................................................................................................132
Change the point discovery limit...........................................................................................................................................................................................................................134
Edit point discovery rule files...........................................................................................................................................................................................................................................134
Remove point discovery rule files....................................................................................................................................................................................................................................134
Create tag attribute files................................................................................................................................................................................................................................................... 135
Edit tag attribute files........................................................................................................................................................................................................................................................ 139
Remove tag attribute files.................................................................................................................................................................................................................................................139
Use Studio 5000 Logix Designer Module Profile................................................................................................................................................................................. 140
Configure your Historian module in the Module Profile...............................................................................................................................................................................................140
Configure the module properties..................................................................................................................................................................................................................................... 140
Example: Use the Module Profile......................................................................................................................................................................................................................................142
Add an Ethernet driver.............................................................................................................................................................................................................................................142
Add the module to Studio 5000 Logix Designer................................................................................................................................................................................................. 143
Use output tags to start and stop the data collection......................................................................................................................................................................................144
Use the input and output tags to read the Historian ME status................................................................................................................................................................................145
8 1756-UM106H-EN-E - June 2024 Rockwell Automation, Inc.
Create trends with the FactoryTalk Historian DataLink Add-in..........................................................................................................................................................148
Define the server connection............................................................................................................................................................................................................................................148
Insert trends in a Microsoft Excel workbook.................................................................................................................................................................................................................149
Create trends visualizing the data transfer...................................................................................................................................................................................................................150
Use Web Diagnostics............................................................................................................................................................................................................................ 152
Home...................................................................................................................................................................................................................................................................................... 153
Hardware............................................................................................................................................................................................................................................................................... 153
Overview......................................................................................................................................................................................................................................................................154
CPU, RAM..................................................................................................................................................................................................................................................................... 154
NAND............................................................................................................................................................................................................................................................................ 155
Controller statistics...................................................................................................................................................................................................................................................157
ControlBus statistics.................................................................................................................................................................................................................................................158
EtherNet/IP.................................................................................................................................................................................................................................................................159
Display LED.................................................................................................................................................................................................................................................................160
Time management.....................................................................................................................................................................................................................................................161
Firmware................................................................................................................................................................................................................................................................................162
Overview......................................................................................................................................................................................................................................................................162
Historian server.........................................................................................................................................................................................................................................................162
CIP................................................................................................................................................................................................................................................................................ 163
Data server.................................................................................................................................................................................................................................................................163
Data collection...........................................................................................................................................................................................................................................................164
Data transfer..............................................................................................................................................................................................................................................................165
Data storage...............................................................................................................................................................................................................................................................165
Web configuration server........................................................................................................................................................................................................................................ 167
Web diagnostics server............................................................................................................................................................................................................................................167
Startup log..................................................................................................................................................................................................................................................................168
Admin..................................................................................................................................................................................................................................................................................... 168
Hosts............................................................................................................................................................................................................................................................................169
Restart service...........................................................................................................................................................................................................................................................169
Core dump directory.................................................................................................................................................................................................................................................169
PI commands............................................................................................................................................................................................................................................................. 170
Download logs............................................................................................................................................................................................................................................................170
Change password......................................................................................................................................................................................................................................................170
Troubleshoot......................................................................................................................................................................................................................................... 172
Provide issue information.................................................................................................................................................................................................................................................. 172
Rockwell Automation, Inc. 1756-UM106H-EN-E - June 2024 9
Reboot the module.............................................................................................................................................................................................................................................................. 173
Work in the safe mode.......................................................................................................................................................................................................................................................173
Hardware issues...................................................................................................................................................................................................................................................................173
Web client issues.................................................................................................................................................................................................................................................................174
Data collection issues.........................................................................................................................................................................................................................................................175
Data storage issues.............................................................................................................................................................................................................................................................177
Data transfer issues............................................................................................................................................................................................................................................................177
Data export issues...............................................................................................................................................................................................................................................................179
Auto recovery issues...........................................................................................................................................................................................................................................................179
Time management issues..................................................................................................................................................................................................................................................180
Client computer issues.......................................................................................................................................................................................................................................................180
Point server issues.............................................................................................................................................................................................................................................................. 181
Related FactoryTalk product issues..................................................................................................................................................................................................................................181
FactoryTalk Directory................................................................................................................................................................................................................................................181
FactoryTalk Historian DataLink............................................................................................................................................................................................................................... 181
Configure Internet Explorer for FactoryTalk Historian ME..................................................................................................................................................................182
Internet Explorer configuration checklist.......................................................................................................................................................................................................................182
Add the module site to Local intranet or Trusted sites...............................................................................................................................................................................................182
Add the module website to the Local intranet security zone.......................................................................................................................................................................... 183
Add the module website to the Trusted sites security zone............................................................................................................................................................................184
Enable Active X controls.................................................................................................................................................................................................................................................... 184
Enable Compatibility View..................................................................................................................................................................................................................................................185
Disable Pop-up Blocker......................................................................................................................................................................................................................................................185
Disable ActiveX Filtering.....................................................................................................................................................................................................................................................185
Enable the XML DOM Document add-on..........................................................................................................................................................................................................................186
Enable TLS.............................................................................................................................................................................................................................................................................186
Verify the browser configuration using the F12 developer tools................................................................................................................................................................................187
Install the module certificate in Internet Explorer........................................................................................................................................................................................................187
Install the certificate using the Certificate Import Wizard...............................................................................................................................................................................188
Verify the certificate...........................................................................................................................................................................................................................................................188
Verify the certificate on the security report.......................................................................................................................................................................................................188
Verify the certificate on the System Security page...........................................................................................................................................................................................189
Clear the browser cache....................................................................................................................................................................................................................................................189
Clear the browser cache manually........................................................................................................................................................................................................................189
Clear the browser cache automatically................................................................................................................................................................................................................190
10 1756-UM106H-EN-E - June 2024 Rockwell Automation, Inc.
Add a registry entry for exporting files to Excel.......................................................................................................................................................................................................... 190
Configure Internet Explorer on Windows Server...........................................................................................................................................................................................................190
Internet Explorer security zone settings......................................................................................................................................................................................................................... 191
Rockwell Automation, Inc. 1756-UM106H-EN-E - June 2024 11

Preface
About This Publication
Rockwell Automation recognizes that some of the terms that are currently used in our industry and in this publication are not in alignment with the movement toward
inclusive language in technology. We are proactively collaborating with industry peers to find alternatives to such terms and making changes to our products and content.
Please excuse the use of such terms in our content while we implement these changes.
About this manual
This manual provides procedural instructions for the FactoryTalk® Historian Machine Edition (ME). It is one of a set of related manuals that describe installing,
programming, and operating the FactoryTalk system.
To review FactoryTalk Historian release notes and the latest information regarding product compatibility, refer to the Product Compatibility and Download Center.
Legal Notices
Rockwell Automation publishes legal notices, such as privacy policies, license agreements, trademark disclosures, and other terms and conditions on the Legal Notices
page of the Rockwell Automation website.
Software and Cloud Services Agreement
Review and accept the Rockwell Automation Software and Cloud Services Agreement here.
Open Source Software Licenses
The software included in this product contains copyrighted software that is licensed under one or more open source licenses.
You can view a full list of all open source software used in this product and their corresponding licenses by opening the oss_licenses.txt file located in your product's
OPENSOURCE folder on your hard drive. This file is divided into these sections:
•
Components
Includes the name of the open source component, its version number, and the type of license.
•
Copyright Text
Includes the name of the open source component, its version number, and the copyright declaration.
•
Licenses
Includes the name of the license, the list of open source components citing the license, and the terms of the license.
You may obtain Corresponding Source code for open source packages included in this product from their respective project web site(s). Alternatively, you may obtain
complete Corresponding Source code by contacting Rockwell Automation via the Contact form on the Rockwell Automation website: http://www.rockwellautomation.com/
global/about-us/contact/contact.page. Please include "Open Source" as part of the request text.
Additional resources
These documents contain additional information concerning related products from Rockwell Automation.
Resource Description
FactoryTalk Historian Machine Edition Module Installation Instructions (publication 1756-in106) Installation instructions for FactoryTalk Historian Machine Edition.
12 1756-UM106H-EN-E - June 2024 Rockwell Automation, Inc.

Chapter 1
Overview
The FactoryTalk Historian Machine Edition (ME) Module is a fully embedded historian in a ControlLogix® module
that you can insert into a Rockwell ControlLogix chassis to utilize backplane communications and collect data from
multiple controllers. It collects data at very high speeds as well as runs calculations and statistics on the data inside
its storage archive, utilizing exception and compression filtering to significantly reduce the data archive space.
You can view system and data information through the FactoryTalk Historian ME web interface and all standard
FactoryTalk Historian web clients.
In this document, you will find information on both hardware and software of FactoryTalk Historian ME.
The FactoryTalk Historian ME Module's web interface allows you to do the following:
•
View module information, including status, system utilization, and system statistic information.
•
View current, archive, and trend data.
•
Create, edit, and delete points.
•
Start and stop the data collection.
•
Configure, start, and stop the data transfer.
•
Manage users and groups.
•
Configure time synchronization.
•
Configure the system settings.
•
Upload files to the FactoryTalk Historian ME Module.
•
Back up and restore configuration files.
•
Restore the default settings.
•
Shut down or reboot the FactoryTalk Historian ME Module.
•
Manage security.
Rockwell Automation recognizes that some of the terms that are currently used in our industry and in this publication
are not in alignment with the movement toward inclusive language in technology. We are proactively collaborating
with industry peers to find alternatives to such terms and making changes to our products and content. Please
excuse the use of such terms in our content while we implement these changes.
Features
Key advantages of FactoryTalk Historian ME include:
•
Easy, automated installation and configuration as well as interactive browser experience.
As an embedded historian in a ControlLogix chassis connected to the backplane, FactoryTalk Historian ME
is easily installed and configured. It communicates at high speeds with the controllers in its backplane,
reducing implementation time from hours, days, or months to minutes. It quickly auto-detects ControlLogix
controllers and configures all relevant tags to be historized. The web interface provides easy configuration,
administration, and reporting.
• High-speed data collection rates that are ten times (or more) faster than traditional historian collection rates.
•
FactoryTalk Historian ME is not limited by network bandwidth. It leverages backplane communication to
increase the speed of data collection and, with down to a 10-millisecond scan rate, the unit provides more
granular data than is possible on a traditional, network-connected plant historian.
•
Reliable and robust hardened, embedded appliance with a low total cost of ownership. Only a client computer
is needed to install and configure your FactoryTalk Historian ME.
Rockwell Automation, Inc. 1756-UM106H-EN-E - June 2024 13

Chapter 1Overview
FactoryTalk Historian ME records data safely and accurately with solid-state data capture. It has no moving
parts and requires no operating system or computer maintenance. It is not subject to downtime due to
network outage or the need to perform maintenance on any subsequent firmware updates. It can be pre-
qualified from an OEM in a Factory Acceptance Test (FAT), thereby significantly reducing overall validation
efforts for end users.
•
Scalable data collection from the machine through enterprise.
FactoryTalk Historian ME is modular. It is rack-ready to standalone, or can easily be rolled up and configured
into a plant-wide historian for full-resolution data collection and data transfer. It can capture data from up to
five local controllers and five remote controllers.
Benefits
FactoryTalk Historian ME provides these benefits:
•
Reduces time-to-market by monitoring and analyzing operational and product quality in accord with
specifications, operations, and product constraints.
• Helps reduce time to execute product changes by:
◦
Assisting with product waste reduction, recycling, and blending.
◦ Increasing effective equipment capacity and positively impacting materials cost management.
◦ Improving product development as it collects and evaluates data related to new operation actions,
materials, equipment, equipment capabilities, and procedures.
◦
Identifying operational or production bottlenecks and improving operating eciency to avoid
unnecessary capital spending.
•
Increases compliance by:
◦
Facilitating, validating, and documenting performance within regulatory or permitted boundaries.
◦ Increasing management effectiveness.
◦ Reducing validation by including OEM delivery and testing.
•
Enhances performance by:
◦
Monitoring or calculating effective equipment usage and performance.
◦ Detecting degradation of performance and initiating alerts or requests for operations and maintenance
actions.
◦
Providing real-time, time-stamped operational and production data.
•
Maximizes delivery, quality, and continuous process improvement by:
◦
Documenting actual versus model production and identifying deviations.
◦ Analyzing for new process and operational boundaries when throughput, material, or equipment
changes occur.
Distributed FactoryTalk Historian architecture
Data or process historians are software applications that log data from process equipment, manufacturing devices,
and other main data sources that are important and relevant for the overall manufacturing process and product
quality. The FactoryTalk Historian collects time series data. It collects data points at given intervals whether the data
points are changing. This allows customers to see how these data points are trending and allows them to look at
correlations of data points.
Because the FactoryTalk Historian continuously collects data, it allows customers to review past data, and view what
occurred at a specific past point(s) in time. This means that if a specific event such as a downtime event, a bad
batch, or an alarm occurs, an operator can look at any process variable in the FactoryTalk Historian for the same
14 1756-UM106H-EN-E - June 2024 Rockwell Automation, Inc.

Chapter 1Overview
time frame as the event, and search for correlations that might explain the event. This allows the user to improve
production and operational processes, reducing the anomaly in the future.
The FactoryTalk Historian distributed architecture is multi-tiered. It redefines the available options for manufacturers
who want to maximize their ability to collect and analyze process data. It introduces a scalable, modular,
synchronized methodology for collecting, maintaining, and analyzing process data at each level of manufacturing
operations - machine or line, plant and enterprise (multi-plant). Specifically, FactoryTalk Historian ME:
•
Provides an engine of unmatched performance and scalability, tightly integrated with the FactoryTalk
Services Platform to provide data accuracy and availability across the Rockwell Automation® Integrated
Architecture.
•
Introduces a historian appliance that offers scalable connectivity to Rockwell Automation controllers.
•
Offers Rockwell customers a feature-rich set of commercially proven, industry-focused applications that are
widely regarded as the de-facto standard for plant and enterprise historian capabilities.
The following diagram depicts the three levels of distributed architecture.
FactoryTalk and Logix integration
FactoryTalk Historian ME works with the FactoryTalk product suite and Rockwell ControlLogix and CompactLogix™
devices. The Logix hardware and software provide easy and secure access to resources (data, status, and
configuration) within these.
For up-to-date information on product compatibility, see FactoryTalk Historian ME Release Notes.
FactoryTalk licensing
FactoryTalk Historian ME limits the clients that can access it. Client connections are limited to Rockwell Automation
preferred clients. This means that no anonymous connections will be accepted. The following applications can access
FactoryTalk Historian ME:
• FactoryTalk® Historian DataLink
•
FactoryTalk® Historian ProcessBook
•
FactoryTalk® View Site Edition (SE) Trending
•
FactoryTalk® Administration Console
Rockwell Automation, Inc. 1756-UM106H-EN-E - June 2024 15

Chapter 1Overview
• PI System Management Tools (SMT)
• PI SMT Tag Configurator and PI Builder
• FactoryTalk® VantagePoint® and FactoryTalk VantagePoint EMI
License points for the data transfer
The data transfer subsystem works with the data storage and the data collection services to transfer historical and
real-time data to a FactoryTalk® Historian Site Edition (SE) or PI server. Before you can transfer data to FactoryTalk
Historian SE, you must first purchase a point license for FactoryTalk Historian SE. The point license determines the
number of points that can be transferred to FactoryTalk Historian SE. For each FactoryTalk Historian ME, the licensed
limit is 2500 points.
Tip: FactoryTalk Historian ME is compatible with FactoryTalk Historian SE version 6.00.00 or later.
FactoryTalk Historian ME product number
FactoryTalk Historian ME has the following product number: 1756-HIST2G.
Hard disk
FactoryTalk Historian ME firmware is stored on the mSATA 8 GB SLC hard disk along with the historized data.
A minimal amount of data is lost if the module suddenly loses power and the file system remains intact. Archived and
snapshot data interruption occurs only during the first minute of downtime.
In addition, power loss may help prevent the data collection from restarting, the data transfer from reconnecting if
it was running, and other processes from restarting. If power loss occurs, the module may need to be started in the
Studio 5000 Logix Designer® Module Profile. For details, see Use Studio 5000 Logix Designer Module Profile on page
140.
Before you begin
Before using FactoryTalk Historian ME Series B modules, keep the following considerations in mind.
• We recommend updating series B modules to FRN 5.202 to support more modern browsers.
◦ We recommend using Google® Chrome™ browser and Microsoft® Edge™ web browsers.
◦ After the first time you sign in to Web Configuration and Web Diagnostics, you must change the default
password.
◦ FactoryTalk Historian ME Series B module has been tested with and compatible with:
▪ Add-on Profile: version 1.10.05 or later
▪ FactoryTalk Historian SE: version 6.00.00 or later
▪ FactoryTalk Historian ME Client Tools: version 5.00.00 or later
▪ FactoryTalk Services: version 6.30.00 or later
16 1756-UM106H-EN-E - June 2024 Rockwell Automation, Inc.

Chapter 1Overview
Additional resources
These documents contain additional information for FactoryTalk Historian ME. You can view or download publications
from the Product Compatibility and Download Center and Literature Library.
• FactoryTalk Historian ME Release Notes
• FactoryTalk Historian ME Client Tools Release Notes
•
ControlFLASH Firmware Upgrade Kit User Manual
•
ControlFLASH Plus Quick Start Guide
•
FactoryTalk Historian Machine Edition Module Installation Instructions (publication 1756-in106)
Rockwell Automation, Inc. 1756-UM106H-EN-E - June 2024 17

Chapter 2
Get started
In this section you will learn about the following:
System connectivity on page 18
Software and hardware requirements for FactoryTalk Historian ME on page 19
Upgrade or reinstall the firmware on page 19
Set up your ControlLogix environment on page 24
Install FactoryTalk Historian ME Client Tools on page 25
Access the FactoryTalk Historian ME webpage on page 28
System connectivity
While setting up the FactoryTalk Historian ME environment, pay attention to the following guidelines:
This value: Is the maximum number of:
2 Modules per chassis.
10 Controllers that can transfer data to a single module.
There can be a maximum of 5 controllers in the local chassis
and a maximum of 5 controllers in the remote chassis.
50 Modules that can be used to transfer data simultaneously from
the ME to a single SE server.
5 Clients that can have simultaneous access to the module.
This number includes a web browser, the FactoryTalk Historian
SE or PI server, and any other client tool. After the limit is
reached, any client will be denied access to the module based
on the total number of connections exceeded.
18 1756-UM106H-EN-E - June 2024 Rockwell Automation, Inc.

Chapter 2Get started
Software and hardware requirements for FactoryTalk Historian ME
The hardware and software required for FactoryTalk Historian ME depend on the demands an application places on
the system. The following shows a simple standalone architecture.
The greater the demand, the more powerful a system must be to support this demand. For large or complex
applications, use computers with faster CPUs and more RAM. In addition, there should always be sucient disk space
to provide virtual memory that is at least twice the size of the physical RAM.
For up-to-date information on the software and hardware requirements, see FactoryTalk Historian ME Release Notes.
Upgrade or reinstall the firmware
You can upgrade or reinstall the firmware of your Historian ME module using ControlFLASH™ or ControlFLASH Plus® .
For details on the differences between upgrade and reinstallation, see Differences between upgrade and
reinstallation on page 20.
The process consists of the following steps:
1.
Prepare the module for the upgrade or reinstallation.
a.
Collect the module-related information on page 20
b. Back up the module on page 20
c. Prepare the module for the upgrade or reinstallation on page 20
2.
Upgrade or reinstall the firmware of your Historian module on page 21.
IMPORTANT: If you click Restore Defaults or Reset Security from the FactoryTalk Historian
ME Logix Designer Module Profile, the module goes into a pending state. The pending state
blocks you from upgrading or reinstalling the firmware before one of the following occurs:
◦ The five (5) minute window expires.
◦
The module is physically reset in the chassis.
◦
You power-cycle the module.
Therefore, you can only upgrade or reinstall the firmware when the module is not in a
pending state.
For details, see Use Studio 5000 Logix Designer Module Profile on page 140.
Rockwell Automation, Inc. 1756-UM106H-EN-E - June 2024 19

Chapter 2Get started
Differences between upgrade and reinstallation
There are the following differences between upgrading and reinstalling the firmware:
Upgrade
• Updated binary files are installed.
•
All log files are deleted.
•
The module's configuration data and the archive files are preserved.
Reinstallation
•
Updated binary files are installed.
•
All log files, module configuration data, and archive files are deleted
•
The module's factory settings are restored.
Collect the module-related information
Collect the following information:
•
The catalog number of the Historian ME module: 1756-HIST2G.
• The network configuration information.
• The network path to the Historian ME module.
•
The firmware version number, which is listed on the Historian ME module's home page.
Back up the module
As a best practice, we suggest that you back up your module configuration and download the backup configuration
file to your client computer before performing an upgrade.
For details, see Back up and restore configuration files on page 107.
Prepare the module for the upgrade or reinstallation
To prepare the module for the upgrade or reinstallation
1.
In the module web interface, stop the following services:
◦
The data collection (Configure Historian > Data Collection).
◦ The data transfer (Configure Historian > Data Transfer).
2.
Open the web browser, and type https://<ModuleIP_address>:8443. The module Web Diagnostics
interface appears.
3.
Record the firmware revision number from the Home page.
4. (Optional) Click Admin > Download Logs to download all log files.
5.
Identify the network path across the backplane in the local chassis from the network module to FactoryTalk
Historian ME as defined in RSLinx Classic. This is not the path through the front port of the module. To view
the network path across the backplane, see the image in step 4 in Upgrade or reinstall the module's firmware
on page 21.
6.
Log out and disconnect all clients (including web clients).
20 1756-UM106H-EN-E - June 2024 Rockwell Automation, Inc.

Chapter 2Get started
Upgrade or reinstall the firmware of your Historian module
FactoryTalk Historian ME modules' firmware kits are delivered as individual Device Management Kit (DMK) files. They
are compatible with:
• ControlFLASH version 15.07.00
• ControlFLASH Plus version 6.00.00
The installation of ControlFLASH or ControlFLASH Plus is separate from the firmware kits, and you must install it only
once.
A DMK is a single, digitally signed file that contains the firmware binaries. ControlFLASH authenticates DMK’s origin
and validates its contents, providing enhanced protection against malicious threats. You can download and use
it, no need to install or extract it. The file is named for easy identification and management, for example, 1756-
HIST2G_5.202 (Install).dmk.
To flash the module firmware, you must have FactoryTalk Linx or RSLinx Classic installed.
The process consists of the following steps:
1.
(Optional) Download ControlFLASH on page 21
Perform this step if you don't have the recommended version already installed.
2.
(Optional) Install ControlFLASH on page 21
Perform this step if you don't have the recommended version already installed.
3.
Download the module firmware kit on page 22
4.
Upgrade or reinstall the module firmware on page 22
(Optional) Download ControlFLASH or ControlFLASH Plus
Tip: We recommend that you use:
•
ControlFLASH version 15.07.00.
• ControlFLASH Plus version 6.00.00.
To download ControlFLASH or ControlFLASH Plus
1.
Open the PCDC page in your web browser:
https://compatibility.rockwellautomation.com/Pages/home.aspx
To use this site, you must register and log in.
2.
Under Downloads, click Downloads by Product.
3.
In the search field, type ControlFLASH or ControlFLASH Plus, and then click the search button.
The search results appear.
4.
Click ControlFLASH Firmware Upgrade Tool (Accessories/Software) or ControlFLASH Plus.
The package appears in the right pane.
5.
Select the package, and then click DOWNLOADS.
6.
Follow the on-screen instructions to complete the process.
(Optional) Install ControlFLASH or ControlFLASH Plus
Starting from ControlFLASH version 13.00, when the installation completes, FactoryTalk Security is enabled by default.
When launched, ControlFLASH logins to the FactoryTalk Network Directory.
Rockwell Automation, Inc. 1756-UM106H-EN-E - June 2024 21

Chapter 2Get started
Tip: For details on using ControlFLASH or ControlFLASH Plus, see its documentation.
To install ControlFLASH or ControlFLASH Plus
1. Extract the installation package and double-click setup.exe.
The Rockwell Automation Installer appears.
2.
Follow the instructions to complete the installation process.
Download the module firmware kit
To download the module's firmware kit
1.
Open the PCDC page in your web browser:
http://compatibility.rockwellautomation.com/Pages/home.aspx
To use this site, you must register and log in.
2.
Under Download, click Downloads by Product.
3.
In the search field, type 1756-HIST.
The product name is displayed.
4. Click the product name and choose a version number on the right.
5.
Click DOWNLOADS.
6.
Under Downloads, click Select Files.
The Available Downloads window appears.
7.
Choose a file that matches the operation that you want to perform on the module (Install or Upgrade).
For example, click 1756-HIST2G_5.202(Upgrade).dmk.
8.
Click Downloads in the upper right corner of the window.
9.
In the window that appears, click DOWNLOAD NOW.
10.
Follow the on-screen instructions to complete the process.
Upgrade or reinstall the module firmware
Tip: Before you upgrade or reinstall your module, stop Data Transfer and Data Collection.
To upgrade or reinstall the module's firmware
1. In the Start menu, find and open ControlFLASH.
The Welcome to ControlFlash window appears.
The In use information points you to the version of RSLinx that you currently use. If you have both RSLinx
Classic and FactoryTalk Linx installed on your computer, the Change RSLinx Edition button will be available,
and you may choose the edition that you want to use to perform the steps.
2.
Click Next.
The Catalog Number window appears.
If you don't see the catalog number of your Historian module, click Browse.
22 1756-UM106H-EN-E - June 2024 Rockwell Automation, Inc.

Chapter 2Get started
Tip: When you download DMK firmware kits from Rockwell Automation PCDC, ControlFLASH
automatically saves the folder location where the DMK files were downloaded to. By default,
ControlFLASH monitors two folders:
◦ C:\Program Files (x86)\ControlFLASH for 64-bit operating systems or C:\Program Files
\ControlFLASH for 32-bit operating systems
◦
C:\Users\<user name>\Downloads\RA
For best performance, we recommend you not using shared folders on a network, disk root
folders, or a large number of folders.
The Firmware Kit Locations window appears.
3.
Click Add.
The Browse for Folder window appears.
4.
Select the location to which you saved the module's firmware kits, and then click OK.
The location is added to the Firmware Kit Locations window.
5.
Click OK.
6.
In the Catalog Number window, select your module's type, and then click Next.
The Select the device to update and click OK window appears.
7.
Choose the device that you want to update with the firmware, and then click OK.
The Firmware Revision window appears.
The window lists the firmware kits that you have downloaded. The list may differ from what you see in the
previous image.
8.
Choose the revision of the firmware kit and the operation type that you want to use, and then click Next.
Tip: To learn about the differences between upgrade and reinstallation, see Differences between
upgrade and reinstallation on page 20.
The Summary window appears.
9.
Click Finish.
10.
In the confirmation message, click Yes.
11.
In the warning message, click OK.
The process of upgrading or reinstalling the module begins.
When the process completes, an update status message appears.
It will take the module a couple of minutes to fully initialize. Once the middle LED (STS) is either flashing or
solid color, you can log in to the module.
12.
Start Data Transfer and Data Collection.
Updates and application notes
Rockwell Automation provides technical information on the web to assist you in using its products. Refer to our
extensive online Knowledgebase for the most current information about FactoryTalk Historian ME. Visit https://
rockwellautomation.custhelp.com/ to:
• View technical and application notes.
•
Obtain software patches and firmware updates.
Rockwell Automation, Inc. 1756-UM106H-EN-E - June 2024 23

Chapter 2Get started
• Subscribe to product and service email notifications.
•
Ask questions.
For an additional level of technical phone support for installation, configuration, and troubleshooting, we offer
TechConnect support programs. For more information, contact your local distributor or Rockwell Automation
representative, or visit the Rockwell Automation Technical Support site https://www.rockwellautomation.com/en-
us/support.html.
Set up your ControlLogix environment
To set up your ControlLogix environment
1.
Set up the ControlLogix chassis.
2. Insert the ControlLogix controllers into the chassis.
You can connect to five controllers in a single ControlLogix chassis.
3.
Power on the system.
4.
Configure the ControlLogix devices.
For details, refer to the ControlLogix Chassis and ControlLogix Controller documentation.
FactoryTalk Historian ME can connect to:
•
The controllers in the same chassis in which it is placed.
•
The controllers placed in a remote chassis (ControlLogix and controllers from the CompactLogix 5370 family).
Tip: For more information about the supported controllers refer to FactoryTalk Historian ME
Release Notes.
If FactoryTalk Historian ME must connect to data in other chassis hardware such as non-ControlLogix or third-party
controllers, you can configure a ControlLogix controller to act as a data concentrator in the same chassis. This
controller can then be configured to expose the data from the remote controllers to the FactoryTalk Historian ME.
However, it is critical to consider the increased load that an extra data server will introduce in a ControlLogix system
when configuring the data collection.
FactoryTalk Historian ME’s data gathering and trending impact on a Logix controller is dependent on the ControlLogix
system configuration. This includes the available Logix controller bandwidth as well as the number of tags being
trended and the sample period. The Logix controller bandwidth is determined by the controller type, free memory, the
system overhead time slice, and user application programs.
Trending is a higher priority task in the Logix controller than in user application programs. Trending too many tags at
a too low sample period can impact the Logix controller’s ability to execute user application programs and cause task
overlaps. When using FactoryTalk Historian ME, you must ensure that there is sucient Logix controller bandwidth to
service trending without negatively impacting user application programs.
Install the module in the chassis
FactoryTalk Historian ME has the following product number: 1756-HIST2G.
To install the module, follow the FactoryTalk Historian Machine Edition Module Installation Instructions (Publication 1756-
IN106).
24 1756-UM106H-EN-E - June 2024 Rockwell Automation, Inc.

Chapter 2Get started
FactoryTalk Historian ME receives data from the ControlLogix data collection interface and stores it locally in the
module. The module data and system information can be viewed and managed through the FactoryTalk Historian ME
webpage.
After you install the module, you can log on to the FactoryTalk Historian ME webpage. See Log on to FactoryTalk
Historian ME on page 28 for details.
Install FactoryTalk Historian ME Client Tools
The FactoryTalk Historian ME Client Tools are a set of the following tools:
•
FactoryTalk Historian ME Management
See Install FactoryTalk Historian ME Management on page 25.
• FactoryTalk Historian ME Rule Editor
See Install FactoryTalk Historian ME Rule Editor on page 27.
•
FactoryTalk Historian ME Logix Designer Module Profile
See Install FactoryTalk Historian ME Logix Designer Module Profile on page 27.
The Client Tools are available on the FactoryTalk Historian ME installation DVD and as a download package on the
Rockwell Automation Product Compatibility and Download Center website.
Tip: If you download the Client Tools from the Rockwell Automation Product Compatibility and Download
Center website and cannot extract the content of the package, check the length of the path to the
directory to which you want to extract the package. If the length of the path to the directory is longer
than 116 characters, you will not be able to extract the package to this location.
Install FactoryTalk Historian ME Management
The FactoryTalk Historian ME Management is available on the FactoryTalk Historian ME Client Tools installation DVD.
Tip: The FactoryTalk Historian ME Management requires FactoryTalk Services Platform version 2.50 (FTSP
SR5) or newer to be installed. Refer to FactoryTalk Services Platform documentation for more information.
The package is installed with the following FactoryTalk Historian components:
•
PI Software Development Kit (PI SDK)
•
FactoryTalk Historian SE RA Components
•
MS Runtime Redistributables
For details on the component versions and supported systems, see the FactoryTalk Historian ME Client Tools Release
Notes.
To install FactoryTalk Historian ME Management
1.
Run the FactoryTalk Historian ME Client Tools DVD.
2.
On the welcome page of the installation wizard, click Install FactoryTalk Historian ME Client Tools > Install
FactoryTalk Historian ME Management.
The installation wizard appears.
Rockwell Automation, Inc. 1756-UM106H-EN-E - June 2024 25

Chapter 2Get started
If there are any software prerequisites missing from the computer or services that must be stopped, they are
listed in red at the bottom of the installation wizard Welcome page.
Click Cancel, and then click Finish to exit the wizard, install the prerequisites and/or stop the services, and
then start the installation wizard again.
3.
On the Welcome... page, click Next.
4.
On the License Agreement page, read and accept the terms of the license agreement, selecting the I
accept... option.
5. Click Next.
6.
On the Review Component Installation page, review the list of the components that are already installed
and those that will be installed during the installation process.
7.
Click Next.
8.
On the Destination Drive page, select the drive on which you want to install the product.
If the space available on the drive is not sucient for the installation, a warning message will appear below
the Installation drive list. In such a case, select another drive or increase the available space on the drive
you have originally selected. After you have increased the available space on the selected drive, you can
continue with the installation without restarting the installation wizard.
Tip: You can choose the destination drive only if you install a FactoryTalk Historian component on
the selected machine for the first time. If there have been any FactoryTalk Historian components
installed on the machine before, the Installation drive list will not be available.
9.
Click Next.
The Installation Progress page appears. It lists the components that are going to be installed. The status of
the installation is displayed in the Status column of the component table.
10.
Click Install to start the installation.
If there are any applications, interfaces, and/or services that are currently running on the computer and
must be stopped so that you can continue with the installation, a message will appear to list the items to be
stopped.
11.
Stop the items, and then click Install again.
The following message appears:
12.
Click Yes to continue with the installation.
13.
Wait until the components are installed.
The installation time will vary depending on the number of components being installed and the computer's
performance. Depending on your security settings, you may be prompted to confirm the installation of
individual components.
The installation status is displayed below the component table.
14.
Identify the computer that hosts the FactoryTalk Directory server.
- If it is the current computer (localhost), click OK.
- If it is a remote computer, point to the proper FactoryTalk Directory computer:
a. In the User name box, type the account username with which you will log on to the FactoryTalk
Directory computer.
b.
In the Password box, type the password to the account with which you will log on to the FactoryTalk
Directory computer.
c. Click OK.
The Browse for Computer dialog box appears.
26 1756-UM106H-EN-E - June 2024 Rockwell Automation, Inc.

Chapter 2Get started
d. Select the machine that hosts the FactoryTalk Directory, and then click OK.
The name of the machine appears in the FactoryTalk Directory Server Location Utility dialog box.
e. Click OK.
f. In the message box informing you that you must restart the computer, click OK.
g.
In the Log On to FactoryTalk (New Server) dialog box, type the user name and password to the newly
selected FactoryTalk Directory machine.
h.
Click OK. The system connects to the FactoryTalk Directory server.
i. In the message box prompting you to restart the computer, click No.
15.
On the Installation Wizard Completed page, click Show the installation log, if you want to view the
installation log after the installation wizard closes.
Tip: The installation log, fth_installer.log, is available in the following location:
C:\Program Files\Rockwell Software\FactoryTalk Historian\Installation Manager\<Name of the
Historian suite>\FTHInstallerLogs\<Date and Time of the Installation>.
If any of the installed components requires rebooting the computer, a relevant message will appear on the
installation wizard page, and you will be prompted to restart the machine after the installation wizard closes.
16.
Click Finish to exit the installation wizard.
17.
Restart the computer.
Install FactoryTalk Historian ME Rule Editor
The Rule Editor allows you to create and edit user-defined rules for the point discovery process. The selections
you make in the dialog box are automatically written to this file. The data points matching these rules are found
and added to the FactoryTalk Historian server. You can upload the rule file to FactoryTalk Historian ME using the
FactoryTalk Historian ME Upload Manager feature.
To install the Rule Editor
1.
Run the FactoryTalk Historian ME Client Tools DVD.
The installation wizard appears.
2.
Click Install FactoryTalk Historian ME Client Tools > Install FactoryTalk Historian ME Rule Editor.
The FactoryTalk Historian ME Rule Editor installation wizard appears.
3.
Follow the on-screen instructions to complete the process.
Install FactoryTalk Historian ME Logix Designer Module Profile
FactoryTalk Historian ME can be configured to communicate with a ControlLogix controller through the FactoryTalk
Historian ME Logix Designer Module Profile.
Tip: Install the Module Profile on the computer with RSLogix 5000® or Studio 5000 installed.
To install the Module Profile
1.
Run the FactoryTalk Historian ME Client Tools DVD.
The installation wizard appears.
Rockwell Automation, Inc. 1756-UM106H-EN-E - June 2024 27

Chapter 2Get started
2. Click Install FactoryTalk Historian ME Client Tools > Install FactoryTalk Historian ME Logix Designer
Module Profile.
The Logix Designer Module Profile installation wizard appears.
3. Follow the on-screen instructions to complete the process.
(Optional) Install FactoryTalk Historian SE patch
If you want to integrate your FactoryTalk Historian ME with FactoryTalk Historian SE 2.1, you need to install the
FactoryTalk Historian SE patch. Once installed, FactoryTalk Historian ME can work with FactoryTalk Historian SE to
collect, store, analyze, and visualize data using reporting tools such as time-series trends, bar charts, pie charts,
pareto, and tabular trends.
The FactoryTalk Historian SE patch must be installed on the FactoryTalk Directory and any other computer that will be
administering the FactoryTalk Historian ME module through the FactoryTalk Administration Console.
The patch is not necessary for machines with FactoryTalk Historian SE 2.2 or newer.
You can download the FactoryTalk Historian SE patch from the Rockwell Automation Knowledgebase page.
EDS files
Electronic Data Sheet (EDS) files are simple text files used by network configuration tools to help you identify
products, and easily commission them on a network.
The EDS files for the Historian series A module are located on the FactoryTalk Historian ME installation DVD in the
\3.xx.xx-FTHistorianME\EDS folder. The files are currently a part of the RSLinx Classic product installation.
The EDS files for the Historian series B and series C module can be downloaded directly from the device. The files will
be a part of the RSLinx Classic product installation for newer versions of RSLinx Classic.
Access the FactoryTalk Historian ME webpage
FactoryTalk Historian ME receives data from ControlLogix through the data collection interface and stores it locally in
the module. The module data and system information can be viewed and managed through the FactoryTalk Historian
ME webpage. The web interface supports multiple layers of firmware applications that are designed to collect data, as
well as provide system and module status and statistics.
You can access the FactoryTalk Historian ME webpage through a web browser after the installation of the module.
Log on to FactoryTalk Historian ME
Tip: If a large number of tags are being transferred from the controller to the module when the module
is going through the initial booting up, wait about five to ten minutes before trying to access the web
interface.
To log on to FactoryTalk Historian ME
1.
Open a web browser (for example, Chrome™ browser or Edge™ ).
2.
In the address bar, type the IP address of FactoryTalk Historian ME, and then press Enter.
The IP address scrolls across the LED display on the front panel of FactoryTalk Historian ME.
28 1756-UM106H-EN-E - June 2024 Rockwell Automation, Inc.

Chapter 2Get started
The logon page appears.
Tip:
◦
The default network configuration type is DHCP. If a DHCP server is not available, then the
IP address will not be displayed. You will either need to configure a DHCP server or use
RSLinx Classic or the FactoryTalk Historian ME Logix Designer Module Profile to set the IP
address. For details, see Use Studio 5000 Logix Designer Module Profile on page 140.
◦
You can also type the Fully Qualified Domain Name (FQDN) of the FactoryTalk Historian ME
module in the address bar to access the logon page. Type the FQDN in the following format:
<modulename>.<domainname>.<top-level domain>
For example, module1.mycompany.com
3.
Type the default user name piadmin and leave the password text box blank.
The first time you log on, the default user name is piadmin and the password is blank (no password).
Tip: For details on the user and group security, see Manage security on page 117.
4.
Click Login.
5.
Change the password for the default piadmin user.
Tip: For more details, see Change user passwords on page 96.
Log out of FactoryTalk Historian ME
The reason for this is that after the initial login, when another FactoryTalk-enabled product is started, FactoryTalk
Security checks the credentials of the logged-in user at the FactoryTalk Directory, and authorizes access to the next
product without requiring another log in.
• Click Logout in the upper-right corner of the Historian webpage.
If you close your browser without logging out, a cookie will retain the session for twenty minutes, and another user
may access FactoryTalk Historian ME without logging into the module.
It is recommended that every user should log out after every session to help prevent unauthorized users from
accessing the module without logging into the module.
Rockwell Automation, Inc. 1756-UM106H-EN-E - June 2024 29

Chapter 3
View the module information
The module information is displayed on the following pages of the Home tab:
•
Status
This page is open by default.
See Status on page 31.
•
Module Identity
See Module identity on page 33.
•
System Utilization
See System utilization on page 35.
•
System Statistics
See System statistics on page 36.
Additionally, there is also the System status on page 30 section in the lower-left corner of every page of the web
client.
System status
The system status information appears when you log on to FactoryTalk Historian ME. It is located in the left bottom
corner of every page and provides the system status information detailed in the following table.
The information is refreshed automatically every 30 seconds.
This item: Displays:
CPU usage Percentage of the module’s CPU that is being used.
Note: The CPU usage percent listed under the System
Status section on the left-hand side may display a different
percent than what is listed under CPU and Processes on the
System Utilization page (see System utilization on page 35)
because the CPU usage listed under System Status is updated
periodically while the CPU usage listed in the main window is
static. It does not change once the page is loaded.
Memory usage Percentage of the module’s system memory that is being used.
Collection rate Current collection rate from the data collection service in
events per minute.
Transfer rate Current transfer rate from the data transfer service in events
per minute.
Archive rate Current archiving rate from the Archive subsystem through the
server variant table in events per minute.
Archive usage Percentage of used archive files remaining on FactoryTalk
Historian ME. It is calculated based on the type of data being
collected and the rate of the data collection.
Archive capacity The number of days/hours/minutes (dd:hh:mm) until the
storage space on FactoryTalk Historian ME is used. This
30 1756-UM106H-EN-E - June 2024 Rockwell Automation, Inc.

Chapter 3View the module information
This item: Displays:
calculation is based on the module’s data collection and data
transfer rates.
Status
To open the Status page, click the Home tab.
The page displays the following information:
• Module information
See Module information on page 31.
•
System status
See System status on page 31.
•
System utilization
See System utilization on page 32.
•
Point statistics
See Point statistics on page 32.
Module information
In the ControlLogix chassis figure, the location of the Historian module in the chassis slot is marked with green, while
the location of the controller with grey.
The Module Information section displays the following information:
This item: Displays:
Name The name of the module.
Firmware Version The version of the firmware.
Current Time The current time of the module.
Up Time The total time the module has been running.
System status
Rockwell Automation, Inc. 1756-UM106H-EN-E - June 2024 31

Chapter 3View the module information
The System Status section displays the following information:
This item: Displays:
Point Server FactoryTalk Historian ME server that manages the archives and
provides access to historical data. The status may be Running
or Error.
Data Collection Service FactoryTalk Historian ME data collection subsystem. The status
may be Running, Stopped, or Error.
Data Transfer Service FactoryTalk Historian ME data transfer subsystem. The status
may be Running, Stopped, or Error.
System utilization
The System Utilization section displays the current CPU usage, memory information, and storage information, along
with a graphical representation of this information. The red portion indicates a critical stage for each component.
Point statistics
The Point Statistics section displays information about points configured on the module in the form of statistics and
a pie chart.
Review the following for additional information.
Item Description
Total Points The number of total points on the module.
Total Active Points The number of points actively receiving data.
Incl. Bad Points The number of points out of the Total Active Points that are
configured for collecting data but are not actively receiving it
because the point is being rejected by the data server with an
error.
The pie chart rounds the percentage to the nearest whole percent. For instance, if there are 1000 total points in the
system and 995 active points, the pie chart will still display 100%, but if there are 994 active points, the pie chart will
display 99% and 1%.
32 1756-UM106H-EN-E - June 2024 Rockwell Automation, Inc.

Chapter 3View the module information
Module identity
To open the Module Identity page, click Module Identity on the Home tab.
The page displays the following information:
• Module information
See Module information on page 33.
•
Network settings
See Network settings on page 34.
•
Security configuration
See Security configuration on page 34.
•
Client connections
See Client connections on page 35.
Module information
The Module Information section displays the following information:
This item: Displays:
Name The name of the module.
To change your module name, click the Advanced tab, and then
click System Settings.
For details on the module name and information on the impact
of changing the module name, see Change the module name on
page 102.
Firmware Version The version of the firmware.
Current Time The current time of the module.
To configure time settings, click the Advanced tab, and then
click Time Management.
Up Time The total time the module has been running.
Module Slot Location The location of the module in a slot in the ControlLogix chassis.
Serial Number The serial number of the module.
This number cannot be changed.
Rockwell Automation, Inc. 1756-UM106H-EN-E - June 2024 33

Chapter 3View the module information
Network settings
The Network Settings section displays the following information:
This item: Displays:
MAC Address The Unique Media Access Control (MAC) address of the module.
This number cannot be changed.
IP Address The Internet Protocol (IP) address of the module.
IP Configuration The Dynamic Host Configuration Protocol (DHCP) or static IP
address will display. DHCP is the default configuration.
Link Status The current connection status of the module's front Ethernet
port.
Tip: To change the network settings, click the Advanced tab, and then click System Settings. For details,
see Configure system settings on page 102.
Security configuration
The Security Configuration section displays the following information:
This item: Displays:
Security Mode The security mode used.
Browser Protocol The browser protocol used.
Tip: For details on changing the security settings, see Manage security on page 117.
34 1756-UM106H-EN-E - June 2024 Rockwell Automation, Inc.
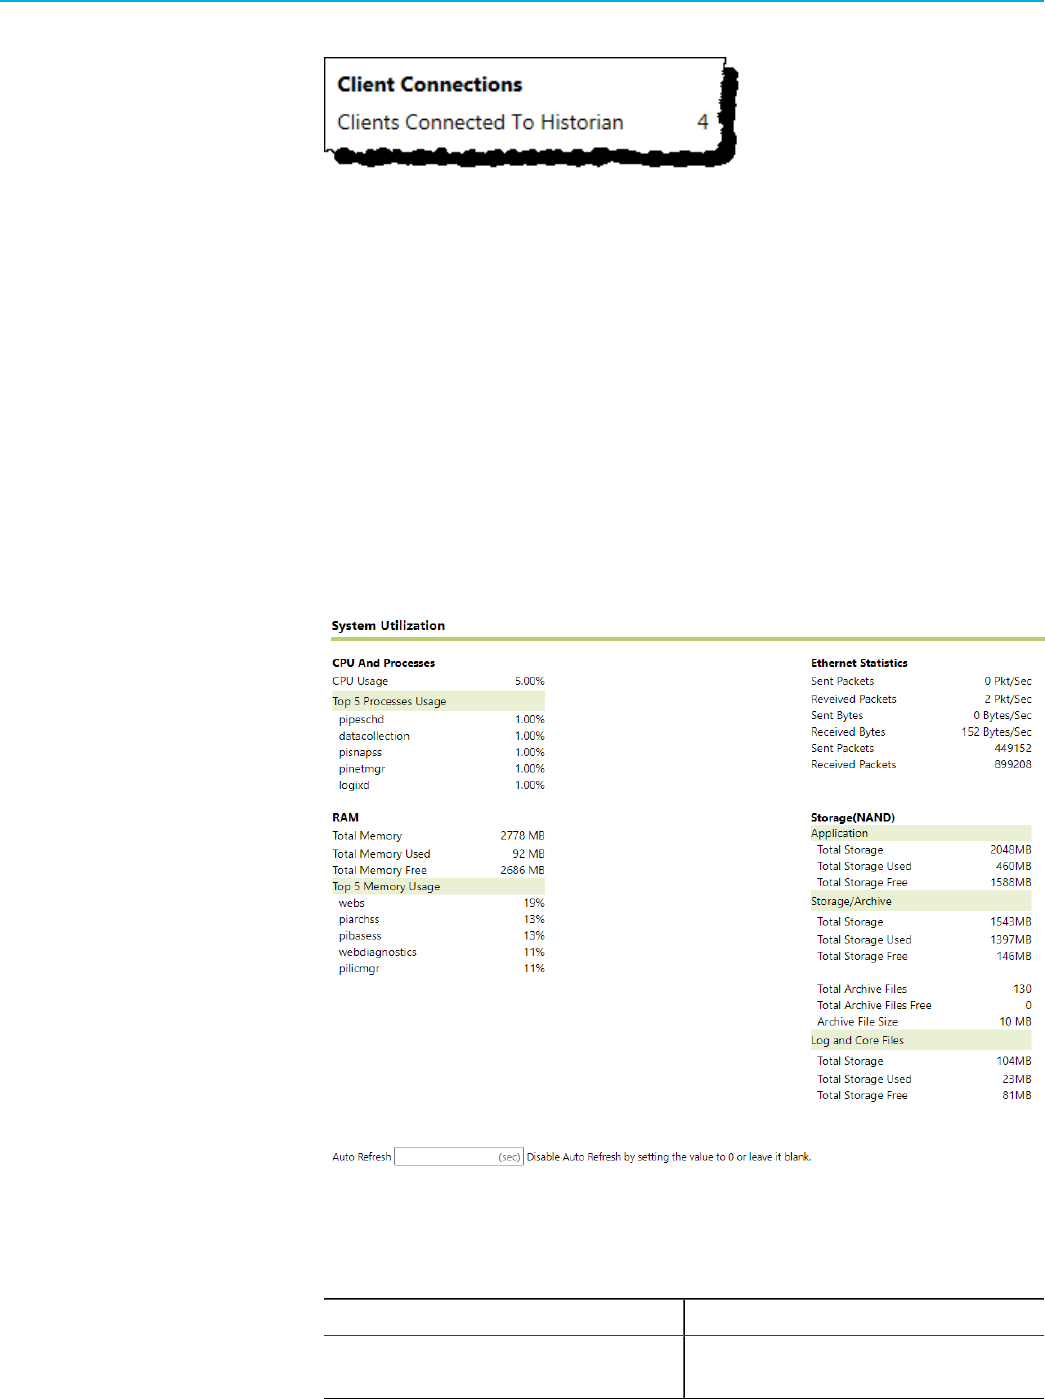
Chapter 3View the module information
Client connections
The Client Connections section displays the number of clients currently connected to FactoryTalk Historian ME.
There may be up to five clients connected simultaneously to the Historian module.
The following client applications are supported:
•
FactoryTalk Historian DataLink
•
FactoryTalk Historian ProcessBook
• FactoryTalk View SE Trending
•
FactoryTalk Administration Console
•
PI System Management Tools (SMT)
•
FactoryTalk VantagePoint
•
FactoryTalk VantagePoint EMI
System utilization
To open the System Utilization page, click System Utilization on the Home tab.
The page displays the following information:
This item: Displays:
CPU and Processes The current percent of the CPU in use and the processes
currently running.
Rockwell Automation, Inc. 1756-UM106H-EN-E - June 2024 35

Chapter 3View the module information
This item: Displays:
Note: The CPU usage percent listed in the System status
section (see System status on page 30) may display a
different percent than the percentage listed in the CPU and
Processes section in the main window. This is because the
CPU usage listed in the System Status section is updated
periodically while the CPU Usage information displayed in the
main window is static. It does not change once the page is
loaded.
RAM The memory usage of the module.
Ethernet Statistics The total amount of data sent and received by the module
through the network.
Storage (NAND) The total storage space used and available on the installed flash
drive. This section also displays the total number of archive
files and how many of them are free, as well as the archive file
size.
System statistics
To open the System Statistics page, click System Statistics on the Home tab.
Choose this option: To display:
Network Manager The network management statistics.
See Network manager on page 37.
Snapshot and Archive The snapshot and archive statistics.
See Snapshot and archive on page 38.
Archive Files The archive file statistics.
See Archive files on page 42.
The information available on this page may be helpful when troubleshooting any issues with your module.
Tip: For details on sorting and viewing information in tables, see Change views on page 51.
36 1756-UM106H-EN-E - June 2024 Rockwell Automation, Inc.

Chapter 3View the module information
Network manager
Click the Network Manager option to view the current network manager connection statistics.
The Network Manager section displays the following information:
Item Description
ID The connection ID. This is the primary key.
Path The root directory on the server. This directory is the same for
all connections.
Name The connection name.
ID The process ID number.
Reg App Name The registered application name.
Reg App Type The registered application type.
Protocol Version The protocol version of the connecting application.
Peer Name The host name of the connecting machine.
Peer Address The IP address of the connecting machine.
Peer Port The port number of the connecting machine.
ConType The connection type.
Net Type The network type.
ConStatus The connection status.
ConTime The time of the connection.
Last Call The time of the last call.
Elapsed Time The amount of time passed.
Bytes Sent The number of bytes sent.
Bytes Recv The number of bytes received.
Msg Sent The number of messages sent.
Msg Recv The number of messages received.
Errors Recv The number of errors received.
Errors Sent The number of errors sent.
API Count The number of APIs.
SDK Count The number of SDKs.
Server ID The identification number of the server.
Rockwell Automation, Inc. 1756-UM106H-EN-E - June 2024 37

Chapter 3View the module information
Item Description
NetMgr Version The number of the network manager version.
OS Sys Name The operating system name.
OS Node Name The operating system node name.
OS Release The operating system release number.
OS Version The operating system version number.
Machine The system name.
User The user name.
OS User The operating system user name.
Trust The name of the trust connection.
Snapshot and archive
Click the Snapshot and Archive option to view the current FactoryTalk Historian ME snapshot and archive statistics.
The Snapshot And Archive section displays the following information:
Item Description
Type The snapshot or archive file type.
Counter The performance counter. For details, see Snapshot and archive
counters on page 38.
Value The current snapshot and/or archive value.
Change The value change between updates.
Snapshot and archive counters
The following table presents information on the snapshot and archive counters.
Counter name Description
Point Count The Point Count is the number of points that are currently
defined in the Point Database. It is incremented when a point is
created and decremented when a point is deleted.
Snapshot Events An "r;event" is the fundamental Historian data element. It
represents a value or status of a unique data source at a
38 1756-UM106H-EN-E - June 2024 Rockwell Automation, Inc.

Chapter 3View the module information
Counter name Description
specific time. Specifically an event is a Value, Timestamp,
and PointID. Most events come from Historian API- or
Historian SDK-based interfaces. The Historian subsystems
("r;Applications" Historian Batch, Historian Performance
Equations, Historian Total, and Historian Alarm), as well as
manual input and laboratory systems are also event sources.
Every Snapshot event increments the Snapshot Events Counter.
The Snapshot Subsystem applies a compression algorithm
to every event. The compression algorithm determines if the
previous Snapshot event is passed on to the archive.
Out of Order Snapshot Events Events older than the current Snapshot event are out-of-order
events. These events bypass compression and are sent directly
to the archive. This counter shows the number of times this has
occurred.
Snapshots Events Reads Count of all Snapshot reads. This is a simple measurement of
how many Snapshot values are read by all applications.
Events Sent to Queue Events that pass compression, or are out of order, are sent to
the Event Queue, and thus increment this counter. Under normal
operating conditions, this count indicates the number of events
that passed the compression test (that is, the events were
different from existing events and could not be eliminated) and
are being sent to the archive.
The ratio of Snapshot events to Events Sent to Queue is
the system aggregate compression ratio. This ratio gives
a quick view of overall system compression tuning. Ratios
less than 2:1 indicate low compression; a compression tuning
evaluation should be performed. Ratios greater than 10:1
indicate over-compression; a compression tuning evaluation
should also be performed.
Three Point Database attributes affect compression: CompDev,
CompMin, and CompMax. These are known as the compression
specifications.
If a point has its Compressing point attribute set to FALSE, all
new events are sent to the Archive Subsystem.
Events in Queue Events passed to the EventQueue are put in the
First-In-First-Out order. The Events in Queue
Counter is incremented when the event is put in the Queue; it is
decremented when the
Archive Subsystem successfully retrieves and processes the
event.
When the system is shut down, the Event Queue is preserved in
the file PI\dat\pimapevq.dat.
Rockwell Automation, Inc. 1756-UM106H-EN-E - June 2024 39

Chapter 3View the module information
Counter name Description
This assures no data loss when the system shuts down, or when
the archive subsystem is not processing events at the same
rate as they come in.
Number of Overflow Queues If the queue PI\dat\pimapevq.dat becomes completely full,
a new queue is created. This should not occur under normal
circumstances and this number will be 0. However, if the
archive is not processing events, a number of such queues (up
to 65536) can be created. This counter shows how many queues
were created. These additional queues are automatically
deleted after the archive subsystem processes them.
Note: When multiple Event Queues exist, the file pimapevq.dat
is renamed to pimq0000.dat, and additional queues are named
pimq<id>.dat where id is the queue number in the hexadecimal
representation (from 0000 to FFFF). The piartool &endash;qs
command always shows information from the queue to which
the Snapshot Subsystem is writing (primary queue).
Total Overflow Events This is the total number of events in all Overflow Queues. The
sum of this counter and the Events in Queue counter are all the
events not yet processed by the archive.
Estimated Remaining Capacity Estimated maximum number of events with the current queue
file.
Archived Events The Archived Events counter is incremented for every new
event written to the archive (via the archive cache). This count
includes delete and edit events.
Out of Order Events The Archive Subsystem receives events from the Snapshot
Subsystem. If the timestamp of the event is older than the last
event in the target record, it is considered an out-of-order
event and is added to this counter.
Excessive out-of-order events might lead to system problems
such as excess processor consumption, excessive disk I/O, and
archives filling faster than expected.
Events Cascade Count Out-of-order events are inserted into the target record. The
insert requires moving other events within the record. If the
record is full, one or more events are forced out of the record
into the adjacent record. This counter is incremented each time
an insertion forces an event out of a record. This counter is an
indication of the impact of out-of-order events on the archive.
Events Read Number of events read by all applications. For example,
a trending application requests an array of events over a
specified time period. This counter is incremented for each
event returned.
40 1756-UM106H-EN-E - June 2024 Rockwell Automation, Inc.

Chapter 3View the module information
Counter name Description
Read Operations Number of archive read requests. Each archive read request
increments this counter once, regardless of the number of
events returned.
Cache Record Count Archive cache records in memory.
Cache Records Created Rate at which archive cache records are created in seconds.
Cache Record Memory Reads Rate of archive cache memory hits in seconds.
Cache Clean Count Rate at which archive cache records are removed from
memory.
Archive Record Disc Reads Rate of archive record disc reads in seconds.
Archive Record Disc Writes Rate of archive record disc writes in seconds.
Unflushed Events Indicates the total number of events not yet flushed to disk.
Unflushed Points Indicates the number of points with any number of events not
yet flushed.
Point Flush Count Number of points flushed to disk. Busy points might get flushed
several times per cycle.
Primary Archive Number The archive receiving current data is called the Primary Archive.
When the Primary Archive becomes full, an Archive Shift occurs
and the next available archive becomes the new Primary
Archive.
The primary number is the internal index number of archive
currently assigned to the primary position.
Archive Shift Prediction (min) Archive Shift (hr) estimates the predicted time to the next
archive shift. Use piartool -al to list the target archive file for
shift. The target archive will be initialized on shift; if it contains
data, make sure it is backed up. If this data is required to
remain online, a new archive of adequate size should be created
and registered.
When the current archive is less than 20% full, the estimate
is 0. In order to determine whether a zero estimate means the
archive is nearly full or not, run piartool -al. The message will
tell you if there is not enough data for a prediction.
Shift Time: Not enough information for prediction
The shift prediction in piartool -as differs slightly from the
one in piartool -al. The piartool -al figure is calculated when
called. The piartool -as command shows the latest 10
minutes average. The latter number is available as a Windows
Performance Counter.
Archiving Flag Indicates whether events may be written to the archive.
A value of 1 indicates that events may be written. A value of 0
indicates that events may not be written.
The Archiving Flag is set to 1 when there is a mounted Primary
Archive. A Primary Archive may be registered but not mounted,
Rockwell Automation, Inc. 1756-UM106H-EN-E - June 2024 41

Chapter 3View the module information
Counter name Description
for example during an archive shift. In this case, the Archiving
Flag would be set to 0. This flag is also set to 0 when in backup
mode.
All registered archives may be viewed using piartool -al. The
Archive Flag is set to 0 if the
Primary Archive becomes full and there is no other archive file
available into which to shift.
Note that the Primary Archive will never overwrite itself.
Archive Backup Flag This flag is set to 1 when the archive is in the backup mode. The
value is 0 when the archive is available for normal access.
To enter the backup mode, run the piartool -bs command.
To exist the backup mode, run the piartool -be command.
Archive Loaded Flag This flag is 1 when a valid primary archive is mounted. It is 0 if
the primary archive is not mounted.
Shift or System Backup Flag This flag is 1 when the archive is in the shift mode or the
Archive Subsystem has been placed in the backup mode. The
shifts occur automatically or can be forced via the piartool
-fs command. System backup mode is entered with the
piartool -systembackup command.
Failed Archive Shift Flag Set to 1 when a shift should occur but no shiftable archive
exists. Under normal conditions, this flag is 0.
Overflow Index Record Count Number of index records. Index records speed up access to
overflow records. Index records are created when two overflow
records for a point are full, and the third one is being created.
This counter is a measurement of archive file consumption.
Overflow Data Record Count Number of non-primary data records. Each archive has
a primary record for each point. When this record is full,
data is written to overflow the records. This counter gives a
measurement of archive consumption.
Archive files
Click the Archive Files option to view archived system statistics.
42 1756-UM106H-EN-E - June 2024 Rockwell Automation, Inc.

Chapter 3View the module information
FactoryTalk Historian ME stores your data in archives, which are the files that hold FactoryTalk Historian ME data.
Archive files are fixed which means that they are always the same size, regardless of how much data they contain.
The archive receiving current data is called the primary archive. When the primary archive becomes full, an
archive shift occurs, and the next available archive becomes the new primary archive. When the primary archive is
being backed up, you cannot modify that archive or the Point database.
Each archive file contains events for a time period specified by the archive start time and end time. The archive files
on each FactoryTalk Historian ME server should cover all-time ranges, without overlapping time ranges or gaps in
time. A list of archive files stored on FactoryTalk Historian ME is displayed by default when you select the Archive
Files option.
The Archive Files section displays the following information:
Item Description
Archive File The archive file name, which includes the full path.
Status The archive status displays one of the following:
• Primary - the archive file that is currently receiving data.
•
Has Data - indicates that the archive file contains data and
is full.
•
Empty - indicates that the archive has no data.
Size (MB) The archive file size in megabytes.
Start Time The time that data was first written to the archive file.
End Time The time that data was last written to the archive file.
Lifetime The archive file age in days, hours, minutes, and seconds.
Last Modified Time The last time and date the archive file was modified.
Backup Time The last time and date the archive file was backed up. Never
indicates that the file has never been backed up.
State The state of the file:
• Created
•
Initialized
• Dismounted
•
Mounted
Type Indicates the type of file, which is always Fixed size.
Write Flag Specifies if a file is writable or read-only.
Shift Flag Specifies if a file is shiftable or not shiftable.
Add Rate/Hour The rate at which files are added to the archive per hour.
% Full The percentage of the archive that is being used.
Annotations The size in bytes of the annotation file associated with the
archive file.
Annotation File Size The size in megabytes of the annotation file associated with the
archive file.
Shift Prediction The target archive or the predicted shift time.
Rockwell Automation, Inc. 1756-UM106H-EN-E - June 2024 43

Chapter 3View the module information
Item Description
Primary Offset The number that indicates the number of primary archive
records in use.
Overflow Offset The number that indicates the number of overflow records in
use.
Record Size The record size for each archive record.
Version The version of the archive header.
# The archive number used by FactoryTalk Historian ME.
44 1756-UM106H-EN-E - June 2024 Rockwell Automation, Inc.

Chapter 4
View data
You can view the following types of data on the pages of the View Data tab:
•
Current data
See View current data on page 47.
• Archive data
See View archive data on page 47.
•
Trends
See View trends on page 48.
To display data, define your search criteria first. For details, see Define search criteria on page 45.
To export data, see Export data on page 47.
To change how the data is displayed, see Change views on page 51.
Define search criteria
The following search rules apply to all the pages on the View Data tab.
To search data
1. Define your search criteria in the boxes at the top of the page.
2.
Click Search.
The information specified in the search criteria is displayed.
Using the asterisk ("*") in the search boxes
The asterisk that appears in the search boxes functions as a wildcard value. You can use it to:
•
Represent a contiguous series of characters (for example: *xxx*, *xxx, or xxx*).
•
Return data that meet all conditions for the given search box.
•
Return ALL points in the system. To do so, leave the asterisk in all the search boxes.
To define search criteria
1.
In the Point Name box, type the point name criteria such as the full name, partial name, or wildcard value for
the data you would like to search.
2.
In the Point Source box, type the point source for the current data.
The point source is the base attribute that identifies the interface or other scanning software responsible for
providing data for the associated point. Common point sources depend upon your environment. They include
the following:
Point source Description
FTME The default point source for FactoryTalk Historian ME.
T The Totalizer utility subsystem.
C The Performance Equation subsystem.
3.
In the Point Type list, select the point type.
Rockwell Automation, Inc. 1756-UM106H-EN-E - June 2024 45

Chapter 4View data
Point types include:
Point type Description
Int16 A 16-bit integer value.
Int32 A 32-bit integer value.
Float16 A 16-bit floating point value.
Float32 A 32-bit floating point value.
Float64 A 64-bit floating point value.
String A string value.
Digital A digital value.
Timestamp A timestamp value.
4.
In the Scan Rate list, select a scan rate.
The scan rate is the rate (in seconds) at which the data is collected.
5.
In the Archiving list, select one of the following options to display points with a specific archive bit setting:
Option Description
On Returns points where the archive is set to On.
Off Returns points where the archive is set to Off.
Asterisk (*) Returns points that meet either condition (On or Off) and
meet the other search conditions.
6.
In the Scan list, select one of the following options to search for points with a specific scan bit setting:
Option Description
On Returns points where the scan bit is set to On.
Off Returns points where the scan bit is set to Off.
Asterisk (*) Returns points that meet either condition (On or Off) and
meet the other search conditions.
7.
Click Search to initiate the tag search.
The search populates the Points table with the following information for each data point:
Item Description
Select column checkbox To create a specific list of points to view, check the box
in the Select column for a specific tag or set of tags, then
mark the Selected Rows option.
Name The name of the data point.
Value The most recently returned value of the data point.
Timestamp The time that the last value was returned for the specified
data point.
Type The data type for the listed point. If the point is of Boolean
or String type, no checkbox will be displayed in the Select
column.
46 1756-UM106H-EN-E - June 2024 Rockwell Automation, Inc.

Chapter 4View data
To clear all your search criteria, click Reset.
Tip: For information on filtering the search results, see Filter search results data on page 52.
Export data
You can export all points that are listed in your search results. The data is exported to a CSV (comma-separated
values) document that you can open in Microsoft Excel.
To export data
1.
Find the data that you want to export by defining your search criteria.
For details, see Define search criteria on page 45.
2.
Export data.
To export all the data displayed in the search results
◦ Click Export.
To export specific data
◦
Select a checkbox in the Select column next to the data row that you want to export.
◦
Click Export.
The Save HTML Document dialog box appears.
3.
Navigate to the place in which you want to save the file.
If you change the name of the file, make sure to leave the .csv file extension in the File name box.
Leave the default settings in the Save as type and Language boxes.
4.
Click Save.
Tip: The FactoryTalk Historian DataLink Excel Reporting Tool provides a Historian Add-In for
Microsoft Excel. If you export more than 65,535 rows of FactoryTalk Historian ME events to
FactoryTalk Historian DataLink using the Compressed Data (Start Time/End Time) configuration
page, Excel generates an "r;Output exceeds dimension" message.
View current data
To view data that is currently being collected by FactoryTalk Historian ME, click the View Data tab, and then click
Current Data.
To view current data
1.
Under Current Data, define your search criteria.
For details, see Define search criteria on page 45.
2.
Click Search.
The data is displayed in the search results table.
View archive data
To view archive data in FactoryTalk Historian ME, click the View Data tab, and then click Archive Data.
The page displays a list of points and the latest value collected for each point.
Rockwell Automation, Inc. 1756-UM106H-EN-E - June 2024 47

Chapter 4View data
To view archive data
1.
Under Select Points For Archive Data, define your search criteria.
For details, see Define search criteria on page 45.
2.
Click Search.
The data is displayed in the Points table.
3.
Under Points, click a point for which you want to view data.
Tip: You can view archive data only for one point at a time.
4.
In the Start Time and End Time boxes, type the start and end time for which you want to view the data.
For details, see Set start and end times on page 53.
5.
Click View.
View trends
To view data in trends, click the View Data tab, and then click Trends.
The page allows you to select multiple points and draw a trend chart to view data. Each trend chart provides a visual
representation of the data collected over a specific time.
To view a trend
1.
Under Select Points For Trend Chart, define your search criteria.
For details, see Define search criteria on page 45.
2.
Click Search.
The data is displayed in the Points table.
3.
Select checkboxes in the Select column next to the points that you want to present on the trend.
4.
(Optional) In the Start Time and End Time boxes, type the start and end times for the selected points.
For details, see Set start and end times on page 53.
5.
(Optional) Using the Auto Refresh list, define the frequency with which the data in the trend will be refreshed
(in seconds).
48 1756-UM106H-EN-E - June 2024 Rockwell Automation, Inc.

Chapter 4View data
The default value is 1 second.
6.
Click .
The button color changes to grey ( ). The trend is drawn. The data in the trend is being refreshed with
the frequency specified in the Auto Refresh list.
The trend chart displays trends for selected points using colored variants to distinguish between the
different points. You will not be able to select the point for viewing in the trend chart until data has been
collected for the new point.
The numbers on the horizontal axis at the bottom of the chart represent the point timestamps. The numbers
on the vertical axis on the left of the chart represent the point values.
The small window next to the trend displays the chart in the total time period set by the time parameters.
Display points on the trend
Use the Show Points option to display individual points on the trend.
To display points on the trend
1. Click .
The button color changes to grey ( ). The data on the trend is no longer refreshed.
2.
Select the Show Points option next to the trend.
Individual points are displayed on the trend as small circles.
3.
Click .
Tip: If you want to draw a trend chart that consists of high-speed points, avoid selecting the
Show Points option due to the large number of points that will be displayed.
Display the vertical bar on the trend
Use the Show Vertical Bar option to display a vertical bar across all points on the X-axis. At the bottom of the trend,
timestamps will be adjusted when you click inside the trend and drag the vertical bar across it.
Rockwell Automation, Inc. 1756-UM106H-EN-E - June 2024 49

Chapter 4View data
To display the vertical bar on the trend
1.
Click .
The button color changes to grey ( ). The data on the trend is no longer refreshed.
2.
Select the Show Vertical Bar option next to the trend.
When you move the mouse pointer over the trend, a vertical bar moves along with the pointer.
3.
Click .
Tip: When Daylight Savings Time (DST) occurs, the timestamps displayed will be automatically
updated to reflect the time change. If you adjust the start time to an earlier start time, the
timestamps reflected will coincide with DST even if the DST transfer did not occur until later.
Zoomthetrend
To zoom in on a specific time span for a set of data
1.
Click .
The button color changes to grey ( ). The data on the trend is no longer refreshed.
2.
Click and drag the mouse pointer to draw a grey box over the time span on which you want to zoom in.
3.
Release the mouse pointer.
The point data from the time span that you marked with the box appears in the trend. The selected time span
is highlighted in the total time period window next to the trend.
50 1756-UM106H-EN-E - June 2024 Rockwell Automation, Inc.

Chapter 4View data
Reset the trend
To reset the zoomed-in trend to the regular view, click Reset or .
Remove points from the trend
To remove a point from the trend
•
In the point list below the trend, clear the checkbox next to the point name that you want to remove.
Change views
You can modify how the data is displayed on the Current Data, Archive Data, and Trends pages by:
•
Filtering search results data.
See Filter search results data on page 52.
• Arranging columns.
See Arranging columns on page 52.
•
Refreshing views.
See Refreshing views on page 52.
• Setting start and end times.
See Set start and end times on page 53.
Rockwell Automation, Inc. 1756-UM106H-EN-E - June 2024 51

Chapter 4View data
Filter search results data
To filter search results, select either the All Rows or the Selected Rows option. Your filter selection will apply to all
the pages on the View Data tab.
If you select the Selected Rows option, all the data that you have searched and selected with checkboxes on any of
the View Data tab pages will be listed in the search results table.
For example, if you have selected the MonitorTag point on the Current Data page, and then the int32tag999
point on the Trends page, both points will be listed in the search results table when you click the All Rows option on
any page on the View Data tab.
To reset the search boxes to their default settings and clear the row selection checkboxes, click Reset.
Arrange columns
Use the following options to arrange columns and their content.
To change the sorting order in a column
1. Move the mouse pointer over a column heading.
An arrow at the top of the column heading indicates its current sorting order:
The sorting order is ascending.
The sorting order is descending.
2.
Click the column heading to change the sorting order.
Tip: To reduce the load on the FactoryTalk Historian ME processor, sorting occurs on the
client computer. If you are monitoring your processor through the task manager, you may see
increased processor usage due to the sorting.
To select columns to display
1.
Move the mouse pointer over a column heading.
A down arrow appears next to the heading.
2.
Click the arrow to list available table columns.
◦
To add a column to the table, select the checkbox next to the column that you want to add.
◦ To remove a column from the table, clear the checkbox next to the column that you want to remove.
Refresh views
You can refresh the content of the search results table either manually or automatically.
To refresh the search results table manually
• Click Search.
52 1756-UM106H-EN-E - June 2024 Rockwell Automation, Inc.

Chapter 4View data
To refresh the search results table automatically
•
Below the table, in the Auto Refresh box, type a refresh interval in seconds.
When using the Auto Refresh option, note the following:
•
It is recommended that you turn off the option if you do not need it.
•
Display the minimum amount of data necessary to reduce memory consumption.
•
Choose the refresh rate prudently. The faster the auto-refresh frequency is, the more memory it consumes.
•
Turn the auto refresh option off before closing the web browser or opening another page to release the
memory that was being used.
Set start and end times
The start and end times are set with relation to the time on the client computer.
The default start time is two minutes before the current time on the client computer. The default end time is the
current time on the client computer.
You can use the following expressions to set time:
This expression: Means:
* The current time.
t Today at midnight (00:00:00).
y Yesterday at midnight (00:00:00).
t 15:00:00 Today at 3:00:00 pm.
y 15:00:00 Yesterday at 3:00:00 pm.
-60s The past 60 seconds.
+45m The future 45 minutes.
-5h The past 5 hours.
-3d The past 3 days.
sun The most recent Sunday at midnight (00:00:00).
25 8 08:00 on the 25th of the current month.
25 8:10 08:10 on the 25th of the current month.
06-dec-08 15:00:00 3:00:00 p.m. on December 6, 2008.
mon+14.5h 2:30:00 p.m. last Monday.
sat-1m 11:59:00 p.m. last Friday.
Bad quality data
FactoryTalk Historian ME tracks data quality during the data collection and the data transfer. It may happen that data
is of bad quality (for example, if the controller loses its connection to the FactoryTalk Historian ME, or if a running tag
is removed from the controller but not from FactoryTalk Historian ME).
Bad quality data is displayed in the point list with the Bad_Quality value.
Rockwell Automation, Inc. 1756-UM106H-EN-E - June 2024 53

Chapter 5
Manage points
In this section you will learn about the following:
•
Recommendations related to managing points on page 54
• Add points using the Add Points Wizard page on page 54
• Add points using the Add Individual Points page on page 58
•
Manage individual points using the Edit Points page on page 59
•
Define point attributes on page 61
•
Configure scan types on page 66
• Configure Trigger Input and Output points on page 67
•
Manage shortcuts on page 72
•
Use scan classes on page 75
Recommendations related to managing points
When managing points, pay attention to the following recommendations:
•
Always stop the data collection before you intend to change the Historian configuration or manage points
either in the Historian web client or the System Management Tools of FactoryTalk Historian SE.
• Make sure that you never delete the FTHMEScanRateDefinition tag or other system-generated tags
with names such as bae9cf24-c8b3-46c0-ad5d-a64df2174ed9 and values such as No data. The
FTMEScanRateDefinition tag is a system-generated tag that contains scan class definitions. If it is deleted,
all scan class definitions will be removed. Deleting other system-generated tags will cause the system log to
overflow with error messages.
•
Every time the point configuration is changed you should expect data interruption.
Add points using the Add Points Wizard page
You can use the Add Points Wizard page to add multiple points to your Historian module.
The process consists of the following steps:
1. Discover tags on page 54.
2.
Create points on page 56.
3.
Review results on page 57.
Discover tags
This is step 1 of adding points using the Add Points Wizard
IMPORTANT: Stop the data collection before adding and creating points to ensure minimal impact on
the Logix controller memory.
To discover tags
1.
Click Manage Points.
The Add Points Wizard page appears.
54 1756-UM106H-EN-E - June 2024 Rockwell Automation, Inc.

Chapter 5Manage points
2. In the Rule File list, do either of the following:
◦
To discover specific tags, select a file with tag discovery rules. The default is ADDefault.xml.
To view the content of the file, click next to the list.
For details on defining rules, see Define point discovery rules on page 132.
◦
To discover all tags from Logix controllers, select None.
Rule files are managed through the Rule Editor. For details, see Use the Rule Editor on page 131.
Since the search only applies to the cached information of the web client, it is limited to the first 2000
tags from a single controller. If you want to browse for more tags, change the tag point discovery limit
in the point discovery rule file. For details, see Define point discovery rules on page 132.
3.
In the Tag File list, select a tag attribute file. The default is FTHMETagDefault.xml.
The tag attribute file defines the attributes of the points to be created.
To view the content of the file, click next to the list.
Rule files are managed through the Rule Editor. For details, see Use the Rule Editor on page 131.
4.
In the Scan Rate list, do either of the following:
◦
The scan rate defines how frequently the data is collected.
If you want to set a global scan rate, select a value in seconds.
Points with invalid scan rates will not be created.
The valid scan rates are the following:
For this scan type: Use this scan rate:
▪ Advised
▪ Polled
Equal to or greater than 0.5 seconds.
▪ High-speed Equal to or greater than 0.01 seconds, and equal to or
less than 0.5 seconds.
The maximum number of events per second is 2500. For the data collection rates slower than 500 ms,
use Polled and Advised tags.
◦
If you use multiple tag attribute files that define different scan rates, and you want to use these scan
rates rather than a global one, select default.
5.
In the Start Search In list, select a checkbox next to each controller that you want to search.
The list contains all online controllers from the same chassis.
FactoryTalk Historian ME supports the data collection from a maximum of four controllers.
6.
Click Show Tags in the right bottom corner of the page.
If the button is disabled, check whether:
◦ The selected rule file is valid.
◦ The selected tag file is valid.
Rockwell Automation, Inc. 1756-UM106H-EN-E - June 2024 55

Chapter 5Manage points
◦ You have selected at least one connector to search.
Tip: For details on creating and editing rule and tag files, see Use the Rule Editor on page
131.
▪ For details on uploading the files, see Upload files to the module on page 105.
The discovered tags are listed on the Create Points wizard page.
The process of retrieving data from a controller is indicated with a message similar to
the following:
INFO: Retrieving data from JCWStandard2500_1_6
If the number of available points has exceeded the discovery tag limit defined in the
rule file, the following message appears:
WARNING: You have reached the maximum number of points that
can be created.
The search results are displayed in the table below the search boxes.
By default, all the points displayed in the table are selected.
The number of selected points is provided in the Selected Points box below the table.
Create points
This is step 2 of adding points using the Add Points Wizard
Tip: You can create a maximum of 2500 data points per Historian module.
To create points
1.
Among the discovered tags, search for those that you want to use to create points:
a.
In the Name box, type the name of the tag.
The * symbol displays all the tags.
b. In the Controller list, select the controller from which you want to filter tags.
c.
In the Type list, select the type of the tag.
The * symbol displays all the tag types.
d.
Click Search.
The search results are refined based on the search criteria that you have selected.
2.
Select the tags that you want to use to create points.
◦
To select all the tags in the search results table, select the All/None checkbox below the table.
◦ To select no tags from the search results table, clear the All/None checkbox below the table.
3.
(Optional). Change the scan rate of the selected tags:
a.
In the list, select a new scan rate.
b. Click Change Scan Rate.
Tip: This setting will override the scan rate setting that you have defined on the Discover
tags wizard page (See Discover tags on page 54).
4.
Click Create, and confirm your action in the message box that appears.
The result of the point creation process is displayed on the Review Result wizard page.
56 1756-UM106H-EN-E - June 2024 Rockwell Automation, Inc.

Chapter 5Manage points
If you have selected more than 2500 tags, the Create button will not be available. To make it available again,
reduce the number of selected tags to less than 2501.
Tip: If you want to restart creating points with theAdd Points Wizard, click Restart Wizard, and
confirm your action in the message box that appears. You will return to the Discover Tags wizard
page.
Review results
This is step 3 of adding points using the Add Points Wizard
The Review Result wizard page contains information on the points that have been processed.
The page contains the following information on points:
•
The number of points that were created is based on the tags that you have selected on the Create points
wizard page (See Create points on page 56).
•
The number of points that were not created because of either of the following reasons:
◦
A specific point already exists in the archive.
◦ An error occurred.
For details, see System log related issues on page 112.
•
The total number of points in the module, including the newly created ones.
The points that have not been created are listed in the Points Not Created table, along with an explanation for the
point creation failure.
Once you finalize the data point creation, restart the data collection by clicking Restart Data Collection. The process
may take several minutes.
Tip: If the FactoryTalk Historian ME Module receives an event with a timestamp 10 minutes or more into
the future, it will discard that event and log an error message in the system log as follows:
[ERROR] TagProcessingForPolledAndAdvised() dropped future event for
point<ID> with <timestamp> with timeDelta=<number of seconds into future>
For example:
6-Oct-09 15:54:29 Data Collection [ERROR] TagPr
ocessingForPolledAndAdvised() dropped future event for point 450 with
timestamp 13-Oct-09 00:37:03.89001 with timeDelta=549754
Note that if the data transfer service is in the auto transfer mode, it may continue running. If the auto transfer mode
is not enabled, you must manually select points to transfer, and then restart the data transfer service.
Rockwell Automation, Inc. 1756-UM106H-EN-E - June 2024 57

Chapter 5Manage points
Add points using the Add Individual Points page
To add points using the Add Individual Points page
1.
Click Manage Points, and then click Add Individual Points.
The Add Individual Points page appears.
2.
In the Tag File list, select a tag attribute file. The default is FTHMETagDefault.xml.
The tag attribute file defines the attributes of the points to be created.
To view the content of the file, click next to the list.
Rule files are managed through the Rule Editor. For details, see Use the rule editor on page 131.
3. In the Scan Rate list, do either of the following:
◦
If you want to set a global scan rate, select a value in seconds.
The scan rate defines how frequently the data is collected.
Points with invalid scan rates will not be created.
For tags, the maximum number of events per second is 2500. For the data collection rates slower than
500 ms, use the Polled and Advised tags.
The valid scan rates are the following:
For this scan type: Use this scan rate:
▪ Advised
▪ Polled
Equal to or greater than 0.5 seconds.
▪ High-speed Equal to or greater than 0.01 seconds, and equal to or
less than 0.5 seconds.
◦
If you use multiple tag attribute files that define different scan rates and you want to use these scan
rates rather than a global one, select default.
4.
Under Folders, expand the tree, and then select the controller from which you want to use tags.
The controller's tags are displayed under Contents.
To refresh the list of controllers, click Refresh.
5.
(Optional) To further filter the tag search results, filter the tags using the Tag Filter box under Folders:
◦
In the Tag Filter box, type a tag name or a part of a tag name with *, and then press Enter.
The tags that are displayed under Contents are filtered using the filter criteria that you have specified
in the Tag Filter box.
To display all the tags again with no filter applied, type * in the Tag Filter box, and then press Enter.
6.
Under Contents, select the tags that you want to use to create points.
To select all the tags, select the All/None checkbox under Contents.
7.
Click Add Tag(s) to List.
The tags that you have selected are listed in the Selected Tags table.
8.
Click Create, and confirm the action in the message box that appears.
The points are created.
58 1756-UM106H-EN-E - June 2024 Rockwell Automation, Inc.

Chapter 5Manage points
The following information is displayed:
◦
The number of points that were created based on the tags that you have selected.
◦ The number of points that were not created because of either of the following reasons:
▪
A specific point already exists in the archive.
▪ An error occurred.
For details, see System log related issues on page 112.
◦
The total number of points in the module, including the newly created ones.
The points that have not been created are listed in the Points Not Created table, along with an explanation for the
point creation failure.
Once you finalize the data point creation, restart the data collection by clicking Restart Data Collection. The process
may take several minutes.
Manage individual points using the Edit Points page
You can perform the following actions on individual points using the Edit Points page:
•
Create points on page 59
• Edit points on page 60
• Rename points on page 60
•
Delete points on page 60
Create points
To create points
1.
Click Manage Points, and then click Edit Points.
The Edit Points page appears.
2.
At the bottom of the page, click New.
3.
The Point Property page appears.
4.
Fill in the point attributes.
For details, see Define point attributes on page 61.
5. Click Save.
If the data transfer service is set to the auto transfer mode, the new points will be created with the new tag names
automatically. Otherwise, you need to add the new points to the data transfer manually.
To add new points to the data transfer
1.
Click Configure Historian, and then click Data Transfer Points.
The Data Transfer Points page appears.
2.
Using the search boxes, find the points that you want to add to the data transfer.
3.
In the search results table, select the points that you want to add to the data transfer.
4.
Click Save.
5.
In the left pane of the window, click Data Transfer.
6.
Restart the data transfer service.
Rockwell Automation, Inc. 1756-UM106H-EN-E - June 2024 59

Chapter 5Manage points
Edit points
To edit points
1.
Click Manage Points, and then click Edit Points.
The Edit Points page appears.
2.
Using the search boxes, set your point search criteria, and then click Search.
3.
In the search results table, click the point that you want to edit, and then click Edit.
The Point Property page appears.
4.
Change the point attributes.
For details, see Define point attributes on page 61.
If you want to cancel your changes and bring back the original attributes of the point, click Reset.
Tip: Resetting will not work after you save the changes using the Save button.
5.
Click Save.
Rename points
To rename points
1.
Click Manage Points, and then click Edit Points.
The Edit Points page appears.
2.
Using the search boxes, set your point search criteria, and then click Search.
3.
In the search results table, click the point that you want to edit, and then click Rename.
The Point Property page appears.
4.
Change the point name.
If you want to cancel your changes and bring back the original attributes of the point, click Reset.
Tip: Resetting will not work after you save the changes using the Save button.
5.
Click Save.
Delete points
To delete points
1.
Click Manage Points, and then click Edit Points.
The Edit Points page appears.
2.
Using the search boxes, set your point search criteria, and then click Search.
3.
In the search results table, click the point that you want to edit, and then click Delete.
4.
The Point Property page appears.
5.
Confirm the message.
60 1756-UM106H-EN-E - June 2024 Rockwell Automation, Inc.

Chapter 5Manage points
Define point attributes
Point attributes tell FactoryTalk Historian ME how and when the server should collect data from a particular data
source. They contain the following information:
• The location of the data source.
• The frequency with which the server should get new values from the data source.
•
The value that the server can ignore.
•
The data that is valid.
In the Historian web client, the point attributes are presented in the following groups:
•
General on page 61
•
Exception filtering on page 64
•
Compression filtering on page 64
•
Snapshot value on page 65
General
The General group contains the following point attributes:
Use this attribute: To:
Name Name the point, following these rules:
• The name must be unique.
•
The first character must be alphanumeric or the percent
sign (%).
•
The name must not contain:
◦ Control characters (such as line feeds or tabs).
◦
The following characters: * ' ? ; : { } [ ] | \ / ( ) ` "
Descriptor Type a basic description of the point. The description will be
displayed in client applications and user reports.
Extended Description Specify a relevant expression or a tag name. For details, see
Configure Trigger Input and Output points on page 67.
Use this attribute only with trigger input and output points.
Instrument Tag Provide a full path to the controller and the tag from which the
data is coming. If you replace the controller with a different
one that measures the same process value, it is usually best
to continue using the same point. Edit the point as required so
that it will collect the new data.
Use the following format of the path:
[<controllerprojectname>_1_<controllerslotnum
ber>][<controllertagname>]
When a source tag receives events from the controller, the tag
that you set in this attribute reads (or writes back) events from
the controller.
Rockwell Automation, Inc. 1756-UM106H-EN-E - June 2024 61

Chapter 5Manage points
Use this attribute: To:
Notes:
• It is recommended that you do not change the tag name in
the attribute, since it may make the tag invalid, and make
it stop collecting data.
•
If the full path points to a controller in a remote chassis,
and the tag from which data is coming is a high-speed or
an output tag, the configuration will not be supported.
Source Tag Type the trigger tag name. If you type a tag name, the source
tag referenced must not be high-speed or have a scan rate of
faster than 1 second. Otherwise, the module will generate an
error and you will not be able to save the point.
Use this attribute only with the Trigger Input or Output tags.
Type Set the data type of the point values. When you change the
point type, the archive subsystem closes the current archive
record, and starts a new one with the new type information in
the header. For points collected automatically, use the point
type that most closely matches the point type in the source
system.
Choose from the following:
•
Int16
For points whose values are 16-bit integers.
•
Int32
For points whose values are 32-bit integers.
•
Float16
For points whose values are 16-bit floating point values.
•
Float32
For points whose values are 32-bit floating point values.
• Float64
For points whose values are 64-bit floating point values.
•
String
Used to store string data up to 1000 characters.
Note: Strings are not supported for high-speed data
collection.
•
Digital
For points whose values can only be one of several
discrete states, such as ON/OFF. You can define digital set
contents.
•
Timestamp
For points whose values are timestamps.
Digital Set Select the type of digital set for the point.
Choose from the following:
•
SYSTEM
• BatchAct
•
Phases
62 1756-UM106H-EN-E - June 2024 Rockwell Automation, Inc.

Chapter 5Manage points
Use this attribute: To:
• Modes
• RABoolean
Use the System Management Tools of FactoryTalk
Historian SE to create additional digital sets. For
more information, refer to the PI Data Archive 2015 R2
Introduction to System Management Guide.pdf.
This attribute only appears if the point is of type digital.
Scan Type Determine the scan type for the point.
Choose from the following:
•
Polled
• Advised
•
Trigger Input
• Output
•
High-speed
Note: For details, see Configure scan types on page 66.
Scan On Identify active tags. The active tags are updated. If you want
a point to be the active point, set this attribute to On and the
point source to FHTME.
Typical Value Type a reasonable value for a point.
For a numeric tag, it must be greater than or equal to the value
of the Zero attribute, and lower than or equal to the sum of the
Zero and Span attribute values.
The typical value range is between 0 and 100.
The typical value range for the points of type Digital is between
0 and 1.
Point Source Identify the interface to which the point belongs.
When you configure an interface, you specify a point source for
the interface. All the points that belong to the interface must
use that point source code as the value for the Point Source
attribute.
The default point source is FTME. Other options include:
•
T, for the Totalizer utility subsystem in PI.
•
C, for the Performance Equation tags.
Scan Rate Set the time in seconds, which tells FactoryTalk Historian ME
how often to collect the data.
For the Trigger Input and Output scan types, it is recommended
that the scan rate is defined as two seconds or longer.
For details, see Use scan classes on page 75.
Span Value Set the difference between the top and the bottom of the range.
This attribute is required for all numeric data type points.
For Float16 point types, the Span value is used with the Zero
value for scaling values in the archive. The Span property
must be a positive value. If the value for a Float16 point type is
Rockwell Automation, Inc. 1756-UM106H-EN-E - June 2024 63

Chapter 5Manage points
Use this attribute: To:
greater than the top of the range, it is recorded in the archive
as Over Range.
For other point types, the Zero and Span values do not affect
the values recorded in the archive. The Span property is also
used when defining a FactoryTalk Historian ProcessBook trend
with a vertical scale of the database. This attribute is not used
for non-numeric points.
Zero Value Type the lowest value possible.
This attribute is required for all numeric data type points. It
does not have to be the same as the instrument zero, but that is
usually a logical choice.
The zero value range is between 0 and 100.
Exception filtering
The exception reporting information determines when to send data to the snapshot subsystem.
The Exception Filtering group contains the following point attributes:
• Exception Min
This value specifies the minimum time span between the exceptions.
The default value is 0 seconds.
•
Exception Max
This value specifies the maximum time span between the exceptions.
The default value is 10 minutes.
•
Exception Deviation
This value specifies how much a point value must change before a new value is reported.
The default value is 0.25 engineering units.
The following are value ranges that you can use to specify parameter values:
•
The range of Exception Min Day and Exception Max Day is between 0 and 100.
•
The range of Exception Min Hr and Exception Max Hr is between 0 and 15.
•
The range of Exception Min Min and Exception Max Min is between 0 and 59.
•
The range of Exception Min Sec and Exception Max Sec is between 0 and 59.
•
The Exception Deviation range is between 0 and 100.
Tip: For details on the exception filtering configuration, see Exception filtering on page 83.
Compression filtering
When a new snapshot arrives, the previous one is evaluated according to the compression information to check
whether it is a significant event. If so, it is sent to the event queue. Otherwise, it is discarded. The result is that only
significant data is written to the archive. This process is called compression.
The Compression filtering group contains the following point attributes:
64 1756-UM106H-EN-E - June 2024 Rockwell Automation, Inc.

Chapter 5Manage points
Use this attribute: To:
Compression On Activate the compression for the point.
The compression should be activated for all real-time points in
the system.
If the compression is deactivated, all values sent to the
snapshot subsystem are saved in the archive.
Compression Min Set a value indicating that events are archived when the
elapsed time since the previous event is greater than or equal
to the minimum time, and the event value has changed by more
than the deviation.
Compression Minimum sets a minimum limit on the time
between events in the archive. Typically, the minimal
compression should equal 0.
Compression Max Set a value indicating that events are archived when the
elapsed time is greater than the maximum time.
Compression Maximum sets a maximum limit on the time
between events in the archive. The recommended maximum
time specification is one work shift (such as, eight hours).
Duplicate values will be archived if the elapsed time exceeds
the Compression Max value. Under no circumstances does this
cause the FactoryTalk Historian ME server to generate events; it
only filters events that are externally generated.
Compression Deviation Set a value for the compression deviation.
If you set the value too low, too little compression is imposed on
the data and much space is wasted in the archive.
If you set the value too high, you may lose important data.
For most flows, pressures, and levels, use a deviation of 1% or
2% span. For temperatures, the deviation should usually be one
degree or two degrees.
The following are value ranges that you can use to specify parameter values:
•
The Compression Deviation range is between 0 and 100.
•
The range of Compression Min Day and Compression Max Day is between 0 and 100.
•
The range of Compression Min Hr and Compression Max Hr is between 0 and 23.
•
The range of Compression Min Min and Compression Max Min is between 0 and 59.
•
The range of Compression Min Sec and Compression Max Sec is between 0 and 59.
Snapshot value
The Snapshot value group contains the following point attributes:
Use this attribute: To:
Value View the current value of the tag, which is based on the tag
type.
Timestamp View the current time and date of the current tag value.
Rockwell Automation, Inc. 1756-UM106H-EN-E - June 2024 65

Chapter 5Manage points
These attributes do not contain any data when you are creating a point.
Configure scan types
The points are collected based on the scan type and scan rate. You must ensure that the scan types and scan rates
are correctly configured for the data collection service.
When you add points using the Add Points Wizard page (see Add points using the Add Points Wizard page on page
54), make sure to set the correct scan type in the rule file.
When you create individual points manually (see Create points on page 56), make sure to set the correct scan type
in the point attributes.
The following scan types are available:
Scan type Description
Polled Polled tags are scanned and the data event (with a value and a
timestamp) is sent to the local FactoryTalk Historian ME server
at the specified scan time interval.
Usually, polled tags are intended for scan rates greater than 0.5
seconds.
Advised Advised tags are scanned for new values at timed intervals that
are defined by the scan class. However, a new event happens
(becomes available) only if the value has changed from the
previous event.
Usually, advised tags are intended for scan rates greater than
0.5 seconds. A point will not be put on scan if it is configured at
a rate faster than 0.5 seconds.
If you need data collection rates faster than 0.5 seconds, use
high-speed tags.
Trigger Input Triggered input tags are used to collect a data point after a
particular triggering event has occurred.
Use this scan type for trigger input tags.
For details, see Configuration example: Trigger Input points on
page 69.
Output Triggered output tags are used to output (write-back) a data
point to a controller after a particular triggering event has
occurred.
Output scan types are not supported for tags created from
shortcuts pointing to remote controllers.
For details, see Configuration example: Output points on page
71.
High-speed High-speed tags are scanned and the data event (with a value
and a timestamp) is logged at the specified scan time interval.
Usually, high-speed tags are intended for fast data collection
speeds with scan rates of 10 ms. A point will not be put on scan
if it is configured at a rate slower than 0.5 seconds.
66 1756-UM106H-EN-E - June 2024 Rockwell Automation, Inc.

Chapter 5Manage points
Scan type Description
The module will not allow high-speed tags to be created with a
scan rate slower than 500 ms, or advised or polled tags to be
created with a scan rate faster than 500 ms.
Configure Trigger Input and Output points
Trigger Input points (tags) are points for which data flows from a controller to the FactoryTalk Historian ME archive.
For Trigger Input points, you need to configure separate trigger points.
Output points (tags) are points for which data flows from the FactoryTalk Historian ME archive to a controller. For
Output points, the timestamp of the trigger value must be greater than the timestamp of the previous value.
IMPORTANT: Since the output tag values reach the controller with variable latency, they cannot be
used for applications requiring real-time update. The output tags are meant for monitoring purposes
only.
The following diagram illustrates the data flow of the trigger mechanism for Trigger Input and Output points:
When you configure the Trigger Input or Output points, pay attention to the following:
•
The scan rate is not applicable to the Trigger Input point.
• Set the Scan On attribute to On.
•
Put trigger names in single quotes.
Configure Trigger Input points
You can associate an Input point with a trigger point by defining the Extended Description attribute of the Input
point using the following expression:
<keyword>=‘<trigger_tag_name>’;<condition>
Rockwell Automation, Inc. 1756-UM106H-EN-E - June 2024 67

Chapter 5Manage points
Where:
This variable: Is:
<keyword> Either of the following:
• TRIG
•
EVENT
Note: The keywords must be written in uppercase.
<trigger_tag_name> The name of the trigger point.
<condition> Any of the following:
• Any
•
Anychange
• Nonzero
•
Decrement
• Increment
Note: The condition names are case-sensitive.
Any scan tag that is referenced in the Extended Description or Scan Tag point attributes must not be high-speed or
have a scan rate higher than 1 second. Otherwise, the module will generate an error and you will not be able to save
your point.
If you provide an expression in the Extended Description point attribute, the point for which you have defined it is
considered by the system to be trigger-based rather than scan-based. As a result, an input is triggered when a new
value is sent to the snapshot of the trigger point.
The TRIG keyword in the expression does not require any condition. Its default condition is Any and you cannot
change it.
The EVENT keyword requires a trigger condition to function properly. If you use multiple trigger definitions, you can
separate them with a space, a comma, or a semicolon.
The following table lists the two keywords and their possible values.
Keyword Trigger condition
This condition triggers an
event on:
Example
TRIG Any - -
Any - -
Nonzero Any non-zero value. An event is triggered on a
value change from "Pt Created"
to 1 but it is not triggered on
a value change from 1 to "bad
Input".
EVENT
Anychange Any change as long as the
value of the current event is
different from the value of the
previous event.
An event is triggered on a
value change from 0 to "bad
Input" or from "bad Input" to 0.
68 1756-UM106H-EN-E - June 2024 Rockwell Automation, Inc.

Chapter 5Manage points
Keyword Trigger condition
This condition triggers an
event on:
Example
Increment Any increase in the value. An event is triggered on a
value change from 0 to 1.
Decrement Any decrease in the value. An event is triggered on a
value change from 1 to 0.
Configuration example: Trigger Input points
Trigger Input point
Trigger Input point with the TRIG keyword
Rockwell Automation, Inc. 1756-UM106H-EN-E - June 2024 69

Chapter 5Manage points
Trigger Input point with the EVENT keyword and the Increment condition
Configure Output points
IMPORTANT: Since the output tag values reach the controller with variable latency, they cannot be
used for applications requiring real-time update. The output tags are meant for monitoring purposes
only.
You can trigger Output points in the following ways:
•
By configuring a separate trigger point.
The Output point must have the same point source as the interface, FTME. The trigger point can be
associated with any point source. The point type of the trigger point and the point type of the Output point
may differ.
You can associate an Output point with a trigger point by setting the Source Tag attribute of the Output point
to be the same as the tag name of the trigger point.
Any scan tag that is referenced in the Extended Description or Scan Tag attributes must not be high-speed
or have a scan rate higher than 1 second. Otherwise, the module will generate an error and you will not be
able to save your point.
An output is triggered when a new value is sent to the snapshot of the trigger point. The new value does
not need to be different than the previous one that was sent to the snapshot to trigger an output, but the
timestamp of the new value needs to be more recent than the previous value.
•
By writing a new value to the snapshot of the output point itself.
The new value does not need to be different from the previous one to trigger an output, but the timestamp of
the new value must be more recent than the previous value.
70 1756-UM106H-EN-E - June 2024 Rockwell Automation, Inc.

Chapter 5Manage points
Configuration example: Output points
Output point
Triggered Output point with the TRIG keyword
Triggered Output point with the EVENT keyword and the Anychange condition
Rockwell Automation, Inc. 1756-UM106H-EN-E - June 2024 71

Chapter 5Manage points
Manage shortcuts
Shortcuts are user-defined names for connections with controllers located in a local or remote chassis. A shortcut
additionally contains the CIP path to a controller in a chassis.
You can use shortcuts to:
•
Assign meaningful names to controller connections.
•
Search for data points in the Add Points Wizard and on the Add Individual Points page.
In FactoryTalk Historian ME, you can perform the following actions on shortcuts:
•
Create shortcuts to the local chassis on page 72
•
Create shortcuts to a remote controller on page 73
•
Edit shortcuts on page 74
•
Delete shortcuts on page 75
Tip: All actions performed on shortcuts are logged. You can view the logged information under
Advanced > System Log.
Create shortcuts to the local chassis
When creating local shortcuts, consider the following points:
•
You can create up to five shortcuts to the local chassis.
• The shortcut paths must be unique. This means that each shortcut must point to a different controller or
have a different CIP path.
•
If you create a shortcut to a controller that is used for time synchronization, the time will no longer be
synchronized with this controller after you save your changes.
This is because adding a shortcut to a controller changes the name structure of the tags from the controller,
which means previously defined tags will be disabled. For details, see Tag naming conventions on page 75.
•
If you create a shortcut to a controller that is used for collecting data, the data will no longer be collected
from this controller after you save your changes.
This is because adding a shortcut to a controller changes the name structure of the tags from the controller,
which means previously defined tags will be disabled. For details, see Tag naming conventions on page 75.
•
Creating shortcuts to local controllers is optional.
To create a shortcut to the local chassis
1.
Click Manage Points, and then click Manage Shortcuts.
2.
Click Add.
3.
Select the controller to which you want to create a shortcut.
Alternatively, select the Add the shortcut using a CIP path instead option, and type the CIP path to the
controller.
4.
Type the name of the shortcut.
72 1756-UM106H-EN-E - June 2024 Rockwell Automation, Inc.

Chapter 5Manage points
When typing the name, consider the following points:
◦
The name can contain only the characters a-z, A-Z, 0-9, and an underscore.
Tip: To learn about the convention of naming tags added to the Historian module using the
shortcuts, see Tag naming conventions on page 75.
◦
The maximum length of the name is 40 characters.
Tip: To minimize the complexity of tag names, we recommend that you keep the shortcut
names short.
◦
The name must start with a letter or an underscore.
◦
The name cannot contain two underscores side by side, or an underscore with a number at the end of
the name (for example, shortcut_12).
◦
The shortcut name must be unique.
5.
Click Save.
The shortcut is added to the shortcut table.
Tip: If any error occurs when creating the shortcut, it is indicated with a message displayed at
the top of the page.
Create shortcuts to a remote controller
When creating shortcuts to remote controllers, consider the following points:
•
The remote controller should be located in a local area network (LAN) rather than a wide area network (WAN)
or a low-speed network.
• You can create up to five shortcuts to remote controllers.
•
The shortcut paths must be unique. This means that each shortcut must point to a different controller or
have a different CIP path.
To create a shortcut to a remote controller
1.
Click Manage Points, and then click Manage Shortcuts.
2.
Click Add.
3.
Under Add New Shortcut, click Remote controller.
4.
Select a local communication module.
5.
Type the IP address of a remote communication module, and then click Load Controllers.
Controllers will not be loaded if:
◦ The IP address is incorrect.
◦ There are no supported controllers detected in the remote chassis.
Tip: For a list of supported controllers, refer to the FactoryTalk Historian ME Release Notes.
6.
Select the remote controller to which you want to create the shortcut.
Rockwell Automation, Inc. 1756-UM106H-EN-E - June 2024 73

Chapter 5Manage points
Alternatively, select the Add the shortcut using a CIP path instead option, and type the CIP path to the
controller.
7. Type the name of the shortcut.
When typing the name, consider the following points:
◦ The name can contain only the characters a-z, A-Z, 0-9, and an underscore.
Tip: To learn about the convention of naming tags added to the Historian module using the
shortcuts, see Tag naming conventions on page 75.
◦
The maximum length of the name is 40 characters.
Tip: To minimize the complexity of tag names, we recommend that you keep the shortcut
names short.
◦
The name must start with a letter or an underscore.
◦
The name cannot contain two underscores side by side, or an underscore with a number at the end of
the name (for example, shortcut_12).
◦
The shortcut name must be unique.
8.
Click Save.
The shortcut is added to the shortcut table.
Tip: If any error occurs when creating the shortcut, it is indicated with a message displayed at
the top of the page.
Edit shortcuts
To edit a shortcut
1.
Click Manage Points, and then click Manage Shortcuts.
2. In the table, click the shortcut that you want to edit, and then click Edit.
3.
Under Edit Shortcut, make your changes to the shortcut.
Tip:
◦
You can make all the changes to the shortcut except for changing its name.
◦ If any change to the shortcut might result in a change in the functionality of time
synchronization or data collection, you will be prompted for confirmation.
4.
Click Save.
When editing shortcuts, consider the following points:
•
If you select a new controller from the list and that controller is already used for time synchronization, the
time will no longer be synchronized with this controller after you save your changes to the shortcut.
This is because adding a shortcut to a controller changes the name structure of the tags from the controller,
which means previously defined tags will be disabled. For details, see Tag naming conventions on page 75.
74 1756-UM106H-EN-E - June 2024 Rockwell Automation, Inc.

Chapter 5Manage points
• If you select a new controller from the list and that controller is used for collecting data, the data will no
longer be collected from this controller after you save your changes to the shortcut.
This is because adding a shortcut to a controller changes the name structure of the tags from the controller,
which means previously defined tags will be disabled. For details, see Tag naming conventions on page 75.
•
If you change the type of a local shortcut used for time synchronization to remote, the time will no longer be
synchronized after you save your changes.
•
If you edit a shortcut used for time synchronization and change the controller to a different one, the time
synchronization may be broken. To correct the time synchronization, you may have to restart the module.
Delete shortcuts
To delete a shortcut
1.
Click Manage Points, and then click Manage Shortcuts.
2. In the table, click the shortcut that you want to delete, and then click Delete.
If you want to delete the shortcut, click OK.
Otherwise, click Cancel.
Tip: If deleting the shortcut might result in a change in the functionality of time synchronization
or data collection, you will be prompted for confirmation.
When deleting shortcuts, consider the following points:
•
If you delete a shortcut used for time synchronization, the time will no longer be synchronized after you save
your changes.
•
If you delete a shortcut used for collecting data, the data will no longer be collected from this shortcut after
you save your changes. However, the data will be collected from the controller used in this shortcut if data
points were defined for the controller before the shortcut was created.
Tag naming conventions
Tag names are created following certain conventions that depend on whether a tag has been added to the Historian
module from a controller for which there exists or does not exist a controller shortcut:
• The names of the tags from controllers for which no shortcuts exist on the Historian module have the
following structure:
<Controller name>_1_<Slot number>.<Tag name>
Example: Standard2500_1_2.booltag1
•
The names of the tags from controllers for which shortcuts exist on the Historian module have the following
structure:
<Controller shortcut name>.<Tag name>
Example: ShortcutToStandard2500.booltag1
Use scan classes
FactoryTalk Historian ME uses scan classes to schedule the data collection. A scan class provides a time in seconds,
which tells FactoryTalk Historian ME how often to collect the data.
You must have administrator privileges to create, edit, or delete scan classes.
Rockwell Automation, Inc. 1756-UM106H-EN-E - June 2024 75

Chapter 5Manage points
Create scan classes
Tip: You must have administrator privileges to create scan classes.
To create a scan class
1. Click Manage Points, and then click Edit Scan Class(es).
2.
At the bottom of the page, click New.
The new consecutive name of the scan class appears in the Scan Point box.
3.
At the top of the page, in the Time text box, type a time value in seconds.
4.
Click Save.
5.
Click OK to close the dialog box, and then click Restart.
Edit scan classes
Tip: You must have administrator privileges to edit scan classes.
To edit a scan class
1. Click Manage Points, and then click Edit Scan Class(es).
2.
In the table, select the scan class that you want to edit.
3.
At the bottom of the page, click Edit.
4.
At the top of the page, in the Time text box, change the scan rate value.
5.
Click Save.
6.
Click OK to close the dialog box, and then click Restart.
Delete scan classes
Tip: You must have administrator privileges to delete scan classes.
To delete a scan class
1. Click Manage Points, and then click Edit Scan Class(es).
2.
In the table, select the scan class that you want to edit.
3.
At the bottom of the page, click Delete.
4.
Click OK to close the dialog box, and then click Restart.
76 1756-UM106H-EN-E - June 2024 Rockwell Automation, Inc.

Chapter 6
Collect and store data
In this section you will learn about the following:
Collect data on page 77
View the data storage information on page 78
Filter data on page 81
Collect data
The FactoryTalk Historian ME server collects data from the Logix controller through the chassis backplane. The data
collection service then optionally performs a series of deadband tests on the data (exception and compression tests)
and stores the data in the FactoryTalk Historian ME archive.
When started, the data collection service performs the following actions:
•
Identifies all points listed as active, based on the value of the Scan property in the points definition.
•
Identifies (or registers) all controllers in the same Logix chassis by logical names, device IDs, and location
(slot numbers).
FactoryTalk Historian ME supports up to ten controllers. There is a maximum of five controllers in the local
chassis and a maximum of five controllers in the remote chassis.
•
Begins collecting data for all points based on the specified scan rate associated with each point.
Access the data collection information
To access the information on the data collection
•
Click the Configure Historian tab.
The Data Collection page appears.
The page provides the following information:
This item: Displays:
Status The status of the data collection:
• Stopped
The data is not being collected or archived.
• Running
The data is being collected and archived.
Collection Rate The number of events per second that the data collection
receives for configured ports.
Archive Rate The number of events per second that pass exception and
compression tests and are committed to the archive.
Archive Capacity The number of days, hours, and minutes until all available
archive files are full.
This number is an estimate. When all archive files are full, data
interruption may occur.
Rockwell Automation, Inc. 1756-UM106H-EN-E - June 2024 77

Chapter 6Collect and store data
This item: Displays:
Note: For details on long-term storage on a FactoryTalk
Historian SE or PI server, see Transfer data to FactoryTalk
Historian SE or PI servers on page 88.
Total Archive Files The total number of archive files residing in the archive. The
size of each archive file is 10 MB.
Approximately 130 archive files are preallocated as data
containers.
Total Archive Files Used The number of archive files currently being used to store data
in the archive subsystem.
Total Archive Files Free The number of archive files in the archive subsystem that
neither store data nor contain data to be overwritten once it is
transferred by the data transfer service.
If the data transfer service is configured and it is transferring
events to the FactoryTalk Historian SE or PI server, the module
frees the archive disk space once the events are successfully
transferred. It results in increasing the number of total archive
files free and reducing the number of total archive files used.
Start and stop the data collection
Tip: You must have administrator privileges to start and stop the data collection.
To start the data collection
1. Click the Configure Historian tab.
The Data Collection page appears.
2.
Click Start.
To stop the data collection
1.
Click the Configure Historian tab.
The Data Collection page appears.
2.
Click Stop.
Make sure that that data collection is fully stopped before you start it again.
Tip: You can also start and stop the data collection using:
◦
Controller programming languages (the Ladder logic).
◦ FactoryTalk Historian ME Logix Designer Module Profile.
For details, see Configure the module properties on page 140.
View the data storage information
Tip: You must have administrator privileges to modify the data storage information.
78 1756-UM106H-EN-E - June 2024 Rockwell Automation, Inc.

Chapter 6Collect and store data
The data storage service in FactoryTalk Historian ME monitors the NAND flash-based storage used in the module.
To view the data storage information
1. Click the Configure Historian tab, and then click Data Storage.
The Data Storage page appears.
2.
Review the following for additional information.
Use this section: To:
Archive Statistics View the information on the current usage of the disk space
allocated to the archive.
Archive Information View the following information on the archive:
• Total Archive Files
The number of archive files.
• Transferred Archives
The number of archive files transferred to a Historian SE
or PI server.
•
Available Archives
The number of archive files that do not have any data
stored in them. These files are available before they are
overwritten.
• Archive File Size
The size of a single archive file. It is fixed and it equals 10
MB.
The FactoryTalk Historian ME module has 130 preallocated
archive files.
Event Queue View the number of temporary files in a transient state. The
module processes the files as soon as it archives events in the
files. Usually, the event queue count should be less than 3.
Note: When the count gets bigger, it may cause the archive disk
to reach its threshold. In such case, the data collection will be
automatically stopped, and data interruption will occur.
You may set a warning level for the archive disk usage in the
Archive Disk Threshold Configuration box to help prevent this
situation.
Log Threshold Configuration Set a threshold for the log files disk usage. The default setting
is 95%.
When the log storage reaches its threshold, FactoryTalk
Historian ME deletes older log files and logs the following
message on the System Log page:
<Log file name and path> has been removed
because the /mnt/log partition is full.
Archive Disk Threshold Configuration Set a threshold for the archive disk usage. The default setting is
95%.
Rockwell Automation, Inc. 1756-UM106H-EN-E - June 2024 79

Chapter 6Collect and store data
Use this section: To:
When the archive disk reaches its threshold, FactoryTalk
Historian ME performs the following actions:
•
Stops the data collection and logs the following message
on the System Log page:
Stopping Data Collection because one or
more partitions are full.
Stopping the data collection allows the module to process
events from transient event files to archive storage and
make more storage space available.
•
Deletes a message log file located under
/mnt/appdata/dat, and logs the following message on
the System Log page:
<File name and path> has been removed
because the /mnt/appdata partition is
full.
Active Usage Threshold Configuration Set a warning and critical thresholds for the data disk usage,
with the following default settings:
•
50% for the warning.
• 75% for the critical level.
For the critical level setting, choose either of the following
options:
•
Select the Stop Data Collection checkbox, if you want
the data collection to be automatically stopped when the
critical level is reached.
With this setting, you may lose data, because it is no
longer being collected.
•
Clear the Stop Data Collection checkbox, if you do not
want the data collection to be automatically stopped when
the critical level is reached.
With this setting, you may risk data interruption, because
the data collection service will start overwriting the oldest
data, once all archive files are filled.
This is the default setting.
FactoryTalk Historian ME storage capacity
The FactoryTalk Historian ME module has 2 GB of total storage. It has an effective archive storage capacity of 1.5 GB.
There are the archive file size limits:
• File size: 10 MB
•
Number of files: 130
•
Disk space for archives: 1.3 GB
The onboard data storage for FactoryTalk Historian ME is limited. When you use a data collection rate of 2500 events
per second (that is, the maximum collection rate available) without compression or exception filtering, the onboard
80 1756-UM106H-EN-E - June 2024 Rockwell Automation, Inc.

Chapter 6Collect and store data
storage capacity is approximately 14 hours. Therefore, it is highly recommended that you include the FactoryTalk
Historian SE or PI server for data aggregation when long-term storage is required. By applying compression and
exception filtering, you can significantly increase the archive space from approximately two to ten times, depending
on variables (for example, how much the data varies between scans). To estimate the archive performance with
and without compression and exception filtering, you can use a typical factor of five. For more information on
compression and exception filtering, see Filter data on page 81.
Use the following table to estimate the performance impact. Note that the data storage information in this table is an
estimate. The actual compressed data storage ranges will vary depending on the volatility of the data collected.
Sample Application Estimate
2500 events per second without Compression or Exception
Filtering
14 hours
2500 events per second with Compression and Exception
Filtering
3 days
500 events per second with Compression and Exception
Filtering
2 weeks
100 events per second with Compression and Exception
Filtering
3 months
2500 events per minute without Compression or Exception
Filtering
1 month
2500 events per minute with Compression and Exception
Filtering
6 months
500 events per minute with Compression and Exception
Filtering
2.5 years
100 events per minute with Compression and Exception Filtering 10+ years
To calculate the total events per second, the tags divided by the scan rate have to be summed up per scan class for
the module:
For example, if the data collection configuration is based on two scan classes (one with 200 tags at a 250 ms scan
rate, and one with 600 tags at a 2 s scan rate), the total events per second are 1100.
200/250ms + 600/2sec <-> 200/.25sec + 600/2sec <-> 800 + 300 events/sec = 1100
events/sec
Filter data
FactoryTalk Historian ME provides two functionalities that let you decide which data collected by controllers you want
to display in the module and then archive:
• Exception filtering
The exception tests determine which events are sent to the Historian ME module from the data source.
Rockwell Automation, Inc. 1756-UM106H-EN-E - June 2024 81

Chapter 6Collect and store data
Exception filtering contributes to relieving your network trac by sending only the important data to the
module.
See Exception filtering on page 83.
• Compression filtering
The compression tests determine which of the events sent to the Historian ME module are archived on the
Historian server.
Compression filtering helps you find a balance between the archive size and the data complexity.
See Compression filtering on page 85.
Through exception and compression filtering, the number of data points stored in order to represent actual data
trends is significantly reduced.
The two processes are illustrated in the following diagram:
The process starts with collecting all data from the data source for all the points that you have defined in your
Historian ME, based on their scan class definitions.
On the Interface node, the collected data undergoes the exception tests. The tests result in sending significant data
to the Historian server and discarding all other data.
82 1756-UM106H-EN-E - June 2024 Rockwell Automation, Inc.

Chapter 6Collect and store data
On the Historian server, the significant data undergoes compression tests. The tests result in archiving the
significant data that match the compression specifications and discarding all other data.
The following point types are excluded from both the exception and compression tests:
•
Digital
•
String
Exception filtering
Exception filtering uses a deadband algorithm to determinewhether to collect data and store it in the FactoryTalk
Historian ME archive. For each point, you can set the exception reporting specifications that create the deadband.
The data collection service throws out values that fall inside the deadband and does not pass it to the archive.
In the previous figure, values A, D, and C are reported to the FactoryTalk Historian ME server. The value A is the
last reported value, and values B and C fall within the exception deadband. However, the value D falls outside the
deadband, so the data collection service reports the value D as well as the previous value (in this case, the value C).
The data collection service uses the following point attributes to choose the values that will be reported to the
Historian ME server:
•
Exception Deviation (ExcDev)
It determines in engineering units how much a point value needs to change before the data collection service
sends it to the Historian ME server.
The exception deviation should be less than the compression deviation by at least a factor of 2.
For example, a 12-bit A/D converter can never be more precise than 1 part in 4096.
This attribute is used with the ExcDevPercent value.
You can set either the ExcDev or the ExcDevPercent attribute. If you change one, the other is automatically
adjusted. If you change both at once, the value of the ExcDevPercent attribute takes precedence.
•
Exception Max (ExcMax)
It sets a limit on how long the data collection service can go without reporting a value to the Historian ME
server.
Once the value of the attribute is exceeded, the data collection service sends the next new value to the
Historian ME server, regardless of whether the value is different from the last reported value.
The time between exception reports might be greater than the exception maximum time if no new values are
received by the data collection service for a point.
Rockwell Automation, Inc. 1756-UM106H-EN-E - June 2024 83

Chapter 6Collect and store data
• Exception Min (ExcMin)
It sets a limit in seconds on how frequently the data collection service reports values.
For example, if you want the data collection service to wait full ten minutes before reporting a new value to
the Historian ME server, set the ExcMin attribute to ten minutes.
A new data value that is received before the end of the ExcMin interval is discarded.
The exception algorithm relies on the following parameters:
This parameter: Defines:
Exception Maximum The maximum time span between exceptions, expressed in
seconds. This value is configured for each point in the ExcMax
attribute.
Exception Minimum The minimum time span between exceptions, expressed in
seconds.
This value is configured for each point in the ExcMin attribute.
ExcDev
(Exception Deviation)
The deadband that causes an exception when it is exceeded.
This value is configured for each point in either the ExcDev or
ExcDevPercent attribute.
OldEvent The value/status/timestamp of the last event sent to the
snapshot subsystem. This is the last event that passed the
exception report.
PrevEvent The value/status/timestamp of the last event used for the
comparison of the event value to determine whether the new
value should be sent to the snapshot subsystem.
NewEvent The value/status/timestamp of the event that is to be tested for
the exception.
In the exception reporting the new event (NewEvent) is sent to the snapshot subsystem, provided that:
•
The time between the timestamps of the new and old event is greater than or equal to the ExcMax value.
•
For digital points, the new value differs from the old value. The ExcMin value is disregarded.
•
For numeric points, the status changes from good to bad, or bad to good.
•
For numeric points, the following conditions are met:
◦
The time between the old event and the new event is greater than or equal to the ExcMin value.
◦ The absolute value of the difference between the new value and the old value is greater than the
ExcDev value.
The new event sent to the snapshot subsystem replaced the old event.
The previous event (PrevEvent) is sent to the snapshot subsystem, provided that:
•
The PrevEvent value does not equal the original OldEvent value.
The only time the previous event is not sent to the snapshot subsystem is when two consecutive exception reports
send there the new event. The PrevEvent value is used to indicate what really happened to the value. Without it, a
step change would look like a ramp change. Basically, if a measurement holds steady for hours, then makes a step
change, just sending the new value to the snapshot subsystem, results in interpolating between the old value and the
new value. By also sending the PrevEvent value, the step change is stored.
84 1756-UM106H-EN-E - June 2024 Rockwell Automation, Inc.

Chapter 6Collect and store data
Compression filtering
The compression filtering, called the swinging door compression, is used by the snapshot subsystem to determine
which events should be archived. The idea behind the compression filtering is to store enough data to reproduce the
original signal.
The compression method used by FactoryTalk Historian ME allows it to keep more data online than conventional
scanned systems. The data is also much more detailed than in an archiving system based on averages or periodic
samples.
The following figure shows events that fall on the same straight line. In this case, in order to recreate any point along
the line, it is enough to archive just two values - the first and the last one (A and B). The other point values can be
interpolated from the values that have been stored.
In practice, the subsequent changes in the point values form curves rather than straight lines, so the compression
specifications for each point must be properly configured to achieve a balance between the storage eciency and
accuracy.
FactoryTalk Historian ME uses a compression algorithm to determine which events should be archived in order to
provide an accurate data history. The compression attributes allow you to control the granularity of the compression
algorithm.
During the compression process, when a new snapshot arrives, the previous one is evaluated according to the
compression specifications to verify whether it is a significant event. If it is, the event is sent to the event queue.
Otherwise, it is discarded.
An event is sent to the event queue disregarding the compression process, provided that:
•
The Compression On attribute of the point is set to Off.
•
The timestamp is older than the timestamp of the current snapshot. An event with such as timestamp is
considered out of order.
•
The status of the point has changed.
The swinging door compression discards values that fall on a line connecting the values that are recorded in the
archive. When a new value is received by the snapshot subsystem, the previous value is recorded only if any of the
values since the last recorded value do not fall within the compression deviation blanket. The deviation blanket
is a parallelogram extending between the last recorded value and the new value with the width equal to twice the
compression deviation specification.
Rockwell Automation, Inc. 1756-UM106H-EN-E - June 2024 85

Chapter 6Collect and store data
Each point has three attributes that comprise the compression specifications:
•
Compression Deviation (CompDev)
The CompDev attribute is the half-width of the deviation blanket. It is provided in engineering units.
The CompDevPercent attribute is similar to the CompDev attribute, but it specifies the compression deviation
in percent of the span.
•
Compression Minimum time (CompMin)
•
Compression Maximum time (CompMax)
The compression specifications work similarly to the exception specifications. Just like the exception reporting,
the compression is a filter. While the exception specifications determine which events are sent to FactoryTalk
Historian ME, the compression specifications determine which of the events sent to FactoryTalk Historian ME should
go archived.
The Compression Min and Compression Max attributes are limits that refer to the time between events in the
archive. A new event is always recorded if the time since the last recorded event is greater than or equal to the
compression maximum time.
You can adjust the compression parameters to maintain significant data and keep a reasonable archive space at the
same time. The compression maximum time is set to one value for all points in the system. It should be large enough
that a point that does not change at all uses very little archive space. The compression maximum time of one work
shift (for example, 8 hours) is often a good choice.
Use the Compression Min attribute with points that produce frequent value changes to ensure that they do not
occupy too much archive space. Set the attribute value to 0 for any point coming from the data collection that does
the exception reporting. For a data acquisition system with slow scan time, this attribute is not important. There are
few cases where you want to use non-zero compression minimum time.
For the Compression Deviation attribute, a reasonable starting point is one or two percent of span for transmitters
and 0.5 degrees to 1.0 degree for thermocouples. Look at trend displays to find points for which the reproduction of
the data is not acceptable. The goal is to filter out instrument and process noise and still record significant process
changes. The effect of changing the compression deviation is not predictable.
86 1756-UM106H-EN-E - June 2024 Rockwell Automation, Inc.

Chapter 6Collect and store data
For digital points, any change is a significant change. That is why only the values of the compression maximum and
minimum attributes are taken into account, while the compression deviation value is disregarded.
Rockwell Automation, Inc. 1756-UM106H-EN-E - June 2024 87

Chapter 7
Transfer data to FactoryTalk Historian SE or PI servers
Use the data transfer to transfer the data collected by your FactoryTalk Historian ME to a FactoryTalk Historian SE or
PI server. You can transfer data to a single FactoryTalk Historian SE or PI server. Server collectives are not supported.
Once you have started the data transfer and selected the data points to be transferred to your FactoryTalk Historian
SE or PI server, you can check the transferred points in the System Management Tools.
To visualize the data transfer, you can create a trend in Microsoft Excel using the FactoryTalk Historian DataLink Add-
in. For details, see Create trends visualizing the data transfer on page 150.
Data transfer prerequisites
You can use the data transfer functionality to copy the FactoryTalk Historian ME data to a single FactoryTalk Historian
SE or PI server.
Tip: To transfer FactoryTalk Historian ME data to a FactoryTalk Historian Server Collective, use the FTH
H2H Interface. To transfer FactoryTalk Historian ME data to an OSI PI Collective, use a PItoPI Interface
from OSI Soft.
Before transferring data, you must ensure that:
•
You have administrator privileges and other necessary security settings configured to enable the data
transfer service in FactoryTalk Historian ME.
For details, see Manage security on page 117.
•
Your system has time synchronization set up and configured for FactoryTalk Historian ME, controllers, the
FactoryTalk Historian SE or PI server, and clients.
For details, see Manage time on page 98.
•
The licenses for FTMS point sources are installed and configured on FactoryTalk Historian SE, and there are
enough licensed points available for the data transfer.
For details, see the FactoryTalk Activation Manager and the FactoryTalk Historian SE user documentation.
For details on enabling the data transfer to FactoryTalk Historian SE 2.1 or 2.2, see (Optional) Install
FactoryTalk Historian SE patch.
•
Trust connections between FactoryTalk Historian ME and the FactoryTalk Historian SE or PI server are set up
and configured properly before you begin transferring data.
For details, see Create trusts for the data transfer on page 124.
•
The archive file time frames on FactoryTalk Historian ME and the FactoryTalk Historian SE or PI server are
synchronized.
When setting up the FactoryTalk Historian SE or PI server for the data transfer, you must ensure that
the archive file time frame covers the archive time frame of FactoryTalk Historian ME. For example, if
FactoryTalk Historian ME has been collecting data from 07/01/2014 to 07/05/2014, the FactoryTalk Historian
SE or PI server archive time period must also cover the same time range. Otherwise, event data will be
discarded during the data transfer from FactoryTalk Historian ME to the FactoryTalk Historian SE or PI server.
88 1756-UM106H-EN-E - June 2024 Rockwell Automation, Inc.

Chapter 7Transfer data to FactoryTalk Historian SE or PI servers
Configure the data transfer
To configure the data transfer
1.
Click the Configure Historian tab, and then click Data Transfer.
The Data Transfer section of the page displays the following information:
Item Description
Host Server The host name or IP address of the FactoryTalk Historian
SE or PI server.
Current Time The FactoryTalk Historian SE or PI server time. It is
read-only.
Time Offset The time difference in seconds between the FactoryTalk
Historian SE or PI server and the FactoryTalk Historian ME
times.
FactoryTalk Historian SE Licensed Points (FactoryTalk Historian SE) The number of points that have
been assigned to the FTMS point source on FactoryTalk
Historian SE. It is based on the currently active license for
FactoryTalk Historian SE and is an indication of the number
of FactoryTalk Historian ME points that can be transferred
to FactoryTalk Historian SE.
"FTMS" Points Available The total number of points assigned by the license minus
the number of points that are already being transferred to
the FactoryTalk Historian SE or PI server.
2.
Under Data Transfer, in the Host Server text box, type the host name or IP address of the FactoryTalk
Historian SE or PI server.
Tip: FactoryTalk Historian SE server collectives are not supported.
3.
Click Test Connection.
A successful connection to the FactoryTalk Historian SE or PI server is indicated with a green check mark
next to the Test Connection button, and a message displayed at the top of the page.
4.
Under Data Transfer Parameters, in the Maximum Events Per Transfer text box, type the value for the
maximum number of events that can be transferred to the FactoryTalk Historian SE or PI server per transfer
session.
The range is 5000 to 150000. The default setting is 50000. The best number of events to transfer per session
varies based on your network bandwidth and the volume of data being collected.
Rockwell Automation, Inc. 1756-UM106H-EN-E - June 2024 89

Chapter 7Transfer data to FactoryTalk Historian SE or PI servers
Tip: If you change the Maximum Events Per Transfer value, click Save, and then stop and
restart the data transfer.
5. Select the Enable Auto Transfer checkbox.
With this option selected, any point configured for the data collection will be automatically transferred to the
FactoryTalk Historian SE or PI server.
If you clear the Enable Auto Transfer checkbox, the points that were previously transferred will continue to
be transferred, but you will have to add new points to the data transfer, and then restart the data transfer
service.
If you attempt to transfer points and the FactoryTalk Historian SE or PI server is not licensed to receive the
points, a message will be sent to the system log:
The new points number is greater than what is allowed by the SE license. Please change to NonAutoTransfer mode.
The configuration then switches to the non-auto transfer mode, and you must manually transfer the points
by selecting them one by one.
Tip: The status of the auto-transfer mode is also displayed on the Data Transfer Points page.
For details, see View the data transfer information on page 92.
Now you are ready to start the data transfer.
For details, see Start the data transfer on page 90.
Start the data transfer
To start the data transfer
1.
Click the Configure Historian tab, and then click Data Transfer.
2. Configure the data transfer on page 89.
3.
Under Data Transfer Parameters, click Start.
The status changes from Stopped to Running.
If the FactoryTalk Historian SE or PI server becomes unavailable, the data will continue to be stored on the
module. When the server becomes available again, it will automatically reconnect, and the data transfer will
continue.
Stop the data transfer
To stop the data transfer
1.
Click the Configure Historian tab, and then click Data Transfer.
2. Under Data Transfer Parameters, click Stop.
The status changes from Running to Stopped.
View data transfer statistics
The data transfer service records performance statistics that determine the connection reliability. You can use the
statistics to refine the data transfer configuration.
90 1756-UM106H-EN-E - June 2024 Rockwell Automation, Inc.

Chapter 7Transfer data to FactoryTalk Historian SE or PI servers
The Data Transfer Statistics section of the page displays the following information:
Item Description
Transfer Rate The number of retrieved events divided by the number of
minutes spent on retrieving events sent to the FactoryTalk
Historian SE or PI server.
Successful Attempt Rate The number of attempts to transfer data to the FactoryTalk
Historian SE or PI server per hour.
Add points to the data transfer
To add points to the data transfer
1.
Click the Configure Historian tab, and then click Data Transfer Points.
2. Under Data Transfer Points, type the search criteria, and then click Search.
The search results are displayed in the table.
The table lists all points that fit the search criteria, with the following information:
Item Description
Selected A checkbox that indicates whether a data point has been
added to the data transfer.
Name The name of the data point in FactoryTalk Historian ME.
Type The type of the data point.
Source The source of the data point.
Created in SE/PI Server ◦ Y - indicates a data point that has already been
transferred to the FactoryTalk Historian SE or PI
server.
◦ N - indicates a data point that has not been
transferred to the FactoryTalk Historian SE or PI
server yet.
3.
Select the checkbox next to each data point that you want to add to the data transfer.
If you want to add all the data points listed, select the All/None checkbox at the bottom of the table.
4.
Click Save.
5.
Click OK.
The outcome of the operation is indicated with a message displayed at the top of the page:
INFO: Save operation successful.
Remove points from data transfer
To remove points from the data transfer
1.
Click the Configure Historian tab, and then click Data Transfer Points.
2. Under Data Transfer Points, type the search criteria, and then click Search.
The search results are displayed in the table.
3.
Clear the checkbox next to each data point that you want to remove from the data transfer.
If you want to remove all the data points listed, clear the All/None checkbox at the bottom of the table.
Rockwell Automation, Inc. 1756-UM106H-EN-E - June 2024 91

Chapter 7Transfer data to FactoryTalk Historian SE or PI servers
4. Click Save.
5.
Click OK.
The outcome of the operation is indicated with a message displayed at the top of the page:
INFO: Save operation successful.
Tip: This way you only remove the data points from the data transfer service. If you want to
remove the data points from the FactoryTalk Historian SE or PI server (for example, in order to
free some licenses), you must delete the points on the FactoryTalk Historian SE or PI server.
View the data transfer information
To view the data transfer information
•
Click the Configure Historian tab, and then click Data Transfer Points.
The Data Transfer Points page provides the following information related to the data transfer service on both the
FactoryTalk Historian SE or PI server and the Historian module:
Information on the FactoryTalk Historian SE or PI server
FactoryTalk Historian SE server item PI server item Description
Current Time The time on the FactoryTalk Historian SE
or PI server.
Time Offset The time difference in seconds between
the FactoryTalk Historian SE or PI server
and the FactoryTalk Historian ME times.
FTHSE Licensed Points - The number of points that have been
assigned to the FTMS point source on
FactoryTalk Historian SE. It is based
on the currently active license for
FactoryTalk Historian SE and is an
indication of the number of FactoryTalk
Historian ME points that can be
transferred to FactoryTalk Historian SE.
- Total Licensed Points The number of points that have been
assigned to the PI server. It is an
indication of the number of FactoryTalk
Historian ME points that can be
transferred to the PI server.
"FTMS" Points Available Available License Points The total number of points assigned by
the license minus the number of points
that are already being transferred to the
FactoryTalk Historian SE or PI server.
The value may not get updated
immediately because it takes
92 1756-UM106H-EN-E - June 2024 Rockwell Automation, Inc.

Chapter 7Transfer data to FactoryTalk Historian SE or PI servers
FactoryTalk Historian SE server item PI server item Description
approximately fifteen minutes to update
the FactoryTalk Historian SE or PI server.
Information on the FactoryTalk Historian ME module
The section on the Historian module provides the following information:
•
The number of data points selected.
•
The number of data points newly added to the data transfer.
•
The status of the auto transfer mode.
Check the data transfer status in the system log
To check the data transfer status
1.
Click the Advanced tab, and then click System Log.
2. In the Time boxes, set the time range in which you want to view the messages.
3.
In the Source box, type DataTransfer, and then click Search.
The search results table is populated with messages related to the data transfer.
For details on the system log, see Use the system log on page 111.
Data transfer considerations
When using the data transfer functionality, pay attention to the following considerations:
Monitoring connections
The data transfer continuously monitors the connection to the FactoryTalk Historian SE or PI server. If the connection
is lost, the data transfer service sends an error message to the system log (see System log related issues on page
112), and records the timestamp in the point ID mapping table as a reference for transferring data when the
connection is restored.
The data transfer service may not restart if the Ethernet connection is lost or if there is a power loss. When power
is restored, the data transfer may not reconnect to the server. In such cases, it may be required to restart the data
transfer manually.
Transferring data to a new FactoryTalk Historian SE or PI server
If the data is to be transferred to a new FactoryTalk Historian SE or PI server, the data transfer service needs to build
a new point ID mapping table using the tag information in the data storage service.
Processing tag data
FactoryTalk Historian ME processes new and existing point data:
•
New points
For new event data from the data storage service, if the point ID is not in the point ID mapping table, the
data transfer service gets the point ID from FactoryTalk Historian ME, and sends a request to the FactoryTalk
Historian SE or the PI server to add a new point. The server responds with a unique point ID. This information
Rockwell Automation, Inc. 1756-UM106H-EN-E - June 2024 93

Chapter 7Transfer data to FactoryTalk Historian SE or PI servers
is added to the point ID mapping table. After the entry has been created, the data transfer uploads the data to
the server.
• Existing points
For new event data from the data storage service, if the point ID is found in the point ID mapping table, the
data transfer uploads the data to the FactoryTalk Historian SE or PI server. The timestamp is recorded in the
point ID mapping table.
Stopping the data transfer service
When the data transfer receives a shutdown signal from the FactoryTalk Historian ME system, the signal is recorded
in the system log, and the status of the service on the Data Transfer page is changed from Running to Stopped.
94 1756-UM106H-EN-E - June 2024 Rockwell Automation, Inc.

Chapter 8
Administer the module
In this section you will learn about the following:
Manage users on page 95
View groups on page 97
Manage time on page 98
Configure system settings on page 102
Upload files to the module on page 105
Back up and restore configuration files on page 107
Use the system log on page 111
Repair archives using safe mode on page 112
Restore and reset module-related settings on page 113
Close and start the module on page 115
Manage users
This section describes how to manage user accounts (that is, add, modify, and remove users) in FactoryTalk Historian
ME using the User Management page.
To access the User Management page, click the Configure Historian tab, and then click User Management.
Tip:
•
You must have administrator privileges to manage user accounts.
• The User Management page is intended primarily to manage user credentials used for logging on
to the module in the FactoryTalk Historian ME Local Security mode.
However, in some cases you may want to recreate on the module the user credentials configured
on the FactoryTalk Directory server in the FactoryTalk Administration Console. For more
information, refer to the FactoryTalk Directory and FactoryTalk Security documentation.
Create users
To create a user
1.
Click the Configure Historian tab, and then click User Management.
The User Management page appears.
2.
Click New.
The Create User page appears.
3.
In the User Name box, type the user name.
The user name must be any combination of lowercase and uppercase characters (a-z, A-Z) and digits (0-9).
4. (Optional) In the Description box, type a description.
Rockwell Automation, Inc. 1756-UM106H-EN-E - June 2024 95

Chapter 8Administer the module
5. In the Password box, enter the user password.
The password must be any combination of lowercase and uppercase characters (a-z, A-Z) and digits (0-9).
6. In the Confirm Password box, confirm the password.
7. (Optional) In the Groups box, select the groups that you want the user to belong to. For details, see View
groups on page 97.
8.
Click Save to create the user.
9.
Click Back to return to the User Management page.
The newly created user is displayed in the user list.
Modify users
To modify a user
1.
Click the Configure Historian tab, and then click User Management.
The User Management page appears.
2.
Select the name of the user that you want to modify, and then click Edit.
The Edit User page appears.
3.
Modify the user settings according to your needs. You can change the user name, description, and group
membership.
4. Click Save.
Tip: For details on changing user passwords, see Change user passwords on page 96.
Remove users
To remove a user
1.
Click the Configure Historian tab, and then click User Management.
The User Management page appears.
2.
Select the name of the user that you want to remove, and then click Delete.
A message appears asking you to confirm that you want to remove the user.
3.
Click OK.
The user is removed and is no longer visible in the user list.
Change user passwords
Any user can change their own password, but only members of the piadmin group can reset passwords for other
users.
To change the user password
1.
On the User Management page, highlight the user whose password you want to change.
2.
Click Change Password.
3.
Do one of the following:
◦
If you are changing your own password, type the old password in the Old Password text box.
◦ If you are changing another user’s password, type "!" in the Old Password text box.
4.
Type a new password or leave the text box blank.
The password must be any combination of lowercase and uppercase characters (a-z, A-Z) and digits (0-9).
96 1756-UM106H-EN-E - June 2024 Rockwell Automation, Inc.

Chapter 8Administer the module
5. Confirm the new password.
6.
Click Save.
Reset passwords
Members of the piadmin group can reset passwords for other users.
To reset the password
1. On the User Management page, click the user whose password you want to reset.
2.
Click Change Password. The Change Password page appears.
3.
Type "!" in the Old Password text box.
4.
Type a new password or leave the text box blank.
The password must be any combination of lowercase and uppercase characters (a-z, A-Z) and digits (0-9).
5.
Confirm the new password.
6.
Click Save.
Reset the default admin password
If the default administrator (piadmin) password is lost or forgotten and you cannot make administrator-level changes
to FactoryTalk Historian ME, you must reset the piadmin user password and security settings.
To reset the default admin password
1.
Click the Advanced tab and then click Restore Defaults.
The Restore Defaults page appears.
2.
Click Reset Security.
A message appears asking you to confirm the action.
3.
Click OK.
You can now access default administrator functions. The default password for the piadmin user is empty. It is
important to change the default piadmin password after you log in.
Tip: You can also reset the password from the Logix Designer interface. For details, see Configure the
module properties on page 140.
View groups
To view groups
1.
Click the Configure Historian tab.
2. Click Group Management.
The Group Management page appears.
Rockwell Automation, Inc. 1756-UM106H-EN-E - June 2024 97

Chapter 8Administer the module
Depending on the way you choose to log on to the module, there will be different users and user groups listed:
•
If you log on to the module using the FactoryTalk Historian ME Local Security credentials, the following groups
are listed in FactoryTalk Historian ME:
Group Description
piadmin The default administrative group for FactoryTalk Historian
ME.
Initially, the group contains only the default piadmin user.
For details on adding users to the group, see Manage users
on page 95.
The piadmin group membership does not automatically
give you special privileges. However, the piadmin user
account has unlimited access to all functions available
on the module. The users added to the piadmin group can
perform all functions, with the exception of deleting the
piadmin user and group.
piuser The group that can contain users without administrative
privileges.
Initially, the group contains only the default pidemo user.
See Manage users on page 95 for more information on
adding users to the group.
•
If you log on to the module using the FactoryTalk Directory security credentials, the available groups will
correspond to groups set in the FactoryTalk Administration Console on the FactoryTalk Directory server
computer. For details, see Configure secure groups in the FactoryTalk Administration Console on page 129.
For details on logon options, see Configure how to log on to the module on page 117.
For details on privileges and access for each group, see Understand privileges for user groups on page 119.
Manage time
Precise timing is critical for most module services including data collection, data transfer, and data storage because
all events are time-stamped and their order is important. To provide accurate time for these services, you can
configure the module to synchronize time with a variety of time sources.
FactoryTalk Historian ME can periodically check external time sources to synchronize its time settings. The
synchronization is based on a single selected time source that coordinates time accuracy among different devices in
your FactoryTalk environment. You can synchronize the module’s Universal Coordinated Time (UTC) with a controller
(preferred solution) or a network NTP time server computer. Alternatively, you can set the time manually.
Changing the module time may affect its performance and services. If you change the module time to a past time
compared to the current module time, the module will reboot into safe mode if the time change results in either of
the following:
•
The new time is in the past compared to the timestamps of the archive files.
•
There are archive files with overlapping time ranges.
If the module enters safe mode, repair the archive files and get the module out of safe mode.
98 1756-UM106H-EN-E - June 2024 Rockwell Automation, Inc.

Chapter 8Administer the module
For details, see Repair archives using safe mode on page 112.
View and edit the current time
To view and edit the current time in FactoryTalk Historian ME
1.
Click the Advanced tab, and then click Time Management.
The Time Management page appears.
You can view the module's current time in the Module's Current Time box.
2.
Select one of the time synchronization options:
◦
Controller Time
In the list, select a controller or a shortcut to a local controller that will be used for time
synchronization.
Tip: The Logix Designer installation DVD contains the Logix Designer Clock Update Tool.
The tool lets you view and synchronize the system time of the controllers and devices on
a network, using any computer with a Microsoft Windows operating system and RSLinx
Classic installed. For details, see the Logix Designer Clock Update Tool online help.
If you use a shortcut to a local controller as the time source, and this shortcut or the controller to which
the shortcut is pointing is removed, an error message appears informing you that this time source is no
longer available.
◦
NTP Server
In the box, type the IP address or the hostname of the NTP server computer that will be used for the
time synchronization.
For details on using this option, see Considerations for using an NTP server as the time source on page
100.
◦
Manual Set
In the box, type the new time in the same format as the one displayed in the Module's Current Time
box. The time is kept by the module’s real-time clock.
Tip: With this option selected, the module's time is not synchronized with any time source.
As it may result in a potential drift of the real-time clock over time, the Manual Set option
should only be used in rare cases such as demonstrations or troubleshooting associated
with maintenance.
For details, see Clock drifts on page 102.
3.
Click Save.
The module is automatically rebooted, and the updated time is displayed in the Module's Current Time box.
Tip: The time on the selected time source may be in the past compared to the current module
time. Using such a time source will cause the module time to be in the past, and will cause the
module to reboot into safe mode. In such a case, you need to repair the archive files and get the
module out of safe mode.
For details, see Repair archives using safe mode on page 112.
Rockwell Automation, Inc. 1756-UM106H-EN-E - June 2024 99

Chapter 8Administer the module
Considerations for using an NTP server as the time source
When you set the time synchronization with an NTP server computer, keep the following in mind:
Configuration requirements
• You can type up to seven IP addresses or hostnames of NTP server computers, separated by a semicolon.
•
The server name can only contain letters A-Z, a-z, numbers, and the "-" and "." characters.
•
The server name cannot be longer than 99 characters.
•
The servers you provide will be validated to check if the configuration is correct.
•
It is critical to have good network connectivity to properly synchronize the module time with the NTP server.
The module behavior
•
Every 15 minutes, and each time that you access the Time Management page on the module and the Time
Management page on the FactoryTalk Historian ME Web Diagnostics client, the system checks if:
◦ The time synchronization with the NTP server computer is correct.
◦ The data packets are transferred from and to the NTP server computer correctly.
•
If data packets are lost, a message appears on the Time Management page on the Historian website and
the Time Management page on the FactoryTalk Historian ME Web Diagnostics client, as well as in the
FactoryTalk Historian ME log. The packets may be lost due to the following reasons:
◦ Problems with the network connection.
◦
Start of the background computer program monitoring the NTP synchronization.
In such a case, you should check the log and/or the Time Management page on the FactoryTalk
Historian ME Web Diagnostics client for any error messages that may have occurred before this
situation.
•
If there occurs a clock drift of 500 ppm or the NTP server cannot be reached to synchronize the time, an
error message appears:
◦ On the Time Management page on the Historian website.
◦ On the Time Management page on the FactoryTalk Historian ME Web Diagnostics client.
◦
In the FactoryTalk Historian ME log.
•
If you used a FactoryTalk Historian SE server for time synchronization, and you upgrade your system to the
current FactoryTalk Historian ME version, your setting will be visible under the NTP Server option, and the
time will be synchronized with the server automatically, provided that it had been configured correctly.
•
If you restore a configuration that used a FactoryTalk Historian SE server for time synchronization, your
setting will be visible under the NTP Server option, and the time will be synchronized with the server
automatically, provided that it had been configured correctly.
The NTP server-related information
•
NTP server computers are typically maintained by a corporate IT department and are often used as the
Windows Active Directory server computer on the network.
100 1756-UM106H-EN-E - June 2024 Rockwell Automation, Inc.

Chapter 8Administer the module
Verify time synchronization
To verify time synchronization
1.
Open the web browser and type https://<Module IP_address>:8443.
Tip: For details, see Configure where to use the secure communication protocol (HTTPS) on page
121.
The FactoryTalk Historian ME Web Diagnostics client appears.
2.
Click the Hardware tab, and then click Time Management.
The Time Management page appears.
3.
Under Time Management, verify the settings for the NTP server computer.
If there are any problems with the synchronization, an error message appears next to the Time Source box.
The time synchronization status is additionally indicated by:
•
Messages on the Time Management page on the Historian client page.
•
Messages in the FactoryTalk Historian ME log.
• The Fault tag in the FactoryTalk Historian ME Logix Designer Module Profile. For details, see Use the input and
output tags to read the Historian ME status on page 145.
You can find additional details about the synchronization under NTP Logs.
Set the time zone
To set the time zone
1.
Click the Advanced tab, and then click Time Management.
The Time Management page appears.
The current time zone is displayed under Time Zone Setting.
The default time zone is US/Eastern (Eastern Standard Time).
Rockwell Automation, Inc. 1756-UM106H-EN-E - June 2024 101

Chapter 8Administer the module
2. In the Region list, select the region.
3.
In the Time Zone list, select the time zone.
4. Click Save.
Tip: Time zone settings for the module affect the time displayed on the Home page and on the
system log message timestamps.
Event timestamps receive the time zone settings from the client.
If you have moved your module to a different time zone, updating only the time will not
automatically update the time zone in the module information. To have the correct time after the
reboot of the module, you need to update both the time zone and the time.
Clock drifts
It is recommended to synchronize all devices with a single reliable time source. You should try to minimize the clock
drifts that may occur among the module, the FactoryTalk Historian SE or PI server, and any controllers. To adjust for
any time variations caused by clock drifts, the module will slew or step as needed.
You can find any time-related information and warnings in the module's log files.
If you have configured your points to have a high-speed scan type and the controller time drifts more than 30
seconds (either forwards or backwards), a message similar to the following appears in the system log:
27-Nov-09 13:24:09 logixd [WARNING] Logixd detected a controller time shift
greater than thirty seconds on High Speed Trend instance 7 running on Data Source
All_Type_Combination_07072009_v17_1_1.
Battery clock
The Historian module's real-time clock is maintained by the replaceable lithium battery.
The battery is non-rechargeable and field-replaceable. It powers the real-time clock for two years when the module is
not powered on and for twelve years with power to the module on.
For information on replacing the battery, see the FactoryTalk Historian Machine Edition Module Installation Instructions
(Publication 1756-IN106).
Configure system settings
In this section you will learn about the following:
•
Change the module name on page 102
• Configure network settings on page 103
Change the module name
The default module name consists of the FactoryTalk Historian ME module serial number prepended to "-FTHME", (for
example, A0003027-FTHME).
102 1756-UM106H-EN-E - June 2024 Rockwell Automation, Inc.

Chapter 8Administer the module
This guarantees a unique name, which is important when the module transfers data to a FactoryTalk Historian SE
or PI server. The FactoryTalk Historian ME module name is prepended to the FactoryTalk Historian ME tag name to
create the FactoryTalk Historian SE or PI server tag name. This provides the tag with uniqueness and context.
Changing the module name may result in duplicate tags being transferred. When tags are transferred to FactoryTalk
Historian SE or PI server, they are appended with the module name. If the module name has changed, the tags will be
transferred again with a different name, for example:
•
Tags from the module FTHME1 are being transferred to the server. When transferred, the module name is
added to the tag name (for example, FTHME1.<tag_name>).
•
The module name is changed from FTHME1 to FTHME2. Consequently, the tags that have already been
transferred will be transferred again because now their tag name is FTHME2.<tag_name>. These duplicate
tags will be counted against your allotted number of points.
Tip: You must have administrator privileges to change the module name.
To change the module name
1.
Click Advanced, and then click System Settings.
The System Settings page appears.
2.
In the Module Name text box, enter a new name.
The name should be descriptive enough to make it easily identifiable. This is especially useful when
transferring data to a FactoryTalk Historian SE server. The name is limited by the following rules:
◦ The name must not contain:
▪
More than 64 alphanumeric characters,
▪ Any special characters (such as !, @, #, $, %, ^,&,*).
▪ Only digits.
▪
Only the following expression:00000000-FTHME.
◦
The name must be unique in relation to other FactoryTalk Historian MEs on the same network.
3.
Click Save.
A message appears asking you to confirm that you want to proceed with the changes.
4.
Click OK.
The module name is changed and the following message appears:
INFO: The module name has been configured successfully. Please stop and start
Data Transfer.
Tip: The module name is also used as the DNS host name of the module and should be unique on
the network. The FactoryTalk Historian ME Module is not able to check the network for naming
conflicts. You need to use the DNS Server to check for such conflicts. Contact your local IT
administrator for more information.
Configure network settings
Tip: You must have administrator privileges to configure network settings.
Rockwell Automation, Inc. 1756-UM106H-EN-E - June 2024 103

Chapter 8Administer the module
To configure network settings
1.
Click Advanced, and then click System Settings.
The System Settings page appears.
2.
Review the following for additional information.
Item Description
Configuration SelectDynamic Host Configuration Protocol (DHCP)or
StaticIP.
DHCP isselected by default.
DHCP Leave this option selected to automate the network
parameter assignment to network devices from one or
more DHCP servers.
A DHCP server is required to assign the module its initial IP
address. Note that the Logix Designer DHCP Server tool can
be used to set the IP address.
Static IP Address Select this option to use the same IP address every time
the module powers up.
If you type an IP address that is already in use, and
then reboot the module, you will not be able to access
the module through the web interface. To repair this,
access the module through FactoryTalk Historian ME
Logix Designer Module Profile and reset the network
configuration. For details, see Use Studio 5000 Logix
Designer module profile on page 140.
IP Address The module’s IP address.
Make sure that the IP address that you use is not assigned
to another device in your network.
This field is enabled when you select Static IP Address.
MAC Address The module’s Media Access Control (MAC) address.
The address comes from the module and cannot be
changed.
Subnet Mask The module’s subnet mask.
The value is unique to your location. To get the correct
value, consult your IT department.
This field is enabled when you select Static IP Address.
Default Gateway The network default gateway.
This allows data to be passed from one subnet to another
in a network.
This field is enabled when you select Static IP Address.
Search Domain The DNS search domain.
This field is enabled when you select Static IP Address.
Primary DNS Server The first Domain Name System (DNS) server.
This field is enabled when you select Static IP Address.
104 1756-UM106H-EN-E - June 2024 Rockwell Automation, Inc.

Chapter 8Administer the module
Item Description
Secondary DNS Server (Optional) The secondary DNS server.
This field is enabled when you select Static IP Address.
Auto-Negotiate Select this checkbox if you want the Autonegotiation to
determine the speed and duplex parameters. The speed
and duplex parameters must match the parameters on the
router switch.
Speed The network speed. Ensure that this setting matches the
speed set on the switch port that your module is connected
to.
This field is enabled when the Auto-Negotiate checkbox is
not selected.
Duplex The duplex parameter determines how communication is
sent and received.
◦
In the list, select Full if you want both communication
ends to be able to send and receive signals at the
same time.
◦ In the list, select Half if you want the communication
to be bidirectional. However, note that the signals can
only flow in one direction at a time.
Ensure that this setting matches the speed set on the
switch port that your module is connected to.
This field is enabled when the Auto-Negotiate checkbox is
not selected.
3.
Click Save.
A message appears asking you to confirm that you want to change the settings.
4.
Click OK.
Tip: If you change the default IP address configuration from DHCP to Static IP Address, or if you
use BootP through Logix Designer and a BOOTP/DHCP server, you cannot access the module
using its host name. The new IP address is not associated with the module host name on the DNS
server, and the host name does not resolve. To avoid this issue, consult your local IT department
to register the new IP address with the DNS server.
Upload files to the module
To upload a file to the FactoryTalk Historian ME Module
1.
Click the Advanced tab, and then click Upload Management.
The Upload Management page appears.
2.
In the File Type list, select the file type.
For details on the file types you can select, see File types on page 106.
3.
In the Please Select File box, type the file name, or click Browse to locate the file.
Rockwell Automation, Inc. 1756-UM106H-EN-E - June 2024 105

Chapter 8Administer the module
The file name may only contain the following characters: @, ., -, _, a-z, A-Z, 0-9, and must not
contain any spaces.
4. Click Upload To Module to upload the selected file to the module.
The uploaded file is displayed in the table. The table includes the name, type, and size of the file, as well as
the time the file was last modified.
Tip: Files of type Ca Certicate, Server Certicate, and Private Key must have the .pem extension.
Files of type AutoDiscoveryRuleFile, TagAttributeFile, and User-dened Timeouts must have the
.xml extension.
The maximum size of the file you want to upload may not exceed 500 KB.
If you use HTTPS, do not delete files of the type CA Certicate, Server Certicate, and Private Key
after uploading them.
For details on security settings, see Manage security on page 117.
File types
The following table lists the file types that you can select in the File Type list:
File type Description
Auto Discovery Rule File The Add Points Wizard uses these files when discovering tags.
Tag Attribute File The Add Points Wizard uses these files when creating tags.
CA Certificate This file is necessary if you have the protocol set to HTTPS.
Server Certificate This file is necessary if you have the protocol set to HTTPS.
Private Key This file is necessary if you have the protocol set to HTTPS.
User-defined Timeouts Use this file to modify the default timeout settings if your
internet connection is slow.
The UserDefinedTimeouts.xml file includes a set of default
timeouts that you can customize. The timeouts are classified
into several groups based on the system areas in which they
occur. The file contains the following information:
• info: the location of the timeout group in the module's web
interface.
• name: the unique name of the timeout group.
• value: the timeout value provided in seconds.
To customize the file, open this help topic on the Upload
Management page in your module. Right-click "this link", and
then click Save Link As to save the file on your computer.
106 1756-UM106H-EN-E - June 2024 Rockwell Automation, Inc.

Chapter 8Administer the module
File type Description
Modify the content in a text editor. When modifying the file,
consider the following:
•
If you change the default value of the timeout, the system
will compare the default value and the new one, and use
the greater one for the timeout. If you do not change the
default value, the value will still be used by the system.
•
If you do not modify all the entries, you can delete the
unchanged ones, or leave them with the default values.
Once you have modified the file, save it, and then upload it
to the module. Even if you have changed the name of the
file, it will revert to UserDefinedTimeouts during the upload.
If you have changed the timeout settings only for one
location in the module's web interface (for example, on the
Add Points Wizard page) press Ctrl+F5 for the changes to
take effect.
If you have changed the timeout settings in several
locations in the module's web interface, clear the cache
of the browser. For detailed information on clearing the
browser's cache, refer to the browser documentation.
Note: Please note that modifying timeout settings is not
recommended, and you should use this feature carefully
as it directly influences the behavior of the ME module.
Manage the uploaded files
Once you have uploaded the files to the FactoryTalk Historian ME Module (see Upload files to the module on page
105), you can manage them on the Upload Management page. Managing the uploaded files includes:
• Viewing the files
To view a file in a new browser window, select a file in the list, and then click View.
•
Deleting the files
To delete a file from the module, select a file in the list, and then click Delete. Click OK to confirm the action.
•
Checking the format of XML files
To check if an XML file is formatted properly, select an XML file in the list, and then click Check Format. This
does not check the format of other file types.
Back up and restore configuration files
It is recommended that you periodically back up the module configuration. You should also back up the configuration
whenever changes are made to it. In case you need to reset the module, you will be able to restore the configuration
after the module resets.
This table describes the backup configuration that can be restored on which Historian module series.
Backup configuration Can be restored on
Series A Series A, B, or C
Rockwell Automation, Inc. 1756-UM106H-EN-E - June 2024 107

Chapter 8Administer the module
Backup configuration Can be restored on
Series B Series B or C
Series C Series C
Tip: You must have administrator privileges to back up or restore the module's configuration files.
View the backup status and perform backup
To view the backup status
1.
Click the Configure Historian tab, and then click Backup And Restore.
The Backup and Restore page appears.
2.
Under Backup Status, view the details of the most recent backup of the system configuration:
◦
The status of the backup.
◦ The date of the backup.
◦ The name of the backup file.
◦
The size of the backup file.
The backup file contains configuration information for the following:
◦
Data collection.
◦ Data storage.
◦
Data transfer.
◦
Security.
◦
Data server.
◦
Point server.
◦
Web server.
Tip: If any changes have been made to the system configuration since the last backup, it is
recommended to perform another backup.
3.
Click Backup to perform the system backup.
Download the backup file to a client computer
To download the backup file to a client computer
1.
Click the Configure Historian tab, and then click Backup And Restore.
The Backup and Restore page appears.
Under Download to Client, the details of the last download are displayed:
◦ The time the backup configuration file was last downloaded to the client computer.
◦
The name of the last downloaded backup configuration file.
The name is based on the date and time that the file was created.
2. Click Download.
The button is inactive if no backup of the module has occurred.
IMPORTANT: Editing the xml files is not recommended.
108 1756-UM106H-EN-E - June 2024 Rockwell Automation, Inc.

Chapter 8Administer the module
After downloading the file from the module, you can use an XML parser to modify the configuration. However, you
should not change the following files:
• datacollection/dconf.xml
• datastorage/dsconf.xml
•
datatransfer/dtconf.xml
Upload the backup file to the module
To upload the backup file from the client computer to the module
1.
Click the Configure Historian tab, and then click Backup And Restore.
The Backup and Restore page appears.
Under Upload to Module, the details of the last upload are displayed:
◦ The time the backup file was last uploaded to the module.
◦
The name of the last uploaded backup file.
2.
Click Browse.
3. Locate the file that you want to upload, and then click Open.
4.
Click Upload.
Tip:
◦
You can also upload the backup file downloaded from one FactoryTalk Historian ME Module
to quickly configure another FactoryTalk Historian ME Module.
◦ Please take the following into consideration:
▪
You can only have one backup configuration file at a time on the FactoryTalk
Historian ME Module.
Only the last version of the backup configuration is stored.
▪
The name of the backup file may not exceed 80 characters.
▪
The backup file must contain the .tar.gz extension in its file name.
▪
If you upload an older backup file, it will overwrite any newer backup file.
▪ The backup file cannot contain a space in its name.
Restore the module from the backup file
To restore the module from the backup file
1.
Click the Configure Historian tab, and then click Backup And Restore.
The Backup and Restore page appears.
Under Restore Module From File, the details of the last restoration process are displayed:
◦ The status of the last restore.
◦
The date of the last restore.
◦
The file used in the last restore.
2. Click Restore Wizard.
Tip: If there is no backup file stored on the module, the Restore Wizard button is inactive.
For details on uploading backup files, see Upload the backup file to the module on page 109.
Rockwell Automation, Inc. 1756-UM106H-EN-E - June 2024 109

Chapter 8Administer the module
The Stop Module step of the wizard appears.
3.
Click Continue.
The Confirm File step of the wizard appears.
4. Check if the name of the backup file is correct, and then click Confirm.
A list of parameters appears, displaying their current and restore values.
5.
Select the checkboxes for the parameters that you want to restore.
Tip: Tips:
◦
For details on restoring the name of the module, see Check and restore the module name
on page 111.
◦ For details on restoring PI Server ID (ServerID), see Why restoring PI Server ID? on page
110.
6.
Click Continue.
The Restore Progress step of the wizard appears.
7.
Wait until the key services stop and the module reboots automatically.
Tip: The key services are stopped within a predefined time period. However, stopping the
subsystems may sometimes take longer than the predefined time. To make sure that the
subsystems are stopped accordingly, the timeout value for stopping the subsystems is extended
1.5 times.
If you are using a custom timeout defined in the AllPagesTimeout xml key in the
UserDefinedTimeouts.xml file and stopping the subsystems fails, extend the AllPagesTimeout
value. For details on user-defined timeouts, see File types on page 106.
Why restoring PI Server ID?
Before restoring an ME module configuration from a backup file, you should decide whether you want to restore its PI
Server ID (ServerID) or not.
Tip:
•
If different modules have the same ServerID, client applications such as DataLink may connect to
other modules than expected.
• On the Backup and Restore page, Current Value and Restore Value are always set to N/A.
Whether the ServerID is restored or not depends on the setting of the ServerID checkbox.
Consider the following use cases:
Use case 1
You have created a backup of the configuration of an ME module. The module gets damaged. You take out the broken
module and replace it with a new one. You restore the backup files of the broken module on the new module. While
configuring the restore process, you leave the ServerID checkbox selected, because you want the new module to
have the ServerID of the original module. PI Server ID will be restored with the configuration.
110 1756-UM106H-EN-E - June 2024 Rockwell Automation, Inc.

Chapter 8Administer the module
Use case 2
You want to copy the configuration of one of your ME modules (Module 1) to other ME modules that will function
simultaneously along with Module 1. You create a backup of the Module 1 configuration and restore it on the other
modules. While configuring the restore process, you clear the ServerID checkbox, because you don't want to replace
PI Server IDs of these modules with the Module 1 ID. PI Server ID won't be restored with the configuration.
Check and restore the module name
Tip: The name of the module is automatically restored when you use a backup file in the restore wizard.
When restoring a module, make sure that the restored module’s name is the same as the original module’s
name. When the tags are transferred to FactoryTalk Historian SE or PI server, the tags are appended with
the module name. If the restored module’s name is different, the same tags will be transferred again with
a different name. For example:
•
Tags from the module FTHME1 are being transferred to FactoryTalk Historian SE or PI server.
When transferred, the module name is added to the tag name (for example, FTHME1.<tag_name>).
•
FTHME1 is backed up and restored. However, the module name is now FTHME2. The same
tags that were already transferred will be transferred again because now their tag name is
FTHME2.<tag_name>. These duplicate tags will be counted against your allotted number of
points.
To avoid this issue, ensure that the restored module’s name is correct after the restoration
process.
To check the module name and restore it from the backup file
1.
Click the Advanced tab, and then click System Settings.
The System Settings page appears.
The name of the module is displayed under System Settings in the Module Name box.
2.
Perform steps 1-4 listed in Restore the module from the backup file on page 109.
3.
Make sure that the Module Name checkbox is selected under Restore Parameter.
4.
Verify that the correct module name is displayed under Restore Value.
5.
Click Continue.
The Restore Progress step of the wizard appears.
6.
Wait until the key services stop and the module reboots automatically.
Use the system log
To search for messages reported to the system log, and export the search results
1.
Click the Advanced tab.
The System Log page appears.
2.
Review the following for additional information.
Rockwell Automation, Inc. 1756-UM106H-EN-E - June 2024 111

Chapter 8Administer the module
Item Description
Time Use the Time box to specify time search criteria. The table
uses m for minutes and d for days. The default value is
*-5m.
Source Use the Source box to filter by source.
The default value is "*", which means that no filtering is
used and messages from all sources are displayed.
Message Use the Message box to filter by message text.
The default value is "*", which means that no filtering is
used and all messages are displayed.
Count Use the Count box to limit the maximum number of log
messages that will be searched out.
The default value is 1000. The maximum value that you can
enter is 5000.
3.
Specify the search criteria.
4.
Click Search to display the messages using the criteria specified.
The messages are displayed in a table. By default, the messages are displayed sorted by time, from oldest to
newest. You can sort the messages by heading. For example, click the Source heading to sort the messages
by source alphabetically, in ascending order.
5.
Click Export to export all search results to a file.
System log related issues
Keep in mind the following system log related issues:
•
If you are using IE 7.0 and want to export to Excel, you must install Windows hotfix 929863. This fix addresses
an Excel file export issue on the System Log page. You need to add the [HKEY_CLASSES_ROOT\.csv]
"PerceivedType"="document" registry value for the .csv document type.
•
If you use the Auto Refresh feature, new messages will appear in the System Log table each time data is
refreshed. When multiple clients perform the refresh action, the System Log table will grow quickly.
•
When the FactoryTalk Historian ME systems are up and running, and the connection to the data source is lost,
a message similar to the following will be logged:
0 DataCollection 28-Dec-09 19:00:47 [ERROR] HandleNotification() detected
erroneous return condition from notify_on_event API.
This message is logged every 300 errors to help prevent the log disk space from being filled with too many
error messages.
Repair archives using safe mode
Each time you reboot the system, the system checks to see if your archive files contain any data that has a
timestamp for a time in the future. If future timestamps are found upon rebooting, the module's STS light is
solid red and the LED displays either SAFE MODE LAN OK <IP_address> or SAFE MODE LAN LOST
<MAC_address>. Both messages indicate that the module is in safe mode. When this happens, the module web
interface is inaccessible and you must go to the Web Diagnostic page to repair the archive files. When the module is
in safe mode, PI commands cannot be executed.
112 1756-UM106H-EN-E - June 2024 Rockwell Automation, Inc.

Chapter 8Administer the module
When the module is in safe mode, the following error message appears on the Web Diagnostics page:
ERROR: Archives are in inaccessible state. Please navigate to "Safe Mode" or click
on "Repair" to continue.
To access the bad archives information, follow the message instructions.
The bad archives are listed and selected by default.
You can repair the bad archives by repairing the time setting. For details, see Repair the time setting on page 113.
Repair the time setting
To repair the time setting
1.
On the Safe Mode page, select the Repair Time option.
2. In the Time text box, type the correct time.
3.
Choose the time zone and the region from the provided lists.
4.
Click Change Time. A message appears:
INFO: The time sync is successful. Please wait while system reboots...
5.
Wait for the module to reboot. The archives have been repaired.
IMPORTANT: If you choose to repair time, be aware that if you have previously synchronized
your ME module to an external time source such as a controller or an NTP server, clicking
Repair Time will reset your time source to manual. We recommend, therefore, that before
you perform this step, you attempt to fix the problem with your original time source first. For
details, see Manage time on page 98.
Tip: If you do not want to repair the time, you can wait until the time listed in the timestamp is no
longer in the future. Once that occurs, click Reboot to reboot the module. When the archives are
checked again, no future timestamps will be found in the archive files and no repair is needed.
Restore and reset module-related settings
You can reset or restore the following module-related settings:
•
The module's defaults.
See The module's defaults on page 114.
• The security mode.
See Reset the security mode on page 114.
•
The Web Diagnostics password.
See Reset the Web Diagnostics password on page 115.
Rockwell Automation, Inc. 1756-UM106H-EN-E - June 2024 113

Chapter 8Administer the module
Restore the module's defaults
Tip: You must have administrator privileges to restore the module.
When you restore the module, all data stored on FactoryTalk Historian ME is deleted, including any backed
up configuration file. Make sure that you download the backup configuration files before restoring
FactoryTalk Historian ME. For details, see Restore the module from the backup file on page 109.
To restore FactoryTalk Historian ME to its original configuration
1.
Click the Advanced tab, and then click Restore Defaults.
The Restore Defaults page appears.
2.
Click Restore Defaults.
FactoryTalk Historian ME is restored to its default settings.
When you restore the module to the default configuration, you must also restart all module clients (for example,
FactoryTalk Historian DataLink, FactoryTalk Historian ProcessBook, FactoryTalk View SE Trending, PI System
Management Tools (SMT), or PI SMT Tag Configurator).
Tip:
•
Alternatively, you can perform the Restore Defaults and Reset Security actions on your Historian
module in the Logix Designer Module Profile.
If the Restore Defaults or Reset Security actions are being executed in the Module Profile, you will
not be able to restore the default settings, reset the security configuration, or reboot the module
from the web client.
For details, see Configure the module properties on page 140.
• After restoring the module to the default configuration, change the password for the default
piadmin user.
For more details, see Change user passwords on page 96.
Reset the security mode
If the module has been configured for FactoryTalk Security, resetting the security mode results in the following:
•
The data collection stops immediately.
• The module is shut down and then restarted using the FactoryTalk Historian ME Local Security.
• The administrative piadmin user, and the users that were created in the FactoryTalk Historian ME Local
Security mode are retained.
•
The piadmin user password becomes empty.
If the module has been configured for the FactoryTalk Historian ME Local Security, resetting the security mode results
in the following:
•
The piadmin user password becomes empty.
•
The user is prompted to log on to the FactoryTalk Historian ME web interface.
Regardless of which security mode has been configured, resetting security always results in resetting the Web
Diagnostics administrator password. For details, see Reset the Web Diagnostics password on page 115.
114 1756-UM106H-EN-E - June 2024 Rockwell Automation, Inc.

Chapter 8Administer the module
Resetting the FactoryTalk Historian ME Local Security mode does not require rebooting the module.
To reset the security mode
1. Click the Advanced tab, and then click Restore Defaults.
The Restore Defaults page appears.
2.
Click Reset Security.
A message appears asking you to confirm the action.
3.
Click OK.
Tip:
◦
Alternatively, you can perform the Restore Defaults and Reset Security actions on your
Historian module in the Logix Designer Module Profile.
If the Restore Defaults or Reset Security actions are being executed in the Module Profile,
you will not be able to restore the default settings, reset the security configuration, or
reboot the module from the web client.
For details, see Configure the module properties on page 140.
◦ After resetting the security mode, change the password for the default piadmin user.
For more details, see Change user passwords on page 96.
Reset the Web Diagnostics password
To reset the Web Diagnostics administrator (admin) password to the default one
(admin)
1. Click the Advanced tab, and then click Restore Defaults.
The Restore Defaults page appears.
2.
Click Reset Web Diagnostics Password.
A message appears asking you to confirm the action.
3.
Click OK.
Close and start the module
You can perform the following actions on the module using the Module Shutdown page:
•
Shut down the module on page 115
• Reboot the module on page 116
• Restart the module on page 116
Shut down the module
The module shutdown allows you to stop all FactoryTalk Historian ME-related services (including the point server,
the data collection, the data transfer, and the web configuration server). It is recommended that you shut down the
module if you plan to remove it from the chassis or if you are going to power down the chassis.
To shut down the module
1.
Click the Advanced tab, and then click Module Shutdown.
A message appears asking you to confirm the action.
Rockwell Automation, Inc. 1756-UM106H-EN-E - June 2024 115

Chapter 8Administer the module
2. Click OK.
The module shutdown is complete when the scrolling message on the module displays the module’s IP
address followed by SHUTDOWN.
Tip: Alternatively, you can shut down the module using the FactoryTalk Historian ME Logix
Designer Module Profile.
For details, see Configure the module properties on page 140.
Reboot the module
To reboot the module
1.
Click the Advanced tab, and then click Module Shutdown.
2. Under Module Reboot, click Module Reboot.
A message appears asking you to confirm the action.
3.
Click OK.
Tip: Alternatively, you can reboot the module using the FactoryTalk Historian ME Logix Designer
Module Profile.
If the Restore Defaults or Reset Security actions are being executed on your Historian module in
the Logix Designer Module Profile, you will not be able to restore the default settings, reset the
security configuration, or reboot the module from the web client.
For details, see Configure the module properties on page 140.
Restart the module
To restart the module
1.
Shut down the module.
See Shut down the module on page 115.
2.
Click the Advanced tab, and then click Module Shutdown.
3.
Go to the module, and do either of the following:
◦
Cut off and restore the power to the module by turning off and on the power switch on the chassis.
◦ Unplug and insert the module into the chassis.
116 1756-UM106H-EN-E - June 2024 Rockwell Automation, Inc.

Chapter 9
Manage security
Security of the FactoryTalk Historian ME module is managed on the System Security page. To access the System
Security page, click the Configure Historian tab, and then click System Security.
Any changes to module security settings will automatically log out the current user because the users and user
groups available depend on the security mode selected. Changing the security mode will also cause the module to
reboot. This process may take a few minutes.
Configure security
Tip:
•
You must have administrator-level privileges to make any changes to security.
• All clients should be logged out before making any changes to the security settings.
You can configure the following security areas:
1.
Configure how to log on to the module on page 117
2.
Configure where to use the secure communication protocol (HTTPS) on page 121
Configure system timeout
If the administrator session expires, you will be automatically logged out and taken to the Home tab. The default
expiration time is 20 minutes. Configure the value in the Configure Historian tab as needed.
To configure system timeout
1.
Click the Configure Historian tab, and then click System Security.
2.
Under System Security, enter the value in the System Timeout box.
Configure how to log on to the module
FactoryTalk Historian ME requires secure credentials (user logon and password) to access the system. You can log on
to FactoryTalk Historian ME in two ways:
Use: If you want to:
FactoryTalk Historian ME Local Security Log on to the module with the credentials configured directly on
the Historian module. For more information, see Manage users
on page 95.
With this option the module can function as a standalone
device, and its security settings are managed on the
FactoryTalk Historian ME client page.
The FactoryTalk Directory Log on to the module with the credentials configured on the
FactoryTalk Directory server in the FactoryTalk Administration
Console.
With this option, the module can be integrated into a complex
FactoryTalk environment, and its security settings are managed
in the FactoryTalk Administration Console. For details, see Log
Rockwell Automation, Inc. 1756-UM106H-EN-E - June 2024 117

Chapter 9Manage security
Use: If you want to:
on using the FactoryTalk Directory with FactoryTalk Historian
ME on page 118 and Integrate the module into a FactoryTalk
environment with the FactoryTalk Directory on page 126.
The logon method influences the list of available users and user groups:
•
If you are using the FactoryTalk Historian ME Local Security option to log on, the available users will be the
ones created on the module and added to the default piadmin or piuser group.
•
If you are using the FactoryTalk Directory option to log on, the available users and groups correspond to the
ones set on the FactoryTalk Directory server computer in the FactoryTalk Administration Console.
For details, see View groups on page 97 and Understand privileges for user groups on page 119.
To log on with the FactoryTalk Historian ME Local Security credentials
•
On the System Security page, under System Security, click FactoryTalk Historian ME Local Security.
To log on with the FactoryTalk Directory security credentials
1.
On the System Security page, under System Security, click FactoryTalk Directory.
2.
Type the IP address or hostname, and the port number for the FactoryTalk Directory server.
The port for HTTPS communication is 443.
3.
(Optional). Type the IP address or hostname, and the port number for the secondary server.
For details on using a secondary server, see Log on using the FactoryTalk Directory with FactoryTalk
Historian ME on page 118.
Log on using the FactoryTalk Directory with FactoryTalk Historian ME
The FactoryTalk Directory is a centerpiece component of the FactoryTalk Services Platform. It uses integrated
FactoryTalk Security services that are installed with the FactoryTalk Services Platform and managed from the
FactoryTalk Administration Console.
Tip: Refer to the FactoryTalk Security documentation for details about FactoryTalk Security.
The FactoryTalk Directory provides a central lookup service for tags and other system elements from multiple data
sources, and makes the information available to clients in a FactoryTalk environment.
If you use the FactoryTalk Directory server, you can enable a primary and a secondary server.
If the connection between FactoryTalk Historian ME and the FactoryTalk Directory server is lost or becomes
unavailable, FactoryTalk Historian ME will attempt to locate a secondary security server. It is recommended that you
use a system that is always up and running to avoid possible failure at logon. The secondary server must have the
same configuration as the FactoryTalk Directory server.
118 1756-UM106H-EN-E - June 2024 Rockwell Automation, Inc.

Chapter 9Manage security
Before using the FactoryTalk Directory for logging on to the module, ensure that:
•
The FactoryTalk Services Platform is installed on the FactoryTalk Directory server computer using the
Custom option.
Tip: Refer to the FactoryTalk Services Platform Release Notes for more information.
•
FactoryTalk Web Services is installed and configured on the FactoryTalk Directory server computer to
authenticate the security calls from the module.
•
FactoryTalk Security services are running on the network.
•
Internet Information Services (IIS) are installed and configured on the FactoryTalk Directory server computer
so that FactoryTalk Historian ME can establish a connection to it.
Understand privileges for user groups
The following table displays the privileges for user groups configured in the FactoryTalk Historian ME Module or on the
FactoryTalk Directory server in the FactoryTalk Administration Console.
Depending on the way you log on to the module, you will have different user groups at your disposal, and you will
manage them differently:
•
If you are using FactoryTalk Historian ME Local Security credentials, you can manage the user groups on the
Group Management page.
For details, see View groups on page 97.
•
If you are using the FactoryTalk Directory security credentials, you can manage the user groups in the
FactoryTalk Administration Console on the FactoryTalk Directory server computer.
For details, see Log on using the FactoryTalk Directory with FactoryTalk Historian ME on page 118 and
Configure secure groups in the FactoryTalk Administration Console on page 129.
If the logon mode is changed, all groups and users associated with the previous logon mode are lost.
Operation The FactoryTalk Directory security groups
The FactoryTalk Historian ME
Local Security groups
FTHAdministrat
ors
FTHEngineers FTHSupervisors FTHOperators piadmin piuser
Manage SNMP Yes No No No Yes No
Create tag Yes Yes No No Yes No
Read status Yes Yes Yes Yes Yes Yes
Start data
collection
Yes Yes Yes No Yes No
Stop data
collection
Yes Yes Yes No Yes No
Read point
definition
Yes Yes Yes Yes Yes Yes
Modify point
properties
Yes Yes No No Yes No
Rockwell Automation, Inc. 1756-UM106H-EN-E - June 2024 119

Chapter 9Manage security
Operation The FactoryTalk Directory security groups
The FactoryTalk Historian ME
Local Security groups
Read point
historical data
Yes Yes Yes Yes Yes Yes
Export point
historical data
Yes Yes Yes Yes Yes Yes
Read system log Yes Yes Yes Yes Yes Yes
Read user
information
Yes Yes Yes Yes Yes Yes
Create/modify/d
elete user
Yes No No No Yes No
Change
password (self)
Yes Yes Yes Yes Yes Yes
Change
password (other
users)
Yes No No No Yes No
Read group
information
Yes Yes Yes Yes Yes Yes
Create/modify/d
elete group
No No No No Yes No
Create/modify/d
elete trust
Yes No No No Yes No
Save NTP server Yes Yes No No Yes No
Synchronize
time
Yes Yes No No Yes No
Read backup
status
Yes Yes Yes Yes Yes Yes
Backup
configuration
Yes Yes No No Yes No
Download
backup file
Yes Yes No No Yes No
Upload backup
file
Yes Yes No No Yes No
Restore
configuration
Yes Yes No No Yes No
Reset module Yes Yes No No Yes No
Reset security Yes Yes No No Yes No
Read security
mode
Yes Yes Yes Yes Yes No
Change security
mode
Yes Yes No No Yes No
120 1756-UM106H-EN-E - June 2024 Rockwell Automation, Inc.

Chapter 9Manage security
Operation The FactoryTalk Directory security groups
The FactoryTalk Historian ME
Local Security groups
Change protocol Yes Yes No No Yes No
Manage
shortcuts
Yes Yes No No Yes No
Configure where to use the secure communication protocol (HTTPS)
The secure communication protocol HTTPS is a combination of the HTTP and a cryptographic protocol. If you choose
to use HTTPS, communication through the web interface will be encrypted for security purposes.
The following items will use the HTTPS protocol. The list of options depends on the way that you chose to log on to the
model under System Security. For details, see Configure how to log on to the module on page 117.
Is available when you choose this logon method:
This option:
FactoryTalk Historian ME Local
Security
The FactoryTalk Directory
The FactoryTalk Historian webpages x x
The FactoryTalk Directory - x
Tip: The FactoryTalk Historian web pages include the client page and the Web Diagnostics page.
To configure where to use the secure communication protocol (HTTPS)
1.
On the System Security page, under HTTPS Settings, select the type of HTTPS certificate:
Certificate type Description
Self-signed certificate A certificate issued by the module, which holds its own
private key. This type is chosen by default to provide a
secure connection out of the box. The certificate is valid
for 5 years.
CA certificate A certificate issued by a trusted third party, for example,
the IT security department in your organization. To use
the CA certificate, you have to manually upload the CA
certificate, server certificate, and private key files to the
module. For details, see Upload files to the module on page
105.
Rockwell Automation, Inc. 1756-UM106H-EN-E - June 2024 121

Chapter 9Manage security
2. Depending on the type of certificate, do either of the following:
◦
For the Self-signed certificate type, complete the following:
Item Description
Issued to Choose the method with which you access the Historian
webpages:
▪
IP address.
The certificate will be issued to the IP address
of the module. This is the default setting. The IP
address is provided by the system automatically.
▪
Module name.
The certificate will be issued to the module name.
The module name is provided by the system
automatically.
▪ Domain name.
The certificate will be issued to the fully qualified
domain name of the module.
Type the domain name in the following format:
<modulename>.<domainname>.<top-level domain>
For example, module1.mycompany.com
Renew Certificate Use this button if:
▪ You change the method with which you access the
Historian webpages. In this way, a new certificate
will be issued.
▪
Your certificate has expired, and you want to issue
a new one.
Tip: If you renew the certificate for your module, you have to install it in the browser. To
install the certificate in the browser, consult your network administrator.
◦
For the CA certificate type, complete the following:
Item Description
CA certificate file Select the certificate authority. This is necessary for
using HTTPS.
Server certificate file Select the file that contains the digital certificate that
has been issued to a server and contains information
about the server.
Private key file Select the file that contains the private key for the web
server.
Private key password Type the encryption password used to secure the
private key file.
Verify the FactoryTalk Directory certificate Select the checkbox to verify if the FactoryTalk
Directory certificate is valid. The module will check
122 1756-UM106H-EN-E - June 2024 Rockwell Automation, Inc.

Chapter 9Manage security
Item Description
if there is a certificate for the FactoryTalk Directory
issued by a certificate authority. This option is only
available if you set HTTPS for communication with the
FactoryTalk Directory.
3.
Click Save.
If the configuration is incomplete, an error message appears prompting you to provide the missing
information.
If the configuration is complete, a message appears.
4.
Click OK.
The configuration will be validated.
If the configuration is successful, you will be logged out and taken to the logon page.
Otherwise, an error message appears.
Tip: If the configuration of the module is restored from a backup file, the communication is
automatically set to HTTPS for connections with the Historian webpages.
If the backup file contains security certificates, they will be used in the restored configuration.
Otherwise, a default self-signed certificate will be generated and used.
For more information on restoring configurations, see Backup and restore configuration files on
page 107.
Manage security trusts
Trusts authorize connections between computers.
FactoryTalk Historian ME uses the following types of trusts:
• Default trusts on page 124
•
User-defined trusts on page 124
To view trusts defined on the Historian ME module
•
Click the Configure Historian tab, and then click Trust Management.
The Trust Management page appears.
The page displays both the default and the user-defined trusts.
Tip: If the IP Address and NetMask boxes are left blank in trust definitions, they appear as
0.0.0.0.
The FactoryTalk Historian ME server compares incoming connection credentials with every trust login record. Each
setting in a trust configuration is compared to the corresponding credential setting. Every setting that is not blank
in the trust configuration must exactly match the passed credentials. Otherwise, authorization is not granted. When
authorization is refused for one trust, the FactoryTalk Historian ME server continues to search the other records until
it has exhausted the possibilities.
Rockwell Automation, Inc. 1756-UM106H-EN-E - June 2024 123

Chapter 9Manage security
Default trusts
The default trusts are recreated or edited every time FactoryTalk Historian ME starts. This guarantees access to all
applications running on the local machine, even if:
• The system network configuration changes.
• The IP address changes as a result of a new network card.
User-defined trusts
If you have configured to log on to your Historian module using the FactoryTalk Historian ME Local Security
credentials (see Configure how to log on to the module on page 117), you will need to configure trusts for:
• Transferring data from FactoryTalk Historian ME to FactoryTalk Historian SE.
The trust configuration is performed on FactoryTalk Historian SE.
For details, see Create trusts for the data transfer on page 124.
For other data transfer prerequisites, see Data transfer prerequisites on page 88.
•
Using data from FactoryTalk Historian ME in FactoryTalk Historian clients.
The trust configuration is performed on FactoryTalk Historian ME.
For details, see Create trusts for FactoryTalk Historian clients on page 125.
If you have configured to log on to your Historian module using the Configure how to log on to the module on page
117, the authorization is handled by FactoryTalk Security.
Create trusts for the data transfer
To ensure a secure connection between FactoryTalk Historian ME and FactoryTalk Historian SE, you need to create the
following trusts in System Management Tools on the FactoryTalk Historian SE server:
1. A trust for webs.
This trust is required so that you can select points for the data transfer on your Historian ME webpage.
When configuring the trust, provide the following information:
◦ The IP address of your Historian ME module.
◦
The trust name: webs.
◦
The trust type: PI-API application.
◦
The application name: webs.
◦ A PI user as the PI Identity.
2.
A trust for datatransfer.
This trust is required so that the selected points are transferred to FactoryTalk Historian SE.
When configuring the trust, provide the following information:
◦ The IP address of your Historian ME module.
◦
The trust name: datatransfer.
◦
The trust type: PI-API application.
◦
The application name: datatransfer.
◦ A PI user as the PI Identity.
For other data transfer prerequisites, see Data transfer prerequisites on page 88.
For details on creating trusts in System Management Tools, refer to the System Management Tools and FactoryTalk
Historian SE user documentation.
124 1756-UM106H-EN-E - June 2024 Rockwell Automation, Inc.

Chapter 9Manage security
Create trusts for FactoryTalk Historian clients
To create a trust between FactoryTalk Historian ME and a FactoryTalk Historian
client
1. Click the Configure Historian tab, and then click Trust Management.
The Trust Management page appears.
2.
At the bottom of the page, click New.
3.
In the Trust text box, type the name of the trust.
To create a trust name, use English alphabet letters and numbers from zero through nine.
4. From the PI User list, select a FactoryTalk Historian ME user.
The privileges of the selected user will be assigned to the incoming connection when the connection
credentials match the specifications in the trust.
5.
In the Domain box, type the name of the domain.
A Windows Domain name may be used only for trusts for SDK client applications running on Windows. The
domain must be the same for the FactoryTalk Historian ME server and the connecting application.
6.
In the OS User text box, type the operating system user.
This text box is used only for SDK applications running within a Windows domain.
7.
In the Application Name box, type the application name.
The format of the application name depends on the application type:
◦ If the application is an API application, its name consists of the first four characters of the executable
file name of the application. The last character in the name must be a capital "E".
For example, FT-PE (for the Historian to Historian interface).
◦
If the application is an SDK application, its name is the full executable file name of the application
(including the file extension):
For this FactoryTalk Historian ME client: Use this application name:
FactoryTalk Historian ProcessBook Procbook.exe
FactoryTalk Historian DataLink EXCEL.exe
FactoryTalk VantagePoint ▪ w3wp.exe,
if you are running Internet Information Services
(IIS) 6.0 or 7.0.
▪ aspnet_wp.exe,
if you are running an earlier version of the IIS.
TrendX FTHRdCli.exe
FactoryTalk Administration Console/FactoryTalk View
Studio
VStudio.exe
ActiveX acview.exe
System Management Tools SMTHost.exe
PI-SDK PI-SDK Utitliy.exe
8.
In the Network Path box, type the name of the network path.
9.
(Optional) In the IP Address box, type an IP address.
10.
(Optional) In the Net Mask box, type a subnet mask address.
Rockwell Automation, Inc. 1756-UM106H-EN-E - June 2024 125

Chapter 9Manage security
Tip: The IP Address and Net Mask text boxes are optional and may be used for either API or SDK
applications. You can fill these boxes to point to exact IP addresses or specific subnets.
11. Click Save.
The new trust is displayed in the table.
Edit trusts
To edit a trust
1.
Click the Configure Historian tab, and then click Trust Management.
The Trust Management page appears.
2.
In the table, click the trust that you want to edit.
3.
At the bottom of the page, click Edit.
The trust settings are displayed in the boxes at the top of the screen.
4.
Make the changes, and then click Save.
5. Click OK.
Delete trusts
To delete a trust
1.
Click the Configure Historian tab, and then click Trust Management.
The Trust Management page appears.
2.
In the table, click the trust that you want to delete.
3.
At the bottom of the page, click Delete.
A message appears prompting you to confirm the action.
4.
Click OK.
Integrate the module into a FactoryTalk environment with FactoryTalk Directory
In this section, you will learn how to integrate a standalone FactoryTalk Historian ME module into an existing
FactoryTalk system using FactoryTalk Directory. Integrating a standalone module into an existing FactoryTalk system
allows:
• Centralized administration of security credentials, performed in FactoryTalk Administration Console.
•
FactoryTalk clients (for example, FactoryTalk View SE or FactoryTalk Batch) to connect to the FactoryTalk
Historian ME module.
Integration prerequisites
Before you register the module in FactoryTalk Directory from a client computer, ensure that:
•
The FactoryTalk Services Platform is installed and configured on the client computer.
• FactoryTalk Historian ME Management is installed on the client computer.
• You are using the FactoryTalk Directory security credentials to log on to the module. For details, see
Configure how to log on to the module on page 117.
126 1756-UM106H-EN-E - June 2024 Rockwell Automation, Inc.
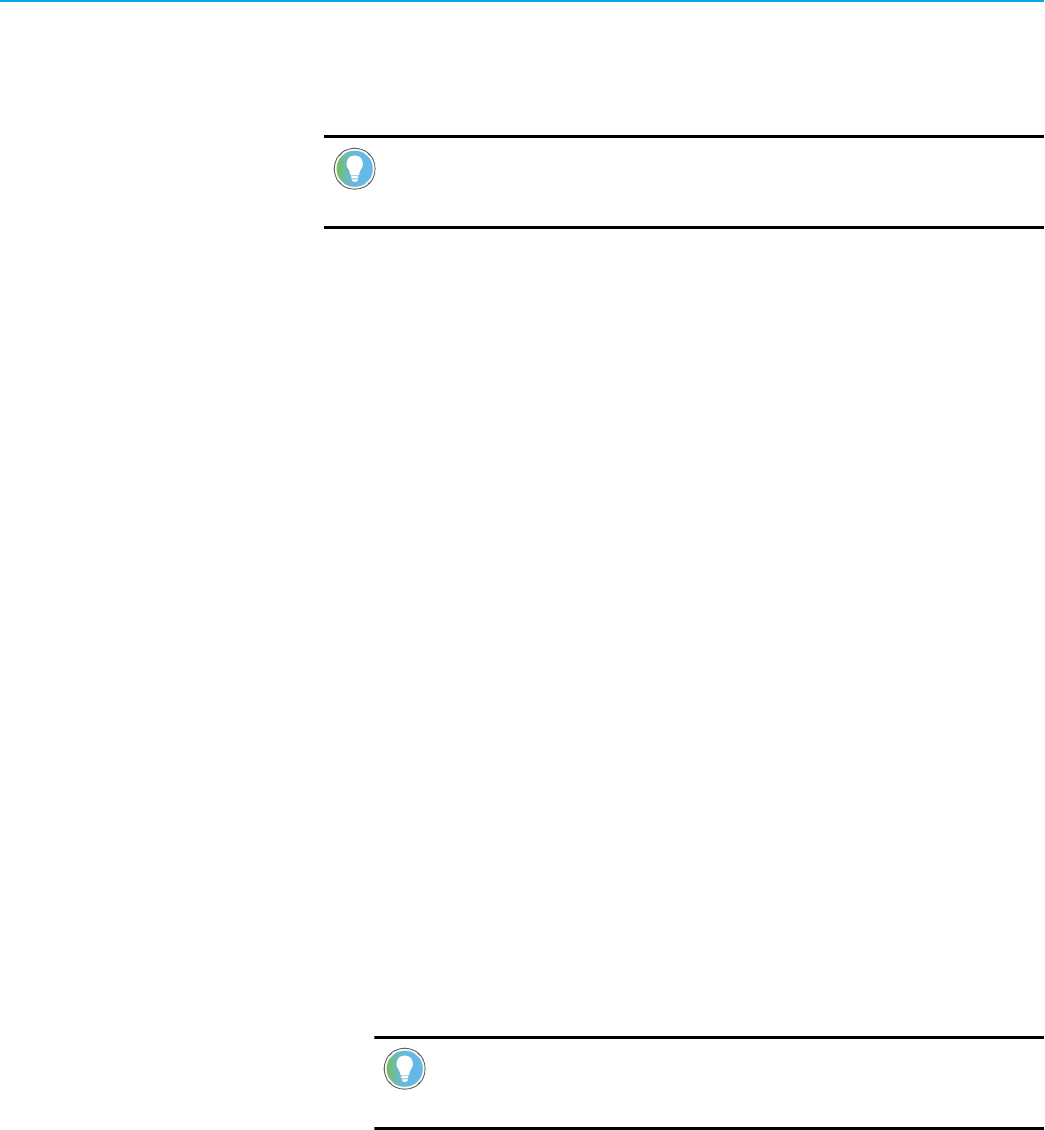
Chapter 9Manage security
Register the module in the FactoryTalk Directory
You can register the FactoryTalk Historian ME module in the FactoryTalk Directory using the FactoryTalk
Administration Console. To register the module, you must create an initial server connection.
Tip: For a list of prerequisites needed to use the FactoryTalk Directory, see Log on using the FactoryTalk
Directory with FactoryTalk Historian ME on page 118.
Add the Historian ME module in the PI SDK Utility
To add the Historian ME module in the PI SDK Utility
1.
Go to Start > All Programs > Rockwell Software > FactoryTalk Historian SE > FactoryTalk Historian SE
System > About PI-SDK.
The PI SDK Utility window appears.
2.
On the File menu, click Connections.
The PI Connection Manager dialog box appears.
3.
On the Server menu, click Add server.
The Add PI Server dialog box appears.
4.
In the Network Path/FQDN box, type the IP address of the Historian module.
5.
Click OK.
If a connection was successfully established, the IP address will appear in the PI Connection Manager dialog
box. If an error occurs, the module might be restarting. Ensure that the middle STS LED is flashing green on
the module. This indicates that the module has fully initialized and a connection can be established.
Register the Historian ME module in the FactoryTalk Administration Console
If you want to add your Historian ME module to the FactoryTalk Directory, you need to register it in the FactoryTalk
Administration Console.
To register the Historian ME module in the FactoryTalk Administration Console
1.
Go to Start > All Programs > Rockwell Software > FactoryTalk Administration Console.
The FactoryTalk Administration Console window appears.
2.
In the Select FactoryTalk Directory dialog box, click Network, and then click OK.
Tip: FactoryTalk Historian ME and FactoryTalk Historian SE support only the Network option in
the FactoryTalk Directory.
3.
In the Explorer pane, expand System > Connections.
4.
Right-click Historical Data ME, and then click New Historian ME Server Connection.
The Historian ME Server dialog box appears.
5.
In the Name text box, type a name for the new server connection.
We suggest that you match the server connection name to your module name. The server connection name
must begin with a letter or a number and contain only letters, numbers, underscores, and spaces.
Rockwell Automation, Inc. 1756-UM106H-EN-E - June 2024 127

Chapter 9Manage security
6. Under Server or Collective Name, do either of the following:
◦
Select your FactoryTalk Historian ME IP address from the list.
◦ Type a new server name or IP address.
7. Click Test Server Connection.
You should receive a Server found message. If you do not receive this message within a few minutes, the
module may still be restarting. Wait a few more minutes, verify the server name or IP address, and try again.
8.
Click OK.
After the module is registered with the FactoryTalk Directory, its name appears under Historical Data ME in
the Explorer pane.
Create users in the FactoryTalk Administration Console
You can add users to preconfigured user groups in the FactoryTalk Administration Console. Each user group
is created automatically when the FactoryTalk Historian ME Management is installed. The FTHAdministrators,
FTHEngineers, FTHOperators, and FTHSupervisors user groups represent different levels of user security. For details,
see Understand privileges for user groups on page 119.
Tip: For more information on FactoryTalk Security users and groups, see the FactoryTalk Security User
Guide.
To create a FactoryTalk Historian ME user in the FactoryTalk Administration
Console
1.
Go to Start > All Programs > Rockwell Software > FactoryTalk Administration Console.
The FactoryTalk Administration Console window appears.
2.
In the Select FactoryTalk Directory dialog box, click Network, and then click OK.
Tip: FactoryTalk Historian ME and FactoryTalk Historian SE support only the Network option in
the FactoryTalk Directory.
3.
In the Explorer pane, expand User and Groups.
4.
Right-click Users, and then click New > User.
The New User dialog box appears.
5.
Complete the user information.
6.
Click the Group Membership tab, and then click Add.
The Select User Group dialog box appears.
7.
Select the group to which you want the user to belong, and then click OK.
8.
In the New User dialog box, click OK.
9.
In the Explorer pane, expand User Groups, and then double-click the group to which you added the new
user.
The new user is listed under Members.
128 1756-UM106H-EN-E - June 2024 Rockwell Automation, Inc.

Chapter 9Manage security
Configure secure groups in the FactoryTalk Administration Console
To use the FactoryTalk Directory with FactoryTalk Historian ME, you need to configure specific user groups in the
FactoryTalk Administration Console. If you have FactoryTalk Historian SE installed in your environment, the secure
groups should already exist in the FactoryTalk Administration Console. Otherwise, you need to create them.
There are the following secure user groups configured in the FactoryTalk Administration Console:
•
FTHAdministrators
•
FTHEngineers
•
FTHSupervisors
•
FTHOperators
IMPORTANT: If your user belongs to a different security group than the groups listed above,
you will not be able to log on to the FactoryTalk Historian ME client website. To manage your
group access, contact the administrator.
If you plan to use the auditing features of FactoryTalk Historian ME while using FactoryTalk Security, you must
create user IDs on the User Management page that exactly match the user IDs in the FactoryTalk Directory. This
will allow you to track changes through a specific user and not a user group. An admin user who is a part of the
FTHAdministrators group in the FactoryTalk Administration Console must also belong to the FTHAdministrators,
FTHSupervisors, and FTHEngineers groups on FactoryTalk Historian ME. In addition, a user who belongs to the
FTHEngineers group must also belong to the FTHSupervisors group to change events on FactoryTalk Historian ME.
SNMP community strings
The Simple Network Management Protocol (SNMP) is a protocol for communication between devices connected in a
network. SNMP uses community strings as passwords that allow a get-request to access the statistics of a module.
Tip:
•
The Backup and Restore function does not include the SNMP community strings.
• Restoring FactoryTalk Historian ME defaults disables SNMP and deletes the existing community
strings. The system creates the default community string: public.
Enable SNMP
Enable SNMP to allow the devices to use community strings for communication.
Prerequisites
Enable HTTPS protocol. See: Configure where to use the secure communication protocol (HTTPS) on page 121.
To enable SNMP
1.
Select the Advanced tab, then select SNMP Management.
2.
Select the Enable SNMP checkbox.
Rockwell Automation, Inc. 1756-UM106H-EN-E - June 2024 129

Chapter 9Manage security
Create SNMP community strings
Create SNMP community strings to use them as passwords to enable access to a device's statistics.
Tip:
•
Only accounts with piadmin or FTHAdministrators privileges can modify the contents of SNMP
Management page.
• While SNMP is enabled, it is not possible to add or delete community strings.
•
The string can contain up to 35 alphanumeric characters (A-Z, a-z, 0-9).
•
FactoryTalk Historian ME supports a maximum of 5 community strings.
To create SNMP community strings
1.
Select the Advanced tab, then select SNMP Management.
2.
Uncheck the Enable SNMP checkbox.
3.
Select Create.
4.
In the next screen, enter the community string.
5.
Select Save.
6.
Repeat steps 3-5 as needed.
7.
Recheck the Enable SNMP checkbox.
Delete SNMP community strings
Delete SNMP community strings that you no longer need.
To delete SNMP community strings
1. Select the Advanced tab, then select SNMP Management.
2.
Uncheck the Enable SNMP checkbox.
3.
In the table, select a string to delete.
4.
Select Delete and confirm.
5.
Repeat steps 3 and 4 as needed.
6.
Recheck the Enable SNMP checkbox.
130 1756-UM106H-EN-E - June 2024 Rockwell Automation, Inc.

Chapter 10
Use the Rule Editor
FactoryTalk Historian ME Rule Editor is a component of the FactoryTalk Historian ME Client Tools suite. You can use it
to create, edit, and delete custom rules for the point discovery process. The selections you make in the dialog box are
automatically written to the point discovery rule file. After you create rule files, you can upload them to the module
with the upload manager (see Upload files to the module on page 105). Tags that match the rules that you create will
be found and added to the FactoryTalk Historian ME server as part of the tag discovery process (see Add points using
the Add Points Wizard page on page 54).
With the Rule Editor, you can perform the following:
•
View the default point discovery rule file on page 131
•
Create point discovery rule files on page 131
•
Define point discovery rules on page 132
•
Edit point discovery rule files on page 134
•
Remove point discovery rule files on page 134
•
Create tag attribute files on page 135
•
Edit tag attribute files on page 139
•
Remove tag attribute files on page 139
View the default point discovery rule file
By default, FactoryTalk Historian ME provides a point discovery rule file named ADDefault.xml. It contains search
criteria with which you find tags for the point creation process.
The path to the ADDefault.xml file is the following:
<Program Files (x86)>\Rockwell Software\FactoryTalk Historian ME\ME Rule Editor\ADDefault.xml
You can open the file from the Rule Editor, or in an XML editor.
To view the default rule file in the Rule Editor
1.
Go to Start > All Programs > Rockwell Software > FactoryTalk Historian ME Rule Editor > Launch Rule
Editor.
The FactoryTalk Historian ME Rule Editor window appears.
2.
Under File Management, click View XML file.
The file is displayed in your web browser.
Create point discovery rule files
Instead of using the default point discovery rule file, you can create your own.
To create a point discovery rule file
1. Go to Start > All Programs > Rockwell Software > FactoryTalk Historian ME Rule Editor > Launch Rule
Editor.
The FactoryTalk Historian ME Rule Editor window appears.
2.
Under File Management, click Rule File Management.
The FactoryTalk Historian ME User Defined Rule File List dialog box appears.
Rockwell Automation, Inc. 1756-UM106H-EN-E - June 2024 131

Chapter 10Use the Rule Editor
3. Click New.
The FactoryTalk Historian ME User Defined Rule File dialog box appears.
4. Under Rule File Name, type a name for the rule.
When typing the name, keep in mind the following points:
◦ The file name may only contain the following characters: @, ., -, _, a-z, A-Z, 0-9, and must not contain
any spaces.
◦
You may include the "Rule_" phrase at the beginning of the name, however, only once.
◦
You cannot include the "Rule_" phrase inside the rule name.
Adding it will cause problems with creating and viewing the rule file.
5.
(Optional) Under Description, enter a description for the rule.
6.
Click OK.
The rule appears in the FactoryTalk Historian ME User Defined Rule File List dialog box.
7.
Select the rule, and then click Open.
The rule file is listed under Current Rule File in the FactoryTalk Historian ME Rule Editor window.
The following information is provided in the current rule file:
◦ The file name.
The name of the rule file that you have typed when creating the file is prepended with the Rule_
prefix, unless you have already included it while naming the rule.
◦
The description.
The point discovery rule files are stored in the following location:
C:\Users\<User Name>\Documents\Rockwell Automation\RuleEditor\
The names of the custom point discovery rule files are preceded with a Rule_ prefix.
Now you can add components to your rule file. For details, see:
•
Define point discovery rules on page 132
•
Create tag attribute files on page 135
Define point discovery rules
Use the rules to define which tags from the data source should be listed for the point discovery process so that you
can create points for them in your Historian module.
To define a rule
1.
In the FactoryTalk Historian ME Rule Editor window, click Rule File Management.
The FactoryTalk Historian ME User Defined Rule File List dialog box appears.
2.
Select the rule file for which you want to add rules, and then click Open.
3.
In the FactoryTalk Historian ME Rule Editor window, click New.
The Define Discovery Rule dialog box appears.
4.
Under Description, type a description for the rule.
The description will be listed in the FactoryTalk Historian ME Rule Editor list.
5.
Define the data source:
◦
Under From, leave the default settings for the data source: LinxEnterprise and LogixControllers.
6.
Define the type of the rule:
◦
If you are creating an inclusion rule, choose include tags.
◦ If you are creating an exclusion rule, choose exclude tags.
132 1756-UM106H-EN-E - June 2024 Rockwell Automation, Inc.

Chapter 10Use the Rule Editor
7. Under Where, define the condition with tag search criteria:
a.
Choose one of the following:
Choose this item: To discover tags that match:
name A tag name.
member A member name.
A member is an element of a user-defined tag (UDT).
data type A data type.
b.
Choose one of the following:
Choose this item: If you want your: To:
starts with Start with a specific string.
contains Contain a specific string.
ends with
▪ name
End with a specific string.
is ▪ name
▪ member
▪
data type
Be a specific string.
c.
Provide the string:
For this item: Do the following:
name
member
Type the string in the box.
data type Choose the data type from the list.
d.
If you have chosen member, under Add these historian points, select an element within the member
with which you want to perform the search.
e.
Click to add another search criterion to the condition.
Tip: To remove a search criterion, click .
f.
From the list, choose either of the following to define the relation between the search criteria:
Choose this item: If you want that:
and All the search criteria from the condition are met in the
point discovery process.
or Any search criterion from the condition is met in the
point discovery process.
8.
Under Use this configuration, choose the tag attribute file that you want to use with the rule.
If there are no files available, choose <New Configuration> to create one.
For details, see Create tag attribute files on page 135.
If you do not choose any file, the default tag attribute file, FTHMETagDefault.xml, will be used.
9.
Click OK.
Rockwell Automation, Inc. 1756-UM106H-EN-E - June 2024 133

Chapter 10Use the Rule Editor
The rule appears in the FactoryTalk Historian ME Rule Editor window.
10.
Upload your file to the Historian module. See Upload files to the module on page 105.
Change the point discovery limit
By default, FactoryTalk Historian ME limits the point discovery to 2000 tags because it is the item count set in the
default rule file (ADDefault.xml) for the data source defined as LogixController.
To change the point discover limit in the rule file
1.
Open the rule file in an XML editor.
2.
Find the following rule:
<Rule where="Item.Count LTE (‘2000’)">
3.
Change the value in the brackets to a higher value.
4.
Save the file.
If you use the default rule file, change the value in this file:
<Program Files (x86)>\Rockwell Software\FactoryTalk Historian ME\ME Rule Editor\ADDefault.xml
If you create your custom rule file, add the rule with the higher item count.
Edit point discovery rule files
To edit a point discovery rule file
1.
In the FactoryTalk Historian ME Rule Editor window, click Rule File Management.
The FactoryTalk Historian ME User Defined Rule File List dialog box appears.
2.
Select the rule file that you want to edit, and then click Open.
The rule file appears in the FactoryTalk Historian ME Rule Editor window.
The rules defined in the file appear in the table.
3.
Make your changes to the rule file:
◦
To change the file description, type a new one in the Description box.
◦ To add a rule, click New.
For details, see Define point discovery rules on page 132.
◦
To edit a rule, select the rule, and then click Edit.
For details, see Define point discovery rules on page 132.
◦
To remove a rule, select the rule, and then click Delete.
In the message box that appears, click Yes.
4.
Click Save.
Remove point discovery rule files
To remove a point discovery rule file
1.
In the FactoryTalk Historian ME Rule Editor window, click Rule File Management.
The FactoryTalk Historian ME User Defined Rule File List dialog box appears.
2.
Select the rule file that you want to remove, and then click Remove.
3.
In the message box that appears, click Yes.
134 1756-UM106H-EN-E - June 2024 Rockwell Automation, Inc.

Chapter 10Use the Rule Editor
Create tag attribute files
Tip: To perform these steps, you need to run the Rule Editor with administrative privileges.
By default, FactoryTalk Historian ME uses a tag attribute file named FTHMETagDefault.xml. It defines point attributes
that will be assigned to the new points in the point creation process.
When you associate the tag attribute file with a rule file and use them to create points, all the points discovered with
the rules from the rule file will take on the attributes defined in the tag attribute file.
Instead of using the default tag attribute file, you may create your own.
To create a tag attribute file
1.
Go to Start > All Programs > Rockwell Software > FactoryTalk Historian ME Rule Editor > Launch Rule
Editor.
Tip: If you have logged on to the computer without administrative privileges, hold down
Shift while clicking Launch Rule Editor with the right mouse button, and then click Run as
administrator. Follow the on-screen instructions to run the program with administrative
privileges.
The FactoryTalk Historian ME Rule Editor window appears.
2.
Click Tag Attributes File Management.
The FactoryTalk Historian ME Tag Attribute File List dialog box appears.
3.
Click New.
The FactoryTalk Historian Tag Attribute dialog box appears.
4.
In the File Name box, type a name for the file.
The file name may only contain the following characters: @, ., -, _, a-z, A-Z, 0-9, and must not contain any
spaces.
5.
In the Description box, type a description for the file.
You can use up to 80 characters.
6.
In the Scan class list, select a scan class, and the scan type.
For details on scan classes, see Use scan classes on page 75.
For details on scan types, see Configure scan types on page 66.
7.
In the Descriptor box, type a basic description of the point.
The description will be displayed in client applications and user reports.
The descriptor defined here will be listed in the Extended Description attribute of the point. For example,
you can use this text as a basis for a tag search or in a trend display. It may be up to 65,535 characters long.
When this value is read, it is truncated to the first 26 characters. Some interfaces use the descriptor for tag
configuration in an external system. For those cases, do not use quotes or wildcards.
8.
In the Eng Units box, specify the unit of measure in the string format.
The string may be of any length. However, when it is read, it is truncated to the first 12 characters.
Engineering unit strings are case-preserving and case-insensitive. The system trims leading and trailing
blank spaces during the input.
If you use a single quote (‘) in a string, precede it with a double quote ("). Similarly, if you use a double quote
in a string, precede it with a single quote.
Rockwell Automation, Inc. 1756-UM106H-EN-E - June 2024 135

Chapter 10Use the Rule Editor
9. In the Display digits box, specify the format of numeric values in the Historian web client and in reports.
A value equal to or greater than zero indicates the number of digits to display to the right of the decimal
point.
A value lower than zero indicates the number of significant digits to display. The number of significant digits
that will be used is determined by calculating the absolute value of the value set in the Display digits box.
The following table shows how 23.45 would appear on the screen depending on the value format set in the
Display digits box:
When Display digits is set to: The value on the screen appears as:
3 23.450
2 23.45
1 23.5
0 23.
-1 2E+001
10.
Click the Archive tab.
11.
In the Typical value box, type a reasonable value for a point.
For a numeric tag, it must be greater than or equal to the value of the Zero attribute, and lower than or equal
to the sum of the Zero and Span attribute values.
The typical value range is between 0 and 100.
The typical value range for the points of type Digital is between 0 and 1.
12.
In the Zero box, type the lowest value possible.
This attribute is required for all numeric data type points. It does not have to be the same as the instrument
zero, but that is usually a logical choice.
The zero value range is between 0 and 100.
13.
In the Span box, set the difference between the top and the bottom of the range.
This attribute is required for all numeric data type points.
For Float16 point types, the Span value is used with the Zero value for scaling values in the archive. The
Span property must be a positive value. If the value for a Float16 point type is greater than the top of the
range, it is recorded in the archive as Over Range.
For other point types, the Zero and Span values do not affect the values recorded in the archive. The Span
property is also used when defining a FactoryTalk Historian ProcessBook trend with a vertical scale of the
database. This attribute is not used for non-numeric points.
14.
Under Step, choose either of the following to define the interpolation of numeric archived values:
The value of the Step attribute also affects the compression calculation. When it is set to On, a linear change
of a value greater than or equal to the value of the Compression Deviation attribute passes compression.
This is essentially the same as the exception reporting. When the value of the Step attribute is set to Off, the
complete swinging door algorithm is applied.
Choose this item: To treat the archived value as:
On A discrete value.
Adjacent archived values are not interpolated and an
archived value is assumed constant until the next archived
value.
136 1756-UM106H-EN-E - June 2024 Rockwell Automation, Inc.

Chapter 10Use the Rule Editor
Choose this item: To treat the archived value as:
For example:
◦ At 12:00:00, the value 101.0 is archived.
◦
At 12:01:00, the value 102.0 is archived.
A request for the value at 12:00:30 would return 101.0.
In general, data coming from discrete measurements,
such as sampled laboratory data, batch charge
weight, etc., should be archived in points with the
Step attribute set to On.
Off A continuous signal.
Adjacent archived values are linearly interpolated.
For example:
◦ At 12:00:00, the value 101.0 is archived.
◦
At 12:01:00, the value 102.0 is archived.
A request for the archive value at 12:00:30 would
return 101.5.
In general, data coming from continuous signals, such
as signals from thermocouples, flow meters, etc.,
should be archived in points with the Step attribute
set to Off.
This is the default setting.
15.
Under Shutdown, choose either of the following to configure shutdown events for a point:
Choose this item: To do the following:
On Record shutdown events for a data point.
FactoryTalk Historian ME will automatically add a shutdown
event with the timestamp of the Historian ME server
shutdown to a point. In some cases, it is useful to record to
FactoryTalk Historian ME points when the archive was shut
down to indicate a gap in the data collection.
This is the default setting.
Off Leave a data point without recording the shutdown events.
16.
Under Compressing, set the data compression configuration.
FactoryTalk Historian ME uses compression specifications to filter the data passed from the snapshot
subsystem to the archive subsystem. The snapshot subsystem stores the most recent value for each
data point. This most recent value is called the snapshot for that point. The snapshot subsystem uses
compression specifications to determine which of the values that it has received get saved in the archive
subsystem. By filtering out data that you do not need, your archive storage gets more ecient.
The compression affects Digital point types, since a new value is recorded only when the current value
changes. For String point types, new points pass compression only when the value changes.
Choose either of the following:
Rockwell Automation, Inc. 1756-UM106H-EN-E - June 2024 137

Chapter 10Use the Rule Editor
Choose this item: To:
On Turn the data compression on for all real-time points in the
system.
This is the default setting,
Off Turn the data compression off for the laboratory and
manually entered points so that all values are archived.
When the Compressing attribute is set to Off, all points are
archived.
17.
Under Exception Deviation, configure which point values are sent to the server:
FactoryTalk Historian ME uses exception specifications so that the interface sends the data you are
interested in to the server, rather than sending a lot of data that is not meaningful. The process of using
exception specification to control the flow of data from the interface to the server is called exception
reporting. It takes place on the interface before the data is sent to the server.
a.
In the first text box, type a value for the exception deviation.
The value defines how much a value of a point must change before it is considered a significant value
and sent to the server.
As a general rule, set the exception deviation slightly smaller than the precision of the instrument
system.
You can set the value in engineering units or as a percentage of the Span value.
b.
In the list, choose either of the following:
▪
If you have set the Exception Deviation value in engineering units, choose Eng. Units.
▪ If you have set the Exception Deviation value as a percentage, choose % of Span.
c.
In the Min Time boxes, specify how frequently the interface can report values to the server.
For example, if you want the interface to wait full 10 minutes before reporting a new value to the server,
set the attribute to 10 minutes.
Usually, this attribute is set to 0.
d.
In the Max Time boxes, specify how long the interface can go without reporting a value to the server.
As soon as the time limit set in this attribute elapses, the interface sends the next new value to the
server regardless of whether the new value is different from the last reported value. This may result in
sending duplicated data.
For Digital or String point types, only the exception maximum and exception minimum attributes are
important. The exception deviation value is ignored by the Historian module.
See also Exception filtering on page 64.
18.
Under Compression Deviation, configure which point values are sent to the archive.
FactoryTalk Historian ME uses the compression configuration to specify which data is archived.
a. In the first text box, type a value for the compression deviation.
The value defines how much a value of a point must change before it is considered a significant value
and sent to the archive.
As a general rule, set the compression deviation to the precision of the data source or hardware
(instrument). After collecting data for a while, go back and check the data for your most important tags
and adjust the value of the attribute, if necessary.
Set the value with care. If you set the value too low, too little compression is imposed on data and a lot
of space is wasted in the archive. If you set the value too high, you may lose important data.
You can set the value in engineering units or as a percentage of the Span value.
138 1756-UM106H-EN-E - June 2024 Rockwell Automation, Inc.

Chapter 10Use the Rule Editor
For regular flows, pressures, and levels, you can set the compression deviation to 1% or 2% of the Span
attribute value. For temperatures, use 1 or 2 degrees.
b. In the list, choose either of the following:
▪
If you have set the Compression Deviation value in engineering units, choose Eng. Units.
▪ If you have set the Compression Deviation value as a percentage, choose % of Span.
c.
In the Min Time boxes, specify how frequently the data is archived.
A point is archived if the time that elapsed since the last archiving equals to or is greater than the Min
Time value, and the value of the point has changed by more than the value of the Exception Deviation
attribute.
For data points associated with interfaces that send exception reports, set this value to 0.
d.
In the Max Time boxes, specify the time break without archiving the data.
A point is archived if the time that elapsed since the last archiving is greater than the Max Time value.
As soon as the time limit set in this attribute elapses, the data is archived regardless of whether the
new value is different from the last archived value. This may result in archiving duplicated data.
The recommended value is one work shift (for example, 8 hours). Typically, you should set the same
Max Time value to all the points in the system.
For Digital or String point types, only the compression maximum and compression minimum attributes
are important. The compression deviation value is ignored by the Historian module.
See also Compression filtering on page 64.
19.
Click OK.
20.
The file is listed in the FactoryTalk Historian Tag Attribute File List dialog box.
Tag attribute files are stored in the same location as the point discovery rule files:
C:\Users\<User Name>\Documents\Rockwell Automation\RuleEditor\
The names of the custom tag attribute files are preceded with a TCFG_ prefix.
21.
After the tag attribute file has been created, you must upload the file to FactoryTalk Historian ME. You must
have administrator privileges to upload files.
Now you can upload your file to the Historian module. For details, see Upload files to the module on page 105.
Edit tag attribute files
To edit a tag attribute file
1.
In the FactoryTalk Historian ME Rule Editor window, click Tag Attributes File Management.
The FactoryTalk Historian ME Tag Attribute File List dialog box appears.
2.
Select the file that you want to edit, and then click Edit.
For details, see Create tag attribute files on page 135.
3.
Click OK.
Remove tag attribute files
To remove a tag attribute file
1.
In the FactoryTalk Historian ME Rule Editor window, click Tag Attributes File Management.
The FactoryTalk Historian ME Tag Attribute File List dialog box appears.
2.
Select the file that you want to remove, and then click Remove.
3.
In the message box that appears, click Yes.
Rockwell Automation, Inc. 1756-UM106H-EN-E - June 2024 139

Chapter 11
Use Studio 5000 Logix Designer Module Profile
The FactoryTalk Historian ME Logix Designer Module Profile allows you to integrate a ControlLogix controller with the
FactoryTalk Historian ME module.
The Module Profile is available on the FactoryTalk Historian ME Client Tools DVD.
You can use the Module Profile with either RSLogix 5000 or Logix Designer, depending on your firmware version:
•
For the firmware revision 20 and earlier, use RSLogix 5000.
•
For the firmware revision 21 and later, use Studio 5000 Logix Designer.
The instructions presented in this chapter are based on RSLogix 5000. You may reuse them for Studio 5000 Logix
Designer.
Configure your Historian module in the Module Profile
To configure the Historian module in the Module Profile
1.
Add the Historian module to a project in Logix Designer.
2. Add the Ladder logic to the controller.
For details, see Example: Use the module profile on page 142.
Configure the module properties
Use the Module Properties dialog box to perform the following actions on your Historian module:
•
Restore the default settings.
• Reset the security configuration.
• Shut down the module.
•
Start up the module.
•
Refresh data about the module.
•
Reset the module.
Tip: Before you modify the module properties, back up your current module configuration.
To configure the module properties
1.
In RSLogix 5000 or Logix Designer, in the Controller Organizer, expand I/O Configuration.
2.
Right-click your Historian module, and then click Properties.
The Module Properties dialog box appears.
3.
Click the Configuration tab.
Tip: The blue arrows next to the buttons indicate that the given action will be immediately
committed, without pressing the Apply button first.
4.
Choose any of the following options:
◦
Restore Defaults
Click this button to restore the module back to its original configuration.
140 1756-UM106H-EN-E - June 2024 Rockwell Automation, Inc.

Chapter 11Use Studio 5000 Logix Designer Module Profile
All configuration data, archives, and logs are deleted and reset.
This process may take some time. While restoring the default settings, the Historian webpage will not
be available.
After you click Restore Defaults, a message appears:
Click To
Yes Perform the restore defaults action.
You will have 5 minutes to do either of the following:
▪
Cut off and restore the power to the module
by turning off and on the power switch on the
chassis.
▪ Unplug and insert the module to the chassis.
Otherwise, the action will be canceled.
No Cancel the restore defaults action.
◦
Reset Security
Resets the module security back to the FactoryTalk Historian ME Local Security mode and makes the
piadmin user the password empty.
If the Historian module is in safe mode, clicking Reset Security will have no effect. For details, see
Repair archives using safe mode on page 112.
After you click Reset Security, a message appears:
Click To
Yes Perform the reset security action.
You will have 5 minutes to do either of the following:
▪
Cut off and restore the power to the module
by turning off and on the power switch on the
chassis.
▪ Unplug and insert the module into the chassis.
Otherwise, the action will be canceled.
No Cancel the reset security action.
◦
Shutdown
Shut down the module. This process may take some time.
The module shutdown allows you to stop all FactoryTalk Historian ME related services (including
the point server, the data collection, the data transfer, and the web configuration server). It is
recommended that you shut down the module if you plan to remove it from the chassis or if you are
going to power down the chassis.
Before you perform any other operations in the Configuration tab, wait until the shutdown is complete.
◦
Startup
Start the module after it was shut down.
When you click the Startup button, the module is rebooted, and the data collection service is restarted.
The button is available only when the module is shut down.
Rockwell Automation, Inc. 1756-UM106H-EN-E - June 2024 141

Chapter 11Use Studio 5000 Logix Designer Module Profile
If Logix Designer Module Profile loses communication with the module at the startup time, the message
"Requested message timed out" appears. Click OK and retry.
Tip: Alternatively, you can execute the Restore Defaults, Reset Security, and Shutdown
actions using the FactoryTalk Historian ME web client.
For details, see Restore and reset module-related settings on page 114, Reset the security
mode on page 114, and Close and start the module on page 115.
5.
Click the Module Info tab.
6.
Choose any of the following options:
◦
Refresh
Click this button to refresh the tab with new data from the module.
◦ Reset Module
Click this button to reset the module.
Tip: After restoring the module defaults configuration or resetting the security mode,
change the password for the default admin user.
Example: Use the Module Profile
In this example you will learn about the following:
•
Setting up a controller in the local chassis to monitor key FactoryTalk Historian ME statistics, and control the
data collection service using the Module Profile.
• Writing the controller logic for:
◦
Monitoring key statistics of the Historian module with input tags.
◦ Making control decisions using output tags.
You can use the output tags to control the status of the data collection (running or stopped) and the
status of the Historian module (running or shut down).
Add an Ethernet driver
After installing the Module Profile, make sure that you install and configure an Ethernet driver using RSLinx Classic.
You will use the driver to connect to your processor and download the Ladder logic to the controller.
For details, see the RSLinx Classic user documentation.
To add the Ethernet driver
1.
Go to Start > All Programs > Rockwell Software > RSLinx > RSLinx Classic.
RSLinx Classic appears.
2.
On the Communications menu, click Configure Drivers.
The Configure Drivers dialog box appears.
3.
In the Available Driver Types list, click Ethernet devices.
4.
Click Add New.
The Add New RSLinx Classic Driver dialog box appears.
5.
In the text box, type the name of the Ethernet module (ENBT or EN2T) from your chassis.
142 1756-UM106H-EN-E - June 2024 Rockwell Automation, Inc.

Chapter 11Use Studio 5000 Logix Designer Module Profile
6. Click OK.
The Configure driver dialog box appears.
7. Next to the 0 station, type the IP address of the Ethernet module (the leftmost module).
8. Click OK.
The new driver appears under Configured Drivers.
Add the module to Studio 5000 Logix Designer
Before you add your Historian module, make sure that the following prerequisites are met:
•
The project file that contains the controller programming and configuration information (the .ACD file)
already exists in Logix Designer.
• Communication devices are added to the I/O Configuration folder.
•
Logic, tags, and communication path are defined.
•
The controller is manually set to the remote run mode.
To add the module to Logix Designer
Tip: The following steps may vary depending on your version of Logix Designer.
1.
Go to Start > Programs > Rockwell Software > Studio 5000.
Studio 5000 Logix Designer appears.
Tip: Alternatively, double-click the .ACD file to open Logix Designer.
2.
On the File menu, click Open, and then browse for the Logix Designer project file.
3.
Click Open.
The project is loaded.
4.
In the Controller Organizer, right-click the I/O Configuration folder, and then click New Module.
The Select Module Type dialog box appears.
5.
Select the Historian module that you want to add to the Logix Designer project.
6.
Click Create.
7.
The New Module dialog box appears.
8.
In the Name box, type the name of the module.
The name will appear in the Controller Organizer.
For information on naming conventions, see the Logix Designer user documentation.
9.
Under Ethernet Address, click IP Address, and then type the IP address of the module.
10.
In the Slot list, select the number of the slot in which the module is located.
11.
(Optional.) Click Change, to configure the electronic keying, the connection type, and/or the revision number.
The Module Definition dialog box appears.
12.
In the Series list, select the series of the Historian module.
13.
In the Revision lists, select the revision numbers of the firmware installed on the module.
14.
In the Electronic Keying list, select the desired option.
For details, see the Logix Designer user documentation.
15.
In the Connection list, select the connection type, and then click OK.
The New Module dialog box appears.
Rockwell Automation, Inc. 1756-UM106H-EN-E - June 2024 143

Chapter 11Use Studio 5000 Logix Designer Module Profile
16. Click OK.
The module appears in the Controller Organizer, under I/O Configuration.
17. On the Communications menu, click Who Active.
The Who Active dialog box appears.
18.
Select the controller to which you will download the Logix Designer project.
19.
Click Set Project Path to provide the path to the controller in the project.
The path in the projects points now to the location of the controller.
20. Click Download to download the project to the controller.
21.
Verify the controller information.
22.
Click Download.
The Logix Designer project is downloaded to the controller.
23.
Click Yes.
Use output tags to start and stop the data collection
To stop the data collection
1.
In the Controller Organizer, under the folder of the controller to which you have downloaded the project,
double-click Controller Tags.
The list of tags appears.
2.
Expand input tags (Local: <Slot number> I) and output tags (Local: <Slot number > O).
For details on input tags and their values, see Use the input and output tags to read the Historian ME status
on page 145.
3.
Under output tags, next to the StopDataCollection tag, change its value from 0 to 1, and then press Enter.
144 1756-UM106H-EN-E - June 2024 Rockwell Automation, Inc.

Chapter 11Use Studio 5000 Logix Designer Module Profile
The following actions take place:
◦
The value of the DataCollectionActive input tag changes from 1 to 0.
◦ The value of the TagsActive input tag changes from its current value to 0, because the scanning of all
the points is stopped.
To start the data collection
1.
Under output tags, next to the StartDataCollection tag, change its value from 0 to 1, and then press Enter.
The following actions take place:
◦ The value of the DataCollectionActive input tag changes from 0 to 1.
◦ The value of the TagsActive input tag changes from 0 to its current value.
◦
The values of the DataCollectionRate, DataTransferRate, and ArchiveRate input tags are updated,
provided that these services are configured on your module.
You can write Ladder logic programs to monitor these statistics and programmatically start and stop the data
collection and/or stop and start batches depending on the status of the module.
To reset the output tags back to 0, write the Ladder logic or manually set them to 0.
Use the input and output tags to read the Historian ME status
With the Module Profile, you can view the current status of your Historian ME module directly in Logix Designer. The
status is presented with input and output tags. Each tag corresponds with a specific functionality of FactoryTalk
Historian ME.
Tip: The bits referenced in this section are indexed from right to left, with the least significant bit
indexed as a0, and the adjoining bits indexed as a1, a2, etc.
The Fault tag may indicate the following activities of the module:
•
The module has entered safe mode.
The safe mode is indicated with the least significant bit (a0) in the Fault word set to 1.
•
There is at least one bad point on the module.
The bad points are indicated with the a1 bit in the Fault word set to 1.
Rockwell Automation, Inc. 1756-UM106H-EN-E - June 2024 145

Chapter 11Use Studio 5000 Logix Designer Module Profile
This reflects the information available on the Home tab of FactoryTalk Historian ME module page under Point
Statistics.
•
The time synchronization with the NTP server does not work correctly.
The time synchronization error is indicated with the a2 bit in the Fault word set to 1.
The update of the time synchronization status in the tag value may be delayed by several minutes after the
actual status change.
The indication of the NTP time synchronization status is correlated with the following message:
There is a clock drift of 500 ppm or the NTP server cannot be reached to
synchronize the time.
The message appears on the Time Management page in the following locations in the Historian module web
interface:
◦
On the Advanced tab in the Historian web client.
◦
On the Hardware tab in the Web Diagnostics client.
146 1756-UM106H-EN-E - June 2024 Rockwell Automation, Inc.

Chapter 11Use Studio 5000 Logix Designer Module Profile
• At least one required PI process and/or FactoryTalk Historian ME-specific process is not running.
This is indicated with the a3 bit in the Fault word set to 1.
Rockwell Automation, Inc. 1756-UM106H-EN-E - June 2024 147

Chapter 12
Create trends with the FactoryTalk Historian DataLink Add-in
FactoryTalk Historian DataLink is a client application that you can use with your FactoryTalk Historian ME. It is a
Microsoft Excel Add-in for exchanging information directly with FactoryTalk Historian ME. It provides powerful tools
for gathering, visualizing, monitoring, analyzing, and reporting data from FactoryTalk Historian ME and FactoryTalk
Historian SE.
For more information on FactoryTalk Historian DataLink, refer to the FactoryTalk Historian DataLink User Guide.
In this chapter you will learn about the following:
•
Define the server connection on page 148
•
Insert trends in a Microsoft Excel workbook on page 149
•
Create trends visualizing the data transfer on page 150
Prerequisites
In order to use the FactoryTalk Historian DataLink Add-in, you should have:
1.
Installed Microsoft Excel in a version compatible with your version of FactoryTalk Historian DataLink.
For details, see the FactoryTalk Historian DataLink Release Notes.
2.
Installed FactoryTalk Historian DataLink Add-in.
For details, see the FactoryTalk Historian DataLink user documentation.
3.
Enabled the FactoryTalk Historian DataLink Add-in tab in Microsoft Excel.
For details, see the FactoryTalk Historian DataLink user documentation.
Tip: If you cannot see the tab, refer to the FactoryTalk Historian SE Installation and Conguration
Guide, section "Enable Excel add-ins for FactoryTalk Historian DataLink" and to "Activate Excel
COM add-ins for FactoryTalk Historian DataLink" to learn how to enable it manually.
Define the server connection
Before you begin using an Excel Add-in, you need to configure a connection to each FactoryTalk Historian ME and
FactoryTalk Historian SE server that you are going to use with the Add-in.
To define a server connection to FactoryTalk Historian SE or FactoryTalk Historian
ME
1.
Go to Start > Programs > Rockwell Software > FactoryTalk Historian SE > FactoryTalk Historian SE
System > About PI-SDK.
The PI SDK Utility window appears.
2.
On the Connections menu, click Add server.
The Add PI Server dialog box appears.
3.
In the Network Path/FQDN box, type the IP address of your FactoryTalk Historian SE or FactoryTalk Historian
ME.
4.
Click OK.
The server is added to the server list.
5.
Select the checkbox next to the server.
148 1756-UM106H-EN-E - June 2024 Rockwell Automation, Inc.

Chapter 12Create trends with the FactoryTalk Historian DataLink Add-in
The connection details appear in the right pane of the PI SDK Utility window.
The connection status appears at the bottom of the window.
6. Repeat the steps for each server that you are going to use with the Add-in.
Insert trends in a Microsoft Excel workbook
To insert a trend in a Microsoft Excel workbook
Tip: The following steps may vary depending on your version of Microsoft Excel.
1. Open Microsoft Excel.
2.
Select the cell in which you want the trend chart to appear.
3.
Click the PI DataLink tab.
Tip: For details, see the prerequisites in Create trends with the FactoryTalk Historian DataLink
Add-in on page 148.
4.
In the Tag Functions group, click Insert Trend.
The Trend Add-in Wizard dialog box appears.
5.
On the Define the Traces page, click Data from PI.
6.
In the Server name box, type the IP address of your module, or select a module from the list.
7.
Next to the Tag name box, click .
The Tag Search dialog box appears.
8.
In the PI Server box, select the server on which you want to search the tags for your trend.
9.
Specify the other filtering criteria, and then click Search.
The table below the search boxes is populated with the search results.
10.
Select the name of the tag for your trend, and then click OK.
The selected tag appears in the right pane of the Define the Traces page.
11.
Select the checkbox next to the tag name, and then click Next.
The Specify the time range page appears.
12.
In the Start Time and End Time checkboxes, set the time range from which the data will be displayed.
The default value for Start Time is *-8h.
The default value for End Time is * (the current time).
13.
Select the Enable updates checkbox, and then click Next.
14.
In the Trend title (optional) box, type a name for your trend.
15.
Click Format.
The PI Trend Control Properties dialog box appears.
16.
Select the Vertical Scale property.
17.
On the Options tab, under Scale:
a.
In the Format list, select General.
b. In the Position list, select Outside Left.
18.
Click OK.
19.
In the Trend Add-in Wizard window, click Finish.
The trend chart appears in your Excel spreadsheet.
Rockwell Automation, Inc. 1756-UM106H-EN-E - June 2024 149

Chapter 12Create trends with the FactoryTalk Historian DataLink Add-in
Create trends visualizing the data transfer
In this exercise, you will choose a data point that you have added to the data transfer, and you will create a trend that
displays this point data from both FactoryTalk Historian ME and FactoryTalk Historian SE.
To create a trend visualizing the data transfer between FactoryTalk Historian ME
and FactoryTalk Historian SE
Tip: The following steps may vary depending on your version of Microsoft Excel.
1.
Open Microsoft Excel.
2.
Select the cell in which you want the trend chart to appear.
3.
Click the PI DataLink tab.
Tip: For details, see the prerequisites in Create trends with the FactoryTalk Historian DataLink
Add-in on page 148.
4.
In the Tag Functions group, click Insert Trend.
The Trend Add-in Wizard dialog box appears.
5.
On the Define the Traces page, click Data from PI.
6.
In the Server name box, type the IP address of your module, or select a module from the list.
7.
Next to the Tag name box, click .
The Tag Search dialog box appears.
8.
Click the PI Server box.
The Multi-Server Pick List dialog box appears.
9.
Choose the FactoryTalk Historian SE server and the Historian module for which you have enabled the data
transfer:
a. Click the IP address of your FactoryTalk Historian SE server, and then hold down the Ctrl key while you
click the IP address of your Historian module.
b.
Click OK.
10.
Configure your search criteria, and then click Search.
11.
There will be two matches for the same point listed: one from FactoryTalk Historian ME, and the other from
FactoryTalk Historian SE.
The name of the point transferred to FactoryTalk Historian SE is prefixed with the Historian module name. In
this example, the Historian module name is A0004B97-FTHME.
12.
Click a point data from your Historian module, and then hold down the Ctrl key while you click the same point
transferred to the FactoryTalk Historian SE server.
13.
Click OK.
The selected data points appear in the right pane of the Define the Traces page.
14.
Select the checkboxes next to the data point names, and then click Next.
The Specify the time range page appears.
15.
In the Start Time and End Time checkboxes, set the time range from which the data will be displayed.
When setting the End Time value, consider the fact that the data from the FactoryTalk Historian SE server
will appear with a slight delay.
In this example, we set the End Time value to 5 minutes (*-5m).
16.
Select the Enable updates checkbox, and then click Next.
150 1756-UM106H-EN-E - June 2024 Rockwell Automation, Inc.

Chapter 12Create trends with the FactoryTalk Historian DataLink Add-in
17. In the Trend title (optional) box, type a name for your trend.
18.
Click Format.
The PI Trend Control Properties dialog box appears.
19. Select the Vertical Scale property.
20.
On the Options tab, under Scale:
a.
In the Format list, select General.
b. In the Position list, select Outside Left.
21. Click OK.
22.
In the Trend Add-in Wizard window, click Finish.
The trend chart appears in your Excel spreadsheet.
The trend displays the following data:
- the data from FactoryTalk Historian SE.
- the data from FactoryTalk Historian ME.
The module data point is a real-time display, while the FactoryTalk Historian SE data point lags by a couple of
minutes. However, the data is identical.
Rockwell Automation, Inc. 1756-UM106H-EN-E - June 2024 151
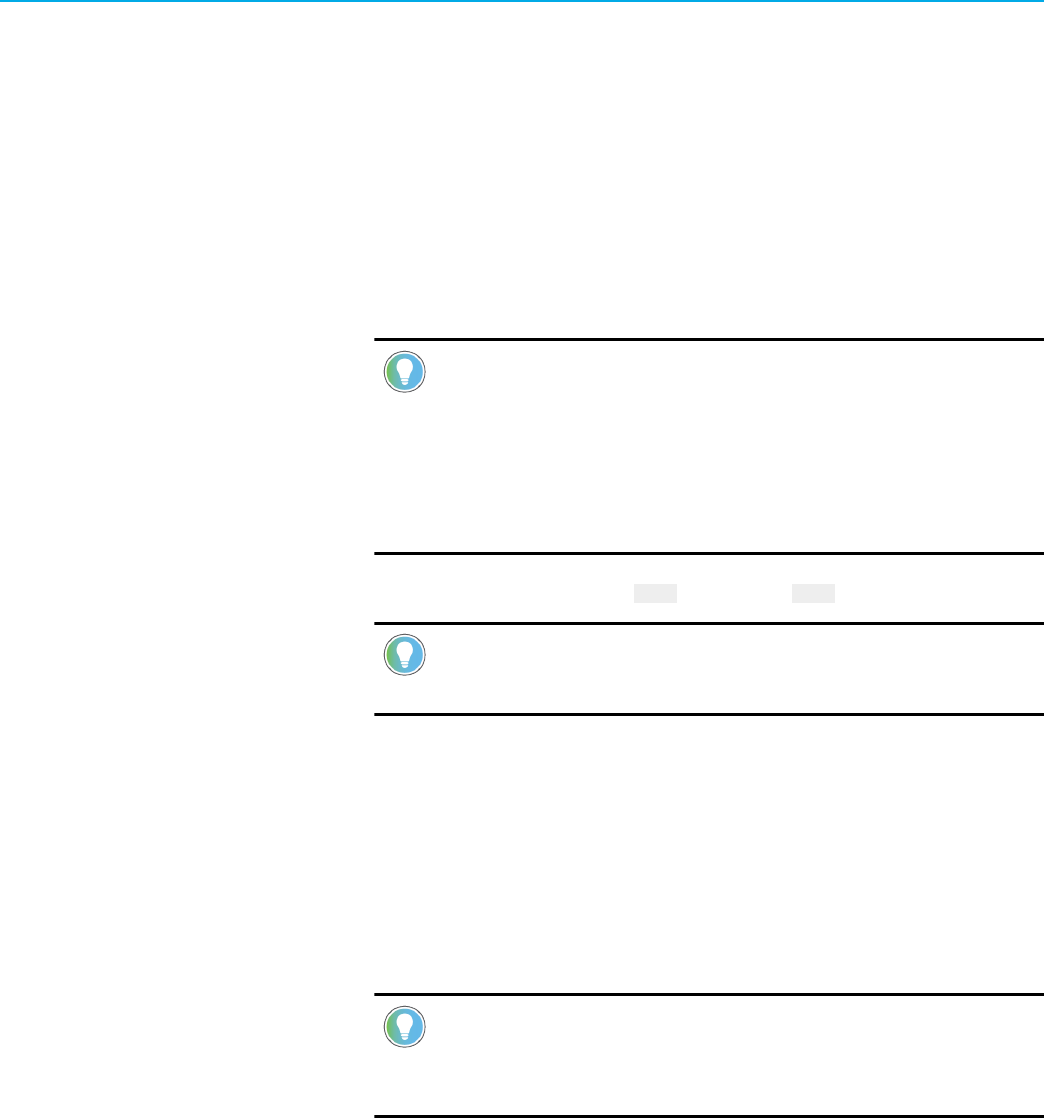
Chapter 13
Use Web Diagnostics
In this chapter, you will learn how to troubleshoot and tune your Historian ME module using the FactoryTalk Historian
ME Web Diagnostics page.
FactoryTalk Historian ME is an embedded system with multiple layers of firmware applications. Firmware applications
and hardware components are available via the FactoryTalk Historian ME Web Diagnostics page.
To access the Web Diagnostics page
1.
Open the web browser and type https://<Module IP_address>:8443.
Tip: For details, see Configure where to use the secure communication protocol (HTTPS) on page
121.
You can also use the Fully Qualified Domain Name instead of the IP address of the module. Type
the domain name in the following format:
<modulename>.<domainname>.<top-level domain>
For example, module1.mycompany.com
2.
In Windows Security, type the user name admin and the password admin.
Tip: This is an optional step if the module is in safe mode. You can repair archives without login.
For more details, see Repair archives using safe mode on page 112.
3.
Change the password for the default admin user.
For more details, see Change password on page 170.
The page contains the following tabs:
•
Home on page 153
•
Hardware on page 153
•
Firmware on page 162
•
Admin on page 168
Tip:
◦
To open the web diagnostics online help, click Help.
◦ To check the firmware version and product ID, click About.
152 1756-UM106H-EN-E - June 2024 Rockwell Automation, Inc.

Chapter 13Use Web Diagnostics
Home
The Home tab displays the following information:
Item Description
Device Name The name of FactoryTalk Historian ME.
Device Description The version number of FactoryTalk Historian ME.
Device Location The physical slot location of the FactoryTalk Historian ME
module in the chassis.
Ethernet Address (MAC) The MAC address of the Ethernet port.
IP Address The IP address of FactoryTalk Historian ME.
Production Revision The revision number of FactoryTalk Historian ME.
Firmware Version The version number of the firmware.
Serial Number The serial number of FactoryTalk Historian ME.
Up Time The amount of CPU time used.
Hardware
The Hardware tab contains the following information:
•
Overview on page 154
• CPU, RAM on page 154
• NAND on page 155
•
Controller statistics on page 157
•
ControlBus statistics on page 158
•
EtherNet/IP on page 159
• Display LED on page 160
•
Time management on page 161
Rockwell Automation, Inc. 1756-UM106H-EN-E - June 2024 153

Chapter 13Use Web Diagnostics
Overview
The Overview page displays the following information:
Item Description
CPU Usage The percent of CPU utilization for the module.
RAM Usage The RAM (physical memory) usage in megabytes (and
percentage).
NAND Usage NAND usage (storage) in megabytes (and percentage).
Ethernet Link Displays the module’s Ethernet connection status.
LED Information for either the static or the scroll display will be
available. If a static message is available, there is no scrolling
display. If a message is scrolling in the module LED, no static
message is available.
•
Static Display
The current message being displayed on module LED.
•
Scroll Display
The current message being scrolled on module LED.
CPU, RAM
The CPU, RAM page contains the following sections:
•
CPU Statistics
This section displays the following information:
Item Description
Cache The amount of CPU cache present on the module.
Model CPU information.
Speed CPU speed. The field always displays Varying.
Usage The current snapshot of CPU utilization (as a percentage).
154 1756-UM106H-EN-E - June 2024 Rockwell Automation, Inc.
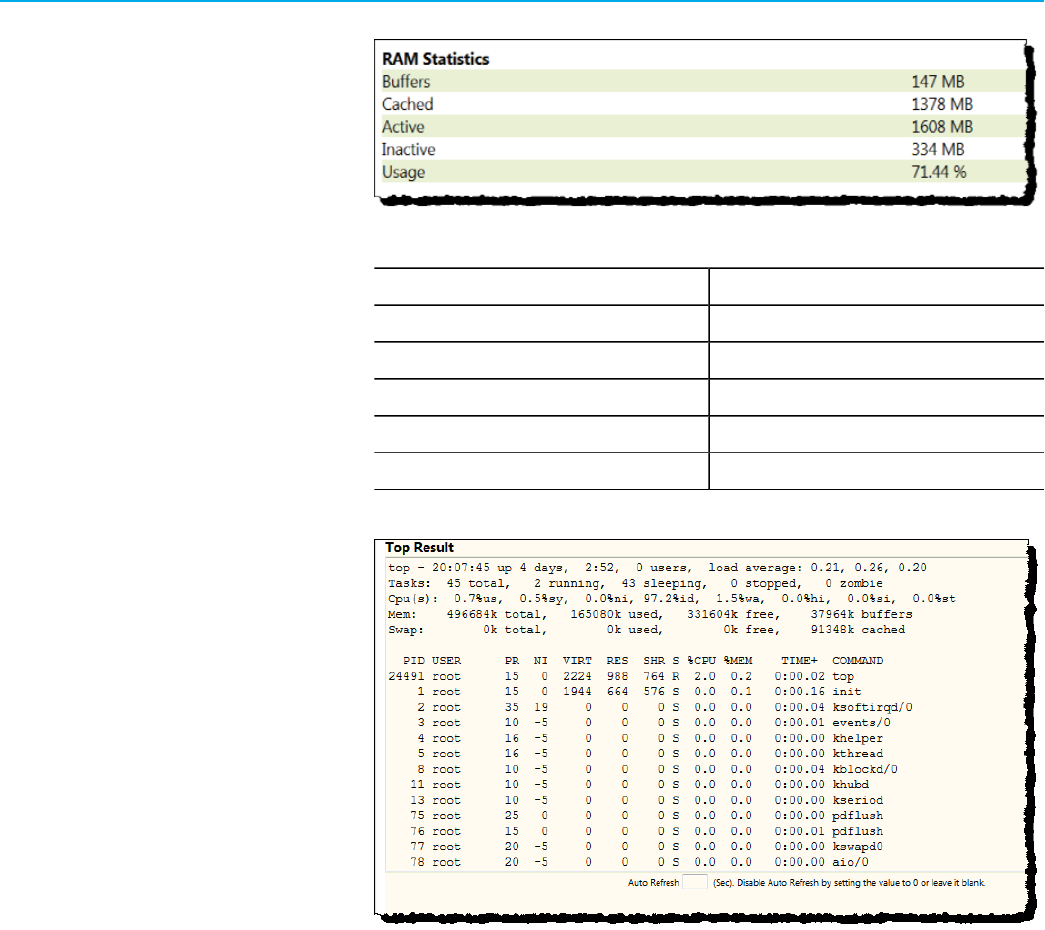
Chapter 13Use Web Diagnostics
• RAM Statistics
This section displays the following information:
Item Description
Buffers The total amount of RAM in megabytes that is buffered.
Cached The total amount of RAM in megabytes that is cached.
Active The total amount of RAM in megabytes that is in use.
Inactive The total amount of RAM in megabytes that is not in use.
Usage The percent of total memory utilization for the module.
•
Top Results
This section displays the results of the Linux top command, which is automatically invoked by the system
when you visit the CPU, RAM page. The command retrieves data on frequently updated processes. The results
displayed in the Top Results section are calculated from a 1-second time period.
You can use this information to administer, configure, and troubleshoot your Historian ME module.
If you want the information to be automatically refreshed and generated dynamically on the page, type the
refresh interval in seconds in the Auto Refresh box below the table.
To disable the auto-refresh option, type 0 in the text box.
NAND
The NAND page (Not AND) displays information on the NAND flash memory used for data storage. It contains the
following sections:
• Application
This section provides statistics on disk space allocated to the Historian ME server binary files. In particular, it
displays the following information:
Rockwell Automation, Inc. 1756-UM106H-EN-E - June 2024 155

Chapter 13Use Web Diagnostics
Item Description
Total Storage Total amount of space allocated for server binary files.
Total Storage Used The amount of space in megabytes (and percentage)
currently used for server binary files.
Total Storage Free The amount of space in megabytes available for server
binary files.
•
Archive
This section provides statistics on disk space allocated to archives. In particular, it displays the following
information:
Item Description
Total Storage Total amount of space allocated for archive files.
Total Storage Used The amount of space in megabytes (and percentage)
currently used for archive files.
Total Storage Free The amount of space in megabytes available for archive
files.
•
Log and Core File
This section provides statistics on disk space allocated to log and core files. In particular, it displays the
following information:
Item Description
Total Storage Total amount of space allocated for log and core files.
Total Storage Used The amount of space in megabytes (and percentage)
currently used for log and core files.
156 1756-UM106H-EN-E - June 2024 Rockwell Automation, Inc.

Chapter 13Use Web Diagnostics
Item Description
Total Storage Free The amount of space in megabytes available for log and
core files.
Controller statistics
The Controller Statistics page provides the following information on Logix Controllers in the chassis:
Item Description
Slot Number The chassis slot in which the Logix Controller is installed.
Application Name The name of the program running on the Logix Controller.
Fault Status The Logix Controller’s current fault status is one of the
following:
•
No Fault
• Minor Fault
•
Major Fault
Collected Points The total number of tags actively collected between the module
and this controller.
Point Event Rate/Sec The number of tag reads from this controller, per second,
accumulated over a rolling 10-second period. Therefore, the
value is the average tag reads per second over the previous 10
seconds.
Point Failure Rate/Sec The number of tags read failures from this controller, per
second, accumulated over a rolling 10-second period. Therefore,
Rockwell Automation, Inc. 1756-UM106H-EN-E - June 2024 157

Chapter 13Use Web Diagnostics
Item Description
the value is the average tag read failures per second over the
previous 10 seconds.
CPU Loading The controller's CPU utilization in tenths of a percent. For
example, the range of 0 - 100 represents 0% to 100%.
ControlBus statistics
The ControlBus Statistics page provides the following information on the ControlLogix backplane:
Item Description
RX bad Multicast CRC The number of multicast received cyclic redundancy check
(CRC) errors since the last power on, module reset, or Internet
Cache Protocol (ICP) Object Reset Service received.
Multicast CRC Error Threshold The threshold value for typing a fault state due to multicast CRC
errors.
RX bad CRC The number of directed receiver CRC errors since the last power
on, module reset, or ICP Object Reset Service received.
RX Bus Timeouts The number of receiver bus timeouts since the last power on,
module reset, or ICP Reset Service received.
TX bad CRC The number of transmit CRC errors since the last power on,
module reset, or ICP Object Reset Service received.
TX Bus Timeouts The number of transmit bus timeouts since the last power on,
module reset, or ICP Reset Service received.
TX Retry Limit The number of times to retry a frame if any transmit error
occurs.
Status The current status of the ICP object:
• 0 (for bit 0) = Normal communications; RX disabled;
reflects the current status of all receivers.
• 1 (for bit 1) = Multicast RX disabled: reflects the current
status of the multicast receiver.
• 2 (for bit 2) = RA/GA miscompare; a persistent indication of
a RA/GA miscompare.
158 1756-UM106H-EN-E - June 2024 Rockwell Automation, Inc.

Chapter 13Use Web Diagnostics
EtherNet/IP
The EtherNet/IP page contains the following sections:
•
Network Settings
This section displays the following information:
Item Description
Link Status Indicates if FactoryTalk Historian ME is connected to the
Ethernet network.
IP Address The FactoryTalk Historian ME IP address.
Ethernet Access (MAC) The FactoryTalk Historian ME MAC address.
IP Configuration Mode Indicates the network setting used for the FactoryTalk
Historian ME module.
•
Network Statistics
This section displays the following information:
Item Description
Sent Packets The number of network packets sent per second.
Received Packets The number of network packets received per second.
Sent Bytes The number of bytes sent per second.
Received Bytes The number of bytes received per second.
Sent Packets Count The cumulative number of total network packets sent.
Rockwell Automation, Inc. 1756-UM106H-EN-E - June 2024 159

Chapter 13Use Web Diagnostics
Item Description
Received Packets Count The cumulative number of total network packets received.
Display LED
The Display LED page displays the current message being displayed or scrolled on the module LED in further detail
and the LED statistics.
The page lists Current Display and LED Statistics information. Data for either the static or the scroll display will be
available. If a static message is available, there is no scrolling display. If a message is scrolling in the module LED, no
static message is available.
Item Description
LED Static Display The current message being displayed on module LED.
LED Scroll Display The current message being scrolled on module LED.
The Display LED page lists the Application LED State information under LED Statistics. Values include:
Item Description
Solid green Indicates that both data collection and data transfer are active.
Flashing green Indicates that the data collection is active but the data transfer
is not configured.
Solid red Indicates that the data collection is inactive.
Flashing red Indicates that the data collection is active but the data transfer
is inactive.
160 1756-UM106H-EN-E - June 2024 Rockwell Automation, Inc.

Chapter 13Use Web Diagnostics
Time management
The Time Management page displays the following information:
Item Description
Time Source The source of the module's current time.
Note: For details on time source options, see Manage time on
page 98.
Current Time Zone The current time zone for the module.
Module's Current Time The current date and time of the module.
RTC Time The current time of the Real Time Clock (RTC).
Last Update Time The date and time the module time was last updated.
Controller Path The path to the Controller system from an external time source.
Update Rate How often the time is updated from an external time source.
NTP Server (Appears only if the time source is an NTP server). The IP
address of the NTP server from an external time source.
NTP Logs If your module is synchronized to an NTP, FactoryTalk Historian
SE, or PI server, NTP log files will appear in this section.
If you want to view an NTP log, select it from the NTP Logs list.
If the time synchronization with an NTP server (including a FactoryTalk Historian SE or PI server) is not successful,
you may see the following error messages on this page:
send to ("IP") (fd=-1): Bad file descriptor (fd=-1) ("IP" is the NTP server's IP
address).
frequency error xxx PPM exceeds tolerance 500 PPM ( "xxx" is the PPM value that is
larger than 500).
No reply; clock not set. (The time was not synchronized successfully).
Rockwell Automation, Inc. 1756-UM106H-EN-E - June 2024 161
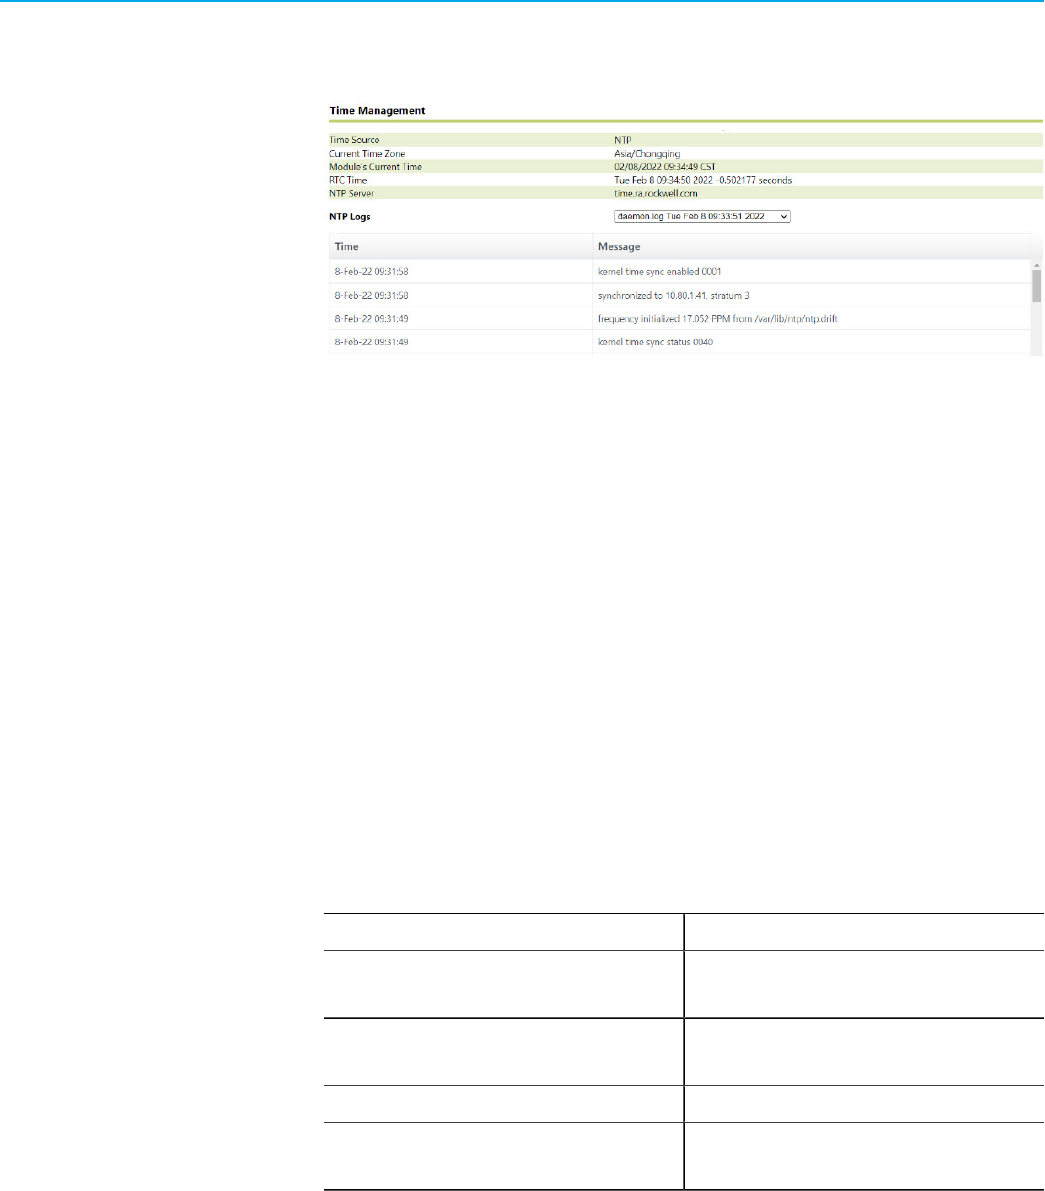
Chapter 13Use Web Diagnostics
When any of these error messages are logged, check to make sure that the NTP server is running properly, and then
reboot the ME module to synchronize with the NTP server again.
Firmware
The Firmware tab contains the following information:
•
Overview on page 162
• Historian server on page 162
• CIP on page 163
•
Data server on page 163
•
Data collection on page 164
•
Data transfer on page 165
• Data storage on page 165
•
Web configuration server on page 167
•
Web diagnostics server on page 167
•
Startup log on page 168
Overview
The Overview page displays the following information:
Item Description
Component Status Displays the current status of all firmware components, either
Running or Stopped.
Security Mode Displays the current security mode, either FactoryTalk Historian
ME Local Security or FactoryTalk Directory Security.
Last Backup Displays status, date, file name, and file size of the last backup.
Top Processes Displays the running processes in descending order based on
CPU usage.
Historian server
The Historian Server page displays information on the FactoryTalk Historian ME server Linux operating system, its
functioning subsystems, and its tuning parameters.
This page displays the following information:
162 1756-UM106H-EN-E - June 2024 Rockwell Automation, Inc.

Chapter 13Use Web Diagnostics
Item Description
Running Subsystem Lists all running subsystems.
Tuning Parameters Lists the PI tuning parameters.
CIP
The Control and Information Protocol (CIP) page displays the CIP process name, CPU usage, memory used, up time,
priority, Nice value, and a restart button for the CIP process.
The page lists the following information:
Item Description
Process Name The title of the process.
CPU Usage The percent of CPU utilization.
Memory Used The amount of memory (in megabytes) utilized by CIP.
Up Time The amount of CPU time used.
Priority Indicates the precedence order for the process.
Nice Value A value that indicates the CPU process priority. The default
value is zero. A high Nice value indicates a lower priority for the
process. Negative Nice values are a higher priority.
Data server
The Data Server page displays the Data Server process name, CPU usage, memory used, up time, priority, and Nice
value.
Rockwell Automation, Inc. 1756-UM106H-EN-E - June 2024 163

Chapter 13Use Web Diagnostics
The page lists the following information:
Item Description
Process Name The title of the process.
CPU Usage The percent of CPU utilization.
Memory Used The amount of memory (in megabytes) utilized by the data
server.
Up Time The amount of CPU time used.
Priority Indicates the precedence order for the process.
Nice Value A value that indicates the CPU process priority. The default
value is zero. A high Nice value indicates a lower priority for the
process. Negative Nice values are a higher priority.
Data collection
The Data Collection page displays the data collection process name, CPU usage, memory used, up time, priority, Nice
value, and collection rate.
The page lists the following information:
Item Description
Process Name A label for the process.
CPU Usage The percent of CPU utilization.
Memory Used The amount of memory (in megabytes) utilized by the data
collection service.
Up Time The amount of CPU time used.
Priority Indicates the precedence order for the process.
Nice Value A value that indicates the CPU process priority. The default
value is zero. A high Nice value indicates a lower priority for the
process. Negative Nice values are a higher priority.
Collection Rate The current collection rate from the data collection service in
events per minute.
164 1756-UM106H-EN-E - June 2024 Rockwell Automation, Inc.

Chapter 13Use Web Diagnostics
Data transfer
The Data Transfer page lists the following information:
Item Description
Process Name The title of the process.
CPU Usage The percent of CPU utilization.
Memory Used The amount of memory (in megabytes) utilized by the data
transfer service.
Up Time The amount of CPU time used.
Priority Indicates the precedence order for the process.
Nice Value A value that indicates the CPU process priority. The default
value is zero. A high Nice value indicates a lower priority for the
process. Negative Nice values are a higher priority.
Transfer Rate Current transfer rate from the data transfer service in events
per minute.
Successful Attempt Rate The number of attempts to transfer data to the FactoryTalk
Historian SE or PI server per hour.
Data storage
The Data Storage page displays storage-related information.
Rockwell Automation, Inc. 1756-UM106H-EN-E - June 2024 165

Chapter 13Use Web Diagnostics
The page displays the following information:
Item Description
Process Information Contains the process name, CPU usage, memory used, up time,
priority, and Nice value.
Archive Storage Information Displays total archive space, the amount used, and the amount
of archive storage space available.
Archive Information Displays the total number of archive files, the number of
transferred files, the total available files, and the archive file
size.
Archive Usage Threshold Configuration Information Displays the percent level at which a warning is triggered
and when the archive reaches a critical size. The monitoring
frequency refers to how often the archive is scanned for size
limits.
166 1756-UM106H-EN-E - June 2024 Rockwell Automation, Inc.

Chapter 13Use Web Diagnostics
Web configuration server
The Web Configuration Server page lists the following information:
Item Description
Process Name The title of the process.
CPU Usage The percent of CPU utilization.
Memory Used The amount of memory (in megabytes) utilized by the web
configuration server.
Up Time The amount of CPU time used.
Priority Indicates the precedence order for the process.
Nice Value A value that indicates the CPU process priority. The default
value is zero. A high Nice value indicates a lower priority for the
process. Negative Nice values are a higher priority.
Web diagnostics server
The Web Diagnostics Server page lists the following information:
Item Description
Process Name The title of the process.
CPU Usage The percent of CPU utilization.
Memory Used The amount of memory (in megabytes) utilized by the web
diagnostics server.
Up Time The amount of CPU time used.
Priority Indicates the precedence order for the process.
Nice Value A value that indicates the CPU process priority. The default
value is zero. A high Nice value indicates a lower priority for the
process. Negative Nice values are a higher priority.
Rockwell Automation, Inc. 1756-UM106H-EN-E - June 2024 167

Chapter 13Use Web Diagnostics
Startup log
The Startup Log page lists log recorded each time the module is rebooted.
To search the startup log
1. In the Time text box, type the time parameters.
2.
In the Source text box, type the source you want to search for.
3.
In the Message text box, type the type of message you want to search for.
4.
In the Count text box, type the maximum number of records you want the search to return.
5.
Click Search. The selected records appear in the list on the Startup Log page.
Tip: For details on time options, see Set start and end times on page 53.
Admin
The Admin tab contains components that require administrative privileges. You need to log on to open it. The default
user name and password are admin/admin.
The administrator session expires after 20 minutes, however, it is renewed each time you act on the Admin tab or
each time you access other tabs on the FactoryTalk Historian ME Web Diagnostics page and/or perform actions there.
If your session expires on the Admin tab, you will be automatically logged out and taken to the Home tab.
Tip: For security reasons, we recommend that you log out of the FactoryTalk Historian ME Web
Diagnostics when you finish working with it.
The tab contains the following information:
•
Hosts on page 169
•
Restart services on page 169
•
Core dump directory on page 169
•
PI commands on page 170
•
Download logs on page 170
168 1756-UM106H-EN-E - June 2024 Rockwell Automation, Inc.

Chapter 13Use Web Diagnostics
• Change password on page 170
Tip: If you want to simultaneously log in to the web diagnostics clients for multiple FactoryTalk
Historian ME modules, note the following:
◦ If you are using Internet Explorer (compatibility mode), logging out of one tab from a single
Internet Explorer session causes all other logged-in tabs to log out as well.
◦
If you are using Internet Explorer (compatibility mode), logging out of one session will also
trigger the other logged-in sessions to log out as well.
For either of these scenarios, if you get logged out unexpectedly, log back in to the tab you
want to view.
Hosts
The Hosts page lists the contents of the module’s hosts file. The hosts file can be used to provide hostname-to-IP
address resolution for networks that do not have reliable DNS servers available.
Use this page to do the following:
•
To add a new host, click New. Type the new hostname and IP address and click Save.
•
To edit a host, select the host in the list and click Edit to make the Host Name and IP Address bars editable.
Update the host name and IP address, and click Save.
•
To delete a host, select the host in the list and click Delete. You will be asked to confirm the deletion. Click OK
to delete the host.
Restart service
The Restart Service page allows you to:
Item Description
Restart web Click this button to restart the web configuration server
process. Please note that the restart is done without
authentication.
Restart CIP Click this button to reset the CIP process. Please note that the
restart is done without authentication.
Restart Data Transfer Click this button to restart the data transfer. Please note that
the restart is done without authentication.
Module Reboot Click this button to reboot the entire module after restarting any
service.
Core dump directory
The Core Dump Directory page contains all core dumps stored on FactoryTalk Historian ME.
To download a core dump file, highlight it in the list, and then click Download.
To delete a core dump file, highlight the file, and then click Delete.
Rockwell Automation, Inc. 1756-UM106H-EN-E - June 2024 169

Chapter 13Use Web Diagnostics
PI commands
IMPORTANT: Executing some PI commands can irreparably damage the data server, stored data,
and possibly the FactoryTalk Historian ME module. Consult with Rockwell Technical Support before
executing any PI command.
The PI commands page lists all available PI commands.
If the Options text box remains blank and you click Execute, a list of valid PI options will appear. To execute a
command, type the command in the Options text box and click Execute.
Tip: When the FactoryTalk Historian ME module is in Safe Mode, PI commands cannot be executed. For
details on how to get the module out of Safe Mode, see Repair archives using safe mode on page 112.
Download logs
IMPORTANT: Any kind of firmware upgrade or reinstallation will clear out all logs. A firmware upgrade
will preserve archived data and application configuration information, but a reinstallation will clear
out all application configuration information and archived data. If you want to save your settings,
download and back up your configuration and logs.
The Download Logs page contains the name of the existing packaged log file, the time when it was packaged, and
the size of the file. Use the provided buttons to package log files, download packaged log files, and delete packaged
log files.
After the packaged logs are downloaded, the packaged export can be deleted so that it does not utilize space on the
FactoryTalk Historian ME module. The original log files are not deleted.
Change password
The Change Password page allows you to change the password for the logged-in user.
To change the password
1. In the Current Password box, type the current password.
2.
In the New Password box, type the new password.
3.
In the Confirm New Password box, type the new password again.
4.
Click Change Password.
A message appears telling you that your password change was successful and that you should now log in with your
new password.
If you forget your Web Diagnostics login and password, you can reset it in the FactoryTalk Historian ME Web interface.
170 1756-UM106H-EN-E - June 2024 Rockwell Automation, Inc.

Chapter 13Use Web Diagnostics
To reset the password
1.
In the ME module web interface, click Advanced in the main navigation, and then click Restore Defaults.
2. Click Reset Web Diagnostics Password. A dialog box appears asking if you are sure you want to reset the
Web Diagnostics password.
3.
Click OK.
The Web Diagnostics login and password revert to admin/admin.
Rockwell Automation, Inc. 1756-UM106H-EN-E - June 2024 171

Chapter 14
Troubleshoot
In this section you will learn about the following:
Provide issue information on page 172
Reboot the module on page 173
Work in the safe mode on page 173
Hardware issues on page 173
Web client issues on page 174
Data collection issues on page 175
Data storage issues on page 177
Data transfer issues on page 177
Data export issues on page 179
Auto recovery issues on page 179
Time management issues on page 180
Client computer issues on page 180
Point server issues on page 181
Related FactoryTalk product issues on page 181
Provide issue information
When your FactoryTalk Historian ME is not operating properly, you should collect the following information for
Technical Support before restarting the module or changing the module configuration. This information will assist the
Support team in troubleshooting your issues.
• Check the system log and export log data.
Go to the Advanced tab, view the System Log page, and export log data.
•
Check for core dump files and download them if there are any.
Go to the Web Diagnostics Firmware tab and click Core Dump Directory to collect the core dump files.
Tip: For details on the web diagnostics interface, see Use Web Diagnostics on page 152.
•
Go to the Web Diagnostics Firmware tab and click Download Logs to package the log files and download
them.
•
Record the firmware information.
Go to the Web Diagnostics Firmware tab. Check the Overview page for the firmware information.
172 1756-UM106H-EN-E - June 2024 Rockwell Automation, Inc.

Chapter 14Troubleshoot
To contact Rockwell Customer Support:
•
Telephone - 1.440.646.3434
• Online
Tip: For details on working with Rockwell Technical Support, see Technical support.
Reboot the module
FactoryTalk Historian ME can be rebooted in two ways:
•
In the web interface, go to Advanced in the top navigation bar, and then click Module Shutdown in the left
navigation bar. Click Module Reboot to reboot the module.
For details, see Reboot the module on page 116.
•
In the Logix Designer Module Profile, click Reset Module.
For details, see Use Studio 5000 Logix Designer Module Profile on page 140.
Work in the safe mode
For details, see Repair archives using safe mode on page 112.
Hardware issues
Symptom Solution
The FactoryTalk Historian ME module display is not responding. • Check to see that both the module and the chassis have
power and that the LED display is on.
•
Check the Ethernet cable port. Be sure that the Ethernet
display LED lights are lit normally and that the messages
scrolling on the display are OK.
The time displayed on the web client is wrong, even if the clock
time has already been synchronized in manual mode.
The battery may need to be replaced. The battery is
non-rechargeable and field-replaceable. For information on
replacing the battery, see the FactoryTalk Historian Machine
Edition Module Installation Instructions (Publication 1756-IN106).
The four-character LED display stops scrolling. • Check to see if the data server has stopped functioning.
Go to the Web Diagnostics Firmware tab, and check
the Data Server page. If the data server has stopped
functioning, restart the module.
•
Check to see if the CIP application has crashed. If so, go
to the Web Diagnostics Firmware tab, and check the CIP
page for errors. If there are any, click Restart.
The Ethernet port lights are not illuminated. • Contact your IT department to verify that your system is
properly connected to your network.
•
For details on the Ethernet cable, see "Wire the Ethernet
connector".
Rockwell Automation, Inc. 1756-UM106H-EN-E - June 2024 173

Chapter 14Troubleshoot
Symptom Solution
The module’s CPU is experiencing continuous high usage
(90-100%).
Go to the Web Diagnostics Hardware tab, and check the CPU,
RAM page to find out each service’s usage and determine which
processes are the most CPU-intensive.
The FactoryTalk Historian ME module cannot obtain an IP
address from a DHCP server.
• Ensure that the network cables are properly connected
and that the module is properly connected to the network.
•
Contact your IT department to verify that a DHCP server is
running on the same network as the module.
•
Ensure that the port LEDs on the module are lit. If so,
restart the module.
•
If the port LEDs are not lit, the module may require service
by Rockwell Technical Support.
The MAC address scrolls across the display. • The Ethernet port has failed to acquire an IP address.
• Restart the module.
The ME module is online but you cannot access it through its
host name.
The FactoryTalk Historian ME module host name may have
a "_" in its name. According to Microsoft DNS server naming
standards, this help prevents the module from being recognized
by its host name. To solve this problem, the underscore "_" must
be removed from the module’s name.
For details on naming the ME module, see Change the module
name on page 102.
For details on DNS naming standards, see the Microsoft TechNet
site and search for "DNS naming standards".
Web client issues
Symptom Solution
You cannot access the FactoryTalk Historian ME web client. First check that the IP address you are trying to connect to is
the same as the one scrolling across the FactoryTalk Historian
ME module’s display. If you see a MAC address instead, that
means that the module can’t find the IP address from the DHCP
server. Restart the module.
The web client is unresponsive. In the Logix Designer Module Profile, in the Configuration tab,
click Restore Defaults.
You can access the FactoryTalk Historian ME web client but
cannot log on.
• First check that you are using the correct security
mode. By default, FactoryTalk Historian ME web client
uses FactoryTalk Historian ME Local Security, with the
administrative user name piadmin.
•
If the module has been configured with FactoryTalk
Directory security mode, you must ensure that the user
has been configured in the FactoryTalk Administration
Console on the FactoryTalk Directory server. To find
the current security mode, go to the Web Diagnostics,
174 1756-UM106H-EN-E - June 2024 Rockwell Automation, Inc.

Chapter 14Troubleshoot
Symptom Solution
Firmware Overview. Check the Security Mode section for
the configured security information.
•
In the Logix Designer Module Profile, in the Configuration
tab, click Reset Security.
The administrator forgot the login name and/or password. • Reset security to factory settings. Click Advanced in the
top navigation bar, and then click Restore Defaults. In the
Reset Security section, click Reset Security.
or
•
In the Logix Designer Module Profile, in the Configuration
tab, click Reset Security.
You are using the host name as a URL and cannot access the
web client.
• Try to navigate to the page using the IP address of the
module. If this works, then be sure that the host name you
typed in is not misspelled.
• Check that the DNS server is running.
The web home page is slow to respond. • If you have downloaded a large .ACD file to the controller
at boot time and tried to add more than 2500 points, you
may need to wait for the module to respond. If it does not
respond after several minutes, restart the module.
•
Keep in mind that the module requires some initialization
time to respond to the controller.
Data collection issues
Symptom Solution
• Check the module STS LED light. Solid red indicates that the data collection is
inactive.
•
Go to the Advanced tab to view the System Log page. Check the log for
messages about the issue and export log data.
The System Status section on the Home
page shows that the data collection is in
the "Stopped" mode.
• The data collection may have
stopped because it reached the
user-configured Archive Usage
Threshold percentage on the Data
Storage page.
Wait for the system to process
overflow events and return to a
state that allows you to restart the
data collection.
or
• If the data collection does not
appear to have stopped due to a
user configuration, go to the Data
Collection page. Click Start to
restart the data collection.
Rockwell Automation, Inc. 1756-UM106H-EN-E - June 2024 175

Chapter 14Troubleshoot
Symptom Solution
Increase the Archive Usage
Threshold percentage.
•
Go to the Data Collection page.
Click Start to restart the data
collection.
The System Status section on the Home
page shows that the data collection is in
the "Error" mode.
• Check the module STS LED light. Solid red indicates that the data collection is
inactive.
•
Go to the Advanced tab to view the System Log page. Check the log for
messages about the issue and export log data.
•
Go to the Web Diagnostics Firmware tab, and check the Data Collection page.
Process information can confirm whether the data collection is in an undesirable
state. N/A indicates an error state.
•
Download additional information that will assist in troubleshooting as described
in the Provide issue information on page 172, Reboot the module on page 173,
and Work in the safe mode on page 173 sections.
• Reboot the module.
•
Contact Technical Support if the issue persists.
Tags are collecting bad-quality data. If you change a tag’s external access attribute to none, then the data collected by that
tag for FactoryTalk Historian ME will be bad quality. To fix this issue, you must change
the tag external access attribute to either Read/Write or Read only.
Check the status of the data collection on the Home page.
Go to Time Source > Controller in the web interface. Check for a message that
indicates that data collection has discarded data.
If the data collection status is "Running", check the Collection Rate in the System
Status section in the left navigation bar.
Snapshot data points displayed on the
Current Data page contain timestamps
that are not being updated.
• Ensure that the Collection Rate is
zero; this confirms that the data
collection is not collecting data.
• Go to the Web Diagnostics
Firmware tab, and check the Data
Server page. N/A indicates an error
state.
•
Reboot the module.
•
If the data collection stops again,
go to the Configure Historian tab,
and click Data Storage. Ensure
that the Archive Disk Threshold
and Archive Usage Threshold are
still valid. If these thresholds have
been reached, wait for the system to
process overflow events and return
to a state that allows you to restart
the data collection.
• If the Collection Rate is not zero,
check the status of the Data Server
on the Home page.
• If the Point Server status is
"Stopped" or "Error", reboot the
module.
176 1756-UM106H-EN-E - June 2024 Rockwell Automation, Inc.

Chapter 14Troubleshoot
Symptom Solution
If the data collection status is "Stopped", go to the Data Collection page and restart
the data collection.
A single point has not collected data for a
significant time period.
• Check the point configuration on the Point Property page.
• Ensure that the scan rate is not set too low, and ensure that the Exception and
Compression values are configured properly for the point.
The module receives a high-speed event
with a timestamp 10 minutes into the
future, discards that event, and logs the
following error message into the system
log:
[ERROR]
TagProcessingForPolledAndAdvi
sed() dropped future
event for point<ID>
with <timestamp> with
timeDelta=<number of seconds
into future>.
• Check the controller time.
• Ensure that the controller time is correct.
The following message is logged on the
System Log page:
[ERROR] Unable to keep pace
with High Speed Trend causing
data loss.
Due to performance issues with the controller, the backplane or the module, the
module cannot receive new high-speed events from the controller. To mitigate the
impact, stop and restart the data collection.
Data storage issues
Symptom Solution
The Data Storage page provides information on archive
statistics. Unexpected information appears on the page.
• Go to the Web Diagnostics Firmware tab and check
the Data Storage page. Process information can confirm
whether Data Storage is in an undesirable state. N/A
indicates an error state.
•
Reboot the module.
Data transfer issues
Symptom Solution
The System Status section on the Home
page shows that the data transfer is in
the "Stopped" mode.
Go to the Advanced tab to view the System Log page. Check the log for messages
about the issue and export log data.
Rockwell Automation, Inc. 1756-UM106H-EN-E - June 2024 177

Chapter 14Troubleshoot
Symptom Solution
• Go to the Configure Historian tab. On the Data Transfer page, click Start to
restart Data Transfer.
•
If Data Transfer does not start:
◦ Ensure that the FactoryTalk Historian SE host name or IP address is
correct.
◦ Ensure that all security settings, including trust connections (if required),
have been properly configured.
•
Click Test Connection to ensure a connection to the FactoryTalk Historian SE or
PI server can be established.
The System Status section on the Home
page shows that the data transfer is in
the "Error" mode.
• Go to the Advanced tab to view the System Log page. Check the log for
messages about the issue and export log data.
•
Check the module STS LED light. Flashing red indicates that the data transfer is
inactive (and the data collection is active.)
•
Go to the Web Diagnostics Firmware tab and check the Data Transfer page.
Process information can confirm whether the data transfer is in an undesirable
state.
•
N/A indicates an error state.
Download log files that will assist in troubleshooting as described in the Provide
issue information on page 172, Reboot the module on page 116, and Work in the
safe mode on page 173 sections.
•
Reboot the module.
•
Contact Technical Support if the issue persists.
If the data collection is running on one
or more modules and these modules
are transferring data to a FactoryTalk
Historian SE or PI server, the FactoryTalk
Historian SE or PI server will experience a
large load and overflow events if the data
transfer is stopped for some time and
then restarted.
To minimize the load and number of overflow events on the FactoryTalk Historian SE
or PI server, go to the Configure Historian tab. On the Data Transfer page, reduce
the Maximum Events per Transfer value. This parameter controls the number of
events transferred.
If data transfer and data collection are
running on one or more modules, and
data transfer is stopped and then started
on one module after some time has
passed, the module may experience data
interruption.
• Restarting the data transfer on the module may cause data interruption because
old timestamps cannot be written to the current archive.
•
After it is restarted, ensure that the data transfer remains running so that
transferred events eventually match the archive event timestamps.
Check the status of the data transfer on the Home page.Data in the FactoryTalk Historian SE or PI
server contains timestamps that are not
being updated.
If the data transfer status is Running:
• Go to the Advanced tab to view the
System Log page. Check the log
for messages about the issue and
export log data.
If the data transfer status is Error:
• Go to the Web Diagnostics
Firmware tab. Check the Data
Transfer page. Process information
can confirm whether the data
178 1756-UM106H-EN-E - June 2024 Rockwell Automation, Inc.

Chapter 14Troubleshoot
Symptom Solution
• Ensure that the CPU load is at a
normal rate and not preventing data
from being transferred.
• Ensure that points are properly
configured with scan rates that are
not too low.
•
Ensure that Exception and
Compression values are properly
configured for points.
transfer is in an undesirable state.
N/A indicates an error state.
•
Reboot the module.
The FactoryTalk Historian SE or PI server
rejects points from a new module that
has been added to an existing collection
of modules transferring data to that
server.
• Ensure that the points are created in the FactoryTalk Historian SE or PI server
before the data transfer is started. This will ensure that the point database and
the archive can be synchronized.
• The FactoryTalk Historian SE or PI server rejects the points because the archives
have shifted several times and are outside the range of the existing archives.
Fewer events than expected have been
transferred to the FactoryTalk Historian
SE or PI server.
• Check the module CPU load. The data transfer checks the module CPU load
before transferring data. If the load is high, events are transferred at a slower
rate.
• Try changing the rate at which events are transferred. Go to the Configure
Historian tab. On the Data Transfer page, increase the Maximum Events per
Transfer value to allow events to transfer more quickly.
No events are being transferred to
FactoryTalk Historian SE or PI server.
Make sure that enough disk space is being allocated in the FactoryTalk Historian SE or
PI server to allow the transfer.
Data export issues
Symptom Solution
The export function in the FactoryTalk Historian ME web
interface does not work.
• Open the Registry Editor, navigate to the
HKEY_CLASSES_ROOT > .csv folder, and verify that the
PerceivedType key is present and has a value of text or
document.
Auto recovery issues
Symptom Solution
The time on the module has moved to a past time. This causes
existing archives to have future timestamps or overlapping
archives.
• First, check the module’s time source to ensure that
it is correct. To resolve time source issues, see Time
management issues on page 180.
• If the issue is not a time source issue, restore the module
to its proper state by rebooting it. The module will start in
safe mode.
•
Click Safe Mode that initially appears when the module is
rebooted. (Safe Mode indicates that your system is in safe
mode.)
Rockwell Automation, Inc. 1756-UM106H-EN-E - June 2024 179

Chapter 14Troubleshoot
Symptom Solution
• Download archives to retain the archive data for your
records.
•
Next, delete the archives with future timestamps or
overlapping archives. For details, see Repair archives
using safe mode on page 112.
Time management issues
Symptom Solution
You have forgotten the module’s time synchronization source. Go to Web Diagnostics, and under the Hardware tab check the
Time Management page. The time source is listed in the Time
Source section.
The module is synchronized to a controller time source and
the controller time is moving back, causing the module time to
move back.
• Correct the controller time. Download archives to save the
archive data with future timestamps.
•
Click Safe Mode that initially appears when the module is
restarted. (Safe Mode indicates that your system is in safe
mode.) Do not delete the archive files.
The module is synchronized to an NTP time source, and the
module time is incorrect.
• Check that the NTP server is running properly.
• If the NTP server is running properly, check the NTP
log; this indicates if the NTP time was successfully
synchronized during the initial configuration or not. If
it was, then it must be resynchronized. Navigate to the
Advanced tab, Time Management screen. Select the NTP
Server option, retype the NTP server address, and click
Save. This will restart the module and may take several
minutes to complete. If the module was never successfully
synchronized, then you must do so now. For details, see
Manage time on page 98.
The module starts in safe mode after a restart because the user
accidentally typed a past time when configuring the module
time.
• The Time Management page will display a warning
message. Correct the module time configuration on the
Time Management page.
• Restart the module.
Client computer issues
Symptom Solution
The client computer’s performance has become degraded and
slow.
Open the Windows Task Manager. If Internet Explorer is
using the most memory, the problem may be an Internet
Explorer-related memory leak. To free up the memory, you can:
• Close and reopen Internet Explorer.
•
Turn off auto refresh.
• Minimize the number of points that you create in the Add
Points Wizard.
180 1756-UM106H-EN-E - June 2024 Rockwell Automation, Inc.

Chapter 14Troubleshoot
Point server issues
Symptom Solution
The System Status section on the Home page shows that the
Point Server is in the "Error" mode.
This indicates that the Point Server is in an undesirable state.
Restart the module.
Related FactoryTalk product issues
This section describes issues related to other FactoryTalk products when they interact with FactoryTalk Historian ME.
FactoryTalk Directory
This section addresses two issues related to FactoryTalk Directory.
•
Before connecting to FactoryTalk Directory, you must install FactoryTalk Services Platform (FTSP).
Additionally, Internet Information Services (IIS) must be installed and configured on the computers that host
the FactoryTalk Directory Server.
Tip: Refer to the FactoryTalk Services Platform documentation and Release Notes for FTSP and
IIS installation details.
•
If you want to use the FactoryTalk Directory security credentials for logging on to the module website,
and set the FactoryTalk Directory server on the System Security page but receive the [Error: A
connection error occurred while connecting to the Security Server.] error
message, do the following:
◦
Check the configuration of the FactoryTalk Directory server computer (for example, if IIS is properly
installed and running). Refer to the FactoryTalk Directory documentation for more details.
◦
Check with the IT security administrator at your organization if there are no problems with the firewall
blocking the port on which the communication with the FactoryTalk Directory server occurs.
FactoryTalk Historian DataLink
The FactoryTalk Historian DataLink Excel reporting tool provides a FactoryTalk Historian Add-in for Microsoft Excel. If
you export more than 65,535 rows of FactoryTalk Historian ME events to DataLink using the Compressed Data (Start
Time/End Time) configuration page, Excel generates the “Output exceeds dimension” message. This error message is
generated by Excel because the amount of data exported to the application exceeds Excel’s 65,535 row limit for data.
Rockwell Automation, Inc. 1756-UM106H-EN-E - June 2024 181

Appendix A
Configure Internet Explorer for FactoryTalk Historian ME
In this section, you will learn how to configure Internet Explorer to work with FactoryTalk Historian ME websites.
Tip: Support for Internet Explorer may be removed in a future release. Please update Series B to FRN
5.202 in order for the module to support more modern web browsers like Chrome and Edge.
The following browsers are supported:
• Microsoft® Internet Explorer® 11
The following operating systems are supported:
• Windows 10
• Windows Server® 2019
• Windows Server 2016
• Windows Server 2012
Tip: This section has been prepared assuming that you access the module by typing its IP
address in the browser. If you access the module by typing the Fully Qualified Domain Name
(FQDN) of the module in the browser, follow the instructions, and type the FQDN instead of the IP
address.
Internet Explorer configuration checklist
To configure Internet Explorer to work with FactoryTalk Historian ME websites, you need to perform the following
actions:
• Add the module site to the Local intranet or the Trusted sites security zone on page 182.
• Enable the Initialize and script ActiveX controls not marked as safe for scripting option on page 184 for the
particular security zone.
• Enable Compatibility View for the module site on page 185.
• Disable Pop-up Blocker for the module site on page 185.
• Disable ActiveX Filtering on page 185.
• Install and/or enable the Microsoft XML DOM Document add-on on page 186.
• Enable TLS on page 186
• If you are using Internet Explorer 10, perform the following in the F12 developer tools on page 187:
◦ Select the Script, Pop-Up Blocker, or CSS option on the Disable menu.
◦ Clear the Disable images option on the Images menu.
◦ Clear the Disable cookies option on the Cache menu.
• Install the module certificate in Internet Explorer on page 187.
• Clear the browser's cache on page 189.
• Add a registry entry for exporting files to Excel on page 190.
Add the module site to Local intranet or Trusted sites
By default, if you visit a website by entering an IP address in the browser, it is identified as a website in the Internet
security zone. Thus, if you open the FactoryTalk Historian ME client website using the IP address of the module,
182 1756-UM106H-EN-E - June 2024 Rockwell Automation, Inc.

Chapter 15Configure Internet Explorer for FactoryTalk Historian ME
the website will be added to the Internet security zone. However, to work with the FactoryTalk Historian ME client
website, you have to change the security zone and add the module website to:
• The Local Intranet security zone on page 183
• The Trusted sites security zone on page 184
By default, the Local intranet security level is medium-low. The Trusted sites security level is medium.
The medium-low security level is the same as the medium level but without prompts. Use the Local intranet zone if
you do not want to be prompted when the content of the page is run.
Tip: Internet security is subject to the security policy and it may be changed by the system
administrators. The zone that you choose depends on the corporate Internet security policy.
Add the module website to the Local intranet security zone
To add the module website to the Local intranet zone
1.
Open the FactoryTalk Historian ME website using the IP address of the module.
2. On the Tools menu, click Internet Options.
The Internet Options dialog box appears.
Tip: If the top menu is not visible, press the left Alt key on your keyboard to bring up the top
menu.
3.
Click the Security tab, and then select Local intranet.
4. Click Sites.
The Local intranet dialog box appears.
5.
Click Advanced.
The Local intranet dialog box appears.
6.
Verify that in the Add this website to the zone text box there is a URL of your module site, and then click
Add.
The URL of the module website appears in the Websites list. Depending on the security protocol used to
communicate with the module, the website URL will be prepended by the https prefix. You need to add the
URL, starting with the https prefix, to the Websites list.
Rockwell Automation, Inc. 1756-UM106H-EN-E - June 2024 183

Chapter 15Configure Internet Explorer for FactoryTalk Historian ME
7. In the Add this website to the zone text box, type the IP address of the module with the prefix other than the
one of the URLs already added to the Websites list, and then click Add.
Both URLs for the module website appear in the Websites list.
8. Click Close, and then click OK.
Add the module website to the Trusted sites security zone
To add the module website to the Trusted sites zone
1.
Open the FactoryTalk Historian ME website using the IP address of the module.
2. On the Tools menu, click Internet Options.
The Internet Options dialog box appears.
Tip: If the top menu is not visible, press the left Alt key on your keyboard to bring up the top
menu.
3.
Click the Security tab, and then select Trusted sites.
4.
Click Sites.
The Trusted sites dialog box appears.
5.
Verify that in the Add this website to the zone text box there is a URL of your module site, and then click
Add.
The URL of the module website appears in the Websites list. Depending on the security protocol used to
communicate with the module, the website URL will be prepended by the https prefix. You need to add the
URL, starting with the https prefix, to the Websites list.
6.
In the Add this website to the zone text box, type the IP address of the module with the prefix other than the
one of the URLs already added to the Websites list, and then click Add.
Both URLs for the module website appear in the Websites list.
7.
Click Close, and then click OK.
Enable Active X controls
When you are interacting with the FactoryTalk Historian ME websites, scripts are run on the page to complete various
actions (for example, uploading a file on the Upload Management page). For this reason, FactoryTalk Historian ME
requires that you customize the security level and enable the Initialize and script ActiveX controls not marked as
safe for scripting option.
To enable Active X controls
1.
In the Internet Options dialog box, click the Security tab, and then click Custom level.
The Security Settings dialog box appears.
2.
Under Settings, browse to the ActiveX controls and plug-ins node.
3.
Under Initialize and script ActiveX controls not marked as safe for scripting, click Enable, and then click
OK.
184 1756-UM106H-EN-E - June 2024 Rockwell Automation, Inc.

Chapter 15Configure Internet Explorer for FactoryTalk Historian ME
Tip: See Internet Explorer security zone settings on page 191 for a list of all security zone
settings configured for FactoryTalk Historian ME websites.
4. Click OK.
Enable Compatibility View
To enable Compatibility View
1.
Open the FactoryTalk Historian ME website using the IP address of the module.
2. On the Tools menu, click Compatibility View settings.
The Compatibility View Settings dialog box appears.
Tip: If the top menu is not visible, press the left Alt key on your keyboard to bring up the top
menu.
3.
Verify that in the Add this website text box there is the IP address of your module site, and then click Add.
Tip: If you access the website by typing the hostname or DNS name of the module, make sure
that they are set in the text box.
4.
Click Close.
Disable Pop-up Blocker
The FactoryTalk Historian ME website requires pop-up windows to display online help. You must allow the browser to
display pop-ups for the module site.
To allow pop-ups in Internet Explorer
•
If a warning message appears informing that Internet Explorer has blocked a pop-up window, in the Options
for this site list, select Always allow.
Disable ActiveX Filtering
ActiveX Filtering allows or filters out the ActiveX controls running in the browser on a website. When you are
interacting with the FactoryTalk Historian ME websites, the ActiveX controls are used on the page to complete various
actions (for example, uploading a file on the Upload Management page). For this reason, FactoryTalk Historian ME
requires that the controls are not filtered out when you visit the website.
Rockwell Automation, Inc. 1756-UM106H-EN-E - June 2024 185

Chapter 15Configure Internet Explorer for FactoryTalk Historian ME
To disable ActiveX Filtering
•
On the Tools menu, verify that the ActiveX Filtering option is cleared.
Tip: If the top menu is not visible, press the left Alt key on your keyboard to bring up the top
menu.
Enable the XML DOM Document add-on
The FactoryTalk Historian ME website requires the Microsoft XML DOM Document add-on to communicate with the
module and send data. Make sure that the add-on is installed and enabled.
To enable the XML DOM Document add-on
1.
On the Tools menu, click Manage add-ons.
The Manage Add-ons dialog box appears.
Tip: If the top menu is not visible, press the left Alt key on your keyboard to bring up the top
menu.
2.
Under Microsoft Corporation, verify that all XML DOM Document add-ons are enabled.
3.
If the add-ons are disabled, under Show, select All add-ons.
4.
Under Microsoft Corporation, click each XML DOM Document add-on, and then click Enable.
5.
Click Close.
Enable TLS
The FactoryTalk Historian ME website requires TLS 1.2. Make sure that TLS 1.2 is enabled.
To enable TLS
1. On the Tools menu, click Internet Options.
The Internet Options dialog box appears.
Tip: If the top menu is not visible, press the left Alt key on your keyboard to bring up the top
menu.
2.
Click the Advanced tab, and then under Settings select the following checkboxes:
◦
Use TLS 1.0
◦ Use TLS 1.1
◦ Use TLS 1.2
3.
For security reasons, clear the following checkboxes:
◦
Use SSL 2.0
◦ Use SSL 3.0
4.
Click OK.
186 1756-UM106H-EN-E - June 2024 Rockwell Automation, Inc.

Chapter 15Configure Internet Explorer for FactoryTalk Historian ME
Verify the browser configuration using the F12 developer tools
The F12 developer tools allow you to toggle certain browser features on and off. These features allow you to properly
display the content of the FactoryTalk Historian ME websites. Verifying the browser configuration using the developer
tools is especially recommended:
• If you are using Internet Explorer 10 or earlier.
•
If you are using Windows Server (for more information, see Configure Internet Explorer on Windows Server on
page 190).
To verify the browser configuration using the developer tools
1.
Go to the FactoryTalk Historian ME website, and then press F12.
2.
On the Disable menu, make sure that the Script, Pop-Up Blocker, and CSS options are cleared.
3.
On the Images menu, make sure that the Disable images option is cleared.
4.
On the Cache menu, make sure that the Disable cookies option is cleared.
Install the module certificate in Internet Explorer
If you are using a secure communication protocol (HTTPS) to communicate with the FactoryTalk Historian ME
websites, you need to install a security certificate in the browser. For more information on the security settings
available for FactoryTalk Historian ME, see Manage security on page .
To install the module certificate in Internet Explorer
1.
Open the FactoryTalk Historian ME website using the HTTPS protocol and the IP address of the module (for
example, https://10.76.38.162). You should see a screen like the one below because your self-signed certificate
is not trusted.
2.
Click Continue to this website (not recommended).
The website is loaded and the address bar is shown in red with a "Certificate error" message in the security
status bar next to it.
3.
Click Certificate error.
The Certificate Invalid message appears.
4.
Click View certificates.
The Certificate dialog box appears with information that the website’s certificate is not trusted.
5.
Verify the certificate:
◦
Verify the value in the Issued to field corresponds to your module IP or hostname.
◦ Verify the value in the Valid to... field. Check if the certificate has not expired.
6.
If the certificate has not expired, click Install Certificate, and follow the steps in the Certificate Import
Wizard to complete the process.
For details, see Install the certificate using the Certificate Import Wizard on page 188.
If you do not see the Install Certificate button:
a.
Close Internet Explorer.
b.
Right-click the Internet Explorer icon, and click Run as administrator.
c.
Open the FactoryTalk Historian ME website again, and repeat steps 1-6.
Rockwell Automation, Inc. 1756-UM106H-EN-E - June 2024 187

Chapter 15Configure Internet Explorer for FactoryTalk Historian ME
Install the certificate using the Certificate Import Wizard
To import the certificate using the Certificate Import Wizard
1.
On the Welcome… page, click Next.
2. Click the Place all certificates in the following store option, and then click Browse.
The Select Certificate Store dialog box appears.
3.
Select Trusted Root Certification Authorities.
Tip: To show the certificate storage hierarchy and allow you to expand the listed stores, select
the Show physical stores checkbox. Then, under Trusted Root Certification Authorities, select
Local Computer.
4.
Click OK.
5.
Verify that the selected certificate store is set to Trusted Root Certification Authorities, and then click
Next.
6.
Click Finish.
A warning message appears.
7.
Click Yes, and wait for a message informing you that the import was successful.
8.
Click OK to close the message, and then click OK to close the Certificate dialog box.
9.
Exit Internet Explorer.
10.
Open the FactoryTalk Historian ME website again.
The closed padlock icon next to the address indicates that the certificate is installed properly.
Verify the certificate
You can verify the current certificate used by FactoryTalk Historian ME websites in two ways:
•
On the security report of the web browser.
It is a recommended method to verify the certificate. This report provides detailed information on both the
self-signed certificate and the CA certificate.
For details, see Verify the certificate on the security report on page 188.
•
On the System Security page of the Historian website.
This page provides basic information about the self-signed certificate only, and does not provide any details
on the CA certificate.
For details, see Verify the certificate on the System Security page on page 189.
Verify the certificate on the security report
To verify the certificate details on the security report
1.
Open the FactoryTalk Historian ME website using the IP address of the module.
2. Click the padlock icon located to the right of the address field in Internet Explorer.
The Website Identification dialog box appears. This is the security report for the webpage.
3.
Click View certificates.
The Certificate dialog box appears.
188 1756-UM106H-EN-E - June 2024 Rockwell Automation, Inc.

Chapter 15Configure Internet Explorer for FactoryTalk Historian ME
4. On the General tab, review the following information:
◦
Issued to
By default, the certificate is issued to the IP address of the ME module.
◦ Issued by
The same as Issued to.
◦
Valid from - to: The validity date of the certificate.
The certificate is valid for five years.
On the General tab, only the date (without the time) is displayed. You can see both the date and time on
the Details tab.
The Valid from value is not only the start date and time of the certificate's validity period, but also the
date and time the certificate was created.
The date and time change each time you renew the certificate on the System Security page.
Verify the certificate on the System Security page
To verify the certificate on the System Security page
1.
Log on to the Historian ME website using your credentials.
2. Click Configure Historian, and then click System Security.
3.
Under HTTPS Settings, in the HTTPS certificate type list, select Self-Signed Certificate.
4.
Verify the certificate information.
Tip: For details on the self-signed certificate, or information about the CA certificate, see Verify
the certificate on the security report on page 188 of the web browser.
Clear the browser cache
If you have already been using the FactoryTalk Historian ME websites, some of their elements (for example, scripts
enabling you to perform actions on the page) may be stored in your browser cache. To get the latest version of these
elements, you need to clear the browser cache.
You can clear the browser cache manually or automatically.
For details, see:
•
Clear the browser cache manually on page 189
•
Clear the browser cache automatically on page 190
Clear the browser cache manually
To clear the browser cache manually
1.
On the Tools menu, click Delete browsing history.
Tip: Alternatively, you can press Ctrl + Shift + Delete.
The Delete Browsing History dialog box appears.
2.
Select the Temporary Internet files and website files checkbox, and clear all other checkboxes.
Rockwell Automation, Inc. 1756-UM106H-EN-E - June 2024 189

Chapter 15Configure Internet Explorer for FactoryTalk Historian ME
Tip: If your FactoryTalk Historian ME site is not added to your Favorites, select the Preserve
Favorites website data checkbox.
3. Click Delete, and wait for the confirmation message.
Clear the browser cache automatically
To configure the browser to clear the cache automatically every time you visit the
site
1. Open Internet Explorer.
2.
On the Tools menu, click Internet options.
The Internet Options dialog box appears.
3.
On the General tab, click Settings.
The Website Data Settings dialog box appears.
4. On the Temporary Internet Files tab, select the Every time I visit the webpage option.
5.
Click OK.
Add a registry entry for exporting files to Excel
In some versions of Internet Explorer, there is an issue when you try to export a file to Excel on the System Log page
of the FactoryTalk Historian ME client website, and the Save As dialog box does not appear.
To fix this issue, you must add the [HKEY_CLASSES_ROOT\.csv] "PerceivedType"="document" registry
value for the .csv document type.
For more information about editing registry entries, refer to the Microsoft documentation.
Configure Internet Explorer on Windows Server
By default, the Internet Explorer Enhanced Security Configuration (IE ESC) is enabled on the Windows Server. This may
result in some issues (for example, caused by blocked JavaScript in Internet Explorer) when trying to access certain
sites. For this reason, it is recommended to disable IE ESC.
To disable the Internet Explorer Enhanced Security Configuration
1.
Go to Start > All Programs > Administrative Tools > Server Manager.
The Server Manager appears.
2.
In the Security Information section, click Configure IE ESC.
The Internet Explorer Enhanced Security Configuration dialog box appears.
3.
Select the Off option for the Administrators or for the Users group.
Tip: For safety reasons, it is recommended to disable the Enhanced Security Configuration for
Administrators only.
190 1756-UM106H-EN-E - June 2024 Rockwell Automation, Inc.

Chapter 15Configure Internet Explorer for FactoryTalk Historian ME
4. Click OK.
Tip: If you do not want to turn off the Internet Explorer Enhanced Security Configuration settings
globally, you can enable the Script setting in the developer tools. For more information, see Verify
the browser configuration using the F12 developer tools on page 187.
Internet Explorer security zone settings
The following is the list of all the security zone settings required by the FactoryTalk Historian ME website.
Security setting Value
Download signed ActiveX controls Prompt
Download unsigned ActiveX controls Disable
Run ActiveX controls and plug-ins Enable
Initialize and script ActiveX controls not marked as safe for
scripting
Enable
Allow scripting of Microsoft web browser control Enable
URLACTION_ACTIVEX_OVERRIDE_REPURPOSEDETECTION Enable
Allow previously unused ActiveX controls to run without prompt
(First run opt-in)
Enable
Allow Scriptlets Enable
Display video and animation on a webpage that uses a legacy
media player
Disable
Only allow approved domains to use ActiveX without prompt Enable
Allow active scripting Enable
Scripting of Java applets Enable
Script ActiveX controls marked safe for scripting Enable
Access data sources across domains Prompt
Allow programmatic clipboard access Enable
Allow cross-domain subframe resize Enable
Turn on Cross-Site Scripting (XSS) Filter Disable
URLACTION_SCRIPT_NAVIGATE Enable
Submit non-encrypted form data Enable
Allow font downloads Enable
Run Java (See 1C00) Enable
Userdata persistence Enable
Navigate windows and frames across different domains Enable
Allow META REFRESH Enable
Display mixed content Prompt
Include local directory path when uploading files to a server Enable
Rockwell Automation, Inc. 1756-UM106H-EN-E - June 2024 191

Chapter 15Configure Internet Explorer for FactoryTalk Historian ME
Security setting Value
URLACTION_HTML_ALLOW_INJECTED_DYNAMIC_HTML Enable
Allow installation of desktop items Prompt
Allow dragging and dropping or coping and pasting files Enable
Allow file downloads Enable
Launching applications and files in an IFRAME Prompt
Launching programs and files in webview Enable
Launching applications and unsafe files Enable
Launch moderate-risk file types Enable
Launch low-risk typically safe data file types Enable
Use Pop-up Blocker Disable
URLACTION_SHELL_RTF_OBJECTS_LOAD Enable
N/A (URLACTION_SHELL_EXTENSIONSECURITY) Disable
URLACTION_SHELL_SECURE_DRAGSOURCE Enable
Allow OpenSearch queries in Windows Explorer Enable
Allow previewing and custom thumbnails of OpenSearch query
results in Windows Explorer
Enable
Logon Options Intranet-only
Allow persistent cookies that are stored on your computer Enable
Allow per-session cookies (not stored) Enable
Do not prompt for client certificate selection when no
certificates or only one certificate exists
Enable
Allow third-party persistent cookies Enable
Allow third-party session cookies Enable
Privacy settings Accept all cookies
Java permissions Med safety
Allow binary and script behaviors Enable
Run .NET Framework-reliant components signed with
Authenticode
Enable
Run .NET Framework-reliant components not signed with
Authenticode
Enable
Run .NET UserControls Enable
Permissions for .NET Framework-reliant components with
manifests
High safety
Enable MIME Sniffing (Open files based on content, not file
extension)
Enable
Websites in less privileged web content zones can navigate into
this zone
Enable
192 1756-UM106H-EN-E - June 2024 Rockwell Automation, Inc.

Chapter 15Configure Internet Explorer for FactoryTalk Historian ME
Security setting Value
Allow script-initiated windows without size or position
constraints
Enable
Allow status bar updates via script Enable
Allow websites to open windows without address or status bars Enable
Allow websites to prompt for information using scripted
windows
Enable
Automatic prompting for file downloads Enable
Automatic prompting for ActiveX controls Enable
Allow webpages to use restricted protocols for active content Prompt
Use Phishing Filter [IE7] / SmartScreen Filter [IE8+] Disable
Loose XAML files Enable
Turn on Protected Mode Disable
Disable .NET Framework setup Enable
InPrivate Filtering Disable
Allow ActiveX Filtering Disable
Enable dragging of content from different domains within a
window
Disable
Enable dragging of content from different domains across
windows
Disable
Render legacy filters Enable
Rockwell Automation, Inc. 1756-UM106H-EN-E - June 2024 193

Glossary
The glossary contains a list of terms and definitions used with FactoryTalk Historian ME.
Glossary terms
Term Definition
.ACD The file extension used for project files created by Logix Designer software.
Archive The historical record of time-series data maintained by the FactoryTalk Historian ME server.
It is the fundamental and most important information store of the FactoryTalk Historian ME
server that contains the historical data record of all events for all points.
Archive Event Any event that is stored in the archive.
Archive File A binary file that contains a section of the data archive covering some finite time range.
These files, defined by start and end times, should be contiguous and non-overlapping. Only
fixed archive files may be created.
Archive Gap A gap between the end time of one archive file and the start time of the chronologically next
archive file. Archive gaps are not desirable because archive events with a timestamp during
the gap cannot be stored on disk in an archive file and will be discarded. To avoid archive
gaps, archive files should always be created in such a way that the end time of one archive
equals the start time of the chronologically next archive.
Archive Shift The process of clearing the oldest writable and shiftable archive file and making it the new
primary archive. An archive shift typically happens automatically when the previous primary
archive becomes full, but it sometimes must be performed manually for maintenance and
troubleshooting purposes.
Attribute, Point A characteristic or parameter of a point that directs an interface and the FactoryTalk
Historian ME server in the collection and processing of data values for that point.
Available Licensed Points The number of licensed points minus the total number of points already tagged for transfer.
This includes tagged points from all modules that are set up to transfer data to the same PI
server.
Chassis The hardware assembly that houses the FactoryTalk Historian ME module, ControlLogix
processors, and other I/O modules.
Common Industrial Protocol (CIP) An open industrial communication network initially created by Allen-Bradley/Rockwell
Automation.
CompDev The base attribute that specifies the compression deviation in engineering units. This
attribute specifies how much a value may differ from the previous value before it is
considered to be a significant value.
CompMax The base attribute that specifies the compression maximum time, in seconds. CompMax is
the maximum time difference from the previous archive event before the next event will be
sent to the archive. A point is archived if the elapsed time since the previous time a point was
saved is greater than the maximum time.
CompMin The base attribute that specifies the compression minimum time, in seconds. CompMin is the
minimum time difference from the previous archive event before the next event is eligible to
be archived. A point is archived if the elapsed time since the previous time a point was saved

Term Definition
is greater than or equal to the minimum time and the value has changed by more than the
deviation.
Compression The process of selecting which Snapshot events will be sent to the archive for storage.
Applying compression is one of the main responsibilities of the Snapshot subsystem, and the
specific algorithm used is known as Swinging Door Compression.
Compression Deviation See CompDev.
Compression Maximum See CompMax.
Compression Minimum See CompMin.
Compression Specification The three base attributes that control the compression process for a particular point:
CompDev, CompMax, and CompMin. Although it is technically not included in the specification,
Span affects CompDev, and Compression determines whether the specification is needed at
all.
Connection Credentials The set of identifying information on a client application seeking connection to the
FactoryTalk Historian ME server. This information can include the client computer’s IP
address or host name, the client application’s name, or the Windows Domain name and
Windows user name under which the client application is running. The FactoryTalk Historian
ME server uses connection credentials to determine if there is a matching trust.
ControlBus The backplane used by the FactoryTalk Historian ME module chassis.
Data Type The kind of value that will be used. Both points and point attributes have a data type. Some of
the possible types include several kinds of numbers, digital, and string.
Deadband A threshold, within the alarm limit, that the rate point must pass after an alarm is triggered
before the point is considered not to be in alarm.
Digital Point Type A point type typically used when values can only be one of several discrete states, such as
ON/OFF or red/green/yellow.
Event The fundamental unit of information used in the FactoryTalk Historian ME server. Each
event consists of two main components: a value and a timestamp. The value can be one of
several different data types (such as string, digital, int32, float64). The timestamp is always
represented as UTC seconds and can contain a subsecond component.
Event Scheduling A method of triggering program execution when some specific condition occurs, such as
the arrival of a new Snapshot event for a particular point. Event scheduling is one method
available for triggering PE or Advanced Computing Engine (ACE) calculations.
ExcDev The base attribute that specifies exception deviation in engineering units. ExcDev specifies
the deadband or how much a new value must differ from the previous value sent to the
Snapshot subsystem on the FactoryTalk Historian ME server in order to determine whether
the new value is significant and should also be sent.
ExcMax The base attribute that specifies exception maximum time, in seconds. ExcMax is the
maximum time difference from the last sent event before the next event will be sent. ExcMax
thus effectively limits the length of time that events can be discarded because their values
did not exceed the exception deviation.
ExcMin The base attribute that specifies exception minimum time, in seconds. ExcMin is the
minimum time difference from the last sent event before the next event is eligible to be sent.

Term Definition
Thus, the send rate of events for the associated point can be at most one event every ExcMin
second.
Exception Deviation See ExcDev.
Exception Maximum See ExcMax.
Exception Minimum See ExcMin.
Exception Reporting The process, executed internally by the data collection, of sending events to the Snapshot
subsystem on the FactoryTalk Historian ME server only when there has been a significant
change in the monitored value. Significance is determined with a simple deadband algorithm.
Exception Specification The three base attributes that control the exception reporting process for a particular point:
ExcDev, ExcMax, and ExcMin. Although it is technically not included in the specification, Span
affects ExcDev.
FactoryTalk Historian ME server The set of several software subsystems packaged together that constitute a single logical
server application capable of storing time-series data from distributed data sources and
serving this same data to client applications in real time.
FactoryTalk Security A set of security services fully integrated into the FactoryTalk Directory.
Fixed Archive A type of archive file that allocates all of its disk space at creation time. Thus, both an empty
and full archive occupy the same amount of disk space. Unless shifting has explicitly been
disabled, non-empty fixed archives will participate in archive shifts.
Ladder Logic A program written in a format resembling a ladder-like diagram. A programmable controller
uses this program to control devices.
LED Light emitting diode. It is used as a status indicator on the module.
NAND The NAND Flash architecture is one of two flash technologies (the other being NOR) used in
memory cards. NAND is best suited to a flash device requiring high-capacity data storage.
This is the data storage architecture for FactoryTalk Historian ME.
Offset An optional text box used when defining a scan class that specifies the first time at which
a scan should occur. If no offset is specified, the first scan occurs immediately after the
specified interval. After the initial scan, subsequent scans continue to occur after every
specified interval.
Out of Order Event An incoming event whose timestamp is prior to the timestamp of the event currently residing
in the Snapshot table for a particular point. All such events bypass compression and are
written directly to the event queue.
Performance Equation (PE) An expression that allows a user to implement an arbitrary and potentially sophisticated
calculation without formal programming. A performance equation has an intuitive syntax
and may consist of standard mathematical and logical operators as well as a wide variety of
built-in functions. The result of a performance equation can be archived for a PE point just
like the data for any other point.
Point A variable whose value is measurable and typically dynamic. Examples include transmitter
readings, status indicators, manual inputs, control limits, etc. Each point must be assigned a
unique tag on the FactoryTalk Historian ME server, and measurements of the point captured
over time are effectively stored as an array of timestamped values in the data archive.
Point Configuration The complete list of attributes characterizing a point.

Term Definition
Point Type The base attribute that specifies the data type for the values that a point stores. The possible
point types include the following: int16, int32, float16, float32, float64, digital, string, and
timestamp. Point types can be edited after point creation, but not all type transitions are
allowed.
Project File The file that Logix Designer software uses to store a controller’s programming and
configuration information. The file extension must be .ACD; if you change the extension, the
file will not open.
RSLogix 5000 Module Profile The Module Profile is used by ControlLogix processors to identify and determine
characteristics of FactoryTalk Historian ME modules.
Scan The base attribute that specifies whether the interface or scanning program should collect
new data for the associated point. If Scan is disabled (set to 0), then new data will not be
collected.
Scan Class A specification that provides an interface with the schedule for performing data collection
for its associated points. The scan class specification consists of a period and an optional
offset. The period determines the recurring interval when data collection should occur, and
the offset determines when data collection should first start. A scan class can also optionally
contain a code to force the interface to use UTC time for scheduling. A point can only be in
one scan class.
Slot Number The number that indicates the physical location of the slot in the chassis where the module or
controller resides.
Snapshot Event Either any event sent to the Snapshot subsystem or the event currently residing in the
Snapshot table for a particular point. The event stored in the Snapshot table for each point
has the most recent timestamp of all events received so far for that point; when a new event
arrives with a more recent timestamp, the previous event is passed through the compression
filter.
Snapshot Subsystem The core component of the FactoryTalk Historian ME server that receives all the new
data events for all points regardless of the sending application. The most recent of these
events for each point is maintained in the Snapshot table along with additional information
necessary to perform compression.
Span The base point attribute that specifies the range or the difference between the maximum and
minimum values for a point.
SQC See Statistical Quality Control.
Statistical Quality Control (SQC) The SDK-based Add-In to FactoryTalk Historian ProcessBook that enables users to create and
view a variety of SQC charts on their FactoryTalk Historian ProcessBook displays.
Swinging Door Compression A data compression algorithm used by the Snapshot subsystem that guarantees all of the
original samples were within a specified value, the compression deviation, of a straight line
drawn between any two events selected for archiving. In other words, this compression
algorithm allows for the reconstruction of the original signal as a series of straight lines, and
the maximum error between the reconstructed and original signals is guaranteed to be no
more than the compression deviation.
Tag The base attribute that is the unique alphanumeric name for a point. Certain characters are
not allowed like ‘*’, ‘?’, ‘\’, and ‘;’. The terms Tag and Point are often used interchangeably.

Term Definition
Timestamp A date and time, almost always associated with a data value through an event. The
FactoryTalk Historian ME server stores timestamps internally in Universal Coordinated Time
(UTC).
Trust A trust allows a system administrator to configure FactoryTalk Historian ME, FactoryTalk
Historian SE, or PI server to automatically allow and assign certain credentials to an
incoming connection that meets the criteria defined in the trust definition without requiring
user authentication. Trusts can be used to allow connections from specific computers,
applications, users, or a combination of criteria without an interactive login. Trusts are
typically used to facilitate connections between background tasks such as between data and
its target SE or PI server.
Index
A
Add an Ethernet driver142
Add points to the data transfer91
Add points using the Add Individual Points page58
Add points using the Add Points Wizard page54
Add the Historian ME module in the PI SDK Utility127
Add the module to Studio 5000 Logix Designer143
Admin168
Administer the module95
Auto recovery issues179
B
Back up and restore configuration files107
Back up the module20
Benefits14
C
Change password170
Change user passwords96
Change views51
Check and restore the module name111
Check the data transfer status in the system log93
CIP163
Clear the browser cache189
Clear the browser cache automatically190
Clock drifts102
Collect and store data77
Collect the module-related information20
Configuration example69, 71
Configure how to log on to the module117
Configure Output points70
Configure scan types66
Configure secure groups in the FactoryTalk Administration Console129
Configure security117
Configure system settings102
Configure the module properties140
Configure Trigger Input and Output points67
Configure Trigger Input points67
Configure where to use the secure communication protocol (HTTPS)121
Configure your Historian module in the Module Profile140
ControlBus statistics158
Core dump directory169
Create point discovery rule files131
Create points56, 59
Create scan classes76
Create tag attribute files135
Create trends with the FactoryTalk Historian DataLink Add-in148
Create trusts for the data transfer124
Create users95
Create users in the FactoryTalk Administration Console128
D
Data collection164
Data server163
Data storage165
Data transfer165
Data transfer considerations93
Data transfer prerequisites88
Default trusts124
Define point attributes61
Define point discovery rules132
Delete points60
Delete scan classes76
Delete trusts126
Differences between upgrade and reinstallation20
Disable Pop-up Blocker185
Discover tags54
Display LED160
Download logs170
E
Edit point discovery rule files134
Edit points60
Edit scan classes76
Edit tag attribute files139
Edit trusts126
Enable Compatibility View185
Enable SNMP129
Enable the XML DOM Document add-on186
Example: Use the Module Profile142
Exception filtering83
F
FactoryTalk Historian ME product number16
FactoryTalk licensing15
File types106
G
General61
Get started18
H
Home153
a
Hosts169
I
Install FactoryTalk Historian ME Client Tools25
Install FactoryTalk Historian ME Logix Designer Module Profile27
Install FactoryTalk Historian ME Rule Editor27
Install the module in the chassis24
Integrate the module into a FactoryTalk environment with the FactoryTalk
Directory126
Integration prerequisites126
Internet Explorer configuration checklist182
L
License points for the data transfer16
M
Manage individual points using the Edit Points page59
Manage points54
Manage security117
Manage security trusts123
Manage shortcuts72
Manage the uploaded files107
Manage time98
Manage users95
Module identity33
Module information31, 33
N
NAND155
Network settings34
O
Overview13
P
Preface12
R
Reboot the module116, 173
Recommendations related to managing points54
Refresh views52
Register the Historian ME module in the FactoryTalk Administration Console127
Register the module in the FactoryTalk Directory127
Related FactoryTalk product issues181
Remove point discovery rule files134
Remove tag attribute files139
Rename points60
Repair archives using safe mode112
Repair the time setting113
Reset passwords97
Reset the default admin password97
Reset the security mode114
Reset the trend51
Reset the Web Diagnostics password115
Restart the module116
Restore and reset module-related settings113
Restore the module from the backup file109
Restore the module's defaults114
Review results57
S
Security configuration34
Set start and end times53
Set the time zone101
Shut down the module115
SNMP community strings129
Start and stop the data collection78
Startup log168
Stop the data transfer90
System connectivity18
System status31
T
Tag naming conventions75
Time management issues180
Transfer data to FactoryTalk Historian SE or PI servers88
U
Understand privileges for user groups119
Upgrade or reinstall the firmware19
Upload files to the module105
Use scan classes75
Use Studio 5000 Logix Designer Module Profile140
Use the Rule Editor131
Use the system log111
User-defined trusts124
V
Verify the browser configuration using the F12 developer tools187
Verify the certificate188
Verify the certificate on the System Security page189
View and edit the current time99
View archive data47
View current data47
View data transfer statistics90
View groups97
View the backup status and perform backup108
View the data storage information78
View the data transfer information92
W
Web configuration server167
b

Rockwell Automation Support
Use these resources to access support information.
Technical Support Center Find help with how-to videos, FAQs, chat, user forums, and product notification updates. rok.auto/support
Knowledgebase Access Knowledgebase articles. rok.auto/knowledgebase
Local Technical Support Phone Numbers Locate the telephone number for your country. rok.auto/phonesupport
Literature Library Find installation instructions, manuals, brochures, and technical data publications. rok.auto/literature
Product Compatibility and Download Center
(PCDC)
Get help determining how products interact, check features and capabilities, and find
associated firmware.
rok.auto/pcdc
Documentation feedback
Your comments help us serve your documentation needs better. If you have any suggestions on how to improve our content, complete the form at rok.auto/docfeedback.
Waste Electrical and Electronic Equipment (WEEE)
At the end of life, this equipment should be collected separately from any unsorted municipal waste.
Rockwell Automation maintains current product environmental information on its website at rok.auto/pec.
Rockwell Otomasyon Ticaret A.Ş. Kar Plaza İş Merkezi E Blok Kat:6 34752 İçerenköy, İstanbul, Tel: +90 (216) 5698400 EEE Yönetmeliğine Uygundur
1756-UM106H-EN-E - June 2024
Supersedes Publication 1756-UM106G-EN-E - March 2023
Copyright © 2024, Rockwell Automation Technologies, Inc. All rights reserved. Printed in the U.S.A.
