
Tableau Server Enterprise
Deployment Guide
Last Updated 8/28/2024
© 2024 Salesforce, Inc.

Contents
Tableau Server Enterprise Deployment Guide 1
Who should read this 1
Version 2
Highlight features 2
Licensing 3
Part 1 - Understanding Enterprise Deployment 4
Industry standards and deployment requirements 4
Security measures 5
Web proxy tier 6
Load-balancers 6
Application tier 7
Data tier 7
Part 2 - Understanding the Tableau Server Deployment Reference Architecture 8
Tableau Server Processes 9
PostgresSQL Repository 10
Node 1: Initial node 10
Node 1 failover and automated restoration 11
Nodes 1 and 2:Application servers 11
Scaling application servers 12
Nodes 3 and 4:Data servers 13
Scaling data servers 13
Tableau Software i
Tableau Server Enterprise Deployment Guide

Part 3 - Preparing for Tableau Server Enterprise Deployment 15
Subnets 16
Firewall/Security group rules 16
Web tier 16
Application tier 16
Data tier 17
Bastion 17
Example: Configure subnets and security groups in AWS 18
AWS reference architecture 19
Slide 1:VPC subnet topology and EC2 instances 19
Slide 2:Protocol flow and connectivity 20
Slide 3:Availability zones 21
Slide 4: Security groups 22
AWS Availability Zones and high availability 22
VPC configuration 22
Configure VPC 23
Configure security groups 24
Specify inbound and outbound rules 25
Public security group rules 25
Private security group rules 25
Data security group rules 26
Bastion host security group rules 27
ii Tableau Software
Tableau Server Enterprise Deployment Guide

Enable auto-assign public IP 28
Load balancer 28
Configure host computers 29
Minimum recommended hardware 29
Directory structure 30
Example: Install and prep host computers in AWS 30
Host instance details 30
Tableau Server 30
Bastion host 31
Tableau Server Independent Gateway 31
PostgreSQL EC2 host 31
Verification: VPC connectivity 31
Example:Connect to bastion host in AWS 32
Part 4 - Installing and Configuring Tableau Server 33
Before you begin 33
Install, configure, and tar PostgreSQL 34
PostgreSQLversioning 34
Install PostgreSQL 35
Configure Postgres 36
Take PostgreSQL Step 1 tar backup 37
Before you install 39
Install initial node of Tableau Server 39
Tableau Software iii
Tableau Server Enterprise Deployment Guide

Run installation package and initialize TSM 39
Activate and register Tableau Server 40
Configure identity store 41
Configure external Postgres 42
Finish Node 1 installation 43
Verification: Node 1 configuration 43
Take Step 2 tar backups 44
Install Tableau Server on remaining nodes 48
Generate, copy, and use the bootstrap file to initialize TSM 50
Configure processes 51
Configure Node 2 52
Configure Node 3 53
Deploy coordination service ensemble to Nodes 1-3 54
Take Step 3 tar backups 55
Configure Node 4 59
Final process configuration and verification 59
Perform backup 60
Part 5 - Configuring Web Tier 62
Tableau Server Independent Gateway 63
Authentication and authorization 63
Pre-authentication with an AuthN module 64
Configuration overview 65
iv Tableau Software
Tableau Server Enterprise Deployment Guide

Example web tier configuration with Tableau Server Independent Gateway 65
Prepare Environment 66
Install Independent Gateway 67
Independent Gateway:direct vs relay connection 69
Configure relay connection 70
Configure direct connection 71
Verification: Base topology configuration 72
Configure AWS application load balancer 73
Step 1: Create target group 73
Step 2: Launch load balancer wizard 74
Wizard configuration 74
Single page configuration 75
Step 3: Enable stickiness 76
Step 4: Set idle timeout on load balancer 76
Step 5:Verify LBS connectivity 77
Update DNSwith public Tableau URL 77
Verify connectivity 77
Example authentication configuration:SAML with external IdP 77
Create Tableau administrator account 78
Configure Okta pre-auth application 78
Create and assign Okta user 80
Install Mellon for pre-auth 80
Tableau Software v
Tableau Server Enterprise Deployment Guide

Configure Mellon as pre-auth module 81
Create Tableau Server application in Okta 83
Set authentication module configuration on Tableau Server 84
Enable SAML on Tableau Server for IdP 84
Restart tsig-httpd service 87
Validate SAML functionality 87
Configure authentication module on second instance of Independent Gateway 87
Part 6 - Post-Installation Configuration 90
Configure SSL/TLS from load balancer to Tableau Server 90
Before you configure TLS 91
Configure Independent Gateway computers for TLS 92
Step 1: Distribute certificates and keys to Independent Gateway computer 92
Step 2: Update the environmental variables for TLS 93
Step 3: Update the stub configuration file for HK protocol 93
Step 4:Copy stub file and restart the service 94
Configure Tableau Server Node 1 for TLS 94
Step 1: Copy certificates and keys and stop TSM 94
Step 2: Set certificate assets and enable Independent Gateway configuration 95
Step 3: Enable "external SSL" for Tableau Server and apply changes 96
Step 4: Update the gateway configuration JSON file and start tsm 96
Update IdP authentication module URLs to HTTPS 97
Configure AWSload balancer for HTTPS 97
vi Tableau Software
Tableau Server Enterprise Deployment Guide

Validate TLS 99
Configure second instance of Independent Gateway for SSL 99
Configure SSLfor Postgres 101
Optional: Enable certificate trust validation on Tableau Server for Postgres SSL 103
Install Postgres client on Node1 104
Copy root certificate to Node 1 105
Connect to Postgres host over SSL from Node 1 105
Configure SMTP and event notifications 105
Install PostgreSQL driver 107
Configure strong password policy 108
Part 7 - Validation, Tools, and Troubleshooting 110
Failover system validation 110
Initial node automated recovery 111
Troubleshooting initial node recovery 113
Rebuilding the failed node 113
switchto 113
Troubleshooting Tableau Server Independent Gateway 116
Restart tableau-tsig service 116
Find incorrect strings 117
Search relevant logs 117
Independent Gateway log files 117
Tableau Server tabadminagent log file 118
Tableau Software vii
Tableau Server Enterprise Deployment Guide

Reload httpd stub file 118
Delete or move log files 119
Browser errors 119
Verify TLSconnection from Tableau Server to Independent Gateway 120
Appendix - AWSDeployment Toolbox 122
TabDeploy4EDG automated installation script 122
Example: Automate AWS infrastructure deployment with Terraform 124
Goal 125
End state 125
Requirements 127
Before you begin 127
Step 1 - Prepare environment 127
A. Download and install Terraform 127
B. Generate private-public key pair 127
C. Download project and add state directory 128
Step 2: Customize the Terraform templates 128
versions.tf 129
key-pair.tf 129
locals.tf 129
providers.tf 130
elb.tf 130
variables.tf 131
viii Tableau Software
Tableau Server Enterprise Deployment Guide

modules/tableau_instance/ec2.tf 131
Step 3 - Run Terraform 132
A. Initialize Terraform 132
B. Plan Terraform 132
C. Apply Terraform 133
Optional: Destroy Terraform 133
Step 4 - Connect to bastion 133
Step 5 -Install PostgreSQL 134
Step 6 - (Optional) Run DeployTab4EDG 135
Appendix - Web Tier with Apache Example Deployment 136
Install Apache 137
Configure proxy to test connectivity to Tableau Server 138
Verification: Base topology configuration 139
Configure load balancing on proxy 139
Copy configuration to second proxy server 140
Configure AWS application load balancer 140
Step 1: Create target group 141
Step 2: Launch load balancer wizard 141
Wizard configuration 142
Single page configuration 143
Step 3: Enable stickiness 144
Step 4: Set idle timeout on load balancer 144
Tableau Software ix
Tableau Server Enterprise Deployment Guide

Step 5:Verify LBS connectivity 144
Update DNSwith public Tableau URL 145
Verify connectivity 145
Example authentication configuration:SAML with external IdP 145
Create Tableau administrator account 145
Configure Okta pre-auth application 146
Create and assign Okta user 148
Install Mellon for pre-auth 148
Configure Mellon as pre-auth module 148
Create Tableau Server application in Okta 151
Enable SAML on Tableau Server for IdP 152
Validate SAML functionality 154
Validation troubleshooting 155
Configure SSL/TLS from load balancer to Tableau Server 156
Example:Configure SSL/TLS in AWSreference architecture 156
Step 1: Gather certificates and related keys 156
Step 2: Configure proxy server for SSL 158
Step 3: Configure Tableau Server for external SSL 160
Step 4:Optional authentication configuration 161
Step 5:Configure AWSload balancer for HTTPS 161
Step 6:Verify SSL 162
x Tableau Software
Tableau Server Enterprise Deployment Guide
Tableau Server Enterprise Deploy-
ment Guide
The Tableau Server Enterprise Deployment Guide (EDG) has been developed to provide pre-
scriptive guidance for deploying Tableau Server (on-premises or in the cloud). The Guide
provides deployment guidance for enterprise scenarios in context of a reference architecture.
We have tested the reference architecture to verify compliance with security, scale, and per-
formance benchmarks, which conform to industry-standard best practices.
At a high-level, the core features of an industry standard enterprise deployment consist of a
tiered topology where each layer of server application functionality (web gateway tier, applic-
ation tier, and data tier) is bound and protected by access-controlled subnets. Users accessing
the server application from the internet are authenticated at the web tier. Once authenticated,
the request is proxied to a protected subnet where the application tier handles the business
logic. High-value data is protected by the third subnet: the data tier. Services in the application
tier communicate over the protected network to the data tier to service data requests to the
backend data sources.
In this deployment, security is at the forefront of all design decisions and implementation.
However, reliability, performance, and scalability are also priority requirements. Given the dis-
tributed and modular design of the reference architecture, reliability and performance scale in
a linearly predictable way by strategically co-locating compatible services at each node and
adding services at chokepoints.
Who should read this
The EDG has been developed for enterprise ITadministrators who may require:
l
An IT-managed Tableau deployment
l
Industry compliance enforcement
Tableau Software 1
Tableau Server Enterprise Deployment Guide
l
Industry deployment best practices
l
Secure deployment by default
The EDG is an implementation guide for deploying the enterprise reference architecture.
While this version of the EDG includes an example AWS/Linux implementation, the Guide
can be used as a resource by experienced enterprise IT administrators to deploy the pre-
scribed reference architecture into any industry standard data center environment.
Version
This version of EDG was developed for the 2021.2.3 version (or later) of Tableau Server.
While you may use the EDGas a general reference for deploying older versions of Tableau
Server, we recommend that you deploy the reference architecture with Tableau Server
2021.2.3 or later. Some features and options are not available on older versions of Tableau
Server.
For the most up-to-date features and improvements, we recommend deploying EDG with
Tableau Server 2022.1.7 and later.
The reference architecture described in this Guide supports the following Tableau
clients:Web authoring with compatible browsers, Tableau Mobile, and Tableau Desktop ver-
sion 2021.2.1 or later. Other Tableau clients (Tableau Prep, Bridge, etc) have not yet been
validated with the reference architecture.
Highlight features
The first version of the Tableau Server reference architecture introduces the following scen-
arios and features:
l
Client pre-authentication: Tableau clients (Desktop, Mobile, Web
Authoring)authenticate with the corporate authentication provider in the web tier
before accessing internal Tableau Server. This process is managed by configuring an
authN plug-in on the Tableau Server Independent Gateway acting as reverse proxy
server. See Part 5 - Configuring Web Tier.
2 Tableau Software
Tableau Server Enterprise Deployment Guide
l
Zero trust deployment: Because all traffic to Tableau Servers is pre-authenticated, the
entire Tableau deployment operates in a private subnet that does not require a trusted
connection.
l
External repository: The reference architecture specifies installing the Tableau repos-
itory onto an external PostgreSQLdatabase, allowing DBAs to manage, optimize, scale,
and back up the repository as a generic database.
l
Initial node recovery:The EDG introduces a script that automates initial node res-
toration in the event of a failure.
l
Tar-based backup and restore:Use familiar tar backups at strategic milestones of the
Tableau deployment. In the event of a failure or deployment misconfiguration, you can
quickly recover to the previous deployment stage by recovering the associated tar
backup.
l
Performance improvement:Customer and lab validation show a 15-20% performance
improvement when running EDG compared to standard deployment.
Licensing
The Tableau Sever reference architecture prescribed in this Guide requires a Tableau
Advanced Management license to enable Tableau Server External Repository. You may also
optionally deploy Tableau Server External File Store, which also requires the Tableau
Advanced Management license. See About Tableau Advanced Management on Tableau
Server (Linux).
Tableau Software 3
Tableau Server Enterprise Deployment Guide

Part 1 - Understanding Enterprise
Deployment
Part 1 describes, in more detail, the features and requirements of industry-standard enter-
prise deployment for which the Tableau Server Enterprise Deployment Guide has been
designed.
The following network diagram shows a generic datacenter tiered deployment with Tableau
Server reference architecture.
Industry standards and deployment require-
ments
The following are features of industry standard deployments. These are the requirements that
the reference architecture has been designed for:
l
A multi-tiered network design: The network is bound by protected subnets to limit
access at each layer: web layer, application layer, and data layer. No single com-
munication is able to pass across subnets, as all communication is terminated at the
next subnet.
4 Tableau Software
Tableau Server Enterprise Deployment Guide
l
Ports and protocols blocked by default: Each subnet or security group will block all
inbound and outbound ports and protocols by default. Communication is enabled, in
part, by opening exceptions in the port or protocol configuration.
l
Off-box web authentication: User requests from the internet are authenticated by an
authentication module on the reverse proxy in the web tier. Therefore, all requests to the
application layer are authenticated at the web tier before passing into the protected
application layer.
l
Platform-independent: Solution can be deployed with on-premises server applications
or in the cloud.
l
Technology-agnostic: Solution can be deployed in a virtual machine environment or in
containers. May also be deployed on Windows or Linux. However, this initial version of
the reference architecture and supporting documentation has been developed for Linux
running in AWS.
l
Highly available: All components in the system are deployed as a cluster and designed
to operate in an active/active or active/passive deployment.
l
Siloed roles: Each server performs a discrete role. This design partitions all servers
such that access may be minimized to service-specific administrators. For example,
DBAs manage PostgreSQL for Tableau, identity administrators manage authentication
module in web tier, network and cloud administrators enable traffic and connectivity.
l
Linearly scalable: as discrete roles, you can scale each tier service independently
according to load profile.
l
Client support:The reference architecture supports all Tableau clients:Tableau
Desktop (versions 2021.2 or later), Tableau Mobile, and Tableau Web Authoring.
Security measures
As stated, a primary feature of industry standard datacenter design is security.
l
Access: Each tier is bound by a subnet that enforces access control at the network layer
using port filtering. Communication access between subnets may also be enforced by
the application layer with authenticated services between processes.
l
Integration: Architecture is designed to plug-in with Identity Provider (IdP) on reverse
proxy in the web tier .
l
Privacy: Traffic into the web tier is encrypted from the client with SSL. Traffic into the
internal subnets may optionally be encrypted as well.
Tableau Software 5
Tableau Server Enterprise Deployment Guide

Web proxy tier
The web tier is a subnet in the DMZ (also referred to as the perimeter zone) that acts as a
security buffer between the internet and the internal subnets where applications are
deployed. The web tier hosts reverse proxy servers that do not store any sensitive inform-
ation. The reverse proxy servers are configured with an AuthN plugin to pre-authenticate cli-
ent sessions with a trusted IdP, before redirecting the client request to Tableau Server. For
more information, see Pre-authentication with an AuthN module.
Load-balancers
The deployment design includes an enterprise load-balancing solution in front of the reverse
proxy servers.
Load balancers provide important security and performance enhancements, by
l
Virtualizing the front-end URL for the application tier services
l
Enforcing SSL encryption
l
Offloading SSL
l
Enforcing compression between the client and the web tier services
l
Protecting against DOS attacks
l
Providing high-availability
Note:Tableau Server version 2022.1 includes the Tableau Server Independent Gate-
way. The Independent Gateway is a standalone instance of the Tableau Gateway pro-
cess that serves as a Tableau-aware reverse proxy. At the time of release, the
Independent Gateway has been validated, but not fully tested in the EDG reference archi-
tecture. After full testing is complete the EDG will be updated with Tableau Server
Independent Gateway prescriptive guidance.
6 Tableau Software
Tableau Server Enterprise Deployment Guide
Application tier
The application tier is in a subnet that runs the core business logic of the server application.
The application tier consists of services and processes that are configured across distributed
nodes in a cluster. The application tier is only accessible from the web tier and is not directly
accessible by users.
Performance and reliability are improved by configuring the application processes such that
processes with different resource-use profiles (i.e., CPU intensive vs memory intensive) are
co-located.
Data tier
The data tier is a subnet that holds valuable data. All traffic to this tier originates from the applic-
ation tier and is therefore already authenticated. In addition to access requirements at the net-
work layer with port configuration, this layer should include authenticated access and
optionally encrypted traffic with the application tier.
Tableau Software 7
Tableau Server Enterprise Deployment Guide

Part 2 - Understanding the Tableau
Server Deployment Reference
Architecture
The following image shows the relevant Tableau Server processes and how they are
deployed in the reference architecture. This deployment is considered the minimal enterprise-
appropriate Tableau Server deployment.
The process diagrams in this topic are intended to show the major, defining processes of
each node. There are many supporting processes that also run on the nodes that are not
shown in the diagrams. For a list of all processes, see the configuration section of this guide,
Part 4 - Installing and Configuring Tableau Server.
8 Tableau Software
Tableau Server Enterprise Deployment Guide
Tableau Server Processes
The Tableau Server reference architecture is a four node Tableau Server cluster deployment
with external repository on PostgreSQL:
l
Tableau Server initial node (Node 1): Runs required TSM administrative and licensing
services that can only be run on a single node in the cluster. In the enterprise context,
the Tableau Server initial node is the primary node in the cluster. This node also runs
redundant application services with Node 2.
l
Tableau Server application nodes (Node 1 and Node 2):The two nodes serve client
requests, connect to and query data sources and to the data nodes.
l
Tableau Server data nodes (Node 3 and Node 4): Two nodes that are dedicated to man-
aging data.
l
External PostgreSQL:this host runs the Tableau Server Repository process. For
HAdeployment you must run an additional PostgreSQLhost for active/passive redund-
ancy.
You can also run PostgreSQL on Amazon RDS. For more information about the dif-
ferences between running the repository on RDS vs an EC2 instance, see Tableau
Server External Repository (Linux).
Deploying Tableau Server with an external repository requires a Tableau Advanced
Management license.
If your organization does not have in-house DBA expertise, you may optionally run the
Tableau Server Repository process in the default, internal PostgreSQL configuration. In
the default scenario, the Repository is run on a Tableau node with embedded Post-
greSQL. In this case, we recommend running the Repository on a dedicated Tableau
node, and a passive Repository on an additional dedicated node to support Repository
failover. See Repository Failover (Linux).
By way of example, the AWS implementation described in this Guide explains how to
deploy the external repository on PostgreSQLrunning on an EC2 instance.
Tableau Software 9
Tableau Server Enterprise Deployment Guide

l
Optional:If your organization uses external storage, you may deploy the Tableau File
Store as an external service. This Guide does not include the External File Store in the
core deployment scenario. See Install Tableau Server with External File Store (Linux).
Deploying Tableau Server with an external File Store requires a Tableau Advanced
Management license.
PostgresSQL Repository
Tableau Server Repository is a PostgresSQL database that stores server data. This data
includes information about Tableau Server users, groups and group assignments, per-
missions, projects, data sources, and extract metadata and refresh information.
The default PostgresSQL deployment consumes almost 50% of system memory resources.
Based on its usage (for production and large production deployments) resource usage can go
up. For this reason, we recommend running the Repository process on a computer that is not
running any other resource-intensive server components like VizQL, Backgrounder, or Data
Engine. Running the Repository process along with any of these components will create IO
contentions, resource constraint, and will degrade overall performance of the deployment.
Node 1: Initial node
The initial node runs a small number of important processes and shares the application load
with Node 2.
The first computer you install Tableau on, the "initial node," has some unique characteristics.
Three processes run only on the initial node and cannot be moved to any other node except in
a failure situation, the License Service (License Manager), Activation Service, and TSM Con-
troller (Administration Controller).
10 Tableau Software
Tableau Server Enterprise Deployment Guide

Node 1 failover and automated restoration
The License, Activation, and TSM Controller services are critical to the health of a Tableau
Server deployment. In the event of a Node 1 failure, users will still be able to connect to the
Tableau Server deployment, as a properly configured reference architecture will route
requests to Node 2. However without these core services, the deployment will be in a critical
state of pending failure. See Initial node automated recovery.
Nodes 1 and 2:Application servers
Nodes 1 and 2 run the Tableau Server processes that serve client requests, query data
sources, generate visualizations, handle content and administration, and other core Tableau
business logic. The application servers do not store user data.
Tableau Software 11
Tableau Server Enterprise Deployment Guide

Note:"Application Server" is a term that also refers to a Tableau Sever process that is lis-
ted in TSM. The underlying process for "Application Server" is VizPortal.
Run in parallel, Node 1 and Node 2 scale to service requests from the load-balancing logic
run on the reverse proxy servers. As redundant nodes, should one of these nodes fail, then cli-
ent requests and servicing are handled by the remaining node.
The reference architecture has been designed so that complimentary application processes
run on the same computer. This means the processes are not competing for computing
resources and creating contention.
For example, VizQL, a core processing service on application servers, is highly CPU and
memory-bound, VizQLuses almost 60-70% of the CPU and memory on the computer. For
this reason, the reference architecture is designed so that no other memory or CPU-bound
processes are on the same node as VizQL. Testing shows that the amount of the load or num-
ber users doesn’t affect the memory or CPU usage on VizQL nodes. For example, reducing
the number of concurrent users in our load test only effects the performance of the dashboard
or the visualization loading process, but does not reduce resource utilization. Therefore,
based on the available memory and CPU during peak usage, you may consider adding more
VizQL processes. As a starting place for typical workbooks, allocate 4 cores per VizQL pro-
cess.
Scaling application servers
The reference architecture is designed for scale based on a use-based model. As a general
starting point, we recommend a minimum of two application servers, each supporting up to
1000 users. As user base increases, plan to add an application server for each additional
1000 users. Monitor usage and performance to tune the user base per host for your organ-
ization.
12 Tableau Software
Tableau Server Enterprise Deployment Guide

Nodes 3 and 4:Data servers
The File Store, Data Engine (Hyper), and Backgrounder processes are co-located on Nodes 3
and 4 for the following reasons:
l
Extract optimization: Running Backgrounder, Hyper, and File Store on the same node
optimizes performance and reliability. During the extraction process, Backgrounder
queries the target database, creates the Hyper file on the same node, and then uploads
to File Store. By co-locating these processes on the same node the extraction creation
workflow does not require copying amounts of data across the network or the nodes.
l
Complimentary resource balancing:Backgrounder is mainly CPU intensive. Data
Engine is a memory-intensive process. Coupling these processes allows maximum
resource utilization on each node.
l
Consolidation of data processes: Since each of these processes are back-end data pro-
cesses, it makes sense to run them in the most secure data tier. In future versions of the
reference architecture, the application and data servers will run in separate tiers.
However, due to application dependencies in the Tableau architecture, application and
data servers must run in the same tier at this time.
Scaling data servers
As with application servers, planning the resources that are required for Tableau data servers
requires use-based modeling. In general, assume each data server can support up to 2000
extract refresh jobs per day. As your extract jobs increase, add additional data servers without
the File Store service. Generally, the two-node data server deployment is suitable for deploy-
ments that use the local filesystem for the File Store service. Note that adding more application
Tableau Software 13
Tableau Server Enterprise Deployment Guide
servers does not impact performance or scale on data servers in a linear fashion. In fact, with
the exception of some overhead from additional user queries, the impact of adding more
application hosts and users is minimal.
14 Tableau Software
Tableau Server Enterprise Deployment Guide

Part 3 - Preparing for Tableau
Server Enterprise Deployment
Part 3 describes the requirements for preparing your infrastructure to deploy the Tableau
Server reference architecture. Before you begin, we recommend reviewing, Part 2 - Under-
standing the Tableau Server Deployment Reference Architecture.
In addition to requirement descriptions, this topic provides an implementation example of the
reference architecture in an AWS environment. The remainder of this Guide builds on the
AWS reference architecture example started in this topic.
A core principle of the reference architecture is standardization with data center security best
practices. Specifically, the architecture is designed to segregate services into protected net-
work subnets. Inter-subnet communication is restricted to specific protocol and port traffic.
The following diagram illustrates the reference architecture subnet design for an on-premises
deployment or a customer-managed cloud deployment. For an example cloud deployment,
see the section below, Example: Configure subnets and security groups in AWS.
Tableau Software 15
Tableau Server Enterprise Deployment Guide

Subnets
Create three subnets:
l
A web tier
l
An application tier
l
A data subnet.
Firewall/Security group rules
The tabs below describe the firewall rules for each tier of the datacenter. For AWS-specific
security group rules, see the section later in this topic.
Web tier
The web tier is a public DMZ subnet that will handle inbound HTTPS requests and proxy the
requests to the application tier. This design provides a layer of defense from malware that
may be targeted at your organization. The web tier blocks access to the application/data tier.
Traffic Type Protocol Port range Source
Inbound
SSH TCP 22 Bastion subnet (for cloud
deployments)
Inbound HTTP TCP 80 Internet (0.0.0.0/0)
Inbound HTTPS TCP 443 Internet (0.0.0.0/0)
Outbound All traffic All All
Application tier
The application subnet is where the Tableau Server deployment resides. The application sub-
net includes the Tableau application servers (Node 1 and Node 2). The Tableau application
16 Tableau Software
Tableau Server Enterprise Deployment Guide

servers process user requests to the data servers and run core business logic.
The application subnet also includes the Tableau data servers (Node 3 and Node 4).
All client traffic to the application tier is authenticated at the web tier. Administrative access to
the application subnet is authenticated and routed through the bastion host.
Traffic Type Protocol Port range Source
Inbound
SSH TCP 22 Bastion subnet (for cloud
deployments)
Inbound HTTPS TCP 443 Web tier subnet
Outbound All traffic All All
Data tier
The data subnet is where the external PostgreSQLdatabase server resides.
Traffic Type Protocol Port range Source
Inbound
SSH TCP 22 Bastion subnet (for cloud
deployments)
Inbound PostgreSQL TCP 5432 Application tier subnet
Outbound All traffic All All
Bastion
Most enterprise security teams do not allow direct communication from the on-premises admin-
istrative system to the nodes deployed in the cloud. Instead, all administrative SSHtraffic to
the cloud nodes is proxied through a bastion host (also referred to as a "jump server"). For
cloud deployments, we recommend bastion host proxy connection to all resources in the
Tableau Software 17
Tableau Server Enterprise Deployment Guide

reference architecture. This is an optional configuration for on-premises environments.
The bastion host authenticates administrative access and only allows traffic over SSH pro-
tocol.
Traffic Type Protocol Port range Source Destination
Inbound
SSH TCP 22 Admin com-
puter
IPaddress
Outbound SSH TCP 22 Web tier subnet
Outbound SSH TCP 22 Application tier
subnet
Example: Configure subnets and security
groups in AWS
This section provides step-by-step procedures to create and configure the VPC and network
environment for the Tableau Server reference architecture deployment in AWS.
The slides below show the reference architecture in four layers. As you progress through the
slides, component elements are layered onto the topology map:
1. VPCsubnet topology and EC2 instances:one bastion host, two reverse proxy servers,
four Tableau servers, and at least one PostgreSQLserver.
2. Protocol flow and internet connectivity. All inbound traffic is managed through the AWS
internet gateway. Traffic to the internet is routed through the NAT.
3. Availability zones. The proxy, Tableau Server, and PostgreSQLhosts are evenly
deployed across two Availability Zones.
4. Security groups. Four security groups (Public, Private, Data, and Bastion) protect each
tier at the protocol level.
18 Tableau Software
Tableau Server Enterprise Deployment Guide

AWS reference architecture
Slide 1:VPC subnet topology and EC2 instances
Tableau Software 19
Tableau Server Enterprise Deployment Guide

Slide 2:Protocol flow and connectivity
20 Tableau Software
Tableau Server Enterprise Deployment Guide

Slide 3:Availability zones
Tableau Software 21
Tableau Server Enterprise Deployment Guide

Slide 4: Security groups
AWS Availability Zones and high availability
The reference architecture as presented in this Guide specifies a deployment that provides
availability through redundancy when any single host fails. However, in the AWS case where
the reference architecture is deployed across two Availability Zones, availability is com-
promised in the very rare case where an Availability Zone fails.
VPC configuration
This section describes how to:
l
Install and configure the VPC
l
Configure internet connectivity
22 Tableau Software
Tableau Server Enterprise Deployment Guide

l
Configure subnets
l
Create and configure security groups
Configure VPC
The procedure in this section maps to the UI in the "classic" VPCExperience. You can toggle
the UI to display the classic view by turning off the New VPCExperience in the upper-left
corner of the AWSVPCDashboard.
Run VPC wizard to create default Private and Public subnets and default routing and network
ACL.
1. Before you configure a VPC, you must create an Elastic IP. Create an allocation using
all defaults.
2. Run VPC wizard > "VPC with Public and Private Subnets"
3. Accept most defaults. Except for the following:
l
Enter a VPC name.
l
Specify the Elastic IP Allocation ID.
l
Specify the following CIDR masks:
l
Public subnet's IPv4 CIDR: 10.0.1.0/24, rename this subnet to Public-a.
l
Private subnet's IPv4 CIDR: 10.0.30.0/24, rename this subnet to Priv-
ate-a.
l
Availability Zone: for both subnets, select the a option for the region that you are
in.
Note: For the purposes of this example, we use a and b to distinguish
between Availability Zones in a given AWSdatacenter. In AWS, Availability
Zone names may not match the examples shown here. For example, some
Availability Zones include c and d zones within a datacenter.
4. Click Create VPC.
5. After VPCis created, create Public-b, Private-b, Data, and Bastion subnets.
To create a subnet, click Subnets > Create subnet.
Tableau Software 23
Tableau Server Enterprise Deployment Guide
l
Public-b:For Availability Zone, select the b option for the region that you are
in. CIDR block: 10.0.2.0/24
l
Private-b: For Availability Zone, select the b option for the region that you are
in. CIDR block: 10.0.31.0/24
l
Data: For Availability Zone, select the a zone for the region that you are in.
CIDR block: 10.0.50.0/24. Optional: If you plan to replicate the external data-
base across a PostgreSQL cluster, then create a Data-b subnet in Availability
Zone b with a CIDRblock of 10.0.51.0/24.
l
Bastion: For Availability Zone, select either zone. CIDR block: 10.0.0.0/24
6. After the subnets are created, edit the route tables on the Public and the Bastion sub-
nets to use the route table that is configured for the associated internet gateway (IGW).
And edit the Private and Data subnets to use the route table that is configured for the
network address translator (NAT).
l
To determine which route table is configured with the IGW or the NAT, click
Route Tables in AWS dashboard. Select one of the two route table links to open
the property page. Look at the Target value at Routes > Destination> 0.0.0.0/0.
The Target value differentiates the type of route and will either start with the
igw- or nat- string.
l
To update route tables, VPC >Subnets > [subnet_name] > Route table > Edit
route table association.
Configure security groups
The VPCwizard creates a single security group that you will not use. Create the following
security groups (Security Groups >Create security group). The EC2 hosts will be installed
into these groups across two Availability Zones as shown in the slide-diagram above.
l
Create a new security group:Private. This is where all 4 nodes of Tableau Server will
be installed. Later in the installation process, the Private security group will be asso-
ciated with the 10.0.30.0/24 and 10.0.31.0/24 subnets.
l
Create a new security group: Public. This is where proxy servers will be installed. Later
in the installation process, the Public security group will be associated with the
10.0.1.0/24 and 10.0.2.0/24 subnets.
l
Create a new security group: Data. This is where the PostgreSQLexternal Tableau
repository will be installed. Later in the installation process, the Data security group will
be associated with the 10.0.50.0/24 (and optionally, 10.0.51.0/24) subnet.
24 Tableau Software
Tableau Server Enterprise Deployment Guide

l
Create a new security group: Bastion. This is where you'll install the bastion host. Later
in the installation process, the Bastion security group will be associated with the
10.0.0.0/24 subnet.
Specify inbound and outbound rules
In AWS, security groups are analogous to firewalls in an on-prem environment. You must spe-
cify the traffic type, (eg, https, https, etc), protocol (TCP or UDP), and ports or port range (eg
80, 443, etc) that are allowed to pass in and/or out of the security group. For each protocol you
must also specify the destination or source traffic.
Public security group rules
Inbound rules
Type Protocol Port range Source
HTTP TCP 80 0.0.0.0/0
HTTPS TCP 443 0.0.0.0/0
SSH TCP 22 Bastion security group
Outbound rules
Type Protocol Port range Destination
All traffic All All 0.0.0.0/0
Private security group rules
The Private security group includes an inbound rule to allow HTTP traffic from the Public secur-
ity group. Allow HTTPtraffic only during the deployment process to verify connectivity. We
recommend removing the HTTP inbound rule after you have finished deploying the reverse
proxy and configuring SSL to Tableau.
Tableau Software 25
Tableau Server Enterprise Deployment Guide

Inbound rules
Type Protocol Port range Source
HTTP TCP 80 Public security group
HTTPS TCP 443 Public security group
PostgreSQL TCP 5432 Data security group
SSH TCP 22 Bastion security group
All traffic All All Private security group
Outbound rule
Type Protocol Port range Destination
All traffic All All 0.0.0.0/0
PostgreSQL TCP 5432 Data security group
SSH TCP 22 Bastion security group
Data security group rules
Inbound rules
Type Protocol Port range Source
PostgreSQL TCP 5432 Private security group
SSH TCP 22 Bastion security group
Outbound rules
Type Protocol Port range Destination
26 Tableau Software
Tableau Server Enterprise Deployment Guide

All traffic All All 0.0.0.0/0
PostgreSQL TCP 5432 Private security group
SSH TCP 22 Bastion security group
Bastion host security group rules
Inbound rules
Type Protocol Port range Source
SSH TCP 22 The IP address and net mask of
the computer that you will use to
log into AWS (admin computer).
SSH TCP 22 Private security group
SSH TCP 22 Public security group
Outbound rules
Type Protocol Port range Destination
SSH TCP 22 The IP address and net mask of
the computer that you will use to
log into AWS (admin computer).
SSH TCP 22 Private security group
SSH TCP 22 Public security group
SSH TCP 22 Data security group
HTTPS TCP 443 0.0.0.0/0 (Optional:create this rule
if you need to access the internet to
download supporting software on
the bastion host)
Tableau Software 27
Tableau Server Enterprise Deployment Guide

Enable auto-assign public IP
This provides you with an IPaddress for connecting to the proxy servers and bastion host.
For Public and Bastion subnets:
1. Select the subnet
2. Under Actions menu, select "Modify auto-assign IPsettings."
3. Click "Enable auto-assign public IPv4 addresses."
4. Click Save.
Load balancer
Note: If you are installing into AWS and following the example deployment in this guide,
then you should install and configure the AWSload balancer later in the deployment pro-
cess, as described in Part 5 - Configuring Web Tier.
For on-premises deployments, work with your network administrators to deploy load bal-
ancers to support the web tier of the reference architecture:
l
A web-facing application load balancer that accepts HTTPS requests from Tableau cli-
ents and communicates with the reverse proxy servers.
l
Reverse proxy:
l
We recommend a minimum of two proxy servers for redundancy and to handle
client load.
l
Receives HTTPS traffic from load balancer.
l
Supports sticky session to Tableau host.
l
Configure proxy for round robin load balancing to each Tableau Server running
the Gateway process.
l
Handles authentication requests from external IdP.
l
Forward proxy: Tableau Server requires access to the internet for licensing and map
functionality. Depending on your forward proxy environment, you may need to con-
figure forward proxy safelists for Tableau service URLs. See Communicating with the
Internet (Linux).
28 Tableau Software
Tableau Server Enterprise Deployment Guide
Configure host computers
Minimum recommended hardware
The following recommendations are based on our testing of real-world data in the reference
architecture.
Application servers:
l
CPU:8 physical cores (16vCPUs),
l
RAM:128 GB (16 GB/physical Core)
l
Disk space: 100 GB
Data servers
l
CPU:8 physical cores (16vCPUs),
l
RAM:128 GB (16 GB/physical Core)
l
Disk space: 1 TB. If your deployment will make use of external storage for the Tableau
File Store, you will need calculate the appropriate disk space. See Install Tableau
Server with External File Store (Linux).
Proxy servers
l
CPU:2 physical cores (4vCPUs),
l
RAM:8 GB (4 GB/physical Core)
l
Disk space: 100 GB
External repository database
l
CPU:8 physical cores (16vCPUs),
l
RAM:128 GB (16 GB/physical Core)
l
Disk space requirement is dependent on your data load and how that will impact
backup.See the section, Backup and restore processes, in the topic, Disk Space
Requirements (Linux).
Tableau Software 29
Tableau Server Enterprise Deployment Guide
Directory structure
The reference architecture recommends installing the Tableau Server package and the data
into non-default locations:
l
Installpackage to: /app/tableau_server: Create this directory path before you
install the Tableau Server package, and then specify this path during installation.
l
Install Tableau data to: /data/tableau_data. Do not create this directory before
you install Tableau Server. Instead, you must specify the path during installation, and
then Tableau Setup will create and permission the path appropriately.
See Run installation package and initialize TSM for implementation details.
Example: Install and prep host computers in
AWS
This section explains how to install EC2 hosts for each server type in the Tableau Server ref-
erence architecture.
The reference architecture requires eight hosts:
l
Four instances for Tableau Server.
l
Two instances for proxy servers (Apache).
l
One instance for bastion host.
l
One or two EC2 PostgreSQL database instances
Host instance details
Install host computers according to the details below.
Tableau Server
l
Amazon Linux 2
l
Instance Type:m5a.8xlarge
l
Security group ID: Private
30 Tableau Software
Tableau Server Enterprise Deployment Guide
l
Storage:EBS, 150 GiB, gp2 volume type. If your deployment will make use of external
storage for the Tableau File Store, you will need calculate the appropriate disk space.
See Install Tableau Server with External File Store (Linux).
l
Network: install two EC2 hosts in each private subnet (10.0.30.0/24 and 10.0.31.0/24).
l
Copy the latest maintenance release of Tableau Server 2021.2 (or later)rpm package
from Tableau Downloads page to each Tableau host.
Bastion host
l
Amazon Linux 2
l
Instance Type: t3.micro
l
Security group ID: Bastion
l
Storage:EBS, 50 GiB, gp2 volume type
l
Network: Bastion subnet 10.0.0.0/24
Tableau Server Independent Gateway
l
Amazon Linux 2
l
Instance Type: t3.xlarge
l
Security group ID: Public
l
Storage:EBS, 100 GiB, gp2 volume type
l
Network: Install one EC2 instance in each public subnet (10.0.1.0/24 and 10.0.2.0/24)
PostgreSQL EC2 host
l
Amazon Linux 2
l
Instance Type:r5.4xlarge
l
Security group ID: Data
l
Storage: Disk space requirement is dependent on your data load and how that will
impact backup.See the section, Backup and restore processes, in the topic, Disk Space
Requirements (Linux).
l
Network: Data subnet 10.0.50.0/24. (If you are replicating PostgreSQL in a HA cluster,
then install the second host in the 10.0.51.0/24 subnet)
Verification: VPC connectivity
After you have installed the host computers, verify network configuration. Verify connectivity
between the hosts by connecting with SSHfrom the host in the Bastion security group to the
Tableau Software 31
Tableau Server Enterprise Deployment Guide
hosts in each subnet.
Example:Connect to bastion host in AWS
1.
Set up your admin computer for ssh-agent. This allows you to connect to hosts in AWS
without placing your private key file on any EC2 instances.
To configure ssh-agent on a Mac, run the following command:
ssh-add -K myPrivateKey.pem or for latest Mac OS, ssh-add --apple-use-
keychain myPrivateKey.pem
For Windows, see the topic, Securely Connect to Linux Instances Running in a Private
Amazon VPC.
2.
Connect to the bastion host by running the following command:
ssh -A ec2-user@<public-IP>
3.
You can then connect to other hosts in the VPC from the bastion host, using the private
IP address, for example:
ssh -A [email protected]
32 Tableau Software
Tableau Server Enterprise Deployment Guide

Part 4 - Installing and Configuring
Tableau Server
This topic describes how to finish installing and configuring the baseline Tableau Server
deployment. The procedure here continues with the AWS and Linux reference architecture
example.
The Linux examples throughout the installation procedures show commands for RHEL-like dis-
tributions. Specifically the commands here have been developed with the Amazon Linux 2 dis-
tribution. If you are running the Ubuntu distribution, edit the commands accordingly.
Before you begin
You must prep and validate your environment as described in Part 3 - Preparing for Tableau
Server Enterprise Deployment.
Tableau Software 33
Tableau Server Enterprise Deployment Guide

Install, configure, and tar PostgreSQL
This PostgreSQL instance hosts the external repository for the Tableau Server deployment.
You must install and configure PostgreSQL before you install Tableau.
You can run PostgreSQL on Amazon RDS or on an EC2 instance. For more information
about the differences between running the repository on RDS vs an EC2 instance, see
Tableau Server External Repository (Linux).
By way of example, the procedure below shows how to install and configure Postgres on an
Amazon EC2 instance. The example shown here is a generic installation and configuration for
PostgreSQLin the reference architecture. Your DBA should optimize your
PostgreSQLdeployment based on the size of your data and performance needs.
Requirements:Note that you must be running PostgreSQL 1.6 and you must install the uuid-
ossp module.
PostgreSQLversioning
You must install compatible major versions of PostgreSQLfor the Tableau Server external
repository. Additionally, minor versions must also meet minimum requirements.
Tableau Server versions PostgreSQLminimum compatible versions
2021.2.3 - 2021.2.8
2021.3.0 - 2021.3.7
2021.4.0 - 2021.4.3
12.6
2021.2.10 - 2021.2.14
2021.3.8 - 2021.3.13
2021.4.4 - 2021.4.8
12.8
2021.2.15 - 2021.2.16 12.10
34 Tableau Software
Tableau Server Enterprise Deployment Guide

2021.3.14 - 2021.3.15
2021.4.9 - 2021.4.10
2021.2.17 - 2021.2.18
2021.3.16 - 2021.3.17
2021.4.11 - 2021.4.12
12.11
2021.3.26
2021.4.23
12.15
2022.1.0 13.3
2022.1.1 - 2022.1.3 13.4
2022.1.4 - 2022.1.6 13.6
2022.1.7 - 2022.1.16
2022.3.0 - 2022.3.7
2023.1.0 - 2023.1.4
13.7
2022.1.17 - 2022.1.19
2022.3.8 - 2022.3.11
2023.1.5 - 2023.1.7
2023.3.0 - 2023.3.3
13.11
2024.0 - 2024.x 15.6
Install PostgreSQL
This example installation procedure describes how to install PostgreSQLversion 13.6.
Sign-in to the EC2 host that you created in the previous Part.
Tableau Software 35
Tableau Server Enterprise Deployment Guide
1.
Run update to apply latest fixes to the Linux OS:
sudo yum update
2.
Create and edit the file, pgdg.repo. in the /etc/yum.repos.d/ path. Populate the file
with the following configuration information:
[pgdg13]
name=PostgreSQL 13 for RHEL/CentOS 7 - x86_64
baseurl-
l=https://download.postgresql.org/pub/repos/yum/13/redhat/rhel-
7-x86_64
enabled=1
gpgcheck=0
3.
Install Posgres 13.6:
sudo yum install postgresql13-server-13.6-1PGDG.rhel7.x86_64
4.
Install the uuid-ossp module:
sudo yum install postgresql13-contrib-13.6-1PGDG.rhel7.x86_64
5.
Initialize Postgres:
sudo /usr/pgsql-13/bin/postgresql-13-setup initdb
Configure Postgres
Finish the base installation by configuring Postgres:
1.
Update the pg_hba configuration file, /var/lib/pgsql/13/data/pg_hba.conf,
with the following two entries. Each entry must include the mask of the subnets where
your Tableau Servers will be running:
host all all 10.0.30.0/24 password
host all all 10.0.31.0/24 password
36 Tableau Software
Tableau Server Enterprise Deployment Guide

2.
Update the PostgreSQL file, /var/lib/pgsql/13/data/postgresql.conf, by
adding this line:
listen_addresses = '*'
3.
Configure to start Postgres on reboot:
sudo systemctl enable --now postgresql-13
4.
Set superuser password:
sudo su - postgres
psql -c "alter user postgres with password 'StrongPassword'"
Note: Set a strong password. Do not use 'StrongPassword' as shown in the
example here.
exit
5.
Restart Postgres:
sudo systemctl restart postgresql-13
Take PostgreSQL Step 1 tar backup
Create a tar back up of the PostgreSQL configuration. Creating a tar snapshot of the current
configuration will save you time if you encounter failures as you continue the deployment.
We'll refer to this as the "Step 1" back up.
On PostgreSQLhost:
1.
Stop the Postgres database instance:
sudo systemctl stop postgresql-13
Tableau Software 37
Tableau Server Enterprise Deployment Guide
2.
Run the following commands to create the tar backup:
sudo su
cd /var/lib/pgsql
tar -cvf step1.13.bkp.tar 13
exit
3.
Start Postgres database:
sudo systemctl start postgresql-13
Restore Step 1
Restore to Step 1 if the Tableau Server initial node fails during installation.
1.
On the computer running Tableau, run the obliterate script to completely remove
Tableau Server from the host:
sudo /app/tableau_server/packages/scripts.<version_code>/./t-
ableau-server-obliterate -a -y -y -y -l
2.
Restore the PostgreSQLStage 1 tar. On the computer running Postgres, run the fol-
lowing commands:
sudo su
systemctl stop postgresql-13
cd /var/lib/pgsql
tar -xvf step1.13.bkp.tar
systemctl start postgresql-13
exit
Resume the installation process of installing the initial node of Tableau Server.
38 Tableau Software
Tableau Server Enterprise Deployment Guide
Before you install
If you are deploying Tableau according to the example AWS/Linux implementation described
in this Guide, then you may be able to run the automated installation script, TabDeploy4EDG.
The TabDeploy4EDG script automates the example installation of the four-node Tableau
deployment that is described in procedures that follow. See Appendix - AWSDeployment Tool-
box.
Install initial node of Tableau Server
This procedure describes how install the initial node of Tableau Server as defined by the ref-
erence architecture. With the exception of the package installation and the initialization of
TSM, the procedure here uses the TSM command line whenever possible. In addition to being
platform-agnostic, using TSMCLIallows a more seamless installation into virtualized and
headless environments.
Run installation package and initialize TSM
Sign in to the Node 1 host server.
1.
Run update to apply latest fixes to the Linux OS:
sudo yum update
2.
Copy the installation package from Tableau Downloads page to the host computer that
will be running Tableau Server.
For example, on a computer running Linux RHEL-like operating system, run
wget https://-
downloads.tableau.com/esdalt/2022<version>/tableau-server-<ver-
sion>.rpm
where <version> is the release number.
Tableau Software 39
Tableau Server Enterprise Deployment Guide
3.
Download and install dependencies:
sudo yum deplist tableau-server-<version>.rpm | awk '/pro-
vider:/ {print $2}' | sort -u | xargs sudo yum -y install
4.
Create the /app/tableau_server path in the root directory:
sudo mkdir -p /app/tableau_server
5.
Run the installation program and specify the /app/tableau_server install path. For
example, on a Linux RHEL-like operating system, run:
sudo rpm -i --prefix /app/tableau_server tableau-server-<ver-
sion>.x86_64.rpm
6.
Change to the /app/tableau_server/packages/scripts.<version_code>/
directory and run the initialize-tsm script located there:
sudo ./initialize-tsm -d /data/tableau_data --accepteula
7.
After initialization is complete, exit the shell:
exit
Activate and register Tableau Server
1.
Sign in to the Node 1 host server.
2.
Provide the Tableau Server product key(s) in this step. Run the following command for
each license key that you have purchased:
tsm licenses activate -k <product key>
3.
Create a json registration file with the format as shown here:
{
"zip" : "97403",
40 Tableau Software
Tableau Server Enterprise Deployment Guide

"country" : "USA",
"city" : "Springfield",
"last_name" : "Simpson",
"industry" : "Energy",
"eula" : "yes",
"title" : "Safety Inspection Engineer",
"company_employees" : "100",
"phone" : "5558675309",
"company" : "Example",
"state" : "OR",
"opt_in" : "true",
"department" : "Engineering",
"first_name" : "Homer",
"email" : "[email protected]"
}
4.
After saving changes to the file, pass it with the --file option to register Tableau
Server:
tsm register --file path_to_registration_file.json
Configure identity store
Note: If your deployment will make use of external storage for the Tableau File Store, you
will need to enable External File Store before you configure the identity store. See Install
Tableau Server with External File Store (Linux).
The default reference architecture uses a local identity store. Configure the initial host with
local identity store by passing the config.json file with the tsm settings import com-
mand.
Import the config.json file according to your operating system:
Tableau Software 41
Tableau Server Enterprise Deployment Guide
The config.json file is included in the scripts.<version> directory path (for example,
scripts.20204.21.0217.1203), and is formatted to configure the identity store.
Run the following command to import the config.json file:
tsm settings import -f /app/tableau_server-
/packages/scripts.<version_code>/config.json
Configure external Postgres
1.
Create an external database json file with the following configuration settings:
{
"flavor":"generic",
"masterUsername":"postgres",
"host":"<instance ip address>",
"port":5432
}
2.
After saving changes to the file, pass the file with the following command:
tsm topology external-services repository enable -f <file-
name>.json --no-ssl
You will be prompted for the Postgres master username password.
The option, --no-ssl, configures Tableau to use SSL/TLS only when the Postgres
server is configured for SSL/TLS. If Postgres is not configured for SSL/TLS, then the
connection is not encrypted. Part 6 - Post-Installation Configuration describes how to
enable SSL/TLS for the Postgres connection after you have completed the first phase
of deployment.
3.
Apply the changes.
Run this command to apply the changes and restart Tableau Server:
42 Tableau Software
Tableau Server Enterprise Deployment Guide
tsm pending-changes apply
4.
Delete the configuration file that you used in Step 1.
Finish Node 1 installation
1.
After Tableau Server has installed you must initialize the server.
Run the following command:
tsm initialize --start-server --request-timeout 1800
2.
When initialization is finished, you must create a Tableau Server administrator account.
Unlike the computer account that you are using to install and manage TSM operating-
system components, the Tableau Server administrator account is an application
account that used for creating Tableau Server users, projects, and sites. The Tableau
Server administrator also applies permissions to Tableau resources. Run the following
command to create the initial administrator account. In the following example, the user
is called tableau-admin:
tabcmd initialuser --serverhttp://localhost --
username"tableau-admin"
Tabcmd will prompt you to set a password for this user.
Verification: Node 1 configuration
1.
Run the following command to verify that TSM services are running:
tsm status -v
Tableau should return the following:
external:
Status: RUNNING
'Tableau Server Repository 0' is running (Active Repository).
node1: localhost
Tableau Software 43
Tableau Server Enterprise Deployment Guide
Status: RUNNING
'Tableau Server Gateway 0' is running.
'Tableau Server Application Server 0' is running.
'Tableau Server Interactive Microservice Container 0' is run-
ning.
'MessageBus Microservice 0' is running.
'Relationship Query Microservice 0' is running.
'Tableau Server VizQL Server 0' is running.
...
All of the services will be listed.
2.
Run the following command to verify that Tableau administrative site is running:
curl localhost
The first few lines should show Vizportal html, similar to this:
<!DOCTYPE html>
<html xmlns:ng="" xmlns:tb="">
<head ng-csp>
<meta charset="UTF-8">
<meta http-equiv="X-UA-Compatible" content="IE=edge">
<meta name="viewport" content="initial-scale=1, maximum-
scale=2, width=device-width, height=device-height, viewport-fit-
t=cover">
<meta name="format-detection" content="telephone=no">
<meta name="vizportal-config ...
Take Step 2 tar backups
After you have verified the initial installation, take two tar backups:
l
PostgreSQL
l
Tableau initial node (Node 1)
In most cases, you can recover your installation of the initial node by restoring these tar files.
Restoring the tar files is much quicker than reinstalling and reinitializing the initial node.
44 Tableau Software
Tableau Server Enterprise Deployment Guide
Create Step 2 tar files
1.
On the initial node of Tableau, stop Tableau:
tsm stop
Wait for Tableau to stop before continuing to the next step.
2.
On PostgreSQLhost, stop the Postgres database instance:
sudo systemctl stop postgresql-13
3.
Run the following commands to create the tar backup:
sudo su
cd /var/lib/pgsql
tar -cvf step2.13.bkp.tar 13
exit
4.
Verify that the Postgres tar file is created with root permissions:
sudo ls -al /var/lib/pgsql
5.
On the Tableau host, stop Tableau administrative services:
sudo /app/tableau_server/packages/scripts.<version_
code>/./stop-administrative-services
6.
Run the following commands to create the tar backup:
cd /data
sudo tar -cvf step2.tableau_data.bkp.tar tableau_data
7.
On the Postgres host, start the Postgres database:
Tableau Software 45
Tableau Server Enterprise Deployment Guide
sudo systemctl start postgresql-13
8.
Start Tableau administrative services:
sudo /app/tableau_server/packages/scripts.<version_
code>/./start-administrative-services
9.
Run the tsm status command to monitor TSM state before restarting.
In most cases, the command will first return a status of DEGRADED or ERROR. Wait a
few minutes and run the command again. If the status of ERROR or DEGRADED is
returned, continue waiting. Do not attempt to start TSM until the status, STOPPED is
returned. And then run the following command:
tsm start
Restore Step 2
This process restores the Tableau Node 1 and the Postgres instance to Step 2. After you
have restored to this step, you can then redeploy the remaining Tableau Nodes.
1.
Stop the tsm services on the initial Tableau host (Node 1):
tsm stop
2.
Stop Tableau administrative services on all nodes of the Tableau Server deployment.
Run the following command on each node, in order (Node 1, Node 2, and then Node
3):
sudo /app/tableau_server/packages/scripts.<version_
code>/./stop-administrative-services
3.
After Tableau services have stopped, restore the PostgreSQLStep 2 tar. On the com-
puter running Postgres, run the following commands:
46 Tableau Software
Tableau Server Enterprise Deployment Guide
l
sudo su
systemctl stop postgresql-13
cd /var/lib/pgsql
tar -xvf step2.13.bkp.tar
systemctl start postgresql-13
exit
4.
Restore the TableauStep 2 tar. On the initial Tableau host, run the following com-
mands:
cd /data
sudo rm -rf tableau_data
sudo tar -xvf step2.tableau_data.bkp.tar
5.
On the Tableau Node 1 computer, remove the following files:
l
sudo rm /data/tableau_data/data/t-
absvc/appzookeeper/0/version-2/currentEpoch
l
sudo rm /data/tableau_data/data/t-
absvc/appzookeeper/0/version-2/acceptedEpoch
l
sudo rm /data/tableau_data/data/t-
absvc/tabadminagent/0/servicestate.json
6.
Start the Tableau administrative services:
sudo /app/tableau_server/packages/scripts.<version_
code>/./start-administrative-services
7.
Reload the Tableau systmctl files and then run start-administrative-services
again:
sudo su -l tableau -c "systemctl --user daemon-reload"
Tableau Software 47
Tableau Server Enterprise Deployment Guide
sudo /app/tableau_server/packages/scripts.<version_
code>/./start-administrative-services
8.
On Node 1, run the tsm status command to monitor TSM state before restarting.
In some cases, you will get an error, Cannot connect to server.... This error
occurs because the tabadmincontroller service has not restarted. Continue to run tsm
status periodically. If this error does not go away after 10 minutes, run the start-
administrative-services command again.
After a few moments, the tsm status command will return a status of DEGRADED,
and then ERROR. Do not start TSM until the status, STOPPED is returned. And then
run the following command:
tsm start
Resume the installation process to install Tableau Server on remaining nodes.
Install Tableau Server on remaining nodes
To continue the deployment, copy the Tableau installer to each node.
Node configuration overview
This section describes the process to configure Nodes 2-4. The sections that follow provide
detailed configuration and validation procedures for each step.
Installation of Tableau Server Nodes 2-4 requires that you generate, copy, and reference a
bootstrap file during node installation.
To generate the bootstrap file, you run a TSMcommand on the initial node. You will then copy
the bootstrap file to the target node, where you run it as part of the node initialization.
The following json content shows an example of a bootstrap file. (The certificate and crypto-
related values have been truncated to make the example file easier to read.)
48 Tableau Software
Tableau Server Enterprise Deployment Guide
{
"initialBootstrapSettings" : {
"certificate" : "-----BEGIN CERTIFICATE-----\r\...=\r\n-----END
CERTIFICATE-----",
"port" : 8850,
"configurationName" : "tabsvc",
"clusterId" : "tabsvc-clusterid",
"cryptoKeyStore" : "zs7OzgAAAAIAAAABAAAAA...w==",
"toksCryptoKeystore" : "LS0tLS1CRUdJTiBUT00tLS0tCjM5MDBh...L",
"sessionCookieMaxAge" : 7200,
"nodeId" : "node1",
"machineAddress" : "ip-10-0-1-93.us-west-1.compute.internal",
"cryptoEnabled" : true,
"sessionCookieUser" : "tsm-bootstrap-user",
"sessionCookieValue" : "eyJjdHkiOiJKV1QiLCJl-
bmMiOiJBMTI4Q0JDLUhQ...",
"sessionCookieName" : "AUTH_COOKIE"
}
}
The bootstrap file includes connection-based validation to authenticate Node 1 and creates an
encrypted channel for the bootstrap process. The bootstrap session is time-limited, and con-
figuring and validating nodes is time consuming. Plan on creating and copying new bootstraps
as you configure the nodes.
After you run the bootstrap file, you then sign in to the initial Tableau Server node and con-
figure the processes for the new node. When you finish configuring the nodes, you must apply
changes and restart the initial node. The new node is configured and started. As you add
nodes, the configuration and restart of the deployment will take consecutively longer to com-
plete.
The Linux examples throughout the installation procedures show commands for RHEL-like dis-
tributions. If you are running the Ubuntu distribution, edit the commands accordingly.
Tableau Software 49
Tableau Server Enterprise Deployment Guide
1.
Run update to apply latest fixes to the Linux OS:
sudo yum update
2.
Download and install dependencies:
sudo yum deplist tableau-server-<version>.rpm | awk '/pro-
vider:/ {print $2}' | sort -u | xargs sudo yum -y install
3.
Create the /app/tableau_server path in the root directory:
sudo mkdir -p /app/tableau_server
4.
Run the installation program and specify the /app/tableau_server install path. For
example, on a Linux RHEL-like operating system, run:
sudo rpm -i --prefix /app/tableau_server tableau-server-<ver-
sion>.x86_64.rpm
Generate, copy, and use the bootstrap file to
initialize TSM
The following procedure shows how to generate, copy, and use a bootstrap file when ini-
tializing TSMon another node. In this example, the bootstrap file is named boot.json.
In this example, the host computers are running in AWS, where EC2 hosts are running
Amazon Linux 2.
1.
Connect to the initial node (Node 1) and run the following command:
tsm topology nodes get-bootstrap-file --file boot.json
2.
Copy the bootstrap file to Node 2.
scp boot.json [email protected]:/home/ec2-user/
50 Tableau Software
Tableau Server Enterprise Deployment Guide
3.
Connect to Node 2 and switch to the Tableau Server scripts directory:
cd /app/tableau_server/packages/scripts.<version_number>
4.
Run the initialize-tsm command and reference the bootstrap file:
sudo ./initialize-tsm -d /data/tableau_data -b /home/ec2-user-
/boot.json --accepteula
5.
After initialize-tsm has completed, delete boot.json, and then exit or log out of
the session.
Configure processes
You must configure the Tableau Server cluster on the node where the Tableau Server Admin-
istration Controller (TSMcontroller) is running. The TSM controller runs on the initial node.
Tableau Software 51
Tableau Server Enterprise Deployment Guide

Configure Node 2
1. After you have initialized TSM using the bootstrap file on Node 2, sign in to the initial
node.
2.
On the initial node (node1) run the following commands to configure processes on
Node 2.:
tsm topology set-process -n node2 -pr clustercontroller -c 1
tsm topology set-process -n node2 -pr gateway -c 1
tsm topology set-process -n node2 -pr vizportal -c 1
tsm topology set-process -n node2 -pr vizqlserver -c 2
tsm topology set-process -n node2 -pr cacheserver -c 2
tsm topology set-process -n node2 -pr searchserver -c 1
tsm topology set-process -n node2 -pr dataserver -c 2
52 Tableau Software
Tableau Server Enterprise Deployment Guide
tsm topology set-process -n node2 -pr clientfileservice -c 1
tsm topology set-process -n node2 -pr tdsservice -c 1
tsm topology set-process -n node2 -pr collections -c 1
tsm topology set-process -n node2 -pr contentexploration -c 1
If you are installing version 2022.1 or later, add the Index and Search service as well:
tsm topology set-process -n node2 -pr indexandsearchserver -c 1
If you are installing version 2023.3 or later, only include the Index and Search service.
Do not add the Search and Browse (searchserver) service
3.
Review the configuration before you apply it. Run the following command:
tsm pending-changes list
4.
After you have verified that your changes are in the pending list (there will be other ser-
vices in the pending list as well), apply the changes:
tsm pending-changes apply
The changes will require a restart. Configuration and restart will take some time.
5.
Verify Node 2 configuration. Run the following command:
tsm status -v
Configure Node 3
Initialize TSMusing the bootstrap process on Node 3, and then run the tsm topology set-
process commands below.
There is a Coordination Service warning that will display each time you set a process. You can
ignore this warning as you set the processes.
1.
After you initialize TSM using the bootstrap file on Node 3, sign in to the initial node
(node1) and run the following commands to configure processes:
Tableau Software 53
Tableau Server Enterprise Deployment Guide
tsm topology set-process -n node3 -pr clustercontroller -c 1
tsm topology set-process -n node3 -pr clientfileservice -c 1
tsm topology set-process -n node3 -pr backgrounder -c 4
tsm topology set-process -n node3 -pr filestore -c 1
If you are installing version 2022.1 or later, add the Index and Search service as well:
tsm topology set-process -n node3 -pr indexandsearchserver -c 1
2.
Review the configuration before you apply it. Run the following command:
tsm pending-changes list
3.
After you have verified that your changes are in the pending list (the list will include
other services that are automatically configured), apply the changes:
tsm pending-changes apply --ignore-warnings
The changes will require a restart. Configuration and restart will take some time.
4.
Verify the configuration by running the following command:
tsm status -v
Deploy coordination service ensemble to
Nodes 1-3
For standard reference architecture four-node deployment, run the following procedure:
1.
Run the following commands on Node 1:
tsm stop
tsm topology deploy-coordination-service -n node1,node2,node3
The process includes a restart of TSM, which will take some time.
54 Tableau Software
Tableau Server Enterprise Deployment Guide
2.
After the coordination service is deployed, start TSM:
tsm start
Take Step 3 tar backups
After you have verified the installation, take four tar backups:
l
PostgreSQL
l
Tableau initial node (Node 1)
l
Tableau Node 2
l
Tableau Node 3
Create Step 3 tar files
1.
On the initial node of Tableau, stop Tableau:
tsm stop
2.
After TSMhas stopped, stop Tableau administrative services on each node. Run the fol-
lowing command on each node, in order (Node 1, Node 2, and then Node 3):
sudo /app/tableau_server/packages/scripts.<version_
code>/./stop-administrative-services
3.
On PostgreSQLhost, stop the Postgres database instance:
sudo systemctl stop postgresql-12
4.
Run the following commands to create the tar backup:
sudo su
cd /var/lib/pgsql
tar -cvf step3.12.bkp.tar 12
Tableau Software 55
Tableau Server Enterprise Deployment Guide
exit
5.
Verify that Postgres tar file is created with root permissions:
sudo ls -al /var/lib/pgsql
6.
On the Postgres host, start the Postgres database:
sudo systemctl start postgresql-12
7.
Create the tar backup on Node 1, Node 2, and Node 3. Run the following commands
on each node:
l
cd /data
sudo tar -cvf step3.tableau_data.bkp.tar tableau_data
l
Verify that the Tableau tar file is created with root permissions:
ls -al
8.
Start Tableau administrative services on each node in order (Node 1, Node 2, and then
Node 3):
sudo /app/tableau_server/packages/scripts.<version_
code>/./start-administrative-services
9.
Run the tsm status command to monitor TSM state before restarting.
In most cases, the command will return a status of DEGRADED, and then ERROR.
Wait a few moments and run the command again. If the status of ERROR or
DEGRADED is returned, continue waiting. Do not attempt to start TSM until the status,
STOPPED is returned. And then run the following command:
tsm start
Restore Step 3
56 Tableau Software
Tableau Server Enterprise Deployment Guide
This process restores the Tableau Node 1, Node 2, and Node 3. It also restores the Postgres
instance to Step 3. After you have restored to this step, you can then deploy coordination ser-
vice, Node 4, and then final node configurations.
1.
Stop the tsm service on the initial Tableau host (Node 1):
tsm stop
2.
After TSMhas stopped, stop Tableau administrative services on Node 1, Node 2, and
Node 3. Run the following command on each node:
sudo /app/tableau_server/packages/scripts.<version_
code>/./stop-administrative-services
3.
Restore the PostgreSQL Step 3 tar. On the computer running Postgres, run the fol-
lowing commands:
sudo su
systemctl stop postgresql-12
cd /var/lib/pgsql
tar -xvf step3.12.bkp.tar
systemctl start postgresql-12
exit
4.
Restore the Tableau Step 3 tar on Node 1, Node 2, and Node 3. Run the following com-
mands on each Tableau node:
cd /data
sudo rm -rf tableau_data
sudo tar -xvf step3.tableau_data.bkp.tar
5.
On the Tableau Node 1 computer, remove the following files:
Tableau Software 57
Tableau Server Enterprise Deployment Guide
l
sudo rm /data/tableau_data/data/t-
absvc/appzookeeper/1/version-2/currentEpoch
l
sudo rm /data/tableau_data/data/t-
absvc/appzookeeper/1/version-2/acceptedEpoch
l
sudo rm /data/tableau_data/data/t-
absvc/tabadminagent/0/servicestate.json
If the shell returns a "file not found"error, you may need to change the path name to
increment the number <n> in this section of the path: .../ap-
pzookeeper/<n>/version-2/....
6.
Restart the administrative services on Node 1, Node 2, and Node 3. Run the following
commands on each node:
sudo /app/tableau_server/packages/scripts.<version_
code>/./start-administrative-services
sudo su -l tableau -c "systemctl --user daemon-reload"
sudo /app/tableau_server/packages/scripts.<version_
code>/./start-administrative-services
7.
On Node 1, run the tsm status command to monitor TSM state before restarting.
In some cases, you will get an error, Cannot connect to server.... This error
occurs because the tabadmincontroller service has not restarted. Continue to run tsm
status periodically. If this error does not go away after 10 minutes, run the start-
administrative-services command again.
After a few moments, the tsm status command will return a status of DEGRADED,
and then ERROR. Do not start TSM until the STOPPED status is returned. And then
run the following command:
tsm start
Resume the installation process to deploy coordination service on Nodes 1-3.
58 Tableau Software
Tableau Server Enterprise Deployment Guide
Configure Node 4
The process for configuring Node 4 is the same as Node 3.
Set the same processes as you set for Node 3, running the same set of commands as shown
above, but specifying node4 in the commands rather than node3.
As with Node 3 verification, verify the Node 4 configuration by running tsm status -v.
Before you proceed, wait for the File Store process on Node 4 to finish synchronizing. The File
Store service status will return is synchronizing until it finishes. When the File Store ser-
vice status returns is running you can proceed.
Final process configuration and verification
The final step to process configuration is to remove redundant processes from Node 1.
1.
Connect to the initial node (node1).
2.
Decommission the file store on Node 1. This will cause a warning about removing the
file store from a co-located controller. You can ignore the warning. Run the following
command:
tsm topology filestore decommission -n node1
3.
When file store is decommissioned, run the following command to remove the back-
grounder process from Node 1:
tsm topology set-process -n node1 -pr backgrounder -c 0
4.
Review the configuration before you apply it. Run the following command:
tsm pending-changes list
5.
After you have verified that your changes are in the pending list, apply the changes:
Tableau Software 59
Tableau Server Enterprise Deployment Guide
tsm pending-changes apply
The changes will require a restart. Configuration and restart will take some time.
6.
Verify the configuration:
tsm status -v.
Before you proceed, wait for the File Store process on Node 4 to finish synchronizing.
The File Store service status will return is synchronizing until it finishes. When the
File Store service status returns is running you can proceed.
Perform backup
A full recovery of Tableau Server requires a backup portfolio that includes three components:
l
A backup file of the repository and file store data. This file is generated by the tsm
maintenance backup command.
l
A topology and configuration export file. This file is generated by the tsm settings
export command.
l
Authentication certificate, key, and keytab files.
For a full description of the backup and restore process, see the Tableau Server topic, Per-
form a Full Backup and Restore of Tableau Server (Linux).
At this stage of your deployment, all relevant files and assets that are required for a full res-
toration are included by running the tsm maintenance backup and tsm settings
export commands.
1.
Run the following command to export the configuration and topology settings to a file
called ts_settings_backup.json
tsm settings export -f ts_settings_backup.json
2.
Run the following command to create a backup of the repository and file store data in a
file named ts_backup-<yyyy-mm-dd>.tsbak. Ignore the warning about the file
60 Tableau Software
Tableau Server Enterprise Deployment Guide
store not being on the controller node.
tsm maintenance backup -f ts_backup -d --skip-compression
Location of backup file:
/data/tableau_data/data/tabsvc/files/backups/
3.
Copy both files and save them on a different storage asset that is not shared by your
Tableau Server deployment.
Tableau Software 61
Tableau Server Enterprise Deployment Guide

Part 5 - Configuring Web Tier
The web tier of the reference architecture should include the following components:
l
A web-facing application load balancer that accepts HTTPS requests from Tableau cli-
ents and communicates with the reverse proxy servers.
l
Reverse proxy:
l
We recommend deploying the Tableau Server Independent Gateway.
l
We recommend a minimum of two proxy servers for redundancy and to handle
client load.
l
Receives HTTPS traffic from load balancer.
l
Supports sticky session to Tableau host.
l
Configure proxy for round robin load balancing to each Tableau Server running
the Gateway process.
l
Handles authentication requests from external IdP.
l
Forward proxy: Tableau Server requires access to the internet for licensing and map
functionality. You must configure forward proxy safelists for Tableau service URLs.
See Communicating with the Internet (Linux).
l
All client-related traffic may be encrypted over HTTPS:
l
Client to application load balancer
l
Application load balancer to reverse proxy servers
62 Tableau Software
Tableau Server Enterprise Deployment Guide
l
Proxy server to Tableau Server
l
Authentication handler running on reverse proxy to IdP
l
Tableau Server to IdP
Tableau Server Independent Gateway
Tableau Server version 2022.1 introduced the Tableau Server Independent Gateway. The
Independent Gateway is a standalone instance of the Tableau Gateway process that serves
as a Tableau-aware reverse proxy.
Independent Gateway supports simple round robin load balancing to the backend Tableau
Servers. However, Independent Gateway is not intended to serve as the enterprise application
load balancer. We recommend running Independent Gateway behind an enterprise-class
application load balancer.
The Independent Gateway requires an Advanced Management license.
Authentication and authorization
The default reference architecture specifies installing Tableau Server with local authentication
configured. In this model, clients must connect to Tableau Server to be authenticated by the
native Tableau Server local authentication process. We do not recommend using this authen-
tication method in the reference architecture because the scenario requires that unau-
thenticated clients communicate into the application tier, which is a security risk.
Instead, we recommend configuring an enterprise grade external identity provider coupled
with an AuthN module to pre-authenticate all traffic to the application tier. When configured
with an external IdP, the native Tableau Server local authentication process is not used.
Tableau Server authorizes access to resources in the deployment after the IdP has authen-
ticated the users.
Tableau Software 63
Tableau Server Enterprise Deployment Guide

Pre-authentication with an AuthN module
In the example documented in this Guide, SAMLSSO is configured, but the pre-authen-
tication process can be configured with most external identity providers and an AuthN mod-
ule.
In the reference architecture the reverse proxy is configured to create a client authentication
session with the IdP before proxying those request to Tableau Server. We refer to this pro-
cess as the pre-auth phase. The reverse proxy will only redirect authenticated client sessions
to Tableau Server. Tableau Server will then create a session, verify authentication of the ses-
sion with the IdP, and then return the client request.
The following diagram shows the step-by-step detail of the pre-auth and authentication pro-
cess with an AuthN module configured. The reverse proxy may be a generic 3rd party solution
or the Tableau Server Independent Gateway:
64 Tableau Software
Tableau Server Enterprise Deployment Guide

Configuration overview
This is an overview of the process to configure the web tier. Verify connectivity after each step:
1. Configure two reverse proxies to provide HTTP access to Tableau Server.
2. Configure load balancing logic with sticky sessions on proxy servers to connect to each
Tableau Server instance running the Gateway process.
3. Configure application load balancing with sticky sessions at the internet gateway to for-
ward requests to the reverse proxy servers.
4. Configure authentication with an external IdP. You can configure SSO or SAML by
installing an authentication handler on the reverse proxy servers. The AuthN module
manages the authentication handshake between the external IdP and your Tableau
deployment. Tableau will also act as an IdPservice provider and authenticate users with
the IdP.
5. To authenticate with Tableau Desktop in this deployment, your clients must be running
Tableau Desktop 2021.2.1 or later.
Example web tier configuration with Tableau
Server Independent Gateway
The remainder of this topic provides an end-to-end procedure that describes how to implement
web tier in the example AWS reference architecture using Tableau Server Independent Gate-
way. For an example configuration using Apache as reverse proxy, see Appendix - Web Tier
with Apache Example Deployment.
The example configuration is composed of the following components:
l
AWSapplication load balancer
l
Tableau Server Independent Gateway
l
Mellon authentication module
l
Okta IdP
l
SAML authentication
Tableau Software 65
Tableau Server Enterprise Deployment Guide

Note:The example web tier configuration presented in this section includes detailed pro-
cedures for deploying third party software and services. We've made a best effort to
verify and document the procedures to enable the web tier scenario. However, the third-
party software may change or your scenario may differ from the reference architecture
described here. Please refer to third-party documentation for authoritative configuration
details and support.
The Linux examples throughout this section show commands for RHEL-like distributions. Spe-
cifically the commands here have been developed with the Amazon Linux 2 distribution. If you
are running the Ubuntu distribution, edit the commands accordingly.
Deploying the web tier in this example follows a stepwise configuration and verification pro-
cedure. The core web tier configuration consists of the following steps to enable HTTP
between Tableau and the internet. Independent Gateway is run and configured for reverse
proxy/load balancing behind the AWS application load balancer:
1. Prepare environment
2. Install Independent Gateway
3. Configure Independent Gateway Server
4. Configure AWS application load balancer
After the web tier is set up and connectivity with Tableau is verified, configure authentication
with an external provider.
Prepare Environment
Complete the following tasks before you deploy Independent Gateway.
1.
AWSSecurity group changes. Configure the Public security group to allow inbound
Independent Gateway housekeeping traffic (TCP 21319) from the Private security
group.
66 Tableau Software
Tableau Server Enterprise Deployment Guide

2.
Install version 22.1.1 (or later) on four node Tableau Server cluster as documented at
Part 4 - Installing and Configuring Tableau Server.
3.
Configure the two proxy EC2 instances in the Public security group as documented at
Configure host computers.
Install Independent Gateway
Tableau Server Independent Gateway requires an Advanced Management license.
Deploying Tableau Server Independent Gateway consists of installing and running the .rpm
package and then configuring initial state. The procedure included with this Guide provides pre-
scriptive guidance for deploying into the reference architecture.
If your deployment differs from the reference architecture, consult the core Tableau Server doc-
umentation, Install Tableau Server with Independent Gateway (Linux).
Important:Configuring Independent Gateway can be an error prone process. It is very dif-
ficult to troubleshoot configuration issues across two instances of Independent Gateway
servers. For this reason, we recommend configuring one Independent Gateway server at
a time. After you configure the first server and verify functionality, you should then con-
figure the second Independent Gateway server.
Although you will configure each Independent Gateway server separately, run this installation
procedure on both EC2 instances that you installed into the Public security group:
1.
Run update to apply latest fixes to the Linux OS:
sudo yum update
2.
If Apache is installed, remove it:
sudo yum remove httpd
Tableau Software 67
Tableau Server Enterprise Deployment Guide
3.
Copy the version 2022.1.1 (or later) Independent Gateway installation package from
Tableau Downloads page to the host computer that will be running Tableau Server.
For example, on a computer running Linux RHEL-like operating system, run
wget https://-
downloads.tableau.com/esdalt/2022<version>/tableau-server-tsig-
<version>.x86_64.rpm
4.
Run the installation program. For example, on a Linux RHEL-like operating system,
run:
sudo yum install <tableau-tsig-version>.x86_64.rpm
5.
Change to the /opt/tableau/tableau_tsig/packages/scripts.<version_
code>/ directory and run the initialize-tsig script located there. In addition to
the --accepteula flag, you must include the IPrange of the subnets where the
Tableau Server deployment is running. Use the -c option to specify the IP range. The
example below shows the command with the example AWS subnets specified:
sudo ./initialize-tsig --accepteula -c "ip 10.0.30.0/24
10.0.31.0/24"
6.
After initialization is complete, open the tsighk-auth.conf file and copy the authen-
tication secret in the file. You will need to submit this code for each Independent Gate-
way instance as part of the back-end TableauServer configuration:
sudo less /var/opt/tableau/tableau_tsig/config/tsighk-auth.conf
7.
After you have run the previous steps on the both instances of the Independent Gate-
way, prepare the tsig.json configuration file. The configuration file consists of an
"independentGateways" array. The array holds configuration objects that each define
connection details for an Independent Gateway instance.
68 Tableau Software
Tableau Server Enterprise Deployment Guide
Copy the following the JSON and customize it according to your deployment envir-
onment. The example here shows a file for a sample AWS reference architecture.
The example JSONfile below only includes connection information for one Independent
Gateway. Later in the process, you will include the connection information for the
second Independent Gateway server.
Save the file as tsig.json for the procedures that follow.
{
"independentGateways": [
{
"id": "ip-10-0-1-169.ec2.internal",
"host": "ip-10-0-1-169.ec2.internal",
"port": "21319",
"protocol" : "http",
"authsecret": "13660-27118-29070-25482-9518-22453"
}]
}
l
"id" - The private DNSname of the AWS EC2 instance running Independent
Gateway.
l
"host" - same as "id".
l
"port" - The housekeeping port, by default, "21319".
l
"protocol" - The protocol for client traffic. Leave this as http for the initial con-
figuration.
l
"authsecret" - The secret that you copied in the previous step.
Independent Gateway:direct vs relay connection
Before proceeding you must decide which connection scheme to configure in your deploy-
ment: direct or relay connection. Each option is briefly described here, along with relevant
decision data points.
Tableau Software 69
Tableau Server Enterprise Deployment Guide
Relay connection: You can configure Independent Gateway to relay client communication
over a single port to the gateway process on Tableau Server. We refer to this as a relay con-
nection:
l
The relay process results in an extra hop from Independent Gateway to the backend
Tableau Server Gateway process. The extra hop degrades performance as compared
to the direct connection configuration.
l
TLSis supported for relay mode. All communication in relay mode is restricted to a
single protocol (HTTPor HTTPS) and can therefore be encrypted and authenticated
with TLS.
Direct connection: The Independent Gateway can communicate directly with the back-end
Tableau Server processes over multiple ports. We refer to this communication as direct con-
nection:
l
Because connection is direct to backend Tableau Server, client performance is
markedly improved as compared to relay connection option.
l
Requires opening 16+ ports from Public to Private subnets for direct process com-
munication from Independent Gateway to Tableau Server computers.
l
TLSis not yet supported on the processes from Independent Gateway to Tableau
Server.
Configure relay connection
To run TLS between Tableau Server and Independent Gateway you must configure with a
relay connection. The example scenarios in the EDG are configured with relay connection.
1.
Copy tsig.json to Node 1 of your Tableau Server deployment.
2.
On Node 1 run the following commands to enable Independent Gateway.
tsm stop
tsm configuration set -k gateway.tsig.proxy_tls_optional -v
none
tsm pending-changes apply
tsm topology external-services gateway enable -c tsig.json
tsm start
70 Tableau Software
Tableau Server Enterprise Deployment Guide
Configure direct connection
Since direct connection does not support TLS, we recommend configuring direct connection
only if you are able to secure all network traffic by other means. To run TLS between Tableau
Server and Independent Gateway you must configure with a relay connection. The example
scenarios in the EDG are configured with relay connection.
If you are configuring Independent Gateway for direct connection to Tableau Server, you must
enable the configuration to trigger communication. After Tableau Server communicates to the
Independent Gateway, the protocol targets will be established. You must then retrieve the
proxy_targets.csv from the Independent Gateway computer and open the corresponding
ports from the Public to the Private security groups in AWS.
1.
Copy tsig.json to Node 1 of your Tableau Server deployment.
2.
On Node 1 run the following commands to enable Independent Gateway.
tsm stop
tsm topology external-services gateway enable -c tsig.json
tsm start
3.
On Independent Gateway computer run the following command to view the ports that
the Tableau Server cluster is using:
less /var/opt/tableau/tableau_tsig/config/httpd/proxy_tar-
gets.csv
4.
Configure AWS security groups. Add the TCP ports listed in proxy_targets.csv to
allow communication from the Public security group to the Private security group.
We recommend automating port ingress configuration since the ports may change if the
Tableau Server deployment changes. Adding nodes or reconfiguring processes on the
Tableau Server deployment will trigger changes to the port access required by
Independent Gateway.
Tableau Software 71
Tableau Server Enterprise Deployment Guide
Verification: Base topology configuration
You should be able to access the Tableau Server admin page by browsing to http://<g-
ateway-public-IP-address>.
If the Tableau Server sign-in page does not load, or if Tableau Server doesn't start then follow
these troubleshooting steps:
Network:
l
Verify connectivity between Tableau deployment and Independent Gateway instance
by running the following wget command from Tableau Server Node1: wget http://<in-
ternal IP address of Independent Gateway>:21319, for example:
wget http://ip-10-0-1-38:21319
If connection is refused or fails, then verify that the Public security group is configured
to allow Independent Gateway housekeeping traffic (TCP 21319) from the Private
security group.
If security group is configured correctly, then verify you specified the correct
IPaddresses or IPranges during the initialization of Independent Gateway. You can
view and change this configuration in the environment.bash file located at /etc/-
opt/tableau/tableau_tsig/environment.bash. If you make a change to this
file then restart the tsig-http service as described below.
On the Proxy 1 host:
1.
Overwrite the httpd.conf file with the Independent Gateway stub file:
cp /var/opt/tableau/tableau_tsig/config/httpd.conf.stub /var/-
opt/tableau/tableau_tsig/config/httpd.conf
2. Restart tsig-httpd as a first troubleshooting step:
sudo su - tableau-tsig
systemctl --user restart tsig-httpd
exit
72 Tableau Software
Tableau Server Enterprise Deployment Guide
On Tableau Node 1
l
Double-check the tsig.json file. If you find errors, fix them, and then run tsm topo-
logy external-services gateway update -c tsig.json.
l
If running direct connection, verify the TCP ports listed in proxy_targets.csv are
configured as ingress ports from Public to Private security groups.
Configure AWS application load balancer
Configure the load balancer as an HTTPlistener. The procedure here describes how to add a
load balancer in AWS.
Step 1: Create target group
A target group is an AWS configuration that defines the EC2 instances running your proxy serv-
ers. These are the targets for traffic from the LBS.
1.
EC2>Target groups > Create target group
2.
On Create page:
l
Enter a target group name, for example TG-internal-HTTP
l
Target type:Instances
l
Protocol:HTTP
l
Port:80
l
VPC:Select your VPC
l
Under Health checks > Advanced health checks settings > Success codes,
append the code list to read: 200,303.
l
Click Create
3.
Select the target group that you just created, and then click the Targets tab:
l
Click Edit.
l
Select the EC2 instances (or single instance if you are configuring one at a time)
that are running proxy application, and then click Add to registered.
l
Click Save.
Tableau Software 73
Tableau Server Enterprise Deployment Guide

Step 2: Launch load balancer wizard
1.
EC2> Load Balancers > Create Load Balancer
2.
On "Select load balancer type" page, create an Application Load Balancer.
Note:The UI that is displayed to configure load balancer is not consistent across AWS
datacenters. The procedure below, "Wizard configuration," maps to the AWS con-
figuration wizard that begins with Step 1 Configure Load Balancer.
If your datacenter displays all configurations in a single page that includes a Create load
balancer button at the bottom of the page, then follow the "Single page configuration"
procedure below.
Wizard configuration
1.
Configure load balancer page:
l
Specify name
l
Scheme: internet-facing (default)
l
IP address type: ipv4 (default)
l
Listeners (Listeners and routing):
a. Leave the default HTTP listener
b. Click Add listener and add HTTPS:443
l
VPC:select the VPCwhere you've installed everything
l
Availability Zones:
l
Select the a and b for your datacenter regions
l
In each corresponding drop-down selector, select the Public subnet
(where your proxy servers reside).
l
Click: Configure Security Settings
2.
Configure Security Settings page
l
Upload your public SSLcertificate.
l
Click Next: Configure Security Groups.
74 Tableau Software
Tableau Server Enterprise Deployment Guide
3.
Configure Security Groups page:
l
Select the Public security group. If the Default security group is selected, then
clear that selection.
l
Click Next: Configure Routing.
4.
Configure Routing page
l
Target group: Existing target group.
l
Name: Select target group that you created earlier
l
Click Next: Register Targets.
5.
Register Targets page
l
The two proxy server instances that you configured previously should be dis-
played.
l
Click Next: Review.
6.
Review page
Click Create.
Single page configuration
Basic configuration
l
Specify name
l
Scheme: internet-facing (default)
l
IP address type: ipv4 (default)
Network mapping
l
VPC:select the VPCwhere you've installed everything
l
Mappings:
l
Select the a and b (or comparable) Availability Zones for your datacenter regions
l
In each corresponding drop-down selector, select the Public subnet (where your
proxy servers reside).
Security groups
Tableau Software 75
Tableau Server Enterprise Deployment Guide
Select the Public security group. If the Default security group is selected, then clear that selec-
tion.
Listeners and routing
l
Leave the default HTTP listener. For Default action, specify the Target Group that you
previously set up.
l
Click Add listener and add HTTPS:443. For Default action, specify the Target Group
that you previously set up.
Secure listener settings
l
Upload your public SSLcertificate.
Click Create load balancer.
Step 3: Enable stickiness
1.
After the load balancer is created, you must enable stickiness on the Target Group.
l
Open AWS Target Group page (EC2> Load Balancing> Target groups),
select the target group instance that you just set up. On the Action menu, select
Edit attributes.
l
On the Edit attributes page, select Stickiness, specify a duration of 1 day,
and then Save changes.
2.
On load balancer, enable stickiness on the HTTPlistener. Select the load balancer you
just configured, and then click the Listeners tab:
l
For HTTP:80, click View/edit rules. On the resulting Rules page, click the edit
icon (once at the top of the page, and then again by the rule) to edit the rule.
Delete the existing THEN rule and replace it by clicking Add action > Forward
to.... In the resulting THEN configuration, specify the same target group you
have created. Under Group-level stickiness, enable stickiness and set duration
to 1 day. Save the setting and then click Update.
Step 4: Set idle timeout on load balancer
On load balancer, update idle timeout to 400 seconds.
76 Tableau Software
Tableau Server Enterprise Deployment Guide
Select the load balancer you have configured for this deployment, and then click Actions >
Edit attributes. Set Idle timeout to 400 seconds, and then click Save.
Step 5:Verify LBS connectivity
Open AWS Load Balancer page (EC2> Load Balancers), select the load balancer instance
that you just set up.
Under Description, copy the DNSname and paste it into a browser to access the Tableau
Server sign in page.
If you get a 500-level error, then you may need to restart your proxy servers.
Update DNSwith public Tableau URL
Use your domain DNS zone name from the AWSLoad Balancer description to create a
CNAMEvalue in your DNS. Traffic to your URL(tableau.example.com) should be sent to the
AWSpublic DNS name.
Verify connectivity
After your DNSupdates are finished, you should be able to navigate to the Tableau Server
sign-in page by entering your public URL, for example,https://tableau.example.com.
Example authentication configuration:SAML
with external IdP
The following example describes how to setup and configure SAML with Okta IdP and Mellon
authentication module for a Tableau deployment running in the AWSreference architecture.
This example picks up from the previous section and assumes that you are configuring one
Independent Gateway at a time.
Tableau Software 77
Tableau Server Enterprise Deployment Guide
The example describes how to configure Tableau Server and Independent Gateway over
HTTP. Okta will send request to the AWSload balancer over HTTPS, but all internal traffic will
travel over HTTP. As you configure for this scenario, be aware of the HTTPvs HTTPS pro-
tocols when setting URL strings.
This example uses Mellon as a pre-authentication service provider module on the Independ-
ent Gateway servers. This configuration ensures that only authenticated traffic connects to
Tableau Server, which also acts as a service provider with the Okta IdP. Therefore, you must
configure two IdPapplications:one for the Mellon service provider and one for the Tableau
service provider.
Create Tableau administrator account
A common mistake when configuring SAML is to forget to create an administrator account on
Tableau Server before enabling SSO.
The first step is to create an account on Tableau Server with a Server Administrator role. For
the example Okta scenario, the username must be in a valid email address format, for
not be used after SAML is configured.
Configure Okta pre-auth application
The end-to-end scenario described in this section requires two Okta applications:
l
Okta pre-auth application
l
Okta Tableau Server application
Each of these applications are associated with different metadata that you will need to con-
figure on the reverse proxy and Tableau Server, respectively.
This procedure describes how to create and configure the Okta pre-auth application. Later in
this topic you will create the Okta Tableau Server application. For a free test Okta account
with limited users, see the Okta Developer web page.
Create a SAML app integration for the Mellon pre-authentication service provider.
78 Tableau Software
Tableau Server Enterprise Deployment Guide
1.
Open the Okta administration dashboard > Applications >Create App Integration.
2.
On Create a new app integration page, select SAML 2.0 and then click Next.
3.
On the General Settings tab, enter an App name, for example Tableau Pre-Auth,
and then click Next.
4.
On the Configure SAML tab:
l
Single sign on (SSO) URL. The final element of the path in the single sign on URL
is referred to as the MellonEndpointPath in the mellon.conf configuration
file that follows later in this procedure. You can specify whatever endpoint you
would like. In this example, sso is the endpoint. The last element, postRe-
sponse, is required: https://t-
ableau.example.com/sso/postResponse.
l
Clear the checkbox:Use this for Recipient URL and Destination URL.
l
Recipient URL: Same as SSO URL, but with HTTP. For example, http://t-
ableau.example.com/sso/postResponse.
l
Destination URL: same as SSO URL, but with HTTP. For example, http://t-
ableau.example.com/sso/postResponse.
l
Audience URI (SPEntity ID). For example, https://tableau.example.com.
l
Name ID format: EmailAddress
l
Application username: Email
l
Attributes Statements: Name = mail; Name format = Unspecified; Value =
user.email.
Click Next.
5.
On the Feedback tab, select:
l
I'm an Okta customer adding an internal app
l
This is an internal app that we have created
l
Click Finish.
6.
Create the pre-auth IdP metadata file:
l
In Okta: Applications > Applications > Your new application (e.g., Tableau
Pre-Auth) >Sign On
l
Adjacent to SAML Signing Certificates, click View SAMLsetup instructions.
Tableau Software 79
Tableau Server Enterprise Deployment Guide
l
On the How to Configure SAML 2.0 for <pre-auth> Application, page, scroll
down to Optional section, Provide the following IDP metadata to your SP
provider.
l
Copy the contents of the XMLfield and save them in a file called pre-auth_
idp_metadata.xml.
7.
(Optional) Configure multifactor authentication:
l
In Okta: Applications > Applications > Your new application (e.g., Tableau
Pre-Auth) >Sign On
l
Under Sign On Policy, click AddRule.
l
On the App Sign On Rule, specify a name and the different MFAoptions. To
test functionality, you can leave all options as default. However, under Actions,
you must select, Prompt for factor, and then specify how often users must sign
in. Click Save.
Create and assign Okta user
1. In Okta, create a user with the same username that you created in Tableau
([email protected]):Directory > People > Add person.
2. After the user is created, assign the new Okta app to that person: Click the user name
then assign the application in Assign Application.
Install Mellon for pre-auth
This example uses mod_auth_mellon, a popular open source module. Some Linux dis-
tributions package obsolete mod_auth_mellon versions from an older repository. Those obsol-
ete versions may contain unknown security vulnerabilities or functional problems. If you
choose to use mod_auth_mellon, check that you are using a current version.
The mod_auth_mellon module is third-party software. We've made a best effort to verify and
document the procedures to enable this scenario. However, third-party software may change
or your scenario may differ from the reference architecture described here. Please refer to
third-party documentation for authoritative configuration details and support.
80 Tableau Software
Tableau Server Enterprise Deployment Guide
1.
On the active EC2 instance that is running Independent Gateway, install a current ver-
sion of the Mellon authentication module.
2.
Create the /etc/mellon directory:
sudo mkdir /etc/mellon
Configure Mellon as pre-auth module
Run this procedure on the first instacee of Independent Gateway.
You must have a copy of pre-auth_idp_metadata.xml file that you created from the Okta
configuration.
1.
Change directory:
cd /etc/mellon
2.
Create the service provider metadata. Run the mellon_create_metadata.sh script.
You must include the entity ID and the return URL for your organization in the command.
The return URL is referred to as the single sign on URL in Okta. The final element of the
path in the return URL is referred to as the MellonEndpointPath in the mel-
lon.conf configuration file that follows later in this procedure. In this example, we spe-
cify sso as the endpoint path.
For example:
sudo /usr/libexec/mod_auth_mellon/mellon_create_metadata.sh
https://tableau.example.com "https://tableau.example.com/sso"
The script returns the service provider certificate, key, and metadata files.
3.
Rename the service provider files in the mellon directory for easier readability. We will
refer to these files by the following names in the documentation:
Tableau Software 81
Tableau Server Enterprise Deployment Guide
sudo mv *.key mellon.key
sudo mv *.cert mellon.cert
sudo mv *.xml sp_metadata.xml
4.
Copy the pre-auth_idp_metadata.xml file to the same directory.
5.
Change ownership and permissions on all files in /etc/mellon directory:
sudo chown tableau-tsig mellon.key
sudo chown tableau-tsig mellon.cert
sudo chown tableau-tsig sp_metadata.xml
sudo chown tableau-tsig pre-auth_idp_metadata.xml
sudo chmod +r * mellon.key
sudo chmod +r * mellon.cert
sudo chmod +r * sp_metadata.xml
sudo chmod +r * pre-auth_idp_metadata.xml
6.
Create the /etc/mellon/conf.d directory:
sudo mkdir /etc/mellon/conf.d
7.
Create the global.conf file in the /etc/mellon/conf.d directory.
Copy the file contents as shown below, but update MellonCookieDomain with your
root domain name. For example, if domain name for Tableau is tableau-
.example.com, enter example.com for the root domain.
<Location "/">
AuthType Mellon
MellonEnable auth
Require valid-user
MellonCookieDomain <root domain>
MellonSPPrivateKeyFile /etc/mellon/mellon.key
MellonSPCertFile /etc/mellon/mellon.cert
MellonSPMetadataFile /etc/mellon/sp_metadata.xml
82 Tableau Software
Tableau Server Enterprise Deployment Guide
MellonIdPMetadataFile /etc/mellon/pre-auth_idp_metadata.xml
MellonEndpointPath /sso
</Location>
<Location "/tsighk">
MellonEnable Off
</Location>
8.
Create the mellonmod.conf file in the /etc/mellon/conf.d directory.
This file holds a single directive that specifies the location of the mod_auth_mel-
lon.so file. The location in the example here is the default location of the file. Verify
that the file is in this location, or change the path in this directive to match the actual loc-
ation of mod_auth_mellon.so:
LoadModule auth_mellon_module /usr/lib64/httpd/modules/mod_
auth_mellon.so
Create Tableau Server application in Okta
1. In Okta dashboard: Applications > Applications > Browse App Catalog
2. In Browse App Integration Catalog, search Tableau, select the Tableau Server tile,
and then click Add.
3. On Add Tableau Server > General Settings, enter a Label, and then click Next.
4. In Sign-On Options, select SAML2.0, and then scroll down to Advanced Sign-on Set-
tings:
l
SAML Entity ID: enter the public URL, for example, https://t-
ableau.example.com.
l
Application user name format:Email
5. Click the Identity Provider metadata link, to launch a browser. Copy the browser link.
This is the link you will use when you configure Tableau in the procedure that follows.
6. Click Done.
user name then assign the application in Assign Application.
Tableau Software 83
Tableau Server Enterprise Deployment Guide
Set authentication module configuration on Tableau Server
Run the following commands on Tableau Server Node 1. These commands specify the file
locations for the Mellon configuration files on the remote Independent Gateway computer.
Double-check that the file paths specified in these commands map to the paths and file loc-
ation on the remote Independent Gateway computer.
tsm configuration set -k gateway.tsig.authn_module_block -v
"/etc/mellon/conf.d/mellonmod.conf" --force-keys
tsm configuration set -k gateway.tsig.authn_global_block -v
"/etc/mellon/conf.d/global.conf" --force-keys
To reduce downtime, do not apply changes until you have enabled SAMLas described in the
next section.
Enable SAML on Tableau Server for IdP
Run this procedure on Tableau Server Node 1.
1.
Download the Tableau Server application metadata from Okta. Use the link that you
saved from the previous procedure:
wget https://dev-66144217.okta.-
com/app/exk1egxgt1fhjkSeS5d7/sso/saml/metadata -O idp_
metadata.xml
2.
Copy a TLScertificate and related key file to the Tableau Server. The key file must be
an RSAkey. For more information about SAMLcertificate and IdPrequirements, see
SAML Requirements (Linux).
To simplify certificate management and deployment, and as a security best practice,
we recommend using certificates generated by a major trusted-third party certificate
authority (CA). Alternatively, you may generate self-signed certificates or use cer-
tificates from a PKI for TLS.
84 Tableau Software
Tableau Server Enterprise Deployment Guide
If you do not have a TLScertificate, you can generate a self-signed certificate using the
embedded procedure below.
Generate a self-signed certificate
Run this procedure onTableau Server Node 1.
a.
Generate signing root certificate authority (CA) key:
openssl genrsa -out rootCAKey-saml.pem 2048
b.
Create the root CAcertificate:
openssl req -x509 -sha256 -new -nodes -key rootCAKey-sam-
l.pem -days 3650 -out rootCACert-saml.pem
You will be prompted to enter values for the certificate fields. For example:
Country Name (2 letter code) [XX]:US
State or Province Name (full name) []:Washington
Locality Name (eg, city) [Default City]:Seattle
Organization Name (eg, company) [Default Company Ltd]:T-
ableau
Organizational Unit Name (eg, section) []:Operations
Common Name (eg, your name or your server's hostname) []:t-
ableau.example.com
Email Address []:[email protected]
c.
Create the certificate and related key (server-saml.csrand server-sam-
l.key in the example below). The subject name for the certificate must match
the public host name of the Tableau host. The subject name is set with the -subj
option with the format "/CN=<host-name>", for example:
Tableau Software 85
Tableau Server Enterprise Deployment Guide
openssl req -new -nodes -text -out server-saml.csr -keyout
server-saml.key -subj "/CN=tableau.example.com"
d.
Signthe new certificate with the CAcertificate that you created above. The fol-
lowing command also outputs the certificate in the crt format:
openssl x509 -req -in server-saml.csr -days 3650 -CA
rootCACert-saml.pem -CAkey rootCAKey-saml.pem -CAcre-
ateserial -out server-saml.crt
e.
Convert the key file to RSA. Tableau requires an RSA key file for SAML. To con-
vert the key, run the following command:
openssl rsa -in server-saml.key -out server-saml-rsa.key
3.
Configure SAML. Run the following command, specifying your entity ID and return
URL, and the paths to the metadata file, certificate file, and key file:
tsm authentication saml configure --idp-entity-id "https://t-
ableau.example.com" --idp-return-url "https://t-
ableau.example.com" --idp-metadata idp_metadata.xml --cert-file
"server-saml.crt" --key-file "server-saml-rsa.key"
tsm authentication saml enable
4.
If your organization is running Tableau Desktop 2021.4 or later, then you must run the
following command to enable authentication through the reverse proxy servers.
Versions of Tableau Desktop 2021.2.1 - 2021.3 will work without running this com-
mand, provided that your pre-authentication module (e.g., Mellon) is configured to
allow top-level domain cookie preservation.
tsm configuration set -k features.ExternalBrowserOAuth -v false
5.
Apply configuration changes:
86 Tableau Software
Tableau Server Enterprise Deployment Guide
tsm pending-changes apply
Restart tsig-httpd service
As your Tableau Server deployment applies changes, sign back into the Tableau Server
Independent Gateway computer and run the following commands to restart the tsig-httpd ser-
vice:
sudo su - tableau-tsig
systemctl --user restart tsig-httpd
exit
Validate SAML functionality
To validate end-to-end SAMLfunctionality, sign-in to Tableau Server with the public URL(e.g.,
https://tableau.example.com) with the Tableau admin account that you created at the begin-
ning of this procedure.
If TSMdoesn't start ("gateway error") or if you get browser errors when you attempt to connect,
see Troubleshooting Tableau Server Independent Gateway.
Configure authentication module on second
instance of Independent Gateway
After you have successfully configured the first instance of Independent Gateway, deploy the
second instance. The example here is the final process for installing the AWS/Mellon/Okta
scenario described in this topic. The procedure assumes that you have already installed
Independent Gateway on the second instance as described in this topic previously (Install
Independent Gateway).
The process for deploying the second Independent Gateway requires the following steps:
Tableau Software 87
Tableau Server Enterprise Deployment Guide
1.
On the second instance of Independent Gateway: Install the Mellon auth module.
Do not configure the Mellon auth module as described earlier in this topic. Instead, you
must clone the configuration as described in the subsequent steps.
2.
On the configured (first) instance of Independent Gateway:
Take a tar copy of the existing Mellon configuration. The tar backup will preserve all dir-
ectory hierarchy and permissions. Run the following commands:
cd /etc
sudo tar -cvf mellon.tar mellon
Copy mellon.tar to the second instance of Independent Gateway.
3.
On the second instance of Independent Gateway:
Extract ("unzip") the tar file to the second instance in the /etc directory. Run the fol-
lowing commands:
cd /etc
sudo tar -xvf mellon.tar
4.
On Node 1 of the Tableau Server deployment: Update the connection file
(tsig.json) with the connection information from the second Independent Gateway.
You will need to retrieve the authentication key as described in this topic previously
(Install Independent Gateway).
An example connection file (tsig.json) is shown here:
{
"independentGateways": [
{
"id": "ip-10-0-1-169.ec2.internal",
"host": "ip-10-0-1-169.ec2.internal",
"port": "21319",
88 Tableau Software
Tableau Server Enterprise Deployment Guide
"protocol" : "http",
"authsecret": "13660-27118-29070-25482-9518-22453"
},
{
"id": "ip-10-0-2-230.ec2.internal",
"host": "ip-10-0-2-230.ec2.internal",
"port": "21319",
"protocol" : "http",
"authsecret": "9055-27834-16487-27455-30409-7292"
}]
}
5.
On Node 1 of the Tableau Server deployment: Run the following commands to update
the configuration:
tsm stop
tsm topology external-services gateway update -c tsig.json
tsm start
6.
On both instances of Independent Gateway:As Tableau Server is starting, restart the
tsig-httpd process:
sudo su - tableau-tsig
systemctl --user restart tsig-httpd
exit
7.
In AWS EC2>Target groups: Update target group to include the EC2 instance running
the second Independent Gateway instance.
Select the target group that you just created, and then click the Targets tab:
l
Click Edit.
l
Select the EC2 instance of the second Independent Gateway computer, and then
click Add to registered.Click Save.
Tableau Software 89
Tableau Server Enterprise Deployment Guide
Part 6 - Post-Installation Con-
figuration
Configure SSL/TLS from load balancer to
Tableau Server
Some organizations require end-to-end encryption channel from the client to the back end ser-
vice. The default reference architecture as described to this point specifies SSL from the cli-
ent to the load balancer running in the web tier of your organization.
This section describes how to configure SSL/TLS for Tableau Server and the Independent
Gateway in the example AWS reference architecture. For a configuration example describing
how to configure SSL/TLS on Apache in AWS reference architecture, see
Example:Configure SSL/TLS in AWSreference architecture.
At this time, TLS is not supported on the backend Tableau Server processes that run in the
8000-9000 range. To enable TLS, you must configure Independent Gateway with a relay con-
nection to the Tableau Server.
This procedure describes how to enable and configure TLS on Independent Gateway to
Tableau Server, and Tableau Server to Independent Gateway. The procedure encrypts the
relay traffic over HTTPS/443 and housekeeping traffic over HTTPS/21319.
The Linux procedures throughout this example show commands for RHEL-like distributions.
Specifically the commands here have been developed with the Amazon Linux 2 distribution. If
you are running the Ubuntu distribution, edit the commands accordingly.
The guidance here is prescriptive to the specific AWS example reference architecture as
presented in this Guide. Therefore, optional configurations are not included. For full reference
documentation, see Configure TLS on Independent Gateway (Linux).
90 Tableau Software
Tableau Server Enterprise Deployment Guide
Before you configure TLS
Perform the TLS configurations outside of business hours. Configuration requires at least one
restart of Tableau Server. If you are running a full four-node reference architecture deploy-
ment, then restarting can take a while.
l
Verify that clients can connect to Tableau Server over HTTP. Configuring TLS with
Independent Gateway is a multi-step process and may require troubleshooting. There-
fore, we recommend starting with a fully operational Tableau Server deployment before
configuring TLS.
l
Collect TLS/SSL certificates, keys, and related assets. You will need SSLcertificates for
the Independent Gateways and for Tableau Server. To simplify certificate management
and deployment, and as a security best practice, we recommend using certificates gen-
erated by a major trusted-third party certificate authority (CA). Alternatively, you may
generate self-signed certificates or use certificates from a PKI for TLS.
The example configuration in this topic uses the following asset names by way of illus-
tration:
l
tsig-ssl.crt: The TLS/SSL certificate for Independent Gateway.
l
tsig-ssl.key: The private key for tsig-ssl.crt on Independent Gateway.
l
ts-ssl.crt: The TLS/SSL certificate for Tableau Server.
l
ts-ssl.key: The private key for tsig-ssl.crt on Tableau Server.
l
tableau-server-CA.pem: The root certificate for the CA that generates the
certificates for the Tableau Server computers. This certificate is generally not
required if you are using certificates from major trusted-third parties.
l
rootTSIG-CACert.pem: The root certificate for the CA that generates the cer-
tificates for the Independent Gateway computers. This certificate is generally not
required if you are using certificates from major trusted-third parties.
l
There are other certificates and key file assets required for SAML that are
detailed in Part 5 of this Guide.
Tableau Software 91
Tableau Server Enterprise Deployment Guide
l
If your implementation requires the use of a certificate chain file, see the Know-
ledge Base article, Configure TLS on Independent Gateway when using a cer-
tificate that has a certificate chain.
l
Verify that you have access to IdP. If you are using an IdPfor authentication, you will
likely need to make changes to the recipient and destination URLs at the IdPafter you
have configured SSL/TLS.
Configure Independent Gateway computers for TLS
Configuring TLS can be an error prone process. Since troubleshooting across two instances
of Independent Gateway can be time consuming, we recommend enabling and configuring
TLSon the EDG deployment with just one Independent Gateway. After you have validated
that TLSworks across the deployment, then configure the second Independent Gateway com-
puter.
Step 1: Distribute certificates and keys to Independent Gateway com-
puter
You can distribute the assets to any arbitrary directory as long as the tsig-httpd user has read
access to the files. The paths to these files are referenced in other procedures. We will use
the example paths under /etc/ssl, as shown below, throughout the topic.
1.
Create directory for private key:
sudo mkdir -p /etc/ssl/private
2.
Copy the certificate and key files to the /etc/ssl paths. For example,
sudo cp tsig-ssl.crt /etc/ssl/certs/
sudo cp tsig-ssl.key /etc/ssl/private/
3.
(Optional)If you are using a self-signed or PKIcertificate for SSL/TLS on Tableau
Server, then you must copy the CA root certificate file to the Independent Gateway com-
92 Tableau Software
Tableau Server Enterprise Deployment Guide
puter as well. For example,
sudo cp tableau-server-CA.pem /etc/ssl/certs/
Step 2: Update the environmental variables for TLS
You must update port and protocol environmental variables for Independent Gateway con-
figuration.
Change these values by updating the file, /etc/opt/tableau/tableau_tsig/en-
vironment.bash, as follows :
TSIG_HK_PROTOCOL="https"
TSIG_PORT="443"
TSIG_PROTOCOL="https"
Step 3: Update the stub configuration file for HK protocol
Manually edit the stub configuration file (/var/opt/tableau/tableau_tsig/-
config/httpd.conf.stub) to set TLS-related Apache httpd directives for the house-
keeping (HK)protocol.
The stub configuration file includes a block of TLS-related directives that are commented out
with a #TLS# marker. Remove the markers from the directives as shown in the example
below. Note that the example shows use of root CAcertificate for the SSLcertificate used on
Tableau Server with the SSLCACertificateFile option.
#TLS# SSLPassPhraseDialog exec:/path/to/file
<VirtualHost *:${TSIG_HK_PORT}>
SSLEngine on
#TLS# SSLHonorCipherOrder on
#TLS# SSLCompression off
SSLCertificateFile /etc/ssl/certs/tsig-ssl.crt
SSLCertificateKeyFile /etc/ssl/private/tsig-ssl.key
SSLCACertificateFile /etc/ssl/certs/tableau-server-CA.pem
#TLS# SSLCARevocationFile /path/to/file
</VirtualHost>
Tableau Software 93
Tableau Server Enterprise Deployment Guide
These changes will be lost if you re-install Independent Gateway. We recommend making a
back-up copy.
Step 4:Copy stub file and restart the service
1.
Copy the file that you updated in the last step, to update httpd.conf with the changes:
cp /var/opt/tableau/tableau_tsig/config/httpd.conf.stub /var/-
opt/tableau/tableau_tsig/config/httpd.conf
2.
Restart the Independent Gateway service:
sudo su - tableau-tsig
systemctl --user restart tsig-httpd
exit
After you restart, the Independent Gateway will be nonoperational until you run the next set of
steps on Tableau Server. After you have completed the steps on Tableau Server, Independ-
ent Gateway will pick up changes and come online.
Configure Tableau Server Node 1 for TLS
Run these steps on Node 1 of the Tableau Server deployment.
Step 1: Copy certificates and keys and stop TSM
1.
Verify that you have the Tableau Server "external SSL"certificates and keys copied to
Node 1.
2.
To minimize downtime, we recommend stopping TSM, running the following steps, and
then starting TSM after changes have been applied:
tsm stop
94 Tableau Software
Tableau Server Enterprise Deployment Guide
Step 2: Set certificate assets and enable Independent Gateway con-
figuration
1.
Specify the location of certificate and key files for Independent Gateway. These paths
reference the location on the Independent Gateway computers. Note that this example
assumes the same certificate and key pair are used to protect HTTPS and house-
keeping traffic:
tsm configuration set -k gateway.tsig.ssl.cert.file_name -v
/etc/ssl/certs/tsig-ssl.crt --force-keys
tsm configuration set -k gateway.tsig.ssl.key.file_name -v
/etc/ssl/private/tsig-ssl.key --force-keys
2.
Enable TLS for HTTPS and HKprotocols for Independent Gateway:
tsm configuration set -k gateway.tsig.ssl.enabled -v true --
force-keys
tsm configuration set -k gateway.tsig.hk.ssl.enabled -v true --
force-keys
3.
(Optional)If you are using a self-signed or PKIcertificate for SSL/TLS on the Independ-
ent Gateway, then you must upload the CA root certificate file. The CAroot certificate
file is the root certificate that was used to generate the certificates for the Independent
Gateway computers. For example,
tsm security custom-cert add -c rootTSIG-CACert.pem
4.
(Optional)If you are using a self-signed or PKIcertificate for SSL/TLS on Tableau
Server, then you must copy the CA root certificate file to the Independent Gateway
/etc/ssl/certs directory. The CAroot certificate file is the root certificate that was
used to generate the certificates for the Tableau Server computers. After you have
copied the certificate to the Independent Gateway, you must specify the location of the
certificate on Node 1 with the following tsm command. For example,
Tableau Software 95
Tableau Server Enterprise Deployment Guide
tsm configuration set -k gateway.tsig.ssl.proxy.gateway_relay_
cluster.cacertificatefile -v /etc/ssl/certs/tableau-server-
CA.pem --force-keys
5.
(Optional:for testing purposes only)If you are using sharing self-signed or
PKIcertificates across computers and therefore the subject names on the certificates
do not match the computer names, then you must disable certificate verification.
tsm configuration set -k gateway.tsig.ssl.proxy.verify -v
optional_no_ca --force-keys
Step 3: Enable "external SSL" for Tableau Server and apply changes
1.
Enable and configure "external SSL" on Tableau Server:
tsm security external-ssl enable --cert-file ts-ssl.crt --key-
file ts-ssl.key
2.
Apply changes.
tsm pending-changes apply
Step 4: Update the gateway configuration JSON file and start tsm
1.
Update the Independent Gateway configuration file (for example, tsig.json) on the
Tableau Server side to specify the https protocol for the Independent Gateway
objects:
"protocol" : "https",
2.
Remove (or comment-out) the connection information for the second instance of
Independent Gateway. Be sure to verify the JSON in an external editor before you save
it.
After you have configured and validated TLS for the single instance of Independent
Gateway, you will update this JSON file with the connection information for the second
instance of Independent Gateway.
3.
Run the following command to update the Independent Gateway configuration:
96 Tableau Software
Tableau Server Enterprise Deployment Guide
tsm topology external-services gateway update -c tsig.json
4.
Start TSM.
tsm start
5.
While TSMis starting, sign in to the Independent Gateway instance and restart the
tsig-httpd service:
sudo su - tableau-tsig
systemctl --user restart tsig-httpd
exit
Update IdP authentication module URLs to HTTPS
If you have configured an external identity provider for Tableau, then you will likely need to
update return URLs in the IdPadministrative dashboard.
For example, if you are using a Okta pre-auth application, you will need to update the applic-
ation to use HTTPS protocol for the Recipient URLand the Destination URL.
Configure AWSload balancer for HTTPS
If you are deploying with AWS load balancer as documented in this guide, then you recon-
figure the AWSload balancer to send HTTPS traffic to the computers running Independent
Gateway:
1.
Delete existing HTTP target group:
In Target Groups, select the HTTP target group that has been configured for the load
balancer, click Actions, and then click Delete.
2.
Create HTTPS target group:
Target groups > Create target group
Tableau Software 97
Tableau Server Enterprise Deployment Guide
l
Select "Instances"
l
Enter a target group name, for example TG-internal-HTTPS
l
Select your VPC
l
Protocol:HTTPS 443
l
Under Health checks > Advanced health checks settings > Success codes,
append the code list to read: 200,303.
l
Click Create.
3.
Select the target group that you just created, and then click the Targets tab:
l
Click Edit
l
Select the EC2 instance that is running Tableau Server Independent Gateway
that you have configured, and then click Add to registered.
l
Click Save.
4.
After the target group is created, you must enable stickiness:
l
Open AWS Target Group page (EC2> Load Balancing> Target groups),
select the target group instance that you just set up. On the Action menu, select
Edit attributes.
l
On the Edit attributes page, select Stickiness, specify a duration of 1 day,
and then Save changes.
5.
On load balancer, update listener rules. Select the load balancer you have configured
for this deployment, and then click the Listeners tab.
l
For HTTP:80, click View/edit rules. On the resulting Rules page, click the edit
icon (once at the top of the page, and then again by the rule) to edit the rule.
Delete the existing THEN rule and replace it by clicking Add action > Redirect
to.... In the resulting THEN configuration, specify HTTPS and port 443 and leave
the other options to default settings. Save the setting and then click Update.
l
For HTTPS:443, click View/edit rules. On the resulting Rules page, click the
edit icon (once at the top of the page, and then again by the rule) to edit the rule.
Delete the existing THEN rule and replace it by clicking Add action > Forward
to.... Specify the Target group to the HTTPS group that you just created. Under
Group-level stickiness, enable stickiness and set duration to 1 day. Save the
setting and then click Update.
98 Tableau Software
Tableau Server Enterprise Deployment Guide
6.
On load balancer, update idle timeout to 400 seconds. Select the load balancer you
have configured for this deployment, and then click the Actions > Edit attributes. Set
Idle timeout to 400 seconds, and then click Save.
Validate TLS
To validate TLS functionality, sign-in to Tableau Server with the public URL(e.g., https://t-
ableau.example.com) with the Tableau admin account that you created at the beginning of this
procedure.
If TSMis not starting or you get other errors, see Troubleshooting Tableau Server Independent
Gateway.
Configure second instance of Independent
Gateway for SSL
After you have successfully configured the first instance of Independent Gateway, deploy the
second instance.
The process for deploying the second Independent Gateway requires the following steps:
1.
On the configured (first) instance of Independent Gateway: Copy the following files to
corresponding locations on the second instance of Independent Gateway:
l
/etc/ssl/certs/tsig-ssl.crt
l
/etc/ssl/private/tsig-ssl.key (You will need to create the private dir-
ectory on the second instance).
l
/var/opt/tableau/tableau_tsig/config/httpd.conf.stub
l
/etc/opt/tableau/tableau_tsig/environment.bash
2.
On Node 1 of the Tableau Server deployment: Update the connection file (tsig.json)
with the connection information from the second Independent Gateway.
An example connection file (tsig.json) is shown here:
Tableau Software 99
Tableau Server Enterprise Deployment Guide
{
"independentGateways": [
{
"id": "ip-10-0-1-169.ec2.internal",
"host": "ip-10-0-1-169.ec2.internal",
"port": "21319",
"protocol" : "https",
"authsecret": "13660-27118-29070-25482-9518-22453"
},
{
"id": "ip-10-0-2-230.ec2.internal",
"host": "ip-10-0-2-230.ec2.internal",
"port": "21319",
"protocol" : "https",
"authsecret": "9055-27834-16487-27455-30409-7292"
}]
}
3.
On Node 1 of the Tableau Server deployment: Run the following commands to update
the configuration:
tsm stop
tsm topology external-services gateway update -c tsig.json
tsm start
4.
On both instances of Independent Gateway:As Tableau Server is starting, restart the
tsig-httpd process on both instances of Independent Gateway:
sudo su - tableau-tsig
systemctl --user restart tsig-httpd
exit
5.
In AWS EC2>Target groups: Update target group to include the EC2 instance running
the second Independent Gateway instance.
100 Tableau Software
Tableau Server Enterprise Deployment Guide
Select the target group that you just created, and then click the Targets tab:
l
Click Edit.
l
Select the EC2 instance of the second Independent Gateway computer, and then
click Add to registered.Click Save.
Configure SSLfor Postgres
You may optionally configure SSL(TLS) for the Postgres connection for the external repository
connection on Tableau Server.
To simplify certificate management and deployment, and as a security best practice, we recom-
mend using certificates generated by a major trusted-third party certificate authority (CA).
Alternatively, you may generate self-signed certificates or use certificates from a PKI for TLS.
This procedure describes how to use OpenSSL to generate self-signed certificate on the Post-
gres host on a RHEL-like Linux distribution in the example AWS reference architecture.
After you generate and sign the SSL certificate, you must copy the CAcertificate to the
Tableau host.
On the host running Postgress:
1.
Generate signing root certificate authority (CA) key:
openssl genrsa -out pgsql-rootCAKey.pem 2048
2.
Create the root CAcertificate:
openssl req -x509 -sha256 -new -nodes -key pgsql-rootCAKey.pem
-days 3650 -out pgsql-rootCACert.pem
You will be prompted to enter values for the certificate fields. For example:
Country Name (2 letter code) [XX]:US
State or Province Name (full name) []:Washington
Locality Name (eg, city) [Default City]:Seattle
Tableau Software 101
Tableau Server Enterprise Deployment Guide
Organization Name (eg, company) [Default Company Ltd]:Tableau
Organizational Unit Name (eg, section) []:Operations
Common Name (eg, Postgres server's hostname) []:ip-10-0-1-
189.us-west-1.compute.internal
Email Address []:[email protected]
3.
Create the certificate and related key (server.csrand server.key in the example
below) for the Postgres computer. The subject name for the certificate must match the
EC2 private DNS name of the Postgres host. The subject name is set with the -subj
option with the format "/CN=<private DNSname>", for example:
openssl req -new -nodes -text -out server.csr -keyout serv-
er.key -subj "/CN=ip-10-0-1-189.us-west-1.compute.internal"
4.
Signthe new certificate with the CAcertificate that you created in step 2. The following
command also outputs the certificate in the crt format:
openssl x509 -req -in server.csr -days 3650 -CA pgsql-rootCACer-
t.pem -CAkey pgsql-rootCAKey.pem -CAcreateserial -out serv-
er.crt
5.
Copy the crt and key files to the Postgres /var/lib/pgsql/13/data/ path:
sudo cp server.crt /var/lib/pgsql/13/data/
sudo cp server.key /var/lib/pgsql/13/data/
6.
Switch to root user:
sudo su
7.
Set permissions on the cer and key files. Run the following commands:
cd /var/lib/pgsql/13/data
chown postgres.postgres server.crt
chown postgres.postgres server.key
chmod 0600 server.crt
chmod 0600 server.key
102 Tableau Software
Tableau Server Enterprise Deployment Guide
8.
Update the pg_haba configuration file, /var/lib/pgsql/13/data/pg_hba.conf
to specify md5 trust:
Change the existing connection statements from
host all all 10.0.30.0/24 password, and
host all all 10.0.31.0/24 password
to
host all all 10.0.30.0/24 md5, and
host all all 10.0.31.0/24 md5.
9.
Update the postgresql file, /var/lib/pgsql/13/data/postgresql.conf, by
adding this line:
ssl = on
10.
Exit root user mode:
exit
11.
Restart Postgres:
sudo systemctl restart postgresql-13
Optional: Enable certificate trust validation on Tableau Server
for Postgres SSL
If you followed the installation procedure in Part 4 - Installing and Configuring Tableau Server,
then Tableau Server is configured with optional SSL for the Postgres connection. This means
that configuring SSL on Postgres (as described above) will result in an encrypted connection.
If you want to require certificate trust validation for the connection, then you must run the fol-
lowing command on Tableau Server to reconfigure the Postgres host connection:
Tableau Software 103
Tableau Server Enterprise Deployment Guide
tsm topology external-services repository replace-host -f <file-
name>.json -c CACert.pem
Where <filename>.json is the connection file described in Configure external Postgres.
And CACert.pem is the CA certificate file for the SSL/TLS certificate used by Postgres.
Optional: Verify SSL connectivity
To verify SSL connectivity, you must:
l
Install the Postgresclient on Tableau Server Node1.
l
Copy the root certificate that you created in the previous procedure to the Tableau
host.
l
Connect to Postgres server from Node1
Install Postgres client on Node1
This example shows how to install version Postgres 13.4. Install the same version that you
are running for the external repository.
1.
On Node 1, create and edit the file, pgdg.repo, in the /etc/yum.repos.d path. Pop-
ulate the file with the following configuration information.
[pgdg13]
name=PostgreSQL 13 for RHEL/CentOS 7 - x86_64
baseurl-
l=https://download.postgresql.org/pub/repos/yum/13/redhat/rhel-
7-x86_64
enabled=1
gpgcheck=0
2.
Install the Postgres client:
sudo yum install postgresql13-13.4-1PGDG.rhel7.x86_64
104 Tableau Software
Tableau Server Enterprise Deployment Guide
Copy root certificate to Node 1
Copy the CAcertificate (pgsql-rootCACert.pem) to the Tableau host:
scp ec2-user@<private-DNS-name-of-Postgress-host>:/home/ec2-user-
/pgsql-rootCACert.pem /home/ec2-user
Connect to Postgres host over SSL from Node 1
Run the following command from Node1, specifying the Postgres server host IP address and
the root CA certificate:
psql "postgresql://postgres@<IP-address>:5432/-
postgres?sslmode=verify-ca&sslrootcert=pgsql-rootCACert.pem"
For example:
psql "post-
gresql://[email protected]:5432/postgres?sslmode=verify-ca&ssl-
rootcert=pgsql-rootCACert.pem"
Postgres will prompt you for the password. After successful sign in, the shell will return:
psql (13.4)
SSL connection (protocol: TLSv1.2, cipher: ECDHE-RSA-AES256-GCM-
SHA384, bits: 256, compression: off)
Type "help" for help.
postgres=#
Configure SMTP and event notifications
Tableau Server sends email notifications to admins and users. To enable this, you must con-
figure Tableau Server to send mail to your email server. You must also specify the event types,
thresholds, and subscription information you want sent.
Tableau Software 105
Tableau Server Enterprise Deployment Guide
For the initial configuration of SMTP,and notifications we recommend that you use the con-
figuration file template below to create a json file. You can also set any single configuration
key listed below with the syntax described tsm configuration set (Linux).
Run this procedure on Node 1 in your Tableau Server deployment:
1.
Copy the following json template to a file. Customize the file with your
SMTPconfiguration options and the subscription and alert notifications for your organ-
ization.
l
To see a list and description of all SMTP options see SMTP CLI configuration ref-
erence (Linux).
l
To see a list and description of all notification event options, see the CLIsection
of Configure Server Event Notification (Linux).
{
"configKeys": {
"svcmonitor.notification.smtp.server": "SMTP server host
name",
"svcmonitor.notification.smtp.send_account": "SMTP user name",
"svcmonitor.notification.smtp.port": 443,
"svcmonitor.notification.smtp.password": "SMTP user account
password",
"svcmonitor.notification.smtp.ssl_enabled": true,
"svcmonitor.notification.smtp.from_address": "From email
address",
"svcmonitor.notification.smtp.target_addresses": "To email
address1,address2",
"svcmonitor.notification.smtp.canonical_url": "Tableau Server
URL",
"backgrounder.notifications_enabled": true,
"subscriptions.enabled": true,
"subscriptions.attachments_enabled": true,
"subscriptions.max_attachment_size_megabytes": 150,
"svcmonitor.notification.smtp.enabled": true,
"features.DesktopReporting": true,
"storage.monitoring.email_enabled": true,
106 Tableau Software
Tableau Server Enterprise Deployment Guide
"storage.monitoring.warning_percent": 20,
"storage.monitoring.critical_percent": 15,
"storage.monitoring.email_interval_min": 25,
"storage.monitoring.record_history_enabled": true
}
}
2.
Run the tsm settings import -f file.json to pass the json file to Tableau Ser-
vices Manager.
3.
Run the tsm pending-changes apply command to apply the changes.
4.
Run the tsm email test-smtp-connection to view and verify the connection con-
figuration.
Install PostgreSQL driver
To view admin views on Tableau Server, the PostgreSQL driver must be installed on Node1 of
the Tableau Server deployment.
1.
Go to the Tableau Driver Download page and copy the URL for the PostgreSQL jar file.
2.
Run the following procedure on each node of the Tableau deployment:
l
Create the following file path:
sudo mkdir -p /opt/tableau/tableau_driver/jdbc
l
From the new path, download the latest version of the PostgreSQL jar file. For
example:
sudo wget https://-
downloads.tableau.com/drivers/linux/postgresql/postgresql-
42.2.22.jar
Tableau Software 107
Tableau Server Enterprise Deployment Guide
3.
On the initial node, restart Tableau Server:
tsm restart
Configure strong password policy
If you are not deploying Tableau Server with an IdP authentication solution, we recommend
security hardening the default Tableau password policy.
If you are deploying Tableau Server with an IdP, then you must manage password policies
with the IdP.
The following procedure includes json configuration for setting password policy on Tableau
Server. For more information about the options below, see Local Authentication (Linux).
1.
Copy the following json template to a file. Fill in the key values with your password
policy configuration.
{
"configKeys": {
"wgserver.localauth.policies.mustcontainletters.enabled":
true,
"wgserver.localauth.policies.mustcontainuppercase.enabled":
true,
"wgserver.localauth.policies.mustcontainnumbers.enabled":
true,
"wgserver.localauth.policies.mustcontainsymbols.enabled":
true,
"wgserver.localauth.policies.minimumpasswordlength.enabled":
true,
"wgserver.localauth.policies.minimumpasswordlength.value": 12,
"wgserver.localauth.policies.maximumpasswordlength.enabled":
false,
"wgserver.localauth.policies.maximumpasswordlength.value":
255,
"wgserver.localauth.passwordexpiration.enabled": true,
108 Tableau Software
Tableau Server Enterprise Deployment Guide
"wgserver.localauth.passwordexpiration.days": 90,
"wgserver.localauth.ratelimiting.maxbackoff.minutes": 60,
"wgserver.localauth.ratelimiting.maxattempts.enabled": false,
"wgserver.localauth.ratelimiting.maxattempts.value": 5,
"features.PasswordReset": true
}
}
2.
Run the tsm settings import -f file.json to pass the json file to Tableau Ser-
vices Manager to configure Tableau Server.
3.
Run the tsm pending-changes apply command to apply the changes.
Tableau Software 109
Tableau Server Enterprise Deployment Guide

Part 7 - Validation, Tools, and
Troubleshooting
This part includes post-installation validation steps and troubleshooting guidance.
Failover system validation
After you have configured your deployment, we recommend running simple failover tests to
validate system redundancy.
We recommend running the following steps to validate failover functionality:
1. Shut down the first instance of Independent Gateway (TSIG1). All inbound traffic
should route through the second instance of Independent Gateway (TSIG2).
2. Resart TSIG1 and then shut down TSIG2. All inbound traffic should route through
TSIG1.
3. Restart TSIG2.
4.
Shut down Tableau Server Node 1. All Vizportal/Application service traffic will fail over
to Node 2.
Note As of September 2022, Node 1 high availability was compromised on certain
versions of Tableau Server 2021.4 and later. Client connections will fail if Node 1
is down. This issue has been fixed in these maintenance releases:
- 2021.4.15 and later
- 2022.1.11 and later
- 2023.1.3 and later
To ensure your Tableau Server installation using ATR activations will have a 72
110 Tableau Software
Tableau Server Enterprise Deployment Guide

hour grace period after initial node failure, install or upgrade to one of these ver-
sions. For more details, see Tableau Server HA using ATR Does Not Have a Grace
Period After the Initial Node Failure in the Tableau Knowledge Base.
5. Restart Node1 and shut down Node 2. All Vizportal/Application service traffic will fail
over to Node 1.
6. Restart Node 2.
In this context "shutting down"or "restarting"is done by turning off the operating system or vir-
tual machine without attempting a graceful shut down of the application before hand. The goal
is to simulate a hardware or virtual machine failure.
The minimum validation step for each failover test is to authenticate with a user and perform
basic view operations.
You may get a "Bad Request"browser error when you attempt to sign-in after a simulated fail-
ure. You may see this error even if you clear the cache in the browser. Often this issue occurs
when the browser is caching data from previous IdP session. If this error persists even after
you clear the local browser cache, validate the Tableau scenario by connecting with a different
browser.
Initial node automated recovery
Tableau Server version 2021.2.4 and later include an automated initial node recovery script,
auto-node-recovery, in the scripts directory (/app/tableau_server-
/packages/scripts.<version>).
If there is a problem with the initial node and you have redundant processes on Node 2, there
is no guarantee that Tableau Server will continue to run. Tableau Server may continue to run
for up to 72 hours after an initial node failure, before the lack of the licensing service impacts
other processes. If so, your users may be able to continue to sign in and see and use their con-
tent after the initial node fails, but you will not be able to reconfigure Tableau Server because
you won't have access to the Administration Controller.
Tableau Software 111
Tableau Server Enterprise Deployment Guide

Even when configured with redundant processes, it is possible that Tableau Server may not
continue to function after the initial node fails.
To recover initial node (Node 1) failure:
1.
Sign in to Tableau Server Node 2.
2.
Change to the scripts directory:
cd /app/tableau_server/packages/scripts.<version>
3.
Run the following command to launch the script:
sudo ./auto-node-recovery -p node1 -n node2 -k <license keys>
Where <license keys> is a comma-separated (no spaces) list of the license keys
for your deployment. If you do not have access to your license keys, visit the Tableau
Customer Portal to retrieve them. For example:
sudo ./auto-node-recovery -p node1 -n node2 -k TSB4-8675-309F-
TW50-9RUS,TSNM-559N-ULL6-22VE-SIEN
112 Tableau Software
Tableau Server Enterprise Deployment Guide
The auto-node-recovery script will execute about 20 steps to recover services to Node 2. Each
step is displayed in the terminal as the script progresses. More detailed status is logged to
/data/tableau_data/logs/app-controller-move.log. In most environments, the
script takes between 35 and 45 minutes to complete.
Troubleshooting initial node recovery
If node recovery fails, you may find running the script interactively to allow or disallow discrete
steps in the process useful. For example, if the script fails part way through the process, you
can review log file, make changes to the configuration, and then run the script again. By run-
ning in interactive mode, you can then skip all the steps until you get to the step that failed.
To run in interactive mode, add the -i switch to the script argument.
Rebuilding the failed node
After you have run the script, Node 2 will be running all of the services that were formerly on
the failed Node 1 host. To add in the 4 node, you need to deploy a fresh Tableau Server host
with the bootstrap file and configure it as you did for the original Node 2, as specified in Part 4.
See Configure Node 2.
switchto
Switchto is a script from Tim that makes switching between windows easy.
1. Copy the following code into a file called switchto in the home directory on your bas-
tion host.
#!/bin/bash
#--------------------------------------------------------------
-----
# switchto
#
# Helper function to simplify SSH into the various AWS hosts
Tableau Software 113
Tableau Server Enterprise Deployment Guide
when
# following the Tableau Server Enterprise Deployment Guide
(EDG).
#
# Place this file on your bastion host and provide your AWS
hosts'
# internal ip addresses or machine names here.
# Example: readonly NODE1="10.0.3.187"
#
readonly NODE1=""
readonly NODE2=""
readonly NODE3=""
readonly NODE4=""
readonly PGSQL=""
readonly PROXY1=""
readonly PROXY2=""
usage() {
echo "Usage: switchto.sh [node1 | node2 | node3 | node4 |
pgsql | proxy1 | proxy2 ]"
}
ip=""
case $1 in
node1)
ip="$NODE1"
;;
node2)
ip="$NODE2"
;;
node3)
ip="$NODE3"
;;
114 Tableau Software
Tableau Server Enterprise Deployment Guide
node4)
ip="$NODE4"
;;
pgsql)
ip="$PGSQL"
;;
proxy1)
ip="$PROXY1"
;;
proxy2)
ip="$PROXY2"
;;
?)
usage
exit 0
;;
*)
echo "Unkown option $1."
usage
exit 1
;;
esac
if [[-z $ip ]]; then
echo "You must first edit this file to provide the ip addresses
of your AWS hosts."
exit 1
fi
ssh -A ec2-user@$ip
2. Update the IPaddresses in the script to map to your EC2 instances and then save the
file.
3. Apply permissions to the script file:
sudo chmod +x switchto
Tableau Software 115
Tableau Server Enterprise Deployment Guide
Usage:
To switch to a host, run the following command:
./switchto <target>
For example, to switch to Node 1, run the following command:
./switchto node1
Troubleshooting Tableau Server Independent
Gateway
Configuring Independent Gateway, Okta, Mellon, and SAML on Tableau Server can be an
error prone process. The most common root cause of failures is a string error. For example, a
trailing slash (/) on the Okta URLs specified during configuration may cause a
SAMLassertion-related mismatch error. This is just one example. There are many oppor-
tunities during configuration to input an incorrect string across any of the applications.
Restart tableau-tsig service
Always start (and finish) troubleshooting by restarting the tableau-tsig service on the
Independent Gateway computers. Restarting this service is quick and often triggers the
updated config to load from the Tableau Server.
Run the following commands on the Independent Gateway computer:
sudo su - tableau-tsig
systemctl --user restart tsig-httpd
exit
116 Tableau Software
Tableau Server Enterprise Deployment Guide
Find incorrect strings
If you have made a string error (copy/paste mistake, string truncated, etc), take time to walk
through each of the settings that you configured:
l
Okta pre-authentication configuration. Carefully review the URLs that you have set.
Look for trailing slashes. Verify HTTP vs HTTPS.
l
Shell history for SAMLconfiguration on Node 1. Review the tsm authentication
saml configure command that you ran. Verify that all of the URLs match those that
you have configured in Okta. While you are reviewing shell history from Node 1, verify
that the tsm configuration set commands that specify the Mellon configuration
file paths map exactly to the file paths where you copied the files on Independent Gate-
way.
l
Mellon configuration on Independent Gateway. Review the shell history to verify that
you created the metadata with the same URLstring that you have configured in Okta
and Tableau SAML. Verify that all the paths that are specified in/etc/mel-
lon/conf.d/global.conf are correct and that the MellonCookieDomain is set to
your root domain, not your Tableau subdomain.
Search relevant logs
If all strings appear to be set correctly, then you should inspect logs for errors.
Tableau Server logs errors and events to dozens of different log files. Independent Gateway
logs to a set of local files as well. We recommend inspecting these logs in the following order.
Independent Gateway log files
The default location of the Independent Gateway log files are at /var/-
opt/tableau/tableau_tsig/logs.
l
access.log:This log is useful to the extent that it has entries that show connections
from the Tableau Server nodes. If you are getting gateway errors (won't start) when you
attempt to start TSM, and there are no entries in the access.log file, then there is a
core connectivity issue. Always verify AWSsecurity group configuration as a first step.
Another common issue is a typo in tsig.json. If you make an update to tsig.json, run
Tableau Software 117
Tableau Server Enterprise Deployment Guide
tsm stop before running tsm topology external-services gateway
update -c tsig.json. After tsig.json is updated, run tsm start.
l
error.log:Among other entries, this log includes SAML and Mellon errors.
Tableau Server tabadminagent log file
The tabadminagent (not tabadmincontroller) set of files are the only relevant log files
for troubleshooting Independent Gateway-related errors.
You must find where Independent Gateway errors have been logged to tabdminagent.
These errors can be on any node, but they are only on one node. Perform the following steps
on each node in the Tableau Server cluster until you find the “independent” string:
1.
Locate the tabadminagent log file location on Tableau Server nodes 1-4 in EDG setup:
cd /data/tableau_data/data/tabsvc/logs/tabadminagent
2.
Open latest log to read:
less tabadminagent_nodeN.log
(replace N with node number)
3.
Search for all instances of “Independent” and “independent” - by using the following
search string:
/ndependent
If there are no matches, then go to next node and repeat steps 1-3.
4.
When you get a match: Shift + G to move to bottom to get last error messages.
Reload httpd stub file
Independent Gateway manages configuration of httpd for Apache. A generic operation that
will often fix transient issues is to reload the httpd stub file that seeds the underlying Apache
configuration. Run the following commands on both instances of Independent Gateway.
118 Tableau Software
Tableau Server Enterprise Deployment Guide
1.
Copy the stub file over to httpd.conf:
cp /var/opt/tableau/tableau_tsig/config/httpd.conf.stub /var/-
opt/tableau/tableau_tsig/config/httpd.conf
2.
Restart the Independent Gateway service:
sudo su - tableau-tsig
systemctl --user restart tsig-httpd
exit
Delete or move log files
Independent Gateway logs all access events. You will need to manage log file storage to avoid
filling up disk space. If your disk fills up Independent Gateway will be unable to write access
events and the service will fail. The following message will be logged to error.log on Independ-
ent Gateway:
(28)No space left on device: [client 10.0.2.209:54332] AH00646:
Error writing to /var/opt/tableau/tableau_tsig/-
logs/access.%Y_%m_%d_%H_%M_%S.log
This failure will result in a status of DEGRADED for the external node when you run tsm
status -v on Tableau Node 1. The external node in the status output refers to Independ-
ent Gateway.
To resolve this issue, delete or move the access.log files off the disk. Access.log files are
stored at /var/opt/tableau/tableau_tsig/logs. After you have cleared the disk,
restart tableau-tsig service.
Browser errors
Bad Request: A common error for this scenario is a "Bad Request"error from Okta. Often this
issue occurs when the browser is caching data from previous Okta session. For example, if
you manage the Okta applications as an Okta administrator and then attempt to access
Tableau using a different Okta-enabled account, session data from the administrator data may
Tableau Software 119
Tableau Server Enterprise Deployment Guide
cause the "Bad Request" error. If this error persists even after you clear the local browser
cache, try validating the Tableau scenario by connecting with a different browser.
Another cause of the "Bad Request"error is a typo in one of the many URLs that you enter
during the Okta, Mellon, and SAML configuration processes. Check that you entered all of
these without error.
Often the error.log file on the Independent Gateway server will specify which URLis caus-
ing the error.
Not Found - The requested URL was not found on this server:This error indicates one
of many configuration errors.
If the user is authenticated with Okta, and then receives this error, then it's likely that you have
uploaded the Okta pre-auth application to Tableau Server when you configured SAML. Verify
that you have the Okta Tableau Server application metadata configured on Tableau Server,
and not the Okta pre-auth application metadata
Other troubleshooting steps:
l
Review the Okta pre-auth application settings. Be sure HTTP vs HTTPS protocols are
set as specified in this topic.
l
Restart tsig-httpd on both Independent Gateway servers.
l
Verify that sudo apachectl configtest returns “Syntax OK” on both Independ-
ent Gateways.
l
Verify that the test user is assigned to both applications in Okta.
l
Verify that stickiess is set on the load balancer and associated target groups.
Verify TLSconnection from Tableau Server to Independent
Gateway
Use the wget command to verify connectivity and access from Tableau Server to Independ-
ent Gateway. Variations of this command can help you understand if certificate issues are
causing connection problems.
120 Tableau Software
Tableau Server Enterprise Deployment Guide
For example run this wget command to verify the housekeeping (HK)protocol from Tableau
Server:
wget https://ip-10-0-1-38.us-west-1.compute.internal:21319
Construct the URL with the same host address that you included for the host option of the
tsig.json file. Specify the https protocol, and append the URL with the HK port 21319.
To check connectivity and ignore certificate verification:
wget https://ip-10-0-1-38.us-west-1.compute.internal:21319 --no-
check-certificate
To verify root CA cert for TSIG is valid:
wget https://ip-10-0-1-38.us-west-1.compute.internal:21319 --ca-cer-
tificate=tsigRootCA.pem
If Tableau is able to communicate, then you may still get content-related errors, but you will not
get connection-related errors. If Tableau is unable to connect at all, then start by verifying pro-
tocol configuration in the firewall/security groups. For example, the inbound rules for the secur-
ity group where Independent Gateway resides must allow TCP21319.
Tableau Software 121
Tableau Server Enterprise Deployment Guide
Appendix - AWSDeployment Tool-
box
This topic includes tools and alternate deployment options for the reference architecture
when deployed in AWS. Specifically, this topic describes how to automate the example
AWSdeployment that is described throughout the EDG.
TabDeploy4EDG automated installation script
The TabDeploy4EDG script automates the implementation of the four-node Tableau deploy-
ment that is described in Part 4 - Installing and Configuring Tableau Server. If you are fol-
lowing the example AWS implementation as described in this Guide, then you may be able to
run TabDeploy4EDG.
Requirements. To run the script, you must prepare and configure the AWS environment
according to the example implementation in Part 3 - Preparing for Tableau Server Enterprise
Deployment:
l
VPC, subnet, and security groups have been configured as described. IP addresses do
not have to match those that are shown in the example implementation.
l
Four EC2 instances running the latest, updated builds of AWS Linux 2
l
PostgreSQL is installed and has been configured as described in Install, configure, and
tar PostgreSQL .
l
A Step 1 tar backup file is on the EC2 instance where PostgreSQLis installed, as
described in Take PostgreSQL Step 1 tar backup.
l
The EC2 instance that will be running Node 1 of the Tableau Server deployment has
been configured to communicate with PostgreSQL as described in Part 4 - Installing
and Configuring Tableau Server.
l
You have logged into each EC2 instance with an SSHsession from the bastion host.
The script takes about 1.5-2 hours to install and configure the four Tableau servers. The script
configures Tableau according to the prescribed settings of the reference architecture. The
script performs the following actions:
122 Tableau Software
Tableau Server Enterprise Deployment Guide
l
Restores Stage 1 backup of PostgreSQL host if you specify a path to the
PostgreSQLhost's tar file.
l
Obliterates existing Tableau installations on all nodes.
l
Runs sudo yum update on all nodes.
l
Downloads and copies Tableau rpm package to each node.
l
Downloads and installs dependencies to each node.
l
Creates /app/tableau_server and installs package on all nodes.
l
Installs Node 1 with a local identity store and configures external repository with Post-
greSQL.
l
Performs bootstrap installation and initial configuration of Node 2- Node 4.
l
Deletes the bootstrap file and the configuration file for TabDeploy4EDG.
l
Configures services across the Tableau cluster according to reference architecture spe-
cifications.
l
Validates installation and returns status for each node.
Download and copy the script to the bastion host
1. Copy the script from the TabDeploy4EDG samples page and paste the code into a file
called, TabDeploy4EDG.
2. Save the file to the home directory on the EC2 host that is serving as the bastion host.
3.
Run the following command to change the mode on the file to make it executable:
sudo chmod +x TabDeploy4EDG
Run TabDeploy4EDG
TabDeploy4EDG must be run from the bastion host. The script has been written with the
assumption that you are running under the context of ssh forward agent as described at
Example:Connect to bastion host in AWS. If you are not running with ssh forward agent con-
text, then you will be prompted for passwords throughout the installation process.
1.
Create, edit, and save a registration file (registration.json). The file must be a
properly-formatted json file. Copy and customize the following template:
{
"zip" : "97403",
"country" : "USA",
Tableau Software 123
Tableau Server Enterprise Deployment Guide
"city" : "Springfield",
"last_name" : "Simpson",
"industry" : "Energy",
"eula" : "yes",
"title" : "Safety Inspection Engineer",
"phone" : "5558675309",
"company" : "Example",
"state" : "OR",
"department" : "Engineering",
"first_name" : "Homer",
"email" : "[email protected]"
}
2.
Run the following command to generate a template configuration file:
./TabDeploy4EDG -g edg.config
3.
Open the configuration file to edit:
sudo nano edg.config
At a minimum, you must add the IPaddresses of each EC2 host, a file path to the regis-
tration file, and a valid license key.
4.
When you are done editing the configuration file, save it, and then close it.
5.
To run TabDeploy4EDG, run the following command:
./TabDeploy4EDG -f edg.config
Example: Automate AWS infrastructure
deployment with Terraform
This section describes how to configure and run Terraform to deploy the EDG reference archi-
tecture in AWS. The example Terraform configuration presented here deploys an AWSVPC
124 Tableau Software
Tableau Server Enterprise Deployment Guide
with the subnets, security groups, and EC2 instances that are described in Part 3 - Preparing
for Tableau Server Enterprise Deployment.
Sample Terraform templates are available on the Tableau Samples website at https://help.t-
ableau.com/samples/en-us/edg/edg-terraform.zip. These templates must be configured and
customized for your organization. The configuration content provided in this section describes
the minimum required template changes you must customize to deploy.
Goal
The Terraform templates and content provided here are intended to provide a working sample
that will allow you to deploy EDG quickly in a development test environment.
We've made a best effort to test and document the example Terraform deployment. However,
using Terraform to deploy and maintain EDG in a production environment will require Ter-
raform expertise that is beyond the scope of this example. Tableau does not provide support
for the example Terraform solution documented here.
End state
Follow the procedure in this section to set up a VPC in AWS that is functionally equivalent to
the VPC that is specified in Part 3 - Preparing for Tableau Server Enterprise Deployment.
Tableau Software 125
Tableau Server Enterprise Deployment Guide
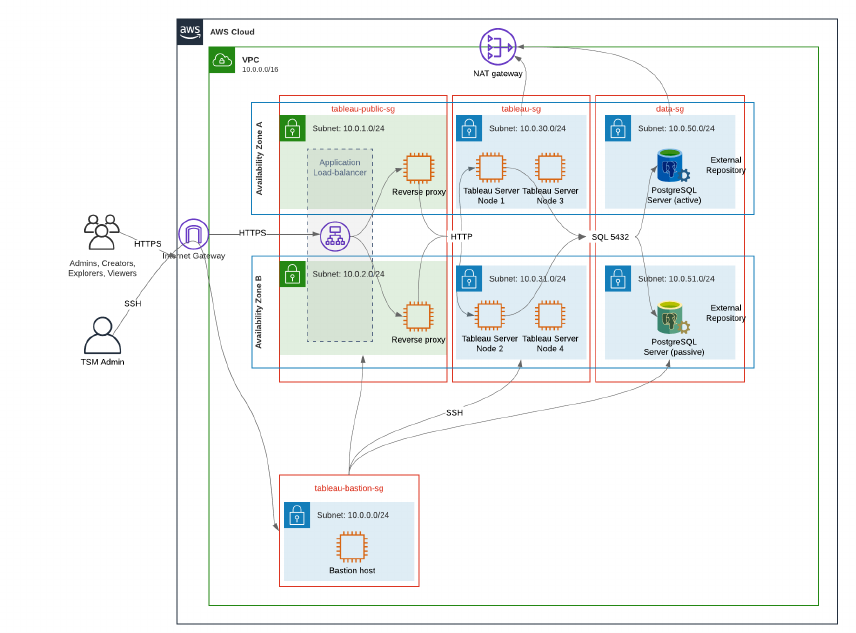
The sample Terraform templates and supporting content in this section:
l
Creates a VPC with an elastic IP address, two availability zones, and subnets organ-
ization as shown above (IP addresses are different)
l
Creates the Bastion, Public, Private, and Data security groups.
l
Sets most ingress and egress rules on the security groups. You will need to edit secur-
ity groups after Terraform runs.
l
Creates the following EC2 hosts (each running AWS Linux2): bastion, proxy 1 proxy 2,
Tableau node 1, Tableau node 2, Tableau node 3, Tableau node 4.
l
EC2 hosts for PostgreSQL are not created. You must create the EC2 manually in the
Data security group, and then install and configure PostgreSQL as described in Install,
configure, and tar PostgreSQL .
126 Tableau Software
Tableau Server Enterprise Deployment Guide
Requirements
l
AWS account - you must have access to an AWS account that allows you to create
VPCs.
l
If you are running Terraform from a Windows computer, you will need to install AWS
CLI.
l
An available elastic IP address in your AWS account.
l
A domain that is registered in AWS Route 53. Terraform will create a DNS zone and
related SSL certificates in Route 53. Therefore, the profile under which Terraform runs,
must also have appropriate permissions in Route 53.
Before you begin
l
The command line examples in this procedure are for Terminal with Apple OS. If you are
running Terraform on Windows you may need to adapt commands with file paths as
appropriate.
l
A Terraform project is made up of many text configuration files (.tf file extension). You
configure Terraform by customizing these files. If you do not have a robust text editor,
install Atom or Text++.
l
If you are sharing the Terraform project with others, we recommend storing the project
in Git for change management.
Step 1 - Prepare environment
A. Download and install Terraform
https://www.terraform.io/downloads
B. Generate private-public key pair
This is the key that you will use to access AWS and the resulting VPC environment. When you
run Terraform, you’ll include the public key.
Open Terminal and run the following commands:
Tableau Software 127
Tableau Server Enterprise Deployment Guide
1.
Create a private key. For example, my-key.pem:
openssl genrsa -out my-key.pem 1024
2.
Create a public key. This key format is not used for Terraform. You will convert it to a
ssh key later in this procedure:
openssl rsa -in my-key.pem -pubout > my-key.pub
3.
Set permissions on the private key:
sudo chmod 0600 my-key.pem
To set permissions on Windows:
l
Locate the file in Windows Explorer, right-click on it then select Properties. Nav-
igate to the Security tab and then click Advanced.
l
Change the owner to you, disable inheritance and delete all permissions. Grant
yourself Full control and then click Save. Mark the file as read-only.
4.
Create ssh public key. This is the key you’ll copy into Terraform later in the process.
ssh-keygen -y -f my-key.pem >my-key-ssh.pub
C. Download project and add state directory
1.
Download and unzip the EDG Terraform project and save them to your local computer.
After you unzip the download you’ll have a top-level directory, edg-terraform, and a
series of subdirectories.
2.
Create a directory called state, as a peer to the top-level edg-terraform directory.
Step 2: Customize the Terraform templates
You must customized the Terraform templates to suit your AWS and EDG environment. The
example here provides the minimum template customizations that most organization will
need to make. It's likely that your particular environment will require other customizations.
This section is organized by template name.
128 Tableau Software
Tableau Server Enterprise Deployment Guide
Be sure to save all changes before proceeding to Step 3 - Run Terraform.
versions.tf
There are three instances of versions.tf files where the required_version field must
match the version of terraform.exe you're using. Check the version of terraform (ter-
raform.exe -version) and update each of the following instances:
l
edg-terraform\versions.tf
l
edg-terraform\modules\proxy\versions.tf
l
edg-terraform\modules\tableau_instance\versions.tf
key-pair.tf
1.
Open the public key that you generated in Step 1B and copy the key:
less my-key-ssh.pub
Windows: Copy the contents of your public key.
2.
Copy the public key string into the public_key argument, for example:
resource "aws_key_pair" "tableau" {
key_name = "my-key"
public_key = "ssh-rsa AAAAB3NzaC1yc2EAAAADAQABAAAAgQ (truncated
example) dZVHambOCw=="
Ensure that the key_name value is unique in the datacenter or terraform apply will fail.
locals.tf
Update user.owner to your name or alias. The value you enter here will be used for the
"Name"tag in AWS on the resources that Terraform creates.
Tableau Software 129
Tableau Server Enterprise Deployment Guide
providers.tf
1.
Add tags per your organization's requirements. For example:
default_tags {
tags = {
"Application" = "tableau",
"Creator" = "[email protected]",
"DeptCode" = "8675309",
"Description" = "EDG",
"Environment" = "test",
"Group" = "[email protected]"
}
}
2.
If using provider, comment out the assume_role lines:
/* assume_role {
role_arn = "arn:aws:iam::310946706895:role/terraform-
backend"
session_name = "terraform"
}*/
elb.tf
Under 'resource "aws_lb" "tableau" {' choose a unique value to use for name and
tags.Name.
If another AWS load balancer has the same name in the datacenter, then terraform
apply will fail.
Add idle_timeout:
resource "aws_lb" "tableau" {
name = "edg-again-alb"
load_balancer_type = "application"
subnets = [for subnet in aws_subnet.public :
130 Tableau Software
Tableau Server Enterprise Deployment Guide
subnet.id]
security_groups = [aws_security_group.public.id]
drop_invalid_header_fields = true
idle_timeout = 400
tags = {
Name = "edg-again-alb"
}
}
variables.tf
Update root domain name. This name must match the domain that you have registered in
Route 53.
variable "root_domain_name" {
default = "example.com"
}
By default, the subdomain, tableau, is specified for the VPC DNS domain name. To change
this, update subdomain:
variable "subdomain" {
default = "tableau"
}
modules/tableau_instance/ec2.tf
There are two ec2.tf files in the project. This customization is for the Tableau instance of the
ec2.tf in the directory: modules/tableau_instance/ec2.tf.
l
If required, add tags blob:
tags = {
"Name" : var.ec2_name,
"user.owner" = "ALIAS",
"Application" = "tableau",
"Creator" = "[email protected]",
"DeptCode" = "8675309",
Tableau Software 131
Tableau Server Enterprise Deployment Guide
"Description" = "EDG",
"Environment" = "test",
"Group" = "[email protected]"
}
}
l
As needed, optionally update your storage to handle your data requirements:
Root volume:
root_block_device {
volume_size = 100
volume_type = "gp3"
}
Application volume:
resource "aws_ebs_volume" "tableau" {
availability_zone = data.aws_subnet.tableau.availability_zone
size = 500
type = "gp3"
}
Step 3 - Run Terraform
A. Initialize Terraform
In Terminal, change to the edg-terraform directory and run the following command:
terraform init
If initialization is successful continue to the next step. If initialize failed, follow the instructions
in the Terraform output.
B. Plan Terraform
From the same directory, run the plan command:
terraform plan
132 Tableau Software
Tableau Server Enterprise Deployment Guide
This command can be run multiple times. Run as many times as needed to fix errors. When
this command runs error free continue to the next step.
C. Apply Terraform
From the same directory run the apply command:
terraform apply
Terraform will prompt you to verify deployment, type Yes.
Optional: Destroy Terraform
You can destroy the entire VPC by running the destroy command:
terraform destroy
The destroy command will only destroy what it has created. If you have made manual changes
to some objects in AWS (i.e., security groups, subnets, etc), then the destroy will fail. To exit
out of a failing/hanging destroy operation, type Control + C. You must then clean up the
VPC manually to the state where it was when Terraform originally created it. You can then run
the destroy command.
Step 4 - Connect to bastion
All command line connection is through the bastion host on TCP 22 (SSH protocol).
1.
In AWS create an inbound rule in the bastion security group (AWS > Security Groups
> Bastion SG > Edit inbound rules) and create a rule to allow SSH (TCP22) con-
nections from the IPaddress or subnet mask where you will be running Terminal com-
mands.
Optional:You may find it helpful to allow file copying between the EC2 instances in the
Private and Public groups during deployment. Create inbound SSHrules:
l
Private: create inbound rule to allow SSH from Public
l
Public:create inbound rule to allow SSH from Private and from Public
Tableau Software 133
Tableau Server Enterprise Deployment Guide
2.
Use the pem key that you created in Step 1.B to connect to the bastion host:
On Mac terminal:
Run the following commands from the directory where the pem key is stored:
ssh-add —apple-use-keychain <keyName>.pem
If you get a warning about private key being accessible by others, then run this com-
mand: chmod 600 <keyName.pem> and then run the ssh-add command again.
Connect to the bastion host with this command: ssh -A ec2-user@IPaddress
For example: ssh -A [email protected].
On Windows using PuTTY and Pageant:
a.
Create ppk from pem key: Use PuTTY Key Generator. Load the pem key that
you created in Step 1.B. After the key imports, click Save private key. This cre-
ates a ppk file.
b.
In PuTTY - open configuration and make the following changes:
l
Sessions>Host Name: add IP address of bastion host.
l
Sessions>Port: 22
l
Connection>Data>Auto-login username: ec2-user
l
Connection>SSH>Auth>Allow agent forwarding
l
Connection>SSH>Auth> For private key, click Browse and select the .ppk
file that you just created.
c.
Install Pageant and load the ppk into the application.
Step 5 -Install PostgreSQL
The Terraform template does not install PostgreSQLfor use as the external repository.
However, the associated security group and subnet is created. If you will be installing
the external repository on an EC2 instance running PostgreSQL, then you must deploy
134 Tableau Software
Tableau Server Enterprise Deployment Guide
the EC2 instance as described in Part 3 - Preparing for Tableau Server Enterprise
Deployment.
Then install, configure, and tar-backup PostgreSQL as described in Part 4 - Installing
and Configuring Tableau Server.
Step 6 - (Optional) Run DeployTab4EDG
The TabDeploy4EDG script automates the implementation of the four-node Tableau
deployment that is described in Part 4. See TabDeploy4EDG automated installation
script.
Tableau Software 135
Tableau Server Enterprise Deployment Guide

Appendix - Web Tier with Apache
Example Deployment
This topic provides an end-to-end procedure that describes how to implement web tier in the
example AWS reference architecture. The example configuration is composed of the fol-
lowing components:
l
AWSapplication load balancer
l
Apache proxy servers
l
Mellon authentication module
l
Okta IdP
l
SAML authentication
Note:The example web tier configuration presented in this section includes detailed pro-
cedures for deploying third party software and services. We've made a best effort to
verify and document the procedures to enable the web tier scenario. However, the third-
party software may change or your scenario may differ from the reference architecture
described here. Please refer to third-party documentation for authoritative configuration
details and support.
136 Tableau Software
Tableau Server Enterprise Deployment Guide
The Linux examples throughout this section show commands for RHEL-like distributions. Spe-
cifically the commands here have been developed with the Amazon Linux 2 distribution. If you
are running the Ubuntu distribution, edit the commands accordingly.
Deploying the web tier in this example follows a stepwise configuration and verification pro-
cedure. The core web tier configuration consists of the following steps to enable HTTP
between Tableau and the internet. Apache is run and configured for reverse proxy/load bal-
ancing behind the AWS application load balancer:
1. Install Apache
2. Configure reverse proxy to test connectivity to Tableau Server
3. Configure load balancing on proxy
4. Configure AWS application load balancer
After the web tier is set up and connectivity with Tableau is verified, configure authentication
with an external provider.
Install Apache
Run the following procedure on both EC2 hosts (Proxy 1 and Proxy 2). If you are deploying in
AWS according to the reference architecture example then you should have two availability
zones and be running a single proxy server in each zone.
1.
Install Apache:
sudo yum update -y
sudo yum install -y httpd
2.
Configure to start Apache on reboot:
sudo systemctl enable --now httpd
3.
Verify that the version of httpd you have installed includes proxy_hcheck_module:
sudo httpd -M
Tableau Software 137
Tableau Server Enterprise Deployment Guide

The proxy_hcheck_module is required. If your version of httpd does not include this
module, then update to a version of httpd that does include it.
Configure proxy to test connectivity to Tableau
Server
Run this procedure on one of the proxy hosts (Proxy 1). The purpose of this step is to verify
connectivity between the internet to your proxy server to the Tableau Server in the private
security group.
1.
Create a file called tableau.conf and add it to the /etc/httpd/conf.d directory.
Copy the following code and specify the ProxyPass and ProxyPassReverse keys
with the private IP address of Tableau Server Node 1.
Important: The configuration shown below is not a secure and should not be used
in production. This configuration should only be used during the installation pro-
cess to verify end-to-end connectivity.
For example, if the private IPaddress of Node 1 is 10.0.30.32, then the contents of
the tableau.conf file would be:
<VirtualHost *:80>
ProxyPreserveHost On
ProxyPass "/" "http://10.0.30.32:80/"
ProxyPassReverse "/" "http://10.0.30.32:80/"
</VirtualHost>
2.
Restart httpd:
sudo systemctl restart httpd
138 Tableau Software
Tableau Server Enterprise Deployment Guide
Verification: Base topology configuration
You should be able to access the Tableau Server admin page by browsing to http://<-
proxy-public-IP-address>.
If the Tableau Server sign-in page does not load in your browser then follow these
troubleshooting steps on the Proxy 1 host:
l
Stop and then start httpd as a first troubleshooting step.
l
Double-check the tableau.conf file. Verify that the Node 1 private IP is correct. Verify
double-quotes and carefully review syntax.
l
Run the curl command on the reverse proxy server with Node 1 private IPaddress, for
example, curl 10.0.1.90. If the shell does not return html, or if it returns html for the
Apache test web page, then verify protocol/port configuration between the Public and
Private security groups.
l
Run the curl command with Proxy 1 private IPaddress, for example, curl
10.0.0.163. If the shell returns the html code for the Apache test web page, then the
proxy file is not configured correctly.
l
Always restart httpd (sudo systemctl restart httpd) after any configuration
change to the proxy file or to the security groups.
l
Make sure TSMis running on Node 1.
Configure load balancing on proxy
1.
On the same proxy host (Proxy 1) where you created the tableau.conf file, remove
the existing Virtual Host configuration and edit the file to include load-balancing logic.
For example:
<VirtualHost *:80>
ServerAdmin [email protected]
#Load balancing logic.
ProxyHCExpr ok234 {%{REQUEST_STATUS} =~ /^[234]/}
Header add Set-Cookie "ROUTEID=.%{BALANCER_WORKER_ROUTE}e;
path=/" env=BALANCER_ROUTE_CHANGED
<Proxy balancer://tableau>
Tableau Software 139
Tableau Server Enterprise Deployment Guide
#Replace IP addresses below with the IP addresses to the
Tableau Servers running the Gateway service.
BalancerMember http://10.0.3.40/ route=1 hcmethod=GET hcex-
pr=ok234 hcuri=/favicon.ico
BalancerMember http://10.0.4.151/ route=2 hcmethod=GET hcex-
pr=ok234 hcuri=/favicon.ico
ProxySet stickysession=ROUTEID
</Proxy>
ProxyPreserveHost On
ProxyPass / balancer://tableau/
ProxyPassReverse / balancer://tableau/
</VirtualHost>
2.
Stop and then start httpd:
sudo systemctl stop httpd
sudo systemctl start httpd
3.
Verify the configuration by browsing to the public IP address of Proxy 1.
Copy configuration to second proxy server
1. Copy the tableau.conf file from Proxy 1 and save it to the /etc/httpd/conf.d
directory on Proxy 2 host.
2.
Stop and then start httpd:
sudo systemctl stop httpd
sudo systemctl start httpd
3.
Verify the configuration by browsing to the public IP address of Proxy 2.
Configure AWS application load balancer
Configure the load balancer as an HTTPlistener. The procedure here describes how to add a
load balancer in AWS.
140 Tableau Software
Tableau Server Enterprise Deployment Guide

Step 1: Create target group
A target group is an AWS configuration that defines the EC2 instances running your proxy serv-
ers. These are the targets for traffic from the LBS.
1.
EC2>Target groups > Create target group
2.
On Create page:
l
Enter a target group name, for example TG-internal-HTTP
l
Target type:Instances
l
Protocol:HTTP
l
Port:80
l
VPC:Select your VPC
l
Under Health checks > Advanced health checks settings > Success codes,
append the code list to read: 200,303.
l
Click Create
3.
Select the target group that you just created, and then click the Targets tab:
l
Click Edit.
l
Select the EC2 instances (or single instance if you are configuring one at a time)
that are running proxy application, and then click Add to registered.
l
Click Save.
Step 2: Launch load balancer wizard
1.
EC2> Load Balancers > Create Load Balancer
2.
On "Select load balancer type" page, create an Application Load Balancer.
Note:The UI that is displayed to configure load balancer is not consistent across AWS
datacenters. The procedure below, "Wizard configuration," maps to the AWS con-
figuration wizard that begins with Step 1 Configure Load Balancer.
If your datacenter displays all configurations in a single page that includes a Create load
Tableau Software 141
Tableau Server Enterprise Deployment Guide

balancer button at the bottom of the page, then follow the "Single page configuration"
procedure below.
Wizard configuration
1.
Configure load balancer page:
l
Specify name
l
Scheme: internet-facing (default)
l
IP address type: ipv4 (default)
l
Listeners (Listeners and routing):
a. Leave the default HTTP listener
b. Click Add listener and add HTTPS:443
l
VPC:select the VPCwhere you've installed everything
l
Availability Zones:
l
Select the a and b for your datacenter regions
l
In each corresponding drop-down selector, select the Public subnet
(where your proxy servers reside).
l
Click: Configure Security Settings
2.
Configure Security Settings page
l
Upload your public SSLcertificate.
l
Click Next: Configure Security Groups.
3.
Configure Security Groups page:
l
Select the Public security group. If the Default security group is selected, then
clear that selection.
l
Click Next: Configure Routing.
4.
Configure Routing page
l
Target group: Existing target group.
l
Name: Select target group that you created earlier
l
Click Next: Register Targets.
5.
Register Targets page
142 Tableau Software
Tableau Server Enterprise Deployment Guide
l
The two proxy server instances that you configured previously should be dis-
played.
l
Click Next: Review.
6.
Review page
Click Create.
Single page configuration
Basic configuration
l
Specify name
l
Scheme: internet-facing (default)
l
IP address type: ipv4 (default)
Network mapping
l
VPC:select the VPCwhere you've installed everything
l
Mappings:
l
Select the a and b (or comparable) Availability Zones for your datacenter regions
l
In each corresponding drop-down selector, select the Public subnet (where your
proxy servers reside).
Security groups
Select the Public security group. If the Default security group is selected, then clear that selec-
tion.
Listeners and routing
l
Leave the default HTTP listener. For Default action, specify the Target Group that you
previously set up.
l
Click Add listener and add HTTPS:443. For Default action, specify the Target Group
that you previously set up.
Secure listener settings
l
Upload your public SSLcertificate.
Tableau Software 143
Tableau Server Enterprise Deployment Guide
Click Create load balancer.
Step 3: Enable stickiness
1.
After the load balancer is created, you must enable stickiness on the Target Group.
l
Open AWS Target Group page (EC2> Load Balancing> Target groups),
select the target group instance that you just set up. On the Action menu, select
Edit attributes.
l
On the Edit attributes page, select Stickiness, specify a duration of 1 day,
and then Save changes.
2.
On load balancer, enable stickiness on the HTTPlistener. Select the load balancer you
just configured, and then click the Listeners tab:
l
For HTTP:80, click View/edit rules. On the resulting Rules page, click the edit
icon (once at the top of the page, and then again by the rule) to edit the rule.
Delete the existing THEN rule and replace it by clicking Add action > Forward
to.... In the resulting THEN configuration, specify the same target group you
have created. Under Group-level stickiness, enable stickiness and set duration
to 1 day. Save the setting and then click Update.
Step 4: Set idle timeout on load balancer
On load balancer, update idle timeout to 400 seconds.
Select the load balancer you have configured for this deployment, and then click Actions >
Edit attributes. Set Idle timeout to 400 seconds, and then click Save.
Step 5:Verify LBS connectivity
Open AWS Load Balancer page (EC2> Load Balancers), select the load balancer instance
that you just set up.
Under Description, copy the DNSname and paste it into a browser to access the Tableau
Server sign in page.
If you get a 500-level error, then you may need to restart your proxy servers.
144 Tableau Software
Tableau Server Enterprise Deployment Guide
Update DNSwith public Tableau URL
Use your domain DNS zone name from the AWSLoad Balancer description to create a
CNAMEvalue in your DNS. Traffic to your URL(tableau.example.com) should be sent to the
AWSpublic DNS name.
Verify connectivity
After your DNSupdates are finished, you should be able to navigate to the Tableau Server
sign-in page by entering your public URL, for example,https://tableau.example.com.
Example authentication configuration:SAML
with external IdP
The following example describes how to setup and configure SAML with Okta IdP and Mellon
authentication module for a Tableau deployment running in the AWSreference architecture.
The example describes how to configure Tableau Server and the Apache proxy servers to use
HTTP. Okta will send request to the AWSload balancer over HTTPS, but all internal traffic will
travel over HTTP. As you configure for this scenario, be aware of the HTTPvs HTTPS pro-
tocols when setting URL strings.
This example uses Mellon as a pre-authentication service provider module on the reverse
proxy servers. This configuration ensures that only authenticated traffic connects to Tableau
Server, which also acts as a service provider with the Okta IdP. Therefore, you must configure
two IdPapplications:one for the Mellon service provider and one for the Tableau service pro-
vider.
Create Tableau administrator account
A common mistake when configuring SAML is to forget to create an administrator account on
Tableau Server before enabling SSO.
Tableau Software 145
Tableau Server Enterprise Deployment Guide
The first step is to create an account on Tableau Server with a Server Administrator role. For
the example Okta scenario, the username must be in a valid email address format, for
not be used after SAML is configured.
Configure Okta pre-auth application
The end-to-end scenario described in this section requires two Okta applications:
l
Okta pre-auth application
l
Okta Tableau Server application
Each of these applications are associated with different metadata that you will need to con-
figure on the reverse proxy and Tableau Server, respectively.
This procedure describes how to create and configure the Okta pre-auth application. Later in
this topic you will create the Okta Tableau Server application. For a free test Okta account
with limited users, see the Okta Developer web page.
Create a SAML app integration for the Mellon pre-authentication service provider.
1.
Open the Okta administration dashboard > Applications >Create App Integration.
2.
On Create a new app integration page, select SAML 2.0 and then click Next.
3.
On the General Settings tab, enter an App name, for example Tableau Pre-Auth,
and then click Next.
4.
On the Configure SAML tab:
l
Single sign on (SSO) URL. The final element of the path in the single sign on
URL is referred to as the MellonEndpointPath in the mellon.conf con-
figuration file that follows later in this procedure. You can specify whatever end-
point you would like. In this example, sso is the endpoint. The last element,
postResponse, is required: https://t-
ableau.example.com/sso/postResponse.
l
Clear the checkbox:Use this for Recipient URL and Destination URL.
146 Tableau Software
Tableau Server Enterprise Deployment Guide
l
Recipient URL: Same as SSO URL, but with HTTP. For example, http://t-
ableau.example.com/sso/postResponse.
l
Destination URL: same as SSO URL, but with HTTP. For example, http://t-
ableau.example.com/sso/postResponse.
l
Audience URI (SPEntity ID). For example, https://tableau.example.com.
l
Name ID format: EmailAddress
l
Application username: Email
l
Attributes Statements: Name = mail; Name format = Unspecified; Value =
user.email.
Click Next.
5.
On the Feedback tab, select:
l
I'm an Okta customer adding an internal app
l
This is an internal app that we have created
l
Click Finish.
6.
Create the pre-auth IdP metadata file:
l
In Okta: Applications > Applications > Your new application (e.g., Tableau
Pre-Auth) >Sign On
l
Adjacent to SAML Signing Certificates, click View SAMLsetup instructions.
l
On the How to Configure SAML 2.0 for <pre-auth> Application, page, scroll
down to Optional section, Provide the following IDP metadata to your SP
provider.
l
Copy the contents of the XMLfield and save them in a file called pre-auth_
idp_metadata.xml.
7.
(Optional) Configure multifactor authentication:
l
In Okta: Applications > Applications > Your new application (e.g., Tableau
Pre-Auth) >Sign On
l
Under Sign On Policy, click AddRule.
l
On the App Sign On Rule, specify a name and the different MFAoptions. To test
functionality, you can leave all options as default. However, under Actions, you
must select, Prompt for factor, and then specify how often users must sign in.
Click Save.
Tableau Software 147
Tableau Server Enterprise Deployment Guide
Create and assign Okta user
1. In Okta, create a user with the same username that you created in Tableau
([email protected]):Directory > People > Add person.
2. After the user is created, assign the new Okta app to that person: Click the user name
then assign the application in Assign Application.
Install Mellon for pre-auth
1.
On the EC2 instances that are running the Apache proxy server, run the following com-
mands to install PHP and Mellon modules:
sudo yum install httpd php mod_auth_mellon
2.
Create the /etc/httpd/mellon directory
Configure Mellon as pre-auth module
Run this procedure on both proxy servers.
You must have a copy of pre-auth_idp_metadata.xml file that you created from the
Okta configuration.
1.
Change directory:
cd /etc/httpd/mellon
2.
Create the service provider metadata. Run the mellon_create_metadata.sh
script. You must include the entity ID and the return URL for your organization in the
command.
The return URL is referred to as the single sign on URL in Okta. The final element of
the path in the return URL is referred to as the MellonEndpointPath in the mel-
lon.conf configuration file that follows later in this procedure. In this example, we spe-
cify sso as the endpoint path.
148 Tableau Software
Tableau Server Enterprise Deployment Guide
For example:
sudo /usr/libexec/mod_auth_mellon/mellon_create_metadata.sh
https://tableau.example.com "https://tableau.example.com/sso"
The script returns the service provider certificate, key, and metadata files.
3.
Rename the service provider files in the mellon directory for easier readability. We will
refer to these files by the following names in the documentation:
sudo mv *.key mellon.key
sudo mv *.cert mellon.cert
sudo mv *.xml sp_metadata.xml
4.
Copy the pre-auth_idp_metadata.xml file to the same directory.
5.
Create the mellon.conf file in the /etc/httpd/conf.d directory:
sudo nano /etc/httpd/conf.d/mellon.conf
6.
Copy the following contents into mellon.conf.
<Location />
MellonSPPrivateKeyFile /etc/httpd/mellon/mellon.key
MellonSPCertFile /etc/httpd/mellon/mellon.cert
MellonSPMetadataFile /etc/httpd/mellon/sp_metadata.xml
MellonIdPMetadataFile /etc/httpd/mellon/pre-auth_idp_
metadata.xml
MellonEndpointPath /sso
MellonEnable "info"
</Location>
7.
Add the following contents into the existing tableau.conf file:
Inside the <VirtualHost *:80> block, add the following content. Update Server-
Name with the public host name in your Entity ID:
Tableau Software 149
Tableau Server Enterprise Deployment Guide
DocumentRoot /var/www/html
ServerName tableau.example.com
ServerSignature Off
ErrorLog logs/error_sp.log
CustomLog logs/access_sp.log combined
LogLevel info
Add the Location block outside of the <VirtualHost *:80> block. Update Mel-
lonCookieDomain with the top-level domain to preserve cookie information as
shown:
<Location />
AuthType Mellon
MellonEnable auth
Require valid-user
MellonCookieDomain example.com
</Location>
The complete tableau.conf file should look like the following example:
<VirtualHost *:80>
ServerAdmin [email protected]
ProxyHCExpr ok234 {%{REQUEST_STATUS} =~ /^[234]/}
Header add Set-Cookie "ROUTEID=.%{BALANCER_WORKER_ROUTE}e;
path=/" env=BALANCER_ROUTE_CHANGED
<Proxy balancer://tableau>
BalancerMember http://10.0.3.36/ route=1 hcmethod=GET hcex-
pr=ok234 hcuri=/favicon.ico
BalancerMember http://10.0.4.15/ route=2 hcmethod=GET hcex-
pr=ok234 hcuri=/favicon.ico
ProxySet stickysession=ROUTEID
</Proxy>
ProxyPreserveHost On
ProxyPass / balancer://tableau/
ProxyPassReverse / balancer://tableau/
DocumentRoot /var/www/html
150 Tableau Software
Tableau Server Enterprise Deployment Guide
ServerName tableau.example.com
ServerSignature Off
ErrorLog logs/error_sp.log
CustomLog logs/access_sp.log combined
LogLevel info
</VirtualHost>
<Location />
AuthType Mellon
MellonEnable auth
Require valid-user
MellonCookieDomain example.com
</Location>
8.
Verify the configuration. Run the following command:
sudo apachectl configtest
If the configuration test returns an error, fix any errors and run configtest again. A suc-
cessful configuration will return, Syntax OK.
9.
Restart httpd:
sudo systemctl restart httpd
Create Tableau Server application in Okta
1. In Okta dashboard: Applications > Applications > Browse App Catalog
2. In Browse App Integration Catalog, search Tableau, select the Tableau Server tile,
and then click Add.
3. On Add Tableau Server > General Settings, enter a Label, and then click Next.
4. In Sign-On Options, select SAML2.0, and then scroll down to Advanced Sign-on Set-
tings:
l
SAML Entity ID: enter the public URL, for example, https://t-
ableau.example.com.
l
Application user name format:Email
Tableau Software 151
Tableau Server Enterprise Deployment Guide
5. Click the Identity Provider metadata link, to launch a browser. Copy the browser link.
This is the link you will use when you configure Tableau in the procedure that follows.
6. Click Done.
user name then assign the application in Assign Application.
Enable SAML on Tableau Server for IdP
Run this procedure on Tableau Server Node 1.
1.
Download the Tableau Server application metadata from Okta. Use the link that you
saved from the previous procedure:
wget https://dev-66144217.okta.-
com/app/exk1egxgt1fhjkSeS5d7/sso/saml/metadata -O idp_
metadata.xml
2.
Copy a TLScertificate and related key file to the Tableau Server. The key file must be
an RSAkey. For more information about SAMLcertificate and IdPrequirements, see
SAML Requirements (Linux).
To simplify certificate management and deployment, and as a security best practice,
we recommend using certificates generated by a major trusted-third party certificate
authority (CA). Alternatively, you may generate self-signed certificates or use cer-
tificates from a PKI for TLS.
If you do not have a TLScertificate, you can generate a self-signed certificate using the
embedded procedure below.
Generate a self-signed certificate
Run this procedure onTableau Server Node 1.
152 Tableau Software
Tableau Server Enterprise Deployment Guide
a.
Generate signing root certificate authority (CA) key:
openssl genrsa -out rootCAKey-saml.pem 2048
b.
Create the root CAcertificate:
openssl req -x509 -sha256 -new -nodes -key rootCAKey-sam-
l.pem -days 3650 -out rootCACert-saml.pem
You will be prompted to enter values for the certificate fields. For example:
Country Name (2 letter code) [XX]:US
State or Province Name (full name) []:Washington
Locality Name (eg, city) [Default City]:Seattle
Organization Name (eg, company) [Default Company Ltd]:T-
ableau
Organizational Unit Name (eg, section) []:Operations
Common Name (eg, your name or your server's hostname) []:t-
ableau.example.com
Email Address []:[email protected]
c.
Create the certificate and related key (server-saml.csrand server-sam-
l.key in the example below). The subject name for the certificate must match
the public host name of the Tableau host. The subject name is set with the -subj
option with the format "/CN=<host-name>", for example:
openssl req -new -nodes -text -out server-saml.csr -keyout
server-saml.key -subj "/CN=tableau.example.com"
d.
Signthe new certificate with the CAcertificate that you created above. The fol-
lowing command also outputs the certificate in the crt format:
openssl x509 -req -in server-saml.csr -days 3650 -CA
rootCACert-saml.pem -CAkey rootCAKey-saml.pem -CAcre-
ateserial -out server-saml.crt
Tableau Software 153
Tableau Server Enterprise Deployment Guide
e.
Convert the key file to RSA. Tableau requires an RSA key file for SAML. To con-
vert the key, run the following command:
openssl rsa -in server-saml.key -out server-saml-rsa.key
3.
Configure SAML. Run the following command, specifying your entity ID and return
URL, and the paths to the metadata file, certificate file, and key file:
tsm authentication saml configure --idp-entity-id "https://t-
ableau.example.com" --idp-return-url "https://t-
ableau.example.com" --idp-metadata idp_metadata.xml --cert-file
"server-saml.crt" --key-file "server-saml-rsa.key"
tsm authentication saml enable
4.
If your organization is running Tableau Desktop 2021.4 or later, then you must run the
following command to enable authentication through the reverse proxy servers.
Versions of Tableau Desktop 2021.2.1 - 2021.3 will work without running this com-
mand, provided that your pre-authentication module (e.g., Mellon) is configured to
allow top-level domain cookie preservation.
tsm configuration set -k features.ExternalBrowserOAuth -v false
5.
Apply configuration changes:
tsm pending-changes apply
Validate SAML functionality
To validate end-to-end SAMLfunctionality, sign-in to Tableau Server with the public URL
(e.g., https://tableau.example.com) with the Tableau admin account that you created at the
beginning of this procedure.
154 Tableau Software
Tableau Server Enterprise Deployment Guide
Validation troubleshooting
Bad Request: A common error for this scenario is a "Bad Request"error from Okta. Often this
issue occurs when the browser is caching data from previous Okta session. For example, if
you manage the Okta applications as an Okta administrator and then attempt to access
Tableau using a different Okta-enabled account, session data from the administrator data may
cause the "Bad Request" error. If this error persists even after you clear the local browser
cache, try validating the Tableau scenario by connecting with a different browser.
Another cause of the "Bad Request"error is a typo in one of the many URLs that you enter dur-
ing the Okta, Mellon, and SAML configuration processes. Check all of these carefully.
Often the httpd error.log file on the Apache server will specify which URLis causing the
error.
Not Found - The requested URL was not found on this server:This error indicates one of
many configuration errors.
If the user is authenticated with Okta, and then receives this error, then it's likely that you have
uploaded the Okta pre-auth application to Tableau Server when you configured SAML. Verify
that you have the Okta Tableau Server application metadata configured on Tableau Server,
and not the Okta pre-auth application metadata
Other troubleshooting steps:
l
Review tableau.conf carefully for typos or configuration errors
l
Review the Okta pre-auth application settings. Be sure HTTP vs HTTPS protocols are
set as specified in this topic.
l
Restart httpd on both proxy servers.
l
Verify that sudo apachectl configtest returns “Syntax OK” on both proxy serv-
ers.
l
Verify that the test user is assigned to both applications in Okta.
l
Verify that stickiess is set on the load balancer and associated target groups
Tableau Software 155
Tableau Server Enterprise Deployment Guide
Configure SSL/TLS from load balancer to
Tableau Server
Some organizations require end-to-end encryption channel from the client to the back end ser-
vice. The default reference architecture as described to this point specifies SSL from the cli-
ent to the load balancer running in the web tier of your organization.
To configure SSLfrom the load balancer to Tableau Server, you must:
l
Install a valid SSLcertificate on both the Tableau and proxy servers.
l
Configure SSLfrom the load balancer to the reverse proxy servers.
l
Configure SSL from the proxy servers to Tableau Server.
l
You may also configure SSL from Tableau Server to the PostgreSQL instance.
The remainder of this topic describes this implementation in the context of the example AWS
example reference architecture.
Example:Configure SSL/TLS in
AWSreference architecture
This section describes how to configure SSLon Tableau and configure SSL on an Apache
proxy server, all running in the example AWS reference architecture.
The Linux procedures throughout this example show commands for RHEL-like distributions.
Specifically the commands here have been developed with the Amazon Linux 2 distribution. If
you are running the Ubuntu distribution, edit the commands accordingly.
Step 1: Gather certificates and related keys
To simplify certificate management and deployment, and as a security best practice, we
recommend using certificates generated by a major trusted-third party certificate authority
(CA).
156 Tableau Software
Tableau Server Enterprise Deployment Guide
Alternatively, you may generate self-signed certificates or use certificates from a PKI for TLS.
The following procedure how to generate self-signed certificates. If you are using 3rd party cer-
tificates as we recommend, then you can skip this procedure.
Run this procedure on one of the proxy hosts. After you generate the certificate and associated
key, you will share it to the other proxy host and to Tableau Server Node 1.
1.
Generate signing root certificate authority (CA) key:
openssl genrsa -out rootCAKey.pem 2048
2.
Create the root CAcertificate:
openssl req -x509 -sha256 -new -nodes -key rootCAKey.pem -days
3650 -out rootCACert.pem
You will be prompted to enter values for the certificate fields. For example:
Country Name (2 letter code) [XX]:US
State or Province Name (full name) []:Washington
Locality Name (eg, city) [Default City]:Seattle
Organization Name (eg, company) [Default Company Ltd]:Tableau
Organizational Unit Name (eg, section) []:Operations
Common Name (eg, your name or your server's hostname) []:t-
ableau.example.com
Email Address []:[email protected]
3.
Create the certificate and related key (serverssl.csrand serverssl.key in the
example below). The subject name for the certificate must match the public host name
of the Tableau host. The subject name is set with the -subj option with the format
"/CN=<host-name>", for example:
openssl req -new -nodes -text -out serverssl.csr -keyout
serverssl.key -subj "/CN=tableau.example.com"
Tableau Software 157
Tableau Server Enterprise Deployment Guide
4.
Signthe new certificate with the CAcertificate that you created in step 2. The following
command also outputs the certificate in the crt format:
openssl x509 -req -in serverssl.csr -days 3650 -CA rootCACer-
t.pem -CAkey rootCAKey.pem -CAcreateserial -out serverssl.crt
Step 2: Configure proxy server for SSL
Run this procedure on both proxy servers.
1.
Install the Apache ssl module:
sudo yum install mod_ssl
2.
Create the /etc/ssl/private directory:
sudo mkdir -p /etc/ssl/private
3.
Copy the crt and key files to the following /etc/ssl/ paths:
sudo cp serverssl.crt /etc/ssl/certs/
sudo cp serverssl.key /etc/ssl/private/
4.
Update the existing tableau.conf with the following updates:
l
Add the SSL rewrite block:
RewriteEngine on
RewriteCond %{SERVER_NAME} =tableau.example.com
RewriteRule ^ https://%{SERVER_NAME}%{REQUEST_URI}
[END,NE,R=permanent]
l
In the SSLrewrite block, update the RewriteCond server name:add your pub-
lic host name, for example, tableau.example.com
l
Change <VirtualHost *:80> to <VirtualHost *:443>.
l
Wrap the <VirtualHost *:443> and the <Location /> blocks with
<IfModule mod_ssl.c> ... </IfModule>.
158 Tableau Software
Tableau Server Enterprise Deployment Guide
l
BalancerMember: change the protocol from http to https.
l
Add SSL* elements inside the <VirtualHost *:443> block:
SSLEngine on
SSLCertificateFile /etc/ssl/certs/serverssl.crt
SSLCertificateKeyFile /etc/ssl/private/serverssl.key
SSLProxyEngine on
SSLProxyVerify none
SSLProxyCheckPeerName off
SSLProxyCheckPeerExpire off
l
In the LogLevel element: add ssl:warn.
l
Optional:If you have installed and configured an authentication module, then you
may have additional elements in the tableau.conf file. For example, the <Loca-
tion /> </Location> block will include elements.
An example tableau.conf file configured for SSLis shown here:
RewriteEngine on
RewriteCond %{SERVER_NAME} =tableau.example.com
RewriteRule ^ https://%{SERVER_NAME}%{REQUEST_URI} [END,NE,R-
R=permanent]
<IfModule mod_ssl.c>
<VirtualHost *:443>
ServerAdmin [email protected]
ProxyHCExpr ok234 {%{REQUEST_STATUS} =~ /^[234]/}
Header add Set-Cookie "ROUTEID=.%{BALANCER_WORKER_ROUTE}e;
path=/" env=BALANCER_ROUTE_CHANGED
<Proxy balancer://tableau>
BalancerMember https://10.0.3.36/ route=1 hcmethod=GET hcex-
pr=ok234 hcuri=/favicon.ico
BalancerMember https://10.0.4.15/ route=2 hcmethod=GET hcex-
pr=ok234 hcuri=/favicon.ico
ProxySet stickysession=ROUTEID
</Proxy>
ProxyPreserveHost On
Tableau Software 159
Tableau Server Enterprise Deployment Guide
ProxyPass / balancer://tableau/
ProxyPassReverse / balancer://tableau/
DocumentRoot /var/www/html
ServerName tableau.example.com
ServerSignature Off
ErrorLog logs/error_sp.log
CustomLog logs/access_sp.log combined
LogLevel info ssl:warn
SSLEngine on
SSLCertificateFile /etc/ssl/certs/serverssl.crt
SSLCertificateKeyFile /etc/ssl/private/serverssl.key
SSLProxyEngine on
SSLProxyVerify none
SSLProxyCheckPeerName off
SSLProxyCheckPeerExpire off
</VirtualHost>
<Location />
#If you have configured a pre-auth module (e.g. Mellon) include
those elements here.
</Location>
</IfModule>
5.
Add index.html file to supress 403 errors:
sudo touch /var/www/html/index.html
6.
Restart httpd:
sudo systemctl restart httpd
Step 3: Configure Tableau Server for external SSL
Copy the serverssl.crt and serverssl.key files from the Proxy 1 host to the initial Tableau
Server (Node 1).
Run the following commands on Node 1:
160 Tableau Software
Tableau Server Enterprise Deployment Guide
tsm security external-ssl enable --cert-file serverssl.crt --key-
file serverssl.key
tsm pending-changes apply
Step 4:Optional authentication configuration
If you have configured an external identity provider for Tableau, then you will likely need to
update return URLs in the IdPadministrative dashboard.
For example, if you are using a Okta pre-auth application, you will need to update the applic-
ation to use HTTPS protocol for the Recipient URLand the Destination URL.
Step 5:Configure AWSload balancer for HTTPS
If you are deploying with AWS load balancer as documented in this guide, then you recon-
figure the AWSload balancer to send HTTPS traffic to the proxy servers:
1.
Deregister existing HTTP target group:
In Target Groups, select the HTTP target group that has been configured for the load
balancer, click Actions, and then click Register and deregister instance.
On the Register and deregister targets page, select the instances that are currently
configured, click Deregister, and then click Save.
2.
Create HTTPS target group:
Target groups > Create target group
l
Select "Instances"
l
Enter a target group name, for example TG-internal-HTTPS
l
Select your VPC
l
Protocol:HTTPS 443
l
Under Health checks > Advanced health checks settings > Success codes,
append the code list to read: 200,303.
l
Click Create.
3.
Select the target group that you just created, and then click the Targets tab:
Tableau Software 161
Tableau Server Enterprise Deployment Guide
l
Click Edit
l
Select the EC2 instances that are running proxy application, and then click Add
to registered.
l
Click Save.
4.
After the target group is created, you must enable stickiness:
l
Open AWS Target Group page (EC2> Load Balancing> Target groups),
select the target group instance that you just set up. On the Action menu, select
Edit attributes.
l
On the Edit attributes page, select Stickiness, specify a duration of 1 day,
and then Save changes.
5.
On load balancer, update listener rules. Select the load balancer you have configured
for this deployment, and then click the Listeners tab.
l
For HTTP:80, click View/edit rules. On the resulting Rules page, click the edit
icon (once at the top of the page, and then again by the rule) to edit the rule.
Delete the existing THEN rule and replace it by clicking Add action > Redirect
to.... In the resulting THEN configuration, specify HTTPS and port 443 and leave
the other options to default settings. Save the setting and then click Update.
l
For HTTP:443, click View/edit rules. On the resulting Rules page, click the edit
icon (once at the top of the page, and then again by the rule) to edit the rule. In
the THEN configuration, under Forward to... change theTarget group to the
HTTPS group that you just created. Under Group-level stickiness, enable stick-
iness and set duration to 1 day. Save the setting and then click Update.
Step 6:Verify SSL
Verify the configuration by browsing to https://tableau.example.com.
162 Tableau Software
Tableau Server Enterprise Deployment Guide
