
G:\RnD\01-Projets\Révélation\Revelation 24' iso 2D.3dm
REVELATION
IMPULSE ICONIC
PANACHE
TRADITION
EDGE EDGE LX
AZOR ESTELLA
04.19
V35037
INSTALLATION MANUAL
ROUND POOLS


ABOVE GROUND POOL SAFETY
warning
FAILURE TO HEED THESE WARNINGS CAN RESULT IN PERMANENT INJURY,
PARALYSIS FROM A BROKEN NECK, ELECTROCUTION OR DROWNING.
THIS POOL IS NOT DESIGNED FOR DIVING OR JUMPING!
DANGEROUS INJURY CAN RESULT. SHALLOW WATER!
Your pool contains a large quantity of water, and is deep enough to present inherent dangers to life and health unless the
following safety rules are strictly observed. First-time users run the highest risk of injury. Make sure everyone understands and
encourage all users especially children to learn how to swim. Learn Basic Life Support (Cardiopulmonary Resuscitation-CPR)
and refresh this knowledge regularly. Instruct all pool users, including children, what to do in case of an emergency. Keep a
working phone and a list of emergency phone numbers near the pool. This can make a life-saving dierence in the event of an
emergency. To ensure your pool is used safely you MUST observe the following safety precautions:
1. NO JUMPING OR DIVING
The top rail of your pool is not a walkway and must not be used for jumping or diving. Do not
permit jumping or diving into the pool from a deck or the top rail of the pool. Diving or jumping
into the pool can result in serious injury.
2. NEVER USE THE POOL ALONE
Never permit the pool to be used unless it is attended by at least one person other than the
bather. Someone should always be available to lend assistance in an emergency. Designate a
competent adult to supervise the pool each time it is being used. Vigilant supervision of weak
swimmers and non-swimmers by a competent adult is required at all times, remembering that
children under ve are at the highest risk of drowning.
3. NEVER LEAVE CHILDREN UNATTENDED
Never leave a child alone and unsupervised in or near the pool—not even for a second. There
is no substitute for constant adult supervision.
4. NO ROUGH PLAY
Do not permit “roughhousing” in and around your pool. Surfaces can become slippery and
hazardous when wet.
5. LIGHT THE POOL AT NIGHT
If the pool is used after dusk, adequate lighting must be provided. Illumination in the pool area
must be sufcient to clearly judge pool depth and all features in and around the pool. For light-
ing recommendations, consult your local licensed electrical contractor
6. RESTRICT ACCESS TO THE POOL
Do not leave chairs or other furniture beside the pool that could be used by a child to climb
up into the pool. Ladders must be removed whenever the pool is unattended. A fence with a
lockable gate around the pool or yard is strongly recommended and may be required by law
in some jurisdictions. Secure doors and windows, where applicable to prevent unauthorized
access to the swimming pool. Remove all toys from the swimming pool and surrounding area
when not in use to avoid attracting children to the pool. Barriers, pool covers, pool alarms
or similar safety devices are helpful aids, but they are not substitutes for continuous adult
supervision.
7. NO ALCOHOL OR DRUGS
Never drink alcoholic beverages, use any intoxicants or medication which could hinder your
judgment and reexes.
8. KEEP YOUR POOL CLEAN AND SANITARY
Your lter system will remove suspended particles from the water and the surface skimmer
will remove insects, leaves and other debris from the water surface. Use the correct pool
chemicals as directed to destroy harmful bacteria and prevent formation of algae. Remember,
unsanitary water is a serious health hazard.
The safety stickers must be installed as per following instructions. Failure to properly install warning labels will void warranty. Failure
to mount these safety labels may subject you to substantial liability in case of injury. These warnings are not to be removed under
any circumstances! If they become discolored or fall o please request replacements which will be sent at no charge.
FOLLOW ALL SAFETY INSTRUCTIONS
Read and follow all safety instructions packaged with pool, ladder,
deck or any other accessory. Additional pool safety publications can be
obtained by contacting: The Association of Pool & Spa Professionals
(www.apsp.org)
important notice read before installation!
9. KEEP OFF TOP LEDGES
Do not walk on top ledges. They can be slippery and they are not a walkway.
10. POOL COVER SAFETY
The cover must have a tamperproof locking retainer cable that positions the cover around the
pool wall and keeps it securely in place. Never allow anyone, especially small children on the
cover. Asphyxiation or drowning could result. Be sure to remove pool cover completely from
the water surface before entering the pool. When purchasing any pool cover, please consult a
swimming pool professional.
11. ELECTRICAL HAZARD
Never touch or attempt to service electrical equipment, including the lter when your body and/
or the ground is wet. Electrocution or permanent injury due to high voltage (120V AC) could
result. The pool should be bonded in accordance with Section 680-26 of the National Electical
Code. For further assistance contact your dealer or a local licensed electrician. Do not use pool
during electrical or rain storms.
12. SAFETY EQUIPMENT
Keep a safety rope 1/4" by 50" with a otation buoy with an outside diamter of 15". Have
accessible in a prominent area by your pool. Keep a pole not less that 16 feet (4,88m) long
with a blunt or hook end available at poolside in case of emergencies. Weak swimmers and
non-swimmers should wear personal protection equipment when using the pool.
13. POOL CHEMICALS
Store pool chemicals out of the reach of children. Do not place chlorine, chlorine tablets or
sticks directly into skimmer, or winterize your pool with liquid chlorine. Damage to the skimmer,
pool liner and lter will result. Failure to obey this instruction will void all component warranties.
Always follow chemical manufacturer’s instructions when storing, handling and dispensing pool
chemicals.
14. CHECK FOR DAMAGE
Periodically check your pool and ladder components for damage and wear. Be sure all screws
are in place. Replace all damaged or worn components and tighten all screws before you use
the pool, deck or ladders. At rst sign, remove rust and touch up immediately.
15. POOL PARTS
Never modify the pool or accessories, or remove or drill holes in the pool, deck or ladder com-
ponents unless instructed. Your pool wall is made of thin metal, there is an inherent cut hazard
with metal so use gloves during installation. Always use Original Equipment Manufactured parts
for your replacement parts.
remember
watch
children
place sign on
wall next to
pool entry
R.01/18
PLEASE READ BEFORE INSTALLATION
place sign on liner above water line, opposite entry to pool
Carefully read, understand and follow all information in this user manual before installing and using the swimming pool.
These warnings, instructions and safety guidelines address some common risks of water recreation, but they cannot
cover all risks and dangers in all cases. Always use caution, common sense and good judgment when enjoying any
water activity. RETAIN THIS INFORMATION FOR FUTURE USE.

IMPORTANT
INFORMATION
ABOUT YOUR LINER
We do not make or supply liners for our pools.
Please contact your liner’s manufacturer with questions or if
instructions are not included with the liner.
Liner must be installed per the liner manufacturer’s
instructions.
Incorrect liner installation may void the warranty.

No Diving or Jumping. Observe all Safety Rules
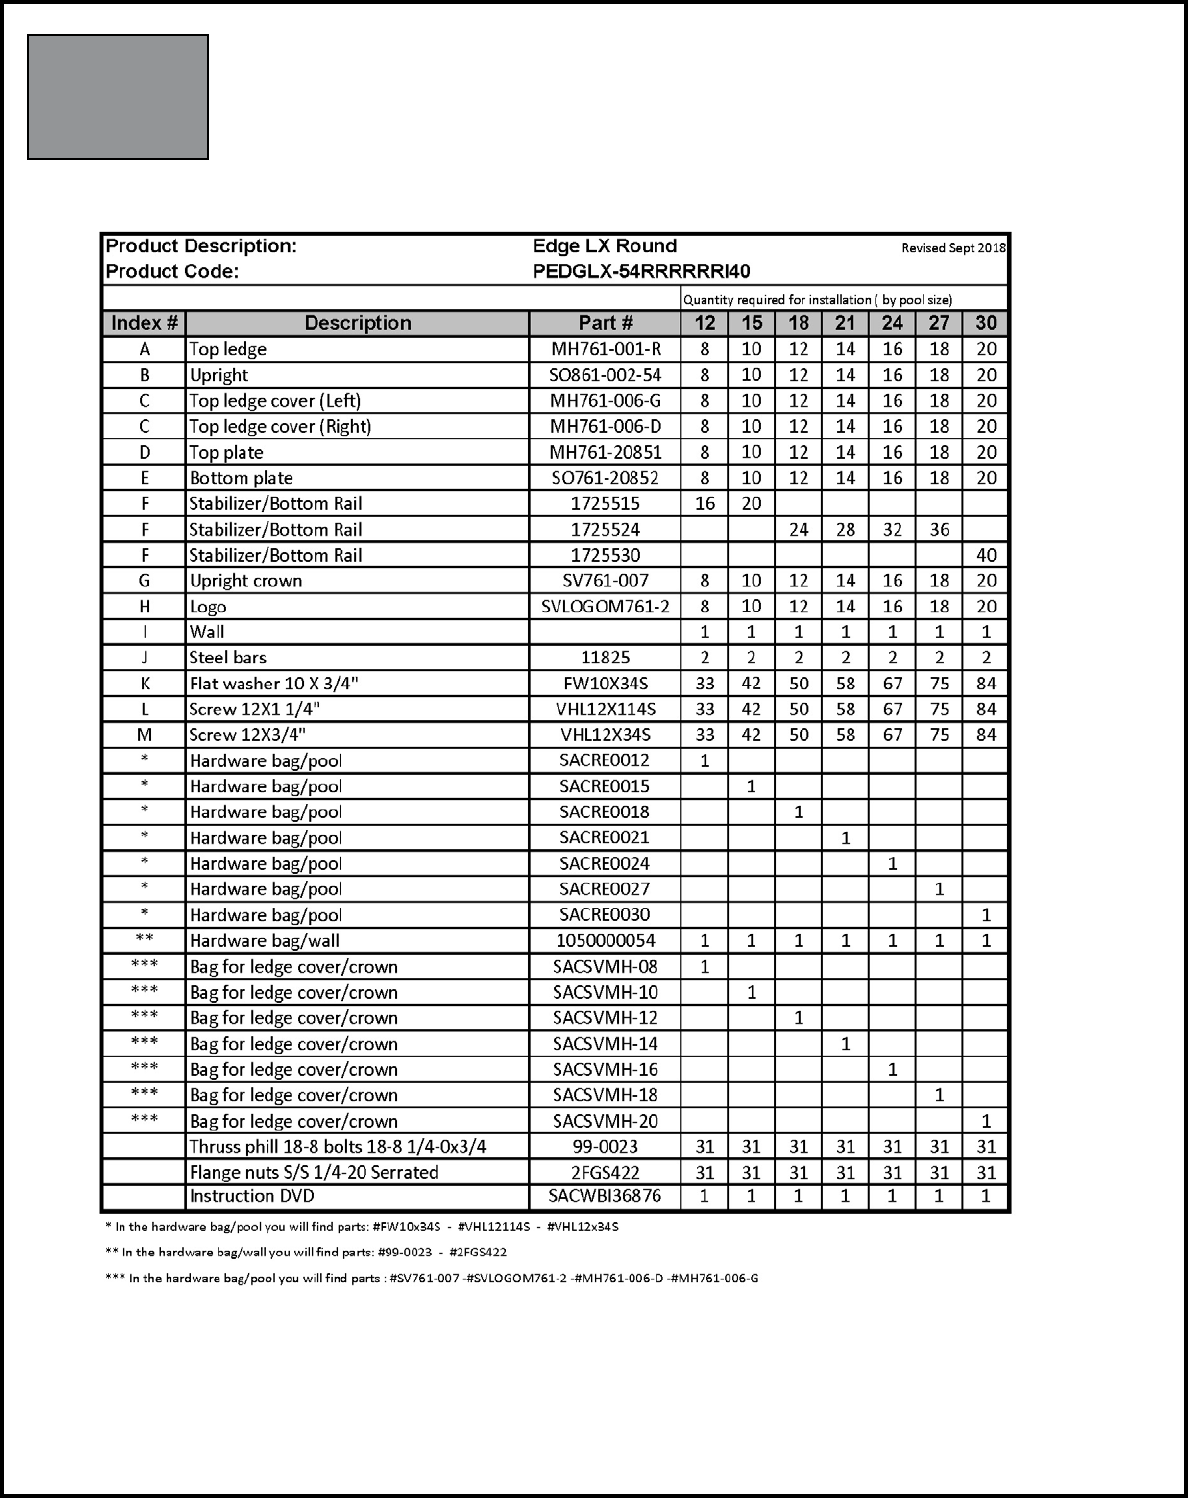
Parts Listing 1-1
PARTS LISTING - EXPLODED VIEW
GENERAL INSTRUCTIONS - ROUND POOLS
GROUND PREPARATION
Secon
1

No Diving or Jumping. Observe all Safety Rules
1-2 PartsListing
PARTS LISTING - CONTENT
GENERAL INSTRUCTIONS - ROUND POOLS
GROUND PREPARATION
Secon
1

No Diving or Jumping. Observe all Safety Rules
Parts Listing 1-3
PARTS LISTING - EXPLODED VIEW
GENERAL INSTRUCTIONS - ROUND POOLS
GROUND PREPARATION
Secon
1

No Diving or Jumping. Observe all Safety Rules
1-4 PartsListing
PARTS LISTING - CONTENT
GENERAL INSTRUCTIONS - ROUND POOLS
GROUND PREPARATION
Secon
1

No Diving or Jumping. Observe all Safety Rules
Parts Listing 1-5
PARTS LISTING - EXPLODED VIEW
GENERAL INSTRUCTIONS - ROUND POOLS
GROUND PREPARATION
Secon
1

No Diving or Jumping. Observe all Safety Rules
1-6 PartsListing
PARTS LISTING - CONTENT
GENERAL INSTRUCTIONS - ROUND POOLS
GROUND PREPARATION
Secon
1

No Diving or Jumping. Observe all Safety Rules
Parts Listing 1-7
PARTS LISTING - EXPLODED VIEW
GENERAL INSTRUCTIONS - ROUND POOLS
GROUND PREPARATION
Secon
1

No Diving or Jumping. Observe all Safety Rules
1-8 PartsListing
PARTS LISTING - CONTENT
GENERAL INSTRUCTIONS - ROUND POOLS
GROUND PREPARATION
Secon
1

No Diving or Jumping. Observe all Safety Rules
Parts Listing 1-9
PARTS LISTING - EXPLODED VIEW
GENERAL INSTRUCTIONS - ROUND POOLS
GROUND PREPARATION
Secon
1

No Diving or Jumping. Observe all Safety Rules
1-10 PartsListing
PARTS LISTING - CONTENT
GENERAL INSTRUCTIONS - ROUND POOLS
GROUND PREPARATION
Secon
1

No Diving or Jumping. Observe all Safety Rules
Parts Listing 1-11
PARTS LISTING - EXPLODED VIEW
GENERAL INSTRUCTIONS - ROUND POOLS
GROUND PREPARATION
Secon
1

No Diving or Jumping. Observe all Safety Rules
1-12 PartsListing
PARTS LISTING - CONTENT
GENERAL INSTRUCTIONS - ROUND POOLS
GROUND PREPARATION
Secon
1

No Diving or Jumping. Observe all Safety Rules
Parts Listing 1-13
PARTS LISTING - EXPLODED VIEW
GENERAL INSTRUCTIONS - ROUND POOLS
GROUND PREPARATION
Secon
1

No Diving or Jumping. Observe all Safety Rules
1-14 PartsListing
PARTS LISTING - CONTENT
GENERAL INSTRUCTIONS - ROUND POOLS
GROUND PREPARATION
Secon
1

No Diving or Jumping. Observe all Safety Rules
Parts Listing 1-15
PARTS LISTING - EXPLODED VIEW
GENERAL INSTRUCTIONS - ROUND POOLS
GROUND PREPARATION
Secon
1

No Diving or Jumping. Observe all Safety Rules
1-16 PartsListing
PARTS LISTING - CONTENT
GENERAL INSTRUCTIONS - ROUND POOLS
GROUND PREPARATION
Secon
1

No Diving or Jumping. Observe all Safety Rules
Parts Listing 1-17
PARTS LISTING - EXPLODED VIEW
GENERAL INSTRUCTIONS - ROUND POOLS
GROUND PREPARATION
Secon
1

No Diving or Jumping. Observe all Safety Rules
1-18 PartsListing
PARTS LISTING - CONTENT
GENERAL INSTRUCTIONS - ROUND POOLS
GROUND PREPARATION
Secon
1

No Diving or Jumping. Observe all Safety Rules
Parts Listing 1-19
PARTS LISTING - EXPLODED VIEW
GENERAL INSTRUCTIONS - ROUND POOLS
GROUND PREPARATION
Secon
1

No Diving or Jumping. Observe all Safety Rules
1-20 PartsListing
PARTS LISTING - CONTENT
GENERAL INSTRUCTIONS - ROUND POOLS
GROUND PREPARATION
Secon
1

No Diving or Jumping. Observe all Safety Rules
Parts Listing 1-21
PARTS LISTING - EXPLODED VIEW
GENERAL INSTRUCTIONS - ROUND POOLS
GROUND PREPARATION
Secon
1

No Diving or Jumping. Observe all Safety Rules
1-22 PartsListing
PARTS LISTING - CONTENT
GENERAL INSTRUCTIONS - ROUND POOLS
GROUND PREPARATION
Secon
1

No Diving or Jumping. Observe all Safety Rules
Parts Listing 1-23
PARTS LISTING - EXPLODED VIEW
GENERAL INSTRUCTIONS - ROUND POOLS
GROUND PREPARATION
Secon
1

No Diving or Jumping. Observe all Safety Rules
1-24 PartsListing
PARTS LISTING - CONTENT
GENERAL INSTRUCTIONS - ROUND POOLS
GROUND PREPARATION
Secon
1

No Diving or Jumping. Observe all Safety Rules
Parts Listing 1-25
PARTS LISTING - EXPLODED VIEW
GENERAL INSTRUCTIONS - ROUND POOLS
GROUND PREPARATION
Secon
1

No Diving or Jumping. Observe all Safety Rules
1-26 PartsListing
PARTS LISTING - CONTENT
GENERAL INSTRUCTIONS - ROUND POOLS
GROUND PREPARATION
Secon
1

No Diving or Jumping. Observe all Safety Rules
Parts Listing 1-27
PARTS LISTING - EXPLODED VIEW
GENERAL INSTRUCTIONS - ROUND POOLS
GROUND PREPARATION
Secon
1

No Diving or Jumping. Observe all Safety Rules
1-28 PartsListing
PARTS LISTING - CONTENT
GENERAL INSTRUCTIONS - ROUND POOLS
GROUND PREPARATION
Secon
1

No Diving or Jumping. Observe all Safety Rules
Parts Listing 1-29
PARTS LISTING - EXPLODED VIEW
GENERAL INSTRUCTIONS - ROUND POOLS
GROUND PREPARATION
Secon
1
No Diving or Jumping. Observe all Safety Rules
1-30 PartsListing
PARTS LISTING - CONTENT
GENERAL INSTRUCTIONS - ROUND POOLS
GROUND PREPARATION
Secon
1

No Diving or Jumping. Observe all Safety Rules
Parts Listing 1-31
PARTS LISTING - EXPLODED VIEW
GENERAL INSTRUCTIONS - ROUND POOLS
GROUND PREPARATION
Secon
1

No Diving or Jumping. Observe all Safety Rules
1-32 PartsListing
PARTS LISTING - CONTENT
GENERAL INSTRUCTIONS - ROUND POOLS
GROUND PREPARATION
Secon
1

1-1
No Diving or Jumping. Observe all Safety Rules
A. DETERMINE THE LOCATION OF YOUR POOL
1. The Terrain
Pay special attention to choosing the right location for
your pool:
• Choose a large area, as flat and level as possible and
well drained. (Image 1)
• Choose a spot on dry, firm earth (stabilizer or
other)—do not install the pool on asphalt, tar or oil
based surfaces, gravel, peat moss, wood or chemically
treated soil.
• Check with your pool dealer to see if Nut Grass grows
in your area. This type of grass may grow up through
your pool liner. Your dealer will be able to advise how
best to treat the site.
• Sloped areas will need to be made level by digging
away high spots, not by filling low spots—be prepared
to hire earth-moving equipment if necessary.
(Images 2a & 2b)
• Ensure the earth is well compacted and a wall is
placed to prevent the earth from seeping out.
(Image 2a)
• If you need to install partly in the ground, you
must contact your dealer to see if this is an option
for you and that you meet law requirements in your
jurisdiction. (Image 2c)
1
Important Note:
Ground preparation is one of the most important steps in
the installation process. A proper foundation will ensure
the rest of the pool assembly goes smoothly and that no
problems will occur when the pool is filled with water.
2a
2c
2b
GENERAL INSTRUCTIONS - ROUND POOLS
GROUND PREPARATION
Secon
1
READ ALL INSTRUCTIONS CAREFULLY
The approximate me it takes for installaon, excluding earthworks and lling is about 1/2 day.
You will need at least 3 people to help with installaon.

1-2
No Diving or Jumping. Observe all Safety Rules
A. CONT. DETERMINE THE LOCATION OF YOUR POOL
2. Things to Avoid
Do not locate your pool near or on any of the following
(Images 3a to 3c):
• Overhanging tree branches.
• Overhead wires and clotheslines.
• Buried pipes and wires. Contact your gas, electric
and telephone utilities to find buried pipes and wires
before you dig.
• Areas with poor drainage.
• Grass, stones and roots. Grass will rot underneath the
pool liner, and stones and roots will damage the pool
liner.
• Areas recently treated with oil-based weed killers,
chemicals or fertilizers.
3. Plan Ahead
• Will you be adding an adjacent deck later?
Be sure to leave room.
• Will you be using pool accessories or other
appliances that need electricity or gas? Locate your
pool near these services or plan to have them installed
later by a licensed contractor.
Important Note:
When locating the centre of the pool, be sure to take
into consideration any structures (deck, patio, house)
or relevant items (change rooms, gazebo, etc.) that the
pool may need to line up with and ensure that the pool
is in the most visual pleasing location for your property.
3a
3b
3c
GENERAL INSTRUCTIONS - ROUND POOLS
GROUND PREPARATION
Secon
1

1-3
No Diving or Jumping. Observe all Safety Rules
A. CONT. DETERMINE THE LOCATION OF YOUR POOL
Compactor Hammer Water hose Level File
Vacuum cleaner Pliers Rake Lawn roller Metal snips
Screwdriver Wheelbarrow Shovel Spraypaint Mallet
Measuring tape Duct tape Trowel Wrench Gloves
4. Tools Needed
List of required materials
• Straight wood plank
• Material that provides a permanent base (ex. Crushed stone)
• Fine sand (void of debris)
• Cement blocks (5cm x 20cm x 40cm / 2”x 8”x16”) (optional)
• 2x Plywood (60cm x 120cm /2ft x 4ft)
• Wood board (30cm x 20cm / 1ft x 1ft)
• Vinyl covered hooks (to hold wall steady)
• String and stakes & wooden pegs
• Prefabricated cove sections (optional)
• Pool carpeting (optional)
• Rope
• Polyethlyne Plastic Sheeting
• Optical Level
Can be useful for precise
measurements
GENERAL INSTRUCTIONS - ROUND POOLS
GROUND PREPARATION
Secon
1

1-4
No Diving or Jumping. Observe all Safety Rules
1. Mark out the Area
a. Drive a peg into the ground at the centre of the
area where you want your pool. (Image 1)
b. Use a length of string tied between the peg and a
can of spray paint, and mark a circle on the ground
(a tape measure can also be used). The circle will
be 12” (30 cm) bigger all round than the pool.
(Image 2)
2. Remove the sod
a. Remove all sod and plants from the circle. (Image 3)
b. Remove any sticks, stones and roots from the circle
using a rake.
c. To make sure your pool is stable, compact the
ground well, use the compactor, before adding the
sand.
B. PREPARE THE FOUNDATION OF YOUR POOL
GENERAL INSTRUCTIONS - ROUND POOLS
GROUND PREPARATION
Secon
1
1
2
3
Important Note:
Your pool must be perfectly level. Take the time you
need to be sure your foundation is perfecty level.

1-5
No Diving or Jumping. Observe all Safety Rules
3. Make the are flat and level
a. Replace the centre peg with a flat-topped stake, at
least 1” (25 mm) square and 6” (15 cm) long. Drive
it down flush with the ground surface.
b. Nail one end of a straight 2-by-4 (5cm x 10cm)
wood plank to the top of the stake. Use a nail long
enough to hold the end of the 2-by-4 (5cm x 10cm)
wood plank to the stake while you rotate it in a
circle. (Image 4)
c. Put a carpenter’s level on the wood plank and
swing the board in a circle to find the high and low
spots. (Image 5)
d. Remove all the high spots with a shovel, hoe or
rake. (Image 6)
B. CONT. PREPARE THE FOUNDATION OF YOUR POOL
GENERAL INSTRUCTIONS - ROUND POOLS
GROUND PREPARATION
Secon
1
4
5
6
Important Note:
Use the optical level to ensure that the ground is
perfectly flat and level.

1-6
No Diving or Jumping. Observe all Safety Rules
e. Be prepared to hire earth moving equipment if you
need to level a large area. Remember, your pool
must be level across the diameter of the pool.
(Image 7)
f. Small dips and hollows may be filled in, but the soil
must be hard-packed and well compacted with a
tamping tool.
g. Take material such as rock dust or fine mortar
that can conform a solid, permanent base and
deposit this material around the rim of the basin.
The material used should be spread around the
perimeter of the pool to a width of 24” (60cm) and
a thickness of 2” (5cm). (Image 8)
Note: Bottom rails will be placed in the center of the
perimeter of the pool see the dashed line. (Image 8)
h. Recheck the outer perimeter of the circle, where
the pool wall will be. Compact the ground and
make sure there are no high or low spots. The
bottom edge of the pool wall must rest flat on the
ground and have no gaps under it. (Image 9)
B. CONT. PREPARE THE FOUNDATION OF YOUR POOL
GENERAL INSTRUCTIONS - ROUND POOLS
GROUND PREPARATION
Secon
1
7
8
9
Important Note:
The outer 24” (60cm) of the circle must be perfectly
flat. The bottom edge of the pool must rest flat on the
ground and have no gaps under it. Take the time you
need to be sure this area is perfectly flat and level.

1-7
No Diving or Jumping. Observe all Safety Rules
i. Go over the entire perimeter of the pool to ensure
that at every 3“ the surface is completely level.
j. Lay out the bottom rails and bottom plates around
the circle.
k. Check the roundness of your circle, by measuring
the diameter across in several locations. Since the
bottom rails do not automatically form a true circle,
DO NOT SKIP THIS STEP! Otherwise you might end
up with a slightly oval shape, which can cause
problems later on. (Image 10)
l. Verify the height of each bottom plate with an
optical level. They have to be at the same height.
Adjust height if necessary.
B. CONT. PREPARE THE FOUNDATION OF YOUR POOL
GENERAL INSTRUCTIONS - ROUND POOLS
GROUND PREPARATION
Secon
1
10
11

1-8
No Diving or Jumping. Observe all Safety Rules
4. Patio Stones (Recommended)
a. Concrete patio stones may be placed at the base
of each upright of your pool.
b. Each bottom plate will show the location for a patio
stone. Make a mark in the ground at each base
plate. (Image 12)
c. Remove the bottom rails and bottom plates and lay
out the patio stones around the circle where the
bottom plates were. (Image 13)
d. The patio stones must be sunk into the ground so
the tops are flush with the soil around them. Use
the carpenter’s level to make sure the patio stones
are perfectly level and flush with the ground. Use
either the carpenter’s level and a 2-by-4 (5cm x
10cm) wood plank, or the optical level between
patio stones to make sure the stones are level with
each other. (Image 14)
e. Do not install blocks or rails on loose sifted soil or
sand. There must be no space between the ground
and the bottom of the rails. All patio blocks must
be flush with the ground, solid and level with each
other in all directions.
NOTE: Installing patio blocks is recommended.
Patio blocks may shift due to temperature changes.
5. Proceed to Section 2 -
Assembling the Pool Base
B. CONT. PREPARE THE FOUNDATION OF YOUR POOL
GENERAL INSTRUCTIONS - ROUND POOLS
GROUND PREPARATION
Secon
1
12
13
14
Important Note:
Make sure the patio stones are perfectly level and flush
with the ground. All patio blocks must be flush with the
ground, solid and level with each other in all directions.

No Diving or Jumping. Observe all Safety Rules
Footprint 1-1
ROUND FOOTPRINT - ALL SIZES
GENERAL INSTRUCTIONS - ROUND POOLS
GROUND PREPARATION
Secon
1
Bottom tracks length: 15'= 55.187", 24'=55.312", 30'=55.25"
Actual PSize
Gap between
Rails
Exceptions
Gap between
Rails
20
Pool Name
ROUND RESIN POOL CHART
12
8
14
Uprights
10 1816
12'
18' 30'
24'21'
33'
15'
22
Upright
Gap between Bottom Wall Channels
Notes:
1. All dimensions are in inches unless otherwise specified.
2. All dimensions are referenced from the wall location.
3. Manufacturers tolerances and field condition may result
in dimensional variations.
1-
5/8"
Impact
Atrium
Discov
1-5/16"
1-5/16"1-1/4"1-1/4"
27'
1-1/4"
1-1/4"
1-5/16"
1-9/16"
569
1245455
1244
568
Wall Length
Exceptions
792
12'
679
Wall Length
Wall Perimeter
454
906
15'
Radius of Rails
1131905565
7.5'7.5' 12'
1018
12'
680
12'
1019 1132793566
Wall Perimeter
Exceptions
15'


No Diving or Jumping. Observe all Safety Rules
1. Lay out bottom plates
a. Place the bottom plates equally spaced around the
perimeter of your foundation. If you are using the
optional patio stones, depending on your model
place one bottom plate on each stone. (Image 1)
2. Assemble bottom plates and bottom rails
a. Insert the end of each bottom rail into a bottom
plate. Leave a gap between the ends of the bottom
rails. (Images 2 & 3)
b. Measure the diameter of your pool all around the
circle and make sure it is correct.
Note: this measurement should be taken from
centre to centre of the bottom plate. When the
circumference is perfectly round, hammer nails into
the ground to keep the bottom rails into place.
(Images 4 & 5)
These nails are to be removed only at the last step
when filling up the pool.
A. LAY OUT THE BOTTOM PLATES AND BOTTOM RAILS
GENERAL INSTRUCTIONS - ROUND POOLS
ASSEMBLING THE POOL BASE
Secon
2
1
4
Important Note:
Use a soft measuring tape to measure around the
perimeter of the pool. Measure from the inside of the
bottom rail, the measurement should equal the wall
length.
2
3
See Diagram:
Please refer to your pool’s footprint (Section 1, last page)
for gap measurement.
5
2-1


3-1No Diving or Jumping. Observe all Safety Rules
1. Preparing for the wall installation
a. Bring the following items into the middle of the pool
foundation before you start uncoiling the pool wall:
plywood, some extra sand or fine dirt to make the
cove and a ladder to climb out after the wall is as-
sembled.
b. Make sure the skimmer and water return holes are
located where you need them to be. The skimmer
and water return holes are positioned towards the
end of the wall, (the section before where the wall
started).
2. Set the pool wall in place
a. Unpackage the coiled pool wall and stand it on the
plywood at the place close to where you need to
install the skimmer. (Image 1)
(Remember the skimmer and water return holes
will be placed at the section just before where you
started the wall installation).
b. Start uncoiling the wall, guiding the bottom edge
into the curved bottom rail. The starting end of the
wall must be positioned in the centre of a bottom
plate, and the skimmer and return holes should be
positioned where the pump and filter will be.
(Image 2)
c. Set lengths of stabilizer onto the top edge of the
wall as you uncoil it. (Image 2)
A. SETTING UP THE POOL WALL
GENERAL INSTRUCTIONS - ROUND POOLS
ASSEMBLING THE POOL WALL
Secon
3
Do not aempt to install the pool wall in the wind, wait for a calm day.
It takes at least 3 people to install the pool wall.
Stabilizer
1
2
Important Note:
It is preferable to use very fine sand that is easily
compacted. Be careful not to spill sand on the bottom
rails.

3-2 No Diving or Jumping. Observe all Safety Rules
GENERAL INSTRUCTIONS - ROUND POOLS
ASSEMBLING THE POOL WALL
Secon
3
d. We also suggest installing vinyl-covered hooks and
rope to hold the wall steady. Ideally the help of sev-
eral people should be solicited to hold the wall in
place. Work around the foundation until the entire
pool wall is uncoiled into the bottom rails. (Image 3)
e. When uncoiling the wall, the skimmer and return
holes are positioned toward the end of the wall.
(Image 4)
A. SETTING UP THE POOL WALL
4
3
Skimmer
Important Note:
Do not attempt to install the pool wall in the wind. Wait
for a calm day.

3-3No Diving or Jumping. Observe all Safety Rules
GENERAL INSTRUCTIONS - ROUND POOLS
ASSEMBLING THE POOL WALL
Secon
3
GENERAL INSTRUCTIONS - ROUND POOLS
ASSEMBLING THE POOL WALL
Secon
3
A. CONT. SETTING UP THE POOL WALL
3. Join the ends of the pool wall
a. Line up the holes in the two ends of the pool wall.
(Image 5)
b. Now that you have installed the wall you can be
faced with three scenarios.
1) The wall joints align perfectly, if so, move on to
the next step (c).
2) Your wall appears to be too short. It is not.
However the space between the bottom rails must
be decreased by lightly tapping the bottom plates
towards the inside of the pool. You can also tap the
wall lightly with both hands in the desired direction.
(Image 6)
You MUST recheck the gaps at each and every one
of the bottom rails so that they are all equal in gap
size.
3) Your wall appears too long. It is not. However the
space between the bottom rails must be increased
by tapping the bottom plates lightly towards the
outside of the pool or by tapping the wall with both
hands in the desired direction. (Image 7)
You MUST recheck the gaps at each and every one
of the bottom rails so that they are all equal in gap
size.
5
6
7
Important Note:
Bottom rails must always be held in place in the bottom
plate.
Important Note:
You MUST recheck the gaps at each and every one of
the bottom rails so that they are all equal in gap size.

3-4 No Diving or Jumping. Observe all Safety Rules
A. CONT. SETTING UP THE POOL WALL
GENERAL INSTRUCTIONS - ROUND POOLS
ASSEMBLING THE POOL WALL
Secon
3
c. To fasten the wall joint, overlap the two steel bars,
one on the inside and the other on the outside.
Tighten the mechanical screws on the inside and
the nuts on the outside. Ensure that all botls and all
the holes are used. (Image 8)
d. Adjusting the pool to the proper shape may cause
the bottom rails and bottom plates to slip out of
alignment a little. Recheck all of the bottom plates
to make sure each one is centred where the bottom
rails meet.
e. Cover the seam and bolt heads on the inside/interi-
or of the pool wall completely with 2” (50mm) duct
tape. (Image 9)
4. Make sure the pool wall is round
a. Using a tape measure, measure across the circle
at each bottom plate. The pool wall must be round.
Adjust the circle by nudging the base plates in or
out with your foot. (Image 10)
Important Note:
Stick a screwdriver through two of the holes to help line
up the ends of the wall.
When tightening the screws start from either
the top and go down or vice versa. Do not start a
few screws from top and a few from the bottom
to meet in the middle, this can cause problems
later on.
Important Note:
The pool must be level across the perimeter. A pool that
is not level is dangerous and may collapse.
8
9
10

3-5No Diving or Jumping. Observe all Safety Rules
B. ASSEMBLING THE COVE
GENERAL INSTRUCTIONS - ROUND POOLS
ASSEMBLING THE POOL WALL
Secon
3
1. Make the cove
a. If you are using sand, bank the sand against the
wall to form a cove of 3” to 6” (7.5cm to 15cm) high
and 8” to 12” (20cm to 30cm) wide at ground level.
This will prevent the liner from creeping under the
wall, and it will also protect the liner from any metal
edges of the pool framework. THIS STEP IS NOT
OPTIONAL, IT MUST BE DONE. (Image 11)
NOTE: If a smaller cove (less than 3” (7.5cm)) is made
along with using a very tight liner, this will buckle
the wall.
b. Water the sand to compact it and use a trowel to
spread it evenly. (Image 12)
c. Since earth containing chemicals can cause dis-
coloration or corrosion, it is suggested that you
place polyethylene plastic sheeting under the cove
around the perimeter of the wall, so no earth comes
in contact with the metal. Since the presence of
such chemicals is beyond the control of the manu-
facturer, such damage is not covered under war-
ranty. (Image 13)
d. If you are using styrofoam cove pieces instead of
sand, insert them in the bottom rail and refer to
the installation instructions that are provided with
them.
e. Proceed to your liner instructions and after liner
installation proceed to Section 4-Installing the pool
frame.
Important Note:
The cove is an important part of the pool structure. Take
your time to make a complete, full-size cove.
11
13
12

3-6 No Diving or Jumping. Observe all Safety Rules
GENERAL INSTRUCTIONS - ROUND POOLS
ASSEMBLING THE POOL WALL
Secon
3
Secon
3
IMPORTANT
INFORMATION
ABOUT YOUR LINER
We do not make or supply liners for our pools.
Please contact your liner’s manufacturer with questions or if
instructions are not included with the liner.
Liner must be installed per the liner manufacturer’s
instructions.
Incorrect liner installation may void the warranty.

No Diving or Jumping. Observe all Safety Rules
A. INSTALLATION OF THE UPRIGHTS
GENERAL INSTRUCTIONS - ROUND POOLS
ASSEMBLING THE POOL FRAME
Secon
4
1. Install the uprights
a. The wall joint is hidden behind the upright on most
pools. This assures that the skimmer and skimmer
return holes are not obstructed.
b. Insert an upright into the bottom plate. Ensure that
the upright is correctly inserted into the bottom
plate. (Image 1)
c. Proceed with the installation of all the uprights.
(Images 2 & 3)
Important Note:
Use the ridges in the pool wall to make sure the upright
column is straight up and down.
See Diagram:
Please refer to your pool’s footprint (Section 1) for gap
measurement.
1
2
3
4-1

No Diving or Jumping. Observe all Safety Rules
GENERAL INSTRUCTIONS - ROUND POOLS
ASSEMBLING THE POOL FRAME
Secon
4
B. INSTALLATION OF THE STABILIZERS AND TOP PLATES
1. Install stabilizers and top plates
a. Install the stabilizer on the wall while ensuring to
leave a gap between each end. You must insert the
stabilizer inside the vertical tabs that are at the
top of the upright. Theses tabs will allow a better
solidity of the assembly and will also facilitate
installation. (Image 4 & 5)
b. Place the top plates on the top of the upright. Align
the holes on the top plate with those on the top of
the upright. The stabilizer must be inserted inside
the back of the top plate. To facilitate the top plate
installation, we suggest that you begin the insertion
of it by the interior side of the pool and then clip it
forward. (Image 6)
c. Ensure that the upright is level.
d. Attach upright to the top plate using screws.
(VHL12x34S) (Image 6)
Repeat until you have installed all the stabilizers
and top plates. (Image 7)
Important Note:
Ensure to leave a gap between the two stabilizers.
See Diagram:
Please refer to your pool’s footprint (Section 1) for gap
measurement.
6
4
5
7
4-2
(VHL12x34S)
No Diving or Jumping. Observe all Safety Rules
C. INSTALLATION OF TOP LEDGE AND LEDGE COVERS
GENERAL INSTRUCTIONS - ROUND POOLS
ASSEMBLING THE POOL FRAME
Secon
4
1. Install top ledge and ledge covers
a. Place top ledges on the wall. Align the holes on the
top ledges with those on the top plates. Make sure
the space left between each top ledge is uniform
all around and that the space in question can be
covered by a ledge cover. Attach the top ledges to
the top plates using the four special plastic screws
(VHL12x114S). (Image 8 & 9)
Important Note:
We suggest that you install all the top ledges on the
wall before attaching them.
8
9
4-3
(VHL12x114S)

No Diving or Jumping. Observe all Safety Rules
C. CONT. INSTALLATION OF TOP LEDGE AND LEDGE COVERS
GENERAL INSTRUCTIONS - ROUND POOLS
ASSEMBLING THE POOL FRAME
Secon
4
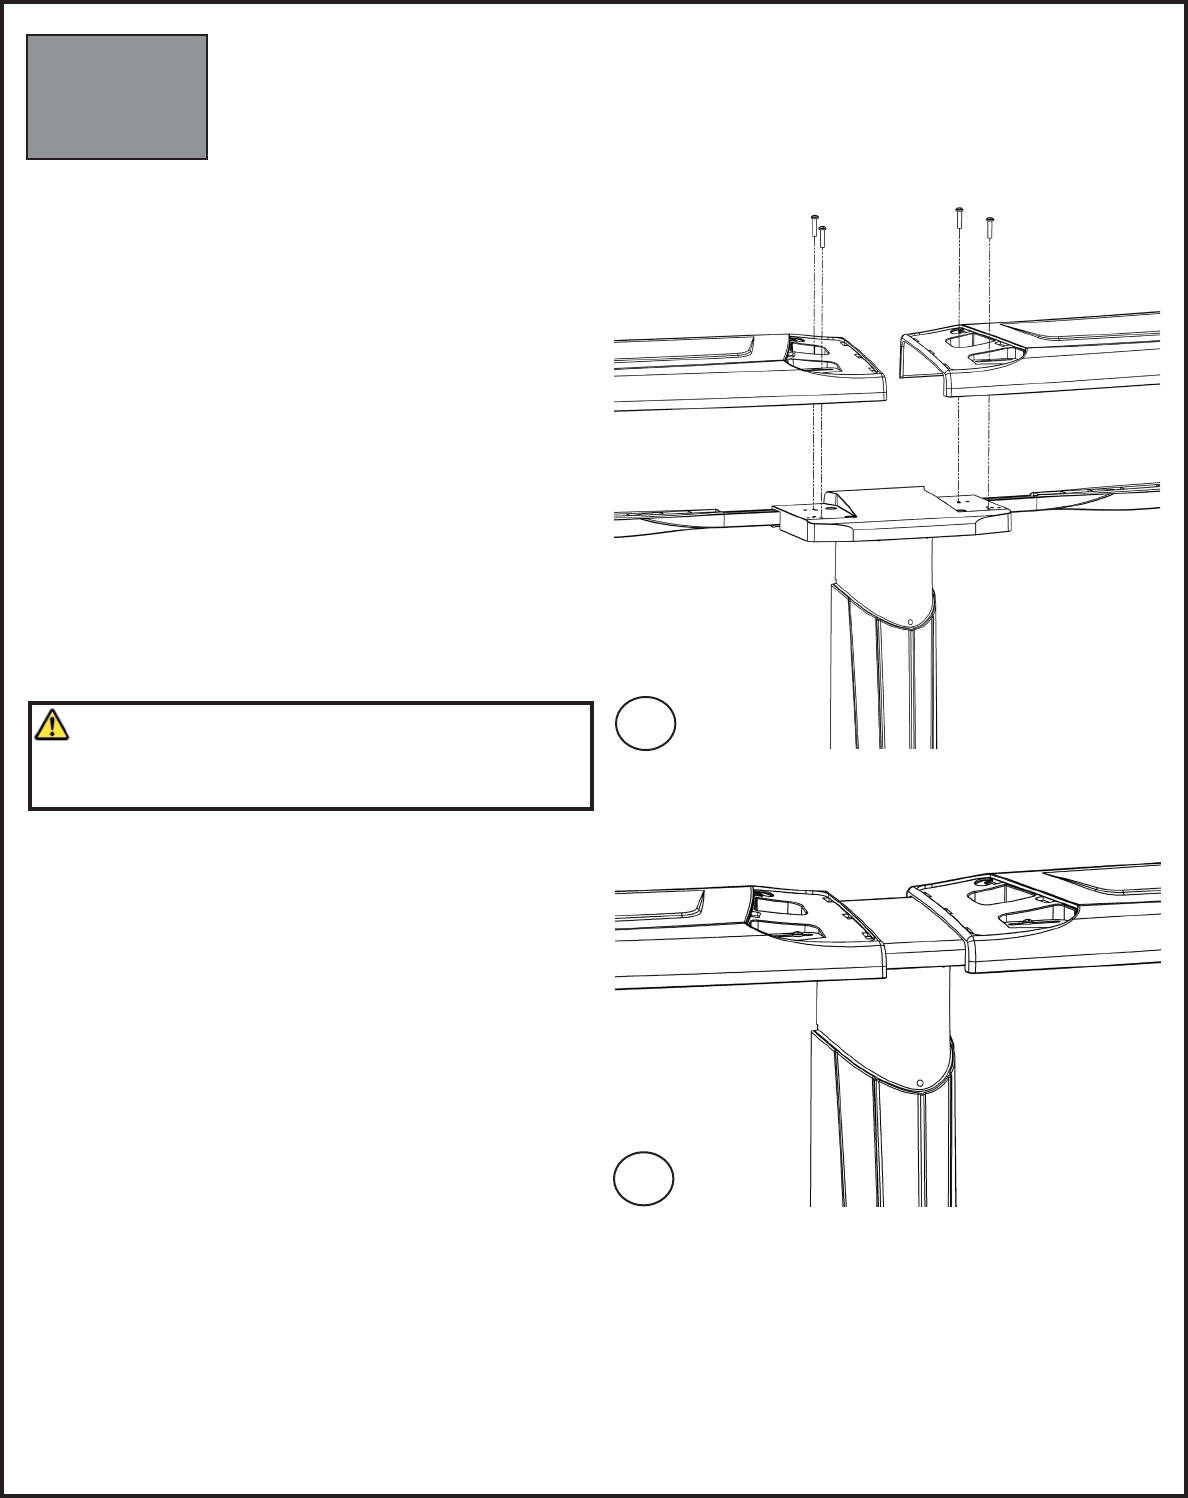
b. You must now install the top ledge covers (one on
the left side and one on the right side of each top
ledge). Fit the finishing pieces onto the openings of
the top ledges. (Image 10)
c. Start the top ledge cover installation by positioning
the piece into an angle of 45 degree to insert the
interior clip into the openings of the top ledge.
Pivot the piece and insert the other side into the
openings of the top ledge. (Image 11)
d. Install the crown at the top of the upright. Insert
the central coupler into the holes and clip on the
two extremities behind the upright. (Image 12)
e. Install the logo. (Image 13)
10
12
11
13
4-4

No Diving or Jumping. Observe all Safety Rules
D. FILL YOUR POOL WITH WATER
GENERAL INSTRUCTIONS - ROUND POOLS
ASSEMBLING THE POOL FRAME
Secon
4
1. Finish filling the pool
a. Fill the pool with water to 2” (5cm) below the
lowest opening. Make sure you remove any creases
from the liner in the bottom of the pool before the
water level gets too high.
b. While the pool is filling, remove the nails that were
holding the bottom rails in place.
c. Your pool is now installed. You must now install the
filter and pump, the skimmer and water return inlet.
Please follow the installation instructions that come
with these products.
Important Note:
Before making any openings in the liner, fill the pool
with 60cm (24”) of water to stretch the liner fully. When
filling your pool, begin with a garden hose until there
is about 30cm (12”) of water in the pool. This will allow
the liner to stretch gradually. You can then use a heavier
flow to finish filling it up.
IMPORTANT SAFETY INFORMATION:
Please refer to the safety page at the beginning of this instruction manual. You must follow the rules and
information regarding placement of safety stickers on your pool.
G:\RnD\01-Projets\Révélation\Revelation 24' iso 2D.3dm
IMPORTANT:
Make sure that your pool is round, do not assume that by filling up the pool that this will help the pool to place
itself into a perfect round circle. Ensure that it is round before filling up the pool with water.
4-5

No Diving or Jumping. Observe all Safety Rules
Secon
4
Secon
4
E. BASIC FLOW OF SYSTEM
1. How the system flow should look like
a. When assembled your pool should have a basic
flow system as in this image, PLEASE CONTACT
YOUR DEALER for more specific instructions.
SKIMMER
RETURN
FILTERPUMP
GENERAL INSTRUCTIONS - ROUND POOLS
ASSEMBLING THE POOL FRAME
4-6

No Diving or Jumping. Observe all Safety Rules
5-1
Secon
5
POOL MAINTENANCE
MAINTAINING YOUR POOL
POOL MAINTENANCE
Keep your pool wall and frame clean. Always wash away any deposits of pool chemicals which land on the frame of
your pool. Wash periodically with a mild soap solution (no abrasives). At least once a year use a clear non-yellowing
household wax on all metal components.
Your pool and liner must be inspected regularly for leaks, corrosion, scratches, and punctures. If any problem is found
IMMEDIATE CORRECTIVE ACTION MUST BE TAKEN. Small repairs and punctures in your liner may be easily repaired
using repair kits available at your local dealer. Scratches on your pool wall & frame must be touched up with anti-rust
enamel. Wire brush all rust and add a coat of enamel primer followed by a coat of color matching paint. Pool water is
full of various caustic chemicals, which will corrode metal parts. If any corrosion is allowed to continue, failure of the
pool structure may occur which could result in excessive property damage as well as bodily harm.
The skimmer & return area and below it are particular areas that must be carefully and regularly inspected. If
this area is wet, and remains wet for any length of time, it usually means there is a small leak. Skimmer/skimmer
return gaskets must be replaced when they become defective. Water must not be permitted to continually run
down the wall, if neglected pool will break. If proper skimmer/skimmer return gasket care is not maintained,
your warranty will be void!
Important Note:
Be sure to follow all local and state safety regulations when installing any accessory to your pool.
Any decks, and all entries, must be carefully monitored for safety and access to pool. Installing
any other manufacturer’s deck or slide is strictly forbidden!
POOL MAINTENANCE
WINTERIZING YOUR POOL
No Diving or Jumping. Observe all Safety Rules
5-2
Secon
5
WINTERIZING YOUR POOL
Along with the cool nights of autumn comes the end of the swimming season. During the
winter your pool is subject to more stress than in the summer, and any breakage that is
caused by incorrect winter procedures is not subject to any warranty with
this company.
All of our pools are designed to be left up all winter, but nonetheless
are subject to the warranty that was purchased. Continue to
chlorinate and filter until the pool is closed down. If you follow our
recommendations, you will be able to winterize your pool
properly in a few hours.
Properly winterizing your pool will protect it from
damage and make it easier for you to reopen it when
spring arrives.
The key to fast and easy winterization lies in regular
treatment of the water until the start of the cold
season, even if you haven’t been using the pool.
Routine maintenance becomes easier and less
frequent as the water gets cooler. In order to keep
the water clean and clear and to prevent the liner
from staining, we recommend closing your pool as
late as possible, i.e. toward the end of September
when the water temperature is about 10°C (50°F).
Waiting until you have finished closing the pool
before shutting off the filtration system will
prevent hoses still connected from freezing.
Follow the instructions on the following pages or
contact your retailer for further information to
ensure that you are protecting your pool properly.

POOL MAINTENANCE
WINTERIZING YOUR POOL
Secon
5
No Diving or Jumping. Observe all Safety Rules
5-3
Secon
5
CLOSING YOUR ABOVE GROUND POOL FOR THE WINTER
At the end of the season, you must follow these directions to make your pool ready for the winter. For areas where
water freezes make sure to follow these instructions before the water is frozen, otherwise do not touch the frozen
water, this may damage the pool.
STEP 1) PRIOR TO CLOSING
a. Several days prior to closing your pool, test the water for the ph level, total alkalinity, and chloring. The water
balance is important to protect the pool from corrosion or scale build-up during winter shut down.
STEP 2) PERFORM A COMPLETE INSPECTION
FINDING LEAKS
a. Towards the end of the summer season or around mid-August, check for leaks by verifying if the pool’s water
level is stable. Draw a line on the liner marking the water level and wait 10 days. If after 10 days the level has
dropped, then there is a leak. It is important to seal off any leaks you find. Leaks left unsealed when freezing
begins can seriously damage your pool and even cause it to collapse.
b. Vacuum carefully to remove all leaves and debris.
CHECK THE LINER
a. Make sure the top of the liner is still attached to the pool wall. make sure there are no leaks. Repair any liner
holes with a vinyl patch: any small punctures in the liner can be easily repaired with underwater repair kits
available at your local retailer. Do not remove the liner from the pool, as removal of the liner will void the
existing warranty.
CHECK ALL JOINTS AND SCREWS
a. Make sure all the fram joints are fitting together properly and make sure the pool wall has not shifted from
the bottom rail. Ensure all screws and bolts are tight.
CHECK FOR RUST
a. Periodically inspect the metal parts for any corrosion especially around the skimmer area. If corrosion is found,
immediate corrective action must be taken. Wire brush any rust and add a coat of enamel primer followed by
a coat of color matching anti-rust enamel paint. Pool structure failure could result in ma jor property damage
and bodily harm. Paint any scratches with anti-rust paint.

POOL MAINTENANCE
WINTERIZING YOUR POOL
Secon
5
No Diving or Jumping. Observe all Safety Rules
5-4
Secon
5
CLOSING YOUR ABOVE GROUND POOL FOR THE WINTER CONTINUED
STEP 3) ADD CLOSING CHEMICALS
a. To maintain water quality, use a winter kit which contains an algicide and chlorine especially designed for this
purpose. When it’s time for spring cleaning, this will save you hours of work and reduce the cost of chemicals
needed to restore your water quality.
b. If your pool has a bottom drain, you will have to use pool antifreeze to prevent it from freezing during the
winter. Unscrew the hose from the base of the skimmer and attach an extension. Pass the extension over the
wall of the pool, making sure it remains well attached. Pour antifreeze into the extension. Leave the valve open
so that water can drain from the skimmer.
STEP 4) LOWER THE WATER LEVEL
a. Lower the water level so as to leave between 6 to 20 inches (15cm to 50cm) below the water return. You may
plug the return jet hole at this time. **IMPORTANT**DO NOT PLUG THE SKIMMER DRAIN HOLE (located at the
base of the skimmer). Remove all hoses attached to the skimmer and return fittings. Do not let water freeze
in the skimmer. Leave the skimmer attached to the pool wall and ensure that the skimmer lid is installed. DO
NOT DRAIN ALL THE WATER OUT OF THE POOL.
b. Depending on your area and if the freezing point is more aggressive, for example 50% is frozen into ice, we
strongly suggest to lowering the water to lowest point. Depending on how great the deep freeze in your area
we suggest you consult with your local dealer about procedures on lowering the water level throughout the
winter. We also suggest throughout the autumn season to continually check this level before freezing season
starts, as it must not reach the skimmer holes at any time during the winter. Remove any snow which may
accumulate on the top ledge.
STEP 5) FILTER PREPARATION
a. Disconnect the hoses from the filter. Remove and store the filter, ladder and all other removable parts from
around the pool. The filter should be clear of any foreign objects and water should be removed from the filter
and pump. See the manufacturer’s instructions. Store the pump in a temperature controlled environment (so
that it is not damaged by changes in temperature).
STEP 6) WINTER COVER
a. For the winter cover we suggest to lower the water level to 1 inch (2.5cm) below the water return. In some
areas your dealer may ask you to install it differently in order to protect the pool and the cover. Contact your
local dealer to verify the correct procedure for your pool.
b. If using a winter cover, make sure to place a ball underneath so that rainwater falls into the pool. An accumulation
of too much water on the cover could place pressure on the pool, causing damage and invalidating the
guarantee. Depending on how great the deep freeze in your area we suggest you consult with your local
dealer about procedures on leaving the pool cover throughout the winter.

POOL MAINTENANCE
WINTERIZING YOUR POOL
Secon
5
No Diving or Jumping. Observe all Safety Rules
5-5
POOL MAINTENANCE
WINTERIZING YOUR POOL
Secon
5
CLOSING YOUR ABOVE GROUND POOL FOR THE WINTER CONTINUED
IMPORTANT
Never let more than 30 cm (1’) of snow accumulate on the pool wall; the wall is designed to
support the lateral pressure of the pool water, not vertical pressure. With spring thaw, if water
leaks from the skimmer or return outlet opening, place a tube at the opening so that the water
will run off as far away from the basin of the pool as possible. PLEASE NOTE: Do not strike or hit
a frozen pool. This would damage it. Do not disturb the pool till spring. If you have left the winter
cover on the pool, make sure to remove accumulated snow after heavy snowfalls.
Important Note:
Whatever the type of valve or extension hose used, you must follow the technique described in
this document to close your pool, otherwise your guarantee may be cancelled. Make sure to use
antifreeze designed for pools.
Important Note:
An unsealed leak may comprise or cancel the guarantee on your pool.
Never leave water in any of the filtration system components due to the risk of damage during
freezing.

Secon
5
No Diving or Jumping. Observe all Safety Rules
5-6
POOL MAINTENANCE
SPRINGTIME CLEANING OF YOUR POOL
Secon
5
PREPARING YOUR POOL IN THE SPRING
At the end of winter, allow the ice in the pool to thaw completely. When the temperature
reaches approximately 10 °C (50 °F), you have to restart your filtration system,
since algae and bacterial form more quickly as it gets warmer. Here is how t o
prepare your pool in a few simple easy steps.
a. If your pool is equipped with a pool cover, remove the cover and
cushion. Carefully remove with a hose any rainwater that
has accumulated on the cover so it does not fall into your
pool. Clean your cover and cushion and let them dry.
Store them in a dry clean place.
b. Attach the return inlet and skimmer to the filter. Bring
the water level up to the middle of the skimmer. Get
your filter working. Clean the bottom of the pool with
the vacuum, taking care to place the filter in the
“waste/drain” position. In this way you will eliminate
particles of dirt without disturbing the sand in the
filter, and will considerably reduce the need for
“backwash rinsing” of the filter.
c. Now that you have purified the water, you have to
test it. It is very important that the pH level of your
pool be between 7.6 and 7.8 and the pool’s alkaline
content be between 80 ppm and 130 ppm. If you
are unable to attain these levels, please contact
your retailer who will gladly do these tests for
you.
Important Note:
Do not drain your pool to clean the water unless absolutely necessary (the water
is recyclable). If you do empty your pool, don’t leave it empty for too long or
expose it to direct sunlight, as the liner may shrink.

Secon
5
No Diving or Jumping. Observe all Safety Rules
5-7
Secon
5
POOL MAINTENANCE
SPRINGTIME CLEANING OF YOUR POOL
PREPARING YOUR POOL IN THE SPRING CONTINUED
d. When the pH and alkaline levels are ideal, apply a shock-treatment or chlorinate your water.
Let it filter for 24 hours and again verify both the pH and free chlorine levels.
NOTE: Add chemical products to your pool after sunset, as sunlight
rapidly destroys chlorine.
e. Let it filter for several days until the water is clear and the pH and
free chlorine levels have stabilized. Add a conditioner/stabilizer
by carefully following the manufacturer’s instructions. This
will stop the chlorine from evaporating quickly in sunlight.
Add the quantity of algicide required to prevent algae.
f. You may now begin regular maintenance of your pool.
Don’t forget to obtain a new set of solutions for your
water analysis kit every spring. The old solutions
may give false results.
g. Make sure that the skimmer (screws and adapter)
is properly in place and tighten the water return
fittings to prevent leakage and premature rusting
of the pool wall or the lower part of the bottom
rail.
HAVE FUN!
IF YOU FOLLOW THESE TIPS AND ASK YOUR DEALER FOR ANY OTHER ADVICE YOU MAY NEED,
YOU WILL HAVE ALL THE INFORMATION NECESSARY TO GET YOUR POOL OPERATING AGAIN.
