
VBA-Session 8
For….Next Loop
Looping is one of the most powerful programming techniques. A loop in Excel
VBA enables you to loop through a range of cells with just a few codes lines.
Single Loop
You can use a single loop to loop through a one-dimensional range of cells.
Place a command button on your worksheet and add the following code lines:
Dim i As Integer
For i = 1 To 6
Cells(i, 1).Value = 100
Next i
Result when you click the command button on the sheet:
Explanation: The code lines between For and Next will be executed six times.
For i = 1, Excel VBA enters the value 100 into the cell at the intersection of row 1 and
column 1. When Excel VBA reaches Next i, it increases i with 1 and jumps back to
the For statement. For i = 2, Excel VBA enters the value 100 into the cell at the
intersection of row 2 and column 1, etc.
Note: it is good practice to always indent (tab) the code between the words For and
Next. This makes your code easier to read.

Double Loop
You can use a double loop to loop through a two-dimensional range of cells.
Place a command button on your worksheet and add the following code lines:
Dim i As Integer, j As Integer
For i = 1 To 6
For j = 1 To 2
Cells(i, j).Value = 100
Next j
Next i
Result when you click the command button on the sheet:
Explanation: For i = 1 and j = 1, Excel VBA enters the value 100 into the cell at the
intersection of row 1 and column 1. When Excel VBA reaches Next j, it increases j
with 1 and jumps back to the For j statement. For i = 1 and j = 2, Excel VBA enters
the value 100 into the cell at the intersection of row 1 and column 2. Next, Excel
VBA ignores Next j because j only runs from 1 to 2. When Excel VBA reaches Next
i, it increases i with 1 and jumps back to the For i statement. For i = 2 and j = 1, Excel
VBA enters the value 100 into the cell at the intersection of row 2 and column 1, etc.

Triple Loop
You can use a triple loop to loop through two-dimensional ranges on multiple Excel
worksheets.
Place a command button on your worksheet and add the following code lines:
Dim c As Integer, i As Integer, j As Integer
For c = 1 To 3
For i = 1 To 6
For j = 1 To 2
Worksheets(c).Cells(i, j).Value = 100
Next j
Next i
Next c
Explanation: The only change made compared to the code for the double loop is that
we have added one more loop and added Worksheets(c). in front of Cells to get the
two-dimensional range on the first sheet for c = 1, the second sheet for c = 2 and the
third sheet for c = 3. Download the Excel file to see this result.

Do While Loop
A Do…While loop is used when we want to repeat a set of statements as long as the
condition is true. The condition may be checked at the beginning of the loop or at the
end of the loop.
The Structure
Following is the syntax of a Do…While loop in VBA.
Do While condition
[statement 1]
[statement 2]
...
[statement n]
[Exit Do]
[statement 1]
[statement 2]
...
[statement n]
Loop

Flow Diagram
Example (Do… While Loop):
The following example uses Do…while loop to check the condition at the beginning
of the loop. The statements inside the loop are executed, only if the condition
becomes True.
Sub show_while( )
Do While i < 5
i = i + 1
msgbox "The value of i is : " & i
Loop
End Sub

When the above code is executed, it prints the following output in a message box.
The value of i is : 1
The value of i is : 2
The value of i is : 3
The value of i is : 4
The value of i is : 5
Alternate Structure
There is also an alternate structure for Do…while loop which checks the condition at
the end of the loop. The major difference between these two structures is explained
in the following example.
Do
[statement 1]
[statement 2]
...
[statement n]
[Exit Do]
[statement 1]
[statement 2]
...
[statement n]
Loop While condition

Example 1 (Do While)
The following example uses Do…While loop to check the condition at the end of the
loop. The Statements inside the loop are executed at least once, even if the condition
is False.
Sub show_while_do( )
i = 10
Do
i = i + 1
MsgBox "The value of i is : " & i
Loop While i < 3
End Sub
When the above code is executed, it prints the following output in a message box.
The value of i is : 11
Example 2:
1. Place a command button on your worksheet and add the following code lines:
Dim i As Integer
i = 1
Do While i < 6
Cells(i, 1).Value = 20
i = i + 1
Loop
Result when you click the command button on the sheet:


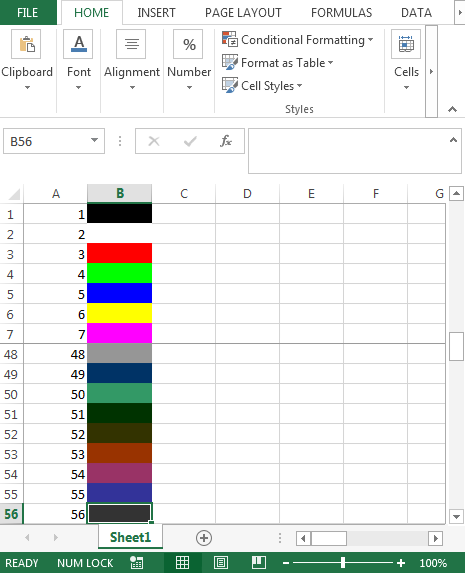
Example 3 (For….Next):
Sub Loop3( )
Dim X As Integer
For X = 1 To 56
Range("B" & X).Interior.ColorIndex = X
Next X
End Sub


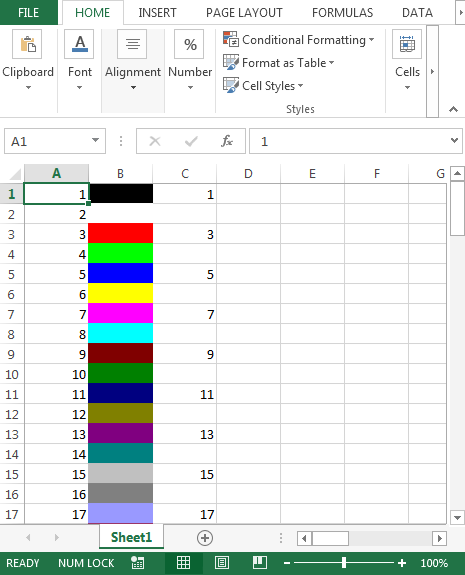
For Loop in Reverse with STEP Instruction
It is not necessary that counter in the For loop will only move from low to higher
values; instead, For loop can run backwards, too i.e. high to lower values.
Even though the Step value is forward 1 by default, however, it can be set to a number
in reverse order.


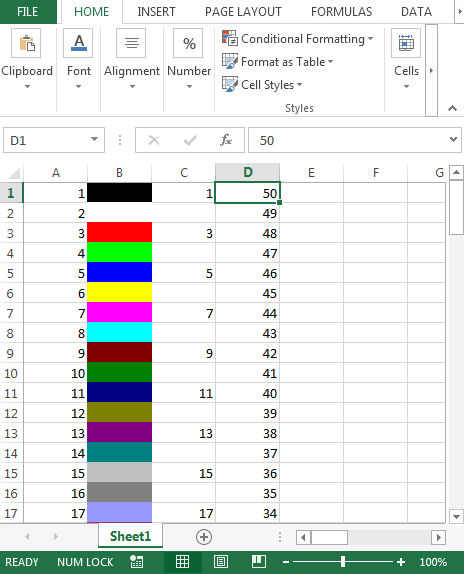
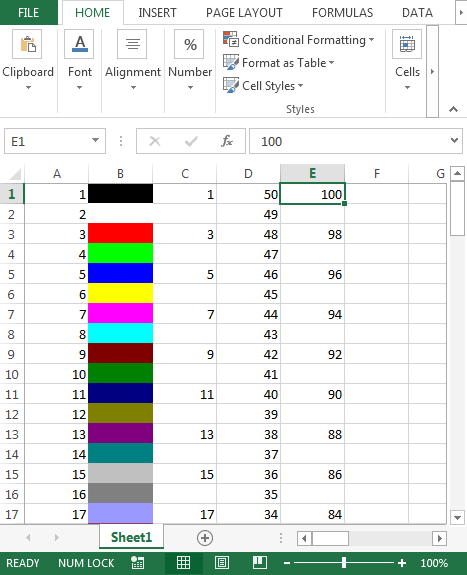
Fills every second cell in Reverse with STEP -2
In the above For loop example, we can use the Step and order to see if the For loop
works in forward or backward direction.
Sub Loop6( )
Dim X As Integer, Row As Integer
Row = 1
For X = 100 To 0 Step -2
Range("E" & Row).Value = X
Row = Row + 2
Next X
End Sub


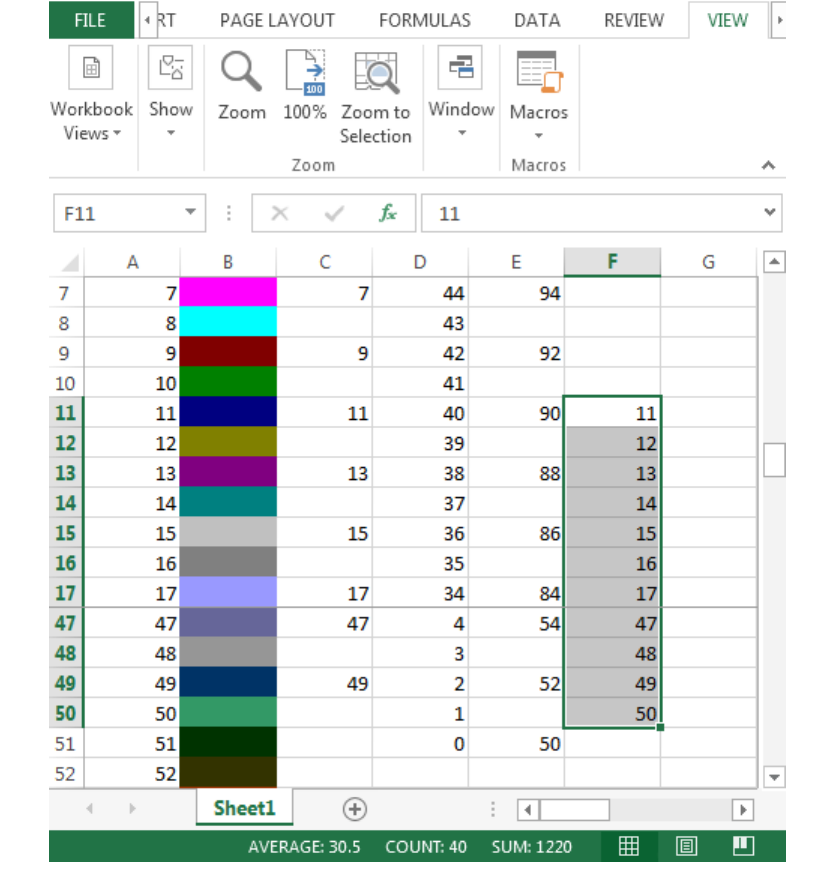
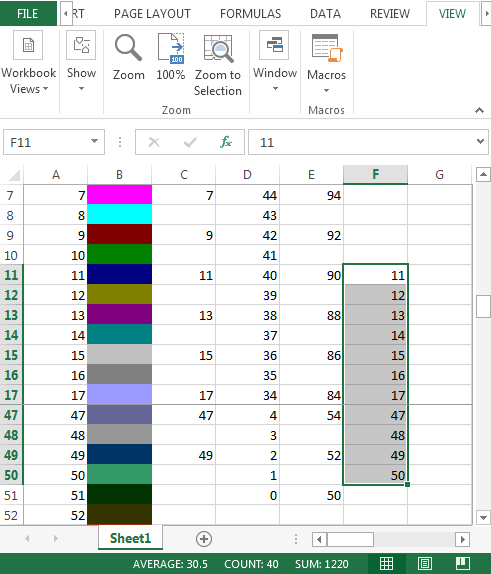
For Loop with IF condition: Fills cells starting from specific cell:
This will fill the cells from cell F11 with value 11 till X meets the IF condition
Sub Loop7( )
Dim X As Integer
For X = 11 To 100
Range("F" & X).Value = X
If X = 50 Then
MsgBox ("Bye Bye")
Exit For
End If
Next X
End Sub
