
At Home Usage Guide: Using MAP Reading Fluency with your
child/student
MAP Reading Fluency is a program that your child’s /student’s teachers are using to get
the information that they need to help your child learn to read. Your child/student
should be able to complete their assignment in 30 minutes or less.
What you need to get started:
• Computer (PC/laptop/Mac/ Chromebook™) or iPad®
• Headset, microphone, or other audio recording device
• Username and password provided by the school proctor or a teacher
• Quiet, comfortable place for your child/student to work on the assignment
Make sure you have the right software:
In order to take MAP Reading Fluency, you need to have the following software installed on your device:
• For Computers (PC/laptop/Mac/Chromebook)
o Chrome 65 (or higher) or Edge 79 (or higher) browser
o These are the only browsers that will work
o If you don’t have one of these two browsers, you will need to choose one and install it
• For iPads
o You must use the latest version of the MAP Reading Fluency app
o If you don’t have it, open the App Store®, search for “NWEA”, and install the MAP Reading Fluency
app.
Make sure your hardware is set up correctly:
Supported device hardware:
• MAP Reading Fluency assessments can be taken on computer (PC/laptop/Mac/Chromebook) or iPad
Microphone requirements:
MAP Reading Fluency does not require any specific brand of headset or microphone. The following are general
guidelines about what kind of recording device to use.
• Microphones with a direct connection (USB, 3.5mm jack, etc.) tend to provide better sound quality than
those that use wireless connections like Bluetooth
• Headsets with a boom microphone (on the end of a stiff arm that extends in front of the child’s/student’s
mouth) are highly recommended
o If no headsets are available, the next best option is earbuds/earphones with a built-in microphone
on the cord
o As a last resort, built-in device microphones (e.g., laptop microphones) may be sufficient, but it may
be difficult to sustain a household environment that is quiet enough to successfully administer the
assessment
Setting microphone/headsets as default device
• Windows:
o Open the sound control panel by right-clicking the Windows icon and choosing Control Panel,
then Hardware and Sound, then Sound.
If you can’t find the control panel using the instructions above, right click on the Windows
icon and choose Search
In the search bar type Sound
In the results of the search, you should see Sound Control Panel … click on this, then
continue following the instructions above

o Check the Playback and Recording tabs and make sure that the headset is chosen as the default
device. The default device will have a green check mark next to it.
• Mac:
o The sound control panel is under System Preferences. Check the Output and Input tabs and make
sure that the headset is chosen as the default device.
o Make sure the mute checkbox next to the volume slider is not selected.
Chromebook and iPad devices should recognize and use your headsets automatically. You can still check if they are
the default device.
• Chromebook:
o Click on the system tray, then click on
the headset icon next to the volume
slider. Make sure that the headset is
chosen under both Output and Input.
• iPad:
o Swipe up from the bottom edge of any
screen on the iPad to open the control center. Tap and hold the audio card (square in the upper-
right corner), then tap the icon to see your devices. Choose your headset in the list of devices that
you can connect.
Microphone use guidelines:
• General guidelines:
o Students should not to touch the microphone while testing, or press any buttons (e.g., mute) on the
cord
o Verify that students are using their regular speaking voice
o Reduce background noises, such as open windows or fans
• Headset with boom mic
o Ideally the microphone should be no closer than two-fingers’-width away from the corner of the
mouth
• Earbuds with microphone on cord
o Ensure that the student does not have any materials blocking the mic (hair, clothing, etc.)
• Device microphone
o Because this microphone is designed to pick up any noise in the area of the device, it is very
important that a quiet testing setting is maintained
o Students may need to sit closer to the device in order for the microphone to pick up their voice
correctly
Common solutions to device set-up issues
Add MAP Reading Fluency website addresses to content filter (firewall)
Advanced filtering technology might need to have the following websites added to the exception list settings for
any firewall, proxy server, or firewall setup on your home network. Add the following website addresses to the
approved list in your content filter:
• https://readingfluency.mapnwea.org
• https://readingfluency-cdn.mapnwea.org
• https://student.mapnwea.org
• https://lmapi.mapnwea.org
Disable virus and malware scanners
• These scanners can interfere with testing
Turn off any screen saver settings
• Occasionally screen savers can interfere with testing or distract students

Disable automatic updates
• Automatic updates can create interference with testing or slow down a device. Our recommendation is to
schedule them during times outside of when the student is testing.
Extend the time for power-saving sleep mode to at least 30 minutes
• This will prevent the device from shutting down during a test session
How to log in to the assignment:
On an iPad:
• Open the MAP Reading Fluency Testing app
• Enter the username and password provided by
your teacher
On a computer or Chromebook
• Open the Chrome or Edge browser
• Go to https://student.mapnwea.org
• Enter the username and password provided by
your teacher
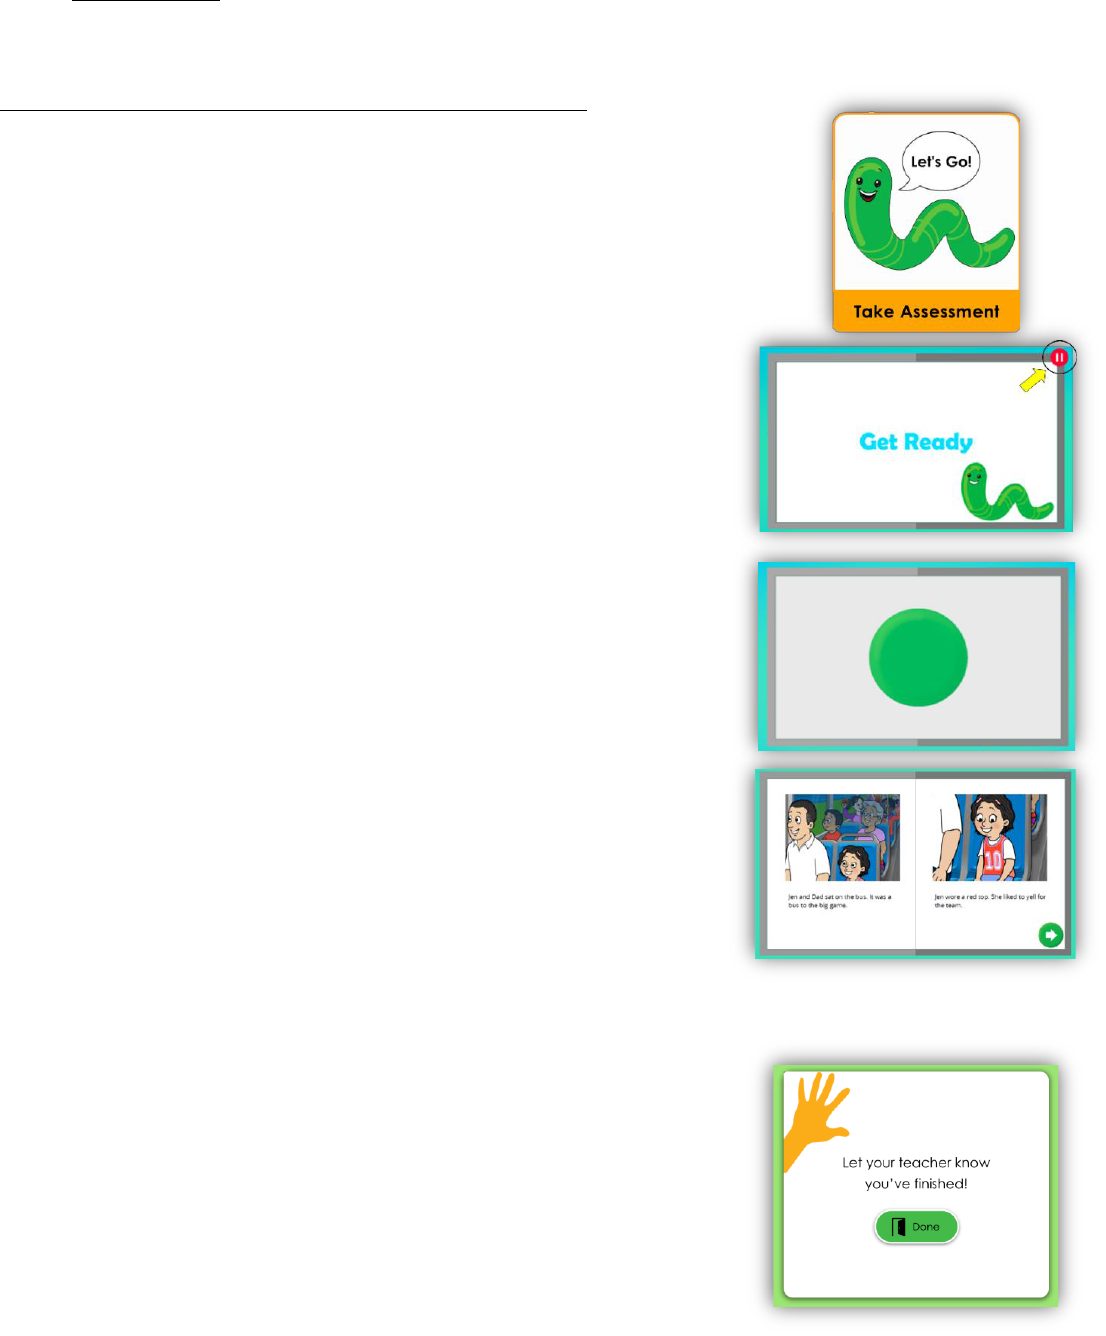
• Click the picture of the worm
• Click on Let’s Go / Take Assessment
How to check if your hardware/software is ready:
After logging in, the student will get a prompt to allow the microphone to record
audio.
On an iPad:
• When a popup appears asking to use the microphone, tap OK
• Tap Check My Equipment
• Tap Check Speakers to check the sound
• Click on the green button next to Record Test Audio, and have the
student speak into the microphone. You will see the input level go
up and down based off the volume of their voice. Once the student is
done speaking, click again on the green button.
• Make any adjustments needed (see Microphone Adjustments below)
• Tap Home
On a computer (PC/laptop/Mac/Chromebook):
• Click Check Equipment
• Click Check Speakers to check the sound
• Click on the green button next to Record Test Audio and have the
student speak into the microphone. You will see the input level go
up and down based off the volume of their voice. Once the student
is done speaking, click again on the green button.
• Make any adjustments needed (see Microphone Adjustments
below)
• When a pop-up appears asking to use the microphone, click Allow
• Click Home
Microphone adjustments:
• Microphone is ok
o The child/student can be heard, and they can start taking the test
• Volume too high
o The child/student is speaking too loudly and/or the microphone is too close to their mouth
• Volume too low
o The child/student is not loud enough and/or the microphone is too far away from their mouth
Completing the assignment (all devices)
1. After the equipment check, click Let’s Go! when your child/student is ready.
2. When the assignment begins, your child/student should follow any instructions
that are given. Depending on what kind of assignment it is, it may take your
child/student 5–30 minutes to complete. They do not have to complete the
entire assignment at once.
3. If your child/student needs a break, you have several options:
a. If you are on a screen with a red pause button, click it. The test
will be paused until you continue. If you quit and your
child/student logs in again, the assignment resumes in the same
place.
b. Some screens have a green button that initiates recording. If
you want to pause, do not click the green button. The
assignment will pause until the green button is clicked. If you
exit the assignment and your child/student logs in again, the
assignment resumes in the same place.
c. On any other screen, press the Esc key on your keyboard to exit
full-screen mode, then close the browser window to
automatically pause the test. If using an iPad, closing the app by
double-tapping on the home button and then dismissing the
app will automatically pause the test. When your child/student
logs in again, re-do the section that was not completed.
4. You will know that your child/student has completed the assignment
when you see the Let your teacher know you’ve finished message:

Troubleshooting / FAQ’s
The username and password aren’t working, or I don’t have a username and password
• Contact the school proctor or teacher for this information
My child/student is locked out of the test … what should I do?
• The student most likely did most pass the mouse screening activity. You will need to contact the school
proctor or teacher and ask them for guidance on what to do next.
What do I do if I need to pause the test or if my child/student needs a break?
• Please see the “Completing the assignment (all devices)” section above. Three different ways to pause the
test are explained in this section.
My child/student is getting a message asking them to raise their hand
• They are seeing this message due to one of issues below:
o There is a problem with volume or the microphone
Make sure that your child/student is using their normal speaking voice
Try and reduce background noise that may interfere with the audio recording
Make sure the student is not pressing the mute button or covering the microphone
o Student did not respond
The assignment will pause if your child/student isn’t active for a while
Take a break or remind your child/student to keep working
o This student did not pass the mouse screening activity
The mouse screening activity is designed to check if the student can interact with the
assignment and correctly maneuver the mouse
Your child/student may have had issues using the mouse
Contact the school proctor/teacher to unlock the account
