R
ead Me First.
Please be sure to change the default password immediately
upon first usage of the product. To set your unique password
please refers to this user manual and FAQs on your applicable
regional support site. The default password is automatically set
upon shipping of the product. Even if the default password is
changed to your unique password, your unique password may
be reset to a default password in the following situations:
1. When the user rese
ts the product by using the associated
App or by depressing the Reset button to accomplish a
reset.
2. When the option “Enable factory default after firmware
upgrade” is selected and the user updates the firmware.

GMAA00500013
594247-A3
02/18
TOSHIBA
Canvio AeroCast™
Wireless Hard Drive
User’s Manual

2
California Prop 65 Warning
This product contains chemicals, including lead, known to
the State of California to cause cancer and birth defects or
other reproductive harm. Wash hands after handling.
For the state of California only.
Safety information and Rules and
Regulations for wireless LAN
Do not use the Wireless LAN functionality near a microwave
oven or in areas subject to radio interference or magnetic
fields. Interference from a microwave oven or other source
can disrupt Wireless LAN operation.
The transmission speed over the wireless LAN, and the
distance over which the wireless LAN can reach, may vary
depending on surrounding electromagnetic environment,
obstacles, access point design and configuration, client
design and software/hardware configurations. The
transmission rate described is the theoretical maximum
speed as specified under the appropriate standard – the
actual transmission speed will be lower than the theoretical
maximum speed.
Federal Communications Commission
(FCC) Notice (USA)
Complies with FCC RF Exposure requirements.
This equipment has been tested and found to comply with the limits for a
Class B digital device, pursuant to Part 15 of the FCC Rules. These limits are
designed to provide reasonable protection against harmful interference in a
residential installation.
This equipment generates, uses, and can radiate radio frequency energy and,
if not installed and used in accordance with the instructions, may cause
harmful interference to radio communications. However, there is no guarantee
that interference will not occur in a particular installation. If this equipment
does cause harmful interference to radio or television reception, which can be
determined by turning the equipment off and on, the user is encouraged to try
to correct the interference by one or more of the following measures:
❖ Reorient or relocate the receiving antenna.
NOTE
NOTE

3
❖ Increase the separation between the equipment and the receiver.
❖ Connect the equipment into an outlet on a circuit different from that
to which the receiver is connected.
❖ Consult the dealer or an experienced radio or television technician
for help.
Changes or modifications made to this equipment not expressly approved by
Toshiba or parties authorized by Toshiba could void the user's authority to
operate the equipment.
Declaration of Conformity for Products
Marked with the FCC Logo (USA)
This device complies with Part 15 of the FCC Rules. Operation is subject to
the following two conditions:
1) This device may not cause harmful interference, and
2) This device must accept any interference received, including
interference that may cause undesired operation.
SAR information
This transmitter must not be co-located or operating in conjunction
with any other antenna or transmitter.
Cet émetteur ne doit pas être Co-placé ou ne fonctionnant en même
temps qu'aucune autre antenne ou émetteur.
Canadian Notice
This device complies with Industry Canada license-exempt RSS standard(s).
Operation is subject to the following two conditions: (1) this device may not
cause interference, and (2) this device must accept any interference, including
interference that may cause undesired operation of the device.
Le présent appareil est conforme aux CNR d'Industrie Canada applicables aux
appareils radio exempts de licence.
L’exploitation est autorisée aux deux conditions suivantes : (1) l’appareil ne doit
pas produire de brouillage, et (2) l’appareil doit accepter tout brouillage
radioélectrique subi, même si le brouillage est susceptible d’en compromettre
le fonctionnement.

4
To comply with the Canadian RF exposure compliance
requirements, this device and its antenna must not be co-
located or operating in conjunction with any other antenna or
transmitter.
Pour être conforme aux exigences canadiennes en matière
d’exposition aux fréquences radio, l’appareil et son antenne
ne doivent pas être situés au même endroit qu’une autre
antenne ou un autre émetteur ni fonctionner en même
temps.
Copyright
This manual may not be reproduced in any form without the prior written
permission of Toshiba. No liability is assumed with respect to the use of the
information contained herein.
© 2018 Toshiba America Electronic Components, Inc. All rights reserved.
Notice
The information contained in this manual, including but not limited to any
product specifications, is subject to change without notice.
TOSHIBA ELECTRONIC DEVICES & STORAGE CORPORATION AND
TOSHIBA AMERICA ELECTRONIC COMPONENTS, INC
TO THIS MANUAL OR ANY OTHER INFORMATION CONTAINED
HEREIN AND HEREBY EXPRESSLY DISCLAIMS ANY IMPLIED
WARRANTIES OF MERCHANTABILITY OR FITNESS FOR ANY
PARTICULAR PURPOSE WITH REGARD TO ANY OF THE
FOREGOING. TOSHIBA ASSUMES NO LIABILITY FOR ANY
DAMAGES INCURRED DIRECTLY OR INDIRECTLY FROM ANY
TECHNICAL OR TYPOGRAPHICAL ERRORS OR OMISSIONS
CONTAINED HEREIN OR FOR DISCREPANCIES BETWEEN THE
PRODUCT AND THE MANUAL. IN NO EVENT SHALL TOSHIBA BE
LIABLE FOR ANY INCIDENTAL, CONSEQUENTIAL, SPECIAL, OR
EXEMPLARY DAMAGES, WHETHER BASED ON TORT, CONTRACT
OR OTHERWISE, ARISING OUT OF OR IN CONNECTION WITH THIS
MANUAL OR ANY OTHER INFORMATION CONTAINED HEREIN OR
THE USE THEREOF.

5
GNU General Public License (“GPL”)
Firmware incorporated into this product may include third party
copyrighted software licensed under the GPL or Lesser General
Public License (“LGPL”) (collectively, “GPL Software”) and not
Toshiba's End User License Agreement. A copy of that license may
be obtained at http://www.gnu.org, and http://support.toshiba.com.
You may obtain, for a period of three years after the date of
purchase, the complete Corresponding Source code from us by
downloading at no charge from http://support.toshiba.com or by
calling Toshiba Customer Support. With respect solely to the GPL
Software, no warranty is provided, to the extent permitted by
applicable law. Modification of or tampering with the Software is
solely at your own risk and will void the product warranty. Toshiba is
not responsible for any such modification or tampering. Toshiba will
not support any product in which you have or have attempted to
modify the Software supplied by Toshiba.
Third party services and other Internet services are not provided by
Toshiba, may change or be discontinued at any time and may be
subject to Internet service provider restrictions. Toshiba makes no
warranties, representations, or assurances about the content,
availability, compatibility or functionality of third-party content or
services. Use of third party Internet services may require the creation
of a separate account and payment of one-time and/or recurring
charges.
Trademarks
Canvio and Canvio AeroCast are trademarks of Toshiba America Electronic
Components, Inc.
Android, Chromecast, and Google Play are trademarks of Google, Inc.
DLNA is a trademark or a registered trademark of the Digital Living Network
Alliance.
Facebook is a registered trademark of Facebook, Inc.
iOS is a registered trademark or trademark of Cisco Systems, Inc. and/or its
affiliates in the United States and certain other countries.
Mac, Mac OS, OSX, iPad, iPhone and Time Machine are trademarks of
Apple Inc., registered in the U.S. and other countries. App Store is a service
mark of Apple Inc.
SD, SDHC, and SDXC are trademarks of SD-3C, LLC.
Twitter is a registered trademark of Twitter, Inc.
Wi-Fi
®
is a registered trademark of the Wi-Fi Alliance
®
.
Windows is either a registered trademark or trademark of Microsoft
Corporation in the United States and/or other countries.
All other brand and product names are trademarks or registered trademarks
of their respective companies.

6
Safety icons
This manual contains safety instructions that must be observed to
avoid potential hazards that could result in personal injuries, damage
to your equipment, or loss of data. These safety cautions have been
classified according to the seriousness of the risk, and icons
highlight these instructions as follows:
Indicates an imminently hazardous situation which, if not
avoided, will result in death or serious injury.
Indicates a potentially hazardous situation which, if not
avoided, could result in death or serious injury.
Indicates a potentially hazardous situation which, if not
avoided, may result in minor or moderate injury.
Indicates a potentially hazardous situation which, if not
avoided, may result in property damage.
Provides important information.
Battery safety precautions
Do not immerse the drive (with the internal battery in
it) in liquid such as water, beverages, or other fluids.
The battery (including protection circuit) may catch
on fire, smoke, explode, or cause heat generation by
unexpected electrical load.
Keep the drive (with the internal battery in it) away from
heat and fire. Heat will damage the battery and may
cause it to generate heat, smoke, catch fire, or
explode.
NOTE

7
Do not disassemble the drive and the internal battery.
Disassembly or modification of the battery may
damage the protection circuit. This may cause the
battery to generate heat, smoke, catch fire, or
explode.
Keep the product away from small children. If the
product is broken or has cracks, keep the battery and
any of its component parts away from small children.
If the battery liquid or any of its component parts are
swallowed, seek medical attention immediately.
Stop charging if the charging process cannot be finished.
If the battery cannot finish the charging process
within the specified time, halt the charging process.
The battery may generate heat, smoke, catch fire, or
explode.
Discard this device in accordance with applicable
laws and regulations. For disposal, reuse or recycling
information, please contact your local government.
Always immediately turn the power off and
disconnect the power cable/cord plug from the plug
socket and stop using the battery if you observe any
of the following conditions: Offensive or unusual
odor/Excessive heat/Discoloration/Deformation,
crack, or leaks/Smoke/Other unusual event during
use, such as abnormal sound. Do not turn on the
drive’s power again. Continued use could cause a fire
or rupture possibly resulting in serious injury or drive
failure including but not limited to the loss of data.
If the drive is leaking or its case is cracked, put on
protective gloves to handle it.

8
Only charge the battery in temperatures between
5 to 35º C (41 to 95º F). Charging outside of this
temperature range may cause the battery to leak,
generate heat, or result in serious damage. It may also
cause the battery's performance and life to deteriorate.
Actual battery life may vary depending on settings,
application usage, features or tasks selected, network
configuration, operating temperature and many other
factors. Recharge time varies depending on usage. The
battery may not charge while the drive is consuming full
power. After a period of time, the battery will lose its
ability to perform at maximum capacity. This is normal for
all batteries.
Power and other Safety Precautions
Failure to observe any of the following instructions may result in risk
of fire, electric shock, serious bodily injury and/or damage to your
device.
Always use power cables/cords and power sources that comply with
the voltage and frequency specifications and requirements of the
country of use.
❖ Do not leave parts such as plastic covers and
ele
ctrical plug within the reach of children an
d
p
ets. Misuse of the part including, withou
t
limitation, accidental
swallowing the part ma
y
ca
use choking and suffocation resu
lting in death
or
serious injury. If you suspect a part
has been
swa
llowed, immediately take appropriate
emergency action and consult a doctor.
❖ Do not disassemble, modify, tamper with or
repair your device as it may cause personal injury
or may result in electric shock or fire.
Water and moisture
❖ Do not use device in a wet location. Do no
t
connect/disconnect a power plug/cord with wet
hands.

9
Service Provider
Disconnect device from the electrical outlet and take
device to an authorized Toshiba service provider if:
❖ AC adaptor or power cable/cord are damaged.
❖ Liquid has spilled into device or
an object (such
as
a screw, staple or paper clip) has entere
d
device.
❖ Device has been dropped, subject to shock or
impact and/or damaged in some way.
❖ Noticeable signs of overheating, smoke,
deformation, cracks, leaks or unusual odor occur.
❖ Service is needed on component inside
compartments requiring opening or removal of
covers.
Failure to do so may result in risk of fire, electric shock,
serious bodily injury and/or damage to your device.
❖ Do not plug the AC adaptor into a power source
that does not correspond to the voltage, current
and the frequency specified on the regulator
y
labe
l of the unit. An overload on the socket and/
or AC adaptor may cause a fire or electric shock,
possibly resulting in serious injury.
❖ Always confirm that the power plug (and
extension cable plug if used) has been fully
in
serted into the socket, to ensure a secure
electrical connection. Failure to do so may result
in a fire or electric shock, possibly resulting
in
serious
injury.
❖ Be careful if you use a multiple connector. An
overload on one socket could cause a fire or
electric shock, possibly resulting in serious injury.

10
❖ Always make sure the drive and AC adaptor have
adequate ventilation and are protected from
overheating when the AC adaptor is connected to
a power outlet. Inadequate ventilation may cause
the drive and AC adaptor to overheat resulting in
a fire or electric shock and serious injury.
❖ If dust gets on the power plug connectors or
connector base, turn the power off and
disconnect the power plug. Then clean the
connector and/or connector base with a dry soft
cloth. Failure to do so may cause a fire or electric
shock, possibly resulting in serious injury.
❖ Avoid extended contact between the drive and
your skin. The drive may become hot! Avoid
prolonged contact to prevent skin irritation and/or
heat injury.
❖ Never pull on a power cord/cable to remove a
plug from a socket. Always grasp the plug
directly.
❖ Do not place the drive on a shaky table, uneven,
tilted surface or other unstable location. The drive
may fall, causing damage to the drive or possibly
injury.
❖ Do not disconnect the USB cable and AC
adaptor while operating, as it may result in loss of
data or damage to the drive.
❖ Do not touch the USB cable and AC adaptor
while operating, as it may result in loss of data or
damage to the drive.
❖ Do not bump, drop or jar the drive, as it may
result in loss of data or damage to the drive.
❖ Do not use the drive at high or low temperatures
or sudden temperature changes. This may result
in loss of data or damage to the drive. (Operating:
5° C-35° C).
❖ Do not cover the drive during operation, as it may
become overheated.

11
Do not use the drive during a thunderstorm. If you see
lightning or hear thunder, immediately turn off the devices
to which this drive is connected, computer and
peripherals, and disconnect the power cord from the
outlet, and disconnect the USB cable from the computer.
An electric surge caused by the lightning may result in
loss of data or damage to the drive.
❖ Compatibility may vary depending on user's
hardware configuration and operating system.
❖ USB 3.0 is backward compatible with USB 2.0.
❖ If the drive is not provided enough power, th
e
drive
does not operate.
❖ You may need a USB 3.0 Express Card Ho
st
Controller for your computer if the computer does
not have a USB 3.0 port. You also can connec
t
t
he drive to a USB 2.0 port on your computer.
❖ However the transfer ra
te will be downgraded
to t
hat of USB 2.0.
❖ One Gigabyte (1GB) means 10
9
= 1,000,000,000
byt
es and one Terabyte (1TB) means 10
12
=
1,000,000,000,000 bytes using power of 10. A
co
mputer operating system, however, report
s
st
orage capacity using powers of 2 for th
e
de
finition of 1GB = 2
30
= 1,073,741,824 bytes and
1T
B = 2
40
= 1,099,511,627,776 bytes, and
therefore shows less storage capacity. Available
storage capacity (including examples of variou
s
media files) w
ill vary based on file si
ze,
f
ormatting, setting, software and operating
system as well as other factors.
❖ Use only the accessories supplied by th
e
manufacturer.
❖ This drive needs the power supply from the
AC
ada
ptor supplied by the manufacturer
.
❖ Pr
oduct specifications are subject to chan
ge
without notice.
NOTE

12
Protection of Stored Data
For your important data, please make periodic back-up copies of all
the data stored on the hard disk or other storage devices as a
precaution against possible failures, alteration, or loss of the data.
IF
YOUR DATA IS ALTERED OR LOST DUE TO ANY TROUBLE,
FAILURE OR MALFUNCTION OF THE HARD DISK DRIVE OR
OTHER STORAGE DEVICES AND THE DATA CANNOT BE
RECOVERED, TOSHIBA SHALL NOT BE LIABLE FOR ANY
DAMAGE OR LOSS OF DATA, OR ANY OTHER DAMAGE
RESULTING THEREFROM. WHEN COPYING OR
TRANSFERRING YOUR DATA, PLEASE BE SURE TO
CONFIRM WHETHER THE DATA HAS BEEN SUCCESSFULLY
COPIED OR TRANSFERRED. TOSHIBA DISCLAIMS ANY
LIABILITY FOR THE FAILURE TO COPY OR TRANSFER THE
DATA CORRECTLY.
Critical Application
The device you have purchased is not designed for any “critical
applications.” “Critical applications” means life support systems,
medical applications, connections to implanted medical devices,
commercial transportation, nuclear facilities or systems or any other
applications where product failure could lead to injury to persons or
loss of life or catastrophic property damage.
ACCORDINGLY,
TOSHIBA, ITS AFFILIATES AND SUPPLIERS DISCLAIM ANY
AND ALL LIABILITY ARISING OUT OF THE USE OF THE
PRODUCT IN ANY CRITICAL APPLICATIONS. IF YOU USE
THE PRODUCT IN A CRITICAL APPLICATION, YOU, AND NOT
TOSHIBA, ASSUME FULL RESPONSIBILITY FOR SUCH USE.

13
Contents
Introduction.......................................................15
Overview .............................................................. 15
Components .................................................. 15
Features ............................................................... 16
Hardware specifications ................................ 16
Software specifications.................................. 17
Chapter 1: Getting Started......................................18
Charging the Canvio AeroCast Wireless
Hard Drive ...................................................... 18
Connect to Canvio AeroCast ............................... 19
Connect via USB............................................ 19
Connect wirelessly......................................... 20
Chapter 2: Canvio AeroCast Wireless Hard
Drive Software Utility ..........................23
System login ........................................................ 23
Connect wirelessly to a PC/Mac.................... 23
Client login for iPhone or iPad ...................... 25
Client login for Android ................................. 25
Main interface ...................................................... 26
Application main interface ............................. 27

14
Contents
Pictures Management interface........................... 28
Picture Viewer interface ................................. 30
Videos Management interface ............................. 31
Video Playback interface
(iPhone, iPad, and Android device
only).......................................................... 33
Music Management interface .............................. 34
Music Player interface
(iPhone, iPad, and Android device
only).......................................................... 36
Documents Management interface...................... 37
Document Viewer interface
(iPhone, iPad, and Android device
only).......................................................... 39
File/Folder Management interface ....................... 40
Transferring files ............................................ 42
Chapter 3: Backup Management ........................... 43
Using the Backup Management feature .............. 43
Manual backup .............................................. 43
Automatic backup.......................................... 44
Chapter 4: Settings Management .......................... 45
Wireless LAN settings.......................................... 46
Operation ............................................................. 47
Information........................................................... 47
User symbol and name........................................ 48
Internet settings ............................................. 49
Internet connection in Bridge Mode .............. 50
Internet connection via your Chromecast
device....................................................... 52
Language ............................................................. 56
Cache................................................................... 56
OSS info............................................................... 57
Contacting Toshiba.............................................. 57
Call Toshiba Customer Support Center......... 57
Index ................................................................ 58

15
Introduction
Overview
The Canvio AeroCast Wireless Hard Drive allows you to wirelessly
access your music, videos, pictures, and data. You can stream files
to your iPad, iPhone, tablet, smartphone, and notebook, without
worrying about tangled cables or wires. With 1 terabyte of storage
space, you have plenty of room to transfer your files over from your
mobile devices. The built-in USB 3.0 port makes file transfer even
faster.
Components
The Canvio AeroCast Wireless Hard Drive includes the following
components:
❖ AC adaptor
❖ USB 3.0 cable
❖ Quick Start guide
❖ Standard Limited Warranty Information

16
Introduction
Features
Features
❖ Built-in 1 TB HDD storage with NTFS format.
❖ Connect wireless
ly or using the included USB 3.0 cable.
❖ Access and stream your music, videos, pictures and data
using the free Toshiba Wireless HDD app supporting iPhone,
iPad, and Android™ operating systems.
❖ Up to 5 hours of continuous battery life in video streaming
condition. Battery life may differ depending on user
conditions.
❖ Search function to locate and access your files much faster.
❖ Four user profiles available to help keep your files organized.
❖ Access the Internet via wireless, supporting 802.11 b/g/n.
❖ Supports SD™/SDHC™/SDXC™ memory card, Class 10
compatible.
Hardware specifications
Product dimension: 121.4mm (L) x 86mm (W) x 24.4mm (H)
[4.8 in (L) x 3.4 in (W) x 1.0 in (H)]
Weight: Approximately 280.0g (9.9 oz)
Battery: Charging time: 3 hours maximum
Environmental requirements:
Wireless LAN
Standard: 802.11 b/g/n
Frequency: 2.4 GHz
Speed: 1T1R up to 150Mbps
Te mp er a tu re
Operating: 5 to 35º C (41 to 95º F)
Storage: -20 to 40º C (-4 to 104º F)
Humidity
Operating: 20-80%
Storage: 8-90%

17
Introduction
Features
Software specifications
This drive is formatted in NTFS for Windows. When
using this drive with both Windows PC and Mac, you
can read and write data to both Windows PC and
Mac only if the “Tuxera NTFS for Mac” is installed on
the Mac. Under these conditions the Time Machine
function of the OS X is disabled.
Compatible File Types:
Videos: mp4, m4v, mov
Music: mp3, m4a, aac, wav
Pictures: jpg, bmp, png, gif, tif
Documents: pdf, doc, docx, ppt, pptx, xls, xlsx, txt, rtf
System requirements:
Operating System
Windows
®
:
Windows
®
7 (32bit & 64bit), Windows
®
8.1 (32bit & 64bit),
Windows
®
10 Version1506 / Version 1511 (32bit & 64bit)
OS X:
OS X v10.7, v10.8
Android™, iPhone,
or iPad:
Android smartphones and tablets, iPhone, and iPads are
supported. Visit the “Wireless HDD for Toshiba” app Web site
for the supported versions.
NOTE

18
Chapter 1
Getting Started
Charging the Canvio AeroCast Wireless
Hard Drive
To get started using the Canvio AeroCast, ensure that your device is
charged. The Canvio AeroCast Wireless Hard Drive can be charged
via the AC adaptor and USB cable.
(Sample Illustration) Canvio AeroCast Wireless Hard Drive
charging
To charge the Canvio AeroCast Wireless Hard Drive:
1 Attach the USB cable to the AC adaptor.
USB cable
USB 3.0 port
AC adaptor

19
Getting Started
Connect to Canvio AeroCast
2 Plug the USB cable into the USB 3.0 Host port on the Canvio
AeroCast Wireless Hard Drive.
3 Plug the AC adaptor into a live electrical wall outlet.
While charging, the battery indicator light will blink slowly
(interval time is 2 seconds).
Connect to Canvio AeroCast
You can connect to the Canvio AeroCast Wireless Hard Drive directly
with the included USB cable (Direct-Attached Storage mode) or
connect wirelessly (Wireless LAN mode).
Connect via USB
To operate via USB, connect the Canvio AeroCast Wireless Hard
Drive to the computer’s USB port using the included USB cable.
For Mac users:
To write files via USB, you will need to install the “NTFS driver for
Mac” to your Mac. Refer the pre-loaded manual stored on the
Canvio AeroCast Wireless Hard Drive.
(Sample Illustration) Connect via USB
To connect the Canvio AeroCast to your computer:
1 Make sure the Canvio AeroCast Wireless Hard Drive is
powered OFF.
2 Connect the included USB 3.0 cable to the Canvio AeroCast
Wireless Hard Drive.
3 Connect the other end of the USB 3.0 cable to your
computer’s USB port.
You can now begin transferring data to and from the product.
USB cable
USB 3.0 port
USB port

20
Getting Started
Connect to Canvio AeroCast
Connect wirelessly
You can access the Canvio AeroCast Wireless Hard Drive wirelessly
from Windows, Mac, iPhone, iPad, Android mobile devices, and
DLNA
®
devices using the “Toshiba Wireless HDD” app.
Visit the “Toshiba Wireless HDD” app Web site for the
supported versions.
(Sample Image) Wireless LAN mode
If not connected to your computer via the USB cable, the Canvio
AeroCast Wireless Hard Drive automatically functions in Wireless
LAN mode once the app has been set up, see “Connect wirelessly to
a PC/Mac” on page 23.
(Sample Illustration) Ports, buttons, and indicators
NOTE
SD Card indicator light
Wi-Fi
®
/HDD indicator light
Battery indicator light
On/Off button
Reset button
USB 3.0 port
SD Card slot

21
Getting Started
Connect to Canvio AeroCast
SD Card slot:
❖ Supports SD/SDHC/SDXC memory card, Class 10
compatible.
❖ In Wireless LAN mode, you can access the SD Card.
Reset button:
❖ In Wireless LAN mode, press and hold for 5 seconds. The
system will restore to its factory settings.
On/Off button:
❖ Press and hold for 2 seconds: Wireless LAN mode turns ON.
❖ Press and hold for 2 seconds again: Wireless LAN mode
turns OFF.
If the battery is too low, you cannot turn the Canvio
AeroCast Wireless Hard Drive ON. The battery indicator
will blink orange for 6 seconds, and then turn off.
USB 3.0 port:
❖ Compatible with USB 3.0 and USB 2.0.
❖ Allows for data transfer between a computer and the Canvio
AeroCast Wireless Hard Drive, when connected.
❖ Allows you to charge the product battery when connected to
the AC adaptor.
Battery Indicator light:
❖ Green: 30% or more available battery power.
❖ Yellow: 10%-30% remaining battery power.
❖ Orange (blinking fast): the product is out of battery power or
the operating temperature is too high. The product will shut
down after 30 seconds.
❖ Green or Yellow (blinking slowly): The battery is charging.
❖ Green (Not blinking): Finished charging.
❖ Green or Yellow (blinking fast): The product is shutting down
or turning ON.
❖ LED Off: The device is powered OFF.
NOTE

22
Getting Started
Connect to Canvio AeroCast
Wireless LAN/HDD indicator:
❖ Wireless LAN Mode
❖ Blue: Wireless LAN is ON (no data access).
❖ Blue (blinking): Wireless LAN is ON (storage access
available).
❖ Blue (turned off): Wireless LAN is OFF.
❖ USB Mode
❖ White: No data access.
❖ White (blinking): Data access available.
❖ White (turned off): The device is in Sleep or Standby
mode. It is safe to disconnect the device.
SD Card indicator:
❖ Only glows in Wireless LAN Mode
❖ Violet: No SD Card access.
❖ Violet (blinking): SD Card access available.
❖ Violet (turned off): SD Card is in Standby.

23
Chapter 2
Canvio AeroCast
Wireless Hard Drive
Software Utility
System login
Connect wirelessly to a PC/Mac
1 Press the ON/OFF button to power on the system.
2 Once the Wi-Fi indicator light stops blinking, enable the
Wireless LAN feature on your PC/Mac and open the Wireless
Network connection.
3 Select the Toshiba whdd xxxx wireless connection (where
xxxx is a 4-digit number generated by your Canvio
AeroCast Wireless Hard Drive (default wireless SSID:
Toshiba whdd xxxx), and then enter the default
password 12345678.
Please be sure to change the default password
immediately upon first usage of the product.
4 The Canvio AeroCast Wireless Hard Drive can now be
accessed as a network-attached device.

24
Canvio AeroCast Wireless Hard Drive Software
Utility
System login
File copy wirelessly to PC
You can wirelessly transfer files to/from the Canvio AeroCast
Wireless Hard Drive to/from a PC once the drive has been mapped.
1 To map the drive on your PC, click or touch
Computer, and
then
Map Network Drive.
(Sample Image) Map Network Drive screen
2 Select a letter from the “Drive” drop down menu.
3 In the “Folder” field, type
\\10.10.10.254\share, and then
click or touch
Finish.
You should now be able to see your Canvio AeroCast
Wireless Hard Drive on your PC’s “My Computer” screen.
File copy wirelessly to Mac
On a Mac, the Canvio AeroCast Wireless Hard Drive automatically
displays as a network drive. You can transfer files by simply dragging
and dropping them to the desired location.
For faster file transfer use a USB cable. For more information, see
“Connect via USB” on page 19.

25
Canvio AeroCast Wireless Hard Drive Software
Utility
System login
Client login for iPhone or iPad
Install the app for iPhone and iPad
1 In the App Store, search for and locate the Toshiba Wireless
HDD app.
2 Install the
Toshiba Wireless HDD app and follow the
on-screen installation instructions.
3 The Toshiba Wireless HDD icon appears on the Desktop
once the installation process is complete.
Connecting wirelessly to an iPhone or iPad
1 Press the
ON/OFF button to power ON the Canvio AeroCast
Wireless Hard Drive. Wait for the Wi-Fi indicator light to stop
blinking.
2 On your iPad/iPhone, click or touch
Settings, and then
Wi-Fi.
3 Select
Toshiba whdd xxxx (where xxxx is a 4-digit number
generated by your Canvio AeroCast Wireless Hard Drive).
4
Enter the default password 12345678.
Application login
Run the “Toshiba Wireless HDD” app.
Client login for Android
Install Android app
1 In the Google Play™ store, search for and locate the Toshiba
Wireless HDD app.
2 Install the
Toshiba Wireless HDD app and follow the
on-screen installation instructions.
3 The Canvio AeroCast icon appears on the Desktop once the
installation process is complete.
Connecting wirelessly to an Android device
1 Press the
ON/OFF button to power ON the Canvio AeroCast
Wireless Hard Drive. Wait for the Wi-Fi indicator light to stop
blinking.
2 Once the Wi-Fi indicator light stops blinking, click or touch
Settings, and then the Wireless LAN option in your tablet
or smartphone.
Please be sure to change the default password
immediately upon first usage of the product.

26
Canvio AeroCast Wireless Hard Drive Software
Utility
Main interface
3 Select Toshiba whdd xxxx (where xxxx is a 4-digit number
generated by your Canvio AeroCast Wireless Hard Drive).
4 Enter the default password 12345678.
Application login
Run the “Toshiba Wireless HDD” app.
Main interface
When displaying the main interface screen, the application may
inform you that an update is available. The following 3 options are
available:
❖
OK (enables the update process; recommended)
❖
Cancel (cancels the update process)
❖
Do not prompt (discontinues future notifications; not
recommended)
(Sample Image) Firmware update screen
If you select
OK to update, the system will inform you to wait
approximately five minutes.
(Sample Image) Firmware update - wait 5 minutes screen
If you select
Cancel, you may be informed of any available upgrades
the next time you log in and enter the main interface.
If you select
Do not prompt, the application will never again
automatically inform you of a firmware upgrade, however, you can
manually upgrade the firmware in the Settings screen.
Please be sure to change the default password
immediately upon first usage of the product.

27
Canvio AeroCast Wireless Hard Drive Software
Utility
Main interface
Application main interface
Below are examples of how the Toshiba Wireless Hard Drive main
screen may appear when viewed in the iPhone, iPad, or Android app.
(Sample Image) Main interface screen - app
Main interface functionality
Below is a description of each button/icon and its function within the
main interface:
Button/Icon Function
Displays the Pictures Management screen.
Displays the Videos Management screen
Displays the Documents Management screen.
Displays the Music Management screen.
Displays the File/Folder Management screen.
Displays the Backup Management screen.
(iPhone, iPad, and Android devices only.) See “Backup
Management” on page 43.
Click or touch to select a Chromecast™ device. (Only
available when a Chromecast device is available.) See
“Internet connection via your Chromecast device” on
page 52.
Tablets/iPads Smartphones/iPhones

28
Canvio AeroCast Wireless Hard Drive Software
Utility
Pictures Management interface
Pictures Management interface
Before using this feature, content should be transferred
to the Canvio AeroCast Wireless Hard Drive via USB
connection, see “Connect via USB” on page 19.
Click or touch the
Pictures button to display the Pictures
Management screen.
Click or touch to disconnect a Chromecast device. (Only
available when a Chromecast device is connected.)
Click or touch the HDD button to switch to the Canvio
AeroCast Wireless Hard Drive internal HDD storage.
Click or touch the
SD Card button to display the SD Card
pop up menu functions. The available functions are “Detect
SD Card” and “Unmount SD Card.”
Click or touch the
Local button to switch to the local device.
(iPhone, iPad, or Android devices only.)
The SD Card is available.
The SD Card is not available. Click or touch to display the SD
Card pop up menu functions. The available functions are
“Detect SD Card” and “Unmount SD Card.”
Internet connection is available. Click or touch to display
Internet Setting screen.
No Internet connection is available. Click or touch to display
Internet Setting screen.
Displays the current battery level of the Canvio AeroCast
Wireless Hard Drive.
Click or touch the
Settings button to enter the Canvio
AeroCast Wireless Hard Drive system settings.
Button/Icon Function
NOTE

29
Canvio AeroCast Wireless Hard Drive Software
Utility
Pictures Management interface
Below is an example of how the Pictures Management screen may
appear.
(Sample Image) Pictures Management screen
Below is a description of each button/icon and its function within the
Pictures Management screen:
Button/Icon Function
Click or touch the
Back button to return to the main screen.
When the “Sort by name” icon is displayed, the pictures are
sorted by filename.
When the “Sort by date” icon is displayed, the pictures are
sorted by file date.
Click or touch the icon to toggle between modes.
When the “Thumbnail” icon is displayed, the pictures are
displayed in thumbnails.
When the “List” icon is displayed, the pictures are displayed
as a list, featuring a smaller thumbnail along with file
information.
Click or touch the icon to toggle between modes.
Click or touch the
Go To button to display a pop-up menu
with navigation options from the main interface.
Enter key letters or numbers in the Search & Explorer field to
perform a search of a specific file or folder. If there is no
Search & Explorer field, tap on the
Folder icon and navigate
through the folders to find the desired file.
Click or touch the
HDD button to switch to the Canvio
AeroCast Wireless Hard Drive
’s internal storage.
Tablets/iPads Smartphones/iPhones

30
Canvio AeroCast Wireless Hard Drive Software
Utility
Pictures Management interface
Picture Viewer interface
Click or touch the desired picture file in the Picture Management
screen to display it in the Picture Viewer screen.
(Sample Image) Picture Viewer screen
Below is a description of each button/icon and its function within the
Pictures Management interface screen:
Click or touch the SD Card button to switch to the inserted
SD Card.
Click or touch the Local button to switch to the local device.
(iPhone, iPad, or Android devices only.)
In the HDD storage mode, you can choose pictures from one
of 4 users. Click or touch the User icon to display other
users.
The 4 user default names are: Default, Owner1, Owner2, and
Owner3. To configure these names, see “User symbol and
name” on page 48.
Button/Icon Function
Click or touch the
Back button to return to the Pictures
Management screen.
Click or touch the
Download button to download the
current picture to the local album.
(HDD mode only.)
Button/Icon Function

31
Canvio AeroCast Wireless Hard Drive Software
Utility
Videos Management interface
Videos Management interface
Before using this feature, content should be transferred
to the Canvio AeroCast Wireless Hard Drive via USB
connection, see “Connect via USB” on page 19.
Click or touch the
Videos button to display the Videos Management
screen.
(Sample Image) Videos Management screen
Click or touch the Upload button to upload the current
picture from the local album to the current owner's
“Uploaded” folder.
(Local mode only.)
Click or touch the
Play/Pause button to start/stop the
photo slide show.
Click or touch the
Delete button to delete the current
picture.
Click or touch the Share button to share the current picture
to Facebook, Twitter, or email.
Click or touch to select a Chromecast device. (Only available
when a Chromecast device is available.) See “Internet
connection via your Chromecast device” on page 52.
Click or touch to disconnect a Chromecast device. (Only
available when a Chromecast device is connected.)
Button/Icon Function
NOTE

32
Canvio AeroCast Wireless Hard Drive Software
Utility
Videos Management interface
Below is a description of each button/icon and its function within the
Videos Management screen:
Button/Icon Function
Click or touch the
Back button to return to the main screen.
When the “Sort by name” icon is displayed, the videos are
sorted by filename.
When the “Sort by date” icon is displayed, the videos are
sorted by file date.
Click or touch the icon to toggle between modes.
When the “Thumbnail” icon is displayed, the videos are
displayed in thumbnails.
When the “List” icon is displayed, the videos are displayed
as a list, featuring a smaller thumbnail along with file
information.
Click or touch the icon to toggle between modes.
Click or touch the
Go To button to display a pop-up menu
with navigation options from the main interface.
Enter key letters or numbers in the Search & Explorer field to
perform a search of a specific file or folder. If there is no
Search & Explorer field, tap on the Folder icon and navigate
through the folders to find the desired file.
Click or touch the HDD button to switch to the Canvio
AeroCast Wireless Hard Drive
’s internal storage.
Click or touch the
SD Card button to switch to the Canvio
AeroCast Wireless Hard Drive's inserted SD Card.
Click or touch the
Local button to switch to the local device.
(iPhone, iPad, or Android devices only.)
When switching to the Canvio AeroCast Wireless Hard
Drive's internal storage, you can choose videos from one of 4
users. Click or touch the
Owner icon to display other users.
The 4 user default names are: Default, Owner1, Owner2, and
Owner3

33
Canvio AeroCast Wireless Hard Drive Software
Utility
Videos Management interface
Video Playback interface
(iPhone, iPad, and Android device only)
Click or touch a video file to display the Video Playback screen.
(Sample Image) Video Playback screen
Below is a description of each button/icon and its function within the
Video Playback screen:
Button/Icon Function
Click or touch the
Back button to return to the main screen.
Click or touch the
Zoom button to adjust the playback
screen size.
Click or touch the
Previous button to switch to the previous
video playback.
Click or touch the Next button to switch to the next video
playback.
Click or touch the
Rewind button to rewind the video 20
seconds.
Click or touch the
Forward button to forward the video 20
seconds.
Click or touch the
Play/Pause button to play/pause the
currently playing video.
Drag the Playback progress bar, to navigate to different
positions in the video playback.

34
Canvio AeroCast Wireless Hard Drive Software
Utility
Music Management interface
Music Management interface
Before using this feature, content should be transferred
to the Canvio AeroCast Wireless Hard Drive via USB
connection, see “Connect via USB” on page 19.
(Sample Image) Music Management screen
Drag the Volume control bar to adjust the volume of the
video.
Click or touch to select a Chromecast device. (Only available
when a Chromecast device is available.) See “Internet
connection via your Chromecast device” on page 52.
Click or touch to disconnect a Chromecast device. (Only
available when a Chromecast device is connected.)
Button/Icon Function
NOTE

35
Canvio AeroCast Wireless Hard Drive Software
Utility
Music Management interface
Below is a description of each button/icon and its function within the
Music Management screen:
Button/Icon Function
Click or touch the
Back button to return to the main screen.
When the “Thumbnail” icon is displayed, music tracks are
displayed in thumbnails.
When the “List” icon is displayed, music tracks are displayed
as a list, featuring a smaller thumbnail along with file
information.
Click or touch the icon to toggle between modes.
Click or touch the
Go To button to display a pop-up menu
with navigation options from the main interface.
Enter key letters or numbers in the Search & Explorer field to
perform a search of a specific file or folder. If there is no
Search & Explorer field, tap on the
Folder icon and navigate
through the folders to find the desired file.
Click or touch the
HDD button to switch to the Canvio
AeroCast Wireless Hard Drive
’s internal storage.
Click or touch the SD Card button to switch to the Canvio
AeroCast Wireless Hard Drive's inserted SD Card.
Click or touch the Local button to switch to the local device.
(iPhone, iPad, or Android devices only.)
Click or touch the
Songs button to view all of the song files
available on the Canvio AeroCast Wireless Hard Drive (default
mode).
Click or touch the
Albums button to view all of the song files
by albums.
Click or touch the
Artist button to view all of the song files
by Artist.
Click or touch the
Favorites button to view all of your
favorite songs. You can add songs to the favorites screen by
clicking or touching the ( ) button on the
Songs screen,
Album screen, or Artist screen. Remove songs from the
Favorites screen by clicking or touching the ( ) button on
the Music Player.

36
Canvio AeroCast Wireless Hard Drive Software
Utility
Music Management interface
Music Player interface
(iPhone, iPad, and Android device only)
Click or touch a music file to display the Music Player screen.
(Sample Image) Music Player screen
Below is a description of each button/icon and its function within the
Music Player screen:
Button/Icon Function
Click or touch the
Back button to return to the Music
Management screen.
Click or touch the
Music Playlist button to change the
songs in a playlist.
Click or touch the
Previous button to switch to the previous
music playback.
Click or touch the Next button to switch to the next music
playback.
Click or touch the
Rewind button to rewind the music 20
seconds.
Click or touch the
Forward button to forward the music 20
seconds.
Click or touch the
Play/Pause button to play/pause the
currently playing music.
Drag the Playback progress bar, to navigate to different
positions in the music playback.

37
Canvio AeroCast Wireless Hard Drive Software
Utility
Documents Management interface
Documents Management interface
Click or touch the Documents button to display the Documents
Management screen.
(Sample Image) Documents Management screen
Drag the Volume control bar to adjust the volume of the
music.
Click or touch the
Music mode button to switch between
the following four musical modes:
Shuffle ( ) (default mode), Loop Playback ( ), Order Play
( ), and Single Cycle ( ).
Click or touch the
Favorites button to add the currently
playing music to your Favorites.
Button/Icon Function

38
Canvio AeroCast Wireless Hard Drive Software
Utility
Documents Management interface
Below is a description of each button/icon and its function within the
Documents Management screen:
Button/Icon Function
Click or touch the
Back button to return to the main screen.
When the “Sort by name” icon is displayed, the documents
are sorted by filename.
When the “Sort by date” icon is displayed, the documents
are sorted by file date.
Click or touch the icon to toggle between modes.
When the “Thumbnail” icon is displayed, the documents are
displayed in thumbnails.
When the “List” icon is displayed, the documents are
displayed as a list, featuring a smaller thumbnail along with
file information.
Click or touch the icon to toggle between modes.
Click or touch the
Go To button to display a pop-up menu
with navigation options from the main interface.
Enter key letters or numbers in the Search & Explorer field to
perform a search of a specific file or folder. If there is no
Search & Explorer field, tap on the Folder icon and navigate
through the folders to find the desired file.
Click or touch the HDD button to switch to the Canvio
AeroCast Wireless Hard Drive
’s internal storage.
Click or touch the
SD Card button to switch to the Canvio
AeroCast Wireless Hard Drive's inserted SD Card.
Click or touch the
Local button to switch to the local device.
(iPhone, iPad, or Android devices only.)
When switching to the Canvio AeroCast Wireless Hard
Drive's internal storage, you can choose documents from
one of 4 users. Click or touch the
Owner icon to display
other users.
The 4 user default names are: Default, Owner1, Owner2, and
Owner3

39
Canvio AeroCast Wireless Hard Drive Software
Utility
Documents Management interface
Document Viewer interface
(iPhone, iPad, and Android device only)
Click or touch a document file to display the Document Viewer
screen.
In the iPhone and iPad app, only supported file types can be viewed.
In the Android app, you are prompted to open the document in
another available app. You can choose to use that app just once or
always. If you select
Always, you will not see the prompt again.
(Sample Image) Document Viewer screen
Below is a description of each button/icon and its function within the
Document Viewer screen:
Button/Icon Function
Click or touch the
Find button to open the find screen. Enter
key letters or numbers in the search box to perform a search
of specific text.
Click or touch the
Options button to view various
document options.
40
Canvio AeroCast Wireless Hard Drive Software
Utility
File/Folder Management interface
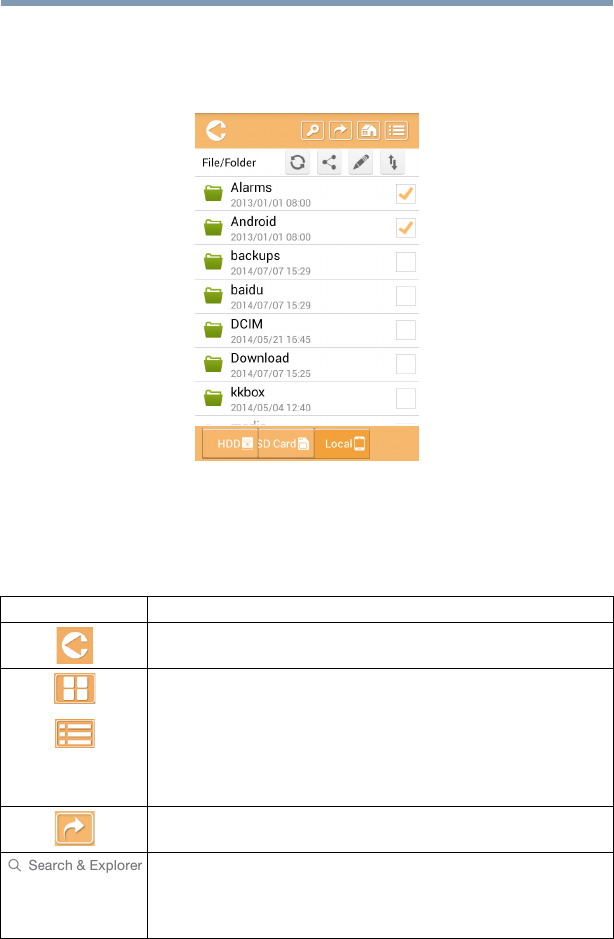
File/Folder Management interface
Click or touch the File/Folder button to display the File/Folder
Management screen.
(Sample Image) File/Folder Management interface - Application
screen
Below is a description of each button/icon and its function within the
Documents Management screen:
Button/Icon Function
Click or touch the Back button to return to the main screen.
When the “Thumbnail” icon is displayed, the files/folders are
displayed in thumbnails.
When the “List” icon is displayed, the files/folders are
displayed as a list, featuring a smaller thumbnail along with
file/folder information.
Click or touch the icon to toggle between modes.
Click or touch the
Go To button to display a pop-up menu
with navigation options from the main interface.
Enter key letters or numbers in the Search & Explorer field to
perform a search of a specific file or folder. If there is no
Search & Explorer field, tap on the
Folder icon and navigate
through the folders to find the desired file.

41
Canvio AeroCast Wireless Hard Drive Software
Utility
File/Folder Management interface
Click or touch the HDD button to switch to the Canvio
AeroCast Wireless Hard Drive
’s internal storage.
Click or touch the
SD Card button to switch to the Canvio
AeroCast Wireless Hard Drive's inserted SD Card.
Click or touch the
Local button to switch to the local device.
(iPhone, iPad, or Android devices only.)
Click or touch the
Refresh button to refresh the screen.
Click or touch the Share button to share the current
document via email. Note that this feature only works with
photo files.
A Checkmark icon indicates that the file
or folder is selected.
Click or touch the
Settings button to display the following
options:
Click or touch the
Transfer button to display the File
transfer status screen.
Button/Icon Function

42
Canvio AeroCast Wireless Hard Drive Software
Utility
File/Folder Management interface
Transferring files
When an action is taken with a file or folder (copy, cut, upload, or
download), the File transmission dialog box opens. A progress bar of
each transmission is displayed as well as successful and failed
transmissions.
(Sample Image) Queued Files status screen
❖ The “Upload” ( ) icon indicates an uploading file/folder in
progress.
❖ The “Download” ( ) icon indicates a downloading file/folder
in progress.
❖ Click or touch the
Upload/Download icon to pause the
upload/download process. The “Pause” ( ) icon is
displayed.
❖ The ( ) icon indicates that a file/folder is waiting for
upload/download. This application allows for individual
file/folder upload/download.
❖ Click or touch the
Cancel ( ) icon to cancel all queued
files. The buttons above the Queued Files list indicate
“Transfer Complete” or “Transfer Failed.”
(Sample Image) Document Viewer Queued Files screen
If a transfer fails and you wish to try again, click the
Re-Transfer
( ) button.

43
Chapter 3
Backup Management
Using the Backup Management feature
(For iPhone, iPad, and Android devices only.)
You can back up the files on the SD Card or local device to one of
the four user directories: Default, Owner1, Owner2, or Owner3. The
backup is an incremental backup.
You can back up the SD card manually or use the automatic backup
function. Local devices must be backed up manually.
If the size of the backup files are larger than the available space on
the Canvio AeroCast Wireless Hard Drive’s internal storage, you will
see a warning message before the backup process begins.
Manual backup
1 To perform a manual backup, click or touch the Backup
button on the main screen.
2 Click or touch
Backup SD Card or Backup Local Data.
3 Click or touch a desired user directory you wish to back up
the files to.
4 Click or touch
Start Backup. Files from the SD Card or
local device will be backed up to the selected user directory.
The backup progress is displayed at the bottom of the
interface screen. Once the backup has finished, you will see
a message indicating the backup succeeded.

44
Backup Management
Using the Backup Management feature
Automatic backup
You can set up an Automatic backup for your SD Card by selecting
the
Auto Copy box on the Backup SD Card screen. The next time
you insert the SD Card, all of the videos and pictures on the SD Card
will be automatically backed up to the selected user directory.
(Sample Image) Back up data - Automatic screen
Be sure to confirm that any transfers from the SD Card
are complete before removing the card.
NOTE

45
Chapter 4
Settings
Management
Click or touch the Settings button in the upper-right corner of the
Main interface screen to display the Settings interface screen. The
following modules are available:
❖ Wireless
❖ Operation
❖ Information
❖ User symbol and name
❖ SSID Attribute
❖ Internet
❖ Language
❖ Cache
❖ OSS Info

46
Settings Management
Wireless LAN settings
Wireless LAN settings
Click or touch Wireless to display the Wireless LAN settings screen.
(Sample Image) Settings - Wireless screen
The following options are available:
❖ SSID
❖ Enable Password
❖ Modify Password
SSID:
1 Click or touch the SSID button to enter the SSID settings
screen.
(Sample Image) Settings - SSID settings screen
2 Enter your SSID. The default SSID is “Toshiba whdd xxxx.”
3 Click or touch the
OK button.
4 Click or touch the
Apply button at the top-right corner of the
Wireless screen.
Enable Password:
1 Move the Enable slider to the right or left to enable or
disable the password feature.
2 Click or touch the
Apply button at the top-right corner of the
Wireless screen.
Modify Password:
1 Click or touch the Modify Password button.
2 Enter the new password.
3 Click or touch the
OK button.
4 Click or touch the
Apply button at the top-right corner of the
Wireless screen.

47
Settings Management
Operation
Operation
You can reset, power off, or restart the Canvio AeroCast Wireless
Hard Drive from the Operation screen. Click or touch
Settings, and
then
Operation to display the Operation screen:
(Sample Image) Settings - Operation screen
The following options are available:
❖
Reset—Click or touch to reset the Canvio AeroCast
Wireless Hard Drive settings.
❖
Power off—Click or touch to power OFF the Canvio
AeroCast Wireless Hard Drive.
❖
Restart—Click or touch to restart the Canvio AeroCast
Wireless Hard Drive.
Information
The Information screen provides system information for the Canvio
AeroCast Wireless Hard Drive. Click or touch
Settings, and then
Information to display the Information screen:
(Sample Image) Settings - Information screen
The following fields are available:
❖ HDD Capacity
❖ SD Card Capacity
❖ MAC Address

48
Settings Management
User symbol and name
❖ Firmware Version
❖ Application Version
User symbol and name
Click or touch Settings, and then User symbol and name to
display the User symbol and name screen.
(Sample Image) Settings - User symbol and name screen
On this screen, you can change user icons and names. This change
will reflect on the Pictures Management screen, Video Management
screen, SD Card screen, and Backup screen.
(Sample Image) Settings - User symbol and name management
screen
There are a total of 12 icons to choose from. You can also type a new
name for each user.

49
Settings Management
User symbol and name
Click or touch a User icon, and then type a name, if desired, for each
of the four users (e.g. “Default” to “Father”).
Internet settings
The Internet screen allows you to configure the Internet settings for
your Canvio AeroCast device.
There are two (2) Canvio AeroCast Wireless Hard Drive work
connection modes to choose from:
❖ Home Network (Station Mode)
❖ Public Network (Bridge Mode)
In the Bridge Mode, you can connect the Canvio AeroCast Wireless
Hard Drive to a network while keeping your mobile device connected
to the Canvio AeroCast Wireless Hard Drive. This allows you to
access the Internet without having to disconnect your device from
the Canvio AeroCast Wireless Hard Drive network and connect it to
the local network. Bridge Mode also allows you to share files via
email and social media from within the Toshiba Wireless HDD app.
In Station Mode, both the Canvio AeroCast Wireless Hard Drive and
your mobile device are connected to the local network. In this mode,
you can still access the Canvio AeroCast Wireless Hard Drive and
the Internet, however this method also allows the Canvio AeroCast
Wireless Hard Drive to communicate with a Chromecast device that
is also connected to the same network. The Canvio AeroCast
Wireless Hard Drive must be set to Station Mode in order to connect
to a Chromecast device.

50
Settings Management
User symbol and name
Internet connection in Bridge Mode
You must be connected to the network to choose or
switch to Public Network (Bridge Mode).
1 To configure your Internet settings to run in Bridge mode,
select
Public Network.
(Sample Image) Choosing Bridge Mode screen (iOS)
2 Click or touch the
OK button.
The following message appears when switching from Station
Mode to Bridge Mode:
(Sample Image) Message screen (iOS)
NOTE

51
Settings Management
User symbol and name
If the app cannot find the Canvio AeroCast Wireless Hard
Drive, you may see the following message:
(Sample Image) Message screen (iOS)
3 To change the WLAN to Access Point on the Canvio
AeroCast Wireless Hard Drive, return to the Settings screen
on your local device.
4 Select your router.
If the app is successful at finding the Canvio AeroCast
Wireless Hard Drive, you may see the following message:
(Sample Image) Message screen (iOS)
The screen below displays a successful connection:
(Sample Image) Successful connection screen (iOS)

52
Settings Management
User symbol and name
Internet connection via your Chromecast device
To connect your Chromecast device begin by setting up your
Chromecast device (sold separately) per the instructions
provided with the Chromecast. Then follow the instructions
below:
1 Click or touch
Settings, and then Internet to display the
Internet screen. The Internet screen displays the current
connections available with the Canvio AeroCast Wireless
Hard Drive.
(Sample Image) Internet Settings screen (iOS)
2 Connect the Canvio AeroCast Wireless Hard Drive to the
router by clicking or touching the
Set ( ) icon that is
located between the Not Connected and TOSHIBA icons
within the network connection diagram.
(Sample Image) Wi-Fi connections screen (iOS)

53
Settings Management
User symbol and name
3 Choose the wireless network you wish to connect to from
the options listed in the “Choose Network” menu, and then
enter the password to connect to it.
4 Ensure that the
Home Network radio button is enabled.
Click or touch the checkbox to enable it.
You will see a screen similar to the one below:
(Sample Image) SSID connection screen (iOS)
5 Click or touch the
OK button.
The following message appears when switching from Bridge
Mode to Station Mode:
(Sample Image) Message screen (iOS)
You may see the following message:

54
Settings Management
User symbol and name
(Sample Image) Message screen (iOS)
If the app cannot find the Canvio AeroCast Wireless Hard
Drive, you may see the following message:
(Sample Image) Message screen (iOS)
6 To change the WLAN to “Access Point” on the Canvio
AeroCast Wireless Hard Drive, return to the Settings screen.
7 Select your router.
If the app is successful at finding the Canvio AeroCast
Wireless Hard Drive, you may see the following message:
(Sample Image) Message screen (iOS)
8 Click or touch the
OK button.
You should now be connected to your Chromecast device, Canvio
AeroCast Wireless Hard Drive, and your local device.

55
Settings Management
User symbol and name
The screen below displays a successful connection:
(Sample Image) Successful connection screen (iOS)
If you connect to the Home Network (Station Mode),
other people will have access to your attached storage
device through the network.
Use caution when connecting to a network in a public
place as others may be able to connect to your device.
NOTE

56
Settings Management
Language
Language
The default language for the Canvio AeroCast Wireless Hard Drive is
English. You can change the language setting for your Canvio
AeroCast Wireless Hard Drive in the Language screen.
1 From the Settings screen, click or touch
Language.
A list of languages is displayed.
(Sample Image) Language screen
2 Click or touch your desired language.
The language is immediately updated on your screen.
Cache
In the Cache screen you can apply cache settings on your local
device to improve the response speed of the Canvio AeroCast
Wireless Hard Drive.
(Sample Image) Cache screen
The following options are available:
❖ Enable Video Cache
❖ Clear Cache

57
Settings Management
OSS info
E
nable Video Cache:
Move the Enable Video Cache slider to the right or left to enable or
disable video cache respectively.
Cl
ear Cache:
Click or touch the Clear Cache button to clear the Canvio AeroCast
Wireless Hard Drive’s cache.
OSS info
The OSS Info screen allows you to see information regarding the
Open Source Software utilized in Canvio AeroCast Wireless Hard
Drive.
Contacting Toshiba
For technical support, or to stay current on the most recent software
and hardware options for your computer, and for other product
information, be sure to regularly check the Toshiba Web site at
storage.toshiba.com/consumer-hdd/support.

58
Index
A
AeroCast
system login 23
AeroCast main interface
application 27
Android
application login 26
client login 25
connect wirelessly 25
install app 25
B
Backup Management feature 43
C
Cache 56
Canvio AeroCast
charging 18
connection 19
features 16
Components 15
connection
USB 19
wirelessly 20
Contacting Toshiba 57
D
Document Viewer interface 39
Documents Management interface
37
F
file copy wirelessly
Mac 24
PC 24
File/Folder Management interface
40
H
Hardware specifications 16
I
icon
safety 6
Internet connection
Bridge Mode 50
Station Mode 52
via Chromecast 52
iPhone and iPad
install application 25
iPhone or iPad
application login 25
client login 25

59
Index
connect wirelessly 25
L
Language 56
M
Main interface 26
functionality 27
Music Management interface 34
Music Player interface 36
O
OSS info 57
Overview 15
P
Picture Viewer interface 30
Pictures Management interface 28
S
safety
icons 6
SD Card
automatic backup 44
manual backup 43
Settings
Internet 49
Settings Management
information 47
operation 47
user symbol and name 48
Wireless LAN 46
Software specifications 17
T
Trademarks 5
V
Video Playback interface 33
Videos Management interface 31
W
wireless connection
PC/Mac 23
