

MobileIron Email+ 3.14.0 for iOS Guide for Administrators| 2
Copyright © 2009 - 2020 MobileIron, Inc. All Rights Reserved.
Any reproduction or redistribution of part or all of these materials is strictly prohibited. Information in this publication
is subject to change without notice. MobileIron, Inc. does not warrant the use of this publication. For some phone
images, a third-party database and image library, Copyright © 2007-2009 Aeleeta's Art and Design Studio, is used.
This database and image library cannot be distributed separate from the MobileIron product.
“MobileIron,” the MobileIron logos and other trade names, trademarks or service marks of MobileIron, Inc.
appearing in this documentation are the property of MobileIron, Inc. This documentation contains additional trade
names, trademarks and service marks of others, which are the property of their respective owners. We do not
intend our use or display of other companies’ trade names, trademarks or service marks to imply a relationship
with, or endorsement or sponsorship of us by, these other companies.

MobileIron Email+ 3.14.0 for iOS Guide for Administrators| 3
Contents
New features summary 7
Email+ app feature and enhancement 7
Email+ administrator features and enhancements 7
Overview of Email+ for iOS 8
About Email+ for iOS 8
Where to find Email+ for iOS 8
About Email+ for iOS configuration 8
What users can do in Email+ for iOS 9
Configuring Email+ for iOS 10
Required components for an Email+ for iOS deployment 10
Before you configure Email+ for iOS 10
Main steps for Configuring Email+ for iOS (Core) 11
Adding Email+ for iOS to MobileIron Core as a recommended app 11
Enabling third-party AppConnect apps 12
Configuring the AppConnect global policy 12
Configuring the AppConnect container policy 13
Creating an AppConnect app configuration for Email+ 14
ActiveSync server synchronization due to app configuration changes 15
Customize Email+ app behavior with key-value pairs 16
Configuring email attachment control with StandaloneSentry 16
Informing users to install Email+ for iOS 16
Main steps for configuring Email+ for iOS (Cloud) 18
Adding Email+ for iOS on MobileIron Cloud 18
Configuring Email+ for iOS on MobileIron Cloud 18
Email+ installation on an iOS device (Core and Cloud) 19
Email+ for iOS installation from notification 19
Email+ for iOS installation from the MobileIron app catalog 20

MobileIron Email+ 3.14.0 for iOS Guide for Administrators| 4
Email+ configuration field description (Cloud) 20
Additional configurations using key-value pairs 23
Key-value pairs for customizing Email+ for iOS 23
Key-value pairs for customizing Email+ for iOS (Cont.) 35
S/MIME support in Email+ for iOS 44
Before you set up S/MIME for Email+ for iOS 45
Pushing S/MIME certificates from MobileIron Core 45
Enabling per-message S/MIME for iOS 45
Configuring key-value pairs 45
Pushing S/MIME certificates from MobileIron Cloud 46
Importing S/MIME certificates to the device through email 46
Background email checks and user notifications 47
How Email+ for iOS checks for new emails 47
Configuring Web@Work for iOS to open mailto links in Email+ for iOS 48
Allow copy from Email+ for iOS to other AppConnect apps only 48
What Email+ for iOS users see for copy/paste 49
Email and calendar classification capabilities (Deprecated) 50
Classification markers 51
Crash reporting capabilities 56
Allow logging on Email+ 56
Real-time push notifications 57
Push notifications at specified intervals 57
About real-time push notifications for Email+ for iOS 57
Need for a notification service 57
About the cloud notification service for Email+ for iOS 58
Configuring cloud notification service for Email+ 58
How the notification service works 60
Standalone Sentry setup for real-time push notifications 61
Exchange, real-time push notifications, and Standalone Sentry setup 61

MobileIron Email+ 3.14.0 for iOS Guide for Administrators| 5
EWS service and Standalone Sentry setup 63
Deployment use cases for real-time push notifications 64
Before you configure real-time push notifications 64
Configuring EWS to send push notifications 65
Configuring additional Exchange setup for identity certificates 66
Overview of configuration on MobileIron Core 66
Using MobileIron Tunnel to tunnel EWS traffic (Core) 66
Using AppTunnel to tunnel EWS traffic (Core) 67
Description of configurations in MobileIron Core 67
Configuring SCEP settings 67
Configuring an AppTunnel service 68
Updating the AppConnect app configuration for Email+ 68
Overview of configuration on MobileIron Cloud 69
Using MobileIron Tunnel to tunnel EWS traffic (Cloud) 69
Using AppTunnel to tunnel EWS traffic (Cloud) 70
Description of configurations in MobileIron Cloud 70
Configuring a custom HTTP service 70
Configuring Identity certificate setting 71
Updating the app configuration for Email+ 72
Keys for real-time and interval-based push notifications (Core and Cloud) 72
Key-value pairs for real-time push notifications 72
Key-value pairs for push notifications (interval-based) 75
Verifying that the cloud notification service is working 76
Troubleshooting Email+ for iOS 77
Setting up logging for Email+ for iOS (Core) 77
Detailed logging for AppConnect apps for iOS (Core) 78
Email+ crash recovery 78
What users see 79
Real-time push notifications 79

MobileIron Email+ 3.14.0 for iOS Guide for Administrators| 6
How will I receive Email+ notifications? 79
How do I change the notification settings? 79
Why do I see two notifications for each email? 80
Why am I not receiving Email+ Notifications? 80
How do I turn on/off notification details on the lock screen? 81
Rights Management System for iOS Overview 82
Setting permissions on an email 83
Setting permissions on Email+ iOS app 83
Searching mail in Email+ app 83
Introduction to Email+ Notification Services 84
About Email+ Notification Services 84
Configuring service account 87
Setting up service accounts on Exchange server 87
Configuring a service account on Microsoft Exchange Server 87
Setting up Standalone Sentry as an Email+ Notification Service 88
Configuring Email+ using KVPs on MobileIron Core for Notification Services 88
Registering your iOS device using MobileIron Core 89
Configuring Email+ using KVPs on MobileIron Cloud for notification services 89
Registering your iOS device using MobileIron Cloud 89

MobileIron Email+ 3.14.0 for iOS Guide for Administrators| 7
New features summary
This guide documents the following new features and enhancements:
• Email+ app feature and enhancement
• Email+ administrator features and enhancements
Email+ app feature and enhancement
• Support for UIWebView is removed: Now WKWebView is used for previewing the attachment and License
screen.
• Select multiple classification values: Support for selecting multiple field values for the Email Classification
implemented. This can be achieved with selectionsMaxNumber JSON property in email_security_
classification_json configuration text. For more information see, Classification markers
• "On behalf" info enabled: On receiving a forwarded invite, the information about the event organizer is now
displayed on the both message list and message details screens.
• New "style" property added in Classification markers: New "style" property defines text style in HTML
format. When defined, "color" and "alignment" properties are ignored. Also "\\n" is resolved as a new line
within the text. For more information see, Classification markers
Email+ administrator features and enhancements
• New key-value pair added: New key-value pair report_phishing_address is added to configure reporting a
suspicious mail. For more information see, Key-value pairs for customizing Email+ for iOS (Cont.)
New features summary

1
MobileIron Email+ 3.14.0 for iOS Guide for Administrators| 8
Overview of Email+ for iOS
MobileIron Email+ for iOS provides secure email, calendar, contacts, notes, and tasks on corporate-owned and
BYOD iOS devices by communicating with an ActiveSync server in your enterprise.
About Email+ for iOS
Email+ for iOS is an AppConnect-enabled app. AppConnect is a MobileIron feature that containerizes apps to
protect content on iOS and Android devices. Each AppConnect app becomes a secure container whose content is
encrypted and, protected from unauthorized access. Because each user has multiple business apps, each app
container is also connected to other secure app containers. This connection allows the AppConnect apps to share
content. AppConnect apps are managed using policies configured in a MobileIron unified endpoint management
(UEM) platform. The UEM platform is either MobileIron Core or MobileIron Cloud.
As an AppConnect app, all Email+ content is secured. The app interacts with other apps according to the data loss
prevention policies that you specify. The app has the following secure features:
• Secure apps passcode: A secure apps passcode, if you require one, protects access to all secure apps. This
is the AppConnect passcode, which you define in MobileIron UEM. The AppConnect passcode provides an
additional layer of security for secure apps, beyond the device passcode.
• Data encryption: AppConnect encrypts all AppConnect-related data on the device, such as Email+ app data,
app configurations, and policies. This means app data is secure even if a device is compromised.
• Data loss prevention: You determine whether Email+ for iOS can use the iOS copy/paste, open-in, and open-
from features. AppConnect data loss prevention policies control if users can copy/paste data out of Email+ and
control how email attachments can be shared with other apps via open-in and open-from.
For information about AppConnect features and configuration beyond Email+ for iOS, see the AppConnect and
AppTunnel Guide.
Where to find Email+ for iOS
You can download Email+ for iOS from the Apple App Store.
About Email+ for iOS configuration
You configure settings for Email+ in the MobileIron UEM platform. Because MobileIron UEM provides these
settings to the app, device users do not have to manually enter configuration details. By automating the
configuration for device users, each user has a better experience when installing and setting up the app. Also, the
enterprise has fewer support calls, and the app is secured from misuse due to configuration.

MobileIron Email+ 3.14.0 for iOS Guide for Administrators| 9
These settings include, for example:
• the ActiveSync server, or the Standalone Sentry that interacts with the ActiveSync server.
• the user ID for the ActiveSync server.
• the SCEP or certificate setting for the certificate that the device presents to the Standalone Sentry for
authentication, if you are using certificates for authentication.
• Kerberos Constrained Delegation with Standalone Sentry, which provides a better user experience for device
users.
What users can do in Email+ for iOS
When users launch Email+ for iOS, users can do the following from the main screen:
• Email: Send and receive their corporate email, and manage any sub-folders.
• Calendar: Manage and synchronize their corporate calendar data, including meetings and appointments in a
daily, monthly, or list view.
• Contacts: Manage and synchronize their corporate contacts.
• Notes: Manage, synchronize, and create new notes.
• Tasks: Manage, synchronize, and create new tasks.
• Settings: Manage their certificates, keys, recognized certificate authorities, as well as alerts, sync period,
S/MIME signing and encryption, and so on.
What users can do inEmail+ for iOS

2
MobileIron Email+ 3.14.0 for iOS Guide for Administrators| 10
Configuring Email+ for iOS
You can configure Email+ for iOS using different componoents. It can be configured on both MobileIron Core and
MobileIron Cloud.
Required components for an Email+ for iOS
deployment
The following components are required for an Email+ for iOS deployment:
• MobileIron unified endpoint management (UEM) platform: MobileIron Core or MobileIron Cloud
• Sentry, with ActiveSync enabled (required if you want to secure access to the ActiveSync server using Sentry)
• An iOS device that is registered with a MobileIron UEM
• MobileIron client: Mobile@Work for MobileIron Core deployments, MobileIron Go for MobileIron Cloud
deployments.
For supported versions see the MobileIron Email+ for iOS Release Notes.
A device user who launches Email+ for iOS without MobileIron’s UEM platform will be running Email+ for iOS as an
unsecured standalone app during a 30 day trial.
NOTE: If a device user has already launched Email+ for iOS as a standalone trial app, the device user
must uninstall and reinstall Email+ for iOS to use it as a secure AppConnect-enabled app.
Before you configure Email+ for iOS
Before you configure Email+ for iOS:
• Ensure that all devices to which you plan to deploy Email+ must be able to access
https://activate-emailplus.mobileiron.com. This URL enables the use of ActiveSync features in Email+. No
identifiable information, however, is reported to the server.
• If you are using Sentry to allow access to your enterprise ActiveSync server, you must have either an
Integrated Sentry (MobileIron Core only) or Standalone Sentry installed and configured for ActiveSync with the
necessary device authentication set up.
• For related documentation see the following:
- For information on how to install Standalone Sentry, see the MobileIron Standalone Sentry Installation
Guide.
- For information on how to set up Standalone Sentry for ActiveSync, see
MobileIron Sentry Guide for MobileIron Cloud.
OR

MobileIron Email+ 3.14.0 for iOS Guide for Administrators| 11
“Adding an entry for Standalone Sentry in MobileIron Core” in the MobileIron Sentry Guide for MobileIron
Core.
- For information on how to set up Integrated Sentry, see “Adding an entry for Integrated Sentry in MobileIron
Core” in the MobileIron Sentry Guide for MobileIron Core.
Note The Following:
• For MobileIron Cloud, you will configure the Exchange (ActiveSync) service as part of the Standalone Sentry
setup for ActiveSync.
• In an Email+ deployment a separate Exchange configuration is not required. The Email+ configuration contains
the necessary settings.
Main steps for Configuring Email+ for iOS (Core)
Following are the main steps for configuring Email+ for iOS on MobileIron Core:
Adding Email+ for iOS to MobileIron Core as a recommended app
Enabling third-party AppConnect apps
Configuring the AppConnect global policy
Configuring the AppConnect container policy
Creating an AppConnect app configuration for Email+
Configuring email attachment control with StandaloneSentry
Informing users to install Email+ for iOS
NOTE: You do not configure a separate Exchange setting for the device as you do for other email apps.
The AppConnect app configuration provides the necessary information.
Adding Email+ for iOS to MobileIron Core as a recommended
app
Device users can download Email+ for iOS directly from the Apple App Store. You can also distribute Email+ for
iOS as a recommended app through Apps@Work.
Procedure
1. In the Admin Portal, go to Apps > App Catalog.
2. From the Quick Import drop-down list, select iOS.
3. Enter MobileIron Email+ in the Application Name text box.
4. Click Search.
5. Select the app from the list that is displayed.
6. For MobileIron Email+, click Import.
7. Click OK on the pop-up message, and close the Quick Import dialog.
MobileIron Email+ is now listed in the App Catalog. Information included in the app, such as the name, is
automatically configured. All other settings, such as the App Category and whether the app is a free app, are
set to default settings.
TIP: To view and edit the settings for the app, click on the app name in the App Catalog.
Main steps for Configuring Email+ for iOS (Core)

MobileIron Email+ 3.14.0 for iOS Guide for Administrators| 12
8. Select the app to apply the app to a label:
a. Click Actions > Apply to Label.
b. Select the label that represents the iOS devices for which you want the selected app to be displayed.
c. Click Apply.
Next steps
Continue to Enabling third-party AppConnect apps on page12.
Related topics
• For more information on adding iOS apps to the app distribution library, see “Working with apps for iOS devices”
in the Apps@Work Guide. See also, “Setting per app VPN priority” in the Apps@Work Guide.
• For information on creating a MobileIron Tunnel VPN setting, see the MobileIron Tunnel for iOS Guide for
Administrators.
Enabling third-party AppConnect apps
Email+ for iOS requires you to enable the licensing option for third-party and in-house AppConnect apps.
Procedure
1. In the Admin Portal, go to Settings > System Settings.
2. Click Additional Products > Licensed Products.
3. Select AppConnect For Third-party And In-house Apps.
4. Click Save.
Next steps
Continue to Configuring the AppConnect global policy on page12.
Configuring the AppConnect global policy
Because Email+ for iOS is an AppConnect app, AppConnect must be enabled in the AppConnect global policy if it
has not yet been configured. The AppConnect global policy specifies AppConnect app settings such as
AppConnect passcode and data loss prevention requirements. You can use the Default AppConnect Global Policy.
TIP: Most fields are set to suitable default values.
Procedure
1. In the Admin Portal, go to Policies & Configs > Policies.
2. Select the Default AppConnect Global Policy and click Edit.
FIGURE 1. ENABLE APPCONNECT IN THE APPCONNECT GLOBAL POLICY
Main steps for Configuring Email+ for iOS (Core)

MobileIron Email+ 3.14.0 for iOS Guide for Administrators| 13
3. For AppConnect, select Enabled.
4. (Optional) Scroll down to the Data Loss Prevention Policies section.
5. (Optional) For Apps without an AppConnect container policy, select Authorize.
NOTE: If you do not select this option, then you must create an AppConnect container policy for
Email+.
6. (Optional) If you select Authorize for Apps without an AppConnect container policy, also select the data
loss preventions options you want to enable.
7. Click Save.
NOTE: If you create a new AppConnect Global Policy, you must apply it to the appropriate labels. You
do not need to apply the Default AppConnect Global Policy to a label.
Procedure: Applying to a label
1. Select the AppConnect global policy.
2. Click More Actions > Apply To Label.
3. Select the appropriate labels to which you want to apply the policy.
4. Click Apply.
Next steps
Continue on Configuring the AppConnect container policy on page13.
Related topics
For more information about the AppConnect Global policy, see the “Configuring the AppConnect global policy”
section in the AppConnect and AppTunnel Guide for detailed description of each field.
Configuring the AppConnect container policy
This task is only required:
• If you did not select Authorize for Apps without an AppConnect container policy, in the AppConnect
Global Policy.
• If you want to configure a different set of data loss prevention policies for Email+.
The AppConnect container policy authorizes an AppConnect app and specifies the data loss prevention settings.
The container policy overrides the corresponding settings in the AppConnect Global Policy.
Main steps for Configuring Email+ for iOS (Core)

MobileIron Email+ 3.14.0 for iOS Guide for Administrators| 14
NOTE: Make sure to apply only one AppConnect container policy for Email+ for iOS.
Procedure
1. In the Admin Portal, select Policy & Configs > Configurations.
2. Select Add New > AppConnect > Container Policy.
3. Enter a name for the policy.
4. Enter a description for the policy.
5. In the Application field, enter the bundle ID for the app:
com.mobileiron.ios.emailplus
6. Configure the iOS data loss prevention policies according to your requirements.
7. Click Save.
8. Select the container policy.
9. Select More Actions > Apply To Label.
10. Select the labels to which you want to apply the policy.
11. Click Apply.
Next steps
Continue on to Creating an AppConnect app configuration for Email+ on page14.
Creating an AppConnect app configuration for Email+
Email+ for iOS requires an AppConnect app configuration in MobileIron Core. The AppConnect app configuration
provides the type of information that is usually configured in an Exchange setting, such as the fully qualified domain
name and user ID for the ActiveSync server, and certificate information. As such, Email+ for iOS does not require
an Exchange setting.
The AppConnect app configuration for Email+ for iOS also includes the bundle ID for the app and key-value pairs
used to configure app settings.
IMPORTANT: Make sure to apply only one AppConnect app configuration for Email+ for iOS to each
device.
NOTE: If you make a mistake in the configuration, the app shows a message to the device user
indicating an error in configuration.
Procedure
1. In the MobileIron Core Admin Portal, go to Policy & Configs > Configurations.
2. Click Add New > AppConnect > Configuration to create a new AppConnect configuration.
3. In the Name field, enter brief text that identifies this AppConnect app configuration.
Example: Email+ for iOS
4. In the Description field, enter additional text that clarifies the purpose of this AppConnect app configuration.
5. In the Application field, enter the bundle ID for the app:
com.mobileiron.ios.emailplus
6. In the App-specific Configurations section enter the following required key-value pairs:
Main steps for Configuring Email+ for iOS (Core)

MobileIron Email+ 3.14.0 for iOS Guide for Administrators| 15
Key Value
email_exchange_host
Fully qualified domain name of your ActiveSync server or Sentry.
email_ssl_required
Enter true to secure communication using https to the server that you
specified in email_exchange_host. Otherwise, enter false.
Typically, set this field to true unless you are working in a test
environment.
7. Click Save.
When you save an app configuration with the bundle ID com.mobileiron.ios.emailplus, MobileIronCore
automatically applies the following key-value pairs to the app configuration:
- email_exchange_username with value $USERID$
- email_device_id with value $DEVICE_UUID_NO_DASHES$
- email_address with value $EMAIL$
8. Select the new AppConnect app configuration.
9. Click More Actions > Apply To Label.
10. Select the labels to which you want to apply the AppConnect app configuration.
11. Click Apply.
ActiveSync server synchronization due to app configuration changes
Email+ for iOS synchronizes all emails, contacts, calendar, and task items with the ActiveSync server when the
device user first launches Email+ for iOS. It also does a full synchronization if you change the values of the
following keys in the app configuration:
• email_address
• email_exchange_host
• email_exchange_username
Main steps for Configuring Email+ for iOS (Core)

MobileIron Email+ 3.14.0 for iOS Guide for Administrators| 16
After you have changed one of these values, the full synchronization occurs the next time Email+ for iOS receives
the updated app configuration. Email+ for iOS receives the update the next time it runs after the AppConnect app
checkin interval has expired.
WARNING: The first Email+ for iOS synchronization with the ActiveSync server may require considerable
time and bandwidth, as does changing the values of the keys mentioned here.
Customize Email+ app behavior with key-value pairs
Administrators can customize Email+ app behavior by configuring key-value pairs in the App-specific
Configurations section of AppConnect app configuration for Email+ for iOS. These key-value pairs define app
behavior such as providing detailed notifications to device users and export contacts from Email+. See Additional
configurations using key-value pairs on page23 for the complete list of custom key-value pairs.
Configuring email attachment control with StandaloneSentry
With Email+ for iOS, you can configure Standalone Sentry to deliver emails with attachments to the secure app.
The attachments can then only be shared with other apps according to your data loss prevention policies.
Therefore, when using secure email apps, you typically configure Standalone Sentry to use the email attachment
control setting called Open With Secure Email App.
Procedure
1. Go to Settings > Sentry in the MobileIron Core Admin Portal.
2. Select the Standalone Sentry that handles email for the devices.
3. Click the edit icon.
4. In the section Attachment Control Configuration, select Enable Attachment Control.
5. For iOS And Android Using Secure Email Apps, select Open With Secure Email App.
6. Click Save.
Related topics
• For more information about email attachment control, see the MobileIron Sentry Guide for MobileIron Core.
Informing users to install Email+ for iOS
You can inform device users by sending an APNS (Apple Push Notification Service) notification that directs device
users to the new or updated Email+ for iOS app in Apps@Work. Or, you can send an installation request directly to
all devices in the labels applied to Email+ for iOS, bypassing Apps@Work entirely.
As with badge notifications, updates are determined by comparing the version number of the installed app with that
of the update.
NOTE: The notification feature applies only to apps designated as Featured apps.
Main steps for Configuring Email+ for iOS (Core)

MobileIron Email+ 3.14.0 for iOS Guide for Administrators| 17
Procedure
1. In the Admin Portal, go to Apps > App Distribution Library.
2. Select iOS from the Select Platform list.
3. Select the featured app you want to work with.
4. Click Message.
FIGURE 2. SEND APP INSTALLATION REQUEST
5. Use the following guidelines to select the app installation option:
Item Description
Send request for new
installations
Prompts the device user to install the app if it is not already installed.
Send request for updates Prompts the device user to update the app if it is not already updated.
Send request for both new
installations and updates
Prompts the device user to install or update the app.
Use iOS managed app
install/update action
Ignore the Apps@Work display and immediately install or update the app.
6. To check the content of the message prior to sending:
a. Select the Push Notification template from the list.
b. Click View Messages.
7. Click Send.
The message is sent only for apps configured as featured apps in the app distribution library.
Main steps for Configuring Email+ for iOS (Core)

MobileIron Email+ 3.14.0 for iOS Guide for Administrators| 18
Main steps for configuring Email+ for iOS (Cloud)
You add Email+ from the MobileIron Cloud app catalog, and as part of the setup, you also specify the app
configurations.
Following are the main steps for configuring Email+ for iOS on MobileIron Cloud:
Adding Email+ for iOS on MobileIron Cloud
Configuring Email+ for iOS on MobileIron Cloud
Adding Email+ for iOS on MobileIron Cloud
Email+ for iOS is available in the app catalog in MobileIron Cloud.
Procedure
1. In MobileIron Cloud, go to Apps > App Catalog > +Add.
2. In Business Apps, click Email+ (iOS).
3. Make any updates as necessary and click Next
You can change the category and add a description.
4. Choose a distribution option for the app and click Next.
5. Update the default install settings or add install settings as necessary.
6. Update the promotion settings or add promotion settings as necessary.
7. For Email+ configuration, click + to add an Email+ configuration.
Next steps
• Configuring Email+ for iOS on MobileIron Cloud on page18.
Configuring Email+ for iOS on MobileIron Cloud
The Email+ configuration provides the type of information that is usually configured in an Exchange setting, such
as the fully qualified domain name and user ID for the ActiveSync server, and certificate information. As such,
Email+ for iOS does not require an Exchange setting. The configuration for Email+ for iOS also includes the bundle
ID for the app and key-value pairs used to configure app settings.
NOTE: Make sure that only one Email+ for iOS configuration is distributed to a device.
NOTE: If you make a mistake in the configuration, the app shows a message to the device user
indicating an error in configuration.
Procedure
1. In the MobileIron Email+ configuration, enter a name for the configuration.
2. Configure the Email+ settings as needed.
3. Add any custom configurations for the app in AppConnect App Configurations.
4. Add any certificates that are required.
Main steps for configuring Email+ for iOS (Cloud)

MobileIron Email+ 3.14.0 for iOS Guide for Administrators| 19
5. Choose a distribution option for the configuration and click Done.
The configuration is distributed to the subset of the devices to which the app is distributed.
Related topics
• See Email+ configuration field description (Cloud) on page20 for a description of the fields.
• See Additional configurations using key-value pairs on page23 for a complete list of custom key-value pairs.
• See the Certificates and S/MIME sections in Additional configurations using key-value pairs on page23.
Email+ installation on an iOS device (Core and
Cloud)
Device users can install Email+ from a notification they receive on their iOS device, or from the MobileIron app
catalog on their device.
Email+ for iOS installation from notification
Email+ for iOS installation from the MobileIron app catalog
Email+ for iOS installation from notification
After you send an installation request for Email+ for iOS, users receive a notification that prompts them to install
the new or updated app.
FIGURE 3. EMAIL+ INSTALLATION FROM NOTIFICATION
Email+ installation on an iOS device (Core and Cloud)

MobileIron Email+ 3.14.0 for iOS Guide for Administrators| 20
By tapping Install, Email+ for iOS is installed to the device.
Email+ for iOS installation from the MobileIron app catalog
When a featured app or an update to an installed app is published to device users, those users see a badge that
appears on the corresponding tab in the MobileIron app catalog. The number on the badge indicates the number of
apps or updates available. The availability of an update is determined by comparing the version number for the
installed app to that of the newly-published app.
After importing Email+ for iOS into the app distribution library, the app appears in Apps@Work on the device. Tap
the entry for Email+ and follow the prompts to install the app.
Email+ configuration field description (Cloud)
To configure Email+ configuration on MobileIron Cloud, select the check box next to the configuration. The
following table provides a description of the configuration fields for Email+ for iOS on MobileIron Cloud.
Item Description
Email Address (Required) Enter ${userEmailAddress}.
Email Password Enter the user’s password for the ActiveSync server. If you provide a
password, Email+ for iOS does not prompt the device user for the
password.
You can use the variable ${PASSWORD}
Exchange Host (Required) Enter the fully qualified domain name of the ActiveSync server or the
external hostname or IP address for Standalone Sentry.
Exchange Username (Required) Enter ${userUID}
SSL required Check to secure communication to the ActiveSync server or
StandaloneSentry using HTTPS.
Select the check box unless you are working in a test environment.
Minimum Characters for GAL
Search
Enter the minimum number of characters for Email+ for iOS to use for
automatic Global Address List (GAL) lookup in Mail and Contacts.
When the device user enters the specified number of characters of a
particular name, Email+ for iOS searches the GAL and presents any
matches to the device user.
NOTE: To enable GAL search, you must set the minimum number
TABLE 1. EMAIL+ CONFIGURATION FIELD DESCRIPTION IN MOBILEIRON CLOUD
Email+ configuration field description (Cloud)

MobileIron Email+ 3.14.0 for iOS Guide for Administrators| 21
Item Description
of characters for GAL search in your Microsoft Exchange
server to the same value you set for this Email+ for iOS key.
The default is 4.
App Identity Certificate Select the App Identity Certificate created for Sentry. This field is required
only if you are deploying Standalone Sentry that uses an identity
certificate for device authentication.
Trust All Certificates Check if you want Email+ for iOS to automatically accept untrusted
certificates.
Typically, you select the check box only if you are working in a test
environment.
Prompt for Password Before
Connecting to Server
Check if Email+ for iOS should prompt the user for the email password
before attempting to connect to the email server. When it first launches
and connects to the email server, Email+ for iOS provides the user’s
email password to the email server.
If the field is unchecked, when Email+ for iOS first launches and
connects to the email server, it does not provide the device user’s email
password to the server. After establishing a connection with the email
server, Email+ for iOS prompts the user for an email password. If the
email server limits the number of password attempts, it counts the
connection as one failed attempt.
MobileIron recommends checking this field if the email server allows only
a small number of password attempts. For example, if the email server
allows only three login attempts, setting this value to true means the
device user gets three login attempts as specified by the email server.
IBM Lotus Notes Traveler Check if your email server is IBM Lotus Notes Traveler.
Allow Safari Browser Check to open links in Email+ in Safari.
NOTE: If the setting is checked, the values of email_url_scheme_
http and email_url_scheme_https keys are ignored.
Allow Detailed Notifications
(Required)
Check if you want Email+ for iOS to show the device user detailed
notifications. The details can include sensitive information such as email
subject, or event titles and times.
Show Pictures by Default Check to enable the Show Pictures option. Device users automatically
see images when opening an email.
Device users can override the value you configure by toggling the Show
Pictures option on or off.
TABLE 1. EMAIL+ CONFIGURATION FIELD DESCRIPTION IN MOBILEIRON CLOUD (CONT.)
Email+ configuration field description (Cloud)

MobileIron Email+ 3.14.0 for iOS Guide for Administrators| 22
Item Description
NOTE: When changing the value of this key, Email+ does not
change the Show Pictures option until after completing a
full synchronization. A full synchronization occurs only when
you change certain fundamental key-value pairs, like
email_address, or when the device user uninstalls and
reinstalls Email+ for iOS.
Allow Export Contacts Check if you want to allow Email+ for iOS users to export Email+ for iOS
contacts to an Email+ for iOS contacts group on the personal side of the
device. Otherwise, enter false.
When device users export Email+ contacts, device users can see the
caller ID of incoming calls from phone numbers in the list of corporate
contacts. Third-party apps can also access the corporate contacts.
Limit Contact Export to Name
and Number only
Check to limit export of Email+ contacts to only the name and number of
the contacts.
This option is available only if Allow Export Contacts is checked.
Allow Logging Check if you want Email+ to log data to the device console, and allow the
log file to be attached to a feedback email.
This option is useful for problem diagnosis.
Default Email Signature Enter the default email signature.
The value of this key is the default email signature for all emails.
However, the device user can define the default email signature at any
time, overriding this value. After the user defines the default email
signature, Email+ does not use the value, even if you update it.
Allow Send Feedback Enter the email address to which app feedback is to be delivered.
Use this key to send Email+ for iOS log messages to a particular email
address.
TABLE 1. EMAIL+ CONFIGURATION FIELD DESCRIPTION IN MOBILEIRON CLOUD (CONT.)
Email+ configuration field description (Cloud)

3
MobileIron Email+ 3.14.0 for iOS Guide for Administrators| 23
Additional configurations using key-value
pairs
The following describe how to customize Email+ for iOS app behavior:
Key-value pairs for customizing Email+ for iOS
Table 2 on page24 describes the key-value pairs available to administrators to customize Email+ for iOS app
behavior. These key-value pairs define app behavior such as providing detailed notifications to device users and
export contacts from Email+.
TIP: Key-value pairs marked as Core only are not applicable to MobileIron Cloud. For MobileIron Cloud
deployments, these key-value pairs are either provided as fields in MobileIron Cloud or are set
automatically and do not require action from the administrator. See Email+ configuration field
description (Cloud) on page20 for a description of the fields in MobileIron Cloud.
NOTE: Some values can use MobileIron Core variables, such as $EMAIL$. MobileIron Core substitutes the
device user’s value when sending the app configuration to the device.
You can configure and customize the following features with key-value pairs:
• Required key-value pairs
• Background email check and user notifications
• Certificates
• S/MIME
• Manage contacts
• Syncing
• Maximum size for email
• Email attachments
• Open links in a browser
• Default signature
• IBM Lotus Notes Traveler
• SSL
• GAL search

MobileIron Email+ 3.14.0 for iOS Guide for Administrators| 24
Key Value: Enter/
Select one
Description
Required key-value pairs
email_address
(Core only)
Email address of
the device user
Typically, this field uses the MobileIron Core variable
$EMAIL$.
You can also use combinations of these MobileIron Core
variables, depending on your ActiveSync server
requirements:
$USERID$, $USER_CUSTOM1$,
$USER_CUSTOM2$, $USER_CUSTOM3$, $USER_
CUSTOM4$.
email_device_id
(Core only)
$DEVICE_UUID_
NO_DASHES$
Identifies the device to the ActiveSync server.
IMPORTANT: Always use the MobileIron Core variable
$DEVICE_UUID_NO_DASHES$.
email_exchange_host
(Core only)
FQDN of the
ActiveSync server
or Standalone
Sentry
The fully qualified domain name of the ActiveSync server. If
you are using a Standalone Sentry, enter the fully qualified
domain name (FQDN) of Standalone Sentry.
Example:
mySentry.mycompany.com
Note The Following:
• When using Standalone Sentry with Lotus Domino
server 8.5.3.1 Upgrade Pack 1, set the server address to
Standalone Sentry FQDN/traveler.
• When using Standalone Sentry with a Lotus Domino
server earlier than 8.5.3.1 Upgrade Pack 1, set the server
address to Standalone Sentry
FQDN/servlet/traveler.
• If you are using an IBM Lotus Notes Traveler server
without a Standalone Sentry, append the IBM Lotus
Notes Traveler server FQDN to the host path of the IBM
Lotus Traveler server. If you use a custom path, append
the custom path to the FQDN.
email_exchange_
username
(Core only)
User ID for the
ActiveSync server
The user ID for the ActiveSync server.
Typically, you use the MobileIron Core variable
$USERID$.
If your ActiveSync server requires a domain, use <domain
name>\$USERID$. For example: mydomain\$USERID$.
You can also use combinations of these MobileIron Core
variables, depending on your ActiveSync server
TABLE 2. KEY-VALUE PAIRS F CONFIGURING
Key-value pairs for customizing Email+ for iOS

MobileIron Email+ 3.14.0 for iOS Guide for Administrators| 25
Key Value: Enter/
Select one
Description
requirements: $EMAIL$,
$USER_CUSTOM1$, $USER_CUSTOM2$, $USER_CUSTOM3$,
$USER_CUSTOM4$.
Background email check and user notifications
allow_detailed_
notifications
(Core only)
• true
• false
true: Device user sees detailed notifications. The details can
include sensitive information such as email subject, or event
titles and times.
false: Notifications do not include any details.
Default if key-value is not configured: false.
should_cache_
tunneling_config
• true
• false
Use the key should_cache_tunnelling_config along with the
key allow_device_keychain.
true: The configuration will be cached by AppConnect, as a
result device user sees detailed push notifications and badge
count (number of unread mails) after force closing the app.
false: The configuration is not cached.
Default if key-value is not configured: false.
Certificates
allow_certificate_
revocation_check
• true
• false
true: Allows CRL check.
Default if key-value is not configured: false
allow_device_keychain • true
• false
true: Email+ stores the decryption key received from the
UEM client in the device keychain. This allows Email+ to
access its credentials and check email when iOS launches it
in the background, thus improving background email
notifications.
false: The AppConnect content decryption key is not stored
on the device.
MobileIron recommends that customers set this to true in
conjunction with a strong device passcode. For more
information see Background email checks and user
notifications on page47.
Default if key-value is not configured: false
email_login_certificate
(Core only)
From the dropdown
list
The device uses the certificate for authentication.
See the MobileIron Core Device Management Guide for your
deivce platform for information on configuring Certificate
Enrollment settings.
TABLE 2. KEY-VALUE PAIRS F CONFIGURING (CONT.)
Key-value pairs for customizing Email+ for iOS

MobileIron Email+ 3.14.0 for iOS Guide for Administrators| 26
Key Value: Enter/
Select one
Description
If the certificate is password-encoded, MobileIron Core
automatically also sends another key, email_login_
certificate_MI_CERT_PW, with the password as the
certificate’s value.
This key is required if Sentry is configured to require
certificates.
Default if key-value is not configured: Certificates are not
used.
email_trust_all_
certificates
(Core only)
• true
• false
true: Email+ automatically accepts untrusted certificates.
Typically, you enter true only when working in a test
environment.
false: Email+ does not accept untrusted certificates.
Default if key-value is not configured: false.
email_user_certificate_
self_service
(Core only)
From the dropdown
list
Allows the administrator to distribute certificates to device
users. Users can then upload the certificates manually to the
MobileIron Core user portal.
email_certificate_X
where X is 1 through 10
From the dropdown
list
You can designate up to ten certificate authority (CA) root
certificates as trusted. Email+ imports the certificate into its
keychain of trusted certificates, and trusts any certificates
derived from the CA root certificate in its keychain.
Designating a CA root certificate as trusted is necessary for
the following:
• You have configured device authentication in
StandaloneSentry to require a certificate whose
certificate authority is not a trusted CA.
A common scenario for this case is if you are using a
self-signed certificate or a certificate that is not derived
from a well-known certificate authority.
NOTE: You specify this certificate to Email+ in the key
email_login_certificate. It corresponds to the
certificate you specified for device
authentication in Standalone Sentry
configuration in the MobileIron Core Admin
Portal.
• You have configured certificates for encrypting or signing
S/MIME emails and these certificates are self-signed or
not derived from a well-known certificate authority.
NOTE: You specify these certificates in the keys email_
encryption_certificate and email_signing_
TABLE 2. KEY-VALUE PAIRS F CONFIGURING (CONT.)
Key-value pairs for customizing Email+ for iOS

MobileIron Email+ 3.14.0 for iOS Guide for Administrators| 27
Key Value: Enter/
Select one
Description
certificate.
NOTE: Use .DER format instead of normal .PEM format
for email_certificate_X certificates.
S/MIME
email_encryption_
certificate
From the dropdown
list
Specifies the certificate to use for encrypting S/MIME
emails.
The MobileIron UEM sends the contents of the certificate as
the value.
Email+ imports the key into the keystore and selects the
certificate as the encryption certificate.
If you change the certificate, Email+ imports the new
certificate into the keychain and selects the new certificate
as the encryption certificate. It leaves the previous certificate
in the keychain.
If you delete the key-value pair, Email+ leaves the certificate
in the keychain, while changing its settings to specify that no
certificate is selected as the encryption certificate.
For more information about configuring S/MIME for Email+
for iOS, see S/MIME support in Email+ for iOS on page44.
Default if key-value is not configured: Certificate is not
configured.
NOTE: For S/MIME certificates use .DER format instead
of normal .PEM format.
email_signing_
certificate
From the dropdown
list
Specifies the certificate to use for signing S/MIME emails.
The MobileIron UEM sends the contents of the certificate as
the value.
Email+ imports the key into the keychain and selects the
certificate as the signing certificate.
If you change the certificate, Email+ imports the new
certificate into the keychain and selects the new certificate
as the signing certificate. It leaves the previous certificate in
the keychain.
If you delete the key-value pair, Email+ leaves the certificate
in the keychain and changes its settings to specify that no
certificate is selected as the signing certificate.
For more information about configuring S/MIME for Email+
for iOS, see S/MIME support in Email+ for iOS on page44.
TABLE 2. KEY-VALUE PAIRS F CONFIGURING (CONT.)
Key-value pairs for customizing Email+ for iOS

MobileIron Email+ 3.14.0 for iOS Guide for Administrators| 28
Key Value: Enter/
Select one
Description
Default if key-value is not configured: Certificate is not
configured.
NOTE: For S/MIME certificates use .DER format instead
of normal .PEM format.
S/MIME- Support for Retired Certs
email_escrow_
certificates
Each dictionary
consists of the
following two keys:
• email_escrow_
certificates
• email_escrow_
certificates_
MI_CERT_PW
Use this option to use the multiple retired certificate for
decrypting older messages. This value corresponding to this
KVP is an array of dictionaries.
• email_escrow_certificates: Is a base64 encoded p12
archive with certificate and private key.
• email_escrow_certificates_MI_CERT_PW: Is a
password string to unpack archives.
Manage contacts
allow_export_contacts
(Core only)
• true
• false
true: Allows Email+ users to export Email+ contacts to an
Email+ contacts group on the personal side of the device.
When device users export the contacts, they can see the
caller ID of incoming calls from phone numbers in the list of
corporate contacts. Third-party apps can also access the
corporate contacts.
false: Device users cannot export the Email+ contacts. They
see the caller ID only for personal contacts.
Default if key-value is not configured: false.
limit_contact_export_to
(Core only)
• name_number
• all
• name_number: limits the exported contact information to
each contact’s name and number.
• all: exports all contact information for each contact.
This field is used only if allow_export_contacts is set to
true.
NOTE: If you enter a value other than all or name_
number, Email+ for iOS uses the value all.
Default if key-value is not configured: all
email_safe_domains A comma-
separated list of
safe domains
Ensure that there are no spaces before or after the comma. A
wildcard in the domain name is supported. The only format
supported for domain names with a wildcard is
*.domainname.com. Entering * only will make all domains
TABLE 2. KEY-VALUE PAIRS F CONFIGURING (CONT.)
Key-value pairs for customizing Email+ for iOS

MobileIron Email+ 3.14.0 for iOS Guide for Administrators| 29
Key Value: Enter/
Select one
Description
safe.
Base domain is not included in the wildcard domain, it needs
to be added explicitly if required. For example,
*.domainname.com, domainname.com.
Email addresses not in the safe domain list are displayed in
red color in Email+.
This configuration minimizes the risk that a user will
accidentally send internal emails to external email
addresses. You may want to use this key-value pair:
• if your company policy requires this risk mitigation step.
• if your company has multiple domains and you want to
identify your company’s domains as opposed to domains
that are not your company domains.
Example:
mycompany.com,mycompany.net,internal.mycompany.com
Default if key-value is not configured: Only the domain of the
email account is safe.
email_alert_unsafe_
domains
• true
• false
true: Users see an alert if the recipients in an email or
calendar invite include addresses that are not in a safe
domain. For the alert to be displayed, the email_safe_
domains key must also be configured.
false: An alert is not displayed for addresses not in a safe
domain.
Default if key-value is not configured: false.
Syncing
email_max_sync_
period
• 0
• 1
• 2
• 3
• 4
• 5
Controls the maximum number of days for which emails are
synced:
• 0 = Download all emails.
• 1 = Download emails received over the last day.
• 2 = Download emails received over the last 3 days.
• 3 = Download emails received over the last week.
• 4 = Download emails received over the last 2 weeks.
• 5 = Download emails received over the past month.
Default if key-value is not configured: 0
Device users can change the interval to a value less than the
default maximum. This feature is useful for regulatory
purposes, if an organization requires device users to have no
TABLE 2. KEY-VALUE PAIRS F CONFIGURING (CONT.)
Key-value pairs for customizing Email+ for iOS

MobileIron Email+ 3.14.0 for iOS Guide for Administrators| 30
Key Value: Enter/
Select one
Description
more than n days of emails on their devices.
NOTE: If the maximum email synchronization (email_
max_sync_period) period is less than the default
email synchronization period, then the
maximum value is used.
email_default_sync_
period
• 0
• 1
• 2
• 3
• 4
• 5
Controls the default time interval for which emails are
downloaded:
• 0 = Download all emails.
• 1 = Download emails received over the last day.
• 2 = Download emails received over the last 3 days.
• 3 = Download emails received over the last week.
• 4 = Download emails received over the last 2 weeks.
• 5 = Download emails received over the past month.
Default if key-value is not configured: 2
NOTE: MobileIron does not recommend setting the
value as 0, as downloading all emails could
take a very long time, and take up too much
space on the device.
Maximum size for email
email_max_body_size A number
Specifies the maximum size in megabytes permitted for
each email that is received.
This feature allows administrators to manage bandwidth and
memory consumption on devices by restricting the maximum
size of individual emails.
If the size of the email is greater than the default or
configured size, users are presented with the following
message and the email cannot be downloaded: Email+
maximum message size exceeded.
Default if key-value is not configured: 4 MB.
Email attachments
email_max_attachment A number
Specifies the maximum size in megabytes permitted for
each email attachment for incoming emails. The key-value
pair is applied to incoming emails only.
TABLE 2. KEY-VALUE PAIRS F CONFIGURING (CONT.)
Key-value pairs for customizing Email+ for iOS

MobileIron Email+ 3.14.0 for iOS Guide for Administrators| 31
Key Value: Enter/
Select one
Description
If you set the maximum value to 10MB, a device user who
receives an email that includes attachments of 3MB, 9MB,
and 10MB will be able to download each attachment. If,
however, a device user receives an email with an 11MB
attachment, the following alert is displayed and users cannot
download the attached file: Failed To Retrieve Attachment
Email+ maximum attachment size exceeded.
NOTE: If users try to send an attachment larger than
10MB, the following alert is presented: Warning:
The message size exceeds 10 MB. Please
confirm you would like to continue. Users have
the option to either Cancel or Proceed. If users
tap Proceed, the email is successfully sent.
This feature allows administrators to manage bandwidth and
memory consumption on devices by restricting the maximum
size of individual email attachments.
Default if key-value is not configured: 10 MB.
calendar_attachments • true
• false
Enabled viewing of files attached to calendar meeting
invites.This feature requires Exchange Web Services to be
configured. Email+ fetches calendar attachments via an
EWS API.
If Email+ is configured through MobileIron Sentry, then
additional key-value pair email_ews_host is needed with
server address.
The email_exchange_host is used automatically, but it is
configured through MobileIron Sentry email_ews_host.
Default if key-value is not configured: false
MI_SHARED_
GROUP_ID
A unique,
sufficiently
complex
alphanumeric
string
Required to enable attaching of files from Docs@Work.
Ensure that the key-value pair is configured in the
Docs@Work configuration as well and that the value is
identical (including case) in both Email+ and Docs@Work
configurations.
The key is case sensitive. Enter the key in upper case.
TABLE 2. KEY-VALUE PAIRS F CONFIGURING (CONT.)
Key-value pairs for customizing Email+ for iOS

MobileIron Email+ 3.14.0 for iOS Guide for Administrators| 32
Key Value: Enter/
Select one
Description
IMPORTANT: Configure mi_enable_doc_sharing with
value true in the Docs@Work
configuration.
MI_AC_ACCESS_
CONTROL_ID
A unique,
sufficiently
complex
alphanumeric
string
Required to enable attaching of files from Docs@Work.
Ensure that the key-value pair is configured in the
Docs@Work configuration as well and that the value is
identical (including case) in both Email+ and Docs@Work
configurations.
The key is case sensitive. Enter the key in upper case.
IMPORTANT: Configure mi_enable_doc_sharing with
value true in the Docs@Work
configuration.
Open links in a browser
Links in Email+ are opened by default in Web@Work. If Web@Work is not installed on the device, Email+ for
iOS displays an error. However, administrators can specify the default browser to use when device users click
links in Email+.
Administrators can configure the default browser to be used for both HTTP and HTTPS links, using
customized URL schemes. This allows finer control over the browser used to open HTTP and HTTPS links,
respectively. Additionally, this key can be used to configure a customized browser as the one that launches
when a device user clicks a link in Email+.
allow_safari_browser
(Core only)
• true
• false
true: Allows Email+ to open URLs (included, for example, in
an email) in Safari.
NOTE: If the allow_safari_browser key is configured,
the values of email_url_scheme_http and
email_url_scheme_https are ignored.
Default if key-value is not configured: false.
email_url_scheme_http • mibrowser
• googlechrome
• opera-http
• mibrowser: Default value. Opens links in Web@Work for
iOS
• googlechrome: Opens links in Chrome.
• opera-http: Opens links in Opera.
Default if key-value is not configured: mibrowser
email_url_scheme_ • mibrowsers • mibrowsers: Default value. Opens links in Web@Work
TABLE 2. KEY-VALUE PAIRS F CONFIGURING (CONT.)
Key-value pairs for customizing Email+ for iOS

MobileIron Email+ 3.14.0 for iOS Guide for Administrators| 33
Key Value: Enter/
Select one
Description
https • googlechromes
• opera-https
for iOS.
• googlechromes: Opens links in Chrome.
• opera-https: Opens links in Opera.
Default if key-value is not configured: mibrowsers.
webatwork_install_link
(Core only. Not
supported on Cloud)
URL for
Web@Work
If Web@Work is not installed on the device, device users
are prompted to install Web@Work when they click on a
webpage link in an email in Email+. If users accept the
prompt, they are redirected to Apps@Work for installing
Web@Work.
TIP: The Web@Work URL is available in the app catalog
in the MobileIron Core Admin Portal. In MobileIron
Core, go to Apps > App Catalog, click on the
Web@Work app, and then click Global. In the
global settings, for App URL, click Copy Link to
Clipboard. Paste the link as the value.
Default signature
email_default_signature
(Core only)
The default email
signature
The value of this key is the default email signature for all
emails. However, the device user can define the default
email signature at any time, overriding this key’s value. After
the user defines the default email signature, Email+ does not
use the value in the key, even if you update it.
Default if key-value is not configured: Sent by Email+ for iOS
managed by MobileIron
IBM Lotus Notes Traveler
email_enable_lotus
(Core only)
• true
• false
Enter true only if your email server is IBM Lotus Notes
Traveler.
Default if key-value is not configured: false
SSL
email_ssl_required
(Core only)
• true
• false
true: Secures communication using https to the server
specified in email_exchange_host. Typically, set this field
to true unless you are working in a test environment.
Default if key-value is not configured: false
GAL search
gal_search_minimum_
characters
(Core only)
A number The minimum number of characters Email+ uses for
automatic Global Address List (GAL) lookup in Mail and
Contacts.
TABLE 2. KEY-VALUE PAIRS F CONFIGURING (CONT.)
Key-value pairs for customizing Email+ for iOS

MobileIron Email+ 3.14.0 for iOS Guide for Administrators| 34
Key Value: Enter/
Select one
Description
When device users enter the specified number of characters
of a name, Email+ searches the GAL and presents the
matches that it finds.
IMPORTANT: On your Exchange server, set the
minimum number of characters for GAL
search to the same value you set for this
key. If you do not, GAL search will not
work properly in Email+.
Default if key-value is not configured: 4
gal_search_display_
name
• true
• false
true: Enables Display Name in Email+ Settings >
Contacts by default.
false: Disables Display Name in Email+ Settings >
Contacts by default.
Default if key-value is not configured: true
contacts_display_order • first_last
• last_first
Sets the default display order for contact names in search
results. Device users can change the display order in Email+
in Settings > Contacts.
The values are case sensitive; enter in lower case.
first_last: Contact names in search results are displayed
with first name followed by the last name.
last_first: Contact names in search results are displayed
with last name followed by the first name.
Default if key-value is not configured: first_last.
Classification Markers
email_security_
classification_json
Is equal to JSON
representation of
JSON
configuration.
Is equal to JSON
representation of
classification
configuration.
For JSON. sample
format. See,
Classification
markers section.
Allows the admin to configure Email Classification Markers,
for secure sharing of Mail and Calendar events. The mail is
marked with a marker that defines security of the mail. You
can add any of the following markers to a mail:
• Unofficial
• Official
• Secret
• Protected
• Top secret
TABLE 2. KEY-VALUE PAIRS F CONFIGURING (CONT.)
Key-value pairs for customizing Email+ for iOS

MobileIron Email+ 3.14.0 for iOS Guide for Administrators| 35
Key-value pairs for customizing Email+ for iOS
(Cont.)
You can configure and customize the following features with key-value pairs:
• Prompt the device user for password
• Keyboard extension
• Enable Show Pictures
• Photo library
• Calendar customization
• Notes customization
• Default network timeout
• App feedback
• Troubleshooting
• Miscellaneous
Key-value pairs for customizing Email+ for iOS (Cont.)

MobileIron Email+ 3.14.0 for iOS Guide for Administrators| 36
TABLE 3. KEY-VALUE PAIRS F CONFIGURING
Key Value: Enter/ Select one Description
Prompt the device user for password
prompt_email_pass-
word
(Core only)
• true
• false
true: Email+ prompts the user for the
email password before attempting to
connect to the email server. When
Email+ first launches and connects to
the email server, Email+ provides the
user’s email password to the email
server.
false: When Email+ first launches and
connects to the email server, it does
not provide the device user’s email
password to the server. After
establishing a connection with the
email server, Email+ prompts the user
for an email password. If the email
server limits the number of password
attempts, it counts the connection as
one failed attempt.
Set the value of this key to true if the
email server allows only a small
number of password attempts.
Example: It he email server allows only
three attempts, setting this value to
true ensures that device users get
three attempts, not two attempts.
Default if key-value is not configured:
false
allow_prompt_pass-
word
• 0
• 1
0 = users are allowed access without a
prompt for a password.
1 = users are prompted for a password
to access email.
Default if key-value is not configured:
1.
email_password (Core
only)
User’s password for the ActiveSync
server
You can use the MobileIron Core
variable $PASSWORD$ if you have
checked Save User Password in
Settings > Preferences. MobileIron
Core then passes the user’s password
as the value to the device.
WARNING: If you plan to use the
Key-value pairs for customizing Email+ for iOS (Cont.)

MobileIron Email+ 3.14.0 for iOS Guide for Administrators| 37
Key Value: Enter/ Select one Description
$PASSWORD$ variable, be
sure to set Save User
Password to Yes before
any device users
register. If a device user
was registered before
you set Save User
Password, Email+
prompts the user to
enter the password
manually.
NOTE: MobileIron recommends
deleting the key if the
password is not being saved
on MobileIronCore.
Default if key-value is not configured:
Email+ requests device users to enter
the password.
Keyboard extension
MI_AC_IOS_ALLOW_
CUSTOM_
KEYBOARDS
• true
• false
true: Email+ allows the use of
keyboards extensions.
false: Email+ does not allow the use of
keyboards extensions.
This key-value pair is case sensitive.
Default if key-value is not configured:
false.
Enable Show Pictures
show_pictures_default
(Core only)
• true
• false
true: Enables the Show Pictures
option. Device users automatically see
images when opening an email.
false: Disables the Show Pictures
option. Device users must tap Show
Pictures to view images when opening
an email.
Device users can override the value
you configure by toggling the Show
Pictures option on or off.
NOTE: When changing the value
Key-value pairs for customizing Email+ for iOS (Cont.)

MobileIron Email+ 3.14.0 for iOS Guide for Administrators| 38
Key Value: Enter/ Select one Description
of this key, Email+ does not
change the Show Pictures
option until after
completing a full
synchronization. A full
synchronization occurs only
when you change certain
fundamental key-value
pairs, like email_address, or
when the device user
uninstalls and reinstalls
Email+ for iOS.
Default if key-value is not configured:
false.
Photo library
allow_photo_library_
access
• true
• false
• true: Users can attach photos and
video files from their personal photo
library on the device.
• false: Disables access to the
personal photo library, including
video files, from Email+. Device
users cannot attach photos or
videos from their personal photo
library. However, users can take
new photos or videos directly from
the email they are composing in
Email+ and attach to the email.
This feature allows administrators to
clearly separate work-related and
personal content on device.
Default if key-value is not configured:
true.
Calendar customization
calendar_default_
reminder
• -1
• 0
• 5
• 10
• 15
• 30
• 60
• 120
• 1440
Specifies the default calendar alert:
• -1: No alert
• 0: At the time of event
• 5: 5 minutes before the event
• 10: 10 minutes before the event
• 15: 15 minutes before the event
• 30: 30 minutes before the event
• 60: 1 hour before the event
• 120: 2 hours before the event
Key-value pairs for customizing Email+ for iOS (Cont.)

MobileIron Email+ 3.14.0 for iOS Guide for Administrators| 39
Key Value: Enter/ Select one Description
• 2880 • 1440: 1 day before the event
• 2880: 2 days before the event
Device users can edit the alert as
desired after creating the event.
Default if key-value is not configured: -
1.
calendar_default_
mode_tablet
• day
• week
• month
• list
Sets the default Calendar view on an
iPad.
Device users can change the view in
the Calendar's Settings. The device
user’s choice overrides the default set
by the administrator.
Default if key-value is not configured:
week.
calendar_default_
mode_phone
• day
• month
• list
Sets the default Calendar view on an
iPhone.
Device users can change the view in
the Calendar's
Settings. The device user’s choice
overrides the default set by the
administrator.
Default if key-value is not configured:
day.
calendar_reset_view_
threshold
A number Sets the inactivity threshold after
which the calendar view is reset to the
default view.
The inactivity threshold is measured in
seconds.
If the device screen is auto-locked or
the app is in background for more than
the configured time, the default view is
loaded when users launch Calendar.
Default if key-value is not configured:
120 seconds.
Notes customization
allow_notes_title • true
• false
true: Email+ users are presented with a
separate title field to add a title to a
note.
false: A separate title field for a notes is
Key-value pairs for customizing Email+ for iOS (Cont.)

MobileIron Email+ 3.14.0 for iOS Guide for Administrators| 40
Key Value: Enter/ Select one Description
not available, instead, the first line of
the note is used as a title.
Default if key-value is not configured:
false.
Default network timeout
default_network_
timeout
A positive integer Sets the app’s default timeout for all
ActiveSync network requests. The
value is measured in seconds.
Example: 30. In this example, for
ActiveSync network requests, Email+
will timeout after 30 seconds.
Default if key-value is not configured:
90 seconds
App feedback
feedback_email_
address
(Core only)
An email address Device user app feedback and log
messages are sent to the email
address.
Default if key-value is not configured:
App feedback is not available to
Email+ users.
Email watermark
email_watermark Any alphanumeric string Adds watermark in an email for mail
view and mail compose screens
supported. The text for the watermark
is unique to a customer.
email_watermark_
parameters
• textColor,
• textSize,
• horizontalSpacing,
• verticalSpacing
Where:
textColor is #AARRGGBB and textSize,
horizontalSpacing, and verticalSpacing
are integer values.
Sets the watermark parameters such
as text color, size, horizontal and
vertical spacing.
Troubleshooting
allow_logging
(Core only)
• true
• false
true: Email+ logs data to the device
console, and allows the log file to be
attached to a feedback email. Entering
true is useful for problem diagnosis.
Key-value pairs for customizing Email+ for iOS (Cont.)

MobileIron Email+ 3.14.0 for iOS Guide for Administrators| 41
Key Value: Enter/ Select one Description
Default if key-value is not configured:
false.
allow_show_
configuration
• true
• false
true: Enables the display of
configuration information while setting
up Email+ on an iOS device. Set this
value to true for test devices first, then
disable the key value pair when it is
time to roll out Email+ for iOS to device
users.
Default if key-value is not configured:
false.
exit_on_configuration_
error
• true
• false
• true: Email+ simply shuts down
without any notification if there is
an error in the Email+ configuration
that is pushed to the device.
• false: If Email+ encounters an error
in the configuration, device users
are provided with the option to
email the Email+ logs. The Email+
logs are helpful in debugging
configuration errors.
NOTE: Not all configuration errors
are considered critical.
Example: A missing S/MIME
signing or encryption
certificate is not considered
a critical error.
Default if key-value is not configured:
true
enable_calendar_dump • true
• false
• true: Enables calendar dump to
Email+ feedback logs for
troubleshooting. Calendar data is
encrypted.
• false: Disables calendar dump to
Email+ feedback logs.
Default if key-value is not configured:
false
Miscellaneous
disabled_features • move_button
• local_cache_all
• attach_files
• move_button: Disables the Move
button in the Move to screen in
Email+. Emails are moved without
Key-value pairs for customizing Email+ for iOS (Cont.)

MobileIron Email+ 3.14.0 for iOS Guide for Administrators| 42
Key Value: Enter/ Select one Description
• openin_compose
• document_viewer
confirmation when users tap on a
folder
• local_cache_all: Disables all local
caching.
• attach_files: Disables the Attach
Files option in Email+.
• openin_compose: Disables
opening of files into Email+ from
other apps.
• document_viewer: Disables
opening of attachments in Email+.
Instead, users are provided the
Open In ... option to choose an
app in which to view the
attachment. However, some
attachments, such as text, .eml,
audio, and certificate files are
opened in Email+. Configure the
value if you are also using the
Watermark capability in
Docs@Work. If you want
watermarks to be shown on all
documents, configure the value to
disable the document viewer in
Email+ and use Docs@Work
exclusively.
enabled_features • gmail_smart_folders
• wkwebview_mail_viewer
• richtext_email_support
• rms_support
• fit_to_width
• Enables smart folders, All mails,
Spam, and Starred, for Gmail
accounts.
• WkWebView based framework for
viewing emails. This option is
enabled by default.
• Enables the ability to format text
using Bold, Italic, and Underline
options.This option is enable by
default.
• Enables fetching, displaying and
composing of the protected
messages. If rms_support is
enabled with configured server, list
of fetched templates is displayed in
Settings/Troubleshooting/Available
Permissions. Due to ActiveSync
protocol limitations, maximum of
20 templates are displayed in
Email+.
Key-value pairs for customizing Email+ for iOS (Cont.)
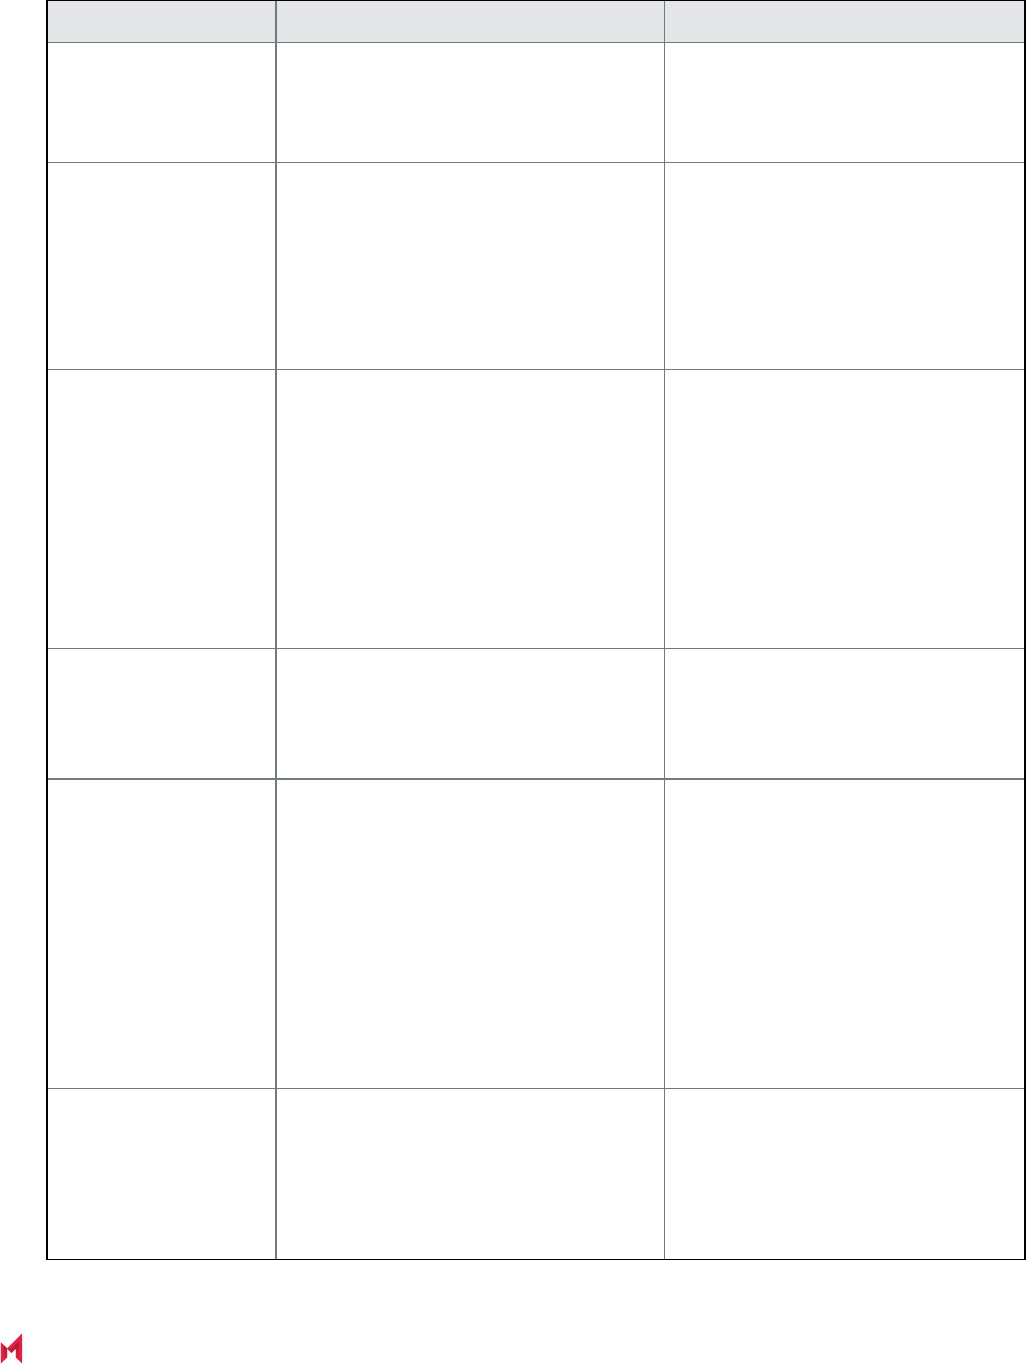
MobileIron Email+ 3.14.0 for iOS Guide for Administrators| 43
Key Value: Enter/ Select one Description
• Enables scaling down the size of
an email to fit the width of the
screen, but will not reduce it to less
than 25% of its original size.
always_fetch_mime • true
• false
Use this option to set the default value
for Email+ setting of Always Fetch
MIME. Enable this option only when
applications fail to launch when you
click the links in the email body.
Default if key-value is not configured:
false
allow_callkit • true
• false
Use this option to disable CallKit
functionality, which is restricted in
China by Apple. Customers are
advised to set allow_callkit to false for
all their users in China.
True - CallKit functionality enabled
False - CallKit functionality disabled
Default if key-value is not configured:
true
disable_analytics • true
• false
Use this option to disable crash
analytics.
Default if key-value is not configured:
false
filepass_key_identifier A unique, sufficiently complex
alphanumeric string.
This key allows admin to enable
sharing documents securely between
MobileIron Docs@Work and Microsoft
IntuneMAM protected Office365 apps
through FilePass.
The value for this key-value pair needs
to be same for the all the supported
MobileIron Apps (Docs@Work,
Email+, and FilePass) participating in
File Sharing with Microsoft Office 365
apps.
migrate_from_email_
exchange_host
The value is the previous email_
exchange_host key that was set up on
MobileIron Core.
This key allows the admin to configure
MobileIron Core to MobileIron Cloud
migration for the email exchange host.
NOTE: Post-migration of a device,
the Email+ app needs to be
Key-value pairs for customizing Email+ for iOS (Cont.)

MobileIron Email+ 3.14.0 for iOS Guide for Administrators| 44
Key Value: Enter/ Select one Description
re-synced to continue
receiving and sending
email messages. The
content in local folders,
such as Draft and Outbox,
will be removed and no
longer available. The Inbox
folder should be refreshed
for the email list to display.
Microsoft Office 365 authority and resource URL
modern_auth_
authority_url
https://login.microsoftonline.com/common This KVP is added to specify Microsoft
Office 365 authority url.
modern_auth_
resource_url
https://outlook.office365.com This KVP is added to specify Microsoft
Office 365 resource url.
Phishing reporting
report_phishing_
address
email address Enabling 'Report Phishing' option on
View screen in the "More" menu.
Phishing email will be sent to email
address set in value.
S/MIME support in Email+ for iOS
Email+ for iOS includes support for Secure/Multipurpose Internet Mail Extensions (S/MIME). This functionality
provides the following features:
• The device user sending the email can digitally sign the email.
On the receiving side, Email+ for iOS validates the sender’s identity and determines whether the email has
been tampered with.
• The device user sending the email can encrypt the email.
On the receiving side, Email+ for iOS decrypts the email.
• Email+ for iOS automatically encrypts emails when replying to or forwarding an encrypted email thread.
Using S/MIME requires a user certificate on the device running Email+ for iOS. You can import encryption
certificates in one of two ways:
• Pushing S/MIME certificates from MobileIron Core
OR
• Importing S/MIME certificates to the device through email
S/MIME support in Email+ for iOS

MobileIron Email+ 3.14.0 for iOS Guide for Administrators| 45
Before you set up S/MIME for Email+ for iOS
Before you set up S/MIME do the following:
• Make users’ public encryption keys accessible to all users.
To send an encrypted email, a user needs the recipient’s public key. If you provide users’ public keys in the
Active Directory, Email+ for iOS uses global address lookup to retrieve a public key as needed.
Another way for one user to have the public key of another user is to receive an email from a user with one
certificate for both signing and encryption. When receiving a signed email where the signing certificate and
encryption certificate are the same, Email+ for iOS now has the sender’s public key. The recipient can now
send an encrypted email to the sender of the signed email.
• Make sure users’ encryption certificates are the same on all devices.
Users need their private keys and certificates to read encrypted emails. A user’s encryption key and certificate
must be the same on all the user’s email apps that use S/MIME, including desktop email apps.
• When an encryption key/certificate is renewed, the existing email on a device cannot be decrypted unless the
original key certificate is available. Keep a backup copy of the encryption key and certificate or consider using a
third-party escrow service.
• To restore an encryption key and certificate from backup, users can send themselves the key/certificate as an
email attachment, as described in Importing S/MIME certificates to the device through email on page46.
Pushing S/MIME certificates from MobileIron Core
Pushing S/MIME certificates from MobileIron Core is a two-step process:
1. Enabling per-message S/MIME for iOS
2. Configuring key-value pairs
Enabling per-message S/MIME for iOS
See the “Enabling per-message S/MIME for iOS” section in the MobileIron Device Management Guide for iOS
device to set up the encryption and signing certificates for S/MIME.
Configuring key-value pairs
The key-value pairs define the encryption and signing certificates to be used in Email+. The value for each key is
the certificate enrollment setting you created. You enter the key-value pairs in the AppConnect app configuration
you created for Email+ for iOS.
Procedure
1. In the MobileIron Core Admin Portal, go to Policy & Configs > Configurations.
2. Select the app configuration you created in Creating an AppConnect app configuration for Email+ on page14.
3. Click Edit.
4. Add the following key-value pairs in the App-specific Configurations section:
- email_encryption_certificate: This key specifies the certificate to use for encrypting S/MIME emails.
Select the SCEP setting you want to use from the dropdown list.
- email_signing_certificate: This key specifies the certificate to use for signing S/MIME emails. Select
the SCEP setting you want to use from the dropdown list.
S/MIME support in Email+ for iOS

MobileIron Email+ 3.14.0 for iOS Guide for Administrators| 46
NOTE: Use of expired or revoked certificates for signing and encryption not supported. Also, the expired
certificates are not displayed in the signing or encryption selection lists.
Pushing S/MIME certificates from MobileIron Cloud
To enable S/MIME encryption, set up the certificates you will use for S/MIME in MobileIron Cloud. You will
reference the certificates in the Email+ configuration to distribute the certificates to devices. Certificates are sent
to the devices to which the configuration is distributed. Email+ imports the certificates into the keychain and
selects the certificates as the encryption and signing certificates, respectively. Device users can then use the
certificates in Email+ for iOS.
Procedure
1. Set up certificates.
Create a Certificate or Identity Certificate setting from Configurations > +Add.
Before creating an Identity Certificate, you must have also added a certificate authority in Admin >
Certificate Authority. See MobileIron Cloud Help for information about setting up certificates in
MobileIronCloud.
2. Configure the S/MIME key-value pairs in the Email+ configuration.
The key-value pairs define the encryption and signing certificates to be used in Email+ for iOS. The value for
each key is the certificate setting you created in Step 1.
Related topics
See the key-value pairs f configuring on page24, for the S/MIME key-value pairs for the encryption and signing
certificates.
Importing S/MIME certificates to the device through email
Device users can import the signing and encryption certificates to their device from email.
Procedure
1. Device users email themselves the certificate they use for S/MIME as an attachment.
The certificate must be sent as a PFX file.
2. Open the email using Email+ for iOS on the device
3. Tap to open the attachment.
Email+ for iOS prompts the user for the certificate password.
4. Enter the certificate password.
Email+ for iOS imports the certificate into its keychain.
5. Enable S/MIME signing and encryption in the mail settings in Email+ for iOS.
a. In Email+ for iOS, tap Settings > Mail.
b. Tap Security.
c. Tap Sign. The user’s signing certificate is automatically selected.
Users may optionally tap Always Sign to always sign emails with their certificate, and Sign As Clear
Text.
d. Tap Encrypt. The user’s signing certificate is automatically selected.
S/MIME support in Email+ for iOS

MobileIron Email+ 3.14.0 for iOS Guide for Administrators| 47
Users may optionally tap Always Encrypt to encrypt every email they send through Email+ for iOS.
Background email checks and user notifications
Email+ relies on iOS background execution to check for new email and to notify users. In the following cases
Email+ may not be able to check for new email:
• To conserve battery power, iOS limits when third-party apps can run in the background. When Email+ is sent to
the background, iOS occasionally allows Email+ to check for new email.
• iOS may terminate Email+ to reclaim memory for other apps. iOS may later decide to launch Email+ for iOS in
the background to check email.
When Email+ is in the background and attempts to check email, as an AppConnect app that encrypts its content,
Email+ must retrieve its encryption key from the UEM client. This requires an app flip to the UEM client, which
cannot happen in the background. As a result, Email+ cannot retrieve the encryption key and therefore cannot
verify working hours for notifications or check for new email.
To allow Email+ access to the encryption key even when it is in background, configure the allow_device_
keychain key-value pair to allow Email+ to store the key in the device keychain. This allows Email+ to check for
new email even when iOS launches it in the background.
NOTE: The allow_device_keychain key-value pair should only be used with a strong device passcode so
as to secure the decryption key.
How Email+ for iOS checks for new emails
The following describes how Email+ for iOS checks for new emails.
When the ... Email+ for iOS... iOS...
user launches Email+ checks for new email and notifies the user of
new email
allows Email+ for iOS to run
as usual
app is in the background occasionally checks for new email and notifies
the user, depending on iOS background refresh
might do a periodic
background refresh
TABLE 4. CHECKING FOR NEW EMAILS
Note The Following:
• iOS may sometimes terminate an app to preserve battery power or memory. If iOS terminates and then
attempts to relaunch Email+ for iOS while the device is locked, then the decryption key is not accessible for
reasons of security, and iOS cannot relaunch Email+ for iOS.
• iOS learns user habits and adjusts its background refresh parameters accordingly. As device users work with
Email+ for iOS more frequently, iOS similarly launches Email+ for iOS in the background more frequently.
Background email checks and user notifications

MobileIron Email+ 3.14.0 for iOS Guide for Administrators| 48
Configuring Web@Work for iOS to open mailto
links in Email+ for iOS
Administrators can configure Web@Work for iOS to open mailto links in Email+ for iOS using key-value pairs.
When device users click a mailto link in Web@Work for iOS, Email+ is automatically used.This feature allows
administrators to maintain good security across the organization by ensuring that users go from a secure browser
to a secure email application when clicking a mailto link.
Procedure
1. Select the Web@Work configuration in your UEM and click Edit.
- In the MobileIron Core Admin Portal, go to Policies & Configs > Configurations.
- In MobileIron Cloud, go to Apps.
2. For custom configurations, click Add to add a key-value pair.
3. Add the key mailto_prefix, and assign any of the following values:
Value Value options Description
email+app://<Email+
for iOS app>
email+app://email
email+app://calendar
email+app://contacts
Used for launching one of the
apps within Email+ for iOS, such
as the email app itself, calendar,
or contacts.
email+launcher://<
browser URL
scheme>
email+launcher://mibrowser?url=mailto: Sets Email+ as the default app to
open mailto links.
4. Save the configuration.
Allow copy from Email+ for iOS to other
AppConnect apps only
You can configure data loss prevention policies (DLPs) for Email+ for iOS, which involves specifying whether the
device user can copy content from Email+ for iOS to any other app. You can specify whether the device user can
copy content from Email+ for iOS only to other AppConnect apps, rather than all other apps. This allows device
users to share content without also allowing the content to flow to non-AppConnect apps.
Review your AppConnect for iOS DLP settings for copy/paste for Email+ for iOS. Ask these questions depending
on your current setting:
Configuring Web@Work for iOS to open mailto links in Email+ for iOS

MobileIron Email+ 3.14.0 for iOS Guide for Administrators| 49
Current setting Ask yourself
Copy/Paste To is not
allowed for Email+ for
iOS.
• Would your security needs still be met if you allowed copying only to other
AppConnect apps, but not to all other apps?
• Does Email+ for iOS have content that a device user would want to copy to
another AppConnect app?
If you answered yes to these questions, change the Copy/Paste To setting for
Email+ for iOS to allow copying only to other AppConnect apps.
Copy/Paste To is
allowed for Email+ for
iOS to all other apps.
• Would your security needs be better met by limiting copying only to other
AppConnect apps, instead of all other apps?
• Would the user feel limited if copying is allowed only to other AppConnect
apps? If so, is the more limited user experience, but tighter content security the
right trade-off for your needs?
If you answered yes to these questions, change the Copy/Paste To setting for
Email+ for iOS to allow copying only to other AppConnect apps.
TABLE 5. REVIEW APPCONNECT COPY/PASTE SETTINGS FOR EMAIL+ FOR IOS
Data loss prevention policies for Email+ for iOS are configured on the MobileIron Core Admin Portal in one of the
following places:
• the AppConnect container policy for Email+ for iOS
See Configuring the AppConnect container policy on page13
• the AppConnect global policy if you allow apps to be authorized without an AppConnect container policy and
have no AppConnect container policy for Email+ for iOS.
See Configuring the AppConnect global policy on page12
What Email+ for iOS users see for copy/paste
When you limit copying from Email+ for iOS to only other AppConnect apps, the device user is able to copy from
Email+ for iOS, but can paste only into the same app or other AppConnect apps. If the device user tries to paste
into a non-AppConnect app, the content is not available.
The device user can also see the Copy/Paste To data loss protection policy setting in Mobile@Work at Settings
> Secure Apps > Email+.
Allow copy from Email+ for iOS to other AppConnect apps only

MobileIron Email+ 3.14.0 for iOS Guide for Administrators| 50
Email and calendar classification capabilities
(Deprecated)
Classification capabilities provides the ability to manage protective markings to emails and calendar events.
Email+ shows appropriate user interface fields to the user when viewing messages, replying to messages, or
composing new messages, or creating new calendar events.
The messages that are sent through Email+, adds the markings to the subject line, header, and optionally on the
top and the bottom of message body. Email+ supports two levels of markings:
l
Classification - To identify the overall sensitivity of the message
l
Distribution Limiting Markers - To limit the distribution
The different Classification and Distribution Limiting Markers (DLM) values are configured via key-value pairs as
described in the following table;
Key-
value
pair
Description
email_
classifi
cation_
list
Enables the email classification feature. If present, it specifies the list of classification values to be
used and all the supported permutations.
The values are separated by a ";".
For example:
SEC=UNOFFICIAL;SEC=UNCLASSIFIED;DLM=For-Official-Use Only;
DLM=Sensitive;DLM=Sensitive:LegalDLM=Sensitive:Personal;SEC=PROTECTED;SEC=PROT
ECTED,DLM=Sensitive;SEC=PROTECTED,DLM=Sensitive:Legal;
email_
classifi
cation_
version
Prefix the string to the x-header to represent the version of the standard supported. Default is
"VER=2012.3,NS=gov.au". For example:
X-Protective-Marking: VER=2012.3, NS=gov.au, SEC=UNCLASSIFIED,
ORIGIN=neville.jones@ato.example.org
email_
classifi
cation_
default
Allows an administrator to specify the default classification value for all the new emails composed
in Email+. If this value is not specified, then the user has to explicitly classify a message.
The following value defaults to unofficial with no DLM
SEC=UNOFFICIAL
email_
classifi
cation_
body
Enables whether the classification values are added to the message body (top and bottom) for
emails that are sent (new emails as well as replies to existing emails). It is the Boolean value, if it is
set to True then the message body is enclosed in Header and Footer.
TABLE 6. KEY-VALUE PAIRS TO CONFIGURE CLASSIFICATION AND DLM VALUES
Email and calendar classification capabilities (Deprecated)

MobileIron Email+ 3.14.0 for iOS Guide for Administrators| 51
Key-
value
pair
Description
True/False. Default is True.
email_
classifi
cation_
lock_
dlm
Enables the administrator to not allow any changes to the DLM value once it has been set in the
original message.
True/False. Default is False.
email_
classifi
cation_
require
d_
string
A string value that is shown in the alert to the user asking the user to enter classification. Default is
"Required".
email_
classifi
cation_
alert_
string
A string value that is shown in the alert to the user asking the user to enter classification. Default is
"Classification is required"
email_
classifi
cation_
securit
y_label
A string value that is shown in the message compose user interface as label in the text field where
the SEC value is selected.
email_
classifi
cation_
dlm_
label
A string value that is shown in the message compose user interface as label in the text field where
the DLM value is selected.
TABLE 6. KEY-VALUE PAIRS TO CONFIGURE CLASSIFICATION AND DLM VALUES (CONT.)
NOTE: With Email+ 3.14.0 and above the Email and calendar classification capabilities will be replaced
with Classification markers. When you configure email_security_classification_json the older
version of classification will be ignored.
Classification markers
Email classification markers allows secure sharing of Mail and Calendar events with internal and external
audience. Configure Email classification marker using the email_security_classification_json key-value pair. To
Classification markers

MobileIron Email+ 3.14.0 for iOS Guide for Administrators| 52
verify if classification is enabled on the Email+ app, go to Settings > Troubleshooting > Email classification
markers.
The admin can configure and customize classification rules as required. When you compose a new mail using the
Email+ app, select the Classification field to apply classification markers. The device users can set text value,
color, alignment, and header or footer labels. You can assign colors to differentiate between field values for easy
identification. When a mail with classification is saved as a draft or is stuck in the outbox. The classifications are
also saved along with the mail message, you can edit the drafts mail to add or remove classification markers.
The Email classification markers consists of JSON formatted data. The following table describes the generic
classification and sample format:
Classificatio
n
Value Sample format
Fields Array of JSON objects of the classification
field configurations.
• name: The name is a combination of
alphabets and numbers. The first letter
of the name should be in uppercase.
• title: The text that is displayed to a user
in classification picker. It consists of
letters, numbers, and spaces. The
default value is equal to name value.
(Optional)
• description: The text displayed in the
Classification Picker, to provide users
with more information about the Field.
The default value is an empty string.
(Optional)
• required: When set to "true" a user is
required to select a value for this field
Boolean. The default value is set to
false. (Optional)
• onReply: Possible values:
- UPGRADE_ONLY - allows to
upgrade this classification field on
email reply.
- LOCK - prevents from changing this
classification field on email reply.
(Optional)
- ANY - allows any change to this
classification field on email reply.
The default value is set to "ANY".
(Optional)
• allowCustomValue: When "true" a
user would be able to add a custom
value manually in the picker. Possible
"fields":[
{
"name":"SEC",
"type":"text",
"title":"Security Classification",
"description":"",
"onReply":"UPGRADE_ONLY"
},
{
"name":"ACCESS",
"title":"Information Management Marker",
"parent":"SEC",
"required":false,
"onReply":"LOCK"
},
{
"name":"CAVEAT",
"title":"Caveat",
"required":false,
"allowCustomValue":true
}
]
Classification markers
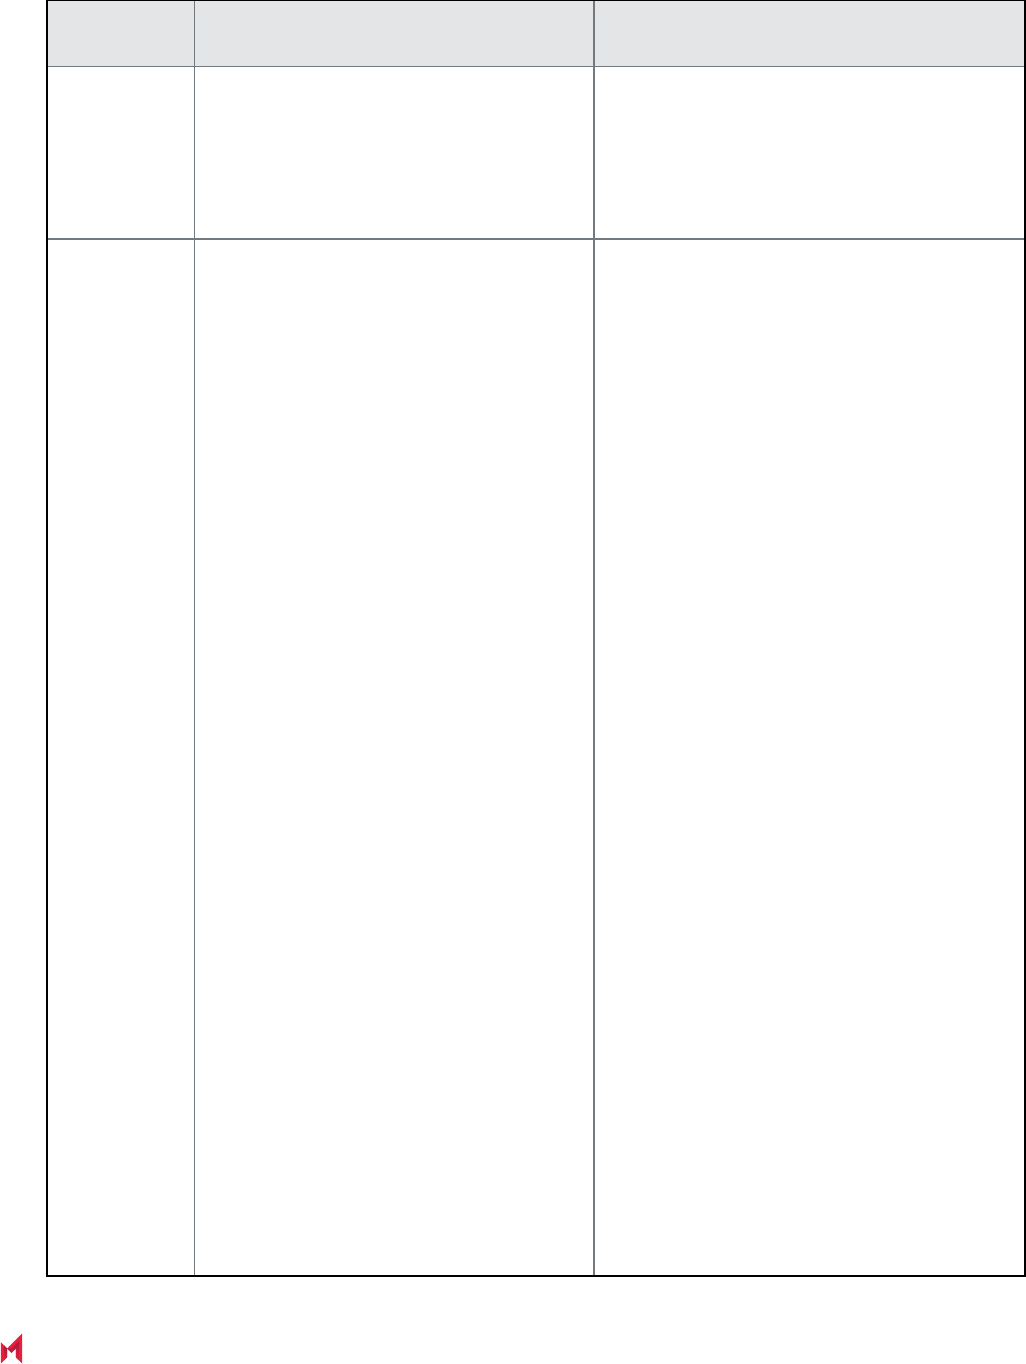
MobileIron Email+ 3.14.0 for iOS Guide for Administrators| 53
Classificatio
n
Value Sample format
only when "onReply" is "ANY".
Boolean. The default value is set to
false. (Optional)
• selectionsMaxNumber:When enabled,
you can select multiple field values. The
default value is set to 1.
Values Array of JSON objects of the classification
fields values.
• $Fields.name$: Array on the
classification values for the appropriate
field. The same field name can be
declared multiple times for the unique
"parentRange"
- value: A value to be used for the
specific classification marking.
Must not contain semi-colons or be
comprised of only spaces. Must be
declared in the priority order, from
the least secure to the most.
(Required)
- title: The text that is displayed as a
classification value in the picker.
The default value is equal to "value".
(Optional)
- description: The text that is
displayed as a description to the
specific classification value. The
default value is an empty string.
(Optional)
• defaultValue: Classification selected
by default on a message compose start.
Object of the field-value pairs. The
default is an empty field.
• conditionality: Defines the
dependencies between different fields.
One field may be dependent just to a
single another one.
- target: defines a parent field and its
values in "field":["value_1",
...,"value_n"] format.
- dependent: defines a child field
with a list of values that a user
would be shown when any of the
"target" fields is selected.
"values":[
{
"SEC":[
{
"value":"UNOFFICIAL",
"title":"Unofficial",
"description":"Non work-related email"
},
{
"value":"OFFICIAL",
"title":"Official",
"description":" Work-related emails that do not
carry a security classification"
},
{
"value":"OFFICIAL:Sensitive",
"title":"Official:Sensitive",
"description":"Sensitive but not security classified
information"
},
{
"value":"PROTECTED",
"title":"Protected"
},
{
"value":"SECRET",
"title":"Secret"
},
{
"value":"TOP-SECRET",
"title":"Top secret"
},
],
},
{
"ACCESS":[{"value":"Personal-Privacy"},
{"value":"Legal-Privilege"}, {"value":"Legislative-
Secrecy"}]
},
{
"CAVEAT":[{"value":"SH:CABINET", title:"Cabinet"},
{"value":"REL:AU", title:"Australia"}],
}
],
"defaultValue":{"SEC":"OFFICIAL",
"ACCESS":"Personal-Privacy" },
"conditionality":[
{
"targetField":"SEC",
"dependentField":"ACCESS",
"dependencies":[{"targetValues":
Classification markers

MobileIron Email+ 3.14.0 for iOS Guide for Administrators| 54
Classificatio
n
Value Sample format
["OFFICIAL","OFFICIAL:Sensitive","PROTECTED","SECRET
","TOP-SECRET"],
"dependentValues":["Personal-Privacy","Legal-
Privilege","Legislative-Secrecy"]}]
},
{
"targetField":"SEC",
"dependentField":"CAVEAT",
"dependencies":[{"targetValues":
["PROTECTED","SECRET","TOP-
SECRET"],"dependentValues":["SH:CABINET","$custom$"]
}
]
},
]
}
SendOptions JSON object that defines the actions that
would be applied to a message while
sending and to a new event after creation.
• xHeader: Object to define the X-Header
key and value to be sent with each
email.Optional.
• subjectSuffix: Text to be appended to a
classified message subject.
• bodyHeader and bodyFooter:
Formatted text to be appended to the
start or the end of a message before an
email sending. Optional.
- text: text in Special formatting. "\\n"
is resolved as a new line within the
text.
Required.
- color: defines text color in
#RRGGBB. Optional, default
"#000000".
- alignment: defines text alignment
with "LEFT"|"CENTER"|"RIGHT"
values. Optional, default "LEFT".
- style - defines text style in HTML
style format. When defined, "color"
and "alignment" properties would be
ignored.
- conditions: allows to modify
"bodyHeader" or "bodyFooter"
values ("text", "color", "alignment")
depending on "when" condition.
- when: includes a field name and
values. On an email sending with
any of these classification values, a
"sendOptions": {
"subjectSuffix" : "[(SEC=$SEC.value$){, }
(ACCESS=$ACCESS.value$){, }(CAVEAT=$CAVEAT.value$){,
}(CAVEAT=$CAVEAT.value_1$){, }(CAVEAT=$CAVEAT.value_
2$)]",
"bodyHeader":{
"text":"($CAVEAT.title$: $CAVEAT.value$){, }
($CAVEAT.value_1$){, }($CAVEAT.value_2$)",
"color":"#000000",
"alignment":"CENTER",
"conditions":[{"when":{"SEC":
["PROTECTED"]},"result":{"color":"#FF0000"}}]
},
"bodyFooter":{
"text":"($CAVEAT.title$: $CAVEAT.value$){, }
($CAVEAT.value_1$){, }($CAVEAT.value_2$)",
"color":"#000000",
"alignment":"CENTER",
"conditions":[{"when":{"SEC":
["PROTECTED"]},"result":{"color":"#FF0000"}}]
},
"allowNotClassified":true
}
Classification markers

MobileIron Email+ 3.14.0 for iOS Guide for Administrators| 55
Classificatio
n
Value Sample format
property from "result" would override
the original
"bodyHeader"/"bodyFooter"
properties.
• allowNotClassified: Boolean value
that identifies if Email can be sent
without classification selected.
Boolean. Optional. Default value
"false".
ReceiveMarki
ng
Defines a list of patterns to parse
classification from a received message.
The order in which the patterns are applied
is defined in "priorities".
• xHeaderPatterns: Rules to parse
classification value from the X-
Header.The X-Header key is searched
by "headerName" values with left-to-
right priority. (Optional)
• subjectSuffixPatterns: Rules to parse
classification value from an email
subject.
- boundaries define the range of
characters in the subject to check
for the classification. The "rules" are
applied to the text starting from the
first inclusion of "start" text and the
last of "end". Whole subject is
checked when not defined.
(Optional)
• priorities: Defines which patterns to
fetch classification value. The default
value is set to "priorities".
["xHeaderPatterns","subjectSuffixPatte
rns"]. (Optional)
"receiveMarking": {
"priorities":
["xHeaderPatterns","subjectSuffixPatterns"],
"xHeaderPatterns":{ "headerName" : ["X-Protective-
Marking", "X-Classification"],
"rules":["SEC=$SEC$", "sec=$SEC$", "SEC:$SEC$",
"sec:$SEC$",
"ACCESS=$ACCESS$", "access=$ACCESS$",
"ACCESS:$ACCESS$", "access:$ACCESS$",
"CAVEAT=$CAVEAT$", "caveat=$CAVEAT$",
"caveat:$CAVEAT$", "caveat:$CAVEAT$"],
"separatorRegex":"[^a-zA-Z\d\-_\s]"
},
"subjectSuffixPatterns":{
"rules":["SEC=$SEC$", "sec=$SEC$", "SEC:$SEC$",
"sec:$SEC$",
"ACCESS=$ACCESS$", "access=$ACCESS$",
"ACCESS:$ACCESS$", "access:$ACCESS$",
"CAVEAT=$CAVEAT$", "caveat=$CAVEAT$",
"caveat:$CAVEAT$", "caveat:$CAVEAT$"],
"boundaries":{"start":"[", "end":"]"},
"separatorRegex":"[^a-zA-Z\\d\\-_\\s:]"
}
},
Version version value should be defined to differ
between JSON schemas. (Required)
classification version: 2.0.0
For more information on JSON samples, see the Email+ 3.14.0 sample files for classifications KB article.
Classification markers

MobileIron Email+ 3.14.0 for iOS Guide for Administrators| 56
Crash reporting capabilities
Crashlytics is an enterprise grade service owned by Google and the Crashlytics SDK is embedded in MobileIron
apps. Email+ implements the Crashlytics SDK. This enhancement helps MobileIron to proactively address issues
experienced by end-users.
Crashlytics related features:
• When an application crashes, the details of the crash are collected and uploaded to Crashlytics servers.
• The collected data includes OS version, RAM size, disk space, and so on, in addition to crash specific data.
• PII data is not uploaded to Crashlytics.
• Each device uses a unique random ID when uploading its crash reports to Crashlytics. This ID is also written to
various application specific log files (such as Email+) and allows the MobileIron engineering team to co-relate
crash reports with specific customer provided log files.
• All data is maintained in the Mobilelron Crashlytics account managed by the MobileIron engineering team.
• Disable Crashlytics through the existing key-value pair disable_analytics for iOS Email+.
Allow logging on Email+
Email+ logs data to the device console, and allows the log file to be attached to a feedback email.
For MobileIron Core, allow_logging key-value pair is used to configure logging.
For MobileIron Cloud, select the “allow Logging” check box in Email+ configuration to configure logging.
NOTE: The allow_logging KVP does not work on an AppConnect configuration.
Crash reporting capabilities

4
MobileIron Email+ 3.14.0 for iOS Guide for Administrators| 57
Real-time push notifications
These sections provide information on how to configure real-time push notifications. With real-time push
notifications, notifications appear on the device as soon as a new email arrives on the Exchange server.
Push notifications at specified intervals
You can also set up push notifications at specified intervals (interval-based) as opposed to real-time push
notifications. With interval-based push notifications the notification interval is configurable by the administrator. For
information on how to configure interval-based push notifications for MobileIron Core deployments, see MobileIron
Cloud Notification Service for Email+ for iOS at https://community.mobileiron.com/docs/DOC-4443.
About real-time push notifications for Email+ for
iOS
Email+ can be set up to receive real-time push notifications. Real-time notifications require additional setup with
the MobileIron cloud notification service (CNS).
The MobileIron cloud notification service (CNS) is a cloud-based service hosted on Amazon Web Services (AWS)
that provides real-time push notifications for Email+ for iOS users by using Microsoft’s Exchange Web Services
(EWS), Amazon’s SNS service, and Apple Push Notification Service (APNs).
• Need for a notification service
• How the notification service works
Need for a notification service
As a third-party app, Email+ for iOS is not permitted by iOS to execute for an unlimited period of time when the app
is in the background. Only apps developed by Apple, such as the native mail app, are able to execute for an
unlimited period of time in the background. Therefore, even though both native mail and Email+ use the ActiveSync
protocol, only the native mail app can get real-time notifications.
The MobileIron cloud-based notification service (CNS) addresses this limitation by using the Apple APNS push
notification service to notify users about new emails even when Email+ is running in the background on iOS
devices. New emails also include calendar invites.

MobileIron Email+ 3.14.0 for iOS Guide for Administrators| 58
About the cloud notification service for Email+ for iOS
Cloud-based notification service enables Email+ for iOS to check new emails at regular intervals. The cloud server
sends a periodic APNs message to devices with Email+ for iOS installed. The periodic APNs message triggers
iOS to launch Email+ for iOS in the background, allowing Email+ to download new email from the mail server and
notify device users accordingly. Administrators can optionally set the interval at which Email+ app checks for new
email.
The notification service is configured on MobileIron Core using key-value pairs added to the AppConnect app
configuration for Email+ for iOS.
Configuring the cloud notification service for Email+ for iOS involves the following main steps:
• Provide an email address to Mobileiron for registration with the cloud notification service.
NOTE: No push notifications will be sent to this email address.
• Configure your organization ID and token (received from MobileIron) in MobileIron Core.
Before you begin
Configure, distribute, and install Email+ for iOS on all iOS devices.
Configuring cloud notification service for Email+
You must provide MobileIron with the name of your organization and an email address to which the cloud
notification service is to be registered. MobileIron will register your organization with the service, and provide an
organization ID and token (for security purposes) to be configured on MobileIron Core. The ID and token will allow
Email+ for iOS to use the service.
To configure the cloud notification service for Email+ for iOS:
1. Navigate to the MobileIron Customer Support Portal at http://help.mobileiron.com.
2. Enter your log in credentials.
3. Click the Software link at the top of the page.
4. On the Software page, click the Cloud Notification Service (CNS) for iOS Email+ link.
5. To register for the service, click Register Cloud Notification Service for iOS Email+.
NOTE: Make sure popup windows are enabled in your browser.
6. On the registration page, enter the following information in the space provided:
• Email: The email address to which the cloud notification service is to be registered.
• Organization: The name of your organization.
NOTE: Make sure the email address you provide to MobileIron is an externally facing group address (not
the email address of an individual), such as admin@example.com.
7. Click Register.
The registration page shows the email address and organization you entered, as well as an authorization token
for the cloud server.
About real-time push notifications for Email+ for iOS

MobileIron Email+ 3.14.0 for iOS Guide for Administrators| 59
NOTE: After MobileIron has registered your details, you will receive an email with the following
information:
Item Description
Name The name of your organization as provided to MobileIron. For example, Acme Corp.
Email The email address you provided to MobileIron, for example admin@example.com.
ID An ID for your organization generated by MobileIron. For example: 000000b0-e000-00eb-a0ba-
000000ba000c
Token A randomly generated string from MobileIron, representing an authorization token for the cloud server.
8. Copy the token and paste it into a text editor.
9. In the MobileIron Core Admin Portal, go to Policy & Configs > Configurations.
10. Select the AppConnect app configuration you created for Email+.
11. Click Edit.
12. Add the following key-value pairs:
Key Decription
notification_
server_host
Enter the URL of the notification server:
• cns-na1.mobileiron.com/PROD (interval-based push notifications)
• cns.mobileiron.com/PROD (real-time notifications)
The name of your organization as provided to MobileIron. For example, Acme Corp.
allow_
device_
keychain
Enter a value of true to enable Email+ for iOS to fetch email in the background.
notification_
server_
organization_
id
Enter your organization’s ID as provided to you by MobileIron. Use this KVP for interval-based
push notifications.
notification_
server_
authorization
Copy and paste the token you received after you registered for the cloud notification service.
Use this KVP for interval-based push notifications.
notification_
interval
Optional. Enter the desired notification interval in seconds. The recommended interval is range
is 5 minutes (300 seconds) to15 minutes (900 seconds). Use this KVP for interval-based push
notifications.
13. Click Save.
14. The updated AppConnect app configuration for Email+ for iOS will be sent to devices at the next sync interval.
About real-time push notifications for Email+ for iOS

MobileIron Email+ 3.14.0 for iOS Guide for Administrators| 60
How the notification service works
Email+ uses Microsoft’s Exchange Web Services (EWS) protocol to subscribe with Exchange to receive push
notifications. As a result of the EWS subscription, Exchange sends a brief message to the MobileIron cloud-based
notification service (CNS) when a new message is received.The MobileIron cloud notification service is hosted on
Amazon Web Services (AWS) and uses Amazon’s SNS service in conjunction with Apple’s APNs service to send
notifications to iOS devices. The APNs message triggers iOS to launch Email+ for iOS in the background, allowing
Email+ to notify device users of new emails.
No sensitive user data or email content is transferred from Exchange to CNS. No corporate data or user identity
information is stored on CNS, thus making the notification service safe and secure. Only the following information
is sent from EWS to CNS:
• The unique EWS subscription ID of the user.
• Watermark to avoid duplicate notifications.
• The folder ID of the sub folder from which the new email originated.
CNS does not make any requests to the Exchange server.
The notification service is configured via the MobileIron unified endpoint management (UEM) platform using key-
value pairs added to the AppConnect app configuration for Email+ for iOS.
FIGURE 4. REAL TIME PUSH NOTIFICATION ARCHITECTURE
1. Subscription workflow:
a. Device registers with Apple APNs.
About real-time push notifications for Email+ for iOS

MobileIron Email+ 3.14.0 for iOS Guide for Administrators| 61
b. Devices registers with the EWS service on Exchange.
2. A new email arrives on the Exchange server.
3. Exchange notifies MobileIron CNS.
4. MobileIron CNS triggers APNs.
5. APNs notifies the iOS device.
6. Notification workflow on Email+:
NOTE: This feature requires users to be subscribed to CNS v2 for Real Time Notifications.
a. iOS displays a notification to the user indicating that there are new messages.
b. iOS wakes up Email+ in the background.
c. Email+ wakes up and fetches the email messages from the Exchange server via ActiveSync.
Note that the email headers are fetched, and the body snippet is used for list view. The entire
email body is not fetched.
d. Email+ replaces the previous notification with details of the new messages.
Standalone Sentry setup for real-time push
notifications
The following sections provide the authentication to the Exchange and EWS service and the supported
StandaloneSentry setup.
• Exchange, real-time push notifications, and Standalone Sentry setup
• EWS service and Standalone Sentry setup
Exchange, real-time push notifications, and Standalone Sentry
setup
The following table shows the Standalone Sentry setup based on the required authentication and whether you are
deploying real-time push notifications.
Standalone Sentry setup for real-time push notifications

MobileIron Email+ 3.14.0 for iOS Guide for Administrators| 62
What is the
authentication to
Exchange?
Do you want
real-time push
notification?
Supported Standalone Sentry setup
Basic, NTLM No Enable ActiveSync on Standalone Sentry.
Basic Yes Enable ActiveSync and AppTunnel on Standalone Sentry.
• Set up an AppTunnel service to tunnel Exchange Web Services
(EWS).
Device user experience:
• Device users are prompted for user name and password for
authentication to EWS.
Basic Yes Enable AppTunnel on Standalone Sentry.:
• Set up an AppTunnel service for to tunnel Exchange Web
Services (EWS) and Exchange ActiveSync (EAS) traffic.
Device user experience:
• Device users are prompted for user name and password for
authentication to EWS and Exchange ActiveSync (EAS).
TABLE 7. SUPPORTED STANDALONE SENTRY SETUP
Standalone Sentry setup for real-time push notifications

MobileIron Email+ 3.14.0 for iOS Guide for Administrators| 63
What is the
authentication to
Exchange?
Do you want
real-time push
notification?
Supported Standalone Sentry setup
Basic Yes Set up per app VPN with MobileIron Tunnel.:
NOTE: Email+ must be an MDM managed app so that it can
use MobileIron Tunnel.
Device user experience:
• Device users are prompted for user name and password.
Certificate No Enable ActiveSync on Standalone Sentry.
Certificate, NTLM,
Modern Auth
Yes Setup per app VPN with MobileIron Tunnel.
NOTE:
• Email+ must be an MDM managed app so that it can use
MobileIron Tunnel.
• If you are using certificates for authentication:
- the certificate chain (root and intermediate) must be trusted
by the Exchange server.
- The certificate can be issued per user by a third-party CA or
ADCS on Exchange.
- The certificate is configured as a key-value pair in the
Email+ configuration in the UEM.
• For modern auth, Standalone Sentry setup is supported. The
PKCS-12 and X.509 certificates should be configured on
MobileIron Core.
Modern auth uses ADFS that is exposed to the internet. The
AppTunnel Sentry rules should be set to <ANY> for
adfs.company.com on ports 443 and 49443.
Device user experience:
• Device users are not prompted for authentication.
TABLE 7. SUPPORTED STANDALONE SENTRY SETUP (CONT.)
EWS service and Standalone Sentry setup
The following table provides the supported authentication methods to the EWS service.
Standalone Sentry setup for real-time push notifications

MobileIron Email+ 3.14.0 for iOS Guide for Administrators| 64
Setup Basic Auth Certificate Auth NTLM Auth Modern Auth
ActiveSync +
AppTunnel
Yes
Uses AppTunnel for EWS
No No No
AppTunnel only Yes
Uses AppTunnel for EWS
and EAS.
No No No
MobileIron Tunnel Yes Yes Yes Yes
No Sentry Yes Yes Yes Yes
TABLE 8. SUPPORTED AUTHENTICATION TO THE EWS SERVICE
Deployment use cases for real-time push
notifications
This document addresses the following use cases:
• Email+ uses AppTunnel to tunnel EWS traffic to the Exchange server. This setup only supports basic
authentication to the EWS service.
• Email+ uses MobileIron Tunnel to tunnel all traffic to the Exchange server. This setup supports basic, NTLM,
modern auth, and identity certificates to authenticate to the EWS service.
NOTE: If your existing Email+ deployment uses a Standalone Sentry for ActiveSync and your Exchange
Web Service (EWS) is set up to use certificates, you have to disable ActiveSync on Standalone
Sentry and set up MobileIron Tunnel.
Before you configure real-time push notifications
Before you configure real-time push notifications;
• Configure, distribute, and install Email+ for iOS.
Real time notification is supported for Email+ 2.4 for iOS through the most recently released version as
supported by MobileIron.
For information about installing Email+ for iOS, see Configuring Email+ for iOS on page10.
• For information about the EWS push notification service see Microsoft’s documentation at
https://msdn.microsoft.com/en-us/library/office/dn458791%28v=exchg.150%29.aspx
• Open port 443, for outbound only HTTPS requests, on your firewall to allow Exchange to send notifications to
MobileIron CNS. The URL for the CNS server is https://cns.mobileiron.com/PROD. Alternately, you can enter
the following IP addresses:
- 13.56.49.23
- 34.253.2.239
Deployment use cases for real-time push notifications

MobileIron Email+ 3.14.0 for iOS Guide for Administrators| 65
NOTE: MobileIron strongly recommends entering the URL for the notification server, as the IP addresses
for the server might change.
• Set up your Exchange environment. See the following:
- For information about installing Email+ for iOS, see Configuring Email+ for iOS on page10. on page64.
- Configuring additional Exchange setup for identity certificates on page66.
• Ensure that Go Daddy is available in the Exchange trust store as a trusted certificate authority (CA). The
MobileIron cloud notification service uses the Go Daddy CA.
Configuring EWS to send push notifications
These steps are applicable for both Exchange 2010 and 2013 servers.
Before you begin
• You must have enabled EWS on the Exchange server.
Procedure
1. On the Exchange server, launch IIS Manager.
2. Go to Server > Sites > Default Web Site > EWS.
FIGURE 5. EWS HOME AUTHENTICATION AND AUTHORIZATION
3. Verify that the Authentication and Authorization Rules roles are added to IIS.
4. Open Authentication and Enable Basic Authentication.
5. Open Authorization Rules and add rule to Allow for All users if it was not added automatically.
Next steps
• If your setup uses MobileIron Tunnel and identity certificates to authenticate with EWS and ActiveSync, do the
additional setup on the Exchange server described in Configuring additional Exchange setup for identity
certificates on page66.
Before you configure real-time push notifications

MobileIron Email+ 3.14.0 for iOS Guide for Administrators| 66
• Once you have set up your Exchange environment, go to Overview of configuration on MobileIron Core on
page66.
Configuring additional Exchange setup for identity certificates
Perform these steps only if your setup uses MobileIron Tunnel and identity certificates for authentication to EWS
and ActiveSync.
Procedure
1. On the Exchange server, launch IIS Manager.
2. Go to Server > Sites > Default Web Site > EWS.
3. Click on SSL Settings.
4. Check Require SSL.
5. For Client certificate, select Accept.
6. In the EWS directory, click on Configuration Editor and browse to the clientCertificateMappingAuth
option. Set the value for the option to True.
7. In the EWS directory, click on Authentication and enable the Windows Authentication option. Disable all
other authentication types.
Next steps
• Once you have set up your Exchange environment, go to Overview of configuration on MobileIron Core on
page66.
Overview of configuration on MobileIron Core
This section provides an overview of the steps required to set up Email+ for real-time push notifications on
MobileIron Core. Depending on your authentication requirements, use one of the following setup to tunnel
Exchange Web Services (EWS) traffic:
• Using MobileIron Tunnel to tunnel EWS traffic (Core)
OR
• Using AppTunnel to tunnel EWS traffic (Core)
Using MobileIron Tunnel to tunnel EWS traffic (Core)
This section provides the main steps for configuring real-time notifications with Email+ for iOS on MobileIron Core
if you are using MobileIron Tunnel to tunnel EWS traffic.
Before you begin
• Complete the setup described in Before you configure real-time push notifications on page64.
Procedure
1. Set up MobileIron Tunnel.
Overview of configuration on MobileIron Core

MobileIron Email+ 3.14.0 for iOS Guide for Administrators| 67
NOTE: Email+ must be an MDM managed app so that it can use MobileIron Tunnel.
2. If your EWS setup uses either NTLM, modern auth, or identity certificates for authenticating to the
EcWS service, create a SCEP certificate enrollment setting. Skip this step if your EWS setup uses basic
authentication.
3. Update the Email+ AppConnect app configuration.
Related topics
• See MobileIron Tunnel for iOS Guide for Administrators to set up MobileIron Tunnel on MobileIron Core.
• Configuring SCEP settings.
• Updating the AppConnect app configuration for Email+
Using AppTunnel to tunnel EWS traffic (Core)
This section provides the main steps for configuring real-time notifications with Email+ for iOS on MobileIron Core
if you are using AppTunnel to tunnel EWS traffic.
Before you begin
• Complete the setup described in Before you configure real-time push notifications on page64.
Procedure
1. Add an <ANY> AppTunnel service in Standalone Sentry settings.
2. Update the Email+ AppConnect app configuration.
Related topics
• Configuring an AppTunnel service on page68.
• Updating the AppConnect app configuration for Email+ on page68.
Description of configurations in MobileIron Core
This section provides a more detailed description of the configuration steps referenced in Overview of configuration
on MobileIron Core on page66. The following configurations are described:
• Configuring SCEP settings
• Configuring an AppTunnel service
• Updating the AppConnect app configuration for Email+
Configuring SCEP settings
Create a SCEP setting if your Exchange server and the EWS service require certificate authentication. You will
reference the name of SCEP setting in the AppConnect configuration for Email+ to generate the login certificate for
Email+, so that the Exchange server and EWS trust the device.
Description of configurations in MobileIron Core

MobileIron Email+ 3.14.0 for iOS Guide for Administrators| 68
Procedure
1. In the Admin Portal, go to Policies & Configs > Configurations.
2. Select Add New > Certificate Enrollment > SCEP.
3. In the New SCEP Setting window, configure the settings based on your SCEP requirements.
4. Click Save to save the SCEP setting.
5. Click OK to dismiss the prompt indicating the successful creation of your SCEP setting.
You will reference this SCEP setting in the AppConnect app configuration for Email+ using the key email_
login_certificate.
Related topics
• “Configuring SCEP” in the MobileIron Core Device Management Guide for iOS devices.
Configuring an AppTunnel service
You create an AppTunnel service in Standalone Sentry as part of an AppTunnel setup.
Before you begin
Ensure that you have a Standalone Sentry that is set up for AppTunnel and the necessary device authentication is
also configured. See “Configuring Standalone Sentry for app tunneling” in the MobileIron Sentry Guide.
Procedure
1. In the MobileIron Core Admin Portal, go to Services > Sentry.
2. Edit the entry for the Standalone Sentry that supports AppTunnel.
3. In the App Tunneling Configuration section, under Services, click + to add a new service.
4. Use the following guidelines to configure an AppTunnel service:
Item Description
Service Name Select <ANY>.
The Service Name is used in the AppConnect app configuration for Email+.
Server List Select the Standalone Sentry
TLS Enabled NA
Proxy/ATC NA
Server SPN List NA
5. Click Save.
Updating the AppConnect app configuration for Email+
Update the AppConnect app configuration for Email+ for iOS, so that Email+ on iOS devices is authorized to get
real-time notifications from CNS.
Description of configurations in MobileIron Core

MobileIron Email+ 3.14.0 for iOS Guide for Administrators| 69
Procedure
1. In the Core Admin Portal, go to Policy & Configs > Configurations.
2. Select the AppConnect app configuration you created for Email+.
3. Click Edit.
4. Add an AppTunnel rule that points to the Standalone Sentry on which you configured the AppTunnel service.
a. For URL Wildcard, enter the Exchange server’s IP address or FQDN.
5. For Identity Certificate, select the Certificate Enrollment setting you configured for Standalone Sentry.
You would have created the Certificate Enrollment setting as part of the Standalone Sentry setup for identity
certificate with Pass through.
6. Add the necessary key-value pairs.
7. Click Save.
8. Ensure that the configuration is applied to the labels that contain the devices to which you want to push the
configuration. The updated AppConnect app configuration for Email+ for iOS will be sent to devices at the next
sync interval.
Related topics
See Key-value pairs for real-time push notifications on page72 for a list of key-value pairs.
Overview of configuration on MobileIron Cloud
This section provides an overview of the steps required to set up Email+ for real-time push notifications on
MobileIron Cloud. Depending on your authentication requirements, use one of the following setup to tunnel
Exchange Web Services (EWS) traffic:
• Using MobileIron Tunnel to tunnel EWS traffic (Cloud)
OR
• Using AppTunnel to tunnel EWS traffic (Cloud)
Using MobileIron Tunnel to tunnel EWS traffic (Cloud)
This section provides the main steps for configuring real-time notifications with Email+ for iOS on MobileIronCloud
if you are using MobileIron Tunnel to tunnel EWS traffic.
Before you begin
• Complete the setup described in Before you configure real-time push notifications on page64.
Procedure
1. Set up MobileIron Tunnel.
See MobileIron Tunnel for iOS Guide for Administrators to set up MobileIronTunnel on MobileIron Cloud.
NOTE: Email+ must be an MDM managed app so that it can use MobileIron Tunnel.
2. If your EWS setup uses either NTLM, modern auth or identity certificates for authenticating to the EWS
service, create a SCEP certificate enrollment setting. Skip this step if your EWS setup uses basic
authentication.
Overview of configuration on MobileIron Cloud

MobileIron Email+ 3.14.0 for iOS Guide for Administrators| 70
See Configuring Identity certificate setting on page71.
3. Update the Email+ app configuration.
See Updating the app configuration for Email+ on page72.
Using AppTunnel to tunnel EWS traffic (Cloud)
This section provides the main steps for configuring real-time notifications with Email+ for iOS on MobileIronCloud
if you are using AppTunnel to tunnel EWS traffic.
Before you begin
• Complete the setup described in Before you configure real-time push notifications on page64.
Procedure
1. Add a custom HTTP service to the Standalone Sentry profile.
See Configuring a custom HTTP service on page70.
2. Update the Email+ app configuration.
See Updating the app configuration for Email+ on page72.
Description of configurations in MobileIron Cloud
This section provides a more detailed description of the configuration steps referenced in Overview of configuration
on MobileIron Cloud on page69. The following configurations are described:
• Configuring a custom HTTP service
• Configuring Identity certificate setting
• Updating the app configuration for Email+
Configuring a custom HTTP service
You create an AppTunnel service in Standalone Sentry as part of the AppTunnel setup.
Before you begin
Ensure that you have a Standalone Sentry that is set up for AppTunnel and the necessary device authentication is
also configured. See “Configuring Standalone Sentry for app tunneling” in the MobileIron Sentry Guide for
MobileIron Cloud.
Procedure
1. In MobileIron Cloud, go to Admin > Sentry.
2. Edit the entry for the Standalone Sentry profile that supports AppTunnel.
3. In Services, click Custom HTTP to add a new service.
4. Use the following guidelines to configure the service:
Description of configurations in MobileIron Cloud

MobileIron Email+ 3.14.0 for iOS Guide for Administrators| 71
Item Description
Service Name Enter a name to identify the service.
The Service Name is used in the Email+ app configuration.
Server
Authentication
Select Pass through (Basic Authentication).
All destinations
(forward proxy)
Selected by default.
5. Click Save.
Related topics
See “Configuring Standalone Sentry for app tunneling” in the MobileIron Sentry Guide for MobileIron Cloud for more
information on creating an AppTunnel service.
Configuring Identity certificate setting
You need to create the SCEP setting if your Exchange server and the EWS service require certificate
authentication. You will reference the name of SCEP setting in the AppConnect configuration for Email+ to
generate the login certificate for Email+, so that the Exchange server and EWS trust the device.
Before you begin
Create a certificate authority in Admin > Certificate Authority.
Procedure
1. In MobileIron Cloud, go to Configurations.
2. Click Add > Identity Certificate.
3. Fill in the following fields for the certificate configuration:
- Name: Enter brief text that identifies this certificate setting.
- Description: Enter additional text that clarifies the purpose of this SCEP setting.
- Certificate Distribution: Select Dynamically Generated.
- Source: Select the Certificate Authority you created in Admin > Certificate Authority.
- Subject: CN=${EMAIL}
- Key size: 2048
4. Test the configuration, and click Next.
5. Click Done to save the configuration.
You will reference the certificate configuration in the app configuration for Email+ using the key email_login_
certificate.
Description of configurations in MobileIron Cloud

MobileIron Email+ 3.14.0 for iOS Guide for Administrators| 72
Updating the app configuration for Email+
Update the app configuration for Email+ for iOS with key-value pairs, so that Email+ on iOS devices is authorized
to get real-time notifications from CNS.
Procedure
1. In MobileIron Cloud, go to Apps > App Catalog.
2. In the App Catalog, click on MobileIron Email+.
3. Click App Configurations.
4. In App Configurations Summary, click on AppTunnel to add an AppTunnel rule.
a. Enter a name for the configuration.
b. Select the Sentry profile in which you configured the custom HTTP service.
c. Select the custom HTTP service you created for real-time push notifications in the Sentry configuration.
d. For URL Wildcard, enter the Exchange server’s IP address or FQDN.
e. Select the distribution for this configuration.
f. Click Save.
5. In App Configurations Summary, click on Email+ Configuration to add the necessary key-value pairs in
AppConnect Custom Configuration.
6. Select the app distribution.
7. Click Update.
Related topics
See Key-value pairs for real-time push notifications on page72 for a list of key-value pairs.
Keys for real-time and interval-based push
notifications (Core and Cloud)
• Key-value pairs for real-time push notifications
• Key-value pairs for push notifications (interval-based)
Key-value pairs for real-time push notifications
The following keys are applicable to configuring real-time push notifications:
• notification_server_host
For real-time push notifications enter the following value: cns.mobileiron.com/PROD.
• allow_realtime_notifications
• email_ews_host
• eas_min_allowed_auth_mode
• ews_min_allowed_auth_mode
• notification_resubscription_interval
• allow_device_keychain
• subscription_valid_until
Keys for real-time and interval-based push notifications (Core and Cloud)

MobileIron Email+ 3.14.0 for iOS Guide for Administrators| 73
• sentry_server_host
The following table describes the key-value pairs applicable for real-time push notifications.
Key Value:
Enter/Select
one
Description
allow_realtime_notifications true Enables real-time push notifications.
notification_server_host The URL of the
notification
server
The URL for the notification server for real-time push
notifications is cns.mobileiron.com/PROD.
Alternately, you can enter the following IP addresses:
13.56.49.23
34.253.2.239
NOTE: MobileIron strongly recommends entering
the URL for the notification server, as the IP
addresses for the server might change.
email_ews_host Exchange
server address
for the EWS
host
Explicitly sets the EWS host address for real-time push
notifications, as opposed to the value configured for
email_exchange_host.
Enter the IP address or DNS of the EWS host. The
DNS name must be in the following format:
case2010.xyz.com. Do not prepend https or full path
name.
For Office 365, enter outlook.office365.com.
This key-value pair is required if your Standalone
Sentry is the email host, i.e. the email_exchange_host
key points to the Standalone Sentry FQDN.
eas_min_allowed_auth_mode • basic
• ntlm
• cert_base
• modern_
auth
Defines the authentication method to the Exchange
ActiveSync service.
• basic: Select if you are using Basic authentication
(user name and password)
• ntlm: Select if you are using NTLM authentication
• cert_base: Select if you are using identity
certificates for authentication
• modern-auth: Select to enable modern auth for
corresponding protocol
If a key-value pair is not configured, the default
authentication method is Basic. If you have configured
ntlm or cert_base or modern_auth, and there are errors
in your configuration, the authentication method
TABLE 9. KEY-VALUE PAIRS FOR REAL-TIME PUSH NOTIFICATIONS
Keys for real-time and interval-based push notifications (Core and Cloud)

MobileIron Email+ 3.14.0 for iOS Guide for Administrators| 74
Key Value:
Enter/Select
one
Description
defaults to basic.
ews_min_allowed_auth_mode • basic
• ntlm
• cert_base
• modern_
auth
Defines the authentication method to the Exchange
EWS service.
• basic: EWS uses basic authentication (User name
and password)
• ntlm: EWS uses NTLM authentication
• cert_base: EWS uses identity certificates for
authentication
• modern_auth: user authentication on first
application launch or when token cannot be
refreshed or renewed
If you have configured ntlm or cert_base or modern_
auth, and there are errors in your configuration, the
authentication method defaults to basic.
Default value if no key-value is configured is basic.
notification_resubscription_
interval
A number Optional. Sets the interval when Email+ resubscribes
to receive real-time push notifications.
The resubscription interval is in minutes.
If a key-value pair is not configured, the default
resubscription interval is 60 minutes.
subscription_valid_until The default
value for
"validUntil" is
1440 minutes
Sets the duration of the subscription.
sentry_server_host host name
address
Installs MobileIron Sentry, to support VIP notification.
Once Sentry is installed, the "VIP Allowed After Work
Hours" option is enabled.
Add the following key-value pairs if you are using an identity certificate for authentication
email_exchange_username $USERID$ The user ID for the ActiveSync server.
email_exchange_host <exchange_
real_address>
The fully qualified domain name of the ActiveSync
server.
email_trust_all_certificates true Email+ automatically accepts all certificates.
email_login_certificate <name of the
identity
certificate
Core: Name of the SCEP setting in MobileIron Core.
Cloud: Name of the Identity certificate configuration in
TABLE 9. KEY-VALUE PAIRS FOR REAL-TIME PUSH NOTIFICATIONS (CONT.)
Keys for real-time and interval-based push notifications (Core and Cloud)

MobileIron Email+ 3.14.0 for iOS Guide for Administrators| 75
Key Value:
Enter/Select
one
Description
configuration> MobileIron Cloud
email_ssl_required true Secures communication using https to the server that
you specified in email_exchange_host.
allow_logging true Email+ logs data to the device console, and allows the
log file to be attached to a feedback email.
email_device_id $DEVICE_
UUID_NO_
DASHES$
Identifies the device to the ActiveSync server.
email_address $EMAIL$ Email address of the device user.
feedback_email_address An email
address
Device user app feedback and log messages are sent
to the email address.
Add the following key-value pairs if your deployment includes Email+ versions 2.3.4 and less and
the devices require interval-based push notifications:
• notification_server_organization_id
• notification_server_authorization
For a description of the key-value pairs see Key-value pairs for push notifications (interval-based) on page76.
NOTE: Email+ versions 2.3.4 and less do not get real-time notifications.
TABLE 9. KEY-VALUE PAIRS FOR REAL-TIME PUSH NOTIFICATIONS (CONT.)
Key-value pairs for push notifications (interval-based)
The following keys are applicable to configuring push notifications:
• notification_server_host
For push notifications enter the following value: cns-na1.mobileiron.com/PROD.
• notification_server_organization_id
• notification_server_authorization
• notification_interval
• allow_device_keychain
The following table describes the key-value pairs applicable for interval-based push notifications.
Keys for real-time and interval-based push notifications (Core and Cloud)

MobileIron Email+ 3.14.0 for iOS Guide for Administrators| 76
Key Value:
Enter/Select
one
Description
notification_server_host The URL of the
notification
server
The URL for the notification server for real-time push
notifications is cns-na1.mobileiron.com/PROD.
notification_interval A number The desired notification interval in seconds. The
recommended interval is 15 minutes, or 900 seconds.
The minimum interval is 5 minutes, or 300 seconds.
This key is ignored if real-time push notifications is
configured.
Default value if no key-value is configured: 900
seconds.
allow_device_keychain true Enables Email+ to fetch email in the background.
notification_server_
organization_id
ID provided by
MobileIron
Organization ID provided by MobileIron.
notification_server_authorization Token provided
by MobileIron
Token for the cloud notification service.
TABLE 10. KEY-VALUE PAIRS FOR PUSH NOTIFICATIONS (INTERVAL-BASED)
Verifying that the cloud notification service is
working
After configuring real-time push notification, verify that the service is working.
Procedure
1. Obtain a test iOS device with an email address you can access configured on it.
2. Ensure that Email+ for iOS is installed to the device.
3. In Email+, go to Settings > Notifications and verify that your device is subscribed with EWS.
The following message appears in the Mail Alerts section:
You are subscribed to real-time push notifications.
4. Place the Email+ app in the background without exiting the app.
5. From your desktop, send an email to yourself, using the email address configured on the test iOS device.
6. Watch for a new mail notification from Email+ for iOS on the test device.
Verifying that the cloud notification service is working

5
MobileIron Email+ 3.14.0 for iOS Guide for Administrators| 77
Troubleshooting Email+ for iOS
The following describe some tools for troubleshooting Email+ for iOS:
Setting up logging for Email+ for iOS (Core)
You can troubleshoot user issues with Email+ for iOS by collecting logs and sending them to an email address you
can access. You then ask the device user to reproduce the issue so that you can view logging data. You can also
diagnose your configuration before rolling out Email+ for iOS to device users.
Procedure
1. In the MobileIron Core Admin Portal, go to Policy & Configs > Configurations and select the AppConnect
configuration you created for Email+ for iOS.
2. Click Edit.
3. In the App-specific Configurations section, enter the key allow_logging with value as true.
This allows Email+ for iOS to log data to the device console.
4. Enter the key feedback_email_address with value as a valid email address which you can access.
Email+ for iOS sends the collected log data to the email address entered here.
5. If you are diagnosing a configuration, enter the key allow_show_configuration with value as true.
When set to true, Email+ for iOS shows all configured key-value pairs for diagnostic purposes. Disable this
setting after diagnosis is complete.
6. Click Save.
7. Force a check-in on the user’s device to ensure the modified AppConnect app configuration for Email+ for iOS
is sent to that device:
a. Go to Users & Devices > Devices.
b. Select the checkbox for the device.
c. Click Actions > Force Device Check-in.
The Force Device Check-In dialog appears.
d. In the dialog, confirm the user and device information and enter a note.
e. Click Force Device Check-in.
The device user will now see a Feedback icon in Email+ for iOS.
8. Ask the device user to reproduce the problematic action and tap the Feedback button.
Email+ for iOS log data will be collected and emailed to the address you provided.
Related topics
See Key-value pairs for customizing Email+ for iOS on page23 for additional key-value pairs for troubleshooting.

MobileIron Email+ 3.14.0 for iOS Guide for Administrators| 78
Detailed logging for AppConnect apps for iOS
(Core)
For more information about logging for AppConnect apps for iOS, see the section “Detailed logging for AppConnect
apps for iOS” in the AppConnect and AppTunnel Guide.
Email+ crash recovery
Email+ has a built-in crash recovery mechanism that is triggered in the event that Email+ consistently crashes
upon launch. If Email+ crashes three times consecutively within a short interval each time it is launched, the
consecutive crashes are considered a catastrophic failure that is associated with some internal data. In this case,
the app reconfigures and the reconfiguration wipes all cached data.
Detailed logging for AppConnect apps for iOS (Core)

6
MobileIron Email+ 3.14.0 for iOS Guide for Administrators| 79
What users see
The user can manage notifications for the Email+ app.
Real-time push notifications
Real-time push notifications allow Email+ users to receive notifications about new emails as soon as the emails
arrive in the Inbox. Previous versions of Email+ supported periodic notifications for new emails at an interval set
by the IT department. The following sections address some questions you may have about real-time notifications:
• How will I receive Email+ notifications?
• How do I change the notification settings?
• Why do I see two notifications for each email?
• Why am I not receiving Email+ Notifications?
• How do I turn on/off notification details on the lock screen?
How will I receive Email+ notifications?
Email+ notifications are displayed on your device as:
• A new email notification in the Notification Center on your device.
• Badging of the Email+ app icon on the Home Screen.
FIGURE 6. EMAIL+ APP ICON BADGING
How do I change the notification settings?
To change the notifications settings for Email+, in iOS device Settings, tap Email+ > Notifications.
FIGURE 7. EMAIL+ NOTIFICATIONS OPTIONS IN DEVICE SETTINGS

MobileIron Email+ 3.14.0 for iOS Guide for Administrators| 80
Why do I see two notifications for each email?
If real-time notifications are enabled, the Email+ app displays two notifications for each new email. The first
notification is sent by Apple APNs and shows up immediately on the lock screen (depending on the Emai+
Notification settings in your device Settings). This notification has the text: “You have new messages”. The
second, more detailed, notification is sent by the Email+ app if the app is running in the background. The Email+
app fetches the email summary for the new unread email, removes the original device notification, and replaces it
with a new notification. The second notification shows either the unread email count or summary of the new emails,
depending on your Email+ settings. To turn off detailed notifications, see How do I turn on/off notification details on
the lock screen? on page81.
Occasionally, the Email+ app is not able to sync new email in the background due to poor network connectivity or
because the app is no longer running in the background. If this happens, you may continue to receive the first
notification, which shows that you have new messages, but the second notification with the summary/unread
email count will not display. To correct this, move to an area with better network connectivity and launch Email+.
Why am I not receiving Email+ Notifications?
There are a number of reasons why you may not be receiving notifications on your device:
• Notification options are disabled: Check the notifications options for Email+ in iOS device Settings to make
sure that the options to “Allow Notifications”, “Show in Notification Center”, “Badge App Icon”, and “Show on
Lock Screen” are enabled.
• Email+ app is force terminated: If you force killed Email+ by flicking it off the top of the screen, the app will stop
receiving the second notification. Please launch Email+ to start receiving notifications again.
• Background App Refresh is disabled: If you have disabled Background App Refresh for Email+, in your iOS
device Settings, you will see the first email notification showing that you have new messages but will not see
the second notification showing the new email details/unread email count. You can manage your background
app refresh settings in your iOS device Settings by going to General > Background App Refresh.
Real-time push notifications

MobileIron Email+ 3.14.0 for iOS Guide for Administrators| 81
• Cellular Data option is disabled: If the Cellular Data option is disabled and the device is not connected to WiFi,
the device will not receive new email notification for Email+. Enable the Cellular Data option in your iOS device
Settings for Cellular > Cellular Data and for Email+ > Cellular Data, to get notifications when the device is not
connected to WiFi.
• Device is in Low Power Mode: If your device goes into Low Power mode when the battery is running low,
Background App Refresh gets disabled and the second notification will stop working. Charge your device,
disable low power mode, and launch Email+ to get notifications to work again.
iOS 9 introduced a new feature called Low Power Mode where the user can control whether a device can go
into a battery conservation state to extend battery life. This is typically used when the device battery is running
low and it is not possible to immediately recharge the device. In this state, iOS turns off background app refresh
and also prevents apps from running in the background. When this happens, Email+ will show the first
notification (“You have new messages”), but will not be able to fetch updated unread email summaries in the
background. So the second notification will not be displayed. To recover from this, charge your device fully and
disable low power mode. You may also need to launch Email+ to get notifications to work again.
How do I turn on/off notification details on the lock screen?
You can control whether detailed notifications are displayed on the lock screen by using the Email+ notification
settings in the iOS device settings. In addition, you can control whether the summary of new unread emails is
displayed in the lock screen, by using the Show Mail Details option in the Notifications screen in the Settings
section of the Email+ app.
If the Show Mail Details option is enabled, an individual notification is displayed for each unread email. If the
option is disabled, a single notification that shows the aggregate count of unread emails is displayed.
FIGURE 8. NOTIFICATIONS OPTIONS IN THE EMAIL+ SETTINGS
Real-time push notifications

7
MobileIron Email+ 3.14.0 for iOS Guide for Administrators| 82
Rights Management System for iOS Overview
The Rights Management System (RMS) enables you to share encrypted mails to protect the content that is shared
over email when using Microsoft Mail Exchange server.
When enabled the sender can control the distribution of the content shared over the mail. A rights managed email
message is used to protect email content from inappropriate access, use, and distribution.
A rights policy template specifies whether a user can edit, forward, reply, reply all, print, extract (copy), export
(remove protection), or programmatically access the content in the rights-managed email message. List of RMS
permissions is displayed in Email+ Settings/Troubleshooting/Available Permissions and is selected in New
Mail Composer > lock button > Protect. Due to ActiveSync protocol limitations, maximum of 20 RMS
permissions are displayed in Email+.
Every protected mail has additional cell in mail viewer below subject cell, that contains information about license
that is template name and description.
The admin can apply the following options to secure mail exchange as indicated by the
RightsManagementLicense element included in the response. The RightsManagementLicense include:
• ContentExpiryDate - specifies the expiration date for the license (set to "9999-12-30T23:59:59.999Z" if the
rights management license has no expiration date set).
• ContentOwner - specifies the email address of the content owner.
• EditAllowed - specifies if the content of the original email can be modified by the user when the user forwards,
replies, or replies all to the email message.
• ExportAllowed - specifies if the IRM protection on the e-mail message can be removed by the user. The user
can remove the IRM protection of the original message’s content in the outgoing message when the user
forwards, replies, or replies all to the original e-mail message;
• ExtractAllowed - specifies if the user can copy content out of the e-mail message (the content of the e-mail
message can be cut, copied, or a screen capture can be taken of the content).
• ForwardAllowed - specifies if the user can forward the e-mail message.
• ModifyRecipientsAllowed – specifies if the user can modify the recipient list.
• Owner - value of true indicates that the authenticated user has owner rights on this message. This element is
used for information presentation purposes only.
• ProgrammaticAccessAllowed - specifies if the contents of the e mail message can be accessed
programmatically by third party applications.
• ReplyAllAllowed - specifies if the user can reply to all the recipients of the original e-mail message.
• ReplyAllowed - specifies if the user can reply to the e-mail message.
• TemplateDescription - This element is used for informational presentation purposes only.
• TemplateID - It contains a string that identifies the rights policy template.
• TemplateName - specifies the name of the rights policy template.
For more information on To create a new Azure information protection template, see Microsoft documentation

MobileIron Email+ 3.14.0 for iOS Guide for Administrators| 83
Setting permissions on an email
The permissions for email protection can be set on MobileIron Email+ iOS app.
Setting permissions on Email+ iOS app
Using the Email+ app to set email permissions.
Procedure
1. In the Email+ app, click on the compose mail icon.
2. Click on the Lock icon, select Protect option.
3. Select the permission you want to apply from the list of Available Permissions to the mail.
4. Click Ok.
Result: The selected permission is applied to the mail.
Searching mail in Email+ app
Device users can search for mails in the Email+ app in particular folder or complete mailbox. You can preview mail
from the search results list. Email+ iOS app supports token based search, you can select suggested token or any
other that is automatically generated based on user emails. Type in the name of a sender or other keyword in the
search field. The following default search tokens are suggested by the application:
• Unread Messages
• Flagged Messages
• Messages from VIP
• Messages with Attachments
• Messages with Calendar Invites
Multiple tokens can be applied to a search.
The following procedure describes how to initiate search for an email in a folder:
Procedure
1. In the Email+ app, select a mailbox.
2. Pull down the screen, search bar is displayed.
3. Type in the name of a sender or other keyword to in the search field.
4. By default, search is executed for “All Folders”. The search results view displays two tab and the search is
executed by default in the "All Folders" view. The user can switch to "Current Folder" if required.
Setting permissions on an email

MobileIron Email+ 3.14.0 for iOS Guide for Administrators| 84
Introduction to Email+ Notification Services
When a mail is received on an iOS mobile device, a notification appears if real-time notification is enabled. For each
mail there are two notifications received:
• Apple APNS notification: Shows up immediately on the lock screen (depending on the Email+ Notification
settings in your device Settings). This notification has the text: “You have new messages”.
• Email+ notification: The Email+app fetches the email summary for the new unread email, removes the
original device notification, and replaces it with a new notification. The second notification shows either the
unread email count or summary of the new emails, depending on your Email+ settings.
VoIP notifications for Email+ are not supported starting Email+ 3.13.0 and later, due to the changes in Apple Policy
with regards to notifications. This impacts the VIP notifications outside of work hours, other notifications such
as Work hours notifications and the Weekend notifications work as before.
MobileIron has developed Email+ Notification Services (ENS), as a recommended solution to fix this issue.
There are two different notification deliverable mechanism for real-time notification:
1. Cloud based service which only supports work hour notification, see About real-time push notifications for
Email+ for iOS section.
2. ENS based service which supports VIP email only notifications. The following sections describes about ENS
and how to configure it on your device.
About Email+ Notification Services
Email+ Notification Service leverages a standalone server that is based on existing MobileIron Sentry and hosted
inside the organizations firewall. This server is configurable on MobileIron UEM servers and leverages a service
account on Microsoft Exchange to retrieve email metadata information (such as Sender, Subject, and Body
Snippet) required to support VIP mails notifications outside of office hours and direct detail notifications.
The following diagram describes how the ENS solution works:
Introduction to Email+ Notification Services

MobileIron Email+ 3.14.0 for iOS Guide for Administrators| 85
FIGURE 9. EMAIL+ NOTIFICATION SERVICES ARCHITECTURE
1. Email+ App: The Email+ app registers callback URL with Microsoft Exchange server to send out work hours,
list of VIP contacts, key-value pairs settings, and VIP notifications outside work hours.
2. Microsoft Exchange: When a new mail is received in the folder that you are subscribed to, Microsoft
Exchange sends a notification to Email+ Notification Proxy (ENP) which consists of Message Id and Folder Id
for the new received mail.
3. Email+ Notification Proxy: ENP logs in to the exchange server using a service account and pulls the
following information about the mail:
a. Senders email address
b. Subject line
c. Snippet of the mail
ENP applies and verifies the rules. Once the verifications is complete, it creates a payload and sends it to real-
time push notification server on the cloud.
4. Real-time push notifications: The MobileIron CNS relays the information to Apple Push Notification service
(APNs).
5. Apple Push Notification service (APNs): Notifies the iOS device.
6. Notification workflow on Email+: This feature requires users to be subscribed to CNS for Real Time
Notifications. iOS displays a notification to the user indicating that there are new messages.
7. Mailbox active sync: A notification is triggered to Email+, to open the correct mailbox a sync up is performed
to co-relate the notification and the mail.
Enable Email+ settings on your device to receive notifications. In Email+ app, go to Settings > Notifications and
enable Work Hours Only option first to enable Weekend Alerts or VIP Allowed After Work Hours option. The
VIP related options are not be enabled if ENS is not configured, as there is no service account to check if the
sender is a VIP contact (ensure that the contacts are marked as VIP).
Introduction to Email+ Notification Services

MobileIron Email+ 3.14.0 for iOS Guide for Administrators| 86
When notification settings is changed, a note similar to the following is displayed:
Changes to alert times will come into effect after 'X' hours. The default interval is 1440 minutes.
NOTE: If you are using CNS only for real-time notifications. all the settings related to VIP are not visible on
the Email+ app and cannot process notifications outside work hours other than delivering
notifications over weekend.
The following section describes how to configure ENS.
Limitation: The ENS solution is not supported on Microsoft Exchange Office 365.
Before you begin
• Supported on MobileIron Core 10.7.0.0 or later, MobileIron Cloud R70 and later, and MobileIron Sentry 9.8.5.
• Ensure that you have configured a service account on Microsoft Exchange Server (Service account on
exchange impersonates other mailboxes when accessing exchange over various supported protocols. For the
purpose of Exchange Notification Proxy (ENP), Microsoft’s Exchange Web Services (EWS) protocol is used to
access mailbox messages.)
• Ensure that you have the JWT token of CNS production server. For more information, see About real-time push
notifications for Email+ for iOS section.
NOTE: The term JWT token is also referred as Authorization Token, Token, and notification_server_
authorization in MobileIron products.
• Standalone Sentry must be configured ActiveSync with a publicly trusted certificate.
• Ensure that the Exchange servers are configured with the service account. The servers must have identity
certificate to authenticate the service account
• If Exchange server version support is earlier than TLS v1.2, then the supported protocols should be configured
in Incoming protocols on MICS.
The following table describes the ENS port rules for firewall.
TABLE 11. ENS PORT NETWORK RULES
Requirement Destination Port Direction
Standalone Sentry CNS.mobileiron.com TCP443
Outbound Initialized,
Bi-direction Connection
Exchange Server Standalone Sentry TCP443 Outbound
Standalone Sentry Exchange Server TCP443 Inbound
Core Management IP Standalone Sentry TCP443, 9090 Bi-direction Connection
IT Admin PC IP Standalone Sentry TCP8443, 22 Inbound Initialized, Bi-direction Connection
Introduction to Email+ Notification Services

MobileIron Email+ 3.14.0 for iOS Guide for Administrators| 87
Standalone Sentry NTP Server NTP Outbound
Standalone Sentry DNS Server DNS Outbound
Standalone Sentry SMTP Server SMTP Outbound
Configuring service account
Service account on Microsoft Exchange impersonates other mailboxes when accessing exchange over various
supported protocols. Following are the main steps for configuring service account.
• Setting up service accounts on Exchange server
• Configuring a service account on Exchange server
Setting up service accounts on Exchange server
For the purpose of Exchange Notification Proxy (ENP), Microsoft’s Exchange Web Services (EWS) protocol is
used to access mailbox messages.
For example service account is assigned to the following role:
ApplicationImpersonation
The EWS sends requests with the credentials of a single service account which includes an .XML key.
<soap:Header>
<t:RequestServerVersion Version="Exchange2013" />
<!-- The following causes the request to run as alfred@contoso.com -->
<t:ExchangeImpersonation>
<t:ConnectingSID>
<t:SmtpAddress>alfred@contoso.com</t:SmtpAddress>
</t:ConnectingSID>
</t:ExchangeImpersonation>
</soap:Header>
This allows a single account to access the mailbox of other accounts.
Configuring a service account on Microsoft Exchange Server
To configure service account on EWS follow these steps:
1. In the Microsoft Exchange Management console, open a browser and type in URL. For example:
https://<hostname>/ecp
2. Log in as an Admin, go to Mail > Options > Manage My Organization > Roles & Auditing> Mailboxes and
create a new Role group.
3. Add the applicationImpersonation role to the group.
4. Add members to the group.
5. Click Save to finish.
Configuring service account

MobileIron Email+ 3.14.0 for iOS Guide for Administrators| 88
For more information on configuring service account on Microsoft Exchange server, see Microsoft documentation
Setting up Standalone Sentry as an Email+ Notification Service
You can set up a dedicated Standalone Sentry as an Email+ Notification Service. This capability allows you to
configure multiple Exchange servers to provide notifications for VIP accounts in Email+. This feature requires
MobileIron UEM servers, MobileIron Cloud Notification Service (CNS), Standalone Sentry, and Email+. Applicable
to iOS only, the Email+ Notification Service cannot be combined with ActiveSync or AppTunnel. Email+
Notification Service requires Sentry 9.8.5 and Email+ 3.13.0 through the latest versions as supported by
MobileIron. (Content Notification System is automatically upgraded by MobileIron). For more information, see:
“Standalone Sentry Email Notifications” section in the MobileIron Sentry Guide.
Configuring Email+ using KVPs on MobileIron Core for
Notification Services
After Standalone Sentry is set up, you must configure Email+ on MobileIron Core.
Procedure
1. In the MobileIron Core Admin Portal, go to Policy & Configs > Configurations.
2. Click Add New > AppConnect > App Configuration to create a new AppConnect configuration.
3. In the Name field, enter brief text that identifies this AppConnect app configuration. For example: Email+ for
iOS.
4. In the Description field, enter additional text that clarifies the purpose of this AppConnect app configuration.
5. In the Application field, enter the bundle ID for the app:
com.mobileiron.ios.emailplus
6. In the App-specific Configurations section enter the required key-value pairs.
For more information on how to configure the key-value pair on Cloud Notification Service, see Real-time
push notifications section.
7. Click Save.
8. Go to Policies & Configs > Policies, select an AppConnect policy and click Edit. Guidelines to edit
AppConnect Global Policy:
Fields Option
Name Default AppConnect Global Policy
AppConnect Select Enabled option.
Security Policies > Apps without an AppConnect container policy Check the Authorize option.
9. Click Save.
10. Go to Apps > App Catalog > Add + >In-house.
11. Click Browse to Upload Email+ Inhouse App.
Configuring service account

MobileIron Email+ 3.14.0 for iOS Guide for Administrators| 89
Registering your iOS device using MobileIron Core
You should register your iOS device with an LDAP user or local user:
1. In the MobileIron Core Admin Portal, go to Device & Users > Users.
2. Click on Add and select Add Local User or LDAP User.
3. Fill in the details in the Add New User window.
4. Click Save.
5. Register device with the Local or LDAP user.
Result: Email+ is pushed to Device as a part of MDM configuration.
Configuring Email+ using KVPs on MobileIron Cloud for
notification services
Set up a Standalone Sentry before configuring Email+ on MobileIron Cloud, see the Standalone Sentry Email+
Notification Services section in the MobileIron Sentry Guide for Cloud.
Procedure
1. In the MobileIron Cloud Admin Portal, go to Apps > App Catalog > Email+
2. Go to App Configuration > Email+ Configuration, click + to create a new Email+ configuration.
3. In the Configuration Setup section enter the following:
a. In the Name field, enter the name of the configuration.
b. In the Description field, enter additional text that clarifies the purpose of the configuration.
4. In the Email+ Settings section, enter the following:
a. Email Address
b. Exchange Host
c. Exchange Username
5. In the AppConnect Custom Configuration section enter the required key-value pairs, to configure ENS.
6. Choose a distribution option for the configuration and click Done. The configuration is distributed to the subset
of the devices to which the app is distributed.
NOTE: The sentry_server_host key-value pair should point to ENS Sentry hostname.
Registering your iOS device using MobileIron Cloud
To register your iOS device with Email+, see the Device Registration (iOS, macOS, and Android) section in the
MobileIron Cloud Administrator Guide.
Procedure
1. In the MobileIron Cloud Admin Portal, go Admin >User.
2. Click on +Add to add a user, select the user type.
3. Click Done. New user is added.
4. In the MobileIron Go Client, log in with the user details. After registering on MI Go Client. The device is listed
under the devices tab in MI Cloud.
Configuring service account
