
Owner’s Manual
The features and functions outlined in the Owner’s Manual reflect
Version 1.3 or later software. Occupancy sensing is only available with
Series B or Series C Infinity System Controls. Not all features or
functions are available on all version of the system controls. See the
Downloads section of www.MyInfinityTouch.Carrier.com for the latest
software release and literature.
US Patents: Carrier® U.S. Pat No. 7,243,004, Carrier® U.S. Pat No.
7,775,452, pointSET™ U.S. Pat No. 7,415,102
SYSTXCCITC01-C,
SYSTXCCWIC01-B,
SYSTXCCICF01-B,
SYSTXCCWIF01-B
Infinity® System Control
A210174
A170203A A180218C

2

3
Table of Contents
1. Introduction . . . . . . . . . . . . . . . . . . . . . . . . . . . . . . . . . . . . . . . . . . . . . . . . . . . . . 6
2. Home Screen . . . . . . . . . . . . . . . . . . . . . . . . . . . . . . . . . . . . . . . . . . . . . . . . . . . . 6
2.1. Information Displayed . . . . . . . . . . . . . . . . . . . . . . . . . . . . . . . . . . . . . . . 6
2.2. Occupancy Status . . . . . . . . . . . . . . . . . . . . . . . . . . . . . . . . . . . . . . . . . . . 7
2.3. Wi-Fi® Connectivity Status . . . . . . . . . . . . . . . . . . . . . . . . . . . . . . . . . . . 7
2.4. Information Buttons . . . . . . . . . . . . . . . . . . . . . . . . . . . . . . . . . . . . . . . . . 9
3. Main Screen. . . . . . . . . . . . . . . . . . . . . . . . . . . . . . . . . . . . . . . . . . . . . . . . . . . . 10
3.1. System Mode. . . . . . . . . . . . . . . . . . . . . . . . . . . . . . . . . . . . . . . . . . . . . . 10
3.2. Set Day and Time . . . . . . . . . . . . . . . . . . . . . . . . . . . . . . . . . . . . . . . . . . 11
3.3. Adjust Temperature (Temporary Hold) . . . . . . . . . . . . . . . . . . . . . . . . . 12
3.4. Adjusting Comfort Activities (See Comfort Profiles on page 19) . . . . . 12
3.5. Adjusting Heating . . . . . . . . . . . . . . . . . . . . . . . . . . . . . . . . . . . . . . . . . . 13
3.6. Adjusting Cooling . . . . . . . . . . . . . . . . . . . . . . . . . . . . . . . . . . . . . . . . . . 13
3.7. Adjust Temperature (Permanent Hold). . . . . . . . . . . . . . . . . . . . . . . . . . 14
3.8. Adjusting Comfort Activities (See Comfort Profiles on page 19) . . . . . 14
3.9. Adjusting Heating . . . . . . . . . . . . . . . . . . . . . . . . . . . . . . . . . . . . . . . . . . 14
3.10. Adjusting Cooling . . . . . . . . . . . . . . . . . . . . . . . . . . . . . . . . . . . . . . . . . . 15
3.11. Occupancy Override . . . . . . . . . . . . . . . . . . . . . . . . . . . . . . . . . . . . . . . . 16
4. Features . . . . . . . . . . . . . . . . . . . . . . . . . . . . . . . . . . . . . . . . . . . . . . . . . . . . . . . 18
4.1. Adjust Fan Speed . . . . . . . . . . . . . . . . . . . . . . . . . . . . . . . . . . . . . . . . . . 18
4.2. View Current Humidity Level . . . . . . . . . . . . . . . . . . . . . . . . . . . . . . . . 18
5. Menu Screen . . . . . . . . . . . . . . . . . . . . . . . . . . . . . . . . . . . . . . . . . . . . . . . . . . . 18
5.1. Comfort Profiles . . . . . . . . . . . . . . . . . . . . . . . . . . . . . . . . . . . . . . . . . . . 19
5.2. Home Comfort Profile Humidity Control. . . . . . . . . . . . . . . . . . . . . . . . 21
5.3. Home Comfort Profile Fresh Air Control . . . . . . . . . . . . . . . . . . . . . . . . 23
5.4. Away Comfort Profile Humidity Control . . . . . . . . . . . . . . . . . . . . . . . . 25
5.5. Away Comfort Profile Fresh Air Control . . . . . . . . . . . . . . . . . . . . . . . . 26
5.6. Vacation Comfort Profile Humidity Control . . . . . . . . . . . . . . . . . . . . . 27
5.7. Vacation Comfort Profile Fresh Air Control . . . . . . . . . . . . . . . . . . . . . 29
6. Schedules for Series B. . . . . . . . . . . . . . . . . . . . . . . . . . . . . . . . . . . . . . . . . . . . 29
6.1. View or Edit Schedule . . . . . . . . . . . . . . . . . . . . . . . . . . . . . . . . . . . . . . 30
6.2. Guided Scheduling . . . . . . . . . . . . . . . . . . . . . . . . . . . . . . . . . . . . . . . . . 31
6.3. Upload My Schedule for Series B. . . . . . . . . . . . . . . . . . . . . . . . . . . . . . 33

4
7. Vacation. . . . . . . . . . . . . . . . . . . . . . . . . . . . . . . . . . . . . . . . . . . . . . . . . . . . . . . 34
8. Reminders . . . . . . . . . . . . . . . . . . . . . . . . . . . . . . . . . . . . . . . . . . . . . . . . . . . . . 35
9. Operating Status . . . . . . . . . . . . . . . . . . . . . . . . . . . . . . . . . . . . . . . . . . . . . . . . 36
9.1. Equipment Operating Status . . . . . . . . . . . . . . . . . . . . . . . . . . . . . . . . . . 36
9.2. Accessories Status. . . . . . . . . . . . . . . . . . . . . . . . . . . . . . . . . . . . . . . . . . 37
9.3. Temperature Control Status . . . . . . . . . . . . . . . . . . . . . . . . . . . . . . . . . . 38
10.Display. . . . . . . . . . . . . . . . . . . . . . . . . . . . . . . . . . . . . . . . . . . . . . . . . . . . . . . . 39
10.1. Temperature Units. . . . . . . . . . . . . . . . . . . . . . . . . . . . . . . . . . . . . . . . . . 39
10.2. Set Backlight Levels . . . . . . . . . . . . . . . . . . . . . . . . . . . . . . . . . . . . . . . . 40
10.3. Sound Settings. . . . . . . . . . . . . . . . . . . . . . . . . . . . . . . . . . . . . . . . . . . . . 41
10.4. Screen Saver Settings . . . . . . . . . . . . . . . . . . . . . . . . . . . . . . . . . . . . . . . 41
10.5. Activate Screen Lock . . . . . . . . . . . . . . . . . . . . . . . . . . . . . . . . . . . . . . . 42
11.Energy Tracking . . . . . . . . . . . . . . . . . . . . . . . . . . . . . . . . . . . . . . . . . . . . . . . . 43
12.Time / Date . . . . . . . . . . . . . . . . . . . . . . . . . . . . . . . . . . . . . . . . . . . . . . . . . . . . 44
12.1. Set Time and Date. . . . . . . . . . . . . . . . . . . . . . . . . . . . . . . . . . . . . . . . . . 45
12.2. Manually Adjust Time and Date. . . . . . . . . . . . . . . . . . . . . . . . . . . . . . . 45
12.3. Setup Daylight Savings Time . . . . . . . . . . . . . . . . . . . . . . . . . . . . . . . . . 46
12.4. Setup Time Zone. . . . . . . . . . . . . . . . . . . . . . . . . . . . . . . . . . . . . . . . . . . 46
12.5. Enable Time Synchronization. . . . . . . . . . . . . . . . . . . . . . . . . . . . . . . . . 47
13.Service . . . . . . . . . . . . . . . . . . . . . . . . . . . . . . . . . . . . . . . . . . . . . . . . . . . . . . . . 48
13.1. Service Information. . . . . . . . . . . . . . . . . . . . . . . . . . . . . . . . . . . . . . . . . 48
13.2. Service Reminder Update . . . . . . . . . . . . . . . . . . . . . . . . . . . . . . . . . . . . 49
13.3. Software Update for Series B . . . . . . . . . . . . . . . . . . . . . . . . . . . . . . . . . 50
13.4. Updating Software Using Micro SD card for Series B . . . . . . . . . . . . . . 50
13.5. Updating Software Using Wi-Fi® . . . . . . . . . . . . . . . . . . . . . . . . . . . . . 52
13.6. Model / Serial Numbers . . . . . . . . . . . . . . . . . . . . . . . . . . . . . . . . . . . . . 54
14.Photo Upload for Series B. . . . . . . . . . . . . . . . . . . . . . . . . . . . . . . . . . . . . . . . . 55
15.Heat Source (If Applicable). . . . . . . . . . . . . . . . . . . . . . . . . . . . . . . . . . . . . . . . 56
16.Zone Names (If Applicable) . . . . . . . . . . . . . . . . . . . . . . . . . . . . . . . . . . . . . . . 56
16.1. Home Automation System Interface (If Applicable) . . . . . . . . . . . . . . . 57

5
17.Wireless . . . . . . . . . . . . . . . . . . . . . . . . . . . . . . . . . . . . . . . . . . . . . . . . . . . . . . . 58
18.Weather . . . . . . . . . . . . . . . . . . . . . . . . . . . . . . . . . . . . . . . . . . . . . . . . . . . . . . . 62
19.Sensors. . . . . . . . . . . . . . . . . . . . . . . . . . . . . . . . . . . . . . . . . . . . . . . . . . . . . . . . 64
19.1. Menu . . . . . . . . . . . . . . . . . . . . . . . . . . . . . . . . . . . . . . . . . . . . . . . . . . . . 64
19.2. Occupancy Setup. . . . . . . . . . . . . . . . . . . . . . . . . . . . . . . . . . . . . . . . . . . 65
20.Utility Demand Event Response Setup . . . . . . . . . . . . . . . . . . . . . . . . . . . . . . . 67
20.1. Utility Event . . . . . . . . . . . . . . . . . . . . . . . . . . . . . . . . . . . . . . . . . . . . . . 67
20.2. When a utility event is in progress… . . . . . . . . . . . . . . . . . . . . . . . . . . . 67
20.3. Price Response . . . . . . . . . . . . . . . . . . . . . . . . . . . . . . . . . . . . . . . . . . . . 68
20.4. Price Settings. . . . . . . . . . . . . . . . . . . . . . . . . . . . . . . . . . . . . . . . . . . . . . 69
20.5. Demand Response. . . . . . . . . . . . . . . . . . . . . . . . . . . . . . . . . . . . . . . . . . 69
20.6. Demand Settings . . . . . . . . . . . . . . . . . . . . . . . . . . . . . . . . . . . . . . . . . . . 70
20.7. Response Limits . . . . . . . . . . . . . . . . . . . . . . . . . . . . . . . . . . . . . . . . . . . 71
20.8. Restore UE Factory Default Settings . . . . . . . . . . . . . . . . . . . . . . . . . . . 72
21.Statement Information. . . . . . . . . . . . . . . . . . . . . . . . . . . . . . . . . . . . . . . . . . . . 73
21.1. FCC Interference Statement . . . . . . . . . . . . . . . . . . . . . . . . . . . . . . . . . . 73

6
1. Introduction
CONGRATULATIONS! Your decision to choose the Infinity System
puts you in a select group of homeowners who understand the value of
precise comfort control and appreciate the simplicity of an easy-to-use,
intuitive, Control.
Your new Infinity System offers high quality comfort technology. Please
take a few moments to carefully read through this manual. Next set up a
comfort profile and schedule that makes sense for your lifestyle; then
relax and enjoy the new comfort of your home!
2. Home Screen
2.1. Information Displayed
NOTE: When you connect your system to the Internet and register on the
My Infinity website, you can access nearly all of the consumer features
on the Carrier® Home mobile app. See the WIRELESS section for more
information.
The information displayed on the Home Screen will appear when there
has been no interaction with the Infinity System Control for at least two
minutes. The basic information displayed on the Home Screen consists of
the current date and time, the room temperature (zone temperature if
applicable), the outdoor temperature (if available, contact your installing
dealer for details), occupancy sensing status and current weather
condition. (Wi-Fi® models only, when properly configured).
Connectivity status to the home Wi-Fi network and the MyInfinity Server
will also be displayed on the Home Screen. Note: You must have Wi-Fi
enabled for the indicator to appear.
If you have uploaded a photo to the Control (see page 55), it will be
displayed until you touch the display. You will then be taken to the Home
Screen.

7
2.2. Occupancy Status
When the occupancy sensing feature is enabled, a dot (occupancy
sensing indicator) next to the zone name is shown to indicate if the room
is sensed to be occupied. When no movement is detected, Occupancy
Status indicator stays GRAY. When movement is detected, but the system
hasn’t yet determined that the space is occupied (example, someone is
just walking through the room), Occupancy Status indicator turns BLUE.
When the system determines that the space is occupied, Occupancy
Status indicator turns GREEN.
2.3. Wi-Fi® Connectivity Status
A13258C
Connectivity status to the home Wi-Fi network and MyInfinity Server is
displayed in the top right hand corner of the Home Screen.
Infinity System Control is connected to the home Wi-Fi network and the
MyInfinity Server, the signal strength bars will be displayed in white as
depicted in the image below. Connection strength to the home Wi-Fi
network will be indicated by the number of solid white bars displayed. A

8
red “X” over the bars indicates no connection to the home Wi-Fi
network.
A170246
• Pressing on the Connectivity Status bars from the Home Screen will
allow you to view the Remote Access Status screen.
A13260C
NOTE: If the Infinity System Control is not connected to the home
network, a red “X” will appear over the strength bars. If the Infinity
System Control is connected to the home Wi-Fi network but loses
connection to the MyInfinity Server, a triangle will appear over the
strength bars as depicted in the image below. Connection strength to the
home Wi-Fi network will continue to be displayed by the number of solid
bars. If this problem persists, please contact 1-800-Carrier for assistance.
Strong Connection
Limited Connection Poor Connection
No Connection

9
A170247
• Pressing on the Connectivity Status bars from the Home Screen will
allow you to view the Remote Access Status screen.
A13262C
2.4. Information Buttons
On the bottom of some screens will be an information icon. By pressing
the information icon, a text box will display to show what interactions are
available on that particular screen. To close the text box, touch the text
box.

10
A14237C
3. Main Screen
The Main Screen is where most interactions will take place. Touch
anywhere on the Home Screen to arrive at the Main Screen. The most
convenient way to interact with your control is using the Carrier® Home
mobile app. See the WIRELESS section for more details on connecting
your product to the Internet.
3.1. System Mode
Once in the Main Screen,
• To access your system mode touch the MODE label located in the
upper right of the Control.
• The drop-down menu will allow you to choose between AUTO,
HEAT, COOL, FAN ONLY and OFF, depending on the equipment
installed in your system.

11
• If OFF is selected your system will not control temperatures,
humidity, or fan.
• If AUTO is selected, the Infinity System Control automatically
switches between heating and cooling to maintain your comfort during
transitional seasons.
NOTE: AUTO mode is intended to switch between heating and cooling
modes based on temperature demand. A gradual auto transition is the
energy-conscious default that will satisfy the majority of customers. For
Infinity Zoning systems, some customers might have significant and
simultaneous heating and cooling demands in different zones. To address
this need, a special simultaneous heating and cooling demand auto mode
could be enabled by the Installer. When the feature is enabled and
AUTO mode is selected, the simultaneous heating and cooling demand
auto mode will alternate between heating and cooling, depending on
demand, every half hour. This may result in higher energy usage but
provide the benefit of greater comfort. Your installing contractor is able
to enable this feature, if desired. (This feature is only available with
zoned systems).
• If HEAT is selected then the Infinity System Control operates only the
heating system.
• If COOL is selected then the Infinity System Control operates only
the cooling system.
• If FAN ONLY is selected, then the Infinity System Control operates
the indoor fan but heating, cooling, humidification or
dehumidification will not take place.
3.2. Set Day and Time
• To set the day and time for your home screen enter the Main Screen by
touching anywhere on the Control.

12
• Touch the DAY and TIME label located at the top middle of the
screen or access by going through the menu screen (see page 44).
• To set the HOUR, MINUTE, MONTH, DAY, or YEAR touch the
feature you wish to change.
• Use the Up (Y) and Down (B) buttons to make the appropriate
changes.
• When you have completed all of the settings, touch SAVE.
• If you make a mistake you may touch CANCEL and begin again.
3.3. Adjust Temperature (Temporary Hold)
The Infinity System Control allows you to temporarily override your
programmed schedule by adjusting the indoor temperature at any time to
meet your needs.
NOTE: The Infinity System may seem slow to react to set point, activity
and system mode changes. This is normal, as the system will ramp up
capacity and fan speeds slowly to achieve the proper level of home
conditioning, while avoiding wasting energy, stressing home circuits and
dimming lights with a ”hard start.”
3.4. Adjusting Comfort Activities (See Comfort
Profiles on page 19)
• To adjust the comfort activity, enter the Main Screen by touching
anywhere on the Control.
• Touch the activity/top button under the Touch ’N’ Go® feature on the
left side of the screen; then select the desired activity of HOME,
AWAY, SLEEP, or WAKE.
• Use the Up (Y) and Down (B) buttons to change the time to
temporarily hold the desired temperature in 15 minute increments.
• When the correct time interval is displayed, touch DONE.

13
• To return to the scheduled program, touch HOLD UNTIL, and then
select PER SCHEDULE.
3.5. Adjusting Heating
NOTE: If OFF is selected, the Heat, Cool, Auto and Fan Only will not
be available. When changing from the OFF mode to Heat, Cool, Auto, or
Fan Only, it is normal for the system to run the blower for a minute or
two. During this time, the system is using the True Sense™ feature to
determine the filter usage. This feature is part of the system design and
cannot be turned off.
• To adjust the heating temperature, enter the Main Screen by touching
anywhere on the Control.
• With the system in either AUTO or HEAT mode, use the Up (Y) and
Down (B) buttons to set the desired temperature.
• On the left hand side of the screen, the comfort profile will switch to
manual, and the system will be placed in a temporary hold.
• Use the Up (Y) and Down (B) buttons to change the time to
temporarily hold the desired temperature in 15 minute increments.
• When the correct time interval is displayed, touch DONE.
• To return to the scheduled program, touch HOLD UNTIL, and then
select PER SCHEDULE.
3.6. Adjusting Cooling
• To adjust the cooling temperature, enter the Main Screen by touching
anywhere on the Control.
• With the system in either AUTO or COOL mode, use the Up (Y) and
Down (B) buttons to set the desired temperature.
• On the left hand side of the screen, the comfort profile will switch to
manual, and the system will be placed in a temporary hold.

14
• Use the Up (Y) and Down (B) buttons to change the time to
temporarily hold the desired temperature in 15 minute increments.
• When the correct time interval is displayed, touch DONE.
• To return to the scheduled program, touch HOLD UNTIL, and then
select PER SCHEDULE.
3.7. Adjust Temperature (Permanent Hold)
The Infinity System Control allows you to permanently override your
programmed schedule by adjusting the indoor temperature at any time to
meet your needs.
3.8. Adjusting Comfort Activities (See Comfort
Profiles on page 19)
• To adjust the comfort activity, enter the Main Screen by touching
anywhere on the Control.
• Touch the activity under the Touch ’N’ Go® feature on the left side of
the screen; then select the desired activity of HOME, AWAY, SLEEP,
or WAKE.
• Touch the HOLD UNTIL button, then touch HOLD.
• To return to the scheduled program touch HOLD, and then touch PER
SCHEDULE.
3.9. Adjusting Heating
• To adjust the heating temperature, enter the Main Screen by touching
anywhere on the Control.
• With the system in either AUTO or HEAT mode, use the Up (Y) and
Down (B) buttons to set the desired temperature.
• On the left hand side of the screen, the comfort profile will switch to
MANUAL.
• Touch the HOLD UNTIL button, then touch HOLD.

15
• To return to the scheduled program, touch HOLD, and then touch
PER SCHEDULE.
3.10. Adjusting Cooling
• To adjust the cooling temperature, enter the Main Screen by touching
anywhere on the Control.
• With the system in either AUTO or COOL mode, use the Up (Y) and
Down (B) buttons to set the desired temperature.
• On the left hand side of the screen, the comfort profile will switch to
MANUAL.
• Touch the HOLD UNTIL button, then touch HOLD.
• To return to the scheduled program, touch HOLD, and then touch
PER SCHEDULE.
NOTE: For Multi-Zone Applications (Temporary and Permanent Hold
options)
• For added convenience in a multi-zone application, the Touch ’N’
Go® feature will also allow you select the desired activity of HOME
or AWAY for ALL ZONES.
A14238

16
• Once you have selected the desired activity for ALL ZONES, you
will have the option to either permanently (HOLD) or temporarily
(HOLD UNTIL) override your programmed schedule.
A14239
– Selecting the HOLD option will permanently override your
programmed schedule until you CANCEL ALL ZONES.
– Selecting the HOLD UNTIL option will allow you to temporarily
override your programmed schedule.
– Once selected, use the Up (Y) and Down (B) buttons to change the
time in 15 minute increments.
– When the correct time interval is displayed, touch DONE.
3.11. Occupancy Override
The integrated motion sensor allows the system to make automatic set
point and activity changes, based on occupancy, to provide the optimum
home comfort and energy savings.

17
A170203
The Occupancy Sensing feature can be enabled or disabled under the
“sensors” icon on the main screen. See Occupancy Setup section on
page 65.
When the Occupancy Sensing feature is enabled, the current scheduled
activity is HOME or WAKE, and timing is “per schedule,” the activity
and set point(s) change to AWAY automatically when the space is
determined to be Unoccupied.
When Occupancy Sensing feature is enabled, the current scheduled
activity is AWAY, and timing is “per schedule, “ the activity and set
point(s) change to HOME automatically when the space is determined to
be Occupied.
“All zones HOME“ or “All zones AWAY” activity, and any HOLD or
HOLD UNTIL setting will override Occupancy sensing activity changes.

18
4. Features
4.1. Adjust Fan Speed
The Features function of Infinity System Control allows you to adjust the
fan speed during continuous fan operation.
• To adjust the fan speed, enter the Main Screen by touching anywhere
on the Control.
• Touch FEATURES on the top left of the screen.
• A drop down menu will appear. Touch FAN selection.
• Use the Up (Y) and Down (B) buttons to set the fan to AUTO,
LOW, MEDIUM or HIGH, then touch SAVE. This will permanently
change the fan setting in the active Comfort Profile. If the current
activity is Manual, it will only change the current fan speed.
• For zoned systems, the selected fan speed and Comfort Profile
changes will apply to the zone currently displayed in the Home and
Main screens. To adjust the fan speed in another zone, touch the zone
name on the Main screen, and select the desired zone.
4.2. View Current Humidity Level
The Features function of Infinity System Control allows you to view the
current humidity level within the conditioned space.
• Enter the Main Screen by touching anywhere on the Control.
• Touch FEATURES on the top left of the screen.
• In the drop down menu you will see your measured humidity levels
within the conditioned space.
5. Menu Screen
Your menu screen offers more features and control for your Infinity
System Control. Touch the MENU button at the bottom right of the Main
Screen. The most convenient way to program your control is using the

19
Carrier® Home mobile app. See the WIRELESS section for more
details on connecting your product to the Internet.
5.1. Comfort Profiles
You will need to set the comfort profiles before you attempt to program
your new Infinity System Control.
• The COMFORT PROFILES button includes settings for
Temperature and Fan Profiles, Humidity and Fresh Air Profiles, as
well as Window Protection Setup.
A14240
• Set your desired heating and cooling temperatures and your fan setting
using the TEMPERATURE AND FAN PROFILES for each
activity. In zoned systems, the activity settings will apply to the
selected zone only.

20
A14241
– For example to change your HOME comfort profile, touch the
HOME icon.
– Use the Up (Y) and Down (B) buttons to change the fan settings,
heating and cooling temperatures. When you are done, press the
DONE button on the bottom right.
– Do the same thing to change the WAKE and SLEEP profiles.
– The AWAY profile provides an extra feature called Advanced
Smart Setback. It allows the Infinity System to dynamically
determine the away temperature automatically to save the most
amount of money, yet reach your comfort settings when you return
home. Advanced Smart Setback may Control the temperature
somewhere in between the Away temperature limits. This is
normal and is intended to prevent excessive energy use.
– Use the Up (Y) and Down (B) buttons to change the fan settings
and temperature settings. The temperature settings are the range in
which you choose to keep your home conditioned while you are
away. The Advanced Smart Setback function will maintain your
temperature within this range.

21
• Set your desired humidity and fresh air (if applicable) using the
HUMIDITY AND FRESH AIR PROFILES for each activity.
A14242
5.2. Home Comfort Profile Humidity Control
• Touch WHEN AT HOME to set your humidity settings while the
home is occupied to enjoy superior comfort.
A14243

22
• If you have a humidifier installed for your system, touch HEATING
HUMIDITY to set the desired humidity level within the home.
– You will have the option to turn ON or OFF your humidifier from
this screen.
A14244
– Once your Humidifier is turned ON, use the Up (Y) and Down (B)
buttons to set the desired humidity level between 5-45%.
– Press SAVE when finished, or CANCEL to discard any changes.
• Next, select your desired humidity level during cooling by touching
COOLING HUMIDITY.

23
A14245
– Use the Up (Y) and Down (B) buttons to set the desired
dehumidification level between 46-58%.
– Touch YES or NO for the system to over-cool the conditioned
space by up to 3ºF to remove as much humidity out of the air as
possible. The system will not over-cool past 70°F.
– Press SAVE when finished, or CANCEL to discard any changes.
5.3. Home Comfort Profile Fresh Air Control
• If a ventilator is installed in your home, select the amount of fresh air
to circulate during heating mode by touching Heating Fresh Air.
NOTE: This option may not be available with the ERVXXNVA
ventilator due to its simplified control design.

24
A14246
• You will have the option of choosing among AUTO, MANUAL, or
OFF.
NOTE: This option may not be available with the ERVXXNVA
ventilator due to its simplified Control design.
– The AUTO setting will allow the user to choose the maximum
fresh air that the ventilator will provide. Selections are Low,
Medium or High. In Auto, the ventilator will run continuously,
unless the outdoor temperature is near or below 0°F or is near or
above 100°F. Beyond those temperatures, it will turn off.
– The MANUAL setting allows you to select the percentage of fresh
air to supply your home. In the MANUAL mode, there are several
selections available: Off, Low 25%, Low 50%, Low 75%, Low
100%, Medium, and High. The percent values are percent of an
hour.
– Use the Up (Y) and Down (B) buttons to set the desired
ventilation level.
– Press SAVE when finished, or CANCEL to discard any changes.

25
• If applicable, next select the amount of fresh air to circulate during
cooling mode by touching COOLING FRESH AIR. Again, you will
have the option of choosing among AUTO, MANUAL and OFF.
– Use the Up (Y) and Down (B) buttons to set the desired ventilator
speed level.
– Press SAVE when finished, or CANCEL to discard any changes.
5.4. Away Comfort Profile Humidity Control
You may wish to have different humidity settings when you’re away.
Press the Menu area on the Main Screen to access the additional menu
selections. Select Comfort Profiles, then select Humidity and Fresh
Air Profiles option.
A14247
• Touch AWAY to set your humidity settings while you are away from
home to save the most amount of energy.
• If you have a humidifier installed for your system, touch HEATING
HUMIDITY to set the desired humidity level when you are away
from home.

26
– Use the Up (Y) and Down (B) buttons to set the minimum
humidity level between 5%-45%.
– Press SAVE when finished, or CANCEL to discard any changes.
• To set the desired humidity level during cooling, touch COOLING
HUMIDITY.
– Use the Up (Y) and Down (B) buttons to set the maximum
dehumidification level at NONE or between 55-65%.
– Touch YES or NO for the system to over-cool the conditioned
space by up to 3°F to remove as much humidity out of the air as
possible.
– Press SAVE when finished, or CANCEL to discard any changes.
5.5. Away Comfort Profile Fresh Air Control
You may wish to have different Fresh Air profiles for when you’re away.
Press the menu area on the Main Screen to access the additional menu
selections. Select Comfort Profiles, then select Humidity and Fresh
Air Profiles option.
• Touch AWAY to set your fresh air settings while you are away from
home.
• If a ventilator is installed in your home, select the amount of fresh air
to circulate during heating mode by touching HEATING FRESH
AIR.
NOTE: This option may not be available with the ERVXXNVA
ventilator due to its simplified Control design.
– You will have the option of choosing between AUTO, MANUAL,
or OFF.
– The AUTO setting will allow the system to choose the fresh air
setting in a range of Low, Medium or High, as selected by you.
– The MANUAL setting allows you to select the percentage of fresh
air to supply to your home. In the MANUAL mode, there are

27
several selections available: Off, Low 25%, Low 50%, Low 75%,
Low 100%, Medium, and High. The percent values are percent of
an hour.
– Use the Up (Y) and Down (B) buttons to set the desired
ventilation level.
– Press SAVE when finished, or CANCEL to discard any changes.
• If applicable, select the amount of fresh air to circulate during cooling
mode by touching COOLING FRESH AIR. Again, you will have the
option of choosing among AUTO, MANUAL and OFF.
– Use the Up (Y) and Down (B) buttons to set the desired
ventilation speed level.
– Press SAVE when finished, or CANCEL to discard any changes.
5.6. Vacation Comfort Profile Humidity Control
You may wish to have different humidity settings when you’re on
Vacation. Press the Menu area on the Main Screen to access the
additional menu selections. Select Comfort Profiles, then select
Humidity and Fresh Air Profiles option.
• Touch VACATION to set your humidity settings while you are on
vacation to save the most amount of energy.

28
A14248
• If you have a humidifier installed for your system, touch HEATING
HUMIDITY to set the desired humidity level when you are away
from home.
– Use the Up (Y) and Down (B) buttons to set the minimum
humidity level between 5%-45%.
– Press SAVE when finished, or CANCEL to discard any changes.
• To set the desired humidity level during cooling, touch COOLING
HUMIDITY.
– Use the Up (Y) and Down (B) buttons to set the maximum
dehumidification level at NONE or between 55-65%.
– Touch YES or NO for the system to over-cool the conditioned
space by up to 3°F to remove as much humidity out of the air as
possible.
– Press SAVE when finished, or CANCEL to discard any changes.

29
5.7. Vacation Comfort Profile Fresh Air Control
• If a ventilator is installed in your home, select the amount of fresh air
to circulate during heating mode by touching HEATING FRESH
AIR.
• You will have the option of choosing between AUTO, MANUAL, or
OFF.
NOTE: This option may not be available with the ERVXXNVA
ventilator due to its simplified Control design.
– The AUTO setting will allow the user to choose the maximum
fresh air that the ventilator will provide. Selections are Low,
Medium or High.
– The MANUAL setting allows you to select the percentage of fresh
air to supply to your home.
– Use the Up (Y) and Down (B) buttons to set the desired
ventilation level.
– Press SAVE when finished, or CANCEL to discard any changes.
• If applicable, select the amount of fresh air to circulate during cooling
mode by touching COOLING FRESH AIR. Again, you will have the
option of choosing among AUTO, MANUAL and OFF.
– Use the Up (Y) and Down (B) buttons to set the desired
ventilation level.
– Press SAVE when finished, or CANCEL to discard any changes.
6. Schedules for Series B
Program your Infinity System Control by selecting the SCHEDULES
icon. You may select to use the guided scheduling feature, view or edit
your schedule or upload your schedule from a micro SD memory card.
The most convenient way to program your control is using the Carrier®
Home mobile app. See the WIRELESS section for more details on
connecting your product to the Internet.

30
A14249
6.1. View or Edit Schedule
• To set a specific day use the Left (A) and Right (") buttons beside
the day names.
– If you wish to copy this schedule to other days, touch COPY above
the day.
– Select the days you wish to have the same schedule, then touch
COPY.
• To select the time the activity starts, touch the TIME icons. Use the
Up (Y) and Down (B) buttons to set the desired start time.
• If you want to delete a time period, touch the TIME icon, then touch
DELETE.
• To change the desired activity touch the ACTIVITY icon then select
the desired activity (WAKE, HOME, AWAY or SLEEP
buttons).When finished touch SAVE.
• For Zoned Systems
– To set a specific room, use the Left (A) and Right (") buttons
beside the zone name.
– If you wish to copy this schedule to a different zone, touch COPY
above the zone name.
– Select the zones you wish to have the same schedule, then press
COPY.

31
6.2. Guided Scheduling
The Guided Scheduling feature will prompt you with simple questions to
help set a schedule that meets your desired comfort level and lifestyle.
If you are satisfied with your comfort settings, proceed to the next screen.
If you are not, go through the process outlined under Comfort Profiles
(page 19).
1. If you have a zoning system, the next question will prompt you to
pick the zone you wish to schedule.
– Select the desired zone to program, then touch NEXT.
– If you do not have a zoned system, the Control will skip this
question.
2. The next question will prompt you to select the days you wish to
schedule.
– You may select individual days, all days or weekdays by touching
their respective buttons.
– After you have selected the desired days, touch NEXT to continue.
3. The next question will ask what time you wake up on the scheduled
days.
– Use the Up (Y) and Down (B) buttons to set the time you wake
up.
– After you have selected the correct time, touch NEXT to continue.
4. The next question will ask if someone is home all day.
– Simply touch YES or NO to answer this question.
– If you select NO, the next question will ask what time you leave the
home.
• Use the Up (Y) and Down (B) buttons to set the time you leave.
• After you have selected the correct time, touch NEXT to
continue.
– You will then be asked what time you will return to your home.

32
• Use the Up (Y) and Down (B) buttons to set the time you return
home.
• After you have selected the correct time, touch NEXT to
continue.
5. If you select YES or have completed the previous steps, the next
question will ask if you want different sleep settings.
– If you select YES, the next question will ask what time you go to
sleep.
• Use the Up (Y) and Down (B) buttons to set the time you go to
sleep.
• After you have selected the correct time, touch NEXT to
continue.
6. If you select NO or have completed the previous steps, you will be
shown a screen that the scheduling process is complete for the
selected days and zones (if applicable).
– If you have completed the schedule, touch SAVE continue.
– If you touch CANCEL, it will prompt you back to Fig. 5.
7. If you touched SAVE in Fig. 6, you will be asked if you want to
schedule more days.
– Simply touch YES or NO to answer this question.
– If you select YES, you will return to Fig. 2 and follow the process.
8. If you select NO, the screen Control will show you the newly
created schedule.
– If you have a zoning system, you will be asked if you want to
schedule another zone.
• If you select YES, you will return to Fig. 2 and follow the
process.
• If you select NO, you will see the newly created schedule.

33
6.3. Upload My Schedule for Series B
As noted earlier, programming the control with the Carrier® Home
mobile app is the most convenient way. You can program a system that is
not connected to the Internet using a PC or MAC computer using the
process shown, below.
The Upload My Schedule feature with the desktop app will allow you to
upload your schedules from a PC or MAC computer, load those
schedules onto a micro SD card memory device, and upload the
schedules into the Infinity System Control.
NOTE: Use a 4GB to 32GB micro SD memory card. The card should be
formatted for FAT32 (rather than FAT64 or exFAT) in order to be read by
the control.
• To download the MyInfinity application for your computer, go to
www.MyInfinityTouch.com.
– Click on the Downloads tab.
– Download the MyInfinity Desktop application.
– The MyInfinity Desktop application provides you the ability to
create your schedule for the Infinity System Control.
• Once the schedules are complete, insert a micro SD card memory
device into your computer. Add a new folder to the micro SD card
device labeled User. Make sure that this folder is at the top of the
folder chain in the micro SD card; this is also called the “root
directory.”
– Select the Save Schedule to the micro SD card option on the
computer Desktop application Schedules menu. Read the directions
and then select Export.
– Save the schedule file in the User folder on the micro SD card.
– Once that is complete, safely remove the micro SD card from the
computer.

34
• Install the micro SD card into the micro SD card slot on the bottom of
the Infinity System Control.
• On the Infinity System Control, select Schedules from the Menu
screen, then select the Upload Schedule option.
• If the folder and file have been placed correctly on the micro SD card,
you will be asked if you wish to upload the schedule.
– Select Yes.
– When successful, press Next.
7. Vacation
Forgot to enter your vacation schedule until you got to the airport? No
Problem! The most convenient way to program your control is using the
My Infinity mobile app. See the WIRELESS section for more details on
connecting your product to the Internet.
Touch the VACATION icon in order to set a prolonged vacation
schedule.
A12174
• Touch PLAN VACATION to begin your vacation schedule.
• The system automatically selects to start vacation at the current time.

35
• Use the Up (Y) and Down B) buttons to set the time and date of
when your vacation begins; then touch NEXT. The Control won’t
allow you to select a vacation start date/time earlier than the current
date/time.
• Use the Up (Y) and Down (B) buttons set the fan speed and the
temperature range you wish to keep your house; then touch NEXT.
• Use the Up (Y) and Down (B) buttons to set the time and date of
when plan to return from your vacation; then touch NEXT. The
system won’t allow you to select a vacation end time that would result
in a vacation duration of less than one day.
• Review your vacation schedule to make sure it is accurate. If it is
correct, touch SAVE to complete your vacation schedule.
A12110
8. Reminders
NOTE: When you connect your system to the Internet and register on the
My Infinity website, you can receive alerts and reminders via email. See
the WIRELESS section for more information.

36
With the Infinity System Control, there are accessory messages to remind
you when it is time for maintenance. Select the REMINDERS icon from
the menu screen.
A12123
• You have the option of choosing a pop-up reminder for your air filter,
humidifier, UV lights, or ventilator pre-filter.
NOTE: This option my not be available with the ERVXXNVA ventilator
due to its simplified Control design.
• To enable a reminder, touch YES.
• After you have selected your desired reminders, touch SAVE.
9. Operating Status
The OPERATING STATUS menu gives a quick look at the status of
your Infinity Heating and Cooling System.
A12173
9.1. Equipment Operating Status
Within the operating status, you can view which function your system is
performing, and at which stage the heating or cooling equipment is
37
operating. A message stating, “System Check in Progress” means that the
system is performing its normal 1 p.m. Filter check. This also happens
any time the system mode is changed from Off to Auto, Heat, Cool, or
Fan Only. When you are finished looking at the operating status, press
the DONE button to return to the previous menu.
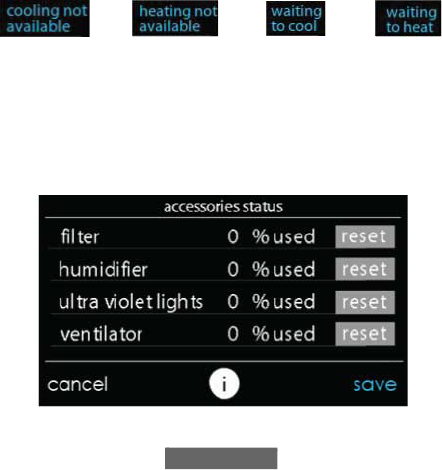
When simultaneous heat/cool demand is enabled, this screen will display
an information message at this location. This includes the following
messages:
A160190
9.2. Accessories Status
Within the accessory status, you can view how much of each accessory
has been consumed, and reset the counter for each accessory.
• To reset the counter for your installed accessory, touch the RESET
button, then press SAVE.
• To return to the previous menu, press CANCEL.
A12108

38
9.3. Temperature Control Status
The Temperature Control Status allows you to take a quick look at the
actual temperatures, and temperature set points for each zone in your
system.
• When you are done looking at your zone status, press DONE.
The system will indicate which mode is running by showing flashing
arrows towards either the heating or cooling set point. For a zoned
system, the system shows flashing arrows for each zone currently being
conditioned. If the system is preparing for the next program period, an
indicator will be displayed to show that the system is moving the
temperature toward the next programmed set point. In zoned systems
with the simultaneous heat cool demand auto mode active, the system
will show a single arrow towards either the heating or cooling set point
for each zone pending conditioning in the other mode.
A160187

39
10. Display
The following display preferences can be adjusted for Infinity System
Control, Temperature Units (°F or °C), Backlight Levels, Sound
Settings and Screen Saver Settings.
A14256
10.1. Temperature Units
Select the desired temperature units, either °F for Fahrenheit, or °C for
Celsius and touch SAVE. Temperatures will be displayed with
half-degree resolution for Celsius, or full degree resolution for
Fahrenheit.

40
A14257
10.2. Set Backlight Levels
• Backlight levels are programmable for each Comfort Profile setting
HOME, AWAY, WAKE, or SLEEP.
• Use the Up (Y) and Down (B) buttons to set/change the brightness of
back lighting.
– Brightness levels include OFF or 1-10.
NOTE: After 30 seconds of inactivity on the touch screen, the backlight
level will be set back to the current selected level which may be OFF.
A14258

41
10.3. Sound Settings
The control can emit a ”click” sound in response to each screen touch.
Select ENABLED to turn this sound on; or DISABLED to turn it off.
A14259
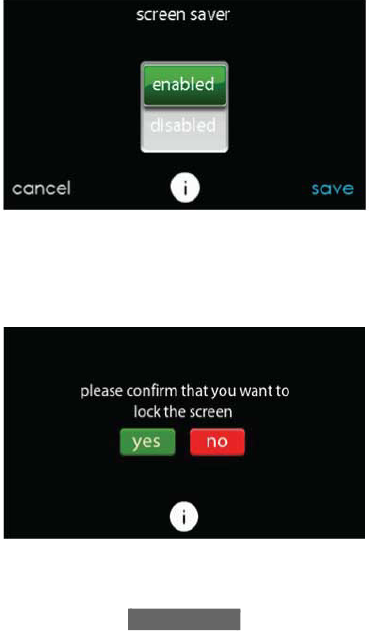
10.4. Screen Saver Settings
To allow a photo to act as a screen saver, touch ENABLE; otherwise,
touch DISABLE.
42
A14260
10.5. Activate Screen Lock
• A message will pop up asking if you want to proceed with the screen
lock. Selecting Yes will lock the screen and take you back to the home
screen.
A13247

43
• To unlock the screen, press and hold UNLOCK in the bottom left
hand corner for 10 seconds.
A13248
• The screen will change and the Control will then be accessible. If the
screen is to be locked again, return to the menu, select the screen lock
and touch YES.
11. Energy Tracking
The Infinity System Control has the ability to monitor and estimate the
energy consumption of certain models of your Infinity System. For
systems where energy tracking is not available, the menu icon will be
shown in gray color, and this section does not apply.
A12111

44
• Touch VIEW ENERGY USAGE to view the estimated energy
consumption in daily, monthly or annual time intervals. You can view
energy consumption in units (kWh for electric and selected unit for
gas heat), or in dollars.
• If a gas furnace is installed, you can SELECT FUEL TYPE (natural
gas or propane), and also SELECT FUEL DISPLAY UNITS.
• Touch ENTER ENERGY PRICES to enter the current electric and
gas utility rates.
– Use the Up (Y) and Down (B) buttons to set the costs per kWh
and cost per Therm or your selected unit.
– Once the correct pricing is entered, press SAVE.
A12113
12. Time / Date
The TIME/DATE icon allows you to set the time and date for the
Infinity System Control.

45
A14250
12.1. Set Time and Date
The time and date can either be set manually or can be synchronized with
the web server (only for Wi-Fi connected units). From the Main Screen,
touch MENU, on the bottom of the Control. The TIME/DATE icon will
bring up the time and date menu.
12.2. Manually Adjust Time and Date
Select manually adjust time and date and follow these steps:
• To set the HOUR, MINUTE, MONTH, DAY, or YEAR, touch the
feature you wish to change.
A14251

46
• Use the Up (Y) and Down (B) buttons to make the appropriate
changes.
• When you have completed all of the settings touch SAVE.
12.3. Setup Daylight Savings Time
You can program your Infinity System Control to automatically adjust for
daylight saving time. From this screen, you can also choose to override
the preprogrammed start and end dates for daylight saving.
A14252
12.4. Setup Time Zone
The time zone can be selected by selecting the setup time zone from the
menu. Then select the time zone for the location. Time zones for both US
and Canada are included.

47
A14217
12.5. Enable Time Synchronization
For systems with Wi-Fi® capability, after setting up the time zone, the
time synchronization can then be done. Both must be done in order to
enable time synchronization.
A14253

48
13. Service
Selecting the SERVICE icon from the menu screen will allow you to
view service contact information, set-up or modify service reminders and
update the software for your wall Control.
A170237C
13.1. Service Information
Your dealer information is easily accessible and may already be
pre-programmed in your Control by your dealer. Select the SERVICE
INFORMATION option.
• Either your dealer’s contact information or the Carrier service number,
1-800-Carrier, will appear.
• This information will also appear if your system requires service.

49
A13250C
13.2. Service Reminder Update
Setup option will allow you to setup routine service reminders. Once the
reminder option is enabled, you can select the frequency of these
reminders (3 to 18 months).
A13251

50
13.3. Software Update for Series B
Carrier will periodically issue software updates for the Infinity System
Control. Updates will download automatically through your Wi-Fi
connection, allowing you to install them at your convenience. Software
updates will be made available on the MyInfinity website for download
to a micro SD card.
A13252
13.4. Updating Software Using Micro SD card for
Series B
• When software updates are available, they will be posted to on the
downloads page of the MyInfinity website,
www.MyInfinityTouch.Carrier.com/Infinity/Downloads.
NOTE: You will obtain best results using a micro SD card that is 4 GB to
32 GB in size. Your micro SD card must be formatted as FAT32.
• From the downloads page on the MyInfinity website, click on the link
under the Download Latest Software
• Read the End User License Agreement (EULA).

51
• At the bottom of the EULA, choose “Yes” if you accept the
agreement.
NOTE: If you do not wish to accept the agreement, you will not be able
to download the software update.
• Use the Download link provided in the EULA document to download
the software update package.
A13253
• Highlight the TSTAT folder in the WinZip window by clicking on the
folder icon ONCE to highlight the proper folder to be downloaded to
the micro SD card. Then click on EXTRACT.
• Choose the micro SD card memory device root directory as the
location to extract the folder from the zip file. When the download is
complete, the TSTAT folder will appear on the root directory of the
micro SD card. Verify that the files, including the “.hex” file, have
been extracted into the TSTAT folder of the micro SD card.

52
A13254C
• Plug the micro SD card into the bottom of the Infinity System Control
and click on the UPDATE SOFTWARE USING MICRO SD
CARD.
• Press Yes to continue with the software upgrade. The upload and
installation will take several minutes.
• When the software upgrade is complete, a “successful” message will
appear. Click DONE.
• The Infinity System Control will perform a restart after the DONE
button is pressed. Once the Infinity System Control has successfully
restarted, the micro SD card may be removed.
• This completes the software upgrade process.
13.5. Updating Software Using Wi-Fi®
When software updates are available, this reminder message will be
displayed on the home screen.

53
A13255
Touch anywhere inside the software update reminder message to install
the latest software or customize your reminder messages for software
updates. (Note: The version numbers shown below are examples. Actual
version numbers will vary.)
A150194
Selecting YES will initiate the software update process. Your Infinity
System Control will reboot in order to complete the software update

54
process. All of your previously stored information and settings will be
maintained.
NOTE: Select DETAILS to view the release notes associated with the
software to be downloaded.
Selecting NO will allow to set-up a reminder for a later time or you can
disable the reminder feature for this particular software update.
A150204
13.6. Model / Serial Numbers
This screen will allow you to access the model numbers and serial
numbers for the installed equipment.
A14255

55
14. Photo Upload for Series B
With the Infinity System Control, you can upload a personal photo to act
as a screen saver. Select the PHOTO UPDATE icon from the menu
screen.
NOTE: Use a 4GB to 32GB micro SD memory card. The card should be
formatted for FAT32 (rather than FAT64 or exFAT) in order to be read by
the control.
A170238C
• Use the PC application to upload the photo on the control and save it
to a standard micro SD card. Go to https://www.MyInfinityTouch.com
and select the Infinity System Control and click the downloads tab to
download the MyInfinity computer Desktop application for either PC
or MAC. Install the software on your computer, then go to the Menu
and select Photo Export. Follow the instructions on-screen in the PC
application.
• Touch the upload photo icon on the menu screen on the Infinity
System Control.
• Place the micro SD card into the micro SD card port on the bottom of
the Infinity System Control when prompted.
• The Control will automatically upload the photo.
• Once complete, you will receive a confirmation that your photo is
loaded.
• After you have selected your desired reminders, touch SAVE.

56
15. Heat Source (If Applicable)
With the Infinity System Control, you can select the desired heat source
of your system, if your system is equipped as a HYBRID HEAT®
System. Select the HEAT SOURCE icon from the menu screen.
A170239C
NOTE: Options available on this screen will correspond to the
equipment attached. Options may appear that are different than those
shown, below.
• The default is for the system to Control the heat source.
• To have only the furnace Control, select FURNACE ONLY.
• To have only the heat pump, select HEAT PUMP ONLY.
• To have only electric select ELECTRIC ONLY.
• When you have made the appropriate selection, touch SAVE.
16. Zone Names (If Applicable)
With the Infinity System Control, you have the ability to customize zone
names. Select the ZONE NAMES icon from the menu screen.

57
A170240C
• Touch the zone in which you choose to change the name.
• Choose between selecting a COMMON NAME or CREATE A
CUSTOM NAME.
– If you choose select a common name, touch the name you want for
that particular zone.
– If you choose create a custom name, use the (≤ or clear) button to
erase the existing zone name. Then, use the on-screen keyboard to
type in the name you want for that particular zone.
16.1. Home Automation System Interface (If
Applicable)
The Infinity System Control can connect to a variety of home automation
systems. Note that not all Home Automation systems may be compatible.
Your dealer can access information for interfaces to home automation
systems. See the Infinity System Control Installation Instructions for
more details.
The Infinity System can also be accessed via other home automation
interfaces such as Amazon Alexa™ Home Skills. See the My Apps tab
on the www.MyInfinityTouch.com website for more information.
Your dealer can work with your home automation supplier to see if the
systems are compatible, or to see if the home automation supplier can
make them compatible.

58
17. Wireless
The Infinity System Control can connect to the in-home Wi-Fi® network
to connect the Infinity System to the Internet. The Infinity System
Control is intended to connect to an existing home Wi-Fi network, or to
be added to an existing Infinity System Wi-Fi network. Please call
1-800-Carrier for support with Wi-Fi set-up and connection to the
MyInfinity Server.
The ability to remotely access and adjust the settings of the Infinity
System Control with the Carrier® Home mobile application is dependent
on the compatibility of the user’s mobile device, the Infinity System
Control, and/or the MyInfinity web server with, and the availability of,
the user’s Internet service provider or mobile device carrier service.
Carrier Corporation makes no representations or warranties, express or
implied, including, to the extent permitted by applicable law, any implied
warranty of merchantability or fitness for a particular purpose or use,
about the compatibility of the user’s mobile device, with the Infinity
System Control, and/or the MyInfinity web server, with, and the
availability of, the user’s Internet service provider or mobile device
carrier service, or that the ability to remotely access and adjust the
settings of the Infinity System Control will not be negatively affected by
the network-related modifications, upgrades, or similar activity of the
user’s Internet service provider or mobile device carrier service.
To establish Wi-Fi connectivity to the Infinity System Control using the
in-home router or wireless access point the wireless access point SSID
and password/passkey must be known for set-up.

59
A170241C
• Select WIRELESS from the menu screen.
• Make sure the Wi-Fi connection is enabled, by touching ENABLED.
• Touch SETUP A WI-FI CONNECTION to begin the process.
• Next, touch SCAN FOR AVAILABLE ACCESS POINTS.
A13235

60
• On the next screen look for the SSID of the router/access point. After
being selected, it will be outlined in faint blue and will be indicated by
a checkmark. Then select NEXT.
A150175
• The selected network will show. Choose an appropriate Wi-Fi
security. Usually auto-detect will correctly identify the type of
security used. If the network has no security it will show as on the
left, but a secured network will prompt for the Wi-Fi security key.
A150191
• If a Wi-Fi security key is shown as on the right hand picture above
then select the white bar and enter the security key, then select NEXT.
• Touch in the security key area, and the keyboard will appear.

61
– Use the on screen keyboard to enter the Wi-Fi security key, then
touch NEXT.
• The Control will inform you if the connection is successful. If so,
touch DONE.
– If the connection is unsuccessful, verify that the proper information
has been entered before you touch RETRY. The Control will go
through the process again.
A13238
• After the control has connected to the network, go to
www.MyInfinityTouch.com, or use the Carrier® Home mobile app to
register the unit. Registration requires the MAC address and serial
number of the Infinity System Control. On the wall control to find the
serial number and MAC address of the Infinity System Control , click
on Menu, Down Arrow, Wireless and View MyInfinity Registration
Info.When using the Carrier® Home mobile app you can take a
picture of the QR code and these items will be filled in for you. This
screen will provide the information needed on the MyInfinity website
during registration.

62
A170285C
• When the connection to the MyInfinity web server has been
established, the status screen will show Connected for both Wi-Fi and
the server.
A13242C
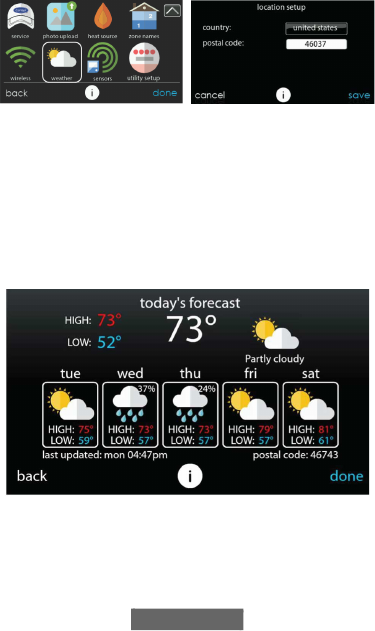
18. Weather
When the Infinity System Control is connected to a Wi-Fi® network, use
the WEATHER icon to retrieve the weather forecast based your postal
code.
63
A170242C
• To enter your postal code, touch CHANGE CURRENT
LOCATION.
• Next, select your country (United States or Canada).
• To enter your postal code, touch in the blank area; then enter your
postal code using the on screen keyboard. Note that you may select a
postal code other than where the system is located, if another postal
code has a more relevant weather forecast for your area.
• After you have entered your postal code, touch SAVE.
A170250

64
19. Sensors
19.1. Menu
An occupancy sensor is built into the main system control. This sensor is
used to control occupancy for the entire home, including all zones in
zoning systems. By selecting the SENSORS icon in the menu, a menu
will be shown that offers options to setup the occupancy sensor.
A170208C

65
A170156
A170286
19.2. Occupancy Setup
Home or zone (for zoning systems) occupancy setup is used to enable or
disable the occupancy sensing feature in the home or each zone (for
zoning systems).
Sensors Menu for Zoning System
Sensors Menu for Non-Zoning System

66
A170174
A170175
NOTE: Occupancy sensing indicator ONLY displays on the main and
home screen when the occupancy sensing feature is ENABLED.
NON-ZONING SYSTEMS
ZONING SYSTEMS

67
20. Utility Demand Event Response Setup
This section is only applicable if your utility company is running a
demand response or price response program in which you have agreed to
participate. Contact your local electrical utility company for information
about programs in your area.
NOTE: If you wish to participate with your electrical utility company, a
service person or Utility representative must enable the utility event
interface.
A170236C
20.1. Utility Event
Your utility may send price response or demand response events to your
Wi-Fi connected Infinity System Control. When a price response or
demand response event is received, your temperature set points will be
automatically adjusted depending on the utility event setup settings that
you have selected.
20.2. When a utility event is in progress…
• The temperature set points will be automatically adjusted depending
on the utility event setup. The adjusted heating and cooling
temperatures will be displayed in green on the Main Screen along with
a “utility event” message.
• A utility event icon will appear on the home screen. Pressing the icon
or manually adjusting the heating and cooling set points will display

68
the type of event, the adjustment to the heating and cooling set points,
the time the event will end, an accept button, and an override button.
• Pressing the accept button will accept the adjustments made to the
heating and cooling set points.
• Pressing the override button will change the heating and cooling set
points back to their original values prior to the event.
NOTE: If you change the set points, or reject participating in a particular
response event, your utility may not provide the credit or other
compensation that is part of that program.
20.3. Price Response
Price response determines how the heating and cooling set points will be
adjusted during a pricing event with two choices - offsets or absolute
temperature. When offsets are selected, the heating and cooling set
points are adjusted by the number of degrees selected. When absolute
temperature is selected, the heating and cooling set points are adjusted to
heating and cooling temperatures.
A14263

69
20.4. Price Settings
When the electric rate from the utility company meets or exceeds the
“ELECTRICAL RATE”, the heating and cooling set points will be
adjusted according to the absolute temperature or offset shown here. If
the set point at the time of the event is more favorable (uses less energy)
than what you have programmed, the Infinity System Control will use the
more favorable set point for the duration of the event. Unless otherwise
indicated, all settings temperatures will be shown in Fahrenheit degrees.
A14264
20.5. Demand Response
Demand response determines how the heating and cooling set points will
be adjusted during a demand response event with two choices - offsets or
absolute temperature. When offsets are selected, the heating and cooling
set points are adjusted by the number of degrees selected. When absolute
temperature is selected, the heating and cooling set points are adjusted to
heating and cooling temperatures.

70
A14265
20.6. Demand Settings
When a demand response is received from the utility company, the
heating and cooling set points will be adjusted according to the absolute
temperature or offset shown here. If the set point at the time of the event
is more favorable (uses less energy) than what you have programmed, the
Infinity System Control will use the more favorable set point for the
duration of the event.

71
A14266
20.7. Response Limits
Response limits are minimum heating and maximum cooling
temperatures allowed during a utility event. These limits are not
exceeded and are intended to protect the occupant premises from extreme
temperatures that might otherwise be imposed by a utility event. Unless
otherwise indicated, all settings temperatures will be shown in Fahrenheit
degrees.

72
A14267
20.8. Restore UE Factory Default Settings
Restore UE (Utility Event) factory default settings will restore all utility
event set points and price settings to their original factory default values.
A14268

73
21. Statement Information
This device complies with Part 15 of the FCC Rules. Operation is subject
to the following two conditions: (1) This device may not cause harmful
interference, and (2) This device must accept any interference received,
including interference that may cause undesired operation.
Changes or modifications not expressly approved by the party
responsible for compliance could void the user’s authority to operate the
equipment.
21.1. FCC Interference Statement
This equipment has been tested and found to comply with the limits for a
Class B digital device, pursuant to part 15 of the FCC Rules. These limits
are designed to provide reasonable protection against harmful
interference in a residential installation. This equipment generates, uses
and can radiate radio frequency energy and, if not installed and used in
accordance with the instructions, may cause harmful interference to radio
communications. However, there is no guarantee that interference will
not occur in a particular installation. If this equipment does cause
harmful interference to radio or television reception, which can be
determined by turning the equipment off and on, the user is encouraged
to try to correct the interference by one or more of the following
measures:
• Reorient or relocate the receiving antenna.
• Increase the separation between the equipment and receiver.
• Connect the equipment into an outlet on a circuit different from that to
which the receiver is connected.
• Consult the dealer or an experienced radio/TV technician for help.
To comply with FCC/IC RF exposure limits for general population /
uncontrolled exposure, the antenna(s) used for this transmitter must be

74
installed to provide a separation distance of at least 20 cm from all
persons and must not be co-located or operating in conjunction with any
other antenna or transmitter.
Pour se conformer aux limites d’exposition RF FCC et IC pour la
population générale / l’exposition incontrôlée, l’antenne utilisée pour cet
émetteur doit être installée pour assurer une distance de séparation d’au
moins 20 cm de toutes les personnes et fonctionnant conjointement avec
toute autre antenne ou émetteur.
This Device complies with Industry Canada License-exempt RSS
standard(s). Operation is subject to the following two conditions: 1) this
device may not cause interference, and 2) this device must accept any
interference, including interference that may cause undesired operation
of the device.
Cet appareil est conforme avec Industrie Canada, exempts de licence
standard RSS (s). Son fonctionnement est soumis aux deux conditions
suivantes: 1) ce dispositif ne peut pas causer d’interférences, et 2) ce
dispositif doit accepter toute interférence, y compris les interférences qui
peuvent causer un mauvais fonctionnement de l’appareil.

75
A180093

© 2021 Carrier. All rights reserved.
Catalog No: OM-SYSTXCCITC-08 997-017070-8-R
Edition Date: 09/21 Replaces: OM-SYSTXCCITC-07
Manufacturer reserves the right to change, at any time, specifications and designs
without notice and without obligations.
76
Infinity®Evolution®, Touch ’N’ Go®, True Sense™ and HYBRID
HEAT® are trademarks or registered trademarks of Carrier Corporation
in the United States and other countries. Other brands and product names
are trademarks of their respective holders.
Wi-Fi® is a registered trademark of Wi-Fi Alliance Corporation.
Amazon Alexa is a trademark of Amazon, Inc. or its affiliates.
TP-LINK is a trademark of TP-Link Technologies Co., Ltd.
The Bluetooth word mark and logos are owned by Bluetooth SIG, Inc.
