
1
CONSOLIDATED -FAQ’S FOR KAVACH

2
Contents
1. Introduction to 2FA ..................................................................................................... 3
2. Installation of Kavach application ..................................................................................... 4
1.1 Desktop/Laptop ........................................................................................................ 4
1.2 Mobile .................................................................................................................. 4
3. Enrollment on Kavach application ..................................................................................... 5
4. Addition of a new user with Kavach Account ......................................................................... 5
5. How to use the Desktop/Laptop application ........................................................................... 7
6. How to use the Mobile application ..................................................................................... 8
6.1 Other features of the Mobile app: .................................................................................... 9
7. Change of Mobile device ............................................................................................... 9
8. Delete/ De-register a registered Device ...............................................................................10
8.1 Using kavach.mail.gov.in ............................................................................................10
8.2 Using Desktop/Laptop Application ..................................................................................13
8.3. Using Mobile Application ...........................................................................................15
9. Access eMail using Kavach Application .............................................................................16
9.1 Append OTP with password .....................................................................................18
10. Configuration of IMAP with Kavach on Windows Device .......................................................18
10.1 Steps to configure path for Mailing Client (outlook) in Kavach application .....................................19
10.2 Steps to configure outlook in Kavach Application ................................................................20
11. Configuration of IMAP with Kavach application on Linux Device ..................................................25
11.1 Installation of Kavach Application on Linux Desktop/Laptop ...................................................25
11.2 Steps to configure path for Mailing Client (Thunderbird) in Kavach application ...............................25
11.3 Steps to configure Thunderbird using Kavach application ........................................................26
12. Installing Kavach Application on your Mac Desktop/Laptop ....................................................29
13. Step to configure IMAP on Android Device .......................................................................35
14. Step to configure IMAP on iPhone Device ........................................................................38
15. Stop frequent notifications in Android Application ...............................................................41
16. Stop frequent notifications in IOS mobile .........................................................................43
17. How to Trust the WI-FI network ...................................................................................45
18. Set Mail Path in Kavach for different Mail clients ................................................................46
19. How to turn on precise location for iPhone for Wi-Fi network ...................................................47

3
1. Introduction to 2FA
As per the directive from Competent Authority, the installation of 2FA has been made mandatory with
immediate effect.
All users availing the email services from NIC must use 2FA to access their accounts. Additionally, users are
advised to install the same on their access devices (phone/laptop/desktop) immediately.
Please note: If you choose to install kavach on a single device, it must be ensured that that device is always
available with you to accept kavach notification for accessing mails.
Please Note:
1. Please note that NIC does not send any mail under any situation that requires you to submit your
login credentials (login/password). Hence, do not take any action on a mail that asks for your login
and/or password as it could be a fake mail and may carry malicious malware to infect your devices.
2. If you receive any email with a link, please verify its authenticity before clicking. It could be a
phishing link.
3. The user ID for Kavach is activated prior to activation by the users. Hence, this procedure needs to
be followed by ONLY those users who receive a mail from [email protected]. This mail is sent
after the id has been enabled for Kavach. If a user receives a mail forwarded by a
colleague/acquaintance, please do not try and activate as it will give an error. User needs to wait to
receive a direct mail.
4. Ensure the correct mobile no is mapped with your id as you will receive a OTP for registration.
5. Contact your respective NIC coordinator / delegated administrator for updation of your mobile no
or any other assistance required in this regard.
6. Notification will be sent to all devices on which the app is installed hence for ease of use please
install on all (max 3) devices that are used for accessing email services.
Video tutorial is available on https://email.gov.in (after logging in) under the heading “How to
Install Kavach App on Android and iPhone”

4
2. Installation of Kavach application
The Kavach application can be installed on various devices such as Desktop/Laptop and Mobile (Android
or iOS). To install, please follow the steps mentioned below:
1.1 Desktop/Laptop
• Download the Desktop App from https://kavach.mail.gov.in
• Minimum requirement for Desktop App
o Windows 7
o MAC 10.11
o Ubuntu 19.04
o CentOS/RedHat 6.9
o Fedora – arduino package is mandatory before kavach installation.
1.2 Mobile
For Android users:
• Go to Google play store and search for “Kavach Authentication” (screenshot of the correct application is
shown below)
• Install the application
• Minimum requirement for Kavach Mobile App is Android OS: 8.0 and above
Kavach application on Google Play Store

5
For iOS users:
• Go to Apple App Store and search for “Kavach Authentication” (screenshot of the correct application is
shown below)
• Install the application
• Minimum requirement for Kavach Mobile App is iOS: 9.1 and above
Kavach application on App Store
The Kavach application can also be downloaded from the URL: https://kavach.mail.gov.in.
3. Enrollment on Kavach application
Once the application is downloaded and installed, to complete the enrolment user should follow the steps
mentioned below:
• Accept the terms and conditions
• Authenticate by submitting username & password
• Insert the 6-digit code OTP (One time password) received via SMS on your registered Mobile number.
• Click on Submit
4. Addition of a new user with Kavach Account
(This feature is provisioned to allow additional account for a user like Personal Secretary (PS)/ Group
Member to access user’s account)
• To access additional user’s account, the User/PS/ Group member should follow the steps mentioned
below. Please ensure that the User/PS/ Group member being added to the app also has Kavach enabled.
• The User/PS/ Group member will install the kavach application and register with his/her email address

6
by following the steps mentioned under “Installation of Kavach Application” and “Enrollment on
Kavach application”.
• The User/PS/ Group member will click on “ADD NEW ACCOUNT” in the Kavach app.
• Enter the email ID and Password of the user whose account he/she has to access.
• Enter the 6-digit OTP sent on the registered mobile number of the user (the user needs to share the OTP
received on phone with the PS/Group member to allow access).
• Once the enrolment is completed, the authorized User/PS /Group member can access the user’s account.
Adding additional email account using Desktop Application
▪ Click on “Add Account” option and follow the same process of registration.

7
Adding additional email account using Mobile Application
▪ Click on “Add Account” Icon shown below and follow the same process for registration to add
another account successfully.
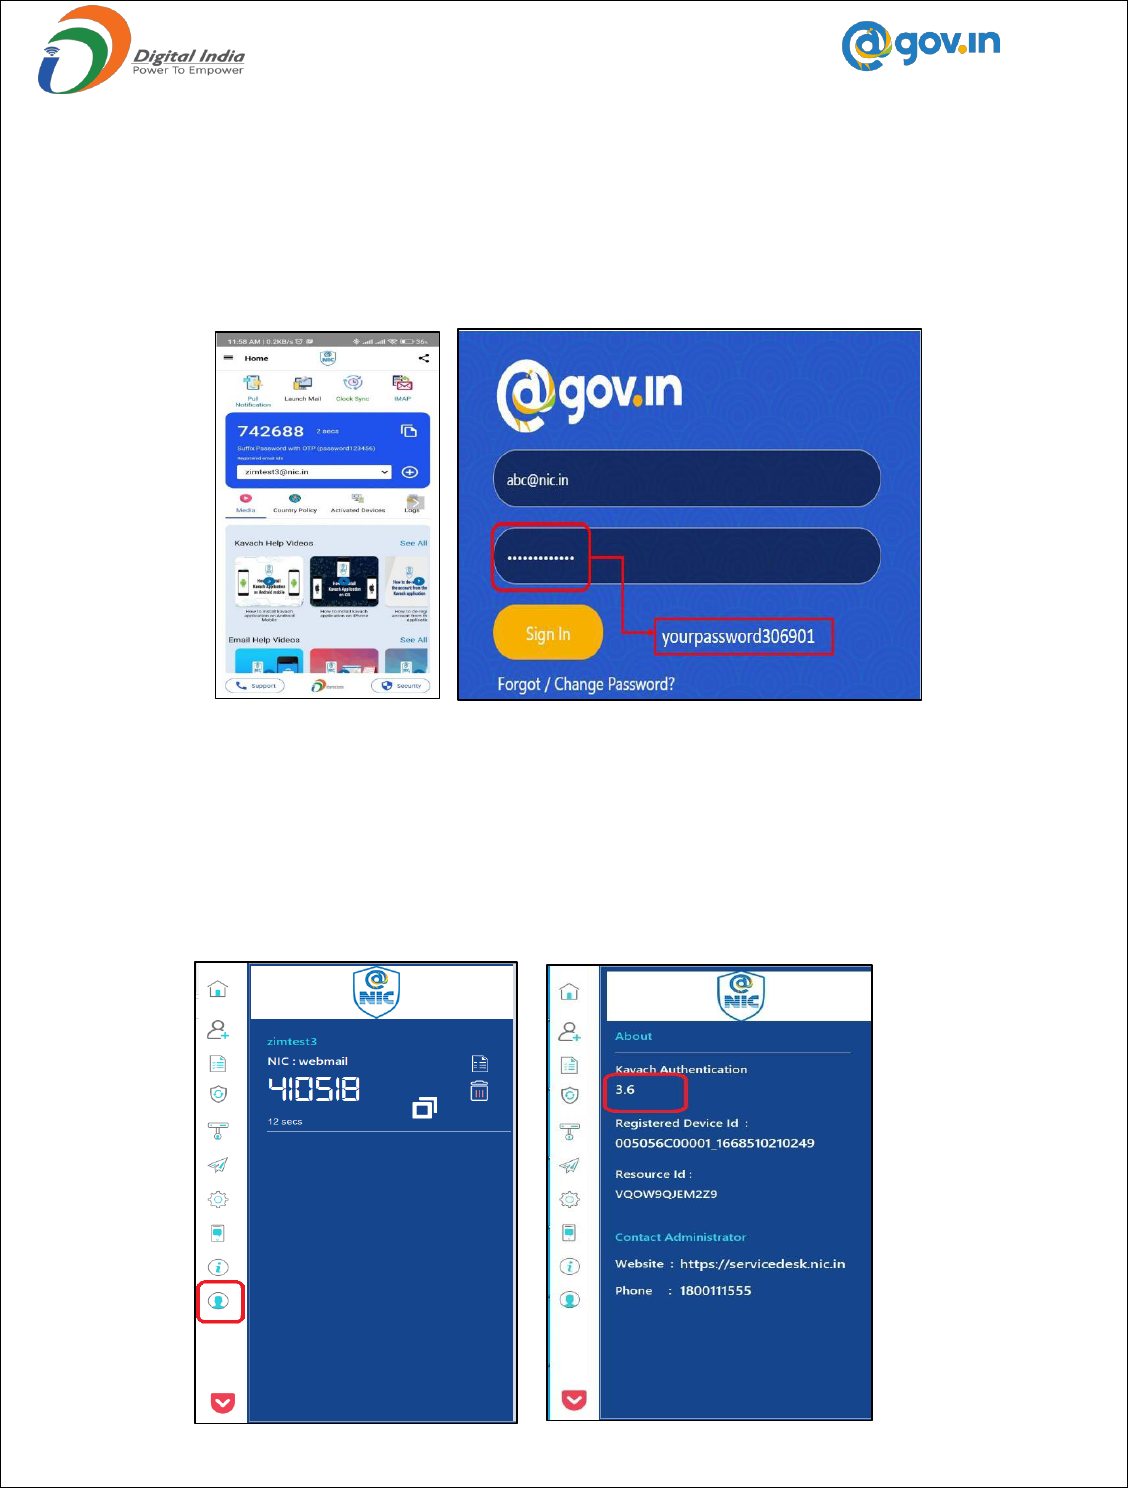
5. How to use the Desktop/Laptop application
• Open the app on desktop/laptop
• A 6-digit number (code) will appear on the app. This is the OTP. This code will change every 30
seconds.
• Suffix (Add) this 6-digit code with your password, without any gap and click on “Sign In”.

8
Please Note:
In case the user is not able to login using the given OTP, use “Clock Sync” to login. This option is available
under “Settings” button on the desktop App. Refer the images given below to login using “Clock Sync”.
6. How to use the Mobile application
After successful installation of the mobile application, please follow the steps mentioned below:
• Login with username /password and press enter.
• The user will receive a notification from Kavach mobile app to “Accept”/” Deny” the login
request.

9
• The request should be accepted immediately. Any delay will result in “timeout” and the user will
have to repeat the above-mentioned steps.
• Please note: The user should be in strong signal zone to receive the notification. If, for any reason,
the user is in a weak signal zone, then the user may not receive the notification immediately. Please
use the following two option in such a scenario:
o Use the “PULL NOTIFICATION” option on the home screen of the Kavach app to receive
the notification (as shown below) OR
o Use the 6-digit OTP (displayed on the home screen of the Kavach app) and suffix it with
password and then press “Sign In”.
6.1 Other features of the Mobile app:
• The user watch videos and gain understanding about the Kavach app in the media.
• The user can apply for the country policy using the kavach app.
• The user can keep a track of their registered devices through Activated Devices.
• The user can check logs to keep track of access activity.
The user is advised to go through all the options available on the app for using it effectively.
For any issues, please call the 24x7 NIC Helpdesk 1800-111-555 or Contact NIC Officers/Delegated
Administrator in your respective Ministry/Department.
7. Change of Mobile device
In case of change in the mobile device, the user may follow the steps mentioned below:
• The user must ensure to delete the previously registered device. This can be done from
https://kavach.mail.gov.in.
• The user must follow the steps mentioned under “Installation of Kavach Application” and

10
“Enrollment on Kavach application” to use the application on the new device.
8. Delete/ De-register a registered Device
There are three ways in which a user can Delete/De-register a registered Device. The steps for each way are
detailed below.
8.1 Using kavach.mail.gov.in
1. Go to https://kavach.mail.gov.in
2. Login with user email id and password.
Delete/ De-register a registered device
Using
kavach.mail.gov.in
Using desktop/laptop
application
Using mobile
application

11
3. Enter the OTP sent on the registered mobile number and click on Login.
4. A dashboard will be opened for kavach.mail.gov.in.

12
5. Click on Manage Activated Devices and then select the device to be deleted and click on De-register.
6. The device has been successfully deleted.

13
8.2 Using Desktop/Laptop Application
1. Open the Kavach application on the Desktop/Laptop.
2. Click on the Manage Policy Tab on the sidebar.

14
3. Go to Manage Activated Devices section.
4. Click on the delete icon present on the right corner to delete the required device same.
5. The device has been successfully deleted.

15
8.3. Using Mobile Application
1. Open the kavach application on your Android/iOS mobile device.
2. Click on the “Registered Devices” Tab.
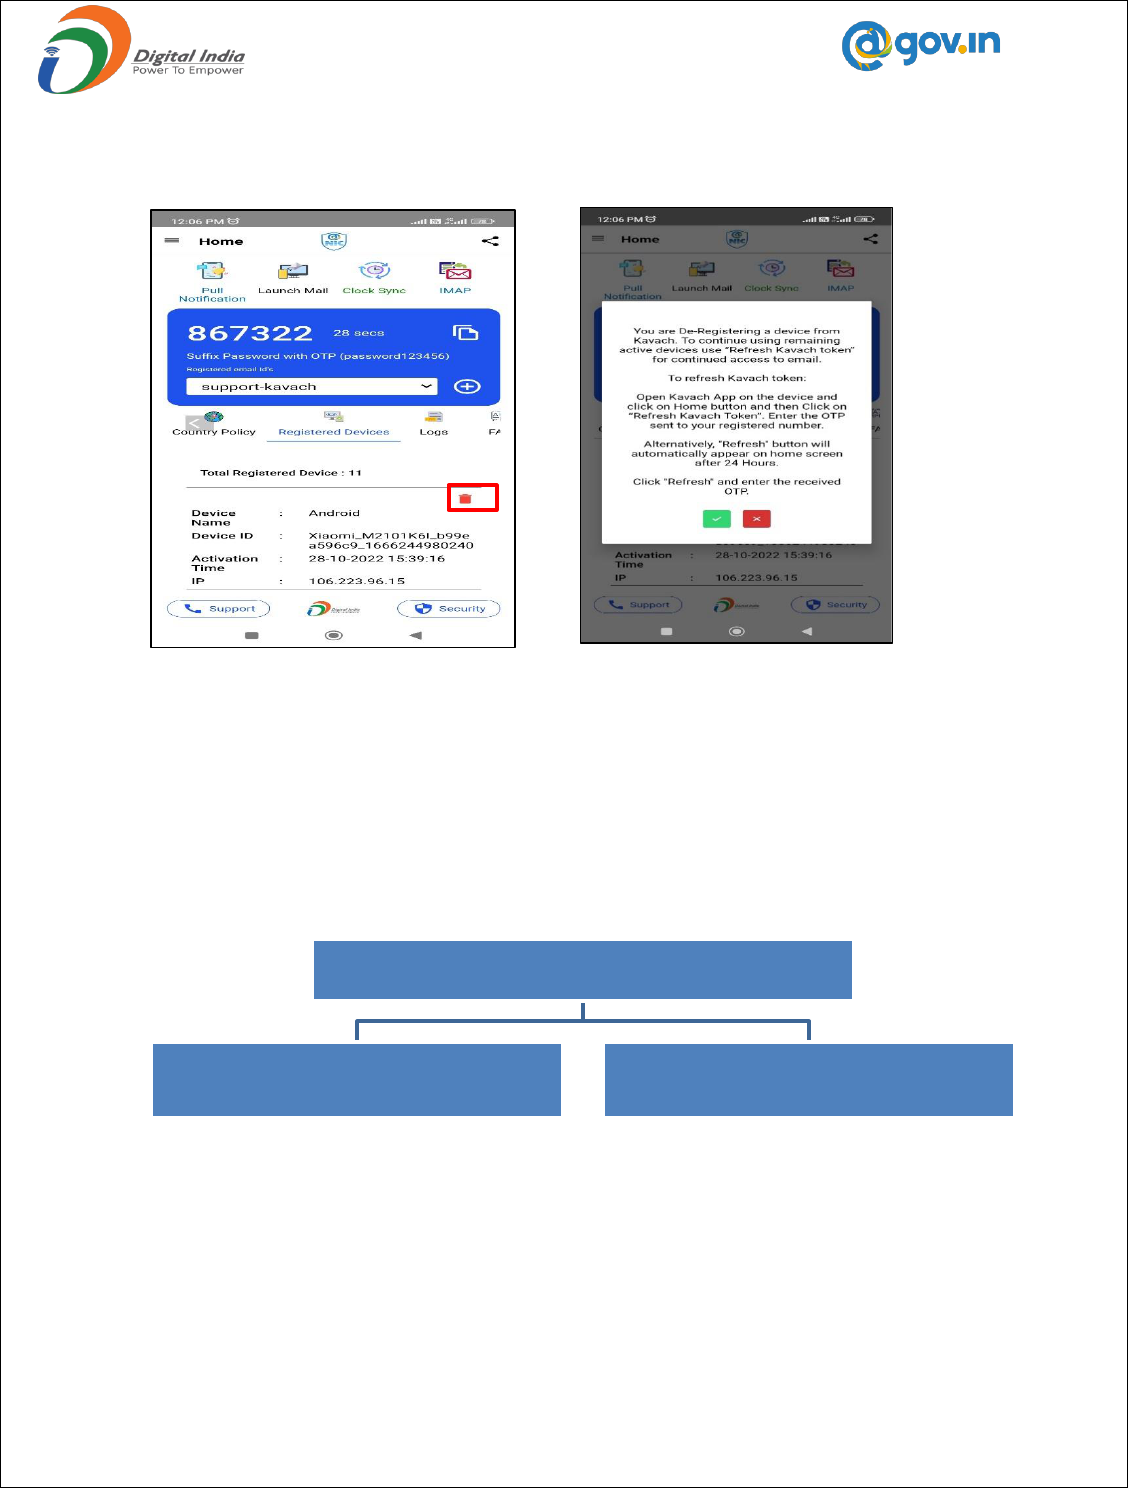
16
3. Click on the delete icon on the right corner to delete the required device.
4. Click on the green checkbox.
5. The device has been successfully deleted.
9. Access eMail using Kavach Application
There are two ways in which a user can use Kavach application to access mails. The steps for each way are
detailed below.
Accept the TAP request
1. Go to https://email.gov.in. Enter user email-id and password. Click on “Sign-In”.
2. A notification for “Accept/Deny” will pop-up on mobile devices on which the Kavach app has been
installed & registered.
3. Tap “Accept” to access email. If the user has not initiated the request, please click on “Deny”.
4. The request should be accepted immediately as the request will time out in 45 seconds.
Access mail using Kavach application
Accept the TAP request Append OTP with password

17
Please note: Notification requires a strong and stable network connection (Wi-Fi/Mobile Data). If the user is in
a weak signal zone, then the user may not receive the notification immediately. In this case, the user can click on
“PULL NOTIFICATION” option on the home screen of the Kavach app to receive the notification. The user
should accept to access mail.
Step 1 Step 2 Step 3
18
9.1 Append OTP with password
1. Open the Kavach application.
2. Use the 6-digit OTP (displayed on the home screen of the Kavach app). This OTP will change in every
30 seconds.
3. Suffix the numbers with your password, without any gap and click on “Sign In”
10. Configuration of IMAP with Kavach on Windows Device
1. Open the Kavach application on your desktop/laptop
2. Click on “about” icon.
3. Check the current version of application. The current version should be 3.5 or above.
4. Incase current version of the application is 3.4 or lower, please upgrade it from https://kavach.mail.gov.in

19
10.1 Steps to configure path for Mailing Client (outlook) in Kavach application
1. Open the Kavach Application
2. Click on “Settings” and then click on “Set Mail Path” to set the Outlook path
3. A new window prompt “Select Mail application to Launch” will open. To set up a mail path of Outlook
Client, the user must enter “ C:\Program Files (x86)\Microsoft Office\root\Office16\outlook.exe “ in the
File Name.
4. Click “Open”. The user will get a prompt on the screen with “Updated mail program path successfully”.

20
10.2 Steps to configure outlook in Kavach Application
1. Open the Kavach Application
2. Click on “Launch mail” (Mail application will open)
3. Click on OK

21
4. Click on Manually Configure & then click on Next
5. Click on Internet E-mail and then Next

22
6. Enter the required details that are hilighted in red box & then click on More Settings
7. Ensure all settings as per highlighted in red box

23
8. Ensure check BOX is clicked for My Outgoing Server (SMTP) & then click on ok
9. Click on Next

24
10. You will see below screen, check Status is “Completed” & then click on “Close”
11. Click on Finish as below screen
Now your email has been configured.
Please Note:
• Always Use “Launch Mail” option on Kavach App to access the Mails.
• As soon as the user clicks “Launch Mail”, the current IP of the user will be registered, and the mail
can be used.

25
11. Configuration of IMAP with Kavach application on Linux Device
11.1 Installation of Kavach Application on Linux Desktop/Laptop
1. Open the terminal and check the java version by using the command “java –version”
2. The Java version should be 8 or above.
3. Command to Install “Jdk” with command “apt-get install jdk”
4. To install in Ubuntu, use command “apt install net-tools”
5. To install in Redhat, use command “yum install net-tools”
6. Please note: To install in Fedora, arduino package is mandatory before kavach installation
7. After successful installation of jdk, make the “KavacAuthentcation.jar” executable with command
“chmod +x KavacAuthentcation.jar”.
8. The Kavach application can now be opened by double clicking the KavachAuthentication.jar file or by
using command “java –jar KavachAuthentication.jar”.
11.2 Steps to configure path for Mailing Client (Thunderbird) in Kavach application
1. Open the Kavach Application
2. Click on “Settings” and then click on “Set Mail Path” to set the Outlook path
A new window prompt “Select Mail application to Launch” will open. To set up a mail path of
Thunderbird, the user must enter “ /bin/thunderbird ” in the File Name.

26
3. Click “Open”. The user will get a prompt on the screen with “Updated mail program path successfully”.
11.3 Steps to configure Thunderbird using Kavach application
1. Open the Kavach Application.
2. Click on Launch mail icon. (Mail application will open)

27
3. Enter the user ID, email address and password & click on continue
4. Enter the Incoming Server and Outgoing Server Details along with the port number and click on done.

28
5. Enter the Server Setting Details and Proceed further
6. You can now access your mail.
Now your email has been configured.
Please Note:
• Always Use “Launch Mail” option on Kavach App to access the Mails.
• As soon as the user clicks “Launch Mail”, the current IP of the user will be registered, and the mail
can be used.

29
12. Installing Kavach Application on your Mac Desktop/Laptop
12.1 Installation of Kavach Application on Mac Desktop/Laptop
1. Go to “Security & Privacy” option and click on “Open Anyway” under the General option to start the
installation of Kavach application on the desktop/Laptop.
2. Click on “Continue” for introduction of the Kavach Application.
3. Click on “Continue” to start the installation of the Kavach application.

30
4. Then click on “install” option as screen shot below.

31
5. Once the installation of the Kavach application is completed. The below stated window will appear to
notify about the completion of installation and then click on close.
12.3
Steps to configure path for Mailing Client (Mail App) in Kavach application
1. Open the Kavach Application
2. Click on “Settings” and then click on “Set Mail Path” to set the Outlook path
A new window prompt “Select Mail application to Launch” will open. To set up a mail path of Mail App,
the user must enter “/system/applications/mail app/macos/mail” or path of outlook

32
“Application/Microsoft Outlook.app/Contents/Macos/Microsoft outlook” in the File Name.
3. Click “Open”. The user will get a prompt on the screen with “Updated mail program path successfully”.
12.4 Steps to configure Mail App using Kavach application
1. Open the Kavach Application.
2. Click on Launch mail icon. (Mail application will open)

33
3. Click on Other Mail Account
4. Enter Name, email ID, password and click on Sign In
5. Enter incoming Mail Server and Outgoing Mail Server and click on Sign In

34
6. Now select the App you want to use

35
6. Click on Protect Mail Security and then click on Continue
Now your email has been configured.
Please Note:
• Always Use “Launch Mail” option on Kavach App to access the Mails.
• As soon as the user clicks “Launch Mail”, the current IP of the user will be registered, and the mail
can be used.
13. Step to configure IMAP on Android Device
1. Open kavach application, click on Launch Mail option on HOME SCREEN.

36
2. Popup window will appear on your screen to “Choose an Email Client application”.
3. Enter the mail and then click on IMAP option and enter the password.

37
4 .Enter the Incoming and Outgoing server details as email.gov.in shown below and click on Next.
5. Select the Sync Frequency option to “Never”.

38
6. You have successfully configured your account
14. Step to configure IMAP on iPhone Device
1. Open kavach application, click on Launch Mail option on HOME SCREEN.
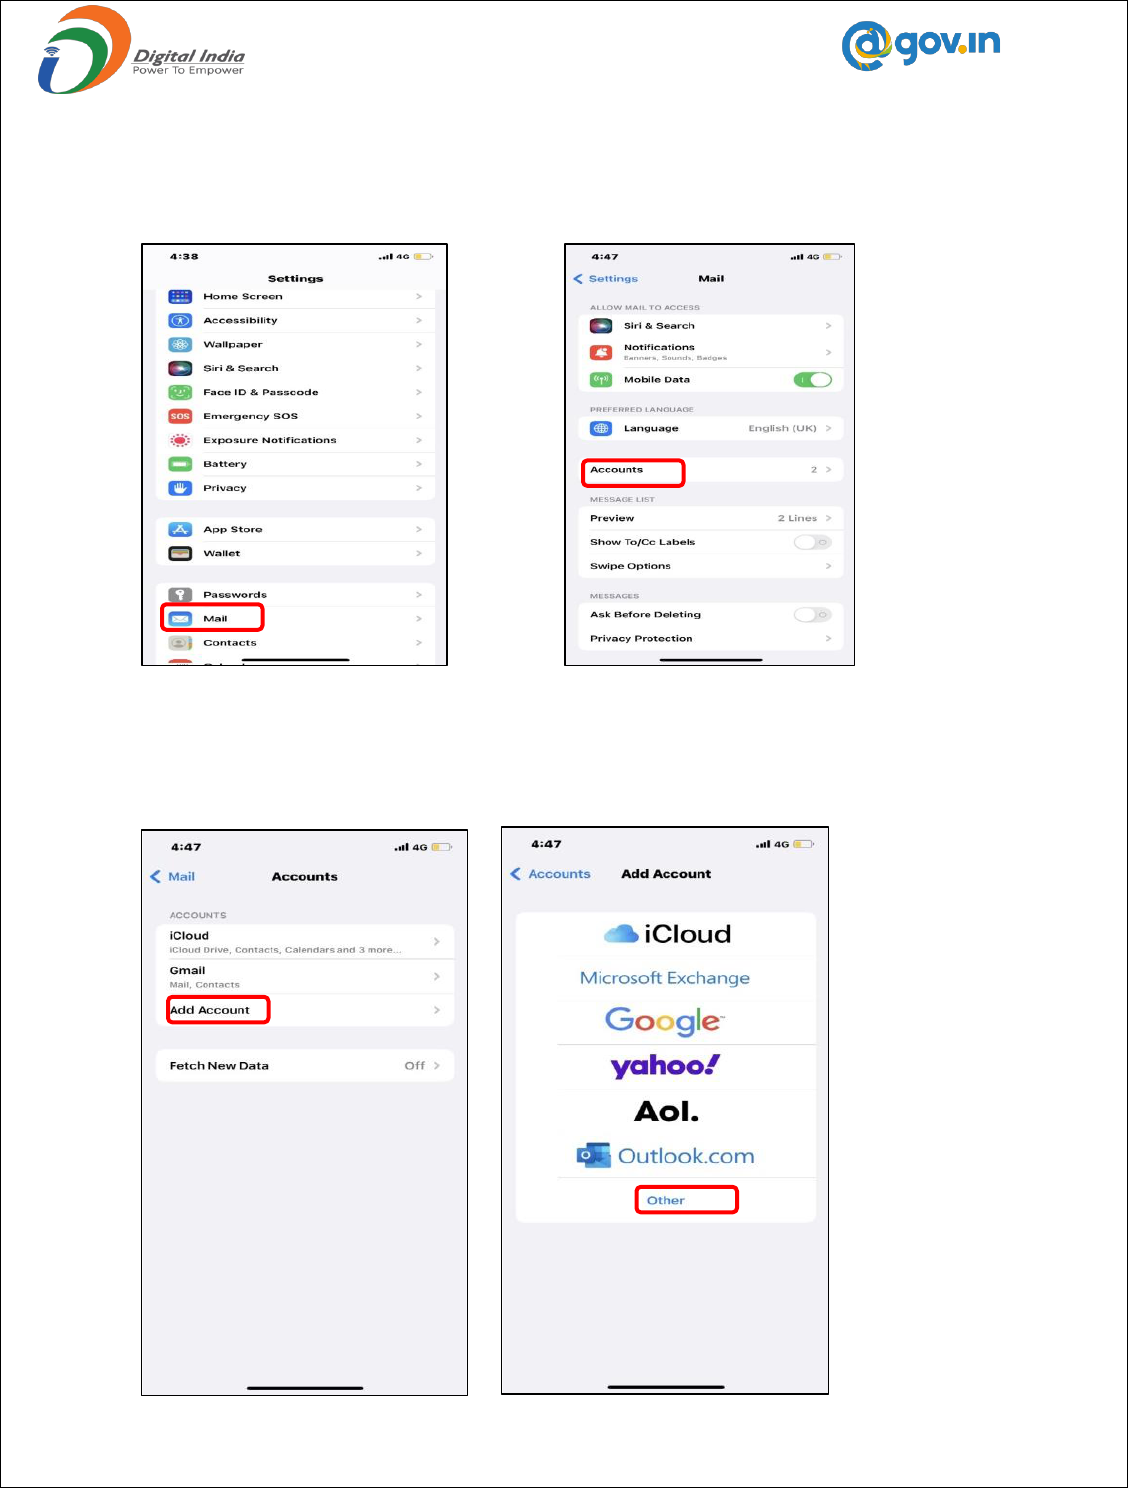
39
2. Go to settings in iPhone and click on Mail option and then click on Accounts.
3. Now, click on Add Account and choose other option shown in below screen.

40
4. Click on Add Mail Account and enter the email address and password and click on Next.
5. Enter the Incoming Server and Outgoing Server Details along with the Password.

41
6. Now Click on Save. You have successfully configured your account
15. Stop frequent notifications in Android Application
You need to set Sync Frequency option as Never/Manual in Email Client App.

42
1. Open Mail client (Gmail App) and click on home option on top left corner.
2. Click on setting option and select the account.

43
7. Click on Sync Frequency option and select the Never option.
16. Stop frequent notifications in IOS mobile
You need to set Sync Frequency option as Manual in Email Client App.
1. Open iPhone Setting and choose mail option and click on Accounts option

44
2. Click on Fetch New Data option and select the mail id you want to set to manual.
3. Choose Manual to set frequency.

45
17. How to Trust the WI-FI network
In case you are on WIFI network:
Click Launch Mail option, you will get the below notifications.
Always Trust This Network: - If you choose this option, then your network will be trusted and you will not get any
prompt in future from this network. Choose this option If you want to trust the network permanently.
Yes (For 8 Hours): - If you choose this option, network will be trusted for 8hrs only i.e you can use this network to
download the mails only for 8hrs.
Deny (For 8 Hours): - If you choose this option, network will be untrusted and you will not able to download mails
using this network.

46
18. Set Mail Path in Kavach for different Mail clients
Click on Setting Icon and then click on “Set Mail Path” to set the Outlook path

47
Path for Outlook 2016 :- C:\Program Files (x86)\Microsoft Office\root\Office16\outlook.exe
Path for Thunderbird :- /bin/thunderbird
Path for MAC OutlookPath :- Application/Microsoft Outlook.app/Contents/Macos/Microsoft outlook
Path for MAC Default mail APP path :- /system/applications/mail app/macos/mail
Path for Outlook 2015 :- C:\Program Files (x86)\Microsoft Office\Office15\outlook.exe
19. How to turn on precise location for iPhone for Wi-Fi network
1. Go to iPhone setting and click on kavach application

48
2. Click on Location and enable precise location option.
