
Inforiver Matrix QuickStart Guide
Introduction
This document is designed to get you up and running with Inforiver Matrix as quickly as possible. If you
have not already installed the Inforiver custom visual, see the install guide here. In this guide, we will
quickly show you how to create a P&L (profit and loss) statement and apply some basic formatting to it.
By the end of this guide, you should have a sense of what Inforiver can do and feel comfortable
expanding and customizing your report.
Contents
Introduction .................................................................................................................................................. 1
What is Inforiver Matrix and how does it fit? ............................................................................................... 2
Displaying data .............................................................................................................................................. 3
Creating a Power BI hierarchy .................................................................................................................. 5
Filling out the visual .................................................................................................................................. 6
Formatting the numbers ............................................................................................................................... 7
Formatting the sign ................................................................................................................................... 8
Formatting the layout ................................................................................................................................... 9
Customizing the contents ........................................................................................................................... 11
Exporting the results ................................................................................................................................... 12
What’s next? ............................................................................................................................................... 13

What is Inforiver Matrix and how does it fit?
Inforiver Matrix is a tool for displaying tabular data with a high degree of customization and control. This
is ideal for information-dense business reports such as P&L statements, general ledgers, etc. Inforiver
gives you many more formatting options than your traditional Excel pivot tables, and allows for
advanced in-line charts, such as sparklines.
Inforiver is a custom visual, which means that it is a custom add-on to Power BI. Once it has been
installed, you can use it like any other visual. Power BI and Inforiver are both licensed per user, although
Power BI has per capacity options as well. This means to use Inforiver you will have to license both
Power BI and Inforiver.

Displaying data
The first step to using Inforiver is to add it to the Power BI canvas. You can drag it over from the
visualization pane. Then, for this tutorial, resize it to fill the entire screen. There are other times where
you will use it as one of many visuals.
Similar to using a pivot table, to use the visual we need to specify 3 things:
• Rows
• Columns (optional) and
• Values
If you’ve used pivot tables before, this experience should feel familiar. If you have experience with
Power BI, then this process is identical to any other Power BI visual, especially a table or matrix visual.
Here we’ve dragged the Level 4 description to the rows field well, and the Actuals measure to the Values
(AC) well. The “AC” is IBCS notation for “Actuals”. We have left the columns field well empty because we
don’t need a matrix view for a P&L statement.

We can see that while this produces a nicely formatted table, it doesn’t show all the information we
want. Many accounting reports show a nested hierarchy of data, and a P&L statement is no different. To
make the most of Inforiver, we need to provide it with a structure to organize the data.

Creating a Power BI hierarchy
When working with Power BI, there are two ways to create a hierarchy of your descriptive fields. One
option is to drag and drop the different fields into the rows well, like how you would do it with a pivot
table.
Alternatively, you can use use the Power BI hierarchies feature to create a combined group of fields.
This can be useful when you have a nested set of fields you want to use repeatedly. Right click on your
top level field (Level 0 Description) in the fields pane and click Create Hierarchy.
Next, rename the new hierarchy to the name “Accounts”. Then right click on the next level of detail
(Level 1 Description) and select Add to Hierarchy.

Repeat this for the rest of the levels. Now you will have an accounts hierarchy that you cran drag and
drop, instead of manually adding each level of detail.
Filling out the visual
Once you have the hierarchy, the next step is to fill in the values of the report. Drag the accounts
hierarchy to the Rows field well and the actuals field to the values field well. At this point your report
should look like this.

While the default settings are readable, we want to make a few formatting changes to better suit the
type of report we are creating.
Formatting the numbers
The first step is to format the numbers the way that you want. In this case, we want to show the
numbers in millions with a single decimal point. Click on the header for the actuals column to select that
column. It will turn blue when selected.
Next, click on the quick format dropdown of the Number section of the ribbon.

There you can select millions.
Then below the Quick Format dropdown, click in the decrease decimal button.
Formatting the sign
Finally, we want to make sure that the data is correctly showing as positive or negative. This requires
two steps, specifying the sign and influencing the totals.
In this case, we have a sign field in the data that has a 0 or a -1 to indicate whether the data is positive
or negative. This is important because the answer can vary depending on what type of accounting
analysis you are doing. Simply drag the sign field to the sign field well.
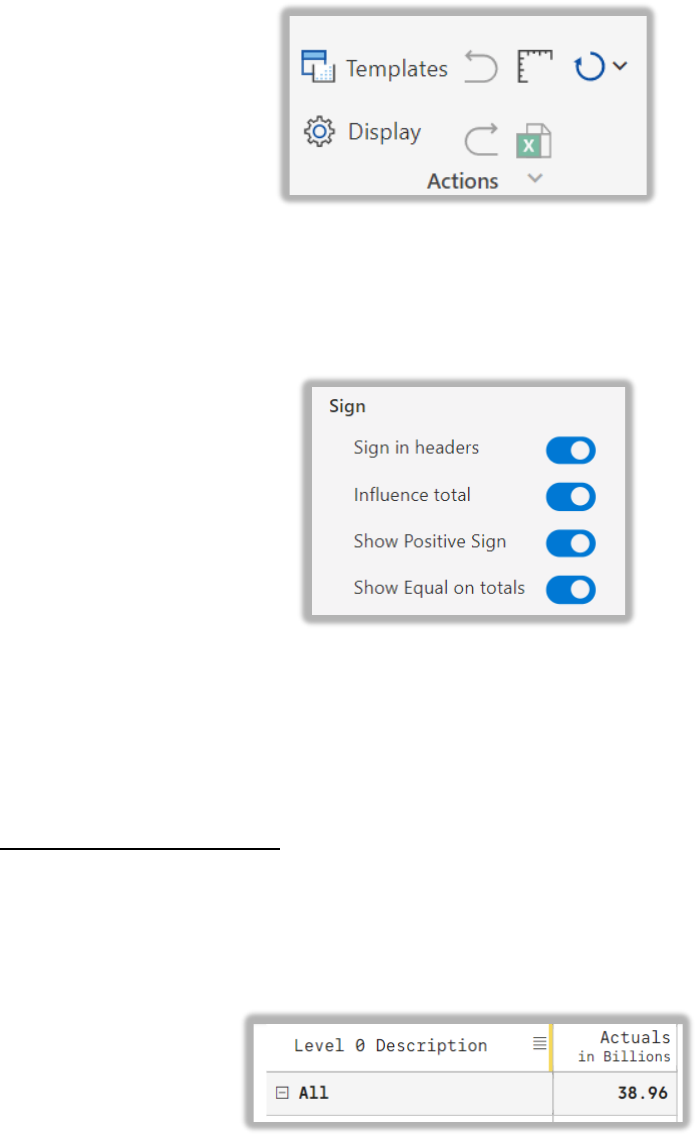
Next, we want to make sure that the sign affects the totals. So, on the ribbon go to Home -> Display ->
Actions. Then click on the Display button. This will show you all the settings related to the general
appearance of the visual.
Click on the numbers section and go down to the sign subsection. Turn on “Sign in Headers” and
“Influence Total”. When you do so, “Show Positive Sign” and “Show Equal on Totals” will appear. Click
those as well.
This will do two things. First, it will show the signs next to the headers which can make it easier to tell
what type of value you are looking at. Second, the influence total setting will make sure that the
negative values toll up to the total as such, instead of being for display purposes.
Formatting the layout
Next, we need to make some changes to the overall layout and display. First, we want a little bit more
room for the account descriptions. At the very top of the table, hover over the divider between the
column headers. It should turn yellow when you do.

Drag the column divider to the right, just like you would in Word or Excel. This should give enough space
to show the full descriptions.
After that, go to Home -> Analyze -> Total and turn off the grand total. We won’t be needing that for a
P&L Statement.
Next, go to Design -> Table -> Single Page to turn off pagination. For a report like this, it makes sense to
have a scroll bar instead of separate pages. Usually a P&L report isn’t very long unless you are viewing
data at the more detailed levels.
Next, we want to hide the header. If you wanted to edit the contents of the header, you could either
click on Design -> Layout -> Header and Footer, or double click on the header itself. In this case, we just
want to hide it entirely. In that case, Hover over the header and you’ll see an eye icon with a slash
through it. Click that icon to hide the header.
At this point, you’ve created a P&L statement and applied some basic formatting. In the next section, we
see some of the customization features that are unique to Inforiver.

Customizing the contents
Unlike Excel or Power BI, Inforiver allows you to easily reorganize the items in your report, without the
risk of overwriting the contents. First, let’s customize the order of the categories. Whenever you hover
over a row, you’ll notice four horizontal lines appear to the far left.
This allows you to manually reorder a row. Simply click on it and drag it to drag the entire row. To do this
in Power BI, you’d have to create a customer sort column for the exact sort order you want.
Next, let’s imagine we wanted to add a row with a custom formula. Click on the row for net revenue.
Then, in the ribbon, go to Insert -> Row -> Insert Row Calculated Row. Alternatively, you can click on the
4 bars to the left of the selected row and select insert row.
For our calculated row we want to calculate gross profit margin. To set started, enter “Gross Margin %”
into the title. We want to calculate the following: (Net Revenue – Cost of Goods Sold) / Net Revenue.
When entering the formula, you can either click on the rows being referenced, or you can use the dot
notation. So, for Net Revenue, the dot notation would be [Operating Profit].[Gross Profit].[Net
Revenue].
Once you are done, your row configuration should look like this:

Finally, go to Home -> Number on the ribbon and format this row as a percentage.
Exporting the results
To export an Inforiver visual to Excel or PDF, you will first have to publish the report to the Power BI
service. If you need help publishing your report, this Microsoft documentation covers the publishing
steps. Once you have done that, open the report, and click on the Export tab. There you can export to
PDF, Excel, or the clipboard.

What’s next?
After completing this tutorial, you should have a good idea of the general capabilities of Inforiver. To
learn more in-depth and learn about additional features, see the resources below.
https://inforiver.com/blogs/
https://inforiver.com/webinars/
https://www.youtube.com/c/Inforiverbi
https://inforiver.com/demos/
If you would like to writeback, schedule reports, or collaborate with other users in your organization
using Inforiver, check out Inforiver Enterprise.
If you are interested in performance management, exploratory analysis, contextual storytelling, or
multi-measure visualizations, explore Inforiver Analytics+.
Need to report a bug? Have suggestions for improvement? Visit https://community.inforiver.com/. We
appreciate your feedback. You can also reach out to us directly for purchase related queries.
