

Use the Freeform Shape Tool to
draw around parts to highlight.
Click to start, release the mouse
button, move to the next point
and click to continue. Click on
start point to finish.
Create full slide black box and
send back using the layer tools,
to reveal the freeform shapes.
Select the black box, then shift
click the highlight shapes and
use the Merge Shapes Subtract
tool to cut out the highlights.
Make black box semi-transparent
(30%) and add labels to
highlighted areas.
Banish the drudgery of content-heavy, detailed slides by using this technique to
focus attention on what’s important and bring your stories to life. Use highlighting
to help your audience understand the key ideas and remember them.
Home > Shapes >
Lines > Freeform
Home > Arrange >
Send Backward
Format > Merge
Shapes > Subtract
Right-click on shape >
Format Shape > Fill >
Transparency
View video
tutorial
Highlighting content

Keyboard shortcuts
Group
Ungroup
Decrease/Increase font size
Change type casing
Find and replace text
Duplicate objects
Cycle through layers/objects
Run slideshow
Run slideshow from current slide
Jump to specific slide (slideshow mode)
Copy style formatting
Paste style formatting
Move on a straight axis
Keep aspect when resizing
Ctrl
G
Ctrl
Shift
G
Ctrl
[
]
Shift
F3
Ctrl
H
Ctrl
Tab
F5
F5
Shift
Enter
<#>
Slide
number
Ctrl
Shift
C
Ctrl
Shift
V
Shift
Shift
+
+
+
+
+
+
+
+
+
+
+
+
+
+
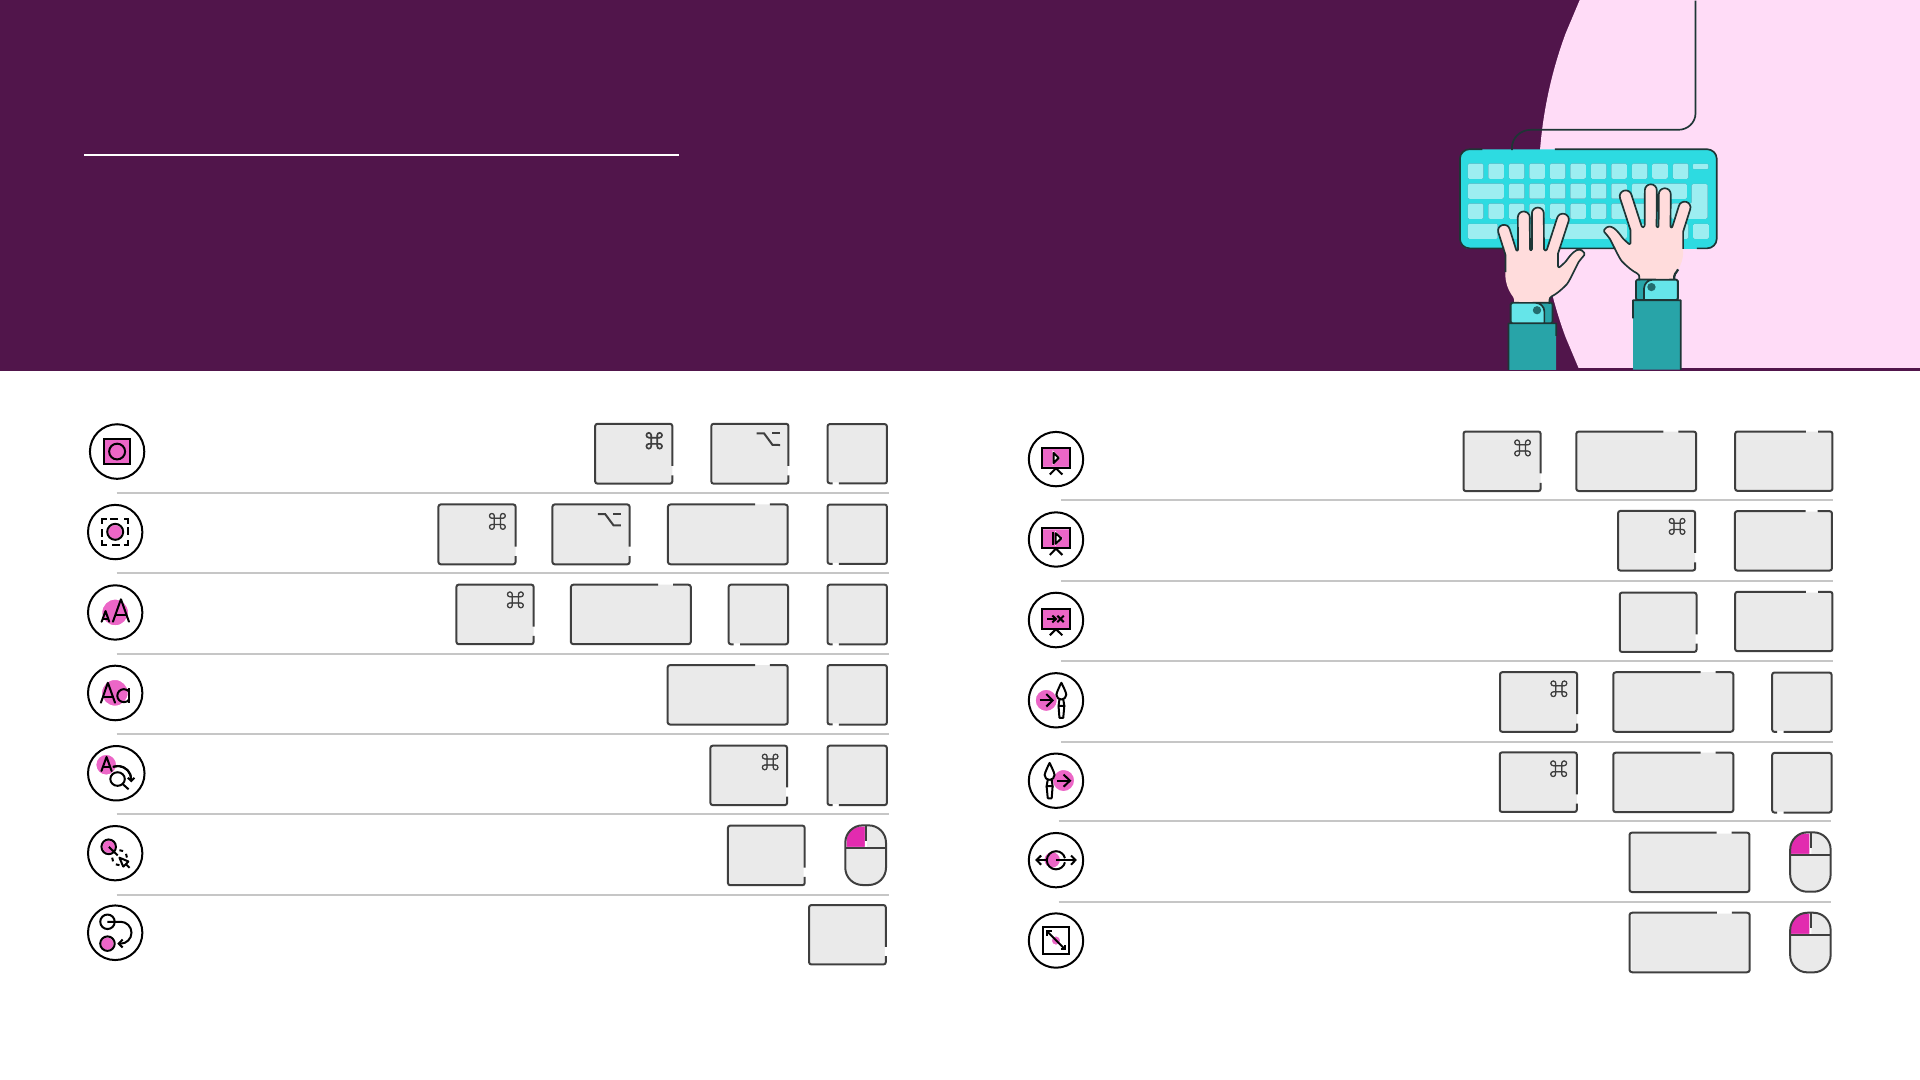
Be a PowerPoint productivity superhero with the top shortcuts that will have you
creating amazing slides in seconds.
+
+
G
G
+
< >
Return
Enter
Shift
Shift
Shift
Cmd
Cmd
Cmd
Cmd
Shift
Cmd
Shift
Keyboard shortcuts for Mac
Group
Ungroup
Decrease/Increase
font size
Change type casing
Find and replace text
Duplicate objects
Cycle through layers/objects
Run slideshow
Run slideshow from current slide
Jump to specific slide
(slideshow mode)
Copy style formatting
Paste style formatting
Move on a straight axis
Keep aspect when resizing
Tab
+
Be a PowerPoint productivity superhero with the top shortcuts that will have you
creating amazing slides in seconds.
+
+
+
++
++
+
Option
Option
Shift
Cmd
Cmd
Shift
Shift
Return
Enter
Return
Enter
<#>
Slide
number
+
+
+
+
+
+
+
+
F3
F
+
+
+
Ctrl
C
Cmd
V

BrightSlide
Created by PowerPoint experts the BrightSlide add-in will help you create, polish,
and edit presentations at speed. It draws on industry-standard shortcuts to boost
your workflow and provides amazing, extra functionality PowerPoint users have
only dreamed of. And it’s all yours, for free!
View video
tutorial
Align with
precision
Save animation
combinations
Easy custom
grids
Update slides in
seconds
Advanced
typography
Swap objects
with ease
‘So long’ to the
Selection Pane
Super shortcuts
Tidy and tame
tables
Download
here
We developed BrightSlide as the ultimate
productivity add-in to tackle the pitfalls of
PowerPoint. And, because we love the
presentation community almost as much as
we love PowerPoint, we are sharing
BrightSlide with you for free!

Download BrightCarbon’s most
used PowerPoint functions in
our own customized toolbar
www.brightcarbon.com
Search:
Quick Access Toolbar
or
Click this box
A
Add to Quick Access Toolbar
File > Options > Quick Access Toolbar
Right-click on anything in the
menus to add to the Quick
Access Toolbar
or
Quick Access Toolbar
Add shortcuts to your Quick Access Toolbar to access the things you use more
quickly.
View video
tutorial
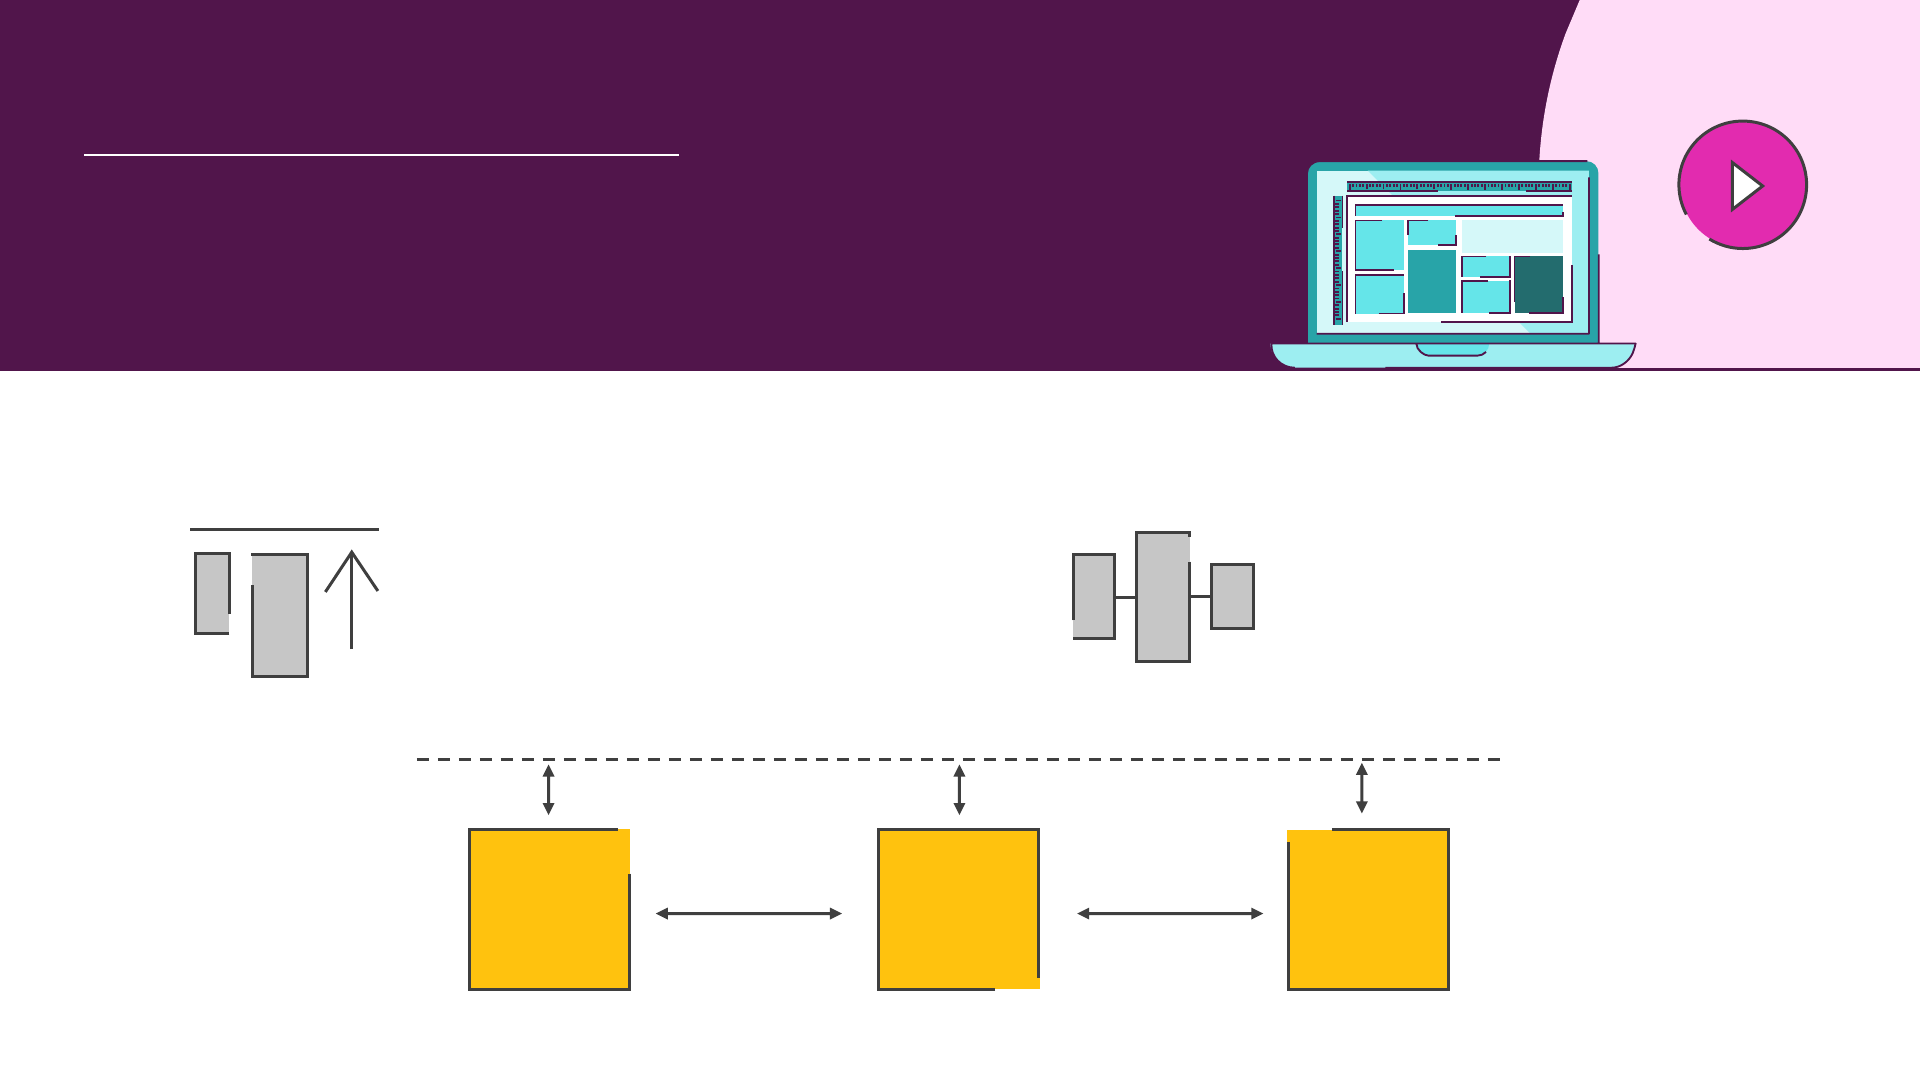
Use alignment and distribution tools to easily center and equally space your
objects.
View video
tutorial
Alignment & distribution
The alignment tools allow you to line
up objects relative to each other along
the top, middle, bottom, left, right, or
center of a set of shapes.
Align objects top
The distribute tools allow you to
evenly space a set of shapes
horizontally or vertically.
Distribute horizontally
Home > Arrange > Align

Copy the image (Ctrl + C) to
build up multiple layers. Then
make the initial image grayscale
so that the highlight later stands
out.
Paste a new image (Ctrl + V) and
align with the original. Then
apply a greyscale recolor and
blur using Artistic Effects to
create contrast.
Paste a new image. Use the
Freeform Shape Tool to draw
around parts to highlight. Click
to start, release the mouse
button, move to the next point
and click to continue. Click on
start point to finish.
Select the color image, then shift
click the highlight shape and use
the Merge Shapes Intersect tool
to cut out the highlight on the
color image.
Want to make an impact? Learn how to capture attention in PowerPoint,
transforming your slides from dull and boring walls of text, into beautiful and
impactful visual slides that capture your audience’s attention and leave them
thinking about what’s most important in your story.
Format > Color >
Grayscale
Format > Artistic
Effects > Blur
Home > Shapes >
Lines > Freeform
Format > Merge
Shapes > Intersect
View video
tutorial
Capturing attention

View video
tutorial
Morph is a stunning way to seamlessly transition between slides, but also to
create motion, emphasis and tell stories. Note that it only works with Office 365 or
PowerPoint 2019. Earlier versions of PowerPoint will simply use a Fade transition.
Morph magic
Transitions > Morph
Morph recognizes objects across slides and will seamlessly move,
resize, recolour, and rotate objects. You can use this to change
content on your slide. Objects have to be on both slides to create any
change using morph, otherwise, the transition appears like a fade.
Introduce objects by having them off the edge of the first slide
canvass and on the second slide, or remove them by having them on
the first slide and off the edge of the second slide canvass.
Give the effect of moving around a more complex diagram with
content moving off and onto the slide, by creating a diagram that
only partly fits on the slide canvass. On the second slide, move the
diagram so that a different part is on the slide canvass, and morph
will pan around the diagram. Zoom into particular elements by
making the diagram larger on the second slide.
Morph isn’t just for transitioning between slides, it can be used for interesting
effects to tell stories, such as creating a magnifying lens to highlight content. Note
that it only works with Office 365 or PowerPoint 2019. Earlier versions of
PowerPoint will simply use a Fade transition.
Morph magnify
Transitions > Morph
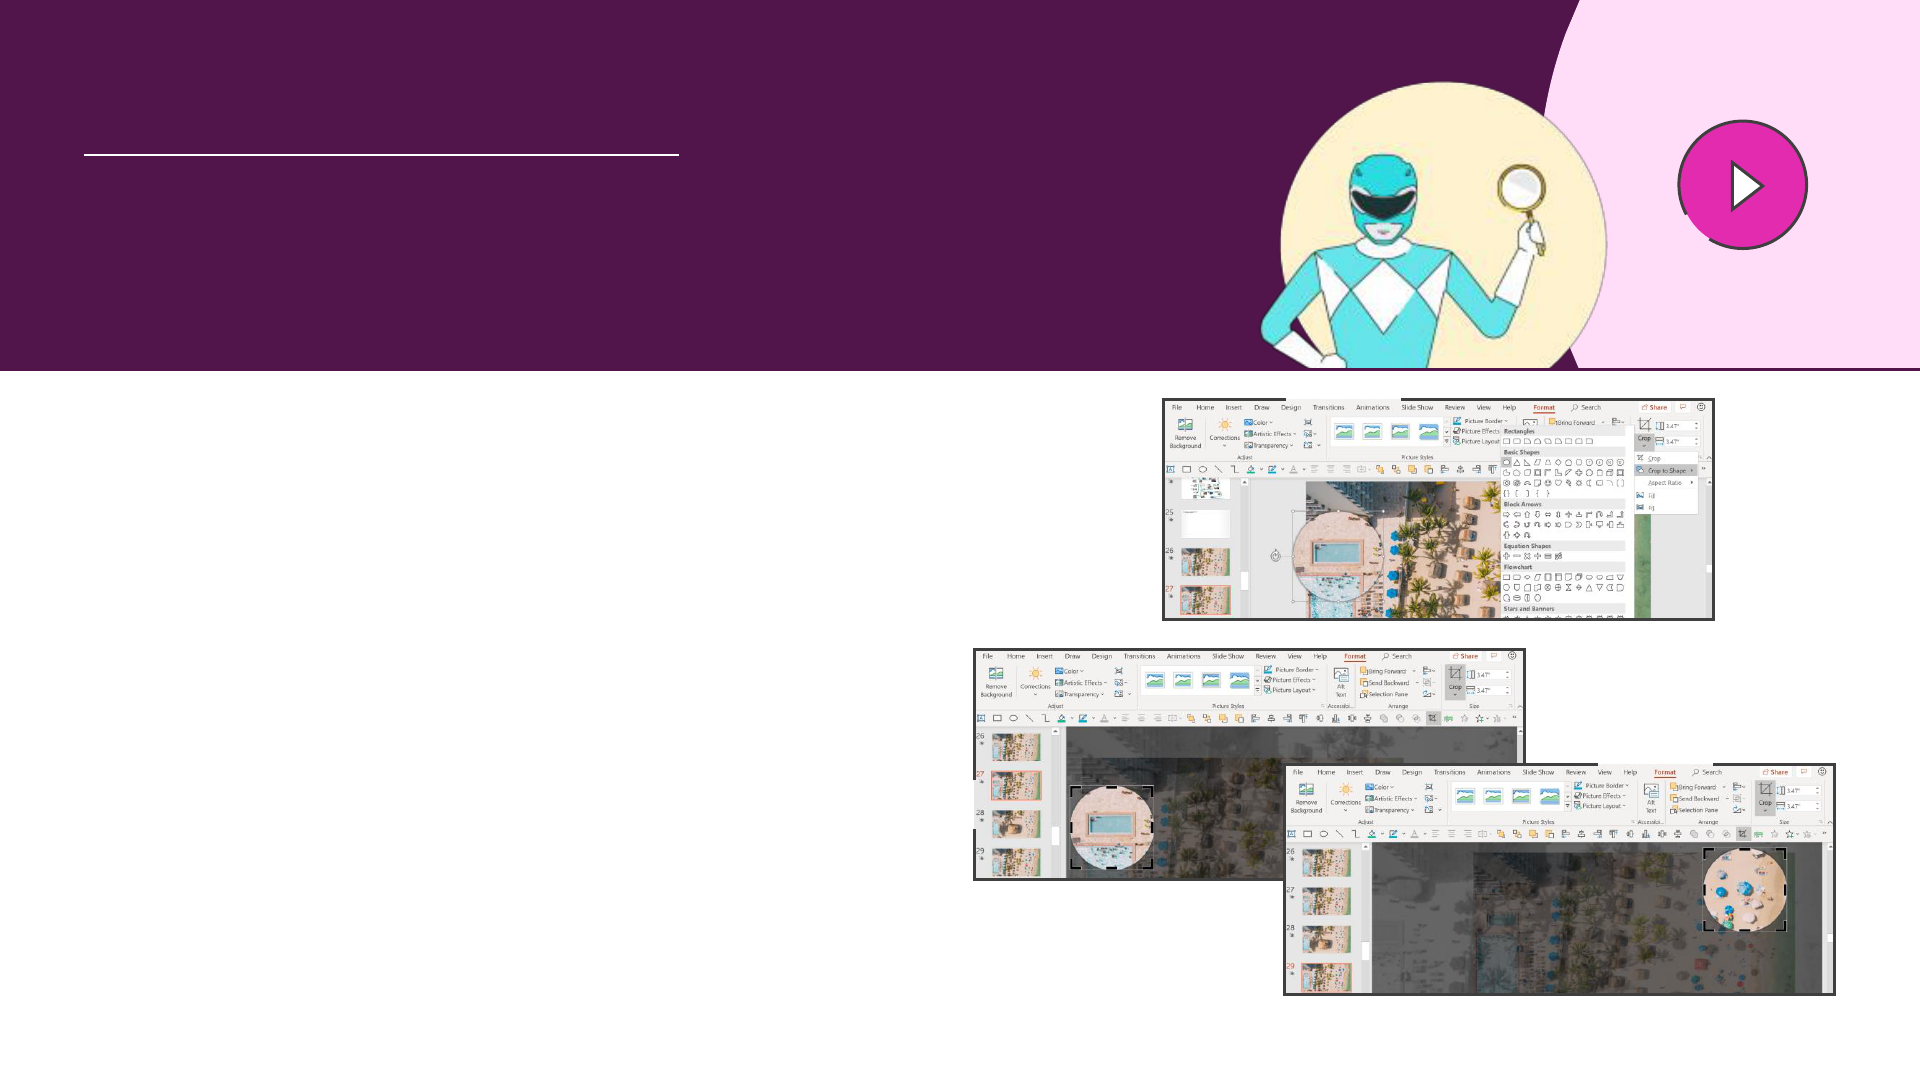
Insert an image on the slide, copy, paste, and align the new
image on top of the original.
View video
tutorial
Crop the top image to a rough square focusing on a specific
area, set the Crop to Shape (Oval), and set the Aspect Ratio
to 1:1 (Picture Tools Format > Crop).
Add a shadow or outline to the new cropped circle image and
make it larger (use Shift and Ctrl to expand in proportion and
the correct position).
Duplicate the slide (Ctrl + D) and on the new slide, move the
circle image to a different position.
Select Crop on the circle image, but now move the image
within the circle placeholder, so that it matches the image
behind in the new position.

Zoom in PowerPoint is a terrific tool that allows you to jump straight to the
content you want and supports a seamless interactive presentation. It’s really
quick and straightforward to do.
Zoom navigation
Home > Slides > Section > Add Section
Adding sections to your deck makes it much
easier to manage and navigate through using
Zoom. Create a section for each topic or
subtopic that you might want to navigate to.
Insert > Links > Zoom
You can add three different types of Zoom, but
Section Zooms are probably most useful as
they will navigate through entire sections of
your presentation before coming back to the
menu or launch slide.
View video
tutorial

Be a PowerPoint productivity superhero with the top shortcuts that will have you
creating amazing slides in seconds.
Slide show functions
See all the slides
Zoom in on a slide
Go to that slide
End Slide show
All Slides Dialogue
Blacks/Unblacks the screen
Whites/Unwhites the screen
Stop/Restart automatic show
Go to next slide if hidden
Return to first slide
View task bar
Return to previous zoom slide
G
+
+
+
or
-
Ctrl
Enter
<#>
Slide
number
+
Esc
Ctrl
S
+
B
.
>
W
,
<
or
or
S
H
+
+ 2 secs.
Ctrl
+
T
Ctrl
+
T U
/
Shift
+
<
^
/
/
Hide/Show arrow on mouse move
Zoom out of a slide
Ctrl
+
-

