
Version 7.2 | July 17, 2017

July 17, 2017
2
Contract Express® Author Getting Started Manual
Disclaimer
This manual as well as the software described in it, is furnished under license and may be used or copied only in accordance with the terms
of such a license. The content of this document is furnished for informational use only, is subject to change without notice and does not
represent a commitment on the part of Thomson Reuters. Thomson Reuters assumes no responsibility or liability for any errors or
inaccuracies that may appear in this manual.
Copyright © 2017 Thomson Reuters.
All rights reserved. Except as permitted by such license, this manual may not be copied, photocopied, reproduced, translated or converted
to any electronic or machine readable form in whole or in part without the prior written approval of Thomson Reuters.
Trademarks
Contract Express, Contract Express 5, Contract Express for SharePoint, Contract Express for Salesforce, Contract Express Author, Contract
Express Drafter, Contract Express DealBuilder, Contract Express Negotiator, Contract Express Administrator, ContractEpress.com, Contract
Express Cloud, Contract Express for SharePoint Cloud, Contract Express QuickStart, and the Contract Express system are trademarks of
Thomson Reuters. All other brand or product names are trademarks or registered trademarks of their respective owners.
For technical support contact: [email protected]

July 17, 2017
3
Contract Express® Author Getting Started Manual
Contents
1. Key concepts in Contract Express ...................................................................................................................... 8
1.1 What is Contract Express? ......................................................................................................................... 8
1.2 Contract Express Author ............................................................................................................................ 8
1.3 Contract Express templates ....................................................................................................................... 9
1.4 Inserting values into a generated document ............................................................................................ 9
1.5 Controlling optional text in a generated document .................................................................................. 9
1.6 Contract Express dictionary ..................................................................................................................... 10
2. Installing Contract Express Author .................................................................................................................. 10
3. The Contract Express Tab in Microsoft Word.................................................................................................. 12
4. Create a new variable and insert it into a template ........................................................................................ 14
4.1 Insert Field ............................................................................................................................................... 14
4.2 Replacing a string of text throughout a document with a new variable ................................................. 17
4.3 Inserting a field using the Dictionary Editor ............................................................................................ 17
4.4 Inserting a field as you type..................................................................................................................... 18
5. Using Entities in a template ............................................................................................................................. 18
5.1.1 Defining an entity variable ...................................................................................................................... 21
6. Marking and controlling optional text in the template ................................................................................... 22
6.1 Inserting spans ......................................................................................................................................... 23
6.2 Updating spans using the Markup Editor ................................................................................................ 23
6.3 Business rules .......................................................................................................................................... 24
6.4 Creating business rules ............................................................................................................................ 24
6.4.1 Simple business rules based on yes/no variables ................................................................................... 24
6.4.2 Standard business rules based on selections .......................................................................................... 25
6.5 Combining business rules ........................................................................................................................ 25
6.6 Business rules based on computable variables ....................................................................................... 25
6.7 Handling Pluralities .................................................................................................................................. 26
6.8 Code completion of expressions ............................................................................................................. 27
7. Using the Dictionary Editor ............................................................................................................................. 28
7.1 Docking and undocking the Dictionary Editor to the task pane .............................................................. 28
7.2 Toggling between sections of the dictionary .......................................................................................... 30

July 17, 2017
4
Contract Express® Author Getting Started Manual
7.3 Viewing all variables in the dictionary ..................................................................................................... 30
7.3.1 Filtering the list of variables .................................................................................................................... 31
7.4 Adding a variable to the dictionary ......................................................................................................... 32
7.5 Inserting existing variables into the current document .......................................................................... 32
7.6 Find a variable in the dictionary .............................................................................................................. 32
7.7 Find and replace across entire dictionary ............................................................................................... 33
7.8 Spell check the entire dictionary ............................................................................................................. 33
7.9 Delete a variable ...................................................................................................................................... 33
7.10 Duplicate a variable ................................................................................................................................. 33
7.11 Show the relevance of a variable ............................................................................................................ 34
7.12 Navigate between uses of a variable....................................................................................................... 35
7.13 Determine where variables are referenced elsewhere in the dictionary ............................................... 35
7.14 Jump to a variable referenced in a computable variable ........................................................................ 35
7.15 Check the mark-up of the current document.......................................................................................... 35
8. Editing Variables .............................................................................................................................................. 37
8.1 General Tab ............................................................................................................................................. 38
8.1.1 Name ....................................................................................................................................................... 38
8.1.2 Question .................................................................................................................................................. 39
8.1.3 Type ......................................................................................................................................................... 39
8.1.4 Presentation ............................................................................................................................................ 40
8.1.5 Compulsory .............................................................................................................................................. 43
8.1.6 Key Question ........................................................................................................................................... 43
8.2 Guidance Tab ........................................................................................................................................... 44
8.2.1 Guidance .................................................................................................................................................. 44
8.2.2 Preamble ................................................................................................................................................. 44
8.3 Constraints Tab ........................................................................................................................................ 45
8.3.1 Selection List Items .................................................................................................................................. 45
8.3.2 Template .................................................................................................................................................. 48
8.3.3 Allow new ................................................................................................................................................ 49
8.3.4 Filter ......................................................................................................................................................... 49
8.3.5 Label ........................................................................................................................................................ 49
8.3.6 Minimum Value ....................................................................................................................................... 49

July 17, 2017
5
Contract Express® Author Getting Started Manual
8.3.7 Maximum Value....................................................................................................................................... 49
8.3.8 Default Value ........................................................................................................................................... 50
8.3.9 Minimum Character Length..................................................................................................................... 50
8.3.10 Maximum Character Length .................................................................................................................... 50
8.3.11 Mask ........................................................................................................................................................ 50
8.3.12 Custom Repeat Labels ............................................................................................................................. 52
8.3.13 Tag for Yes ............................................................................................................................................... 52
8.3.14 Tag for No ................................................................................................................................................ 52
8.4 Document Tab ......................................................................................................................................... 52
8.4.1 Default Format ........................................................................................................................................ 52
8.4.2 Default Case ............................................................................................................................................. 52
8.4.3 Default Alternative Text .......................................................................................................................... 53
8.5 Usage Tab ................................................................................................................................................ 53
8.5.1 Variable Usage ......................................................................................................................................... 53
8.5.2 Author Note ............................................................................................................................................. 53
8.6 Computation Tab ..................................................................................................................................... 53
8.6.1 Definition ................................................................................................................................................. 53
8.6.2 Save in Session ......................................................................................................................................... 53
9. Using the Markup Editor ................................................................................................................................. 54
9.1 Docking and undocking the Markup Editor to the task pane .................................................................. 54
9.2 Choose what is displayed in the Markup Editor ...................................................................................... 56
9.3 Walking up the tree structure of nested spans of text ........................................................................... 56
9.4 Updating spans using the Markup Editor ................................................................................................ 59
9.5 Deleting markup using the Markup Editor .............................................................................................. 60
9.6 Relevancy at a point in the document ..................................................................................................... 61
9.7 Navigate between uses of markup in the template ................................................................................ 62
9.8 Check the markup of the current document ........................................................................................... 63
10. Organize the questionnaire into groups and pages ........................................................................................ 63
10.1 Adding a page .......................................................................................................................................... 65
10.2 Adding a group ........................................................................................................................................ 65
10.3 Adding a variable to a group ................................................................................................................... 66
10.4 Editing attributes of a page ..................................................................................................................... 66

July 17, 2017
6
Contract Express® Author Getting Started Manual
10.5 Editing attributes of a group ................................................................................................................... 67
10.6 Duplicate a page ...................................................................................................................................... 70
10.7 Duplicate a group .................................................................................................................................... 70
10.8 Arrange questionnaire ............................................................................................................................. 70
11. Create a new function and add it into a Template .......................................................................................... 70
11.1 Create a new Function ............................................................................................................................. 70
11.2 Adding a Function into the Template ...................................................................................................... 71
12. Accessing external data in the questionnaire ................................................................................................. 71
12.1 Creating a new lookup table .................................................................................................................... 71
12.2 Adding data to a lookup table ................................................................................................................. 72
12.3 Dynamic data definition .......................................................................................................................... 73
12.4 Find a lookup table .................................................................................................................................. 74
12.5 Find content within a lookup table ......................................................................................................... 74
12.6 Add notes to a lookup table .................................................................................................................... 74
13. Using a common dictionary across multiple templates .................................................................................. 75
13.1 Server based External Dictionaries .......................................................................................................... 75
13.1.1 Attaching a server based External Dictionary to a template ................................................................... 77
13.1.2 Detaching a server based External Dictionary to a template .................................................................. 78
13.1.3 Refreshing server based External Dictionaries ........................................................................................ 79
13.2 File based External Dictionaries .............................................................................................................. 79
13.2.1 Attaching a file based External Dictionary to a template ........................................................................ 81
13.2.2 Detaching a file based External Dictionary to a template ....................................................................... 82
13.2.3 Refreshing file based External Dictionaries ............................................................................................. 83
13.3 Typical process when using External Dictionaries with a template hierarchy ........................................ 83
14. Case sensitivity in Contract Express ................................................................................................................ 86
14.1 Identifiers................................................................................................................................................. 86
14.2 Reserved words ....................................................................................................................................... 86
14.3 Text literals .............................................................................................................................................. 87
15. Test the questionnaire .................................................................................................................................... 87
15.1 Upload and launch ................................................................................................................................... 87
15.1.1 Connecting to the Contract Express application ..................................................................................... 88
15.2 Uploading to a specific server ................................................................................................................. 90

July 17, 2017
7
Contract Express® Author Getting Started Manual

July 17, 2017
8
Contract Express® Author Getting Started Manual
1. Key concepts in Contract Express
1.1 What is Contract Express?
Contract Express® is a family of products that enable law firms and corporations to create standardized legal
documents from templates. There are three main products:
Contract Express: The flagship web-based document assembly solution that provides law firms with a
single platform to allow users within the firm to create documents from automated Contract Express
templates, and to enable law firms to share Contract Express templates with clients via client microsites
or publicly available templates. Small corporate legal departments can also use Contract Express for self-
service contract creation, approvals and e-signature. Contract Express is available as an on-premises
solution or via Software as a Service (SaaS).
Contract Express for SharePoint: This application for the Microsoft SharePoint 2013 platform integrates
the core document assembly and contract creation capabilities of Contract Express with SharePoint lists
and document libraries. Contract Express for SharePoint provides a contract automation solution for
corporate legal departments to provide self-service contract creation capabilities to end users, together
with matrix-based approvals, document versioning, e-signature, search and reporting. Law firms who use
SharePoint as an extranet based platform can also use Contract Express for SharePoint to provide self-
service document automation to their clients.
Contract Express for Salesforce: This app is available in the Salesforce AppExchange and directly
integrates the Contract Express contract automation product into an organizations Salesforce Org.
Contracts can be initiated from any Salesforce record or object and all of the contract documents and data
are stored within the customers Salesforce Org. This solution can be used by corporations for revenue
generating contracts as well as NDAs, Employment Agreements and Sourcing Agreements.
Common to all three products is the unique and patented Contract Express document generation engine. The
same engine is used in all three products, meaning that templates created for one product can be used by the
other products too. Indeed, both Contract Express for SharePoint and Contract Express for Salesforce have the
main Contract Express product embedded inside the solution.
1.2 Contract Express Author
Contract Express Author is the tool that template owners use to create templates for these three Contract Express
products. Contract Express Author is an add-in for Microsoft Word 2007 and above and provides template authors
with all of the capabilities for converting a regular Microsoft Word document into a Contract Express template
through the addition of mark-up and the creation of dictionary items. Once a template is created in Microsoft
Word with Contract Express Author, it is uploaded to one of the Contract Express products above where end-users
can start to create documents from that template. Contract Express contains a unique and patented questionnaire
generation engine which automatically creates the questionnaire forms directly from the information contained
within the template. This is one of the major advantages of Contract Express over other document assembly
systems.

July 17, 2017
9
Contract Express® Author Getting Started Manual
1.3 Contract Express templates
Contract Express templates are regular Microsoft Word documents with mark-up denoting:
Fields: where names, dates, amounts (“variables”) and other values will appear in the generated
document;
Spans: optional text (characters, words, paragraphs, clauses, sections) controlled by business rules.
The field and span mark-up is regular Microsoft Word text and can be typed directly into a Contract Express
template using Microsoft Word in the same way as any other text. The Contract Express Author ribbon in Microsoft
Word makes it quick to:
Define variables and business rules in the template’s dictionary;
Rapidly insert fields and spans into the template;
Organize questions into groups and pages;
Define user alerts and look-up tables;
Upload templates to Contract Express.
1.4 Inserting values into a generated document
A field determines where values such as a date, a person's name, or an amount will appear in the generated
document. Fields are usually denoted using curly brackets { } and can either contain variables like dates, names
or amounts or can contain calculations, cross references and even references to text in other templates.
For example, if a template is based on an earlier contract which contains text stating "This agreement pertains to
Bob Smith born September 18th, 1972" then in the template the name and date of birth are replaced by fields
such as: "This document pertains to {ApplicantName} born {ApplicantDoB}."
When a user subsequently answers the questionnaire {ApplicantlName} and {ApplicantDoB} will be replaced in
the generated document by the user’s answers.
Fields are often re-used many times in the template. For example, each occurrence of {ApplicantName} will be
replaced throughout the generated document by the user's answer (e.g. Bob Smith).
1.5 Controlling optional text in a generated document
A span denotes optional text in the template which will be included in the generated document if the span’s
business rule is satisfied. Spans are usually denoted by square brackets around the optional text, with the business
rule as regular superscripted text immediately following the opening bracket. E.g.: [
Rule
optional text].
A business rule:
Determines whether or not the optional text is included in the generated document,
May determine how many times the span will be repeated, and

July 17, 2017
10
Contract Express® Author Getting Started Manual
May also include a statement that controls how the text within the span will be punctuated.
As an example, if you are authoring a template with a sentence that only applies in California, you would enclose
that sentence in square brackets and apply a rule such as: State is "California". The optional text would look like:
[
State is "California"
Some text that only applies in California.] Similarly for Delaware: [
State is "Delaware"
Alternative text for
Delaware.]
1.6 Contract Express dictionary
The template’s dictionary contains definitions of the variables and business rules used in the mark-up of fields
and optional spans.
For example, the dictionary may contain a variable called ApplicantAddress, which is defined in the dictionary to
ask the question "Please enter the applicant's address" with the answer as a multi-line text box.
Similarly, the dictionary may contain a variable called State, which is defined to ask the question "Which state’s
laws will govern this agreement?" with the answer in the form of three mutually exclusive radio buttons labelled
"California", "Delaware", and "Texas".
The dictionary may also define:
How questions are organized into groups and pages on the questionnaire;
How user alerts are set up to alert users for specific combinations of answers;
Alternative values for variables in lookup tables.
2. Installing Contract Express Author
Template authors need Microsoft Word 2007, Microsoft Word 2010, Microsoft Word 2013 or Microsoft Word
2016 running on Windows 7, Windows 8 or Windows 10 to install Contract Express Author. Follow these steps to
install the application.
1. Select the Templates tab
2. Click on Download Author
This will download a file called setupweb.exe. Once downloaded click on the file to install the application or
click Run if prompted. Below is a snip from Chrome which downloads to the Downloads folder.

July 17, 2017
11
Contract Express® Author Getting Started Manual
3. When prompted with the following screen, click on Install
4. Click Close when the install is Complete
5. Open Microsoft Word. If it was already open you must close first and then re-open. If installing for the
first time you will be required to accept the End User License Agreement. You will now see a new tab on
the Microsoft Word ribbon called Contract Express. This completes the installation of Contract Express
Author.

July 17, 2017
12
Contract Express® Author Getting Started Manual
3. The Contract Express Tab in Microsoft Word
The Contract Express tab in Microsoft Word provides access to all the features of Contract Express Author.
The features available on the Contract Express ribbon tab are:
See Using the Markup Editor
See Create a new variable and insert it into a template
See Marking and controlling optional text in the template
See Using the Dictionary Editor
Use this button to link to a common dictionary. Can be used across multiple templates
to keep questions consistent. See Using a common dictionary across multiple
templates
Use this button to create a dictionary Report document
Use this button to upload the latest version of your template, and run the
questionnaire to generate a document. By pressing on the arrow beneath it you can
choose to Upload or Launch individually, or do both simultaneously. There is also an
option to navigate directly to the Contract Express site. See Test the questionnaire

July 17, 2017
13
Contract Express® Author Getting Started Manual
Use this button to perform a Usage analysis on the template. Check for relevancy or
questionnaire order issues in the troubleshooting area of the task pane
Use this button to add colored highlighting to the mark-up in the template. For more
complex templates this can make the markup easier to troubleshoot
Use this button to change the Template properties such as the name and reference of
the template and set the symbols to be used for the markup (by default curly brackets
for fields: {} and square brackets for spans: [])
Use this button to change user options such as the location of the Questionnaire
server, and to turn off auto-ordering of the questionnaire

July 17, 2017
14
Contract Express® Author Getting Started Manual
4. Create a new variable and insert it into a template
A field in a Contract Express template is a region of the document which will contain data. The most common type
of field is a field which contains the name of a variable where that variable is a date, name or number which the
user will enter on the questionnaire.
4.1 Insert Field
The Insert Field button on the Contract Express tab in Microsoft Word is used to create new variables which are
then inserted as a field into the Contract Express template. This is a quick and convenient way to add fields such
as names, numbers, dates and Contract Express Author will add the variable name and field mark-up elements
into the template.
Fields can be inserted at various places within a document:
The body of the document.
The page headers and footers associated with a section.
Within footnotes and endnotes.
To insert a new text variable called BuyerName into the document, first select the point in the document where
the new field will be inserted and then click the Insert Field button on the Contract Express tab in Microsoft Word:

July 17, 2017
15
Contract Express® Author Getting Started Manual
This will open the variable editor:
Enter the details of the BuyerName variable as:
Click OK and the new variable will be inserted into a field in the current document:

July 17, 2017
16
Contract Express® Author Getting Started Manual
Variable names that contain certain characters will require quoting e.g.:
{'Client Name'}.
Note that if these characters are entered into the Name field, Contract Express will automatically add the single
quotes when it is added into the document.
Note that variables are not case sensitive so NAMEBUYER and namebuyer refer to the same variable. For more on
case sensitivity see section 14.

July 17, 2017
17
Contract Express® Author Getting Started Manual
4.2 Replacing a string of text throughout a document with a new variable
When marking up a document in Contract Express Author, your existing manual precedent or model form may
contain a specific string of text through the document such as Party name. By selecting this text and clicking Insert
Variable, this text will be replaced with a field containing the new variable. Contract Express Author will also
provide an option to replace all occurrences of Party name in the document with a field containing the new
variable.
4.3 Inserting a field using the Dictionary Editor
You can also quickly insert a field containing a pre-existing variable from the Dictionary Editor. To do this, place
the cursor in the location where you would like to insert the field then click the Dictionary Editor in the Ribbon
and locate the variable you want to place in the document in either All Variables or Questionnaire. Right click the
Style Characteristics
Fields inherit the characteristics of the opening bracket {. For example, if the opening bracket
is emboldened:
{ NameBuyer }
Then the value in the generated document will be emboldened:
John Smith

July 17, 2017
18
Contract Express® Author Getting Started Manual
variable and select the option Insert to Document. This will insert a field with the pre-existing variable at the
position where the cursor is placed. Alternatively, you can drag and drop the variable to the desired location within
the document.
To replace text in the document with a variable, highlight the text within the document then right click the variable
in the Dictionary Editor and select the option Insert to Document. The selected text will be replaced by a field
containing your chosen variable. A dialog will be displayed asking whether you would like to replace all
occurrences of the selected text in the document with the variable. Selecting Yes will run through the document,
look for any occurrences of the text that was selected and replace it with the variable. Selecting No will only
replace the selected text.
4.4 Inserting a field as you type
Note also that as an alternative to using the Insert Field icon, it is possible to simply type the field mark-up element
directly into the template using the correct bracket mark-up for Fields.
In addition to inserting variable fields manually, it is also possible to insert fields which contain calculations, cross
references or even the text from other templates.
For example, to insert an expression that represents the VAT (Value Added Tax) on the UnitPrice formatted as a
currency, first select the point in the document where the new expression will be inserted and then enter the text:
{UnitPrice * 20 / 100 Format "currencydigits"}
To include a sub-template containing a boiler-plate clause, first create a blank paragraph at the point where the
clause will be included (N.B. the style of the paragraph does not matter as it will disappear from the generated
document), and then enter the text:
{Include Template BOILER_PLATE_CLAUSE}
Where BOILER_PLATE_CLAUSE is the template reference of the sub-document.
5. Using Entities in a template
An entity is a type of variable which allows a Business User to input a collection of related data into the
questionnaire which can either be used at a later point within the questionnaire or within a different
questionnaire. Where an entity has been added to the template, during the questionnaire session the following
will be displayed:

July 17, 2017
19
Contract Express® Author Getting Started Manual
When the Set option is selected, an entity selector will be displayed which will allow the user to choose to create
a new entity or to choose from a list of existing entities:

July 17, 2017
20
Contract Express® Author Getting Started Manual
A variable that is defined as type entity (see section 5.1.1 for details about defining entity variables) will be a
parent variable which can be augmented with child variables of any variable type that will capture the data that
will belong to the entity. There are a number of conditions that must be met in order for entities to work
seamlessly:
Compulsory
Entity template
Every entity variable must reference a template that will provide the required structure
and variables needed to collect data for the entity. The entity template can be the auto
provisioned Contact or Address templates in Contract Express or another template as
long as that it meets the conditions below. The entity template used will determine the
type of the entity (e.g. Contact entity).
Compulsory
Name
Every entity must have a child variable that defines the name of the entity. This variable
can be of any type and the value will be displayed in the Name column for an entity in
Contract Express.
Description
This variable will populate the Description column for an entity in Contract Express.
Type
If required, entities can have subtypes (e.g. for contact entities - types Person, Company,
Charity) which the user can select within the questionnaire in the entity selector. This
variable must be of type Text-Selection.
For example, if we have a Lease Agreement template and we wanted to capture the tenant as an entity of type
contact we will:
1. Create an entity variable called Tenant and reference the Contact template.
2. We need the Tenant entity to collect the name, address and tenant type details, so we will create 8 child
variables of the Tenant entity which will capture the Name, Type, Address (as an entity)
^
, Address Line 1,
Address Line 2, City, Country, Postcode:
*Tenant:Name compulsory
Tenant:Type
Tenant:Address – references the Address template in Contract Express
^
Tenant:Address:Line1
Tenant:Address:Line2
Tenant:Address:City
Tenant:Address:Country
Tenant:Address:Postcode
^ Adding the address as an entity will allow the user to reuse the address for another contact (e.g. Landlord).

July 17, 2017
21
Contract Express® Author Getting Started Manual
5.1.1 Defining an entity variable
To create a new entity variable select the new icon from the
toolbar. Select New Variable from the drop-down menu. This will then
display the attributes for the variable. Change the Type attribute to
Entity and fill out all other attributes on the General tab as required.
Click on the Constraints tab.
Click on the ellipses on the Template attribute, this will display all templates that are available within the default
server. Note that if this is the first time connecting to Contract Express within the current Microsoft Word session
you will be required to enter valid credentials.
Select a template to use as the entity template. You will then be able to pull in the variables that have been defined
as part of the entity template by selecting the checkboxes. If you wish to select multiple variables under one
variable, right click the variable and click “Select Node”. The variables that are selected will be imported into your
template against the entity variable with the entity name as a prefix of the names of the imported variables.

July 17, 2017
22
Contract Express® Author Getting Started Manual
6. Marking and controlling optional text in the template
The most common type of span is the conditional span. A conditional span is a range in the template that is to be
included in the generated document if some condition or business rule evaluates to true. The business rule is
specified as part of the span mark-up, appearing as superscripted text immediately following the open bracket of
the span. The span range itself is delineated by a matching pair of open and close brackets. Square brackets ([])
are most often used as the span brackets, however other characters can be specified in the Template Properties
dialog. Span ranges can be nested within one another. A close bracket matches an open bracket if there are no
other unmatched open or close brackets in the range of text between them.
Spans can be inserted at various places within a document:
The body of the document.
The page headers and footers associated with a section.
Within footnotes and endnotes.
Superscripted styles
Only text that has been explicitly superscripted will be considered as part of the span mark-
up. Text that has a character style whose definition includes superscript (e.g. the character
style Footnote Reference) will not be considered as part of the mark-up.

July 17, 2017
23
Contract Express® Author Getting Started Manual
Generally, a span condition is simply a business rule. In this example we will use the following as a possible span
in a document (using the default square brackets as the delineators):
[This Agreement is subject to the laws of the State of New York]
6.1 Inserting spans
The easiest way to insert a new span is to position the cursor at the point in the template you want the
span to appear, or highlight the existing text in the template that you want to be controlled by the span,
then press the Insert Span button in the Contract Express tab in Microsoft Word.
This presents the Span Editor dialog:
Either select an appropriate business rule from the drop-down list or simply type a new one. The drop-down list
contains all the business rules currently used in the template plus any Yes/No type variables that exist in the
dictionary.
By clicking the ‘Edit’ button in the Span Editor, the Expression Editor is brought up.
It is then possible to create spans by selecting a Variable, a Logical Operator (‘And’, ‘Or’. ‘IsMoreThan’… etc.) and
one of the Variable’s Possible Values. Rules that have been previously created are also available here. Note that
the Expression Editor uses the auto-complete feature as detailed in section 6.7.
6.2 Updating spans using the Markup Editor
It is possible to update spans by using the Markup Editor. To do this, click the Markup Editor in the Ribbon and
use the left/right arrows to navigate to the span that you would like to update.

July 17, 2017
24
Contract Express® Author Getting Started Manual
Edit the text in the Markup Expression field then click Update at the bottom of the task pane. By clicking on the
arrow on the Update button, you can choose whether to only update that single occurrence of the span that is
selected by clicking Update Selected Markup. Alternatively, you can choose to update all occurrences in the
template of the selected span by clicking Update All Markup.
You can revert any edits that have been made to the markup before clicking update by clicking on Reset.
Note that it is not possible to edit the definition of a variable that is in a field. This must be edited using the
Dictionary Editor.
6.3 Business rules
The conditional span business rule can be any expression with value to compare against, for example:
Age IsMoreThan 21
Or even a simple Yes/No question like:
DirectorUKDomiciled
6.4 Creating business rules
6.4.1 Simple business rules based on yes/no variables
The simplest form of business rule is one which is based on a yes/no type variable. In this case we may decide to
create one called "AgreementInNY". By typing this into the span editor, the business rule is applied to the span
and a yes/no variable is automatically created which controls the inclusion on the span (hint: to change the
question phrasing - use the variable editor):
Quoting Variable Names
Remember that Variable names containing certain characters (including spaces) will need to
be quoted using single quotes:
'Tax Regulations Apply'
For a list of characters that do not need quoting see the Characters used in Identifier names
topic in the online documentation.

July 17, 2017
25
Contract Express® Author Getting Started Manual
[
AgreementInNY
This Agreement is subject to the laws of the State of New York]
Note that if your variable name contains certain characters, it will need to be quoted:
[
'Agreement In NY'
This Agreement is subject to the laws of the State of New York]
6.4.2 Standard business rules based on selections
The most common form of business rule compares a question variable with a literal value. The syntax is usually:
VariableName Is "Value"
For example:
Region Is "North America"
This usually comes from a text selection variable with 2 or more options (in our case the Region variable may have
"Europe", "South America", "Africa" and "Australasia" as well as "North America"):
[
Region Is "North America"
This Agreement is subject to the laws of the state of New York]
6.5 Combining business rules
Simple business rules can be combined using the operators "and", "or" and "not". The Author task pane provides
direct support for this. Select one or more business rules in the Author task pane and then right-click on one. A
pop-up menu offers to insert various combinations of the selected business rule(s).
[
Region Is "North America" or Region Is "South America"
This Agreement is subject to the laws of the state of New York]
6.6 Business rules based on computable variables
More complex business rules obviously take up more space in the template wording, which can make the template
harder to read. One way to avoid this problem is to move the complex expression into a computation variable and
use the computation variable in the body of the template. For example we could define a computable variable
named Americas OR Americas Area whose definition is:
Region Is "North America" or Region Is "South America"
Single vs Double quotes
Note that the value from text selection variables are double-quoted in the business rule. If
the text selection variable also had spaces or other characters that need to be quoted in
identifiers, the business rule would look like this:
[
'Contract Region' Is "North America"
This Agreement is subject to the laws of the state of New York]

July 17, 2017
26
Contract Express® Author Getting Started Manual
[
Americas
This Agreement is subject to the laws of the United States of America]
Or
[
'Americas Area'
This Agreement is subject to the laws of the United States of America]
6.7 Handling Pluralities
There may be cases where the wording in the document is dependent on whether a singular value or a multi value
is entered/selected in the questionnaire.
For example, a document refers to a “Tenant” but depending on the value of the variable “tenantCount” we will
need to use either term "Tenant" or "Tenants". In this case we will highlight the text “Tenant” and click on the
Pluralise button on the Contract Express ribbon. The highlighted text will be auto populated in the Singular field
and Contract Express Author will attempt to pluralise the highlighted text. If this is unsuitable, the plural value can
be edited.
Then select the variable which will determine whether the singular or plural value should be used – this will need
to be a variable of type Whole Number (see section 8.1.3 for more details about variable types). In our example
the variable will be “tenantCount”.
It is also possible to highlight a plural value and Contract Express Author will attempt
to auto populate the singular value. If we highlight “Tenants” instead, click on
Pluralise then click on the down arrow we can select the option to Move Plural to
Singular.
Once you are happy with the values, click OK.
You will be asked whether you would like to apply the pluralization to all occurrences of the highlighted text. If
Yes is selected then Contract Express Author will scan the template to see if there are any other occurrences and
update them all. If there are no other occurrences then no additional updates will be made to the template. As
with our example, we would click Yes to update all instances of “Tenant” in the document or click No to update
only that single instance.

July 17, 2017
27
Contract Express® Author Getting Started Manual
6.8 Code completion of expressions
When creating statements in the Contract Express Mark-up Language (CEML) within the Dictionary Editor or when
inserting a Field/Span, Contract Express Author offers suggestions of possible variables, variable values, functions
or operators that can be applied to a statement as you type. These smart suggestions will attempt to complete
statements using existing Variables and their values within the Dictionary of the template along with operators
and built-in/custom Functions.
Within any multiline edit field, the code completion feature is triggered once you begin typing and the list of
suggestions filters down as you continue to type.
To select a suggestion simply double click on the desired item or use the keyboard down arrow to scroll through
the list and hit Enter to select the item. Highlighting a Variable in the suggestion list will display the Question
attribute of the Variable.
For ease of understanding, Contract Express Mark-up Language (CEML) statements are color coded using the key
below:
Identifiers (and single quoted identifiers): Light Blue
Functions: Blue
Numbers and operators: Black
Strings: Red
Comments: Green
Parameters: Light Blue
Keywords: Grey

July 17, 2017
28
Contract Express® Author Getting Started Manual
7. Using the Dictionary Editor
The Dictionary Editor is a central component of Contract Express Author. It provides access to a number of
features for managing the Contract Express Author dictionary. To open the Dictionary Editor, click on the
Dictionary Editor icon from the Contract Express tab.
With the Dictionary Editor you can:
View all variables defined in the dictionary.
Create new variables.
Edit existing variables.
Add existing variables to the current template.
Search for variables.
Check spelling across the dictionary.
Rename variables.
Find and replace text across the dictionary.
Show the relevance of a variable.
Create and Edit Questionnaire pages.
Determine where variables are referenced elsewhere in the dictionary.
View relevancy information.
Check the mark-up of the current template.
View issues reported in the current template.
7.1 Docking and undocking the Dictionary Editor to the task pane
When the Dictionary Editor is opened for the first time, it floats over the top of the Microsoft Word Document in
an "undocked" state. This mode works very well if you are using dual monitors as the Dictionary Editor can be
opened on one screen with the document open on another screen. For those users who only have a single screen
you may wish to "dock" the Dictionary Editor into a task pane. To do this, click on the Dock icon in the Dictionary
Editor Toolbar as highlighted below:

July 17, 2017
29
Contract Express® Author Getting Started Manual
When the Dictionary Editor is docked it will appear in the task pane on the right side of Microsoft Word. You can
undock again by clicking the dock button in the Dictionary Editor Toolbar.

July 17, 2017
30
Contract Express® Author Getting Started Manual
7.2 Toggling between sections of the dictionary
The examples below use the sample Non Disclosure Agreement template which is included in every new install or
new account in Contract Express.
When the Dictionary Editor loads for the first time you are presented
with the Home menu which displays links to All Variables,
Questionnaire, Lookup tables, Alerts and Functions. You can switch
between these areas of the dictionary by either going home and
selecting from the home menu, or selecting from the drop-down menu
beneath the toolbar.
7.3 Viewing all variables in the dictionary
Select All Variables from the dictionary drop-down menu to view all variables within the dictionary. When
undocked, the list of variables will appear in the content area on the left. Selecting a variable from this list will
display all of the attributes of that variable on the right. When docked the variable list appears at the top with the
variable attributes below.
July 17, 2017
31
Contract Express® Author Getting Started Manual
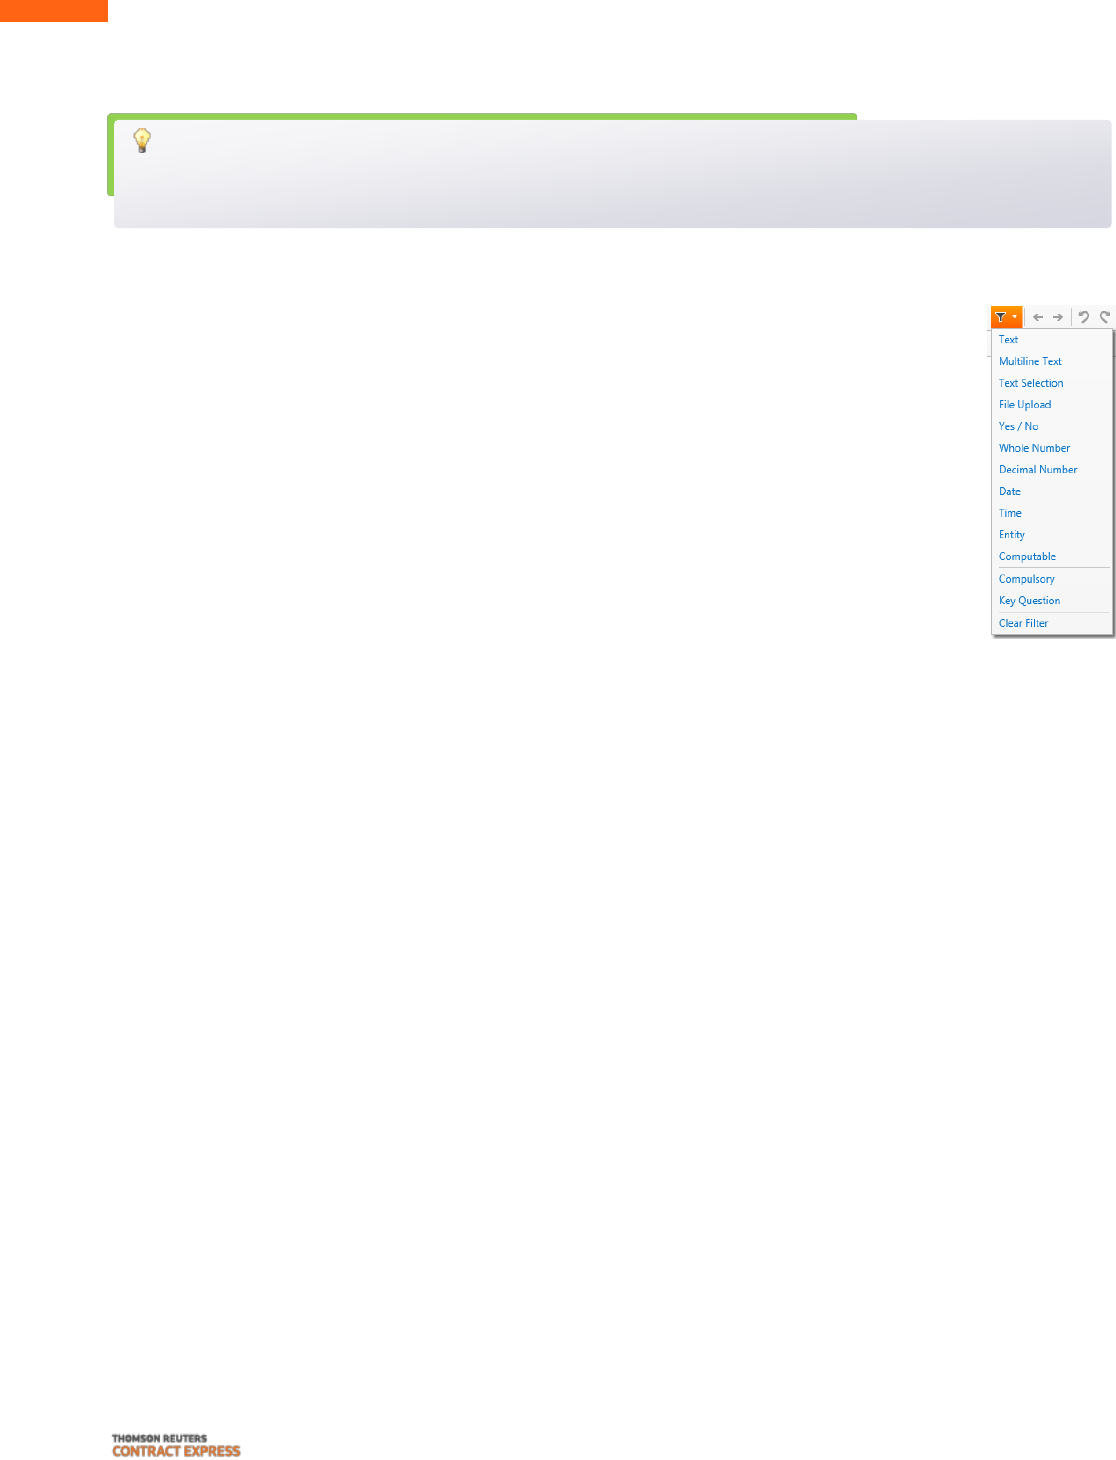
7.3.1 Filtering the list of variables
To apply a filter to the list of variables, click on the filter icon from the toolbar. You can filter the
list by Variable type, Compulsory questions or Key questions by selecting the required type from
the drop-down list.
To change the filter type, select a different option from the drop-down menu. Or to remove the
filtering select “Clear Filter”.
Grayed out variables
A grayed-out variable is one that is defined in the dictionary but not used in that document.

July 17, 2017
32
Contract Express® Author Getting Started Manual
7.4 Adding a variable to the dictionary
To add a variable to the dictionary select the new icon from the
toolbar. Select New Variable from the drop-down menu. This will then
display the attributes for the variable, such as prompt, type, guidance
and selections. See section 8 below for more details about the different
attributes of a variable.
7.5 Inserting existing variables into the current document
To apply an existing variable to a new location in the template, either place the cursor in the position you would
like to add the variable, or select the text that you would like to replace with the variable. Then right click the
variable in the Dictionary Editor and select Insert to document. Alternatively, you can drag and drop a variable
from the Dictionary Editor into the document.
7.6 Find a variable in the dictionary
To search for a specific variable in the list click the Find icon in
the Dictionary Editor Toolbar. This will open the Find pane above
the list of variables. With Current List selected in the Find Where
drop-down the search will be performed against the current list
of variables names.

July 17, 2017
33
Contract Express® Author Getting Started Manual
7.7 Find and replace across entire dictionary
The Find pane also enables users to search for a string of text across the entire
dictionary and to replace that text with new text. Select Entire Dictionary from
the Find Where drop-down. Enter what you want to find in the “Find What”
text box and enter the replacement text in the Replace With text box.
7.8 Spell check the entire dictionary
To check the spelling in your dictionary, click the spell check
icon in the Dictionary Editor Toolbar. This will launch the spell
check dialog. Use the Ignore / Add to Dictionary and Change buttons.
Clicking on Go To Definition will redirect you to the item that contains
the misspelled word.
7.9 Delete a variable
To delete a variable in the dictionary, right click the variable and select Delete from the actions menu.
7.10 Duplicate a variable
To make a copy of a variable, right click the variable and select Duplicate.
Removing all variables
To remove all unused variables select all the grayed-out variables and right click and select
delete. This may reveal further unused variables (i.e. variables that only occurred in the
definitions of previously deleted computation variables). Repeat this process until there are no
more grayed-out variables. If Contract Express Author states that the variable is used, first select
the variable and use the Right and Left arrows in toolbar to find where it is used in the
document, or right click the variable and select Find in Dictionary.

July 17, 2017
34
Contract Express® Author Getting Started Manual
7.11 Show the relevance of a variable
Contract Express automatically creates questionnaire forms from your Microsoft Word templates when you click
on the Test button. These questionnaire forms are dynamic decision trees such that answering one question may
lead to further questions becoming enabled. Contract Express uses the location of variables within the template
to work out these dependencies. The relevance of a variable is the expression or rule which must be true for that
question to be enabled on the questionnaire. The Dictionary Editor allows authors to view what Contract Express
determines as the relevancy of a variable.
Locate the variable in the Dictionary Editor. Select the Usage tab from the variable attributes panel as shown
below. Always click Refresh to instruct Contract Express Author to update the relevance information.
“Used, but only in contexts that do not contribute to relevance”
You may see a message "Used, but only in contexts that do not contribute to relevance." in the
Variable Usage text box. This may indicate that a Usage Analysis has not been completed. Click
on Refresh beneath the Variable Usage text box to force a Usage Analysis and update the
relevancy information.

July 17, 2017
35
Contract Express® Author Getting Started Manual
7.12 Navigate between uses of a variable
Select the variable you wish to find in the document. Click on the forward and back arrows in the Dictionary Editor
Taskbar to highlight the next/previous uses of the selected variable in the document.
7.13 Determine where variables are referenced elsewhere in the dictionary
Right-click on the variable you are interested in and choose Find in Dictionary. A pop-up dialogue box will detail
all the instances of that variable.
7.14 Jump to a variable referenced in a computable variable
Computable variables can contain other variables in their definition. For example in the sample Non Disclosure
Agreement there exists a computable variable named UniIn which is defined as DisclosingParty Is "Outside party
only".
The Go to definition icon in the Dictionary Editor Toolbar allows the template author to jump from the
current computable variable to the variable selected in the definition. In the following example, the UniIn
computable variable is selected in the Dictionary Editor. The Computation tab is selected in the attributes pane
and the DisclosingParty variable highlighted in the definition text box. By clicking on the Go to definition button
in the toolbar selects the DisclosingParty variable in the Dictionary Editor.
Click on the Back button in the Dictionary Editor Toolbar to return to the UniIn variable.
7.15 Check the mark-up of the current document
Click the refresh icon in the Dictionary Editor Taskbar to force Contract Express Author to scan the mark-up in
the current document and refresh the dictionary. If Contract Express Author finds any issues with the current
document it will change the traffic light in the status bar from green to orange or red, depending on the severity
of the issue.

July 17, 2017
36
Contract Express® Author Getting Started Manual
Click on the status bar to open up the status pane to view the issues:
If the issue is related to mark-up in the document, double clicking the issue will highlight the area in the
document. If the issue is related to a variable, double clicking the issue will open that variable in the Dictionary
Editor.

July 17, 2017
37
Contract Express® Author Getting Started Manual
8. Editing Variables
Variables are added and edited in the Dictionary Editor. The Dictionary Editor is opened by clicking the Dictionary
Editor button on the Contract Express tab in Microsoft Word. When the Dictionary Editor is opened click on All
Variables to access the list of variables in the current document. For a quick introduction to adding new variables
see section 4. For an introduction to the features and functions of the Dictionary Editor see section 7.
This topic covers the editing of variables, specifically their attributes.
When a variable is selected in the Dictionary Editor the attributes of the variable are visible in the attributes panel.
The attributes panel appears below the variable list when the Dictionary Editor is docked in the task pane, or to
the right of the variable list when the Dictionary Editor is undocked.

July 17, 2017
38
Contract Express® Author Getting Started Manual
The attributes are organized into the following tabs:
General: Most commonly used attributes such as Name, Question and Compulsory.
Guidance: Contains both Guidance and Preamble.
Constraints: Selections, default value, character lengths.
Computation: Definition for computable variables.
Document: Including the default format and case.
Usage: relevancy and author notes.
Each attribute is described below.
8.1 General Tab
8.1.1 Name
Specifies the name of the variable.
Note that variable names are not case-sensitive, so BuyerName is the same as buyername and also the same as
BUYERNAME. However, the name as it appears in the Dictionary Editor is the name that appears elsewhere in the
Contract Express Author UI, such as the expression editor.
If the name of your variable includes a space or any character outside of the letter characters from the Latin-1
Supplement or Latin Extended-A Unicode character set, then the Dictionary Editor will automatically add single
quotes around the variable when the variable is added into a field in the template.

July 17, 2017
39
Contract Express® Author Getting Started Manual
8.1.2 Question
Specifies the question text that is displayed on the questionnaire displayed to end users. This can have rich text
formatting using the rich text controls above the text box.
8.1.3 Type
The type of the variable primarily determines how its value is collected on the questionnaire, and secondly how
that value appears in a generated document.
The type of a variable determines the kinds of values that can be entered into the field on the questionnaire and
how that information can be used in your master document. For example, when Contract Express encounters a
date type it will add a field and a calendar popup box on the questionnaire page. When displaying the answer to
this date in the generated document you can choose whether to have it display in short form e.g. 01/01/2008,
long form 1st January 2008 or a custom format.
Escape character and reserved words.
If you include a single quote as part of the variable Name, the Variable Editor will automatically
add a backslash character to escape the quote: \'
Similarly, if the name includes a backslash, the variable editor will prefix this with a further
backslash character \\
If you add fields into the template as you type, you must remember to escape quotes and
backslashes where necessary.
There are a number of reserved words which variable names cannot contain such as AND and
NOT. The full list is as follows:
alt, and, answered, as, attach, attribute, authornote, by, capitals, cell, cloaked, collect,
collectvalues, committed, datatype, deferred, definite, doctitle, document, else, every, exists,
export, expressiontext, false, foreach, format, from, hyperlink, if, ifknownelse, include, is,
isatleast, isatmost, islessthan, ismorethan, isnot, known, knowntrue, label, list, lower, mark,
nonmutualand, nonmutualor, nonrepeated, not, note, now, occurrence, onlyoninput,
onlyonoutput, onlyother, or, other, otherselections, picture, prefix, prescribedselections,
proper, punctuation, ref, reference, relevance, repeat, repeatcontext, repeatcounter, select,
selectionoptions, sensitive, simplify, spanrelevance, style, sure, template, templaterelevance,
textfile, then, to, today, true, unrepeated, upper, using, value, where, with, xor
Additionally, you cannot use the following symbols as the variable name (but they can be
included as part of the variable name if quoted):
+ - * / // , ( ) # ? .

July 17, 2017
40
Contract Express® Author Getting Started Manual
The type of variable also determines how you can manipulate that variable in your master document. A variable
whose type is set to a number can be used in numeric calculations. For example, it is possible to add two number
variables together and put the resultant calculation into a field in the document.
Variables that ask the user to choose from a series of selections are well suited for controlling the inclusion of
conditional text. This is because each item of conditional text is based on some pre-configured option, rather than
a number or free text.
Type
Description
Text
Any single row of text
Multiline Text
Any multiline text
Text Selection
A list of text selections from which one or many can be chosen (see special note below)
File Upload
A path to a document to be uploaded and re-generated
Yes/No
Yes or No options
Whole Number
A whole number, including positive and negative numbers but no decimals
Decimal Number
Any number, including positive and negative whole numbers and decimal numbers
Date
Any date
Time
Any time
Entity
A collection of data values from multiple variable types
Computable
Derived from an expression. Could be a calculation containing number variables, a
concatenation of text variables or a business rule based on multiple text selections with
"AND" and "OR" operators
8.1.4 Presentation
This attribute is only applicable to Yes / No, Date, Time, Whole Number and Text Selection variables. The
presentation determines how values are presented, and thus collected, on the questionnaire.
Text selections are text types
Even if your text selection contains a list of numbers, Contract Express Author will treat these
as text options - you must refer to them with quotes in Business Rules. If you want to perform
numeric calculations on text selection options then you will need to convert them to a
number using the ToNumber number function.

July 17, 2017
41
Contract Express® Author Getting Started Manual
The options available in the presentation drop-down list vary according to the type of variable.
Presentation: Yes/No Variables
Radio
Buttons
The user is presented with a pair of radio buttons
representing Yes and No.
Check Box
The user is presented with a single checkbox
representing Yes (checked) and No (un-checked).
Presentation: Date Variables
Calendar
The user is presented with an edit box and a button
which invokes a popup calendar.
By Format
The user is presented with a mixture of edit boxes
and drop-down selections that are determined by
the year/month/day ingredients in the variable's
default format.
Presentation: Time Variables
Clock
The user is presented with an edit box and a button
which invokes a popup clock.
By Format
The user is presented with a mixture of edit boxes
and drop-down selections that are determined by the
hour/minute/second/am pm ingredients in the
variable's default format.
Presentation: Whole Number Variables
Edit Box
The user is presented with an edit box in which the
whole number value can be entered.

July 17, 2017
42
Contract Express® Author Getting Started Manual
Calculated
From
Repeat
The question does not actually appear on the
questionnaire, but is calculated as the number of
repetitions created for one or more repeated variables.
N/A
Presentation: Text Selection Variables
Single
Select
Drop-down
The user is presented with a drop-down list from which
one and only one option can be chosen.
Single
Select
Radio
Buttons
The user is presented with a group of radio buttons of
which one and only one radio button can be pressed.
Multi-
Select List
The user is presented with a select box containing
options from which none, one, many or all can be
chosen.
Multi-
Select
Checkboxes
The user is presented with a group of checkboxes of
which none, one, many or all can be checked.
Searchable
List
The user is presented with an edit box - as they type
characters a select box appears which contains options
that match what they have typed - one and only one
option can be chosen. Searchable lists must always be
dynamically built.

July 17, 2017
43
Contract Express® Author Getting Started Manual
Presentation: Multiline text variables
Rich
Text
The user is presented with an edit box with various
formatting options. This is for populating HTML.
8.1.5 Compulsory
Specifies whether the question is compulsory (checked) or non-compulsory (un-checked). When compulsory is
checked, the question must be answered by the user. A compulsory question is indicated on the questionnaire by
the presence of a red asterisk, between the question and the value field. Contract Express will not allow any
questionnaire page to be submitted if it contains a relevant compulsory question that has not been answered.
8.1.6 Key Question
Specifies whether it is a key question (checked) or not (un-checked). The questionnaire can be configured so that
it only contains key questions. This can be achieved by creating a new profile in Contract Express and changing
the setting Display a subset of questions on the questionnaire.

July 17, 2017
44
Contract Express® Author Getting Started Manual
8.2 Guidance Tab
8.2.1 Guidance
Specifies the guidance text that appears on the questionnaire.
This is edited in the same way as the question attribute except
that it will appear below, rather than above, the variable's
answer box, and in smaller text. As with the question, rich text
formatting can be applied to guidance.
Images can be placed within the guidance by switching the editor to source mode. Click on the icon then enter
the URL for the image using a HTML image tag (e.g. <img src="URL">)
8.2.2 Preamble
Specifies the preamble text that appears on the questionnaire.
This is very similar to the guidance attribute except that it appears above the question on the questionnaire. As
with the question and guidance boxes, rich text formatting can be applied to preamble text.

July 17, 2017
45
Contract Express® Author Getting Started Manual
8.3 Constraints Tab
8.3.1 Selection List Items
This attribute contains sub-attributes that determine whether the user can pick
only a single choice or multi-values and also how they are presented on screen.
There are a group of sub-attributes that collectively determine which selection
options appear on the questionnaire:
Dynamic: Options are specified statically or dynamically.
Search Mode: Searchable lists can use "begins with" or "contains" to
match the text entered by the user.
Unknown: The questionnaire user can explicitly state that the selection is
unknown.
Other: The questionnaire user can specify options that are not in the list.
All: The questionnaire user can select all options with a single click.
The Selection List Items section determines how individual options in a text
selection are specified. There are two options and the Dynamic checkbox controls which of the options is selected
as follows:
1. Dynamic is unchecked: The text selection will be a static list of options
2. Dynamic is checked: The text selection will be built dynamically from an
expression such as a lookup expression
Static options are entered into the edit box on separate lines.
Default values are chosen by selecting an option and then clicking the Toggle
Default button which will embolden the option and pre-select that answer on the
questionnaire.
Dynamic options are expressions entered into the edit box which result in a list
being created. The edit box makes use of the code completion feature as detailed
in section 6.7.
For example, in the sample Non Disclosure Agreement, the OtherPartyCountry
variable is a text selection whose text selection options are defined as a dynamic
list. The expression is Select Country which instructs Contract Express to look for
a lookup table containing a column called Country and present the options in the
questionnaire from that lookup.
Text Selection variables can have a Presentation Type of Searchable List. This results in the questionnaire
presenting the user with a text box, but as the user types into the text box a drop-down pane will appear displaying

July 17, 2017
46
Contract Express® Author Getting Started Manual
text selections which match the text entered so far. The Search Mode
attribute is displayed for Text Selections of this Presentation Type and
defines how Contract Express will perform the search. The options are:
Begins With: Only items that start with the entered text will be
displayed
Contains: Any item that contains the entered text will be
displayed
When Show Unknown sub-attribute is checked an additional option
appears on the questionnaire which allows the user to explicitly state
that the selection is unknown. This is useful if you do not want the text
selection to be pre-filled with a default value. You can change the label
for the unknown option from the default "select ..."
When Show Other is checked an additional option appears on the
questionnaire which allows the user to enter an option or options that
are not in the list of options.
This additional option is labeled Other (for english_uk and english_usa
locales) which can be changed by entering the new label in the corresponding edit box to the right.
For example, consider a multi select checkboxes list of options representing communal areas in a leased property.
Business rules testing for Other
Consider the effect of the user choosing the "Other" option on your generated document. If you
are only using the variable in a field, their answer will automatically be used for the value of the
field. If you are using the variable as part of a Business Rule you may need to add extra provision
in for when they choose Other. Business Rules based on this scenario use the
Other(VariableName) function.

July 17, 2017
47
Contract Express® Author Getting Started Manual
Dynamic selections are used anytime we do not want to use static options for our lists. They can be built from
other multi-select variables, repeat values, lookup table, database tables views or SharePoint lists.
Consider a multi-select variable with product options:
We may then want to choose which Products are being sold with a support package using one text selection
variable:

July 17, 2017
48
Contract Express® Author Getting Started Manual
To do this we use the answer to the Product question as the Options for the
Support question by entering it into the Dynamic Selections area for
SupportPackage.
We can also use Repeat values as the options for a text selection variable.
Since text selections are filled with Lists, we need to build a list from our
repeated values. We use the Collect function to do this. Let’s say we ask for
one or more PartnerNames within a repeat span. Therefore our dynamic
selections definition for the text selection variable EquityPartners becomes:
Collect(PartnerName)
Columns from lookup tables can also be used to populate the options of text
selections. In the dynamic selections area we use a select statement to refer
to the column name, for example:
Select State
We can also display one column as the options seen on the questionnaire but
have the value of the text selection come from another column. This is useful if you want the user to choose the
state but actually have the state code as the value for the variable:
Select Statecode, State
In the above example, the options on the questionnaire would be populated with state names such as Alabama,
Alaska, Arizona etc. but the value in the document would be AL, AK, AZ (useful for addresses).
Columns from database tables, views or SharePoint lists can also be used to populate the options on a text
selection variable. These are very similar to working with lookups but you must add a FROM clause to the select
statement to state the table name the lookup is to be performed on:
Select State From USStates
Or:
Select Statecode, State From USStates
When data values actually reside in an external source, you must set up a link to that database by defining a Table
in Contract Express. Once the view has been created you can use Select statements such as those referred to
above. You must always use a From clause.
8.3.2 Template
This attribute is only pertinent for Entity variables.

July 17, 2017
49
Contract Express® Author Getting Started Manual
8.3.3 Allow new
This attribute is only pertinent for Entity variables.
Controls whether new entities can be used when completing the questionnaire. If checked, Business Users will be
able to add new entities. If un-checked, Business Users will only be able to add existing entities when completing
this question.
8.3.4 Filter
This attribute is only pertinent for Entity variables.
8.3.5 Label
This attribute is only pertinent for Entity variables.
The text entered in the Label field will be displayed as a suffix for the Set/Change/Remove entity buttons in the
questionnaire e.g. the Label field has the text “Address”.
In the questionnaire this will be displayed as:
Set Address
Change Address
Remove Address
8.3.6 Minimum Value
This attribute is only pertinent for Whole Number, Decimal Number, Date and Time variables.
Minimum values are used to ensure the user enters a value that is at least the specified minimum, and are
expressions which can be either:
1. Entered manually in the edit box, or
2. Clicking the corresponding Edit... button to the right of the edit box to invoke the Expression Editor.
The type of the minimum value expression must correspond to the type of the variable. So, for example, Whole
Number variables must have a minimum value expression which evaluates to a whole number.
8.3.7 Maximum Value
This attribute is only pertinent for Whole Number, Decimal Number, Date and Time variables.
Maximum values are used to ensure the user enters a value that is at most the specified maximum, and are
expressions which can be either:
1. Entered manually in the edit box, or
2. Clicking the corresponding Edit... button to the right of the edit box to invoke the Expression Editor.

July 17, 2017
50
Contract Express® Author Getting Started Manual
The type of the maximum value expression must correspond to the type of the variable. So, for example, Whole
Number variables must have a maximum value expression which evaluates to a whole number.
8.3.8 Default Value
Default values are values used to pre-fill the questionnaire on first use. Default values are expressions which can
be either:
1. Entered manually in the edit box, or
2. Clicking the corresponding Edit... button to the right of the edit box to invoke the Expression Editor.
The type of the default value expression must correspond to the type of the variable. So, for example, Date
variables must have a default value expression which evaluates to a date. Use the Today function to default a date
variable to today's date. To do this just type Today in the default box.
8.3.9 Minimum Character Length
This attribute is only pertinent for Text and Multiline Text variables.
When specified it must be a positive whole number which represents the minimum number of characters that can
be entered on the questionnaire.
8.3.10 Maximum Character Length
This attribute is only pertinent for Text and Multiline Text variables.
When specified it must be a positive whole number which represents the maximum number of characters that
must be entered on the questionnaire. The text box on the questionnaire will stop the user entering more
characters than the value specified for this attribute.
8.3.11 Mask
This attribute is only applicable to Text and Multiline Text variables. There are two kinds of masks that can be
specified:
A pre-defined mask.
A regular expression that restricts characters in certain positions to be of a certain form.
Defaults are only prefill values
If the variable is un-answered, either because the user removed the default value or because
the user did not visit the questionnaire page that contained the question, then the default value
is NOT used when generating the document. This ensures that only values that have been
submitted (and thus confirmed) by the user can appear in generated documents.

July 17, 2017
51
Contract Express® Author Getting Started Manual
The pre-defined masks are:
telephone
The user must enter a valid telephone number.
Any sequence of digit (0-9) characters, minus (-) characters and space characters.
Optional leading plus (+) character.
Optional matching pair of open/close round brackets.
emailaddress
The user must enter a valid email address.
Any sequence of characters that contains at least one at (@) character and at least
one dot (.) character.
webaddress
The user must enter a valid web address.
Any sequence of characters that contains at least one dot (.) character.
searchaddress
Enables the postcode search feature within the questionnaire. A Postcode Search
button will be displayed next to the text field in the questionnaire. Note that this
feature will only work when using en-GB as the base locale and only applies to UK
postcodes.
searchcompany
Enables the companies house search feature. A button “Search Companies House”
will be displayed next to the text field in the questionnaire. Note that this feature will
only work when using either of the following locales:
- en-GB as the base locale: this will only allow searching for companies registered in
the UK
- nl-NL as the base locale: this will only allow searching for companies registered in
the Netherlands
password
The edit box contains bullet characters for every character typed by the user.
file
A "Browse..." button to the right of the edit box which enables the user to browse to
a file URL.
Use the drop-down list to apply a pre-defined Mask. Otherwise type into the Mask edit box to customize the
Mask using a regular expression.
The characters in a regular expression have the following meaning:
# A digit character in the range 0-9
a A lowercase letter character in the range a-z
A An uppercase letter character in the range A-Z
^ A letter character in the range a-z or A-Z
_ An optional space character
? Any character
* Any sequence of zero or more characters
Any other character in the mask must be matched verbatim. For example, to ensure the user enters a valid UK
National Insurance number (of the form AB 12 34 56 Z), with or without space characters to separate the digits,
the mask is:
^^_##_##_##_^
Which represents:

July 17, 2017
52
Contract Express® Author Getting Started Manual
letter, letter, optional space, digit, digit, optional space, digit, digit, optional space, digit, digit, optional space,
letter.
8.3.12 Custom Repeat Labels
This attribute is only pertinent for Whole Number variables using a presentation style of Calculated from Repeat.
It allows customization of the text on the 3 repeat buttons, the defaults being 'Insert After', 'Insert Before' and
'Delete'.
8.3.13 Tag for Yes
This attribute is only pertinent for Yes / No variables. It allows the user to specify a text label for the ‘true’ option,
the default value being 'Yes'.
8.3.14 Tag for No
This attribute is only pertinent for Yes / No variables. It allows the user to specify a text label for the ‘false’ option,
the default value being 'No'.
8.4 Document Tab
8.4.1 Default Format
The default format attribute determines how, in the absence of any local formatting, variable values appear in a
generated document. The default format is interpreted according to the type of the variable. Use the dropdown
to choose from popular formats or type your own formatting. Clicking on the Preview Button next to the Default
Format box will take you to the Format dialog.
Use the Format dialog to test how formatting will look in the generated document. Use the dropdown at the top
to choose formats or customize by typing in your own. The values on the left represent test values and the box on
the right will show how those values will look if the formatting is applied. Use the Locale to see how this will affect
the output.
8.4.2 Default Case
The default case attribute determines, in the absence of any local case, the casing of variable values as they appear
in a generated document. The options are:
Capitals: The first letter of the word will appear capitalized in the generated document.
Uppercase: All letters will appear in uppercase in the generated document.
Lowercase: All letters will appear in lowercase in the generated document.
Case-sensitive: All letters will appear as they are entered on the questionnaire in the generated
document.

July 17, 2017
53
Contract Express® Author Getting Started Manual
8.4.3 Default Alternative Text
The default alternative text appears in a generated document if the variable's value is unknown. It will also appear
in active text when the variable's value is unknown. You can override the default alternative text of a variable by
including an ALT phrase in an expression field.
For example:
{NameBuyer ALT "the buyer"}
8.5 Usage Tab
8.5.1 Variable Usage
This is a read-only field which displays the relevancy of the variable in the current document.
8.5.2 Author Note
The Author Note is for information purposes only. This attribute can be used to describe the role of the variable,
or what it means in relation to other variables, or even how it maps onto some external data source. It can also
be used to store a temporary note about a variable to remind you of tasks on that variable yet to be completed.
The description does not appear either on the questionnaire or in a generated document.
8.6 Computation Tab
8.6.1 Definition
This attribute is used to define a Computable variable in terms of other
variables. For example, to create a new variable which represents 3 months
after the execution date.
This field makes use of the auto-complete feature as detailed in the section
6.7.
8.6.2 Save in Session
If you tick this check box then the value of the computed variable will be
recorded in the answer set. It is only applicable to unrepeated variables. This
is useful for exposing data to other systems, such as Contract Express for
SharePoint or Contract Express for Salesforce.

July 17, 2017
54
Contract Express® Author Getting Started Manual
9. Using the Markup Editor
The Markup Editor provides a way for you to view/edit/delete fields and spans in the template. To open the
Markup Editor, click on the Markup Editor icon from the Contract Express tab.
With the Markup Editor you can:
View all spans/fields in the template
Edit existing spans/fields
Delete spans/fields in the template: note that deleting/editing fields that are variables will not edit the
definition of the variable in the dictionary. Variable definitions should be edited/deleted via the Dictionary
Editor
9.1 Docking and undocking the Markup Editor to the task pane
When the Markup Editor is opened for the first time, it floats over the top of the Microsoft Word Document in an
"undocked" state. This mode works very well if you are using dual monitors as the Markup Editor can be opened
on one screen with the document open on another screen. For those users who only have a single screen you may
wish to "dock" the Markup Editor into a task pane. To do this, click on the Dock icon in the Markup Editor Toolbar
as highlighted below:

July 17, 2017
55
Contract Express® Author Getting Started Manual
When the Markup Editor is docked it will appear in the task pane on the right side of Microsoft Word. You can
undock again by clicking the dock button in the Markup Editor Toolbar.

July 17, 2017
56
Contract Express® Author Getting Started Manual
9.2 Choose what is displayed in the Markup Editor
Applying a filter to the Markup Editor will determine what type of markup is displayed in the
Markup Editor. To apply a filter click on the filter icon from the toolbar. You can filter the list so
that it only shows spans or only shows fields.
To change the filter type, select a different option from the drop-down menu. Or to remove the
filtering select “Clear Filter”.
9.3 Walking up the tree structure of nested spans of text
It is possible to create deeply nested spans of optional or repeating text within a Contract Express template. When
deep nesting occurs it is important to be able to walk the structure of the nested optional spans from the
innermost span to the outermost span. The Outer Span button on the toolbar of the Markup Editor performs this
walking of the nested structure.

July 17, 2017
57
Contract Express® Author Getting Started Manual
In the following simple example the cursor is placed inside the field containing the variable VarA. The Outer Span
button is then pressed and variable is highlighted. Pressing again selects the repeat span and this continues until
the outermost span is highlighted.

July 17, 2017
58
Contract Express® Author Getting Started Manual

July 17, 2017
59
Contract Express® Author Getting Started Manual
9.4 Updating spans using the Markup Editor
It is possible to update spans by using the Markup Editor. To do this, click the Markup Editor in the Ribbon and
use the left/right arrows to navigate to the span that you would like to update.
Edit the text in the Markup Expression field then click Update at the bottom of the task pane. By clicking on the
arrow on the Update button, you can choose whether to only update that single occurrence of the span/field that
is selected by clicking Update Selected Markup. Alternatively, you can choose to update all occurrences in the
template of the selected span by clicking Update All Markup.

July 17, 2017
60
Contract Express® Author Getting Started Manual
You can revert any edits that have been made to the markup before clicking update by clicking on Reset.
Note that it is not possible to edit the definition of a variable that is in a field. This must be edited using the
Dictionary Editor.
9.5 Deleting markup using the Markup Editor
To delete a field or a span, click the Markup Editor in the Ribbon and use the left/right arrows to navigate to the
field/span that you would like to delete.
Click on the Delete option in the toolbar to delete that field/span. By clicking on the arrow on the Delete button,
you can choose whether to:
Delete Selected Markup and Content: this will delete the markup and the content within the markup for
this single occurrence only
Delete Selected Markup: for this single occurrence, the markup will be deleted but the content within the
markup will remain as plain text
Delete All Markup and Content: this will delete the markup and the content within the markup for all
occurrences
Delete All Markup: for all occurrences, the markup will be deleted but the content within the markup will
remain as plain text
Note that it is not possible to delete the definition of a variable that is in a field from the template dictionary. This
must be deleted using the Dictionary Editor.

July 17, 2017
61
Contract Express® Author Getting Started Manual
9.6 Relevancy at a point in the document
A key component of the Contract Express solution is the automatic determination of relevancy between variables.
This relevancy information is necessary for Contract Express to automatically generate the decision tree within
the questionnaire. See Using the Dictionary Editor to find out how to determine the overall relevancy of an
individual variable within the dictionary. In addition to the overall relevancy of an individual variable it is often
useful to select individual points in a document and find out the relevancy statement at that point. For example,
the questionnaire may not be behaving exactly as you expect. The reason for this might be due to the location of
a single instance of a variable in the document not being within the correct spans as the others. The Usage tab in
the Markup Editor can assist with troubleshooting issues like these.
To determine the relevancy at a particular point in the document, open the Markup Editor and use the navigation
buttons to navigate to the field/span occurrence of interest using and click on the Usage tab. In the simple example
below, the Usage tab is selected for the field {NDAPurposeOther}.

July 17, 2017
62
Contract Express® Author Getting Started Manual
9.7 Navigate between uses of markup in the template
Use the forward and back arrows in the Markup Editor Taskbar to highlight the next/previous instance of
markup in the template. Note that if a filter has been applied this will affect the navigation (e.g. if the filtering is
set to only display spans, the navigation will only ever pick up spans and will bypass fields).
Note that this is looking at the local relevance of this location in the document and not the
overall relevancy of all instances of the NDAPurposeOther.

July 17, 2017
63
Contract Express® Author Getting Started Manual
9.8 Check the markup of the current document
Click the refresh icon in the Markup Editor Taskbar to force Contract Express Author to scan the mark-up in
the current document and refresh the dictionary. If Contract Express Author finds any issues with the current
document it will change the traffic light in the status bar from green to orange or red, depending on the severity
of the issue.
Click on the status bar to open up the status pane to view the issues:
If the issue is related to markup in the document, double clicking the issue will highlight the area in the
document.
10. Organize the questionnaire into groups and pages
The Dictionary Editor allows you to create pages and groups for your questionnaire and to allocate
questions to them. To access the Dictionary Editor and organize the questionnaire click on the
Dictionary Editor icon in the Contract Express tab in Microsoft Word.
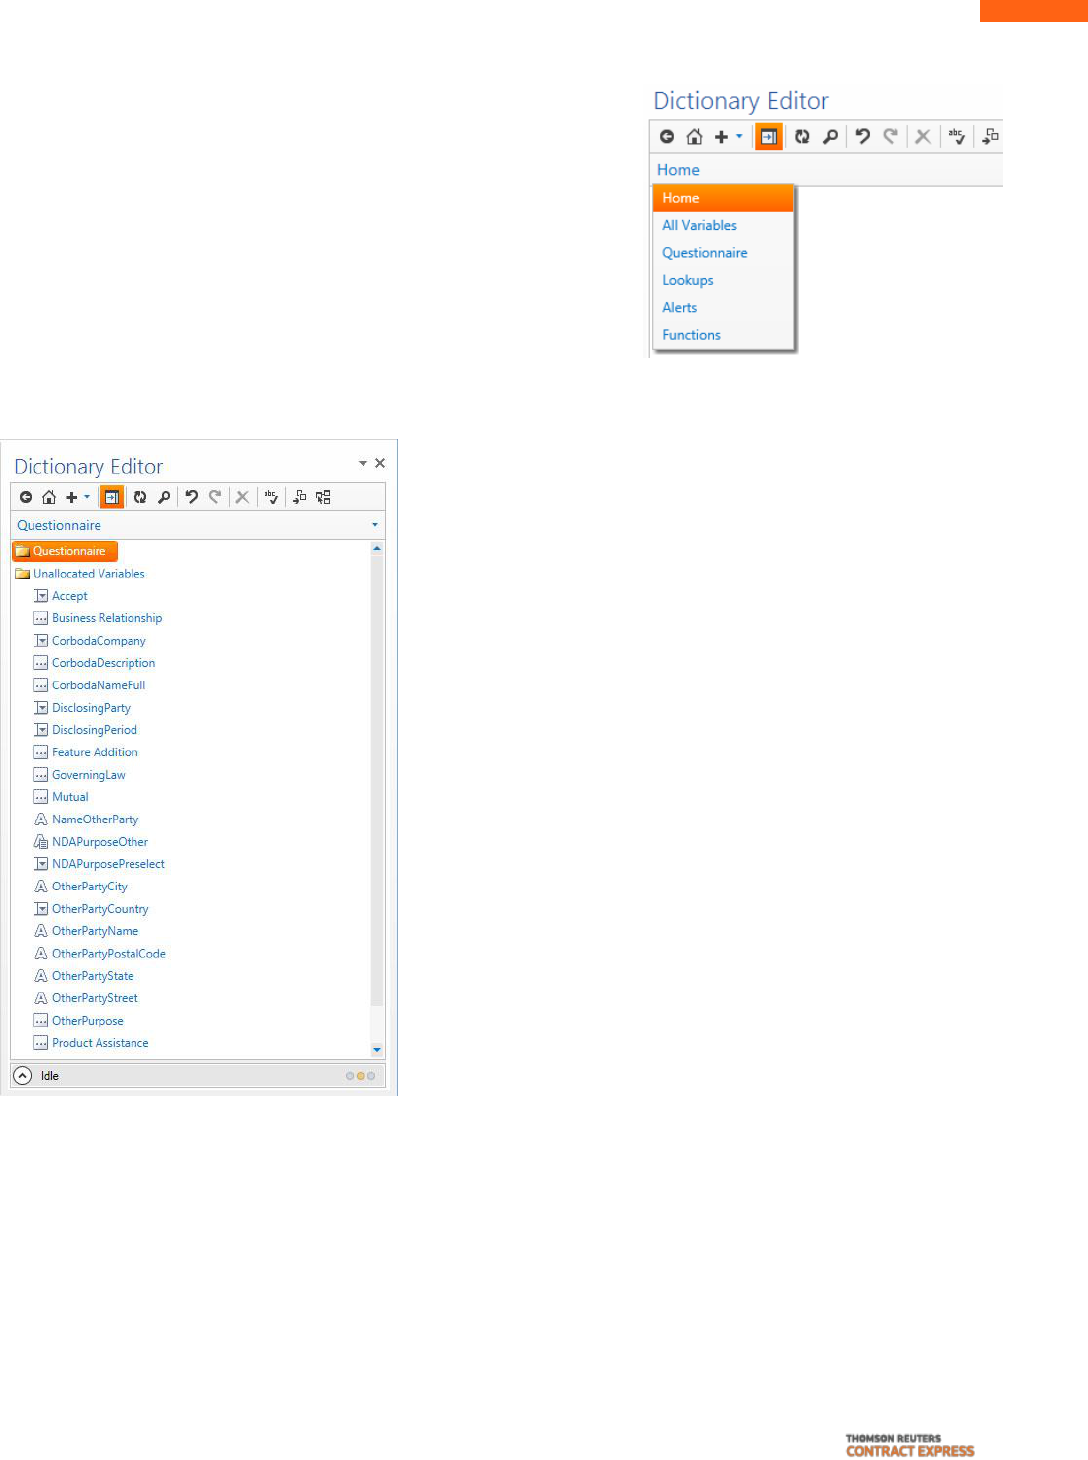
July 17, 2017
64
Contract Express® Author Getting Started Manual
Then select the Questionnaire section of the dictionary by double clicking
Questionnaire selection from the home page or selecting Questionnaire
from the section dropdown.
Contract Express questionnaires are organized into pages. On each page
is one or more groups. In each group are the questions that the
questionnaire user will be asked. The Questionnaire section of the
Dictionary Editor has a folder structure displaying the Questionnaire and
questions which have not yet been allocated to the questionnaire. In the
example below we can see that the sample template does not have a
questionnaire yet defined, but a selection of unallocated variables.

July 17, 2017
65
Contract Express® Author Getting Started Manual
10.1 Adding a page
The first step is to create a new page for the questionnaire. You can
either select the New Page option from the New icon in the
Dictionary Editor toolbar or by right clicking Questionnaire and
selecting new page.
The Page will be added beneath Questionnaire and the attributes of the page will be displayed in the attributes
pane. Edit the name of the page on the General tab and page guidance on the Guidance tab.
10.2 Adding a group
A questionnaire page must have a minimum of one group before you can allocate a variable onto the
questionnaire. To add a group, first select the page the group is to be added to and select Add group from the
New button on the Dictionary Editor task pane. Alternatively right click the questionnaire page and select New
Group from the actions menu.

July 17, 2017
66
Contract Express® Author Getting Started Manual
10.3 Adding a variable to a group
To add a variable to a questionnaire group, drag and drop the variable
from the Unallocated Variables list into the group. If your list of
unallocated variables is very large and / or your list of questionnaire
pages is very large there is an alternative to the drag and drop. First
select the group you wish to allocate the variables by left-clicking. Now
hold down the Ctrl key on your keyboard and select one or more
variables which you wish to allocate to the selected group. Right click
one of the selections and select Allocate from the drop-down menu.
10.4 Editing attributes of a page
When a page is selected in the questionnaire, the attributes panel in the Dictionary Editor displays three tabs:
General, Guidance and Usage.
Page Title: Use this to change the name of the page that will be displayed in the questionnaire (hint: your first
page should generally be the name of the type of document the user will produce e.g. Sales Agreement, Loan
Agreement, Shorthold Lease, etc. This will help to give the user context when they first see the questionnaire).
Layout: Choosing Expanded will show all groups on the page. Selecting the Collapsed option will show only one
group at a time with click-able links to the other groups on this page. This is most useful if you have a lot of groups
per page. The <Default> option allows the system default to be used to control the layout of the groups.
Always Show: Check this box if you always want the page to show even if no variables are relevant. This is useful
if you want to have an informational page as the first page or last page which contains no variables at all. (Note:
checking this for a page that contains variables will not make those variables relevant).
Collate Groups: An advanced setting for nested repeats. Use this on 2nd level repeats that have variables in
different groups. This will show the groups within the repeat context rather than the repeated variables over the
groups.
Guidance: Type any amount of text in here to give more information to the questionnaire user. For a first page,
this could explain more about the type of document they are about to produce, what circumstances to use this
in, contact details for feedback, links to further guidance notes contained elsewhere on the intranet or
even links to an internet page as well as images. To add images, click on the icon then enter the URL
for the image using a HTML image tag (e.g. <img src="URL”>).
Usage: The usage tab in the attributes panel will display the relevancy of the selected page.

July 17, 2017
67
Contract Express® Author Getting Started Manual
10.5 Editing attributes of a group
When a group is selected in the questionnaire, the attributes panel in the Dictionary Editor displays three tabs:
General, Guidance and Usage.
Title: Use this to change the name of the group (hint: think of the variables you are going to put into this
group and how you would classify them).
Repeat Title: This is used for groups that contain repeated variables. The Repeat Title can be dynamically
generated depending on which repetition the user is in. For example, your group title may be
Customizations and your repeat title may be Enter details of the {RepeatCounter Format "Nth"}
Customization which will give you a count of each customization. This repeat title appears whether the
group is expanded or collapsed (see below). This section is optional and you do not need to specify this
value unless you are working with repeated variables in the group.
Layout: This is for use with repeated groups only. Selecting the <Default> option allows the system default
to be used to control the layout of the groups.
Always Show: Check this box if you always want the group to show even if no variables are relevant. This
is useful if you want to give more information or guidance to the user separate from the rest of the page.
Guidance: Type any amount of text in here to give more information to the user. This could explain more
about the questions contained in this group and anything the user needs to consider when answering.
This can include intranet or internet links as well as images. To add images, click on the icon then
enter the URL for the image using a HTML image tag (e.g. <img src="URL”>).
The Expanded option will show all repeated instances of a group:

July 17, 2017
68
Contract Express® Author Getting Started Manual

July 17, 2017
69
Contract Express® Author Getting Started Manual
Selecting the Collapsed option will show only a single repeated instance of the group with clickable links to
navigate between any other repetitions - like a card index.
The final two options are for use with nested repeats only. They will show the repeated variables in a table format.

July 17, 2017
70
Contract Express® Author Getting Started Manual
10.6 Duplicate a page
To make a copy of a page, right click the page and select Duplicate. This will clone the page along with all groups
and variables within the page.
10.7 Duplicate a group
To make a copy of a group, right click the group and select Duplicate. This will clone the group along with all
variables within the group.
10.8 Arrange questionnaire
The Arrange questionnaire button on the Dictionary Editor task pane will automatically create questionnaire
pages and groups and automatically add unallocated variables to those groups. It uses an algorithm which
considers the relevancy of the variables and the order the variables appear within the document. Variables which
control repeated variables will appear on pages prior to the repeating variables. To ensure that the Arrange
questionnaire adds the variables based on up to date relevancy information it is advised that you click the Usage
Analysis button in the Contract Express tab prior to selecting the Arrange questionnaire option.
11. Create a new function and add it into a Template
To create and view user-defined functions within Contract Express Author,
click on the Dictionary Editor icon in the Contract Express ribbon in Microsoft
Word. Then select the Functions option. Here you will see a list of existing
functions that have been created.
11.1 Create a new Function
To create a new function, click on the plus icon on the Dictionary Editor
Toolbar and select New Function. Fill in the Name field and define the function within the Definition field.
Parameters of a function are defined using a percentage sign (%) plus the number of the parameter.
For example, if we want to create a function that represents the VAT (Value Added Tax) at 20%, we will define the
function as
%1 * 0.2
‘%1’ represents the parameter to use. In this case it is referring to the first parameter but if we wanted to
reference a 2
nd
or 3
rd
parameter we will use ‘%2’ or ‘%3’.

July 17, 2017
71
Contract Express® Author Getting Started Manual
11.2 Adding a Function into the Template
User defined functions can be used in the same way as regular functions. If we wanted to add our example VAT
function (from the previous section) into a template we would enter the following into the template:
{VAT(NumberVariable)}
Where VAT is our defined function and NumberVariable is the required parameter.
12. Accessing external data in the questionnaire
Lookups provide a way of storing data that can be referenced directly or mapped from the answers that a user
has given on a questionnaire. They can be used to store all of the options for a text selection variable, or to link
one value to another. For example, if a user has selected a geographical
location, that answer can be used to find other data (such as the
currency or capital city) for that location. This data can be presented on
the questionnaire or in the assembled document.
To access the Dictionary Editor and add lookups, click on the Dictionary
Editor icon in the Contract Express tab in Microsoft Word.
Then select the Lookups from the home page or from the section
dropdown.
12.1 Creating a new lookup table
To create a new lookup table, select the new icon from the toolbar then
select New Lookup Table from the drop down menu. You will then be asked to
enter the number of rows and columns for the lookup table; these can be edited
at a later stage.
Once you click OK a new lookup table will be created and you will be able to give the lookup table a name.

July 17, 2017
72
Contract Express® Author Getting Started Manual
The column headers can be edited by right clicking on the column header and selecting the Rename option.
Alternatively, double clicking on the column header will also give you the option to edit the column name.
To insert additional columns, right click on the column header and select either Insert Before to insert a column
before the currently selected column or Insert After to insert a column after the currently selected column.
Similarly to delete a column, right click on the column header and select Delete.
Rows can be added or deleted in a similar fashion. Right click on a row and select either Insert Before or Insert
After to add additional rows. Select a single row or multiple rows by clicking on a row and dragging the mouse,
then select Delete to delete the row(s).
12.2 Adding data to a lookup table
You can begin adding data to the lookup table as soon as it has been created by selecting the cell you require and
typing the content. You can also apply formatting to the data by selecting the text within a cell and using the
toolbar above the lookup table. Note that the formatting applied within a lookup table will be displayed on the
questionnaire when the lookup data is included in Active Text. The formatting will not be displayed on the
questionnaire if the lookup data is used within the selection of a variable of type text selection.

July 17, 2017
73
Contract Express® Author Getting Started Manual
Multiple cells can be copied from an existing Microsoft
Excel spreadsheet and pasted into the lookup table. To do
this, select the relevant cells in Microsoft Excel and either
right click and select copy or use CTRL + C. Within the
lookup table select the arrow button to the left of the first
column header and select Paste Table. Formatting that
has been applied within a cell in Excel will be carried through to the lookup table.
You can also copy data from a lookup table by selecting the arrow button to the left of the first column and
selecting Copy table. It can then be pasted into a new lookup table or an Excel spreadsheet.
12.3 Dynamic data definition
To use external data within the lookup table select the Dynamic checkbox. The table will change
into a box where you can enter a select expression against an External Table that has been
defined in the Contract Express web application.
Dynamic lookup tables are evaluated once and the result is cached so that subsequent lookup
or select expressions against the lookup table do not require the underlying database to be
accessed again during that request.
For example, consider a database table named US States containing:
State Code
State Name
Capital City
Time Zone
AL
Alabama
Montgomery
Central
AK
Alaska
Juneau
Alaska
AZ
Arizona
Phoenix
Mountain
AR
Arkansas
Little Rock
Central
To link a lookup table to this database, use the following select expression:
Select 'State Code', 'State Name', 'Capital City', 'Time Zone' From 'US States'

July 17, 2017
74
Contract Express® Author Getting Started Manual
The column names of the lookup table will be the column names of the database table. Note: the single quotes
are needed as there are spaces in the table name and column names.
12.4 Find a lookup table
To search for a specific lookup table in the list click the Find icon in the Dictionary Editor Toolbar. This will open
the Find pane above the list of lookup tables. With Current List selected in the Find Where dropdown the search
will be performed against the list of lookup tables as displayed on the left.
12.5 Find content within a lookup table
The Find pane also enables users to search for a string of text within a selected lookup table and to replace that
text with new text. Select Selected Item from the Find Where dropdown. Enter what you want to find in the Find
What text box and enter the replacement text in the Replace With text box. If you do not want to replace the text,
simply leave the Replace With text box empty to only do a search of the lookup table.
12.6 Add notes to a lookup table
Author notes can be added to a table via the Notes tab. These notes are applicable to the
currently selected table.

July 17, 2017
75
Contract Express® Author Getting Started Manual
13. Using a common dictionary across multiple templates
Templates in Contract Express Author are self-contained Microsoft Word documents that contain both the mark-
up and the dictionary. This means all information about the template is stored in the template (and not, say, in
some shared resource such as a database or external dictionary file) and all relevant information is visible in Author
(including variable properties).
However, sometimes it is useful for shared definitions to be available to multiple templates, for example if they
are to interact. This is the concept we call "External Dictionaries".
One template can reference multiple external dictionaries. These references can be uploaded to templates in the
Contract Express template repository or to templates that are stored locally. Contract Express copies out the
variables, alerts, and lookup tables from the External Dictionary and stores a local copy in the dictionary of this
template. The local copy is marked as external. If an external dictionary cannot be reached then Contract Express
Author carries on using the current locally cached version. All dictionary objects are visible through the Dictionary
Editor but external ones are, by default, read-only. The local dictionary, with the currently cached external
objects, is used when the template is uploaded.
Note when using an External Dictionary from the Contract Express template repository, the Server does not keep
a link between the External Dictionary and the Template. Any changes made in the local dictionary must be synced
manually. To do this click on the External Dictionary button in the Contract Express ribbon in Microsoft Word and
select the Refresh button for the changes in the Template to take effect. See section 13.1.3 for more details on
refreshing external dictionaries.
13.1 Server based External Dictionaries
To manage the external dictionaries connected to a Template click on the External Dictionary button.
Switching between file based and server based External Dictionaries
Note that if you switch from using server based External Dictionaries to file based External
Dictionaries you will be required to re-attach any existing External Dictionaries. If
switching from file based External Dictionaries to server based External Dictionaries and
the file based External Dictionaries already exist on the server, you can refresh the
dictionaries. See section 13.1.3 for details on refreshing External Dictionaries.
If this is the first time that Contract Express Author is connecting to the Contract Express
application within the current Microsoft Word session, you will be prompted for authorization.
See section 15.1.1 for more details.
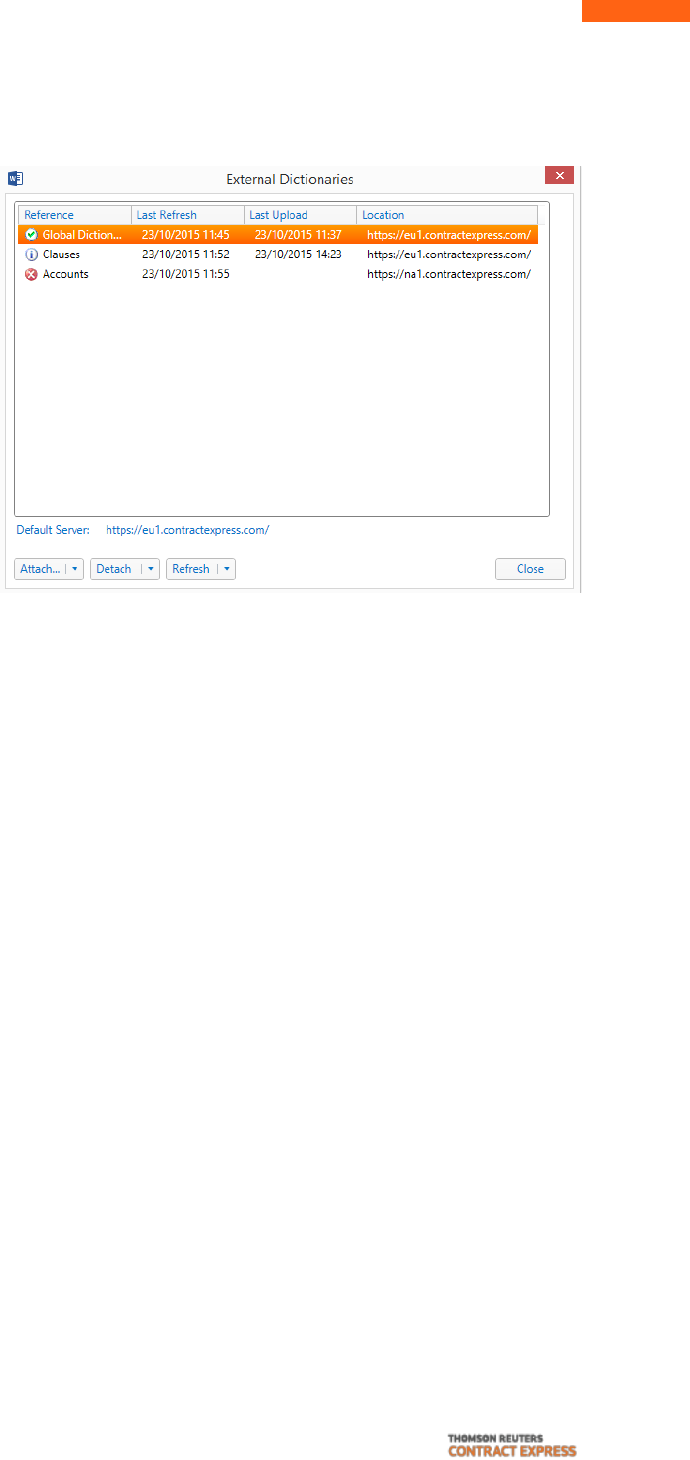
July 17, 2017
76
Contract Express® Author Getting Started Manual
The list view shows all of the external dictionaries that are currently attached to this Template. The columns show
information relating to the last upload of the template to the Server and last refresh in Contract Express Author:
Reference: The Template reference of
the attached Dictionary preceded by
a red, green or warning icon
- Red: The last attempt to
refresh from this Dictionary
failed.
- Warning: A refresh is
required. This can occur if a
new version of the Template
has been uploaded to the
server after the last refresh.
- Green: The refresh was
successful.
Last Refresh: The date (or time if
today) of the last successful update.
Last Upload: The date (or time if
today) of the last successful upload of the Template to the server.
Location: The URL of the Contract Express web application where the External Dictionary resides.
The order reflects the order in which the external dictionaries will be refreshed. If several dictionaries define a
variable of the same name then the definition used in this template is the one from the external dictionary earlier
in the list.
There are three possible states for objects that can come from external dictionaries:
Pure local when they are only defined locally
Pure external when they are managed externally
Locally overridden external when the object came from an External Dictionary but has been locally
modified
This last option is useful if you need to change a variable but cannot wait for the External Dictionary to be updated,
or you may just want to use a different prompt for a variable which originated in an External Dictionary. If you are
viewing a variable that originated from an External Dictionary, then the General tab in the Dictionary Editor will
contain an option called Use external definition from [Name of Dictionary]. If this is checked then the variable is
a pure external variable and no attributes can be changed. If it is unchecked then the object is a locally overridden
external and its properties can be changed.

July 17, 2017
77
Contract Express® Author Getting Started Manual
13.1.1 Attaching a server based External Dictionary to a template
To attach a new Dictionary click the External Dictionary button on the Contract Express ribbon in Microsoft Word
to launch the External Dictionary dialog. Click the Attach button to select templates which are located at the
default server (the currently selected server in Options Server). You may select multiple files. The Dictionary
information from the Template(s) will be copied to your Template, and marked as external. If it is your first time
interacting with the Contract Express web application via Contract Express Author in a Microsoft Word session,
you will be asked to enter your credentials for the default server before getting access to the available templates.
Note that if an external variable of the same name already exists then a new variable is not created. Also if a pure
local variable of that name already exists then it becomes a locally overridden external variable and none of its
properties are updated.
Note that the Attach button is a "split" button with 2 options: Attach without Questionnaire (the default option)
and Attach and append Questionnaire. To access the non-default option, you must click on the drop-down arrow
beside the button:

July 17, 2017
78
Contract Express® Author Getting Started Manual
The Attach and append questionnaire option does the same as above but also copies the questionnaire pages
from the external dictionaries as they are attached. Note that the questionnaire is never updated on a refresh.
13.1.2 Detaching a server based External Dictionary to a template
The Detach button removes the external dictionaries selected in the list view. This will remove the definitions
for pure external objects that came from those external dictionaries, even if they are used in your Template. Any
locally overridden external objects from those dictionaries will become pure local objects.
Note that the Detach button is a "split" button with 2 options: Detach removing local definitions (the default
option) and Detach leaving local definitions. To access the non-default option, you must click on the drop-down
arrow beside the button:
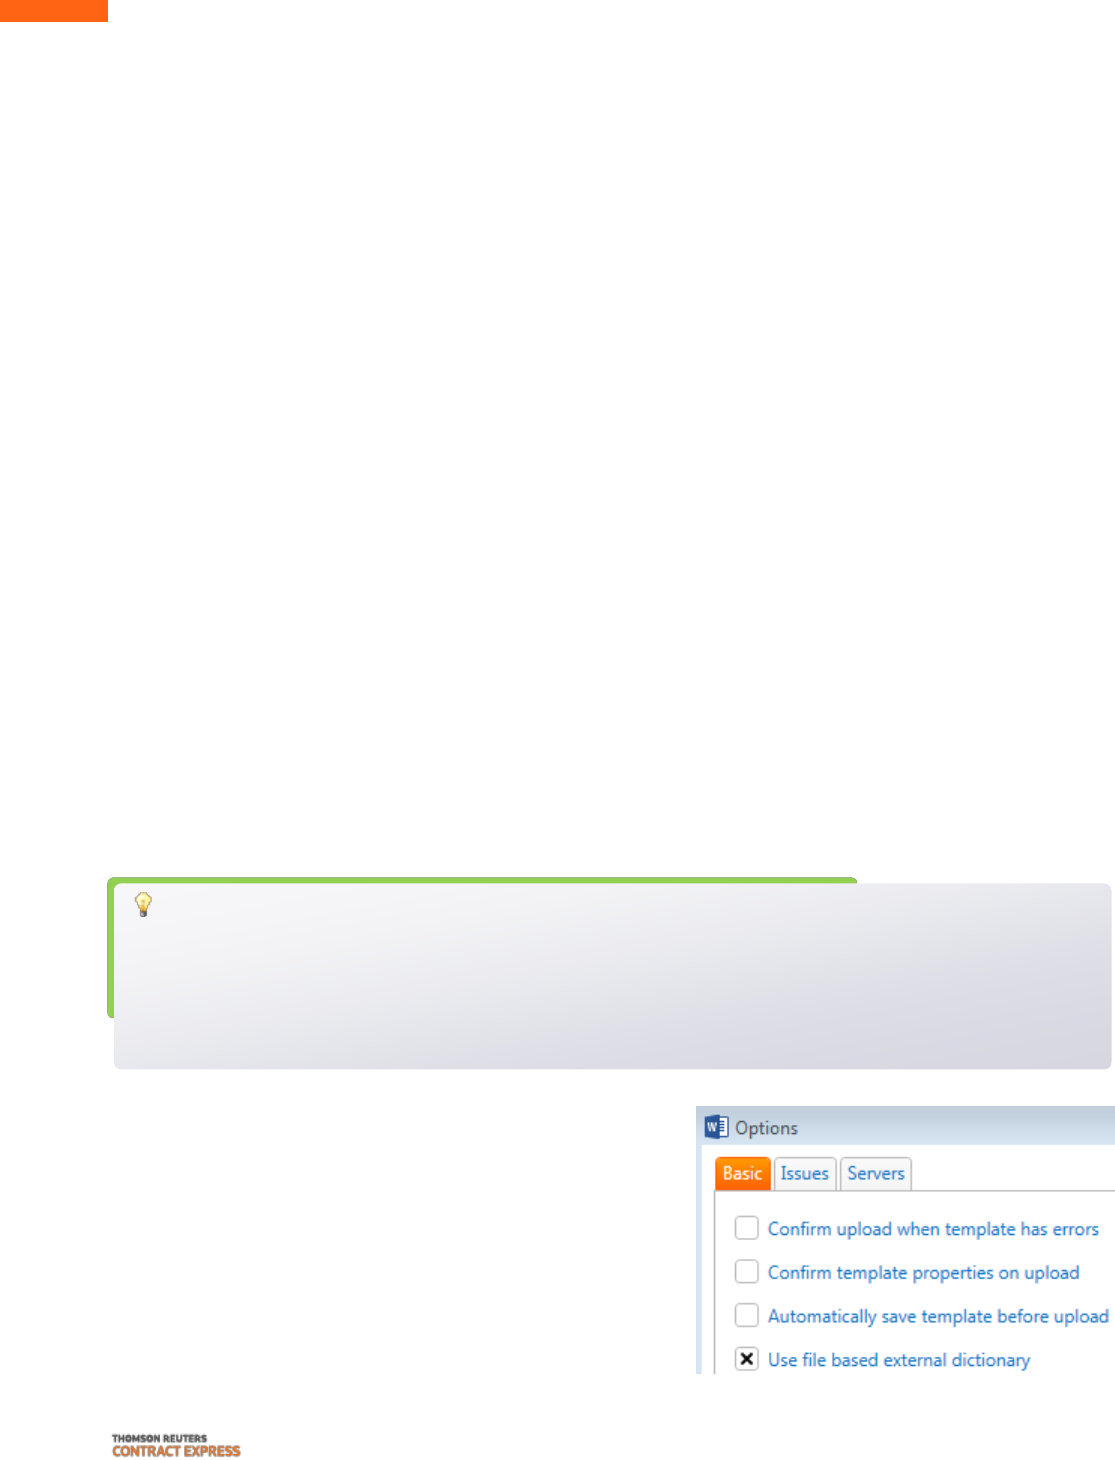
July 17, 2017
79
Contract Express® Author Getting Started Manual
The Detach leaving local definitions option will remove the dictionaries but leave behind all their objects as
pure local objects. This is useful if you want to create an External Dictionary from multiple similar templates (i.e.
open a blank document and Attach and then Detach (choosing "leaving local definitions") each Template in turn.
The result will be a blank Template containing all dictionary objects from each Template that can then be used
as an External Dictionary).
13.1.3 Refreshing server based External Dictionaries
The Refresh button refreshes the local copies of the objects from the external dictionaries selected in the list view.
Only pure external objects are updated; locally overridden objects are not updated.
If a new object has been introduced to the External Dictionary then the same rules as during Attach are applied:
- If an external variable already exists then a new variable is not created.
- A pure local variable existing in the External Dictionary will become a locally overridden external variable.
If an object has been deleted then the default Detach rules are applied:
- Pure external objects are removed.
- Locally overridden objects become pure local.
The Refresh overwriting local definitions option converts any locally overridden objects that originally came from
the External Dictionary into pure externals and updates their properties.
Note that the questionnaire is never updated on a refresh.
Note that as soon as you view the Contract Express ribbon in Microsoft Word, any existing external dictionaries
of a Template will be refreshed automatically.
13.2 File based External Dictionaries
By default Contract Express Author will use server based
external dictionaries (templates stored within the Contract
Express Template repository). To use file based external
dictionaries (templates that have been stored locally), click on
Options on the Contract Express ribbon in Microsoft Word. In
the Basic tab there will be an option to “Use file based external
The refresh will update from the last uploaded version of the External Dictionary to the server. If
a new version of the External Dictionary is uploaded to the server whilst the current Template
is being edited, click the Refresh button for the template to use the latest version of the External
Dictionary.

July 17, 2017
80
Contract Express® Author Getting Started Manual
dictionary”. Select this checkbox and click OK to save your changes.
To manage the external dictionaries connected to a Template click on the External Dictionary button.
A dialog will be presented which lists all of the external dictionaries that are currently attached to this
Template.
The columns show information relating to the last upload of the template to the server and last refresh in Contract
Express Author:
Reference: The Template reference of the attached dictionary preceded by a red, green or warning icon
- Red: The last attempt to refresh from this dictionary failed.
- Warning: A refresh is required. This can occur if a new version of the Template has been uploaded
to the server after the last refresh.
- Green: Refresh was successful.
Last Refresh: The date (or time if today) of the last successful update.
Last Upload: The date (or time if today) of the last successful upload of the Template to the server.
Location: The URL of the Contract Express web application where the External Dictionary resides.
The order reflects the order in which the external dictionaries will be refreshed. If several dictionaries define a
variable of the same name then the definition used in this template is the one from the external dictionary earlier
in the list.
There are three possible states for objects that can come from external dictionaries:
Pure local when they are only defined locally
Pure external when they are managed externally

July 17, 2017
81
Contract Express® Author Getting Started Manual
Locally overridden external when the object came from an External Dictionary but has been locally
modified
This last option is useful if you need to change a variable but cannot wait for the external dictionary to be updated,
or you may just want to use a different prompt for a variable which originated in an External Dictionary. If you are
viewing a variable that originated from an External Dictionary, then the General tab in the Dictionary Editor will
contain an option called Use external definition from [Name of Dictionary]. If this is checked then the variable is
a pure external variable and no attributes can be changed. If it is unchecked then the object is a locally overridden
external and its properties can be changed.
13.2.1 Attaching a file based External Dictionary to a template
To attach a new dictionary click the External Dictionary button on the Contract Express ribbon in Microsoft Word
to launch the External Dictionary dialog. Click the Attach button and browse to a file location where the dictionary
is located. You may select multiple files. These DOCX files are opened and if they contain a Contract Express
Template then the dictionary information from that Template will be copied into your Template, and marked as
external. Note that if an external variable of the same name already exists then a new variable is not created. Also
if a pure local variable of that name already exists then it becomes a locally overridden external variable and none
of its properties are updated.
Note that if an external variable of the same name already exists then a new variable is not created. Also if a pure
local variable of that name already exists then it becomes a locally overridden external variable and none of its
properties are updated.

July 17, 2017
82
Contract Express® Author Getting Started Manual
The Attach button is a "split" button with 2 options: Attach without Questionnaire (the default option) and Attach
and append Questionnaire. To access the non-default option, you must click on the dropdown arrow beside the
button.
The Attach and append questionnaire option does the same as above but also copies the questionnaire pages
from the external dictionaries as they are attached. Note that the questionnaire is never updated on a refresh.
13.2.2 Detaching a file based External Dictionary to a template
The Detach button removes the external dictionaries selected in the list view. This will remove the definitions for
pure external objects that came from those external dictionaries, even if they are used in your template. Any
locally overridden external objects from those dictionaries will become pure local objects.
Note that the Detach button is a "split" button with 2 options: Detach removing local definitions (the default
option) and Detach leaving local definitions. To access the non-default option, you must click on the dropdown
arrow beside the button.
The attachment will be linked to the last saved version of the dictionary document. If the
template and dictionary documents are being edited simultaneously, then save the dictionary
document before (re-)attaching to the template document.

July 17, 2017
83
Contract Express® Author Getting Started Manual
The Detach leaving local definitions option will remove the dictionaries but leave behind all their objects as pure
local objects. This is useful, for example, if you want to create an External Dictionary from multiple similar
templates (i.e. open a blank document and Attach and then Detach (choosing "leaving local definitions") each
Template in turn. The result will be a blank Template containing all dictionary objects from each Template that
can then be used as an External Dictionary).
13.2.3 Refreshing file based External Dictionaries
The Refresh button refreshes the local copies of the objects from the external dictionaries selected in the list view.
Only pure external objects are updated; locally overridden objects are not updated.
If a new object has been introduced to the External Dictionary then the same rules as during Attach are applied:
- If an external variable already exists then a new variable is not created.
- A pure local variable existing in the external dictionary will become a locally overridden external variable.
If an object has been deleted then the same rules as the default Detach are applied:
- Pure external objects are removed.
- Locally overridden objects become pure local.
The Refresh overwriting local definitions option converts any locally overridden objects that originally came from
the external dictionary into pure externals and updates their properties.
Note that the questionnaire is never updated on a refresh.
13.3 Typical process when using External Dictionaries with a template hierarchy
There are generally two scenarios when working with external dictionaries
Scenario 1: The “Top Template” scenario
In this scenario, T1 is always the Template that is launched, it either attaches or includes T2 and T3 but they are
never run standalone. Even if the answers need to be amended, they will be through the launch of the "top
template":
The refresh will update from the last saved version of the dictionary document. If the template
and dictionary documents are being edited simultaneously, then save the dictionary document
before refreshing the template document.

July 17, 2017
84
Contract Express® Author Getting Started Manual
T1
/ \
T2 T3
It is common for T1 to also be used as the dictionary and to have the full questionnaire order defined. T2 and T3
will attach T1 as their External Dictionary and no local variables will be defined in these sub-templates. This has
the advantage of the questionnaire order needing to be defined only once (in the T1 template). Any changes to
questionnaire order and variable definitions (apart from computation definitions) will only need to be made in
the top-template since its dictionary and questionnaire order will take precedence over the others in the
hierarchy.
When working in this way:
Automate the top Template (i.e. T1) and add a questionnaire order and ensure that it has been
saved.
Open or create the first of the sub-templates (i.e. T2) and choose Attach without questionnaire...
to the top Template from the External Dictionary menu item.
If the sub-template document already has variables that are defined in the dictionary, then use the
Refresh, overwriting local definitions button to ensure that all variable definitions originate from
the dictionary document.
If a new variable needs to be created for the sub-template that is not yet in the top template, then
create this variable in the dictionary of the top Template first. To refresh the sub-template to
ensure this new variable is part of the sub-template dictionary, choose Refresh, overwriting local
definitions from the External Dictionary dialog if the sub-template is open. Otherwise, the
dictionary amendments will automatically be copied when the sub-template document is next
opened, provided the dictionary template is reachable.
Scenario 2: Individual templates sharing common variables
In this scenario templates are launched separately. They are individual documents that share the same variables
but are not thought of as a hierarchy. They do not reference each other via include or attach statements:
T1 }
T2 } ED
T3 }
When testing sub-templates from a hierarchy that has a top template as this scenario defines,
best testing results are achieved when launching from the top Template rather than each
template individually (as no questionnaire is defined locally for the sub-templates).

July 17, 2017
85
Contract Express® Author Getting Started Manual
In order to maintain variable definition consistency and maximize reuse, an External Dictionary is used (ED in the
diagram above), but this is often a separate blank template (i.e. it has no Microsoft Word content). It may or may
not house a common questionnaire order depending on how many variables are used in the templates (those
with a smaller number might benefit a more compact questionnaire over less pages than those with many
variables in).
When working in this way:
1. Create the separate dictionary document first and ensure that it has been saved.
Open or create a template document (T1). If it will be using the questionnaire from the top template then
use Attach and append questionnaire... to the external dictionary, otherwise simply Attach without
questionnaire... to the External Dictionary.
If the template document already has variables that are defined in the dictionary, then use the Refresh,
overwriting local definitions button to ensure that all variable definitions originate from the External
Dictionary.
If a new variable needs to be created for the Template that is not yet in the External Dictionary, then
create this variable in the dictionary first. To refresh the Template to ensure this new variable is part of
the template dictionary, choose Refresh, overwriting local definitions from the External Dictionary
dialog if the Template is open. Otherwise, the dictionary amendments will automatically be copied when
the sub-template document is next opened, providing the external dictionary is reachable.
To create a dictionary from one or more automated Contract Express Templates with variable
definitions, you may choose to open a clean document, Attach the first Template and then
Detach leaving local definitions. Repeating for each Template will result in all variable definitions
being added to your clean document, thus becoming your Dictionary.
Once your template document has a questionnaire defined, any subsequent attaches of the
External Dictionary must be done with Attach without questionnaire... If you want to reset to the
questionnaire that is defined in the dictionary template, you will need to:
Detach the external dictionary.
Delete the questionnaire from the template document.
Attach and append questionnaire... the external dictionary.
Refresh, overwriting local definitions.

July 17, 2017
86
Contract Express® Author Getting Started Manual
14. Case sensitivity in Contract Express
14.1 Identifiers
Identifiers, including variable names, function names, table and column names, etc., are not case sensitive. For
example, the following all refer to the same variable:
ClientName
clientname
CLIENTNAME
Identifiers that contain characters outside the letter characters from Latin-1 Supplement plus Latin Extended-A
Unicode character set will require single quotes when referenced (this includes the space character).
Even when identifiers are quoted they remain case insensitive. For example, the following all refer to the same
column in a lookup table:
'Country Code'
'country code'
'COUNTRY CODE'
14.2 Reserved words
Reserved words of the Contract Express Mark-up Language are not case sensitive. For example, the following
expressions are equivalent:
DirectorCount Is 0
DirectorCount is 0
DirectorCount IS 0
It is recommended for templates in a hierarchy to un-tick the "Arrange unallocated questions"
checkbox from the Options dialog prior to uploading your templates. Having this option turned on
could cause unexpected behaviour for unallocated questions in a hierarchy as Contract Express Author
will place them on the questionnaire during the upload.

July 17, 2017
87
Contract Express® Author Getting Started Manual
14.3 Text literals
Text literals, however, are always case sensitive. The most common place to use text literals is when referring to
the options of a select variable.
For example, the following text literals are all different:
"Public Limited Company"
"public limited company"
"PUBLIC LIMITED COMPANY"
For example, if the options for a select variable ClientType are entered into the variable editor as:
Public Limited Company
Limited Liability Partnership
Private Individual
Then the boolean expression:
ClientType Is "PUBLIC LIMITED COMPANY"
Will always evaluate to false.
15. Test the questionnaire
15.1 Upload and launch
The Test button in the Contract Express ribbon will upload the current document to the Contract Express solution,
where the Template can be tested and made available to other users. The button has four options available in the
dropdown:
Upload and Launch: Uploads the Template to Contract Express and opens
the questionnaire.
Upload template: Uploads the Template to Contract Express.
Launch questionnaire: Opens the questionnaire.
Contract Express: Opens Contract Express (site set in Options Server)
Simply clicking the main Test button will perform an Upload and Launch.
Clicking the Test button to upload a new Template will first prompt you to
enter a Template Reference if this has not already been specified. The Template reference is a unique reference
which will identify that Template. Upon entering a template reference, Contract Express Author will perform a full

July 17, 2017
88
Contract Express® Author Getting Started Manual
Usage Analysis of the current template to check for any serious issues in the Template. If there are serious issues
such as mismatched brackets then Contract Express Author will prevent the Template from being published and
the issues will be displayed in the Dictionary Editor.
15.1.1 Connecting to the Contract Express application
If this is the first time Contract Express Author is connecting to the Contract Express application in the current
Microsoft Word session, you will be prompted for authentication against the default server selected in Options.
When connecting to Contract Express, the behaviour will differ depending on how Contract Express has been
setup for authentication:
1. Windows Authentication only: You will be authenticated silently and no action is required.
2. Forms Based Authentication only: Simply enter your credentials into the modal and log in to continue.
3. Both Forms Based and Windows Authentication: You can choose whether to enter your email address
and password or use your Windows credentials by selecting the Windows button.

July 17, 2017
89
Contract Express® Author Getting Started Manual
Note that once you have been authenticated in Contract Express Author, if you have selected an option which will
open a browser, you may have to enter your credentials again once the browser is launched.
Add Contract Express as a local intranet for Windows Authenticated instances
Adding Contract Express as a local intranet will allow Contract Express to authenticate
silently without requesting for Windows credentials.
To do this go to Internet Explorer -> Security tab -> Local Intranet -> Sites -> Advanced.
Enter the Contract Express URL and click Add.

July 17, 2017
90
Contract Express® Author Getting Started Manual
15.2 Uploading to a specific server
Contract Express will upload the active Template to the Contract Express instance selected on the Server tab in
the Options Dialog. If the Template is to be uploaded to an alternative instance, click on Options, select the Server
tab and add in a new URL to the instance that you wish to upload to. See User options for more details.
