
Elastic Beanstalk
Developer Guide
API Version 2010-12-01

Elastic Beanstalk: Developer Guide
Copyright © 2015 Amazon Web Services, Inc. and/or its affiliates. All rights reserved.
The following are trademarks of Amazon Web Services, Inc.: Amazon, Amazon Web Services Design, AWS, Amazon CloudFront,
AWS CloudTrail, AWS CodeDeploy, Amazon Cognito, Amazon DevPay, DynamoDB, ElastiCache, Amazon EC2, Amazon Elastic
Compute Cloud, Amazon Glacier, Amazon Kinesis, Kindle, Kindle Fire, AWS Marketplace Design, Mechanical Turk, Amazon Redshift,
Amazon Route 53, Amazon S3, Amazon VPC, and Amazon WorkDocs. In addition, Amazon.com graphics, logos, page headers,
button icons, scripts, and service names are trademarks, or trade dress of Amazon in the U.S. and/or other countries. Amazon's
trademarks and trade dress may not be used in connection with any product or service that is not Amazon's, in any manner that is
likely to cause confusion among customers, or in any manner that disparages or discredits Amazon.
All other trademarks not owned by Amazon are the property of their respective owners, who may or may not be affiliated with, connected
to, or sponsored by Amazon.
Elastic Beanstalk Developer Guide

Table of Contents
What Is Elastic Beanstalk and Why Do I Need It? ................................................................................ 1
Storage ............................................................................................................................... 2
Pricing ................................................................................................................................. 2
Community ........................................................................................................................... 2
Where to Go Next .................................................................................................................. 3
Getting Started ............................................................................................................................. 4
Walkthrough ......................................................................................................................... 4
Step 1: Sign up for the Service ......................................................................................... 4
Step 2: Create an Application .......................................................................................... 5
Step 3: View Information About Your Environment ................................................................ 6
Step 4: Deploy New Version ............................................................................................ 7
Step 5: Change Configuration .......................................................................................... 8
Step 6: Clean Up ......................................................................................................... 10
Accessing Elastic Beanstalk .................................................................................................. 11
AWS Management Console ........................................................................................... 12
Git Deployment Via Eb .................................................................................................. 12
AWS SDK for Java ....................................................................................................... 12
AWS Toolkit for Eclipse ................................................................................................. 12
AWS SDK for .NET ...................................................................................................... 13
AWS Toolkit for Visual Studio ......................................................................................... 13
AWS SDK for Node.js ................................................................................................... 13
AWS SDK for PHP ....................................................................................................... 13
Boto (AWS SDK for Python) .......................................................................................... 13
AWS SDK for Ruby ...................................................................................................... 14
Elastic Beanstalk API ................................................................................................... 14
Endpoints ................................................................................................................... 14
Where to Go Next ................................................................................................................ 14
How Does Elastic Beanstalk Work? ................................................................................................. 15
Components ....................................................................................................................... 15
Application ................................................................................................................. 15
Application Version ....................................................................................................... 15
Environment ............................................................................................................... 16
Environment Configuration ............................................................................................ 16
Configuration Template ................................................................................................. 16
Architectural Overview .......................................................................................................... 16
Web Server Environment Tiers ....................................................................................... 16
Worker Environment Tiers ............................................................................................. 18
Supported Platforms ............................................................................................................ 19
Docker ....................................................................................................................... 19
Docker - Preconfigured ................................................................................................. 22
Java .......................................................................................................................... 27
Windows and .NET ...................................................................................................... 32
Node.js ...................................................................................................................... 33
PHP .......................................................................................................................... 41
Python ....................................................................................................................... 46
Ruby ......................................................................................................................... 50
Design Considerations .......................................................................................................... 58
Scalability ................................................................................................................... 58
Security ..................................................................................................................... 58
Persistent Storage ....................................................................................................... 59
Fault Tolerance ............................................................................................................ 59
Content Delivery .......................................................................................................... 59
Software Updates and Patching ..................................................................................... 59
Connectivity ................................................................................................................ 59
Where to Go Next ................................................................................................................ 60
API Version 2010-12-01
iii
Elastic Beanstalk Developer Guide

Applications from Docker Containers ............................................................................................... 61
Single Container Docker Using the Console ............................................................................. 62
Single Container Docker Using Eb .......................................................................................... 63
Set Up Eb .................................................................................................................. 64
Configure Elastic Beanstalk Using Eb .............................................................................. 66
Create an Application ................................................................................................... 67
Single Container Docker Configurations ................................................................................... 68
Dockerfile ................................................................................................................... 68
Dockerrun.aws.json ...................................................................................................... 69
Multicontainer Docker Environments ....................................................................................... 71
Multicontainer Docker Platform ....................................................................................... 71
Dockerrun.aws.json File ................................................................................................ 72
Docker Images ............................................................................................................ 72
Container Instance Role ............................................................................................... 73
Amazon ECS Resources Created by Elastic Beanstalk ....................................................... 73
Using Multiple Elastic Load Balancing Listeners ................................................................ 74
Multicontainer Docker Configuration ........................................................................................ 75
Dockerrun.aws.json Format ........................................................................................... 75
Tutorial - Multicontainer Docker .............................................................................................. 78
Configure a Container Instance IAM Role ........................................................................ 78
Define Docker Containers ............................................................................................. 80
Add Content ............................................................................................................... 82
Deploy to Elastic Beanstalk ........................................................................................... 82
Connect to a Container Instance .................................................................................... 83
Inspect the Amazon ECS Container Agent ....................................................................... 85
Applications from Preconfigured Docker Containers ........................................................................... 87
Getting Started with Preconfigured Docker Containers ............................................................... 87
Set Up Your Local Development Environment ................................................................... 87
Develop and Test Locally ............................................................................................... 88
Deploy to Elastic Beanstalk ........................................................................................... 89
Example: Customize and Configure Preconfigured Docker Platforms ............................................ 89
Go Applications Using Preconfigured Docker Containers .................................................................... 90
Getting Started with Go Preconfigured Docker Containers .......................................................... 90
Set Up Your Local Development Environment ................................................................... 90
Develop and Test Locally Using Docker ............................................................................ 91
Deploy to Elastic Beanstalk ........................................................................................... 92
Java Applications Using Eclipse ..................................................................................................... 93
Develop, Test, and Deploy ..................................................................................................... 93
Create Project ............................................................................................................. 94
Test Locally ................................................................................................................ 96
Deploy to AWS Elastic Beanstalk .................................................................................... 98
Debug/View Logs ....................................................................................................... 101
Edit the Application and Redeploy ................................................................................. 101
Deploy to Production .................................................................................................. 102
Importing Existing Environments into Eclipse .......................................................................... 102
Using Custom Environment Properties .................................................................................. 102
Setting Custom Environment Properties with AWS Toolkit for Eclipse .................................. 102
Setting Custom Environment Properties with AWS Management Console ............................ 103
Accessing Custom Environment Properties .................................................................... 104
Using Amazon RDS and MySQL Connector/J ......................................................................... 105
Using a New Amazon RDS DB Instance with Java ........................................................... 105
Using an Existing Amazon RDS DB Instance with Java ..................................................... 107
Troubleshooting Database Connections ......................................................................... 108
Managing Multiple AWS Accounts ......................................................................................... 110
Viewing Events ................................................................................................................. 111
Managing Environments ...................................................................................................... 112
Changing Environment Configuration Settings ................................................................. 112
Environment Types ..................................................................................................... 113
API Version 2010-12-01
iv
Elastic Beanstalk Developer Guide

EC2 Server Instances ................................................................................................. 113
Elastic Load Balancing ................................................................................................ 116
Auto Scaling .............................................................................................................. 118
Notifications .............................................................................................................. 120
Containers ................................................................................................................ 121
Listing and Connecting to Server Instances ............................................................................ 123
................................................................................................................................ 414
Terminating an Environment ................................................................................................. 123
................................................................................................................................ 124
Tools ................................................................................................................................ 124
AWS SDK for Java ..................................................................................................... 124
AWS Toolkit for Eclipse ............................................................................................... 124
Resources ........................................................................................................................ 124
.NET Applications Using Visual Studio ........................................................................................... 125
Get Started ....................................................................................................................... 126
Step 1: Set Up the NerdDinner Application ..................................................................... 126
Step 2: Launch an Amazon RDS DB Instance ................................................................. 127
Step 3: Set Up the NerdDinner Database ....................................................................... 128
Step 4: Deploy to Elastic Beanstalk ............................................................................... 131
Develop, Test, and Deploy ................................................................................................... 134
Create a Project ......................................................................................................... 135
Test Locally ............................................................................................................... 135
Deploy to AWS Elastic Beanstalk ................................................................................. 136
Debug/View Logs ...................................................................................................... 143
Edit the Application and Redeploy ................................................................................. 143
Deploy to Production .................................................................................................. 144
Deploy an Existing Application Version to an Existing Environment ..................................... 149
Customizing and Configuring a .NET Environment ................................................................... 150
Accessing Environment Configuration Settings ................................................................ 151
Using Amazon RDS ........................................................................................................... 152
Using a New Amazon RDS DB Instance with .NET .......................................................... 152
Using an Existing Amazon RDS DB Instance with .NET .................................................... 153
Managing Multiple Accounts ................................................................................................ 154
................................................................................................................................ 154
Monitoring Application Health ............................................................................................... 155
Understanding Environment Health ............................................................................... 155
Viewing Application Health and Environment Status ......................................................... 157
................................................................................................................................ 157
Viewing Events .................................................................................................................. 158
Managing Environments ...................................................................................................... 159
Changing Environment Configurations Settings ............................................................... 159
EC2 Server Instances ................................................................................................. 159
Elastic Load Balancing ................................................................................................ 162
Auto Scaling .............................................................................................................. 165
Notifications .............................................................................................................. 166
Containers ................................................................................................................ 167
Listing and Connecting to Server Instances ............................................................................ 168
................................................................................................................................ 414
Terminating an Environment ................................................................................................. 169
................................................................................................................................ 169
Tools ................................................................................................................................ 170
AWS SDK for .NET ..................................................................................................... 170
AWS Toolkit for Visual Studio ........................................................................................ 170
Deployment Tool ........................................................................................................ 170
Resources ........................................................................................................................ 173
Node.js Applications Using EB CLI and Git ..................................................................................... 174
Develop, Test, and Deploy ................................................................................................... 174
Get Set Up ................................................................................................................ 175
API Version 2010-12-01
v
Elastic Beanstalk Developer Guide

Develop Locally ......................................................................................................... 175
Test Locally ............................................................................................................... 176
Deploy to AWS Elastic Beanstalk ................................................................................. 176
Debug/View Logs ...................................................................................................... 178
Edit the Application and Redeploy ................................................................................. 178
Deploy to Production .................................................................................................. 179
Deploy an Existing Application Version to an Existing Environment ..................................... 179
Deploying an Express Application ......................................................................................... 179
Step 1: Set Up Your Git Repository ................................................................................ 180
Step 2: Set Up Your Express Development Environment .................................................... 180
Step 3: Configure Elastic Beanstalk ............................................................................... 204
Step 4: View the Application ......................................................................................... 183
Step 5: Update the Application ..................................................................................... 183
Step 6: Clean Up ....................................................................................................... 191
Deploying an Express Application with Clustering .................................................................... 191
Step 1: Set Up Your Git Repository ................................................................................ 192
Step 2: Set Up Your Express Development Environment .................................................... 192
Step 3: Configure Elastic Beanstalk ............................................................................... 204
Step 4: View the Application ......................................................................................... 195
Step 5: Update the Application ..................................................................................... 195
Step 6: Clean Up ....................................................................................................... 202
Deploying a Geddy Application with Clustering ........................................................................ 202
Step 1: Set Up Your Git Repository ................................................................................ 202
Step 2: Set Up Your Geddy Development Environment ...................................................... 203
Step 3: Configure Elastic Beanstalk ............................................................................... 204
Step 5: View the Application ......................................................................................... 205
Step 6: Update the Application ..................................................................................... 206
Step 7: Clean Up ....................................................................................................... 213
Customizing and Configuring a Node.js Environment ............................................................... 213
Accessing Environment Configuration Settings ................................................................ 215
Example: Configuring Nginx and Apache ........................................................................ 215
Using the Console .............................................................................................................. 215
Using Amazon RDS ........................................................................................................... 216
Using a New Amazon RDS DB Instance with Node.js ....................................................... 217
Using an Existing Amazon RDS DB Instance with Node.js ................................................. 218
Tools ................................................................................................................................ 219
AWS SDK for Node.js ................................................................................................. 219
Git Deployment Via Eb ................................................................................................ 219
Resources ........................................................................................................................ 219
PHP Applications Using Eb and Git ............................................................................................... 220
Develop, Test, and Deploy ................................................................................................... 220
Get Set Up ................................................................................................................ 221
Develop Locally ......................................................................................................... 221
Test Locally ............................................................................................................... 222
Deploy to AWS Elastic Beanstalk ................................................................................. 222
Debug/View Logs ...................................................................................................... 224
Edit the Application and Redeploy ................................................................................. 224
Deploy to Production .................................................................................................. 225
Deploy an Existing Application Version to an Existing Environment ..................................... 225
Deploying a Symfony2 Application ........................................................................................ 225
Step 1: Set Up Your Git Repository ................................................................................ 226
Step 2: Set Up Your Symfony2 Development Environment ................................................. 226
Step 3: Configure Elastic Beanstalk ............................................................................... 227
Step 4: View the Application ......................................................................................... 229
Step 5: Update the Application ..................................................................................... 229
Step 6: Clean Up ....................................................................................................... 229
Deploying a CakePHP Application ........................................................................................ 230
Step 1: Set Up Your Git Repository ................................................................................ 230
API Version 2010-12-01
vi
Elastic Beanstalk Developer Guide

Step 2: Set Up Your CakePHP Development Environment ................................................. 230
Step 3: Configure Elastic Beanstalk ............................................................................... 231
Step 4: View the Application ......................................................................................... 233
Step 5: Update the Application ..................................................................................... 233
Step 6: Clean Up ....................................................................................................... 234
Deploying Using the Console ............................................................................................... 235
Customizing and Configuring a PHP Environment .................................................................... 236
Accessing Environment Configuration Settings ................................................................ 237
Using Amazon RDS ........................................................................................................... 237
Using a New Amazon RDS DB Instance with PHP ........................................................... 238
Using an Existing Amazon RDS DB Instance with PHP ..................................................... 239
Tools ................................................................................................................................ 240
AWS SDK for PHP ..................................................................................................... 240
Git Deployment Via Eb ................................................................................................ 241
Resources ........................................................................................................................ 241
Python Applications Using EB CLI and Git ...................................................................................... 242
Deploying a Django Application ............................................................................................ 243
Step 1: Set Up Your Git Repository ................................................................................ 243
Step 2: Set Up Your Python Development Environment ..................................................... 243
Step 3: Configure Elastic Beanstalk ............................................................................... 245
Step 3: View Application .............................................................................................. 246
Step 4: Update Application ........................................................................................... 247
Step 5: Configure the Django Admin Site (Optional) ......................................................... 249
Step 6: Clean Up ....................................................................................................... 251
Deploying a Flask Application ............................................................................................... 252
Step 1: Initialize Your Git Repository .............................................................................. 252
Step 2: Configure Elastic Beanstalk ............................................................................... 252
Step 3: View Application .............................................................................................. 254
Step 4: Update Application ........................................................................................... 254
Step 5: Clean Up ....................................................................................................... 255
Using the Console .............................................................................................................. 256
Customizing and Configuring a Python Container .................................................................... 256
Accessing Environment Variables ................................................................................. 258
Using Amazon RDS ........................................................................................................... 258
Using a New Amazon RDS DB Instance with Python ........................................................ 259
Using an Existing Amazon RDS DB Instance with Python ................................................. 260
Tools ................................................................................................................................ 261
Boto (open source AWS SDK for Python) ....................................................................... 261
Git Deployment Via Eb ................................................................................................ 261
Resources ........................................................................................................................ 261
Ruby Applications Using EB CLI and Git ........................................................................................ 262
Deploying a Rails Application ............................................................................................... 262
Rails Development Environment Setup .......................................................................... 263
Install the EB CLI ....................................................................................................... 264
Set Up Your Git Repository .......................................................................................... 265
Configure the EB CLI .................................................................................................. 265
Deploy the Project ...................................................................................................... 266
Update the Application ................................................................................................ 268
Clean Up ................................................................................................................. 269
Deploying a Sinatra Application ............................................................................................ 270
Step 1: Set Up Your Git Repository ................................................................................ 270
Step 2: Configure Elastic Beanstalk ............................................................................... 270
Step 3: View the Application ......................................................................................... 272
Step 4: Update the Application ..................................................................................... 272
Step 5: Clean Up ....................................................................................................... 273
Customizing and Configuring a Ruby Environment ................................................................... 273
Accessing Environment Variables ................................................................................. 274
Using Amazon RDS ........................................................................................................... 275
API Version 2010-12-01
vii
Elastic Beanstalk Developer Guide

Using a New Amazon RDS DB Instance with Ruby .......................................................... 275
Using an Existing Amazon RDS DB Instance with Ruby .................................................... 276
Tools ................................................................................................................................ 277
AWS SDK for Ruby .................................................................................................... 277
Git Deployment Via EB CLI .......................................................................................... 277
Resources ........................................................................................................................ 277
Managing Applications ................................................................................................................ 278
Creating New Applications ................................................................................................... 279
AWS Management Console ......................................................................................... 279
Command Line Interface (CLI) ...................................................................................... 287
API .......................................................................................................................... 288
Creating New Application Versions ........................................................................................ 292
AWS Management Console ......................................................................................... 421
CLI .......................................................................................................................... 422
API .......................................................................................................................... 422
Creating an Application Source Bundle .................................................................................. 294
Zipping Files in Mac OS X Finder or Windows Explorer ..................................................... 294
Creating a Source Bundle from the Command Line .......................................................... 297
Creating a Source Bundle with Git ................................................................................ 298
Testing Your Source Bundle ......................................................................................... 298
Filtering Applications .......................................................................................................... 299
Launching New Environments .............................................................................................. 299
AWS Management Console ......................................................................................... 299
CLI .......................................................................................................................... 308
API .......................................................................................................................... 309
Deploying Versions to Existing Environments .......................................................................... 313
AWS Management Console ......................................................................................... 427
CLI .......................................................................................................................... 316
API .......................................................................................................................... 317
Deploying Versions with Zero Downtime ................................................................................. 318
AWS Management Console ......................................................................................... 318
CLI .......................................................................................................................... 321
API .......................................................................................................................... 325
Monitoring Application Health ............................................................................................... 327
Health Monitoring ....................................................................................................... 328
Monitoring Your Environment ........................................................................................ 330
Managing Alarms ............................................................................................................... 331
Viewing Events .................................................................................................................. 333
AWS Management Console ......................................................................................... 334
CLI .......................................................................................................................... 334
API .......................................................................................................................... 335
Managing Environments ...................................................................................................... 335
Changing Environment Configuration Settings ................................................................. 336
Environment Tiers ...................................................................................................... 337
Environment Types ..................................................................................................... 345
Changing Environment Type ........................................................................................ 346
Saving Environment Configuration Settings .................................................................... 348
Cloning an Environment .............................................................................................. 350
Amazon EC2 Server Instances ..................................................................................... 352
Elastic Load Balancing ................................................................................................ 358
Auto Scaling .............................................................................................................. 367
Rolling Updates ......................................................................................................... 375
Deploying Versions in Batches ...................................................................................... 379
Canceling Environment and Application Version Updates .................................................. 381
Upgrading the Platform ............................................................................................... 382
Databases ................................................................................................................ 384
Notifications .............................................................................................................. 387
Tagging Environments ................................................................................................ 389
API Version 2010-12-01
viii
Elastic Beanstalk Developer Guide

Environment Configurations ......................................................................................... 389
VPC ........................................................................................................................ 413
Listing and Connecting to Server Instances ............................................................................ 413
................................................................................................................................ 414
Working with Logs .............................................................................................................. 415
Viewing Tail Log Snapshots in the Elastic Beanstalk Console ............................................. 415
Downloading Bundle Logs from the Elastic Beanstalk Console ........................................... 417
Configuring Your Environment to Publish Logs to Amazon S3 ............................................ 419
Deleting Application Versions ............................................................................................... 421
AWS Management Console ......................................................................................... 421
CLI .......................................................................................................................... 422
API .......................................................................................................................... 422
Terminating an Environment ................................................................................................. 423
AWS Management Console ......................................................................................... 423
CLI .......................................................................................................................... 424
API .......................................................................................................................... 424
Customizing Your Environments ............................................................................................ 425
Migrating Your Application from a Legacy Container Type .......................................................... 426
Why are some container types marked legacy? ............................................................... 426
Constructing a Launch Now URL .......................................................................................... 427
URL Parameters ........................................................................................................ 427
Example ................................................................................................................... 429
Customizing and Configuring Environments .................................................................................... 430
Supported Container Types .................................................................................................. 430
Using Configuration Files .................................................................................................... 431
Customizing the Software on EC2 Instances Running Linux ...................................................... 431
Packages ................................................................................................................. 432
Sources ................................................................................................................... 433
Files ........................................................................................................................ 434
Users ....................................................................................................................... 435
Groups ..................................................................................................................... 436
Commands ............................................................................................................... 436
Container_commands ................................................................................................. 437
Services ................................................................................................................... 439
Option_settings ......................................................................................................... 440
Example: Using Custom Amazon CloudWatch Metrics ..................................................... 441
Customizing the Software on EC2 Instances Running Windows ................................................. 447
Packages ................................................................................................................. 448
Sources ................................................................................................................... 449
Files ........................................................................................................................ 449
Commands ............................................................................................................... 450
Container_commands ................................................................................................. 451
Services ................................................................................................................... 452
Option_settings ......................................................................................................... 454
Example: Using Custom Amazon CloudWatch Metrics ..................................................... 455
Customizing Environment Resources .................................................................................... 456
Resources ................................................................................................................ 457
Example Snippets: ElastiCache .................................................................................... 459
Example Snippet: SQS, CloudWatch, and SNS ............................................................... 465
Example: DynamoDB, CloudWatch, and SNS ................................................................. 467
Example Snippets ...................................................................................................... 477
Using Custom Domains .............................................................................................................. 478
Using a Domain Hosted by a Third Party ................................................................................ 478
Using a Domain Hosted by Amazon Route 53 ......................................................................... 479
Configuring HTTPS .................................................................................................................... 482
Step 1: Create a Custom Domain .......................................................................................... 482
Step 2: Create and Upload an SSL Certificate to AWS IAM ....................................................... 483
Install and Configure OpenSSL .................................................................................... 483
API Version 2010-12-01
ix
Elastic Beanstalk Developer Guide

Create a Private Key ................................................................................................... 484
Create a Certificate Signing Request ............................................................................. 484
Submit the CSR to Certificate Authority .......................................................................... 485
Upload the Signed Certificate ....................................................................................... 486
Step 3: Update Your Elastic Beanstalk Environment to Use HTTPS ............................................. 486
SSL on Single Instances ............................................................................................................. 489
Step 1: Create an SSL Certificate and Private Key ................................................................... 489
Step 2: Create an SSL Configuration File ............................................................................... 490
Step 3: Open Port 443 ........................................................................................................ 490
Step 4: Complete the Configuration File for Your Container Type ................................................. 491
SSL on Docker .................................................................................................................. 491
SSL on Java/Apache Tomcat ................................................................................................ 494
SSL on Node.js ................................................................................................................. 496
SSL on PHP ..................................................................................................................... 500
SSL on Python .................................................................................................................. 502
SSL on Ruby ..................................................................................................................... 506
Ruby with Puma ........................................................................................................ 506
Ruby with Passenger .................................................................................................. 509
Troubleshooting ......................................................................................................................... 510
Launch Events .................................................................................................................. 512
HTTP HEAD Request to Your Elastic Beanstalk URL Fails ................................................. 512
CPU Utilization Exceeds 95.00% .................................................................................. 513
Elastic Load Balancer Has Zero Healthy Instances .......................................................... 513
Elastic Load Balancer Cannot Be Found ........................................................................ 513
Instance Fails to Respond to Status Health Check ........................................................... 515
Environment Launch Fails ........................................................................................... 515
Amazon EC2 Instance Launch Fails .............................................................................. 515
Application Does Not Enter the Ready State Within the Timeout Period ............................... 515
Environment Launches but with Issues .......................................................................... 516
Amazon EC2 Instances Fail to Launch within the Wait Period ............................................. 516
Launch and Update Environment Operations Succeeded but with Command Timeouts .......... 517
Docker Containers ............................................................................................................. 518
Dockerfile Syntax Errors .............................................................................................. 518
Dockerrun.aws.json Syntax Errors ................................................................................. 518
No EXPOSE Directive Found in Dockerfile ...................................................................... 519
Invalid EC2 Key Pair and/or S3 Bucket in Dockerrun.aws.json ............................................ 520
Other AWS Services ................................................................................................................... 521
Architectural Overview ........................................................................................................ 521
Amazon CloudFront ............................................................................................................ 522
AWS CloudTrail ................................................................................................................. 522
Amazon CloudWatch .......................................................................................................... 523
Amazon CloudWatch Logs ................................................................................................... 523
Granting IAM Permissions ........................................................................................... 525
Setting Up CloudWatch Logs Integration with Configuration Files ....................................... 526
Troubleshooting CloudWatch Logs Integration ................................................................. 527
DynamoDB ....................................................................................................................... 527
Amazon ElastiCache .......................................................................................................... 527
Amazon RDS .................................................................................................................... 528
Amazon Route 53 .............................................................................................................. 528
Amazon S3 ....................................................................................................................... 531
Amazon VPC .................................................................................................................... 531
What VPC Configurations Do I Need? ............................................................................ 531
Example: Launching a Single-Instance Environment without Any Associated Private Resources
in a VPC ................................................................................................................... 533
Example: Launching a Load-Balancing, Autoscaling Environment with Private Instances in a
VPC ........................................................................................................................ 536
Example: Bastion Hosts .............................................................................................. 542
Example: Amazon RDS ............................................................................................... 550
API Version 2010-12-01
x
Elastic Beanstalk Developer Guide

Example: Launching a Load-Balancing, Autoscaling Environment with Public Instances in a
VPC ........................................................................................................................ 557
IAM ................................................................................................................................. 561
Granting Permissions to IAM Users ............................................................................... 561
Granting Permissions to Users and Services Using IAM Roles ........................................... 562
Using Policies to Control Access to Resources ................................................................ 563
Using Policy Templates to Control Access to All Resources ............................................... 563
Creating Policies to Control Access to Specific Resources ................................................ 564
Using IAM Roles ........................................................................................................ 568
Amazon Resource Name (ARN) Format ......................................................................... 579
Resources and Conditions for Actions ........................................................................... 581
Example Policies Based on Policy Templates ................................................................. 604
Example Policies Based on Resource Permissions ......................................................... 607
IAM Roles for Environment Tiers ................................................................................... 617
Tools ........................................................................................................................................ 620
EB and Eb Command Line Interfaces .................................................................................... 620
EB CLI 3.x ................................................................................................................ 621
Eb CLI 2.6.x .............................................................................................................. 672
AWS Command Line Interface .............................................................................................. 698
Migrating to the AWS CLI ............................................................................................ 699
API Command Line Interface ............................................................................................... 704
Getting Set Up ........................................................................................................... 704
Common Options ....................................................................................................... 706
Option Values ............................................................................................................ 707
Operations ................................................................................................................ 736
AWS DevTools ................................................................................................................... 785
Getting Set Up ........................................................................................................... 785
Develop, Test, and Deploy ........................................................................................... 788
Resources ................................................................................................................................ 794
Sample Applications ........................................................................................................... 794
Document History ...................................................................................................................... 796
Appendix .................................................................................................................................. 802
Customizing AWS Resources ............................................................................................... 802
AWS Resource Types ................................................................................................. 802
Resource Property Types ............................................................................................ 810
Intrinsic Functions ...................................................................................................... 812
Updating Stacks ........................................................................................................ 814
Using Amazon RDS ........................................................................................................... 815
................................................................................................................................ 815
Using Amazon RDS and MySQL Connector/J (Legacy Container Types) ..................................... 816
................................................................................................................................ 816
Using Custom AMIs ............................................................................................................ 817
................................................................................................................................ 817
API Version 2010-12-01
xi
Elastic Beanstalk Developer Guide

What Is Elastic Beanstalk and Why
Do I Need It?
Amazon Web Services (AWS) comprises dozens of services, each of which exposes an area of
functionality.While the variety of services offers flexibility for how you want to manage your AWS
infrastructure, it can be challenging to figure out which services to use and how to provision them.
With Elastic Beanstalk, you can quickly deploy and manage applications in the AWS cloud without worrying
about the infrastructure that runs those applications. AWS Elastic Beanstalk reduces management
complexity without restricting choice or control.You simply upload your application, and Elastic Beanstalk
automatically handles the details of capacity provisioning, load balancing, scaling, and application health
monitoring. Elastic Beanstalk uses highly reliable and scalable services that are available in the AWS
Free Usage Tier such as:
• Amazon Elastic Compute Cloud
• Amazon Simple Storage Service
• Amazon Simple Notification Service
• Amazon CloudWatch
• Elastic Load Balancing
• Auto Scaling
• Amazon RDS
• Amazon DynamoDB
• Amazon CloudFront
• Amazon ElastiCache
To learn more about the AWS Free Usage Tier, and how to deploy a sample web application in it using
AWS Elastic Beanstalk, go to Getting Started with AWS: Deploying a Web Application.
You can also perform most deployment tasks, such as changing the size of your fleet of Amazon EC2
instances or monitoring your application, directly from the Elastic Beanstalk web interface.
To use Elastic Beanstalk, you create an application, upload an application version in the form of an
application source bundle (for example, a Java .war file) to Elastic Beanstalk, and then provide some
information about the application. Elastic Beanstalk automatically launches an environment and creates
API Version 2010-12-01
1
Elastic Beanstalk Developer Guide

and configures the AWS resources needed to run your code. After your environment is launched, you
can then manage your environment and deploy new application versions.The following diagram illustrates
the workflow of Elastic Beanstalk.
After you create and deploy your application, information about the application—including metrics, events,
and environment status—is available through the AWS Management Console, APIs, or Command Line
Interfaces, including the unified AWS CLI. For step-by-step instructions on how to create, deploy, and
manage your application using the AWS Management Console, go to Getting Started Using Elastic
Beanstalk (p. 4). To learn more about an Elastic Beanstalk application and its components, see Elastic
Beanstalk Components (p. 15).
Elastic Beanstalk provides developers and systems administrators an easy, fast way to deploy and
manage their applications without having to worry about AWS infrastructure. If you already know the AWS
resources you want to use and how they work, you might prefer AWS CloudFormation to create your
AWS resources by creating a template.You can then use this template to launch new AWS resources
in the exact same way without having to recustomize your AWS resources. Once your resources are
deployed, you can modify and update the AWS resources in a controlled and predictable way, providing
the same sort of version control over your AWS infrastructure that you exercise over your software. For
more information about AWS CloudFormation, go to AWS CloudFormation Getting Started Guide.
Storage
Elastic Beanstalk does not restrict your choice of persistent storage and database service options. For
more information on AWS storage options, go to Storage Options in the AWS Cloud.
Pricing
There is no additional charge for Elastic Beanstalk.You pay only for the underlying AWS resources that
your application consumes. For details about pricing, see the Elastic Beanstalk service detail page.
Community
Customers have built a wide variety of products, services, and applications on top of AWS. Whether you
are searching for ideas about what to build, looking for examples, or just want to explore, you can find
many solutions at the AWS Customer App Catalog.You can browse by audience, services, and technology.
We also invite you to share applications you build with the community. Developer resources produced
by the AWS community are at http://aws.amazon.com/resources/.
API Version 2010-12-01
2
Elastic Beanstalk Developer Guide
Storage

Where to Go Next
This guide contains conceptual information about the Elastic Beanstalk web service, as well as information
about how to use the service to deploy web applications. Separate sections describe how to use the AWS
Management console, command line interface (CLI) tools, and API to deploy and manage your Elastic
Beanstalk environments.This guide also documents how Elastic Beanstalk is integrated with other services
provided by Amazon Web Services.
We recommend that you first read Getting Started Using Elastic Beanstalk (p. 4) to learn how to start
using Elastic Beanstalk. Getting Started steps you through creating, viewing, and updating your Elastic
Beanstalk application, as well as editing and terminating your Elastic Beanstalk environment. Getting
Started also describes different ways you can access Elastic Beanstalk. We also recommend that you
familiarize yourself with Elastic Beanstalk concepts and terminology by reading How Does Elastic Beanstalk
Work? (p. 15).
API Version 2010-12-01
3
Elastic Beanstalk Developer Guide
Where to Go Next

Getting Started Using Elastic
Beanstalk
Topics
• Walkthrough (p. 4)
• Accessing Elastic Beanstalk (p. 11)
• Where to Go Next (p. 14)
Getting started with Elastic Beanstalk is simple, and the AWS Management Console makes it easy for
you to create, edit, and manage your Docker, Go, Java, PHP, .NET, Node.js, Python, and Ruby applications
in a matter of minutes.The following walkthrough steps you through how to use the console to get started.
You can also access Elastic Beanstalk using the AWS Toolkit for Eclipse, AWS Toolkit for Microsoft Visual
Studio, AWS SDKs, APIs, and CLIs; for more information about these tools, see AWS Developer Tools.
The remainder of this section provides information about each of these and where to go next.
Walkthrough
The following tasks will help you get started with Elastic Beanstalk to create, view, deploy, and update
your application as well as edit and terminate your environment.You'll use the AWS Management Console,
a point-and-click web-based interface, to complete these tasks.
Step 1: Sign up for the Service
If you're not already an AWS customer, you'll need to sign up. Signing up allows you to access Elastic
Beanstalk and other AWS services that you will need, such as Amazon Elastic Compute Cloud (Amazon
EC2), Amazon Simple Storage Service (Amazon S3), and Amazon Simple Notification Service (Amazon
SNS).
To sign up for an AWS account
1. Open the Elastic Beanstalk console at https://console.aws.amazon.com/elasticbeanstalk/.
2. Follow the on-screen instructions.
API Version 2010-12-01
4
Elastic Beanstalk Developer Guide
Walkthrough

Note
If you have never registered for Amazon EC2, part of the sign-up procedure for Elastic Beanstalk
will include receiving an automated telephone call and entering a PIN using the telephone keypad.
Step 2: Create an Application
Next, you will create and deploy a sample application. For this step, you use a sample application that is
already prepared. If any Elastic Beanstalk applications already exist in the region in which you want to
create and deploy an application, you must follow different procedures to create a new application. For
more information, see Creating New Applications (p. 279).
Important
Elastic Beanstalk is free, but the AWS resources that it provides will be live (and not running in
a sandbox).You will incur the standard usage fees for these resources until you terminate them
in the last task in this tutorial. The total charges will be minimal (typically less than a dollar). For
information on how you might minimize any charges, go to http://aws.amazon.com/free/.
To create a sample application
1. Open the Elastic Beanstalk console at https://console.aws.amazon.com/elasticbeanstalk/.
2. Select a platform and then click Launch Now.
To run a sample application on AWS resources, Elastic Beanstalk takes the following actions, which can
take several minutes to complete:
• Creates an Elastic Beanstalk application named My First Elastic Beanstalk Application.
• Launches an environment named Default-Environment that provisions the AWS resources to host
the sample application.
• Creates a new application version named Sample Application, which refers to the default Elastic
Beanstalk sample application file.
• Deploys the Sample Application application into the Default-Environment.
API Version 2010-12-01
5
Elastic Beanstalk Developer Guide
Step 2: Create an Application

Step 3:View Information About Your Environment
After you create the Elastic Beanstalk application, you can view information about the application you
deployed and its provisioned resources by going to the environment dashboard in the AWS Management
Console.The dashboard shows the health of your application's environment, the running version, and
the environment configuration.
While Elastic Beanstalk creates your AWS resources and launches your application, the environment will
be in a Launching (gray) state. Status messages about launch events are displayed in the environment's
dashboard.
To see the environment dashboard for the My First Elastic Beanstalk Application application
1. Open the Elastic Beanstalk console at https://console.aws.amazon.com/elasticbeanstalk/.
2. From the Elastic Beanstalk applications page, click Default-Environment in the My First Elastic
Beanstalk Application application.
From the dashboard you can view the status of the environment, the running application version, the
platform, and a list of recent events.
Note
If the environment health is gray, the environment is still in the process of being launched.
You can also view additional details about the environment by going to other pages from the dashboard:
• The Configuration page shows the resources provisioned for this environment, such as Amazon EC2
instances that host your application.This page also lets you configure some of the provisioned resources.
• The Logs page lets you view a snapshot of the last 100 lines of logs or review all logs for all your
servers.
• The Monitoring page shows the statistics for the environment, such as average latency and CPU
utilization.This page also lets you create alarms for the metrics that you are monitoring.
• The Alarms page shows the CloudWatch alarms you've created for this environment.
API Version 2010-12-01
6
Elastic Beanstalk Developer Guide
Step 3:View Information About Your Environment

• The Events page shows any informational or error messages from services that this environment is
using.
• The Tags page shows the metadata that you assigned in the form of tags to this environment. Each
tag is represented on the page as a key-value pair. The page includes tags that Elastic Beanstalk
automatically creates for the environment name and environment ID. For more information about tags,
see Tagging Your Environments (p. 389).
Step 4: Deploy New Version
You can update your deployed application, even while it is part of a running environment. For a Java
application, you can also use the AWS Toolkit for Eclipse to update your deployed application; for
instructions, see Edit the Application and Redeploy (p. 101). For a PHP application, it is easy to update
your application using a Git deployment via eb; for instructions, see Deploying Elastic Beanstalk
Applications in PHP (p. 220). For a .NET application, you can use the AWS Toolkit for Visual Studio to
update your deployed application; for instructions, see Edit the Application and Redeploy (p. 143).
The application version you are running now is labeled Sample Application.
To update your application version
1. Download one of the following sample applications that match the configuration for your environment:
• Docker–Go to https://s3.amazonaws.com/elasticbeanstalk-samples-us-east-1/docker-sample-v3.zip
and save the file as docker-sample-v3.zip.
• Preconfigured Docker (Glassfish)–Go to https://s3.amazonaws.com/
elasticbeanstalk-samples-us-east-1/glassfish-sample.war and save the file as
glassfish-sample.war.
• Preconfigured Docker (Python 3.x)–Go to http://
elasticbeanstalk-samples-us-east-1.s3.amazonaws.com/python3-sample.zip and save the file as
python3-sample.zip.
• Preconfigured Docker (Go)–Go to http://elasticbeanstalk-samples-us-east-1.s3.amazonaws.com/
golang-sample.zip and save the file as golang-sample.zip.
• Java–Go to https://elasticbeanstalk-samples-us-east-1.s3.amazonaws.com/
elasticbeanstalk-sampleapp.war and save the file as elasticbeanstalk-sampleapp.war.
• .NET–Go to https://elasticbeanstalk-samples-us-east-1.s3.amazonaws.com/FirstSample.zip and
save the file as FirstSample.zip.
• Node.js–Go to http://s3.amazonaws.com/elasticbeanstalk-samples-us-east-1/nodejs-sample.zip
and save the file as nodejs-sample.zip.
• PHP–Go to http://s3.amazonaws.com/elasticbeanstalk-samples-us-east-1/php-newsample-app.zip
and save the file as php-newsample-app.zip.
• Python–Go to http://s3.amazonaws.com/elasticbeanstalk-samples-us-east-1/basicapp.zip and
save the file as basicapp.zip.
• Ruby (Passenger Standalone)–Go to http://s3.amazonaws.com/
elasticbeanstalk-samples-us-east-1/ruby-sample.zip and save the file as ruby-sample.zip.
• Ruby (Puma)–Go to http://s3.amazonaws.com/elasticbeanstalk-samples-us-east-1/
ruby2PumaSampleApp.zip and save the file as ruby2PumaSampleApp.zip.
2. Open the Elastic Beanstalk console at https://console.aws.amazon.com/elasticbeanstalk/.
3. From the Elastic Beanstalk applications page, click My First Elastic Beanstalk Application and
then click Default-Environment.
API Version 2010-12-01
7
Elastic Beanstalk Developer Guide
Step 4: Deploy New Version

4. In the Overview section, click Upload and Deploy and then enter details about the application
version.
• Use Upload application to locate and specify the application version (WAR or ZIP file) that you
want to upload.
• For Version label, enter a name for the application version that you are uploading, such as Sample
Application Second Version.
5. Click Deploy.
Elastic Beanstalk now deploys your file to your Amazon EC2 instances.You can view the status of your
deployment on the environment's dashboard.The Environment Health status turns gray while the
application version is updated.When the deployment is complete, Elastic Beanstalk performs an application
health check.The status returns to green when the application responds to the health check.The
environment dashboard will show the new Running Version as Sample Application Second Version
(or whatever you provided as the Version label.
Your new application version is also uploaded and added to the table of application versions.To view
the table of application versions, click My First Elastic Beanstalk Application and then click Application
Versions.
Step 5: Change Configuration
You can customize your environment to better suit your application. For example, if you have a
compute-intensive application, you can change the type of Amazon EC2 instance that is running your
application.
Some configuration changes are simple and happen quickly. Some changes require Elastic Beanstalk
to delete and recreate AWS resources, which can take several minutes. Elastic Beanstalk will warn you
about possible application downtime when changing configuration settings.
API Version 2010-12-01
8
Elastic Beanstalk Developer Guide
Step 5: Change Configuration

In this task, you change the minimum instance settings for your Auto Scaling group from one to two and
then verify that the change occurred. After the new instance gets created, it will become associated with
your load balancer.
To change your environment configuration
1. Go back to the environment dashboard by clicking My First Elastic Beanstalk Application and
then Default-Environment.
2. In the navigation pane, click Configuration.
3.
In the Scaling settings, click the gear icon ( ).
4. In the Auto Scaling section, change Minimum Instance Count from 1 to 2.This increases the
minimum number of Auto Scaling instances deployed in Amazon EC2.
5. At the bottom of the page, click Save.
The environment update might take a few minutes. When the environment is ready, you can go to the
next task to verify your changes.
To verify changes to load balancers
1. In the navigation pane, click Events.
You will see the event Successfully deployed new configuration to environment in the events
list.This confirms that the Auto Scaling minimum instance count has been set to 2. A second instance
is launched automatically.
2. Open the Amazon EC2 console at https://console.aws.amazon.com/ec2/.
3. In the navigation pane, under NETWORK & SECURITY, click Load Balancers.
4. Repeat the next two steps until you identify the load balancer with the desired instance name.
5. Click a load balancer in the list of load balancers.
API Version 2010-12-01
9
Elastic Beanstalk Developer Guide
Step 5: Change Configuration

6. Click the Instances tab in the Load Balancer: <load balancer name> pane, and then look at the
Name in the Instances table.
The information shows that two instances are associated with this load balancer, corresponding to
the increase in Auto Scaling instances.
Step 6: Clean Up
Congratulations! You have successfully deployed a sample application to the cloud, uploaded a new
version, and modified its configuration to add a second Auto Scaling instance.To make sure you are not
charged for any services you don't need, delete any unwanted applications and environments from Elastic
Beanstalk and AWS services.
To completely delete the application
1. Delete all application versions.
a. Open the Elastic Beanstalk console at https://console.aws.amazon.com/elasticbeanstalk/.
b. From the Elastic Beanstalk applications page, click Default-Environment in the My First Elastic
Beanstalk Application application.
c. Click Upload and Deploy.
d. When prompted for an application, click Application Versions page.
e. On the Application Versions page, select all application versions that you want to delete, and
then click Delete.
f. Confirm the versions that you are deleting, and then click Delete.
g. Click Done.
API Version 2010-12-01
10
Elastic Beanstalk Developer Guide
Step 6: Clean Up

2. Terminate the environment.
a. Go back to the environment dashboard by clicking My First Elastic Beanstalk Application and
then Default-Environment.
b. Click Actions and then click Terminate Environment.
c. Confirm that you are terminating Default-Environment and then click Terminate.
3. Delete the My First Elastic Beanstalk Application Elastic Beanstalk application.
a. Click Elastic Beanstalk at the upper left to return to the main dashboard.
b. From the Elastic Beanstalk applications page, click Actions for the My First Elastic Beanstalk
Application application and then click Delete Application.
c. Confirm that you want to delete this Elastic Beanstalk application by clicking Delete.
Accessing Elastic Beanstalk
Topics
• AWS Management Console (p. 12)
• Git Deployment Via Eb (p. 12)
• AWS SDK for Java (p. 12)
• AWS Toolkit for Eclipse (p. 12)
• AWS SDK for .NET (p. 13)
• AWS Toolkit for Visual Studio (p. 13)
• AWS SDK for Node.js (p. 13)
• AWS SDK for PHP (p. 13)
• Boto (AWS SDK for Python) (p. 13)
• AWS SDK for Ruby (p. 14)
• Elastic Beanstalk API (p. 14)
• Endpoints (p. 14)
You can create an application using one of several different Elastic Beanstalk interfaces: the Elastic
Beanstalk console in the AWS Management Console, Git deployment using AWS DevTools, the Elastic
Beanstalk command line interface, the AWS Toolkits for Eclipse and Visual Studio, or programmatically
through the AWS SDKs for Java, PHP, .NET, Node.js, Python, Ruby, or the Elastic Beanstalk web service
API.
The simplest and quickest method for creating an application is to use the Elastic Beanstalk console.
This does not require any additional software or tools.The console is a web browser interface that you
can use to create and manage your Elastic Beanstalk applications.
The following sections contain overviews of each of the available Elastic Beanstalk interfaces. In order
to use the Elastic Beanstalk features, you need to have an AWS account and be signed up for Elastic
Beanstalk. For instructions on how to sign up for Elastic Beanstalk, see Step 1: Sign up for the
Service (p. 4).
API Version 2010-12-01
11
Elastic Beanstalk Developer Guide
Accessing Elastic Beanstalk

AWS Management Console
The AWS Management Console enables you to manage applications through Elastic Beanstalk from a
single web browser interface.The console provides access to all of your deployed applications and gives
you the ability to manage and monitor your applications and environments. From the console you can:
• Create and delete applications
• Add and delete application versions
• Create and delete environments
• Identify the running version within an environment
• View operational metrics
• View application and environment logs
The AWS Management Console is available at http://console.aws.amazon.com/elasticbeanstalk.
For more information about getting started with Elastic Beanstalk using the AWS Management Console,
go to the Managing and Configuring Applications and Environments Using the Console, CLI, and
APIs (p. 278).
Git Deployment Via Eb
Eb is an updated command line interface for AWS Elastic Beanstalk that enables you to deploy applications
quickly and more easily. To learn how to get started using eb, see Getting Started with Eb (p. 672). For
an example of how to use eb for PHP, see Deploying Elastic Beanstalk Applications in PHP (p. 220). For
an example of how to use eb for Python, see Deploying Elastic Beanstalk Applications in Python Using
EB CLI and Git (p. 242).
For a complete CLI reference for more advanced scenarios, see Operations (p.736), and see Getting Set
Up (p. 704) for instructions on how to get set up.
AWS SDK for Java
The AWS SDK for Java provides a Java API you can use to build applications that use AWS infrastructure
services.With the AWS SDK for Java, you can get started in minutes with a single, downloadable package
that includes the AWS Java library, code samples, and documentation.
The AWS SDK for Java requires J2SE Development Kit 5.0 or later.You can download the latest Java
software from http://developers.sun.com/downloads/.The SDK also requires Apache Commons (Codec,
HTTPClient, and Logging), and Saxon-HE third-party packages, which are included in the third-party
directory of the SDK.
For more information on using the AWS SDK for Java, go to the AWS SDK for Java.
AWS Toolkit for Eclipse
With the AWS Toolkit for Eclipse plug-in, you can create new AWS Java web projects that are preconfigured
with the AWS SDK for Java, and then deploy the web applications to Elastic Beanstalk. The Elastic
Beanstalk plug-in builds on top of the Eclipse Web Tools Platform (WTP). The toolkit provides a Travel
Log sample web application template that demonstrates the use of Amazon S3 and Amazon SNS.
To ensure you have all the WTP dependencies, we recommend that you start with the Java EE distribution
of Eclipse, which you can download from http://eclipse.org/downloads/.
API Version 2010-12-01
12
Elastic Beanstalk Developer Guide
AWS Management Console

For more information on using the Elastic Beanstalk plug-in for Eclipse, go to the AWS Toolkit for Eclipse
web page.To get started creating your Elastic Beanstalk application using Eclipse, see Creating and
Deploying Elastic Beanstalk Applications in Java Using AWS Toolkit for Eclipse (p. 93).
AWS SDK for .NET
The AWS SDK for .NET enables you to build applications that use AWS infrastructure services.With the
AWS SDK for .NET, you can get started in minutes with a single, downloadable package that includes
the AWS .NET library, code samples, and documentation.
The AWS SDK for .NET requires .NET Framework 2.0 or later. It will work with any of the following Visual
Studio editions:
• Microsoft Visual Studio Professional Edition 2010 and 2012 (recommended)
• Microsoft Visual C# 2008 Express Edition
• Microsoft Visual Web Developer 2008 Express Edition
For more information on using the AWS SDK for .NET, go to the AWS SDK for .NET web page.
AWS Toolkit for Visual Studio
With the AWS Toolkit for Visual Studio plug-in, you can deploy an existing .NET application to Elastic
Beanstalk.You can also create new projects using the AWS templates that are preconfigured with the
AWS SDK for .NET. For prerequisite and installation information, go to AWS Toolkit for Visual Studio. To
get started creating your Elastic Beanstalk application using Visual Studio, see Creating and Deploying
Elastic Beanstalk Applications in .NET Using AWS Toolkit for Visual Studio (p. 125).
AWS SDK for Node.js
The AWS SDK for Node.js enables you to build applications on top of AWS infrastructure services. With
the AWS SDK for Node.js, you can get started in minutes with a single, downloadable package that
includes the AWS Node.js library, code samples, and documentation.
For more information on using the AWS SDK for Node.js, go to the AWS SDK for Node.js (Developer
Preview) web page.
AWS SDK for PHP
The AWS SDK for PHP enables you to build applications on top of AWS infrastructure services.With the
AWS SDK for PHP, you can get started in minutes with a single, downloadable package that includes
the AWS PHP library, code samples, and documentation.
The AWS SDK for PHP requires PHP 5.2 or later.
For more information on using the AWS SDK for PHP, go to the AWS SDK for PHP web page.
Boto (AWS SDK for Python)
With Boto, you can get started in minutes with a single, downloadable package complete with the AWS
Python library, code samples, and documentation.You can build Python applications on top of APIs that
take the complexity out of coding directly against web services interfaces.The all-in-one library provides
Python developer-friendly APIs that hide much of the lower-level tasks associated with programming for
the AWS cloud, including authentication, request retries, and error handling. Practical examples are
API Version 2010-12-01
13
Elastic Beanstalk Developer Guide
AWS SDK for .NET

provided in Python for how to use the libraries to build applications. For information about Boto, sample
code, documentation, tools, and additional resources, go to http://aws.amazon.com/python/.
AWS SDK for Ruby
You can get started in minutes with a single, downloadable package complete with the AWS Ruby library,
code samples, and documentation.You can build Ruby applications on top of APIs that take the complexity
out of coding directly against web services interfaces.The all-in-one library provides Ruby developer-friendly
APIs that hide much of the lower-level tasks associated with programming for the AWS cloud, including
authentication, request retries, and error handling. Practical examples are provided in Ruby for how to
use the libraries to build applications. For information about the SDK, sample code, documentation, tools,
and additional resources, go to http://aws.amazon.com/ruby/.
Elastic Beanstalk API
Elastic Beanstalk provides a comprehensive API that enables you to programmatically access Elastic
Beanstalk functionality. For more information, go to the Elastic Beanstalk API Reference.
Endpoints
For information about this product's regions and endpoints, go to Regions and Endpoints in the Amazon
Web Services General Reference.
Where to Go Next
Now that you have learned about Elastic Beanstalk and how to access it, we recommend that you read
How Does Elastic Beanstalk Work? (p. 15) This topic provides information about the Elastic Beanstalk
components, the architecture, and important design considerations for your Elastic Beanstalk application.
API Version 2010-12-01
14
Elastic Beanstalk Developer Guide
AWS SDK for Ruby

How Does Elastic Beanstalk Work?
Topics
• Elastic Beanstalk Components (p. 15)
• Architectural Overview (p. 16)
• Supported Platforms (p. 19)
• Design Considerations (p. 58)
• Where to Go Next (p. 60)
Now that you have a better understanding of what Elastic Beanstalk is, let's take a peek under the hood
and see how Elastic Beanstalk works.The following sections discuss the Elastic Beanstalk components,
the architecture, and important design considerations for your Elastic Beanstalk application.
Elastic Beanstalk Components
The components that comprise Elastic Beanstalk work together to enable you to easily deploy and manage
your application in the cloud.This section discusses those components.
Application
An Elastic Beanstalk application is a logical collection of Elastic Beanstalk components, including
environments, versions, and environment configurations. In Elastic Beanstalk an application is conceptually
similar to a folder.
Application Version
In Elastic Beanstalk, an application version refers to a specific, labeled iteration of deployable code for a
web application. An application version points to an Amazon Simple Storage Service (Amazon S3) object
that contains the deployable code such as a Java WAR file. An application version is part of an application.
Applications can have many versions and each application version is unique. In a running environment,
you can deploy any application version you already uploaded to the application or you can upload and
immediately deploy a new application version.You might upload multiple application versions to test
differences between one version of your web application and another.
API Version 2010-12-01
15
Elastic Beanstalk Developer Guide
Components

Environment
An environment is a version that is deployed onto AWS resources. Each environment runs only a single
application version at a time, however you can run the same version or different versions in many
environments at the same time. When you create an environment, Elastic Beanstalk provisions the
resources needed to run the application version you specified. For more information about the environment
and the resources that are created, see Architectural Overview (p. 16).
Environment Configuration
An environment configuration identifies a collection of parameters and settings that define how an
environment and its associated resources behave. When you update an environment’s configuration
settings, Elastic Beanstalk automatically applies the changes to existing resources or deletes and deploys
new resources (depending on the type of change).
Configuration Template
A configuration template is a starting point for creating unique environment configurations. Configuration
templates can be created or modified only by using the Elastic Beanstalk command line utilities or APIs.
Architectural Overview
When you launch an Elastic Beanstalk environment, you choose an environment tier, platform, and
environment type.The environment tier that you choose determines whether Elastic Beanstalk provisions
resources to support a web application that handles HTTP(S) requests or a web application that handles
background-processing tasks. An environment tier whose web application processes web requests is
known as a web server tier. An environment tier whose web application runs background jobs is known
as a worker tier.This topic describes the components, resources, and architecture for each type of
environment tier.
Note
One environment cannot support two different environment tiers because each requires its own
set of resources; a worker environment tier and a web server environment tier each require an
Auto Scaling group, but Elastic Beanstalk supports only one Auto Scaling group per environment.
Web Server Environment Tiers
This following diagram illustrates an example Elastic Beanstalk architecture for a web server environment
tier and shows how the components in that type of environment tier work together. The remainder of this
section discusses all the components in more detail.
API Version 2010-12-01
16
Elastic Beanstalk Developer Guide
Environment

The environment is the heart of the application. In the diagram, the environment is delineated by the
broken yellow line.When you create an environment, Elastic Beanstalk provisions the resources required
to run your application. AWS resources created for an environment include one elastic load balancer
(ELB in the diagram), an Auto Scaling group, and one or more Amazon EC2 instances.
Every environment has a CNAME (URL) that points to a load balancer.The environment has a URL such
as MyApp.elasticbeanstalk.com. This URL is aliased in Amazon Route 53 to an Elastic Load Balancing
URL—something like abcdef-123456.us-west-2.elb.amazonaws.com—by using a CNAME record.Amazon
Route 53 is a highly available and scalable Domain Name System (DNS) web service. It provides secure
and reliable routing to your infrastructure.Your domain name that you registered with your DNS provider
will forward requests to the CNAME.The load balancer sits in front of the Amazon EC2 instances, which
are part of an Auto Scaling group. (The Auto Scaling group is delineated in the diagram by a broken black
line.) Auto Scaling automatically starts additional Amazon EC2 instances to accommodate increasing
load on your application. If the load on your application decreases, Auto Scaling stops instances, but
always leaves at least one instance running. For information about how to map your root domain to your
Elastic Load Balancer, see Using Elastic Beanstalk with Amazon Route 53 to Map Your Domain to Your
Load Balancer (p. 528).
The software stack running on the Amazon EC2 instances is dependent on the container type. A container
type defines the infrastructure topology and software stack to be used for that environment. For example,
an Elastic Beanstalk environment with an Apache Tomcat container uses the Amazon Linux operating
system, Apache web server, and Apache Tomcat software. For a list of supported container types, see
Supported Platforms (p. 19). Each Amazon EC2 server instance that runs your application uses one of
these container types. In addition, a software component called the host manager (HM) runs on each
Amazon EC2 server instance. (In the diagram, the HM is an orange circle in each EC2 instance.) The
host manager is responsible for:
• Deploying the application
• Aggregating events and metrics for retrieval via the console, the API, or the command line
• Generating instance-level events
• Monitoring the application log files for critical errors
• Monitoring the application server
• Patching instance components
• Rotating your application's log files and publishing them to Amazon S3
API Version 2010-12-01
17
Elastic Beanstalk Developer Guide
Web Server Environment Tiers

The host manager reports metrics, errors and events, and server instance status, which are available via
the AWS Management Console, APIs, and CLIs.
The Amazon EC2 instances shown in the diagram are part of one security group. A security group defines
the firewall rules for your instances. By default, Elastic Beanstalk defines a security group, which allows
everyone to connect using port 80 (HTTP).You can define more than one security group. For instance,
you can define a security group for your database server. For more information about Amazon EC2
security groups and how to configure them for your Elastic Beanstalk application, see the Amazon EC2
Security Groups (p. 354).
Worker Environment Tiers
AWS resources created for a worker environment tier include an Auto Scaling group, one or more Amazon
EC2 instances, and an IAM role. For the worker environment tier, Elastic Beanstalk also creates and
provisions an Amazon SQS queue if you don’t already have one.When you launch a worker environment
tier, Elastic Beanstalk installs the necessary support files for your programming language of choice and
a daemon on each EC2 instance in the Auto Scaling group.The daemon is responsible for pulling requests
from an Amazon SQS queue and then sending the data to the web application running in the worker
environment tier that will process those messages. If you have multiple instances in your worker
environment tier, each instance has its own daemon, but they all read from the same Amazon SQS queue.
The following diagram shows the different components and their interactions across environments and
AWS services.
Amazon CloudWatch is used for alarms and health monitoring. For more information, go to Monitoring
Application Health (p. 327).
For details about how the worker environment tier works, see How the Worker Environment Tier
Works (p. 337).
API Version 2010-12-01
18
Elastic Beanstalk Developer Guide
Worker Environment Tiers

Supported Platforms
Elastic Beanstalk web server environment tiers support applications developed in Java, PHP, .NET,
Node.js, Python, and Ruby as well as different container types for each language. Elastic Beanstalk
worker environment tiers support applications developed in Node.js, PHP, Python, Ruby, and Java.
Furthermore, for worker environment tiers, only Amazon Linux AMIs are supported.
Elastic Beanstalk provisions the resources needed to run your application including one or more Amazon
EC2 instances.The software stack running on the Amazon EC2 instances depends on the container
type. A container type defines the infrastructure topology and software framework to be used for that
environment. For example, an Elastic Beanstalk environment with an Apache Tomcat container uses the
Amazon Linux operating system, Apache web server, and Apache Tomcat software. In a container name,
the version number refers to the solution stack and not the Amazon Linux operating system version.
• Docker (p. 19)
• Docker - Preconfigured (p. 22)
• Java (p. 27)
• Windows and .NET (p. 32)
• Node.js (p. 33)
• PHP (p. 41)
• Python (p. 46)
• Ruby (p. 50)
Docker
You can use Docker containers to deploy applications to Elastic Beanstalk.They are included in the list
of predefined configurations (or solution stacks) that you can choose when you create an environment.
Elastic Beanstalk supports the following container types:
Docker Container Types
Docker VersionAMIName
1.5.02014.0964bit Amazon Linux 2014.09 v1.2.1 running
Docker 1.5.0
1.3.32014.0964bit Amazon Linux 2014.09 v1.2.0 running
Multi-container Docker 1.3.3 (Generic)
Elastic Beanstalk supports the following container types for environments created with Docker containers
between February 17, 2015 and March 23, 2015:
Docker Container Types
Docker VersionAMIName
1.3.32014.0964bit Amazon Linux 2014.09 v1.2.0 running
Docker 1.3.3
Elastic Beanstalk supports the following container types for environments created with Docker containers
between January 28, 2015 and February 16, 2015:
API Version 2010-12-01
19
Elastic Beanstalk Developer Guide
Supported Platforms

Docker Container Types
Docker VersionAMIName
1.3.32014.0964bit Amazon Linux 2014.09
1
v1.1.0 running
Docker 1.3.3
Elastic Beanstalk supports the following container types for environments created with Docker containers
between December 13, 2014 and January 27, 2015:
Docker Container Types
Docker VersionAMIName
1.3.32014.0964bit Amazon Linux 2014.09
1
v1.0.11 running
Docker 1.3.3
Elastic Beanstalk supports the following container types for environments created with Docker containers
between November 26, 2014 and December 12, 2014:
Docker Container Types
Docker VersionAMIName
1.3.22014.0964bit Amazon Linux 2014.09 v1.0.10 running
Docker 1.3.2
Elastic Beanstalk supports the following container types for environments created with Docker containers
between October 16, 2014 and November 25, 2014:
Docker Container Types
Docker VersionAMIName
1.2.02014.0964bit Amazon Linux 2014.09 v1.0.9
1
running
Docker 1.2.0
1.0.02014.0364bit Amazon Linux 2014.03 v1.0.9
1
running
Docker 1.0.0
Elastic Beanstalk supports the following container types for environments created with Docker containers
between October 9, 2014 and October 15, 2014:
Docker Container Types
Docker VersionAMIName
1.2.02014.0964bit Amazon Linux 2014.09 v1.0.8 running
Docker 1.2.0
Elastic Beanstalk supports the following container types for environments created with Docker containers
between September 24, 2014 and October 8, 2014:
API Version 2010-12-01
20
Elastic Beanstalk Developer Guide
Docker

Docker Container Types
Docker VersionAMIName
1.0.02014.0364bit Amazon Linux 2014.03 v1.0.7
1
running
Docker 1.0.0
Elastic Beanstalk supports the following container types for environments created with Docker containers
between June 30, 2014 and September 23, 2014:
Docker Container Types
Docker VersionAMIName
1.0.02014.0364bit Amazon Linux 2014.03 v1.0.1 running
Docker 1.0.0
Elastic Beanstalk supports the following container types for environments created with Docker containers
between June 16, 2014 and June 29, 2014:
Docker Container Types
Docker VersionAMIName
1.0.02014.0364bit Amazon Linux 2014.03 v1.0.0 running
Docker 1.0.0
Elastic Beanstalk supports the following container types for environments created with Docker containers
between June 5, 2014 and June 15, 2014:
Docker Container Types
Docker VersionAMIName
0.9.02014.0364bit Amazon Linux 2014.03 v1.0.5
1
running
Docker 0.9.0
Elastic Beanstalk supports the following container types for environments created with Docker containers
between May 5, 2014 and June 4, 2014:
Docker Container Types
Docker VersionAMIName
0.9.02014.0364bit Amazon Linux 2014.03 v1.0.4 running
Docker 0.9.0
Elastic Beanstalk supports the following container types for environments created with Docker containers
between April 29, 2014 and May 4, 2014:
Docker Container Types
Docker VersionAMIName
API Version 2010-12-01
21
Elastic Beanstalk Developer Guide
Docker

Docker Container Types
0.9.02014.0364bit Amazon Linux 2014.03 v1.0.3 running
Docker 0.9.0
Elastic Beanstalk supports the following container types for environments created with Docker containers
prior to April 28, 2014:
Docker Container Types
Docker VersionAMIName
0.9.02014.0364bit Amazon Linux 2014.03 v1.0.2 running
Docker 0.9.0
Docker - Preconfigured
You can deploy applications to Elastic Beanstalk with Docker containers that are preconfigured to support
application88s that were developed using a specific language platform. They are included in the list of
predefined configurations (or solution stacks) as Docker - Preconfigured configurations that you can
choose when you create an environment. Elastic Beanstalk supports the following preconfigured Docker
container types:
Preconfigured Docker Container Types
Dock-
er
Im-
age
Name
Ap-
plic-
a-
tion
Serv-
er
Proxy
Serv-
er
Lan-
guage
Docker VersionContainer Operating
System
AMIName
amazon/aws-
eb-
glassfish:4.1-
jdk8-
on-
build-
3.5.1
Glassfish
4.1
Nginx
1.6.2
Java
8
1.5.0Debian Jessie2014.0964bit Debian Jessie v1.2.1 running
Glassfish 4.1 Java 8 (Precon-
figured – Docker)
amazon/aws-
eb-
glassfish:4.0-
jdk7-
on-
build-
3.5.1
Glassfish
4.0
Nginx
1.6.2
Java
7
1.5.0Debian Jessie2014.0964bit Debian Jessie v1.2.1 running
Glassfish 4.0 Java 7 (Precon-
figured – Docker)
golang:1.4.1-
on-
build
Nginx
1.6.2
Go
1.4.1
1.5.0Debian Jessie2014.0964bit Debian Jessie v1.2.1 running
Go 1.4 (Preconfigured – Docker)
golang:1.3.3-
on-
build
Nginx
1.6.2
Go
1.3.3
1.5.0Debian Jessie2014.0964bit Debian Jessie v1.2.1 running
Go 1.3 (Preconfigured – Docker)
API Version 2010-12-01
22
Elastic Beanstalk Developer Guide
Docker - Preconfigured

Preconfigured Docker Container Types
amazon/aws-
eb-
py-
thon:3.4.2-
on-
build-
3.5.1
uWSGI
2.0.8
Nginx
1.6.2
Py-
thon
3.4
1.5.0Debian Jessie2014.0964bit Debian Jessie v1.2.1 running
Python 3.4 (Preconfigured –
Docker)
Elastic Beanstalk supports the following container types for environments created with preconfigured
Docker containers between February 17, 2015 and March 23, 2015:
Preconfigured Docker Container Types
Dock-
er
Im-
age
Name
Ap-
plic-
a-
tion
Serv-
er
Proxy
Serv-
er
Lan-
guage
Docker VersionContainer Operating
System
AMIName
amazon/aws-
eb-
glassfish:4.1-
jdk8-
on-
build-
3.5.1
Glassfish
4.1
Nginx
1.6.2
Java
8
1.3.3Debian Jessie2014.0964bit Debian Jessie v1.2.0 running
Glassfish 4.1 Java 8 (Precon-
figured – Docker)
amazon/aws-
eb-
glassfish:4.0-
jdk7-
on-
build-
3.5.1
Glassfish
4.0
Nginx
1.6.2
Java
7
1.3.3Debian Jessie2014.0964bit Debian Jessie v1.2.0 running
Glassfish 4.0 Java 7 (Precon-
figured – Docker)
golang:1.4.1-
on-
build
Nginx
1.6.2
Go
1.4.1
1.3.3Debian Jessie2014.0964bit Debian Jessie v1.2.0 running
Go 1.4 (Preconfigured – Docker)
golang:1.3.3-
on-
build
Nginx
1.6.2
Go
1.3.3
1.3.3Debian Jessie2014.0964bit Debian Jessie v1.2.0 running
Go 1.3 (Preconfigured – Docker)
amazon/aws-
eb-
py-
thon:3.4.2-
on-
build-
3.5.1
uWSGI
2.0.8
Nginx
1.6.2
Py-
thon
3.4
1.3.3Debian Jessie2014.0964bit Debian Jessie v1.2.0 running
Python 3.4 (Preconfigured –
Docker)
Elastic Beanstalk supports the following container types for environments created with preconfigured
Docker containers between February 6, 2015 and February 16, 2015:
API Version 2010-12-01
23
Elastic Beanstalk Developer Guide
Docker - Preconfigured

Preconfigured Docker Container Types
Dock-
er
Im-
age
Name
Proxy
Serv-
er
Lan-
guage
Docker VersionContainer Operating
System
AMIName
golang:1.3.3-
on-
build
Nginx
1.6.2
Go
1.3.3
1.3.3Debian Jessie2014.0964bit Debian Jessie v1.1.0 running
Go 1.3 (Preconfigured – Docker)
golang:1.4.1-
on-
build
Nginx
1.6.2
Go
1.4.1
1.3.3Debian Jessie2014.0964bit Debian Jessie v1.1.0 running
Go 1.4 (Preconfigured – Docker)
Elastic Beanstalk supports the following container types for environments created with preconfigured
Docker containers between January 28, 2015 and February 5, 2015:
Preconfigured Docker Container Types
Dock-
er
Im-
age
Name
Ap-
plic-
a-
tion
Serv-
er
Proxy
Serv-
er
Lan-
guage
Docker VersionContainer Operating
System
AMIName
amazon/aws-
eb-
glassfish:4.1-
jdk8-
on-
build-
3.5.1
Glassfish
4.1
Nginx
1.6.2
Java
8
1.3.3Debian Jessie2014.0964bit Debian Jessie v1.1.0
1
run-
ning Glassfish 4.1 Java 8 (Precon-
figured – Docker)
amazon/aws-
eb-
glassfish:4.0-
jdk7-
on-
build-
3.5.1
Glassfish
4.0
Nginx
1.6.2
Java
7
1.3.3Debian Jessie2014.0964bit Debian Jessie v1.1.0
1
run-
ning Glassfish 4.0 Java 7 (Precon-
figured – Docker)
amazon/aws-
eb-
py-
thon:3.4.2-
on-
build-
3.5.1
uWSGI
2.0.8
Nginx
1.6.2
Py-
thon
3.4
1.3.3Debian Jessie2014.0964bit Debian Jessie v1.1.0
1
run-
ning Python 3.4 (Preconfigured –
Docker)
Elastic Beanstalk supports the following container types for environments created with preconfigured
Docker containers between December 13, 2014 and January 27, 2015:
API Version 2010-12-01
24
Elastic Beanstalk Developer Guide
Docker - Preconfigured

Preconfigured Docker Container Types
Dock-
er
Im-
age
Name
Ap-
plic-
a-
tion
Serv-
er
Proxy
Serv-
er
Lan-
guage
Docker VersionContainer Operating
System
AMIName
amazon/aws-
eb-
glassfish:4.1-
jdk8-
on-
build-
3.5.1
Glassfish
4.1
Nginx
1.6.2
Java
8
1.3.3
1
Debian Jessie2014.0964bit Debian Jessie v1.0.2 running
Glassfish 4.1 Java 8 (Precon-
figured – Docker)
amazon/aws-
eb-
glassfish:4.0-
jdk7-
on-
build-
3.5.1
Glassfish
4.0
Nginx
1.6.2
Java
7
1.3.3
1
Debian Jessie2014.0964bit Debian Jessie v1.0.2 running
Glassfish 4.0 Java 7 (Precon-
figured – Docker)
amazon/aws-
eb-
py-
thon:3.4.2-
on-
build-
3.5.1
uWSGI
2.0.8
Nginx
1.6.2
Py-
thon
3.4
1.3.3
1
Debian Jessie2014.0964bit Debian Jessie v1.0.2 running
Python 3.4 (Preconfigured –
Docker)
Elastic Beanstalk supports the following container types for environments created with preconfigured
Docker containers between November 26, 2014 and December 12, 2014:
Preconfigured Docker Container Types
Dock-
er
Im-
age
Name
Ap-
plic-
a-
tion
Serv-
er
Proxy
Serv-
er
Lan-
guage
Docker VersionContainer Operating
System
AMIName
amazon/aws-
eb-
glassfish:4.1-
jdk8-
on-
build-
3.5.1
Glassfish
4.1
Nginx
1.6.2
Java
8
1.3.2Debian Jessie2014.0964bit Debian Jessie v1.0.1 running
Glassfish 4.1 Java 8 (Precon-
figured – Docker)
API Version 2010-12-01
25
Elastic Beanstalk Developer Guide
Docker - Preconfigured

Preconfigured Docker Container Types
amazon/aws-
eb-
glassfish:4.0-
jdk7-
on-
build-
3.5.1
Glassfish
4.0
Nginx
1.6.2
Java
7
1.3.2Debian Jessie2014.0964bit Debian Jessie v1.0.1 running
Glassfish 4.0 Java 7 (Precon-
figured – Docker)
amazon/aws-
eb-
py-
thon:3.4.2-
on-
build-
3.5.1
uWSGI
2.0.8
Nginx
1.6.2
Py-
thon
3.4
1.3.2Debian Jessie2014.0964bit Debian Jessie v1.0.1 running
Python 3.4 (Preconfigured –
Docker)
Elastic Beanstalk supports the following container types for environments created with preconfigured
Docker containers prior to November 25, 2014:
Preconfigured Docker Container Types
Dock-
er
Im-
age
Name
Ap-
plic-
a-
tion
Serv-
er
Proxy
Serv-
er
Lan-
guage
Docker VersionContainer Operating
System
AMIName
amazon/aws-
eb-
glassfish:4.1-
jdk8-
on-
build-
3.5.1
Glassfish
4.1
Nginx
1.6.2
Java
8
1.2.0Debian Jessie2014.0964bit Debian Jessie v1.0.0 running
Glassfish 4.1 Java 8 (Precon-
figured – Docker)
amazon/aws-
eb-
glassfish:4.0-
jdk7-
on-
build-
3.5.1
Glassfish
4.0
Nginx
1.6.2
Java
7
1.2.0Debian Jessie2014.0964bit Debian Jessie v1.0.0 running
Glassfish 4.0 Java 7 (Precon-
figured – Docker)
amazon/aws-
eb-
py-
thon:3.4.2-
on-
build-
3.5.1
uWSGI
2.0.8
Nginx
1.6.2
Py-
thon
3.4
1.2.0Debian Jessie2014.0964bit Debian Jessie v1.0.0 running
Python 3.4 (Preconfigured –
Docker)
API Version 2010-12-01
26
Elastic Beanstalk Developer Guide
Docker - Preconfigured

Java
You can get started with Java using the AWS Toolkit for Eclipse.The toolkit is a downloadable package
that includes the AWS libraries, project templates, code samples, and documentation.The AWS SDK for
Java supports developing applications using either Java 5 or Java 6. Elastic Beanstalk supports the
following container types:
Java Container Types
Web
Serv-
er
Application ServerLanguageAMIName
Apache
2.2.29
Tomcat 8Java 1.8.0_312014.0964bit Amazon Linux 2014.09
v1.1.0
1
running Tomcat 8 Java 8
Apache
2.2.26
Tomcat 7.0.55Java 1.7.0.512014.0964bit Amazon Linux 2014.09
v1.1.0
1
running Tomcat 7 Java 7
Apache
2.2.26
Tomcat 7.0.55Java 1.6.0_242014.0964bit Amazon Linux 2014.09
v1.1.0
1
running Tomcat 7 Java 6
Apache
2.2.29
Tomcat 7.0.55Java 1.7.0.712014.0332bit Amazon Linux 2014.03
v1.1.0
1
running Tomcat 7 Java 7
Apache
2.2.29
Tomcat 7.0.55Java 1.7.0.712014.0364bit Amazon Linux 2014.03
v1.1.0
1
running Tomcat 7 Java 7
Apache
2.2.29
Tomcat 7.0.55Java 1.6.0_332014.0332bit Amazon Linux 2014.03
v1.1.0
1
running Tomcat 7 Java 6
Apache
2.2.29
Tomcat 7.0.55Java 1.6.0_332014.0364bit Amazon Linux 2014.03
v1.1.0
1
running Tomcat 7 Java 6
Elastic Beanstalk supports the following container types for environments created with Java containers
between January 28, 2015 and February 16, 2015:
Java Container Types
Web
Serv-
er
Application ServerLanguageAMIName
Apache
2.2.29
Tomcat 8.0.15Java 1.8.0_312014.0964bit Amazon Linux 2014.09
v1.2.0 running Tomcat 8 Java 8
Apache
2.2.29
Tomcat 7.0.57Java 1.7.0.752014.0964bit Amazon Linux 2014.09
v1.2.0 running Tomcat 7 Java 7
Apache
2.2.29
Tomcat 7.0.57Java 1.6.0_332014.0964bit Amazon Linux 2014.09
v1.2.0 running Tomcat 7 Java 6
Elastic Beanstalk supports the following container types for environments created with Java containers
between November 6, 2014 and January 27, 2015:
API Version 2010-12-01
27
Elastic Beanstalk Developer Guide
Java

Java Container Types
Web
Serv-
er
Application ServerLanguageAMIName
Apache
2.2.29
Tomcat 8Java 1.8.0_252014.0964bit Amazon Linux 2014.09
v1.0.0 running Tomcat 8 Java 8
Elastic Beanstalk supports the following container types for environments created with Java containers
between October 16, 2014 and November 5, 2014:
Java Container Types
Web
Serv-
er
Application ServerLanguageAMIName
Apache
2.2.26
Tomcat 7.0.55Java 1.7.0.512014.0964bit Amazon Linux 2014.09
v1.0.9
1
running Tomcat 7 Java 7
Apache
2.2.26
Tomcat 7.0.55Java 1.6.0_242014.0964bit Amazon Linux 2014.09
v1.0.9
1
running Tomcat 7 Java 6
Apache
2.2.26
Tomcat 7.0.55Java 1.7.0.512014.0332bit Amazon Linux 2014.03
v1.0.9
1
running Tomcat 7 Java 7
Apache
2.2.26
Tomcat 7.0.55Java 1.7.0.512014.0364bit Amazon Linux 2014.03
v1.0.9
1
running Tomcat 7 Java 7
Apache
2.2.26
Tomcat 7.0.55Java 1.6.0_242014.0332bit Amazon Linux 2014.03
v1.0.9
1
running Tomcat 7 Java 6
Apache
2.2.26
Tomcat 7.0.55Java 1.6.0_242014.0364bit Amazon Linux 2014.03
v1.0.9
1
running Tomcat 7 Java 6
Elastic Beanstalk supports the following container types for environments created with Java containers
between October 9, 2014 and October 15, 2014:
Java Container Types
Web
Serv-
er
Application ServerLanguageAMIName
Apache
2.2.26
Tomcat 7.0.47Java 1.7.0.512014.0932bit Amazon Linux 2014.09
v1.0.8 running Tomcat 7 Java 7
Apache
2.2.26
Tomcat 7.0.47Java 1.7.0.512014.0964bit Amazon Linux 2014.09
v1.0.8 running Tomcat 7 Java 7
Apache
2.2.26
Tomcat 7.0.47Java 1.6.0_242014.0932bit Amazon Linux 2014.09
v1.0.8 running Tomcat 7 Java 6
Apache
2.2.26
Tomcat 7.0.47Java 1.6.0_242014.0964bit Amazon Linux 2014.09
v1.0.8 running Tomcat 7 Java 6
API Version 2010-12-01
28
Elastic Beanstalk Developer Guide
Java

Elastic Beanstalk supports the following container types for environments created with Java containers
between September 24, 2014 and October 8, 2014:
Java Container Types
Web
Serv-
er
Application ServerLanguageAMIName
Apache
2.2.26
Tomcat 7.0.47Java 1.7.0.512014.0332bit Amazon Linux 2014.03
v1.0.7
1
running Tomcat 7 Java 7
Apache
2.2.26
Tomcat 7.0.47Java 1.7.0.512014.0364bit Amazon Linux 2014.03
v1.0.7
1
running Tomcat 7 Java 7
Apache
2.2.26
Tomcat 7.0.47Java 1.6.0_242014.0332bit Amazon Linux 2014.03
v1.0.7
1
running Tomcat 7 Java 6
Apache
2.2.26
Tomcat 7.0.47Java 1.6.0_242014.0364bit Amazon Linux 2014.03
v1.0.7
1
running Tomcat 7 Java 6
Elastic Beanstalk supports the following container types for environments created with Java containers
between June 30, 2014 and September 23, 2014:
Java Container Types
Web
Serv-
er
Application ServerLanguageAMIName
Apache
2.2.26
Tomcat 7.0.47Java 1.7.0.512014.0364bit Amazon Linux 2014.03
v1.0.4 running Tomcat 7 Java 7
Apache
2.2.26
Tomcat 7.0.47Java 1.6.0_242014.0364bit Amazon Linux 2014.03
v1.0.4 running Tomcat 7 Java 6
Elastic Beanstalk supports the following container types for environments created with Java containers
between June 5, 2014 and June 29, 2014:
Java Container Types
Web
Serv-
er
Application ServerLanguageAMIName
Apache
2.2.26
Tomcat 7.0.47Java 1.7.0.512014.0332bit Amazon Linux 2014.03
v1.0.3
1
running Tomcat 7 Java 7
Apache
2.2.26
Tomcat 7.0.47Java 1.7.0.512014.0364bit Amazon Linux 2014.03
v1.0.3
1
running Tomcat 7 Java 7
Apache
2.2.26
Tomcat 7.0.47Java 1.6.0_242014.0332bit Amazon Linux 2014.03
v1.0.3
1
running Tomcat 7 Java 6
Apache
2.2.26
Tomcat 7.0.47Java 1.6.0_242014.0364bit Amazon Linux 2014.03
v1.0.3
1
running Tomcat 7 Java 6
API Version 2010-12-01
29
Elastic Beanstalk Developer Guide
Java

Elastic Beanstalk supports the following container types for environments created with Java containers
between May 5, 2014 and June 4, 2014:
Java Container Types
Web
Serv-
er
Application ServerLanguageAMIName
Apache
2.2.26
Tomcat 7.0.47Java 1.7.0.512014.0332bit Amazon Linux 2014.03
v1.0.2 running Tomcat 7 Java 7
Apache
2.2.26
Tomcat 7.0.47Java 1.7.0.512014.0364bit Amazon Linux 2014.03
v1.0.2 running Tomcat 7 Java 7
Apache
2.2.26
Tomcat 7.0.47Java 1.6.0_242014.0332bit Amazon Linux 2014.03
v1.0.2 running Tomcat 7 Java 6
Apache
2.2.26
Tomcat 7.0.47Java 1.6.0_242014.0364bit Amazon Linux 2014.03
v1.0.2 running Tomcat 7 Java 6
Elastic Beanstalk supports the following container types for environments created with Java containers
between April 7, 2014 and May 4, 2014:
Java Container Types
Web
Serv-
er
Application ServerLanguageAMIName
Apache
2.2.26
Tomcat 7.0.47Java 1.7.0.512013.0932bit Amazon Linux 2014.02
v1.0.1
1
running Tomcat 7 Java 7
Apache
2.2.26
Tomcat 7.0.47Java 1.7.0.512013.0964bit Amazon Linux 2014.02
v1.0.1
1
running Tomcat 7 Java 7
Apache
2.2.26
Tomcat 7.0.47Java 1.6.0_242013.0932bit Amazon Linux 2014.02
v1.0.1
1
running Tomcat 7 Java 6
Apache
2.2.26
Tomcat 7.0.47Java 1.6.0_242013.0964bit Amazon Linux 2014.02
v1.0.1
1
running Tomcat 7 Java 6
Apache
2.2.26
Tomcat 7.0.47Java 1.7.0_252013.0932bit Amazon Linux 2013.09
v1.0.1
1
running Tomcat 7 Java 7
Apache
2.2.26
Tomcat 7.0.47Java 1.7.0_252013.0964bit Amazon Linux 2013.09
v1.0.1
1
running Tomcat 7 Java 7
Apache
2.2.26
Tomcat 7.0.47Java 1.6.0_622013.0932bit Amazon Linux 2013.09
v1.0.1
1
running Tomcat 7 Java 6
Apache
2.2.26
Tomcat 7.0.47Java 1.6.0_622013.0964bit Amazon Linux 2013.09
v1.0.1
1
running Tomcat 7 Java 6
Apache
2.2.22
Tomcat 6.0.35Java 1.6.0_242012.0932bit Amazon Linux running
Tomcat 6
Apache
2.2.22
Tomcat 6.0.35Java 1.6.0_242012.0964bit Amazon Linux running
Tomcat 6
API Version 2010-12-01
30
Elastic Beanstalk Developer Guide
Java

Elastic Beanstalk supports the following container types for environments created with Java containers
between March 18, 2014 and April 6, 2014:
Java Container Types
Web
Serv-
er
Application ServerLanguageAMIName
Apache
2.2.26
Tomcat 7.0.47Java 1.7.0.512013.0932bit Amazon Linux 2014.02 run-
ning Tomcat 7 Java 7
Apache
2.2.26
Tomcat 7.0.47Java 1.7.0.512013.0964bit Amazon Linux 2014.02 run-
ning Tomcat 7 Java 7
Apache
2.2.26
Tomcat 7.0.47Java 1.6.0_242013.0932bit Amazon Linux 2014.02 run-
ning Tomcat 7 Java 6
Apache
2.2.26
Tomcat 7.0.47Java 1.6.0_242013.0964bit Amazon Linux 2014.02 run-
ning Tomcat 7 Java 6
Apache
2.2.26
Tomcat 7.0.47Java 1.7.0_252013.0932bit Amazon Linux 2013.09 run-
ning Tomcat 7 Java 7
Apache
2.2.26
Tomcat 7.0.47Java 1.7.0_252013.0964bit Amazon Linux 2013.09 run-
ning Tomcat 7 Java 7
Apache
2.2.26
Tomcat 7.0.47Java 1.6.0_622013.0932bit Amazon Linux 2013.09 run-
ning Tomcat 7 Java 6
Apache
2.2.26
Tomcat 7.0.47Java 1.6.0_622013.0964bit Amazon Linux 2013.09 run-
ning Tomcat 7 Java 6
Apache
2.2.22
Tomcat 6.0.35Java 1.6.0_242012.0932bit Amazon Linux running
Tomcat 6
Apache
2.2.22
Tomcat 6.0.35Java 1.6.0_242012.0964bit Amazon Linux running
Tomcat 6
Elastic Beanstalk supports the following container types for environments created with Java containers
between November 7, 2013 and March 17, 2014:
Java Container Types
Web
Serv-
er
Application ServerLanguageAMIName
Apache
2.2.26
Tomcat 7.0.47Java 1.7.0_252013.0932bit Amazon Linux 2013.09 run-
ning Tomcat 7 Java 7
Apache
2.2.26
Tomcat 7.0.47Java 1.7.0_252013.0964bit Amazon Linux 2013.09 run-
ning Tomcat 7 Java 7
Apache
2.2.26
Tomcat 7.0.47Java 1.6.0_622013.0932bit Amazon Linux 2013.09 run-
ning Tomcat 7 Java 6
Apache
2.2.26
Tomcat 7.0.47Java 1.6.0_622013.0964bit Amazon Linux 2013.09 run-
ning Tomcat 7 Java 6
API Version 2010-12-01
31
Elastic Beanstalk Developer Guide
Java

Java Container Types
Apache
2.2.22
Tomcat 6.0.35Java 1.6.0_242012.0932bit Amazon Linux running
Tomcat 6
Apache
2.2.22
Tomcat 6.0.35Java 1.6.0_242012.0964bit Amazon Linux running
Tomcat 6
Elastic Beanstalk supports the following container types for environments created with Java containers
prior to November 6, 2013:
Java Container Types
Web
Serv-
er
Application ServerLanguageAMIName
Apache
2.2.22
Tomcat 7.0.27Java 1.6.0_242012.0932bit Amazon Linux running
Tomcat 7
Apache
2.2.22
Tomcat 7.0.27Java 1.6.0_242012.0964bit Amazon Linux running
Tomcat 7
Windows and .NET
You can get started in minutes using the AWS Toolkit for Visual Studio.The toolkit includes the AWS
libraries, project templates, code samples, and documentation.The AWS SDK for .NET supports the
development of applications using .NET Framework 2.0 or later. To learn how to get started deploying a
.NET application using the AWS Toolkit for Visual Studio, see Creating and Deploying Elastic Beanstalk
Applications in .NET Using AWS Toolkit for Visual Studio (p.125). Elastic Beanstalk supports the following
container types:
.NET Container Types
Web ServerLanguageAMIName
IIS 8.5v1.0
v1.1
v2.0
v3.0
v3.5
v4.0/v4.5
Custom64bit Windows Server 2012 R2
1
running IIS 8.5
API Version 2010-12-01
32
Elastic Beanstalk Developer Guide
Windows and .NET

.NET Container Types
IIS 8.5v1.0
v1.1
v2.0
v3.0
v3.5
v4.0/v4.5
Custom64bit Windows Server Core
2012 R2
1
running IIS 8.5
Elastic Beanstalk supports the following container types for environments created with .NET containers
prior to August 6, 2014:
.NET Container Types
Web ServerLanguageAMIName
IIS 8v1.0
v1.1
v2.0
v3.0
v3.5
v4.0/v4.5
Custom64bit Windows Server 2012
1
running IIS 8
IIS 7.5v1.0
v1.1
v2.0
v3.0
v3.5
v4.0/v4.5
Custom64bit Windows Server 2008 R2
1
running IIS 7.5
Node.js
You can get started in minutes using the AWS Management Console or the eb command line interface.
You can deploy applications by simply zipping them up and uploading them through the console.To learn
how to upload an application using the AWS Management Console, see Creating New Applications (p.279).
To learn how to get started deploying a Node.js application to Elastic Beanstalk using eb and Git, see
Deploying Elastic Beanstalk Applications in Node.js Using EB CLI and Git (p. 174). Elastic Beanstalk
supports the following container types:
API Version 2010-12-01
33
Elastic Beanstalk Developer Guide
Node.js

Node.js Container Types
Web
Serv-
er
Node.js VersionLanguageAMIName
Nginx
1.6.2
or
Apache
2.4.10
0.8.26
0.8.28
0.10.21
0.10.26
0.10.31
0.12.0
JavaScript2014.0964bit Amazon Linux 2014.09
v1.2.1 running Node.js
Elastic Beanstalk supports the following container types for environments created with Node.js containers
between February 17, 2015 and March 23, 2015:
Node.js Container Types
Web
Serv-
er
Node.js VersionLanguageAMIName
Nginx
1.6.2
or
Apache
2.4.10
0.8.26
0.8.28
0.10.21
0.10.26
0.10.31
JavaScript2014.0964bit Amazon Linux 2014.09
v1.2.0 running Node.js
Elastic Beanstalk supports the following container types for environments created with Node.js containers
between January 28, 2015 and February 16, 2015:
Node.js Container Types
Web
Serv-
er
Node.js VersionLanguageAMIName
Nginx
1.6.2
or
Apache
2.4.6
0.8.26
0.8.28
0.10.21
0.10.26
0.10.31
JavaScript2014.0964bit Amazon Linux 2014.09
v1.1.0
1
running Node.js
API Version 2010-12-01
34
Elastic Beanstalk Developer Guide
Node.js

Node.js Container Types
Nginx
1.4.7
or
Apache
2.4.10
0.8.26
0.8.28
0.10.21
0.10.26
0.10.31
JavaScript2014.0332bit Amazon Linux 2014.03
v1.1.0
1
running Node.js
Nginx
1.4.7
or
Apache
2.4.10
0.8.26
0.8.28
0.10.21
0.10.26
0.10.31
JavaScript2014.0364bit Amazon Linux 2014.03
v1.1.0
1
running Node.js
Elastic Beanstalk supports the following container types for environments created with Node.js containers
between October 16, 2014 and January 27, 2015:
Node.js Container Types
Web
Serv-
er
Node.js VersionLanguageAMIName
Nginx
1.6.2
or
Apache
2.4.6
0.8.26
0.8.28
0.10.21
0.10.26
0.10.31
JavaScript2014.0964bit Amazon Linux 2014.09
v1.0.9
1
running Node.js
Nginx
1.6.2
or
Apache
2.4.6
0.8.26
0.8.28
0.10.21
0.10.26
0.10.31
JavaScript2014.0332bit Amazon Linux 2014.03
v1.0.9
1
running Node.js
Nginx
1.6.2
or
Apache
2.4.6
0.8.26
0.8.28
0.10.21
0.10.26
0.10.31
JavaScript2014.0364bit Amazon Linux 2014.03
v1.0.9
1
running Node.js
API Version 2010-12-01
35
Elastic Beanstalk Developer Guide
Node.js

Elastic Beanstalk supports the following container types for environments created with Node.js containers
between October 9, 2014 and October 15, 2014:
Node.js Container Types
Web
Serv-
er
Node.js VersionLanguageAMIName
Nginx
1.4.7
or
Apache
2.4.6
0.8.6 through 0.8.21
0.8.24
0.8.26
0.10.10
0.10.21
0.10.26
JavaScript2014.0964bit Amazon Linux 2014.09
v1.0.8 running Node.js
Elastic Beanstalk supports the following container types for environments created with Node.js containers
between September 24, 2014 and October 8, 2014:
Node.js Container Types
Web
Serv-
er
Node.js VersionLanguageAMIName
Nginx
1.4.7
or
Apache
2.4.6
0.8.6 through 0.8.21
0.8.24
0.8.26
0.10.10
0.10.21
0.10.26
JavaScript2014.0332bit Amazon Linux 2014.03
v1.0.7
1
running Node.js
Nginx
1.4.7
or
Apache
2.4.6
0.8.6 through 0.8.21
0.8.24
0.8.26
0.10.10
0.10.21
0.10.26
JavaScript2014.0364bit Amazon Linux 2014.03
v1.0.7
1
running Node.js
Elastic Beanstalk supports the following container types for environments created with Node.js containers
between June 30, 2014 and September 23, 2014:
API Version 2010-12-01
36
Elastic Beanstalk Developer Guide
Node.js

Node.js Container Types
Web
Serv-
er
Node.js VersionLanguageAMIName
Nginx
1.4.7
or
Apache
2.4.6
0.8.6 through 0.8.21
0.8.24
0.8.26
0.10.10
0.10.21
0.10.26
JavaScript2014.0364bit Amazon Linux 2014.03
v1.0.4 running Node.js
Elastic Beanstalk supports the following container types for environments created with Node.js containers
between June 5, 2014 and June 29, 2014:
Node.js Container Types
Web
Serv-
er
Node.js VersionLanguageAMIName
Nginx
1.4.7
or
Apache
2.4.6
0.8.6 through 0.8.21
0.8.24
0.8.26
0.10.10
0.10.21
0.10.26
JavaScript2014.0332bit Amazon Linux 2014.03
v1.0.3
1
running Node.js
Nginx
1.4.7
or
Apache
2.4.6
0.8.6 through 0.8.21
0.8.24
0.8.26
0.10.10
0.10.21
0.10.26
JavaScript2014.0364bit Amazon Linux 2014.03
v1.0.3
1
running Node.js
Elastic Beanstalk supports the following container types for environments created with Node.js containers
between May 5, 2014 and June 4, 2014:
API Version 2010-12-01
37
Elastic Beanstalk Developer Guide
Node.js

Node.js Container Types
Web
Serv-
er
Node.js VersionLanguageAMIName
Nginx
1.4.7
or
Apache
2.4.6
0.8.6 through 0.8.21
0.8.24
0.8.26
0.10.10
0.10.21
0.10.26
JavaScript2014.0332bit Amazon Linux 2014.03
v1.0.2 running Node.js
Nginx
1.4.7
or
Apache
2.4.6
0.8.6 through 0.8.21
0.8.24
0.8.26
0.10.10
0.10.21
0.10.26
JavaScript2014.0364bit Amazon Linux 2014.03
v1.0.2 running Node.js
Elastic Beanstalk supports the following container types for environments created with Node.js containers
between April 7, 2014 and May 4, 2014:
Node.js Container Types
Web
Serv-
er
Node.js VersionLanguageAMIName
Nginx
1.4.3
or
Apache
2.4.6
0.8.6 through 0.8.21
0.8.24
0.8.26
0.10.10
0.10.21
0.10.26
JavaScript2013.0932bit Amazon Linux 2014.02
v1.0.1
1
running Node.js
API Version 2010-12-01
38
Elastic Beanstalk Developer Guide
Node.js

Node.js Container Types
Nginx
1.4.3
or
Apache
2.4.6
0.8.6 through 0.8.21
0.8.24
0.8.26
0.10.10
0.10.21
0.10.26
JavaScript2013.0964bit Amazon Linux 2014.02
v1.0.1
1
running Node.js
Nginx
1.4.3
or
Apache
2.4.6
0.8.6 through 0.8.21
0.8.24
0.10.10
0.10.21
JavaScript2013.0932bit Amazon Linux 2013.09
v1.0.1
1
running Node.js
Nginx
1.4.3
or
Apache
2.4.6
0.8.6 through 0.8.21
0.8.24
0.10.10
0.10.21
JavaScript2013.0964bit Amazon Linux 2013.09
v1.0.1
1
running Node.js
Elastic Beanstalk supports the following container types for environments created with Node.js containers
between March 18, 2014 and April 6, 2014:
Node.js Container Types
Web
Serv-
er
Node.js VersionLanguageAMIName
Nginx
1.4.3
or
Apache
2.4.6
0.8.6 through 0.8.21
0.8.24
0.8.26
0.10.10
0.10.21
0.10.26
JavaScript2013.0932bit Amazon Linux 2014.02
running Node.js
API Version 2010-12-01
39
Elastic Beanstalk Developer Guide
Node.js

Node.js Container Types
Nginx
1.4.3
or
Apache
2.4.6
0.8.6 through 0.8.21
0.8.24
0.8.26
0.10.10
0.10.21
0.10.26
JavaScript2013.0964bit Amazon Linux 2014.02
running Node.js
Nginx
1.4.3
or
Apache
2.4.6
0.8.6 through 0.8.21
0.8.24
0.10.10
0.10.21
JavaScript2013.0932bit Amazon Linux 2013.09
running Node.js
Nginx
1.4.3
or
Apache
2.4.6
0.8.6 through 0.8.21
0.8.24
0.10.10
0.10.21
JavaScript2013.0964bit Amazon Linux 2013.09
running Node.js
Elastic Beanstalk supports the following container types for environments created with Node.js containers
between October 29, 2013 and March 17, 2014:
Node.js Container Types
Web
Serv-
er
Node.js VersionLanguageAMIName
Nginx
1.4.3
or
Apache
2.4.6
0.8.6 through 0.8.21
0.8.24
0.10.10
0.10.21
JavaScript2013.0932bit Amazon Linux 2013.09
running Node.js
Nginx
1.4.3
or
Apache
2.4.6
0.8.6 through 0.8.21
0.8.24
0.10.10
0.10.21
JavaScript2013.0964bit Amazon Linux 2013.09
running Node.js
Elastic Beanstalk supports the following container types for environments created with Node.js containers
between August 15, 2013 and October 28, 2013:
API Version 2010-12-01
40
Elastic Beanstalk Developer Guide
Node.js

Node.js Container Types
Web
Serv-
er
Node.js VersionLanguageAMIName
Nginx
1.2.9
or
Apache
2.4.4
0.8.6 through 0.8.21
0.8.24
0.10.10
JavaScript2013.0332bit Amazon Linux running
Node.js
Nginx
1.2.9
or
Apache
2.4.4
0.8.6 through 0.8.21
0.8.24
0.10.10
JavaScript2013.0364bit Amazon Linux running
Node.js
Elastic Beanstalk supports the following container types for environments created with Node.js containers
prior to August 15, 2013:
Node.js Container Types
Web
Serv-
er
Node.js VersionLanguageAMIName
Nginx
1.2.6
or
Apache
2.4.3
0.8.6 through 0.8.21
0.8.24
JavaScript2012.0932bit Amazon Linux 2012.09
running Node.js
Nginx
1.2.6
or
Apache
2.4.3
0.8.6 through 0.8.21
0.8.24
JavaScript2012.0964bit Amazon Linux 2012.09
running Node.js
PHP
You can get started in minutes using the AWS Management Console or the eb command line interface.
You can deploy applications by simply zipping them up and uploading them through the console.To learn
how to upload an application using the AWS Management Console, see Creating New Applications (p.279).
To learn how to get started deploying a PHP application to Elastic Beanstalk using eb and Git, see
Deploying Elastic Beanstalk Applications in PHP (p.220). Elastic Beanstalk supports the following container
types:
PHP Container Types
Web ServerLanguageAMIName
Apache 2.4.10PHP 5.5.202014.0964bit Amazon Linux 2014.09
v1.2.0 running PHP 5.5
API Version 2010-12-01
41
Elastic Beanstalk Developer Guide
PHP

PHP Container Types
Apache 2.4.10PHP 5.4.362014.0964bit Amazon Linux 2014.09
v1.2.0 running PHP 5.4
Elastic Beanstalk supports the following container types for environments created with PHP containers
between January 28, 2015 and February 16, 2015:
PHP Container Types
Web ServerLanguageAMIName
Apache 2.4.6PHP 5.5.72014.0964bit Amazon Linux 2014.09
v1.1.0
1
running PHP 5.5
Apache 2.4.6PHP 5.4.202014.0964bit Amazon Linux 2014.09
v1.1.0
1
running PHP 5.4
Apache 2.4.10PHP 5.5.142014.0332bit Amazon Linux 2014.03
v1.1.0
1
running PHP 5.5
Apache 2.4.10PHP 5.5.142014.0364bit Amazon Linux 2014.03
v1.1.0
1
running PHP 5.5
Apache 2.4.10PHP 5.4.302014.0332bit Amazon Linux 2014.03
v1.1.0
1
running PHP 5.4
Apache 2.4.10PHP 5.4.302014.0364bit Amazon Linux 2014.03
v1.1.0
1
running PHP 5.4
Elastic Beanstalk supports the following container types for environments created with PHP containers
between October 16, 2014 and January 27, 2015:
PHP Container Types
Web ServerLanguageAMIName
Apache 2.4.6PHP 5.5.72014.0964bit Amazon Linux 2014.09
v1.0.9
1
running PHP 5.5
Apache 2.4.6PHP 5.4.202014.0964bit Amazon Linux 2014.09
v1.0.9
1
running PHP 5.4
Apache 2.4.6PHP 5.5.72014.0332bit Amazon Linux 2014.03
v1.0.9
1
running PHP 5.5
Apache 2.4.6PHP 5.5.72014.0364bit Amazon Linux 2014.03
v1.0.9
1
running PHP 5.5
Apache 2.4.6PHP 5.4.202014.0332bit Amazon Linux 2014.03
v1.0.9
1
running PHP 5.4
Apache 2.4.6PHP 5.4.202014.0364bit Amazon Linux 2014.03
v1.0.9
1
running PHP 5.4
Elastic Beanstalk supports the following container types for environments created with PHP containers
between October 9, 2014 and October 15, 2014:
API Version 2010-12-01
42
Elastic Beanstalk Developer Guide
PHP

PHP Container Types
Web ServerLanguageAMIName
Apache 2.4.6PHP 5.5.72014.0932bit Amazon Linux 2014.09
v1.0.8 running PHP 5.5
Apache 2.4.6PHP 5.5.72014.0964bit Amazon Linux 2014.09
v1.0.8 running PHP 5.5
Apache 2.4.6PHP 5.4.202014.0932bit Amazon Linux 2014.09
v1.0.8 running PHP 5.4
Apache 2.4.6PHP 5.4.202014.0964bit Amazon Linux 2014.09
v1.0.8 running PHP 5.4
Elastic Beanstalk supports the following container types for environments created with PHP containers
between September 24, 2014 and October 8, 2014:
PHP Container Types
Web ServerLanguageAMIName
Apache 2.4.6PHP 5.5.72014.0332bit Amazon Linux 2014.03
v1.0.7
1
running PHP 5.5
Apache 2.4.6PHP 5.5.72014.0364bit Amazon Linux 2014.03
v1.0.7
1
running PHP 5.5
Apache 2.4.6PHP 5.4.202014.0332bit Amazon Linux 2014.03
v1.0.7
1
running PHP 5.4
Apache 2.4.6PHP 5.4.202014.0364bit Amazon Linux 2014.03
v1.0.7
1
running PHP 5.4
Elastic Beanstalk supports the following container types for environments created with PHP containers
between June 30, 2014 and September 23, 2014:
PHP Container Types
Web ServerLanguageAMIName
Apache 2.4.6PHP 5.5.72014.0364bit Amazon Linux 2014.03
v1.0.4 running PHP 5.5
Apache 2.4.6PHP 5.4.202014.0364bit Amazon Linux 2014.03
v1.0.4 running PHP 5.4
Elastic Beanstalk supports the following container types for environments created with PHP containers
between June 5, 2014 and June 29, 2014:
PHP Container Types
Web ServerLanguageAMIName
Apache 2.4.6PHP 5.5.72014.0332bit Amazon Linux 2014.03
v1.0.3
1
running PHP 5.5
API Version 2010-12-01
43
Elastic Beanstalk Developer Guide
PHP

PHP Container Types
Apache 2.4.6PHP 5.5.72014.0364bit Amazon Linux 2014.03
v1.0.3
1
running PHP 5.5
Apache 2.4.6PHP 5.4.202014.0332bit Amazon Linux 2014.03
v1.0.3
1
running PHP 5.4
Apache 2.4.6PHP 5.4.202014.0364bit Amazon Linux 2014.03
v1.0.3
1
running PHP 5.4
Elastic Beanstalk supports the following container types for environments created with PHP containers
between May 5, 2014 and June 4, 2014:
PHP Container Types
Web ServerLanguageAMIName
Apache 2.4.6PHP 5.5.72014.0332bit Amazon Linux 2014.03
v1.0.2 running PHP 5.5
Apache 2.4.6PHP 5.5.72014.0364bit Amazon Linux 2014.03
v1.0.2 running PHP 5.5
Apache 2.4.6PHP 5.4.202014.0332bit Amazon Linux 2014.03
v1.0.2 running PHP 5.4
Apache 2.4.6PHP 5.4.202014.0364bit Amazon Linux 2014.03
v1.0.2 running PHP 5.4
Elastic Beanstalk supports the following container types for environments created with PHP containers
between April 7, 2014 and May 4, 2014:
PHP Container Types
Web ServerLanguageAMIName
Apache 2.4.6PHP 5.5.72013.0932bit Amazon Linux 2014.02
v1.0.1
1
running PHP 5.5
Apache 2.4.6PHP 5.5.72013.0964bit Amazon Linux 2014.02
v1.0.1
1
running PHP 5.5
Apache 2.4.6PHP 5.4.202013.0932bit Amazon Linux 2014.02
v1.0.1
1
running PHP 5.4
Apache 2.4.6PHP 5.4.202013.0964bit Amazon Linux 2014.02
v1.0.1
1
running PHP 5.4
Apache 2.4.6PHP 5.52013.0932bit Amazon Linux 2013.09
v1.0.1
1
running PHP 5.5
Apache 2.4.6PHP 5.52013.0964bit Amazon Linux 2013.09
v1.0.1
1
running PHP 5.5
Apache 2.4.6PHP 5.42013.0932bit Amazon Linux 2013.09
v1.0.1
1
running PHP 5.4
API Version 2010-12-01
44
Elastic Beanstalk Developer Guide
PHP

PHP Container Types
Apache 2.4.6PHP 5.42013.0964bit Amazon Linux 2013.09
v1.0.1
1
running PHP 5.4
Apache 2.4.6PHP 5.32013.0332bit Amazon Linux running
PHP 5.3
Apache 2.4.6PHP 5.32013.0364bit Amazon Linux running
PHP 5.3
Elastic Beanstalk supports the following container types for environments created with PHP containers
between March 18, 2014 and April 6, 2014:
PHP Container Types
Web ServerLanguageAMIName
Apache 2.2.26PHP 5.5.72013.0932bit Amazon Linux 2014.02
running PHP 5.5
Apache 2.2.26PHP 5.5.72013.0964bit Amazon Linux 2014.02
running PHP 5.5
Apache 2.2.26PHP 5.4.202013.0932bit Amazon Linux 2014.02
running PHP 5.4
Apache 2.2.26PHP 5.4.202013.0964bit Amazon Linux 2014.02
running PHP 5.4
Apache 2.4.6PHP 5.52013.0932bit Amazon Linux 2013.09
running PHP 5.5
Apache 2.4.6PHP 5.52013.0964bit Amazon Linux 2013.09
running PHP 5.5
Apache 2.4.6PHP 5.42013.0932bit Amazon Linux 2013.09
running PHP 5.4
Apache 2.4.6PHP 5.42013.0964bit Amazon Linux 2013.09
running PHP 5.4
Apache 2.4.6PHP 5.32013.0332bit Amazon Linux running
PHP 5.3
Apache 2.4.6PHP 5.32013.0364bit Amazon Linux running
PHP 5.3
Elastic Beanstalk supports the following container types for environments created with PHP containers
between October 30, 2013 and March 17, 2014:
PHP Container Types
Web ServerLanguageAMIName
Apache 2.4.6PHP 5.52013.0932bit Amazon Linux 2013.09
running PHP 5.5
API Version 2010-12-01
45
Elastic Beanstalk Developer Guide
PHP

PHP Container Types
Apache 2.4.6PHP 5.52013.0964bit Amazon Linux 2013.09
running PHP 5.5
Apache 2.4.6PHP 5.42013.0932bit Amazon Linux 2013.09
running PHP 5.4
Apache 2.4.6PHP 5.42013.0964bit Amazon Linux 2013.09
running PHP 5.4
Apache 2.4.6PHP 5.32013.0332bit Amazon Linux running
PHP 5.3
Apache 2.4.6PHP 5.32013.0364bit Amazon Linux running
PHP 5.3
Elastic Beanstalk supports the following container types for environments created with PHP containers
between August 29, 2013 and October 29, 2013:
PHP Container Types
Web ServerLanguageAMIName
Apache 2.4.6PHP 5.42013.0332bit Amazon Linux running
PHP 5.4
Apache 2.4.6PHP 5.42013.0364bit Amazon Linux running
PHP 5.4
Elastic Beanstalk supports the following container types for environments created with PHP containers
prior to August 29, 2013:
PHP Container Types
Web ServerLanguageAMIName
Apache 2.4.3PHP 5.42012.0932bit Amazon Linux 2012.09
running PHP 5.4
Apache 2.4.3PHP 5.42012.0964bit Amazon Linux 2012.09
running PHP 5.4
Apache 2.4.3PHP 5.32012.0932bit Amazon Linux 2012.09
running PHP 5.3
Apache 2.4.3PHP 5.32012.0964bit Amazon Linux 2012.09
running PHP 5.3
Python
Elastic Beanstalk supports Python applications running on Apache and WSGI.This includes support for
many popular frameworks such as Django and Flask.You can get started in minutes using the AWS
Management Console or the eb command line interface.You can deploy applications by simply zipping
them up and uploading them through the console.To learn how to upload an application using the AWS
Management Console, see Creating New Applications (p. 279). To learn how to get started deploying a
API Version 2010-12-01
46
Elastic Beanstalk Developer Guide
Python

Python application to Elastic Beanstalk using eb and Git, see Deploying Elastic Beanstalk Applications
in Python Using EB CLI and Git (p. 242). Elastic Beanstalk supports the following container types:
Python Container Types
Web ServerLanguageAMIName
Apache 2.4.10 with
mod_wsgi 3.5
Python 2.7.82014.0964bit Amazon Linux 2014.09
v1.2.0 running Python 2.7
Apache 2.4.10 with
mod_wsgi 3.5
Python 2.6.92014.0964bit Amazon Linux 2014.09
v1.2.0 running Python 2.6
Elastic Beanstalk supports the following container types for environments created with Python containers
between January 28, 2015 and February 16, 2015:
Python Container Types
Web ServerLanguageAMIName
Apache 2.4.10 with
mod_wsgi 3.5
Python 2.7.52014.0964bit Amazon Linux 2014.09
v1.1.0
1
running Python 2.7
Apache 2.4.10 with
mod_wsgi 3.5
Python 2.6.92014.0964bit Amazon Linux 2014.09
v1.1.0
1
running Python
Apache 2.4.10 with
mod_wsgi 3.2
Python 2.7.52014.0332bit Amazon Linux 2014.03
v1.1.0
1
running Python 2.7
Apache 2.4.10 with
mod_wsgi 3.2
Python 2.7.52014.0364bit Amazon Linux 2014.03
v1.1.0
1
running Python 2.7
Apache 2.4.10 with
mod_wsgi 3.2
Python 2.6.92014.0332bit Amazon Linux 2014.03
v1.1.0
1
running Python
Apache 2.4.10 with
mod_wsgi 3.2
Python 2.6.92014.0364bit Amazon Linux 2014.03
v1.1.0
1
running Python
Elastic Beanstalk supports the following container types for environments created with Python containers
between October 31, 2014 and January 27, 2015:
Python Container Types
Web ServerLanguageAMIName
Apache 2.4.10 with
mod_wsgi 3.5
Python 2.7.52014.0964bit Amazon Linux 2014.09
v1.0.9 running Python 2.7
Apache 2.4.10 with
mod_wsgi 3.5
Python 2.6.92014.0964bit Amazon Linux 2014.09
v1.0.9 running Python
Elastic Beanstalk supports the following container types for environments created with Python containers
between October 16, 2014 and October 30, 2014:
Python Container Types
Web ServerLanguageAMIName
API Version 2010-12-01
47
Elastic Beanstalk Developer Guide
Python

Python Container Types
Apache with mod_wsgi 3.2Python 2.72014.0332bit Amazon Linux 2014.03
v1.0.9
1
running Python 2.7
Apache with mod_wsgi 3.2Python 2.72014.0364bit Amazon Linux 2014.03
v1.0.9
1
running Python 2.7
Apache with mod_wsgi 3.2Python 2.62014.0332bit Amazon Linux 2014.03
v1.0.9
1
running Python
Apache with mod_wsgi 3.2Python 2.62014.0364bit Amazon Linux 2014.03
v1.0.9
1
running Python
Elastic Beanstalk supports the following container types for environments created with Python containers
between September 24, 2014 and October 15, 2014:
Python Container Types
Web ServerLanguageAMIName
Apache with mod_wsgi 3.2Python 2.72014.0332bit Amazon Linux 2014.03
v1.0.7
1
running Python 2.7
Apache with mod_wsgi 3.2Python 2.72014.0364bit Amazon Linux 2014.03
v1.0.7
1
running Python 2.7
Apache with mod_wsgi 3.2Python 2.62014.0332bit Amazon Linux 2014.03
v1.0.7
1
running Python
Apache with mod_wsgi 3.2Python 2.62014.0364bit Amazon Linux 2014.03
v1.0.7
1
running Python
Elastic Beanstalk supports the following container types for environments created with Python containers
between June 30, 2014 and September 23, 2014:
Python Container Types
Web ServerLanguageAMIName
Apache with mod_wsgi 3.2Python 2.72014.0364bit Amazon Linux 2014.03
v1.0.4 running Python 2.7
Apache with mod_wsgi 3.2Python 2.62014.0364bit Amazon Linux 2014.03
v1.0.4 running Python
Elastic Beanstalk supports the following container types for environments created with Python containers
between June 5, 2014 and June 29, 2014:
Python Container Types
Web ServerLanguageAMIName
Apache with mod_wsgi 3.2Python 2.72014.0332bit Amazon Linux 2014.03
v1.0.3
1
running Python 2.7
API Version 2010-12-01
48
Elastic Beanstalk Developer Guide
Python

Python Container Types
Apache with mod_wsgi 3.2Python 2.72014.0364bit Amazon Linux 2014.03
v1.0.3
1
running Python 2.7
Apache with mod_wsgi 3.2Python 2.62014.0332bit Amazon Linux 2014.03
v1.0.3
1
running Python
Apache with mod_wsgi 3.2Python 2.62014.0364bit Amazon Linux 2014.03
v1.0.3
1
running Python
Elastic Beanstalk supports the following container types for environments created with Python containers
between May 5, 2014 and June 4, 2014:
Python Container Types
Web ServerLanguageAMIName
Apache with mod_wsgi 3.2Python 2.72014.0332bit Amazon Linux 2014.03
v1.0.2 running Python 2.7
Apache with mod_wsgi 3.2Python 2.72014.0364bit Amazon Linux 2014.03
v1.0.2 running Python 2.7
Apache with mod_wsgi 3.2Python 2.62014.0332bit Amazon Linux 2014.03
v1.0.2 running Python
Apache with mod_wsgi 3.2Python 2.62014.0364bit Amazon Linux 2014.03
v1.0.2 running Python
Elastic Beanstalk supports the following container types for environments created with Python containers
between April 7, 2014 and May 4, 2014:
Python Container Types
Web ServerLanguageAMIName
Apache with mod_wsgi 3.2Python 2.72013.0932bit Amazon Linux 2013.09
v1.0.1
1
running Python 2.7
Apache with mod_wsgi 3.2Python 2.72013.0964bit Amazon Linux 2013.09
v1.0.1
1
running Python 2.7
Apache with mod_wsgi 3.2Python 2.62013.0932bit Amazon Linux 2013.09
v1.0.1
1
running Python
Apache with mod_wsgi 3.2Python 2.62013.0964bit Amazon Linux 2013.09
v1.0.1
1
running Python
Elastic Beanstalk supports the following container types for environments created with Python containers
between November 7, 2013 and April 6, 2014:
Python Container Types
Web ServerLanguageAMIName
API Version 2010-12-01
49
Elastic Beanstalk Developer Guide
Python

Python Container Types
Apache with mod_wsgi 3.2Python 2.72013.0932bit Amazon Linux 2013.09
running Python 2.7
Apache with mod_wsgi 3.2Python 2.72013.0964bit Amazon Linux 2013.09
running Python 2.7
Apache with mod_wsgi 3.2Python 2.62013.0932bit Amazon Linux 2013.09
running Python
Apache with mod_wsgi 3.2Python 2.62013.0964bit Amazon Linux 2013.09
running Python
Elastic Beanstalk supports the following container types for environments created with Python containers
prior to November 7, 2013:
Python Container Types
Web ServerLanguageAMIName
Apache with mod_wsgi 3.2Python 2.62012.0932bit Amazon Linux running
Python
Apache with mod_wsgi 3.2Python 2.62012.0964bit Amazon Linux running
Python
Ruby
Elastic Beanstalk runs Ruby applications including support for many popular frameworks such as Rails
and Sinatra.You can deploy applications in minutes using the eb command line interface and Git or the
AWS Management Console.To learn how to get started deploying a Ruby application to Elastic Beanstalk
using eb and Git, see Deploying Elastic Beanstalk Applications in Ruby Using EB CLI and Git (p. 262).To
learn how to upload an application using the AWS Management Console, see Creating New
Applications (p. 279). Elastic Beanstalk supports the following container types:
Ruby Container Types
Application/Web ServerLanguageAMIName
Puma 2.9.1 and Nginx
1.6.2
Ruby 2.2.12014.0964bit Amazon Linux 2014.09
v1.2.1 running Ruby 2.2
(Puma)
Passenger 4.0.59 and
Nginx 1.6.2
Ruby 2.2.12014.0964bit Amazon Linux 2014.09
v1.2.1 running Ruby 2.2 (Pas-
senger Standalone)
Puma 2.9.1 and Nginx
1.6.2
Ruby 2.1.5-p2732014.0964bit Amazon Linux 2014.09
v1.2.0 running Ruby 2.1
(Puma)
Passenger 4.0.53 and
Nginx 1.6.2
Ruby 2.1.5-p2732014.0964bit Amazon Linux 2014.09
v1.2.0 running Ruby 2.1 (Pas-
senger Standalone)
API Version 2010-12-01
50
Elastic Beanstalk Developer Guide
Ruby

Ruby Container Types
Puma 2.9.1 and Nginx
1.6.2
Ruby 2.0.0-p5982014.0964bit Amazon Linux 2014.09
v1.2.0 running Ruby 2.0
(Puma)
Passenger 4.0.53 and
Nginx 1.6.2
Ruby 2.0.0-p5982014.0964bit Amazon Linux 2014.09
v1.2.0 running Ruby 2.0 (Pas-
senger Standalone)
Passenger 4.0.53 and
Nginx 1.6.2
Ruby 1.9.3-p5512014.0964bit Amazon Linux 2014.09
v1.2.0 running Ruby 1.9.3
Elastic Beanstalk supports the following container types for environments created with Ruby containers
between February 17, 2015 and March 23, 2015:
Ruby Container Types
Application/Web ServerLanguageAMIName
Puma 2.9.1 and Nginx
1.6.2
Ruby 2.1.5-p2732014.0964bit Amazon Linux 2014.09
v1.2.0 running Ruby 2.1
(Puma)
Passenger 4.0.53 and
Nginx 1.6.2
Ruby 2.1.5-p2732014.0964bit Amazon Linux 2014.09
v1.2.0 running Ruby 2.1 (Pas-
senger Standalone)
Puma 2.9.1 and Nginx
1.6.2
Ruby 2.0.0-p5982014.0964bit Amazon Linux 2014.09
v1.2.0 running Ruby 2.0
(Puma)
Passenger 4.0.53 and
Nginx 1.6.2
Ruby 2.0.0-p5982014.0964bit Amazon Linux 2014.09
v1.2.0 running Ruby 2.0 (Pas-
senger Standalone)
Passenger 4.0.53 and
Nginx 1.6.2
Ruby 1.9.3-p5512014.0964bit Amazon Linux 2014.09
v1.2.0 running Ruby 1.9.3
Elastic Beanstalk supports the following container types for environments created with Ruby containers
between January 28, 2015 and February 16, 2015:
Ruby Container Types
Application/Web ServerLanguageAMIName
Puma 2.9.1 and Nginx
1.6.2
Ruby 2.1.42014.0964bit Amazon Linux 2014.09
v1.1.0
1
running Ruby 2.1
(Puma)
Passenger 4.0.53Ruby 2.1.42014.0964bit Amazon Linux 2014.09
v1.1.0
1
running Ruby 2.1
(Passenger Standalone)
Puma 2.9.1 and Nginx
1.6.2
Ruby 2.0.0-p5942014.0964bit Amazon Linux 2014.09
v1.1.0
1
running Ruby 2.0
(Puma)
API Version 2010-12-01
51
Elastic Beanstalk Developer Guide
Ruby

Ruby Container Types
Passenger 4.0.53Ruby 2.0.0-p5942014.0964bit Amazon Linux 2014.09
v1.1.0
1
running Ruby 2.0
(Passenger Standalone)
Passenger 4.0.53Ruby 1.9.3-p5502014.0964bit Amazon Linux 2014.09
v1.1.0
1
running Ruby 1.9.3
Puma 2.8.1 and Nginx
1.4.7
Ruby 2.1.2-p952014.0364bit Amazon Linux 2014.03
v1.1.0
1
running Ruby 2.1
(Puma)
Passenger 4.0.37Ruby 2.1.22014.0364bit Amazon Linux 2014.03
v1.1.0
1
running Ruby 2.1
(Passenger Standalone)
Puma 2.8.1 and Nginx
1.4.7
Ruby 2.0.0-p4812014.0364bit Amazon Linux 2014.03
v1.1.0
1
running Ruby 2.0
(Puma)
Passenger 4.0.37Ruby 2.0.02014.0364bit Amazon Linux 2014.03
v1.1.0
1
running Ruby 2.0
(Passenger Standalone)
Passenger 4.0.37Ruby 1.9.32014.0332bit Amazon Linux 2014.03
v1.1.0
1
running Ruby 1.9.3
Passenger 4.0.37Ruby 1.9.32014.0364bit Amazon Linux 2014.03
v1.1.0
1
running Ruby 1.9.3
Elastic Beanstalk supports the following container types for environments created with Ruby containers
between October 31, 2014 and January 27, 2015:
Ruby Container Types
Application/Web ServerLanguageAMIName
Puma 2.9.1 and Nginx
1.6.2
Ruby 2.1.42014.0964bit Amazon Linux 2014.09
v1.0.9 running Ruby 2.1
(Puma)
Passenger 4.0.53Ruby 2.1.42014.0964bit Amazon Linux 2014.09
v1.0.9 running Ruby 2.1 (Pas-
senger Standalone)
Puma 2.9.1 and Nginx
1.6.2
Ruby 2.0.0-p5942014.0964bit Amazon Linux 2014.09
v1.0.9 running Ruby 2.0
(Puma)
Passenger 4.0.53Ruby 2.0.0-p5942014.0964bit Amazon Linux 2014.09
v1.0.9 running Ruby 2.0 (Pas-
senger Standalone)
Passenger 4.0.53Ruby 1.9.3-p5502014.0964bit Amazon Linux 2014.09
v1.0.9 running Ruby 1.9.3
API Version 2010-12-01
52
Elastic Beanstalk Developer Guide
Ruby

Elastic Beanstalk supports the following container types for environments created with Ruby containers
between October 16, 2014 and October 30, 2014:
Ruby Container Types
Application/Web ServerLanguageAMIName
Puma 2.8.1 and Nginx
1.4.7
Ruby 2.1.22014.0364bit Amazon Linux 2014.03
v1.0.9
1
running Ruby 2.1
(Puma)
Passenger 4.0.37Ruby 2.1.22014.0364bit Amazon Linux 2014.03
v1.0.9
1
running Ruby 2.1
(Passenger Standalone)
Puma 2.8.1 and Nginx
1.4.7
Ruby 2.0.02014.0364bit Amazon Linux 2014.03
v1.0.9
1
running Ruby 2.0
(Puma)
Passenger 4.0.37Ruby 2.0.02014.0364bit Amazon Linux 2014.03
v1.0.9
1
running Ruby 2.0
(Passenger Standalone)
Passenger 4.0.37Ruby 1.9.32014.0332bit Amazon Linux 2014.03
v1.0.9
1
running Ruby 1.9.3
Passenger 4.0.37Ruby 1.9.32014.0364bit Amazon Linux 2014.03
v1.0.9
1
running Ruby 1.9.3
Elastic Beanstalk supports the following container types for environments created with Ruby containers
between September 24, 2014 and October 15, 2014:
Ruby Container Types
Application/Web ServerLanguageAMIName
Puma 2.8.1 and Nginx
1.4.7
Ruby 2.1.22014.0364bit Amazon Linux 2014.03
v1.0.7
1
running Ruby 2.1
(Puma)
Passenger 4.0.37Ruby 2.1.22014.0364bit Amazon Linux 2014.03
v1.0.7
1
running Ruby 2.1
(Passenger Standalone)
Puma 2.8.1 and Nginx
1.4.7
Ruby 2.0.02014.0364bit Amazon Linux 2014.03
v1.0.7
1
running Ruby 2.0
(Puma)
Passenger 4.0.37Ruby 2.0.02014.0364bit Amazon Linux 2014.03
v1.0.7
1
running Ruby 2.0
(Passenger Standalone)
Passenger 4.0.37Ruby 1.9.32014.0332bit Amazon Linux 2014.03
v1.0.7
1
running Ruby 1.9.3
Passenger 4.0.37Ruby 1.9.32014.0364bit Amazon Linux 2014.03
v1.0.7
1
running Ruby 1.9.3
API Version 2010-12-01
53
Elastic Beanstalk Developer Guide
Ruby

Elastic Beanstalk supports the following container types for environments created with Ruby containers
between August 14, 2014 and September 23, 2014:
Ruby Container Types
Application/Web ServerLanguageAMIName
Puma 2.8.1 and Nginx
1.4.7
Ruby 2.1.22014.0364bit Amazon Linux 2014.03
v1.0.0 running Ruby 2.1
(Puma)
Passenger 4.0.37Ruby 2.1.22014.0364bit Amazon Linux 2014.03
v1.0.0 running Ruby 2.1 (Pas-
senger Standalone)
Elastic Beanstalk supports the following container types for environments created with Ruby containers
between June 30, 2014 and August 13, 2014:
Ruby Container Types
Application/Web ServerLanguageAMIName
Puma 2.8.1 and Nginx
1.4.7
Ruby 2.0.02014.0364bit Amazon Linux 2014.03
v1.0.5 running Ruby 2.0
(Puma)
Passenger 4.0.37Ruby 2.0.02014.0364bit Amazon Linux 2014.03
v1.0.4 running Ruby 2.0 (Pas-
senger Standalone)
Passenger 4.0.37Ruby 1.9.32014.0364bit Amazon Linux 2014.03
v1.0.4 running Ruby 1.9.3
Elastic Beanstalk supports the following container types for environments created with Ruby containers
between June 5, 2014 and June 29, 2014:
Ruby Container Types
Application/Web ServerLanguageAMIName
Puma 2.8.1 and Nginx
1.4.7
Ruby 2.0.02014.0364bit Amazon Linux 2014.03
v1.0.4
1
running Ruby 2.0
(Puma)
Passenger 4.0.37Ruby 2.0.02014.0364bit Amazon Linux 2014.03
v1.0.3
1
running Ruby 2.0
(Passenger Standalone)
Passenger 4.0.37Ruby 1.9.32014.0332bit Amazon Linux 2014.03
v1.0.3
1
running Ruby 1.9.3
Passenger 4.0.37Ruby 1.9.32014.0364bit Amazon Linux 2014.03
v1.0.3
1
running Ruby 1.9.3
Elastic Beanstalk supports the following container types for environments created with Ruby containers
between May 14, 2014 and June 4, 2014:
API Version 2010-12-01
54
Elastic Beanstalk Developer Guide
Ruby

Ruby Container Types
Application/Web ServerLanguageAMIName
Puma 2.8.1 and Nginx
1.4.7
Ruby 2.0.02014.0364bit Amazon Linux 2014.03
v1.0.3 running Ruby 2.0
(Puma)
Elastic Beanstalk supports the following container types for environments created with Ruby containers
between May 5, 2014 and May 13, 2014:
Ruby Container Types
Application/Web ServerLanguageAMIName
Puma 2.8.1 and Nginx
1.4.7
Ruby 2.0.02014.0364bit Amazon Linux 2014.03
v1.0.2 running Ruby 2.0
(Puma)
Passenger 4.0.37Ruby 2.0.02014.0364bit Amazon Linux 2014.03
v1.0.2 running Ruby 2.0 (Pas-
senger Standalone)
Passenger 4.0.37Ruby 1.9.32014.0332bit Amazon Linux 2014.03
v1.0.2 running Ruby 1.9.3
Passenger 4.0.37Ruby 1.9.32014.0364bit Amazon Linux 2014.03
v1.0.2 running Ruby 1.9.3
Elastic Beanstalk supports the following container types for environments created with Ruby containers
between April 7, 2014 and May 4, 2014:
Ruby Container Types
Application/Web ServerLanguageAMIName
Puma 2.8.1 and Nginx
1.4.7
Ruby 2.0.02014.0364bit Amazon Linux 2014.03
v1.0.1
2
running Ruby 2.0
(Puma)
Passenger 4.0.37Ruby 2.0.02014.0364bit Amazon Linux 2014.03
v1.0.1
2
running Ruby 2.0
(Passenger Standalone)
Passenger 4.0.37Ruby 1.9.32013.0932bit Amazon Linux 2014.02
v1.0.1
1
running Ruby 1.9.3
Passenger 4.0.37Ruby 1.9.32013.0964bit Amazon Linux 2014.02
v1.0.1
1
running Ruby 1.9.3
Passenger 4.0.37Ruby 1.8.72013.0932bit Amazon Linux 2014.02
v1.0.1
1
running Ruby 1.8.7
Passenger 4.0.37Ruby 1.8.72013.0964bit Amazon Linux 2014.02
v1.0.1
1
running Ruby 1.8.7
Passenger 4.0.20Ruby 1.9.32013.0932bit Amazon Linux 2013.09
v1.0.1
1
running Ruby 1.9.3
API Version 2010-12-01
55
Elastic Beanstalk Developer Guide
Ruby

Ruby Container Types
Passenger 4.0.20Ruby 1.9.32013.0964bit Amazon Linux 2013.09
v1.0.1
1
running Ruby 1.9.3
Passenger 4.0.20Ruby 1.8.72013.0932bit Amazon Linux 2013.09
v1.0.1
1
running Ruby 1.8.7
Passenger 4.0.20Ruby 1.8.72013.0964bit Amazon Linux 2013.09
v1.0.1
1
running Ruby 1.8.7
Elastic Beanstalk supports the following container types for environments created with Ruby containers
between April 2, 2014 and April 6, 2014:
Ruby Container Types
Application/Web ServerLanguageAMIName
Puma 2.8.1 and Nginx
1.4.7
Ruby 2.0.02014.0364bit Amazon Linux 2014.03
running Ruby 2.0 (Puma)
Passenger 4.0.37Ruby 2.0.02014.0364bit Amazon Linux 2014.03
running Ruby 2.0 (Passenger
Standalone)
Passenger 4.0.37Ruby 1.9.32013.0932bit Amazon Linux 2014.02
running Ruby 1.9.3
Passenger 4.0.37Ruby 1.9.32013.0964bit Amazon Linux 2014.02
running Ruby 1.9.3
Passenger 4.0.37Ruby 1.8.72013.0932bit Amazon Linux 2014.02
running Ruby 1.8.7
Passenger 4.0.37Ruby 1.8.72013.0964bit Amazon Linux 2014.02
running Ruby 1.8.7
Passenger 4.0.20Ruby 1.9.32013.0932bit Amazon Linux 2013.09
running Ruby 1.9.3
Passenger 4.0.20Ruby 1.9.32013.0964bit Amazon Linux 2013.09
running Ruby 1.9.3
Passenger 4.0.20Ruby 1.8.72013.0932bit Amazon Linux 2013.09
running Ruby 1.8.7
Passenger 4.0.20Ruby 1.8.72013.0964bit Amazon Linux 2013.09
running Ruby 1.8.7
Elastic Beanstalk supports the following container types for environments created with Ruby containers
between March 18, 2014 and April 1, 2014:
Ruby Container Types
Application/Web ServerLanguageAMIName
Passenger 4.0.37Ruby 1.9.32013.0932bit Amazon Linux 2014.02
running Ruby 1.9.3
API Version 2010-12-01
56
Elastic Beanstalk Developer Guide
Ruby

Ruby Container Types
Passenger 4.0.37Ruby 1.9.32013.0964bit Amazon Linux 2014.02
running Ruby 1.9.3
Passenger 4.0.37Ruby 1.8.72013.0932bit Amazon Linux 2014.02
running Ruby 1.8.7
Passenger 4.0.37Ruby 1.8.72013.0964bit Amazon Linux 2014.02
running Ruby 1.8.7
Passenger 4.0.20Ruby 1.9.32013.0932bit Amazon Linux 2013.09
running Ruby 1.9.3
Passenger 4.0.20Ruby 1.9.32013.0964bit Amazon Linux 2013.09
running Ruby 1.9.3
Passenger 4.0.20Ruby 1.8.72013.0932bit Amazon Linux 2013.09
running Ruby 1.8.7
Passenger 4.0.20Ruby 1.8.72013.0964bit Amazon Linux 2013.09
running Ruby 1.8.7
Elastic Beanstalk supports the following container types for environments created with Ruby containers
between November 9, 2013 and March 17, 2014:
Ruby Container Types
Application/Web ServerLanguageAMIName
Passenger 4.0.20Ruby 1.9.32013.0932bit Amazon Linux 2013.09
running Ruby 1.9.3
Passenger 4.0.20Ruby 1.9.32013.0964bit Amazon Linux 2013.09
running Ruby 1.9.3
Passenger 4.0.20Ruby 1.8.72013.0932bit Amazon Linux 2013.09
running Ruby 1.8.7
Passenger 4.0.20Ruby 1.8.72013.0964bit Amazon Linux 2013.09
running Ruby 1.8.7
Elastic Beanstalk supports the following container types for environments created with Ruby containers
prior to November 9, 2013:
Ruby Container Types
Application/Web ServerLanguageAMIName
Passenger 3.0.17Ruby 1.9.32012.0932bit Amazon Linux running
Ruby 1.9.3
Passenger 3.0.17Ruby 1.9.32012.0964bit Amazon Linux running
Ruby 1.9.3
Passenger 3.0.17Ruby 1.8.72012.0932bit Amazon Linux running
Ruby 1.8.7
API Version 2010-12-01
57
Elastic Beanstalk Developer Guide
Ruby

Ruby Container Types
Passenger 3.0.17Ruby 1.8.72012.0964bit Amazon Linux running
Ruby 1.8.7
Design Considerations
Because applications deployed using Elastic Beanstalk run on Amazon cloud resources, you should keep
several things in mind when designing your application: scalability, security, persistent storage, fault
tolerance, content delivery, software updates and patching, and connectivity. For a comprehensive list
of technical AWS whitepapers, covering topics such as architecture, security and economics, go to AWS
Cloud Computing Whitepapers.
Scalability
When you're operating in a physical hardware environment, as opposed to a cloud environment, you can
approach scalability two ways—you can scale up (vertical scaling) or scale out (horizontal scaling).The
scale-up approach requires an investment in powerful hardware as the demands on the business increase,
whereas the scale-out approach requires following a distributed model of investment, so hardware and
application acquisitions are more targeted, data sets are federated, and design is service-oriented. The
scale-up approach could become very expensive, and there's still the risk that demand could outgrow
capacity. Although the scale-out approach is usually more effective, it requires predicting the demand at
regular intervals and deploying infrastructure in chunks to meet demand. This approach often leads to
excessive capacity and requires constant manual monitoring.
By moving to the cloud you can bring the use of your infrastructure into close alignment with demand by
leveraging the elasticity of the cloud. Elasticity is the streamlining of resource acquisition and release, so
that your infrastructure can rapidly scale in and scale out as demand fluctuates.To implement elasticity,
configure your Auto Scaling settings to send triggers to your system to take appropriate actions based
on metrics (utilization of the servers or network I/O, for instance).You can use Auto Scaling to automatically
add compute capacity when usage rises and remove it when usage drops. Monitor your system metrics
(CPU, memory, disk I/O, network I/O) using Amazon CloudWatch so that you can take appropriate actions
(such as launching new AMIs dynamically using Auto Scaling) or send notifications. For more instructions
on configuring Auto Scaling, see Configuring Auto Scaling with Elastic Beanstalk (p. 367).
Elastic Beanstalk applications should also be as stateless as possible, using loosely coupled fault-tolerant
components that can be scaled out as needed. For more information about designing scalable application
architectures for AWS, go to Architecting for the Cloud: Best Practices.
Security
Physical security is typically handled by your service provider, however network and application-level
security is your responsibility. If you need to protect information from your clients to your elastic load
balancer, you should configure SSL.You will need a certificate from an external certification authority
such as VeriSign or Entrust. The public key included in the certificate authenticates your server to the
browser and serves as the basis for creating the shared session key used to encrypt the data in both
directions. For instructions on creating and uploading an SSL certificate, go to Creating and Uploading
Server Certificates in Using AWS Identity and Access Management. For instructions on configuring your
SSL ID for your Elastic Beanstalk application, see Ports and Cross-zone Load Balancing (p. 359).
Note
Data moving between the Elastic Load Balancer and the Amazon EC2 instances is unencrypted.
API Version 2010-12-01
58
Elastic Beanstalk Developer Guide
Design Considerations

Persistent Storage
Elastic Beanstalk applications run on Amazon EC2 instances that have no persistent local storage.When
the Amazon EC2 instances terminate, the local file system is not saved, and new Amazon EC2 instances
start with a default file system.You should design your application to store data in a persistent data
source. Amazon Web Services offers a number of persistent storage options that you can leverage for
your application, including:
• Amazon Simple Storage Service (Amazon S3). For more information about Amazon S3, go to the
documentation.
• Amazon Elastic Block Store (Amazon EBS). For more information, go to the documentation and see
also the article Feature Guide: Elastic Block Store.
• Amazon DynamoDB. For more information, go to the documentation. For an example using Amazon
DynamoDB with Elastic Beanstalk, see Example: DynamoDB, CloudWatch, and SNS (p. 467).
• Amazon Relational Database Service (Amazon RDS). For more information, go to the documentation
and see also Amazon RDS for C# Developers.
Fault Tolerance
As a rule of thumb, you should be a pessimist when designing architecture for the cloud. Always design,
implement, and deploy for automated recovery from failure. Use multiple Availability Zones for your
Amazon EC2 instances and for Amazon RDS. Availability Zones are conceptually like logical data centers.
Use Amazon CloudWatch to get more visibility into the health of your Elastic Beanstalk application and
take appropriate actions in case of hardware failure or performance degradation. Configure your Auto
Scaling settings to maintain your fleet of Amazon EC2 instances at a fixed size so that unhealthy Amazon
EC2 instances are replaced by new ones. If you are using Amazon RDS, then set the retention period
for backups, so that Amazon RDS can perform automated backups.
Content Delivery
When users connect to your website, their requests may be routed through a number of individual networks.
As a result users may experience poor performance due to high latency. Amazon CloudFront can help
ameliorate latency issues by distributing your web content (such as images, video, and so on) across a
network of edge locations around the world. End users are routed to the nearest edge location, so content
is delivered with the best possible performance. CloudFront works seamlessly with Amazon S3, which
durably stores the original, definitive versions of your files. For more information about Amazon CloudFront,
see http://aws.amazon.com/cloudfront.
Software Updates and Patching
Elastic Beanstalk does not currently have a software update mechanism or policy. Elastic Beanstalk
periodically updates its default AMIs with new software and patches. Running environments, however,
do not get automatically updated.To obtain the latest AMIs, you must launch a new environment. For
more information about launching a new environment, see Launching New Environments (p. 299).
Connectivity
Amazon EC2 instances require Internet connectivity to complete deployment.When you deploy an Elastic
Beanstalk application inside an Amazon VPC, the configuration required to enable Internet connectivity
depends on the type of Amazon VPC environment you create:
API Version 2010-12-01
59
Elastic Beanstalk Developer Guide
Persistent Storage

• For single-instance environments, no additional configuration is required because Elastic Beanstalk
assigns each Amazon EC2 instance a public Elastic IP address that enables the instance to communicate
directly with the Internet.
• For load-balancing, autoscaling environments in an Amazon VPC with both public and private subnets,
you must do the following:
• Create a load balancer in the public subnet to route inbound traffic from the Internet to the Amazon
EC2 instances.
• Create a network address translation (NAT) instance to route outbound traffic from the Amazon EC2
instances to the Internet.
• Create inbound and outbound routing rules for the Amazon EC2 instances inside the private subnet.
• Configure the default Amazon VPC security group to allow traffic from the Amazon EC2 instances
to the NAT instance.
• For a load-balancing, autoscaling environment in an Amazon VPC that has one public subnet, no
additional configuration is required because the Amazon EC2 instances are configured with a public
IP address that enables the instances to communicate with the Internet.
For more information about using Elastic Beanstalk with Amazon VPC, see Using Elastic Beanstalk with
Amazon VPC (p. 531).
Where to Go Next
Now that you have learned some Elastic Beanstalk basics, you are ready to start creating and deploying
your applications. If you are a developer, go to one of the following sections:
• Java — Creating and Deploying Elastic Beanstalk Applications in Java Using AWS Toolkit for
Eclipse (p. 93)
• .NET — Creating and Deploying Elastic Beanstalk Applications in .NET Using AWS Toolkit for Visual
Studio (p. 125)
• Node.js — Deploying Elastic Beanstalk Applications in Node.js Using EB CLI and Git (p. 174)
• PHP — Deploying Elastic Beanstalk Applications in PHP (p. 220)
• Python — Deploying Elastic Beanstalk Applications in Python Using EB CLI and Git (p. 242)
• Ruby — Deploying Elastic Beanstalk Applications in Ruby Using EB CLI and Git (p. 262)
If you want to manage and configure your applications and environments using the AWS Management
Console, command line interface, or APIs, see Managing and Configuring Applications and Environments
Using the Console, CLI, and APIs (p. 278).
API Version 2010-12-01
60
Elastic Beanstalk Developer Guide
Where to Go Next

Deploying Elastic Beanstalk
Applications from Docker
Containers
Elastic Beanstalk supports the deployment of web applications from Docker containers.With Docker
containers, you can define your own runtime environment.You can choose your own platform, programming
language, and any application dependencies (such as package managers or tools), regardless of whether
other Elastic Beanstalk container types support them. Docker containers are self-contained and include
all the configuration information and software your web application requires to run. By using Docker with
Elastic Beanstalk, you have an infrastructure that automatically handles the details of capacity provisioning,
load balancing, scaling, and application health monitoring.You can manage your web application in an
environment that supports the range of services that are integrated with Elastic Beanstalk, including but
not limited to VPC, RDS, and IAM. For more information about Docker, including how to install it, what
software it requires, and how to use Docker images to launch Docker containers, go to Docker: the Linux
container engine.
This section provides step-by-step instructions for deploying a sample web application to Elastic Beanstalk
from a Docker container.You can deploy your application in just a few minutes using eb (a command
line interface) and Git or by using the AWS Management Console. This section also explains how to
create manifest files for custom Docker images and Docker containers. For more information, see the
following topics:
• Deploying an Application from a Docker Container to Elastic Beanstalk Using the Elastic Beanstalk
Console (p. 62)
• Deploying an Application from a Docker Container to Elastic Beanstalk Using Eb (p. 63)
• Single Container Docker Configurations (p. 68)
After you deploy your Elastic Beanstalk application, you can use the AWS Management Console, CLIs,
or the APIs to manage your Elastic Beanstalk environment. For more information, see Managing and
Configuring Applications and Environments Using the Console, CLI, and APIs (p. 278).
API Version 2010-12-01
61
Elastic Beanstalk Developer Guide

Deploying an Application from a Docker
Container to Elastic Beanstalk Using the Elastic
Beanstalk Console
If you prefer to use a graphical user interface to deploy your application, you can use the Elastic Beanstalk
console. During the deployment process, you can choose the sample application provided by Elastic
Beanstalk or you can upload your own Docker container with your own application. If you want to deploy
your own Docker container, see Single Container Docker Configurations (p. 68) for information about
how to properly create a customized Dockerfile, Dockerrun.aws.json, or .zip file to upload to
Elastic Beanstalk. If you prefer, you can use one of the following sample applications:
• PHP sample application
• Python sample application
For examples, you can refer to the Dockerfile included with the PHP sample application.The Python
application also includes an example Dockerfile. It also includes a Dockerrun.aws.json file that is
unique to Elastic Beanstalk. For more information about the Dockerfile and Dockerrun.aws.json
file, see Single Container Docker Configurations (p. 68).
The PHP sample application uses Amazon RDS, and the Python sample application uses Amazon
DynamoDB, Amazon SQS, and Amazon SNS.You may be charged for using these services. If you are
a new customer, you can make use of the AWS Free Usage Tier. For more information about pricing,
see the following:
• Amazon Relational Database Service (RDS) Pricing
• Amazon DynamoDB Pricing
• Amazon SQS Pricing
• Amazon SNS Pricing
If you want Elastic Beanstalk to run the game 2048, you can upload the following Dockerfile as written.
FROM ubuntu:12.04
RUN apt-get update
RUN apt-get install -y nginx zip curl
RUN echo "daemon off;" >> /etc/nginx/nginx.conf
RUN curl -o /usr/share/nginx/www/master.zip -L https://codeload.github.com/gab
rielecirulli/2048/zip/master
RUN cd /usr/share/nginx/www/ && unzip master.zip && mv 2048-master/* . && rm -
rf 2048-master master.zip
EXPOSE 80
CMD ["/usr/sbin/nginx", "-c", "/etc/nginx/nginx.conf"]
To deploy your application from a Docker container using the Elastic Beanstalk console
1. Using the Elastic Beanstalk console, create a new application with any of the following. For detailed
instructions, see Creating New Applications (p. 279).
• The sample application included with the console
API Version 2010-12-01
62
Elastic Beanstalk Developer Guide
Single Container Docker Using the Console

• One of the previously described sample applications
• The sample Dockerfile
• Your own Dockerfile
• Your own Dockerrun.aws.json file
• Your own .zip file
2. Once your environment is green and ready, click the URL link on the environment dashboard to view
your application.
Because your application will be live, you should consider creating multiple environments, such as a
testing environment and a production environment.You can point your domain name to an Amazon Route
53 (a highly available and scalable Domain Name System [DNS] web service) CNAME, such as
<yourappname>.elasticbeanstalk.com. For information about how to map your root domain to your Elastic
Load Balancer, see Using Elastic Beanstalk with Amazon Route 53 to Map Your Domain to Your Load
Balancer (p. 528).
Deploying an Application from a Docker
Container to Elastic Beanstalk Using Eb
You can use the eb command line tool and Git to deploy an application. Eb is a command line interface
that helps you to deploy applications quickly and more easily using Git. Eb is available as part of the
Elastic Beanstalk command line tools package. If you prefer to use a graphical user interface, you can
use the AWS Management Console. For more information, see Deploying an Application from a Docker
Container to Elastic Beanstalk Using the Elastic Beanstalk Console (p. 62).You can follow these
procedures to upload a sample application or your own Docker container with your own application. If
you want to deploy your own Docker container, first see Single Container Docker Configurations (p. 68)
for information about how to properly create a customized Dockerfile, Dockerrun.aws.json, or
.zip file to upload to Elastic Beanstalk.
API Version 2010-12-01
63
Elastic Beanstalk Developer Guide
Single Container Docker Using Eb

Set Up Eb
Use the following steps to install eb and initialize your Git repository. The command line tools package
has two versions. Install version 2.6.1.
To install eb, its prerequisite software, and initialize your Git repository
1. Install the following software onto your local computer:
• Linux/Unix/Mac
• Elastic Beanstalk command line tools package, version 2.6.1, available in .zip format from
the AWS Sample Code & Libraries website
• Git 1.6.6 or later, available from http://git-scm.com/
• Python 2.7 or 3.0
Windows
• Elastic Beanstalk command line tools package, version 2.6.1, available in .zip format from
the AWS Sample Code & Libraries website
• Git 1.6.6 or later, available from http://git-scm.com/
• PowerShell 2.0
Note
Windows 7 and Windows Server 2008 R2 come with PowerShell 2.0. If you are
running an earlier version of Windows, you can download PowerShell 2.0. For more
information, go to the Windows PowerShell Scripting pages.
2. Initialize your Git repository.
git init .
After installing eb on your local computer, use the Git command line to create your local repository and
add and commit changes. Create your application as you normally would with your favorite editor. If you
prefer, you can use one of the following sample applications:
• PHP sample application
• Python sample application
For examples, you can refer to the Dockerfile included with the PHP sample application.The Python
application also includes a Dockerfile example. It also includes a Dockerrun.aws.json file that is
unique to Elastic Beanstalk. For more information about the Dockerfile and Dockerrun.aws.json
file, see Single Container Docker Configurations (p. 68).
The PHP sample application uses Amazon RDS, and the Python sample application uses Amazon
DynamoDB, Amazon SQS, and Amazon SNS.You may be charged for using these services. If you are
a new customer, you can make use of the AWS Free Usage Tier. For more information about pricing,
see the following:
• Amazon Relational Database Service (RDS) Pricing
API Version 2010-12-01
64
Elastic Beanstalk Developer Guide
Set Up Eb

• Amazon DynamoDB Pricing
• Amazon SQS Pricing
• Amazon SNS Pricing
If you want Elastic Beanstalk to run the game 2048, you can upload the following Dockerfile as written.
FROM ubuntu:12.04
RUN apt-get update
RUN apt-get install -y nginx zip curl
RUN echo "daemon off;" >> /etc/nginx/nginx.conf
RUN curl -o /usr/share/nginx/www/master.zip -L https://codeload.github.com/gab
rielecirulli/2048/zip/master
RUN cd /usr/share/nginx/www/ && unzip master.zip && mv 2048-master/* . && rm -
rf 2048-master master.zip
EXPOSE 80
CMD ["/usr/sbin/nginx", "-c", "/etc/nginx/nginx.conf"]
Next, create a new local repository, add your new program, and commit your change.
git add <filename>
git commit -m "initial check-in"
Note
For information about Git commands, go to Git - Fast Version Control System.
Before you use eb, set your PATH to the location of eb. The following table shows an example for
Linux/UNIX and Windows.
In WindowsIn Linux and UNIX
C:\> set PATH=%PATH%;<path to unzipped
eb CLI package>\eb\windows\
$ export PATH=$PATH:<path to unzipped
eb CLI package>/eb/linux/python2.7/
If you are using Python 3.0, the path will include
python3 rather than python2.7.
Use the init command, and Elastic Beanstalk will prompt you to enter this information. If a default value
is available, and you want to use it, press Enter.
Because your application will be live, you should consider creating multiple environments, such as a
testing environment and a production environment.You can point your domain name to an Amazon Route
53 (a highly available and scalable Domain Name System [DNS] web service) CNAME, such as
<yourappname>.elasticbeanstalk.com. For information about how to map your root domain to your Elastic
Load Balancer, see Using Elastic Beanstalk with Amazon Route 53 to Map Your Domain to Your Load
Balancer (p. 528).
API Version 2010-12-01
65
Elastic Beanstalk Developer Guide
Set Up Eb

Configure Elastic Beanstalk Using Eb
To configure Elastic Beanstalk
1. From the directory where you created your local repository, type the following command:
eb init
2. When you are prompted for the access key ID, type your access key ID.To get your access key ID,
see How Do I Get Security Credentials? in the AWS General Reference.
Enter your AWS Access Key ID (current value is "AKIAIOSFODNN7EXAMPLE"):
3. When you are prompted for the secret access key, type your secret access key.To get your secret
access key, see How Do I Get Security Credentials? in the AWS General Reference.
Enter your AWS Secret Access Key (current value is "wJalrXUtnFEMI/K7MDENG/bPxR
fiCYEXAMPLEKEY"):
4. When you are prompted for the Elastic Beanstalk region, type the number of the region. For information
about this product's regions, go to Regions and Endpoints in the Amazon Web Services General
Reference. For this example, we'll use US West (Oregon).
5. When you are prompted for the Elastic Beanstalk application name, type the name of the application.
Elastic Beanstalk generates an application name based on the current directory name if an application
name has not been previously configured. In this example, we use dockerapp.
Enter an AWS Elastic Beanstalk application name (auto-generated value is
"windows"): dockerapp
Note
If you have a space in your application name, make sure you do not use quotation marks.
6. When you are prompted for the Elastic Beanstalk environment name, type the name of the
environment. Elastic Beanstalk automatically creates an environment name based on your application
name. If you want to accept the default, press Enter.
Enter an AWS Elastic Beanstalk environment name (current value is "windows-
env"): dockerapp-env
Note
If you have a space in your application name, make sure you do not have a space in your
environment name.
7. When you are prompted, choose an environment tier. For more information about environment tiers,
see Architectural Overview (p. 16). For this example, we'll use 1.
Available environment tiers are:
1) WebServer::Standard::1.0
2) Worker::SQS/HTTP::1.0
8. When you are prompted for the solution stack, type the number of the solution stack you want. For
this example, we'll use 64bit Amazon Linux 2014.03 v1.0.2 running Docker 0.9.0.
API Version 2010-12-01
66
Elastic Beanstalk Developer Guide
Configure Elastic Beanstalk Using Eb

9. When you are prompted, choose an environment type. In this example, we'll use 2.
Available environment types are:
1) LoadBalanced
2) SingleInstance
10. When you are prompted to create an Amazon RDS DB instance, type y or n. For this example, we'll
type n.
Create an RDS DB Instance? [y/n]:
11. When you are prompted to enter your instance profile name, you can choose to create a default
instance profile or use an existing instance profile. Using an instance profile enables IAM users and
AWS services to gain access to temporary security credentials to make AWS API calls. Using instance
profiles prevents you from having to store long-term security credentials on the EC2 instance. For
more information about instance profiles, see Granting Permissions to Users and Services Using
IAM Roles (p. 562). For this example, we'll use Create a default instance profile.
You should see a confirmation that your AWS Credential file was successfully updated.
After configuring Elastic Beanstalk, you are ready to create and deploy an application.
Create an Application
Next, you need to create and deploy a sample application. For this step, you use a sample application
that is already prepared. Elastic Beanstalk uses the configuration information you specified in the previous
step to do the following:
• Create an application using the application name you specified.
• Launch an environment using the environment name you specified that provisions the AWS resources
to host the application.
• Deploy the application into the newly created environment.
Use the start command to create and deploy a sample application.
To create the application
• From the directory where you created your local repository, type the following command:
eb start
It may take several minutes to complete this process. Elastic Beanstalk provides status updates during
the process. If at any time you want to stop polling for status updates, press Ctrl+C.When the environment
status is Green, Elastic Beanstalk outputs a URL for the application.
API Version 2010-12-01
67
Elastic Beanstalk Developer Guide
Create an Application

Single Container Docker Configurations
This section describes how to prepare your Docker image and container for uploading to Elastic Beanstalk.
Any web application that you deploy to Elastic Beanstalk in single-container Docker container must include
a Dockerfile, which defines a custom image, a Dockerrun.aws.json file, which specifies an existing
image to use and environment configuration, or both.You can deploy your web application from a Docker
container to Elastic Beanstalk by doing one of the following:
• Create a Dockerfile customize an image and to deploy a Docker container to Elastic Beanstalk.
• Create a Dockerrun.aws.json file to deploy a Docker container from an existing Docker image to
Elastic Beanstalk.
• Create a .zip file containing your application files, any application file dependencies, the Dockerfile,
and the Dockerrun.aws.json file.
Note
If you use only a Dockerfile or only a Dockerrun.aws.json file to deploy your application,
you do not need to compress the file into a .zip file.
Dockerfile
Docker uses a Dockerfile to create a Docker image that contains your source bundle. A Docker image
is the template from which you create a Docker container. Dockerfile is a plain text file that contains
instructions that Elastic Beanstalk uses to build a customized Docker image on each Amazon EC2 instance
in your Elastic Beanstalk environment. Create a Dockerfile when you do not already have an existing
image hosted in a repository.
Include the following instructions in the Dockerfile:
• FROM – (required as the first instruction in the file) Specifies the base image from which to build the
Docker container and against which Elastic Beanstalk runs subsequent Dockerfile instructions.
The image can be hosted in a public repository, a private repository hosted by a third-party registry, or
a repository that you run on EC2.
• EXPOSE – (required) Lists the ports to expose on the Docker container. Elastic Beanstalk uses the
port value to connect the Docker container to the reverse proxy running on the host.
You can specify multiple container ports, but Elastic Beanstalk uses only the first one to connect your
container to the host's reverse proxy and route requests from the public Internet.
• CMD – Specifies an executable and default parameters, which are combined into the command that
the container runs at launch. Use the following format:
CMD ["executable","param1","param2"]
CMD can also be used to provide default parameters for an ENTRYPOINT command by omitting the
executable argument. An executable must be specified in either a CMD or an ENTRYPOINT, but not
both. For basic scenarios, use a CMD and omit the ENTRYPOINT.
• ENTRYPOINT – Uses the same JSON format as CMD and, like CMD, specifies a command to run when
the container is launched. Also allows a container to be run as an executable with docker run.
If you define an ENTRYPOINT, you can use a CMD as well to specify default parameters that can be
overridden with docker run's -d option. The command defined by an ENTRYPOINT (including any
parameters) is combined with parameters from CMD or docker run when the container is run.
API Version 2010-12-01
68
Elastic Beanstalk Developer Guide
Single Container Docker Configurations

• RUN – Specifies one or more commands that install packages and configure your web application
inside the image.
If you include RUN instructions in the Dockerfile, compress the file and the context used by RUN
instructions in the Dockerfile into a .zip file. Compress files at the top level of the directory.
Note
To use a private repository hosted by a third-party registry, you must provide a JSON file called
.dockercfg with information required to authenticate with the repository.Your authentication
credentials are written to a .dockercfg file when you run the command $ sudo docker
login to create an account on Docker Hub. (For a private repository, run the command $ sudo
docker login server_name.) Declare the .dockercfg file in the Dockerrun.aws.json
file. Make sure that the .dockercfg file contains a valid Amazon S3 bucket and Amazon EC2
key pair.The Amazon S3 bucket must be hosted in the same region.as the environment that is
using it. Elastic Beanstalk will not download files from Amazon S3 buckets hosted in other regions.
Grant permissions for the action s3:GetObject to the IAM role in the instance profile. For an
example policy, see Using IAM Roles with Elastic Beanstalk (p.568). For more information about
the .dockercfg file, go to Working with Docker Hub on the Docker website.
The following snippet is an example of the Dockerfile. When you follow the instructions in Deploying
an Application from a Docker Container to Elastic Beanstalk Using the Elastic Beanstalk Console (p. 62),
you can upload this Dockerfile as written. Elastic Beanstalk runs the game 2048 when you use this
Dockerfile.
FROM ubuntu:12.04
RUN apt-get update
RUN apt-get install -y nginx zip curl
RUN echo "daemon off;" >> /etc/nginx/nginx.conf
RUN curl -o /usr/share/nginx/www/master.zip -L https://codeload.github.com/gab
rielecirulli/2048/zip/master
RUN cd /usr/share/nginx/www/ && unzip master.zip && mv 2048-master/* . && rm -
rf 2048-master master.zip
EXPOSE 80
CMD ["/usr/sbin/nginx", "-c", "/etc/nginx/nginx.conf"]
For more information about instructions you can include in the Dockerfile, go to Dockerfile Reference
on the Docker website.
Dockerrun.aws.json
A Dockerrun.aws.json file describes how to deploy a Docker container as an Elastic Beanstalk
application.This JSON file is specific to Elastic Beanstalk. If your application runs on an image that is
available in a hosted repository, you can specify the image in a Dockerrun.aws.json file and omit the
Dockerfile.
Valid keys and values for the Dockerrun.aws.json file include the following:
• AWSEBDockerrunVersion – (required) Specifies the version number as the value "1" for Single
Container Docker environments
• Authentication – (required only for private repositories) Specifies the Amazon S3 object storing the
.dockercfg file.
API Version 2010-12-01
69
Elastic Beanstalk Developer Guide
Dockerrun.aws.json

• Image – Specifies the Docker base image on an existing Docker repository from which you're building
a Docker container. Specify the value of the Name key in the format <organization>/<image
name> for images on Docker Hub, or <site>/<organization name>/<image name> for other
sites.
When you specify an image in the Dockerrun.aws.json file, each instance in your Elastic Beanstalk
environment will run docker pull on that image and run it. Optionally include the Update key. The
default value is "true" and instructs Elastic Beanstalk to check the repository, pull any updates to the
image, and overwrite any cached images.
Do not specify the Image key in the Dockerrun.aws.json file when using a Dockerfile. .Elastic
Beanstalk will always build and use the image described in the Dockerfile when one is present.
• Ports – (required when you specify the Image key) Lists the ports to expose on the Docker container.
Elastic Beanstalk uses ContainerPort value to connect the Docker container to the reverse proxy
running on the host.
You can specify multiple container ports, but Elastic Beanstalk uses only the first one to connect your
container to the host's reverse proxy and route requests from the public Internet.
• Volumes – Maps volumes from an EC2 instance to your Docker container. Specify one or more arrays
of volumes to map.
• Logging – Maps the log directory inside the container.
Configure Elastic Beanstalk to publish log files for the Docker container or to view snapshot logs. For
more information, see Working with Logs (p. 415).
The following snippet is an example that illustrates the syntax of the Dockerrun.aws.json file for a
single container.
{
"AWSEBDockerrunVersion": "1",
"Image": {
"Name": "janedoe/image",
"Update": "true"
},
"Ports": [
{
"ContainerPort": "1234"
}
],
"Volumes": [
{
"HostDirectory": "/var/app/mydb",
"ContainerDirectory": "/etc/mysql"
}
],
"Logging": "/var/log/nginx"
}
Note
The previous example specifies an image on a public repository. The following example snippet
illustrates how to use the Image key to specify an image in a private repository hosted by the
third-party registry www.quay.io.
{
"AWSEBDockerrunVersion": "1",
API Version 2010-12-01
70
Elastic Beanstalk Developer Guide
Dockerrun.aws.json

"Authentication": {
"Bucket": "my-bucket",
"Key": "mydockercfg"
},
"Image": {
"Name": "quay.io/johndoe/image-test",
"Update": "true"
},
"Ports": [
{
"ContainerPort": "1234"
}
],
"Volumes": [
{
"HostDirectory": "/var/app/mydb",
"ContainerDirectory": "/etc/mysql"
}
],
"Logging": "/var/log/nginx"
}
You can provide Elastic Beanstalk with only the Dockerrun.aws.json file or in addition to the
Dockerfile in a .zip file.When you provide both files, the Dockerfile builds the Docker image and
the Dockerrun.aws.json file provides additional information for deployment as described later in this
section.When you provide both the Dockerfile and the Dockerrun.aws.json file, do not specify an
image in the Dockerrun.aws.json file. Elastic Beanstalk uses the image specified in the Dockerfile
and ignores it in the Dockerrun.aws.json file.
Multicontainer Docker Environments
You can create docker environments that support multiple containers per instance with multicontainer
Docker platform for Elastic Beanstalk.
Elastic Beanstalk uses Amazon EC2 Container Service to coordinate container deployments to
multicontainer Docker environments. Amazon ECS provides tools to manage a cluster of instances running
Docker containers. Elastic Beanstalk takes care of Amazon ECS tasks including cluster creation, task
definition and execution.
Topics
• Multicontainer Docker Platform (p. 71)
• Dockerrun.aws.json File (p. 72)
• Docker Images (p. 72)
• Container Instance Role (p. 73)
• Amazon ECS Resources Created by Elastic Beanstalk (p. 73)
• Using Multiple Elastic Load Balancing Listeners (p. 74)
Multicontainer Docker Platform
Standard generic and preconfigured Docker platforms on Elastic Beanstalk support only a single Docker
container per Elastic Beanstalk environment. In order to get the most out of Docker, Elastic Beanstalk
lets you create an environment where your instances run multiple Docker containers side by side.
API Version 2010-12-01
71
Elastic Beanstalk Developer Guide
Multicontainer Docker Environments

The following diagram shows an example Elastic Beanstalk environment configured with three Docker
containers running on each EC2 instance in an Auto Scaling group:
Dockerrun.aws.json File
Multicontainer Docker instances on Elastic Beanstalk require a configuration file named
Dockerrun.aws.json.This file is specific to Elastic Beanstalk and can be used alone or combined with
source code and content in a source bundle (p. 294) to create an environment on a Docker platform.
Note
Version 1 of the Dockerrun.aws.json format is used to launch a single Docker container to
an Elastic Beanstalk environment.Version 2 adds support for multiple containers per instance
and can only be used with the multicontainer Docker platform. The format differs significantly
from the previous version which is detailed under Single Container Docker Configurations (p. 68)
See Dockerrun.aws.json Format (p. 75) for details on the updated format and an example file.
Docker Images
The Multicontainer Docker platform for Elastic Beanstalk requires images to be prebuilt and stored in a
public or private online image repository.
Note
Building custom images during deployment with a Dockerfile is not supported by the
multicontainer Docker platform on Elastic Beanstalk. Build your images and deploy them to an
online repository before creating an Elastic Beanstalk environment.
Specify images by name in Dockerrun.aws.json. Note these conventions:
API Version 2010-12-01
72
Elastic Beanstalk Developer Guide
Dockerrun.aws.json File

• Images in official repositories on Docker Hub use a single name (for example, ubuntu or mongo).
• Images in other repositories on Docker Hub are qualified with an organization name (for example,
amazon/amazon-ecs-agent).
• Images in other online repositories are qualified further by a domain name (for example,
quay.io/assemblyline/ubuntu).
To configure Elastic Beanstalk to authenticate to a private repository, include the authentication
parameter in your Dockerrun.aws.json file.
Container Instance Role
Elastic Beanstalk uses an Amazon ECS-optimized AMI with an Amazon ECS container agent that runs
in a Docker container.The agent communicates with Amazon ECS to coordinate container deployments.
In order to communicate with Amazon ECS, each instance must have the corresponding permissions in
IAM.The following IAM role provides an example:
{
"Version": "2012-10-17",
"Statement": [
{
"Effect": "Allow",
"Action": [
"ecs:StartTask",
"ecs:StopTask",
"ecs:RegisterContainerInstance",
"ecs:DeregisterContainerInstance",
"ecs:DiscoverPollEndpoint",
"ecs:Submit*",
"ecs:Poll"
],
"Resource": ["*"]
},
{
"Effect": "Allow",
"Action": "s3:PutObject",
"Resource": "arn:aws:s3:::elasticbeanstalk-*/resources/environments/logs/*"
}
]
}
For instructions on creating policies and roles in IAM, see Creating IAM Roles in the IAM User Guide.
Note
If you use a role with permissions configured for worker environment tiers, add the container
instance permissions to your existing role policy and use that.Worker environment permissions
are detailed under IAM Roles for Elastic Beanstalk Environment Tiers (p. 617).
Amazon ECS Resources Created by Elastic
Beanstalk
When you create an environment using the multicontainer Docker platform, Elastic Beanstalk automatically
creates and configures several Amazon EC2 Container Service resources while building the environment
in order to create the necessary containers on each EC2 instance.
API Version 2010-12-01
73
Elastic Beanstalk Developer Guide
Container Instance Role

• Amazon ECS Cluster – Container instances in Amazon ECS are organized into clusters.When used
with Elastic Beanstalk, one cluster is always created for each multicontainer Docker environment.
• Amazon ECS Task Definition – Elastic Beanstalk uses the Dockerrun.aws.json file in your project
to generate the Amazon ECS task definition that is used to configure container instances in the
environment.
• Amazon ECS Task – Elastic Beanstalk communicates with Amazon ECS to run a task on every instance
in the environment to coordinate container deployment. In an autoscaling environment, Elastic Beanstalk
initiates a new task whenever an instance is added to the cluster.
• Amazon ECS Container Agent – The agent runs in a Docker container on the instances in your
environment.The agent polls the Amazon ECS service and waits for a task to run.
• Amazon ECS Data Volumes – Elastic Beanstalk inserts volume definitions (in addition to the volumes
that you define in Dockerrun.aws.json) into the task definition to facilitate log collection.
Elastic Beanstalk creates log volumes on the container instance, one for each container, at
/var/log/containers/containername.These volumes are named awseb-logs-containername
and are provided for containers to mount. See Container Definition Format (p. 77) for details on how
to mount them.
Using Multiple Elastic Load Balancing Listeners
You can configure multiple Elastic Load Balancing listeners on a multicontainer Docker environment in
order to support inbound traffic for proxies or other services that don't run on the default HTTP port.
Create a .ebextensions folder in your source bundle and add a file with a .config file extension.The
following example shows a configuration file that creates an Elastic Load Balancing listener on port 8080
and opens the same port for inbound traffic on the Elastic Beanstalk environment's security group.
.ebextensions/elb-listeners.config
option_settings:
aws:elb:listener:8080:
ListenerProtocol: HTTP
InstanceProtocol: HTTP
InstancePort: 8080
Resources:
port8080SecurityGroupIngress:
Type: AWS::EC2::SecurityGroupIngress
Properties:
GroupName: {Ref : AWSEBSecurityGroup}
IpProtocol: tcp
ToPort: 8080
FromPort: 8080
SourceSecurityGroupName: { "Fn::GetAtt": ["AWSEBLoadBalancer",
"SourceSecurityGroup.GroupName"] }
SourceSecurityGroupOwnerId: { "Fn::GetAtt": ["AWSEBLoadBalancer",
"SourceSecurityGroup.OwnerAlias"] }
For more information on the configuration file format, see Customizing Environment Resources (p. 456)
and Option_settings (p. 440)
In addition to adding a listener to the Elastic Load Balancing configuration and opening a port in the
security group, you need to map the port on the host instance to a port on the Docker container in the
containerDefinitions section of the Dockerrun.aws.json file.The following excerpt shows an
example:
API Version 2010-12-01
74
Elastic Beanstalk Developer Guide
Using Multiple Elastic Load Balancing Listeners

"portMappings": [
{
"hostPort": 8080,
"containerPort": 8080
}
]
See Dockerrun.aws.json Format (p. 75) for details on the Dockerrun.aws.json file format.
Multicontainer Docker Configuration
A Dockerrun.aws.json file is an Elastic Beanstalk–specific JSON file that describes how to deploy a
set of Docker containers as an Elastic Beanstalk application.You can use a Dockerrun.aws.json file
for a multicontainer Docker environment.
Dockerrun.aws.json describes the containers to deploy to each container instance in the environment
as well as the data volumes to create on the host instance for the containers to mount.
A Dockerrun.aws.json file can be used on its own or zipped up with additional source code in a single
archive. Source code that is archived with a Dockerrun.aws.json is deployed to container instances
and accessible in the /var/app/current/ directory. Use the volumes section of the config to provide
mount points for the containers running on the instance, and the mountPoints section of the embedded
container descriptions to mount them from the containers.
Topics
• Dockerrun.aws.json Format (p. 75)
Dockerrun.aws.json Format
Dockerrun.aws.json file includes three sections:
• AWSEBDockerrunVersion – Specifies the version number as the value "2" for multicontainer Docker
environments.
• containerDescriptions – An array of container definitions, detailed below.
• volumes – Creates mount points in the container instance that a container can use. Configure volumes
for folders in your source bundle (deployed to /var/app/current on the container instance) for a
container's application to read.
Note
Elastic Beanstalk configures additional volumes for logs, one for each container.These should
be mounted by your containers in order to write logs to the host instance. See Container
Definition Format (p. 77) for details.
Volumes are specified in the following format:
"volumes": [
{
"name": "volumename",
"host": {
"sourcePath": "/path/on/host/instance"
}
}
],
API Version 2010-12-01
75
Elastic Beanstalk Developer Guide
Multicontainer Docker Configuration

• authentication (optional) – the location in Amazon S3 of a dockercfg file that contains authentication
data for a private repository. Uses the following format:
"authentication": {
"bucket": "my-bucket",
"key": "mydockercfg"
},
The following snippet is an example that illustrates the syntax of the Dockerrun.aws.json file for an
instance with two containers.
{
"AWSEBDockerrunVersion": 2,
"volumes": [
{
"name": "php-app",
"host": {
"sourcePath": "/var/app/current/php-app"
}
},
{
"name": "nginx-proxy-conf",
"host": {
"sourcePath": "/var/app/current/proxy/conf.d"
}
}
],
"containerDefinitions": [
{
"name": "php-app",
"image": "php:fpm",
"essential": true,
"memory": 128,
"mountPoints": [
{
"sourceVolume": "php-app",
"containerPath": "/var/www/html",
"readOnly": true
}
]
},
{
"name": "nginx-proxy",
"image": "nginx",
"essential": true,
"memory": 128,
"portMappings": [
{
"hostPort": 80,
"containerPort": 80
}
],
"links": [
"php-app"
],
API Version 2010-12-01
76
Elastic Beanstalk Developer Guide
Dockerrun.aws.json Format

"mountPoints": [
{
"sourceVolume": "php-app",
"containerPath": "/var/www/html",
"readOnly": true
},
{
"sourceVolume": "nginx-proxy-conf",
"containerPath": "/etc/nginx/conf.d",
"readOnly": true
},
{
"sourceVolume": "awseb-logs-nginx-proxy",
"containerPath": "/var/log/nginx"
}
]
}
]
}
Container Definition Format
A Dockerrun.aws.json file contains an array of one or more container definition objects with the
following fields:
name
The name of the container.
image
The name of a Docker image in an online Docker repository from which you're building a Docker
container. Note these conventions:
• Images in official repositories on Docker Hub use a single name (for example, ubuntu or mongo).
• Images in other repositories on Docker Hub are qualified with an organization name (for example,
amazon/amazon-ecs-agent.
• Images in other online repositories are qualified further by a domain name (for example,
quay.io/assemblyline/ubuntu).
essential
True if the task should stop if the container fails. Nonessential containers can finish or crash without
affecting the rest of the containers on the instance.
memory
Amount of memory on the container instance to reserve for the container.
mountPoints
Volumes from the container instance to mount and the location on the container file system at which
to mount them. Mount volumes containing application content so your container can read the data
you upload in your source bundle, as well as log volumes for writing log data to a location where
Elastic Beanstalk can gather it.
Elastic Beanstalk creates log volumes on the container instance, one for each container, at
/var/log/containers/containername.These volumes are named
awseb-logs-containername and should be mounted to the location within the container file
structure where logs are written.
For example, the following mount point maps the Nginx log location in the container to the Elastic
Beanstalk–generated volume for the nginx-proxy container.
API Version 2010-12-01
77
Elastic Beanstalk Developer Guide
Dockerrun.aws.json Format

{
"sourceVolume": "awseb-logs-nginx-proxy",
"containerPath": "/var/log/nginx"
}
portMappings
Maps network ports on the container to ports on the host.
links
List of containers to link to. Linked containers can discover each other and communicate securely.
Note
The container definition and volumes sections of Dockerrun.aws.json use the same formatting
as the corresponding sections of an Amazon ECS task definition file. For more information, see
Amazon ECS Task Definitions in the Amazon ECS Developer Guide.
Multicontainer Docker Environments with the
AWS Management Console
You can launch a cluster of multicontainer instances in a single-instance or autoscaling Elastic Beanstalk
environment using the AWS Management Console.This tutorial details IAM role creation, container
configuration, and source code for an environment that uses two containers.
The containers, a PHP application and an Nginx proxy, run side by side on each of the Amazon EC2
instances in an Elastic Beanstalk environment. After creating the environment and verifying that the
applications are running, you'll connect to a container instance to see how it all fits together.
Note
This tutorial was developed using Windows 7 and Google Chrome 41.
Topics
• Configure a Container Instance IAM Role (p. 78)
• Define Docker Containers (p. 80)
• Add Content (p. 82)
• Deploy to Elastic Beanstalk (p. 82)
• Connect to a Container Instance (p. 83)
• Inspect the Amazon ECS Container Agent (p. 85)
Configure a Container Instance IAM Role
Instances in a multicontainer Docker environment must have an instance profile with permission to access
the Amazon EC2 Container Service, the service that Elastic Beanstalk uses to coordinate container
deployments.To grant Amazon ECS access to the instances in your environment, first create an IAM
policy and assign it to a role.
To create a container instance role in IAM
1. Sign in to the AWS Management Console and open the IAM console at https://
console.aws.amazon.com/iam/.
2. Click Policies, click Get Started if the welcome page appears, and then click Create Policy.
3. For Create Your Own Policy, click Select.
API Version 2010-12-01
78
Elastic Beanstalk Developer Guide
Tutorial - Multicontainer Docker

4. Type BeanstalkECSAccess for the policy name and Allow container instances in an
Elastic Beanstalk environment to run tasks from Amazon ECS and write logs
to S3. for the description.
5. Copy and paste the following text into the policy document:
{
"Version": "2012-10-17",
"Statement": [
{
"Effect": "Allow",
"Action": [
"ecs:StartTask",
"ecs:StopTask",
"ecs:RegisterContainerInstance",
"ecs:DeregisterContainerInstance",
"ecs:DiscoverPollEndpoint",
"ecs:Submit*",
"ecs:Poll"
],
"Resource": ["*"]
},
{
"Effect": "Allow",
"Action": "s3:PutObject",
"Resource": "arn:aws:s3:::elasticbeanstalk-*/resources/environ
ments/logs/*"
}
]
}
6. Click Create Policy
Next you will need a role to attach the policy to. If you've used Elastic Beanstalk before, you will already
have a role named aws-elasticbeanstalk-ec2-role. If not, create a new one.
To create a new role
1. While still in the IAM console, click Roles.
2. Click Create New Role.
3. Type aws-elasticbeanstalk-ec2-role for the Role Name and click Next Step.
4. Under AWS Service Roles click Select next to Amazon EC2.
5. Click Next Step.
6. Click Create Role.
Finally, assign the policy to the role.
To assign the policy to a role
1. While still in the IAM console, click Roles.
2. Click aws-elasticbeanstalk-ec2-role.
3. Click Attach Policy under Permissions.
4. Select the BeanstalkECSAccess policy and click Attach Policy.
5. Click Create Role.
API Version 2010-12-01
79
Elastic Beanstalk Developer Guide
Configure a Container Instance IAM Role

Define Docker Containers
The first step in creating a new Docker environment is to create a directory for your application data.This
folder can be located anywhere on your local machine and have any name you choose. In addition to a
container configuration file, this folder will contain the content that you will upload to Elastic Beanstalk
and deploy to your environment.
Note
All of the code for this tutorial is available in the awslabs repository on GitHub at
https://github.com/awslabs/eb-docker-nginx-proxy
The file that Elastic Beanstalk uses to configure the containers on an EC2 instance is a JSON-formatted
text file named Dockerrun.aws.json. Create a text file with this name at the root of your application
and add the following text:
{
"AWSEBDockerrunVersion": 2,
"volumes": [
{
"name": "php-app",
"host": {
"sourcePath": "/var/app/current/php-app"
}
},
{
"name": "nginx-proxy-conf",
"host": {
"sourcePath": "/var/app/current/proxy/conf.d"
}
}
],
"containerDefinitions": [
{
"name": "php-app",
"image": "php:fpm",
"essential": true,
"memory": 128,
"mountPoints": [
{
"sourceVolume": "php-app",
"containerPath": "/var/www/html",
"readOnly": true
}
]
},
{
"name": "nginx-proxy",
"image": "nginx",
"essential": true,
"memory": 128,
"portMappings": [
{
"hostPort": 80,
"containerPort": 80
}
],
"links": [
API Version 2010-12-01
80
Elastic Beanstalk Developer Guide
Define Docker Containers

"php-app"
],
"mountPoints": [
{
"sourceVolume": "php-app",
"containerPath": "/var/www/html",
"readOnly": true
},
{
"sourceVolume": "nginx-proxy-conf",
"containerPath": "/etc/nginx/conf.d",
"readOnly": true
},
{
"sourceVolume": "awseb-logs-nginx-proxy",
"containerPath": "/var/log/nginx"
}
]
}
]
}
This example configuration defines two containers, a PHP web site with an Nginx proxy in front of it.
These two containers will run side by side in Docker containers on each instance in your Elastic Beanstalk
environment, accessing shared content (the content of the website) from volumes on the host instance,
which are also defined in this file.The containers themselves are created from images hosted in official
repositories on Docker Hub. The resulting environment looks like this:
API Version 2010-12-01
81
Elastic Beanstalk Developer Guide
Define Docker Containers

The volumes defined in the configuration correspond to the content that you will create next and upload
as part of your application source bundle.The containers access content on the host by mounting volumes
in the mountPoints section of the container definitions.
For more information on the format of Dockerrun.aws.config and its parameters, see Container
Definition Format (p. 77).
Add Content
Next you will add some content for your PHP site to display to visitors, and a configuration file for the
Nginx proxy.
php-app\index.php
<h1>Hello World!!!</h1>
<h3>PHP Version <pre><?= phpversion()?></pre></h3>
php-app\static.html
<h1>Hello World!</h1>
<h3>This is a static HTML page.</h3>
proxy\conf.d\default.conf
server {
listen 80;
server_name localhost;
root /var/www/html;
index index.php;
location ~ [^/]\.php(/|$) {
fastcgi_split_path_info ^(.+?\.php)(/.*)$;
if (!-f $document_root$fastcgi_script_name) {
return 404;
}
include fastcgi_params;
fastcgi_param SCRIPT_FILENAME $document_root$fastcgi_script_name;
fastcgi_param PATH_INFO $fastcgi_path_info;
fastcgi_param PATH_TRANSLATED $document_root$fastcgi_path_info;
fastcgi_pass php-app:9000;
fastcgi_index index.php;
}
}
Deploy to Elastic Beanstalk
Your application folder now contains the following files:
php-app\index.php
php-app\static.html
API Version 2010-12-01
82
Elastic Beanstalk Developer Guide
Add Content

proxy\conf.d\default.conf
Dockerrun.aws.json
This is all you need to create the Elastic Beanstalk environment. Create a .zip archive of the above files
and folders (not including the top-level project folder).To create the archive in Windows explorer, select
the contents of the project folder, right-click, select Send To, and then click Compressed (zipped) Folder
Note
For information on the required file structure and instructions for creating archives in other
environments, see Creating an Application Source Bundle (p. 294)
Next, you'll upload the source bundle to Elastic Beanstalk and create your environment.
To create a multicontainer Elastic Beanstalk environment
1. Sign in to the AWS Management Console and open the Elastic Beanstalk console at https://
console.aws.amazon.com/elasticbeanstalk/.
2. Click Create New Application.
3. Enter a name and description and click Next.
4. Click Create web server.
5. Select aws-elasticbeanstalk-ec2-role and click Next.
6. Set Predefined configuration to Multi-container Docker.
7. Set Environment type to Single instance and click Next.
8. For Application Version, select Upload your own.
9. Click Browse, select the .zip archive and click Open. Click Next
10. Configure your environment's name and prefix and click Next.
11. For Additional Resources, if your account does not have a default VPC, select Create this
environment inside a VPC.
Note
Multicontainer Docker environments must be launched in a VPC. Elastic Beanstalk will use
the default VPC, but you must select this option if you do not have a default VPC. AWS
accounts created after November 2013 have a default VPC. For more information, see
Your Default VPC and Subnets in the Amazon VPC User Guide.
12. On the Configuration Details page, select a key pair to enable SSH access to the instances in your
environment. Keep the default values for everything else and click Next.
Note
If you haven't used key pairs before, see Amazon EC2 Key Pairs in the Amazon EC2 User
Guide for Linux Instances.You can also skip key pair assignment and complete this tutorial
without connecting to an instance.
13. Review the information on the final page and click Launch.
The AWS Management Console redirects you to the management dashboard for your new environment.
This screen shows the health status of the environment and events output by the Elastic Beanstalk service.
When the status is Green, click the URL next to the environment name to see your new website.
Connect to a Container Instance
So how does it all work? Next you will connect to an EC2 instance in your Elastic Beanstalk environment
to see some of the moving parts in action.
First, identify the instance and note its public IP address, which is available in the Amazon EC2 console
at https://console.aws.amazon.com/ec2/. If multiple instances are running and you have trouble identifying
API Version 2010-12-01
83
Elastic Beanstalk Developer Guide
Connect to a Container Instance

the one the belongs to your environment, read through the events on the environment dashboard and
find the instance ID.This ID appears in an event listing when Elastic Beanstalk launches an EC2 instance.
Search for the instance ID in the Amazon EC2 console and view its details to find the public IP address.
Next, use an SSH client and your private key file to connect to the instance. Use the following settings:
SSH Settings
• Address – The public IP address or DNS name of the EC2 instance.
• Port – 22. This port is opened for ingress by Elastic BeanstalkBeanstalk when you select an Amazon
EC2 key pair during environment configuration.
• User Name – ec2-user.This is the default user name for EC2 instances running Amazon Linux.
• Private Key – Your private key file.
For full instructions on using SSH to connect to an EC2 instance, see Connecting to Your Linux Instance
Using SSH in the Amazon EC2 User Guide for Linux Instances.
Now that your connected to the EC2 instance hosting your docker containers, you can see how things
are set up. Run ls on /var/app/current:
[ec2-user@ip-10-0-0-117 ~]$ ls /var/app/current
Dockerrun.aws.json php-app proxy
This directory contains the files from the source bundle that you uploaded to Elastic Beanstalk during
environment creation.
[ec2-user@ip-10-0-0-117 ~]$ ls /var/log/containers
nginx nginx-proxy-ffffd873ada5-stdouterr.log rotated
nginx-66a4fd37eb63-stdouterr.log php-app
nginx-proxy php-app-b894601a1364-stdouterr.log
This is where logs are created on the container instance and collected by Elastic Beanstalk. Elastic
Beanstalk creates a volume in this directory for each container, which you mount to the container location
where logs are written.
You can also take a look at Docker to see the running containers with docker ps.
[ec2-user@ip-10-0-0-117 ~]$ sudo docker ps
CONTAINER ID IMAGE COMMAND
CREATED STATUS PORTS NAMES
ffffd873ada5 nginx:1.7 "nginx -g 'daemon of
About an hour ago Up About an hour 443/tcp, 0.0.0.0:80->80/tcp ecs-eb-
dv-example-env-ycmk5geqrm-2-nginx-proxy-90fce996cc8cbecb2800
b894601a1364 php:5-fpm "php-fpm"
About an hour ago Up About an hour 9000/tcp ecs-eb-
dv-example-env-ycmk5geqrm-2-php-app-cec0918ed1a3a49a8001
09fb19828e38 amazon/amazon-ecs-agent:latest "/agent"
About an hour ago Up About an hour 127.0.0.1:51678->51678/tcp ecs-agent
This shows the two running containers that you deployed, as well as the Amazon ECS container agent
that coordinated the deployment.
API Version 2010-12-01
84
Elastic Beanstalk Developer Guide
Connect to a Container Instance

Inspect the Amazon ECS Container Agent
EC2 instances in a Multicontainer Docker environment on Elastic Beanstalk run an agent process in a
Docker container.This agent connects to the Amazon ECS service in order to coordinate container
deployments.These deployments run as tasks in Amazon ECS, which are configured in task definition
files. Elastic Beanstalk creates these task definition files based on the Dockerrun.aws.json that you
upload in a source bundle.
Check the status of the container agent with an HTTP get request to
http://localhost:51678/v1/metadata:
[ec2-user@ip-10-0-0-117 ~]$ curl http://localhost:51678/v1/metadata
{
"Cluster":"eb-dv-example-env-qpoxiguye24",
"ContainerInstanceArn":"arn:aws:ecs:us-east-1:123456789012:container-in
stance/6a72af64-2838-400d-be09-3ab2d836ebcd"
}
This structure shows the name of the Amazon ECS cluster, and the ARN (Amazon Resource Name) of
the cluster instance (the EC2 instance that you are connected to).
For more information, make an HTTP get request to information is available at
http://localhost:51678/v1/tasks:
[ec2-user@ip-10-0-0-117 ~]$ curl http://localhost:51678/v1/tasks
{
"Tasks":[
{
"Arn":"arn:aws:ecs:us-east-1:123456789012:task/3ff2bf0f-790d-4f6d-affb-
5b127b3b6e4a",
"DesiredStatus":"RUNNING",
"KnownStatus":"RUNNING",
"Family":"eb-dv-example-env-qpoxiguye24",
"Version":"2",
"Containers":[
{
"Dock
erId":"b894601a1364a438156a239813c77cdef17040785bc4d5e49349470dc1556b15",
"DockerName":"ecs-eb-dv-exampl e-env-qpoxiguye24-2-php-app-
cec0918ed1a3a49a8001",
"Name":"php-app"
},
{
"Dock
erId":"ffffd873ada5f537c88862cce4e1de7ec3edf962645982fb236961c833a5d0fe",
"DockerName":"ecs-eb-dv-example-env-qpoxiguye24-2-nginx-proxy-
90fce996cc8cbecb2800",
"Name":"nginx-proxy"
}
]
}
]
}
This structure describes the task that is run to deploy the two docker containers from this turorial's example
project.The following information is displayed:
API Version 2010-12-01
85
Elastic Beanstalk Developer Guide
Inspect the Amazon ECS Container Agent

• KnownStatus – The RUNNING status indicates that the containers are still active.
• Family – The name of the task definition that Elastic Beanstalk created from Dockerrun.aws.json.
• Version – The version of the task definition.This is incremented each time the task definition file is
updated.
• Containers – Information about the containers running on the instance.
Even more information is available from the Amazon ECS service itself, which you can call using the
AWS Command Line Interface. For instructions on using the AWS CLI with Amazon ECS, and information
about Amazon ECS in general, see the Amazon ECS User Guide.
API Version 2010-12-01
86
Elastic Beanstalk Developer Guide
Inspect the Amazon ECS Container Agent

Deploying Elastic Beanstalk
Applications from Preconfigured
Docker Containers
Topics
• Getting Started with Preconfigured Docker Containers (p. 87)
• Example: Using a Dockerfile to Customize and Configure a Preconfigured Docker Platform (p. 89)
Elastic Beanstalk supports Docker containers that are based on the language stacks provided in the
Docker Official Repositories.You can use preconfigured Docker containers to develop and test your
application locally and then deploy the application in an Elastic Beanstalk environment that is identical
to your local environment.
For an end-to-end walkthrough about deploying an application to Elastic Beanstalk using a preconfigured
Docker container, see Getting Started with Preconfigured Docker Containers (p. 87).
For more information about supported platforms for preconfigured Docker containers, see Docker -
Preconfigured (p. 22).
Getting Started with Preconfigured Docker
Containers
This section walks you through how to develop a sample application locally and then deploy your application
to Elastic Beanstalk with a preconfigured Docker container.
Set Up Your Local Development Environment
For this walkthrough we will use a Python Flask “Hello World” application.
To set up your develop environment
1. Create a new folder for the sample application.
API Version 2010-12-01
87
Elastic Beanstalk Developer Guide
Getting Started with Preconfigured Docker Containers

$ mkdir eb-flask-sample
$ cd eb-flask-sample
2. In the application's root folder, create an application.py file. In the file, include the following:
from flask import Flask
app = Flask(__name__)
@app.route('/')
def hello_world():
return 'Hello World!'
if __name__ == '__main__':
app.run()
3. In the application's root folder, create a requirements.txt file. In the file, include the following:
flask
Develop and Test Locally
To develop a sample Python Flask application
1. Add a Dockerfile to your application’s root folder. In the file, specify the AWS Elastic Beanstalk
Docker base image to be used to run your local preconfigured Docker container and against which
Elastic Beanstalk runs any subsequent Dockerfile instructions by including the following:
# For Python 3.4
FROM amazon/aws-eb-python:3.4.2-onbuild-3.5.1
AWS Elastic Beanstalk also supports Docker images for Glassfish 4.1 Java 8 and Glassfish 4.0 Java
7. For their Docker image names, see Supported Platforms (p.19). For more information about using
a Dockerfile, see Single Container Docker Configurations (p. 68).
2. Build the Docker image.
$ docker build –t my-app-image .
3. Run the Docker container from the image.
Note
You must include the -p flag to map port 8080 on the container to the localhost port 3000.
Elastic Beanstalk Docker containers always expose the application on port 8080 on the
container.The -it flag runs the image as an interactive process. The -rm flag cleans up
the container file system when the container exits.You can optionally include the -d flag to
run the image as a daemon.
$ docker run –it --rm -p 3000:8080 my-app-image
4. To view the sample application, type the following URL into your web browser.
API Version 2010-12-01
88
Elastic Beanstalk Developer Guide
Develop and Test Locally

http://localhost:3000
Deploy to Elastic Beanstalk
After testing your application, you are ready to deploy it to Elastic Beanstalk.
To deploy your application to Elastic Beanstalk
1. In your application's root folder, rename the Dockerfile to Dockerfile.local. This step is
required for Elastic Beanstalk to use the Dockerfile that contains the correct instructions for Elastic
Beanstalk to build a customized Docker image on each Amazon EC2 instance in your Elastic Beanstalk
environment.
2. Create an application source bundle. For more information, see Creating an Application Source
Bundle (p. 294).
3. To create a new Elastic Beanstalk application to which you can deploy your application, see Creating
New Applications (p. 279). At the appropriate step, on the Environment Type page, in the Predefined
configuration list, under Preconfigured - Docker, click Python.
Example: Using a Dockerfile to Customize and
Configure a Preconfigured Docker Platform
With preconfigured Docker platforms you cannot use a configuration file to customize and configure the
software that your application depends on. If you want to customize the preconfigured Docker platform
to install additional software packages that your application needs, you can add a Dockerfile to your
application's root folder.The following example customizes the Python 3.4 platform by adding PostgreSQL
dependencies.
If you want to use additional AWS resources (such as Amazon DynamoDB or Amazon Simple Notification
Service), modify the proxy server or modify the operating system configuration for your Elastic Beanstalk
environment. For more information about using configuration files, see Customizing and Configuring
Elastic Beanstalk Environments (p. 430).
# Use the AWS Elastic Beanstalk Python 3.4 image
FROM amazon/aws-eb-python:3.4.2-onbuild-3.5.1
# Exposes port 8080
EXPOSE 8080
# Install PostgreSQL dependencies
RUN apt-get update && \
apt-get install -y postgresql libpq-dev && \
rm -rf /var/lib/apt/lists/*
Note
Elastic Beanstalk preconfigured Docker platforms for Glassfish and Python require you to expose
port 8080. Elastic Beanstalk preconfigured Docker platforms for Go require you to expose port
3000.
API Version 2010-12-01
89
Elastic Beanstalk Developer Guide
Deploy to Elastic Beanstalk

Deploying Go Applications to
Elastic Beanstalk Applications
Elastic Beanstalk supports applications that are developed using the Go programming language (sometimes
called Golang). Elastic Beanstalk supports Docker containers that are based on the language stacks
provided in the Docker Official Repositories.You can use Elastic Beanstalk preconfigured Docker containers
to develop and test your Go application locally and then deploy the application in an Elastic Beanstalk
environment that is identical to your local environment.
For an end-to-end walkthrough about deploying a Go application to Elastic Beanstalk using a preconfigured
Docker container, see Getting Started with Go Preconfigured Docker Containers (p. 90).
For more information about supported platforms for preconfigured Docker containers, including the
containers for Go applications, see Docker - Preconfigured (p. 22).
Getting Started with Go Preconfigured Docker
Containers
Follow the steps here to walk you through the process of deploying a Go application to Elastic Beanstalk
with a preconfigured Docker container for Go.
Set Up Your Local Development Environment
This tutorial uses a Go “Hello World” application.
To set up your develop environment
1. Create a new folder for the sample application.
$ mkdir eb-go-sample
$ cd eb-go-sample
2. In the application's root folder, create a file with the name server.go. In the file, include the following:
API Version 2010-12-01
90
Elastic Beanstalk Developer Guide
Getting Started with Go Preconfigured Docker
Containers

package main
import "github.com/go-martini/martini"
func main() {
m := martini.Classic()
m.Get("/", func() string {
return "Hello world!"
})
m.Run()
}
Note
• The application source bundle must include a package called main.Within that package,
you must have a main function for the container to execute.
• Dependencies that need to be imported (for example, the Martini package, go-martini)
will be downloaded to the container and installed during deployment. Therefore, you do
not need to include the dependencies in the application source bundle that you upload
to Elastic Beanstalk.
• Elastic Beanstalk sets the container’s GOPATH environment variable to /go.
Develop and Test Locally Using Docker
With your environment set up, you're ready to create and test your Go application.
To develop a sample Go application
1. Add a Dockerfile to your application’s root folder. In the file, specify the Elastic Beanstalk Docker
base image to use to run your local preconfigured Docker container. Elastic Beanstalk uses this
image to run any subsequent Dockerfile instructions.
Note
Include only the instruction with the Docker image name for your platform version. For
preconfigured Docker image names, see Supported Platforms (p.19). For more information
about using a Dockerfile, see Single Container Docker Configurations (p. 68). For an
example Dockerfile for preconfigured Docker platforms, see Example: Using a Dockerfile
to Customize and Configure a Preconfigured Docker Platform (p. 89).
You can use the following example:
# For Go 1.3
FROM golang:1.3.3-onbuild
# For Go 1.4
FROM golang:1.4.1-onbuild
2. Build the Docker image.
$ docker build –t my-app-image .
3. Run the Docker container from the image.
API Version 2010-12-01
91
Elastic Beanstalk Developer Guide
Develop and Test Locally Using Docker

Note
You must include the -p flag to map port 3000 on the container to the localhost port 8080.
Elastic Beanstalk preconfigured Docker containers for Go applications always expose the
application on port 3000 on the container.The -it flag runs the image as an interactive
process.The -rm flag cleans up the container file system when the container exits.You
can optionally include the -d flag to run the image as a daemon.
$ docker run –it --rm -p 8080:3000 my-app-image
4. To view the sample application, type the following URL into your web browser.
http://localhost:8080
Deploy to Elastic Beanstalk
After testing your application, you are ready to deploy it to Elastic Beanstalk.
To deploy your application to Elastic Beanstalk
1. In your application's root folder, rename the Dockerfile to Dockerfile.local. This step is
required for Elastic Beanstalk to use the Dockerfile that contains the correct instructions for Elastic
Beanstalk to build a customized Docker image on each Amazon EC2 instance in your Elastic Beanstalk
environment.
Note
You do not need to perform this step if your Dockerfile includes instructions that modify
the base Go Docker image.You do not need to use a Dockerfile if your Dockerfile
includes only a FROM line to specify the base image from which to build the container. In
that situation, the Dockerfile is redundant.
2. Create an application source bundle. For more information, see Creating an Application Source
Bundle (p. 294).
3. Create an Elastic Beanstalk application to which you can deploy your application. For step-by-step
instructions, see Creating New Applications (p. 279). At the appropriate step, on the Environment
Type page, in the Predefined configuration list, under Preconfigured - Docker, click Go.
API Version 2010-12-01
92
Elastic Beanstalk Developer Guide
Deploy to Elastic Beanstalk

Creating and Deploying Elastic
Beanstalk Applications in Java
Using AWS Toolkit for Eclipse
Topics
• Develop, Test, and Deploy (p. 93)
• Importing Existing Environments into Eclipse (p. 102)
• Using Custom Environment Properties with Elastic Beanstalk (p. 102)
• Using Amazon RDS and MySQL Connector/J (p. 105)
• Managing Multiple AWS Accounts (p. 110)
• Viewing Events (p. 111)
• Managing Elastic Beanstalk Application Environments (p. 112)
• Listing and Connecting to Server Instances (p. 123)
• Terminating an Environment (p. 123)
• Tools (p. 124)
• Resources (p. 124)
The first part of this topic provides step-by-step instructions for creating, testing, deploying, and redeploying
your Java application to Elastic Beanstalk using the AWS Toolkit for Eclipse.The second part of this topic
provides information on how you can manage and configure your applications and environments using
the AWS Toolkit for Eclipse. For more information about prerequisites and installing the AWS Toolkit for
Eclipse, go to http://aws.amazon.com/eclipse.You can also check out the Using AWS Elastic Beanstalk
with the AWS Toolkit for Eclipse video.This topic also provides useful information covering tools, how-to
topics, and additional resources for Java developers.
Develop,Test, and Deploy
Topics
• Create Project (p. 94)
• Test Locally (p. 96)
API Version 2010-12-01
93
Elastic Beanstalk Developer Guide
Develop,Test, and Deploy

• Deploy to AWS Elastic Beanstalk (p. 98)
• Debug/View Logs (p. 101)
• Edit the Application and Redeploy (p. 101)
• Deploy to Production (p. 102)
The following diagram illustrates a typical software development life cycle that includes deploying your
application to Elastic Beanstalk.
After developing and testing your application locally, you typically deploy your application to AWS Elastic
Beanstalk. After deployment, your application will be live at a URL such as
http://myexampleapp-wpams3yrvj.elasticbeanstalk.com.
If you want to replace the URL with a custom domain name, you can use Amazon Route 53, a highly
available and scalable Domain Name System (DNS) web service.You can point your domain name to
the Amazon Route 53 CNAME <yourappname>.elasticbeanstalk.com. Contact your DNS provider to set
this up. For information about how to map your root domain to your Elastic Load Balancer, see Using
Elastic Beanstalk with Amazon Route 53 to Map Your Domain to Your Load Balancer (p. 528).
Because your application is live, you should consider setting up multiple environments, such as a testing
environment and a production environment.You can use the AWS Toolkit for Eclipse to set up different
AWS accounts for testing, staging, and production. For information about managing multiple accounts,
see Managing Multiple AWS Accounts (p. 110).
After you remotely test and debug your Elastic Beanstalk application, you can make any updates and
then redeploy it to Elastic Beanstalk. After you are satisfied with all of your changes, you can upload the
latest version to your production environment.The following sections explain each stage of the software
development life cycle.
Create Project
The AWS Toolkit provides an AWS Java web project template for use in Eclipse.The template creates
a web tools platform (WTP) dynamic web project that includes the AWS SDK for Java in the project's
classpath.Your AWS account credentials and a simple index.jsp file are provided to help you get
started.The following instructions assume you have installed both the Eclipse IDE for Java EE Developers
and the AWS Toolkit plug-in. For more information, see Setting Up the AWS Toolkit for Eclipse.
Note
For information about what versions of Java are supported, see Supported Platforms (p. 19).
To create a new AWS Java web project in Eclipse
1. In Eclipse, make sure the toolbar and the AWS icon are visible.
API Version 2010-12-01
94
Elastic Beanstalk Developer Guide
Create Project

2. On the toolbar, click the arrow next to the AWS icon and choose New AWS Java Web Project.
3. In the New AWS Java Web Project wizard, click Project name, and then enter the name of your
AWS Java Web Project.
API Version 2010-12-01
95
Elastic Beanstalk Developer Guide
Create Project

4. Select the AWS account you want to use to deploy your application. If you haven't already configured
an account, click Configure AWS accounts to add a new account. For instructions on how to add
a new account, go to Managing Multiple AWS Accounts (p. 110).
5. Select the application you want to start from.
6. Click Finish.
A new AWS Java web project is created inside your Eclipse workspace.To help you get started developing
your project, a basic index.jsp file is included inside your WebContent folder.Your AWS security
credentials are included in the AwsCredentials.properties file inside your src folder.
Test Locally
You can test and debug your application before you deploy it to Elastic Beanstalk using the built-in WTP
tools.
To test and debug your application locally
1. If Eclipse isn't displaying Project Explorer view, do one of the following:
• In the Java EE perspective, click the Window menu, click Show View, and then click Project
Explorer.
• In the AWS Management perspective, click the Window menu, click Show View, expand General,
and then click Project Explorer.
2. In the Project Explorer tab, right-click your Java web project, choose Run As, Run On Server.
API Version 2010-12-01
96
Elastic Beanstalk Developer Guide
Test Locally

Note
If the Run on Server option does not appear, ensure that you have the Web Tools Platform
Eclipse extensions installed.The WTP is included with Eclipse if you install the Eclipse IDE
for Java EE Developers.The tools must be installed when your project is created for the
option to appear.
3. In the Run On Server wizard, click Manually define a new server.
4. Under Select the server type, expand Apache, and then click Tomcat v6.0 Server or Tomcat v7.0
Server.
5. Click Next.
6. You might be prompted to install Apache. If you are using Microsoft Windows, you can click Download
and Install to install the software. After you install the software, click Finish.
Note
You might need to manually create a Tomcat server.This includes going directly to
http://apache.org to download Apache Tomcat, extracting the compressed file containing
Apache Tomcat onto your computer, and then adding the Apache Tomcat runtimes. For
more information, go to the "Creating an Apache Tomcat Server" topic of the Eclipse online
documentation at help.eclipse.org.
After you create a Tomcat server and add the Apache Tomcat runtimes, go to Step 2 in
these procedures.
Your application should be visible on the localhost.
Note
Environment properties that are typically provided by Elastic Beanstalk, such as RDS_HOSTNAME
(when using RDS), are not available to applications running locally.
After you test your application, you can deploy to Elastic Beanstalk.
API Version 2010-12-01
97
Elastic Beanstalk Developer Guide
Test Locally

Deploy to AWS Elastic Beanstalk
The Elastic Beanstalk server is an Eclipse WTP server with added functionality for restarting, publishing,
and terminating your Java web application.The Elastic Beanstalk server in Eclipse represents an Elastic
Beanstalk environment. An environment is a running instance of an application on the AWS platform.
Define Your Server
Before deploying your application, you must define your server and configure your application.
To define your Java web application server
1. In Eclipse, right-click your Java web project in the Project Explorer view. Choose Amazon Web
Services, Deploy to AWS Elastic Beanstalk.
2. In the Run On Server wizard, select Manually define a new server.
3. Under Select the server type, expand Amazon Web Services, and then click Elastic Beanstalk
for Tomcat 6 or Elastic Beanstalk for Tomcat 7.
4. If necessary, enter the server's host name and server name in the provided fields. Click Next.
You have defined your AWS Java web application server.You must use the Configure Application and
Environment options to configure your AWS Java web application before deployment.
Configure
Each application has a configuration and a version. A specific application instance is called an environment.
An environment can have only one version at a time, but you can have multiple simultaneous environments
running the same or different versions. AWS resources created for an environment can include one Elastic
Load Balancing load balancer, an Auto Scaling group, and one or more Amazon EC2 instances.
API Version 2010-12-01
98
Elastic Beanstalk Developer Guide
Deploy to AWS Elastic Beanstalk

To configure your Amazon web application
1. In the Configure Application and Environment view of the Run On Server wizard, click Region,
and then select your Amazon Web Services region.
2. Enter an application name and, if desired, provide an application description.
3. Enter an environment name and, if desired, provide an environment description.The environment
name must be unique within your AWS account.
4. Select the Type of environment that you want.
You can select either Load Balanced or a Single Instance environment. For more information, see
Environment Types (p. 345).
Note
For single-instance environments, load balancing, autoscaling, and the health check URL
settings don't apply.
5. Click Next.
6. Click Deploy with a key pair.
API Version 2010-12-01
99
Elastic Beanstalk Developer Guide
Deploy to AWS Elastic Beanstalk

7. Right-click anywhere inside the key pair list menu and select New Key Pair.
8. For Key Pair Name, enter a key pair name. For Private Key Directory, enter a private key directory
or click Browse and select a directory. Click OK and select the newly created key pair in the key
pair list menu.
9. Select Use incremental deployment to deploy only the changed files. An incremental deployment
is faster because you are updating only the files that changed instead of all the files.
10. Select an instance profile.
If you are using a nonlegacy container, you have the option to select an instance profile. If you are
using a legacy container, this option does not appear in the dialog box. An instance profile provides
applications and services access to AWS resources using temporary security credentials. For example,
if your application requires access to Amazon DynamoDB, it must use AWS security credentials to
make an API request.The application can use the temporary security credentials so you do not have
to store long-term credentials on an EC2 instance or update the EC2 instance every time the
credentials are rotated. In addition, Elastic Beanstalk requires an instance profile to rotate logs to
Amazon S3.The Instance Profile list displays the profiles available for your Elastic Beanstalk
environment. If you do not have an instance profile, you can select Create a default instance profile.
Elastic Beanstalk creates a default instance profile and updates the Amazon S3 bucket policy to
allow log rotation. If you choose to not use the default instance profile, you need to grant permissions
for Elastic Beanstalk to rotate logs. For instructions, see Using a Custom Instance Profile (p. 577).
For more information about log rotation, see Elastic Beanstalk Environment Configurations (p. 389).
For more information about using instance profiles with Elastic Beanstalk, see Using IAM Roles with
Elastic Beanstalk (p. 568).
Note
Users must have permission to create a default profile. For more information, see Granting
IAM Users Permissions to Create and Pass IAM Roles (p. 568).
11. Click Finish.
After you finish the wizard, you are prompted to enter a new version label for your application version,
and a new server appears in the Server view.Your Java web project will be exported as a .war file,
uploaded to Amazon S3, and registered as a new application version with Elastic Beanstalk.The Elastic
API Version 2010-12-01
100
Elastic Beanstalk Developer Guide
Deploy to AWS Elastic Beanstalk

Beanstalk deployment feature monitors your environment until it becomes available with the newly
deployed code and opens your application in a web browser when it's ready.
Debug/View Logs
To investigate any issues, you can view logs. For information about viewing logs, see Working with
Logs (p. 415). If you need to test remotely, you can connect to your EC2 instances. For instructions on
how to connect to your instance, see Listing and Connecting to Server Instances (p. 413).
Edit the Application and Redeploy
Now that you have tested your application, it is easy to edit and redeploy it and to see the results in
moments.Typically, when you redeploy your application, all of the files get updated. However, if you
choose to do an incremental deployment, the toolkit updates the modified files, making your deployment
faster.
To choose to use incremental deployments
1. If Eclipse isn't displaying AWS Explorer view, in the menu choose Window, Show View, AWS
Explorer. In the AWS Explorer pane, expand the Elastic Beanstalk node and your application
node.
2. Double-click your Elastic Beanstalk environment.
3. In the Overview tab, expand the AWS Elastic Beanstalk Deployment tab, and then select Use
Incremental Deployments.
To edit and redeploy your Java web application
1. In Eclipse, locate and double-click the index.jsp file in the Project Explorer or Package Explorer
view. Edit the source contained in the file.
2. Right-click your Java web project in the Project Explorer or Package Explorer view and choose
Amazon Web Services, Deploy to AWS Elastic Beanstalk.
3. In the Run On Server wizard, select Choose an existing server, and click Finish.
Note
If you launched a new environment using the AWS Management Console, you will need to
import your existing environments into Eclipse. For more information, see Importing Existing
Environments into Eclipse (p. 102).
When the application has been deployed successfully, index.jsp is displayed in Eclipse and shows
any edits you made.
API Version 2010-12-01
101
Elastic Beanstalk Developer Guide
Debug/View Logs

Deploy to Production
When you are satisfied with all of the changes that you want to make to your application, you can deploy
your application to your production environment.To deploy the existing version of the application to
production with zero downtime, follow the steps at Deploying Versions with Zero Downtime (p. 318).You
can also create a new environment inside Eclipse, but you will need to specify a new version for your
application. For instructions on deploying to Elastic Beanstalk inside Eclipse, see Deploy to AWS Elastic
Beanstalk (p. 98).
Importing Existing Environments into Eclipse
You can import existing environments that you created in the AWS Management Console into Eclipse.
To import existing environments, expand the AWS Elastic Beanstalk node and double-click on an
environment in the AWS Explorer inside Eclipse.You can now deploy your Elastic Beanstalk applications
to this environment.
Using Custom Environment Properties with
Elastic Beanstalk
You can use the AWS Management Console or the AWS Toolkit for Eclipse to set environment properties
that Elastic Beanstalk passes to your server instances. Environment properties are specific to your
application environment and are not actual (shell) environment variables. More specifically, PARAM1,
PARAM2, etc. are system properties passed into the JVM at startup using the -D flag.You can use them
to pass database connection strings, security credentials, or other information that you don't want to
hard-code into your application. Storing this information in environment properties can help increase the
portability and scalability of your application.You do not need to recompile your source code when you
move between environments.You can acquire them with System.getProperty(name).
Setting Custom Environment Properties with AWS
Toolkit for Eclipse
The following example sets the JDBC_CONNECTION_STRING and PARAM1 environment properties in the
AWS Toolkit for Eclipse. After you set these properties, they become available to your Elastic Beanstalk
application as system properties called JDBC_CONNECTION_STRING and PARAM1, respectively.
The procedure for setting other environment properties is the same.You can use PARAM1 through PARAM5
for any purpose you choose, but you cannot rename the properties.
Note
The AWS Toolkit for Eclipse does not yet support modifying environment configuration, including
environment variables, for environments in a VPC. Unless you have an older account using EC2
Classic, you must use the AWS Management Console (described in the next section) or the EB
CLI (version 3 or newer) (p. 620)
To set environment properties for your Elastic Beanstalk application
1. If Eclipse isn't displaying the AWS Explorer view, choose Window, Show View, Other. Expand
AWS Toolkit and then click AWS Explorer.
2. In the AWS Explorer pane, expand Elastic Beanstalk, expand the node for your application, and
then double-click your Elastic Beanstalk environment.
API Version 2010-12-01
102
Elastic Beanstalk Developer Guide
Deploy to Production

3. At the bottom of the pane for your environment, click the Advanced tab.
4. Under aws:elasticbeanstalk:application:environment, click JDBC_CONNECTION_STRING and
then type a connection string. For example, the following JDBC connection string would connect to
a MySQL database instance on port 3306 of localhost, with a user name of me and a password of
mypassword:
jdbc:mysql://localhost:3306/mydatabase?user=me&password=mypassword
This will be accessible to your Elastic Beanstalk application as a system property called
JDBC_CONNECTION_STRING.
5. Click PARAM1 and then type a string. For example:
My test parameter.
This will be accessible to your Elastic Beanstalk application as a system property called PARAM1.
6. Press Ctrl+S on the keyboard or choose File, Save to save your changes to the environment
configuration. Changes are reflected in about one minute.
Setting Custom Environment Properties with AWS
Management Console
The following example sets the JDBC_CONNECTION_STRING and PARAM1 environment properties in the
AWS Management Console. After you set these properties, they become available to your Elastic Beanstalk
application as system properties called JDBC_CONNECTION_STRING and PARAM1, respectively.
The procedure for setting other environment properties is the same.You can use PARAM1 through PARAM5
for any purpose you choose, but you cannot rename the properties.
To set environment properties for your Elastic Beanstalk application
1. Open the Elastic Beanstalk console at https://console.aws.amazon.com/elasticbeanstalk/.
2. From the Elastic Beanstalk console applications page, click the environment name to view its
dashboard.
API Version 2010-12-01
103
Elastic Beanstalk Developer Guide
Setting Custom Environment Properties with AWS
Management Console

3. In the navigation pane, click Configuration.
4.
On the Configuration page, in the Software Configuration section, click .
5. Under Environment Properties, next to JDBC_CONNECTION_STRING, in the Property Value
column, type a connection string.
For example, the following JDBC connection string would connect to a MySQL database instance
on port 3306 of localhost, with a username of me and a password of mypassword:
jdbc:mysql://localhost:3306/mydatabase?user=me&password=mypassword
This will be accessible to your Elastic Beanstalk application as a system property called
JDBC_CONNECTION_STRING.
6. Next to PARAM1, in the Property Value column, type a string, for example: My test parameter.
This parameter will be accessible to your Elastic Beanstalk application as a system property called
PARAM1.
7. Click Save.
Elastic Beanstalk updates your environment.This takes about one minute.
Accessing Custom Environment Properties
After you set your environment properties for your Elastic Beanstalk application, you can access the
environment properties from your code. For example, the following code snippet shows how to access
the Elastic Beanstalk environment properties using JavaScript in a JavaServer Page (JSP):
<p>
The JDBC_CONNECTION_STRING environment property is:
<%= System.getProperty("JDBC_CONNECTION_STRING") %>
</p>
<p>
The PARAM1 environment property is:
<%= System.getProperty("PARAM1") %>
</p>
API Version 2010-12-01
104
Elastic Beanstalk Developer Guide
Accessing Custom Environment Properties

Using Amazon RDS and MySQL Connector/J
With Amazon Relational Database Service, you can quickly and easily provision and maintain a MySQL,
Oracle, or Microsoft SQL Server instance in the cloud. For more information about Amazon RDS, go to
http://aws.amazon.com/rds/.
This topic explains how you can use Amazon RDS and MySQL Connector/J with your Elastic Beanstalk
Java application.
Note
The instructions in this topic are for nonlegacy container types. If you have deployed an Elastic
Beanstalk application using a legacy container type, we recommend that you migrate to a
nonlegacy container type to gain access to new features. For instructions on how to check the
container type and migrate your application, see Migrating Your Application from a Legacy
Container Type (p. 426). For instructions on using MySQL Connector/J with applications running
on legacy container types, see Using Amazon RDS and MySQL Connector/J (Legacy Container
Types) (p. 816).
To use Amazon RDS from your Elastic Beanstalk application, you need to do the following:
1. Create an Amazon RDS DB instance.
2. Download and install MySQL Connector/J.
3. Establish a database connection in your code by using the connectivity information for your Amazon
RDS DB instance.
4. Deploy your application to Elastic Beanstalk.
This topic walks you through the following:
• Using a new Amazon RDS DB instance with your application
• Using an existing Amazon RDS DB instance with your application
Using a New Amazon RDS DB Instance with Java
This topic walks you through creating a new Amazon RDS DB Instance and using it with your Java
application.
1. Sign in to the AWS Management Console and open the Elastic Beanstalk console at https://
console.aws.amazon.com/elasticbeanstalk/.
2. Click your environment name and select Configuration.
3. Scroll down to the Data Tier section and click Create a new RDS database.
4. Enter a user name and password and click Save. Click Save again on the message about instance
profiles, if shown. Elastic Beanstalk updates your environment to include the new RDS instance and
provides connection information to the web container as environment properties.
5. Download and install MySQL Connector/J for your development environment. For download and
installation instructions, go to http://dev.mysql.com/downloads/connector/j.
6. Copy the MySQL Connector/J .jar file into the project's WebContent/WEB-INF/lib directory.
7. Right click on WebContent/WEB-INF/lib/mysql_connector_java_5.1.34_bin.jar and click
Add to Build Path to add the library to the classpath.
8. Test the database connection by adding the following code to the main view of your Java Web
Application (index.jsp).
API Version 2010-12-01
105
Elastic Beanstalk Developer Guide
Using Amazon RDS and MySQL Connector/J

<%@ page import="java.sql.*" %>
<%
// Read RDS Connection Information from the Environment
String dbName = System.getProperty("RDS_DB_NAME");
String userName = System.getProperty("RDS_USERNAME");
String password = System.getProperty("RDS_PASSWORD");
String hostname = System.getProperty("RDS_HOSTNAME");
String port = System.getProperty("RDS_PORT");
String jdbcUrl = "jdbc:mysql://" + hostname + ":" +
port + "/" + dbName + "?user=" + userName + "&password=" + password;
// Load the JDBC Driver
try {
System.out.println("Loading driver...");
Class.forName("com.mysql.jdbc.Driver");
System.out.println("Driver loaded!");
} catch (ClassNotFoundException e) {
throw new RuntimeException("Cannot find the driver in the classpath!",
e);
}
Connection conn = null;
Statement setupStatement = null;
Statement readStatement = null;
ResultSet resultSet = null;
String results = "";
int numresults = 0;
String statement = null;
try {
// Create connection to RDS instance
conn = DriverManager.getConnection(jdbcUrl);
// Create a table and write two rows
setupStatement = conn.createStatement();
String createTable = "CREATE TABLE Beanstalk (Resource char(50));";
String insertRow1 = "INSERT INTO Beanstalk (Resource) VALUES ('EC2 In
stance');";
String insertRow2 = "INSERT INTO Beanstalk (Resource) VALUES ('RDS In
stance');";
setupStatement.addBatch(createTable);
setupStatement.addBatch(insertRow1);
setupStatement.addBatch(insertRow2);
setupStatement.executeBatch();
setupStatement.close();
} catch (SQLException ex) {
// handle any errors
System.out.println("SQLException: " + ex.getMessage());
System.out.println("SQLState: " + ex.getSQLState());
System.out.println("VendorError: " + ex.getErrorCode());
} finally {
System.out.println("Closing the connection.");
if (conn != null) try { conn.close(); } catch (SQLException ignore) {}
}
try {
API Version 2010-12-01
106
Elastic Beanstalk Developer Guide
Using a New Amazon RDS DB Instance with Java

conn = DriverManager.getConnection(jdbcUrl);
readStatement = conn.createStatement();
resultSet = readStatement.executeQuery("SELECT Resource FROM Beanstalk;");
resultSet.first();
results = resultSet.getString("Resource");
resultSet.next();
results += ", " + resultSet.getString("Resource");
resultSet.close();
readStatement.close();
conn.close();
} catch (SQLException ex) {
// handle any errors
System.out.println("SQLException: " + ex.getMessage());
System.out.println("SQLState: " + ex.getSQLState());
System.out.println("VendorError: " + ex.getErrorCode());
} finally {
System.out.println("Closing the connection.");
if (conn != null) try { conn.close(); } catch (SQLException ignore)
{}
}
%>
9. Place the following code in the body of the html portion of index.jsp to display the results.
<p>Established connection to RDS. Read first two rows: <%= results %></p>
10. Right-click your project in the Package Explorer and choose Run As, Run on Server.
11. If your project is not configured to always deploy to the same environment, select the environment
that your application is currently running on and click Finish.
For more information on getting started using the MySQL Connector/J to access your MySQL database,
go to http://dev.mysql.com/doc/connector-j/en/index.html.
Using an Existing Amazon RDS DB Instance with
Java
With Amazon Relational Database Service you can quickly and easily provision and maintain a MySQL
Server instance in the cloud. This topic discusses how you can use Amazon RDS and the MySQL
Connector/J with your Elastic Beanstalk application.
To use an existing Amazon RDS DB Instance and Java from your Elastic Beanstalk
application
1. Create an Elastic Beanstalk environment in one of the following ways:
• Create a new application with a new environment. For instructions using the Elastic Beanstalk
console, see Creating New Applications (p. 279). For instructions using Eclipse, see Develop, Test,
and Deploy (p. 93).You do not need to create an Amazon RDS DB Instance with this environment
because you already have an existing Amazon RDS DB Instance.
API Version 2010-12-01
107
Elastic Beanstalk Developer Guide
Using an Existing Amazon RDS DB Instance with Java

• Launch a new environment with an existing application version. For instructions using the Elastic
Beanstalk console, see Launching New Environments (p. 299).You do not need to create an
Amazon RDS DB instance with this environment because you already have an existing Amazon
RDS DB instance.
2. Configure your Amazon RDS DB security group to allow access from the Amazon EC2 security group
used by your Elastic Beanstalk application. For instructions on how to find the name of your EC2
security group using the AWS Management Console, see Amazon EC2 Security Groups (p.354). For
more information, go to the "Authorizing Network Access to an Amazon EC2 Security Group" section
of Working with DB Security Groups in the Amazon Relational Database Service User Guide.
3. Download and install MySQL Connector/J for your development environment. For download and
installation instructions, go to http://dev.mysql.com/downloads/connector/j.
4. Create a JDBC connection string that includesyour Amazon RDS DB instance's public DNS name,
port number, and (optionally) database name and login credentials. The following example shows a
JDBC connection string that would connect to the employees database on an Amazon RDS instance
at mydbinstance.abcdefghijkl.us-west-2.rds.amazonaws.com using port 3306, with the user name
"sa" and the password "mypassword".
jdbc:mysql://mydbinstance.abcdefghijkl.us-west-2.rds.amazonaws.com:3306/em
ployees?user=sa&password=mypassword
5. Configure your Elastic Beanstalk environment to pass the string to your Elastic Beanstalk application
as an environment property. For instructions on how to do this, go to Using Custom Environment
Properties with Elastic Beanstalk (p. 102).
6. Retrieve the JDBC connection string from the environment property passed to your server instance
from Elastic Beanstalk and use MySQL Connector/J to access your Amazon RDS database.The
following code example shows how to retrieve the JDBC_CONNECTION_STRING custom environment
property from a Java Server Page (JSP).
<p>
The JDBC_CONNECTION_STRING environment variable is:
<%= System.getProperty("JDBC_CONNECTION_STRING") %>
</p>
For more information on getting started using the MySQL Connector/J to access your MySQL
database, go to http://dev.mysql.com/doc/connector-j/en/index.html.
7. Copy the MySQL Connector/J .jar file into the Tomcat WEB-INF/lib directory.
8. Deploy your updated application to your existing Elastic Beanstalk environment. For information on
how to deploy a new application version to an existing environment using the Elastic Beanstalk
console, see Step 4: Deploy New Version (p. 7). For information on how to deploy your application
using Eclipse, see Develop, Test, and Deploy (p. 93).
Note
To connect to Tomcat RDS environments, you must load the driver explicitly using
Class.forName(<driverClassName>) prior to the call to
DriverManager.getConnection() in the Java code.
Troubleshooting Database Connections
If and when you run into issues connecting to a database from within your application, the web container
log and database itself are two good places to look for information.
API Version 2010-12-01
108
Elastic Beanstalk Developer Guide
Troubleshooting Database Connections

Logs
You can view all of the logs from your Elastic Beanstalk environment from within Eclipse. If you don't
have the AWS Explorer view open, click the arrow next to the orange AWS icon in the toolbar and choose
Show AWS Explorer View. Expand AWS Elastic Beanstalk and your environment name, and then
right-click the server and choose Open in WTP Server Editor.
Click the log tab of the server view to see the aggregate logs from your environment. Use the refresh
button at the upper right corner of the view whenever you need to open the latest logs.
Scroll down and locate the TomCat logs from /var/log/tomcat7/catalina.out. If you loaded the
web page from our earlier example several times, you might see the following in the output.
-------------------------------------
/var/log/tomcat7/catalina.out
-------------------------------------
INFO: Server startup in 9285 ms
Loading driver...
Driver loaded!
SQLException: Table 'Beanstalk' already exists
SQLState: 42S01
VendorError: 1050
Closing the connection.
Closing the connection.
Everything sent to standard output by the web application will show up in the web container log.This
example tries to create the table on every page load and ends up catching a SQL exception on every
page load after the first one.
Note
This is okay for an example, but in real world applications you'll keep your database definitions
in schema objects, perform transactions from within model classes, and coordinate requests
with controller servlets.
RDS
You can connect directly to the Amazon RDS instance in your Elastic Beanstalk environment using the
My SQL client application.
First you'll need to open the security group to your Amazon RDS instance to allow traffic from your
computer.
1. Open the Elastic Beanstalk console at https://console.aws.amazon.com/elasticbeanstalk/.
2. Click the name of your environment and click Configuration.
3.
Under Network Tier, in the RDS section, click the gear icon.
4. Select View in RDS Console next to the DB endpoint.
5. On the RDS Dashboard instance details page, under Security and Network, click the security group
starting with rds- next to Security Groups.
6. In the security group details, select the Inbound tab and click Edit
7. Add a rule for My SQL (similar to the one that is already there) that allows traffic from your IP address
or range.
8. Click Save. The changes take effect immediately.
Return to the Elastic Beanstalk configuration details for your environment and note the endpoint.You will
use the domain name to connect to the RDS instance.
API Version 2010-12-01
109
Elastic Beanstalk Developer Guide
Troubleshooting Database Connections

Install My SQL client and initiate a connection to the database on port 3306. In Windows, install the My
SQL Workbench application from the My SQL home page and follow the prompts.
In Linux, install the My SQL client using the package manager for your distribution.The following example
works on Ubuntu and other Debian derivatives.
// Install My SQL client
$ sudo apt-get install mysql-client-5.5
...
// Connect to database
$ mysql -h aas839jo2vwhwb.cnubrrfwfka8.us-west-2.rds.amazonaws.com -u username
-ppassword ebdb
Reading table information for completion of table and column names
You can turn off this feature to get a quicker startup with -A
Welcome to the MySQL monitor. Commands end with ; or \g.
Your MySQL connection id is 117
Server version: 5.5.40-log Source distribution
...
Once connected, you can run SQL commands to see the status of the database, whether your tables
and rows have been created, and other information.
mysql> SELECT Resource from Beanstalk;
+--------------+
| Resource |
+--------------+
| EC2 Instance |
| RDS Instance |
+--------------+
2 rows in set (0.01 sec)
Managing Multiple AWS Accounts
You might want to set up different AWS accounts to perform different tasks, such as testing, staging, and
production.You can use the AWS Toolkit for Eclipse to add, edit, and delete accounts easily.
To add an AWS account with the AWS Toolkit for Eclipse
1. In Eclipse, make sure the toolbar is visible. On the toolbar, click the arrow next to the AWS icon and
select Preferences.
2. Click Add account.
API Version 2010-12-01
110
Elastic Beanstalk Developer Guide
Managing Multiple AWS Accounts

3. In the Account Name text box, type the display name for the account.
4. In the Access Key ID text box, type your AWS access key ID.
5. In the Secret Access Key text box, type your AWS secret key.
For API access, you need an access key ID and secret access key. Use IAM user access keys
instead of AWS root account access keys. IAM lets you securely control access to AWS services
and resources in your AWS account. For more information about creating access keys, see How Do
I Get Security Credentials? in the AWS General Reference.
6. Click OK.
To use a different account to deploy an application to Elastic Beanstalk
1. In the Eclipse toolbar, click the arrow next to the AWS icon and select Preferences.
2. For Default Account, select the account you want to use to deploy applications to Elastic Beanstalk.
3. Click OK.
4. In the Project Explorer pane, right-click the application you want to deploy, and then select Amazon
Web Services > Deploy to Elastic Beanstalk.
Viewing Events
You can use the AWS Toolkit for Eclipse to access events and notifications associated with your application.
For more details on the most common events, see Understanding Environment Launch Events (p. 512).
To view application events
1. If Eclipse isn't displaying the AWS Explorer view, in the menu click Window > Show View > AWS
Explorer. Expand the Elastic Beanstalk node and your application node.
2. In the AWS Explorer, double-click your Elastic Beanstalk environment.
3. At the bottom of the pane, click the Events tab.
A list of the events for all environments for your application is displayed.
API Version 2010-12-01
111
Elastic Beanstalk Developer Guide
Viewing Events

Managing Elastic Beanstalk Application
Environments
Topics
• Changing Environment Configuration Settings (p. 112)
• Changing Environment Type (p. 113)
• Configuring EC2 Server Instances Using AWS Toolkit for Eclipse (p. 113)
• Configuring Elastic Load Balancing Using AWS Toolkit for Eclipse (p. 116)
• Configuring Auto Scaling Using AWS Toolkit for Eclipse (p. 118)
• Configuring Notifications Using AWS Toolkit for Eclipse (p. 120)
• Configuring Java Containers Using AWS Toolkit for Eclipse (p. 121)
With the AWS Toolkit for Eclipse and the AWS Management Console, you can change the provisioning
and configuration of the AWS resources that are used by your application environments. For information
on how to manage your application environments using the AWS Management Console, see Managing
Environments (p. 335).This section discusses the specific service settings you can edit in the AWS Toolkit
for Eclipse as part of your application environment configuration. For more about AWS Toolkit for Eclipse,
see AWS Toolkit for Eclipse Getting Started Guide.
Changing Environment Configuration Settings
When you deploy your application, Elastic Beanstalk configures a number of AWS cloud computing
services.You can control how these individual services are configured using the AWS Toolkit for Eclipse.
To edit an application's environment settings
1. If Eclipse isn't displaying the AWS Explorer view, in the menu click Window > Show View > AWS
Explorer. Expand the Elastic Beanstalk node and your application node.
2. In AWS Explorer, double-click your Elastic Beanstalk environment.
3. At the bottom of the pane, click the Configuration tab.
API Version 2010-12-01
112
Elastic Beanstalk Developer Guide
Managing Environments

You can now configure settings for the following:
• EC2 server instances
• Load balancer
• Autoscaling
• Notifications
• Environment types
• Environment properties
Changing Environment Type
In AWS Toolkit for Eclipse, the Environment Type section of your environment's Configuration tab lets
you select either Load balanced, auto scaled or a Single instance environment, depending on the
requirements of the application that you deploy. For an application that requires scalability, select Load
balanced, auto scaled. For a simple, low traffic application, select Single instance. For more information,
see Environment Types (p. 345).
Configuring EC2 Server Instances Using AWS
Toolkit for Eclipse
Amazon Elastic Compute Cloud (EC2) is a web service for launching and managing server instances in
Amazon's data centers.You can use Amazon EC2 server instances at any time, for as long as you need,
and for any legal purpose. Instances are available in different sizes and configurations. For more
information, go to the Amazon EC2 product page.
API Version 2010-12-01
113
Elastic Beanstalk Developer Guide
Environment Types

Under Server, on your environment's Configuration tab inside the Toolkit for Eclipse, you can edit the
Elastic Beanstalk environment's Amazon EC2 instance configuration.
Amazon EC2 Instance Types
Instance type displays the instance types available to your Elastic Beanstalk application. Change the
instance type to select a server with the characteristics (including memory size and CPU power) that are
most appropriate to your application. For example, applications with intensive and long-running operations
may require more CPU or memory. Elastic Beanstalk regularly checks your running instances to ensure
they are healthy. If your application consumes 95 percent or greater of the CPU, Elastic Beanstalk will
trigger an event. For more information about this event, see CPU Utilization Exceeds 95.00% (p. 513).
Note
You cannot change between 32-bit and 64-bit instance types. For example, if your application
is built on a 32-bit platform, only 32-bit instance types appear in the list.
For more information about the Amazon EC2 instance types available for your Elastic Beanstalk application,
see Instance Types in the Amazon Elastic Compute Cloud User Guide.
Amazon EC2 Security Groups
You can control access to your Elastic Beanstalk application using an Amazon EC2 Security Group. A
security group defines firewall rules for your instances.These rules specify which ingress (i.e., incoming)
network traffic should be delivered to your instance. All other ingress traffic will be discarded.You can
modify rules for a group at any time.The new rules are automatically enforced for all running instances
and instances launched in the future.
You can set up your Amazon EC2 security groups using the AWS Management Console or by using the
AWS Toolkit for Eclipse.You can specify which Amazon EC2 security groups control access to your
Elastic Beanstalk application by entering the names of one or more Amazon EC2 security group names
(delimited by commas) into the EC2 Security Groups box.
Note
If you are running your application using a legacy container type, make sure port 80 (HTTP) is
accessible from 0.0.0.0/0 as the source CIDR range if you want to enable health checks for your
application. For more information about health checks, see Health Checks (p. 117). To check if
you are using a legacy container type, see Why are some container types marked legacy? (p.426).
To create a security group using the AWS Toolkit for Eclipse
1. In the AWS Toolkit for Eclipse, click AWS Explorer tab. Expand the Amazon EC2 node, and then
double-click Security Groups.
2. Right-click anywhere in the left table, and then click New Group.
API Version 2010-12-01
114
Elastic Beanstalk Developer Guide
EC2 Server Instances

3. In the Security Group dialog box, type the security group name and description and then click OK.
For more information on Amazon EC2 Security Groups, see Using Security Groups in the Amazon Elastic
Compute Cloud User Guide.
Amazon EC2 Key Pairs
You can securely log in to the Amazon EC2 instances provisioned for your Elastic Beanstalk application
with an Amazon EC2 key pair.
Important
You must create an Amazon EC2 key pair and configure your Elastic Beanstalk-provisioned
Amazon EC2 instances to use the Amazon EC2 key pair before you can access your Elastic
Beanstalk-provisioned Amazon EC2 instances.You can create your key pair using the Publish
to Beanstalk Wizard inside AWS Toolkit for Eclipse when you deploy your application to Elastic
Beanstalk. Alternatively, you can set up your Amazon EC2 key pairs using the AWS Management
Console. For instructions on creating a key pair for Amazon EC2, see the Amazon Elastic
Compute Cloud Getting Started Guide.
For more information on Amazon EC2 key pairs, go to Using Amazon EC2 Credentials in the Amazon
Elastic Compute Cloud User Guide. For more information on connecting to Amazon EC2 instances, go
to Connecting to Instances and Connecting to a Linux/UNIX Instance from Windows using PuTTY in
the Amazon Elastic Compute Cloud User Guide.
CloudWatch Metrics
By default, only basic Amazon CloudWatch metrics are enabled; they return data in five-minute periods.
You can enable more granular one-minute CloudWatch metrics by selecting 1 minute for the Monitoring
Interval in the Server section of the Configuration tab for your environment in the AWS Toolkit for
Eclipse.
Note
Amazon CloudWatch service charges can apply for one-minute interval metrics. See Amazon
CloudWatch for more information.
Custom AMI ID
You can override the default AMI used for your Amazon EC2 instances with your own custom AMI by
entering the identifier of your custom AMI into the Custom AMI ID box in the Server section of the
Configuration tab for your environment in the AWS Toolkit for Eclipse.
Important
Using your own AMI is an advanced task and should be done with care. If you need a custom
AMI, we recommend you start with the default Elastic Beanstalk AMI and then modify it.To be
considered healthy, Elastic Beanstalk expects Amazon EC2 instances to meet a set of
requirements, including having a running host manager. If these requirements are not met, your
environment might not work properly.
API Version 2010-12-01
115
Elastic Beanstalk Developer Guide
EC2 Server Instances

Configuring Elastic Load Balancing Using AWS
Toolkit for Eclipse
Elastic Load Balancing is an Amazon web service that improves the availability and scalability of your
application.With Elastic Load Balancing, you can distribute application loads between two or more Amazon
EC2 instances. Elastic Load Balancing improves availability through redundancy, and it supports traffic
growth for your application.
Elastic Load Balancing automatically distributes and balances incoming application traffic among all the
EC2 server instances you are running.The service also makes it easy to add new instances when you
need to increase the capacity of your application.
Elastic Beanstalk automatically provisions Elastic Load Balancing when you deploy an application. Under
Load Balancing, on the Configuration tab for your environment inside the Toolkit for Eclipse, you can
edit the Elastic Beanstalk environment's load balancing configuration.
The following sections describe the Elastic Load Balancing parameters you can configure for your
application.
Ports
The load balancer provisioned to handle requests for your Elastic Beanstalk application sends requests
to the Amazon EC2 instances that are running your application.The provisioned load balancer can listen
for requests on HTTP and HTTPS ports and route requests to the Amazon EC2 instances in your AWS
Elastic Beanstalk application. By default, the load balancer handles requests on the HTTP port. At least
one of the ports (either HTTP or HTTPS) must be turned on.
Important
Make sure that the port you specified is not locked down; otherwise, users will not be able to
connect to your Elastic Beanstalk application.
API Version 2010-12-01
116
Elastic Beanstalk Developer Guide
Elastic Load Balancing

Controlling the HTTP port
To turn off the HTTP port, you select OFF for HTTP Listener Port. To turn on the HTTP port, you select
an HTTP port (for example, 80).
Note
If you want to access your environment using a different port other than the default port 80 (e.g.,
port 8080), you can add a listener to the existing load balancer and configure the new listener
to listen on that port. For example, using the Elastic Load Balancing API Tools, type the following
command replacing <yourloadbalancername> with the name of your load balancer for Elastic
Beanstalk.
elb-create-lb-listeners --lb <yourloadbalancername> --listener "pro
tocol=http, lb-port=8080, instance-port=80"
If you want Elastic Beanstalk to monitor your environment, do not remove the listener on port
80.
Controlling the HTTPS port
Elastic Load Balancing supports the HTTPS/TLS protocol to enable traffic encryption for client connections
to the load balancer. Connections from the load balancer to the EC2 instances are done using plain text.
By default, the HTTPS port is turned off.
To turn on the HTTPS port
1. Create and upload a certificate and key to the AWS Identity and Access Management (IAM) service.
The IAM service will store the certificate and provide an Amazon Resource Name (ARN) for the SSL
certificate you've uploaded. For more information on creating and uploading certificates, see the
Managing Server Certificates section of Using AWS Identity and Access Management.
2. Specify the HTTPS port by selecting a port from the HTTPS Listener Port drop-down list.
3. In the SSL Certificate ID text box, enter the Amazon Resources Name (ARN) of your SSL certificate
(e.g., arn:aws:iam::123456789012:server-certificate/abc/certs/build). Use the SSL
certificate that you created and uploaded in step 1. For information on viewing the certificate's ARN,
see Verify the Certificate Object topic in the Creating and Uploading Server Certificates section of
the Using IAM Guide.
To turn off the HTTPS port, select OFF for HTTPS Listener Port.
Health Checks
You can control the settings for the health check using the EC2 Instance Health Check section of the
Load Balancing panel.
The following list describes the health check parameters you can set for your application.
API Version 2010-12-01
117
Elastic Beanstalk Developer Guide
Elastic Load Balancing

• To determine instance health, Elastic Beanstalk looks for a 200 response code on a URL it queries.
By default, Elastic Beanstalk checks TCP:80 for nonlegacy containers and HTTP:80 for legacy containers.
You can override to match an existing resource in your application (e.g., /myapp/index.jsp) by
entering it in the Application Health Check URL box. If you override the default URL, Elastic Beanstalk
uses HTTP to query the resource.To check if you are using a legacy container type, see Why are some
container types marked legacy? (p. 426).
• For Health Check Interval (seconds), enter the number of seconds between your application's Amazon
EC2 instances health checks.
• For Health Check Timeout, specify the number of seconds for Elastic Load Balancing to wait for a
response before it considers an instance unresponsive.
• Use the Healthy Check Count Threshold and Unhealthy Check Count Threshold boxes, specify
the number of consecutive successful or unsuccessful URL probes before Elastic Load Balancing
changes the instance health status. For example, specifying 5 in the Unhealthy Check Count Threshold
text box means that the URL would have to return an error message or timeout five consecutive times
before Elastic Load Balancing considers the health check "failed."
Sessions
By default, a load balancer routes each request independently to the server instance with the smallest
load. By comparison, a sticky session binds a user's session to a specific server instance so that all
requests coming from the user during the session are sent to the same server instance.
Elastic Beanstalk uses load balancer–generated HTTP cookies when sticky sessions are enabled for an
application.The load balancer uses a special load balancer–generated cookie to track the application
instance for each request. When the load balancer receives a request, it first checks to see if this cookie
is present in the request. If so, the request is sent to the application instance specified in the cookie. If it
finds no cookie, the load balancer chooses an application instance based on the existing load balancing
algorithm. A cookie is inserted into the response for binding subsequent requests from the same user to
that application instance.The policy configuration defines a cookie expiry, which establishes the duration
of validity for each cookie.
Under Load Balancer in the Sessions section, specify whether or not the load balancer for your application
allows session stickiness and the duration for each cookie.
For more information on Elastic Load Balancing, go to the Elastic Load Balancing Developer Guide.
Configuring Auto Scaling Using AWS Toolkit for
Eclipse
Auto Scaling is an Amazon web service designed to automatically launch or terminate Amazon EC2
instances based on user-defined triggers. Users can set up Auto Scaling groups and associate triggers
with these groups to automatically scale computing resources based on metrics such as bandwidth usage
or CPU utilization. Auto Scaling works with Amazon CloudWatch to retrieve metrics for the server instances
running your application.
Auto Scaling lets you take a group of Amazon EC2 instances and set various parameters to have this
group automatically increase or decrease in number. Auto Scaling can add or remove Amazon EC2
instances from that group to help you seamlessly deal with traffic changes to your application.
API Version 2010-12-01
118
Elastic Beanstalk Developer Guide
Auto Scaling

Auto Scaling also monitors the health of each Amazon EC2 instance that it launches. If any instance
terminates unexpectedly, Auto Scaling detects the termination and launches a replacement instance.
This capability enables you to maintain a fixed, desired number of Amazon EC2 instances automatically.
Elastic Beanstalk provisions Auto Scaling for your application. Under Auto Scaling, on your environment's
Configuration tab inside the Toolkit for Eclipse, you can edit the Elastic Beanstalk environment's Auto
Scaling configuration.
The following sections discuss how to configure Auto Scaling parameters for your application.
Launch Configuration
You can edit the launch configuration to control how your Elastic Beanstalk application provisions Auto
Scaling resources.
Use the Minimum Instance Count and Maximum Instance Count settings to specify the minimum and
maximum size of the Auto Scaling group that your Elastic Beanstalk application uses.
Note
To maintain a fixed number of Amazon EC2 instances, set the Minimum Instance Count and
Maximum Instance Count text boxes to the same value.
For Availability Zones, specify the number of Availability Zones you want your Amazon EC2 instances
to be in. It is important to set this number if you want to build fault-tolerant applications: If one Availability
Zone goes down, your instances will still be running in your other Availability Zones.
Note
Currently, it is not possible to specify which Availability Zone your instance will be in.
API Version 2010-12-01
119
Elastic Beanstalk Developer Guide
Auto Scaling

Triggers
A trigger is an Auto Scaling mechanism that you set to tell the system when to increase (scale out) and
decrease (scale in) the number of instances.You can configure triggers to fire on any metric published
to Amazon CloudWatch, such as CPU utilization, and determine whether the specified conditions have
been met.When your upper or lower thresholds for the metric have been breached for the specified period
of time, the trigger launches a long-running process called a scaling activity.
You can define a scaling trigger for your Elastic Beanstalk application using the AWS Toolkit for Eclipse.
You can configure the following list of trigger parameters in the Scaling Trigger section of the
Configuration tab for your environment inside the Toolkit for Eclipse.
• For Trigger Measurement, specify the metric for your trigger.
• For Trigger Statistic, specify which statistic the trigger will use—Minimum, Maximum, Sum, or Average.
• For Unit of Measurement, specify the units for the trigger measurement.
• For Measurement Period, specify how frequently Amazon CloudWatch measures the metrics for your
trigger. For Breach Duration, specify the amount of time a metric can be beyond its defined limit (as
specified for Upper Threshold and Lower Threshold) before the trigger fires.
• For Scale-up Increment and Scale-down Increment, specify how many Amazon EC2 instances to
add or remove when performing a scaling activity.
For more information on Auto Scaling, go to the Auto Scaling documentation.
Configuring Notifications Using AWS Toolkit for
Eclipse
Elastic Beanstalk uses the Amazon Simple Notification Service (Amazon SNS) to notify you of important
events affecting your application.To enable Amazon SNS notifications, simply enter your email address
in the Email Address text box under Notifications on the Configuration tab for your environment inside
the Toolkit for Eclipse.To disable Amazon SNS notifications, remove your email address from the text
box.
API Version 2010-12-01
120
Elastic Beanstalk Developer Guide
Notifications

Configuring Java Containers Using AWS Toolkit
for Eclipse
The Container/JVM Options panel lets you fine-tune the behavior of the Java Virtual Machine on your
Amazon EC2 instances and enable or disable Amazon S3 log rotation.You can use the AWS Toolkit for
Eclipse to configure your container information.
Note
You can modify your configuration settings with zero downtime by swapping the CNAME for
your environments. For more information, see Deploying Versions with Zero Downtime (p. 318).
To access the Container/JVM Options panel for your Elastic Beanstalk application
1. If Eclipse isn't displaying the AWS Explorer view, in the menu click Window > Show View > AWS
Explorer. Expand the Elastic Beanstalk node and your application node.
2. In the AWS Explorer, double-click your Elastic Beanstalk environment.
3. At the bottom of the pane, click the Configuration tab.
4. Under Container, you can configure container options.
JVM Options
The heap size in the Java Virtual Machine affects how many objects can be created in memory before
garbage collection—a process of managing your application's memory—occurs.You can specify an initial
heap size and a maximum heap size. A larger initial heap size allows more objects to be created before
garbage collection occurs, but it also means that the garbage collector will take longer to compact the
heap. The maximum heap size specifies the maximum amount of memory the JVM can allocate when
expanding the heap during heavy activity.
You can set the initial and the maximum JVM heap sizes using the Initial JVM Heap Size (-Xms argument)
and Maximum JVM Heap Size (-Xmx argument) boxes.The available memory is dependent on the
Amazon EC2 instance type. For more information about the Amazon EC2 instance types available for
your Elastic Beanstalk environment, go to Instance Types in the Amazon EC2 User Guide.
The permanent generation is a section of the JVM heap that is used to store class definitions and
associated metadata.To modify the size of the permanent generation, type the new size in the Maximum
JVM PermGen Size (-XX:MaxPermSize argument) box.
Full documentation of JVM is beyond the scope of this guide; for more information on JVM garbage
collection, go to Java Garbage Collection Basics.
API Version 2010-12-01
121
Elastic Beanstalk Developer Guide
Containers

Amazon S3 Log Rotation
Elastic Beanstalk can copy the log files on an hourly basis for your application's Amazon EC2 instances
to the Amazon S3 bucket associated with your application.To enable this feature, select Enable log file
rotation to Amazon S3.
Remote Debugging
To test your application remotely, you can run your application in debug mode.
To enable remote debugging
1. Select Enable remote debugging.
2. For Remote debugging port, specify the port number to use for remote debugging.
The Additional Tomcat JVM command line options setting is filled automatically.
To start remote debugging
1. In the AWS Toolkit for Eclipse menu, click Window > Show View > Other.
2. Expand the Server folder, and then click Servers. Click OK.
3. In the Servers pane, right-click the server your application is running on, and then click Restart in
Debug.
Environment Properties
This section of the Container tab lets you specify environment properties on the Amazon EC2 instances
that are running your application. Environment properties are specific to your application environment
and are not actual (shell) environment variables. More specifically, PARAM1, PARAM2, etc. are system
properties passed into the JVM at startup using the -D flag.You can use them to pass database connection
strings, security credentials, or other information that you don't want to hard-code into your application.
Storing this information in environment properties can help increase the portability and scalability of your
application.You do not need to recompile your source code when you move between environments.You
can acquire them with System.getProperty(name). For more information on using and accessing
custom environment properties, see Using Custom Environment Properties with Elastic Beanstalk (p.102)
You can configure the following environment properties:
• Specify AWS credentials using the AWS_ACCESS_KEY_ID and AWS_SECRET_KEY boxes.
API Version 2010-12-01
122
Elastic Beanstalk Developer Guide
Containers

Note
For nonlegacy containers, use instance profiles so that your application can use temporary
security credentials to access AWS resources.To learn more, see Granting Permissions to
Users and Services Using IAM Roles (p. 562).
• Specify a connection string to an external database (such as Amazon RDS) by entering it in the
JDBC_CONNECTION_STRING box. For more information on how to set your
JDBC_CONNECTION_STRING, see Using Custom Environment Properties with Elastic
Beanstalk (p. 102).
• Specify up to five additional environment properties by entering them in the PARAM boxes.
Note
Environment properties can contain any printable ASCII character except the grave accent (`,
ASCII 96) and cannot exceed 200 characters in length.
Listing and Connecting to Server Instances
You can view a list of Amazon EC2 instances running your Elastic Beanstalk application environment
through the AWS Toolkit for Eclipse or from the AWS Management Console.You can connect to these
instances using Secure Shell (SSH). For information about listing and connecting to your server instances
using the AWS Management Console, see Listing and Connecting to Server Instances (p. 413). The
following section steps you through viewing and connecting you to your server instances using the AWS
Toolkit for Eclipse.
To view and connect to Amazon EC2 instances for an environment
1. In the AWS Toolkit for Eclipse, click AWS Explorer. Expand the Amazon EC2 node, and then
double-click Instances.
2. In the Amazon EC2 Instances window, in the Instance ID column, right-click the Instance ID for the
Amazon EC2 instance running in your application's load balancer. Then click Open Shell.
Eclipse automatically opens the SSH client and makes the connection to the EC2 instance.
For more information on connecting to an Amazon EC2 instance, see the Amazon Elastic Compute
Cloud Getting Started Guide.
Terminating an Environment
To avoid incurring charges for unused AWS resources, you can use the AWS Toolkit for Eclipse to
terminate a running environment.
API Version 2010-12-01
123
Elastic Beanstalk Developer Guide
Listing and Connecting to Server Instances

Note
You can always launch a new environment using the same version later.
To terminate an environment
1. In the AWS Toolkit for Eclipse, click the AWS Explorer pane. Expand the Elastic Beanstalk node.
2. Expand the Elastic Beanstalk application and right-click on the Elastic Beanstalk environment.
3. Click Terminate Environment. It will take a few minutes for Elastic Beanstalk to terminate the AWS
resources running in the environment.
Tools
AWS SDK for Java
With the AWS SDK for Java, you can get started in minutes with a single, downloadable package that
includes the AWS Java library, code samples, and documentation.You can build Java applications on
top of APIs to take the complexity out of coding directly against a web service interface. The library
provides APIs that hide much of the lower level plumbing, including authentication, request retries, and
error handling. Practical examples are provided for how to use the library to build applications.
In addition, with the AWS SDK for Java, you can use DynamoDB to share session states of Apache
Tomcat applications across multiple web servers. For more information, see Manage Tomcat Session
State with Amazon DynamoDB in the AWS SDK for Java documentation. For more information about the
AWS SDK for Java, go to http://aws.amazon.com/sdkforjava/.
AWS Toolkit for Eclipse
The AWS Toolkit for Eclipse is an open source plug-in for the Eclipse Java IDE that makes it easier to
develop and debug Java applications using Amazon Web Services, and now includes the Elastic Beanstalk
deployment feature.With the Elastic Beanstalk deployment feature, developers can use Eclipse to deploy
Java web applications to AWS Elastic Beanstalk and within minutes access their applications running on
AWS infrastructure services. The toolkit provides a Travel Log sample web application template that
demonstrates the use of Amazon S3 and Amazon SNS. For more information about the AWS Toolkit for
Eclipse, go to http://aws.amazon.com/eclipse.
Resources
There are several places you can go to get additional help when developing your Java applications.
DescriptionResource
Post your questions and get feedback.The AWS Java Development Forum
One-stop shop for sample code, documentation, tools, and
additional resources.
Java Developer Center
API Version 2010-12-01
124
Elastic Beanstalk Developer Guide

Creating and Deploying Elastic
Beanstalk Applications in .NET
Using AWS Toolkit for Visual
Studio
Topics
• Get Started (p. 126)
• Develop, Test, and Deploy (p. 134)
• Customizing and Configuring a .NET Environment (p. 150)
• Using Amazon RDS (p. 152)
• Managing Multiple Accounts (p. 154)
• Monitoring Application Health (p. 155)
• Viewing Events (p. 158)
• Managing Your Elastic Beanstalk Application Environments (p. 159)
• Listing and Connecting to Server Instances (p. 168)
• Terminating an Environment (p. 169)
• Tools (p. 170)
• Resources (p. 173)
Elastic Beanstalk for .NET makes it easier to deploy, manage, and scale your ASP.NET web applications
that use Amazon Web Services. Elastic Beanstalk for .NET is available to anyone who is developing or
hosting a web application that uses IIS.The first part of this topic presents instructions for creating, testing,
deploying, and redeploying your ASP.NET web application to Elastic Beanstalk using the AWS Toolkit
for Visual Studio.The second part explains how to manage and configure your applications and
environments using the AWS Toolkit for Visual Studio. For more information about prerequisites, installation
instructions, and running code samples, go to the AWS Toolkit for Microsoft Visual Studio. This site also
provides useful information about tools, how-to topics, and additional resources for ASP.NET developers.
If you are not a developer, but want to easily manage and configure your Elastic Beanstalk applications
and environments, you can use the AWS Management Console. For information, see Managing and
Configuring Applications and Environments Using the Console, CLI, and APIs (p. 278).
API Version 2010-12-01
125
Elastic Beanstalk Developer Guide

Get Started
This topic walks you through how to quickly get started deploying an open source ASP.NET application,
NerdDinner, using the AWS Toolkit for Visual Studio with Amazon Relational Database Service (Amazon
RDS) using Microsoft Visual Studio 2010 (Professional Edition). NerdDinner is an application that helps
people host lunches, dinners, and informal get-togethers.To deploy NerdDinner, you will do the following
steps:
1. Step 1: Set Up the NerdDinner Application (p. 126)
2. Step 2: Launch an Amazon RDS DB Instance (p. 127)
3. Step 3: Set Up the NerdDinner Database (p. 128)
4. Step 4: Deploy to Elastic Beanstalk (p. 131)
Note
This walkthrough has been tested and is supported using Microsoft Visual Studio 2010
(Professional Edition).
Video available
Note
This example uses Amazon RDSs, and you may be charged for its usage. For more information
about pricing, go to Amazon Relational Database Service (RDS) Pricing. If you are a new
customer, you can make use of the AWS Free Usage Tier. For details, go to AWS Free Usage
Tier.
Step 1: Set Up the NerdDinner Application
In this step, you'll download and open NerdDinner inside Visual Studio, and then script the NerdDinner
database to later recreate the database for Amazon RDS. For this example, we use NerdDinner 2.0. If
you haven't already installed the AWS Toolkit for Visual Studio, do that now. For prerequisite and installation
information, go to AWS Toolkit for Microsoft Visual Studio.
To open NerdDinner project in Microsoft Visual Studio
1. Download NerdDinner from http://nerddinner.codeplex.com/, and extract the files to your local
computer.
2. In Visual Studio, on the File menu, click Open, and then click Project. Navigate to the NerdDinner
project, and click Open.
To script the NerdDinner database
1. In Server Explorer, right-click Data Connections, and then click Add Connection.
2. In the Add Connection dialog box, click Change, and then click Microsoft SQL Server Database
File. Click OK.
3. Click Browse next to the Database file name box, and select the NerdDinner.mdf file located in
the NerdDinner/App_Data directory. Click Open.
4. In Server Explorer, right-click NerdDinner.mdf, and click Publish to provider.
5. In the Database Publishing wizard, click Next twice. On the Select an Output Location page, note
the path and file name in the File name box.You will need this for later.
6. Click Finish twice to accept all defaults in the wizard.
API Version 2010-12-01
126
Elastic Beanstalk Developer Guide
Get Started

Step 2: Launch an Amazon RDS DB Instance
Next, you'll want to launch your Amazon RDS database instance because it will take a few minutes to
set up.
To launch an Amazon RDS database
1. In Visual Studio on the View menu, click AWS Explorer.
2. Expand Amazon RDS. Right-click DB Instances, and then click Launch DB Instance.
3. On the DB Engine Selection page in the Launch DB Instance wizard, select a database engine.
Microsoft SQL Server Express Edition is eligible for the Amazon RDS for SQL Server – Free Usage
Tier. For more information, go to Amazon RDS Free Usage Tier. For this example, select sqlserver-ex,
and then click Next.
4. On the DB Engine Instance Options page, do the following, and then click Finish to accept the
default values in the rest of the wizard.Your database instance will appear under the DB Instances
node in Visual Studio.
• In the DB Instance Class list, select the type of database you want. The db.t1.micro is eligible
for the Amazon RDS for SQL Server – Free Usage Tier when used with Microsoft SQL Server
Express Edition. For more information, go to Amazon RDS Free Usage Tier.
• For DB Instance Identifier, type demodb.The DB Instance Identifier is a name for your DB Instance
that is unique for your account in a region.
• For Master User Name, type the name you will use to log on to your DB Instance with all database
privileges.
• For Master User Password, type a password for your master user.
API Version 2010-12-01
127
Elastic Beanstalk Developer Guide
Step 2: Launch an Amazon RDS DB Instance

Step 3: Set Up the NerdDinner Database
To set up the NerdDinner database, you'll need to do the following steps:
1. Create a SQL DB.
2. Update your DB connection string.
3. Connect to the database.
4. Close the connection to the NerdDinner database.
To create a SQL DB
1. When the Amazon RDS database is in the available state, right-click the DB instance, and then click
Create SQL DB.
Note
To check if your database is in the available state, right-click the DB instance, and then click
View. Ensure that the Status column says available.
2. The toolkit needs to add permissions to the Amazon RDS security group so that your computer can
connect to the SQL database. In the Unable to Connect dialog box, click OK.
API Version 2010-12-01
128
Elastic Beanstalk Developer Guide
Step 3: Set Up the NerdDinner Database

3. In the Create SQL Server Database dialog box, type the user name, password, and name for your
database, and then click OK. The database now appears in Server Explorer.
To update your connection string
1. In Server Explorer, click the Amazon RDS database, and copy the connection string from the
Properties window.
2. In Solution Explorer, open the ConnectionStrings.config file.
3. For NerdDinnerEntities, update the embedded connection string by replacing the data source
in the provider connection string with your Amazon RDS connection string as in the following example.
Data Source=<Your RDS endpoint>,1433;Initial Catalog=mydb;User
ID=awsuser;Password=***********
To connect to your database
1. In Visual Studio, open the file NerdDinner.mdf.mysql. Navigate to the path and file name you
wrote down when you scripted the NerdDinner database in Step 1: Set Up the NerdDinner
Application (p. 126).
API Version 2010-12-01
129
Elastic Beanstalk Developer Guide
Step 3: Set Up the NerdDinner Database

2. On the toolbar, click the Connect icon.
3. In the Connect to Database Engine dialog box, in the Server name box, type or paste the Amazon
RDS endpoint.
Note
To get the Amazon RDS endpoint, click the Amazon RDS DB Instance, and copy the endpoint
from the Properties window.
4. Click Options, and for Database name, type the name of your database. In this example, we used
mydb.The name of the NerdDinner.MDF.sql tab will now contain the name of the Amazon RDS
endpoint.
5. On the toolbar, click the Execute SQL icon.You will see the message Command(s) completed
successfully under the Messages tab.
6. To verify everything worked correctly, in Server Explorer, expand the Amazon RDS database, and
then expand the Tables node.You should now see Dinners and RSVP.
Before you deploy to Elastic Beanstalk, close the connection to the NerdDinner database.
To close the connection to the NerdDinner database
1. In Visual Studio, in Server Explorer, expand Data Connections. Right-click NerdDinner.mdf.
2. Click Close Connection.
API Version 2010-12-01
130
Elastic Beanstalk Developer Guide
Step 3: Set Up the NerdDinner Database

Step 4: Deploy to Elastic Beanstalk
After configuring your NerdDinner application to connect to your Amazon RDS database, you are ready
to deploy your application to Elastic Beanstalk.
To deploy your application to Elastic Beanstalk using the AWS Toolkit for Visual Studio
1. In Solution Explorer, right-click your application and then select Publish to AWS.
2. Select a template.
a. In the AWS account to use for deployment list, click your account, or click the Add another
account icon to enter new account information.
b. In the Region list, click the region where you want to deploy your application. For information
about this product's regions, go to Regions and Endpoints in the Amazon Web Services General
Reference. If you select a region that is not supported by Elastic Beanstalk, then the option to
deploy to Elastic Beanstalk will become unavailable.
c. Select Deploy new application with template text box and click Elastic Beanstalk.Then click
Next.
3. For Name, type the name of the application, and then click Next.
API Version 2010-12-01
131
Elastic Beanstalk Developer Guide
Step 4: Deploy to Elastic Beanstalk

4. On the Environment page, do the following:
a. For Name, type a name for your environment.
b. Keep the Type as Load balanced, auto scaled.
c. Click Check availability to make sure the environment URL is available.
d. Click Next twice to accept the default settings and skip to the Amazon RDS Database Security
Group page.
5. If you want to connect your AWS Elastic Beanstalk environment to your Amazon RDS database
instance, select the RDS Database security group associated with your database instance. Click
Finish, and then click Deploy. It will take a few minutes for Elastic Beanstalk to deploy your
application.
API Version 2010-12-01
132
Elastic Beanstalk Developer Guide
Step 4: Deploy to Elastic Beanstalk

6. To check the status of your environment, in AWS Explorer, right-click your Elastic Beanstalk
environment, and then click View Status.When your status says Environment is healthy, you can
view your application.
7. To view your application, in the Elastic Beanstalk environment tab, click the URL shown in the previous
illustration. Log in and host a dinner!
API Version 2010-12-01
133
Elastic Beanstalk Developer Guide
Step 4: Deploy to Elastic Beanstalk

Note
By default, at least one Amazon EC2 instance is launched as part of your Auto Scaling
group. If more than one instance is launched (e.g., due to an increase in traffic load), we
recommend enabling session stickiness when deploying NerdDinner.Your load balancer
makes a user’s session “sticky” by binding it to a specific server instance so that all requests
coming from the user during the session will be sent to the same server instance. For
information about how to enable session stickiness, see Sessions (p. 361).
Develop,Test, and Deploy
Topics
• Create a Project (p. 135)
• Test Locally (p. 135)
• Deploy to AWS Elastic Beanstalk (p. 136)
• Debug/View Logs (p. 143)
• Edit the Application and Redeploy (p. 143)
• Deploy to Production (p. 144)
• Deploy an Existing Application Version to an Existing Environment (p. 149)
The following diagram of a typical software development life cycle includes deploying your application to
Elastic Beanstalk.
API Version 2010-12-01
134
Elastic Beanstalk Developer Guide
Develop,Test, and Deploy

After developing and testing your application locally, you will typically deploy your application to AWS
Elastic Beanstalk. After deployment, your application will be live at a URL such as
http://myexampleapp-wpams3yrvj.elasticbeanstalk.com. Because your application is live, you should
consider setting up multiple environments, such as a testing environment and a production environment.
You can use the AWS Toolkit for Visual Studio if you want to set up different AWS accounts for testing,
staging, and production. For more information about managing multiple accounts, see Managing Multiple
Accounts (p. 154).
Amazon Route 53 is a highly available and scalable Domain Name System (DNS) web service.You can
point your domain name to the Amazon Route 53 CNAME <yourappname>.elasticbeanstalk.com. Contact
your DNS provider to set this up. For information about how to map your root domain to your Elastic Load
Balancer, see Using Elastic Beanstalk with Amazon Route 53 to Map Your Domain to Your Load
Balancer (p. 528).
After you remotely test and debug your Elastic Beanstalk application, you can make any updates and
then redeploy to Elastic Beanstalk. After you are satisfied with all of your changes, you can upload the
latest version to your production environment.The following sections explain each stage of the software
development life cycle.
Create a Project
Visual Studio provides templates for different programming languages and application types.You can
start with any of these templates.The AWS Toolkit for Visual Studio also provides three project templates
that bootstrap development of your application: AWS Console Project, AWS Web Project, and AWS
Empty Project. For this example, you'll create a new ASP.NET Web Application.
To create a new ASP.NET Web Application project
1. In Visual Studio, on the File menu, click New and then click Project.
2. In the New Project dialog box, click Installed Templates, click Visual C#, and then click Web. Click
ASP.NET Empty Web Application, type a project name, and then click OK.
To run a project
Do one of the following:
• Press F5.
• Select Start Debugging from the Debug menu.
Test Locally
Visual Studio makes it easy for you to test your application locally.To test or run ASP.NET web applications,
you need a web server. Visual Studio offers several options, such as Internet Information Services (IIS),
API Version 2010-12-01
135
Elastic Beanstalk Developer Guide
Create a Project

IIS Express, or the built-in Visual Studio Development Server. To learn about each of these options and
to decide which one is best for you, go to Web Servers in Visual Studio for ASP.NET Web Projects .
Deploy to AWS Elastic Beanstalk
After testing your application, you are ready to deploy it to Elastic Beanstalk.
To deploy your application to Elastic Beanstalk using the AWS Toolkit for Visual Studio
1. In Solution Explorer, right-click your application and then select Publish to AWS.
2. In the Publish to AWS wizard, enter your account information.
a. For AWS account to use for deployment, select your account or select Other to enter new
account information.
b. For Region, select the region where you want to deploy your application. For information about
this product's regions, go to Regions and Endpoints in the Amazon Web Services General
Reference. If you select a region that is not supported by Elastic Beanstalk, then the option to
deploy to Elastic Beanstalk will become unavailable.
c. Click Deploy new application with template and select Elastic Beanstalk.Then click Next.
3. On the Application page, enter your application details.
a. For Name, type the name of the application.
b. For Description, type a description of the application. This step is optional.
c. The version label of the application automatically appears in the Deployment version label
d. Select Deploy application incrementally to deploy only the changed files. An incremental
deployment is faster because you are updating only the files that changed instead of all the files.
If you choose this option, an application version will be set from the Git commit ID. If you choose
API Version 2010-12-01
136
Elastic Beanstalk Developer Guide
Deploy to AWS Elastic Beanstalk

to not deploy your application incrementally, then you can update the version label in the
Deployment version label box.
e. Click Next.
4. On the Environment page, describe your environment details.
a. Select Create a new environment for this application.
b. For Name, type a name for your environment.
c. For Description, characterize your environment.This step is optional.
d. Select the Type of environment that you want.
You can select either Load balanced, auto scaled or a Single instance environment. For more
information, see Environment Types (p. 345).
Note
For single-instance environments, load balancing, autoscaling, and the health check
URL settings don't apply.
e. The environment URL automatically appears in the Environment URL once you move your
cursor to that box.
f. Click Check availability to make sure the environment URL is available.
g. Click Next.
5. On the AWS Options page, configure additional options and security information for your deployment.
API Version 2010-12-01
137
Elastic Beanstalk Developer Guide
Deploy to AWS Elastic Beanstalk

a. For Container Type, select 64bit Windows Server 2012 running IIS 8 or 64bit Windows
Server 2008 running IIS 7.5.
b. For Instance Type, select Micro.
c. For Key pair, select Create new key pair. Type a name for the new key pair—in this example,
we use myuswestkeypair—and then click OK. A key pair enables remote-desktop access to
your Amazon EC2 instances. For more information on Amazon EC2 key pairs, see Using
Credentials in the Amazon Elastic Compute Cloud User Guide.
d. Select an instance profile.
If you are using a nonlegacy container, you have the option to select an instance profile. If you
are using a legacy container, this option does not appear in the dialog box. An instance profile
provides applications and services access to AWS resources using temporary security credentials.
For example, if your application requires access to Amazon DynamoDB, it must use AWS security
credentials to make an API request.The application can use the temporary security credentials
so you do not have to store long-term credentials on an EC2 instance or update the EC2 instance
every time the credentials are rotated. In addition, Elastic Beanstalk requires an instance profile
to rotate logs to Amazon S3.The Instance Profile list displays the profiles available for your
Elastic Beanstalk environment. If you do not have an instance profile, you can select Create a
default instance profile. Elastic Beanstalk creates a default instance profile and updates the
Amazon S3 bucket policy to allow log rotation. If you choose to not use the default instance
profile, you need to grant permissions for Elastic Beanstalk to rotate logs. For instructions, see
Using a Custom Instance Profile (p. 577). For more information about log rotation, see Elastic
Beanstalk Environment Configurations (p.389). For more information about using instance profiles
with Elastic Beanstalk, see Using IAM Roles with Elastic Beanstalk (p. 568).
Note
Users must have permission to create a default profile. For more information, see
Granting IAM Users Permissions to Create and Pass IAM Roles (p. 568).
e. If you are using a nonlegacy container, you have the option to create your environment inside
an existing VPC; to do this, click Launch into VPC.You can configure the VPC information on
the next page. For more information about Amazon VPC, go to Amazon Virtual Private Cloud
(Amazon VPC). For a list of supported nonlegacy container types, see Why are some container
types marked legacy? (p. 426).
API Version 2010-12-01
138
Elastic Beanstalk Developer Guide
Deploy to AWS Elastic Beanstalk

f. Click Next.
6. If you selected to launch your environment inside a VPC, the VPC Options page appears; otherwise,
the Additional Options page appears. Here you'll configure your VPC options.
API Version 2010-12-01
139
Elastic Beanstalk Developer Guide
Deploy to AWS Elastic Beanstalk

VPC options for load-balanced, autoscaled environment
VPC options for single-instance environment
a. Select the VPC ID of the VPC in which you would like to launch your environment.
API Version 2010-12-01
140
Elastic Beanstalk Developer Guide
Deploy to AWS Elastic Beanstalk

Note
If you do not see the VPC information, then you have not created a VPC in the same
region in which you are launching your environment.To learn how to create a VPC,
see Using Elastic Beanstalk with Amazon VPC (p. 531).
b. For a load-balanced, autoscaled environment, select private for ELB Scheme if you do not
want your elastic load balancer to be available to the Internet.
For a single-instance environment, this option is not applicable because the environment doesn't
have a load balancer. For more information, see Environment Types (p. 345).
c. For a load-balanced, autoscaled environment, select the subnets for the elastic load balancer
and the EC2 instances. If you created public and private subnets, make sure the elastic load
balancer and the EC2 instances are associated with the correct subnet. By default, Amazon
VPC creates a default public subnet using 10.0.0.0/24 and a private subnet using 10.0.1.0/24.
You can view your existing subnets in the Amazon VPC console at https://
console.aws.amazon.com/vpc/.
For a single-instance environment, your VPC only needs a public subnet for the instance.
Selecting a subnet for the load balancer is not applicable because the environment doesn't have
a load balancer. For more information, see Environment Types (p. 345).
d. For a load-balanced, autoscaled environment, select the VPC security group for your NAT
instance. For instructions on how to create this security group and update your default VPC
security group, see Step 2: Configure the Default VPC Security Group for the NAT
Instance (p. 539).
For a single-instance environment, you don't need a NAT. Select the default security group.
Elastic Beanstalk assigns an Elastic IP address to the instance that lets the instance access the
Internet.
e. Click Next.
7. On the Application Options page, configure your application options.
a. For Target framework, select .NET Frameworke 4.0.
b. Elastic Load Balancing uses a health check to determine whether the Amazon EC2 instances
running your application are healthy.The health check determines an instance's health status
by probing a specified URL at a set interval.You can override the default URL to match an
existing resource in your application (e.g., /myapp/index.aspx) by entering it in the Application
health check URL box. For more information about application health checks, see Health
Checks (p. 362).
c. Type an email address if you want to receive Amazon Simple Notification Service (Amazon
SNS) notifications of important events affecting your application.
d. The Application Environment section lets you specify environment variables on the Amazon
EC2 instances that are running your application.This setting enables greater portability by
eliminating the need to recompile your source code as you move between environments.
e. Select the application credentials option you want to use to deploy your application.
API Version 2010-12-01
141
Elastic Beanstalk Developer Guide
Deploy to AWS Elastic Beanstalk

f. Click Next.
8. If you have previously set up an Amazon RDS database, the Amazon RDS DB Security Group
page appears. If you want to connect your Elastic Beanstalk environment to your Amazon RDS DB
Instance, then select one or more security groups. Otherwise, go on to the next step. When you're
ready, click Next.
9. Review your deployment options. If everything is as you want, click Deploy.
API Version 2010-12-01
142
Elastic Beanstalk Developer Guide
Deploy to AWS Elastic Beanstalk

Your ASP.NET project will be exported as a web deploy file, uploaded to Amazon S3, and registered
as a new application version with Elastic Beanstalk.The Elastic Beanstalk deployment feature will
monitor your environment until it becomes available with the newly deployed code. On the
env:<environment name> tab, you will see status for your environment.
Debug/View Logs
To investigate any issues, you can view logs. For information about viewing logs, see Working with
Logs (p. 415). If you need to test remotely, you can connect to your EC2 instances. For instructions on
how to connect to your instance, see Listing and Connecting to Server Instances (p. 413).
Edit the Application and Redeploy
Now that you have tested your application, it is easy to edit and redeploy your application and see the
results in moments.
To edit and redeploy your ASP.NET web application
1. In Solution Explorer, right-click your application, and then click Republish to Environment <your
environment name>.The Re-publish to AWS Elastic Beanstalk wizard opens.
API Version 2010-12-01
143
Elastic Beanstalk Developer Guide
Debug/View Logs

2. Review your deployment details and click Deploy.
Note
If you want to change any of your settings, you can click Cancel and use the Publish to
AWS wizard instead. For instructions, see Deploy to AWS Elastic Beanstalk (p. 136).
Your updated ASP.NET web project will be exported as a web deploy file with the new version label,
uploaded to Amazon S3, and registered as a new application version with Elastic Beanstalk.The
Elastic Beanstalk deployment feature monitors your existing environment until it becomes available
with the newly deployed code. On the env:<environment name> tab, you will see the status of
your environment.
Deploy to Production
When you are satisfied with all of the changes you want to make to your application, you can deploy your
application version to your production environment.
To deploy an application version to production
1. Right-click your Elastic Beanstalk application by expanding the Elastic Beanstalk node in AWS
Explorer. Select View Status.
2. In the App: <application name> tab, click Versions.
3. Click the application version you want to deploy and click Publish Version.The Publish Application
Version wizard appears.
API Version 2010-12-01
144
Elastic Beanstalk Developer Guide
Deploy to Production

4. Describe your environment details.
a. Select the Create a new environment for this application button.
b. In the Name box, type a name for your environment name.
c. In the Description box, type a description for your environment. This step is optional.
d. The environment URL is auto-populated in the Environment URL box.
e. Click Check availability to make sure the environment URL is available.
f. Click Next. The AWS Options page appears.
5. Configure additional options and security information for your deployment.
API Version 2010-12-01
145
Elastic Beanstalk Developer Guide
Deploy to Production

a. In the Container Type list, click 64bit Windows Server 2012 running IIS 8 or 64bit Windows
Server 2008 running IIS 7.5.
b. In the Instance Type list, click Micro.
c. In the Key pair list, click Create new key pair.Type a name for the new key pair—in this
example, we use my example key pair—and then click OK. A key pair enables you to remote
desktop into your Amazon EC2 instances. For more information on Amazon EC2 key pairs, see
Using Credentials in the Amazon Elastic Compute Cloud User Guide.
d. Select an instance profile.
If you are using a nonlegacy container, you have the option to select an instance profile. If you
are using a legacy container, this option does not appear in the dialog box. An instance profile
provides applications and services access to AWS resources using temporary security credentials.
For example, if your application requires access to Amazon DynamoDB, it must use AWS security
credentials to make an API request.The application can use the temporary security credentials
so you do not have to store long-term credentials on an EC2 instance or update the EC2 instance
every time the credentials are rotated. In addition, Elastic Beanstalk requires an instance profile
to rotate logs to Amazon S3.The Instance Profile list displays the profiles available for your
Elastic Beanstalk environment. If you do not have an instance profile, you can select Create a
default instance profile. Elastic Beanstalk creates a default instance profile and updates the
Amazon S3 bucket policy to allow log rotation. If you choose to not use the default instance
profile, you need to grant permissions for Elastic Beanstalk to rotate logs. For instructions, see
Using a Custom Instance Profile (p. 577). For more information about log rotation, see Elastic
Beanstalk Environment Configurations (p.389). For more information about using instance profiles
with Elastic Beanstalk, see Using IAM Roles with Elastic Beanstalk (p. 568).
Note
Users must have permission to create a default profile. For more information, see
Granting IAM Users Permissions to Create and Pass IAM Roles (p. 568).
e. If you are using a nonlegacy container, you have the option to create your environment inside
an existing VPC; to do this, click Launch into VPC.You can configure the VPC information on
the next page. For more information about Amazon VPC, go to Amazon Virtual Private Cloud
(Amazon VPC). For a list of supported nonlegacy container types, see Why are some container
types marked legacy? (p. 426).
f. Click Next. If you selected to launch your environment inside a VPC, the VPC Options page
appears, otherwise the Additional Options page appears.
API Version 2010-12-01
146
Elastic Beanstalk Developer Guide
Deploy to Production

6. Configure your VPC options.
a. Select the VPC ID of the VPC in which you would like to launch your environment.
Note
If you do not see the VPC information, then you have not created a VPC in the same
region in which you are launching your environment.To learn how to create a VPC,
see Using Elastic Beanstalk with Amazon VPC (p. 531).
b. In the ELB Scheme list, select private if you do not want your elastic load balancer to be available
to the Internet.
c. Select the subnets for the elastic load balancer and the EC2 instances. If you created public
and private subnets, make sure the elastic load balancer and the EC2 instances are associated
with the correct subnet. By default, Amazon VPC creates a default public subnet using 10.0.0.0/24
and a private subnet using 10.0.1.0/24.You can view your existing subnets in the Amazon VPC
console at https://console.aws.amazon.com/vpc/.
d. Select the VPC security group for your NAT instance. For instructions on how to create this
security group and update your default VPC security group, see Step 2: Configure the Default
VPC Security Group for the NAT Instance (p. 539).
e. Click Next. The Application Options page appears.
API Version 2010-12-01
147
Elastic Beanstalk Developer Guide
Deploy to Production

7. Configure your application options.
a. Select .NET Runtime 4.0 from the Target runtime pull-down menu.
b. Elastic Load Balancing uses a health check to determine whether the Amazon EC2 instances
running your application are healthy.The health check determines an instance's health status
by probing a specified URL at a set interval.You can override the default URL to match an
existing resource in your application (e.g., /myapp/index.aspx) by entering it in the Application
health check URL box. For more information about application health checks, see Health
Checks (p. 362).
c. Type an email address if you want to receive Amazon Simple Notification Service (Amazon
SNS) notifications of important events affecting your application.
d. The Application Environment section lets you specify environment variables on the Amazon
EC2 instances that are running your application.This setting enables greater portability by
eliminating the need to recompile your source code as you move between environments.
e. Click the application credentials option you want to use to deploy your application.
f. Click Next. If you have previously set up an Amazon RDS database, the Amazon RDS DB
Security Group page appears. Otherwise, skip the next step to review your deployment
information.
API Version 2010-12-01
148
Elastic Beanstalk Developer Guide
Deploy to Production

8. Configure the Amazon RDS Database security group.
• If you want to connect your Elastic Beanstalk environment to your Amazon RDS DB Instance,
select one or more security groups. Click Next.The Review page appears.
9. Review your deployment options, and click Deploy.
Your ASP.NET project will be exported as a web deploy file and uploaded to Amazon S3.The Elastic
Beanstalk deployment feature will monitor your environment until it becomes available with the newly
deployed code. On the env:<environment name> tab, you will see status for your environment.
Deploy an Existing Application Version to an
Existing Environment
You can deploy an existing application to an existing environment if, for instance, you need to roll back
to a previous application version.
To deploy an application version to an existing environment
1. Right-click your Elastic Beanstalk application by expanding the Elastic Beanstalk node in AWS
Explorer. Select View Status.
2. In the App: <application name> tab, click Versions.
3. Click the application version you want to deploy and click Publish Version.
4. In the Publish Application Version wizard, click Next.
API Version 2010-12-01
149
Elastic Beanstalk Developer Guide
Deploy an Existing Application Version to an Existing
Environment

5. Review your deployment options, and click Deploy.
Your ASP.NET project will be exported as a web deploy file and uploaded to Amazon S3.The Elastic
Beanstalk deployment feature will monitor your environment until it becomes available with the newly
deployed code. On the env:<environment name> tab, you will see status for your environment.
Customizing and Configuring a .NET
Environment
When deploying your .NET application, you may want to customize and configure the behavior of your
EC2 instances.You can easily customize your instances at the same time that you deploy your application
version by including a configuration file with your source bundle.You may also want to customize your
environment resources that are part of your Elastic Beanstalk environment (e.g., SQS queues, ElastiCache
clusters). For example, you may want to add an Amazon SQS queue and an alarm on queue depth, or
you might want to add an Amazon ElastiCache cluster. This section walks you through the process of
creating a configuration file and bundling it with your source.
Configuration files should conform to YAML or JSON formatting standards. For example, indentation is
critical to the proper interpretation of YAML. For more information, go to http://www.yaml.org/start.html
API Version 2010-12-01
150
Elastic Beanstalk Developer Guide
Customizing and Configuring a .NET Environment

or http://www.json.org, respectively. For more information about using configuration files to deploy an
application to Elastic Beanstalk, see Using Configuration Files (p. 431).
Note
This section does not apply to legacy .NET containers. If you are running an application using
a legacy .NET container, then we recommend that you migrate to a nonlegacy .NET container.
For instructions on how to check if you are running a legacy container and to migrate to a
nonlegacy container, see Migrating Your Application from a Legacy Container Type (p. 426). If
you require instructions for managing your environment for a legacy container using the Elastic
Beanstalk console, command line interface, or API, see Managing Environments (p. 335).
To customize and configure your .NET environment
1. Create a configuration file with the extension .config (e.g., myapp.config) and place it in an
.ebextensions top-level directory of your source bundle.You can have multiple configuration files
in your .ebextensions directory. For information about the file format and contents of the
configuration file, see Using Configuration Files (p. 431).
Note
For Visual Studio, .eb extensions needs to be part of the project to be included in the
archive. Alternatively, in the Package/Publish Web settings, in the Items to deploy section,
you can select All Files in the Project Folder.
The following is an example snippet of a configuration file.
# If you do not specify a namespace, the default used is aws:elasticbean
stalk:application:environment
container_commands:
foo:
command: set > c:\\myapp\\set.txt
leader_only: true
waitAfterCompletion: 0
option_settings:
- option_name: PARAM1
value: somevalue
Note
You can specify any key–value pairs in the
aws:elasticbeanstalk:application:environment namespace, and they will be
passed in as environment variables on your EC2 instances.
2. Deploy your application version.
For an example walkthrough of deploying a .NET application and using custom CloudWatch metrics, see
Example: Using Custom Amazon CloudWatch Metrics (p. 455).
Accessing Environment Configuration Settings
The parameters specified in the option_settings section of the configuration file are passed in and
used as application settings.
You might have a code snippet that looks similar to the following to access the keys and parameters:
NameValueCollection appConfig = ConfigurationManager.AppSettings;
string param1 = appConfig["PARAM1"];
API Version 2010-12-01
151
Elastic Beanstalk Developer Guide
Accessing Environment Configuration Settings

For a list of configuration settings, see .NET Container Options (p. 729).
Using Amazon RDS
With Amazon Relational Database Service (Amazon RDS), you can quickly and easily provision and
maintain a MySQL, Oracle, or Microsoft SQL Server instance in the cloud. For more information, go to
Amazon Relational Database.
You can use Amazon RDS with your Elastic Beanstalk .NET application using the AWS Management
Console.You can also use the AWS Toolkit for Visual Studio to create your Amazon RDS DB instance.
For an example walkthrough using SQL Server, see Get Started (p. 126).
Note
The instructions in this topic are for nonlegacy container types. If you have deployed an Elastic
Beanstalk application using a legacy container type, we recommend that you migrate to a
nonlegacy container type to gain access to new features. For instructions on how to check the
container type and migrate your application, see Migrating Your Application from a Legacy
Container Type (p. 426).
To use Amazon RDS from your Elastic Beanstalk application, you need to do the following:
1. Create an Amazon RDS DB instance.
2. Download and install a database driver.
3. Establish a database connection in your code by using the connectivity information for your Amazon
RDS DB instance.
4. Deploy your application to Elastic Beanstalk.
This topic walks you through the following:
• Using a new Amazon RDS DB instance with your application
• Using an existing Amazon RDS DB instance with your application
Using a New Amazon RDS DB Instance with .NET
You can create a new Amazon RDS DB instance using the console or use the RDS connection information
with your .NET application.
To create an Amazon RDS DB instance with .NET
1. Create an Amazon RDS DB instance.You can create an RDS DB instance in one of the following
ways:
• Create an Amazon RDS DB instance when you create a new application version. For instructions
using the Elastic Beanstalk console, see Creating New Applications (p. 279).
• Create an Amazon RDS DB instance when you launch a new environment with an existing
application version. For instructions using the AWS Elastic Beanstalk console, see Launching New
Environments (p. 299).
• If you already deployed an application to AWS Elastic Beanstalk, you can create an RDS DB
instance and attach it to an existing environment. For instructions using the AWS Elastic Beanstalk
console, see Step 4: Deploy New Version (p. 7).
2. Download and install a database driver for your development environment.
API Version 2010-12-01
152
Elastic Beanstalk Developer Guide
Using Amazon RDS

3. Establish a database connection in your code using your Amazon RDS DB instance's connectivity
information.You can access your connectivity information using application settings.The following
shows how you would connect to the database on an RDS instance.
NameValueCollection appConfig = ConfigurationManager.AppSettings;
string dbname = appConfig["RDS_DB_NAME"];
string username = appConfig["RDS_USERNAME"];
string password = appConfig["RDS_PASSWORD"];
string hostname = appConfig["RDS_HOSTNAME"];
string port = appConfig["RDS_PORT"];
Build your connection string:
string cs = "server=" + hostname + ";user=" + username + ";database=" + dbname
+ ";port=" + port + ";password=" + password + ";";
The following connection string is an example using MySQL.
"server=mydbinstance.abcdefghijkl.us-west-2.rds.amazonaws.com;user=sa;data
base=mydb;port=3306;password=******;";
4. Deploy your updated application to your existing Elastic Beanstalk environment. For information on
how to deploy a new application version to an existing environment using the Elastic Beanstalk
Console, see Step 4: Deploy New Version (p. 7). For information on how to deploy your application
using Visual Studio, see Develop, Test, and Deploy (p. 134).
Using an Existing Amazon RDS DB Instance with
.NET
Amazon Relational Database Service (Amazon RDS) lets you quickly and easily provision and maintain
a MySQL Server instance in the cloud. This topic discusses how you can use Amazon RDS and the
MySQL .NET Connector with your Elastic Beanstalk application.
To use an existing Amazon RDS DB instance and .NET from your Elastic Beanstalk
application
1. Create an Elastic Beanstalk environment in one of the following ways:
• Create a new application with a new environment. For instructions using the Elastic Beanstalk
console, see Creating New Applications (p.279). For instructions using Visual Studio, see Develop,
Test, and Deploy (p. 134).You do not need to create an RDS DB instance with this environment
because you already have an existing RDS DB instance.
• Launch a new environment with an existing application version. For instructions using the Elastic
Beanstalk console, see Launching New Environments (p. 299).You do not need to create an
Amazon RDS DB instance with this environment because you already have an existing Amazon
RDS DB instance.
2. Configure your Amazon RDS DB security group to allow access from the Amazon EC2 security group
used by your Elastic Beanstalk application. For instructions on how to find the name of your EC2
security group using the AWS Management Console, see Amazon EC2 Security Groups (p.354). For
API Version 2010-12-01
153
Elastic Beanstalk Developer Guide
Using an Existing Amazon RDS DB Instance with .NET

more information, go to the "Authorizing Network Access to an Amazon EC2 Security Group" section
of Working with DB Security Groups in the Amazon Relational Database Service User Guide.
3. Download and install a database driver for your development environment.
4. Create a connection string using your Amazon RDS DB instance's public DNS name, port number,
and (optionally) database name and login credentials.The following example shows a connection
string that would connect to a database, mydb, on an RDS instance at
mydbinstance.abcdefghijkl.us-west-2.rds.amazonaws.com using port 3306, with the user name sa
and the password mypassword.
string cs = "server=mydbinstance.abcdefghijkl.us-west-2.rds.amazon
aws.com;user=sa;database=mydb;port=3306;password=******;";
5. Deploy your updated application to your existing Elastic Beanstalk environment. For information on
how to deploy a new application version to an existing environment using the Elastic Beanstalk
Console, see Step 4: Deploy New Version (p. 7). For information on how to deploy your application
using Visual Studio, see Develop, Test, and Deploy (p. 134).
Managing Multiple Accounts
If you want to set up different AWS accounts to perform different tasks, such as testing, staging, and
production, you can add, edit, and delete accounts using the AWS Toolkit for Visual Studio.
To manage multiple accounts
1. In Visual Studio, on the View menu, click AWS Explorer.
2. Beside the Account list, click the Add Account button.
The Add Account dialog box appears.
3. Fill in the requested information.
4. Your account information now appears on the AWS Explorer tab.When you publish to Elastic
Beanstalk, you can select which account you would like to use.
API Version 2010-12-01
154
Elastic Beanstalk Developer Guide
Managing Multiple Accounts

Monitoring Application Health
When you are running a production website, it is important to know that your application is available and
responding to requests.To assist with monitoring your application’s responsiveness, Elastic Beanstalk
provides features where you can monitor statistics about your application and create alerts that trigger
when thresholds are exceeded.
Understanding Environment Health
To check application health status, every minute or two Elastic Load Balancing sends a request to the
application health check URL. By default, Elastic Load Balancing uses TCP:80 for nonlegacy configurations
and HTTP:80 for legacy configurations.You can choose to override this setting by specifying an existing
resource in your application. If you specify a path like /myapp/index.jsp, the health check URL is set
to http:80//myapp/index.jsp (the exact port number depends on your environment's configuration).
However, you can also specify a different protocol and port, such as UDP:8888. For instructions on
modifying your health check URL using the AWS Management Console, see Health Checks (p. 362).
Elastic Beanstalk expects a response of 200 OK for the application to be considered healthy. If you are
unsure if you are running a legacy configuration, check the Elastic Beanstalk console. For instructions,
see To check if you are using a legacy container type (p. 426).
Important
For single-instance environments, health checks are done by Amazon EC2 instance status
monitoring, so the health check URL doesn't apply. Amazon EC2 performs automated checks
on the instance to identify hardware and software issues. For more information, see Monitoring
Instances with Status Checks in the Amazon EC2 User Guide for Linux Instances.
Elastic Beanstalk will change the health status of a web server environment tier to one of four color values
depending on how the application responds to the health check. The following table describes the color
codes.
StatusColor
Your application responded to the application health check URL within the
last minute.
Green
Your application hasn't responded to the application health check URL within
the last five minutes.
Yellow
One of the following:
• Your application hasn't responded to the application health check URL for
more than five minutes.
• An environment is also considered red if Elastic Beanstalk detects other
problems with the environment that are known to make the application
unavailable (e.g., the load balancer was deleted).
Red
Your application's health status is unknown because status is reported when
the application is not in the ready state.
Gray
For a web server environment tier, whenever the application health check URL fails to return a 200 OK
response, Elastic Beanstalk performs a series of additional checks to try to determine the cause of the
failure.These additional checks include verifying the following:
• The load balancer still exists.
API Version 2010-12-01
155
Elastic Beanstalk Developer Guide
Monitoring Application Health

• The Auto Scaling group still exists.
• At least one Amazon EC2 instance behind the load balancer is returning an InService response.
• The Amazon EC2 security group is configured to allow ingress on port 80.
• The environment CNAME exists and is pointing to the right load balancer.
• All Amazon EC2 instances are communicating.
In addition to environment-level health checking, Elastic Beanstalk also communicates with every Amazon
EC2 instance running as part of your Elastic Beanstalk application. If any Amazon EC2 instance fails to
respond to ten consecutive health checks, Elastic Beanstalk will terminate the instance, and Auto Scaling
will start a new instance.
If the status of your application health changes to red, you can take several corrective actions:
• Look at environment events.You might find more information about the problem here.
• If you recently deployed a new version of the application, try rolling back to an older version that is
known to work.
• If you recently made configuration changes, try reverting to the former settings.
• If the problem appears to be with the environment, try rebuilding the environment. In the AWS Toolkit
for Visual Studio, on the AWS Explorer tab, right-click your application environment, and then click
Rebuild Environment.
• Try using Snapshot logs to view recent log file entries or log in to the Amazon EC2 instance and
troubleshoot directly.
The health of a worker environment tier is gauged similarly to that of a web server environment tier. The
health status color codes are also similar. Elastic Beanstalk will change the health status of a worker
environment tier to one of four color values depending on how the application responds to the health
check.The following table describes the color codes.
StatusColor
Within the last three minutes:
• At least one daemon (on any instance) successfully polled the SQS queue
for messages within the last three minutes.
• If the worker environment tier is configured with an application health check
URL, the daemon received a 200 OK response to an HTTP GET request
it sent to the URL.
• If the worker environment tier is not configured with an application health
check URL, it successfully established a TCP connection to the TCP port
on the local host.
Green
There haven't been any healthy instances in the environment for up to three
minutes.
Yellow
One of the following:
• Auto Scaling is configured with a minimum size of zero instances.
• The autoscaling group has not had any healthy instances for at least three
minutes.
Red
API Version 2010-12-01
156
Elastic Beanstalk Developer Guide
Understanding Environment Health

StatusColor
Your application's health status is unknown because the environment health
hasn't been reported to CloudWatch.
Gray
Elastic Beanstalk publishes its worker environment tier health status to CloudWatch, where a status of 1
is Green. In order to publish metrics, you must grant the appropriate permissions on the IAM role. For
more information, go to Granting IAM Role Permissions for Worker Environment Tiers (p. 569).You can
review the CloudWatch health metric data in your account via the ElasticBeanstalk/SQSD namespace.
The metric dimension is EnvironmentName, and the metric name is Health. All instances publish their
metrics to the same namespace.
Viewing Application Health and Environment
Status
You can access operational information about your application by using either the AWS Toolkit for Visual
Studio or the AWS Management Console.
The toolkit displays your environment's status and application health in the Status field.
For information about how to view application health by using the AWS Management Console, see
Monitoring Your Environment (p. 330).
To monitor application health
1. In the AWS Toolkit for Visual Studio, in AWS Explorer, expand the Elastic Beanstalk node, and then
expand your application node.
2. Right-click your Elastic Beanstalk environment, and then click View Status.
3. On your application environment tab, click Monitoring.
The Monitoring panel includes a set of graphs showing resource usage for your particular application
environment.
API Version 2010-12-01
157
Elastic Beanstalk Developer Guide
Viewing Application Health and Environment Status

Note
By default, the time range is set to the last hour.To modify this setting, in the Time Range
list, click a different time range.
Viewing Events
You can use the AWS Toolkit for Visual Studio or the AWS Management Console to view events associated
with your application. For information on the most common events, see Understanding Environment
Launch Events (p. 512). For instructions on how to use the AWS Management Console to view events,
see Viewing Events (p. 333). This section steps you through viewing events using the AWS Toolkit for
Visual Studio.
To view application events
1. In the AWS Toolkit for Visual Studio, in AWS Explorer, expand the Elastic Beanstalk node and your
application node.
2. Right-click your Elastic Beanstalk environment in AWS Explorer and then click View Status.
3. In your application environment tab, click Events.
API Version 2010-12-01
158
Elastic Beanstalk Developer Guide
Viewing Events

Managing Your Elastic Beanstalk Application
Environments
With the AWS Toolkit for Visual Studio and the AWS Management Console, you can change the
provisioning and configuration of the AWS resources used by your application environments. For information
on how to manage your application environments using the AWS Management Console, see Managing
Environments (p. 335).This section discusses the specific service settings you can edit in the AWS Toolkit
for Visual Studio as part of your application environment configuration.
Changing Environment Configurations Settings
When you deploy your application, Elastic Beanstalk configures a number of AWS cloud computing
services.You can control how these individual services are configured using the AWS Toolkit for Visual
Studio.
To edit an application's environment settings
• Expand the Elastic Beanstalk node and your application node.Then right-click your Elastic Beanstalk
environment in AWS Explorer. Select View Status.
You can now configure settings for the following:
• Server
• Load balancing
• Autoscaling
• Notifications
• Environment properties
Configuring EC2 Server Instances Using the AWS
Toolkit for Visual Studio
Amazon Elastic Compute Cloud (Amazon EC2) is a web service that you use to launch and manage
server instances in Amazon's data centers.You can use Amazon EC2 server instances at any time, for
as long as you need, and for any legal purpose. Instances are available in different sizes and configurations.
For more information, go to Amazon EC2.
You can edit the Elastic Beanstalk environment's Amazon EC2 instance configuration with the Server
tab inside your application environment tab in the AWS Toolkit for Visual Studio.
API Version 2010-12-01
159
Elastic Beanstalk Developer Guide
Managing Environments

Amazon EC2 Instance Types
Instance type displays the instance types available to your Elastic Beanstalk application. Change the
instance type to select a server with the characteristics (including memory size and CPU power) that are
most appropriate to your application. For example, applications with intensive and long-running operations
may require more CPU or memory. Elastic Beanstalk regularly checks your running instances to ensure
they are healthy. If your application consumes 95 percent or greater of the CPU, Elastic Beanstalk will
trigger an event. For more information about this event, see CPU Utilization Exceeds 95.00% (p. 513).
Note
You cannot change between 32-bit and 64-bit instance types. For example, if your application
is built on a 32-bit platform, only 32-bit instance types appear in the list.
For more information about the Amazon EC2 instance types available for your Elastic Beanstalk application,
see Instance Types in the Amazon Elastic Compute Cloud User Guide.
Amazon EC2 Security Groups
You can control access to your Elastic Beanstalk application using an Amazon EC2 Security Group. A
security group defines firewall rules for your instances.These rules specify which ingress (i.e., incoming)
network traffic should be delivered to your instance. All other ingress traffic will be discarded.You can
modify rules for a group at any time.The new rules are automatically enforced for all running instances
and instances launched in the future.
You can set up your Amazon EC2 security groups using the AWS Management Console or by using the
AWS Toolkit for Visual Studio.You can specify which Amazon EC2 Security Groups control access to
your Elastic Beanstalk application by entering the names of one or more Amazon EC2 security group
names (delimited by commas) into the EC2 Security Groups text box.
Note
Make sure port 80 (HTTP) is accessible from 0.0.0.0/0 as the source CIDR range if you want to
enable health checks for your application. For more information about health checks, see Health
Checks (p. 163).
To create a security group using the AWS Toolkit for Visual Studio
1. In Visual Studio, in AWS Explorer, expand the Amazon EC2 node, and then double-click Security
Groups.
2. Click Create Security Group, and enter a name and description for your security group.
3. Click OK.
API Version 2010-12-01
160
Elastic Beanstalk Developer Guide
EC2 Server Instances

For more information on Amazon EC2 Security Groups, see Using Security Groups in the Amazon Elastic
Compute Cloud User Guide.
Amazon EC2 Key Pairs
You can securely log in to the Amazon EC2 instances provisioned for your Elastic Beanstalk application
with an Amazon EC2 key pair.
Important
You must create an Amazon EC2 key pair and configure your Elastic Beanstalk–provisioned
Amazon EC2 instances to use the Amazon EC2 key pair before you can access your Elastic
Beanstalk–provisioned Amazon EC2 instances.You can create your key pair using the Publish
to AWS wizard inside the AWS Toolkit for Visual Studio when you deploy your application to
Elastic Beanstalk. If you want to create additional key pairs using the Toolkit, follow the steps
below. Alternatively, you can set up your Amazon EC2 key pairs using the AWS Management
Console. For instructions on creating a key pair for Amazon EC2, see the Amazon Elastic
Compute Cloud Getting Started Guide.
The Existing Key Pair text box lets you specify the name of an Amazon EC2 key pair you can use to
securely log in to the Amazon EC2 instances running your Elastic Beanstalk application.
To specify the name of an Amazon EC2 key pair
1. Expand the Amazon EC2 node and double-click Key Pairs.
2. Click Create Key Pair and enter the key pair name.
3. Click OK.
For more information about Amazon EC2 key pairs, go to Using Amazon EC2 Credentials in the Amazon
Elastic Compute Cloud User Guide. For more information about connecting to Amazon EC2 instances,
see Listing and Connecting to Server Instances (p. 168).
Monitoring Interval
By default, only basic Amazon CloudWatch metrics are enabled; they return data in five-minute periods.
You can enable more granular one-minute CloudWatch metrics by selecting 1 minute for the Monitoring
Interval in the Server section of the Configuration tab for your environment in the AWS Toolkit for
Eclipse.
Note
Amazon CloudWatch service charges can apply for one-minute interval metrics. See Amazon
CloudWatch for more information.
Custom AMI ID
You can override the default AMI used for your Amazon EC2 instances with your own custom AMI by
entering the identifier of your custom AMI into the Custom AMI ID box in the Server section of the
Configuration tab for your environment in the AWS Toolkit for Eclipse.
Important
Using your own AMI is an advanced task and should be done with care. If you need a custom
AMI, we recommend you start with the default Elastic Beanstalk AMI and then modify it.To be
considered healthy, Elastic Beanstalk expects Amazon EC2 instances to meet a set of
requirements, including having a running host manager. If these requirements are not met, your
environment might not work properly.
API Version 2010-12-01
161
Elastic Beanstalk Developer Guide
EC2 Server Instances

Configuring Elastic Load Balancing Using the AWS
Toolkit for Visual Studio
Elastic Load Balancing is an Amazon web service that helps you improve the availability and scalability
of your application.This service makes it easy for you to distribute application loads between two or more
Amazon EC2 instances. Elastic Load Balancing enables availability through redundancy and supports
traffic growth for your application.
Elastic Load Balancing lets you automatically distribute and balance the incoming application traffic among
all the instances you are running.The service also makes it easy to add new instances when you need
to increase the capacity of your application.
Elastic Beanstalk automatically provisions Elastic Load Balancing when you deploy an application.You
can edit the Elastic Beanstalk environment's Amazon EC2 instance configuration with the Load Balancer
tab inside your application environment tab in AWS Toolkit for Visual Studio.
The following sections describe the Elastic Load Balancing parameters you can configure for your
application.
Ports
The load balancer provisioned to handle requests for your Elastic Beanstalk application sends requests
to the Amazon EC2 instances that are running your application.The provisioned load balancer can listen
for requests on HTTP and HTTPS ports and route requests to the Amazon EC2 instances in your AWS
Elastic Beanstalk application. By default, the load balancer handles requests on the HTTP port. At least
one of the ports (either HTTP or HTTPS) must be turned on.
Important
Make sure that the port you specified is not locked down; otherwise, users will not be able to
connect to your Elastic Beanstalk application.
API Version 2010-12-01
162
Elastic Beanstalk Developer Guide
Elastic Load Balancing

Controlling the HTTP Port
To turn off the HTTP port, select OFF for HTTP Listener Port. To turn on the HTTP port, you select an
HTTP port (for example, 80) from the list.
Note
If you want to access your environment using a different port other than the default port 80 (e.g.,
port 8080), you can add a listener to the existing load balancer and configure the new listener
to listen on that port. For example, using the Elastic Load Balancing API Tools, type the following
command replacing <yourloadbalancername> with the name of your load balancer for Elastic
Beanstalk.
elb-create-lb-listeners --lb <yourloadbalancername> --listener "pro
tocol=http, lb-port=8080, instance-port=80"
If you want Elastic Beanstalk to monitor your environment, do not remove the listener on port
80.
Controlling the HTTPS Port
Elastic Load Balancing supports the HTTPS/TLS protocol to enable traffic encryption for client connections
to the load balancer. Connections from the load balancer to the EC2 instances use plaintext encryption.
By default, the HTTPS port is turned off.
To turn on the HTTPS port
1. Create and upload a certificate and key to the AWS Identity and Access Management (IAM) service.
The IAM service will store the certificate and provide an Amazon Resource Name (ARN) for the SSL
certificate you've uploaded. For more information about creating and uploading certificates, see the
Managing Server Certificates section of Using AWS Identity and Access Management.
2. Specify the HTTPS port by selecting a port for HTTPS Listener Port.
3. For SSL Certificate ID, enter the Amazon Resources Name (ARN) of your SSL certificate (e.g.,
arn:aws:iam::123456789012:server-certificate/abc/certs/build). Use the SSL
certificate that you created and uploaded in step 1. For information on viewing the certificate's ARN,
see Verify the Certificate Object topic in the Creating and Uploading Server Certificates section of
the Using IAM Guide.
To turn off the HTTPS port, select OFF for HTTPS Listener Port.
Health Checks
The health check definition includes a URL to be queried for instance health. By default, Elastic Beanstalk
uses TCP:80 for nonlegacy containers and HTTP:80 for legacy containers.You can override the default
URL to match an existing resource in your application (e.g., /myapp/default.aspx) by entering it in
the Application Health Check URL box. If you override the default URL, then Elastic Beanstalk uses
HTTP to query the resource.To check if you are using a legacy container type, see Why are some
container types marked legacy? (p. 426).
API Version 2010-12-01
163
Elastic Beanstalk Developer Guide
Elastic Load Balancing

You can control the settings for the health check using the EC2 Instance Health Check section of the
Load Balancing panel.
The health check definition includes a URL to be queried for instance health. Override the default URL
to match an existing resource in your application (e.g., /myapp/index.jsp) by entering it in the
Application Health Check URL box.
The following list describes the health check parameters you can set for your application.
• For Health Check Interval (seconds), enter the number of seconds Elastic Load Balancing waits
between health checks for your application's Amazon EC2 instances.
• For Health Check Timeout (seconds), specify the number of seconds Elastic Load Balancing waits
for a response before it considers the instance unresponsive.
• For Healthy Check Count Threshold and Unhealthy Check Count Threshold, specify the number
of consecutive successful or unsuccessful URL probes before Elastic Load Balancing changes the
instance health status. For example, specifying 5 for Unhealthy Check Count Threshold means that
the URL would have to return an error message or timeout five consecutive times before Elastic Load
Balancing considers the health check failed.
Sessions
By default, a load balancer routes each request independently to the server instance with the smallest
load. By comparison, a sticky session binds a user's session to a specific server instance so that all
requests coming from the user during the session are sent to the same server instance.
Elastic Beanstalk uses load balancer–generated HTTP cookies when sticky sessions are enabled for an
application.The load balancer uses a special load balancer–generated cookie to track the application
instance for each request. When the load balancer receives a request, it first checks to see if this cookie
is present in the request. If so, the request is sent to the application instance specified in the cookie. If
there is no cookie, the load balancer chooses an application instance based on the existing load balancing
algorithm. A cookie is inserted into the response for binding subsequent requests from the same user to
that application instance.The policy configuration defines a cookie expiry, which establishes the duration
of validity for each cookie.
You can use the Sessions section on the Load Balancer tab to specify whether or not the load balancer
for your application allows session stickiness.
For more information on Elastic Load Balancing, go to the Elastic Load Balancing Developer Guide.
API Version 2010-12-01
164
Elastic Beanstalk Developer Guide
Elastic Load Balancing

Configuring Auto Scaling Using the AWS Toolkit
for Visual Studio
Auto Scaling is an Amazon web service designed to automatically launch or terminate Amazon EC2
instances based on user-defined triggers. Users can set up Auto Scaling groups and associate triggers
with these groups to automatically scale computing resources based on metrics such as bandwidth usage
or CPU utilization. Auto Scaling works with Amazon CloudWatch to retrieve metrics for the server instances
running your application.
Auto Scaling lets you take a group of Amazon EC2 instances and set various parameters to have this
group automatically increase or decrease in number. Auto Scaling can add or remove Amazon EC2
instances from that group to help you seamlessly deal with traffic changes to your application.
Auto Scaling also monitors the health of each Amazon EC2 instance that it launches. If any instance
terminates unexpectedly, Auto Scaling detects the termination and launches a replacement instance.
This capability enables you to maintain a fixed, desired number of Amazon EC2 instances automatically.
Elastic Beanstalk provisions Auto Scaling for your application.You can edit the Elastic Beanstalk
environment's Amazon EC2 instance configuration with the Auto Scaling tab inside your application
environment tab in the AWS Toolkit for Visual Studio.
The following section discusses how to configure Auto Scaling parameters for your application.
Launch the Configuration
You can edit the launch configuration to control how your Elastic Beanstalk application provisions Auto
Scaling resources.
The Minimum Instance Count and Maximum Instance Count boxes let you specify the minimum and
maximum size of the Auto Scaling group that your Elastic Beanstalk application uses.
API Version 2010-12-01
165
Elastic Beanstalk Developer Guide
Auto Scaling

Note
To maintain a fixed number of Amazon EC2 instances, set Minimum Instance Count and
Maximum Instance Count to the same value.
The Availability Zones box lets you specify the number of Availability Zones you want your Amazon
EC2 instances to be in. It is important to set this number if you want to build fault-tolerant applications. If
one Availability Zone goes down, your instances will still be running in your other Availability Zones.
Note
Currently, it is not possible to specify which Availability Zone your instance will be in.
Triggers
A trigger is an Auto Scaling mechanism that you set to tell the system when you want to increase (scale
out) the number of instances, and when you want to decrease (scale in) the number of instances.You
can configure triggers to fire on any metric published to Amazon CloudWatch, such as CPU utilization,
and determine if the conditions you specified have been met. When the upper or lower thresholds of the
conditions you have specified for the metric have been breached for the specified period of time, the
trigger launches a long-running process called a Scaling Activity.
You can define a scaling trigger for your Elastic Beanstalk application using AWS Toolkit for Visual Studio.
Auto Scaling triggers work by watching a specific Amazon CloudWatch metric for an instance.Triggers
include CPU utilization, network traffic, and disk activity. Use the Trigger Measurement setting to select
a metric for your trigger.
The following list describes the trigger parameters you can configure using the AWS Management Console.
• You can specify which statistic the trigger should use.You can select Minimum, Maximum, Sum, or
Average for Trigger Statistic.
• For Unit of Measurement, specify the unit for the trigger measurement.
• The value in the Measurement Period box specifies how frequently Amazon CloudWatch measures
the metrics for your trigger. The Breach Duration is the amount of time a metric can be beyond its
defined limit (as specified for the Upper Threshold and Lower Threshold) before the trigger fires.
• For Upper Breach Scale Increment and Lower Breach Scale Increment, specify how many Amazon
EC2 instances to add or remove when performing a scaling activity.
For more information on Auto Scaling, go to the Auto Scaling documentation.
Configuring Notifications Using AWS Toolkit for
Visual Studio
Elastic Beanstalk uses the Amazon Simple Notification Service (Amazon SNS) to notify you of important
events affecting your application.To enable Amazon SNS notifications, simply enter your email address
in the Email Address box.To disable these notifications, remove your email address from the box.
API Version 2010-12-01
166
Elastic Beanstalk Developer Guide
Notifications

Configuring .NET Containers Using the AWS
Toolkit for Visual Studio
The Container/.NET Options panel lets you fine-tune the behavior of your Amazon EC2 instances and
enable or disable Amazon S3 log rotation.You can use the AWS Toolkit for Visual Studio to configure
your container information.
Note
You can modify your configuration settings with zero downtime by swapping the CNAME for
your environments. For more information, see Deploying Versions with Zero Downtime (p. 318).
If you want to, you can extend the number of parameters. For information about extending parameters,
see Option_settings (p. 454).
To access the Container/.NET Options panel for your Elastic Beanstalk application
1. In AWS Toolkit for Visual Studio, expand the Elastic Beanstalk node and your application node.
2. In AWS Explorer, double-click your Elastic Beanstalk environment.
3. At the bottom of the Overview pane, click the Configuration tab.
4. Under Container, you can configure container options.
.NET Container Options
You can choose the version of .NET Framework for your application. Choose either 2.0 or 4.0 for Target
runtime. Select Enable 32-bit Applications if you want to enable 32-bit applications.
API Version 2010-12-01
167
Elastic Beanstalk Developer Guide
Containers

Application Settings
This section of the Container panel lets you specify application settings. These settings enable greater
portability by eliminating the need to recompile your source code as you move between environments.
You can configure the following application settings:
• Specify AWS credentials using the AWS_ACCESS_KEY_ID and AWS_SECRET_KEY text boxes.
Note
Except for legacy containers, Elastic Beanstalk uses instance profiles so that your application
can use temporary security credentials to access AWS resources.To learn more, see Granting
Permissions to Users and Services Using IAM Roles (p. 562).
• Specify up to five additional key-value pairs by entering them in the PARAM boxes.
You might have a code snippet that looks similar to the following to access the keys and parameters:
NameValueCollection appConfig = ConfigurationManager.AppSettings;
string param1 = appConfig["PARAM1"];
Note
These settings can contain any printable ASCII character except the grave accent (`, ASCII
96) and cannot exceed 200 characters in length.
Listing and Connecting to Server Instances
You can view a list of Amazon EC2 instances running your Elastic Beanstalk application environment
through the AWS Toolkit for Visual Studio or from the AWS Management Console.You can connect to
these instances using Remote Desktop Connection. For information about listing and connecting to your
server instances using the AWS Management Console, see Listing and Connecting to Server
Instances (p. 413). The following section steps you through viewing and connecting you to your server
instances using the AWS Toolkit for Visual Studio.
To view and connect to Amazon EC2 instances for an environment
1. In Visual Studio, in AWS Explorer, expand the Amazon EC2 node and double-click Instances.
2. Right-click the instance ID for the Amazon EC2 instance running in your application's load balancer
in the Instance column and select Open Remote Desktop from the context menu.
API Version 2010-12-01
168
Elastic Beanstalk Developer Guide
Listing and Connecting to Server Instances

3. Select Use EC2 keypair to log on and paste the contents of your private key file that you used to
deploy your application in the Private key box. Alternatively, enter your user name and password in
the User name and Password text boxes.
Note
If the key pair is stored inside the Toolkit, the text box does not appear.
4. Click OK.
Terminating an Environment
To avoid incurring charges for unused AWS resources, you can terminate a running environment using
the AWS Toolkit for Visual Studio.
Note
You can always launch a new environment using the same version later.
To terminate an environment
1. Expand the Elastic Beanstalk node and the application node in AWS Explorer. Right-click your
application environment and select Terminate Environment.
2. When prompted, click Yes to confirm that you want to terminate the environment. It will take a few
minutes for Elastic Beanstalk to terminate the AWS resources running in the environment.
API Version 2010-12-01
169
Elastic Beanstalk Developer Guide
Terminating an Environment

Note
When you terminate your environment, the CNAME associated with the terminated
environment becomes available for anyone to use.
Tools
Topics
• AWS SDK for .NET (p. 170)
• AWS Toolkit for Visual Studio (p. 170)
• Deploying Elastic Beanstalk Applications in .NET Using the Deployment Tool (p. 170)
The AWS SDK for .NET makes it even easier for Windows developers to build .NET applications that tap
into the cost-effective, scalable, and reliable AWS cloud. Using the SDK, developers will be able to build
solutions for AWS infrastructure services, including Amazon Simple Storage Service (Amazon S3) and
Amazon Elastic Compute Cloud (Amazon EC2).You can use the AWS Toolkit for Visual Studio to add
the AWS .NET SDK to an existing project, or create a new .NET project based on the AWS .NET SDK.
AWS SDK for .NET
With the AWS SDK for .NET, you can get started in minutes with a single, downloadable package complete
with Visual Studio project templates, the AWS .NET library, C# code samples, and documentation.You
can build .NET applications on top of APIs that take the complexity out of coding directly against web
services interfaces.The all-in-one library provides .NET developer-friendly APIs that hide much of the
lower-level plumbing associated with programming for the AWS cloud, including authentication, request
retries, and error handling. Practical examples are provided in C# for how to use the libraries to build
applications. Online video tutorials and reference documentation are provided to help you learn how to
use the libraries and code samples. For more information, go to AWS SDK for .NET.
AWS Toolkit for Visual Studio
The AWS Toolkit for Visual Studio is a plug-in for .NET that makes it easier to develop and debug .NET
applications using Amazon Web Services.You can get started quickly with building solutions for the AWS
cloud using Visual Studio Project Templates. For more information about prerequisites, installation
instructions and running code samples, go to AWS Toolkit for Microsoft Visual Studio.
Deploying Elastic Beanstalk Applications in .NET
Using the Deployment Tool
The AWS Toolkit for Visual Studio includes a deployment tool, a command line tool that provides the
same functionality as the deployment wizard in the AWS Toolkit.You can use the deployment tool in your
build pipeline or in other scripts to automate deployments to Elastic Beanstalk.
API Version 2010-12-01
170
Elastic Beanstalk Developer Guide
Tools

The deployment tool supports both initial deployments and redeployments. If you previously deployed
your application using the deployment tool, you can redeploy using the deployment wizard within Visual
Studio. Similarly, if you have deployed using the wizard, you can redeploy using the deployment tool.
This chapter walks you through deploying a sample .NET application to Elastic Beanstalk using the
deployment tool, and then redeploying the application using an incremental deployment. For a more
in-depth discussion about the deployment tool, including the parameter options, go to Deployment Tool.
Prerequisites
In order to deploy your web application using the deployment tool, you need to package it as a .zip file.
For more information about how to package your application for deployment, go to How to: Deploy a Web
Application Project Using a Web Deployment Package at MSDN.
To use the deployment tool, you need to install the AWS Toolkit for Visual Studio. For information on
prerequisites and installation instructions, go to AWS Toolkit for Microsoft Visual Studio.
The deployment tool is typically installed in one of the following directories on Windows:
64-bit32-bit
C:\Program Files (x86)\AWS Tools\Deployment Tool\awsde-
ploy.exe
C:\Program Files\AWS Tools\Deploy-
ment Tool\awsdeploy.exe
Deploy to Elastic Beanstalk
To deploy the sample application to Elastic Beanstalk using the deployment tool, you first need to modify
the ElasticBeanstalkDeploymentSample.txt configuration file, which is provided in the Samples
directory. This configuration file contains the information necessary to deploy your application, including
the application name, application version, environment name, and your AWS access credentials. After
modifying the configuration file, you then use the command line to deploy the sample application.Your
web deploy file is uploaded to Amazon S3 and registered as a new application version with Elastic
Beanstalk. It will take a few minutes to deploy your application. Once the environment is healthy, the
deployment tool outputs a URL for the running application.
To deploy a .NET application to Elastic Beanstalk
1. From the Samples subdirectory where the deployment tool is installed, open
ElasticBeanstalkDeploymentSample.txt and enter your AWS access key and AWS secret
key as in the following example.
For API access, you need an access key ID and secret access key. Use IAM user access keys
instead of AWS root account access keys. IAM lets you securely control access to AWS services
and resources in your AWS account. For more information about creating access keys, see How Do
I Get Security Credentials? in the AWS General Reference.
### AWS Access Key and Secret Key used to create and deploy the application
instance
AWSAccessKey = AKIAIOSFODNN7EXAMPLE
AWSSecretKey = wJalrXUtnFEMI/K7MDENG/bPxRfiCYEXAMPLEKEY
2. At the command line prompt, type the following:
API Version 2010-12-01
171
Elastic Beanstalk Developer Guide
Deployment Tool

C:\Program Files (x86)\AWS Tools\Deployment Tool>awsdeploy.exe /w
Samples\ElasticBeanstalkDeploymentSample.txt
It takes a few minutes to deploy your application. If the deployment succeeds, you will see the
message, Application deployment completed; environment health is Green.
Note
If you receive the following error, the CNAME already exists.
[Error]: Deployment to AWS Elastic Beanstalk failed with exception:
DNS name (MyAppEnv.elasticbeanstalk.com) is not available.
Because a CNAME must be unique, you need to change Environment.CNAME in
ElasticBeanstalkDeploymentSample.txt.
3. In your web browser, navigate to the URL of your running application.The URL will be in the form
<CNAME.elasticbeanstalk.com> (e.g., MyAppEnv.elasticbeanstalk.com).
Redeploy to Elastic Beanstalk
You can redeploy your application using an incremental deployment. Incremental deployments are faster
because you are updating only the files that have changed instead of all the files.This section walks you
through redeploying the sample application you deployed in Deploy to Elastic Beanstalk (p. 171).
To edit and redeploy a .NET application to Elastic Beanstalk
1. Extract AWSDeploymentSampleApp.zip from the Samples directory to a location on your computer
such as c:\mydeploymentarchive\AWSDeploymentSampleApp.
2. Modify one of the files in the AWSDeploymentSampleApp directory. For example, you can modify
the title in default.aspx.
3. In the ElasticBeanstalkDeploymentSample.txt configuration file, do the following:
• Specify the location where you extracted the files. This means modifying the value for the
DeploymentPackage key in the Incremental Deployment Settings section in
ElasticBeanstalkDeploymentSample.txt. For example:
C:\mydeploymentarchive\AWSDeploymentSampleApp
• Remove the # in front of IncrementalPushRepository and DeploymentPackage.
• Add a # in front of DeploymentPackage in the Non-Incremental Deployment Settings.
4. At the command line, type the following:
C:\Program Files (x86)\AWS Tools\Deployment Tool>awsdeploy.exe /r
Samples\ElasticBeanstalkDeploymentSample.txt
If this command succeeds, you should see something similar to the following:
...environment 'MyAppEnvironment' found and available for redeployment
(configuration parameters not required for redeployment will be ignored)
...starting redeployment to AWS Elastic Beanstalk environment 'MyAppEnviron
ment'
API Version 2010-12-01
172
Elastic Beanstalk Developer Guide
Deployment Tool

...starting incremental deployment to environment 'MyAppEnvironment'
...finished incremental deployment in 9199.9199 ms
5. In your web browser, navigate to the same URL as in Deploy to Elastic Beanstalk (p. 171).You should
see your updated application.
Resources
There are several places you can go to get additional help when developing your .NET applications:
DescriptionResource
Post your questions and get feedback..NET Development Forum
One-stop shop for sample code, documentation, tools, and
additional resources.
.NET Developer Center
Read about setting up the SDK and running code samples,
features of the SDK, and detailed information about the API
operations for the SDK.
AWS SDK for .NET Documentation
API Version 2010-12-01
173
Elastic Beanstalk Developer Guide
Resources

Deploying Elastic Beanstalk
Applications in Node.js Using EB
CLI and Git
Topics
• Develop, Test, and Deploy (p. 174)
• Deploying an Express Application to Elastic Beanstalk (p. 179)
• Deploying an Express Application with Clustering to Elastic Beanstalk (p. 191)
• Deploying a Geddy Application with Clustering to Elastic Beanstalk (p. 202)
• Customizing and Configuring a Node.js Environment (p. 213)
• Deploying a Node.js Application to Elastic Beanstalk Using the Elastic Beanstalk Console (p. 215)
• Using Amazon RDS with Node.js (p. 216)
• Tools (p. 219)
• Resources (p. 219)
Elastic Beanstalk for Node.js makes it easy to deploy, manage, and scale your Node.js web applications
using Amazon Web Services. Elastic Beanstalk for Node.js is available to anyone developing or hosting
a web application using Node.js.This section provides step-by-step instructions for deploying your Node.js
web application to Elastic Beanstalk using EB Command Line Interface (CLI) 3.x and Git. EB CLI is a
command line interface tool that enables you to deploy applications more easily using Git.This topic also
provides walkthroughs for common frameworks such as Express and Geddy.
After you deploy your Elastic Beanstalk application, you can continue to use EB CLI to manage your
application and environment, or you can use the Elastic Beanstalk console, AWS CLI, or the APIs.You
can also use the Elastic Beanstalk console to upload your Node.js files using a .zip file. For more
information, see Managing and Configuring Applications and Environments Using the Console, CLI, and
APIs (p. 278).
Develop,Test, and Deploy
The following diagram illustrates a typical software development life cycle including deploying your
application to Elastic Beanstalk.
API Version 2010-12-01
174
Elastic Beanstalk Developer Guide
Develop,Test, and Deploy

Typically, after developing and testing your application locally, you will deploy your application to Elastic
Beanstalk. At this point, your application will be live at a URL such as
http://myexampleapp-wpams3yrvj.elasticbeanstalk.com. Because your application will be live, you should
consider setting up multiple environments, such as a testing environment and a production environment.
You can point your domain name to the Amazon Route 53 (a highly available and scalable Domain Name
System (DNS) web service) CNAME <yourappname>.elasticbeanstalk.com. Contact your DNS provider
to set this up. For information about how to map your root domain to your Elastic Load Balancer, see
Using Elastic Beanstalk with Amazon Route 53 to Map Your Domain to Your Load Balancer (p. 528). After
you remotely test and debug your Elastic Beanstalk application, you can then make any updates and
redeploy to Elastic Beanstalk. After you are satisfied with all of your changes, you can upload your latest
version to your production environment.The following sections provide more details explaining each
stage of the software development life cycle.
Get Set Up
EB CLI is a command line interface that you can use with Git to deploy applications quickly and more
easily. EB is available as part of the Elastic Beanstalk command line tools package. For instructions to
install EB CLI, see Getting Set Up with EB Command Line Interface (CLI) 3.x (p. 621).
Initialize your Git repository. After you run the following command, when you run eb init, EB CLI will
recognize that your application is set up with Git.
git init .
Develop Locally
After installing EB CLI 3.x on your local computer, you use the Git command line as you normally would
to create your local repository and add and commit changes.You create your Node.js application as you
normally would with your favorite editor. If you don't already have a Node.js application ready, you can
use a simple "Hello World" application. Type the following program into your favorite editor, and save it
as server.js in your root project directory.
var http = require("http");
http.createServer(function(request, response) {
response.writeHead(200, {"Content-Type": "text/plain"});
response.write("Hello World");
response.end();
}).listen(process.env.PORT || 8888);
Next, test your program, add it to your repository, and commit your change.
API Version 2010-12-01
175
Elastic Beanstalk Developer Guide
Get Set Up

node server.js
git add server.js
git commit -m "initial check-in"
Note
For information about Git commands, go to Git - Fast Version Control System.
Test Locally
Normally, at this point you would test your application locally before deploying to Elastic Beanstalk.
Suppose you find a few issues you would like to fix. Using the above "Hello World" application, add a "!"
after "Hello World" and check in your changes. Update your server.js file, and then type the following
commands to check in your updated file.
node server.js
git add server.js
git commit -m "my second check-in"
After you commit your changes, you should see a response similar to the following:
[master 0535814] my second check-in
1 files changed, 1 insertions(+), 1 deletions(-)
Note the commit ID that is generated.This ID is used to generate a version label for your application.
Deploy to AWS Elastic Beanstalk
After testing your application, you are ready to deploy it to Elastic Beanstalk. Deploying requires the
following steps:
• Configure Elastic Beanstalk.
• Deploy a sample application.
• Update the sample application with your application.
When you update the sample application with your application, Elastic Beanstalk replaces the existing
sample application version with your new application version in the existing environment.
Use the init command, and Elastic Beanstalk will prompt you to enter this information. If a default value
is available, and you want to use it, press Enter.
Before you use eb, set your PATH to the location of eb. The following table shows an example for
Linux/UNIX and Windows.
In WindowsIn Linux and UNIX
C:\> set PATH=%PATH%;<path to unzipped
eb CLI package>\eb\windows\
$ export PATH=$PATH:<path to unzipped
eb CLI package>/eb/linux/python2.7/
If you are using Python 3.0, the path will include
python3 rather than python2.7.
API Version 2010-12-01
176
Elastic Beanstalk Developer Guide
Test Locally

To configure Elastic Beanstalk
1. From the directory where you created your local repository, type the following command:
eb init
2. When you are prompted for the Elastic Beanstalk region, type the number of the region. For information
about this product's regions, go to Regions and Endpoints in the Amazon Web Services General
Reference. For this example, we'll use US West (Oregon).
3. When you are prompted for the Elastic Beanstalk application to use, type the number corresponding
to the option Create new Application. Elastic Beanstalk generates an application name based on
the current directory name if an application name has not been previously configured. In this example,
we use HelloWorld.
Enter Application Name (default is "tmp-dev"): HelloWorld
Note
If you have a space in your application name, make sure you do not use quotation marks.
4. Type y if Elastic Beanstalk correctly detected the correct platform you are using.Type n if not, and
then specify the correct platform.
5. When prompted, type y if you want to set up Secure Shell (SSH) to connect to your instances. Type
n if you do not want to set up SSH. In this example, we will type n.
Do you want to set up SSH for your instances?
(y/n): n
6. Create your running environment.
eb create
7. When you are prompted for the Elastic Beanstalk environment name, type the name of the
environment. Elastic Beanstalk automatically creates an environment name based on your application
name. If you want to accept the default, press Enter.
Enter Environment Name
(default is HelloWorld-env):
Note
If you have a space in your application name, make sure you do not have a space in your
environment name.
8. When you are prompted to provide a CNAME prefix, type the CNAME prefix you want to use. Elastic
Beanstalk automatically creates a CNAME prefix based on the environment name. If you want to
accept the default, press Enter.
Enter DNS CNAME prefix
(default is HelloWorld):
EB CLI will display your environment details and the status of the create operation.
API Version 2010-12-01
177
Elastic Beanstalk Developer Guide
Deploy to AWS Elastic Beanstalk

View the application by typing the following:
eb open
To update the sample application with your local application
1. Make changes to your code, and then type the following command:
eb deploy
Elastic Beanstalk will attempt to start app.js, then server.js, and then "npm start" in that order.
2. If everything worked as expected, you should see something similar to the following:
Counting objects: 5, done.
Delta compression using up to 4 threads.
Compressing objects:100% (2/2), done.
Writing objects: 100% (3/3), 298 bytes, done.
Total 3 (delta 1), reused 0 (delta 0)
To https://<some long string>@git.elasticbeanstalk.us-west-
2.amazon.com/helloworld/helloworldenv
44c7066..b1f11a1 master -> master
3. Verify that your application has been updated by refreshing your web browser.
Debug/View Logs
You can use the eb logs command to investigate any issues. If you do not specify any flags with the
command, logs will be displayed in the command window. For other ways to retrieve logs using this
command, see logs (p. 654).
Edit the Application and Redeploy
Now that you have tested your application, it is easy to edit your application, redeploy, and see the results
in moments. First, make changes to your application and commit your changes. Then deploy a new
application version to your existing Elastic Beanstalk environment.
git add server.js
git commit -m "my third check-in"
eb deploy
A new application version will be uploaded to your Elastic Beanstalk environment.
You can use the AWS Management Console, CLI, or APIs to manage your Elastic Beanstalk environment.
For more information, see Managing and Configuring Applications and Environments Using the Console,
CLI, and APIs (p. 278).
You can also configure Git to push from a specific branch to a specific environment. For more information,
see Deploying a Git Branch to a Specific Environment (p. 677).
API Version 2010-12-01
178
Elastic Beanstalk Developer Guide
Debug/View Logs

Deploy to Production
When you are satisfied with all of the changes you want to make to your application, you can deploy it to
your production environment.To deploy your application to a new environment, do the following:
1. Commit your changes
2. Create a branch
3. Create and launch your new environment
4. Deploy your application to your new production environment
When you update your application using EB CLI, Elastic Beanstalk will create a new application version.
For information on how to deploy an already existing application version to a new environment, see
Launching New Environments (p.299).The following steps walk you through committing your new changes
and then updating your environment with a new application version using EB CLI and Git.
To deploy to production using EB CLI
1. Commit your changes.
git add .
git commit -m "final checkin"
2. Create a branch and switch to it.
git checkout -b prodenv
eb use prod
3. When prompted, type your new environment name, and accept all settings from your previous
environment.
4. When you are ready, deploy your new application version to Elastic Beanstalk.
eb deploy
Deploy an Existing Application Version to an
Existing Environment
If you need to deploy an existing application to an existing environment, you can do so using the AWS
Management Console, CLI, or APIs.You may want to do this if, for instance, you need to roll back to a
previous application version. For instructions on how to deploy an existing application version to an
existing environment, see Deploying Versions to Existing Environments (p. 313).
Deploying an Express Application to Elastic
Beanstalk
This section walks you through deploying a sample application to Elastic Beanstalk using EB CLI and
Git, and then updating the application to use the Express framework.
API Version 2010-12-01
179
Elastic Beanstalk Developer Guide
Deploy to Production

Note
This example uses Amazon RDSs, and you may be charged for its usage. For more information
about pricing, go to Amazon Relational Database Service (RDS) Pricing. If you are a new
customer, you can make use of the AWS Free Usage Tier. For details, go to AWS Free Usage
Tier.
Step 1: Set Up Your Git Repository
EB CLI is a command line interface that you can use with Git to deploy applications quickly and more
easily. EB is available as part of the Elastic Beanstalk command line tools package. For instructions to
install EB CLI, see Getting Set Up with EB Command Line Interface (CLI) 3.x (p. 621).
Initialize your Git repository. After you run the following command, when you run eb init, EB CLI will
recognize that your application is set up with Git.
git init .
Step 2: Set Up Your Express Development
Environment
Set up Express and create the project structure.The following walks you through setting up Express on
a Linux operating system.
To set up your Express development environment on your local computer
1. Install node.js. For instructions, go to http://nodejs.org/.Verify you have a successful installation
before proceeding to the next step.
$ node -v
Note
For information about what Node.js versions are supported, see Supported Platforms (p.19).
2. Create a directory for your express application.
$ mkdir node-express
$ cd node-express
3. Install npm if you don't already have it installed. Here's one example of how to install npm.
node-express# cd . && yum install npm
4. Install Express globally so that you have access to the express command.
node-express# npm install -g express-generator
5. Depending on your operating system, you may need to set your path to run the express command.
If you need to set your path, use the output from the previous step when you installed Express.The
following is an example.
API Version 2010-12-01
180
Elastic Beanstalk Developer Guide
Step 1: Set Up Your Git Repository

node-express# export:PATH=$PATH:/usr/local/share/npm/bin/express
6. Run the express command.This generates package.json.
node-express# express
When prompted if you want to continue, type y.
7. Set up local dependencies.
node-express# cd . && npm install
8. Verify it works.
node-express# npm start
You should see output similar to the following:
Express server listening on port 3000
Press Ctrl+C to stop the server.
9. Initialize the Git repository.
node-express# git init
10. Edit the .gitignore file and add the following files and directories to it.These files will be excluded
from being added to the repository. This step is not required, but it is recommended.
node-express# cat > .gitignore <<EOT
node_modules/
.gitignore
.elasticbeanstalk/
EOT
Step 3: Configure Elastic Beanstalk
You use eb, a command line tool, to configure Elastic Beanstalk. If you haven't already installed eb on
your local computer, do that now at the AWS Sample Code & Libraries website. If you are running eb on
a Linux operating system, you will need to install Python 2.7 or 3.0.
Before you use eb, set your PATH to the location of eb. The following table shows an example for
Linux/UNIX and Windows.
API Version 2010-12-01
181
Elastic Beanstalk Developer Guide
Step 3: Configure Elastic Beanstalk

In WindowsIn Linux and UNIX
C:\> set PATH=%PATH%;<path to unzipped
eb CLI package>\eb\windows\
$ export PATH=$PATH:<path to unzipped
eb CLI package>/eb/linux/python2.7/
If you are using Python 3.0, the path will include
python3 rather than python2.7.
Use the init command, and Elastic Beanstalk will prompt you to enter this information. If a default value
is available, and you want to use it, press Enter.
To configure Elastic Beanstalk
1. From the directory where you created your local repository, type the following command:
eb init
2. When you are prompted for the Elastic Beanstalk region, type the number of the region. For information
about this product's regions, go to Regions and Endpoints in the Amazon Web Services General
Reference. For this example, we'll use US West (Oregon).
3. When you are prompted for the Elastic Beanstalk application to use, type the number corresponding
to the option Create new Application. Elastic Beanstalk generates an application name based on
the current directory name if an application name has not been previously configured. In this example,
we use expressapp.
Enter an AWS Elastic Beanstalk application name (auto-generated value is
"node-express"): expressapp
Note
If you have a space in your application name, make sure you do not use quotation marks.
4. Type y if Elastic Beanstalk correctly detected the correct platform you are using.Type n if not, and
then specify the correct platform.
5. When prompted, type y if you want to set up Secure Shell (SSH) to connect to your instances. Type
n if you do not want to set up SSH. In this example, we will type n.
Do you want to set up SSH for your instances?
(y/n): n
6. Create your running environment.
eb create
7. When you are prompted for the Elastic Beanstalk environment name, type the name of the
environment. Elastic Beanstalk automatically creates an environment name based on your application
name. If you want to accept the default, press Enter.
Enter Environment Name
(default is HelloWorld-env):
API Version 2010-12-01
182
Elastic Beanstalk Developer Guide
Step 3: Configure Elastic Beanstalk

Note
If you have a space in your application name, make sure you do not have a space in your
environment name.
8. When you are prompted to provide a CNAME prefix, type the CNAME prefix you want to use. Elastic
Beanstalk automatically creates a CNAME prefix based on the environment name. If you want to
accept the default, press Enter.
Enter DNS CNAME prefix
(default is HelloWorld):
EB CLI will display your environment details and the status of the create operation.
To deploy a sample application
• From the directory where you created your local repository, type the following command:
eb deploy
This process may take several minutes to complete. Elastic Beanstalk will provide status updates
during the process. If at any time you want to stop polling for status updates, press Ctrl+C. Once
the environment status is Green, Elastic Beanstalk will output a URL for the application.You can
copy and paste the URL into your web browser to view the application.
Step 4:View the Application
To view the application
• To open your application in a browser window, type the following:
eb open
Step 5: Update the Application
After you have deployed a sample application, you can update it with your own application. In this step,
we update the sample application to use the Express framework.You can download the final source code
from http://elasticbeanstalk-samples-us-east-1.s3.amazonaws.com/nodejs-example-express.zip.
To update your application to use Express
1. Stage the files.
node-express# git add .
node-express# git commit -m "First express app"
node-express# eb deploy
2. Once the environment is green and ready, refresh the URL to verify it worked.You should see a web
page that says "Welcome to Express".
API Version 2010-12-01
183
Elastic Beanstalk Developer Guide
Step 4:View the Application

Next, let's update the Express application to server static files and add a new page.
To configure static files and add a new page to your Express application
1. On your local computer, create an .ebextensions directory in the top-level directory of your source
bundle. In this example, we use node-express/.ebextensions.
2. Create a configuration file, /node-express/.ebextensions/static.config. For more
information about the configuration file, see Customizing and Configuring a Node.js
Environment (p. 213). Type the following inside the configuration file to configure static files:
option_settings:
- namespace: aws:elasticbeanstalk:container:nodejs:staticfiles
option_name: /public
value: /public
3. On your local computer, comment out the static mapping in node-express/app.js. This step is
not required, but it is a good test to see if the static mappings are configured correctly.
// app.use(express.static(path.join(__dirname, 'public')));
4. Add your updated files to your local repository and commit your changes.
node-express# git add .ebextensions/ app.js
node-express# git commit -m "Making stylesheets be served by nginx."
5. On your local computer, add node-express/routes/hike.js. Type the following:
exports.index = function(req, res) {
res.render('hike', {title: 'My Hiking Log'});
};
exports.add_hike = function(req, res) {
};
6. On your local computer, update node-express/app.js to include three new lines.
First, add the following line to add a require for this route:
, hike = require('./routes/hike');
Your file should look similar to the following snippet:
var express = require('express')
, routes = require('./routes')
, user = require('./routes/user')
, http = require('http')
, path = require('path')
, hike = require('./routes/hike');
Then, add the following two lines to node-express/app.js after app.get('/users', users.list);
API Version 2010-12-01
184
Elastic Beanstalk Developer Guide
Step 5: Update the Application

app.get('/hikes', hike.index);
app.post('/add_hike', hike.add_hike);
Your file should look similar to the following snippet:
app.get('/', routes.index);
app.get('/users', user.list);
app.get('/hikes', hike.index);
app.post('/add_hike', hike.add_hike);
7. On your local computer, copy node-express/views/index.jade to
node-express/views/hike.jade.
node-express# cp views/index.jade views/hike.jade
8. Add your files to the local repository, commit your changes, and deploy your updated application.
node-express# git add .
node-express# git commit -m "added new file"
node-express# eb deploy
9. Your environment will be updated after a few minutes. After your environment is green and ready,
verify it worked by refreshing your browser and appending hikes at the end of the URL (e.g.,
http://node-express-env-syypntcz2q.elasticbeanstalk.com/hikes).
You should see a web page titled My Hiking Log.
Next, let's update the application to add a database.
To update your application with a database
1. On your local computer, update node-express/app.js to add the database information and add
a record to the database.You can also copy app.js from http://
elasticbeanstalk-samples-us-east-1.s3.amazonaws.com/nodejs-example-express.zip.
/**
* Module dependencies.
*/
var express = require('express')
, routes = require('./routes')
, user = require('./routes/user')
, hike = require('./routes/hike')
, http = require('http')
, path = require('path')
, mysql = require('mysql')
, async = require('async');
var app = express();
app.configure(function(){
app.set('port', process.env.PORT || 3000);
app.set('views', __dirname + '/views');
API Version 2010-12-01
185
Elastic Beanstalk Developer Guide
Step 5: Update the Application

app.set('view engine', 'jade');
app.use(express.favicon());
app.use(express.logger('dev'));
app.use(express.bodyParser());
app.use(express.methodOverride());
app.use(app.router);
// app.use(express.static(path.join(__dirname, 'public')));
});
app.configure('development', function() {
console.log('Using development settings.');
app.set('connection', mysql.createConnection({
host: '',
user: '',
port: '',
password: ''}));
app.use(express.errorHandler());
});
app.configure('production', function() {
console.log('Using production settings.');
app.set('connection', mysql.createConnection({
host: process.env.RDS_HOSTNAME,
user: process.env.RDS_USERNAME,
password: process.env.RDS_PASSWORD,
port: process.env.RDS_PORT}));
});
function init() {
app.get('/', routes.index);
app.get('/users', user.list);
app.get('/hikes', hike.index);
app.post('/add_hike', hike.add_hike);
http.createServer(app).listen(app.get('port'), function(){
console.log("Express server listening on port " + app.get('port'));
});
}
var client = app.get('connection');
async.series([
function connect(callback) {
client.connect(callback);
},
function clear(callback) {
client.query('DROP DATABASE IF EXISTS mynode_db', callback);
},
function create_db(callback) {
client.query('CREATE DATABASE mynode_db', callback);
},
function use_db(callback) {
client.query('USE mynode_db', callback);
},
function create_table(callback) {
client.query('CREATE TABLE HIKES (' +
'ID VARCHAR(40), ' +
'HIKE_DATE DATE, ' +
'NAME VARCHAR(40), ' +
API Version 2010-12-01
186
Elastic Beanstalk Developer Guide
Step 5: Update the Application

'DISTANCE VARCHAR(40), ' +
'LOCATION VARCHAR(40), ' +
'WEATHER VARCHAR(40), ' +
'PRIMARY KEY(ID))', callback);
},
function insert_default(callback) {
var hike = {HIKE_DATE: new Date(), NAME: 'Hazard Stevens',
LOCATION: 'Mt Rainier', DISTANCE: '4,027m vertical', WEATHER:'Bad'};
client.query('INSERT INTO HIKES set ?', hike, callback);
}
], function (err, results) {
if (err) {
console.log('Exception initializing database.');
throw err;
} else {
console.log('Database initialization complete.');
init();
}
});
2. On your local computer, update node-express/views/hike.jade to display a record from the
database.
extends layout
block content
h1= title
p Welcome to #{title}
div
h3 Hikes
table(border="1")
tr
td Date
td Name
td Location
td Distance
td Weather
each hike in hikes
tr
td #{hike.HIKE_DATE.toDateString()}
td #{hike.NAME}
td #{hike.LOCATION}
td #{hike.DISTANCE}
td #{hike.WEATHER}
3. On your local computer, update node-express/routes/hike.js to configure the route to show
the record.
var uuid = require('node-uuid');
exports.index = function(req, res) {
res.app.get('connection').query( 'SELECT * FROM HIKES', function(err,
rows) {
API Version 2010-12-01
187
Elastic Beanstalk Developer Guide
Step 5: Update the Application

if (err) {
res.send(err);
} else {
console.log(JSON.stringify(rows));
res.render('hike', {title: 'My Hiking Log', hikes: rows});
}});
};
exports.add_hike = function(req, res){
};
4. On your local computer, update node-express/package.json to add dependencies.
{
"name": "application-name",
"version": "0.0.1",
"private": true,
"scripts": {
"start": "node app"
},
"dependencies": {
"express": "3.1.0",
"jade": "*",
"mysql": "*",
"async": "*",
"node-uuid": "*"
}
}
5. On your local computer, update node-express/.ebextensions/static.config to add a
production flag to the environment variables.
option_settings:
- namespace: aws:elasticbeanstalk:container:nodejs:staticfiles
option_name: /public
value: /public
- option_name: NODE_ENV
value: production
6. Add your files to the local repository, commit your changes, and deploy your updated application.
node-express# git add .
node-express# git commit -m "updated files"
node-express# eb deploy
7. Your environment will be updated after a few minutes. After your environment is green and ready,
verify it worked by refreshing your URL. Remember to append hikes at the end of the URL.You
should see the following page.
API Version 2010-12-01
188
Elastic Beanstalk Developer Guide
Step 5: Update the Application

Next, update the application to accept new entries and display records from the database.
To update the application to allow new entries into the database
1. On your local computer, update node-express/views/hike.jade so the user can enter new
entries. Add the form block inside the block content.
extends layout
block content
h1= title
p Welcome to #{title}
form(action="/add_hike", method="post")
table(border="1")
tr
td Your Name
td
input(name="hike[NAME]", type="textbox")
tr
td Location
td
input(name="hike[LOCATION]", type="textbox")
tr
td Distance
td
input(name="hike[DISTANCE]", type="textbox")
tr
td Weather
td
input(name="hike[WEATHER]", type="radio", value="Good")
| Good
input(name="hike[WEATHER]", type="radio", value="Bad")
| Bad
input(name="hike[WEATHER]", type="radio", value="Seattle", checked)
| Seattle
tr
td(colspan="2")
input(type="submit", value="Record Hike")
div
API Version 2010-12-01
189
Elastic Beanstalk Developer Guide
Step 5: Update the Application

h3 Hikes
table(border="1")
tr
td Date
td Name
td Location
td Distance
td Weather
each hike in hikes
tr
td #{hike.HIKE_DATE.toDateString()}
td #{hike.NAME}
td #{hike.LOCATION}
td #{hike.DISTANCE}
td #{hike.WEATHER}
2. On your local computer, update node-express/routes/hike.js to accept new entries. Update
exports.add_hike to be the following.
exports.add_hike = function(req, res){
var input = req.body.hike;
var hike = { HIKE_DATE: new Date(), ID: uuid.v4(), NAME: input.NAME,
LOCATION: input.LOCATION, DISTANCE: input.DISTANCE, WEATHER: input.WEATH
ER};
console.log('Request to log hike:' + JSON.stringify(hike));
req.app.get('connection').query('INSERT INTO HIKES set ?', hike, func
tion(err) {
if (err) {
res.send(err);
} else {
res.redirect('/hikes');
}
});
};
3. Add your files to the local repository, commit your changes, and deploy your updated application.
node-express# git add .
node-express# git commit -m "added new file"
node-express# eb deploy
4. Your environment will be updated after a few minutes. After your environment is green and ready,
verify it worked by refreshing your URL and adding a couple of entries. Remember to append hikes
at the end of the URL.You should see a page similar to the following diagram.
API Version 2010-12-01
190
Elastic Beanstalk Developer Guide
Step 5: Update the Application

Step 6: Clean Up
If you no longer want to run your application, you can clean up by terminating your environment and
deleting your application.
Use the terminate command to terminate your environment and the delete command to delete your
application.
To terminate your environment and delete the application
• From the directory where you created your local repository, type the following command:
eb terminate
This process may take a few minutes. Elastic Beanstalk displays a message once the environment
has been successfully terminated.
Note
If you attached an Amazon RDS DB instance to your environment, your Amazon RDS DB
will be deleted, and you will lose your data.To save your data, create a snapshot before
you delete the application. For instructions on how to create a snapshot, go to Creating a
DB Snapshot in the Amazon Relational Database Service User Guide.
Deploying an Express Application with
Clustering to Elastic Beanstalk
This section walks you through deploying a sample application to Elastic Beanstalk using EB Command
Line Interface (CLI) 3.x and Git, and then updating the application to use the Express framework and
Amazon ElastiCache for clustering. Clustering enhances your web application's high availability,
API Version 2010-12-01
191
Elastic Beanstalk Developer Guide
Step 6: Clean Up

performance, and security. To learn more about Amazon ElastiCache, go to Introduction to ElastiCache
in the Amazon ElastiCache User Guide.
Note
This example creates AWS resources, which you may be charged for. For more information
about AWS pricing, go to http://aws.amazon.com/pricing/. Some services are part of the AWS
Free Usage Tier. If you are a new customer, you may test drive these services for free. Go to
http://aws.amazon.com/free/ for more information.
Step 1: Set Up Your Git Repository
EB CLI is a command line interface that you can use with Git to deploy applications quickly and more
easily. EB is available as part of the Elastic Beanstalk command line tools package. For instructions to
install EB CLI, see Getting Set Up with EB Command Line Interface (CLI) 3.x (p. 621).
Initialize your Git repository. After you run the following command, when you run eb init, EB CLI will
recognize that your application is set up with Git.
git init .
Step 2: Set Up Your Express Development
Environment
Set up Express and create the project structure.The following walks you through setting up Express on
a Linux operating system.
To set up your Express development environment on your local computer
1. Install node.js. For instructions, go to http://nodejs.org/.Verify you have a successful installation
before proceeding to the next step.
$ node -v
Note
For information about what Node.js versions are supported, see Supported Platforms (p.19).
2. Create a directory for your Express application.
$ mkdir express-cluster
$ cd express-cluster
3. Install npm.
express-cluster# cd . && yum install npm
4. Install Express globally so that you have access to the express command.
express-cluster# npm install -g express-generator
5. Depending on your operating system, you may need to set your path to run the express command.
If you need to set your path, use the output from the previous step when you installed Express.The
following is an example.
API Version 2010-12-01
192
Elastic Beanstalk Developer Guide
Step 1: Set Up Your Git Repository

express-cluster# export:PATH=$PATH:/usr/local/share/npm/bin/express
6. Run the express command.This generates package.json.
express-cluster# express
When prompted if you want to continue, type y.
7. Set up local dependencies
express-cluster# cd . && npm install
8. Verify it works.
express-cluster# node app
You should see output similar to the following:
Express server listening on port 3000
Press Ctrl+C to stop the server.
9. Initialize the Git repository.
express-cluster# git init
10. Exclude the following files from being added to the repository. This step is not required, but it is
recommended.
express-cluster# cat > .gitignore <<EOT
node_modules/
.gitignore
.elasticbeanstalk/
EOT
Step 3: Configure Elastic Beanstalk
You use eb, a command line tool, to configure Elastic Beanstalk. If you haven't already installed eb on
your local computer, do that now at the AWS Sample Code & Libraries website. If you are running eb on
a Linux operating system, you will need to install Python 2.7 or 3.0.
Before you use eb, set your PATH to the location of eb. The following table shows an example for
Linux/UNIX and Windows.
API Version 2010-12-01
193
Elastic Beanstalk Developer Guide
Step 3: Configure Elastic Beanstalk

In WindowsIn Linux and UNIX
C:\> set PATH=%PATH%;<path to unzipped
eb CLI package>\eb\windows\
$ export PATH=$PATH:<path to unzipped
eb CLI package>/eb/linux/python2.7/
If you are using Python 3.0, the path will include
python3 rather than python2.7.
Use the init command, and Elastic Beanstalk will prompt you to enter this information. If a default value
is available, and you want to use it, press Enter.
To configure Elastic Beanstalk
1. From the directory where you created your local repository, type the following command:
eb init
2. When you are prompted for the Elastic Beanstalk region, type the number of the region. For information
about this product's regions, go to Regions and Endpoints in the Amazon Web Services General
Reference. For this example, we'll use US West (Oregon).
3. When you are prompted for the Elastic Beanstalk application to use, type the number corresponding
to the option Create new Application. Elastic Beanstalk generates an application name based on
the current directory name if an application name has not been previously configured. In this example,
we use expressapp.
Enter an AWS Elastic Beanstalk application name (auto-generated value is
"express-cluster"): expressclusterapp
Note
If you have a space in your application name, make sure you do not use quotation marks.
4. Type y if Elastic Beanstalk correctly detected the correct platform you are using.Type n if not, and
then specify the correct platform.
5. When prompted, type y if you want to set up Secure Shell (SSH) to connect to your instances. Type
n if you do not want to set up SSH. In this example, we will type n.
Do you want to set up SSH for your instances?
(y/n): n
6. Create your running environment.
eb create
7. When you are prompted for the Elastic Beanstalk environment name, type the name of the
environment. Elastic Beanstalk automatically creates an environment name based on your application
name. If you want to accept the default, press Enter.
Enter Environment Name
(default is HelloWorld-env):
API Version 2010-12-01
194
Elastic Beanstalk Developer Guide
Step 3: Configure Elastic Beanstalk

Note
If you have a space in your application name, make sure you do not have a space in your
environment name.
8. When you are prompted to provide a CNAME prefix, type the CNAME prefix you want to use. Elastic
Beanstalk automatically creates a CNAME prefix based on the environment name. If you want to
accept the default, press Enter.
Enter DNS CNAME prefix
(default is HelloWorld):
After configuring Elastic Beanstalk, you are ready to deploy a sample application.
If you want to update your Elastic Beanstalk configuration, you can use the init command again.When
prompted, you can update your configuration options. If you want to keep any previous settings, press
the Enter key.
To deploy a sample application
• From the directory where you created your local repository, type the following command:
eb deploy
This process may take several minutes to complete. Elastic Beanstalk will provide status updates
during the process. If at any time you want to stop polling for status updates, press Ctrl+C. Once
the environment status is Green, Elastic Beanstalk will output a URL for the application.You can
copy and paste the URL into your web browser to view the application.
Step 4:View the Application
To view the application
• To open your application in a browser window, type the following:
eb open
Step 5: Update the Application
After you have deployed a sample application, you can update it with your own application. In this step,
we update the sample application to use the Express framework.You can download the final source code
from http://elasticbeanstalk-samples-us-east-1.s3.amazonaws.com/nodejs-example-express-elasticache.zip.
To update your application to use Express
1. On your local computer, rename express-cluster/app.js to
express-cluster/express-app.js.
express-cluster# mv app.js express-app.js
2. Update the line var app = express(); in express-cluster/express-app.js to the following:
API Version 2010-12-01
195
Elastic Beanstalk Developer Guide
Step 4:View the Application

var app = module.exports = express();
3. On your local computer, create a file named express-cluster/app.js with the following code.
var cluster = require('cluster'),
app = require('./express-app');
var workers = {},
count = require('os').cpus().length;
function spawn(){
var worker = cluster.fork();
workers[worker.pid] = worker;
return worker;
}
if (cluster.isMaster) {
for (var i = 0; i < count; i++) {
spawn();
}
cluster.on('death', function(worker) {
console.log('worker ' + worker.pid + ' died. spawning a new process...');
delete workers[worker.pid];
spawn();
});
} else {
app.listen(process.env.PORT || 5000);
}
4. Stage the files.
express-cluster# git add .
express-cluster# git commit -m "First express app"
express-cluster# eb deploy
5. Your environment will be updated after a few minutes. Once the environment is green and ready,
refresh the URL to verify it worked.You should see a web page that says "Welcome to Express".
You can access the logs for your EC2 instances running your application. For instructions on accessing
your logs, see Working with Logs (p. 415).
Next, let's update the Express application to use Amazon ElastiCache.
To update your Express application to use Amazon ElastiCache
1. On your local computer, create an .ebextensions directory in the top-level directory of your source
bundle. In this example, we use express-cluster/.ebextensions.
2. Create a configuration file
express-cluster/.ebextensions/elasticache-iam-with-script.config with the following
snippet. For more information about the configuration file, see Customizing and Configuring a Node.js
Environment (p. 213). This creates an IAM user with the permissions required to discover the
elasticache nodes and writes to a file anytime the cache changes.You can also copy the file from
http://elasticbeanstalk-samples-us-east-1.s3.amazonaws.com/nodejs-example-express-elasticache.zip.
API Version 2010-12-01
196
Elastic Beanstalk Developer Guide
Step 5: Update the Application

For more information on the ElastiCache properties, see Example Snippets: ElastiCache (p.459). For
a more complete reference, see AWS Resource Types Reference (p. 802).
Note
Configuration files should conform to YAML or JSON formatting standards. For example,
indentation is critical to the proper interpretation of YAML. For more information, go to http://
www.yaml.org/start.html or http://www.json.org, respectively. For more information about
using configuration files to deploy an application to Elastic Beanstalk, see Using Configuration
Files (p. 431).
Resources:
MyElastiCache:
Type: AWS::ElastiCache::CacheCluster
Properties:
CacheNodeType:
Fn::GetOptionSetting:
OptionName : CacheNodeType
DefaultValue: cache.m1.small
NumCacheNodes:
Fn::GetOptionSetting:
OptionName : NumCacheNodes
DefaultValue: 1
Engine:
Fn::GetOptionSetting:
OptionName : Engine
DefaultValue: memcached
CacheSecurityGroupNames:
- Ref: MyCacheSecurityGroup
MyCacheSecurityGroup:
Type: AWS::ElastiCache::SecurityGroup
Properties:
Description: "Lock cache down to webserver access only"
MyCacheSecurityGroupIngress:
Type: AWS::ElastiCache::SecurityGroupIngress
Properties:
CacheSecurityGroupName:
Ref: MyCacheSecurityGroup
EC2SecurityGroupName:
Ref: AWSEBSecurityGroup
AWSEBAutoScalingGroup :
Metadata :
ElastiCacheConfig :
CacheName :
Ref : MyElastiCache
CacheSize :
Fn::GetOptionSetting:
OptionName : NumCacheNodes
DefaultValue: 1
WebServerUser :
Type : AWS::IAM::User
Properties :
Path : "/"
Policies:
-
PolicyName: root
PolicyDocument :
Statement :
-
API Version 2010-12-01
197
Elastic Beanstalk Developer Guide
Step 5: Update the Application

Effect : Allow
Action :
- cloudformation:DescribeStackResource
- cloudformation:ListStackResources
- elasticache:DescribeCacheClusters
Resource : "*"
WebServerKeys :
Type : AWS::IAM::AccessKey
Properties :
UserName :
Ref: WebServerUser
Outputs:
WebsiteURL:
Description: sample output only here to show inline string function
parsing
Value: |
http://`{ "Fn::GetAtt" : [ "AWSEBLoadBalancer", "DNSName" ] }`
MyElastiCacheName:
Description: Name of the elasticache
Value:
Ref : MyElastiCache
NumCacheNodes:
Description: Number of cache nodes in MyElastiCache
Value:
Fn::GetOptionSetting:
OptionName : NumCacheNodes
DefaultValue: 1
files:
"/etc/cfn/cfn-credentials" :
content : |
AWSAccessKeyId=`{ "Ref" : "WebServerKeys" }`
AWSSecretKey=`{ "Fn::GetAtt" : ["WebServerKeys", "SecretAccessKey"]
}`
mode : "000400"
owner : root
group : root
"/etc/cfn/get-cache-nodes" :
content : |
# Define environment variables for command line tools
export AWS_ELASTICACHE_HOME="/home/ec2-user/elasticache/$(ls /home/ec2-
user/elasticache/)"
export AWS_CLOUDFORMATION_HOME=/opt/aws/apitools/cfn
export PATH=$AWS_CLOUDFORMATION_HOME/bin:$AWS_ELASTICACHE_HOME/bin:$PATH
export AWS_CREDENTIAL_FILE=/etc/cfn/cfn-credentials
export JAVA_HOME=/usr/lib/jvm/jre
# Grab the Cache node names and configure the PHP page
cfn-list-stack-resources `{ "Ref" : "AWS::StackName" }` --region `{
"Ref" : "AWS::Region" }` | grep MyElastiCache | awk '{print $3}' | xargs -
I {} elasticache-describe-cache-clusters {} --region `{ "Ref" : "AWS::Region"
}` --show-cache-node-info | grep CACHENODE | awk '{print $4 ":" $5}' > `{
"Fn::GetOptionSetting" : { "OptionName" : "NodeListPath", "DefaultValue"
: "/var/www/html/nodelist" } }`
mode : "000500"
API Version 2010-12-01
198
Elastic Beanstalk Developer Guide
Step 5: Update the Application

owner : root
group : root
"/etc/cfn/hooks.d/cfn-cache-change.conf" :
"content": |
[cfn-cache-size-change]
triggers=post.update
path=Resources.AWSEBAutoScalingGroup.Metadata.ElastiCacheConfig
action=/etc/cfn/get-cache-nodes
runas=root
sources :
"/home/ec2-user/elasticache" : "https://s3.amazonaws.com/elasticache-
downloads/AmazonElastiCacheCli-latest.zip"
commands:
make-elasticache-executable:
command: chmod -R ugo+x /home/ec2-user/elasticache/*/bin/*
packages :
"yum" :
"aws-apitools-cfn" : []
container_commands:
initial_cache_nodes:
command: /etc/cfn/get-cache-nodes
3. On your local computer, create a configuration file
express-cluster/.ebextensions/elasticache_settings.config with the following snippet
to configure ElastiCache.
option_settings:
"aws:elasticbeanstalk:customoption" :
CacheNodeType : cache.m1.small
NumCacheNodes : 1
Engine : memcached
NodeListPath : /var/nodelist
4. On your local computer, replace express-cluster/express-app.js with the following snippet.
This file reads the nodes list from disk (/var/nodelist) and configures express to use memcached
as a session store if nodes are present.Your file should look like the following.
/**
* Module dependencies.
*/
var express = require('express'),
fs = require('fs'),
filename = '/var/nodelist',
app = module.exports = express();
var MemcachedStore = require('connect-memcached')(express);
function setup(cacheNodes) {
app.configure(function(){
API Version 2010-12-01
199
Elastic Beanstalk Developer Guide
Step 5: Update the Application

app.use(express.bodyParser());
app.use(express.methodOverride());
if (cacheNodes) {
app.use(express.cookieParser());
console.log('Using memcached store nodes:');
console.log(cacheNodes);
app.use(express.session({
secret: 'your secret here',
store: new MemcachedStore({'hosts':cacheNodes})
}));
} else {
console.log('Not using memcached store.');
app.use(express.cookieParser('your secret here'));
app.use(express.session());
}
app.use(app.router);
});
app.get('/', function(req, resp){
resp.writeHead(200, "Content-type: text/html");
resp.write("You are session: " + req.session.id);
resp.end();
});
if (!module.parent) {
console.log('Running express without cluster.');
app.listen(process.env.PORT || 5000);
}
}
// Load elasticache configuration.
fs.readFile(filename, 'UTF8', function(err, data) {
if (err) throw err;
var cacheNodes = [];
if (data) {
var lines = data.split('\n');
for (var i = 0 ; i < lines.length ; i++) {
if (lines[i].length > 0) {
cacheNodes.push(lines[i]);
}
}
}
setup(cacheNodes);
});
5. On your local computer, update express-cluster/package.json to add connect-memcached
to the dependencies.
{
"name": "application-name",
"version": "0.0.1",
"private": true,
"scripts": {
"start": "node app"
API Version 2010-12-01
200
Elastic Beanstalk Developer Guide
Step 5: Update the Application

},
"dependencies": {
"express": "3.1.0",
"jade": "*",
"connect-memcached": "*"
}
}
6. Add your updated files to your local repository and commit your changes.
express-cluster# git add .
express-cluster# git commit -m "Adding ElastiCache"
express-cluster# eb deploy
7. Your environment will be updated after a few minutes. After your environment is green and ready,
verify everything worked.
a. Check the Amazon CloudWatch console to view your ElastiCache metrics. To view your
ElastiCache metrics, click ElastiCache in the left pane, and then select ElastiCache: Cache
Node Metrics from the Viewing list.
Note
Make sure you are looking at the same region that you deployed your application to.
If you copy and paste your application URL into another web browser, you should see your
CurrItem count go up to 2 after 5 minutes.
b. Take a snapshot of your logs, and check /var/log/nodejs/nodejs.log. For more information
about logs, see Working with Logs (p. 415).You should see something similar to the following:
API Version 2010-12-01
201
Elastic Beanstalk Developer Guide
Step 5: Update the Application

MemcachedStore initialized for servers: aws-my-
1oys9co8zt1uo.1iwtrn.0001.use1.cache.amazonaws.com:11211
Step 6: Clean Up
If you no longer want to run your application, you can clean up by terminating your environment and
deleting your application.
Use the terminate command to terminate your environment and the delete command to delete your
application.
To terminate your environment and delete the application
• From the directory where you created your local repository, type the following command:
eb terminate
This process may take a few minutes. Elastic Beanstalk displays a message once the environment
has been successfully terminated.
Note
If you attached an Amazon RDS DB instance to your environment, your Amazon RDS DB
will be deleted, and you will lose your data.To save your data, create a snapshot before
you delete the application. For instructions on how to create a snapshot, go to Creating a
DB Snapshot in the Amazon Relational Database Service User Guide.
Deploying a Geddy Application with Clustering
to Elastic Beanstalk
This section walks you through deploying a sample application to Elastic Beanstalk using EB Command
Line Interface (CLI) 3.x and Git, and then updating the application to use the Geddy framework and
Amazon ElastiCache for clustering. Clustering enhances your web application's high availability,
performance, and security. To learn more about Amazon ElastiCache, go to Introduction to ElastiCache
in the Amazon ElastiCache User Guide.
Note
This example creates AWS resources, which you may be charged for. For more information
about AWS pricing, go to http://aws.amazon.com/pricing/. Some services are part of the AWS
Free Usage Tier. If you are a new customer, you may test drive these services for free. Go to
http://aws.amazon.com/free/ for more information.
Step 1: Set Up Your Git Repository
EB CLI is a command line interface that you can use with Git to deploy applications quickly and more
easily. EB is available as part of the Elastic Beanstalk command line tools package. For instructions to
install EB CLI, see Getting Set Up with EB Command Line Interface (CLI) 3.x (p. 621).
Initialize your Git repository. After you run the following command, when you run eb init, EB CLI will
recognize that your application is set up with Git.
API Version 2010-12-01
202
Elastic Beanstalk Developer Guide
Step 6: Clean Up

git init .
Step 2: Set Up Your Geddy Development
Environment
Set up Geddy and create the project structure.The following steps walk you through setting up Geddy
on a Linux operating system.
To set up your Geddy development environment on your local computer
1. Install Node.js. For instructions, go to http://nodejs.org/.Verify you have a successful installation
before proceeding to the next step.
$ node -v
Note
For information about what Node.js versions are supported, see Supported Platforms (p.19).
2. Create a directory for your Geddy application.
$ mkdir node-geddy
$ cd node-geddy
3. Install npm.
node-geddy# cd . && yum install npm
4. Install Geddy globally so that you have geddy generators or start the server.
node-geddy# npm install -g geddy
5. Depending on your operating system, you may need to set your path to run the geddycode> command.
If you need to set your path, use the output from the previous step when you installed Geddy. The
following is an example.
node-geddy# export:PATH=$PATH:/usr/local/share/npm/bin/geddy
6. Create the directory for your application.
node-geddy# geddy app myapp
node-geddy# cd myapp
7. Start the server.Verify everything is working, and then stop the server.
myapp# geddy
myapp# curl localhost:4000 (or use web browser)
Press Ctrl+C to stop the server.
API Version 2010-12-01
203
Elastic Beanstalk Developer Guide
Step 2: Set Up Your Geddy Development Environment

8. Initialize the Git repository.
myapp# git init
9. Exclude the following files from being added to the repository. This step is not required, but it is
recommended.
myapp# cat > .gitignore <<EOT
log/
.gitignore
.elasticbeanstalk/
EOT
Step 3: Configure Elastic Beanstalk
You use eb, a command line tool, to configure Elastic Beanstalk. If you haven't already installed eb on
your local computer, do that now at the AWS Sample Code & Libraries website. If you are running eb on
a Linux operating system, you will need to install Python 2.7 or 3.0.
Before you use eb, set your PATH to the location of eb. The following table shows an example for
Linux/UNIX and Windows.
In WindowsIn Linux and UNIX
C:\> set PATH=%PATH%;<path to unzipped
eb CLI package>\eb\windows\
$ export PATH=$PATH:<path to unzipped
eb CLI package>/eb/linux/python2.7/
If you are using Python 3.0, the path will include
python3 rather than python2.7.
Use the init command, and Elastic Beanstalk will prompt you to enter this information. If a default value
is available, and you want to use it, press Enter.
To configure Elastic Beanstalk
1. From the directory where you created your local repository, type the following command:
eb init
2. When you are prompted for the Elastic Beanstalk region, type the number of the region. For information
about this product's regions, go to Regions and Endpoints in the Amazon Web Services General
Reference. For this example, we'll use US West (Oregon).
3. When you are prompted for the Elastic Beanstalk application to use, type the number corresponding
to the option Create new Application. Elastic Beanstalk generates an application name based on
the current directory name if an application name has not been previously configured. In this example,
we use geddyapp.
Enter an AWS Elastic Beanstalk application name (auto-generated value is
"myapp"): geddyapp
API Version 2010-12-01
204
Elastic Beanstalk Developer Guide
Step 3: Configure Elastic Beanstalk

Note
If you have a space in your application name, make sure you do not use quotation marks.
4. Type y if Elastic Beanstalk correctly detected the correct platform you are using.Type n if not, and
then specify the correct platform.
5. When prompted, type y if you want to set up Secure Shell (SSH) to connect to your instances. Type
n if you do not want to set up SSH. In this example, we will type n.
Do you want to set up SSH for your instances?
(y/n): n
6. Create your running environment.
eb create
7. When you are prompted for the Elastic Beanstalk environment name, type the name of the
environment. Elastic Beanstalk automatically creates an environment name based on your application
name. If you want to accept the default, press Enter.
Enter Environment Name
(default is HelloWorld-env):
Note
If you have a space in your application name, make sure you do not have a space in your
environment name.
8. When you are prompted to provide a CNAME prefix, type the CNAME prefix you want to use. Elastic
Beanstalk automatically creates a CNAME prefix based on the environment name. If you want to
accept the default, press Enter.
Enter DNS CNAME prefix
(default is HelloWorld):
After configuring Elastic Beanstalk, you are ready to deploy a sample application.
If you want to update your Elastic Beanstalk configuration, you can use the init command again.When
prompted, you can update your configuration options. If you want to keep any previous settings, press
the Enter key.
Step 5:View the Application
To view the application
• To open your application in a browser window, type the following:
eb open
API Version 2010-12-01
205
Elastic Beanstalk Developer Guide
Step 5:View the Application

Step 6: Update the Application
After you have deployed a sample application, you can update it with your own application. In this step,
we update the sample application to use the Geddy framework.You can download the final source code
from http://elasticbeanstalk-samples-us-east-1.s3.amazonaws.com/nodejs-example-geddy.zip.
To update your application to use Geddy
1. On your local computer, create a file called node-geddy/myapp/package.json.This file contains
the necessary dependencies.
{
"name": "Elastic_Beanstalk_Geddy",
"version": "0.0.1",
"dependencies": {
"geddy": "0.6.x"
}
}
2. On your local computer, create a file called node-geddy/maypp/app.js as an entry point to the
program.
var geddy = require('geddy');
geddy.startCluster({
hostname: '0.0.0.0',
port: process.env.PORT || '3000',
environment: process.env.NODE_ENV || 'development'
});
The preceding snippet uses an environment variable for the environment setting.You can manually
set the environment to production (environment: 'production'), or you can create an
environment variable and use it like in the above example. We'll create an environment variable and
set the environment to production in the next procedure.
3. Test locally.
myapp# npm install
myapp# node app
The server should start. Press Ctrl+C to stop the server.
4. Deploy to Elastic Beanstalk.
myapp# git add .
myapp# git commit -m "First Geddy app"
myapp# eb deploy
5. Your environment will be updated after a few minutes. Once the environment is green and ready,
refresh the URL to verify it worked.You should see a web page that says "Hello, World!".
API Version 2010-12-01
206
Elastic Beanstalk Developer Guide
Step 6: Update the Application

You can access the logs for your EC2 instances running your application. For instructions on accessing
your logs, see Working with Logs (p. 415).
Next, let's create an environment variable and set the environment to production.
To create an environment variable
1. On your local computer in your project directory (e.g., myapp/), create a directory called
.ebextensions.
2. On your local computer, create a file called node-geddy/myapp/.ebextensions/myapp.config
with the following snippet to set the environment to production.
Note
Configuration files should conform to YAML or JSON formatting standards. For example,
indentation is critical to the proper interpretation of YAML. For more information, go to http://
www.yaml.org/start.html or http://www.json.org, respectively. For more information about
using configuration files to deploy an application to Elastic Beanstalk, see Using Configuration
Files (p. 431).
option_settings:
- option_name: NODE_ENV
value: production
For more information about the configuration file, see Customizing and Configuring a Node.js
Environment (p. 213)
3. Run "geddy secret" to get the secret value.You'll need the secret value to successfully deploy your
application.
myapp# geddy secret
API Version 2010-12-01
207
Elastic Beanstalk Developer Guide
Step 6: Update the Application

You can add node-geddy/myapp/config/secrets.json to .gitignore, or you can put the
secret value in an environment variable and create a command to write out the contents. For this
example, we'll use a command.
4. Add the secret value from node-geddy/myapp/config/secrets.json to the
node-geddy/myapp/.elasticbeanstalk/optionsettings.gettyapp-env file. (The name
of the optionsettings file contains the same extension as your environment name).Your file
should look similar to the following:
[aws:elasticbeanstalk:application:environment]
secret=your geddy secret
PARAM1=
5. Update your Elastic Beanstalk environment with your updated option settings.
myapp# eb update
Verify that your environment is green and ready before proceeding to the next step.
6. On your local computer, create a configuration file
node-geddy/myapp/.ebextensions/write-secret.config with the following command.
container_commands:
01write:
command: |
cat > ./config/secrets.json << SEC_END
{ "secret": "`{ "Fn::GetOptionSetting": {"OptionName": "secret",
"Namespace":"aws:elasticbeanstalk:application:environment"}}`" }
SEC_END
7. Add your files to the local repository, commit your changes, and deploy your updated application.
myapp# git add .
myapp# git commit -m "added config files"
myapp# eb deploy
Your environment will be updated after a few minutes. After your environment is green and ready,
refresh your browser to make sure it worked.You should still see "Hello, World!".
Next, let's update the Geddy application to use Amazon ElastiCache.
To updated your Geddy application to use Amazon ElastiCache
1. On your local computer, create a configuration file
node-geddy/myapp/.ebextensions/elasticache-iam-with-script.config with the
following snippet.This configuration file adds the elasticache resource to the environment and creates
a listing of the nodes in the elasticache on disk at /var/nodelist.You can also copy the file from
http://elasticbeanstalk-samples-us-east-1.s3.amazonaws.com/nodejs-example-geddy.zip. For more
information on the ElastiCache properties, see Example Snippets: ElastiCache (p. 459). For a more
complete reference, see AWS Resource Types Reference (p. 802).
Resources:
MyElastiCache:
Type: AWS::ElastiCache::CacheCluster
API Version 2010-12-01
208
Elastic Beanstalk Developer Guide
Step 6: Update the Application

Properties:
CacheNodeType:
Fn::GetOptionSetting:
OptionName : CacheNodeType
DefaultValue: cache.m1.small
NumCacheNodes:
Fn::GetOptionSetting:
OptionName : NumCacheNodes
DefaultValue: 1
Engine:
Fn::GetOptionSetting:
OptionName : Engine
DefaultValue: memcached
CacheSecurityGroupNames:
- Ref: MyCacheSecurityGroup
MyCacheSecurityGroup:
Type: AWS::ElastiCache::SecurityGroup
Properties:
Description: "Lock cache down to webserver access only"
MyCacheSecurityGroupIngress:
Type: AWS::ElastiCache::SecurityGroupIngress
Properties:
CacheSecurityGroupName:
Ref: MyCacheSecurityGroup
EC2SecurityGroupName:
Ref: AWSEBSecurityGroup
AWSEBAutoScalingGroup :
Metadata :
ElastiCacheConfig :
CacheName :
Ref : MyElastiCache
CacheSize :
Fn::GetOptionSetting:
OptionName : NumCacheNodes
DefaultValue: 1
WebServerUser :
Type : AWS::IAM::User
Properties :
Path : "/"
Policies:
-
PolicyName: root
PolicyDocument :
Statement :
-
Effect : Allow
Action :
- cloudformation:DescribeStackResource
- cloudformation:ListStackResources
- elasticache:DescribeCacheClusters
Resource : "*"
WebServerKeys :
Type : AWS::IAM::AccessKey
Properties :
UserName :
Ref: WebServerUser
Outputs:
API Version 2010-12-01
209
Elastic Beanstalk Developer Guide
Step 6: Update the Application

WebsiteURL:
Description: sample output only here to show inline string function
parsing
Value: |
http://`{ "Fn::GetAtt" : [ "AWSEBLoadBalancer", "DNSName" ] }`
MyElastiCacheName:
Description: Name of the elasticache
Value:
Ref : MyElastiCache
NumCacheNodes:
Description: Number of cache nodes in MyElastiCache
Value:
Fn::GetOptionSetting:
OptionName : NumCacheNodes
DefaultValue: 1
files:
"/etc/cfn/cfn-credentials" :
content : |
AWSAccessKeyId=`{ "Ref" : "WebServerKeys" }`
AWSSecretKey=`{ "Fn::GetAtt" : ["WebServerKeys", "SecretAccessKey"]
}`
mode : "000400"
owner : root
group : root
"/etc/cfn/get-cache-nodes" :
content : |
# Define environment variables for command line tools
export AWS_ELASTICACHE_HOME="/home/ec2-user/elasticache/$(ls /home/ec2-
user/elasticache/)"
export AWS_CLOUDFORMATION_HOME=/opt/aws/apitools/cfn
export PATH=$AWS_CLOUDFORMATION_HOME/bin:$AWS_ELASTICACHE_HOME/bin:$PATH
export AWS_CREDENTIAL_FILE=/etc/cfn/cfn-credentials
export JAVA_HOME=/usr/lib/jvm/jre
# Grab the Cache node names and configure the PHP page
cfn-list-stack-resources `{ "Ref" : "AWS::StackName" }` --region `{
"Ref" : "AWS::Region" }` | grep MyElastiCache | awk '{print $3}' | xargs -
I {} elasticache-describe-cache-clusters {} --region `{ "Ref" : "AWS::Region"
}` --show-cache-node-info | grep CACHENODE | awk '{print $4 ":" $6}' > `{
"Fn::GetOptionSetting" : { "OptionName" : "NodeListPath", "DefaultValue"
: "/var/www/html/nodelist" } }`
mode : "000500"
owner : root
group : root
"/etc/cfn/hooks.d/cfn-cache-change.conf" :
"content": |
[cfn-cache-size-change]
triggers=post.update
path=Resources.AWSEBAutoScalingGroup.Metadata.ElastiCacheConfig
action=/etc/cfn/get-cache-nodes
runas=root
sources :
"/home/ec2-user/elasticache" : "https://s3.amazonaws.com/elasticache-
API Version 2010-12-01
210
Elastic Beanstalk Developer Guide
Step 6: Update the Application

downloads/AmazonElastiCacheCli-latest.zip"
commands:
make-elasticache-executable:
command: chmod -R ugo+x /home/ec2-user/elasticache/*/bin/*
packages :
"yum" :
"aws-apitools-cfn" : []
container_commands:
initial_cache_nodes:
command: /etc/cfn/get-cache-nodes
2. On your local computer, create a configuration file
node-geddy/myapp/.ebextensions/elasticache_settings.config with the following
snippet.
option_settings:
"aws:elasticbeanstalk:customoption" :
CacheNodeType : cache.m1.small
NumCacheNodes : 1
Engine : memcached
NodeListPath : /var/nodelist
3. On your local computer, update node-geddy/myapp/config/production.js. Add the following
line to the top of the file (just below the header).
var fs = require('fs')
Then, add the following snippet just above modules.exports.
var data = fs.readFileSync('/var/nodelist', 'UTF8', function(err) {
if (err) throw err;
});
var nodeList = [];
if (data) {
var lines = data.split('\n');
for (var i = 0 ; i < lines.length ; i++) {
if (lines[i].length > 0) {
nodeList.push(lines[i]);
}
}
}
if (nodeList) {
config.sessions = {
store: 'memcache',
servers: nodeList,
key: 'sid',
expiry: 14*24*60*60
}
}
API Version 2010-12-01
211
Elastic Beanstalk Developer Guide
Step 6: Update the Application

4. On your local computer, update node-geddy/myapp/package.json to include memcached.
{
"name": "Elastic_Beanstalk_Geddy",
"version": "0.0.1",
"dependencies": {
"geddy": "0.6.x",
"memcached": "*"
}
}
5. Add your files to the local repository, commit your changes, and deploy your updated application.
myapp# git add .
myapp# git commit -m "added elasticache functionality"
myapp# git aws.push
6. Your environment will be updated after a few minutes. After your environment is green and ready,
verify everything worked.
a. Check the Amazon CloudWatch console to view your ElastiCache metrics. To view your
ElastiCache metrics, click ElastiCache in the left pane, and then select ElastiCache: Cache
Node Metrics from the Viewing list.
Note
Make sure you are looking at the same region that you deployed your application to.
API Version 2010-12-01
212
Elastic Beanstalk Developer Guide
Step 6: Update the Application

If you copy and paste your application URL into another web browser, you should see your
CurrItem count go up to 2 after 5 minutes.
b. Take a snapshot of your logs, and look in /var/log/nodejs/nodejs.log. For more information
about logs, see Working with Logs (p. 415).You should see something similar to the following:
"sessions": {
"key": "sid",
"expiry": 1209600,
"store": "memcache",
"servers": [
"aws-my-1awjsrz10lnxo.ypsz3t.0001.usw2.cache.amazonaws.com:11211"
]
},
Step 7: Clean Up
If you no longer want to run your application, you can clean up by terminating your environment and
deleting your application.
Use the terminate command to terminate your environment and the delete command to delete your
application.
To terminate your environment and delete the application
• From the directory where you created your local repository, type the following command:
eb terminate
This process may take a few minutes. Elastic Beanstalk displays a message once the environment
has been successfully terminated.
Note
If you attached an Amazon RDS DB instance to your environment, your Amazon RDS DB
will be deleted, and you will lose your data.To save your data, create a snapshot before
you delete the application. For instructions on how to create a snapshot, go to Creating a
DB Snapshot in the Amazon Relational Database Service User Guide.
Customizing and Configuring a Node.js
Environment
When deploying your Node.js application, you may want to customize and configure the behavior of your
EC2 instances.You can easily customize your instances at the same time that you deploy your application
version by including a configuration file with your source bundle. This section walks you through the
process of creating a configuration file and bundling it with your source. For an example walkthrough
using configuration files, see Deploying an Express Application to Elastic Beanstalk (p. 179).
API Version 2010-12-01
213
Elastic Beanstalk Developer Guide
Step 7: Clean Up

To customize and configure your Node.js environment
1. Create a configuration file with the extension .config (e.g., myapp.config) and place it in an
.ebextensions top-level directory of your source bundle.You can have multiple configuration files
in your .ebextensions directory.These files are executed in alphabetical order. For example,
.ebextensions/01run.config is executed before .ebextensions/02do.config.
Configuration files should conform to YAML or JSON formatting standards. For example, indentation
is critical to the proper interpretation of YAML. For more information, go to http://www.yaml.org/
start.html or http://www.json.org, respectively. For more information about using configuration files
to deploy an application to Elastic Beanstalk, see Using Configuration Files (p. 431).
The following is an example snippet of a configuration file. For a full list of Node.js container options,
see Node.js Container Options (p. 730).
# If you do not specify a namespace, the default used is aws:elasticbean
stalk:application:environment
option_settings:
- option_name: AWS_SECRET_KEY
value: wJalrXUtnFEMI/K7MDENG/bPxRfiCYEXAMPLEKEY
- option_name: AWS_ACCESS_KEY_ID
value: AKIAIOSFODNN7EXAMPLE
- namespace: aws:elasticbeanstalk:container:nodejs
option_name: ProxyServer
value: nginx
- namespace: aws:elasticbeanstalk:container:nodejs:staticfiles
option_name: /public
value: /public
Note
You can specify any key-value pairs in the
aws:elasticbeanstalk:application:environment namespace, and they will be
passed in as environment variables on your EC2 instances.
2. Create a package.json file and place it in the top-level directory of your source bundle. A typical
Node.js application will have dependencies on other third-party packages.You specify all the packages
you need (as well as their versions) in a single package.json file. For more information about the
requirements file, go to Requirements files.The following is an example package.json file for the
Express framework.
{
"name": "application-name",
"version": "0.0.1",
"private": true,
"scripts": {
"start": "node app"
},
"dependencies": {
"express": "3.1.0",
"jade": "*",
"mysql": "*",
"async": "*",
"node-uuid": "*"
}
}
3. Deploy your application version.
API Version 2010-12-01
214
Elastic Beanstalk Developer Guide
Customizing and Configuring a Node.js Environment

For an example walkthrough of deploying an Express application, see Deploying an Express Application
to Elastic Beanstalk (p. 179) and Deploying an Express Application with Clustering to Elastic
Beanstalk (p.191). For an example walkthrough of deploying a Geddy application with Amazon ElastiCache,
see Deploying a Geddy Application with Clustering to Elastic Beanstalk (p. 202).
Accessing Environment Configuration Settings
Inside the Node.js environment running in AWS Elastic Beanstalk, you can access the environment
variables using process.env.ENV_VARIABLE similar to the following example.
process.env.PARAM1
process.env.PARAM2
For a list of configuration settings, see Node.js Container Options (p. 730).
Example: Using Configuration Files to Configure
Nginx and Apache
You can use configuration files to make modifications to Apache. For example, if you want to configure
Nginx or Apache to server application/json gzipped, which is not on by default, you would create a
configuration file with the following snippets.
Example 1. Example configuring Nginx
files:
/etc/nginx/conf.d/gzip.conf:
content: |
gzip_types application/json;
Example 2. Example configuring Apache
files:
/etc/httpd/conf.d/gzip.conf:
content: |
AddOutputFilterByType DEFLATE application/json
Deploying a Node.js Application to Elastic
Beanstalk Using the Elastic Beanstalk Console
If you prefer to use a graphical user interface to deploy your Node.js application, you can use the Elastic
Beanstalk console.When using the console, you need to do the following:
1. Create a .zip file containing your application files.
2. Upload your .zip file to Elastic Beanstalk.
To deploy your Node.js application using the Elastic Beanstalk console
1. Create a package.json file and place it in the top-level directory of your source bundle.
API Version 2010-12-01
215
Elastic Beanstalk Developer Guide
Accessing Environment Configuration Settings

The following is an example package.json file for the Express framework.
{
"name": "application-name",
"version": "0.0.1",
"private": true,
"scripts": {
"start": "node app"
},
"dependencies": {
"express": "3.1.0",
"jade": "*",
"mysql": "*",
"async": "*",
"node-uuid": "*"
}
}
2. Create a .zip file containing your application files. By default, Elastic Beanstalk looks for your
application in top-level directory of your source bundle.
3. Using the Elastic Beanstalk console, create a new application and upload your .zip file. For instructions,
see Creating New Applications (p. 279).
4. Once your environment is green and ready, click the URL link on the environment dashboard to view
your application.
Using Amazon RDS with Node.js
With Amazon Relational Database Service (Amazon RDS), you can quickly and easily provision and
maintain a MySQL, Oracle, or Microsoft SQL Server instance in the cloud.This topic explains how you
can use Amazon RDS and Node.js with your Elastic Beanstalk application. For more information about
Amazon RDS, go to http://aws.amazon.com/rds/.
To use Amazon RDS from your Elastic Beanstalk application, you need to do the following:
1. Create an Amazon RDS DB instance.
2. Install a Node.js driver. For information about drivers, go to https://npmjs.org/.
3. Establish a database connection in your code by using the connectivity information for your Amazon
RDS DB instance.
API Version 2010-12-01
216
Elastic Beanstalk Developer Guide
Using Amazon RDS

4. Deploy your application to Elastic Beanstalk.
This topic walks you through the following:
• Using a new Amazon RDS DB instance with your application
• Using an existing Amazon RDS DB instance with your application
Using a New Amazon RDS DB Instance with
Node.js
This topic walks you through creating a new Amazon RDS DB Instance and using it with your Node.js
application.
To use a new Amazon RDS DB Instance and Node.js from your Elastic Beanstalk application
1. Create an Amazon RDS DB Instance.You can create an RDS DB Instance in one of the following
ways:
• Create an Amazon RDS DB instance when you create a new application version. For instructions
using the Elastic Beanstalk console, see Creating New Applications (p. 279). For a sample
walkthrough of an Express application deployment with Amazon RDS using eb, see Deploying an
Express Application to Elastic Beanstalk (p. 179).
• Create an Amazon RDS DB instance when you launch a new environment with an existing
application version. For instructions using the AWS Elastic Beanstalk console, see Launching New
Environments (p. 299).
• If you already deployed an application to Elastic Beanstalk, you can create an Amazon RDS DB
instance and attach it to an existing environment. For instructions using the AWS Elastic Beanstalk
console, see Configuring Databases with Elastic Beanstalk (p.384). If you use eb, use the eb init
command to specify RDS configuration settings, and then use the eb update command to update
your environment.
2. Install the driver you want to use to make your database connection. For more information, go to
https://npmjs.org/.
3. Establish a database connection in your code using your Amazon RDS DB Instance's connectivity
information.You can access your connectivity information using environment variables.The following
shows how you would connect to the database on an RDS instance.
Example 1. Example using node-mysql to connect to an RDS database
var mysql = require('mysql');
var connection = mysql.createConnection({
host : process.env.RDS_HOSTNAME,
user : process.env.RDS_USERNAME,
password : process.env.RDS_PASSWORD,
port : process.env.RDS_PORT
});
For more information about constructing a connection string using node-mysql, go to https://npmjs.org/
package/mysql.
API Version 2010-12-01
217
Elastic Beanstalk Developer Guide
Using a New Amazon RDS DB Instance with Node.js

4. Deploy your updated application to your existing Elastic Beanstalk environment. For information on
how to deploy a new application version to an existing environment using the Elastic Beanstalk
Console, see Step 4: Deploy New Version (p. 7). If you are using eb, commit your changes and
deploy your application. For an example, see Step 5: Update the Application (p. 676).
Using an Existing Amazon RDS DB Instance with
Node.js
You can update your Node.js application to use an Amazon RDS DB Instance that you have previously
created.This topic walks you through how to update your Node.js application using an existing Amazon
RDS DB Instance and deploy your application to Elastic Beanstalk.
To use an existing Amazon RDS DB Instance and Node.js from your Elastic Beanstalk
application
1. Create a new Elastic Beanstalk environment in one of the following ways:
• Create a new application with a new environment. For instructions using the Elastic Beanstalk
console, see Creating New Applications (p. 279). For instructions using eb, see Develop, Test, and
Deploy (p. 174).You do not need to create an RDS DB Instance with this environment because
you already have an existing RDS DB Instance.
• Launch a new environment with an existing application version. For instructions using the Elastic
Beanstalk console, see Launching New Environments (p. 299).You do not need to create an
Amazon RDS DB instance with this environment because you already have an existing Amazon
RDS DB instance.
2. Configure your Amazon RDS DB security group to allow access from the Amazon EC2 security group
used by your Elastic Beanstalk application. For instructions on how to find the name of your EC2
security group using the AWS Management Console, see Amazon EC2 Security Groups (p.354). For
more information, go to the "Authorizing Network Access to an Amazon EC2 Security Group" section
of Working with DB Security Groups in the Amazon Relational Database Service User Guide.
3. Install the driver you want to use to make your database connection. For more information, go to
https://npmjs.org/.
4. Establish a database connection in your code using your Amazon RDS DB instance's connectivity
information.The following examples show how you could connect to the database on an RDS instance
at mydbinstance.abcdefghijkl.us-west-2.rds.amazonaws.com using port 3306, with the user name
"sa" and the password "mypassword".
Example 1. Example using node-mysql to connect to an RDS database
var mysql = require('mysql');
var connection = mysql.createConnection({
host : 'mydbinstance.abcdefghijkl.us-west-2.rds.amazonaws.com;db
name=mydb',
user : 'sa',
password : 'mypassword',
port : '3306'
});
For more information about constructing a connection string using node-mysql, go to https://npmjs.org/
package/mysql.
API Version 2010-12-01
218
Elastic Beanstalk Developer Guide
Using an Existing Amazon RDS DB Instance with Node.js

5. Deploy your updated application to your existing Elastic Beanstalk environment. For information on
how to deploy a new application version to an existing environment using the Elastic Beanstalk
Console, see Step 4: Deploy New Version (p. 7). If you are using eb, commit your changes and
deploy your application. For an example, see Step 5: Update the Application (p. 676).
Tools
AWS SDK for Node.js
With the AWS SDK for Node.js, you can get started in minutes with a single, downloadable package
complete with the AWS Node.js library, code samples, and documentation.You can build Node.js
applications on top of APIs that take the complexity out of coding directly against web services interfaces.
The all-in-one library provides developer-friendly APIs that hide much of the lower-level tasks associated
with programming for the AWS cloud, including authentication, request retries, and error handling. Practical
examples are provided in Node.js for how to use the libraries to build applications. Online video tutorials
and reference documentation are provided to help you learn how to use the libraries and code samples.
For more information about the AWS SDK for Node.js, go to http://aws.amazon.com/sdkfornodejs/.
Git Deployment Via Eb
Eb is an updated command line interface for AWS Elastic Beanstalk that enables you to deploy applications
quickly and more easily. To learn how to get started deploying a Node.js application to AWS Elastic
Beanstalk using eb and Git, see Develop, Test, and Deploy (p. 174).
Resources
There are several places you can go to get additional help when developing your Node.js applications:
DescriptionResource
Install the AWS SDK for Node.js using GitHub.GitHub
Post your questions and get feedback.Node.js Development Forum
One-stop shop for sample code, documentation, tools, and
additional resources.
AWS SDK for Node.js (Developer Pre-
view)
API Version 2010-12-01
219
Elastic Beanstalk Developer Guide
Tools

Deploying Elastic Beanstalk
Applications in PHP
Topics
• Develop, Test, and Deploy (p. 220)
• Deploying a Symfony2 Application to Elastic Beanstalk (p. 225)
• Deploying a CakePHP Application to Elastic Beanstalk (p. 230)
• Deploying Elastic Beanstalk Applications in PHP Using the Elastic Beanstalk Console (p. 235)
• Customizing and Configuring a PHP Environment (p. 236)
• Using Amazon RDS with PHP (p. 237)
• Tools (p. 240)
• Resources (p. 241)
Elastic Beanstalk for PHP makes it easy to deploy, manage, and scale your PHP web applications using
Amazon Web Services. Elastic Beanstalk for PHP is available to anyone developing or hosting a web
application using PHP.This section provides instructions for deploying your PHP web application to
Elastic Beanstalk.You can deploy your application in just a few minutes using EB Command Line Interface
(CLI) 3.x and Git or by using the Elastic Beanstalk management console. It also provides walkthroughs
for common frameworks such as CakePHP and Symfony2. For instructions on managing your application
and environments using the console, CLIs, or APIs, see Managing and Configuring Applications and
Environments Using the Console, CLI, and APIs (p. 278).
Note
This section discusses deploying applications using a non-legacy PHP container. If you are
running an application using a legacy PHP container, then we recommend that you migrate to
a non-legacy PHP container. For instructions on how to check if you are running a legacy container
and to migrate to a non-legacy container, see Migrating Your Application from a Legacy Container
Type (p. 426). If you require instructions to deploy an application using a legacy PHP container,
see Getting Started with Eb (p. 672).
Develop,Test, and Deploy
The following diagram illustrates a typical software development life cycle including deploying your
application to Elastic Beanstalk.
API Version 2010-12-01
220
Elastic Beanstalk Developer Guide
Develop,Test, and Deploy

Typically, after developing and testing your application locally, you will deploy your application to Elastic
Beanstalk. At this point, your application will be live at a URL such as
http://myexampleapp-wpams3yrvj.elasticbeanstalk.com. Because your application will be live, you should
consider setting up multiple environments, such as a testing environment and a production environment.
You can point your domain name to the Amazon Route 53 (a highly available and scalable Domain Name
System (DNS) web service) CNAME <yourappname>.elasticbeanstalk.com. Contact your DNS provider
to set this up. For information about how to map your root domain to your Elastic Load Balancer, see
Using Elastic Beanstalk with Amazon Route 53 to Map Your Domain to Your Load Balancer (p. 528). After
you remotely test and debug your Elastic Beanstalk application, you can then make any updates and
redeploy to Elastic Beanstalk. After you are satisfied with all of your changes, you can upload your latest
version to your production environment.The following sections provide more details explaining each
stage of the software development life cycle.
This section walks you through the steps to deploy a PHP application to Elastic Beanstalk using eb. If
you want instructions on how to deploy a PHP application using the Elastic Beanstalk console, see
Deploying Elastic Beanstalk Applications in PHP Using the Elastic Beanstalk Console (p. 235).
Get Set Up
EB CLI is a command line interface that you can use with Git to deploy applications quickly and more
easily. EB is available as part of the Elastic Beanstalk command line tools package. For instructions to
install EB CLI, see Getting Set Up with EB Command Line Interface (CLI) 3.x (p. 621).
Initialize your Git repository. After you run the following command, when you run eb init, EB CLI will
recognize that your application is set up with Git.
git init .
Develop Locally
After installing EB CLI on your local computer, you use the Git command line as you normally would to
create your local repository and add and commit changes.You create your PHP application as you
normally would with your favorite editor. If you don't already have a PHP application ready, you can use
a simple "Hello World" application. Type the following program into your favorite editor, and save it as a
PHP file.
<html>
<head>
<title>PHP Test</title>
</head>
<body>
<?php echo '<p>Hello World</p>'; ?>
</body>
</html>
API Version 2010-12-01
221
Elastic Beanstalk Developer Guide
Get Set Up

Next, create a new local repository, add your new program, and commit your change.
git add index.php
git commit -m "initial check-in"
Note
For information about Git commands, go to Git - Fast Version Control System.
Test Locally
Normally, at this point you would test your application locally before deploying to Elastic Beanstalk.
Suppose you find a few issues you would like to fix. Using the above "Hello World" application, add a "!"
after "Hello World" and check in your changes. Update your index.php file, and then type the following
commands to check in your updated file.
git add index.php
git commit -m "my second check-in"
After you commit your changes, you should see a response similar to the following:
[master 0535814] my second check-in
1 files changed, 1 insertions(+), 1 deletions(-)
Note the commit ID that is generated.This ID is used to generate a version label for your application.
Deploy to AWS Elastic Beanstalk
After testing your application, you are ready to deploy it to Elastic Beanstalk. Deploying requires the
following steps:
• Configure Elastic Beanstalk.
• Deploy a sample application.
• Update the sample application with your application.
When you update the sample application with your application, Elastic Beanstalk replaces the existing
sample application version with your new application version in the existing environment.
Use the init command, and Elastic Beanstalk will prompt you to enter this information. If a default value
is available, and you want to use it, press Enter.
Before you use eb, set your PATH to the location of eb. The following table shows an example for
Linux/UNIX and Windows.
In WindowsIn Linux and UNIX
C:\> set PATH=%PATH%;<path to unzipped
eb CLI package>\eb\windows\
$ export PATH=$PATH:<path to unzipped
eb CLI package>/eb/linux/python2.7/
If you are using Python 3.0, the path will include
python3 rather than python2.7.
API Version 2010-12-01
222
Elastic Beanstalk Developer Guide
Test Locally

To configure Elastic Beanstalk
1. From the directory where you created your local repository, type the following command:
eb init
2. When you are prompted for the Elastic Beanstalk region, type the number of the region. For information
about this product's regions, go to Regions and Endpoints in the Amazon Web Services General
Reference. For this example, we'll use US West (Oregon).
3. When you are prompted for the Elastic Beanstalk application to use, type the number corresponding
to the option Create new Application. Elastic Beanstalk generates an application name based on
the current directory name if an application name has not been previously configured. In this example,
we use HelloWorld.
Enter an AWS Elastic Beanstalk application name (auto-generated value is
"windows"): HelloWorld
Note
If you have a space in your application name, make sure you do not use quotation marks.
4. Type y if Elastic Beanstalk correctly detected the correct platform you are using.Type n if not, and
then specify the correct platform.
5. When prompted, type y if you want to set up Secure Shell (SSH) to connect to your instances. Type
n if you do not want to set up SSH. In this example, we will type n.
Do you want to set up SSH for your instances?
(y/n): n
6. Create your running environment.
eb create
7. When you are prompted for the Elastic Beanstalk environment name, type the name of the
environment. Elastic Beanstalk automatically creates an environment name based on your application
name. If you want to accept the default, press Enter.
Enter Environment Name
(default is HelloWorld-env):
Note
If you have a space in your application name, make sure you do not have a space in your
environment name.
8. When you are prompted to provide a CNAME prefix, type the CNAME prefix you want to use. Elastic
Beanstalk automatically creates a CNAME prefix based on the environment name. If you want to
accept the default, press Enter.
Enter DNS CNAME prefix
(default is HelloWorld):
After configuring Elastic Beanstalk, you are ready to deploy a sample application.
API Version 2010-12-01
223
Elastic Beanstalk Developer Guide
Deploy to AWS Elastic Beanstalk

If you want to update your Elastic Beanstalk configuration, you can use the init command again.When
prompted, you can update your configuration options. If you want to keep any previous settings, press
the Enter key.
To update the sample application with your local application
1. Type the following command.
eb deploy
2. If everything worked as expected, you should see something similar to the following:
Counting objects: 5, done.
Delta compression using up to 4 threads.
Compressing objects:100% (2/2), done.
Writing objects: 100% (3/3), 298 bytes, done.
Total 3 (delta 1), reused 0 (delta 0)
To https://<some long string>@git.elasticbeanstalk.us-west-
2.amazon.com/helloworld/helloworldenv
44c7066..b1f11a1 master -> master
3. Verify that your application has been updated by refreshing your web browser.
Note
The running version is updated and begins with the commit ID from your last commit.
Debug/View Logs
You can use the eb logs command to investigate any issues. If you do not specify any flags with the
command, logs will be displayed in the command window. For other ways to retrieve logs using this
command, see logs (p. 654).
Edit the Application and Redeploy
Now that you have tested your application, it is easy to edit your application, redeploy, and see the results
in moments. First, make changes to your application and commit your changes. Then deploy a new
application version to your existing Elastic Beanstalk environment.
git add index.php
git commit -m "my third check-in"
git aws.push
A new application version will be uploaded to your Elastic Beanstalk environment.
You can use the AWS Management Console, CLI, or APIs to manage your Elastic Beanstalk environment.
For more information, see Managing and Configuring Applications and Environments Using the Console,
CLI, and APIs (p. 278).
You can also configure Git to push from a specific branch to a specific environment. For more information,
see Deploying a Git Branch to a Specific Environment (p. 677).
API Version 2010-12-01
224
Elastic Beanstalk Developer Guide
Debug/View Logs

Deploy to Production
When you are satisfied with all of the changes you want to make to your application, you can deploy it to
your production environment.To deploy your application to a new environment, do the following:
1. Commit your changes
2. Create a branch
3. Create and launch your new environment
4. Deploy your application to your new production environment
When you update your application using EB CLI, Elastic Beanstalk will create a new application version.
For information on how to deploy an already existing application version to a new environment, see
Launching New Environments (p.299).The following steps walk you through committing your new changes
and then updating your environment with a new application version using EB CLI and Git.
To deploy to production using EB CLI
1. Commit your changes.
git add .
git commit -m "final checkin"
2. Create a branch and switch to it.
git checkout -b prodenv
eb use prod
3. When prompted, type your new environment name, and accept all settings from your previous
environment.
4. When you are ready, deploy your new application version to Elastic Beanstalk.
eb deploy
Deploy an Existing Application Version to an
Existing Environment
If you need to deploy an existing application to an existing environment, you can do so using the AWS
Management Console, CLI, or APIs.You may want to do this if, for instance, you need to roll back to a
previous application version. For instructions on how to deploy an existing application version to an
existing environment, see Deploying Versions to Existing Environments (p. 313).
Deploying a Symfony2 Application to Elastic
Beanstalk
This section walks you through deploying a sample application to Elastic Beanstalk using EB Command
Line Interface (CLI) 3.x and Git, and then updating the application to use the Symfony2 framework.
API Version 2010-12-01
225
Elastic Beanstalk Developer Guide
Deploy to Production

Step 1: Set Up Your Git Repository
EB CLI is a command line interface that you can use with Git to deploy applications quickly and more
easily. EB is available as part of the Elastic Beanstalk command line tools package. For instructions to
install EB CLI, see Getting Set Up with EB Command Line Interface (CLI) 3.x (p. 621).
Initialize your Git repository. After you run the following command, when you run eb init, EB CLI will
recognize that your application is set up with Git.
git init .
Step 2: Set Up Your Symfony2 Development
Environment
Set up Symfony2 and create the project structure.The following walks you through setting up Symfony2
on a Linux operating system. For more information, go to http://symfony.com/download.
To set up your PHP development environment on your local computer
1. Download and install composer from getcomposer.org. For more information, go to http://
getcomposer.org/download/.
curl -s https://getcomposer.org/installer | php
2. Install Symfony2 Standard Edition with Composer. Check http://symfony.com/download for the latest
available version. Using the following command, composer will install the vendor libraries for you.
php composer.phar create-project symfony/framework-standard-edition sym
fony2_example/ <version number>
cd symfony2_example
Note
You may need to set the date.timezone in the php.ini to successfully complete installation.
Also provide parameters for Composer, as needed.
3. Initialize the Git repository.
git init
4. Update the .gitignore file to ignore vendor, cache, logs, and composer.phar.These files do not need
to get pushed to the remote server.
cat > .gitignore <<EOT
app/bootstrap.php.cache
app/cache/*
app/logs/*
vendor
composer.phar
EOT
5. Generate the hello bundle.
API Version 2010-12-01
226
Elastic Beanstalk Developer Guide
Step 1: Set Up Your Git Repository

php app/console generate:bundle --namespace=Acme/HelloBundle --format=yml
When prompted, accept all defaults. For more information, go to Creating Pages in Symfony2.
Next, configure Composer. Composer dependencies require that you set the HOME or COMPOSER_HOME
environment variable. Also configure Composer to self-update so that you always use the latest version.
To configure Composer
1. Create a configuration file with the extension .config (e.g., composer.config) and place it in an
.ebextensions directory at the top level of your source bundle.You can have multiple configuration
files in your .ebextensions directory. For information about the file format of configuration files,
see Using Configuration Files (p. 431).
Note
Configuration files should conform to YAML or JSON formatting standards. For more
information, go to http://www.yaml.org/start.html or http://www.json.org, respectively.
2. In the .config file, type the following.
commands:
01updateComposer:
command: export COMPOSER_HOME=/root && /usr/bin/composer.phar self-update
option_settings:
- namespace: aws:elasticbeanstalk:application:environment
option_name: COMPOSER_HOME
value: /root
Step 3: Configure Elastic Beanstalk
You use eb, a command line tool, to configure Elastic Beanstalk. If you haven't already installed eb on
your local computer, do that now at the AWS Sample Code & Libraries website. If you are running eb on
a Linux operating system, you will need to install Python 2.7 or 3.0.
Before you use eb, set your PATH to the location of eb. The following table shows an example for
Linux/UNIX and Windows.
In WindowsIn Linux and UNIX
C:\> set PATH=%PATH%;<path to unzipped
eb CLI package>\eb\windows\
$ export PATH=$PATH:<path to unzipped
eb CLI package>/eb/linux/python2.7/
If you are using Python 3.0, the path will include
python3 rather than python2.7.
Use the init command, and Elastic Beanstalk will prompt you to enter this information. If a default value
is available, and you want to use it, press Enter.
To configure Elastic Beanstalk
1. From the directory where you created your local repository, type the following command:
API Version 2010-12-01
227
Elastic Beanstalk Developer Guide
Step 3: Configure Elastic Beanstalk

eb init
2. When you are prompted for the Elastic Beanstalk region, type the number of the region. For information
about this product's regions, go to Regions and Endpoints in the Amazon Web Services General
Reference. For this example, we'll use US West (Oregon).
3. When you are prompted for the Elastic Beanstalk application name, type the name of the application.
Elastic Beanstalk generates an application name based on the current directory name if an application
name has not been previously configured. In this example, we use symfony2app.
Enter an AWS Elastic Beanstalk application name (auto-generated value is
"windows"): symfony2app
Note
If you have a space in your application name, make sure you do not use quotation marks.
4. Type y if Elastic Beanstalk correctly detected the correct platform you are using.Type n if not, and
then specify the correct platform.
5. When prompted, type y if you want to set up Secure Shell (SSH) to connect to your instances. Type
n if you do not want to set up SSH. In this example, we will type n.
Do you want to set up SSH for your instances?
(y/n): n
6. Create your running environment.
eb create
7. When you are prompted for the Elastic Beanstalk environment name, type the name of the
environment. Elastic Beanstalk automatically creates an environment name based on your application
name. If you want to accept the default, press Enter.
Enter Environment Name
(default is HelloWorld-env):
Note
If you have a space in your application name, make sure you do not have a space in your
environment name.
8. When you are prompted to provide a CNAME prefix, type the CNAME prefix you want to use. Elastic
Beanstalk automatically creates a CNAME prefix based on the environment name. If you want to
accept the default, press Enter.
Enter DNS CNAME prefix
(default is HelloWorld):
After configuring Elastic Beanstalk, you are ready to deploy a sample application.
If you want to update your Elastic Beanstalk configuration, you can use the init command again.When
prompted, you can update your configuration options. If you want to keep any previous settings, press
the Enter key.
API Version 2010-12-01
228
Elastic Beanstalk Developer Guide
Step 3: Configure Elastic Beanstalk

To deploy a sample application
• From the directory where you created your local repository, type the following command:
eb deploy
This process may take several minutes to complete. Elastic Beanstalk will provide status updates
during the process. If at any time you want to stop polling for status updates, press Ctrl+C. Once
the environment status is Green, Elastic Beanstalk will output a URL for the application.You can
copy and paste the URL into your web browser to view the application.
Step 4:View the Application
To view the application
• To open your application in a browser window, type the following:
eb open
Step 5: Update the Application
After you have deployed a sample application, you can update it with your own application. In this step,
we update the sample application with a simple "Hello World" Symfony2 application.
To update the sample application
1. Add your files to your local Git repository, and then commit your change.
git add -A && git commit -m "Initial commit"
Note
For information about Git commands, go to Git - Fast Version Control System.
2. Create an application version matching your local repository and deploy to the Elastic Beanstalk
environment if specified.
eb deploy
You can also configure Git to push from a specific branch to a specific environment. For more
information, see "Using Git with EB CLI" in the topic Getting Started with EB CLI 3.x (p. 627).
3. After your environment is Green and Ready, append /web/hello/AWS to the URL of your application.
The application should write out "Hello AWS!"
You can access the logs for your EC2 instances running your application. For instructions on accessing
your logs, see Working with Logs (p. 415).
Step 6: Clean Up
If you no longer want to run your application, you can clean up by terminating your environment and
deleting your application.
API Version 2010-12-01
229
Elastic Beanstalk Developer Guide
Step 4:View the Application

Use the terminate command to terminate your environment and the delete command to delete your
application.
To terminate your environment and delete the application
• From the directory where you created your local repository, type the following command:
eb terminate
This process may take a few minutes. Elastic Beanstalk displays a message once the environment
has been successfully terminated.
Note
If you attached an Amazon RDS DB instance to your environment, your Amazon RDS DB
will be deleted, and you will lose your data.To save your data, create a snapshot before
you delete the application. For instructions on how to create a snapshot, go to Creating a
DB Snapshot in the Amazon Relational Database Service User Guide.
Deploying a CakePHP Application to Elastic
Beanstalk
This section walks you through deploying a sample application to Elastic Beanstalk using EB Command
Line Interface (CLI) 3.x and Git, and then updating the application to use the CakePHP framework.
Note
This example uses Amazon RDSs, and you may be charged for its usage. For more information
about pricing, go to Amazon Relational Database Service (RDS) Pricing. If you are a new
customer, you can make use of the AWS Free Usage Tier. For details, go to AWS Free Usage
Tier.
Step 1: Set Up Your Git Repository
EB CLI is a command line interface that you can use with Git to deploy applications quickly and more
easily. EB is available as part of the Elastic Beanstalk command line tools package. For instructions to
install EB CLI, see Getting Set Up with EB Command Line Interface (CLI) 3.x (p. 621).
Initialize your Git repository. After you run the following command, when you run eb init, EB CLI will
recognize that your application is set up with Git.
git init .
Step 2: Set Up Your CakePHP Development
Environment
Set up CakePHP and create the project structure.The following steps walk you through setting up
CakePHP on a Linux operating system. For more information, go to http://book.cakephp.org/2.0/en/
installation.html.
To set up your PHP development environment on your local computer
1. Download the latest release of CakePHP.This can be done using the .zip file available from GitHub.
API Version 2010-12-01
230
Elastic Beanstalk Developer Guide
Deploying a CakePHP Application

mkdir ~/cakephp_example
cd ~/cakephp_example
wget https://github.com/cakephp/cakephp/archive/2.2.4.zip
unzip 2.2.4.zip && rm 2.2.4.zip
mv cakephp-2.2.4/* . && rm -rf cakephp-2.2.4
2. Initialize the Git repository.
git init
3. Copy the database settings over.
cp app/Config/database.php.default app/Config/database.php
4. CakePHP excludes app/Config by default from being committed to a repository. (The .gitignore
file that comes with CakePHP also excludes app/tmp by default from being committed to a repository.)
When deploying to Elastic Beanstalk, we need the database to be configured so that it reads database
settings from environment variables. So we need to make sure we do not exclude our database
settings. Update the .gitignore file so that it does not exclude our database settings.
cat > .gitignore <<EOT
/lib/Cake/Console/Templates/skel/tmp/
/plugins
/vendors
/build
/dist
.DS_Store
/tags
.elasticbeanstalk/
EOT
Step 3: Configure Elastic Beanstalk
You use eb, a command line tool, to configure Elastic Beanstalk. If you haven't already installed eb on
your local computer, do that now at the AWS Sample Code & Libraries website. If you are running eb on
a Linux operating system, you will need to install Python 2.7 or 3.0.
Before you use eb, set your PATH to the location of eb. The following table shows an example for
Linux/UNIX and Windows.
In WindowsIn Linux and UNIX
C:\> set PATH=%PATH%;<path to unzipped
eb CLI package>\eb\windows\
$ export PATH=$PATH:<path to unzipped
eb CLI package>/eb/linux/python2.7/
If you are using Python 3.0, the path will include
python3 rather than python2.7.
Use the init command, and Elastic Beanstalk will prompt you to enter this information. If a default value
is available, and you want to use it, press Enter.
API Version 2010-12-01
231
Elastic Beanstalk Developer Guide
Step 3: Configure Elastic Beanstalk

To configure Elastic Beanstalk
1. From the directory where you created your local repository, type the following command:
eb init
2. When you are prompted for the Elastic Beanstalk region, type the number of the region. For information
about this product's regions, go to Regions and Endpoints in the Amazon Web Services General
Reference. For this example, we'll use US West (Oregon).
3. When you are prompted for the Elastic Beanstalk application name, type the name of the application.
Elastic Beanstalk generates an application name based on the current directory name if an application
name has not been previously configured. In this example, we use cakephpapp.
Enter an AWS Elastic Beanstalk application name (auto-generated value is
"windows"): cakephpapp
Note
If you have a space in your application name, make sure you do not use quotation marks.
4. Type y if Elastic Beanstalk correctly detected the correct platform you are using.Type n if not, and
then specify the correct platform.
5. When prompted, type y if you want to set up Secure Shell (SSH) to connect to your instances. Type
n if you do not want to set up SSH. In this example, we will type n.
Do you want to set up SSH for your instances?
(y/n): n
6. Create your running environment.
eb create
7. When you are prompted for the Elastic Beanstalk environment name, type the name of the
environment. Elastic Beanstalk automatically creates an environment name based on your application
name. If you want to accept the default, press Enter.
Enter Environment Name
(default is HelloWorld-env):
Note
If you have a space in your application name, make sure you do not have a space in your
environment name.
8. When you are prompted to provide a CNAME prefix, type the CNAME prefix you want to use. Elastic
Beanstalk automatically creates a CNAME prefix based on the environment name. If you want to
accept the default, press Enter.
Enter DNS CNAME prefix
(default is HelloWorld):
After configuring Elastic Beanstalk, you are ready to deploy a sample application.
API Version 2010-12-01
232
Elastic Beanstalk Developer Guide
Step 3: Configure Elastic Beanstalk

If you want to update your Elastic Beanstalk configuration, you can use the init command again.When
prompted, you can update your configuration options. If you want to keep any previous settings, press
the Enter key.
To deploy a sample application
• From the directory where you created your local repository, type the following command:
eb deploy
This process may take several minutes to complete. Elastic Beanstalk will provide status updates
during the process. If at any time you want to stop polling for status updates, press Ctrl+C. Once
the environment status is Green, Elastic Beanstalk will output a URL for the application.You can
copy and paste the URL into your web browser to view the application.
Step 4:View the Application
To view the application
• To open your application in a browser window, type the following:
eb open
Step 5: Update the Application
After you have deployed a sample application, you can update the sample application with your own
application. In this step, we'll update the sample application with a simple "Hello World" CakePHP
application.
To update the sample application
1. On your local computer, modify the app/Config/database.php to include RDS database settings.
You'll need to add a block of code above the `class DATABASE_CONFIG {` line that defines constant
values for RDS configurations.You then need to modify the public $default value to use the constants.
if (!defined('RDS_HOSTNAME')) {
define('RDS_HOSTNAME', $_SERVER['RDS_HOSTNAME']);
define('RDS_USERNAME', $_SERVER['RDS_USERNAME']);
define('RDS_PASSWORD', $_SERVER['RDS_PASSWORD']);
define('RDS_DB_NAME', $_SERVER['RDS_DB_NAME']);
}
class DATABASE_CONFIG {
public $default = array(
'datasource' => 'Database/Mysql',
'persistent' => false,
'host' => RDS_HOSTNAME,
'login' => RDS_USERNAME,
'password' => RDS_PASSWORD,
'database' => RDS_DB_NAME,
'prefix' => '',
API Version 2010-12-01
233
Elastic Beanstalk Developer Guide
Step 4:View the Application

//'encoding' => 'utf8',
);
public $test = array(
'datasource' => 'Database/Mysql',
'persistent' => false,
'host' => 'localhost',
'login' => 'user',
'password' => 'password',
'database' => 'test_database_name',
'prefix' => '',
//'encoding' => 'utf8',
);
}
2. Add your files to your local Git repository, and then commit your change.
git add -A && git commit -m "eb config"
Note
For information about Git commands, go to Git - Fast Version Control System.
3. Create an application version matching your local repository and deploy to the Elastic Beanstalk
environment if specified.
eb deploy
You can also configure Git to push from a specific branch to a specific environment. For more
information, see "Using Git with EB CLI" in the topic Getting Started with EB CLI 3.x (p. 627).
You can access the logs for your EC2 instances running your application. For instructions on accessing
your logs, see Working with Logs (p. 415).
Step 6: Clean Up
If you no longer want to run your application, you can clean up by terminating your environment and
deleting your application.
Use the terminate command to terminate your environment and the delete command to delete your
application.
To terminate your environment and delete the application
• From the directory where you created your local repository, type the following command:
eb terminate
This process may take a few minutes. Elastic Beanstalk displays a message once the environment
has been successfully terminated.
Note
If you attached an Amazon RDS DB instance to your environment, your Amazon RDS DB
will be deleted, and you will lose your data.To save your data, create a snapshot before
API Version 2010-12-01
234
Elastic Beanstalk Developer Guide
Step 6: Clean Up

you delete the application. For instructions on how to create a snapshot, go to Creating a
DB Snapshot in the Amazon Relational Database Service User Guide.
Deploying Elastic Beanstalk Applications in PHP
Using the Elastic Beanstalk Console
If you prefer to use a graphical user interface to deploy your PHP application, you can use the Elastic
Beanstalk console.When using the console, you need to do the following:
1. Create a .zip file containing your application files.
2. Upload your .zip file to Elastic Beanstalk.
3. Configure the path for your root document.
To deploy your PHP application using the Elastic Beanstalk console
1. Create a .zip file containing your application files. By default, Elastic Beanstalk looks for your root
document in top-level directory of your source bundle. If you place your root document in a child
directory (e.g., <yourproject>/public), you will need to configure the path for the document root.
In this example, we'll use the following directory structure for your .zip file.
myproject/public/index.php
2. Using the Elastic Beanstalk console, create a new application and upload your .zip file. For instructions,
see Creating New Applications (p. 279).
3. Once your environment is green and ready, click the URL link on the environment dashboard to view
your application.
4. Update the document root settings to point to the child directory. In the console, click Configuration
and then click for Software Configuration in order to edit the container settings. For more
information, see Configuring PHP Containers with Elastic Beanstalk (p. 404).
API Version 2010-12-01
235
Elastic Beanstalk Developer Guide
Deploying Using the Console

It will take a few minutes to update your environment.
Customizing and Configuring a PHP
Environment
When deploying your PHP application, you may want to customize and configure the behavior of your
EC2 instances.You can easily customize your instances at the same time that you deploy your application
version by including a configuration file with your source bundle. This section walks you through the
process of creating a configuration file and bundling it with your source.
Configuration files should conform to YAML or JSON formatting standards. For example, indentation is
critical to the proper interpretation of YAML. For more information, go to http://www.yaml.org/start.html
or http://www.json.org, respectively. For more information about using configuration files to deploy an
application to Elastic Beanstalk, see Using Configuration Files (p. 431).
Note
This section does not apply to PHP containers. If you are running an application using a legacy
PHP container, then we recommend that you migrate to a non-legacy PHP container. For
instructions on how to check if you are running a legacy container and to migrate to a non-legacy
container, see Migrating Your Application from a Legacy Container Type (p. 426). If you require
instructions for managing your environment for a legacy container using the Elastic Beanstalk
console, CLI, or API, see Managing Environments (p. 335).
To customize and configure your PHP environment
1. Create a configuration file with the extension .config (e.g., myapp.config) and place it in an
.ebextensions top-level directory of your source bundle.You can have multiple configuration files
in your .ebextensions directory. For information about the file format and contents of the configuration
file, see Using Configuration Files (p. 431).
API Version 2010-12-01
236
Elastic Beanstalk Developer Guide
Customizing and Configuring a PHP Environment

The following is an example snippet of a configuration file.
# If you do not specify a namespace, the default used is aws:elasticbean
stalk:application:environment
option_settings:
- option_name: PARAM1
value: somevalue
- option_name: PARAM2
value: somevalue2
Note
You can specify any key-value pairs in the
aws:elasticbeanstalk:application:environment namespace, and they will be
passed in as environment variables on your EC2 instances.
2. Deploy your application version.
For an example walkthrough of deploying a Symfony2 application, see Deploying a Symfony2 Application
to Elastic Beanstalk (p. 225). For an example walkthrough of deploying a CakePHP application, see
Deploying a CakePHP Application to Elastic Beanstalk (p. 230).
Accessing Environment Configuration Settings
Inside the PHP environment running in Elastic Beanstalk, these values are written to
/etc/php.d/environment.ini and are accessible using $_SERVER.
Note
The get_cfg_var function is also supported.
You might have a code snippet that looks similar to the following to access the keys and parameters:
echo $_SERVER['PARAM1'];
echo $_SERVER['PARAM2'];
…
echo $_SERVER['PARAM5'];
For a list of configuration settings, see PHP Container Options (p. 731).
Using Amazon RDS with PHP
With Amazon Relational Database Service (Amazon RDS), you can quickly and easily provision and
maintain a MySQL, Oracle, or Microsoft SQL Server instance in the cloud.This topic explains how you
can use Amazon RDS and PHP with your Elastic Beanstalk application. For more information about
Amazon RDS, go to http://aws.amazon.com/rds/.
Note
The instructions in this topic are for non-legacy container types. If you have deployed an Elastic
Beanstalk application using a legacy container type, we recommend that you migrate to a
non-legacy container type to gain access to new features. For instructions on how to check the
container type and migrate your application, see Migrating Your Application from a Legacy
Container Type (p. 426). For instructions on using RDS with applications running on legacy
container types, see Using Amazon RDS with PHP (Legacy Container Types) (p. 815).
To use Amazon RDS from your Elastic Beanstalk application, you need to do the following:
API Version 2010-12-01
237
Elastic Beanstalk Developer Guide
Accessing Environment Configuration Settings

1. Create an Amazon RDS DB instance.
2. If you plan to use PDO, install the PDO drivers. For more information, go to http://www.php.net/manual/
pdo.installation.php.
3. Establish a database connection in your code by using the connectivity information for your Amazon
RDS DB instance.
4. Deploy your application to Elastic Beanstalk.
This topic walks you through the following:
• Using a new Amazon RDS DB instance with your application
• Using an existing Amazon RDS DB instance with your application
Using a New Amazon RDS DB Instance with PHP
This topic walks you through creating a new Amazon RDS DB Instance and using it with your PHP
application.
To use a new Amazon RDS DB Instance and PHP from your Elastic Beanstalk application
1. Create an Amazon RDS DB Instance.You can create an RDS DB Instance in one of the following
ways:
• Create an Amazon RDS DB instance when you create a new application version. For instructions
using the Elastic Beanstalk console, see Creating New Applications (p. 279). For a sample
walkthrough of a CakePHP application deployment with Amazon RDS using eb, see Deploying a
CakePHP Application to Elastic Beanstalk (p. 230).
• Create an Amazon RDS DB instance when you launch a new environment with an existing
application version. For instructions using the AWS Elastic Beanstalk console, see Launching New
Environments (p. 299).
• If you already deployed an application to Elastic Beanstalk, you can create an Amazon RDS DB
instance and attach it to an existing environment. For instructions using the AWS Elastic Beanstalk
console, see Configuring Databases with Elastic Beanstalk (p.384). If you use eb, use the eb init
command to specify RDS configuration settings, and then use the eb update command to update
your environment.
2. If you plan to use PDO, install the PDO drivers. For more information, go to http://www.php.net/
manual/pdo.installation.php.
3. Establish a database connection in your code using your Amazon RDS DB Instance's connectivity
information.You can access your connectivity information using environment variables.The following
shows how you would connect to the database on an RDS instance.
API Version 2010-12-01
238
Elastic Beanstalk Developer Guide
Using a New Amazon RDS DB Instance with PHP

Example 1. Example using PDO to connect to an RDS database
<?php
$dbhost = $_SERVER['RDS_HOSTNAME'];
$dbport = $_SERVER['RDS_PORT'];
$dbname = $_SERVER['RDS_DB_NAME'];
$dsn = "mysql:host={$dbhost};port={$dbport};dbname={$dbname}";
$username = $_SERVER['RDS_USERNAME'];
$password = $_SERVER['RDS_PASSWORD'];
$dbh = new PDO($dsn, $username, $password);
?>
For more information about constructing a connection string using PDO, go to http://us2.php.net/
manual/en/pdo.construct.php.
Example 2. Example using mysqli_connect() to connect to an RDS database
$link = mysqli_connect($_SERVER['RDS_HOSTNAME'], $_SERVER['RDS_USERNAME'],
$_SERVER['RDS_PASSWORD'], $_SERVER['RDS_DB_NAME'], $_SERVER['RDS_PORT']);
For more information on using mysqli_connect(), go to http://www.phpbuilder.com/manual/
function.mysqli-connect.php.
4. Deploy your updated application to your existing Elastic Beanstalk environment. For information on
how to deploy a new application version to an existing environment using the Elastic Beanstalk
Console, see Step 4: Deploy New Version (p. 7). If you are using eb, commit your changes and
deploy your application. For an example, see Step 5: Update the Application (p. 676).
Using an Existing Amazon RDS DB Instance with
PHP
You can update your application to use an Amazon RDS DB Instance that you have previously created.
This topic walks you through how to update your PHP application using an existing Amazon RDS DB
Instance and deploy your application to Elastic Beanstalk.
To use an existing Amazon RDS DB Instance and PHP from your Elastic Beanstalk
application
1. Create an Elastic Beanstalk environment in one of the following ways:
• Create a new application with a new environment. For instructions using the Elastic Beanstalk
console, see Creating New Applications (p.279). For a sample walkthrough of a CakePHP application
deployment with Amazon RDS using eb, see Deploying a CakePHP Application to Elastic
Beanstalk (p. 230).You do not need to create an RDS DB Instance with this environment because
you already have an existing RDS DB Instance.
• Launch a new environment with an existing application version. For instructions using the Elastic
Beanstalk console, see Launching New Environments (p. 299).You do not need to create an
Amazon RDS DB instance with this environment because you already have an existing Amazon
RDS DB instance.
API Version 2010-12-01
239
Elastic Beanstalk Developer Guide
Using an Existing Amazon RDS DB Instance with PHP

2. Configure your Amazon RDS DB security group to allow access from the Amazon EC2 security group
used by your Elastic Beanstalk application. For instructions on how to find the name of your EC2
security group using the AWS Management Console, see Amazon EC2 Security Groups (p.354). For
more information, go to the "Authorizing Network Access to an Amazon EC2 Security Group" section
of Working with DB Security Groups in the Amazon Relational Database Service User Guide.
3. If you plan to use PDO, install the PDO drivers. For more information, go to http://www.php.net/
manual/pdo.installation.php.
4. Establish a database connection in your code using your Amazon RDS DB instance's connectivity
information.The following examples show how you could connect to the database on an RDS instance
at mydbinstance.abcdefghijkl.us-west-2.rds.amazonaws.com using port 3306, with the user name
"sa" and the password "mypassword".
Example 1. Example using PDO to connect to an RDS database
<?php
$dsn = 'mysql:host=mydbinstance.abcdefghijkl.us-east-1.rds.amazon
aws.com;port=3306;dbname=mydb';
$username = 'sa';
$password = 'mypassword';
$dbh = new PDO($dsn, $username, $password);
?>
For more information about constructing a connection string using PDO, go to http://us2.php.net/
manual/en/pdo.construct.php.
Example 2. Example using mysqli_connect() to connect to an RDS database
$link = mysqli_connect('mydbinstance.abcdefghijkl.us-east-1.rds.amazon
aws.com', 'sa', 'mypassword', 'mydb', 3306);
For more information on using mysqli_connect(), go to http://www.phpbuilder.com/manual/
function.mysqli-connect.php.
5. Deploy your updated application to your existing Elastic Beanstalk environment. For information on
how to deploy a new application version to an existing environment using the Elastic Beanstalk
Console, see Step 4: Deploy New Version (p. 7). If you are using eb, commit your changes and
deploy your application. For an example, see Step 5: Update the Application (p. 676).
Tools
AWS SDK for PHP
With the AWS SDK for PHP, you can get started in minutes with a single, downloadable package complete
with the AWS PHP library, code samples, and documentation.You can build PHP applications on top of
APIs that take the complexity out of coding directly against web services interfaces.The all-in-one library
provides PHP developer-friendly APIs that hide much of the lower-level tasks associated with programming
for the AWS cloud, including authentication, request retries, and error handling. Practical examples are
provided in PHP for how to use the libraries to build applications. Online video tutorials and reference
documentation are provided to help you learn how to use the libraries and code samples. For more
information about the AWS SDK for PHP, go to http://aws.amazon.com/sdkforphp/.
API Version 2010-12-01
240
Elastic Beanstalk Developer Guide
Tools

Git Deployment Via Eb
Eb is an updated command line interface for AWS Elastic Beanstalk that enables you to deploy applications
quickly and more easily.To learn how to get started deploying a PHP application to AWS Elastic Beanstalk
using eb and Git, see Develop, Test, and Deploy (p. 220).
Resources
There are several places you can go to get additional help when developing your PHP applications:
DescriptionResource
Install the AWS SDK for PHP using GitHub.GitHub
Post your questions and get feedback.PHP Development Forum
One-stop shop for sample code, documentation, tools, and
additional resources.
PHP Developer Center
Get answers to commonly asked questions.AWS SDK for PHP FAQs
API Version 2010-12-01
241
Elastic Beanstalk Developer Guide
Git Deployment Via Eb

Deploying Elastic Beanstalk
Applications in Python Using EB
CLI and Git
Topics
• Deploying a Django Application to Elastic Beanstalk (p. 243)
• Deploying a Flask Application to Elastic Beanstalk (p. 252)
• Deploying a Python Application to Elastic Beanstalk Using the Elastic Beanstalk Console (p. 256)
• Customizing and Configuring a Python Container (p. 256)
• Using Amazon RDS with Python (p. 258)
• Tools (p. 261)
• Resources (p. 261)
Elastic Beanstalk for Python makes it easy to deploy, manage, and scale your Python web applications
using Amazon Web Services. Elastic Beanstalk is available to anyone developing or hosting a web
application using Python.This section provides step-by-step instructions for deploying a sample application
to Elastic Beanstalk using EB CLI 3.x and Git, and then updating the application to use the Django and
Flask web application frameworks.To complete this walkthrough, you will need to download the command
line tools at the AWS Sample Code & Libraries website, and optionally you can set up a Python
development environment. If you are running EB CLI on a Linux operating system, you will need to install
Python 2.7 or later. If you are running EB CLI on a Windows operating system, install Python 3.4. For
information on setting up a Python development environment, go to virtualenv.
After you deploy your Elastic Beanstalk application, you can use the AWS Management Console, CLIs,
or the APIs to manage your Elastic Beanstalk environment. For more information, see Managing and
Configuring Applications and Environments Using the Console, CLI, and APIs (p. 278).
API Version 2010-12-01
242
Elastic Beanstalk Developer Guide

Deploying a Django Application to Elastic
Beanstalk
This section walks you through deploying a sample application to Elastic Beanstalk using EB Command
Line Interface (CLI) 3.x and Git, and then updating the application to use the Django framework. This
example uses a configuration file to customize and configure the Python container. For more information
about configuration files, see Customizing and Configuring Elastic Beanstalk Environments (p. 430).
Note
This example uses Amazon RDSs, and you may be charged for its usage. For more information
about pricing, go to Amazon Relational Database Service (RDS) Pricing. If you are a new
customer, you can make use of the AWS Free Usage Tier. For details, go to AWS Free Usage
Tier.
Step 1: Set Up Your Git Repository
EB CLI is a command line interface that you can use with Git to deploy applications quickly and more
easily. EB is available as part of the Elastic Beanstalk command line tools package. For instructions to
install EB CLI, see Getting Set Up with EB Command Line Interface (CLI) 3.x (p. 621).
Initialize your Git repository. After you run the following command, when you run eb init, EB CLI will
recognize that your application is set up with Git.
git init .
Step 2: Set Up Your Python Development
Environment
Set up your Python development environment on your local computer and then create the basic structure
for your Python application. For more information, go to virtualenv. In this example, we use an Amazon
Linux EC2 instance as our local python development environment.
To set up your local Python development environment
• Install the necessary packages. Python 2.7 or later is required and only used for EB CLI to run on
the Linux and Mac operating systems. Python 3.4 is required for Windows operating systems. It is
best practice to develop your application using the same Python environment that your application
will be running in production. For information about what Python versions are supported, see Supported
Platforms (p. 19).This example sets up two different environments: one for application development
and one for deployment. On your local computer, make sure you install the Python and MySQL
packages, GCC, pip, eb, and virtualenv.The following commands are examples; specify the paths,
file names, and package names of the versions you want to use.
$ sudo su -
$ yum install -y python27 python27-devel
$ yum install -y gcc mysql mysql-devel
$ yum install -y python-devel
$ yum install -y git
$ wget https://s3.amazonaws.com/elasticbeanstalk/cli/AWS-ElasticBeanstalk-
CLI-2.6.3.zip
$ unzip AWS-ElasticBeanstalk-CLI-2.4.0.zip
$ easy_install pip
API Version 2010-12-01
243
Elastic Beanstalk Developer Guide
Deploying a Django Application

$ pip install http://pypi.python.org/packages/source/v/virtualenv/virtualenv-
1.7.2.tar.gz
Note
You can download the most recent .zip file for the AWS Elastic Beanstalk Command Line
Tool from the AWS Sample Code & Libraries website.
On your local computer, create a virtual environment for django development. For example:
$ virtualenv –p python2.7 /tmp/djangodev
On your local computer, activate virtualenv.
$ . /tmp/djangodev/bin/activate
On your local computer inside your virtual environment, install django and mysql-python. Specify the
version numbers that you want to use.
(djangodev)# pip install django==1.4.1
(djangodev)# pip install mysql-python==1.2.3
Create the django project structure.
(djangodev)# django-admin.py startproject mysite
(djangodev)# cd mysite
Freeze the requirements.txt file.
(djangodev)# pip freeze > requirements.txt
Note
Make sure your requirements.txt file contains the Django and MySQL version numbers that
you want to use.The following is an example requirements.txt file. For more information
about the requirements file, go to Requirements File Format.
Django==1.4.1
MySQL-python==1.2.3
Note
You can verify that the development server is working by typing the following command on
your local computer:
(djangodev)# python manage.py runserver
At this point, you should see the introductory Django page if you start up the dev server. Be sure to
stop the dev server before continuing.
Next, you will configure the Elastic Beanstalk using eb from your local computer.
API Version 2010-12-01
244
Elastic Beanstalk Developer Guide
Step 2: Set Up Your Python Development Environment

Step 3: Configure Elastic Beanstalk
You use eb, a command line tool, to configure Elastic Beanstalk. If you haven't already installed eb on
your local computer, do that now at the AWS Sample Code & Libraries website. If you are running eb on
a Linux operating system, you will need to install Python 2.7 or 3.0.
Before you use eb, set your PATH to the location of eb. The following table shows an example for
Linux/UNIX and Windows.
In WindowsIn Linux and UNIX
C:\> set PATH=%PATH%;<path to unzipped
eb CLI package>\eb\windows\
$ export PATH=$PATH:<path to unzipped
eb CLI package>/eb/linux/python2.7/
If you are using Python 3.0, the path will include
python3 rather than python2.7.
Use the init command, and Elastic Beanstalk will prompt you to enter this information. If a default value
is available, and you want to use it, press Enter.
To configure Elastic Beanstalk
1. Initialize your Git repository. From the /root/mysite directory, type the following:
git init .
2. Create an alias to use EB CLI with Python. Specify the path where you installed EB CLI. On a Linux
operating system, it would look similar to the following example.
alias eb="python2.7 ../AWS-ElasticBeanstalk-CLI-2.4.0/eb/linux/python2.7/eb"
3. From your directory where you created your local repository, type the following command.
eb init
4. When you are prompted for the Elastic Beanstalk region, type the number of the region. For information
about this product's regions, go to Regions and Endpoints in the Amazon Web Services General
Reference. For this example, we'll use US West (Oregon).
5. When you are prompted for the Elastic Beanstalk application name, type the name of the application.
Elastic Beanstalk generates an application name based on the current directory name if an application
name has not been previously configured. In this example, we use djangoapp.
Enter an AWS Elastic Beanstalk application name (auto-generated value is
"windows"): djangoapp
Note
If you have a space in your application name, make sure you do not use quotation marks.
6. Type y if Elastic Beanstalk correctly detected the correct platform you are using.Type n if not, and
then specify the correct platform.
7. When prompted, type y if you want to set up Secure Shell (SSH) to connect to your instances. Type
n if you do not want to set up SSH. In this example, we will type n.
API Version 2010-12-01
245
Elastic Beanstalk Developer Guide
Step 3: Configure Elastic Beanstalk

Do you want to set up SSH for your instances?
(y/n): n
8. Create your running environment.
eb create
9. When you are prompted for the Elastic Beanstalk environment name, type the name of the
environment. Elastic Beanstalk automatically creates an environment name based on your application
name. If you want to accept the default, press Enter.
Enter Environment Name
(default is HelloWorld-env):
Note
If you have a space in your application name, make sure you do not have a space in your
environment name.
10. When you are prompted to provide a CNAME prefix, type the CNAME prefix you want to use. Elastic
Beanstalk automatically creates a CNAME prefix based on the environment name. If you want to
accept the default, press Enter.
Enter DNS CNAME prefix
(default is HelloWorld):
EB CLI will display your environment details and the status of the create operation.
To deploy a sample application
• From the directory where you created your local repository, type the following command:
eb deploy
This process may take several minutes to complete. Elastic Beanstalk will provide status updates
during the process. If at any time you want to stop polling for status updates, press Ctrl+C. Once
the environment status is Green, Elastic Beanstalk will output a URL for the application.You can
copy and paste the URL into your web browser to view the application.
Step 3:View Application
To view the application
• To open your application in a browser window, type the following:
eb open
API Version 2010-12-01
246
Elastic Beanstalk Developer Guide
Step 3:View Application

Step 4: Update Application
After you have deployed a sample application, you can update it with your own application. In this step,
we'll update the sample application to use the Django framework.
To update the sample application
1. On your local computer, create an .ebextensions directory in the top-level directory of your source
bundle. In this example, we use /root/mysite/.ebextensions.
mkdir .ebextensions
2. Create a configuration file with the extension .config (e.g., myapp.config) and place it in the
.ebextensions top-level directory of your source bundle. For more information about the
configuration file, see Customizing and Configuring a Python Container (p. 256).
Note
Configuration files should conform to YAML or JSON formatting standards. For example,
indentation is critical to the proper interpretation of YAML. For more information, go to http://
www.yaml.org/start.html or http://www.json.org, respectively. For more information about
using configuration files to deploy an application to Elastic Beanstalk, see Using Configuration
Files (p. 431).
container_commands:
01_syncdb:
command: "django-admin.py syncdb --noinput"
leader_only: true
option_settings:
- namespace: aws:elasticbeanstalk:container:python
option_name: WSGIPath
value: mysite/wsgi.py
- option_name: DJANGO_SETTINGS_MODULE
value: mysite.settings
In this example, the syncdb command is run on the command header during deployment.The
environment variable DJANGO_SETTINGS_MODULE is set to mysite.settings and is available
to the commands specified in the commands section.WSGIPath for the Apache HTTP Server module
mod_wsgi points to mysite/wsgi.py, which is one of the autogenerated files from the
django-admin.py startproject command. For more information about these options, see
Python Container Options (p. 732).
Note
The DJANGO_SETTINGS_MODULE setting is passed in as an environment variable and
will be available to your application. It is not necessary to provide a "namespace" key to
pass in environment variables.
3. You must also make the AWS secret key and AWS access key ID available to your application as
environment variables.
a. Open the Elastic Beanstalk console at https://console.aws.amazon.com/elasticbeanstalk/.
b. From the region list, select the region that has the environment running the application version
that you want to update with your own application.
c. On the Elastic Beanstalk console applications page, click the name of the environment.
d. In the navigation pane, click Configuration.
API Version 2010-12-01
247
Elastic Beanstalk Developer Guide
Step 4: Update Application

e. On the Configuration page, under Web Tier, next to Software Configuration, click the cog
icon ( ).
f. Under Environment Properties, type your AWS_ACCESS_KEY_ID and AWS_SECRET_KEY,
and then click Save.
At this point, you can close the Elastic Beanstalk console.
4. On your local computer, edit /root/mysite/settings.py to use Amazon RDS. Elastic Beanstalk
has built-in support for Amazon RDS, so when you launch a Python container, you can associate an
Amazon RDS DB Instance. The values of the Amazon RDS parameters are available through
environment variables.
import os
DATABASES = {
'default': {
'ENGINE': 'django.db.backends.mysql',
'NAME': os.environ['RDS_DB_NAME'],
'USER': os.environ['RDS_USERNAME'],
'PASSWORD': os.environ['RDS_PASSWORD'],
'HOST': os.environ['RDS_HOSTNAME'],
'PORT': os.environ['RDS_PORT'],
}
}
5. Add your files to your local Git repository, and then commit your change.
git add .
git commit -m "eb configuration"
Note
For information about Git commands, go to Git - Fast Version Control System.
6. Create an application version matching your local repository and deploy to the Elastic Beanstalk
environment if specified.
eb deploy
You can also configure Git to push from a specific branch to a specific environment. For more
information, see "Using Git with EB CLI" in the topic Getting Started with EB CLI 3.x (p. 627).
7. Use the eb status --verbose command to check your environment status.When your environment
is green and ready, refresh your web browser to view your updated application.You should see the
following.
API Version 2010-12-01
248
Elastic Beanstalk Developer Guide
Step 4: Update Application

You can access the logs for your EC2 instances running your application. For instructions on accessing
your logs, see Working with Logs (p. 415).
Step 5: Configure the Django Admin Site (Optional)
Now that you have your Django application up and running, you can optionally configure the admin
interface. For more information, go to The Django admin site.
To configure the Django admin site
1. On your local computer, edit the /root/mysite/mysite/settings.py file with the following:
• Uncomment the following line in INSTALLED_APPS:
'django.contrib.admin'
Your snippet should look similar to the following:
INSTALLED_APPS = (
'django.contrib.auth',
'django.contrib.contenttypes',
'django.contrib.sessions',
'django.contrib.sites',
'django.contrib.messages',
'django.contrib.staticfiles',
# Uncomment the next line to enable the admin:
'django.contrib.admin',
# Uncomment the next line to enable admin documentation:
# 'django.contrib.admindocs',
)
• Change the value of STATIC_ROOT to create a static directory in the top level of your source
bundle that will contain static content:
STATIC_ROOT = os.path.join(os.path.dirname(os.path.dirname(os.path.ab
spath(__file__))), 'static')
API Version 2010-12-01
249
Elastic Beanstalk Developer Guide
Step 5: Configure the Django Admin Site (Optional)

2. On your local computer, edit the /root/mysite/mysite/urls.py to uncomment out four lines.The file
should look like the following:
from django.conf.urls import patterns, include, url
# Uncomment the next two lines to enable the admin:
from django.contrib import admin
admin.autodiscover()
urlpatterns = patterns('',
# Examples:
url(r'^$', 'mysite.views.home', name='home'),
# url(r'^mysite/', include('mysite.foo.urls')),
# Uncomment the admin/doc line below to enable admin documentation:
# url(r'^admin/doc/', include('django.contrib.admindocs.urls')),
# Uncomment the next line to enable the admin:
url(r'^admin/', include(admin.site.urls)),
)
3. On your local computer, create a file called views.py in the /root/mysite/mysite directory.
from django.http import HttpResponse
def home(request):
return HttpResponse("Hello from django, try out <a href='/admin/'>/ad
min/</a>\n")
4. On your local computer, create a file called createadmin.py and place it in a directory called scripts
in your top level directory (/root/mysite/). Make the script executable.
mkdir scripts
#!/usr/bin/env python
from django.contrib.auth.models import User
if User.objects.count() == 0:
admin = User.objects.create(username='admin')
admin.set_password('admin')
admin.is_superuser = True
admin.is_staff = True
admin.save()
chmod +x scripts/createadmin.py
This creates a user with username/password of admin/admin if there are no users in the database
yet.
5. On your local computer, update your configuration file (e.g., myapp.config) in the .ebextensions
directory.
API Version 2010-12-01
250
Elastic Beanstalk Developer Guide
Step 5: Configure the Django Admin Site (Optional)

container_commands:
01_syncdb:
command: "django-admin.py syncdb --noinput"
leader_only: true
02_createadmin:
command: "scripts/createadmin.py"
leader_only: true
03_collectstatic:
command: "django-admin.py collectstatic --noinput"
option_settings:
- namespace: aws:elasticbeanstalk:container:python
option_name: WSGIPath
value: mysite/wsgi.py
- namespace: aws:elasticbeanstalk:container:python:staticfiles
option_name: /static/
value: static/
- option_name: DJANGO_SETTINGS_MODULE
value: mysite.settings
- option_name: AWS_SECRET_KEY
value: wJalrXUtnFEMI/K7MDENG/bPxRfiCYEXAMPLEKEY
- option_name: AWS_ACCESS_KEY_ID
value: AKIAIOSFODNN7EXAMPLE
The three commands will create the initial database tables, create a user with username "admin"
password "admin", and collect all the static files used by the admin interface and bundle them in the
"static/" directory of your app directory. Files in your directory on your EC2 instance will be mapped
to <your domain>/static/*. For more information about the option settings, see Python Container
Options (p. 732).
Note
The DJANGO_SETTINGS_MODULE, AWS_SECRET_KEY, and AWS_ACCESS_KEY_ID
settings are passed in as environment variables and will be available to your application. It
is not necessary to provide a "namespace" key to pass in environment variables.
6. Add your files to your local Git repository, commit your change, and redeploy.
git add .
git commit -m "configure admin interface"
eb deploy
Step 6: Clean Up
If you no longer want to run your application, you can clean up by terminating your environment and
deleting your application.
Use the terminate command to terminate your environment and the delete command to delete your
application.
To terminate your environment and delete the application
• From the directory where you created your local repository, type the following command:
eb terminate
API Version 2010-12-01
251
Elastic Beanstalk Developer Guide
Step 6: Clean Up

This process may take a few minutes. Elastic Beanstalk displays a message once the environment
has been successfully terminated.
Note
If you attached an Amazon RDS DB instance to your environment, your Amazon RDS DB
will be deleted, and you will lose your data.To save your data, create a snapshot before
you delete the application. For instructions on how to create a snapshot, go to Creating a
DB Snapshot in the Amazon Relational Database Service User Guide.
Deploying a Flask Application to Elastic
Beanstalk
This section walks you through deploying a sample application to Elastic Beanstalk using EB Command
Line Interface (CLI) 3.x and Git, and then updating the application to use the Flask framework. The
following frameworks have been tested with Elastic Beanstalk:
• Flask 0.9
• Flask 0.8
Step 1: Initialize Your Git Repository
EB CLI is a command line interface that you can use with Git to deploy applications quickly and more
easily. EB is available as part of the Elastic Beanstalk command line tools package. For instructions to
install EB CLI, see Getting Set Up with EB Command Line Interface (CLI) 3.x (p. 621).
Initialize your Git repository. After you run the following command, when you run eb init, EB CLI will
recognize that your application is set up with Git.
git init .
Step 2: Configure Elastic Beanstalk
You use eb, a command line tool, to configure Elastic Beanstalk. If you haven't already installed eb on
your local computer, do that now at the AWS Sample Code & Libraries website. If you are running eb on
a Linux operating system, you will need to install Python 2.7 or 3.0.
Before you use eb, set your PATH to the location of eb. The following table shows an example for
Linux/UNIX and Windows.
In WindowsIn Linux and UNIX
C:\> set PATH=%PATH%;<path to unzipped
eb CLI package>\eb\windows\
$ export PATH=$PATH:<path to unzipped
eb CLI package>/eb/linux/python2.7/
If you are using Python 3.0, the path will include
python3 rather than python2.7.
Use the init command, and Elastic Beanstalk will prompt you to enter this information. If a default value
is available, and you want to use it, press Enter.
API Version 2010-12-01
252
Elastic Beanstalk Developer Guide
Deploying a Flask Application

To configure Elastic Beanstalk
1. From the directory where you created your local repository, type the following command:
eb init
2. When you are prompted for the Elastic Beanstalk region, type the number of the region. For information
about this product's regions, go to Regions and Endpoints in the Amazon Web Services General
Reference. For this example, we'll use US West (Oregon).
3. When you are prompted for the Elastic Beanstalk application name, type the name of the application.
Elastic Beanstalk generates an application name based on the current directory name if an application
name has not been previously configured. In this example, we use flaskapp.
Enter an AWS Elastic Beanstalk application name (auto-generated value is
"windows"): flaskapp
Note
If you have a space in your application name, make sure you do not use quotation marks.
4. Type y if Elastic Beanstalk correctly detected the correct platform you are using.Type n if not, and
then specify the correct platform.
5. When prompted, type y if you want to set up Secure Shell (SSH) to connect to your instances. Type
n if you do not want to set up SSH. In this example, we will type n.
Do you want to set up SSH for your instances?
(y/n): n
6. Create your running environment.
eb create
7. When you are prompted for the Elastic Beanstalk environment name, type the name of the
environment. Elastic Beanstalk automatically creates an environment name based on your application
name. If you want to accept the default, press Enter.
Enter Environment Name
(default is HelloWorld-env):
Note
If you have a space in your application name, make sure you do not have a space in your
environment name.
8. When you are prompted to provide a CNAME prefix, type the CNAME prefix you want to use. Elastic
Beanstalk automatically creates a CNAME prefix based on the environment name. If you want to
accept the default, press Enter.
Enter DNS CNAME prefix
(default is HelloWorld):
After configuring Elastic Beanstalk, you are ready to deploy a sample application.
API Version 2010-12-01
253
Elastic Beanstalk Developer Guide
Step 2: Configure Elastic Beanstalk

If you want to update your Elastic Beanstalk configuration, you can use the init command again.When
prompted, you can update your configuration options. If you want to keep any previous settings, press
the Enter key.
To deploy a sample application
• From the directory where you created your local repository, type the following command:
eb deploy
This process may take several minutes to complete. Elastic Beanstalk will provide status updates
during the process. If at any time you want to stop polling for status updates, press Ctrl+C. Once
the environment status is Green, Elastic Beanstalk will output a URL for the application.You can
copy and paste the URL into your web browser to view the application.
Step 3:View Application
To view the application
• To open your application in a browser window, type the following:
eb open
Step 4: Update Application
After you have deployed a sample application, you can update the sample application with your own
application. In this step, we'll update the sample application with a simple "Hello World" Flask application.
To update the sample application
1. On your local computer, create a requirements.txt file.
Flask==0.9
Note
For more information about the requirements file, go to Requirements File Format.
2. On your local computer, create an application.py file.
import flask
application = flask.Flask(__name__)
#Set application.debug=true to enable tracebacks on Beanstalk log output.
#Make sure to remove this line before deploying to production.
application.debug=True
@application.route('/')
def hello_world():
return "Hello world!"
API Version 2010-12-01
254
Elastic Beanstalk Developer Guide
Step 3:View Application

if __name__ == '__main__':
application.run(host='0.0.0.0')
3. Add your two files to your local Git repository, and then commit your change.
git add .
git commit -m "update app"
Note
For information about Git commands, go to Git - Fast Version Control System.
4. Create an application version matching your local repository and deploy to the Elastic Beanstalk
environment if specified.
git aws.push
You can also configure Git to push from a specific branch to a specific environment. For more
information, see "Using Git with EB CLI" in the topic Getting Started with EB CLI 3.x (p. 627).
5. Refresh your web browser to view your updated application when your environment is ready.
You can access the logs for your EC2 instances running your application. For instructions on accessing
your logs, see Working with Logs (p. 415).
Step 5: Clean Up
If you no longer want to run your application, you can clean up by terminating your environment and
deleting your application.
Use the terminate command to terminate your environment and the delete command to delete your
application.
To terminate your environment and delete the application
• From the directory where you created your local repository, type the following command:
eb terminate
This process may take a few minutes. Elastic Beanstalk displays a message once the environment
has been successfully terminated.
Note
If you attached an Amazon RDS DB instance to your environment, your Amazon RDS DB
will be deleted, and you will lose your data.To save your data, create a snapshot before
you delete the application. For instructions on how to create a snapshot, go to Creating a
DB Snapshot in the Amazon Relational Database Service User Guide.
API Version 2010-12-01
255
Elastic Beanstalk Developer Guide
Step 5: Clean Up

Deploying a Python Application to Elastic
Beanstalk Using the Elastic Beanstalk Console
If you prefer to use a graphical user interface to deploy your Python application, you can use the Elastic
Beanstalk console.When using the console, you need to do the following:
1. Create a .zip file containing your application files.
2. Upload your .zip file to Elastic Beanstalk.
To deploy your python application using the Elastic Beanstalk console
1. Create a requirements.txt file and place it in the top-level directory of your source bundle.
The following is an example requirements.txt file for Django.
Django==1.4.1
MySQL-python==1.2.3
Note
For more information about the requirements file, go to Requirements File Format.
2. Create a .zip file containing your application files. By default, Elastic Beanstalk looks for your
application (application.py) in top-level directory of your source bundle.
3. Using the Elastic Beanstalk console, create a new application and upload your .zip file. For instructions,
see Creating New Applications (p. 279).
4. Once your environment is green and ready, click the URL link on the environment dashboard to view
your application.
Customizing and Configuring a Python
Container
When deploying your Python application, you may want to customize and configure the behavior of your
Amazon EC2 instances.You can easily customize your instances at the same time that you deploy your
application version by including a configuration file with your source bundle.This section walks you through
the process of creating a configuration file and bundling it with your source.
API Version 2010-12-01
256
Elastic Beanstalk Developer Guide
Using the Console

To customize and configure your Python container
1. Create a configuration file with the extension .config (e.g., myapp.config) and place it in an
.ebextensions top-level directory of your source bundle.You can have multiple configuration files
in your .ebextensions directory. These files are executed in alphabetical order. For example,
.ebextensions/01run.config is executed before .ebextensions/2do.config.
Configuration files should conform to YAML or JSON formatting standards. For example, indentation
is critical to the proper interpretation of YAML. For more information, go to http://www.yaml.org/
start.html or http://www.json.org, respectively. For more information about using configuration files
to deploy an application to Elastic Beanstalk, see Using Configuration Files (p. 431).
The following is an example snippet of a configuration file.
packages:
yum:
libmemcached-devel: '0.31'
container_commands:
collectstatic:
command: "django-admin.py collectstatic --noinput"
01syncdb:
command: "django-admin.py syncdb --noinput"
leader_only: true
02migrate:
command: "django-admin.py migrate"
leader_only: true
99customize:
command: "scripts/customize.sh"
# You can specify any key-value pairs in the aws:elasticbeanstalk:applica
tion:environment namespace and it will be
# passed in as environment variables on your EC2 instances
option_settings:
"aws:elasticbeanstalk:application:environment":
DJANGO_SETTINGS_MODULE: "djproject.settings"
"application_stage": "staging"
"aws:elasticbeanstalk:container:python":
WSGIPath: djproject/wsgi.py
NumProcesses: 3
NumThreads: 20
"aws:elasticbeanstalk:container:python:staticfiles":
"/static/": "static/"
The following is an example of specifying the option_settings in a list format:
# If you do not specify a namespace, the default used is aws:elasticbean
stalk:application:environment
option_settings:
- option_name: PARAM1
value: somevalue
Note
If you want to set environment variables that will be available to your application, you do
not need to provide a "namespace" key in the option_settings section.
API Version 2010-12-01
257
Elastic Beanstalk Developer Guide
Customizing and Configuring a Python Container

2. Create a requirements.txt file and place it in the top-level directory of your source bundle. A typical
python application will have dependencies on other third-party Python packages. In Python, pip is
the standard way of installing packages. Pip has a feature that allows you to specify all the packages
you need (as well as their versions) in a single requirements file. For more information about the
requirements file, go to Requirements File Format. The following is an example requirements.txt file
for Django.
Django==1.4.1
MySQL-python==1.2.3
From your working environment, you can also type the following command to generate the
requirements file.
pip install django
pip install MySQL-python==1.2.3
pip freeze > requirements.txt
3. Deploy your application version.
For an example walkthrough of deploying a Django application using an instance configuration file, see
Deploying a Django Application to Elastic Beanstalk (p.243). For an example walkthrough of deploying a
Flask application, see Deploying a Flask Application to Elastic Beanstalk (p. 252).
Accessing Environment Variables
Inside the Python environment running in Elastic Beanstalk, these values are accessible using Python's
os.environ dictionary. For more information, go to http://docs.python.org/library/os.html. For a list of
option settings, see Python Container Options (p. 732).
You might have a code snippet that looks similar to the following to access the keys and parameters:
import os
param1 = os.environ['PARAM1']
django_settings_module = os.environ['DJANGO_SETTINGS_MODULE']
Using Amazon RDS with Python
With Amazon Relational Database Service (Amazon RDS), you can quickly and easily provision and
maintain a MySQL, Oracle, or Microsoft SQL Server instance in the cloud.This topic explains how you
can use Amazon RDS and Python with your Elastic Beanstalk application. For more information about
Amazon RDS, go to http://aws.amazon.com/rds/.
To use Amazon RDS from your Elastic Beanstalk application, you need to do the following:
1. Create an Amazon RDS DB instance.
2. Establish a database connection in your code by using the connectivity information for your Amazon
RDS DB instance.
3. Update your requirements.txt file.
4. Deploy your application to Elastic Beanstalk.
API Version 2010-12-01
258
Elastic Beanstalk Developer Guide
Accessing Environment Variables

This topic walks you through the following:
• Using a new Amazon RDS DB instance with your application
• Using an existing Amazon RDS DB instance with your application
Using a New Amazon RDS DB Instance with
Python
This topic walks you through creating a new Amazon RDS DB Instance and using it with your Python
application.
To use a new Amazon RDS DB Instance and Python from your Elastic Beanstalk application
1. Create an Amazon RDS DB Instance.You can create an RDS DB Instance in one of the following
ways:
• Create an Amazon RDS DB instance when you create a new application version. For instructions
using the Elastic Beanstalk console, see Creating New Applications (p. 279). For a sample
walkthrough of a Django application deployment with Amazon RDS using eb, see Deploying a
Django Application to Elastic Beanstalk (p. 243).
• Create an Amazon RDS DB instance when you launch a new environment with an existing
application version. For instructions using the AWS Elastic Beanstalk console, see Launching New
Environments (p. 299).
• If you already deployed an application to Elastic Beanstalk, you can create an Amazon RDS DB
instance and attach it to an existing environment. For instructions using the AWS Elastic Beanstalk
console, see Configuring Databases with Elastic Beanstalk (p.384). If you use eb, use the eb init
command to specify RDS configuration settings, and then use the eb update command to update
your environment.
2. Establish a database connection in your code using your Amazon RDS DB Instance's connectivity
information.You can access your connectivity information using environment variables.The following
shows how you would connect to the database on an RDS instance.
import os
if 'RDS_HOSTNAME' in os.environ:
DATABASES = {
'default': {
'ENGINE': 'django.db.backends.mysql',
'NAME': os.environ['RDS_DB_NAME'],
'USER': os.environ['RDS_USERNAME'],
'PASSWORD': os.environ['RDS_PASSWORD'],
'HOST': os.environ['RDS_HOSTNAME'],
'PORT': os.environ['RDS_PORT'],
}
}
3. Create a requirements.txt file and place it in the top-level directory of your source bundle. A typical
python application will have dependencies on other third-party Python packages. In Python, pip is
the standard way of installing packages. Pip has a feature that allows you to specify all the packages
you need (as well as their versions) in a single requirements file. For more information about the
requirements file, go to Requirements File Format. The following is an example requirements.txt file
for Django.
API Version 2010-12-01
259
Elastic Beanstalk Developer Guide
Using a New Amazon RDS DB Instance with Python

Django==1.4.1
MySQL-python==1.2.3
4. Deploy your updated application to your existing Elastic Beanstalk environment. For information on
how to deploy a new application version to an existing environment using the Elastic Beanstalk
Console, see Step 4: Deploy New Version (p. 7). If you are using eb, commit your changes and
deploy your application. For an example, see Step 5: Update the Application (p. 676).
Using an Existing Amazon RDS DB Instance with
Python
You can update your Python application to use an Amazon RDS DB Instance that you have previously
created.This topic walks you through how to update your Python application using an existing Amazon
RDS DB Instance and deploy your application to Elastic Beanstalk.
To use an existing Amazon RDS DB Instance and Python from your Elastic Beanstalk application
1. Create an Elastic Beanstalk environment in one of the following ways:
• Create a new application with a new environment. For instructions using the Elastic Beanstalk
console, see Creating New Applications (p.279). For a sample walkthrough of an Django application
deployment with Amazon RDS using eb, see Deploying a Django Application to Elastic
Beanstalk (p. 243).You do not need to create an RDS DB Instance with this environment because
you already have an existing RDS DB Instance.
• Launch a new environment with an existing application version. For instructions using the Elastic
Beanstalk console, see Launching New Environments (p. 299).You do not need to create an
Amazon RDS DB instance with this environment because you already have an existing Amazon
RDS DB instance.
2. Configure your Amazon RDS DB security group to allow access from the Amazon EC2 security group
used by your Elastic Beanstalk application. For instructions on how to find the name of your EC2
security group using the AWS Management Console, see Amazon EC2 Security Groups (p.354). For
more information, go to the "Authorizing Network Access to an Amazon EC2 Security Group" section
of Working with DB Security Groups in the Amazon Relational Database Service User Guide.
3. Establish a database connection in your code using your Amazon RDS DB instance's connectivity
information.The following examples show how you could connect to the database on an RDS instance
at mydbinstance.abcdefghijkl.us-west-2.rds.amazonaws.com using port 3306, with the user name
"sa" and the password "mypassword".
DATABASES = {
'default': {
'ENGINE': 'django.db.backends.mysql',
'NAME': 'mydb',
'USER': 'sa',
'PASSWORD': 'mypwd',
'HOST': 'mydbinstance.abcdefghijkl.us-west-2.rds.amazonaws.com',
'PORT': '3306',
}
}
API Version 2010-12-01
260
Elastic Beanstalk Developer Guide
Using an Existing Amazon RDS DB Instance with Python

4. Create a requirements.txt file, add the package you need to communicate to the database, and
place it in the top-level directory of your source bundle. For more information about the requirements
file, go to Requirements File Format. The following is an example requirements.txt file.
MySQL-python==1.2.3
5. Deploy your updated application to your existing Elastic Beanstalk environment. For information on
how to deploy a new application version to an existing environment using the Elastic Beanstalk
Console, see Step 4: Deploy New Version (p. 7). If you are using eb, commit your changes and
deploy your application. For an example, see Step 5: Update the Application (p. 676).
Tools
Boto (open source AWS SDK for Python)
With Boto, you can get started in minutes with a single, downloadable package complete with the AWS
Python library, code samples, and documentation.You can build Python applications on top of APIs that
take the complexity out of coding directly against web services interfaces.The all-in-one library provides
Python developer-friendly APIs that hide much of the lower-level tasks associated with programming for
the AWS cloud, including authentication, request retries, and error handling. Practical examples are
provided in Python for how to use the libraries to build applications. For information about Boto, sample
code, documentation, tools, and additional resources, go to http://aws.amazon.com/python/.
Git Deployment Via Eb
Eb is an updated command line interface for AWS Elastic Beanstalk that enables you to deploy applications
quickly and more easily. To learn how to get started deploying a Python application to Elastic Beanstalk
using eb and Git, see Deploying Elastic Beanstalk Applications in Python Using EB CLI and Git (p. 242).
Resources
There are several places you can go to get additional help when developing your Python applications:
DescriptionResource
Install Boto using GitHub.Boto (open source AWS SDK for Python)
Post your questions and get feedback.Python Development Forum
One-stop shop for sample code, documentation, tools, and
additional resources.
Python Developer Center
API Version 2010-12-01
261
Elastic Beanstalk Developer Guide
Tools

Deploying Elastic Beanstalk
Applications in Ruby Using EB CLI
and Git
Topics
• Deploying a Rails Application to Elastic Beanstalk (p. 262)
• Deploying a Sinatra Application to Elastic Beanstalk (p. 270)
• Customizing and Configuring a Ruby Environment (p. 273)
• Using Amazon RDS with Ruby (p. 275)
• Tools (p. 277)
• Resources (p. 277)
Elastic Beanstalk for Ruby makes it easy to deploy, manage, and scale your Ruby web applications using
Amazon Web Services. Elastic Beanstalk is available to anyone developing or hosting a web application
using Ruby. This section provides step-by-step instructions for deploying a sample application to Elastic
Beanstalk using EB Command Line Interface (CLI) 3.x and Git, and then updating the application to use
the Rails and Sinatra web application frameworks.To complete this walkthrough, you will need to download
the command line tools at the AWS Sample Code & Libraries website, and optionally you can set up a
Ruby development environment. If you are running EB CLI on a Linux operating system, you will need
to install Python 2.7 or 3.0. If you are running EB CLI on a Windows operating system, install Python 3.4.
After you deploy your Elastic Beanstalk application, you can use the AWS Management Console, CLIs,
or the APIs to manage your Elastic Beanstalk environment. For more information, see Managing and
Configuring Applications and Environments Using the Console, CLI, and APIs (p. 278).
Deploying a Rails Application to Elastic
Beanstalk
You can use the EB Command Line Interface (CLI) 3.x and Git to deploy a Rails sample application to
Elastic Beanstalk.This walkthrough shows you how.You'll also learn how to set up a Rails installation
from scratch in case you don't already have a development environment and application.
API Version 2010-12-01
262
Elastic Beanstalk Developer Guide
Deploying a Rails Application

Software Versions
Many of the technologies presented here are under active development. For the best results,
use the same versions of each tool when possible.The versions used during the development
of this tutorial are listed below.
Versions
14.04Ubuntu
1.26.3RVM
2.1.5p273Ruby
4.1.8Rails
2.7.6Python
For the typographic conventions used in this tutorial, see Document Conventions in the General Reference.
Rails Development Environment Setup
Read this section if you are setting up a Rails development environment from scratch. If you have a
development environment configured with Rails, Git and a working app, you can skip this section (p. 264).
Getting an Ubuntu EC2 Instance
The following instructions were developed and tested using an Amazon EC2 instance running
Ubuntu 14.04. For instructions on configuring and connecting to an EC2 instance using the AWS
Management Console, read the Getting Started section of the Amazon EC2 User Guide for
Linux.
If you don't have access to the AWS Management Console or prefer to use the command line,
check out the AWS CLI User Guide for instructions on installing the AWS CLI and using it to
configure security groups, create a key pair, and launch instances with the same credentials
that you will use with the EB CLI.
Install Rails
RVM, a popular version manager for Ruby, provides an option to install RVM, Ruby, and Rails with just
a few commands:
$ gpg --keyserver hkp://keys.gnupg.net --recv-keys D39DC0E3
$ curl -sSL https://get.rvm.io | bash -s stable --rails
$ source /home/ubuntu/.rvm/scripts/rvm
Install nodejs to allow the Rails server to run locally:
$ sudo apt-get install nodejs
Note
For help installing rails on other operating systems, try http://installrails.com/.
Create a New Rails Project
Use rails new with the name of the application to create a new Rails project.
API Version 2010-12-01
263
Elastic Beanstalk Developer Guide
Rails Development Environment Setup

$ rails new rails-beanstalk
Rails creates a directory with the name specified, generates all of the files needed to run a sample project
locally, and then runs bundler to install all of the dependencies (Gems) defined in the project's Gemfile.
Run the Project Locally
Test your Rails installation by running the default project locally.
$ cd rails-beanstalk
rails-beanstalk $ rails server -d
=> Booting WEBrick
=> Rails 4.2.0 application starting in development on http://localhost:3000
=> Run `rails server -h` for more startup options
rails-beanstalk $ curl http://localhost:3000
<!DOCTYPE html>
<html>
<head>
<title>Ruby on Rails: Welcome aboard</title>
...
Note
Elastic Beanstalk precompiles Rails assets by default. For Ruby 2.1 container types, note the
following:
• The Nginx web server is preconfigured to serve assets from the /public and
/public/assets folders.
• The Puma application requires that you add gem "puma" to your Gemfile for bundle exec
to run correctly.
Install the EB CLI
In this section you'll install the EB CLI, a few dependencies, and Git.
Note
Using Git or another form of revision control is recommended but also entirely optional when
using the EB CLI. Any of the steps in this tutorial that use Git can be skipped.
Install Git, Python Development Libraries and Pip
This tutorial uses Git for revision control and Pip to manage the EB CLI installation. In your Ubuntu
development environment, you can install all of them with the following sequence of commands:
$ sudo apt-get install git
$ sudo apt-get install python-dev
$ curl "https://bootstrap.pypa.io/get-pip.py" -o "get-pip.py"
$ sudo python get-pip.py
Windows Users
Install Python 3.4, which includes pip.
API Version 2010-12-01
264
Elastic Beanstalk Developer Guide
Install the EB CLI

Install the EB CLI
With Pip you can install the EB CLI with a single command:
Linux, OS X, or Unix
$ sudo pip install awsebcli
Windows
> pip install awsebcli
Set Up Your Git Repository
If your Rails project is already in a local Git repository, continue to Configure the EB CLI (p. 265).
First, initiate the repository. From within the Rails project directory, type git init.
$ git init
Initialized empty Git repository in /home/ubuntu/rails-beanstalk/.git/
Next, add all of the project's files to the staging area and commit the change.
rails-beanstalk $ git add .
rails-beanstalk $ git commit -m "default rails project"
56 files changed, 896 insertions(+)
create mode 100644 .gitignore
create mode 100644 Gemfile
...
Configure the EB CLI
With the Git repository configured and all necessary tools installed, configuring the EB CLI project is as
simple as running eb init from within the project directory and following the prompts.
$ eb init
Select a default region
1) us-east-1 : US East (N. Virginia)
2) us-west-1 : US West (N. California)
3) us-west-2 : US West (Oregon)
...
The following values work for this tutorial, but feel free to use values that make sense for your requirements.
If you don't have access keys, see How Do I Get Security Credentials? in the AWS General Reference.
Eb Init Values
Enter (keep default)Region
Your access keyAWS Access Key ID
Your secret keyAWS Secret Access Key
API Version 2010-12-01
265
Elastic Beanstalk Developer Guide
Set Up Your Git Repository

Enter (keep default)Application Name
y (yes)Using Ruby?
Enter (keep default)Platform Version
n (no)Set up SSH?
In addition to configuring the environment for deployment, eb init sets up some Git extensions and
adds an entry to the .gitignore file in the project directory. Commit the change to .gitignore before
moving on.
rails-beanstalk $ git commit -am "updated .gitignore"
Deploy the Project
Next, you'll deploy the default Rails project to an Elastic Beanstalk environment.
rails-beanstalk $ eb create rails-beanstalk-env
Creating application version archive "app-150219_215138".
Uploading rails-beanstalk/app-150219_215138.zip to S3. This may take a while.
Upload Complete.
Environment details for: rails-beanstalk-env
Application name: rails-beanstalk
Region: us-west-2
Deployed Version: app-150219_215138
Environment ID: e-pi3immkys7
Platform: 64bit Amazon Linux 2014.09 v1.2.0 running Ruby 2.1 (Puma)
Tier: WebServer-Standard
CNAME: UNKNOWN
Updated: 2015-02-19 21:51:40.686000+00:00
Printing Status:
INFO: createEnvironment is starting.
...
With just one command, the EB CLI sets up all of the resources our application needs to run in AWS,
including the following:
• An Amazon S3 bucket to store environment data
• A load balancer to distribute traffic to the web server(s)
• A security group to allow incoming web traffic
• An Auto Scaling group to adjust the number of servers in response to load changes
• Amazon CloudWatch alarms that notify the Auto Scaling group when load is low or high
• An Amazon EC2 instance hosting our application
When the process is complete, the EB CLI outputs the public DNS name of the application server. Use
eb open to open the website in the default browser. In our Ubuntu environment the default browser is a
text based browser called W3M.
$ eb open
A really lowlevel plumbing error occured. Please contact your local Maytag(tm)
repair man.
API Version 2010-12-01
266
Elastic Beanstalk Developer Guide
Deploy the Project

This is Puma's way of telling us that something went wrong.When an error like this occurs, you can check
out the logs using the eb logs command.
rails-beanstalk $ eb logs
INFO: requestEnvironmentInfo is starting.
INFO: [Instance: i-8cdc6480] Successfully finished tailing 5 log(s)
================ i-8cdc6480 =================
-------------------------------------
/var/log/eb-version-deployment.log
-------------------------------------
...
The error you're looking for is in the web container log, /var/log/puma/puma.log.
...
-------------------------------------
/var/log/puma/puma.log
-------------------------------------
=== puma startup: 2014-12-15 18:37:51 +0000 ===
=== puma startup: 2014-12-15 18:37:51 +0000 ===
[1982] + Gemfile in context: /var/app/current/Gemfile
[1979] - Worker 0 (pid: 1982) booted, phase: 0
2014-12-15 18:41:42 +0000: Rack app error: #<RuntimeError: Missing
`secret_key_base` for 'production' environment, set this value in `con
fig/secrets.yml`>
/opt/rubies/ruby-2.1.4/lib/ruby/gems/2.1.0/gems/railties-4.1.8/lib/rails/applic
ation.rb:462:in `validate_secret_key_config!'
/opt/rubies/ruby-2.1.4/lib/ruby/gems/2.1.0/gems/railties-4.1.8/lib/rails/applic
ation.rb:195:in `env_config'
...
To get the application working, you need to configure a few environment variables. First is
SECRET_KEY_BASE, which is referred to by secrets.yml in the config folder of our project.
This variable is used to create keys and should be a secret, as the name suggests.This is why you don't
want it stored in source control where other people might see it. Set this to any value using eb setenv:
rails-beanstalk $ eb setenv SECRET_KEY_BASE=23098520lkjsdlkjfsdf
INFO: Environment update is starting.
INFO: Updating environment rails-beanstalk-env's configuration settings.
INFO: Successfully deployed new configuration to environment.
INFO: Environment update completed successfully.
The EB CLI automatically restarts the web server whenever you update configuration or deploy new code.
Try loading the site again.
$ eb open
The page you were looking for doesn't exist (404)
A 404 error may not look like much of an improvement, but it shows that the web container is working
and couldn't find a route to the page you're looking for.
So what happened to the welcome page you saw earlier? In this case the environment variable you need
is RACK_ENV. Right now it's set to production, suppressing the display of debug features as well as the
Welcome to Rails page.
API Version 2010-12-01
267
Elastic Beanstalk Developer Guide
Deploy the Project

View the current value of all environment variables using the eb printenv command.
rails-beanstalk $ eb printenv
Environment Variables:
AWS_SECRET_KEY = None
RAILS_SKIP_ASSET_COMPILATION = false
SECRET_KEY_BASE = 23098520lkjsdlkjfsdf
RACK_ENV = production
PARAM5 = None
PARAM4 = None
PARAM3 = None
PARAM2 = None
PARAM1 = None
BUNDLE_WITHOUT = test:development
RAILS_SKIP_MIGRATIONS = false
AWS_ACCESS_KEY_ID = None
The proper way to fix this is to add content and routes to the project. For the moment, though, we just
want to see our project working, so we'll set RACK_ENV to development.
rails-beanstalk $ eb setenv RACK_ENV=development
The next time you load the site it should succeed.
$ eb open
Ruby on Rails: Welcome aboard
...
Now that you know it works, you can set RACK_ENV back to production and see about adding that
content.
rails-beanstalk $ eb setenv RACK_ENV=production
Update the Application
Now it's time to add some content to the front page to avoid the 404 error you saw in production mode.
First you'll use rails generate to create a controller, route, and view for your welcome page.
$ rails generate controller WelcomePage welcome
create app/controllers/welcome_page_controller.rb
route get 'welcome_page/welcome'
invoke erb
create app/views/welcome_page
create app/views/welcome_page/welcome.html.erb
...
This gives you all you need to access the page at
rails-beanstalk-env-kpvmmmqpbr.elasticbeanstalk.com/welcome_page/welcome. Before you publish
the changes, however, change the content in the view and add a route to make this page appear at the
top level of the site.
API Version 2010-12-01
268
Elastic Beanstalk Developer Guide
Update the Application

Use your favorite text editor to edit the content in app/views/welcome_page/welcome.html.erb.
Nano and Vim are popular command line editors. For this example, you'll use cat to simply overwrite
the content of the existing file.
rails-beanstalk $ cat > app/views/welcome_page/welcome.html.erb
> <h1>Welcome!</h1>
> <p>This is the front page of my first Rails application on Elastic Bean
stalk.</p>
Ctrl+D
Finally, add the following route to config/routes.rb:
Rails.application.routes.draw do
get 'welcome_page/welcome'
root 'welcome_page#welcome'
end
This tells Rails to route requests to the root of the website to the welcome page controller's welcome
method, which renders the content in the welcome view (welcome.html.erb). Now we're ready to
commit the changes and update our environment using eb deploy.
rails-beanstalk $ git add .
rails-beanstalk $ git commit -m "welcome page controller, view and route"
rails-beanstalk $ eb deploy
INFO: Environment update is starting.
INFO: Deploying new version to instance(s).
INFO: New application version was deployed to running EC2 instances.
INFO: Environment update completed successfully.
The update process is fairly quick. Read the front page at the command line using Curl or navigate to the
type eb open to open the site in a web browser to see the results.
$ eb open
Welcome
This is the front page of my first Rails application on Elastic Beanstalk.
Now you're ready to continue work on your Rails site. Whenever you have new commits to push, use eb
deploy to update your environment.
Clean Up
If you no longer want to run your application, you can clean up by terminating your environment and
deleting your application.
Use the terminate command to terminate your environment and the delete command to delete your
application.
To terminate your environment and delete the application
• From the directory where you created your local repository, type the following command:
eb terminate
API Version 2010-12-01
269
Elastic Beanstalk Developer Guide
Clean Up

This process may take a few minutes. Elastic Beanstalk displays a message once the environment
has been successfully terminated.
Note
If you attached an Amazon RDS DB instance to your environment, your Amazon RDS DB
will be deleted, and you will lose your data.To save your data, create a snapshot before
you delete the application. For instructions on how to create a snapshot, go to Creating a
DB Snapshot in the Amazon Relational Database Service User Guide.
Don't hesitate to terminate an environment to save on resources while you continue to develop your site.
You can always recreate your Beanstalk environment using eb create.
Deploying a Sinatra Application to Elastic
Beanstalk
This section walks you through deploying a sample application to Elastic Beanstalk using EB Command
Line Interface (CLI) 3.x and Git, and then updating the application to use the Sinatra framework. This
example uses a configuration file to customize and configure the Ruby container. For more information
about the configuration file, see Customizing and Configuring Elastic Beanstalk Environments (p. 430).
Ruby 1.8.7, 1.9.3, and 2.0.0 have been tested with Elastic Beanstalk.
Step 1: Set Up Your Git Repository
EB CLI is a command line interface that you can use with Git to deploy applications quickly and more
easily. EB is available as part of the Elastic Beanstalk command line tools package. For instructions to
install EB CLI, see Getting Set Up with EB Command Line Interface (CLI) 3.x (p. 621).
Initialize your Git repository. After you run the following command, when you run eb init, EB CLI will
recognize that your application is set up with Git.
git init .
Step 2: Configure Elastic Beanstalk
You use eb, a command line tool, to configure Elastic Beanstalk. If you haven't already installed eb on
your local computer, do that now at the AWS Sample Code & Libraries website. If you are running eb on
a Linux operating system, you will need to install Python 2.7 or 3.0.
Before you use eb, set your PATH to the location of eb. The following table shows an example for
Linux/UNIX and Windows.
In WindowsIn Linux and UNIX
C:\> set PATH=%PATH%;<path to unzipped
eb CLI package>\eb\windows\
$ export PATH=$PATH:<path to unzipped
eb CLI package>/eb/linux/python2.7/
If you are using Python 3.0, the path will include
python3 rather than python2.7.
Use the init command, and Elastic Beanstalk will prompt you to enter this information. If a default value
is available, and you want to use it, press Enter.
API Version 2010-12-01
270
Elastic Beanstalk Developer Guide
Deploying a Sinatra Application

To configure Elastic Beanstalk
1. From the directory where you created your local repository, type the following command:
eb init
2. When you are prompted for the Elastic Beanstalk region, type the number of the region. For information
about this product's regions, go to Regions and Endpoints in the Amazon Web Services General
Reference. For this example, we'll use US West (Oregon).
3. When you are prompted for the Elastic Beanstalk application to use, type the number corresponding
to the option Create new Application. Elastic Beanstalk generates an application name based on
the current directory name if an application name has not been previously configured. In this example,
we use sinatraapp.
Enter an AWS Elastic Beanstalk application name (auto-generated value is
"windows"): sinatraapp
Note
If you have a space in your application name, make sure you do not use quotation marks.
4. Type y if Elastic Beanstalk correctly detected the correct platform you are using.Type n if not, and
then specify the correct platform.
5. When prompted, type y if you want to set up Secure Shell (SSH) to connect to your instances. Type
n if you do not want to set up SSH. In this example, we will type n.
Do you want to set up SSH for your instances?
(y/n): n
6. Create your running environment.
eb create
7. When you are prompted for the Elastic Beanstalk environment name, type the name of the
environment. Elastic Beanstalk automatically creates an environment name based on your application
name. If you want to accept the default, press Enter.
Enter Environment Name
(default is HelloWorld-env):
Note
If you have a space in your application name, make sure you do not have a space in your
environment name.
8. When you are prompted to provide a CNAME prefix, type the CNAME prefix you want to use. Elastic
Beanstalk automatically creates a CNAME prefix based on the environment name. If you want to
accept the default, press Enter.
Enter DNS CNAME prefix
(default is HelloWorld):
After configuring Elastic Beanstalk, you are ready to deploy a sample application.
API Version 2010-12-01
271
Elastic Beanstalk Developer Guide
Step 2: Configure Elastic Beanstalk

If you want to update your Elastic Beanstalk configuration, you can use the init command again.When
prompted, you can update your configuration options. If you want to keep any previous settings, press
the Enter key.
To deploy a sample application
• From the directory where you created your local repository, type the following command:
eb deploy
This process may take several minutes to complete. Elastic Beanstalk will provide status updates
during the process. If at any time you want to stop polling for status updates, press Ctrl+C. Once
the environment status is Green, Elastic Beanstalk will output a URL for the application.You can
copy and paste the URL into your web browser to view the application.
Step 3:View the Application
To view the application
• To open your application in a browser window, type the following:
eb open
Step 4: Update the Application
After you have deployed a sample application, you can update it with your own application. In this step,
we'll update the sample application to use the Rails framework.
To update the sample application
1. On your local computer, create a config.ru file and place it in the top-level directory of your source
bundle.
require './helloworld'
run Sinatra::Application
2. On your local computer, create a helloworld.rb file and place it in the top-level directory of your
source bundle.
require 'sinatra'
get '/' do
"Hello World!"
end
3. On your local computer, create a Gemfile and place it in the top-level directory of your source bundle.
source 'http://rubygems.org'
gem 'sinatra'
API Version 2010-12-01
272
Elastic Beanstalk Developer Guide
Step 3:View the Application

4. Add your files to your local Git repository, and then commit your change.
git add .
git commit -m "update Sinatra app"
Note
For information about Git commands, go to Git - Fast Version Control System.
5. Deploy to Elastic Beanstalk.
eb deploy
You can also configure Git to push from a specific branch to a specific environment. For more
information, see "Using Git with EB CLI" in the topic Getting Started with EB CLI 3.x (p. 627).
6. Use the eb status --verbose command to check your environment status.When your environment
is green and ready, refresh your web browser to view your updated application.
You can access the logs for your EC2 instances running your application. For instructions on accessing
your logs, see Working with Logs (p. 415).
Step 5: Clean Up
If you no longer want to run your application, you can clean up by terminating your environment and
deleting your application.
Use the terminate command to terminate your environment and the delete command to delete your
application.
To terminate your environment and delete the application
• From the directory where you created your local repository, type the following command:
eb terminate
This process may take a few minutes. Elastic Beanstalk displays a message once the environment
has been successfully terminated.
Note
If you attached an Amazon RDS DB instance to your environment, your Amazon RDS DB
will be deleted, and you will lose your data.To save your data, create a snapshot before
you delete the application. For instructions on how to create a snapshot, go to Creating a
DB Snapshot in the Amazon Relational Database Service User Guide.
Customizing and Configuring a Ruby
Environment
When deploying your Ruby application, you may want to customize and configure the behavior of your
Amazon EC2 instances.You can easily customize your instances at the same time that you deploy your
application version by including a configuration file with your source bundle.This section walks you through
the process of creating a configuration file and bundling it with your source.
API Version 2010-12-01
273
Elastic Beanstalk Developer Guide
Step 5: Clean Up

Note
Configuration files should conform to YAML or JSON formatting standards. For example,
indentation is critical to the proper interpretation of YAML. For more information, go to http://
www.yaml.org/start.html or http://www.json.org, respectively. For more information about using
configuration files to deploy an application to Elastic Beanstalk, see Using Configuration
Files (p. 431).
To customize and configure your Ruby environment
1. Create a configuration file with the extension .config (e.g., myapp.config) and place it in an
.ebextensions top-level directory of your source bundle.You can have multiple configuration files
in your .ebextensions directory. For information about file format and contents of the configuration
file, see Using Configuration Files (p. 431).
The following is an example snippet of a configuration file.
# Configure third-party service credentials
# in environment variables:
option_settings:
- option_name: AIRBRAKE_API_KEY
value: MYAPIKEY
# Run rake tasks before an application deployment
container_commands:
01deploy:
command: rake my_deployment_tasks
Note
If you want to set environment variables that will be available to your application, you do
not need to provide a "namespace" key in the option_settings section.
You can also pass in your access credentials. For example, you could specify the following:
# If you do not specify a namespace, the default used is aws:elasticbean
stalk:application:environment
option_settings:
- option_name: PARAM1
value: somevalue
2. Deploy your application version.
For an example walkthrough of deploying a Rails application, see Deploying a Rails Application to Elastic
Beanstalk (p.262). For an example walkthrough of deploying a Sinatra application, see Deploying a Sinatra
Application to Elastic Beanstalk (p. 270).
Accessing Environment Variables
Inside the Ruby environment running in Elastic Beanstalk, environment variables are accessible using
ENV['VARIABLE_NAME'].
You might have a code snippet that looks similar to the following:
param1 = ENV['MYPARAM']
param2 = ENV['MYPARAM2']
API Version 2010-12-01
274
Elastic Beanstalk Developer Guide
Accessing Environment Variables

For a list of option settings, see Ruby Container Options (p. 734).
Using Amazon RDS with Ruby
With Amazon Relational Database Service (Amazon RDS), you can quickly and easily provision and
maintain a MySQL, Oracle, or Microsoft SQL Server instance in the cloud.This topic explains how you
can use Amazon RDS and Ruby with your Elastic Beanstalk application. For more information about
Amazon RDS, go to http://aws.amazon.com/rds/.
To use Amazon RDS from your Elastic Beanstalk application, you need to do the following:
1. Create an Amazon RDS DB instance.
2. Establish a database connection in your code by using the connectivity information for your Amazon
RDS DB instance.
3. Deploy your application to Elastic Beanstalk.
This topic walks you through the following:
• Using a new Amazon RDS DB instance with your application
• Using an existing Amazon RDS DB instance with your application
Using a New Amazon RDS DB Instance with Ruby
This topic walks you through creating a new Amazon RDS DB Instance and using it with your Ruby
application.
To use a new Amazon RDS DB Instance and Ruby from your Elastic Beanstalk application
1. Create an Amazon RDS DB instance.You can create an RDS DB instance in one of the following
ways:
• Create an Amazon RDS DB instance when you create a new application version. For instructions
using the Elastic Beanstalk console, see Creating New Applications (p. 279). For a sample
walkthrough of a Rails application deployment with Amazon RDS using eb, see Deploying a Rails
Application to Elastic Beanstalk (p. 262).
• Create an Amazon RDS DB instance when you launch a new environment with an existing
application version. For instructions using the AWS Elastic Beanstalk console, see Launching New
Environments (p. 299).
• If you already deployed an application to Elastic Beanstalk, you can create an Amazon RDS DB
instance and attach it to an existing environment. For instructions using the AWS Elastic Beanstalk
console, see Configuring Databases with Elastic Beanstalk (p.384). If you use eb, use the eb init
command to specify RDS configuration settings, and then use the eb update command to update
your environment.
2. Establish a database connection in your code using your Amazon RDS DB Instance's connectivity
information.You can access your connectivity information using environment variables.The following
shows how you would connect to the database on an RDS instance.
production:
adapter: mysql2
encoding: utf8
API Version 2010-12-01
275
Elastic Beanstalk Developer Guide
Using Amazon RDS

database: <%= ENV['RDS_DB_NAME'] %>
username: <%= ENV['RDS_USERNAME'] %>
password: <%= ENV['RDS_PASSWORD'] %>
host: <%= ENV['RDS_HOSTNAME'] %>
port: <%= ENV['RDS_PORT'] %>
3. Deploy your updated application to your existing Elastic Beanstalk environment. For information on
how to deploy a new application version to an existing environment using the Elastic Beanstalk
Console, see Step 4: Deploy New Version (p. 7). If you are using eb, commit your changes and
deploy your application. For an example, see Step 5: Update the Application (p. 676).
Using an Existing Amazon RDS DB Instance with
Ruby
You can update your Ruby application to use an Amazon RDS DB Instance that you have previously
created.This topic walks you through how to update your Ruby application using an existing Amazon
RDS DB Instance and deploy your application to Elastic Beanstalk.
To use an existing Amazon RDS DB Instance and Ruby from your Elastic Beanstalk application
1. Create an Elastic Beanstalk environment in one of the following ways:
• Create a new application with a new environment. For instructions using the Elastic Beanstalk
console, see Creating New Applications (p. 279). For a sample walkthrough of a Rails application
deployment with Amazon RDS using eb, see Deploying a Rails Application to Elastic
Beanstalk (p. 262).You do not need to create an RDS DB Instance with this environment because
you already have an existing RDS DB Instance.
• Launch a new environment with an existing application version. For instructions using the Elastic
Beanstalk console, see Launching New Environments (p. 299).You do not need to create an
Amazon RDS DB instance with this environment because you already have an existing Amazon
RDS DB instance.
2. Configure your Amazon RDS DB security group to allow access from the Amazon EC2 security group
used by your Elastic Beanstalk application. For instructions on how to find the name of your EC2
security group using the AWS Management Console, see Amazon EC2 Security Groups (p.354). For
more information, go to the "Authorizing Network Access to an Amazon EC2 Security Group" section
of Working with DB Security Groups in the Amazon Relational Database Service User Guide.
3. Establish a database connection in your code using your Amazon RDS DB instance's connectivity
information.The following examples show how you could connect to the database on an RDS instance
at mydbinstance.abcdefghijkl.us-west-2.rds.amazonaws.com using port 3306, with the user name
"sa" and the password "mypassword".
production:
adapter: mysql2
encoding: utf8
database: exampledb
username: sa
password: mypwd
host: example.rds.amazonaws.com
port: 3306
API Version 2010-12-01
276
Elastic Beanstalk Developer Guide
Using an Existing Amazon RDS DB Instance with Ruby

4. Deploy your updated application to your existing Elastic Beanstalk environment. For information on
how to deploy a new application version to an existing environment using the Elastic Beanstalk
Console, see Step 4: Deploy New Version (p. 7). If you are using eb, commit your changes and
deploy your application. For an example, see Step 5: Update the Application (p. 676).
Tools
AWS SDK for Ruby
You can get started in minutes with a single, downloadable package complete with the AWS Ruby library,
code samples, and documentation.You can build Ruby applications on top of APIs that take the complexity
out of coding directly against web services interfaces.The all-in-one library provides Ruby developer-friendly
APIs that hide much of the lower-level tasks associated with programming for the AWS cloud, including
authentication, request retries, and error handling. Practical examples are provided in Ruby for how to
use the libraries to build applications. For information about the SDK, sample code, documentation, tools,
and additional resources, go to http://aws.amazon.com/ruby/.
Git Deployment Via EB CLI
EB CLI is an AWS Elastic Beanstalk that enables you to deploy applications quickly and more easily from
the command line.To learn how to get started deploying a Ruby application to Elastic Beanstalk using
eb and Git, see Deploying Elastic Beanstalk Applications in Ruby Using EB CLI and Git (p. 262).
Resources
There are several places you can go to get additional help when developing your Ruby applications:
DescriptionResource
Install AWS SDK for Ruby.AWS SDK for Ruby
Post your questions and get feedback.Ruby Development Forum
One-stop shop for sample code, documentation, tools, and
additional resources.
Ruby Developer Center
API Version 2010-12-01
277
Elastic Beanstalk Developer Guide
Tools

Managing and Configuring
Applications and Environments
Using the Console, CLI, and APIs
Topics
• Creating New Applications (p. 279)
• Creating New Application Versions (p. 292)
• Creating an Application Source Bundle (p. 294)
• Filtering Applications in Your Environment (p. 299)
• Launching New Environments (p. 299)
• Deploying Versions to Existing Environments (p. 313)
• Deploying Versions with Zero Downtime (p. 318)
• Monitoring Application Health (p. 327)
• Managing Alarms (p. 331)
• Viewing Events (p. 333)
• Managing Environments (p. 335)
• Listing and Connecting to Server Instances (p. 413)
• Working with Logs (p. 415)
• Deleting Application Versions (p. 421)
• Terminating an Environment (p. 423)
• Customizing Your Elastic Beanstalk Environments (p. 425)
• Migrating Your Application from a Legacy Container Type (p. 426)
• Constructing a Launch Now URL (p. 427)
This topic discusses some of the most important features of Elastic Beanstalk in detail, including usage
examples using the AWS Management Console, CLI, and the APIs. For more information about the CLI,
see Tools (p. 620). For more information about the API, go to AWS Elastic Beanstalk API Reference.
API Version 2010-12-01
278
Elastic Beanstalk Developer Guide

Creating New Applications
You can use the AWS Management Console, the command line interface (CLI), or the API to create a
new Elastic Beanstalk application and deploy the application version to a new environment.
AWS Management Console
To create a new application
1. Open the Elastic Beanstalk console at https://console.aws.amazon.com/elasticbeanstalk/.
2. From the region list, select a region in which to create the Elastic Beanstalk application.
3. On the Elastic Beanstalk application navigation bar, click Create New Application.
4. Enter the name of the application and, optionally, a description.Then click Next.
5. To launch a new environment in which to deploy your application, select an environment tier. The
environment tier setting specifies whether you want a Web Server or Worker tier. For more
information, see Architectural Overview (p. 16).
Note
After you launch an environment, you cannot change the environment tier. If your application
requires a different environment tier, you must launch a new environment.When you remove
an environment, the AWS resources associated with the environment and the application
version you deployed in that environment are deleted.You can save the environment
configuration to use later if you want to rebuild an environment using the same environment
tier.
Note
If you want to create the application without launching a new environment and deploying
your application at this time, clear the selection for the Launch a new environment running
this application setting.Then click Done.You are directed to the Elastic Beanstalk
applications page.
To continue specifying settings for your application and environment, click Next.
6. In the Permissions window, choose the instance profile that you want to use to launch the Amazon
EC2 instances in the new environment. (An instance profile is associated with the IAM role that is
configured with the appropriate permissions to access the AWS resources that your application will
require. A worker environment tier requires different permissions from a web server environment tier.
For more information, see IAM Roles for Elastic Beanstalk Environment Tiers (p.617).) Do one of the
following:
• For a web server environment tier, click the name of the instance profile with the appropriate IAM
role, and then click Next.
• For a worker environment tier, do one of the following:
• If you want Elastic Beanstalk to create a role with the default permissions required by a worker
application, click Create an IAM role and instance profile, and then click Next.
• If you have an existing instance profile with an IAM role that is configured with the permissions
required by a worker application, click Select an existing instance profile, and then click Next.
API Version 2010-12-01
279
Elastic Beanstalk Developer Guide
Creating New Applications

7. If, in the previous step, you clicked Create an IAM role and instance profile, click View Details to
see options for the role, and then do one of the following:
• To add default permissions for a worker application to an existing role, click IAM Role, click the
name of the instance profile for which you want to add a role policy, and then click Allow.You can
optionally associate a saved policy with an existing role by clicking Policy Name, and then clicking
the name of the policy before you click Allow.
• To create a new role with default permissions, click Allow.You can optionally change the Role
Name and edit the policy document.
8. On the Environment Type page, select a platform and environment type, and then click Next.
• The Predefined configuration setting specifies the platform and version that will be used for the
environment. For more information, see Supported Platforms (p. 19).
Note
After you launch an environment with a specific configuration, you cannot change the
configuration. If your application requires a different configuration, you must launch a new
environment.
• The Saved configuration setting lists all environment configurations you previously saved for this
application, if any. If you have no saved configurations for this application, Elastic Beanstalk does
not display this option in the console.
• The Environment type specifies whether the environment is load balancing and autoscaling or
only a single Amazon EC2 instance. For more information, see Environment Types (p. 345).
Note
The single-instance environment type is not available for legacy containers. For instructions
on migrating from a legacy container, see Migrating Your Application from a Legacy
Container Type (p. 426).
9. Specify the source for your application version.You can use a sample application or upload your
own, or specify the URL for the Amazon S3 bucket that contains your application code.To upload
your own, click Browse, and then select your application.
Note
Elastic Beanstalk supports only a single .war file for a Java application version and only a
single .zip file for other applications.The file size limit is 512 MB.
10. For load-balancing, autoscaling environments only, you can also control downtime when application
versions are deployed to your environment later. Next to Batch size, click Percentage or Fixed.
Enter a percentage or fixed number of instances to which you want to deploy the new application
version at any given time, and then click Next.
11. On the Environment Information page, enter the details of your environment.
a. For a web server environment tier:
• Enter a name for the environment.
• Enter a unique environment URL. Even though the environment URL is populated with the
environment name, you can enter a different name for the URL. Elastic Beanstalk uses this
name to create a unique CNAME for the environment.You can check the availability of the
URL by clicking Check Availability
• (Optional) Enter a description for this environment.
• Click Next.
b. For a worker environment tier:
API Version 2010-12-01
280
Elastic Beanstalk Developer Guide
AWS Management Console

• Enter a name for the environment.
• (Optional) Enter a description for this environment.
• Click Next.
12. Optional: Select additional resources for the environment, and then click Next.
• Unless you are creating an application using a legacy container type, you have the option to include
an Amazon RDS database. To include an Amazon RDS database with this application, select
Create an RDS DB instance with this environment. For more information about Amazon RDS,
go to Amazon Relational Database Service (Amazon RDS). For a detailed list of supported container
types, see Supported Platforms (p. 19).
Note
If you are using a legacy container type, the Amazon RDS option does not appear. For
a list of supported legacy container types, see Why are some container types marked
legacy? (p. 426). For more information about configuring databases with legacy container
types, see Configuring Databases with Elastic Beanstalk (p. 384).
• Unless you are using a legacy container type, you have the option to create your environment
inside a VPC.To do this, select Create this environment inside a VPC. For more information
about Amazon VPC, go to Amazon Virtual Private Cloud (Amazon VPC). For a detailed list of
supported container types that support the option to create an environment inside a Amazon VPC,
see Supported Platforms (p. 19). For a list of supported nonlegacy container types, see Why are
some container types marked legacy? (p. 426).
13. Set configuration details for the environment as explained below.Then click Next.
API Version 2010-12-01
281
Elastic Beanstalk Developer Guide
AWS Management Console

• Instance type displays the instance types available to your Elastic Beanstalk environment. Select
a server with the characteristics (including memory size and CPU power) that are most appropriate
to your application.
Note
Elastic Beanstalk is free, but the AWS resources that it provisions might not be. For
information on Amazon EC2 usage fees, go to Amazon EC2 Pricing.
For more information about the Amazon EC2 instance types available for your Elastic Beanstalk
environment, go to Instance Families and Types in the Amazon EC2 User Guide for Linux Instances.
API Version 2010-12-01
282
Elastic Beanstalk Developer Guide
AWS Management Console

• EC2 key pair shows all the Amazon EC2 key pairs in your AWS account. Select a key pair if you
need to log in securetly to the Amazon EC2 instances provisioned for your Elastic Beanstalk
application.
For more information about Amazon EC2 key pairs, see Using Credentials in the Amazon EC2
User Guide for Linux Instances. For more information on connecting to Amazon EC2 instances,
see Connecting to Instances and Connecting to an Instance from Windows using PuTTY in the
Amazon EC2 User Guide for Linux Instances.
• Email address specifies who receives Amazon Simple Notification Service notifications about
important events regarding your application. If you want to receive email notifications of important
events, enter an email address.You can disable Amazon SNS notifications at a later time by
removing the email address in the configuration settings of your running environment.
• For load-balancing, autoscaling environments, Application health check URL specifies a resource
in your application that Elastic Load Balancing checks for a 200 OK response. For more information,
see Monitoring Application Health (p. 327).
• Enable rolling updates provides options for managing how instances are updated or replaced.
For more information, see Updating Elastic Beanstalk Environments with Rolling Updates (p.375).
Note
You can configure rolling updates after you have saved your environment configuration.
Rolling updates uses default settings when first enabled.
• For load-balancing, autoscaling environments, Cross-zone load balancing configures the load
balancer to route traffic evenly among all Amazon EC2 instances, regardless of the Availability
Zone, instead of within a single Availability Zone only. For more information, see Enabling cross-zone
load balancing (p. 360).
• For load-balancing, autoscaling environments, Connection draining keeps connections open
between the load balancer and Amazon EC2 instances that are unhealthy or deregistering for the
purposes of completing in-progress requests. For more information, see Connection Draining (p. 361).
• When you enable connection draining, specify the Connection draining timeout value as the
maximum number of seconds that the load balancer allows for the completion of in-progress
requests. Connections are automatically forced closed after 300 seconds when you do not specify
a draining timeout.
• Root volume type displays the types of storage volumes provided by Amazon EBS that you can
attach to Amazon EC2 instances in your Elastic Beanstalk environment. Select the volume type
that meets your performance and price requirements. For more information, see Amazon EBS
Volume Types and Amazon EBS Product Details.
• With Root volume size, you can specify the size of the storage volume that you selected.You
must specify your desired root volume size if you choose Provisioned IOPS (SSD) as the root
volume type that your instances will use. For other root volumes, if you do not specify your own
value, Elastic Beanstalk will use the default volume size for the storage volume type. The default
volume size varies according to the AMI of the solution stack on which your environment is based.
For Provisioned IOPS (SSD) root volumes, the minimum number of gibibytes is 10 and the maximum
is 1024. For other root volumes, the minimum number of gibibytes is 8 and the maximum is 1024.
• If you selected Provisioned IOPS (SSD) as your root volume type, you must specify your desired
input/output operations per second (IOPS).The minimum is 100 and the maximum is 4000.The
maximum ratio of IOPS to your volume size is 30 to 1. For example, a volume with 3000 IOPS
must be at least 100 GiB.
14. (Optional) On the Environment Tags page, create tags for the environment, and then click Next.
Restrictions on tag keys and tag values include the following:
• Keys and values can contain any alphabetic character in any language, any numeric character,
white space, invisible separator, and the following symbols: _ . : / = + \ - @
• Keys can contain up to 128 characters.Values can contain up to 256 characters.
API Version 2010-12-01
283
Elastic Beanstalk Developer Guide
AWS Management Console

• Keys and values are case sensitive.
• Values cannot match the environment name.
• Values cannot include either aws: or elasticbeanstalk:.
For more information about using tags, see Tagging Your Amazon EC2 Resources in the Amazon
EC2 User Guide for Linux Instances.
15. If you are creating a worker environment tier, on the Worker Details page, set the following preliminary
worker environment tier details.Then click Next.You can also click Next to accept the default values.
• Worker queue specifies the queue from which the worker environment tier reads messages that
it will process. If you do not provide a value, then Elastic Beanstalk automatically creates one for
you.
• HTTP path specifies the relative path on the local host to which messages from the queue are
forwarded in the form of HTTP POST requests.
• MIME type specifies the MIME type of the message sent in the HTTP POST request.
API Version 2010-12-01
284
Elastic Beanstalk Developer Guide
AWS Management Console

• HTTP connections specifies the maximum number of concurrent connections to the application.
Set this to the number of process or thread messages your application can process in parallel.
• Visibility timeout specifies how long an incoming message is locked for processing before being
returned to the queue. Set this to the potentially longest amount of time that might be required to
process a message.
16. Unless you are creating an application using a legacy container type, if you chose to associate an
Amazon RDS DB, set the Amazon RDS configuration settings as explained below.Then click
Continue.
Note
You cannot associate an Amazon RDS DB if you use a legacy container type.
• (Optional) For Snapshot, select whether to create an Amazon RDS DB from an existing snapshot.
• (Optional) For DB engine, select a database engine.
• (Optional) For Instance Class, select a database instance class. For information about the DB
instance classes, go to http://aws.amazon.com/rds/.
• For Allocated Storage, type the space needed for your database.You can allocate between 5
GB and 1024 GB.You cannot update the allocated storage for a database to a lower amount after
you set it. In some cases, allocating a larger amount of storage for your DB instance than the size
of your database can improve IO performance. For information about storage allocation, go to
Features.
• For Master Username, type a name using alphanumeric characters that you will use to log in to
your DB instance with all database privileges.
• For Master Password, type a password containing 8 to 16 printable ASCII characters (excluding
/, \, and @).
• For Deletion Policy, select Create snapshot to create a snapshot that you can use later to create
another Amazon RDS database. Select Delete to delete the DB instance when you terminate the
API Version 2010-12-01
285
Elastic Beanstalk Developer Guide
AWS Management Console

environment. If you select Delete, you lose your DB instance and all the data in it when you
terminate the Elastic Beanstalk instance associated with it. By default, Elastic Beanstalk creates
and saves a snapshot.You can use a snapshot to restore data to use in a new environment, but
cannot otherwise recover lost data.
Note
You may incur charges for storing database snapshots. For more information, see the
"Backup Storage" section of Amazon RDS Pricing.
• For Availability, select one of the following:
• To configure your database in one Availability Zone, select Single Availability Zone. A database
instance launched in one Availability Zone does not have protection from the failure of a single
location.
• To configure your database across multiple availability zones, select Multiple Availability Zones.
Running your database instance in multiple Availability Zones helps safeguard your data in the
unlikely event of a database instance component failure or service health disruption in one
Availability Zone.
17. If you chose to create an environment inside a Amazon VPC, set the Amazon VPC configuration
details as explained below. Then click Continue.
Note
You cannot create an environment inside an Amazon VPC if you use a legacy container
type.
• Select the VPC ID of the VPC in which you want to launch your environment.
Note
If you do not see the VPC information, then you have not created a VPC in the same
region in which you are launching your environment.To learn how to create a VPC, see
Using Elastic Beanstalk with Amazon VPC (p. 531).
API Version 2010-12-01
286
Elastic Beanstalk Developer Guide
AWS Management Console

• For a load-balancing, autoscaling environment, select the subnets for the Elastic Load Balancing
load balancer and the Amazon EC2 instances. If you created a single public subnet, select the
Associate Public IP Address check box, and then select the check boxes for the load balancer
and the Amazon EC2 instances. If you created public and private subnets, make sure the load
balancer (public subnet) and the Amazon EC2 instances (private subnet) are associated with the
correct subnet. By default, Amazon VPC creates a default public subnet using 10.0.0.0/24 and a
private subnet using 10.0.1.0/24.You can view your existing subnets in the Amazon VPC console
at https://console.aws.amazon.com/vpc/.
• For a single-instance environment, select a public subnet for the Amazon EC2 instance. By default,
Amazon VPC creates a default public subnet using 10.0.0.0/24.You can view your existing subnets
in the Amazon VPC console at https://console.aws.amazon.com/vpc/.
• If you are using Amazon RDS, you must select at least two subnets in different Availability Zones.
To learn how to create subnets for your VPC, go to Task 1: Create the VPC and Subnets in the
Amazon VPC User Guide.
• If you have a NAT instance (usually when you have instances in a private subnet), select the VPC
security group that is assigned to the NAT instance. For instructions on how to create this security
group and update your default VPC security group, see Step 2: Configure the Default VPC Security
Group for the NAT Instance (p. 539). If you do not have a NAT instance, you can use the default
security group.
• For a load-balancing, autoscaling environment, select whether you want to make the load balancer
external or internal. If you do not want your load balancer to be available to the Internet, select
Internal.
18. Review your application and environment information, and then click Launch.
The new environment is launched with your application. Note that it can take several minutes for the
new environment to start while Elastic Beanstalk is provisioning AWS resources.
Command Line Interface (CLI)
To create a new application
1. Create a new application.
PROMPT> elastic-beanstalk-create-application -a [Application Name] -d
[Description]
2. Create a new application version.
PROMPT> elastic-beanstalk-create-application-version -a [Application Name]
-l [Version Label] -d [Description] -s [Source Location]
Note
If you want to use the sample application, do not pass the source location parameter.
3. Check whether the CNAME for the environment is available.
PROMPT> elastic-beanstalk-check-dns-availability -c [CNAME Prefix]
4. Create environment.
PROMPT> elastic-beanstalk-create-environment -a [Application Name] -l [Version
Label] -e [Environment Name] -c [CNAME Prefix] -d [Description] -s [Solution
Stack Name] -f [Option Settings File Name
Option Settings are defined in the Options.txt file:
[
{"Namespace": "aws:autoscaling:launchconfiguration",
"OptionName": "IamInstanceProfile",
API Version 2010-12-01
287
Elastic Beanstalk Developer Guide
Command Line Interface (CLI)

"Value": ElasticBeanstalkProfile}
]
The above option setting defines the IAM instance profile.You can specify the ARN or the profile
name.
5. Determine if the new environment is Green and Ready.
PROMPT> elastic-beanstalk-describe-environments -e [Environment Name]
If the new environment does not come up Green and Ready, you should decide whether to retry the
operation or leave the environment in its current state for investigation. Make sure to terminate the
environment after you are finished, and clean up any unused resources.
Note
You can adjust the timeout period if the environment doesn't launch in a reasonable time.
API
To create a new application
1. Call CreateApplication with the following parameters:
• ApplicationName = SampleApp
• Description = description
Example
https://elasticbeanstalk.us-west-2.amazon.com/?ApplicationName=SampleApp
&Description=description
&Operation=CreateApplicationVersion
&AuthParams
2. Call CreateApplicationVersion with the following parameters:
• ApplicationName = SampleApp
• VersionLabel = Version1
• Description = description
• SourceBundle.S3Bucket = <your S3 bucket name>
• SourceBundle.S3Key = mynewjavawebapp-v1.war
Example
https://elasticbeanstalk.us-west-2.amazon.com/?ApplicationName=SampleApp
&VersionLabel=Version1
&Description=description
&SourceBundle.S3Bucket=<your S3 bucket name>
&SourceBundle.S3Key=mynewjavawebapp-v1.war
&Operation=CreateApplicationVersion
&AuthParams
3. Call CheckDNSAvailability with the following parameters:
API Version 2010-12-01
288
Elastic Beanstalk Developer Guide
API

• CNAMEPrefix = mysampleapplication
Example
https://elasticbeanstalk.us-west-2.amazon.com/?CNAMEPrefix=mysampleapplication
&Operation=CheckDNSAvailability
&AuthParams
4. Call CreateEnvironment with one of the following sets of parameters:
a. For a web server environment tier:
• ApplicationName = SampleApp
• VersionLabel = Version1
• EnvironmentName = mynewappenv
• SolutionStackName = "32bit Amazon Linux running Tomcat 7"
• CNAMEPrefix = mysampleapplication
• Description = description
• OptionSettings.member.1.Namespace = aws:autoscaling:launchconfiguration
• OptionSettings.member.1.OptionName = IamInstanceProfile
• OptionSettings.member.1.Value = ElasticBeanstalkProfile
Example
https://elasticbeanstalk.us-west-2.amazon.com/?ApplicationName=SampleApp
&VersionLabel=Version1
&EnvironmentName=mynewappenv
&SolutionStackName=32bit%20Amazon%20Linux%20running%20Tomcat%207
&CNAMEPrefix=mysampleapplication
&Description=description
&Operation=CreateEnvironment
&OptionSettings.member.1.Namespace=aws%3Aautoscaling%3Alaunchconfiguration
&OptionSettings.member.1.OptionName=IamInstanceProfile
&OptionSettings.member.1.Value=ElasticBeanstalkProfile
&AuthParams
b. For a worker environment tier:
• EnvironmentName = SampleAppEnv2
• VersionLabel = Version2
• Description = description
• SolutionStackName = "32bit Amazon Linux running Tomcat 7"
• ApplicationName = SampleApp
• Tier = Worker
• OptionSettings.member.1.Namespace = aws:autoscaling:launchconfiguration
• OptionSettings.member.1.OptionName = IamInstanceProfile
• OptionSettings.member.1.Value = ElasticBeanstalkProfile
API Version 2010-12-01
289
Elastic Beanstalk Developer Guide
API

• OptionSettings.member.2.Namespace = aws:elasticbeanstalk:sqsd
• OptionSettings.member.2.OptionName = WorkerQueueURL
• OptionSettings.member.2.Value =
sqsd.elasticbeanstalk.us-west-2.amazon.com
• OptionSettings.member.3.Namespace = aws:elasticbeanstalk:sqsd
• OptionSettings.member.3.OptionName = HttpPath
• OptionSettings.member.3.Value = /
• OptionSettings.member.4.Namespace = aws:elasticbeanstalk:sqsd
• OptionSettings.member.4.OptionName = MimeType
• OptionSettings.member.4.Value = application/json
• OptionSettings.member.5.Namespace = aws:elasticbeanstalk:sqsd
• OptionSettings.member.5.OptionName = HttpConnections
• OptionSettings.member.5.Value = 75
• OptionSettings.member.6.Namespace = aws:elasticbeanstalk:sqsd
• OptionSettings.member.6.OptionName = ConnectTimeout
• OptionSettings.member.6.Value = 10
• OptionSettings.member.7.Namespace = aws:elasticbeanstalk:sqsd
• OptionSettings.member.7.OptionName = InactivityTimeout
• OptionSettings.member.7.Value = 10
• OptionSettings.member.8.Namespace = aws:elasticbeanstalk:sqsd
• OptionSettings.member.8.OptionName = VisibilityTimeout
• OptionSettings.member.8.Value = 60
• OptionSettings.member.9.Namespace = aws:elasticbeanstalk:sqsd
• OptionSettings.member.9.OptionName = RetentionPeriod
• OptionSettings.member.9.Value = 345600
API Version 2010-12-01
290
Elastic Beanstalk Developer Guide
API

Example
https://elasticbeanstalk.us-west-2.amazon.com/?ApplicationName=SampleApp
&VersionLabel=Version2
&EnvironmentName=SampleAppEnv2
&SolutionStackName=32bit%20Amazon%20Linux%20running%20Tomcat%207
&Description=description
&Tier=Worker
&Operation=CreateEnvironment
&OptionSettings.member.1.Namespace=aws%3Aautoscaling%3Alaunchconfiguration
&OptionSettings.member.1.OptionName=IamInstanceProfile
&OptionSettings.member.1.Value=ElasticBeanstalkProfile
&OptionSettings.member.2.Namespace=aws%3Aelasticbeanstalk%3Asqsd
&OptionSettings.member.2.OptionName=WorkerQueueURL
&OptionSettings.member.2.Value=sqsd.elasticbeanstalk.us-west-2.amazon.com
&OptionSettings.member.3.Namespace=aws%3elasticbeanstalk%3sqsd
&OptionSettings.member.3.OptionName=HttpPath
&OptionSettings.member.3.Value=%2F
&OptionSettings.member.4.Namespace=aws%3Aelasticbeanstalk%3Asqsd
&OptionSettings.member.4.OptionName=MimeType
&OptionSettings.member.4.Value=application%2Fjson
&OptionSettings.member.5.Namespace=aws%3Aelasticbeanstalk%3Asqsd
&OptionSettings.member.5.OptionName=HttpConnections
&OptionSettings.member.5.Value=75
&OptionSettings.member.6.Namespace=aws%3Aelasticbeanstalk%3Asqsd
&OptionSettings.member.6.OptionName=ConnectTimeout
&OptionSettings.member.6.Value=10
&OptionSettings.member.7.Namespace=aws%3Aelasticbeanstalk%3Asqsd
&OptionSettings.member.7.OptionName=InactivityTimeout
&OptionSettings.member.7.Value=10
&OptionSettings.member.8.Namespace=aws%3Aelasticbeanstalk%3Asqsd
&OptionSettings.member.8.OptionName=VisibilityTimeout
&OptionSettings.member.8.Value=60
&OptionSettings.member.9.Namespace=aws%3Aelasticbeanstalk%3Asqsd
&OptionSettings.member.9.OptionName=RetentionPeriod
&OptionSettings.member.9.Value=345600
&AuthParams
5. Call DescribeEnvironments with the following parameter:
• EnvironmentName = mynewappenv
Example
https://elasticbeanstalk.us-west-2.amazon.com/?EnvironmentName=mynewappenv
&Operation=DescribeEnvironments
&AuthParams
API Version 2010-12-01
291
Elastic Beanstalk Developer Guide
API

Creating New Application Versions
You can create different versions for an application. Each application version consists of a unique file
(WAR file or ZIP file), as well as contextual information about the version.This topic describes how to
create a new version of an existing Elastic Beanstalk application and deploy it to an existing environment.
You may want to do this if, for instance, you have updated your application and want to re-deploy it to
your testing environment. For information on how to create new application versions using the AWS
Toolkit for Eclipse, see Creating and Deploying Elastic Beanstalk Applications in Java Using AWS Toolkit
for Eclipse (p.93). For more information on how to create new application versions for PHP, see Deploying
Elastic Beanstalk Applications in PHP (p. 220). For more information on how to create new application
versions using the AWS Toolkit for Visual Studio, see Creating and Deploying Elastic Beanstalk Applications
in .NET Using AWS Toolkit for Visual Studio (p. 125).
Note
For information on creating a new application, see Creating New Applications (p. 279).
AWS Management Console
To create a new application version
1. Open the Elastic Beanstalk console at https://console.aws.amazon.com/elasticbeanstalk/.
2. From the region list, select the region that includes the application that you want to work with.
3. From the Elastic Beanstalk console applications page, click the name of the application to which you
want to add a new application version.
4. In the navigation pane, click Application Versions.
5. Click Upload.
• Enter a label for this version in the Version label field.
• (Optional) Enter a brief description for this version in the Description field.
• Click Browse to specify the location of the application version (.war or .zip file).
Note
Elastic Beanstalk supports only a single .war file for a Java application version and only
a single .zip file for other applications.The file size limit is 512 MB.
• Click Upload.
The file you specified is associated with your application.You can deploy the application version to
a new or existing environment. For more information, see Launching New Environments (p. 299) or
Deploying Versions to Existing Environments (p. 313)
API Version 2010-12-01
292
Elastic Beanstalk Developer Guide
Creating New Application Versions

CLI
To create a new application version
1. Create a new application version.
PROMPT> elastic-beanstalk-create-application-version -a [Application Name]
-l [Version Label] -d [Description] -s [Source Location]
2. Update your existing environment.
PROMPT> elastic-beanstalk-update-environment -e [Environment Name] -l [Version
Label] -d [Description]
3. Determine if the new environment is Green and Ready.
PROMPT> elastic-beanstalk-describe-environments -e [Environment Name]
If the new environment does not come up Green and Ready, you should decide if you want to retry
the operation or leave the environment in its current state for investigation. Make sure to terminate
the environment after you are finished, and clean up any unused resources.
Note
You can adjust the timeout period if the environment doesn't launch in a reasonable time.
API
To create a new application version
1. Call CreateApplicationVersion with the following parameters:
• ApplicationName = SampleApp
• VersionLabel = Version2
• Description = description
• SourceBundle.S3Bucket = <your bucket name>
• SourceBundle.S3Key = <your application file name>
• AutoCreateApplication = true
Example
https://elasticbeanstalk.us-west-2.amazon.com/?ApplicationName=SampleApp
&VersionLabel=Version2
&Description=description
&SourceBundle.S3Bucket=amazonaws.com
&SourceBundle.S3Key=sample.war
&AutoCreateApplication=true
&Operation=CreateApplicationVersion
&AuthParams
2. Call UpdateEnvironment with the following parameters:
• EnvironmentName = SampleAppEnv
• VersionLabel = Version2
• Description = description
• TemplateName = MyConfigTemplate
API Version 2010-12-01
293
Elastic Beanstalk Developer Guide
CLI

Example
https://elasticbeanstalk.us-west-2.amazon.com/?EnvironmentName=mysampleappenv
&TemplateName=myconfigtemplate
&Description=description
&VersionLabel=Version2
&Operation=UpdateEnvironment
&AuthParams
3. Call DescribeEnvironments with the following parameter:
• EnvironmentName = SampleAppEnv
Example
https://elasticbeanstalk.us-west-2.amazon.com/?EnvironmentName=SampleAppEnv
&Operation=DescribeEnvironments
&AuthParams
Creating an Application Source Bundle
When you use the AWS Elastic Beanstalk console to deploy a new application or an application version,
you’ll need to upload a source bundle.Your source bundle must meet the following requirements:
• Consist of a single .zip file or .war file
• Not exceed 512 MB
• Not include a parent folder or top-level directory (subdirectories are fine)
If you want to deploy a worker application that processes periodic background tasks, your application
source bundle must also include a cron.yaml file. For more information, see Periodic Tasks
2
(p. 340).
This section explains how to create a source bundle manually.
Note
If you’re creating a source bundle with the eb command-line tool, the AWS Toolkit for Eclipse,
or the AWS Toolkit for Visual Studio, the .zip or .war file will automatically be structured correctly.
For more information, go to EB and Eb Command Line Interfaces (p. 620), Creating and Deploying
Elastic Beanstalk Applications in Java Using AWS Toolkit for Eclipse (p. 93), and AWS Toolkit
for Visual Studio (p. 170).
Zipping Files in Mac OS X Finder or Windows
Explorer
When you create a .zip file in Mac OS X Finder or Windows Explorer, make sure you zip the files and
subfolders themselves, rather than zipping the parent folder.
Note
The graphical user interface (GUI) on Mac OS X and Linux-based operating systems does not
display files and folders with names that begin with a period (.). Use the command line instead
of the GUI to compress your application if the .zip file must include a hidden folder, such as
API Version 2010-12-01
294
Elastic Beanstalk Developer Guide
Creating an Application Source Bundle

.ebextensions. For command line procedures to create a .zip file on Mac OS X or a
Linux-based operating system, see Creating a Source Bundle from the Command Line (p. 297).
Example
Suppose you have a Python project folder labeled myapp, which includes the following files and subfolders:
myapplication.py
README.md
static/
static/css
static/css/styles.css
static/img
static/img/favicon.ico
static/img/logo.png
templates/
templates/base.html
templates/index.html
As noted in the list of requirements above, your source bundle must be compressed without a parent
folder, so that its decompressed structure does not include an extra top-level directory. In this example,
no myapp folder should be created when the files are decompressed (or, at the command line, no myapp
segment should be added to the file paths).
This sample file structure is used throughout this topic to illustrate how to zip files.
To zip files in Mac OS X Finder
1. Open your top-level project folder and select all the files and subfolders within it. Do not select the
top-level folder itself.
2. Right-click the selected files, and then click Compress X items, where X is the number of files and
subfolders you’ve selected.
API Version 2010-12-01
295
Elastic Beanstalk Developer Guide
Zipping Files in Mac OS X Finder or Windows Explorer

To zip files in Windows Explorer
1. Open your top-level project folder and select all the files and subfolders within it. Do not select the
top-level folder itself.
2. Right-click the selected files, click Send to, and then click Compressed (zipped) folder.
API Version 2010-12-01
296
Elastic Beanstalk Developer Guide
Zipping Files in Mac OS X Finder or Windows Explorer

Creating a Source Bundle from the Command Line
When you create a source bundle using a zip command or jar command (Mac OS X or Linux), you
may want to work in the same directory as your source files, rather than in a parent folder or other
higher-level directory.This will help ensure that the file paths in the compressed archive do not include
an extra parent folder. Mac OS X and Linux-based operating systems hide files and folders with names
that begin with a period (.).The following command ensures that your source bundle includes folders that
begin with a period, such as the .ebextensions folder.
Example
PROMPT> zip ../myapp.zip -r * .[^.]*
PROMPT> jar -cvf mywebapp.war *
API Version 2010-12-01
297
Elastic Beanstalk Developer Guide
Creating a Source Bundle from the Command Line

Creating a Source Bundle with Git
If you’re using Git to manage your application source code, you can use the archive command to create
your source bundle.
To bundle your most recent Git commit
• To create a .zip archive of your most recent Git commit on the current branch, type the following
command or issue it via a Git client, replacing <myapp> with your preferred archive name:
PROMPT> git archive --format=zip HEAD > <myapp>.zip
For more details, go to the git-archive manual page.
Testing Your Source Bundle
You may want to test your source bundle locally before you upload it to Elastic Beanstalk. Because Elastic
Beanstalk essentially uses the command line to extract the files, it's best to do your tests from the command
line rather than with a GUI tool.
To test the file extraction in Mac OS X or Linux
1. Open a terminal window (Mac OS X) or connect to the Linux server. Navigate to the directory that
contains your source bundle.
2. Using the unzip or jar xf command, decompress the archive.
3. Ensure that the decompressed files appear in the same folder as the archive itself, rather than in a
new top-level folder or directory.
API Version 2010-12-01
298
Elastic Beanstalk Developer Guide
Creating a Source Bundle with Git

Note
If you use Mac OS X Finder to decompress the archive, a new top-level folder will be created,
no matter how you structured the archive itself. For best results, use the command line.
To test the file extraction in Windows
1. Download or install a program that allows you to extract compressed files via the command line. For
example, you can download the free unzip.exe program from http://stahlforce.com/dev/
index.php?tool=zipunzip.
2. If necessary, copy the executable file to the directory that contains your source bundle. If you've
installed a system-wide tool, you can skip this step.
3. Using the appropriate command, decompress the archive. If you downloaded unzip.exe using the
link in step 1, the command is unzip <archive-name>.
4. Ensure that the decompressed files appear in the same folder as the archive itself, rather than in a
new top-level folder or directory.
Filtering Applications in Your Environment
You can filter the list of all Elastic Beanstalk applications deployed in an environment.You may want to
do this if, for example, you deployed a large number of applications in one environment.The AWS
Management Console can help you quickly find an Elastic Beanstalk application in an environment.You
can search for applications within only one environment at a time.
To filter a list of applications in your environment
1. Open the Elastic Beanstalk console at https://console.aws.amazon.com/elasticbeanstalk/.
2. From the region list, select the region that includes the environment that you want to work in.
3. On the Elastic Beanstalk All Applications page, click Filter by Application Name.
4. Type part or all of the name of the application you want to find.
As you type, Elastic Beanstalk dynamically displays a list of applications with names that include the text
in your search query.
Launching New Environments
You can deploy multiple environments when you need to run multiple versions of an application. For
example, you might have development, integration, and production environments.When launching, you
can deploy a different version to any environment quickly and easily. For more information about deploying
with zero downtime, see Deploying Versions with Zero Downtime (p. 318).
Important
After you create an environment, the environment URL is publicly visible.
AWS Management Console
To launch a new environment
1. Open the Elastic Beanstalk console at https://console.aws.amazon.com/elasticbeanstalk/.
2. From the region list, select the region that has the application that you want to work in.
API Version 2010-12-01
299
Elastic Beanstalk Developer Guide
Filtering Applications

3. From the Elastic Beanstalk console applications page, click Actions for the application in which you
want to launch a new environment.
4. Click Launch New Environment.
5. On the New Environment page, select an environment tier.The environment tier setting specifies
whether you want a Web Server or Worker tier. For more information, see Architectural
Overview (p. 16).
Note
After you launch an environment, you cannot change the environment tier. If your application
requires a different environment tier, you must launch a new environment.When you remove
an environment, the AWS resources associated with the environment and the application
version you deployed in that environment are deleted.You can save the environment
configuration to use later if you want to rebuild an environment using the same environment
tier.
6. In the Permissions window, choose the instance profile that you want to use to launch the Amazon
EC2 instances in the new environment. (An instance profile is associated with the IAM role that is
configured with the appropriate permissions to access the AWS resources that your application will
require. A worker environment tier requires different permissions from a web server environment tier.
For more information, see IAM Roles for Elastic Beanstalk Environment Tiers (p.617).) Do one of the
following:
• For a web server environment tier, click the name of the instance profile with the appropriate IAM
role, and then click Next.
• For a worker environment tier, do one of the following:
• If you want Elastic Beanstalk to create a role with the default permissions required by a worker
application, click Create an IAM role and instance profile, and then click Next.
• If you have an existing instance profile with an IAM role that is configured with the permissions
required by a worker application, click Select an existing instance profile, and then click Next.
7. If, in the previous step, you clicked Create an IAM role and instance profile, click View Details to
see options for the role, and then do one of the following:
• To add default permissions for a worker application to an existing role, click IAM Role, click the
name of the instance profile for which you want to add a role policy, and then click Allow.You can
optionally associate a saved policy with an existing role by clicking Policy Name, and then clicking
the name of the policy before you click Allow.
• To create a new role with default permissions, click Allow.You can optionally change the Role
Name and edit the policy document.
8. On the Environment Type page, select a platform and environment type, and then click Next.
API Version 2010-12-01
300
Elastic Beanstalk Developer Guide
AWS Management Console

• The Predefined configuration setting specifies the platform and version that will be used for the
environment. For more information, see Supported Platforms (p. 19).
Note
After you launch an environment with a specific configuration, you cannot change the
configuration. If your application requires a different configuration, you must launch a new
environment.
• The Saved configuration setting lists all environment configurations that you previously saved
for this application, if any. If you have no saved configurations for this application, Elastic Beanstalk
does not display this option in the console.
• The Environment type specifies whether the environment is load balancing and autoscaling or
only a single Amazon EC2 instance. For more information, see Environment Types (p. 345).
Note
The single-instance environment type is not available for legacy containers. For instructions
on migrating from a legacy container, see Migrating Your Application from a Legacy
Container Type (p. 426).
9. On the Application Version page, you can use the sample application, upload your own, or specify
the URL for the Amazon S3 bucket that contains your application code.
Note
Elastic Beanstalk supports only a single .war file for a Java application version and only a
single .zip file for other applications.The file size limit is 512 MB.
10. For load-balancing, autoscaling environments only, you can also control downtime when application
versions are deployed to your environment later. Next to Batch size, click Percentage or Fixed.
Enter a percentage or fixed number of instances to which you want to deploy the new application
version at any given time, and then click Next.
11. On the Environment Information page, enter the details of your environment.
a. For a web server environment tier:
• Enter a name for the environment.
• Enter a unique environment URL. Even though the environment URL is populated with the
environment name, you can enter a different name for the URL. Elastic Beanstalk uses this
name to create a unique CNAME for the environment.You can check the availability of the
URL by clicking Check Availability
• (Optional) Enter a description for this environment.
• Click Next.
b. For a worker environment tier:
• Enter a name for the environment.
• (Optional) Enter a description for this environment.
• Click Next.
12. (Optional) On the Additional Resources page, select additional resources for the environment, and
then click Next. Note the following:
• Unless you are creating an application using a legacy container type, you have the option to
associate an Amazon RDS database. If you want to associate an Amazon RDS DB with this
application, select Create an RDS Database with this environment. For more information about
API Version 2010-12-01
301
Elastic Beanstalk Developer Guide
AWS Management Console

Amazon RDS, go to Amazon Relational Database Service (Amazon RDS). For a detailed list of
container types that provide the option to include an Amazon RDS database, see Supported
Platforms (p. 19).
Note
If you are using a legacy container type, then the Amazon RDS option does not appear.
For a list of supported legacy container types, see Why are some container types marked
legacy? (p. 426). For more information about configuring databases with legacy container
types, see Configuring Databases with Elastic Beanstalk (p. 384).
• Unless you are creating an application using a legacy container type, you have the option to create
your environment inside a VPC.To do this, select Create this environment inside a VPC. For
more information about Amazon VPC, go to Amazon Virtual Private Cloud (Amazon VPC). For a
list of supported legacy container types, see Why are some container types marked legacy? (p.426).
13. Set configuration details for the environment, and then click Next.
API Version 2010-12-01
302
Elastic Beanstalk Developer Guide
AWS Management Console

• Instance type displays the instance types available to your Elastic Beanstalk environment. Select
a server with the characteristics (including memory size and CPU power) that are most appropriate
to your application.
Note
Elastic Beanstalk is free, but the AWS resources that it provisions might not be. For
information on Amazon EC2 usage fees, go to Amazon EC2 Pricing.
For more information about the Amazon EC2 instance types available for your Elastic Beanstalk
environment, go to Instance Families and Types in the Amazon EC2 User Guide for Linux Instances.
API Version 2010-12-01
303
Elastic Beanstalk Developer Guide
AWS Management Console

• EC2 key pair shows all the Amazon EC2 key pairs in your AWS account. Select a key pair if you
need to log in securetly to the Amazon EC2 instances provisioned for your Elastic Beanstalk
application.
For more information about Amazon EC2 key pairs, see Using Credentials in the Amazon EC2
User Guide for Linux Instances. For more information on connecting to Amazon EC2 instances,
see Connecting to Instances and Connecting to an Instance from Windows using PuTTY in the
Amazon EC2 User Guide for Linux Instances.
• Email address specifies who receives Amazon Simple Notification Service notifications about
important events regarding your application. If you want to receive email notifications of important
events, enter an email address.You can disable Amazon SNS notifications at a later time by
removing the email address in the configuration settings of your running environment.
• For load-balancing, autoscaling environments, Application health check URL specifies a resource
in your application that Elastic Load Balancing checks for a 200 OK response. For more information,
see Monitoring Application Health (p. 327).
• Enable rolling updates provides options for managing how instances are updated or replaced.
For more information, see Updating Elastic Beanstalk Environments with Rolling Updates (p.375).
Note
You can configure rolling updates after you have saved your environment configuration.
Rolling updates uses default settings when first enabled.
• For load-balancing, autoscaling environments, Cross-zone load balancing configures the load
balancer to route traffic evenly among all Amazon EC2 instances, regardless of the Availability
Zone, instead of within a single Availability Zone only. For more information, see Enabling cross-zone
load balancing (p. 360).
• For load-balancing, autoscaling environments, Connection draining keeps connections open
between the load balancer and Amazon EC2 instances that are unhealthy or deregistering for the
purposes of completing in-progress requests. For more information, see Connection Draining (p. 361).
• When you enable connection draining, specify the Connection draining timeout value as the
maximum number of seconds that the load balancer allows for the completion of in-progress
requests. Connections are automatically forced closed after 300 seconds when you do not specify
a draining timeout.
• Root volume type displays the types of storage volumes provided by Amazon EBS that you can
attach to Amazon EC2 instances in your Elastic Beanstalk environment. Select the volume type
that meets your performance and price requirements. For more information, see Amazon EBS
Volume Types and Amazon EBS Product Details.
• With Root volume size, you can specify the size of the storage volume that you selected.You
must specify your desired root volume size if you choose Provisioned IOPS (SSD) as the root
volume type that your instances will use. For other root volumes, if you do not specify your own
value, Elastic Beanstalk will use the default volume size for the storage volume type. The default
volume size varies according to the AMI of the solution stack on which your environment is based.
For Provisioned IOPS (SSD) root volumes, the minimum number of gibibytes is 10 and the maximum
is 1024. For other root volumes, the minimum number of gibibytes is 8 and the maximum is 1024.
• If you selected Provisioned IOPS (SSD) as your root volume type, you must specify your desired
input/output operations per second (IOPS).The minimum is 100 and the maximum is 4000.The
maximum ratio of IOPS to your volume size is 30 to 1. For example, a volume with 3000 IOPS
must be at least 100 GiB.
14. (Optional) On the Environment Tags page, create tags for the environment, and then click Next.
Restrictions on tag keys and tag values include the following:
• Keys and values can contain any alphabetic character in any language, any numeric character,
white space, invisible separator, and the following symbols: _ . : / = + \ - @
• Keys can contain up to 128 characters.Values can contain up to 256 characters.
API Version 2010-12-01
304
Elastic Beanstalk Developer Guide
AWS Management Console

• Keys and values are case sensitive.
• Values cannot match the environment name.
• Values cannot include either aws: or elasticbeanstalk:.
For more information about using tags, see Tagging Your Amazon EC2 Resources in the Amazon
EC2 User Guide for Linux Instances.
15. If you are creating a worker environment tier, on the Worker Details page, set the following preliminary
worker environment tier details.Then click Next.You can also click Next to accept the default values.
• Worker queue specifies the queue from which the worker environment tier reads messages that
it will process. If you do not provide a value, then Elastic Beanstalk automatically creates one for
you.
• HTTP path specifies the relative path on the local host to which messages from the queue are
forwarded in the form of HTTP POST requests.
• MIME type specifies the MIME type of the message sent in the HTTP POST request.
API Version 2010-12-01
305
Elastic Beanstalk Developer Guide
AWS Management Console

• HTTP connections specifies the maximum number of concurrent connections to the application.
Set this to the number of process or thread messages your application can process in parallel.
• Visibility timeout specifies how long an incoming message is locked for processing before being
returned to the queue. Set this to the potentially longest amount of time that might be required to
process a message.
16. If you chose to associate an Amazon RDS DB earlier in the environment configuration process, on
the RDS Configuration page, set the Amazon RDS configuration settings, and then click Next.
Note
If you are using a legacy container type, you cannot use Amazon RDS with Elastic Beanstalk.
Elastic Beanstalk does not display an RDS Configuration page when you create an
environment with a legacy container type. For more information about configuring databases
with legacy container types, see Configuring Databases with Elastic Beanstalk (p. 384).
• (Optional) For Snapshot, select whether to create an Amazon RDS DB from an existing snapshot.
• (Optional) For DB engine, select a database engine.
• (Optional) For Instance Class, select a database instance class. For information about the DB
instance classes, go to http://aws.amazon.com/rds/.
• For Allocated Storage, type the space needed for your database.You can allocate between 5
GB and 1024 GB.You cannot update the allocated storage for a database to a lower amount after
you set it. In some cases, allocating a larger amount of storage for your DB instance than the size
of your database can improve IO performance. For information about storage allocation, go to
Features.
• For Master Username, type a name using alphanumeric characters that you will use to log in to
your DB instance with all database privileges.
• For Master Password, type a password containing 8 to 16 printable ASCII characters (excluding
/, \, and @).
API Version 2010-12-01
306
Elastic Beanstalk Developer Guide
AWS Management Console

• For Deletion Policy, select Create snapshot to create a snapshot that you can use later to create
another Amazon RDS database. Select Delete to delete the DB instance when you terminate the
environment. If you select Delete, you lose your DB instance and all the data in it when you
terminate the Elastic Beanstalk instance associated with it. By default, Elastic Beanstalk creates
and saves a snapshot.You can use a snapshot to restore data to use in a new environment, but
cannot otherwise recover lost data.
Note
You may incur charges for storing database snapshots. For more information, see the
"Backup Storage" section of Amazon RDS Pricing.
• For Availability, select one of the following:
• To configure your database in one Availability Zone, select Single Availability Zone. A database
instance launched in one Availability Zone does not have protection from the failure of a single
location.
• To configure your database across multiple availability zones, select Multiple Availability Zones.
Running your database instance in multiple Availability Zones helps safeguard your data in the
unlikely event of a database instance component failure or service health disruption in one
Availability Zone.
17. If you chose to create an environment inside a VPC earlier in the environment creation process, set
the VPC configuration settings, and then click Next.
Note
If you are using a legacy container type, you cannot configure Amazon VPC with Elastic
Beanstalk. Elastic Beanstalk does not display an VPC Configuration page when you create
an environment with a legacy container type.
• Select the VPC ID of the VPC in which you want to launch your environment.
API Version 2010-12-01
307
Elastic Beanstalk Developer Guide
AWS Management Console

Note
If you do not see the VPC information, then you have not created a VPC in the same
region in which you are launching your environment.To learn how to create a VPC, see
Using Elastic Beanstalk with Amazon VPC (p. 531).
• For a load-balancing, autoscaling environment, select the subnets for the Elastic Load Balancing
load balancer and the Amazon EC2 instances. If you created a single public subnet, select the
Associate Public IP Address check box, and then select the check boxes for the load balancer
and the Amazon EC2 instances. If you created public and private subnets, make sure the load
balancer (public subnet) and the Amazon EC2 instances (private subnet) are associated with the
correct subnet. By default, Amazon VPC creates a default public subnet using 10.0.0.0/24 and a
private subnet using 10.0.1.0/24.You can view your existing subnets in the Amazon VPC console
at https://console.aws.amazon.com/vpc/.
• For a single-instance environment, select a public subnet for the Amazon EC2 instance. By default,
Amazon VPC creates a default public subnet using 10.0.0.0/24.You can view your existing subnets
in the Amazon VPC console at https://console.aws.amazon.com/vpc/.
• If you are using Amazon RDS, you must select at least two subnets in different Availability Zones.
To learn how to create subnets for your VPC, go to Task 1: Create the VPC and Subnets in the
Amazon VPC User Guide.
• If you have a NAT instance (usually when you have instances in a private subnet), select the VPC
security group that is assigned to the NAT instance. For instructions on how to create this security
group and update your default VPC security group, see Step 2: Configure the Default VPC Security
Group for the NAT Instance (p. 539). If you do not have a NAT instance, you can use the default
security group.
• For a load-balancing, autoscaling environment, select whether you want to make the load balancer
external or internal. If you do not want your load balancer to be available to the Internet, select
Internal.
18. On the Review Information page, review your application and environment information, and then
click Launch.
Elastic Beanstalk launches your application in a new environment. Note that it can take several
minutes for the new environment to start while Elastic Beanstalk is provisioning AWS resources.You
can view the status of your deployment on the environment's dashboard.While Elastic Beanstalk
creates your AWS resources and launches your application, the environment displays a gray state.
Status messages about launch events appear in the environment's dashboard.When the deployment
is complete, AWS Elastic Beanstalk performs an application health check.The environment status
becomes green when the application responds to the health check.
CLI
To launch a new environment
1. Check if the CNAME for the environment is available.
PROMPT> elastic-beanstalk-check-dns-availability -c [CNAME prefix]
2. Make sure your application version exists.
PROMPT> elastic-beanstalk-describe-application-versions -a [Application
Name] -l [Version Label]
3. Create a configuration template for an existing application.
PROMPT> elastic-beanstalk-create-configuration-template -a [Application
Name] -t [Template Name]
4. Create environment.
API Version 2010-12-01
308
Elastic Beanstalk Developer Guide
CLI

PROMPT> elastic-beanstalk-create-environment -a [Application Name] -l [Version
Label] -e [Environment Name] -c [CNAME Prefix] -d [Description] -s [Solution
Stack Name] -f [Option Settings File Name]
Option Settings are defined in the Options.txt file:
[
{"Namespace": "aws:autoscaling:launchconfiguration",
"OptionName": "IamInstanceProfile",
"Value": ElasticBeanstalkProfile}
]
The above option setting defines the IAM instance profile.You can specify the ARN or the profile
name.
5. Determine if the new environment is Green and Ready.
PROMPT> elastic-beanstalk-describe-environments -e [Environment Name]
If the new environment does not come up Green and Ready, you should decide if you want to retry
the operation or leave the environment in its current state for investigation. Make sure to terminate
the environment after you are finished, and clean up any unused resources.
Note
You can adjust the timeout period if the environment doesn't launch in a reasonable time.
API
To launch a new environment
1. Call CheckDNSAvailability with the following parameter:
• CNAMEPrefix = SampleApp
Example
https://elasticbeanstalk.us-east-1.amazon.com/?CNAMEPrefix=sampleapplication
&Operation=CheckDNSAvailability
&AuthParams
2. Call DescribeApplicationVersions with the following parameters:
• ApplicationName = SampleApp
• VersionLabel = Version2
Example
https://elasticbeanstalk.us-east-1.amazon.com/?ApplicationName=SampleApp
&VersionLabel=Version2
&Operation=DescribeApplicationVersions
&AuthParams
3. Call CreateConfigurationTemplate with the following parameters:
• ApplicationName = SampleApp
API Version 2010-12-01
309
Elastic Beanstalk Developer Guide
API

• TemplateName = MyConfigTemplate
Example
https://elasticbeanstalk.us-east-1.amazon.com/?ApplicationName=SampleApp
&TemplateName=MyConfigTemplate
&Operation=CreateConfigurationTemplate
&AuthParams
4. Call CreateEnvironment with one of the following sets of parameters.
a. Use the following for a web server environment tier:
• EnvironmentName = SampleAppEnv2
• VersionLabel = Version2
• Description = description
• TemplateName = MyConfigTemplate
• ApplicationName = SampleApp
• CNAMEPrefix = sampleapplication
• OptionSettings.member.1.Namespace = aws:autoscaling:launchconfiguration
• OptionSettings.member.1.OptionName = IamInstanceProfile
• OptionSettings.member.1.Value = ElasticBeanstalkProfile
Example
https://elasticbeanstalk.us-east-1.amazon.com/?ApplicationName=SampleApp
&VersionLabel=Version2
&EnvironmentName=SampleAppEnv2
&TemplateName=MyConfigTemplate
&CNAMEPrefix=sampleapplication
&Description=description
&Operation=CreateEnvironment
&OptionSettings.member.1.Namespace=aws%3Aautoscaling%3Alaunchconfiguration
&OptionSettings.member.1.OptionName=IamInstanceProfile
&OptionSettings.member.1.Value=ElasticBeanstalkProfile
&AuthParams
b. Use the following for a worker environment tier:
• EnvironmentName = SampleAppEnv2
• VersionLabel = Version2
• Description = description
• TemplateName = MyConfigTemplate
• ApplicationName = SampleApp
• Tier = Worker
• OptionSettings.member.1.Namespace = aws:autoscaling:launchconfiguration
• OptionSettings.member.1.OptionName = IamInstanceProfile
API Version 2010-12-01
310
Elastic Beanstalk Developer Guide
API

• OptionSettings.member.1.Value = ElasticBeanstalkProfile
• OptionSettings.member.2.Namespace = aws:elasticbeanstalk:sqsd
• OptionSettings.member.2.OptionName = WorkerQueueURL
• OptionSettings.member.2.Value =
sqsd.elasticbeanstalk.us-east-1.amazon.com
• OptionSettings.member.3.Namespace = aws:elasticbeanstalk:sqsd
• OptionSettings.member.3.OptionName = HttpPath
• OptionSettings.member.3.Value = /
• OptionSettings.member.4.Namespace = aws:elasticbeanstalk:sqsd
• OptionSettings.member.4.OptionName = MimeType
• OptionSettings.member.4.Value = application/json
• OptionSettings.member.5.Namespace = aws:elasticbeanstalk:sqsd
• OptionSettings.member.5.OptionName = HttpConnections
• OptionSettings.member.5.Value = 75
• OptionSettings.member.6.Namespace = aws:elasticbeanstalk:sqsd
• OptionSettings.member.6.OptionName = ConnectTimeout
• OptionSettings.member.6.Value = 10
• OptionSettings.member.7.Namespace = aws:elasticbeanstalk:sqsd
• OptionSettings.member.7.OptionName = InactivityTimeout
• OptionSettings.member.7.Value = 10
• OptionSettings.member.8.Namespace = aws:elasticbeanstalk:sqsd
• OptionSettings.member.8.OptionName = VisibilityTimeout
• OptionSettings.member.8.Value = 60
• OptionSettings.member.9.Namespace = aws:elasticbeanstalk:sqsd
• OptionSettings.member.9.OptionName = RetentionPeriod
• OptionSettings.member.9.Value = 345600
API Version 2010-12-01
311
Elastic Beanstalk Developer Guide
API

Example
https://elasticbeanstalk.us-east-1.amazon.com/?ApplicationName=SampleApp
&VersionLabel=Version2
&EnvironmentName=SampleAppEnv2
&TemplateName=MyConfigTemplate
&Description=description
&Tier=Worker
&Operation=CreateEnvironment
&OptionSettings.member.1.Namespace=aws%3Aautoscaling%3Alaunchconfiguration
&OptionSettings.member.1.OptionName=IamInstanceProfile
&OptionSettings.member.1.Value=ElasticBeanstalkProfile
&OptionSettings.member.2.Namespace=aws%3Aelasticbeanstalk%3Asqsd
&OptionSettings.member.2.OptionName=WorkerQueueURL
&OptionSettings.member.2.Value=sqsd.elasticbeanstalk.us-east-1.amazon.com
&OptionSettings.member.3.Namespace=aws%3elasticbeanstalk%3sqsd
&OptionSettings.member.3.OptionName=HttpPath
&OptionSettings.member.3.Value=%2F
&OptionSettings.member.4.Namespace=aws%3Aelasticbeanstalk%3Asqsd
&OptionSettings.member.4.OptionName=MimeType
&OptionSettings.member.4.Value=application%2Fjson
&OptionSettings.member.5.Namespace=aws%3Aelasticbeanstalk%3Asqsd
&OptionSettings.member.5.OptionName=HttpConnections
&OptionSettings.member.5.Value=75
&OptionSettings.member.6.Namespace=aws%3Aelasticbeanstalk%3Asqsd
&OptionSettings.member.6.OptionName=ConnectTimeout
&OptionSettings.member.6.Value=10
&OptionSettings.member.7.Namespace=aws%3Aelasticbeanstalk%3Asqsd
&OptionSettings.member.7.OptionName=InactivityTimeout
&OptionSettings.member.7.Value=10
&OptionSettings.member.8.Namespace=aws%3Aelasticbeanstalk%3Asqsd
&OptionSettings.member.8.OptionName=VisibilityTimeout
&OptionSettings.member.8.Value=60
&OptionSettings.member.9.Namespace=aws%3Aelasticbeanstalk%3Asqsd
&OptionSettings.member.9.OptionName=RetentionPeriod
&OptionSettings.member.9.Value=345600
&AuthParams
5. Call DescribeEnvironments with the following parameter:
• EnvironmentName = SampleAppEnv2
Example
https://elasticbeanstalk.us-east-1.amazon.com/?EnvironmentName=SampleAppEnv2
&Operation=DescribeEnvironments
&AuthParams
API Version 2010-12-01
312
Elastic Beanstalk Developer Guide
API

Deploying Versions to Existing Environments
You can deploy existing Elastic Beanstalk application versions to existing environments.You may want
to do this if, for instance, you need to roll back to a previous version of your application. This section
describes how you can use the AWS Management Console, the CLI, or APIs to deploy an existing Elastic
Beanstalk application version to an existing environment.
Note
When you deploy application versions as described in this topic, all Amazon EC2 instances are
taken out of service at the same time by default. However, you can configure a load-balancing,
autoscaling environment to deploy application versions to batches each consisting of a specified
number of Amazon EC2 instances.You also have the option to deploy application versions with
zero downtime by performing a CNAME swap. For detailed information about configuring and
deploying application versions in batches of Amazon EC2 instances when you upload an
application version, see Deploying Application Versions in Batches (p.379). For more information
about performing a CNAME swap, see Deploying Versions with Zero Downtime (p. 318).
AWS Management Console
You can configure batched application deployment settings when you deploy a new application version
to an existing environment.Those settings apply to current and future application version deployments.
You cannot configure batched application deployment settings at the time that you deploy an existing
application version to an existing environment. This section contains procedures for both scenarios.
To deploy a new application version to an existing environment
1. Open the Elastic Beanstalk console at https://console.aws.amazon.com/elasticbeanstalk/.
2. From the region list, select the region that includes the environment that want to work in.
3. From the Elastic Beanstalk console applications page, click the name of the environment that you
want to deploy an existing application version to.
4. Click Upload and Deploy,
5. If you are deploying an application version to a load-balancing, autoscaling environment, skip to the
next step.
For a single-instance environment, do the following:
API Version 2010-12-01
313
Elastic Beanstalk Developer Guide
Deploying Versions to Existing Environments

1. Click Browse to select the application source bundle for the application version that you want to
deploy.
2. (Optional) For Version label, type a new description or change any description that Elastic
Beanstalk may have automatically created.
3. When you are finished, click Deploy.
6. For a load-balancing, autoscaling environment, do the following:
API Version 2010-12-01
314
Elastic Beanstalk Developer Guide
AWS Management Console

1. Click Browse to select the application source bundle for the application version you want to deploy.
2. (Optional) For Version label, type a new description or change any description that Elastic
Beanstalk may have automatically created.
3. Next to Batch size, click Percentage or Fixed, and then enter a percentage or fixed number of
instances to which you want to deploy the new application version to at any given time.
4. When you are finished, click Deploy.
To deploy an existing application version to an existing environment
1. Open the Elastic Beanstalk console at https://console.aws.amazon.com/elasticbeanstalk/.
2. From the region list, select the region that includes the environment that want to work in.
3. From the Elastic Beanstalk console applications page, click the name of the environment that you
want to deploy an existing application version to.
API Version 2010-12-01
315
Elastic Beanstalk Developer Guide
AWS Management Console

4. Click Upload and Deploy to view a list of all applications versions that you can deploy for this
environment.The listed application versions are associated with this Elastic Beanstalk application.
5. Select the application version that you want to deploy, and then click Deploy.
6. Verify that you are deploying the right application version in the right environment, and then click
Deploy.
Elastic Beanstalk now deploys your file to your Amazon EC2 instances.You will see the environment
start the update process. If you specified a health check URL, there's an application health check when
the deployment is complete.The environment returns to green when the application responds to the
health check. For more information, see Monitoring Application Health (p. 327). If you need to deploy an
application version with zero downtime, see Deploying Versions with Zero Downtime (p. 318).
If you view the environment dashboard, you can verify the application version.
CLI
You can configure batched application deployment settings when you deploy a new application version
to an existing environment.Those settings apply to current and future application version deployments.
You cannot configure batched application deployment settings at the time that you deploy an existing
application version to an existing environment. This section contains procedures for both scenarios.
To deploy an existing application version to an existing environment
1. Make sure your application version exists.
PROMPT> elastic-beanstalk-describe-application-versions -a [Application
Name] -l [Version Label]
2. Update your environment with your existing application version.
PROMPT> elastic-beanstalk-update-environment -e [Environment Name] -l [Version
Label] -d [Description]
3. Determine if the environment is Green and Ready.
PROMPT> elastic-beanstalk-describe-environments -e [Environment Name]
To configure batched application version deployments using the AWS CLI
• Change how application versions are applied to your environment.
PROMPT> elastic-beanstalk-update-environment --environment-name SampleAppEnv
--option-settings "Options.txt"
Options.txt
API Version 2010-12-01
316
Elastic Beanstalk Developer Guide
CLI

[
{"Namespace": "aws:elasticbeanstalk:command",
"OptionName": "BatchSize",
"Value": "50"},
{"Namespace": "aws:elasticbeanstalk:command",
"OptionName": "BatchType",
"Value": "Percentage"},
]
API
To deploy an existing application version to an existing environment
1. Call UpdateEnvironment with the following parameters:
• EnvironmentName = SampleAppEnv
• VersionLabel = FirstRelease
• Description = description
Example
https://elasticbeanstalk.us-west-2.amazon.com/?EnvironmentName=MySampleAppEnv
&Description=description
&VersionLabel=FirstRelease
&Operation=UpdateEnvironment
&AuthParams
2. Call DescribeEnvironments with the following parameter:
• EnvironmentName = SampleAppEnv
Example
https://elasticbeanstalk.us-west-2.amazon.com/?EnvironmentName=SampleAppEnv
&Operation=DescribeEnvironments
&AuthParams
To edit rolling updates using the API
• Call UpdateEnvironment with the following parameters:
• EnvironmentName = SampleAppEnv
• VersionLabel = Version2
• OptionSettings.member.1.Namespace = aws:elasticbeanstalk:command
• OptionSettings.member.1.OptionName = BatchSize
• OptionSettings.member.1.Value = 50
• OptionSettings.member.2.Namespace = aws:elasticbeanstalk:command
• OptionSettings.member.2.OptionName = BatchSizeType
API Version 2010-12-01
317
Elastic Beanstalk Developer Guide
API

• OptionSettings.member.2.Value = Percentage
Example
https://elasticbeanstalk.us-west-2.amazon.com/?EnvironmentName=SampleAppEnv
&VersionLabel=Version2
&OptionSettings.member.1.Namespace=aws%3Aelasticbeanstalk%3Acommand
&OptionSettings.member.1.OptionName=BatchSize
&OptionSettings.member.1.Value=50
&OptionSettings.member.2.Namespace=aws%3Aelasticbeanstalk%3Acommand
&OptionSettings.member.2.OptionName=BatchSizeType
&OptionSettings.member.2.Value=Percentage
&Operation=UpdateEnvironment
&AuthParams
Deploying Versions with Zero Downtime
Because Elastic Beanstalk performs an in-place update when you update your application versions, you
will experience some downtime. However, it is possible to avoid this downtime by swapping the CNAMEs
for your environments.To do the swap, you need to upload the updated application version and then
create a new environment running that version.This section walks you through how to perform a CNAME
swap using the AWS Management Console, the command line interface, or APIs.
Although using Elastic Beanstalk to attach an Amazon RDS database to your environment can help you
avoid downtime in accessing your application, you might lose data during the CNAME swap process.
This can happen as the application continues to generate data between the time the original database
is deleted and a new database becomes available for the new environment.Taking a snapshot of the
original database (as recommended in the instructions that follow) only saves some data because the
snapshot will not contain any newly generated data.
To avoid that, manage your Amazon RDS database from the Amazon RDS console, CLI, or API instead
of Elastic Beanstalk.That way, the database is unaffected by what you do to your Elastic Beanstalk
environments. If you manage the database using Amazon RDS instead of managing it using Elastic
Beanstalk, during a CNAME swap from one environment to another, the original environment continues
to read from and write to the existing database until you delete the environment.When traffic stops flowing
to the database after the CNAME swap, you can delete the original environment without losing data.
Depending on your needs, using Amazon RDS to manage your database also lets you take advantage
of other Amazon RDS features and configuration options. For example, you might want to configure your
new environment to bind to a read replica and then promote the read replica to a database instance. For
more information about Amazon RDS, go to the Amazon RDS User Guide at What is Amazon Relational
Database Service?.
Note
If you have created an Alias record to map your root domain to your Elastic Load Balancer using
Amazon Route 53, then after you have created you new environment, you will need to change
your resource record set to map your root domain to the Elastic Load Balancer in your new
environment. For instructions on how to change your existing resource record set, go to Using
Elastic Beanstalk with Amazon Route 53 to Map Your Domain to Your Load Balancer (p. 528).
AWS Management Console
To deploy with zero downtime
API Version 2010-12-01
318
Elastic Beanstalk Developer Guide
Deploying Versions with Zero Downtime

1. Open the Elastic Beanstalk console at https://console.aws.amazon.com/elasticbeanstalk/.
2. From the region list, select the region that has the application that you want to work with.
3. From the Elastic Beanstalk console applications page, click the name of the application to which you
want to add a new application version.
4. In the navigation pane, click Application Versions.
5. Click Upload.
a. Enter a label for this version in the Version Label field.
b. Enter a brief description for this version in the Description field.
c. Enter a label for this version in the Version label field.
d. (Optional) Enter a brief description for this version in the Description field.
e. Click Browse to specify the location of the application version (.war or .zip file).
Note
Elastic Beanstalk supports only a single .war file for a Java application version and
only a single .zip file for other applications.The file size limit is 512 MB.
The file you specified is associated with your application; you'll deploy the new application version
to a new environment.
6. Save the configuration for the live environment by opening the environment's dashboard, clicking
Actions and then selecting Save Configuration.
For more information, see Saving Environment Configuration Settings (p. 348).You'll use this
configuration to create a new environment that will run the updated application version. Note that
saved configurations do not include database information. When you delete an environment, you
delete the data from any database instance you created in that environment.You can, however,
create a snapshot of your current database instance and then use it as the basis for a new DB
instance when you create a new environment in the next step. For more information, see Creating
a DB Snapshot in the Amazon Relational Database Service User Guide.
7. Launch a new environment with your new application version and saved configuration. For more
information, see Launching New Environments (p. 299).
8. Verify that your new environment is ready by viewing its dashboard. If the environment has an error,
view the events and logs for the environment in order to troubleshoot any errors.
9. From the new environment's dashboard, click Actions and then select Swap Environment URLs.
API Version 2010-12-01
319
Elastic Beanstalk Developer Guide
AWS Management Console

10. From the Environment name drop-down list, select the current live environment name in order to
use that environment's URL for the new environment.
11. Click Swap.
12. After Elastic Beanstalk completes the swap operation, verify that the new environment responds
when you try to connect to the old environment URL. However, do not terminate your old environment
until the DNS changes have been propagated and your old DNS records expire. DNS servers do not
necessarily clear old records from their cache based on the time to live (TTL) you set on your DNS
records.Therefore, we recommend that you wait an additional period of time after the TTL before
you terminate your environment.
API Version 2010-12-01
320
Elastic Beanstalk Developer Guide
AWS Management Console

CLI
You can use the command line interface to deploy a new application with zero downtime. The following
steps walk you through creating a configuration template, launching a new environment with the new
application version using the configuration template, and swapping the environment CNAMEs.You can
also use the following steps to perform configuration changes with zero downtime.
To deploy with zero downtime
1. Check that your current environment is not updating.
PROMPT> elastic-beanstalk-describe-environments -E [Environment ID]
2. Verify that your new application version exists.
PROMPT> elastic-beanstalk-describe-application-versions -a [Application
Name] -l [Version Label]
3. Create a configuration template from the current environment.
PROMPT> elastic-beanstalk-create-configuration-template -E [Environment ID]
-a [Application Name] -t [Template Name]
4. Launch a new environment for the new application version and template.
PROMPT> elastic-beanstalk-create-environment -e [Environment Name] -t
[Template Name] -a [Application Name] -l [Version Label]
Note
Environment names must be at least 4 characters, and less than or equal to 23 characters.
5. Check that your current environment is not updating.
PROMPT> elastic-beanstalk-describe-environments -E [Environment ID]
If the new environment does not come up Green and Ready, you should decide if you want to retry
the operation or leave the environment in its current state for investigation. Make sure to terminate
the environment after you are finished, and clean up any unused resources.
Note
You can adjust the timeout period if the environment doesn't launch in a reasonable time.
6. After the new environment is Green and Ready, swap the environment CNAMEs.
PROMPT> elastic-beanstalk-swap-environment-cnames -S [Source Environment
ID] -D [Destination Environment ID]
7. After Elastic Beanstalk completes the swap operation, verify that the new environment responds
when you try to connect to the old environment URL. However, do not terminate your old environment
until the DNS changes have been propagated and your old DNS records expire. DNS servers do not
necessarily clear old records from their cache based on the time to live (TTL) you set on your DNS
records.Therefore, we recommend that you wait an additional period of time after the TTL before
you terminate your environment.
PROMPT> elastic-beanstalk-terminate-environment -E [Environment ID]
An example script
#! /usr/bin/env ruby
require 'optparse'
require 'json'
require 'timeout'
options = {}
optparse = OptionParser.new do |opts|
opts.banner = "Usage: #{File.basename($0, ".rb")} [options] environment_id"
API Version 2010-12-01
321
Elastic Beanstalk Developer Guide
CLI

options[:verbose] = false
opts.on('-v', '--verbose', 'Output more information') do
options[:verbose] = true;
end
options[:version_label] = nil
opts.on('-l LABEL', '--version-label', 'The application version to deploy to
the new environment') do |label|
options[:version_label] = label
end
options[:application_name] = nil
opts.on('-a NAME', '--application-name', 'The name of the application associated
with the version to deploy to the new environment.',
'Note if this is different from the application associated with the envir
onment you are redeploying, the new environment will be associated with this
application.') do |app|
options[:application_name] = app
end
opts.on('-h', '--help', 'Display this information') do
puts opts
exit
end
end
optparse.parse!
verbose = options[:verbose]
puts "Verbose mode enabled" if verbose
environment_id = ARGV[0]
if (environment_id == nil)
puts optparse.to_s
exit
end
puts "Starting zero downtime deployment for environment: #{environment_id}" if
verbose
## Verify Environment exists and has the right status
puts "Verifying environment exists and has correct status/health" if verbose
results = JSON.parse(%x[elastic-beanstalk-describe-environments -j -E #{envir
onment_id}])
environment_info = results['DescribeEnvironmentsResponse']['DescribeEnvironment
sResult']['Environments'][0] if (results['DescribeEnvironmentsResponse'] &&
results['DescribeEnvironmentsResponse']['DescribeEnvironmentsRes
ult'] &&
results['DescribeEnvironmentsResponse']['DescribeEnvironmentsRes
ult']['Environments'])
if !environment_info
puts "No such environment found with environment_id: #{environment_id}"
exit
end
env_health = environment_info['Health']
API Version 2010-12-01
322
Elastic Beanstalk Developer Guide
CLI

env_status = environment_info['Status']
puts "Current Health: #{env_health} Current Status: #{env_status}" if verbose
if (("Green" != env_health) || ("Ready" != env_status))
puts "Environment must be Ready and Green to perform a zero downtime deployment.
Current Health: #{env_health} Current Status: #{env_status}"
exit
end
## Verify version exists
version_label = options[:version_label]
application_name = options[:application_name]
if (! application_name)
application_name = environment_info['ApplicationName']
end
if (! version_label)
version_label = environment_info['VersionLabel']
end
puts "Verifying version #{version_label} in application #{application_name}
exists" if verbose
results = JSON.parse(%x[elastic-beanstalk-describe-application-versions -j -a
#{application_name} -l #{version_label}])
version_info = results['DescribeApplicationVersionsResponse']['DescribeApplica
tionVersionsResult']['ApplicationVersions'][0] if (results['DescribeApplication
VersionsResponse'] &&
results['DescribeApplicationVersionsResponse']['DescribeApplication
VersionsResult'] &&
results['DescribeApplicationVersionsResponse']['DescribeApplication
VersionsResult']['ApplicationVersions'])
if (!version_info)
puts "No such version #{version_label} in application #{application_name} exists"
exit
end
environment_name = environment_info['EnvironmentName']
## New environment name will have 8 additional characters. This is important
since the environment
## name is already limited to 25 characters in length (due to ELB usage).
new_environment_name = environment_name.gsub(/_zdd_\d+$/, "_zdd_#{rand(10)}")
## Create a Configuration Template from the existing environment
template_name = new_environment_name
puts "Creating ConfigurationTemplate named #{template_name}" if verbose
results = JSON.parse(%x[elastic-beanstalk-create-configuration-template -j -E
#{environment_id} -a #{application_name} -t #{template_name}])
template_info = results['CreateConfigurationTemplateResponse']['CreateConfigur
ationTemplateResult'] if results['CreateConfigurationTemplateResponse']
if (! template_info)
puts "Error when creating configuration template: #{results}"
exit
end
API Version 2010-12-01
323
Elastic Beanstalk Developer Guide
CLI

## Launch a new environment with the desired version and template
puts "Creating new environment named #{new_environment_name}" if verbose
results = JSON.parse(%x[elastic-beanstalk-create-environment -j -a #{applica
tion_name} -l #{version_label} -e #{new_environment_name} -t #{template_name}}
])
new_environment_info = results['CreateEnvironmentResponse']['CreateEnvironmen
tResult'] if results['CreateEnvironmentResponse']
if (! new_environment_info)
puts "Error when launching new environment: #{results}"
exit
end
new_environment_id = new_environment_info['EnvironmentId']
puts "New environment: #{new_environment_info}" if verbose
## Wait for the new environment to go ready
## This wait can be customized for a given application to determine when it is
really ready
max_wait_time_sec = 5 * 60; ## 5 minutes
begin
Timeout::timeout(max_wait_time_sec) do
done = false
while (! done) do
puts "Checking if new environment is ready/green" if verbose
results = JSON.parse(%x[elastic-beanstalk-describe-environments -j -E
#{new_environment_id}])
new_environment_info = results['DescribeEnvironmentsResponse']['DescribeEnvir
onmentsResult']['Environments'][0] if (results['DescribeEnvironmentsResponse']
&&
results['DescribeEnvironmentsResponse']['DescribeEnvir
onmentsResult'] &&
results['DescribeEnvironmentsResponse']['DescribeEnvir
onmentsResult']['Environments'])
puts "Current Health: #{new_environment_info['Health']} Current Status:
#{new_environment_info['Status']}" if verbose
done = (new_environment_info &&("Ready" == new_environment_info['Status']))
if (! done)
sleep 20 ## seconds
end
end
end
rescue Timeout::Error
puts "Environment does not seem to be launching in a reasonable time. Exiting
after #{max_wait_time_sec} seconds"
exit
end
results = JSON.parse(%x[elastic-beanstalk-describe-environments -j -E
#{new_environment_id}])
new_environment_info = results['DescribeEnvironmentsResponse']['DescribeEnvir
onmentsResult']['Environments'][0] if (results['DescribeEnvironmentsResponse']
&&
results['DescribeEnvironmentsResponse']['DescribeEnvironment
sResult'] &&
results['DescribeEnvironmentsResponse']['DescribeEnvironment
API Version 2010-12-01
324
Elastic Beanstalk Developer Guide
CLI

sResult']['Environments'])
if (! new_environment_info)
puts "Error waiting for environment to launch: #{results}"
exit
end
if ("Green" != new_environment_info['Health'])
puts "New Environment is not healthy, aborting"
%x[elastic-beanstalk-terminate-environment -E #{new_environment_id}]
exit
end
## Execute CNAME swap
puts "Executing CNAME Swap between old environment #{environment_id} and new
environment: #{new_environment_id}" if verbose
results = JSON.parse(%x[elastic-beanstalk-swap-environment-cnames j -S #{envir
onment_id} -D #{new_environment_id}])
## Clean up resources
## Once comfortable that the environment swap has completed the old environment
can be terminated
#results = JSON.parse(%x[elastic-beanstalk-terminate-environment -j -E #{envir
onment_id}])
# Also delete the configuration template
#results = JSON.parse(%x[elastic-beanstalk-delete-configuration-template -j -a
#{application_name} -t #{template_name}])
API
To deploy with zero downtime
1. Check your current environment to make sure it is Green and Ready.
Call DescribeEnvironments with the following parameter:
• EnvironmentID = e-pyumupm7mph
Example
https://elasticbeanstalk.us-west-2.amazon.com/?EnvironmentID=e-pyumupm7mph
&Operation=DescribeEnvironments
&AuthParams
2. Verify that your new application version exists.
Call DescribeApplicationVersions with the following parameters:
• ApplicationName = SampleApp
• VersionLabel = Version2
API Version 2010-12-01
325
Elastic Beanstalk Developer Guide
API

Example
https://elasticbeanstalk.us-west-2.amazon.com/?ApplicationName=SampleApp
&VersionLabel=Version2
&Operation=DescribeApplicationVersions
&AuthParams
3. Create a configuration template from the current environment.
Call CreateConfigurationTemplate with the following parameters:
• EnvironmentID = e-pyumupm7mph
• ApplicationName = SampleApp
• TemplateName = MyConfigTemplate
Example
https://elasticbeanstalk.us-west-2.amazon.com/?ApplicationName=SampleApp
&TemplateName=MyConfigTemplate
&EnvironmentID=e-pyumupm7mph
&Operation=CreateConfigurationTemplate
&AuthParams
4. Launch a new environment for the new application version and template.
Call CreateEnvironment with the following parameters:
• ApplicationName = SampleApp
• VersionLabel = Version2
• EnvironmentName = SampleAppEnv2
Note
Environment names must be at least 4 characters, and less than or equal to 23 characters.
• TemplateName = MyConfigTemplate
Example
https://elasticbeanstalk.us-west-2.amazon.com/?ApplicationName=SampleApp
&VersionLabel=Version2
&EnvironmentID=SampleAppEnv2
&TemplateName=MyConfigTemplate
&Operation=CreateEnvironment
&AuthParams
5. Determine if the new environment is Green and Ready.
Call DescribeEnvironments with the following parameters:
• EnvironmentID = e-eup272zdrw
API Version 2010-12-01
326
Elastic Beanstalk Developer Guide
API

Example
https://elasticbeanstalk.us-west-2.amazon.com/?EnvironmentID=e-eup272zdrw
&Operation=DescribeEnvironments
&AuthParams
If the new environment does not come up Green and Ready, you should decide if you want to retry
the operation or leave the environment in its current state for investigation. Make sure to terminate
the environment after you are finished, and clean up any unused resources.
Note
You can adjust the timeout period if the environment doesn't launch in a reasonable time.
6. After the new environment is Green and Ready, swap the environment CNAMEs.
Call SwapEnvironmentCNAMEs with the following parameters:
• SourceEnvironmentID = e-pyumupm7mph
• DestinationEnvironmentID = e-eup272zdrw
Example
https://elasticbeanstalk.us-west-2.amazon.com/?SourceEnvironmentID=e-pyu
mupm7mph
&DestinationEnvironmentIDe=e-eup272zdrw
&Operation=SwapEnvironmentCNAMEs
&AuthParams
7. After Elastic Beanstalk completes the swap operation, verify that the new environment responds
when you try to connect to the old environment URL. However, do not terminate your old environment
until the DNS changes have been propagated and your old DNS records expire. DNS servers do not
necessarily clear old records from their cache based on the time to live (TTL) you set on your DNS
records.Therefore, we recommend that you wait an additional period of time after the TTL before
you terminate your environment.
Call TerminateEnvironment with the following parameters:
• EnvironmentID = e-pyumupm7mph
Example
https://elasticbeanstalk.us-west-2.amazon.com/?EnvironmentId=e-pyumupm7mph
&Operation=TerminateEnvironment
&AuthParams
Monitoring Application Health
When you are running a production website, it is important to know that your application is available and
responding to requests.To assist with monitoring your application’s responsiveness, Elastic Beanstalk
provides features that monitor statistics about your application and create alerts that trigger when thresholds
are exceeded.
API Version 2010-12-01
327
Elastic Beanstalk Developer Guide
Monitoring Application Health

Health Monitoring
To check application health status, every minute or two Elastic Load Balancing sends a request to the
application health check URL. By default, Elastic Load Balancing uses TCP:80 for nonlegacy configurations
and HTTP:80 for legacy configurations. (If you are unsure if you are running a legacy configuration, check
the Elastic Beanstalk console. For instructions, see To check if you are using a legacy container
type (p.426).) You can choose to override this setting by specifying an existing resource in your application.
If you specify a path like /myapp/index.jsp, the health check URL is set to
http:80//myapp/index.jsp. (The exact port number depends on your environment's configuration.)
However, you can also specify a different protocol and port, such as UDP:8888. For instructions on
modifying your health check URL using the AWS Management Console, see Health Checks (p. 362).
Elastic Load Balancing expects a response of 200 OK for the application to be considered healthy. The
application fails the application health check if it responds with any other HTTP status code. When a
health check fails, Elastic Load Balancing marks the state of the instance as out of service. For more
information about health checks performed by Elastic Load Balancing, see Health Check in the Elastic
Load Balancing Developer Guide.
Important
For single-instance environments, health checks are done by Amazon EC2 instance status
monitoring, so the health check URL doesn't apply. Amazon EC2 performs automated checks
on the instance to identify hardware and software issues. For more information, see Monitoring
Instances with Status Checks in the Amazon EC2 User Guide for Linux Instances.
Elastic Beanstalk will change the health status of a web server environment tier to one of four color values
depending on how the application responds to the health check. The following table describes the color
codes.
StatusColor
Your application responded to the application health check URL within the
last minute.
Green
Your application hasn't responded to the application health check URL within
the last five minutes.
Yellow
One of the following:
• Your application hasn't responded to the application health check URL for
more than five minutes.
• An environment is also considered red if Elastic Beanstalk detects other
problems with the environment that are known to make the application
unavailable (e.g., the load balancer was deleted).
Red
Your application's health status is unknown because status is reported when
the application is not in the ready state.
Gray
For a web server environment tier, whenever the application health check URL fails to return a 200 OK
response, Elastic Beanstalk performs a series of additional checks to try to determine the cause of the
failure.These additional checks include verifying the following:
• The load balancer still exists.
• The Auto Scaling group still exists.
• At least one Amazon EC2 instance behind the load balancer is returning an InService response.
• The Amazon EC2 security group is configured to allow ingress on port 80.
API Version 2010-12-01
328
Elastic Beanstalk Developer Guide
Health Monitoring

• The environment CNAME exists and is pointing to the right load balancer.
• All Amazon EC2 instances are communicating.
In addition to environment-level health checking, Elastic Beanstalk also communicates with every Amazon
EC2 instance running as part of your Elastic Beanstalk application. If any Amazon EC2 instance fails to
respond to ten consecutive health checks, Elastic Beanstalk will terminate the instance, and Auto Scaling
will start a new instance.
If the status of your application health changes to red, you can take several corrective actions:
• Look at environment events.You might find more information about the problem here.
• If you recently deployed a new version of the application, try rolling back to an older version that is
known to work.
• If you recently made configuration changes, try reverting to the former settings.
• If the problem appears to be with the environment, try rebuilding the environment. In the AWS Toolkit
for Visual Studio, on the AWS Explorer tab, right-click your application environment, and then click
Rebuild Environment.
• Try using Snapshot logs to view recent log file entries or log in to the Amazon EC2 instance and
troubleshoot directly.
The health of a worker environment tier is gauged similarly to that of a web server environment tier. The
health status color codes are also similar. Elastic Beanstalk will change the health status of a worker
environment tier to one of four color values depending on how the application responds to the health
check.The following table describes the color codes.
StatusColor
Within the last three minutes:
• At least one daemon (on any instance) successfully polled the SQS queue
for messages within the last three minutes.
• If the worker environment tier is configured with an application health check
URL, the daemon received a 200 OK response to an HTTP GET request
it sent to the URL.
• If the worker environment tier is not configured with an application health
check URL, it successfully established a TCP connection to the TCP port
on the local host.
Green
There haven't been any healthy instances in the environment for up to three
minutes.
Yellow
One of the following:
• Auto Scaling is configured with a minimum size of zero instances.
• The autoscaling group has not had any healthy instances for at least three
minutes.
Red
Your application's health status is unknown because the environment health
hasn't been reported to CloudWatch.
Gray
API Version 2010-12-01
329
Elastic Beanstalk Developer Guide
Health Monitoring

Elastic Beanstalk publishes its worker environment tier health status to CloudWatch, where a status of 1
is Green. In order to publish metrics, you must grant the appropriate permissions on the IAM role. For
more information, go to Granting IAM Role Permissions for Worker Environment Tiers (p. 569).You can
review the CloudWatch health metric data in your account via the ElasticBeanstalk/SQSD namespace.
The metric dimension is EnvironmentName, and the metric name is Health. All instances publish their
metrics to the same namespace.
Monitoring Your Environment
You can access operational information about your application from the AWS Management Console at
http://console.aws.amazon.com/elasticbeanstalk.
The AWS Management Console displays your environment's status and application health at a glance.
In the Elastic Beanstalk console applications page, each environment is color-coded to indicate an
environment's status.
To view metrics for an environment
1. From the Elastic Beanstalk console applications page, click an environment name to view the
environment dashboard.
2. In the left navigation, click Monitoring.
The Monitoring page shows you overall statistics about your environment, such as CPU utilization
and average latency. In addition to the overall statistics, you can view monitoring graphs that show
resource usage over time.You can click any of the graphs to view more detailed information.
Note
By default, only basic CloudWatch metrics are enabled, which return data in five-minute
periods.You can enable more granular one-minute CloudWatch metrics by editing your
environment's configuration settings.
API Version 2010-12-01
330
Elastic Beanstalk Developer Guide
Monitoring Your Environment

To add a metric to the Monitoring page
1. In the Monitoring section of the Monitoring page, click Edit.
2. In the Add Graph section, select the resource, metric, statistic, and dimension that you want to add.
For more information about metrics and dimensions for each resource, see Amazon CloudWatch
Metrics, Namespaces, and Dimensions Reference in the Amazon CloudWatch Developer Guide.
3. After you select the details of the graph, click Add.
4. If you want to add another graph, select details for the new graph and then click Add Another.
5. After you completed adding the graphs that you want, click Save.
The graphs are added to the Monitoring page.
Managing Alarms
You can create alarms for metrics that you are monitoring by using the AWS Management Console.
Alarms help you monitor changes to your environment so that you can easily identify and mitigate problems
before they occur. For example, you can set an alarm that notifies you when CPU utilization in an
environment exceeds a certain threshold, ensuring that you are notified before a potential problem occurs.
For more information, see Using Elastic Beanstalk with Amazon CloudWatch (p. 523).
Note
Elastic Beanstalk uses CloudWatch for monitoring and alarms, meaning CloudWatch costs are
applied to your AWS account for any alarms that you use.
For more information about monitoring specific metrics, see Monitoring Application Health (p. 327).
To check the state of your alarms
1. From the Elastic Beanstalk console applications page, click the environment name that you want to
manage alarms for.
API Version 2010-12-01
331
Elastic Beanstalk Developer Guide
Managing Alarms

2. From the navigation menu, click Alarms to see a list of alarms.
If any alarms is in the alarm state, they are flagged with (warning).
3. To filter alarms, click the drop-down filter and select the filter that you want.
4.
To edit or delete an alarm, click (edit) or (delete).
To create an alarm
1. From the Elastic Beanstalk console applications page, click the environment name that you want to
add alarms to.
2. From the navigation menu, click Monitoring.
3.
For the metric that you want to create an alarm for, click .You are directed to the Alarms page.
API Version 2010-12-01
332
Elastic Beanstalk Developer Guide
Managing Alarms

4. Enter details about the alarm:
• Name: A name for this alarm.
• Description (optional): A short description of what this alarm is.
• Period: The time interval between readings.
• Threshold: Describes the behavior and value that the metric must exceed in order to trigger an
alarm.
• Change state after: The amount a time after a threshold has been exceed that triggers a change
in state of the alarm.
• Notify: The Amazon SNS topic that is notified when an alarm changes state.
• Notify when state changes to:
• OK: The metric is within the defined threshold.
• Alarm: The metric exceeded the defined threshold.
• Insufficient data: The alarm has just started, the metric is not available, or not enough data is
available for the metric to determine the alarm state.
5. Click Add. The environment status changes to gray while the environment updates.You can view
the alarm that you created by going to the Alarms page.
Viewing Events
You can use the AWS Management Console to access events and notifications associated with your
application. For more details on the most common events, see Understanding Environment Launch
Events (p. 512). For information on how to view events using the AWS Toolkit for Eclipse, see Viewing
Events (p. 111).
API Version 2010-12-01
333
Elastic Beanstalk Developer Guide
Viewing Events

AWS Management Console
To view environment and application events
1. From the Elastic Beanstalk console applications page, click an environment name to view the
environment dashboard.
2. From the navigation menu, click Events.
The Events page shows you a list of all events that have been recorded for the environment and
application version.You can filter on the type of events by using the Severity drop-down list.You
can also filter when the events occurred by using the time slider.
CLI
You can use the Elastic Beanstalk command line tools to view all events for your application. In this
example, we use the command line interface to get a list of all events for an application named My First
Elastic Beanstalk Application.
To view all application events
• Enter the following command at a command prompt:
PROMPT> elastic-beanstalk-describe-events -a "My First Elastic Beanstalk
Application"
A list of all of the events for your application is displayed.
API Version 2010-12-01
334
Elastic Beanstalk Developer Guide
AWS Management Console

You can filter the events displayed using the filter parameters for the
elastic-beanstalk-describe-events command; enter elastic-beanstalk-describe-events
--help from a command prompt for a list of available parameters.
API
You can use the Elastic Beanstalk APIs to view all events for your application. In this example, we use
the APIs to get a list of all events for an application named My First Elastic Beanstalk Application.
To view all application events
• Call DescribeEvents with the following parameter:
• ApplicationName = My First Elastic Beanstalk Application
Example
https://elasticbeanstalk.us-west-2.amazon.com/?Application
Name=My%20First%20Elastic%20Beanstalk%20Application
&Operation=DescribeEvents
&AuthParams
Managing Environments
By using the Elastic Beanstalk console, you can save or change the provisioning and configuration of the
AWS resources your application environments use. For information about managing your application
environments using the AWS Toolkit for Eclipse, see Managing Elastic Beanstalk Application
Environments (p. 112). For information about managing your application environments using the AWS
Toolkit for Visual Studio, see Managing Your Elastic Beanstalk Application Environments (p. 159). For
information about launching a new environment with a saved configuration, see Launching New
Environments (p. 299).
Topics
• Changing Environment Configuration Settings (p. 336)
• Environment Tiers (p. 337)
• Environment Types (p. 345)
• Changing Environment Type (p. 346)
• Saving Environment Configuration Settings (p. 348)
• Cloning an Environment (p. 350)
• Configuring Amazon EC2 Server Instances with Elastic Beanstalk (p. 352)
• Configuring Elastic Load Balancing with Elastic Beanstalk (p. 358)
• Configuring Auto Scaling with Elastic Beanstalk (p. 367)
• Updating Elastic Beanstalk Environments with Rolling Updates (p. 375)
• Deploying Application Versions in Batches (p. 379)
• Canceling Environment and Application Version Updates (p. 381)
• Upgrading the Elastic Beanstalk Environment's Platform Version (p. 382)
• Configuring Databases with Elastic Beanstalk (p. 384)
• Configuring Notifications with Elastic Beanstalk (p. 387)
• Tagging Your Environments (p. 389)
API Version 2010-12-01
335
Elastic Beanstalk Developer Guide
API

• Elastic Beanstalk Environment Configurations (p. 389)
• Configuring VPC with Elastic Beanstalk (p. 413)
Changing Environment Configuration Settings
Elastic Beanstalk configures a number of AWS cloud computing services when deploying your application.
You can edit your environment's configuration settings, which include the settings for these individual
services.
AWS Management Console
To edit an application's environment settings
1. Open the Elastic Beanstalk console at https://console.aws.amazon.com/elasticbeanstalk/.
2. From the region list, select the region that includes the environment that you want to work with.
3. On the Elastic Beanstalk console applications page, click the name of the environment whose settings
you want to edit.
4. In the Overview section of the environment dashboard, click Edit.
5.
For any of the configuration settings, click in order to edit its configuration.
Command Line Interface (CLI)
To edit an application's environment settings
• Update an application's environment settings.
PROMPT> elastic-beanstalk-update-environment -e MySampleAppEnv -f
"Options.txt"
Options.txt
[
{"Namespace": "aws:autoscaling:trigger",
"OptionName": "LowerThreshold",
"Value": "1000000"}
]
API Version 2010-12-01
336
Elastic Beanstalk Developer Guide
Changing Environment Configuration Settings

API
To edit an application's environment settings
• Call UpdateEnvironment with the following parameters:
• EnvironmentName = SampleAppEnv
• OptionSettings.member.1.Namespace = aws:autoscaling:trigger
• OptionSettings.member.1.OptionName = LowerThreshold
• OptionSettings.member.1.Value = 1000000
Example
https://elasticbeanstalk.us-west-2.amazon.com/?EnvironmentName=SampleAppEnv
&OptionSettings.member.1.Namespace=aws%3Aautoscaling%3Atrigger
&OptionSettings.member.1.OptionName=LowerThreshold
&OptionSettings.member.1.Value=1000000
&Operation=UpdateEnvironment
&AuthParams
Environment Tiers
When you launch an Elastic Beanstalk environment, you choose an environment tier, platform, and
environment type.The environment tier that you choose determines whether Elastic Beanstalk provisions
resources to support a web application that handles HTTP(S) requests or a web application that handles
background-processing tasks. An environment tier whose web application processes web requests is
known as a web server tier. An environment tier whose web application runs background jobs is known
as a worker tier.
You can deploy a worker tier on its own to perform background-processing tasks for any AWS service
that can write to an Amazon Simple Queue Service queue (for example, Amazon EC2 or AWS OpsWorks).
Or you can deploy it alongside an Elastic Beanstalk web server tier.You can use a worker tier to execute
long-running tasks or tasks that can be performed asynchronously. By offloading background-processing
tasks to a worker environment tier, you free up the web application in your web server environment tier
to handle web requests.
How the Worker Environment Tier Works
Elastic Beanstalk installs a daemon on each Amazon EC2 instance in the Auto Scaling group to process
Amazon SQS messages in the worker environment tier. The daemon pulls data off the Amazon SQS
queue, inserts it into the message body of an HTTP POST request, and sends it to a user-configurable
URL path on the local host.The content type for the message body within an HTTP POST request is
application/json by default.
Important
We strongly recommend that you familiarize yourself with how Amazon SQS works if you plan
to deploy a worker environment tier. In particular, the properties of Amazon SQS queues (message
order, at-least-once delivery, and message sampling) can affect how you design a web application
for a worker environment tier. For more information, see Properties of Distributed Queues in the
Amazon Simple Queue Service Developer Guide.
API Version 2010-12-01
337
Elastic Beanstalk Developer Guide
Environment Tiers

The following diagram illustrates an example of the worker environment tier processing an Amazon SQS
message.
The daemon sets the following HTTP headers:
Note
HTTP header names are not case-sensitive. For more information, see 4.2 Message Headers
in the Hypertext Transfer Protocol -- HTTP/1.1 specification.
HTTP Headers
ValueName
aws-sqsd
aws-sqsd/1.1
1
User-Agent
SQS message ID, used to detect message stormsX-Aws-Sqsd-Ms-
gid
Name of the SQS queueX-Aws-Sqsd-
Queue
Time stamp showing when the message was first received (in the UTC time zone)
Note
The time stamp is conveyed using the ISO 8601 time format. For more
information, go to http://www.w3.org/TR/NOTE-datetime.
X-Aws-Sqsd-First-
Received-At
API Version 2010-12-01
338
Elastic Beanstalk Developer Guide
Environment Tiers

HTTP Headers
SQS message receive countX-Aws-Sqsd-Re-
ceive-Count
Mime type configuration; by default, application/jsonContent-Type
Name of the periodic taskX-Aws-Sqsd-
Taskname
2
Custom message attributes assigned to the message being processed.The mes-
sage-attribute-name is the actual message attribute name. All string and
number message attributes are added to the header, Binary attributes are discarded
and not included in the header.
X-Aws-Sqsd-At-
tr-message-at-
tribute-name
2
Time at which the periodic task was scheduledX-Aws-Sqsd-
Scheduled-At
2
AWS account number of the sender of the messageX-Aws-Sqsd-
Sender-Id
2
The requests are sent to the HTTP Path value that you configure.This is done in such a way as to appear
to the web application in the worker environment tier that the daemon originated the request. In this way,
the daemon serves a similar role to a load balancer in a web server environment tier.
The worker environment tier, after processing the messages in the queue, forwards the messages over
the local loopback to a web application at a URL that you designate.The queue URL is only accessible
from the local host. Because you can only access the queue URL from the same EC2 instance, no
authentication is needed to validate the messages that are delivered to the URL.
A web application in a worker environment tier should only listen on the local host. When the web
application in the worker environment tier returns a 200 OK response to acknowledge that it has received
and successfully processed the request, the daemon sends a DeleteMessage call to the SQS queue
so that the message will be deleted from the queue. (SQS automatically deletes messages that have
been in a queue for longer than the configured RetentionPeriod.) If the application returns any response
other than 200 OK or there is no response within the configured InactivityTimeout period, SQS once
again makes the message visible in the queue and available for another attempt at processing.
Dead Letter Queues
1
Worker environment tiers
1
include support for Amazon Simple Queue Service (SQS) dead letter queues.
A dead letter queue is a queue where other (source) queues can send messages that for some reason
could not be successfully processed. A primary benefit of using a dead letter queue is the ability to sideline
and isolate the unsuccessfully processed messages.You can then analyze any messages sent to the
dead letter queue to try to determine why they were not successfully processed.
Note
Worker environment tiers created prior to May 27, 2014 do not support dead letter queues.You
must create a new environment in order to use a dead letter queue. Before you create a new
environment, you can save the configuration settings from your existing environment and then
use the saved configuration to launch a new environment. For more information about saving
environment configuration settings, see Saving Environment Configuration Settings (p.348). For
more information about launching a new environment, see Launching New Environments (p.299).
A dead letter queue is enabled by default for a worker environment tier if you specify an autogenerated
Amazon SQS queue at the time you create your worker environment tier. If you choose an existing SQS
queue for your worker environment tier, you must use SQS to configure a dead letter queue independently.
For information about how to use SQS to configure a dead letter queue, see Using Amazon SQS Dead
Letter Queues.
API Version 2010-12-01
339
Elastic Beanstalk Developer Guide
Environment Tiers

You cannot disable dead letter queues. Messages that cannot be delivered will always eventually be sent
to a dead letter queue.You can, however, effectively disable this feature by setting the MaxRetries option
to the maximum valid value of 1000.
Note
The Elastic Beanstalk MaxRetries option is equivalent to the SQS MaxReceiveCount option.
If your worker environment tier does not use an autogenerated SQS queue, use the
MaxReceiveCount option in SQS to effectively disable your dead letter queue. For more
information, see Using Amazon SQS Dead Letter Queues.
For more information about the lifecycle of an SQS message, go to Message Lifecycle.
Periodic Tasks
2
Elastic Beanstalk supports periodic tasks for worker environment tiers
2
in environments running a
predefined configuration with a solution stack that contains "v1.2.0" in the container name.You must
create a new environment. (Elastic Beanstalk considers a clone environment a new environment.) A
qualified environment can support an application that performs periodic tasks in addition to continuous
polling for and processing messages from the Amazon SQS queue. However, Amazon SQS processes
messages in the order that it receives them. As a result, a periodic task can be delayed when the Amazon
SQS queue has many messages to process.We recommend that you design separate applications when
punctuality for periodic tasks is critical.
To invoke periodic tasks, your application source bundle must include a cron.yaml file at the root level.
The file must contain information about the periodic tasks you want to schedule. Specify this information
using standard crontab syntax. For more information, see CRON expression.
The following snippet contains example file contents for the cron.yaml file.This file instructs a specified
EC2 instance to run the backup-job job every 12 hours and the audit job every day at 11pm in local
time. (11pm is represented as hour 23 of the day.) Each job name must be unique within the file.The url
is appended to the application URL.
version: 1
cron:
- name: "backup-job" # required - unique across all entries in this
file
url: "/backup" # required - does not need to be unique
schedule: "0 */12 * * *" # required - does not need to be unique
- name: "audit"
url: "/audit"
schedule: "0 23 * * *"
Use Amazon CloudWatch for Auto Scaling in Worker
Environment Tiers
Together, Auto Scaling and CloudWatch monitor the CPU utilization of the running instances in the worker
tier. How you configure the autoscaling limit for CPU capacity determines how many instances the
autoscaling group runs to appropriately manage the throughput of messages in the SQS queue. Each
EC2 instance publishes its CPU utilization metrics to CloudWatch. Auto Scaling retrieves from CloudWatch
the average CPU usage across all instances in the worker tier.You configure the upper and lower threshold
as well as how many instances to add or terminate according to CPU capacity.When Auto Scaling detects
that you have reached the specified upper threshold on CPU capacity, Elastic Beanstalk creates new
instances in the worker tier.The instances are deleted when the CPU load drops back below the threshold.
API Version 2010-12-01
340
Elastic Beanstalk Developer Guide
Environment Tiers

Note
Messages that have not been processed at the time an instance is terminated are once again
made visible on the queue where they can be processed by another daemon on an instance
that is still running.
You can also set other CloudWatch alarms, as needed, by using the AWS Management Console, CLI,
or the options file. For more information, go to Using Elastic Beanstalk with Amazon CloudWatch (p. 523)
and Use Auto Scaling Policies and Amazon CloudWatch Alarms for Dynamic Scaling.
To publish metrics to CloudWatch, you must configure an IAM policy that grants your IAM role permission
to send data to CloudWatch. For more information, see Granting IAM Role Permissions for Worker
Environment Tiers (p. 569).
About Creating a Worker Environment Tier
When you create an Elastic Beanstalk environment or update an existing environment, whether through
the AWS Management Console, CreateEnvironment API, UpdateEnvironment API, the eb command line,
or the AWS command line, you specify whether you want a Web Server or Worker environment tier.
You cannot have one environment that is both a web server environment tier and a worker environment
tier because Elastic Beanstalk supports only one Auto Scaling group per environment. By default, Elastic
Beanstalk launches a web server environment tier.You cannot change the environment tier after you
launch an environment. If your web application needs a different kind of environment tier, you must launch
a new environment.
Note
The CreateEnvironment and UpdateEnvironment APIs have an attribute called tier. (The
DescribeEnvironments API has a tier parameter as part of its response and will omit some
parameters from its response if the tier it describes is a worker tier. The
DescribeEnvironmentResources API has an attribute called EnvironmentResources.)
If you use an existing Amazon SQS queue, the settings that you configure when you create a worker
environment tier can conflict with settings you configured directly in Amazon SQS. For example, if you
configure a worker environment tier with a RetentionPeriod value that is higher than the
MessageRetentionPeriod value you set in Amazon SQS, then Amazon SQS will delete the message
when it exceeds the MessageRetentionPeriod. Conversely, if the RetentionPeriod value you configure
in the worker environment tier settings is lower than the MessageRetentionPeriod value you set in Amazon
SQS, then the daemon will delete the message before Amazon SQS can. For VisibilityTimeout, the value
that you configure for the daemon in the worker environment tier settings overrides the Amazon SQS
VisibilityTimeout setting. Ensure that messages are deleted appropriately by comparing your Elastic
Beanstalk settings to your Amazon SQS settings.
If you don't specify an existing Amazon SQS queue when you configure a worker environment tier, Elastic
Beanstalk will create one for you.You can get the URL by calling DescribeEnvironmentResources.
For procedures to launch an environment, go to Launching New Environments (p. 299).
Configuring Worker Environment Tiers with Elastic Beanstalk
As noted earlier, Elastic Beanstalk installs a daemon on each Amazon EC2 instance in the Auto Scaling
group. After the worker tier environment is created, you can control how that daemon processes Amazon
SQS messages. For example, you can configure additional settings such as the retention period during
which a message is valid or the visibility timeout period during which a message is not visible in the
Amazon SQS queue because it is locked for processing.
AWS Management Console
You can manage a worker environment tier's configuration by editing Worker Configuration on the
Configuration (p. 336) page for that environment.
API Version 2010-12-01
341
Elastic Beanstalk Developer Guide
Environment Tiers

The Worker Details page has the following options:
• Worker queue – Specify the Amazon SQS queue from which the daemon reads.You can choose an
existing queue, if you have one. If you choose Autogenerated queue, Elastic Beanstalk creates a new
Amazon SQS queue and a corresponding Worker queue URL.
• Worker queue URL – If you choose an existing Worker queue, then this setting displays the URL
associated with that Amazon SQS queue.
• HTTP path – Specify the relative path to the application that will receive the data from the Amazon
SQS queue.The data is inserted into the message body of an HTTP POST message.The default value
is /.
• MIME type – Indicate the MIME type that the HTTP POST message uses.The default value is
application/json. However, any value is valid because you can create and then specify your own
MIME type.
• Max retries – Specify the maximum number of times Elastic Beanstalk attempts to send the message
to the Amazon SQS queue before moving the message to the dead letter queue. The default value is
10.You can specify a value between 1 and 1000.
• HTTP connections – Specify the maximum number of concurrent connections that the daemon can
make to any application(s) within an Amazon EC2 instance.The default is 50.You can specify a value
between 1 and 100.
• Connection timeout – Indicate the amount of time, in seconds, to wait for successful connections to
an application.The default value is 5.You can specify a value between 1 and 60 seconds.
API Version 2010-12-01
342
Elastic Beanstalk Developer Guide
Environment Tiers

• Inactivity timeout – Indicate the amount of time, in seconds, to wait for a response on an existing
connection to an application.The default value is 180.You can specify a value between 1 and 1800
seconds.
• Visibility timeout – Indicate the amount of time, in seconds, an incoming message from the Amazon
SQS queue is locked for processing. After the configured amount of time has passed, the message is
again made visible in the queue for any other daemon to read. For worker environment tiers created
after May 27, 2014, the default value is 300 seconds. For worker environment tiers created before May
27, 2014, the default value is 30 seconds.You can specify a value between 0 and 43200.We
recommend that you specify a value that is higher than you expect your application requires to process
messages.
• Error visibility timeout – Indicate the amount of time, in seconds, that elapses before Elastic Beanstalk
returns a message to the Amazon SQS queue after an attempt to process it fails with an explicit error.
You can specify a value between 0 and 43200.
• Retention period – Indicate the amount of time, in seconds, a message is valid and will be actively
processed.The default value is 345600.You can specify a value between 60 and 1209600.
CLI
To launch an environment with a worker environment tier
• Create a worker environment tier.
PROMPT> elastic-beanstalk-create-environment -a [Application Name] -e
[Environment Name] -T Worker -f [Option Settings File Name]
Options.txt
[
{"Namespace": "aws:elasticbeanstalk:sqsd",
"OptionName": "MimeType",
"Value": "application/json"},
{"Namespace": "aws:elasticbeanstalk:sqsd",
"OptionName": "HttpConnections",
"Value": "75"},
{"Namespace": "aws:elasticbeanstalk:sqsd",
"OptionName": "ConnectTimeout",
"Value": "10"},
{"Namespace": "aws:elasticbeanstalk:sqsd",
"OptionName": "InactivityTimeout",
"Value": "10"},
{"Namespace": "aws:elasticbeanstalk:sqsd",
"OptionName": "VisibilityTimeout",
"Value": "300"},
{"Namespace": "aws:elasticbeanstalk:sqsd",
"OptionName": "RetentionPeriod",
"Value": "345600"},
{"Namespace": "aws:elasticbeanstalk:sqsd",
"OptionName": "MaxRetries",
"Value": "50"},
]
API
For information about all the option values you can pass, see Option Values.
To launch an environment with a worker environment tier
API Version 2010-12-01
343
Elastic Beanstalk Developer Guide
Environment Tiers

• Call CreateEnvironment with the following parameters:
• EnvironmentName = SampleAppEnv2
• VersionLabel = Version2
• Description = description
• TemplateName = MyConfigTemplate
• ApplicationName = SampleApp
• Tier = Worker
• OptionSettings.member.1.Namespace = aws:autoscaling:launchconfiguration
• OptionSettings.member.1.OptionName = IamInstanceProfile
• OptionSettings.member.1.Value = ElasticBeanstalkProfile
• OptionSettings.member.2.Namespace = aws:elasticbeanstalk:sqsd
• OptionSettings.member.2.OptionName = WorkerQueueURL
• OptionSettings.member.2.Value = sqsd.elasticbeanstalk.us-west-2.amazon.com
• OptionSettings.member.3.Namespace = aws:elasticbeanstalk:sqsd
• OptionSettings.member.3.OptionName = HttpPath
• OptionSettings.member.3.Value = /
• OptionSettings.member.4.Namespace = aws:elasticbeanstalk:sqsd
• OptionSettings.member.4.OptionName = MimeType
• OptionSettings.member.4.Value = application/json
• OptionSettings.member.5.Namespace = aws:elasticbeanstalk:sqsd
• OptionSettings.member.5.OptionName = HttpConnections
• OptionSettings.member.5.Value = 75
• OptionSettings.member.6.Namespace = aws:elasticbeanstalk:sqsd
• OptionSettings.member.6.OptionName = ConnectTimeout
• OptionSettings.member.6.Value = 10
• OptionSettings.member.7.Namespace = aws:elasticbeanstalk:sqsd
• OptionSettings.member.7.OptionName = InactivityTimeout
• OptionSettings.member.7.Value = 10
• OptionSettings.member.8.Namespace = aws:elasticbeanstalk:sqsd
• OptionSettings.member.8.OptionName = VisibilityTimeout
• OptionSettings.member.8.Value = 300
• OptionSettings.member.9.Namespace = aws:elasticbeanstalk:sqsd
• OptionSettings.member.9.OptionName = RetentionPeriod
• OptionSettings.member.9.Value = 345600
• OptionSettings.member.10.Namespace = aws:elasticbeanstalk:sqsd
• OptionSettings.member.10.OptionName = MaxRetries
• OptionSettings.member.10.Value = 50
API Version 2010-12-01
344
Elastic Beanstalk Developer Guide
Environment Tiers

Example
https://elasticbeanstalk.us-west-2.amazon.com/?ApplicationName=SampleApp
&VersionLabel=Version2
&EnvironmentName=SampleAppEnv2
&TemplateName=MyConfigTemplate
&Description=description
&Tier=Worker
&Operation=CreateEnvironment
&OptionSettings.member.1.Namespace=aws%3Aautoscaling%3Alaunchconfiguration
&OptionSettings.member.1.OptionName=IamInstanceProfile
&OptionSettings.member.1.Value=ElasticBeanstalkProfile
&OptionSettings.member.2.Namespace=aws%3Aelasticbeanstalk%3Asqsd
&OptionSettings.member.2.OptionName=WorkerQueueURL
&OptionSettings.member.2.Value=sqsd.elasticbeanstalk.us-west-2.amazon.com
&OptionSettings.member.3.Namespace=aws%3elasticbeanstalk%3sqsd
&OptionSettings.member.3.OptionName=HttpPath
&OptionSettings.member.3.Value=%2F
&OptionSettings.member.4.Namespace=aws%3Aelasticbeanstalk%3Asqsd
&OptionSettings.member.4.OptionName=MimeType
&OptionSettings.member.4.Value=application%2Fjson
&OptionSettings.member.5.Namespace=aws%3Aelasticbeanstalk%3Asqsd
&OptionSettings.member.5.OptionName=HttpConnections
&OptionSettings.member.5.Value=75
&OptionSettings.member.6.Namespace=aws%3Aelasticbeanstalk%3Asqsd
&OptionSettings.member.6.OptionName=ConnectTimeout
&OptionSettings.member.6.Value=10
&OptionSettings.member.7.Namespace=aws%3Aelasticbeanstalk%3Asqsd
&OptionSettings.member.7.OptionName=InactivityTimeout
&OptionSettings.member.7.Value=10
&OptionSettings.member.8.Namespace=aws%3Aelasticbeanstalk%3Asqsd
&OptionSettings.member.8.OptionName=VisibilityTimeout
&OptionSettings.member.8.Value=300
&OptionSettings.member.9.Namespace=aws%3Aelasticbeanstalk%3Asqsd
&OptionSettings.member.9.OptionName=RetentionPeriod
&OptionSettings.member.9.Value=345600
&OptionSettings.member.10.Namespace=aws%3Aelasticbeanstalk%3Asqsd
&OptionSettings.member.10.OptionName=MaxRetries
&OptionSettings.member.10.Value=50
&AuthParams
1
For worker environment tiers created after May 27, 2014
2
For worker environment tiers created after February 17, 2015
Environment Types
In Elastic Beanstalk, you can create a load-balancing, autoscaling environment or a single-instance
environment.The type of environment that you require depends on the application that you deploy. For
example, you can develop and test an application in a single-instance environment to save costs and
then upgrade that environment to a load-balancing, autoscaling environment when the application is
ready for production.
API Version 2010-12-01
345
Elastic Beanstalk Developer Guide
Environment Types

Load-balancing, Autoscaling Environment
A load-balancing and autoscaling environment uses the Elastic Load Balancing and Auto Scaling services
to provision the Amazon EC2 instances that are required for your deployed application. Auto Scaling
automatically starts additional instances to accommodate increasing load on your application. If the load
on your application decreases, Auto Scaling stops instances but always leaves your specified minimum
number of instances running. If your application requires scalability with the option of running in multiple
Availability Zones, use a load-balancing, autoscaling environment. If you're not sure which environment
type to select, you can pick one, and if required, switch the environment type later. For more information,
see Changing Environment Type (p. 346).
Single-instance Environment
A single-instance environment contains one Amazon EC2 instance with an Elastic IP address. A
single-instance environment doesn't have a load balancer, which can help you reduce costs compared
to a load-balancing, autoscaling environment. Although a single-instance environment does use the Auto
Scaling service, settings for the minimum number of instances, maximum number of instances, and
desired capacity are all set to 1. Consequently, new instances are not started to accommodate increasing
load on your application.
Use a single-instance environment if you expect your production application to have low traffic or if you
are doing remote development. If you're not sure which environment type to select, you can pick one,
and, if required, you can switch the environment type later. For more information, see Changing
Environment Type (p. 346).
The single-instance environment type is available for nonlegacy containers only. For instructions on
migrating from a legacy container, see Migrating Your Application from a Legacy Container Type (p. 426).
Important
In a single-instance environment, you cannot use the Elastic Beanstalk console to configure
settings for the Auto Scaling group. Instead, you can edit the options file and then pass in the
options file using the AWS Command Line Interface or the Elastic Beanstalk API-based command
line interface. Any IAM users that work with single-instance environments must have Auto Scaling
permissions. For more information about the options file, see Option Values. For more information
about working with IAM, see Using Elastic Beanstalk with AWS Identity and Access Management
(IAM) (p. 561).
Because single-instance environments do not use the Elastic Load Balancing service, you cannot
configure load balancer settings.You also do not need to configure Elastic Load Balancing
permissions for your IAM users in this case.
Changing Environment Type
You can change your environment type to a single-instance or load-balancing, autoscaling environment
by editing your environment's configuration. In some cases, you might want to change your environment
type from one type to another. For example, let's say that you developed and tested an application in a
single-instance environment in order to save costs. When your application is ready for production, you
can change the environment type to a load-balancing, autoscaling environment so that it can scale to
meet the demands of your customers.
To change an environment type
1. Open the Elastic Beanstalk console at https://console.aws.amazon.com/elasticbeanstalk/.
2. From the region list, select the region that includes the environment that you want to work with.
3. On the Elastic Beanstalk console applications page, click the name of the environment.
API Version 2010-12-01
346
Elastic Beanstalk Developer Guide
Changing Environment Type

4. In the Overview section of the environment dashboard, click Edit.
5.
Click for the Scaling settings.
6. In the Environment Type section, select the type of environment that you want.
Note
The single-instance environment type is available for nonlegacy containers only. For
instructions on migrating from a legacy container, see Migrating Your Application from a
Legacy Container Type (p. 426).
7. If your environment is in a VPC, you need to specify additional settings.
API Version 2010-12-01
347
Elastic Beanstalk Developer Guide
Changing Environment Type

8. Click Save.
Note that it can take several minutes for the environment to update while Elastic Beanstalk provisions
AWS resources.
Saving Environment Configuration Settings
Elastic Beanstalk configures a number of AWS cloud computing services when it deploys your application.
You can save your preferred environment's configuration settings, which include the settings for these
individual services.You can easily apply your saved environment's configuration settings to other
environments.
Note
Saved environment configuration templates do not include any configured tags.
AWS Management Console
To save an application's environment settings
1. Open the Elastic Beanstalk console at https://console.aws.amazon.com/elasticbeanstalk/.
2. From the region list, select the region that includes the environment that you want to work with.
3. On the Elastic Beanstalk console applications page, click the name of the environment whose settings
you want to save.
4. On the environment dashboard, click Actions and then select Save Configuration.
API Version 2010-12-01
348
Elastic Beanstalk Developer Guide
Saving Environment Configuration Settings

5. For Configuration Name, type the name of the configuration.
6. (Optional) For Description, type a description for this configuration.
7. Click Save.
Command Line Interface (CLI)
To save an application's environment settings
• Create a configuration template from an existing application.
PROMPT> elastic-beanstalk-create-configuration-template -a [Application
Name] -t [Template Name]
API
To save an application's environment settings
• Call CreateConfigurationTemplate with the following parameters:
• ApplicationName = SampleApp
• TemplateName = MyConfigTemplate
API Version 2010-12-01
349
Elastic Beanstalk Developer Guide
Saving Environment Configuration Settings

Example
https://elasticbeanstalk.us-west-2.amazon.com/?ApplicationName=SampleApp
&TemplateName=MyConfigTemplate
&Operation=CreateConfigurationTemplate
&AuthParams
Cloning an Environment
You can use an existing environment as the basis for a new environment by creating a clone of the existing
environment. For example, you might want to create a clone so that you can use a newer version of the
solution stack used by the original environment's platform. Elastic Beanstalk configures the clone with
the same environment settings used by the original environment. By cloning an existing environment
instead of creating a new environment, you do not have to manually configure option settings, environment
variables, and other settings. Elastic Beanstalk also creates a copy of any AWS resource associated with
the original environment. However, during the cloning process, Elastic Beanstalk does not copy data from
Amazon RDS to the clone. After you have created the clone environment, you can modify environment
configuration settings as needed.
Note
Elastic Beanstalk does not include any unmanaged changes to resources in the clone. Changes
to AWS resources that you make using tools other than the Elastic Beanstalk management
console, command-line tools, or API are considered unmanaged changes.
AWS Management Console
To clone an environment
1. Open the Elastic Beanstalk console at https://console.aws.amazon.com/elasticbeanstalk/.
2. From the region list, select the region that includes the environment that you want to work with.
3. On the Elastic Beanstalk console applications page, click the name of the application, and then the
name of the environment that you want to clone.
4. On the environment dashboard, click Actions, and then do one of the following:
• Click Clone Environment if you want to clone the environment without any changes to the solution
stack version.
• Click Clone with Latest Platform if you want to clone the environment, but with a newer version
of the original environment's solution stack.
API Version 2010-12-01
350
Elastic Beanstalk Developer Guide
Cloning an Environment

5. On the Clone Environment page, review the information in the Original Environment section to
verify that you chose the environment from which you want to create a clone.
6. In the New Environment section, you can optionally change the Environment name, Environment
URL, Description, and Platform values that Elastic Beanstalk automatically set based on the original
environment.
Note
For Platform, you cannot choose a different language or framework. Options include only
the solution stacks available for the language or framework of the original environment.You
will see the message Most recent version if the original environment uses the most recent
solution stack for its platform or if you chose Clone with Latest Platform.You will see the
message Newer version available if the original environment uses a solution stack that is
not the newest for the platform. For more information, see Supported Platforms (p. 19).
API Version 2010-12-01
351
Elastic Beanstalk Developer Guide
Cloning an Environment

7. When you are ready, click Clone.
EB Command Line Interface (CLI) 3.x
To clone an environment using EB CLI 3.x
• Create a new environment by cloning an existing environment.
PROMPT> eb clone [environment_name] [--update]
Note
You can specify the environment name. If you don't provide environment_name as a
command line parameter, EB CLI will use the default environment. The --update option
clones the original environment to a new environment, but with the most recent solution
stack available for the platform used by the original environment. Do not include the
--update option if you want to use the same solution stack as the original environment.
For more information, including other command line parameters for the eb clone command,
see clone (p. 633).
Configuring Amazon EC2 Server Instances with
Elastic Beanstalk
Amazon EC2 is a web service that enables you to launch and manage server instances in Amazon's data
centers.You can use Amazon EC2 server instances at any time, for as long as you need, and for any
API Version 2010-12-01
352
Elastic Beanstalk Developer Guide
Amazon EC2 Server Instances

legal purpose. Instances are available in different sizes and configurations. For more information, go to
the Amazon EC2 product page.
AWS Management Console
You can edit the Elastic Beanstalk environment's Amazon EC2 instance configuration by editing Instances
on the Configuration page for that environment. For information about getting to the Configuration
page, see Changing Environment Configuration Settings (p. 336).
Amazon EC2 Instance Types
Instance type displays the instance types available to your Elastic Beanstalk application. Change the
instance type to select a server with the characteristics (including memory size and CPU power) that are
most appropriate to your application. For example, applications with intensive and long-running operations
may require more CPU or memory. Elastic Beanstalk regularly checks your running instances to ensure
they are healthy. If your application consumes 95 percent or greater of the CPU, Elastic Beanstalk will
trigger an event. For more information about this event, see CPU Utilization Exceeds 95.00% (p. 513).
API Version 2010-12-01
353
Elastic Beanstalk Developer Guide
Amazon EC2 Server Instances

Note
You cannot change between 32-bit and 64-bit instance types. For example, if your application
is built on a 32-bit platform, only 32-bit instance types appear in the list.
For more information about the Amazon EC2 instance types available for your Elastic Beanstalk application,
see Instance Types in the Amazon Elastic Compute Cloud User Guide.
Amazon EC2 Security Groups
You can control access to your Elastic Beanstalk application using an Amazon EC2 security group. A
security group defines firewall rules for your instances.These rules specify which ingress (i.e., incoming)
network traffic should be delivered to your instance. All other ingress traffic will be discarded.You can
modify rules for a group at any time.The new rules are automatically enforced for all running instances
and instances launched in the future.
You can set up your Amazon EC2 security groups using the Amazon EC2 console.You can specify which
Amazon EC2 security groups control access to your Elastic Beanstalk application by entering one or
more Amazon EC2 security group names (delimited by commas) into the EC2 security groups text box.
For more information on Amazon EC2 security groups, see Amazon EC2 Security Groups in the Amazon
Elastic Compute Cloud User Guide.
Elastic Beanstalk creates a default security group for you. If you are using a legacy container, the security
group is elasticbeanstalk-default. If you are using a non-legacy container, then Elastic Beanstalk
dynamically creates a security group.You can view the security group name in the EC2 security group
box.
Note
If you are running your application using a legacy container type, make sure port 80 (HTTP) is
accessible from 0.0.0.0/0 as the source CIDR range if you want to enable health checks for your
application. For more information about health checks, see Health Checks (p. 362). To check if
you are using a legacy container type, see Why are some container types marked legacy? (p.426).
To modify your Amazon EC2 security group
1. Add a new rule for 80 (HTTP) for your EC2 security group with a new source. For instructions, see
Adding Rules to a Security Group in the Amazon Elastic Compute Cloud User Guide.
2. Type the public DNS address of your EC2 instance in address bar your web browser to verify you
can see your application. For instructions on determining your DNS address, see Determining Your
Public, Private, and Elastic IP Addresses in the Amazon Elastic Compute Cloud User Guide.
Amazon EC2 Key Pairs
You can securely log in to the Amazon EC2 instances provisioned for your Elastic Beanstalk application
with an Amazon EC2 key pair.
Important
You must create an Amazon EC2 key pair and configure your Elastic Beanstalk–provisioned
Amazon EC2 instances to use the Amazon EC2 key pair before you can access your Elastic
Beanstalk–provisioned Amazon EC2 instances.You can set up your Amazon EC2 key pairs
using the AWS Management Console. For instructions on creating a key pair for Amazon EC2,
see the Amazon Elastic Compute Cloud Getting Started Guide.
The EC2 key pair text box lets you specify the name of an Amazon EC2 key pair you use to securely log
in to the Amazon EC2 instances running your Elastic Beanstalk application.
For more information on Amazon EC2 key pairs, see Network and Security in the Amazon Elastic Compute
Cloud User Guide. For more information on connecting to Amazon EC2 instances, see Connect to Your
API Version 2010-12-01
354
Elastic Beanstalk Developer Guide
Amazon EC2 Server Instances

Instance and Connecting to Linux/UNIX Instances from Windows using PuTTY in the Amazon Elastic
Compute Cloud User Guide.
Monitoring Interval
By default, only basic Amazon CloudWatch metrics are enabled; they return data in five-minute periods.
You can enable more granular one-minute CloudWatch metrics by selecting 1 minute for the Monitoring
Interval in the Server section of the Configuration tab for your environment in the AWS Toolkit for
Eclipse.
Note
Amazon CloudWatch service charges can apply for one-minute interval metrics. See Amazon
CloudWatch for more information.
Custom AMI ID
You can override the default AMI used for your Amazon EC2 instances with your own custom AMI by
entering the identifier of your custom AMI into the Custom AMI ID box in the Server section of the
Configuration tab for your environment in the AWS Toolkit for Eclipse.
Important
Using your own AMI is an advanced task and should be done with care. If you need a custom
AMI, we recommend you start with the default Elastic Beanstalk AMI and then modify it.To be
considered healthy, Elastic Beanstalk expects Amazon EC2 instances to meet a set of
requirements, including having a running host manager. If these requirements are not met, your
environment might not work properly.
Instance Profiles
If you are using a nonlegacy container, you can select an instance profile. If you are using a legacy
container, this option does not appear. Instance profiles provide applications and services access to AWS
resources. For example, your application may require access to DynamoDB. Every API request made to
AWS services must be signed using AWS security credentials. One way to grant applications access to
AWS resources is to distribute your credentials to each instance; however, distributing long-term credentials
to each instance is challenging to manage and a potential security risk. Instead, Elastic Beanstalk requires
an IAM role with the permissions that applications must have when an application makes calls to other
AWS resources.When Elastic Beanstalk launches the Amazon EC2 instances, it uses the instance profile
associated with an IAM role. All applications that run on the instances can use the role credentials to sign
requests. Because role credentials are temporary and rotated automatically, you don't have to worry
about long-term security risks.
In addition,
The Instance profile list displays the profiles available for your Elastic Beanstalk environment. If you do
not have any instance profiles, Elastic Beanstalk creates one for you. Elastic Beanstalk creates a default
instance profile and updates the Amazon S3 bucket policy to allow log rotation. If you choose to not use
the default instance profile, you need to grant permissions for Elastic Beanstalk to rotate logs. For more
information about this policy, see Example: Granting Elastic Beanstalk Permission to Rotate Logs to
Amazon S3 (p. 576). For a list of supported container types, see Why are some container types marked
legacy? (p. 426).
Note
Users must have permission to create a default profile. For more information, see Granting IAM
Users Permissions to Create and Pass IAM Roles (p. 568).
Root Volume (Boot Device)
You can configure a root volume (otherwise known as a boot device) to attach to Amazon EC2 instances
in your Elastic Beanstalk environment. An Amazon EBS volume is a durable, block-level storage device
API Version 2010-12-01
355
Elastic Beanstalk Developer Guide
Amazon EC2 Server Instances

that you can attach to a single Amazon EC2 instance. After a volume is attached to an instance, you can
use it like any other physical hard drive.The Root volume type list includes Magnetic, General Purpose
(SSD), and Provisioned IOPS (SSD) volume types. Select the volume type that meets your performance
and price requirements. For more information, see Amazon EBS Volume Types and Amazon EBS Product
Details.
With Root volume size, you can specify the size of the storage volume that you selected.You must
specify your desired root volume size if you choose Provisioned IOPS (SSD) as the root volume type that
your instances will use. For other root volumes, if you do not specify your own value, Elastic Beanstalk
will use the default volume size for the storage volume type. The default volume size varies according to
the AMI of the solution stack on which your environment is based. For Provisioned IOPS (SSD) root
volumes, the minimum number of gibibytes is 10 and the maximum is 1024. For other root volumes, the
minimum number of gibibytes is 8 and the maximum is 1024.
If you selected Provisioned IOPS (SSD) as your root volume type, you must specify your desired
input/output operations per second (IOPS).The minimum is 100 and the maximum is 4000.The maximum
ratio of IOPS to your volume size is 30 to 1. For example, a volume with 3000 IOPS must be at least 100
GiB.
Block Device Mappings
Note
You cannot configure this option using the AWS Management Console. Instead, modify the
Options.txt file using the command line interface (CLI) as explained in Command Line Interface
(CLI) (p. 356). For a list of possible configuration settings, see Option Values.You can also call
UpdateEnvironment in the API. For an example of how to configure this option in the API, see
API (p. 357).
Although each Amazon Elastic Compute Cloud instance has an associated root device volume upon
launch, you can use block device mappings to specify additional Amazon Elastic Block Store volumes or
instance store volumes to attach to all the instances in the autoscaling group. For more information about
block device mappings, see Block Device Mapping in the Amazon Elastic Cloud Computer User Guide.
For more information about instance storage, see Amazon EC2 Instance Store in the Amazon Elastic
Cloud Computer User Guide.
Command Line Interface (CLI)
To edit an application's environment settings
• Update an application's environment settings.
PROMPT> elastic-beanstalk-update-environment -e MySampleAppEnv -f
"Options.txt"
Options.txt
[
{"Namespace": "aws:autoscaling:launchconfiguration",
"OptionName": "InstanceType",
"Value": "m1.small"},
{"Namespace": "aws:autoscaling:launchconfiguration",
"OptionName": "SecurityGroups",
"Value": "awseb-e-98pjjgr9cs-stack-AWSEBSecurityGroup-D1FOQASTKD12"},
{"Namespace": "aws:autoscaling:launchconfiguration",
"OptionName": "EC2KeyName",
"Value": "mykeypair"},
{"Namespace": "aws:autoscaling:launchconfiguration",
API Version 2010-12-01
356
Elastic Beanstalk Developer Guide
Amazon EC2 Server Instances

"OptionName": "MonitoringInterval",
"Value": "5 minute"},
{"Namespace": "aws:autoscaling:launchconfiguration",
"OptionName": "ImageId",
"Value": "ami-cbab67a2"},
{"Namespace": "aws:autoscaling:launchconfiguration",
"OptionName": "IamInstanceProfile",
"Value": "ElasticBeanstalkProfile"},
{"Namespace": "aws:autoscaling:launchconfiguration",
"OptionName": "BlockDeviceMappings",
"Value": "/dev/sdj=:100,/dev/sdh=snap-51eef269,/dev/sdb=ephemeral0"}
]
API
For information about all the option values you can pass, see Option Values.
To edit an application's environment settings
• Call UpdateEnvironment with the following parameters:
• EnvironmentName = SampleAppEnv
• OptionSettings.member.1.Namespace = aws:autoscaling:launchconfiguration
• OptionSettings.member.1.OptionName = InstanceType
• OptionSettings.member.1.Value = m1.small
• OptionSettings.member.2.Namespace = aws:autoscaling:launchconfiguration
• OptionSettings.member.2.OptionName = SecurityGroups
• OptionSettings.member.2.Value = mysecuritygroup
• OptionSettings.member.3.Namespace = aws:autoscaling:launchconfiguration
• OptionSettings.member.3.OptionName = EC2KeyName
• OptionSettings.member.3.Value = mykeypair
• OptionSettings.member.4.Namespace = aws:autoscaling:launchconfiguration
• OptionSettings.member.4.OptionName = MonitoringInterval
• OptionSettings.member.4.Value = 1 minute
• OptionSettings.member.5.Namespace = aws:autoscaling:launchconfiguration
• OptionSettings.member.5.OptionName = ImageId
• OptionSettings.member.5.Value = ami-cbab67a2
• OptionSettings.member.6.Namespace = aws:autoscaling:launchconfiguration
• OptionSettings.member.6.OptionName = IamInstanceProfile
• OptionSettings.member.6.Value = ElasticBeanstalkProfile
• OptionSettings.member.7.Namespace = aws:autoscaling:launchconfiguration
• OptionSettings.member.7.OptionName = BlockDeviceMappings
• OptionSettings.member.7.Value =
/dev/sdj=:100,/dev/sdh=snap-51eef269,/dev/sdb=ephemeral0
API Version 2010-12-01
357
Elastic Beanstalk Developer Guide
Amazon EC2 Server Instances

Example
https://elasticbeanstalk.us-west-2.amazon.com/?EnvironmentName=SampleAppEnv
&OptionSettings.member.1.Namespace=aws%3Aautoscaling%3Alaunchconfiguration
&OptionSettings.member.1.OptionName=InstanceType
&OptionSettings.member.1.Value=m1.small
&OptionSettings.member.2.Namespace=aws%3Aautoscaling%3Alaunchconfiguration
&OptionSettings.member.2.OptionName=SecurityGroups
&OptionSettings.member.2.Value=awseb-e-98pjjgr9cs-stack-AWSEBSecurityGroup-
D1FOQASTKD12
&OptionSettings.member.3.Namespace=aws%3Aautoscaling%3Alaunchconfiguration
&OptionSettings.member.3.OptionName=EC2KeyName
&OptionSettings.member.3.Value=mykeypair
&OptionSettings.member.4.Namespace=aws%3Aautoscaling%3Alaunchconfiguration
&OptionSettings.member.4.OptionName=MonitoringInterval
&OptionSettings.member.4.Value=5%20minute
&OptionSettings.member.5.Namespace=aws%3Aautoscaling%3Alaunchconfiguration
&OptionSettings.member.5.OptionName=ImageId
&OptionSettings.member.5.Value=ami-cbab67a2
&OptionSettings.member.6.Namespace=aws%3Aautoscaling%3Alaunchconfiguration
&OptionSettings.member.6.OptionName=IamInstanceProfile
&OptionSettings.member.6.Value=ElasticBeanstalkProfile
&OptionSettings.member.7.Namespace=aws%3Aautoscaling%3Alaunchconfiguration
&OptionSettings.member.7.OptionName=BlockDeviceMappings
&OptionSettings.member.7.Value=/dev/sdj=:100,/dev/sdh=snap-
51eef269,/dev/sdb=ephemeral0
&Operation=UpdateEnvironment
&AuthParams
Configuring Elastic Load Balancing with Elastic
Beanstalk
Elastic Load Balancing is an Amazon web service that helps you improve the availability and scalability
of your application.This service makes it easy for you to distribute application loads among Amazon EC2
instances. Elastic Load Balancing increases availability through redundancy and supports traffic growth
for your application.
Elastic Load Balancing lets you automatically distribute and balance the incoming application traffic among
all the instances you are running.The service also makes it easy to add and remove instances when you
need to increase or decrease the capacity of your application.
AWS Management Console
You can modify an environment's load balancing configuration by editing Load Balancing in the Network
Tier section of the environment's Configuration page. For information about getting to the Configuration
page, see Changing Environment Configuration Settings (p. 336).
In the AWS Management Console, Elastic Beanstalk groups the parameters that you can configure for
Elastic Load Balancing into the following categories:
• Load Balancer – For information about these settings, see Ports and Cross-zone Load Balancing (p.359).
• Connection Draining – For information about these settings, see Connection Draining (p. 361).
• Sessions – For information about these settings, see Sessions (p. 361).
API Version 2010-12-01
358
Elastic Beanstalk Developer Guide
Elastic Load Balancing

• EC2 Instance Health Check – For information about these settings, see Health Checks (p. 362).
The following sections describe the Elastic Load Balancing settings you can configure for your application.
Ports and Cross-zone Load Balancing
The load balancer provisioned to handle requests for your Elastic Beanstalk application sends requests
to the Amazon EC2 instances that are running your application.The provisioned load balancer can listen
for requests on the specified ports and route requests to the Amazon EC2 instances in your Elastic
Beanstalk application. By default, the load balancer handles requests on port 80. At least one of the ports
must be turned on.
Important
Note the following:
• If you are deploying an application using a legacy container type, make sure the port you
specified is not locked down; otherwise, users will not be able to connect to your Elastic
Beanstalk application.To check if you are using a legacy container type, see Why are some
container types marked legacy? (p. 426).
• If you are deploying an application using a nonlegacy container type, and you want to access
your application directly on the EC2 instance using your web browser, modify your HTTP rule
in your EC2 security group. For instructions, go to Amazon EC2 Security Groups (p. 354). For
a list of supported nonlegacy container types, see Why are some container types marked
legacy? (p. 426).
Controlling the listener port
To turn off the listener port, you select OFF for Listener Port. To turn on the listener port, you select a
port (for example, 80).
Note
If you want to access your environment using a different port other than the default port 80 (e.g.,
port 8080), you can add a listener to the existing load balancer and configure the new listener
to listen on that port. For example, using the Elastic Load Balancing API Tools, type the following
command replacing <yourloadbalancername> with the name of your load balancer for Elastic
Beanstalk.
API Version 2010-12-01
359
Elastic Beanstalk Developer Guide
Elastic Load Balancing

elb-create-lb-listeners --lb <yourloadbalancername> --listener "pro
tocol=http, lb-port=8080, instance-port=80"
If you want Elastic Beanstalk to monitor your environment, do not remove the listener on port
80.
Controlling the listener protocol
If you turn on the listener port, you can specify the protocol to use. Select HTTP or TCP from the Listener
protocol list.
Note
This option is available for nonlegacy containers only. For instructions on migrating from a legacy
container, see Migrating Your Application from a Legacy Container Type (p. 426).
Controlling the secure listener port
Elastic Load Balancing supports the HTTPS/TLS protocol to enable traffic encryption for client connections
to the load balancer. Connections from the load balancer to the EC2 instances are done using plaintext.
By default, the secure listener port is turned off.
To turn on the secure listener port
1. Create and upload a certificate and key to the AWS Access and Identity Management (IAM) service.
The IAM service will store the certificate and provide an Amazon Resource Name (ARN) for the SSL
certificate you've uploaded. For more information about creating and uploading certificates, see the
Managing Server Certificates section of Using AWS Identity and Access Management.
2. Specify the secure listener port by selecting a port from the Secure Listener Port list.
3. In the SSL Certificate ID box, enter the Amazon Resources Name (ARN) of your SSL certificate
(e.g., arn:aws:iam::123456789012:server-certificate/abc/certs/build). Use the SSL
certificate that you created and uploaded in step 1. For information about viewing the certificate's
ARN, see Creating, Uploading, and Deleting Server Certificates topic in the Creating and Uploading
Server Certificates section of the Using IAM guide.
To turn off the secure listener port, select OFF from the Secure Listener Port drop-down list.
Controlling the secure protocol
If you turn on the secure listener port, you can specify the protocol to use. Select HTTPS or SSL from
the Secure Listener Protocol list.
Note
This option is available for nonlegacy containers only. For instructions on migrating from a legacy
container, see Migrating Your Application from a Legacy Container Type (p. 426).
Enabling cross-zone load balancing
By default, the load balancer node routes traffic to Amazon EC2 instances within the same Availability
Zone.When you enable cross-zone load balancing, traffic is routed evenly across all instances, regardless
of which Availability Zone the instances are in.This ensures that all Availability Zones receive an equal
amount of request traffic. Cross-zone load balancing reduces the need to maintain equivalent numbers
of instances in each zone and improves the application's ability to fail over if you lose one or more
instances.
API Version 2010-12-01
360
Elastic Beanstalk Developer Guide
Elastic Load Balancing

Connection Draining
You can enable connection draining if you want to keep existing load balancer connections open to
unhealthy or deregistering instances to complete in-progress requests even as the load balancer stops
sending new requests. Otherwise, when a load balancer detects an unhealthy or deregistering instance,
it closes the connections without regard for requests that are in progress.When you enable connection
draining, you can specify a maximum time for the load balancer to keep connections alive before forcibly
closing connections and reporting the instance as deregistered. If you do not specify the maximum timeout
period, by default, the load balancer will close connections to the deregistering instance after 20 seconds.
You can specify a draining timeout value up to 3600.
If your instances are part of an Auto Scaling group and if connection draining is enabled for your load
balancer, Auto Scaling will wait for the requests that are in progress to be completed or for the maximum
timeout to expire, whichever comes first, before terminating instances.
Sessions
By default a load balancer routes each request independently to the server instance with the smallest
load. By comparison, enabling session stickiness binds a user's session to a specific server instance so
that all requests coming from the user during the session will be sent to the same server instance.
Elastic Beanstalk uses load balancer-generated HTTP cookies when sticky sessions are enabled for an
application.The load balancer uses a special load balancer–generated cookie to track the application
instance for each request. When the load balancer receives a request, it first checks to see if this cookie
is present in the request. If so, the request is sent to the application instance specified in the cookie. If
there is no cookie, the load balancer chooses an application instance based on the existing load balancing
algorithm. A cookie is inserted into the response for binding subsequent requests from the same user to
that application instance.The policy configuration defines a cookie expiry, which establishes the duration
of validity for each cookie.You can configure the cookie expiration period as a value between 0 and
1000000 seconds.
For more information about Elastic Load Balancing, go to the Elastic Load Balancing Developer Guide.
API Version 2010-12-01
361
Elastic Beanstalk Developer Guide
Elastic Load Balancing

Health Checks
Elastic Load Balancing uses a health check to determine whether the Amazon EC2 instances running
your application are healthy. The health check determines an instance's health status by probing a
specified URL at a set interval; if the URL returns an error message, or fails to return within a specified
timeout period, the health check fails. Elastic Beanstalk uses Elastic Load Balancing health checks to set
the status of your application in the AWS Management Console.
You can control the settings for the health check using the EC2 Instance Health Check section of the
Load Balancing configuration page.
The health check definition includes a URL to be queried for instance health. By default, Elastic Beanstalk
uses TCP:80 for nonlegacy containers and HTTP:80 for legacy containers.You can override the default
URL to match an existing resource in your application (e.g., /myapp/index.jsp) by entering it in the
Application health check URL box. If you override the default URL, then Elastic Beanstalk uses HTTP
to query the resource.To check if you are using a legacy container type, see Why are some container
types marked legacy? (p. 426).
The following list describes the health check parameters you can set for your application.
• For Health check interval (seconds), enter the number of seconds for Elastic Load Balancing to wait
between each check of your application's Amazon EC2 instances.
• For Health check timeout (seconds), specify the number of seconds Elastic Load Balancing will wait
for a response before it considers the instance unresponsive.
• For Healthy check count threshold and Unhealthy check count threshold, specify the number of
consecutive successful or unsuccessful URL probes before Elastic Load Balancing changes the instance
health status. For example, specifying 5 in the Unhealthy Check Count Threshold box means that
the URL would have to return an error message or timeout five consecutive times before Elastic Load
Balancing considers the health check failed.
Command Line Interface (CLI)
To edit an application's environment settings
• Update an application's environment settings.
API Version 2010-12-01
362
Elastic Beanstalk Developer Guide
Elastic Load Balancing

PROMPT> elastic-beanstalk-update-environment -e MySampleAppEnv -f
"Options.txt"
Options.txt
[
{"Namespace": "aws:elb:loadbalancer",
"OptionName": "LoadBalancerHTTPPort",
"Value": "80"},
{"Namespace": "aws:elb:loadbalancer",
"OptionName": "LoadBalancerPortProtocol",
"Value": "HTTP"},
{"Namespace": "aws:elb:loadbalancer",
"OptionName": "LoadBalancerHTTPSPort",
"Value": "443"},
{"Namespace": "aws:elb:loadbalancer",
"OptionName": "LoadBalancerSSLPortProtocol",
"Value": "HTTPS"},
{"Namespace": "aws:elb:loadbalancer",
"OptionName": "SSLCertificateId",
"Value": "arn:aws:iam::123456789012:server-certificate/abc/certs/build"},
{"Namespace": "aws:elasticbeanstalk:application",
"OptionName": "Application Healthcheck URL",
"Value": "/"},
{"Namespace": "aws:elb:healthcheck",
"OptionName": "Interval",
"Value": "30"},
{"Namespace": "aws:elb:healthcheck",
"OptionName": "Timeout",
"Value": "5"},
{"Namespace": "aws:elb:healthcheck",
"OptionName": "HealthyThreshold",
"Value": "3"},
{"Namespace": "aws:elb:healthcheck",
"OptionName": "UnhealthyThreshold",
"Value": "5"},
{"Namespace": "aws:elb:policies",
"OptionName": "Stickiness Policy",
"Value": "false"},
{"Namespace": "aws:elb:policies",
"OptionName": "Stickiness Cookie Expiration",
"Value": "0"}
{"Namespace": "aws:elb:policies",
"OptionName": "ConnectionDrainingEnabled",
"Value": "true"}
{"Namespace": "aws:elb:policies",
"OptionName": "ConnectionDrainingTimeout",
"Value": "60"}
{"Namespace": "aws:elb:loadbalancer",
"OptionName": "CrossZone",
"Value": "true"}
]
API Version 2010-12-01
363
Elastic Beanstalk Developer Guide
Elastic Load Balancing

API
To edit an application's environment settings
• Call UpdateEnvironment with the following parameters:
• EnvironmentName = SampleAppEnv
• OptionSettings.member.1.Namespace = aws:elb:loadbalancer
• OptionSettings.member.1.OptionName = LoadBalancerHTTPPort
• OptionSettings.member.1.Value = 80
• OptionSettings.member.2.Namespace = aws:elb:loadbalancer
• OptionSettings.member.2.OptionName = LoadBalancerHTTPSPort
• OptionSettings.member.2.Value = 443
• OptionSettings.member.3.Namespace = aws:elb:loadbalancer
• OptionSettings.member.3.OptionName = SSLCertificateId
• OptionSettings.member.3.Value =
arn:aws:iam::123456789012:server-certificate/abc/certs/build
• OptionSettings.member.4.Namespace = aws:elasticbeanstalk:application
• OptionSettings.member.4.OptionName = Application Healthcheck URL
• OptionSettings.member.4.Value = /
• OptionSettings.member.5.Namespace = aws:elb:healthcheck
• OptionSettings.member.5.OptionName = Interval
• OptionSettings.member.5.Value = 30
• OptionSettings.member.6.Namespace = aws:elb:healthcheck
• OptionSettings.member.6.OptionName = Timeout
• OptionSettings.member.6.Value = 5
• OptionSettings.member.7.Namespace = aws:elb:healthcheck
• OptionSettings.member.7.OptionName = HealthyThreshold
• OptionSettings.member.7.Value = 3
• OptionSettings.member.8.Namespace = aws:elb:healthcheck
• OptionSettings.member.8.OptionName = UnhealthyThreshold
• OptionSettings.member.8.Value = 5
• OptionSettings.member.9.Namespace = aws:elb:policies
• OptionSettings.member.9.OptionName = Stickiness Policy
• OptionSettings.member.9.Value = false
• OptionSettings.member.10.Namespace = aws:elb:policies
• OptionSettings.member.10.OptionName = Stickiness Cookie Expiration
• OptionSettings.member.10.Value = 0
• OptionSettings.member.11.Namespace = aws:elb:loadbalancer
• OptionSettings.member.11.OptionName = LoadBalancerPortProtocol
• OptionSettings.member.11.Value = HTTP
API Version 2010-12-01
364
Elastic Beanstalk Developer Guide
Elastic Load Balancing

• OptionSettings.member.12.Namespace = aws:elb:loadbalancer
• OptionSettings.member.12.OptionName = LoadBalancerSSLPortProtocol
• OptionSettings.member.12.Value = HTTPS
• OptionSettings.member.13.Namespace = aws:elb:policies
• OptionSettings.member.13.OptionName = ConnectionDrainingEnabled
• OptionSettings.member.13.Value = true
• OptionSettings.member.14.Namespace = aws:elb:policies
• OptionSettings.member.14.OptionName = ConnectionDrainingTimeout
• OptionSettings.member.14.Value = 60
• OptionSettings.member.15.Namespace = aws:elb:loadbalancer
• OptionSettings.member.15.OptionName = CrossZone
• OptionSettings.member.15.Value = true
API Version 2010-12-01
365
Elastic Beanstalk Developer Guide
Elastic Load Balancing

Example
https://elasticbeanstalk.us-west-2.amazon.com/?EnvironmentName=SampleAppEnv
&OptionSettings.member.1.Namespace=aws%3Aelb%3Aloadbalancer
&OptionSettings.member.1.OptionName=LoadBalancerHTTPPort
&OptionSettings.member.1.Value=80
&OptionSettings.member.2.Namespace=aws%3Aelb%3Aloadbalancer
&OptionSettings.member.2.OptionName=LoadBalancerHTTPSPort
&OptionSettings.member.2.Value=443
&OptionSettings.member.3.Namespace=aws%3Aelb%3Aloadbalancer
&OptionSettings.member.3.OptionName=SSLCertificateIdSSLCertificateId
&OptionSettings.member.3.Value=arn%3Aaws%3Aiam%3A%3A123456789012%3Aserver-
certificate%2Fabc%2Fcerts%2Fbuild
&OptionSettings.member.4.Namespace=aws%3Aelb%3Aapplication
&OptionSettings.member.4.OptionName=Application%20Healthcheck%20URL
&OptionSettings.member.4.Value=/
&OptionSettings.member.5.Namespace=aws%3Aelb%3Ahealthcheck
&OptionSettings.member.5.OptionName=Interval
&OptionSettings.member.5.Value=30
&OptionSettings.member.6.Namespace=aws%3Aelb%3Ahealthcheck
&OptionSettings.member.6.OptionName=Timeout
&OptionSettings.member.6.Value=5
&OptionSettings.member.7.Namespace=aws%3Aelb%3Ahealthcheck
&OptionSettings.member.7.OptionName=HealthyThreshold
&OptionSettings.member.7.Value=3
&OptionSettings.member.8.Namespace=aws%3Aelb%3Ahealthcheck
&OptionSettings.member.8.OptionName=UnhealthyThreshold
&OptionSettings.member.8.Value=5
&OptionSettings.member.9.Namespace=aws%3Aelb%3Apolicies
&OptionSettings.member.9.OptionName=Stickiness%20Policy
&OptionSettings.member.9.Value=false
&OptionSettings.member.10.Namespace=aws%3Aelb%3Apolicies
&OptionSettings.member.10.OptionName=Stickiness%20Cookie%20Expiration
&OptionSettings.member.10.Value=0
&OptionSettings.member.11.Namespace=aws%3Aelb%3Aloadbalancer
&OptionSettings.member.11.OptionName=LoadBalancerPortProtocol
&OptionSettings.member.11.Value=HTTP
&OptionSettings.member.12.Namespace=aws%3Aelb%3Aloadbalancer
&OptionSettings.member.12.OptionName=LoadBalancerSSLPortProtocol
&OptionSettings.member.12.Value=HTTPS
&OptionSettings.member.13.Namespace=aws%3Aelb%3Apolicies
&OptionSettings.member.13.OptionName=ConnectionDrainingEnabled
&OptionSettings.member.13.Value=true
&OptionSettings.member.14.Namespace=aws%3Aelb%3Apolicies
&OptionSettings.member.14.OptionName=ConnectionDrainingTimeout
&OptionSettings.member.14.Value=60
&OptionSettings.member.15.Namespace=aws%3Aelb%3Aloadbalancer
&OptionSettings.member.15.OptionName=CrossZone
&OptionSettings.member.15.Value=true
&Operation=UpdateEnvironment
&AuthParams
API Version 2010-12-01
366
Elastic Beanstalk Developer Guide
Elastic Load Balancing

Configuring Auto Scaling with Elastic Beanstalk
Auto Scaling is a web service designed to automatically launch or terminate Amazon EC2 instances
based on user-defined triggers. Users can set up Auto Scaling groups and associate triggers with these
groups to automatically scale computing resources based on metrics such as bandwidth usage or CPU
utilization. Auto Scaling works with Amazon CloudWatch to retrieve metrics for the server instances
running your application.
Auto Scaling lets you take a group of Amazon EC2 instances and set various parameters to have this
group automatically increase or decrease in number. Auto Scaling can add or remove Amazon EC2
instances from that group to help you seamlessly deal with traffic changes to your application.
Auto Scaling also monitors the health of each Amazon EC2 instance that it launches. If any instance
terminates unexpectedly, Auto Scaling detects the termination and launches a replacement instance.
This capability enables you to maintain a fixed, desired number of Amazon EC2 instances automatically.
AWS Management Console
You can configure how Auto Scaling works by editing Scaling on the environment's Configuration page.
For information about getting to the Configuration page, see Changing Environment Configuration
Settings (p. 336).
API Version 2010-12-01
367
Elastic Beanstalk Developer Guide
Auto Scaling

The following section discusses how to configure Auto Scaling parameters for your application.
API Version 2010-12-01
368
Elastic Beanstalk Developer Guide
Auto Scaling

Launch Configuration
You can edit the launch configuration to control how your Elastic Beanstalk application provisions Auto
Scaling resources.
The Minimum instance count and Maximum instance count boxes let you specify the minimum and
maximum size of the Auto Scaling group that your Elastic Beanstalk application uses.
Note
To maintain a fixed number of Amazon EC2 instances, set the Minimum instance count and
Maximum instance count boxes to the same value.
The Availability Zones box lets you specify the number of Availability Zones you want Elastic Beanstalk
to launch your instances in. It is recommended that you choose enough Availability Zones to spread your
instances across. For example, if you have a minimum of 3 instances, then you should choose 3 Availability
Zones.
The Custom Availability Zones box lets you specify which Availability Zones you want Elastic Beanstalk
to launch instance(s) in across a region. If you do not select any custom Availability Zones, then Elastic
Beanstalk will choose the Availability Zones for you. The number of Availability Zones must be less than
or equal to the number of custom Availability Zones you select. For example, if you select Any 2, then
you must select at least two custom Availability Zones.
Note
Here are some things to keep in mind when working with Availability Zones:
• It is important to launch instances in more than one Availability Zone in order to build
fault-tolerant applications. If one Availability Zone goes down, your instances will still be running
in another Availability Zones.
• If you purchased Reserved Instances, you need to specify the same Availability Zone(s) that
you specified when you purchased your Reserved Instances. Reserved Instances let you
make a low, one-time, upfront payment for an instance, reserve it for a one- or three-year
term, and pay a significantly lower hourly rate for that instance. For more information about
Reserved Instances, see Reserved Instances in the Amazon EC2 User Guide for Linux
Instances.
Triggers
A trigger is an Auto Scaling mechanism that you set to tell the system when to increase (scale out) the
number of instances, and when to decrease (scale in) the number of instances.You can configure triggers
to fire on Amazon EC2 or Elastic Load Balancing metrics published to Amazon CloudWatch, such as an
Amazon EC2 instance's CPU utilization, and determine whether the conditions you specified have been
met. When the upper or lower thresholds of the conditions for the metric have been breached for the
specified period of time, the trigger launches a long-running process called a scaling activity. For more
information about Amazon EC2 metrics, see Amazon Elastic Compute Cloud Dimensions and Metrics in
the Amazon CloudWatch Developer Guide. For more information about Elastic Load Balancing metrics,
see Monitor Your Load Balancer Using Amazon CloudWatch in the Elastic Load Balancing Developer
Guide.
You can define a scaling trigger for your Elastic Beanstalk application using the AWS Management
Console.
Auto Scaling triggers work by watching a specific Amazon CloudWatch metric for an instance.Triggers
include CPU utilization, network traffic, and disk activity. Use the Trigger measurement setting to specify
a metric for your trigger.
The following list describes the trigger parameters you can configure using the AWS Management Console.
API Version 2010-12-01
369
Elastic Beanstalk Developer Guide
Auto Scaling

• Use Trigger statistic to specify which statistic the trigger should use—Minimum, Maximum, Sum, or
Average.
• Use Unit of measurement to specify the unit for the trigger measurement.
• For Measurement period, specify how frequently Amazon CloudWatch measures the metrics for your
trigger.Breach duration is the amount of time a metric can extend beyond its defined limit (as specified
for Upper threshold and Lower threshold) before the trigger fires.
• Upper breach scale increment and Lower breach scale increment specify how many Amazon EC2
instances to add or remove when performing a scaling activity.
For more information on Auto Scaling, go to the Auto Scaling documentation.
Command Line Interface (CLI)
To edit an application's environment settings
• Update an application's environment settings.
PROMPT> elastic-beanstalk-update-environment -e MySampleAppEnv -f
"Options.txt"
Options.txt
[
{"Namespace": "aws:autoscaling:asg",
"OptionName": "MinSize",
"Value": "1"},
{"Namespace": "aws:autoscaling:asg",
"OptionName": "MaxSize",
"Value": "4"},
{"Namespace": "aws:autoscaling:asg",
"OptionName": "Availability Zones",
"Value": "Any 1"},
{"Namespace": "aws:autoscaling:asg",
"OptionName": "Cooldown",
"Value": "360"},
{"Namespace": "aws:autoscaling:trigger",
"OptionName": "MeasureName",
"Value": "NetworkOut"},
{"Namespace": "aws:autoscaling:trigger",
"OptionName": "Statistic",
"Value": "Average"},
{"Namespace": "aws:autoscaling:trigger",
"OptionName": "Unit",
"Value": "Bytes"},
{"Namespace": "aws:autoscaling:trigger",
"OptionName": "Period",
"Value": "5"},
{"Namespace": "aws:autoscaling:trigger",
"OptionName": "BreachDuration",
"Value": "5"},
{"Namespace": "aws:autoscaling:trigger",
"OptionName": "UpperThreshold",
"Value": "6000000"},
{"Namespace": "aws:autoscaling:trigger",
"OptionName": "UpperBreachScaleIncrement",
API Version 2010-12-01
370
Elastic Beanstalk Developer Guide
Auto Scaling

"Value": "1"},
{"Namespace": "aws:autoscaling:trigger",
"OptionName": "LowerThreshold",
"Value": "2000000"},
{"Namespace": "aws:autoscaling:trigger",
"OptionName": "LowerBreachScaleIncrement",
"Value": "-1"}
]
You can also specify custom Availability Zones using the CLI.
To update an application's environment settings with custom Availability Zones
• Update an application's environment settings.
PROMPT> elastic-beanstalk-update-environment -e MySampleAppEnv -f
"Options.txt"
Options.txt
[
{"Namespace": "aws:autoscaling:asg",
"OptionName": "MinSize",
"Value": "1"},
{"Namespace": "aws:autoscaling:asg",
"OptionName": "MaxSize",
"Value": "4"},
{"Namespace": "aws:autoscaling:asg",
"OptionName": "Availability Zones",
"Value": "Any 1"},
{"Namespace": "aws:autoscaling:asg",
"OptionName": "Cooldown",
"Value": "360"},
{"Namespace": "aws:autoscaling:trigger",
"OptionName": "MeasureName",
"Value": "NetworkOut"},
{"Namespace": "aws:autoscaling:trigger",
"OptionName": "Statistic",
"Value": "Average"},
{"Namespace": "aws:autoscaling:trigger",
"OptionName": "Unit",
"Value": "Bytes"},
{"Namespace": "aws:autoscaling:trigger",
"OptionName": "Period",
"Value": "5"},
{"Namespace": "aws:autoscaling:trigger",
"OptionName": "BreachDuration",
"Value": "5"},
{"Namespace": "aws:autoscaling:trigger",
"OptionName": "UpperThreshold",
"Value": "6000000"},
{"Namespace": "aws:autoscaling:trigger",
"OptionName": "UpperBreachScaleIncrement",
"Value": "1"},
{"Namespace": "aws:autoscaling:trigger",
"OptionName": "LowerThreshold",
"Value": "2000000"},
API Version 2010-12-01
371
Elastic Beanstalk Developer Guide
Auto Scaling

{"Namespace": "aws:autoscaling:trigger",
"OptionName": "LowerBreachScaleIncrement",
"Value": "-1"}
]
You can also specify custom Availability Zones using the CLI.
To update an application's environment settings with custom Availability Zones
• Update an application's environment settings.
PROMPT> elastic-beanstalk-update-environment -e MySampleAppEnv -f
"Options.txt"
Options.txt
[
{"Namespace": "aws:autoscaling:asg",
"OptionName": "Custom Availability Zones",
"Value": "us-west-2a, us-west-2b"}
]
Note
You use the command elastic-beanstalk-update-environment to specify the same
Availability Zone(s) that you specified when you purchased your Reserved Instances. Reserved
Instances let you make a low, one-time, upfront payment for an instance, reserve it for a one-year
or three-year term, and pay a significantly lower hourly rate for that instance. For more information
about Reserved Instances, go to Reserved Instances in the Amazon Elastic Compute Cloud
User Guide.
API
To edit an application's environment settings
• Call UpdateEnvironment with the following parameters:
• EnvironmentName = SampleAppEnv
• OptionSettings.member.1.Namespace = aws:autoscaling:asg
• OptionSettings.member.1.OptionName = MinSize
• OptionSettings.member.1.Value = 1
• OptionSettings.member.2.Namespace = aws:autoscaling:asg
• OptionSettings.member.2.OptionName = MaxSize
• OptionSettings.member.2.Value = 4
• OptionSettings.member.3.Namespace = aws:autoscaling:asg
• OptionSettings.member.3.OptionName = Availability Zones
• OptionSettings.member.3.Value = Any 1
• OptionSettings.member.4.Namespace = aws:autoscaling:asg
• OptionSettings.member.4.OptionName = Cooldown
• OptionSettings.member.4.Value = 360
• OptionSettings.member.5.Namespace = aws:autoscaling:trigger
API Version 2010-12-01
372
Elastic Beanstalk Developer Guide
Auto Scaling

• OptionSettings.member.5.OptionName = MeasureName
• OptionSettings.member.5.Value = NetworkOut
• OptionSettings.member.6.Namespace = aws:autoscaling:trigger
• OptionSettings.member.6.OptionName = Statistic
• OptionSettings.member.6.Value = Average
• OptionSettings.member.7.Namespace = aws:autoscaling:trigger
• OptionSettings.member.7.OptionName = Unit
• OptionSettings.member.7.Value = Bytes
• OptionSettings.member.8.Namespace = aws:autoscaling:trigger
• OptionSettings.member.8.OptionName = Period
• OptionSettings.member.8.Value = 5
• OptionSettings.member.9.Namespace = aws:autoscaling:trigger
• OptionSettings.member.9.OptionName = BreachDuration
• OptionSettings.member.9.Value = 5
• OptionSettings.member.10.Namespace = aws:autoscaling:trigger
• OptionSettings.member.10.OptionName = UpperThreshold
• OptionSettings.member.10.Value = 6000000
• OptionSettings.member.11.Namespace = aws:autoscaling:trigger
• OptionSettings.member.11.OptionName = UpperBreachScaleIncrement
• OptionSettings.member.11.Value = 1
• OptionSettings.member.12.Namespace = aws:autoscaling:trigger
• OptionSettings.member.12.OptionName = LowerThreshold
• OptionSettings.member.12.Value = 2000000
• OptionSettings.member.13.Namespace = aws:autoscaling:trigger
• OptionSettings.member.13.OptionName = LowerBreachScaleIncrement
• OptionSettings.member.13.Value = -1
API Version 2010-12-01
373
Elastic Beanstalk Developer Guide
Auto Scaling

Example
https://elasticbeanstalk.us-west-2.amazon.com/?EnvironmentName=SampleAppEnv
&OptionSettings.member.1.Namespace=aws%3Aautoscaling%3Aasg
&OptionSettings.member.1.OptionName=MinSize
&OptionSettings.member.1.Value=1
&OptionSettings.member.2.Namespace=aws%3Aautoscaling%3Aasg
&OptionSettings.member.2.OptionName=MaxSize
&OptionSettings.member.2.Value=4
&OptionSettings.member.3.Namespace=aws%3Aautoscaling%3Aasg
&OptionSettings.member.3.OptionName=Availability%20Zones
&OptionSettings.member.3.Value=Any%201
&OptionSettings.member.4.Namespace=aws%3Aautoscaling%3Aasg
&OptionSettings.member.4.OptionName=Cooldown
&OptionSettings.member.4.Value=360
&OptionSettings.member.5.Namespace=aws%3Aautoscaling%3Atrigger
&OptionSettings.member.5.OptionName=MeasureName
&OptionSettings.member.5.Value=NetworkOut
&OptionSettings.member.6.Namespace=aws%3Aautoscaling%3Atrigger
&OptionSettings.member.6.OptionName=Statistic
&OptionSettings.member.6.Value=Average
&OptionSettings.member.7.Namespace=aws%3Aautoscaling%3Atrigger
&OptionSettings.member.7.OptionName=Unit
&OptionSettings.member.7.Value=Bytes
&OptionSettings.member.8.Namespace=aws%3Aautoscaling%3Atrigger
&OptionSettings.member.8.OptionName=Period
&OptionSettings.member.8.Value=5
&OptionSettings.member.9.Namespace=aws%3Aautoscaling%3Atrigger
&OptionSettings.member.9.OptionName=BreachDuration
&OptionSettings.member.9.Value=5
&OptionSettings.member.10.Namespace=aws%3Aautoscaling%3Atrigger
&OptionSettings.member.10.OptionName=UpperThreshold
&OptionSettings.member.10.Value=6000000
&OptionSettings.member.11.Namespace=aws%3Aautoscaling%3Atrigger
&OptionSettings.member.11.OptionName=UpperBreachScaleIncrement
&OptionSettings.member.11.Value=1
&OptionSettings.member.12.Namespace=aws%3Aautoscaling%3Atrigger
&OptionSettings.member.12.OptionName=LowerThreshold
&OptionSettings.member.12.Value=2000000
&OptionSettings.member.13.Namespace=aws%3Aautoscaling%3Atrigger
&OptionSettings.member.13.OptionName=Period
&OptionSettings.member.13.Value=-1
&Operation=UpdateEnvironment
&AuthParams
You can also specify custom Availability Zones using the API.
• Call UpdateEnvironment with the following parameters:
• EnvironmentName = SampleAppEnv
• OptionSettings.member.1.Namespace = aws:autoscaling:asg
• OptionSettings.member.1.OptionName = Custom Availability Zones
• OptionSettings.member.1.Value = us-west-2a, us-west-2b
API Version 2010-12-01
374
Elastic Beanstalk Developer Guide
Auto Scaling

Example
https://elasticbeanstalk.us-west-2.amazon.com/?EnvironmentName=SampleAppEnv
&OptionSettings.member.1.Namespace=aws%3Aautoscaling%3Aasg
&OptionSettings.member.1.OptionName=Custom%20Availability%20Zones
&OptionSettings.member.1.Value=us-west-2a%2C%20us-west-2b
&Operation=UpdateEnvironment
&AuthParams
Updating Elastic Beanstalk Environments with
Rolling Updates
Rolling updates provide control over the availability of your environment when Elastic Beanstalk needs
to update or replace Amazon EC2 instances in the environment's autoscaling group.You can specify
whether to update all instances concurrently or keep some instances running to serve requests even
while other instances are being updated.You can also choose whether the service will wait for a specified
amount of time between consecutive updates or instead begin applying updates to a batch of instances
upon receiving reports that the current batch is healthy. Changes to options in the
aws:autoscaling:launchconfiguration namespace or aws:ec2:vpc namespace trigger rolling
updates if rolling updates are enabled. For more information about these options, see Option Values.
Note
Application deployments do not require you to update or replace Amazon EC2 instances.
Consequently, rolling updates do not apply to application deployments. For information about
deploying application versions without disruption, see Deploying Versions with Zero Downtime.
For information about deploying application versions to instances in batches, see Deploying
Application Versions in Batches.
AWS Management Console
You can enable and configure rolling updates by editing Updates and Deployments on the environment's
Configuration page. For information about getting to the Configuration page, see Changing Environment
Configuration Settings (p. 336).
You must enable rolling updates before you can configure any of the parameters.
API Version 2010-12-01
375
Elastic Beanstalk Developer Guide
Rolling Updates

Note
Enabling rolling updates or changing its settings has no effect unless your IAM permissions are
configured appropriately.To configure rolling updates, you must configure your IAM policy to
allow you to perform any action on any autoscaling group in the AWS account by including a
statement with autoscaling:*. For more information about how Elastic Beanstalk uses IAM
policies, see Creating Policies to Control Access to Specific Elastic Beanstalk Resources (p.564).
The Configuration Updates section of the Updates and Deployments page has the following options
for rolling updates triggered by environment configuration changes:
Rolling Update Type
Environment configuration changes in load-balancing, autoscaling environments trigger updates to the
instances in the environment. In those situations, you can specify what criteria to use to determine when
to apply rolling updates to a batch of instances.The Rolling update type setting lets you specify whether
to wait a specific amount of time or wait for instances to indicate that they are healthy before continuing
to complete the update process on the next batch of instances.
It can be difficult to gauge the amount of time to wait between consecutive updates.You might choose
a conservative pause time that results in an unnecessarily long total period of time that rolling updates
are applied. With health-based rolling updates, you can potentially decrease the total amount of time to
complete environment configuration updates to all instances. By basing the rolling update process on the
results of an Elastic Load Balancing health check, you also have the assurance that instances within a
batch are running and available after receiving an update.
In contrast, time-based rolling updates proceed without regard to the health of the instances in a particular
batch.This can result in an environment with instances that have updated environment configuration
settings, but are unavailable to receive traffic. For more information about Elastic Load Balancing health
checks, see Health Checks (p. 362).
If you choose Health as the rolling update type, by default, Elastic Beanstalk waits 30 minutes for all
instances in a batch to send events that indicate they are healthy before it cancels the update process.
You can use the API or CLI to change the timeout setting to between 15 minutes and one hour. If the
rolling update process fails, Elastic Beanstalk rolls back to the environment configuration settings in use
prior to the rolling update attempt. If the attempt to roll back fails (for example, if you receive messages
indicating that "resources failed to update" or Elastic Beanstalk cannot detect the health status of the
instances in question), then you must terminate the environment and then launch a new environment.
You can use a saved configuration to launch a new environment.
Batch Settings
• Maximum batch size – Specify the number of instances to terminate at any given time. Instances
must be terminated before they can be updated or replaced during the rolling update process. By
default, this value is one-third of the minimum size of the autoscaling group, rounded to the next highest
integer.You can override this with a value between 1 and 10000.
• Minimum instances in service – Indicate the minimum number of instances to keep running while
other instances are being updated.The default value is either the minimum size of the autoscaling
group or one less than the maximum size of the autoscaling group, whichever number is lower. For
example, if the minimum size is 1 and the maximum size is 3, then the default is 1. However, if the
minimum size is 4 and the maximum size is 4, then the default is 3.You can specify a number between
0 and 9999.
• Pause time – Specify the amount of time the AWS CloudFormation service waits after it has completed
updates to one batch of instances before it continues on to the next batch. The pause time accounts
for the fact that instances are not immediately available after they start running. The environment's
instance type and container type determine the default pause time, but you can override the
recommended value. A valid pause time can range from 0 seconds to 1 hour.
API Version 2010-12-01
376
Elastic Beanstalk Developer Guide
Rolling Updates

Note
Elastic Beanstalk does not display the Pause time option if you have a load-balancing,
autoscaling web server environment and choose to use health-based rolling updates. Rather
than wait for a specific period of time to elapse, the AWS CloudFormation service continues
on to the next batch of instances when it receives reports that the instances are running and
available.
Default Pause Time Values
The Pause time boxes let you specify how long Elastic Beanstalk waits after it has completed updates
to one batch of instances before it continues on to the next batch. Unless you have a specific need, we
recommend that you use the default values provided by Elastic Beanstalk for each instance type and
container combination.To use Elastic Beanstalk default values for pause time, you can either omit the
parameter, leave it blank, or specify the option value as "null" when you configure rolling updates. If you
choose to specify a custom pause time, you must follow the ISO8601 duration format in the form:
PT#H#M#S, where each # is the number of hours, minutes, and/or seconds, respectively.
Command Line Interface (CLI)
To edit rolling updates using the AWS CLI
• Change how updates are applied to your environment.
PROMPT> aws elasticbeanstalk update-environment --environment-name
MySampleAppEnv --option-settings "Options.txt"
Options.txt (Example 1)
[
{"Namespace": "aws:autoscaling:updatepolicy:rollingupdate",
"OptionName": "MaxBatchSize",
"Value": "5"},
{"Namespace": "aws:autoscaling:updatepolicy:rollingupdate",
"OptionName": "MinInstancesInService",
"Value": "2"},
{"Namespace": "aws:autoscaling:updatepolicy:rollingupdate",
"OptionName": "PauseTime",
"Value": "PT5M30S"},
{"Namespace": "aws:autoscaling:updatepolicy:rollingupdate",
"OptionName": "RollingUpdateEnabled",
"Value": "true"},
{"Namespace": "aws:autoscaling:updatepolicy:rollingupdate",
"OptionName": "RollingUpdateType",
"Value": "Time"},
]
Options.txt (Example 2)
[
{"Namespace": "aws:autoscaling:updatepolicy:rollingupdate",
"OptionName": "MaxBatchSize",
"Value": "5"},
{"Namespace": "aws:autoscaling:updatepolicy:rollingupdate",
"OptionName": "MinInstancesInService",
"Value": "2"},
API Version 2010-12-01
377
Elastic Beanstalk Developer Guide
Rolling Updates

{"Namespace": "aws:autoscaling:updatepolicy:rollingupdate",
"OptionName": "RollingUpdateEnabled",
"Value": "true"},
{"Namespace": "aws:elb:healthcheck",
"OptionName": "RollingUpdateType",
"Value": "Health"},
{"Namespace": "aws:elb:healthcheck",
"OptionName": "TimeOutTime",
"Value": "PT10M"},
]
API
To edit rolling updates using the API
• Call UpdateEnvironment with the following parameters:
• EnvironmentName = SampleAppEnv
• OptionSettings.member.1.Namespace =
aws:autoscaling:updatepolicy:rollingupdate
• OptionSettings.member.1.OptionName = MaxBatchSize
• OptionSettings.member.1.Value = 5
• OptionSettings.member.2.Namespace =
aws:autoscaling:updatepolicy:rollingupdate
• OptionSettings.member.2.OptionName = MinInstancesInService
• OptionSettings.member.2.Value = 2
• OptionSettings.member.3.Namespace =
aws:autoscaling:updatepolicy:rollingupdate
• OptionSettings.member.3.OptionName = PauseTime
• OptionSettings.member.3.Value = PT5M30S
• OptionSettings.member.4.Namespace =
aws:autoscaling:updatepolicy:rollingupdate
• OptionSettings.member.4.OptionName = RollingUpdateEnabled
• OptionSettings.member.4.Value = true
API Version 2010-12-01
378
Elastic Beanstalk Developer Guide
Rolling Updates

Example
https://elasticbeanstalk.us-west-2.amazon.com/?EnvironmentName=SampleAppEnv
&OptionSettings.member.1.Namespace=aws%3Aautoscaling%3Aupdatepolicy%3Arol
lingupdate
&OptionSettings.member.1.OptionName=MaxBatchSize
&OptionSettings.member.1.Value=5
&OptionSettings.member.2.Namespace=aws%3Aautoscaling%3Aupdatepolicy%3Arol
lingupdate
&OptionSettings.member.2.OptionName=MinInstancesInService
&OptionSettings.member.2.Value=2
&OptionSettings.member.3.Namespace=aws%3Aautoscaling%3Aupdatepolicy%3Arol
lingupdate
&OptionSettings.member.3.OptionName=PauseTime
&OptionSettings.member.3.Value=PT5M30S
&OptionSettings.member.4.Namespace=aws%3Aautoscaling%3Aupdatepolicy%3Arol
lingupdate
&OptionSettings.member.4.OptionName=RollingUpdateEnabled
&OptionSettings.member.4.Value=true
&Operation=UpdateEnvironment
&AuthParams
Deploying Application Versions in Batches
You can simultaneously deploy a new or existing application version to a specified percentage or number
of Amazon EC2 instances in your Elastic Beanstalk environment. A group of instances that are updated
together are known as a batch. By default, an application version deployment is performed on all instances
in an autoscaling group at once. Batched application version deployments are also an alternative to
application version deployments that involve a CNAME swap, as described in Deploying Versions with
Zero Downtime (p. 318). When you perform an application version deployment in sequential batches,
some portion of Amazon EC2 instances in the autoscaling group continues serving requests while the
others are updated.The instances that remain in service run the current application version until they are
taken out of service for their own update.
If you have connection draining (p. 361) enabled, Elastic Beanstalk drains existing connections from the
Amazon EC2 instances before beginning the application version deployment.When an instance no longer
has active connections, Elastic Beanstalk deregisters it from the Elastic Load Balancing load balancer
along with the other instances in the same batch.When the application version is up to date on all instances
in the batch, the instances are reattached to the Elastic Load Balancing load balancer so that they can
begin receiving new connections. Elastic Beanstalk then deploys a new or existing application version to
a subsequent batch of Amazon EC2 in the autoscaling group until all instances have been updated.You
can use the AWS Management Console, the CLI, or APIs to deploy a new or existing application version
to batches of Amazon EC2 instances in an existing Elastic Beanstalk environment.
AWS Management Console
You can enable and configure batched application version deployments by editing Updates and
Deployments on the environment's Configuration page in the Elastic Beanstalk console. For information
about getting to the Configuration page, see Changing Environment Configuration Settings (p. 336).
API Version 2010-12-01
379
Elastic Beanstalk Developer Guide
Deploying Versions in Batches

The Application Deployments section of the Updates and Deployments page has the following options
for configuring batched application version deployments:
• Batch type – Specify whether you want a batch of Amazon EC2 instances to consist of a percentage
of the total number of instances in the autoscaling group or a fixed number. This setting and Batch
size are used together. Percentage is the default.You can choose Fixed if you want to specify a fixed
number for the Batch size.
• Batch size – Indicate the maximum percentage or number of instances that can be out of service
during an application version deployment while other instances in the autoscaling group remain in
service.The default value is 100 (percent). If you specify the Batch type as Percentage, you can
specify a batch size between 1 and 100. If you specify the Batch type as a Fixed number, you must
specify a Batch size that is a number that is less than or equal to the maximum number of running
instances in the autoscaling group.You can see the settings you configured for autoscaling behavior
in the Auto Scaling section of the page.
Command Line Interface (CLI)
To configure batched application version deployments using the AWS CLI
• Change how application versions are applied to your environment.
PROMPT> elastic-beanstalk-update-environment --environment-name SampleAppEnv
--option-settings "Options.txt"
Options.txt
[
{"Namespace": "aws:elasticbeanstalk:command",
"OptionName": "BatchSize",
"Value": "50"},
{"Namespace": "aws:elasticbeanstalk:command",
"OptionName": "BatchType",
"Value": "Percentage"},
]
API
To edit rolling updates using the API
• Call UpdateEnvironment with the following parameters:
• EnvironmentName = SampleAppEnv
• VersionLabel = Version2
• OptionSettings.member.1.Namespace = aws:elasticbeanstalk:command
API Version 2010-12-01
380
Elastic Beanstalk Developer Guide
Deploying Versions in Batches

• OptionSettings.member.1.OptionName = BatchSize
• OptionSettings.member.1.Value = 50
• OptionSettings.member.2.Namespace = aws:elasticbeanstalk:command
• OptionSettings.member.2.OptionName = BatchSizeType
• OptionSettings.member.2.Value = Percentage
Example
https://elasticbeanstalk.us-west-2.amazon.com/?EnvironmentName=SampleAppEnv
&VersionLabel=Version2
&OptionSettings.member.1.Namespace=aws%3Aelasticbeanstalk%3Acommand
&OptionSettings.member.1.OptionName=BatchSize
&OptionSettings.member.1.Value=50
&OptionSettings.member.2.Namespace=aws%3Aelasticbeanstalk%3Acommand
&OptionSettings.member.2.OptionName=BatchSizeType
&OptionSettings.member.2.Value=Percentage
&Operation=UpdateEnvironment
&AuthParams
Canceling Environment and Application Version
Updates
You can cancel in-progress updates that are triggered by environment configuration changes.You can
also cancel the deployment of a new application version in progress. For example, you might want to
cancel an update if you decide you want to continue using the existing environment configuration instead
of applying new environment configuration settings. Or, you might realize that the new application version
that you are deploying has problems that will cause it to not start or not run properly. By canceling an
environment update or application version update, you can avoid waiting until the update or deployment
process is done before you begin a new attempt to update the environment or application version.
Elastic Beanstalk performs the rollback the same way that it performed the last successful update. For
example, if you have time-based rolling updates enabled in your environment, then Elastic Beanstalk will
wait the specified pause time between rolling back changes on one batch of instances before rolling back
changes on the next batch. Or, if you recently turned on rolling updates, but the last time you successfully
updated your environment configuration settings was without rolling updates, Elastic Beanstalk will perform
the rollback on all instances simultaneously.
You cannot stop Elastic Beanstalk from rolling back to the previous environment configuration once it
begins to cancel the update.The rollback process continues until all instances in the environment have
the previous environment configuration or until the rollback process fails. For application version
deployments, canceling the deployment simply stops the deployment; some instances will have the new
application version and others will continue to run the existing application version.You can deploy the
same or another application version later.
For more information about rolling updates, see Updating Elastic Beanstalk Environments with Rolling
Updates (p. 375). For more information about batched application version deployments, see Deploying
Application Versions in Batches (p. 379).
To cancel an update
• On the environment dashboard, click Actions, and then click Abort Current Operation.
API Version 2010-12-01
381
Elastic Beanstalk Developer Guide
Canceling Environment and Application Version Updates

Upgrading the Elastic Beanstalk Environment's
Platform Version
You can change the environment platform to the newest version available or any other version, at any
time.The environment dashboard notifies you when the environment is running a platform that is anything
other than the most recent version. For a list of all supported platforms and their container names, see
Supported Platforms (p. 19).
AWS Management Console
To upgrade the platform
1. Open the Elastic Beanstalk console at https://console.aws.amazon.com/elasticbeanstalk/.
2. From the region list, select the region that includes the environment that you want to work with.
3. On the Elastic Beanstalk console applications page, click the name of the application, and then the
name of the environment with the platform that you want to upgrade.
4. On the environment dashboard, in the Overview section, under Configuration, click Change.
API Version 2010-12-01
382
Elastic Beanstalk Developer Guide
Upgrading the Platform

5. On the Update Platform Version page, click Platform, and then click the platform version that you
want the environment to use.
Note
The availability of your application during the platform version upgrade depends on whether
you have rolling updates enabled.The Update Platform Version window explains what
will happen and what procedures you can follow to minimize downtime. Elastic Beanstalk
displays a window similar to one of the following:
•
API Version 2010-12-01
383
Elastic Beanstalk Developer Guide
Upgrading the Platform

•
6. After you choose the platform version you want to use, click Save.
Configuring Databases with Elastic Beanstalk
Amazon Web Services offers a number of database options that you can leverage for your application
such as Amazon Relational Database Service (Amazon RDS), Amazon DynamoDB, and Amazon
ElastiCache.
Amazon RDS is a web service that makes it easy to set up, operate, and scale a relational database in
the cloud. It provides cost-efficient and resizable capacity while managing time-consuming database
administration tasks, freeing you to focus on your applications and business.
You can create a new RDS database instance for an existing environment and view its settings. For
information about using an existing RDS database instance with Elastic Beanstalk, go to Using Elastic
Beanstalk with Amazon RDS (p. 528). See the appropriate topic for your programming language.
If you didn't use the Create New Application wizard to add an RDS DB instance to your environment,
you can use an application's Configuration page to do so. If you have already created an instance using
Elastic Beanstalk, you can view the DB instance connectivity information as well as edit some of the
configuration settings for the following container types:
• Docker
• Node.js
• PHP 5.3, PHP 5.4, and PHP 5.5
• Python
• Ruby 1.8.7, 1.9.3, 2.0.0, and 2.1.2
• Apache Tomcat 6, 7, and 8
• Windows Server 2008 R2 running IIS 7.5 and Windows Server 2012 running IIS 8 or IIS 8.5
If you have deployed an Elastic Beanstalk using a legacy container type, then you will not see the option
to create, view or edit settings for an Amazon RDS DB instance on the Configuration page. Depending
on your programming language, there are several other alternatives you can use.
• Java — Using Amazon RDS and MySQL Connector/J (Legacy Container Types) (p. 816)
API Version 2010-12-01
384
Elastic Beanstalk Developer Guide
Databases
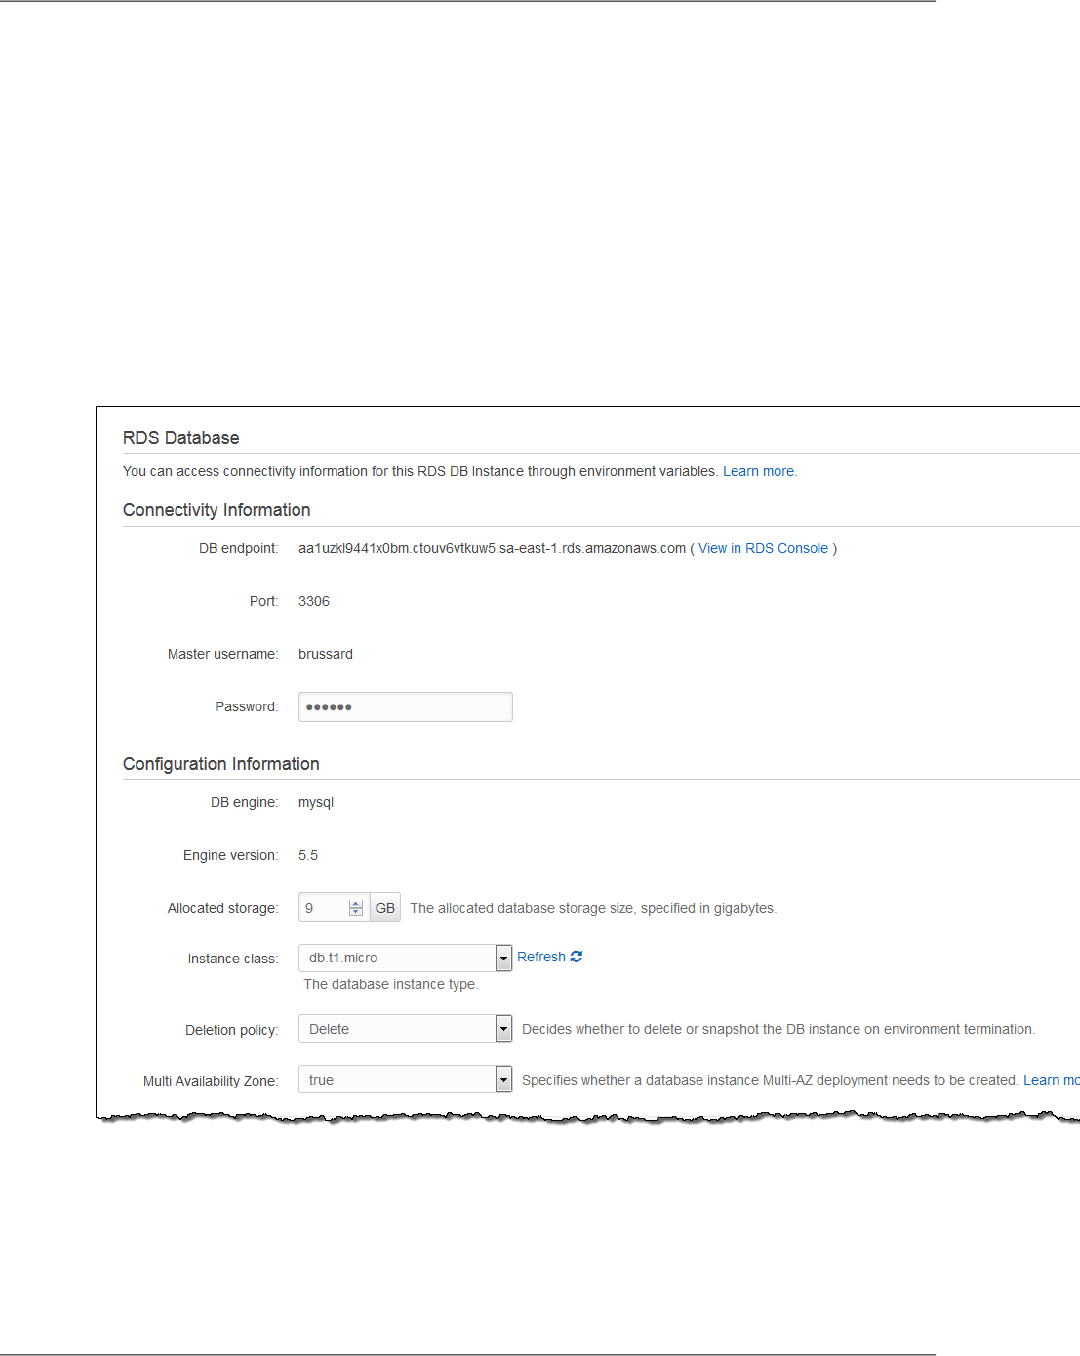
• PHP — Using Amazon RDS with PHP (Legacy Container Types) (p. 815)
• .NET — Get Started (p. 126)
For more information about legacy and nonlegacy container types, see Migrating Your Application from
a Legacy Container Type (p. 426).
For information about using AWS Elastic Beanstalk with Amazon DynamoDB or Amazon RDS, see Using
Elastic Beanstalk with DynamoDB (p. 527) or Using Elastic Beanstalk with Amazon RDS (p. 528)
AWS Management Console
If you have a database associated with your environment, you can view the configuration settings by
viewing the settings in the Data Tier section on the environment's Configuration page. For information
about getting to the Configuration page, see Changing Environment Configuration Settings (p. 336).
If you don't have an Amazon RDS database associated with your environment, you can associate one
by clicking create a new RDS database on the Configuration page. For information about getting to
the Configuration page, see Changing Environment Configuration Settings (p. 336).
To create an Amazon RDS database and associate it with your existing environment
1. On the Configuration page, under Data Tier, click create a new RDS database.
API Version 2010-12-01
385
Elastic Beanstalk Developer Guide
Databases

2. Configure the following settings for your database:
• (Optional) For Snapshot, select whether to create an Amazon RDS DB from an existing snapshot.
• (Optional) For DB engine, select a database engine.
• (Optional) For Instance Class, select a database instance class. For information about the DB
instance classes, go to http://aws.amazon.com/rds/.
• For Allocated Storage, type the space needed for your database.You can allocate between 5
GB and 1024 GB.You cannot update the allocated storage for a database to a lower amount after
you set it. In some cases, allocating a larger amount of storage for your DB instance than the size
of your database can improve IO performance. For information about storage allocation, go to
Features.
• For Master Username, type a name using alphanumeric characters that you will use to log in to
your DB instance with all database privileges.
• For Master Password, type a password containing 8 to 16 printable ASCII characters (excluding
/, \, and @).
• For Deletion Policy, select Create snapshot to create a snapshot that you can use later to create
another Amazon RDS database. Select Delete to delete the DB instance when you terminate the
environment. If you select Delete, you lose your DB instance and all the data in it when you
terminate the Elastic Beanstalk instance associated with it. By default, Elastic Beanstalk creates
and saves a snapshot.You can use a snapshot to restore data to use in a new environment, but
cannot otherwise recover lost data.
Note
You may incur charges for storing database snapshots. For more information, see the
"Backup Storage" section of Amazon RDS Pricing.
• For Availability, select one of the following:
• To configure your database in one Availability Zone, select Single Availability Zone. A database
instance launched in one Availability Zone does not have protection from the failure of a single
location.
• To configure your database across multiple availability zones, select Multiple Availability Zones.
Running your database instance in multiple Availability Zones helps safeguard your data in the
unlikely event of a database instance component failure or service health disruption in one
Availability Zone.
3. Click Save.
Elastic Beanstalk updates the environment and creates the Amazon RDS database. After the update
is complete, you can view the databases by going to the Configuration page.
Use the connectivity information to connect to your DB from inside your application through environment
variables. For more information about using Amazon RDS with your applications, see the following topics.
• Java — Using a New Amazon RDS DB Instance with Java (p. 105)
• Node.js — Using a New Amazon RDS DB Instance with Node.js (p. 217)
API Version 2010-12-01
386
Elastic Beanstalk Developer Guide
Databases

• .NET — Using a New Amazon RDS DB Instance with .NET (p. 152)
• PHP — Using a New Amazon RDS DB Instance with PHP (p. 238)
• Python — Using a New Amazon RDS DB Instance with Python (p. 259)
• Ruby — Using a New Amazon RDS DB Instance with Ruby (p. 275)
You can use the Elastic Beanstalk Management Console to edit some settings for the Amazon RDS
database associated with your environment.
To edit the Amazon RDS database instance associated with your environment
1.
On the Configuration page, under Data Tier, click for the RDS settings.
2. Update the configuration for any of the following Amazon RDS database settings:
• For Master Password, type a password containing 8 to 16 printable ASCII characters (excluding
/, \, and @).
• For Allocated Storage, type the space needed for your database.You can allocate between 5
GB and 1024 GB.You cannot update the allocated storage for a database to a lower amount after
you set it. In some cases, allocating a larger amount of storage for your DB instance than the size
of your database can improve IO performance. For information about storage allocation, go to
Features.
• (Optional) For Instance Class, select a database instance class. For information about the DB
instance classes, go to http://aws.amazon.com/rds/.
• For Deletion Policy, select Create snapshot to create a snapshot that you can use later to create
another Amazon RDS database. Select Delete to delete the DB instance when you terminate the
environment. If you select Delete, you lose your DB instance and all the data in it when you
terminate the Elastic Beanstalk instance associated with it. By default, Elastic Beanstalk creates
and saves a snapshot.You can use a snapshot to restore data to use in a new environment, but
cannot otherwise recover lost data.
Note
You may incur charges for storing database snapshots. For more information, see the
"Backup Storage" section of Amazon RDS Pricing.
• For Availability, select one of the following:
• To configure your database in one Availability Zone, select Single Availability Zone. A database
instance launched in one Availability Zone does not have protection from the failure of a single
location.
• To configure your database across multiple availability zones, select Multiple Availability Zones.
Running your database instance in multiple Availability Zones helps safeguard your data in the
unlikely event of a database instance component failure or service health disruption in one
Availability Zone.
3. Click Save.
Elastic Beanstalk updates the environment, replacing the Amazon RDS database if you changed
the database instance class.
Configuring Notifications with Elastic Beanstalk
Elastic Beanstalk can use Amazon Simple Notification Service (Amazon SNS) to notify you of important
events affecting your application.
API Version 2010-12-01
387
Elastic Beanstalk Developer Guide
Notifications

AWS Management Console
You can enable Amazon SNS notifications by editing the Notifications settings on the environment's
Configuration page. For information about getting to the Configuration page, see Changing Environment
Configuration Settings (p. 336).
Command Line Interface (CLI)
To edit an application's environment settings
• Update an application's environment settings.
PROMPT> elastic-beanstalk-update-environment -e MySampleAppEnv -f
"Options.txt"
Options.txt
[
{"Namespace": "aws:elasticbeanstalk:sns:topics",
"OptionName": "Notification Endpoint",
"Value": "[email protected]"}
]
API
To edit an application's environment settings
• Call UpdateEnvironment with the following parameters:
• EnvironmentName = SampleAppEnv
• OptionSettings.member.1.Namespace = aws:elasticbeanstalk:sns:topics
• OptionSettings.member.1.OptionName = Notification Endpoint
API Version 2010-12-01
388
Elastic Beanstalk Developer Guide
Notifications

Example
https://elasticbeanstalk.us-west-2.amazon.com/?EnvironmentName=SampleAppEnv
&OptionSettings.member.1.Namespace=aws%3Aelasticbeanstalk%3Asns%3Atopics
&OptionSettings.member.1.OptionName=Notification%20Endpoint
&OptionSettings.member.1.Value=janedoe%40example.com
&Operation=UpdateEnvironment
&AuthParams
Tagging Your Environments
When you create a new environment, you can specify tags to categorize the environment.Tags can help
you identify environments in cost allocation reports, especially if you have many to manage.You can use
cost allocation reports to track your usage of AWS resources. The reports include both tagged and
untagged resources, but they aggregate costs according to tags.You can also use tags to manage
permissions at the resource level. When Elastic Beanstalk launches a new environment, it automatically
applies tags to your Amazon EC2, Amazon RDS, and Auto Scaling resources. For more information about
Amazon EC2 tags, including examples, see Tagging Your Amazon EC2 Resources in the Amazon EC2
User Guide for Linux Instances. For information specifically about how cost allocation reports use tags,
see Use Cost Allocation Tags for Custom Billing Reports in the AWS Billing and Cost Management User
Guide.
Note
Elastic Beanstalk does not support tags for legacy environments.
You can apply tags to an environment in the form of key-value pairs by using the console, the AWS
command line tool, or the CreateEnvironment API. For more information, see the AWS Management
Console (p. 299) section of Launching New Environments (p. 299), create-environment in the AWS CLI
Reference, or CreateEnvironment in the Elastic Beanstalk API Reference.
Elastic Beanstalk Environment Configurations
Each environment configuration has its own options and properties that you can configure as well as
logging options. For more information, see the following sections.
Topics
• Configuring Docker Containers with Elastic Beanstalk (p. 389)
• Configuring Java Containers with Elastic Beanstalk (p. 392)
• Configuring .NET Containers with Elastic Beanstalk (p. 396)
• Configuring Node.js Containers with Elastic Beanstalk (p. 399)
• Configuring PHP Containers with Elastic Beanstalk (p. 404)
• Configuring Python Containers with Elastic Beanstalk (p. 408)
• Configuring Ruby Containers with Elastic Beanstalk (p. 410)
Configuring Docker Containers with Elastic Beanstalk
AWS Management Console
To access the Docker container configurations for your Elastic Beanstalk application
1. Open the Elastic Beanstalk console at https://console.aws.amazon.com/elasticbeanstalk/.
API Version 2010-12-01
389
Elastic Beanstalk Developer Guide
Tagging Environments

2. From the Elastic Beanstalk console applications page, click the environment that you want to configure.
3. In the Overview section of the environment dashboard, click Edit.
4.
On the Configuration page, click for Software Configuration in order to edit the container
settings.
Log Options
The Log Options section has two settings:
• Instance profile–Specifies the instance profile that has permission to access the Amazon S3 bucket
associated with your application.
• Enable log file Amazon EC2 instances should be copied to the Amazon S3 bucket associated with
your application.
Amazon S3 Log Rotation
Elastic Beanstalk can copy the log files for your application's Amazon EC2 instances to the Amazon S3
bucket associated with your application on an hourly basis.To enable this feature, select Enable log file
rotation to Amazon S3.
Environment Properties
The Environment Properties section lets you specify application settings.This setting enables greater
portability by eliminating the need to recompile your source code as you move between environments.
You can configure the following application settings:
• Specify AWS credentials using the AWS_ACCESS_KEY_ID and AWS_SECRET_KEY text boxes.
Note
Except for legacy containers, use instance profiles so that your application can use temporary
security credentials to access AWS resources.To learn more, see Granting Permissions to
Users and Services Using IAM Roles (p. 562)
• Specify up to five additional key-value pairs by entering them in the PARAM boxes.
Note
These settings can contain any printable ASCII character except the grave accent (`, ASCII
96) and cannot exceed 200 characters in length.
API Version 2010-12-01
390
Elastic Beanstalk Developer Guide
Environment Configurations

Command Line Interface CLI)
To edit your Elastic Beanstalk application's environment settings container/Docker options
• Update an application's environment settings.
PROMPT> elastic-beanstalk-update-environment -e MySampleAppEnv -f
"Options.txt"
Options.txt
[
{"Namespace": "aws:elasticbeanstalk:application:environment",
"OptionName": "AWS_ACCESS_KEY_ID",
"Value": "AKIAIOSFODNN7EXAMPLE"},
{"Namespace": "aws:elasticbeanstalk:application:environment",
"OptionName": "AWS_SECRET_KEY",
"Value": "wJalrXUtnFEMI/K7MDENG/bPxRfiCYEXAMPLEKEY"},
{"Namespace": "aws:elasticbeanstalk:application:environment",
"OptionName": "myvar",
"Value": "somevalue"},
{"Namespace": "aws:elasticbeanstalk:hostmanager",
"OptionName": "LogPublicationControl",
"Value": "false"}
]
API
To access the Container/Docker Options panel for your Elastic Beanstalk application
• Call UpdateEnvironment with the following parameters:
• EnvironmentName = SampleAppEnv
• OptionSettings.member.1.Namespace =
aws:elasticbeanstalk:application:environment
• OptionSettings.member.1.OptionName = AWS_ACCESS_KEY_ID
• OptionSettings.member.1.Value = AKIAIOSFODNN7EXAMPLE
• OptionSettings.member.2.Namespace =
aws:elasticbeanstalk:application:environment
• OptionSettings.member.2.OptionName = AWS_SECRET_KEY
• OptionSettings.member.2.Value = wJalrXUtnFEMI/K7MDENG/bPxRfiCYEXAMPLEKEY
• OptionSettings.member.3.Namespace =
aws:elasticbeanstalk:application:environment
• OptionSettings.member.3.OptionName = myvar
• OptionSettings.member.3.Value = somevalue
• OptionSettings.member.4.Namespace = aws:elasticbeanstalk:hostmanager
• OptionSettings.member.4.OptionName = LogPublicationControl
• OptionSettings.member.4.Value = false
API Version 2010-12-01
391
Elastic Beanstalk Developer Guide
Environment Configurations

Example
https://elasticbeanstalk.us-west-2.amazon.com/?EnvironmentName=MySampleAppEnv
&OptionSettings.member.1.Namespace=aws%3Aelasticbeanstalk%3Aapplication%3Aen
vironment
&OptionSettings.member.1.OptionName=AWS_ACCESS_KEY_ID
&OptionSettings.member.1.Value=AKIAIOSFODNN7EXAMPLE
&OptionSettings.member.2.Namespace=aws%3Aelasticbeanstalk%3Aapplication%3Aen
vironment
&OptionSettings.member.2.OptionName=AWS_SECRET_KEY
&OptionSettings.member.2.Value=wJalrXUtnFEMI/K7MDENG/bPxRfiCYEXAMPLEKEY
&OptionSettings.member.3.Namespace=aws%3Aelasticbeanstalk%3Aapplication%3Aen
vironment
&OptionSettings.member.3.OptionName=myvar
&OptionSettings.member.3.Value=somevalue
&OptionSettings.member.4.Namespace=aws%3Aelasticbeanstalk%3Ahostmanager
&OptionSettings.member.4.OptionName=LogPublicationControl
&OptionSettings.member.4.Value=false
&Operation=UpdateEnvironment
&AuthParams
Configuring Java Containers with Elastic Beanstalk
AWS Management Console
To access the JVM container configurations for your Elastic Beanstalk application
1. Open the Elastic Beanstalk console at https://console.aws.amazon.com/elasticbeanstalk/.
2. From the Elastic Beanstalk console applications page, click the environment that you want to configure.
3. In the Overview section of the environment dashboard, click Edit.
4.
On the Configuration page, click for Software Configuration in order to edit the container
settings.
JVM Container Options
The heap size in the Java Virtual Machine affects how many objects can be created in memory before
garbage collection—a process of managing your application's memory—occurs.You can specify an initial
heap size and a maximum heap size. A larger initial heap size allows more objects to be created before
garbage collection occurs, but it also means that the garbage collector will take longer to compact the
API Version 2010-12-01
392
Elastic Beanstalk Developer Guide
Environment Configurations

heap. The maximum heap size specifies the maximum amount of memory the JVM can allocate when
expanding the heap during heavy activity.
You can set the initial and the maximum JVM heap sizes using the Initial JVM Heap Size (-Xms argument)
and Maximum JVM Heap Size (-Xmx argument) boxes.The available memory is dependent on the
Amazon EC2 instance type. For more information about the Amazon EC2 instance types available for
your Elastic Beanstalk environment, go to Instance Types in the Amazon EC2 User Guide.
The permanent generation is a section of the JVM heap that is used to store class definitions and
associated metadata.To modify the size of the permanent generation, type the new size in the Maximum
JVM PermGen Size (-XX:MaxPermSize argument) box.
Full documentation of JVM is beyond the scope of this guide; for more information on JVM garbage
collection, go to Java Garbage Collection Basics.
Amazon S3 Log Rotation
Elastic Beanstalk can copy the log files for your application's Amazon EC2 instances to the Amazon S3
bucket associated with your application on an hourly basis.To enable this feature, select Enable log file
rotation to Amazon S3.
Environment Properties
The environment properties lets you specify environment properties on the Amazon EC2 instances that
are running your application. Environment properties are specific to your application environment and
are not actual (shell) environment variables. More specifically, PARAM1, PARAM2, etc. are system
properties passed into the JVM at startup using the -D flag.You can use them to pass database connection
strings, security credentials, or other information that you don't want to hard-code into your application.
Storing this information in environment properties can help increase the portability and scalability of your
application.You do not need to recompile your source code when you move between environments.You
can acquire them with System.getProperty(name). For more information on using and accessing
custom environment properties, see Using Custom Environment Properties with Elastic Beanstalk (p.102).
You can configure the following environment properties:
• Specify AWS credentials using the AWS_ACCESS_KEY_ID and AWS_SECRET_KEY boxes.
Note
For nonlegacy containers, use instance profiles so that your application can use temporary
security credentials to access AWS resources.To learn more, see Granting Permissions to
Users and Services Using IAM Roles (p. 562).
• Specify a connection string to an external database (such as Amazon RDS) by entering it in the
JDBC_CONNECTION_STRING box. For more information on how to set your
JDBC_CONNECTION_STRING, see Using Custom Environment Properties with Elastic
Beanstalk (p. 102).
• Specify up to five additional environment properties by entering them in the PARAM boxes.
Note
Environment properties can contain any printable ASCII character except the grave accent (`,
ASCII 96) and cannot exceed 200 characters in length.
Command Line Interface (CLI)
To edit an application's environment settings for your container/JVM options
• Update an application's environment settings.
PROMPT> elastic-beanstalk-update-environment -e MySampleAppEnv -f
"Options.txt"
API Version 2010-12-01
393
Elastic Beanstalk Developer Guide
Environment Configurations

Options.txt
[
{"Namespace": "aws:elasticbeanstalk:container:tomcat:jvmoptions",
"OptionName": "Xms",
"Value": "256m"},
{"Namespace": "aws:elasticbeanstalk:container:tomcat:jvmoptions",
"OptionName": "Xmx",
"Value": "256m"},
{"Namespace": "aws:elasticbeanstalk:container:tomcat:jvmoptions",
"OptionName": "XX:MaxPermSize",
"Value": "64m"},
{"Namespace": "aws:elasticbeanstalk:container:tomcat:jvmoptions",
"OptionName": "JVM Options",
"Value": "somevalue"},
{"Namespace": "aws:elasticbeanstalk:application:environment",
"OptionName": "AWS_ACCESS_KEY_ID",
"Value": "AKIAIOSFODNN7EXAMPLE"},
{"Namespace": "aws:elasticbeanstalk:application:environment",
"OptionName": "AWS_SECRET_KEY",
"Value": "wJalrXUtnFEMI/K7MDENG/bPxRfiCYEXAMPLEKEY"},
{"Namespace": "aws:elasticbeanstalk:application:environment",
"OptionName": "JDBC_CONNECTION_STRING",
"Value": "jdbc:mysql://localhost:3306/mydatabase?user=me&password=mypass
word"},
{"Namespace": "aws:elasticbeanstalk:application:environment",
"OptionName": "myvar",
"Value": "somevalue"},
{"Namespace": "aws:elasticbeanstalk:hostmanager",
"OptionName": "LogPublicationControl",
"Value": "false"}
]
API
To edit an application's environment settings for your container/JVM options
• Call UpdateEnvironment with the following parameters:
• EnvironmentName = SampleAppEnv
• OptionSettings.member.1.Namespace =
aws:elasticbeanstalk:container:tomcat:jvmoptions
• OptionSettings.member.1.OptionName = Xms
• OptionSettings.member.1.Value = 256m
• OptionSettings.member.2.Namespace =
aws:elasticbeanstalk:container:tomcat:jvmoptions
• OptionSettings.member.2.OptionName = Xmx
• OptionSettings.member.2.Value = 256m
• OptionSettings.member.3.Namespace =
aws:elasticbeanstalk:container:tomcat:jvmoptions
• OptionSettings.member.3.OptionName = XX:MaxPermSize
• OptionSettings.member.3.Value = 64m
API Version 2010-12-01
394
Elastic Beanstalk Developer Guide
Environment Configurations

• OptionSettings.member.4.Namespace =
aws:elasticbeanstalk:container:tomcat:jvmoptions
• OptionSettings.member.4.OptionName = JVM Options
• OptionSettings.member.4.Value = somevalue
• OptionSettings.member.5.Namespace =
aws:elasticbeanstalk:application:environment
• OptionSettings.member.5.OptionName = AWS_ACCESS_KEY_ID
• OptionSettings.member.5.Value = AKIAIOSFODNN7EXAMPLE
• OptionSettings.member.6.Namespace =
aws:elasticbeanstalk:application:environment
• OptionSettings.member.6.OptionName = AWS_SECRET_KEY
• OptionSettings.member.6.Value = wJalrXUtnFEMI/K7MDENG/bPxRfiCYEXAMPLEKEY
• OptionSettings.member.7.Namespace =
aws:elasticbeanstalk:application:environment
• OptionSettings.member.7.OptionName = JDBC_CONNECTION_STRING
• OptionSettings.member.7.Value =
jdbc:mysql://localhost:3306/mydatabase?user=me&password=mypassword
• OptionSettings.member.8.Namespace =
aws:elasticbeanstalk:application:environment
• OptionSettings.member.8.OptionName = myvar
• OptionSettings.member.8.Value = somevalue
• OptionSettings.member.9.Namespace = aws:elasticbeanstalk:hostmanager
• OptionSettings.member.9.OptionName = LogPublicationControl
• OptionSettings.member.9.Value = false
API Version 2010-12-01
395
Elastic Beanstalk Developer Guide
Environment Configurations

Example
https://elasticbeanstalk.us-west-2.amazon.com/?EnvironmentName=SampleAppEnv
&OptionSettings.member.1.Namespace=aws%3Aelasticbeanstalk%3Acontainer%3Atom
cat%3Ajvmoptions
&OptionSettings.member.1.OptionName=Xms
&OptionSettings.member.1.Value=256m
&OptionSettings.member.2.Namespace=aws%3Aelasticbeanstalk%3Acontainer%3Atom
cat%3Ajvmoptions
&OptionSettings.member.2.OptionName=Xmx
&OptionSettings.member.2.Value=256m
&OptionSettings.member.3.Namespace=aws%3Aelasticbeanstalk%3Acontainer%3Atom
cat%3Ajvmoptions
&OptionSettings.member.3.OptionName=XX:MaxPermSize
&OptionSettings.member.3.Value=64m
&OptionSettings.member.4.Namespace=aws%3Aelasticbeanstalk%3Acontainer%3Atom
cat%3Ajvmoptions
&OptionSettings.member.4.OptionName=JVM&20Options
&OptionSettings.member.4.Value=somevalue
&OptionSettings.member.5.Namespace=aws%3Aelasticbeanstalk%3Aapplication%3Aen
vironment
&OptionSettings.member.5.OptionName=AWS_ACCESS_KEY_ID
&OptionSettings.member.5.Value=AKIAIOSFODNN7EXAMPLE
&OptionSettings.member.6.Namespace=aws%3Aelasticbeanstalk%3Aapplication%3Aen
vironment
&OptionSettings.member.6.OptionName=AWS_SECRET_KEY
&OptionSettings.member.6.Value=wJalrXUtnFEMI%2FK7MDENG%2FbPxRfiCYEXAMPLEKEY
&OptionSettings.member.7.Namespace=aws%3Aelasticbeanstalk%3Aapplication%3Aen
vironment
&OptionSettings.member.7.OptionName=JDBC_CONNECTION_STRING
&OptionSettings.member.7.Value=jdbc%3Amysql%3A%2F%2Flocalhost%3A3306%2Fmydata
base%3Fuser%3Dme%26password%3Dmypassword
&OptionSettings.member.8.Namespace=aws%3Aelasticbeanstalk%3Aapplication%3Aen
vironment
&OptionSettings.member.8.OptionName=myvar
&OptionSettings.member.8.Value=somevalue
&OptionSettings.member.9.Namespace=aws%3Aelasticbeanstalk%3Ahostmanager
&OptionSettings.member.9.OptionName=LogPublicationControl
&OptionSettings.member.9.Value=false
&Operation=UpdateEnvironment
&AuthParams
Configuring .NET Containers with Elastic Beanstalk
AWS Management Console
To access the .NET container configurations for your Elastic Beanstalk application
1. Open the Elastic Beanstalk console at https://console.aws.amazon.com/elasticbeanstalk/.
2. From the Elastic Beanstalk console applications page, click the environment that you want to configure.
API Version 2010-12-01
396
Elastic Beanstalk Developer Guide
Environment Configurations

3. In the Overview section of the environment dashboard, click Edit.
4.
On the Configuration page, click for Software Configuration in order to edit the container
settings.
.NET Container Options
For your application's version Framework, you can choose either 2.0 or 4.0. Select Enable 32-bit
Applications if you plan to run 32-bit applications.
Amazon S3 Log Rotation
Elastic Beanstalk can copy the log files for your application's Amazon EC2 instances to the Amazon S3
bucket associated with your application on an hourly basis.To enable this feature, select Enable log file
rotation to Amazon S3.
Environment Properties
The Environment Properties section lets you specify application settings.This setting enables greater
portability by eliminating the need to recompile your source code as you move between environments.
You can configure the following application settings:
• Specify AWS credentials using the AWS_ACCESS_KEY_ID and AWS_SECRET_KEY text boxes.
Note
Except for legacy containers, Elastic Beanstalk uses instance profiles so that your application
can use temporary security credentials to access AWS resources.To learn more, see Granting
Permissions to Users and Services Using IAM Roles (p. 562).
• Specify up to five additional key-value pairs by entering them in the PARAM boxes.
You might have a code snippet that looks similar to the following to access the keys and parameters:
NameValueCollection appConfig = ConfigurationManager.AppSettings;
string param1 = appConfig["PARAM1"];
Note
These settings can contain any printable ASCII character except the grave accent (`, ASCII
96) and cannot exceed 200 characters in length.
API Version 2010-12-01
397
Elastic Beanstalk Developer Guide
Environment Configurations

Command Line Interface CLI)
To access the Container/.NET Options panel for your Elastic Beanstalk application
• Update an application's environment settings.
PROMPT> elastic-beanstalk-update-environment -e MySampleAppEnv -f
"Options.txt"
Options.txt
[
{"Namespace": "aws:elasticbeanstalk:container:dotnet:apppool",
"OptionName": "Target Runtime",
"Value": "4.0"},
{"Namespace": "aws:elasticbeanstalk:container:dotnet:apppool",
"OptionName": "Enable 32-bit Applications",
"Value": "false"},
{"Namespace": "aws:elasticbeanstalk:application:environment",
"OptionName": "AWS_ACCESS_KEY_ID",
"Value": "AKIAIOSFODNN7EXAMPLE"},
{"Namespace": "aws:elasticbeanstalk:application:environment",
"OptionName": "AWS_SECRET_KEY",
"Value": "wJalrXUtnFEMI/K7MDENG/bPxRfiCYEXAMPLEKEY"},
{"Namespace": "aws:elasticbeanstalk:application:environment",
"OptionName": "myvar",
"Value": "somevalue"},
{"Namespace": "aws:elasticbeanstalk:hostmanager",
"OptionName": "LogPublicationControl",
"Value": "false"}
]
API
To access the Container/.NET Options panel for your Elastic Beanstalk application
• Call UpdateEnvironment with the following parameters:
• EnvironmentName = SampleAppEnv
• OptionSettings.member.1.Namespace =
aws:elasticbeanstalk:container:dotnet:apppool
• OptionSettings.member.1.OptionName = Target Runtime
• OptionSettings.member.1.Value = 4.0
• OptionSettings.member.2.Namespace =
aws:elasticbeanstalk:container:dotnet:apppool
• OptionSettings.member.2.OptionName = Enable 32-bit Applications
• OptionSettings.member.2.Value = false
• OptionSettings.member.3.Namespace =
aws:elasticbeanstalk:application:environment
• OptionSettings.member.3.OptionName = AWS_ACCESS_KEY_ID
• OptionSettings.member.3.Value = AKIAIOSFODNN7EXAMPLE
• OptionSettings.member.4.Namespace =
aws:elasticbeanstalk:application:environment
API Version 2010-12-01
398
Elastic Beanstalk Developer Guide
Environment Configurations

• OptionSettings.member.4.OptionName = AWS_SECRET_KEY
• OptionSettings.member.4.Value = wJalrXUtnFEMI/K7MDENG/bPxRfiCYEXAMPLEKEY
• OptionSettings.member.5.Namespace =
aws:elasticbeanstalk:application:environment
• OptionSettings.member.5.OptionName = myvar
• OptionSettings.member.5.Value = somevalue
• OptionSettings.member.6.Namespace = aws:elasticbeanstalk:hostmanager
• OptionSettings.member.6.OptionName = LogPublicationControl
• OptionSettings.member.6.Value = false
Example
https://elasticbeanstalk.us-west-2.amazon.com/?EnvironmentName=MySampleAppEnv
&OptionSettings.member.1.Namespace=aws%3Aelasticbeanstalk%3Acontainer%3Adot
net%3Aapppool
&OptionSettings.member.1.OptionName=Target%20Runtime
&OptionSettings.member.1.Value=4.0
&OptionSettings.member.2.Namespace=aws%3Aelasticbeanstalk%3Acontainer%3Adot
net%3Aapppool
&OptionSettings.member.2.OptionName=Enable%2032-bit%20Applications
&OptionSettings.member.2.Value=false
&OptionSettings.member.3.Namespace=aws%3Aelasticbeanstalk%3Aapplication%3Aen
vironment
&OptionSettings.member.3.OptionName=AWS_ACCESS_KEY_ID
&OptionSettings.member.3.Value=AKIAIOSFODNN7EXAMPLE
&OptionSettings.member.4.Namespace=aws%3Aelasticbeanstalk%3Aapplication%3Aen
vironment
&OptionSettings.member.4.OptionName=AWS_SECRET_KEY
&OptionSettings.member.4.Value=wJalrXUtnFEMI/K7MDENG/bPxRfiCYEXAMPLEKEY
&OptionSettings.member.5.Namespace=aws%3Aelasticbeanstalk%3Aapplication%3Aen
vironment
&OptionSettings.member.5.OptionName=myvar
&OptionSettings.member.5.Value=somevalue
&OptionSettings.member.6.Namespace=aws%3Aelasticbeanstalk%3Ahostmanager
&OptionSettings.member.6.OptionName=LogPublicationControl
&OptionSettings.member.6.Value=false
&Operation=UpdateEnvironment
&AuthParams
Configuring Node.js Containers with Elastic Beanstalk
You can fine-tune the behavior of your Amazon EC2 instances by using a configuration file to configure
your container settings. For instructions on customizing and configuring a Node.js container, see
Customizing and Configuring a Node.js Environment (p. 213). For a list of container options, see Node.js
Container Options (p. 730).
The Container/Node.js Options configuration also lets you fine-tune the behavior of your Amazon EC2
instances and enable or disable Amazon S3 log rotation.You can edit the Elastic Beanstalk environment's
Amazon EC2 instance configuration with the AWS Management Console.
API Version 2010-12-01
399
Elastic Beanstalk Developer Guide
Environment Configurations

AWS Management Console
The Node.js settings lets you fine-tune the behavior of your Amazon EC2 instances and enable or disable
Amazon S3 log rotation.You can edit the Elastic Beanstalk environment's Amazon EC2 instance
configuration using the AWS Management Console.
To access the Node.js container configurations for your Elastic Beanstalk application
1. Open the Elastic Beanstalk console at https://console.aws.amazon.com/elasticbeanstalk/.
2. From the Elastic Beanstalk console applications page, click the environment that you want to configure.
3. In the Overview section of the environment dashboard, click Edit.
4.
On the Configuration page, click for Software Configuration in order to edit the container
settings.
Container Options
On the configuration page, specify the following:
• Proxy Server–Specifies which web server to use to proxy connections to Node.js. By default, Nginx
is used. If you select none, static file mappings do not take affect, and gzip compression is disabled.
• Node Version–Specifies the version of Node.js. For information about what versions are supported,
see Supported Platforms (p. 19).
• Gzip Compression–Specifies whether gzip compression is enabled. By default, gzip compression is
enabled.
• Node Command–Lets you enter the command used to start the Node.js application. An empty string
(the default) means Elastic Beanstalk will use app.js, then server.js, and then npm start in that
order.
Log Options
The Log Options section has two settings:
• Instance profile– Specifies the instance profile that has permission to access the Amazon S3 bucket
associated with your application.
• Enable log file rotation to Amazon S3–Specifies whether log files for your application's Amazon EC2
instances should be copied to your Amazon S3 bucket associated with your application.
API Version 2010-12-01
400
Elastic Beanstalk Developer Guide
Environment Configurations

Static Files
To improve performance, you may want to configure Nginx or Apache to server static files (for example,
HTML or images) from a set of directories inside your web application.You can set the virtual path and
directory mapping on the Container tab in the Static Files section.To add multiple mappings, click Add
Path. To remove a mapping, click Remove.
Environment Properties
The Environment Properties section lets you specify environment configuration settings on the Amazon
EC2 instances that are running your application.These settings are passed in as key-value pairs to the
application.
You can configure the following environment settings:
• Specify AWS credentials using the AWS_ACCESS_KEY_ID and AWS_SECRET_KEY boxes.
Note
For nonlegacy containers, use instance profiles so that your application can use temporary
security credentials to access AWS resources.To learn more, see Granting Permissions to
Users and Services Using IAM Roles (p. 562).
• Specify up to five additional environment configuration settings by entering them in the PARAM boxes.
Note
Environment configuration settings can contain any printable ASCII character except the grave
accent (`, ASCII 96) and cannot exceed 200 characters in length.
Accessing Environment Configuration Settings
Inside the Node.js environment running in AWS Elastic Beanstalk, you can access the environment
variables using process.env.ENV_VARIABLE similar to the following example.
process.env.PARAM1
process.env.PARAM2
For a list of configuration settings, see Node.js Container Options (p. 730).
Command Line Interface (CLI)
To edit an application's environment configuration settings
• Update an application's environment configuration settings.
PROMPT> elastic-beanstalk-update-environment -e MySampleAppEnv -f
"Options.txt"
Options.txt
[
{"Namespace": "aws:elasticbeanstalk:container:nodejs:staticfiles",
"OptionName": "/public",
"Value": "/public"},
{"Namespace": "aws:elasticbeanstalk:container:nodejs",
"OptionName": "ProxyServer",
"Value": "nginx"},
{"Namespace": "aws:elasticbeanstalk:container:nodejs",
API Version 2010-12-01
401
Elastic Beanstalk Developer Guide
Environment Configurations

"OptionName": "NodeCommand",
"Value": ""},
{"Namespace": "aws:elasticbeanstalk:container:nodejs",
"OptionName": "NodeVersion",
"Value": "0.8.18"},
{"Namespace": "aws:elasticbeanstalk:container:nodejs",
"OptionName": "GzipCompression",
"Value": "true"},
{"Namespace": "aws:elasticbeanstalk:application:environment",
"OptionName": "AWS_ACCESS_KEY_ID",
"Value": "AKIAIOSFODNN7EXAMPLE"},
{"Namespace": "aws:elasticbeanstalk:application:environment",
"OptionName": "AWS_SECRET_KEY",
"Value": "wJalrXUtnFEMI/K7MDENG/bPxRfiCYEXAMPLEKEY"},
{"Namespace": "aws:elasticbeanstalk:application:environment",
"OptionName": "myvar",
"Value": "somevalue"},
{"Namespace": "aws:elasticbeanstalk:hostmanager",
"OptionName": "LogPublicationControl",
"Value": "false"}
]
API
To edit an application's environment configuration settings
• Call UpdateEnvironment with the following parameters:
• EnvironmentName = SampleAppEnv
• OptionSettings.member.1.Namespace =
aws:elasticbeanstalk:container:nodejs:staticfiles
• OptionSettings.member.1.OptionName = /public
• OptionSettings.member.1.Value = /public
• OptionSettings.member.2.Namespace = aws:elasticbeanstalk:container:nodejs
• OptionSettings.member.2.OptionName = ProxyServer
• OptionSettings.member.2.Value = nginx
• OptionSettings.member.3.Namespace = aws:elasticbeanstalk:container:nodejs
• OptionSettings.member.3.OptionName = NodeCommand
• OptionSettings.member.3.Value = ""
• OptionSettings.member.4.Namespace = aws:elasticbeanstalk:container:nodejs
• OptionSettings.member.4.OptionName = NodeVersion
• OptionSettings.member.4.Value = 0.8.18
• OptionSettings.member.5.Namespace = aws:elasticbeanstalk:container:nodejs
• OptionSettings.member.5.OptionName = GzipCompression
• OptionSettings.member.5.Value = true
• OptionSettings.member.6.Namespace =
aws:elasticbeanstalk:application:environment
• OptionSettings.member.6.OptionName = AWS_ACCESS_KEY_ID
• OptionSettings.member.6.Value = AKIAIOSFODNN7EXAMPLE
API Version 2010-12-01
402
Elastic Beanstalk Developer Guide
Environment Configurations

• OptionSettings.member.7.Namespace =
aws:elasticbeanstalk:application:environment
• OptionSettings.member.7.OptionName = AWS_SECRET_KEY
• OptionSettings.member.7.Value = wJalrXUtnFEMI/K7MDENG/bPxRfiCYEXAMPLEKEY
• OptionSettings.member.8.Namespace =
aws:elasticbeanstalk:application:environment
• OptionSettings.member.8.OptionName = myvar
• OptionSettings.member.8.Value = somevalue
• OptionSettings.member.9.Namespace = aws:elasticbeanstalk:hostmanager
• OptionSettings.member.9.OptionName = LogPublicationControl
• OptionSettings.member.9.Value = false
Example
https://elasticbeanstalk.us-west-2.amazon.com/?EnvironmentName=SampleAppEnv
&OptionSettings.member.1.Namespace=aws%3Aelasticbeanstalk%3Acontainer%3An
odejs%3Astaticfiles
&OptionSettings.member.1.OptionName=/public
&OptionSettings.member.1.Value=/public
&OptionSettings.member.2.Namespace=aws%3Aelasticbeanstalk%3Acontainer%3Anodejs
&OptionSettings.member.2.OptionName=ProxyServer
&OptionSettings.member.2.Value=nginx
&OptionSettings.member.3.Namespace=aws%3Aelasticbeanstalk%3Acontainer%3Anodejs
&OptionSettings.member.3.OptionName=NodeCommand
&OptionSettings.member.3.Value=""
&OptionSettings.member.4.Namespace=aws%3Aelasticbeanstalk%3Acontainer%3Anodejs
&OptionSettings.member.4.OptionName=NodeVersion
&OptionSettings.member.4.Value=0.8.18
&OptionSettings.member.5.Namespace=aws%3Aelasticbeanstalk%3Acontainer%3Anodejs
&OptionSettings.member.5.OptionName=GzipCompression
&OptionSettings.member.5.Value=true
&OptionSettings.member.6.Namespace=aws%3Aelasticbeanstalk%3Aapplication%3Aen
vironment
&OptionSettings.member.6.OptionName=AWS_ACCESS_KEY_ID
&OptionSettings.member.6.Value=AKIAIOSFODNN7EXAMPLE
&OptionSettings.member.7.Namespace=aws%3Aelasticbeanstalk%3Aapplication%3Aen
vironment
&OptionSettings.member.7.OptionName=AWS_SECRET_KEY
&OptionSettings.member.7.Value=wJalrXUtnFEMI%2FK7MDENG%2FbPxRfiCYEXAMPLEKEY
&OptionSettings.member.8.Namespace=aws%3Aelasticbeanstalk%3Aapplication%3Aen
vironment
&OptionSettings.member.8.OptionName=myvar
&OptionSettings.member.8.Value=somevalue
&OptionSettings.member.9.Namespace=aws%3Aelasticbeanstalk%3Ahostmanager
&OptionSettings.member.9.OptionName=LogPublicationControl
&OptionSettings.member.9.Value=false
&Operation=UpdateEnvironment
&AuthParams
API Version 2010-12-01
403
Elastic Beanstalk Developer Guide
Environment Configurations

Configuring PHP Containers with Elastic Beanstalk
You can fine-tune the behavior of your Amazon EC2 instances by using a configuration file to configure
your container settings. For instructions on customizing and configuring a PHP container, see Customizing
and Configuring a PHP Environment (p. 236). For a list of container options, see PHP Container
Options (p. 731).
The PHP container settings also lets you fine-tune the behavior of your Amazon EC2 instances and
enable or disable Amazon S3 log rotation.You can edit the Elastic Beanstalk environment's Amazon EC2
instance configuration using the AWS Management Console.
AWS Management Console
The PHP container settings panel lets you fine-tune the behavior of your Amazon EC2 instances and
enable or disable Amazon S3 log rotation.You can edit the Elastic Beanstalk environment's Amazon EC2
instance configuration with the Container tab using the AWS Management Console.
To access the PHP container configurations for your Elastic Beanstalk application
1. Open the Elastic Beanstalk console at https://console.aws.amazon.com/elasticbeanstalk/.
2. From the Elastic Beanstalk console applications page, click the environment that you want to configure.
3. In the Overview section of the environment dashboard, click Edit.
4.
On the Configuration page, click for Software Configuration in order to edit the container
settings.
Container Options
On the configuration page, specify the following:
• Document root–Lets you specify the child directory of your project that is treated as the public-facing
web root. If your root document is stored in your project directory, leave this set to /. If your root document
is inside a child directory (e.g., <project>/public), set this value to match the child directory. Values
should begin with a "/" character, and may not begin with a "." character. (This value is written to the
http-vhosts.conf file.)
• Memory limit–Specifies the amount of memory allocated to the PHP environment. (This value is written
to the php.ini file.)
• Allow URL fopen–Specifies whether the PHP's file functions are allowed to retrieve data from remote
locations, such as websites or FTP servers. (This value is written to the php.ini file.)
• Display errors–Specifies whether error messages should be part of the output. (This value is written
to the php.ini file.)
API Version 2010-12-01
404
Elastic Beanstalk Developer Guide
Environment Configurations

• Max execution time–Sets the maximum time, in seconds, a script is allowed to run before the
environment terminates it. This helps prevent poorly written scripts from tying up the server.
Log Options
The Log Options section has two settings:
• Instance profile– Specifies the instance profile that has permission to access the Amazon S3 bucket
associated with your application.
• Enable log file rotation to Amazon S3–Specifies whether log files for your application's Amazon EC2
instances should be copied to your Amazon S3 bucket associated with your application.
Environment Properties
The Environment Properties section lets you specify environment configuration settings on the Amazon
EC2 instances that are running your application.These settings are passed in as key-value pairs to the
application.
You can configure the following environment configuration settings:
• Specify AWS credentials using the AWS_ACCESS_KEY_ID and AWS_SECRET_KEY boxes.
Note
For nonlegacy containers, use instance profiles so that your application can use temporary
security credentials to access AWS resources.To learn more, see Granting Permissions to
Users and Services Using IAM Roles (p. 562).
• Specify up to five additional environment configuration settings by entering them in the PARAM boxes.
Note
Environment configuration settings can contain any printable ASCII character except the grave
accent (`, ASCII 96) and cannot exceed 200 characters in length.
Accessing Environment Configuration Settings
Inside the PHP environment running in Elastic Beanstalk, these values are written to
/etc/php.d/environment.ini and are accessible using $_SERVER.
Note
The get_cfg_var function is also supported.
You might have a code snippet that looks similar to the following to access the keys and parameters:
echo $_SERVER['PARAM1'];
echo $_SERVER['PARAM2'];
…
echo $_SERVER['PARAM5'];
Command Line Interface (CLI)
To edit an application's environment configuration settings
• Update an application's environment configuration settings.
PROMPT> elastic-beanstalk-update-environment -e MySampleAppEnv -f
"Options.txt"
API Version 2010-12-01
405
Elastic Beanstalk Developer Guide
Environment Configurations

Options.txt
[
{"Namespace": "aws:elasticbeanstalk:container:php:phpini",
"OptionName": "document_root",
"Value": "/"},
{"Namespace": "aws:elasticbeanstalk:container:php:phpini",
"OptionName": "memory_limit",
"Value": "128M"},
{"Namespace": "aws:elasticbeanstalk:container:php:phpini",
"OptionName": "zlib.output_compression",
"Value": "false"},
{"Namespace": "aws:elasticbeanstalk:container:php:phpini",
"OptionName": "allow_url_fopen",
"Value": "true"},
{"Namespace": "aws:elasticbeanstalk:container:php:phpini",
"OptionName": "display_errors",
"Value": "Off"},
{"Namespace": "aws:elasticbeanstalk:container:php:phpini",
"OptionName": "max_execution_time",
"Value": "60"},
{"Namespace": "aws:elasticbeanstalk:container:php:phpini",
"OptionName": "composer_options",
"Value": "vendor/package"},
{"Namespace": "aws:elasticbeanstalk:application:environment",
"OptionName": "AWS_ACCESS_KEY_ID",
"Value": "AKIAIOSFODNN7EXAMPLE"},
{"Namespace": "aws:elasticbeanstalk:application:environment",
"OptionName": "AWS_SECRET_KEY",
"Value": "wJalrXUtnFEMI/K7MDENG/bPxRfiCYEXAMPLEKEY"},
{"Namespace": "aws:elasticbeanstalk:application:environment",
"OptionName": "myvar",
"Value": "somevalue"},
{"Namespace": "aws:elasticbeanstalk:hostmanager",
"OptionName": "LogPublicationControl",
"Value": "false"}
]
API
To edit an application's environment configuration settings
• Call UpdateEnvironment with the following parameters:
• EnvironmentName = SampleAppEnv
• OptionSettings.member.1.Namespace = aws:elasticbeanstalk:container:php:phpini
• OptionSettings.member.1.OptionName = document_root
• OptionSettings.member.1.Value = /
• OptionSettings.member.2.Namespace = aws:elasticbeanstalk:container:php:phpini
• OptionSettings.member.2.OptionName = memory_limit
• OptionSettings.member.2.Value = 128M
• OptionSettings.member.3.Namespace = aws:elasticbeanstalk:container:php:phpini
• OptionSettings.member.3.OptionName = zlib.output_compression
API Version 2010-12-01
406
Elastic Beanstalk Developer Guide
Environment Configurations

• OptionSettings.member.3.Value = false
• OptionSettings.member.4.Namespace = aws:elasticbeanstalk:container:php:phpini
• OptionSettings.member.4.OptionName = allow_url_fopen
• OptionSettings.member.4.Value = true
• OptionSettings.member.5.Namespace = aws:elasticbeanstalk:container:php:phpini
• OptionSettings.member.5.OptionName = display_errors
• OptionSettings.member.5.Value = Off
• OptionSettings.member.6.Namespace = aws:elasticbeanstalk:container:php:phpini
• OptionSettings.member.6.OptionName = max_execution_time
• OptionSettings.member.6.Value = 60
• OptionSettings.member.7.Namespace = aws:elasticbeanstalk:container:php:phpini
• OptionSettings.member.7.OptionName = composer_options
• OptionSettings.member.7.Value = vendor/package
• OptionSettings.member.8.Namespace =
aws:elasticbeanstalk:application:environment
• OptionSettings.member.8.OptionName = AWS_ACCESS_KEY_ID
• OptionSettings.member.8.Value = AKIAIOSFODNN7EXAMPLE
• OptionSettings.member.9.Namespace =
aws:elasticbeanstalk:application:environment
• OptionSettings.member.9.OptionName = AWS_SECRET_KEY
• OptionSettings.member.9.Value = wJalrXUtnFEMI/K7MDENG/bPxRfiCYEXAMPLEKEY
• OptionSettings.member.10.Namespace =
aws:elasticbeanstalk:application:environment
• OptionSettings.member.10.OptionName = myvar
• OptionSettings.member.10.Value = somevalue
• OptionSettings.member.11.Namespace = aws:elasticbeanstalk:hostmanager
• OptionSettings.member.11.OptionName = LogPublicationControl
• OptionSettings.member.11.Value = false
API Version 2010-12-01
407
Elastic Beanstalk Developer Guide
Environment Configurations

Example
https://elasticbeanstalk.us-west-2.amazon.com/?EnvironmentName=SampleAppEnv
&OptionSettings.member.1.Namespace=aws%3Aelasticbeanstalk%3Acontain
er%3Aphp%3Aphpini
&OptionSettings.member.1.OptionName=document_root
&OptionSettings.member.1.Value=/
&OptionSettings.member.2.Namespace=aws%3Aelasticbeanstalk%3Acontain
er%3Aphp%3Aphpini
&OptionSettings.member.2.OptionName=memory_limit
&OptionSettings.member.2.Value=128M
&OptionSettings.member.3.Namespace=aws%3Aelasticbeanstalk%3Acontain
er%3Aphp%3Aphpini
&OptionSettings.member.3.OptionName=zlib.output_compression
&OptionSettings.member.3.Value=false
&OptionSettings.member.4.Namespace=aws%3Aelasticbeanstalk%3Acontain
er%3Aphp%3Aphpini
&OptionSettings.member.4.OptionName=allow_url_fopen
&OptionSettings.member.4.Value=true
&OptionSettings.member.5.Namespace=aws%3Aelasticbeanstalk%3Acontain
er%3Aphp%3Aphpini
&OptionSettings.member.5.OptionName=display_errors
&OptionSettings.member.5.Value=Off
&OptionSettings.member.6.Namespace=aws%3Aelasticbeanstalk%3Acontain
er%3Aphp%3Aphpini
&OptionSettings.member.6.OptionName=max_execution_time
&OptionSettings.member.6.Value=60
&OptionSettings.member.7.Namespace=aws%3Aelasticbeanstalk%3Acontain
er%3Aphp%3Aphpini
&OptionSettings.member.7.OptionName=composer_options
&OptionSettings.member.7.Value=vendor/package
&OptionSettings.member.8.Namespace=aws%3Aelasticbeanstalk%3Aapplication%3Aen
vironment
&OptionSettings.member.8.OptionName=AWS_ACCESS_KEY_ID
&OptionSettings.member.8.Value=AKIAIOSFODNN7EXAMPLE
&OptionSettings.member.9.Namespace=aws%3Aelasticbeanstalk%3Aapplication%3Aen
vironment
&OptionSettings.member.9.OptionName=AWS_SECRET_KEY
&OptionSettings.member.9.Value=wJalrXUtnFEMI%2FK7MDENG%2FbPxRfiCYEXAMPLEKEY
&OptionSettings.member.10.Namespace=aws%3Aelasticbeanstalk%3Aapplication%3Aen
vironment
&OptionSettings.member.10.OptionName=myvar
&OptionSettings.member.10.Value=somevalue
&OptionSettings.member.11.Namespace=aws%3Aelasticbeanstalk%3Ahostmanager
&OptionSettings.member.11.OptionName=LogPublicationControl
&OptionSettings.member.11.Value=false
&Operation=UpdateEnvironment
&AuthParams
Configuring Python Containers with Elastic Beanstalk
You can fine-tune the behavior of your Amazon EC2 instances using a configuration file to configure your
container settings. For instructions on customizing and configuring a Python container, see Customizing
and Configuring a Python Container (p. 256). For a list of container options, see Python Container
Options (p. 732).
API Version 2010-12-01
408
Elastic Beanstalk Developer Guide
Environment Configurations

If you want to enable or disable Amazon S3 log rotation, you can use an instance configuration file, or
you can use the AWS Management Console, CLI, or the API.The topic explains how to configure this
setting using the AWS Management Console, CLI, and the API.
AWS Management Console
The Python container settings lets you enable or disable Amazon S3 log rotation.
To access the Python container configurations for your Elastic Beanstalk application
1. Open the Elastic Beanstalk console at https://console.aws.amazon.com/elasticbeanstalk/.
2. From the Elastic Beanstalk console applications page, click the environment that you want to configure.
3. In the Overview section of the environment dashboard, click Edit.
4.
On the Configuration page, click for Software Configuration in order to edit the container
settings.
Log Options
The Log Options section has two settings:
• Instance profile– Specifies the instance profile that has permission to access the Amazon S3 bucket
associated with your application.
• Enable log file rotation to Amazon S3–Specifies whether log files for your application's Amazon EC2
instances should be copied to your Amazon S3 bucket associated with your application.
Command Line Interface (CLI)
To edit an application's environment configuration settings
• Update an application's environment configuration settings.
PROMPT> elastic-beanstalk-update-environment -e MySampleAppEnv -f
"Options.txt"
Options.txt
[
{"Namespace": "aws:elasticbeanstalk:hostmanager",
"OptionName": "LogPublicationControl",
API Version 2010-12-01
409
Elastic Beanstalk Developer Guide
Environment Configurations

"Value": "false"}
]
API
To edit an application's environment configuration settings
• Call UpdateEnvironment with the following parameters:
• OptionSettings.member.1.Namespace = aws:elasticbeanstalk:hostmanager
• OptionSettings.member.1.OptionName = LogPublicationControl
• OptionSettings.member.1.Value = false
Example
https://elasticbeanstalk.us-east-1.amazon.com/?EnvironmentName=SampleAppEnv
&OptionSettings.member.1.Namespace=aws%3Aelasticbeanstalk%3Ahostmanager
&OptionSettings.member.1.OptionName=LogPublicationControl
&OptionSettings.member.1.Value=false
&Operation=UpdateEnvironment
&AuthParams
Configuring Ruby Containers with Elastic Beanstalk
You can fine-tune the behavior of your Amazon EC2 instances using a configuration file to configure your
container settings. For instructions on customizing and configuring a Ruby container, see Customizing
and Configuring a Ruby Environment (p. 273). For a list of container options, see Ruby Container
Options (p. 734).
The Ruby container settings also lets you fine-tune the behavior of your Amazon EC2 instances and
enable or disable Amazon S3 log rotation.You can edit the Elastic Beanstalk environment's Amazon EC2
instance configuration using the AWS Management Console.
AWS Management Console
The Ruby settings lets you enable or disable Amazon S3 log rotation.
To access the Ruby container configurations for your Elastic Beanstalk application
1. Open the Elastic Beanstalk console at https://console.aws.amazon.com/elasticbeanstalk/.
2. From the Elastic Beanstalk console applications page, click the environment that you want to configure.
API Version 2010-12-01
410
Elastic Beanstalk Developer Guide
Environment Configurations

3. In the Overview section of the environment dashboard, click Edit.
4.
On the Configuration page, click for Software Configuration in order to edit the container
settings.
Log Options
The Log Options section has two settings:
• Instance profile– Specifies the instance profile that has permission to access the Amazon S3 bucket
associated with your application.
• Enable log file rotation to Amazon S3–Specifies whether log files for your application's Amazon EC2
instances should be copied to your Amazon S3 bucket associated with your application.
Environment Properties
The Environment Properties section lets you specify environment configuration settings on the Amazon
EC2 instances that are running your application. Environment properties are passed in as key-value pairs
to the application.
You can configure the following environment settings:
• Specify AWS credentials using the AWS_ACCESS_KEY_ID and AWS_SECRET_KEY boxes.
Note
For nonlegacy containers, you can use instance profiles so that your application can use
temporary security credentials to access AWS resources. To learn more, see Granting
Permissions to Users and Services Using IAM Roles (p. 562).
• BUNDLE_WITHOUT–A colon-separated list of groups to ignore when installing dependencies from a
Gemfile. For more information, go to http://gembundler.com/groups.html.
• Specify additional environment configuration settings by entering them in the PARAM boxes.
Note
Environment configuration settings can contain any printable ASCII character except the grave
accent (`, ASCII 96) and cannot exceed 200 characters in length.
• RACK_ENV–Specifies the environment stage (e.g., development, production, test) in which an
application can be run.
• RAILS_SKIP_ASSET_COMPILIATION–Specifies whether to run rake assets:precompile on
behalf of the users applications, or simply skip it.This is only applicable to Rails 3.x applications.
• RAILS_SKIP_MIGRATIONS–Specifies whether the container should run rake db:migrate on behalf
of users' applications; or simply skip it.This is only applicable to Rails 3.x applications. For non-Rails
migrations, you should use a file with the extension .config (e.g., myconfig.config) file to specify
API Version 2010-12-01
411
Elastic Beanstalk Developer Guide
Environment Configurations

the container command to manually run their migrations. If you set RAILS_SKIP_MIGRATIONS to
true, you should run migrations using a configuration file. For more information on using configuration
files, see Customizing and Configuring a Ruby Environment (p. 273).
Accessing Environment Variables
Inside the Ruby environment running in Elastic Beanstalk, environment variables are accessible using
ENV['VARIABLE_NAME'].
You might have a code snippet that looks similar to the following:
param1 = ENV['MYPARAM']
param2 = ENV['MYPARAM2']
Command Line Interface (CLI)
To edit an application's environment configuration settings
• Update an application's environment configuration settings.
PROMPT> elastic-beanstalk-update-environment -e MySampleAppEnv -f
"Options.txt"
Options.txt
[
{"Namespace": "aws:elasticbeanstalk:hostmanager",
"OptionName": "LogPublicationControl",
"Value": "false"}
]
API
To edit an application's environment configuration settings
• Call UpdateEnvironment with the following parameters:
• OptionSettings.member.1.Namespace = aws:elasticbeanstalk:hostmanager
• OptionSettings.member.1.OptionName = LogPublicationControl
• OptionSettings.member.1.Value = false
Example
https://elasticbeanstalk.us-west-2.amazon.com/?EnvironmentName=SampleAppEnv
&OptionSettings.member.1.Namespace=aws%3Aelasticbeanstalk%3Ahostmanager
&OptionSettings.member.1.OptionName=LogPublicationControl
&OptionSettings.member.1.Value=false
&Operation=UpdateEnvironment
&AuthParams
API Version 2010-12-01
412
Elastic Beanstalk Developer Guide
Environment Configurations

Configuring VPC with Elastic Beanstalk
Amazon Virtual Private Cloud (Amazon VPC) enables you to define a virtual network in your own isolated
section within the Amazon Web Services (AWS) cloud, known as a virtual private cloud (VPC). Using
VPC, you can deploy a new class of web applications on Elastic Beanstalk, including internal web
applications (such as your recruiting application), web applications that connect to an on-premise database
(using a VPN connection), as well as private web service back ends. Elastic Beanstalk launches your
AWS resources, such as instances, into your VPC.Your VPC closely resembles a traditional network,
with the benefits of using AWS's scalable infrastructure.You have complete control over your VPC; you
can select the IP address range, create subnets, and configure routes and network gateways.To protect
the resources in each subnet, you can use multiple layers of security, including security groups and
network access control lists. For more information about Amazon VPC, go to the Amazon VPC User
Guide.
You can use Amazon VPC with Elastic Beanstalk if you use one of the following container types:
• Docker
• Node.js
• PHP 5.3, PHP 5.4, and PHP 5.5
• Python
• Ruby 1.8.7, 1.9.3, 2.0.0, and 2.1.2
• Apache Tomcat 6, 7, and 8
• Windows Server 2008 R2 running IIS 7.5 and Windows Server 2012 running IIS 8 or IIS 8.5
Elastic Beanstalk supports legacy and nonlegacy containers for PHP 5.3, Windows Server 2008 R2
running IIS 7.5, Windows Server 2012 running IIS 8, and Apache Tomcat 6 or 7. If you are not sure if you
are using a legacy container, check the Elastic Beanstalk console. For instructions, see To check if you
are using a legacy container type (p. 426).
You can view your environment's VPC configuration by viewing the VPC settings on the environment's
Configuration page. If you do not see the VPC settings on the Configuration page, your current
environment is not inside a VPC either because you are using a legacy container or you created the
Elastic Beanstalk environment outside a VPC.To learn how to migrate to a nonlegacy container to use
Amazon VPC with Elastic Beanstalk, see Migrating Your Application from a Legacy Container Type (p.426).
To learn how to create your VPC and launch your Elastic Beanstalk environment inside your VPC, see
Using Elastic Beanstalk with Amazon VPC (p. 531).
If you want to update your VPC settings, launch a new environment. For more information, see Launching
New Environments (p. 299).
Listing and Connecting to Server Instances
You can view a list of Amazon EC2 instances running your Elastic Beanstalk application environment
through the AWS Management Console.You can connect to the instances using any SSH client. For
more information about listing and connecting to Server Instances using the AWS Toolkit for Eclipse, see
Listing and Connecting to Server Instances (p. 123).You can connect to the instances running Windows
using Remote Desktop. For more information about listing and connecting to Server Instances using the
AWS Toolkit for Visual Studio, see Listing and Connecting to Server Instances (p. 168).
Important
You must create an Amazon EC2 key pair and configure your Elastic Beanstalk–provisioned
Amazon EC2 instances to use the Amazon EC2 key pair before you can access your Elastic
Beanstalk–provisioned Amazon EC2 instances.You can set up your Amazon EC2 key pairs
using the AWS Management Console. For instructions on creating a key pair for Amazon EC2,
API Version 2010-12-01
413
Elastic Beanstalk Developer Guide
VPC

go to the Amazon EC2 Getting Started Guide. For more information on how to configure your
Amazon EC2 instances to use an Amazon EC2 key pair, see Amazon EC2 Key Pairs (p. 354).
Elastic Beanstalk does not enable remote connections to EC2 instances in a Windows container
by default except for legacy Windows containers. (Beanstalk configures EC2 instances in legacy
Windows containers to use port 3389 for RDP connections.) You can enable remote connections
to your EC2 instances running Windows by adding a rule to a security group that authorizes
inbound traffic to the instances.We strongly recommend that you remove the rule when you end
your remote connection.You can add the rule again the next time you need to log in remotely.
For more information, see Adding a Rule for Inbound RDP Traffic to a Windows Instance and
Connect to Your Windows Instance in the Amazon Elastic Compute Cloud User Guide for
Microsoft Windows.
To view and connect to Amazon EC2 instances for an environment
1. Open the Amazon EC2 console at https://console.aws.amazon.com/ec2/.
2. From the region list, select a region.
3. In the navigation (left) pane of the console, click Load Balancers.
4. Load balancers created by Elastic Beanstalk will have a awseb in the name. Find the load balancer
for your environment and click it.
5. Click the Instances tab in the bottom pane of the console window.
A list of the instances that the load balancer for your Elastic Beanstalk environment uses is displayed.
Make a note of an instance ID that you want to connect to.
6. Click the Instances link in the left side of the Amazon EC2 console, and find your instance ID in the
list.
API Version 2010-12-01
414
Elastic Beanstalk Developer Guide

7. Right-click the instance ID for the Amazon EC2 instance running in your environment's load balancer,
and then select Connect from the context menu.
8. Make a note of the instance's public DNS address on the Description tab.
9. To connect to an instance running Linux, use the SSH client of your choice to connect to your instance
and type ssh -i .ec2/mykeypair.pem ec2-user@<public-DNS-of-the-instance> . For instructions
on how to connect to an instance running Windows, see Connect to your Windows Instance in the
Amazon Elastic Compute Cloud Microsoft Windows Guide.
For more information on connecting to an Amazon EC2 instance, see the Amazon Elastic Compute Cloud
Getting Started Guide.
Working with Logs
You can access logs from the Amazon EC2 instances running your applications.There are several ways
to do this:
• View a snapshot of the last 100 lines of logs (also known as tail logs) in the Elastic Beanstalk console.
• Download all logs (also known as bundle logs) from the Elastic Beanstalk console.
Note
Legacy container types and Windows container types do not support bundle logs.
• Configure your environment to automatically publish logs to an Amazon S3 bucket.
This topic explains how to access your logs using each method.
Note
In the eu-central-1 region, accessing logs from the instances that run your applications requires
an IAM role with permission to rotate logs. If you use a default instance profile, no additional
configuration of the IAM role is required. If you use a custom IAM role to deploy and manage
your application, you must attach a policy to the role that grants Elastic Beanstalk permission to
rotate logs. For more information, see Using a Custom Instance Profile (p. 577).
Viewing Tail Log Snapshots in the Elastic
Beanstalk Console
To take a snapshot and view tail logs in the console
1. Open the Elastic Beanstalk console at https://console.aws.amazon.com/elasticbeanstalk/.
2. From the Elastic Beanstalk console applications page, click the name of the environment for which
you want to view logs.
API Version 2010-12-01
415
Elastic Beanstalk Developer Guide
Working with Logs

Note
If you don't see any applications or environments listed on the All Applications page, ensure
that you have selected the correct region and that you have created an environment for
your application.
3. In the navigation menu, click Logs.The Logs page lists logs you recently requested for your
environment.
4. To get the latest snapshot of the logs for your Elastic Beanstalk application, click Request Logs,
and then click Last 100 Lines.
Note
It takes several seconds to retrieve the log files.You might need to click the Refresh button
to see the contents of the log files.
5. To view the contents of the logs you requested, in the Log file column, click Download.
A web page displays the text output of the log file snapshot.
API Version 2010-12-01
416
Elastic Beanstalk Developer Guide
Viewing Tail Log Snapshots in the Elastic Beanstalk
Console

A copy of the logs is placed in the Amazon S3 bucket associated with your application for 15 minutes
and then they are deleted.You can request new logs later if necessary. Depending on whether you are
using a legacy or non-legacy container, you can access these logs in one of the following locations. If
you are not sure if you are using a legacy or non-legacy container, see To check if you are using a legacy
container type (p. 426).
• non-legacy — elasticbeanstalk-region-account
id/resources/environments/logs/tail/environment ID/instance ID/
You can find your instance ID on the Logs page as shown in the previous diagram.
You can find your environment ID in the Server section of the Instances configuration page.
• legacy — Use the RetrieveEnvironmentInfo API to retrieve the location for the tail logs. For the
CLI reference for this API, see elastic-beanstalk-retrieve-environment-info (p.770). For the API reference,
go to RetrieveEnvironmentInfo in the AWS Elastic Beanstalk API Reference.
Downloading Bundle Logs from the Elastic
Beanstalk Console
1. Open the Elastic Beanstalk console at https://console.aws.amazon.com/elasticbeanstalk/.
2. From the Elastic Beanstalk console applications page, click the name of the environment for which
you want to view logs.
API Version 2010-12-01
417
Elastic Beanstalk Developer Guide
Downloading Bundle Logs from the Elastic Beanstalk
Console

3. In the navigation menu, click Logs.The Logs page lists logs you recently requested for your
environment.
4. To get all logs from each of the Amazon EC2 instances for your Elastic Beanstalk application, click
Request Logs, and then click Full Logs.
Note
It takes several seconds to retrieve the log files.You might need to click the Refresh button.
5. To view the contents of the logs you requested, in the Log file column, click Download.When you
are prompted, you can either open the file or save the file to view later.
The bundle logs are compressed into a .zip file.
A copy of the logs is placed in the Amazon S3 bucket associated with your application for 15 minutes
and then they are deleted.You can request new logs later if necessary. Depending on whether you are
using a legacy or non-legacy container, you can access these logs in one of the following locations. If
API Version 2010-12-01
418
Elastic Beanstalk Developer Guide
Downloading Bundle Logs from the Elastic Beanstalk
Console

you are not sure if you are using a legacy or non-legacy container, see To check if you are using a legacy
container type (p. 426).
• non-legacy — elasticbeanstalk-region-account
id/resources/environments/logs/tail/environment ID/instance ID/
You can find your instance ID on the Logs page as shown in the previous diagram.
You can find your environment ID in the Server section of the Instances configuration page.
• legacy — Use the RetrieveEnvironmentInfo API to retrieve the location for the tail logs. For the
CLI reference for this API, see elastic-beanstalk-retrieve-environment-info (p.770). For the API reference,
go to RetrieveEnvironmentInfo in the AWS Elastic Beanstalk API Reference.
Configuring Your Environment to Publish Logs to
Amazon S3
You can configure your environment so that the logs from the Amazon EC2 instances running your
applications are copied by Elastic Beanstalk to the Amazon S3 bucket associated with your application.
To configure your environment to publish logs to Amazon S3
1. Open the Elastic Beanstalk console at https://console.aws.amazon.com/elasticbeanstalk/.
2. From the Elastic Beanstalk console applications page, click the environment that you want to configure.
API Version 2010-12-01
419
Elastic Beanstalk Developer Guide
Configuring Your Environment to Publish Logs to
Amazon S3

3. In the Overview section of the environment dashboard, click Edit.
4.
On the Configuration page, click for Software Configuration in order to edit the container
settings.
5. Select Enable log file rotation to Amazon S3.
To access your logs
1. Open the Amazon S3 console at https://console.aws.amazon.com/s3/.
2. Depending on whether you are using a legacy or non-legacy container, navigate to one of the Amazon
S3 locations. If you are not sure if you are using a legacy or non-legacy container, see To check if
you are using a legacy container type (p. 426).
• legacy — elasticbeanstalk-region-account id/environment name/logs/instance
ID/
For instructions on accessing your instance ID, see Listing and Connecting to Server
Instances (p. 413).
• non-legacy — elasticbeanstalk-region-account
id/resources/environments/logs/publish/environment ID/instance ID/
For instructions on accessing your instance ID, see Listing and Connecting to Server
Instances (p. 413).
You can find your environment ID in the Server section of the Instances configuration page.
API Version 2010-12-01
420
Elastic Beanstalk Developer Guide
Configuring Your Environment to Publish Logs to
Amazon S3

Deleting Application Versions
You can create different versions of a web application for an Elastic Beanstalk application. Each application
version consists of a unique file (WAR file or ZIP file), as well as contextual information about the version.
This topic describes how to delete an application version from an Elastic Beanstalk application.You might
want to do this if, for example, you previously uploaded multiple application versions to test differences
between one version of your web application and another, but you no longer need all versions. Or, you
might want to do this because you reached the default limit of 500 application versions per AWS account.
Note
Elastic Beanstalk archives application versions to allow quick rollback. Deleting an application
version does not delete the environment to which the application version is deployed, does not
cause any downtime, or otherwise affect running environments.
AWS Management Console
To delete an application version
1. Open the Elastic Beanstalk console at https://console.aws.amazon.com/elasticbeanstalk/.
2. From the region list, select the region that includes the application that you want to work with.
3. From the Elastic Beanstalk console applications page, click the name of the application from which
you want to delete an application version.
4. In the navigation pane, click Application Versions.
API Version 2010-12-01
421
Elastic Beanstalk Developer Guide
Deleting Application Versions

5. In the list of application versions, select the check box next to the application version that you want
to delete, and then click Delete.
6. On the Delete Application Versions page, verify that the version label displayed represents the
application version that you want to delete.
7. (Optional) To remove the application source bundle for this application version from your Amazon
S3 bucket, select the Delete versions from Amazon S3 check box.
8. When you are finished, click Delete, and then click Done.
CLI
To delete an application version
• Delete an application version.
PROMPT> elastic-beanstalk-delete-application-version -a [Application Name]
-l [Version Label]
To delete an application version and source bundle
• PROMPT> elastic-beanstalk-delete-application-version -a [Application Name]
-l [Version Label] -d true
API
To delete an application version
• Call DeleteApplicationVersion with the following parameters:
• ApplicationName = SampleApp
API Version 2010-12-01
422
Elastic Beanstalk Developer Guide
CLI

• VersionLabel = Version2
• DeleteSourceBundle = false
Example
https://elasticbeanstalk.us-west-2.amazon.com/?ApplicationName=SampleApp
&VersionLabel=Version2
&DeleteSourceBundle=false
&AuthParams
Terminating an Environment
You can terminate a running environment using the AWS Management Console to avoid incurring charges
for unused AWS resources. For more information about terminating an environment using the AWS Toolkit
for Eclipse, see Terminating an Environment (p. 123).
Note
You can always launch a new environment using the same version later. If you have data from
an environment that you would like to preserve, create a snapshot of your current database
instance before you terminate the environment.You can later use it as the basis for new DB
instance when you create a new environment. For more information, see Creating a DB Snapshot
in the Amazon Relational Database Service User Guide.
AWS Management Console
To terminate an environment
1. Open the Elastic Beanstalk console at https://console.aws.amazon.com/elasticbeanstalk/.
2. From the region list, select the region that includes the environment that want to terminate.
3. From the Elastic Beanstalk console applications page, click the name of the environment that you
want to terminate.
4. Click Actions and the select Terminate Environment.
API Version 2010-12-01
423
Elastic Beanstalk Developer Guide
Terminating an Environment

5. Confirm that you are terminating the correct environment and then click Terminate.
Note
When you terminate your environment, the CNAME associated with the terminated
environment becomes available for anyone to use.
It will take a few minutes for Elastic Beanstalk to terminate the AWS resources running in the
environment.
CLI
To terminate an environment
• PROMPT> elastic-beanstalk-terminate-environment -e [Environment Name]
API
To terminate an environment
• Call TerminateEnvironment with the following parameter:
• EnvironmentName = SampleAppEnv
API Version 2010-12-01
424
Elastic Beanstalk Developer Guide
CLI

Example
https://elasticbeanstalk.us-west-2.amazon.com/?EnvironmentName=SampleAppEnv
&Operation=TerminateEnvironment
&AuthParams
Customizing Your Elastic Beanstalk
Environments
When deploying your applications, you may want to customize and configure the software that your
application depends on.These files could be either dependencies required by the application—for example,
additional packages from the yum repository—or they could be configuration files such as a replacement
for httpd.conf to override specific settings that are defaulted by AWS Elastic Beanstalk.You may also
want to customize your environment resources that are part of your AWS Elastic Beanstalk environment
(e.g., SQS queues, ElastiCache clusters). For example, you may want to add an Amazon SQS queue
and an alarm on queue depth, or you might want to add an Amazon ElastiCache cluster.
You can use configuration files if you are deploying your Elastic Beanstalk application using one of the
following container types:
• Docker
• Node.js
• PHP 5.3, PHP 5.4, and PHP 5.5
• Python
• Ruby 1.8.7, 1.9.3, 2.0.0, and 2.1.2
• Apache Tomcat 6, 7, and 8
• Windows Server 2008 R2 running IIS 7.5 and Windows Server 2012 running IIS 8 or IIS 8.5
To learn how to customize your environment using configuration files, see Customizing and Configuring
Elastic Beanstalk Environments (p. 430).
Currently, Elastic Beanstalk does not support configuration files for the following legacy container types:
• PHP 5.3
• Tomcat 6 and 7
• Windows Server 2008 R2 running IIS 7.5 and Windows Server 2012 running IIS 8
If you are unsure if you are running a legacy container, check the Elastic Beanstalk console. For
instructions, see To check if you are using a legacy container type (p. 426).
If you want to customize your environment, you can create a custom Amazon Machine Image (AMI) that
Elastic Beanstalk uses for your applications.You do this by customizing the existing Elastic Beanstalk
AMI. For information, see Using Custom AMIs (p. 817).
API Version 2010-12-01
425
Elastic Beanstalk Developer Guide
Customizing Your Environments

Migrating Your Application from a Legacy
Container Type
If you have deployed an Elastic Beanstalk application that uses a legacy container type, you should
migrate your application to a new environment using a non-legacy container type so that you can get
access to new features. If you are unsure whether you are running your application using a legacy container
type, you can check in the Elastic Beanstalk console. For instructions, see To check if you are using a
legacy container type (p. 426).
Why are some container types marked legacy?
Some container types are marked (legacy) and do not support new Elastic Beanstalk functionality.
Non-legacy containers are new container types that enable you to get access to new functionality such
as attaching Amazon RDS DB Instances to your environment and using configuration files.
Currently, Elastic Beanstalk supports the following non-legacy container types:
• Docker
• Node.js
• PHP 5.3, PHP 5.4, and PHP 5.5
• Python
• Ruby 1.8.7, 1.9.3, 2.0.0, and 2.1.2
• Apache Tomcat 6, 7, and 8
• Windows Server 2008 R2 running IIS 7.5 and Windows Server 2012 running IIS 8 or IIS 8.5
Currently, Elastic Beanstalk does not support configuration files for the following legacy container types:
• PHP 5.3
• Tomcat 6 and 7
• Windows Server 2008 R2 running IIS 7.5 and Windows Server 2012 running IIS 8
If you are unsure if you are running a legacy container, check the Elastic Beanstalk console. For
instructions, see To check if you are using a legacy container type (p. 426).
To check if you are using a legacy container type
1. Open the Elastic Beanstalk console at https://console.aws.amazon.com/elasticbeanstalk/.
2. From the Elastic Beanstalk console applications page, click the environment that you want to verify.
API Version 2010-12-01
426
Elastic Beanstalk Developer Guide
Migrating Your Application from a Legacy Container
Type

3. In the Overview section of the environment dashboard, view the Configuration name.
Your application is using a legacy container type if you see (legacy) next to the configuration.
To migrate your application
1. Deploy your application to a new environment. For instructions, go to Launching New
Environments (p. 299).
2. If you have an Amazon RDS DB Instance, update your database security group to allow access to
your EC2 security group for your new environment. For instructions on how to find the name of your
EC2 security group using the AWS Management Console, see Amazon EC2 Security Groups (p.354).
For more information about configuring your EC2 security group, go to the "Authorizing Network
Access to an Amazon EC2 Security Group" section of Working with DB Security Groups in the
Amazon Relational Database Service User Guide.
3. Swap your environment URL. For instructions, go to Deploying Versions with Zero Downtime (p.318).
4. Terminate your old environment. For instructions, go to Terminating an Environment (p. 423).
Note
If you use AWS Identity and Access Management (IAM) then you will need to update your policies
to include AWS CloudFormation and Amazon RDS (if applicable). For more information, see
Using Elastic Beanstalk with AWS Identity and Access Management (IAM) (p. 561).
Constructing a Launch Now URL
You can construct a custom uniform resource locator (URL) so that anyone can quickly deploy and run
a predetermined web application in Elastic Beanstalk. This URL is called a Launch Now URL.You might
need a Launch Now URL, for example, to demonstrate a web application that is built to run on Elastic
Beanstalk.With Launch Now URL, you can use parameters to add the required information to the Create
Application wizard in advance.When you do, anyone can use the URL link to launch an Elastic Beanstalk
environment with your web application source in just a few clicks.This means users don't need to manually
upload or specify the location of the application source bundle or provide any additional input to the wizard.
A Launch Now URL gives Elastic Beanstalk the minimum information required to create an application:
the application name, solution stack, instance type, and environment type. Elastic Beanstalk uses default
values for other configuration details that are not explicitly specified in your custom Launch Now URL.
A Launch Now URL uses standard URL syntax. For more information, see RFC 3986 - Uniform Resource
Identifier (URI): Generic Syntax.
URL Parameters
The URL must contain the following parameters, which are case-sensitive:
• region – Specify an AWS region. For a list of regions supported by Elastic Beanstalk, see AWS Elastic
Beanstalk in the Amazon Web Services General Reference.
• applicationName – Specify the name of your application. Elastic Beanstalk displays the application
name in the AWS Management Console to distinguish it from other applications. By default, the
application name also forms the basis of the environment name and environment URL.
• solutionStackName – Specify the platform and version that will be used for the environment. For more
information, see Supported Platforms (p. 19).
API Version 2010-12-01
427
Elastic Beanstalk Developer Guide
Constructing a Launch Now URL

A Launch Now URL can optionally contain the following parameters. If you do not include the optional
parameters in your Launch Now URL, Elastic Beanstalk uses default values to create and run your
application.When you do not include the sourceBundleUrl parameter, Elastic Beanstalk uses the default
sample application for the specified solutionStackName.
• sourceBundleUrl – Specify the location of your web application source bundle in URL format. For
example, if you uploaded your source bundle to an Amazon Simple Storage Service bucket, you might
specify the value of the sourceBundleUrl parameter as
http://s3.amazonaws.com/mybucket/myobject.
Note
You can specify the value of the sourceBundleUrl parameter as an HTTP URL, but the user's
web browser will convert characters as needed by applying HTML URL encoding.
• environmentType – Specify whether the environment is load balancing and autoscaling or just a single
instance. For more information, see Environment Types (p.345).You can specify either LoadBalancing
or SingleInstance as the parameter value.
• tierName – Specify whether the environment supports a web application that processes web requests
or a web application that runs background jobs. For more information, see Environment Tiers (p. 337).
You can specify either WebServer or Worker,
• instanceType – Specify a server with the characteristics (including memory size and CPU power) that
are most appropriate to your application.To see the instance types that are available in your Elastic
Beanstalk region, see InstanceType in the topic Option Values (p.707).To see the detailed specifications
for each Amazon EC2 instance type, see Instance Types.
• withVpc – Specify whether to create the environment in an Amazon VPC.You can specify either true
or false. For more information about using Elastic Beanstalk with Amazon VPC, see Using Elastic
Beanstalk with Amazon VPC (p. 531).
• withRds – Specify whether to create an Amazon RDS database instance with this environment. For
more information, see Using Elastic Beanstalk with Amazon RDS (p. 528).You can specify either true
or false.
• rdsDBEngine – Specify the database engine that you want to use for your Amazon EC2 instances in
this environment.You can specify mysql, oracle-sel, sqlserver-ex, sqlserver-web, or
sqlserver-se.The default value is mysql.
• rdsDBAllocatedStorage – Specify the allocated database storage size in gigabytes.You can specify
the following values:
• MySQL – 5 to 1024.The default is 5.
• Oracle – 10 to 1024.The default is 10.
• Microsoft SQL Server Express Edition – 30.
• Microsoft SQL Server Web Edition – 30.
• Microsoft SQL Server Standard Edition – 200.
• rdsDBInstanceClass – Specify the database instance type. The default value is db.t1.micro. For
a list of database instance classes supported by Amazon RDS, see DB Instance Class in the Amazon
Relational Database Service User Guide.
• rdsMultiAZDatabase – Specify whether Elastic Beanstalk needs to create the database instance
across multiple Availability Zones.You can specify either true or false. For more information about
multiple Availability Zone deployments with Amazon RDS, go to Regions and Availability Zones in the
Amazon Relational Database Service User Guide.
• rdsDBDeletionPolicy – Specify whether to delete or snapshot the database instance on environment
termination.You can specify either Delete or Snapshot.
API Version 2010-12-01
428
Elastic Beanstalk Developer Guide
URL Parameters

Example
The following is an example Launch Now URL. After you construct your own, you can give it to your users.
For example, you might want to embed the URL on a web page or in training materials.When users
create an application using the Launch Now URL, the Elastic Beanstalk Create an Application wizard
requires no additional input.
https://console.aws.amazon.com/elasticbeanstalk/?region=us-west-2#/newApplication?applicationName=YourCompanySampleApp&solutionStackName=PHP&sourceBundleUrl=http://s3.amazonaws.com/mybucket/myobject&environmentType=SingleInstance&tierName=WebServer&instanceType=m1.small&withVpc=true&withRds=true&rdsDBEngine=postgres&rdsDBAllocatedStorage=6&rdsDBInstanceClass=db.m1.small&rdsMultiAZDatabase=true&rdsDBDeletionPolicy=Snapshot.
When users click a Launch Now URL, Elastic Beanstalk displays a page similar to the following.
To use the Launch Now URL
1. Click the Launch Now URL.
2. When the Elastic Beanstalk console opens, on the Application Info page, click Review and Launch
to view the settings Elastic Beanstalk will use to create the application and launch the environment
in which the application runs.
3. On the Review page, click Launch to create the application.
API Version 2010-12-01
429
Elastic Beanstalk Developer Guide
Example

Customizing and Configuring
Elastic Beanstalk Environments
When deploying your applications, you may want to customize and configure the software that your
application depends on.These files could be either dependencies required by the application—for example,
additional packages from the yum repository—or they could be configuration files such as a replacement
for httpd.conf to override specific settings that are defaulted by AWS Elastic Beanstalk.You may also
want to customize your environment resources that are part of your AWS Elastic Beanstalk environment
(e.g., SQS queues, ElastiCache clusters). For example, you may want to add an Amazon SQS queue
and an alarm on queue depth, or you might want to add an Amazon ElastiCache cluster.
You can easily customize your environment at the same time that you deploy your application version by
including a configuration file with your source bundle.When customizing the software on your instance,
it is more advantageous to use a configuration file than customizing your own AMI because you do not
need to maintain a set of AMIs.
Supported Container Types
You can use a configuration file for the following container types:
• Docker
• Node.js
• PHP 5.3, PHP 5.4, and PHP 5.5
• Python
• Ruby 1.8.7, 1.9.3, 2.0.0, and 2.1.2
• Apache Tomcat 6, 7, and 8
• Windows Server 2008 R2 running IIS 7.5 and Windows Server 2012 running IIS 8 or IIS 8.5
Currently, Elastic Beanstalk does not support configuration files for the following legacy container types:
• PHP 5.3
• Tomcat 6 and 7
• Windows Server 2008 R2 running IIS 7.5 and Windows Server 2012 running IIS 8
API Version 2010-12-01
430
Elastic Beanstalk Developer Guide
Supported Container Types

If you are unsure if you are running a legacy container, check the Elastic Beanstalk console. For
instructions, see To check if you are using a legacy container type (p. 426).
Using Configuration Files
Customizing your Elastic Beanstalk environment when you deploy your application requires two steps:
1. Create a configuration file with the extension .config (e.g., myapp.config) and place it in an
.ebextensions top-level directory of your source bundle.You can have multiple configuration files in
your .ebextensions directory. These files are executed in alphabetical order. For example,
.ebextensions/01run.config is executed before .ebextensions/02do.config.
Note
Configuration files should conform to YAML or JSON formatting standards. For example,
indentation is critical to the proper interpretation of YAML. For more information, go to http://
www.yaml.org/start.html or http://www.json.org, respectively.
Note
For Visual Studio, .ebextensions needs to be part of the project to be included in the archive.
Alternatively, in the Package/Publish Web settings, in the Items to deploy section, you can
select All Files in the Project Folder.
2. Deploy your application version.
Note
You can take a snapshot of the logs to view the output of the steps during deployment. For
instructions on how to view the logs, see Working with Logs (p.415). If any error occurs during
the deployment process, Elastic Beanstalk does not deploy the new application version. If
you deployed an older application version, you will continue to see it running.
When customizing your Elastic Beanstalk environment, you can configure the software on your EC2
instances as well as the AWS resources in your environment.This section is split into the following parts:
• Customizing the Software on EC2 Instances Running Linux (p. 431)
• Customizing the Software on EC2 Instances Running Windows (p. 447)
• Customizing Environment Resources (p. 456)
Each section describes the supported configuration settings and their syntax, as well as provides examples.
Customizing the Software on EC2 Instances
Running Linux
You may want to customize and configure the software that your application depends on. These files
could be either dependencies required by the application—for example, additional packages from the
yum repository—or they could be configuration files such as a replacement for httpd.conf to override
specific settings that are defaulted by Elastic Beanstalk.
This section describes the type of information you can include in a configuration file to customize the
software on your EC2 instances running Linux. For general information on customizing and configuring
your Elastic Beanstalk environments, see Customizing and Configuring Elastic Beanstalk
Environments (p. 430). For information on customizing software on your EC2 instances running Windows,
see Customizing the Software on EC2 Instances Running Windows (p. 447).
API Version 2010-12-01
431
Elastic Beanstalk Developer Guide
Using Configuration Files

Configuration files should conform to YAML or JSON formatting standards. For example, indentation is
critical to the proper interpretation of YAML. For more information, go to http://www.yaml.org/start.html
or http://www.json.org, respectively. For more information about using configuration files to deploy an
application to Elastic Beanstalk, see Using Configuration Files (p. 431).
• Packages (p. 432)
• Sources (p. 433)
• Files (p. 434)
• Users (p. 435)
• Groups (p. 436)
• Commands (p. 436)
• Container_commands (p. 437)
• Services (p. 439)
• Option_settings (p. 440)
The order in which these are processed are as follows:
1. Packages
2. Files
3. Commands
4. Services
5. Container Commands
Packages
You can use the packages key to download and install prepackaged applications and components.
Syntax
packages:
<name of package manager>:
<package name>: <version>
Supported Package Formats
Elastic Beanstalk currently supports the following package managers: yum, rubygems, python, and rpm.
Packages are processed in the following order: rpm, yum, and then rubygems and python.There is no
ordering between rubygems and python, and packages within each package manager are not guaranteed
to be installed in any order. Use a package manager supported by your operating system.
Note
Elastic Beanstalk supports two underlying package managers for Python, pip and easy_install.
However, in the syntax of the configuration file, you must specify the package manager name
as python. When you use a configuration file to specify a Python package manager, Elastic
Beanstalk uses Python 2.6. If your application relies on a different version of Python, you can
specify the packages to install in a requirements.txt file. For more information, see
Customizing and Configuring a Python Container (p. 256).
API Version 2010-12-01
432
Elastic Beanstalk Developer Guide
Packages

Specifying Versions
Within each package manager, each package is specified as a package name and a list of versions.The
version can be a string, a list of versions, or an empty string or list. An empty string or list indicates that
you want the latest version. For rpm manager, the version is specified as a path to a file on disk or a URL.
Relative paths are not supported.
If you specify a version of a package, Elastic Beanstalk attempts to install that version even if a newer
version of the package is already installed on the instance. If a newer version is already installed, the
deployment fails. Some package managers support multiple versions, but others may not. Please check
the documentation for your package manager for more information. If you do not specify a version and
a version of the package is already installed, Elastic Beanstalk does not install a new version—it assumes
that you want to keep and use the existing version.
Example Snippet
The following snippet specifies a version URL for rpm, requests the latest version from yum, and version
0.10.2 of chef from rubygems.
packages:
yum:
libmemcached: []
ruby-devel: []
gcc: []
rpm:
epel: http://download.fedoraproject.org/pub/epel/5/i386/epel-release-5-
4.noarch.rpm
rubygems:
chef: '0.10.2'
Sources
You can use the sources key to download an archive file and unpack it in a target directory on the EC2
instance. Sources does not automatically build the unpacked sources.
Syntax
sources:
<target directory>: <location of archive file>
Supported Formats
Supported formats are tar, tar+gzip, tar+bz2, and zip.You can reference external locations such as
Amazon Simple Storage Service (Amazon S3) (e.g., http://s3.amazonaws.com/mybucket/myobject).
Example Snippet
The following example downloads a .zip file from an Amazon S3 bucket and unpacks it into /etc/myapp:
sources:
/etc/myapp: http://s3.amazonaws.com/mybucket/myobject
API Version 2010-12-01
433
Elastic Beanstalk Developer Guide
Sources

Files
You can use the files key to create files on the EC2 instance. The content can be either inline in the
configuration file, or the content can be pulled from a URL.The files are written to disk in lexicographic
order.You can reference external locations such as Amazon S3 (e.g.,
http://s3.amazonaws.com/mybucket/myobject).The following table lists the supported keys.
Syntax
files:
"<target file location on disk>":
mode: "<six-digit octal value>"
owner: <name of owning user for file>
group: <name of owning group for file>
source: <URL>
authentication: <authentication name>:
"<target file location on disk>":
mode: "<six-digit octal value>"
owner: <name of owning user for file>
group: <name of owning group for file>
content: |
this is my content
encoding: encoding format
authentication: <authentication name>:
Options
DescriptionKey
A string.content
A URL to load the file from.This option cannot be specified with the content
key.
source
The encoding format. Only used if the content is a string. Encoding is not
applied if you are using a source.
Valid values: plain | base64
encoding
The name of the owning group for this file.group
The name of the owning user for this file.owner
A six-digit octal value representing the mode for this file (e.g, "000444").The
first three digits are used for symlinks and the last three digits are used for
setting permissions.
mode
The name of an authentication method to use.This overrides any default
authentication.
authentication
API Version 2010-12-01
434
Elastic Beanstalk Developer Guide
Files

Example Snippet
files:
"/home/ec2-user/myfile" :
mode: "000755"
owner: root
group: root
source: http://foo.bar/myfile
"/home/ec2-user/myfile2" :
mode: "000755"
owner: root
group: root
content: |
# this is my file
# with content
Example using a symlink.This creates a link /tmp/myfile2.txt that points at the existing file /tmp/myfile1.txt.
files:
"/tmp/myfile2.txt" :
mode: "120400"
content: "/tmp/myfile1.txt"
Users
You can use the users key to create Linux/UNIX users on the EC2 instance.
Syntax
users:
<name of user>:
groups:
- <name of group>
uid: "<id of the user>"
homeDir: "<user's home directory>"
Options
DescriptionKey
A user ID. The creation process fails if the user name exists with a different
user ID. If the user ID is already assigned to an existing user, the operating
system may reject the creation request.
uid
A list of group names.The user is added to each group in the list.groups
The user's home directory.homeDir
Users are created as noninteractive system users with a shell of /sbin/nologin. This is by design and
cannot be modified.
API Version 2010-12-01
435
Elastic Beanstalk Developer Guide
Users

Example Snippet
users:
myuser:
groups:
- group1
- group2
uid: "50"
homeDir: "/tmp"
Groups
You can use the groups key to create Linux/UNIX groups and to assign group IDs. To create a group,
add a new key-value pair that maps a new group name to an optional group ID. The groups key can
contain one or more group names.The following table lists the available keys.
Syntax
groups:
<name of group>:
<name of group>:
gid: "<group id>"
Options
DescriptionKey
A group ID number.
If a group ID is specified, and the group already exists by name, the group
creation will fail. If another group has the specified group ID, the operating
system may reject the group creation.
gid
Example Snippet
The following snippet specifies a group named groupOne without assigning a group ID and a group named
groupTwo that specified a group ID value of 45.
groups:
groupOne:
groupTwo:
gid: "45"
Commands
You can use the commands key to execute commands on the EC2 instance.The commands are processed
in alphabetical order by name, and they run before the application and web server are set up and the
application version file is extracted.
API Version 2010-12-01
436
Elastic Beanstalk Developer Guide
Groups

Syntax
commands:
test_command:
command: <command to run>
cwd: <working directory>
env:
<variable name>: <variable value>
test: <conditions for command>
ignoreErrors: true
Options
DescriptionKey
Required. Either an array or a string specifying the command to run. If you
use an array, you do not need to escape space characters or enclose com-
mand parameters in quotes.
command
Optional. Sets environment variables for the command.This property over-
writes, rather than appends, the existing environment.
env
Optional.The working directory. By default, Elastic Beanstalk attempts to find
the directory location of your project. If not found, then "/" is used.
cwd
Optional. A command that must return the value true (exit code 0) in order
for Elastic Beanstalk to process the command (e.g., a bash script) contained
in the command key.
test
Optional. A boolean value that determines if other commands should run if
the command contained in the command key fails (returns a nonzero value).
Set this value to true if you want to continue running commands even if the
command fails. Set it to false if you want to stop running commands if the
command fails.The default value is false.
ignoreErrors
Example Snippet
The following example snippet runs a python script.
commands:
python_install:
command: myscript.py
cwd: /home/ec2-user
env:
myvarname: myvarvalue
test: '[ ! /usr/bin/python ] && echo "python not installed"'
Container_commands
You can use the container_commands key to execute commands for your container. The commands
in container_commands are processed in alphabetical order by name. They run after the application
and web server have been set up and the application version file has been extracted, but before the
application version is deployed. They also have access to environment variables such as your AWS
security credentials. Additionally, you can use leader_only. One instance is chosen to be the leader
API Version 2010-12-01
437
Elastic Beanstalk Developer Guide
Container_commands

in an Auto Scaling group. If the leader_only value is set to true, the command runs only on the instance
that is marked as the leader.
Syntax
container_commands:
<name of container_command>:
command: "<command to run>"
leader_only: true
<name of container_command>:
command: "<command to run>"
Options
DescriptionKey
Required. Either an array or a string specifying the command to run. If you
use an array, you do not need to escape space characters or enclose com-
mand parameters in quotes.
command
Optional. Sets environment variables for the command.This property over-
writes, rather than appends, the existing environment.
env
Optional.The working directory. By default, this is the directory of the unzipped
application.
cwd
Optional. Sets an instance in the Auto Scaling group to be the leader. If the
leader_only value is set to true, the command runs only on the instance
that is marked as the leader. The leader runs first.
leader_only
Optional. A command that must return the value true in order for Elastic
Beanstalk to process the command contained in the command key. If this
option is set to true, it overrides the leader_only setting.
test
Optional. A boolean value that determines if other commands should run if
the command contained in the command key fails (returns a nonzero value).
Set this value to true if you want to continue running commands even if the
command fails. Set it to false if you want to stop running commands if the
command fails.The default value is false.
ignoreErrors
Example Snippet
The following is an example snippet.
container_commands:
collectstatic:
command: "django-admin.py collectstatic --noinput"
01syncdb:
command: "django-admin.py syncdb --noinput"
leader_only: true
02migrate:
command: "django-admin.py migrate"
leader_only: true
99customize:
command: "scripts/customize.sh"
API Version 2010-12-01
438
Elastic Beanstalk Developer Guide
Container_commands

Services
You can use the services key to define which services should be started or stopped when the instance
is launched.The services key also allows you to specify dependencies on sources, packages, and files
so that if a restart is needed due to files being installed, Elastic Beanstalk takes care of the service restart.
Syntax
services:
sysvinit:
<name of service>:
enabled: true
ensureRunning: true
files: "<file name>"
sources: "<directory>"
packages:
<name of package manager>:
<package name>: <version>
commands:
<name of command>
Options
The following table lists the supported keys.
DescriptionKey
Set to true to ensure that the service is running after Elastic Beanstalk fin-
ishes.
Set to false to ensure that the service is not running after Elastic Beanstalk
finishes.
Omit this key to make no changes to the service state.
ensureRunning
Set to true to ensure that the service is started automatically upon boot.
Set to false to ensure that the service is not started automatically upon boot.
Omit this key to make no changes to this property.
enabled
A list of files. If Elastic Beanstalk changes one directly via the files block, the
service is restarted.
files
A list of directories. If Elastic Beanstalk expands an archive into one of these
directories, the service is restarted.
sources
A map of the package manager to a list of package names. If Elastic Beanstalk
installs or updates one of these packages, the service is restarted.
packages
A list of command names. If Elastic Beanstalk runs the specified command,
the service is restarted.
commands
Example Snippet
The following is an example snippet:
API Version 2010-12-01
439
Elastic Beanstalk Developer Guide
Services

services:
sysvinit:
myservice:
enabled: true
ensureRunning: true
Option_settings
Option_settings enables you to modify the Elastic Beanstalk configuration and define variables that
can be retrieved from your application using environment variables.The following table displays the
namespaces that are supported for each container type. Some namespaces allow you to extend the
number of parameters, and specify the parameter names. For a list of configuration settings, see Option
Values (p. 707).
Syntax
option_settings:
- namespace: <namespace>
option_name: <option name>
value: <option value>
- option_name: <option name>
value: <option value>
Options
ExtendNamespaceContainer
Yes
Yes
aws:elasticbeanstalk:applica-
tion:environment
aws:elasticbeanstalk:contain-
er:tomcat:jvmoptions
Java
Yes
No
Yes
aws:elasticbeanstalk:applica-
tion:environment
aws:elasticbeanstalk:contain-
er:nodejs
aws:elasticbeanstalk:contain-
er:nodejs:staticfiles
Node.js
Yes
No
aws:elasticbeanstalk:applica-
tion:environment
aws:elasticbeanstalk:contain-
er:php:phpini
PHP
API Version 2010-12-01
440
Elastic Beanstalk Developer Guide
Option_settings

ExtendNamespaceContainer
Yes
No
Yes
aws:elasticbeanstalk:applica-
tion:environment
aws:elasticbeanstalk:container:py-
thon
aws:elasticbeanstalk:container:py-
thon:staticfiles
Python
Yesaws:elasticbeanstalk:applica-
tion:environment
Ruby
Note
If you do not specify a namespace, the default used is
aws:elasticbeanstalk:application:environment.
Example Snippet
The following is an example snippet.
option_settings:
- namespace: aws:elasticbeanstalk:container:tomcat:jvmoptions
option_name: Xmx
value: 256m
- option_name: myparam1
value: somevalue
Accessing Environment Variables
The parameters specified in the option_settings section of the configuration file are passed in as
environment variables to the EC2 instances. For coding examples, see the following sections:
• Java
• .NET
• Node.js
• PHP
• Python
• Ruby
Example: Using Custom Amazon CloudWatch
Metrics
Amazon CloudWatch is a web service that enables you to monitor, manage, and publish various metrics,
as well as configure alarm actions based on data from metrics.You can define custom metrics for your
own use, and Elastic Beanstalk will push those metrics to Amazon CloudWatch. Once Amazon CloudWatch
contains your custom metrics, you can view those in the Amazon CloudWatch console.
The Amazon CloudWatch Monitoring Scripts for Linux are available to demonstrate how to produce and
consume Amazon CloudWatch custom metrics.The scripts comprise a fully functional example that
reports memory, swap, and disk space utilization metrics for an Amazon Elastic Compute Cloud (Amazon
API Version 2010-12-01
441
Elastic Beanstalk Developer Guide
Example: Using Custom Amazon CloudWatch Metrics

EC2) Linux instance. For more information about the Amazon CloudWatch Monitoring Scripts, go to
Amazon CloudWatch Monitoring Scripts for Linux in the Amazon CloudWatch Developer Guide.
This section walks you through how to deploy a sample application to Elastic Beanstalk and then add
custom Amazon CloudWatch metrics using a configuration file.
Step 1: Initialize Your Git Repository
Eb is a command line interface that you can use with Git to deploy applications quickly and more easily.
Eb is available as part of the Elastic Beanstalk command line tools package. Follow the steps below to
install eb and initialize your Git repository.
To install eb, its prerequisite software, and initialize your Git repository
1. Install the following software onto your local computer:
a. Linux/Unix/Mac
• Download and unzip the Elastic Beanstalk command line tools package at the AWS Sample
Code & Libraries website.
• Git 1.6.6 or later.To download Git, go to http://git-scm.com/.
• Python 2.7 or 3.0.
b. Windows
• Download and unzip the Elastic Beanstalk command line tools package at the AWS Sample
Code & Libraries website.
• Git 1.6.6 or later.To download Git, go to http://git-scm.com/.
• PowerShell 2.0.
Note
Windows 7 and Windows Server 2008 R2 come with PowerShell 2.0. If you are
running an earlier version of Windows, you can download PowerShell 2.0.Visit http://
technet.microsoft.com/en-us/scriptcenter/dd742419.aspx for more details.
2. Initialize your Git repository.
git init .
Step 2: Configure Elastic Beanstalk
You use eb, a command line tool, to configure Elastic Beanstalk. If you haven't already installed eb on
your local computer, do that now at the AWS Sample Code & Libraries website. If you are running eb on
a Linux operating system, you will need to install Python 2.7 or 3.0.
Before you use eb, set your PATH to the location of eb. The following table shows an example for
Linux/UNIX and Windows.
API Version 2010-12-01
442
Elastic Beanstalk Developer Guide
Example: Using Custom Amazon CloudWatch Metrics

In WindowsIn Linux and UNIX
C:\> set PATH=%PATH%;<path to unzipped
eb CLI package>\eb\windows\
$ export PATH=$PATH:<path to unzipped
eb CLI package>/eb/linux/python2.7/
If you are using Python 3.0, the path will include
python3 rather than python2.7.
Use the init command, and Elastic Beanstalk will prompt you to enter this information. If a default value
is available, and you want to use it, press Enter.
To configure Elastic Beanstalk
1. From the directory where you created your local repository, type the following command:
eb init
2. When you are prompted for the access key ID, type your access key ID.To get your access key ID,
see How Do I Get Security Credentials? in the AWS General Reference.
Enter your AWS Access Key ID (current value is "AKIAIOSFODNN7EXAMPLE"):
3. When you are prompted for the secret access key, type your secret access key.To get your secret
access key, see How Do I Get Security Credentials? in the AWS General Reference.
Enter your AWS Secret Access Key (current value is "wJalrXUtnFEMI/K7MDENG/bPxR
fiCYEXAMPLEKEY"):
4. When you are prompted for the Elastic Beanstalk region, type the number of the region. For information
about this product's regions, go to Regions and Endpoints in the Amazon Web Services General
Reference. For this example, we'll use US West (Oregon).
5. When you are prompted for the Elastic Beanstalk application name, type the name of the application.
Elastic Beanstalk generates an application name based on the current directory name if an application
name has not been previously configured. In this example, we use sampleapp.
Enter an Elastic Beanstalk application name (auto-generated value is "win
dows"): sampleapp
Note
If you have a space in your application name, make sure you do not use quotation marks.
6. When you are prompted for the Elastic Beanstalk environment name, type the name of the
environment. Elastic Beanstalk automatically creates an environment name based on your application
name. If you want to accept the default, press Enter.
Enter an Elastic Beanstalk environment name (current value is "sampleapp-
env"):
Note
If you have a space in your application name, make sure you do not have a space in your
environment name.
API Version 2010-12-01
443
Elastic Beanstalk Developer Guide
Example: Using Custom Amazon CloudWatch Metrics

7. When you are prompted for the solution stack, type the number of the solution stack you want. For
this example, we'll use 32bit Amazon Linux running Tomcat 7.
8. When you are prompted to create an Amazon RDS database, type y or n. For more information
about using Amazon RDS, see Using Elastic Beanstalk with Amazon RDS (p.528). For this example,
we'll type n.
Create RDS instance? [y/n]: n
9. When you are prompted to enter your instance profile name, you can choose to create a default
instance profile or use an existing instance profile. Using an instance profile enables IAM users and
AWS services to gain access to temporary security credentials to make AWS API calls. Using instance
profiles prevents you from having to store long-term security credentials on the EC2 instance. For
more information about instance profiles, see Granting Permissions to Users and Services Using
IAM Roles (p. 562). For this example, we'll use Create a default instance profile.
You should see a confirmation that your AWS Credential file was successfully updated.
After configuring Elastic Beanstalk, you are ready to deploy a sample application.
If you want to update your Elastic Beanstalk configuration, you can use the init command again.When
prompted, you can update your configuration options. If you want to keep any previous settings, press
the Enter key.
Step 3: Create an Application
Next, you need to create and deploy a sample application. For this step, you use a sample application
that is already prepared. Elastic Beanstalk uses the configuration information you specified in the previous
step to do the following:
• Create an application using the application name you specified.
• Launch an environment using the environment name you specified that provisions the AWS resources
to host the application.
• Deploy the application into the newly created environment.
Use the start command to create and deploy a sample application.
To create the application
• From the directory where you created your local repository, type the following command:
eb start
It may take several minutes to complete this process. Elastic Beanstalk provides status updates during
the process. If at any time you want to stop polling for status updates, press Ctrl+C.When the environment
status is Green, Elastic Beanstalk outputs a URL for the application.
Step 4:View the Application
In the previous step, you created an application and deployed it to Elastic Beanstalk. After the environment
is ready and its status is Green, Elastic Beanstalk provides a URL to view the application. In this step,
you can check the status of the environment to make sure it is set to Green and then copy and paste the
URL to view the application.
API Version 2010-12-01
444
Elastic Beanstalk Developer Guide
Example: Using Custom Amazon CloudWatch Metrics

Use the status command to check the environment status, and then use the URL to view the application.
To view the application
1. From the directory where you created your local repository, type the following command:
eb status --verbose
Elastic Beanstalk displays the environment status. If the environment is set to Green, Elastic Beanstalk
displays the URL for the application. If you attached an Amazon RDS DB instance to your environment,
your Amazon RDS DB information is displayed.
2. Copy and paste the URL into your web browser to view your application.
Step 5: Grant Permissions to Publish CloudWatch Metrics
In order to publish custom Amazon CloudWatch metrics, you need to grant permissions on the IAM role.
In this step, you'll attach an action policy to the default Elastic Beanstalk IAM role that grants permission
to publish the custom metrics.
To grant permissions to publish CloudWatch metrics
1. In the IAM console, from the Roles pane, click aws-elasticbeanstalk-ec2-role. If you launched your
environment using an IAM role other than the default role, then you can attach this policy to that role.
For the purposes of this example, we use the default role.
2. Inside the Permissions tab, click Attach Policy.
3. Click Custom Policy and then type the following action policy to set the following action for Amazon
CloudWatch and Amazon EC2.
{
"Version": "2012-10-17",
"Statement": [
{
"Action": [
"cloudwatch:PutMetricData",
"ec2:DescribeTags"
],
"Effect": "Allow",
"Resource": [
"*"
]
}
]
}
4. Click Apply Policy.
For more information on managing policies, go to Managing IAM Policies in Using AWS Identity and
Access Management.
Step 6: Update the Application
After you have deployed a sample application, you can update your Elastic Beanstalk environment to
push your custom metrics to Amazon CloudWatch. In this step, we create a configuration file, and then
use eb to push the new file to Elastic Beanstalk.
API Version 2010-12-01
445
Elastic Beanstalk Developer Guide
Example: Using Custom Amazon CloudWatch Metrics

To update the Elastic Beanstalk environment with Amazon CloudWatch metrics
1. Create an .ebextensions directory.
mkdir .ebextensions
2. Create a file with the .config extension (e.g., myapp.config) and place it in the .ebextensions
directory. For more information about the configuration file, see Using Configuration Files (p. 431).
The following command reports memory utilization, memory used, and memory available every 5
minutes to Amazon CloudWatch.
sources:
/opt/cloudwatch: http://ec2-downloads.s3.amazonaws.com/cloudwatch-
samples/CloudWatchMonitoringScripts-v1.1.0.zip
container_commands:
01-setupcron:
command: |
echo '*/5 * * * * root perl /opt/cloudwatch/aws-scripts-mon/mon-put-
instance-data.pl `{"Fn::GetOptionSetting" : { "OptionName" : "CloudWatchMet
rics", "DefaultValue" : "--mem-util --disk-space-util --disk-path=/" }}` >>
/var/log/cwpump.log 2>&1' > /etc/cron.d/cwpump
02-changeperm:
command: chmod 644 /etc/cron.d/cwpump
03-changeperm:
command: chmod u+x /opt/cloudwatch/aws-scripts-mon/mon-put-instance-
data.pl
option_settings:
"aws:autoscaling:launchconfiguration" :
IamInstanceProfile : "aws-elasticbeanstalk-ec2-role"
"aws:elasticbeanstalk:customoption" :
CloudWatchMetrics : "--mem-util --mem-used --mem-avail --disk-space-util
--disk-space-used --disk-space-avail --disk-path=/ --auto-scaling"
Note
After you verify the configuration file works, you can conserve disk usage by changing the
command redirect from a log file (>> /var/log/cwpump.log 2>&1') to /dev/null (> /dev/null).
3. Add your file to your local Git repository, and then commit your change.
git add .
git commit -m "eb configuration"
Note
For information about Git commands, go to Git - Fast Version Control System.
4. Deploy to AWS Elastic Beanstalk.
git aws.push
5. Use the eb status --verbose command to check your environment status.When your environment
is green and ready, check the Amazon CloudWatch console to view your metrics. Custom metrics
will have the prefix System/Linux in the Viewing list.You should something similar see the following.
API Version 2010-12-01
446
Elastic Beanstalk Developer Guide
Example: Using Custom Amazon CloudWatch Metrics

Clean Up
If you no longer want to run your application, you can clean up by terminating your environment and
deleting your application.
Use the stop command to terminate your environment and the delete command to delete your
application.
To terminate your environment and delete the application
1. From the directory where you created your local repository, type the following command:
eb stop
This process may take a few minutes. Elastic Beanstalk displays a message once the environment
has been successfully terminated.
Note
If you attached an Amazon RDS DB instance to your environment, your Amazon RDS DB
will be deleted, and you will lose your data.To save your data, create a snapshot before
you delete the application. For instructions on how to create a snapshot, go to Creating a
DB Snapshot in the Amazon Relational Database Service User Guide.
2. From the directory where you installed the command line interface, type the following command:
eb delete
Elastic Beanstalk displays a message once it has successfully deleted the application.
Customizing the Software on EC2 Instances
Running Windows
You may want to customize and configure the software that your application depends on. These files
could be either dependencies required by the application—for example, additional packages or services
that need to be run. For general information on customizing and configuring your Elastic Beanstalk
environments, see Customizing and Configuring Elastic Beanstalk Environments (p. 430).
This section describes the type of information you can include in a configuration file to customize the
software on your EC2 instances running Windows:
• Packages (p. 448)
• Sources (p. 449)
API Version 2010-12-01
447
Elastic Beanstalk Developer Guide
Customizing the Software on EC2 Instances Running
Windows

• Files (p. 449)
• Commands (p. 450)
• Container_commands (p. 451)
• Services (p. 452)
• Option_settings (p. 454)
The order in which these are processed are as follows:
1. Packages
2. Files
3. Commands
4. Services
5. Container Commands
Note
Configuration files should conform to YAML or JSON formatting standards. For example,
indentation is critical to the proper interpretation of YAML. For more information, go to http://
www.yaml.org/start.html or http://www.json.org, respectively. For more information about using
configuration files to deploy an application to Elastic Beanstalk, see Using Configuration
Files (p. 431).
When creating configuration files, we recommend you use an editor other than Visual Studio
since configuration files require spaces instead of tabs.
Packages
You can use the packages key to download and install prepackaged applications and components.
Syntax
packages:
<name of package manager>:
<package name>: <version>
Supported Package Formats
Elastic Beanstalk currently supports MSI packages.
Specifying Versions
Within the package manager, the package is specified as a package name and a URL to the software.
Elastic Beanstalk attempts to install the specified version even if a newer version of the package is already
installed on the instance. Some package managers support this, but others may not. Please check the
documentation for your package manager for more information. If you specify a version that is already
installed, the deployment fails.
Example Snippet
The following snippet specifies a URL to download mysql.
API Version 2010-12-01
448
Elastic Beanstalk Developer Guide
Packages

packages:
msi:
mysql: http://dev.mysql.com/get/Downloads/Connector-Net/mysql-connector-
net-6.6.5.msi/from/http://cdn.mysql.com/
Sources
You can use the sources key to download an archive file and unpack it in a target directory on the EC2
instance. Sources does not automatically build the unpacked sources.
Syntax
sources:
<target directory>: <location of archive file>
Supported Formats
Elastic Beanstalk currently supports .zip format.You can reference external locations such as Amazon
Simple Storage Service (Amazon S3) (e.g., http://s3.amazonaws.com/mybucket/myobject).
Example Snippet
The following example downloads a .zip file from an Amazon S3 bucket and unpacks it into
c:/myproject/myapp:
sources:
"c:/myproject/myapp": http://s3.amazonaws.com/mybucket/myobject.zip
Files
You can use the files key to create files on the EC2 instance. The content can be either inline in the
configuration file, or the content can be pulled from a URL.The files are written to disk in lexicographic
order.You can reference external locations such as Amazon S3 (e.g.,
http://s3.amazonaws.com/mybucket/myobject).The following table lists the supported keys.
Syntax
files:
"<target file location on disk>":
source: <URL>
authentication: <authentication name>:
"<target file location on disk>":
content: |
this is my content
encoding: encoding format
authentication: <authentication name>:
API Version 2010-12-01
449
Elastic Beanstalk Developer Guide
Sources

Options
DescriptionKey
A string.content
A URL to load the file from.This option cannot be specified with the content
key.
source
The encoding format. Only used if the content is a string. Encoding is not
applied if you are using a source.
Valid values: plain | base64
encoding
The name of an authentication method to use.This overrides any default
authentication.
authentication
Example Snippet
files:
"c:\\targetdirectory\\targetfile.txt":
source: http://foo.bar/myfile
"c:/targetdirectory/targetfile.txt":
content: |
# this is my file
# with content
Note
If you use a "\" in your file path, make sure you use "\\" as shown in the example.
Commands
You can use the commands key to execute commands on the EC2 instance.The commands are processed
in alphabetical order by name, and they run before the application and web server are set up and the
application version file is extracted.
Syntax
commands:
test_command:
command: <command to run>
cwd: <working directory>
env:
<variable name>: <variable value>
ignoreErrors: true
waitAfterCompletion: <number of seconds>
API Version 2010-12-01
450
Elastic Beanstalk Developer Guide
Commands

Options
DescriptionKey
Required. Either an array or a string specifying the command to run. If you
use an array, you do not need to escape space characters or enclose com-
mand parameters in quotes.
command
Optional.The working directory. By default, Elastic Beanstalk attempts to find
the directory location of your project. If not found, it uses "c:\Windows\Sys-
tem32" as the default.
cwd
Optional. Sets environment variables for the command.This property over-
writes, rather than appends, the existing environment.
env
Optional. A boolean value that determines if other commands should run if
the command contained in the command key fails (returns a nonzero value).
Set this value to true if you want to continue running commands even if the
command fails. Set it to false if you want to stop running commands if the
command fails.The default value is false.
ignoreErrors
Optional. A command that must return the value true (exit code 0) in order
for Elastic Beanstalk to process the command contained in the command key.
test
Optional. Seconds to wait after the command completes before the system
reboots.The system does not have to reboot, but Elastic Beanstalk will recover
if it does.The default value is 60 seconds.You can also specify forever,
but the system must reboot before you can run another command.
waitAfterComple-
tion
Example Snippet
The following example snippet runs a command to copy the set values that are currently defined to the
specified file.The system will reboot immediately after the command completes.
commands:
test:
command: set > c:\\myapp\\set.txt
waitAfterCompletion: 0
Container_commands
You can use the container_commands key to execute commands for your container. The commands
in container_commands are processed in alphabetical order by name. They run after the application
version has been deployed.They also have access to environment variables such as your AWS security
credentials. Additionally, you can use leader_only. One instance is chosen to be the leader in an Auto
Scaling group. If the leader_only value is set to true, the command runs only on the instance that is
marked as the leader.
Syntax
container_commands:
<name of container_command>:
command: <command to run>
leader_only: true
API Version 2010-12-01
451
Elastic Beanstalk Developer Guide
Container_commands

<name of container_command>:
command: <command to run>
Options
DescriptionKey
Required. Either an array or a string specifying the command to run. If you
use an array, you do not need to escape space characters or enclose com-
mand parameters in quotes.
command
Optional. Sets environment variables for the command.This property over-
writes, rather than appends, the existing environment.
env
Optional.The working directory. By default, Elastic Beanstalk attempts to find
the directory location of your project. If not found, it uses "c:\" as the default.
cwd
Optional. Sets an instance in the Auto Scaling group to be the leader. If the
leader_only value is set to true, the command runs only on the instance
that is marked as the leader. The leader runs first.
leader_only
Optional. A command that must return the value true in order for Elastic
Beanstalk to process the command contained in the command key. If this
option is set to true, it overrides the leader_only setting.
test
Optional. A boolean value that determines if other commands should run if
the command contained in the command key fails (returns a nonzero value).
Set this value to true if you want to continue running commands even if the
command fails. Set it to false if you want to stop running commands if the
command fails.The default value is false.
ignoreErrors
Example Snippet
The following is an example that runs a command to copy the set values that are currently defined to the
specified file. It will only run the command on one instance, and it will reboot immediately after the command
completes.
container_commands:
foo:
command: set > c:\\myapp\\set.txt
leader_only: true
waitAfterCompletion: 0
Services
You can use the services key to define which services should be started or stopped when the instance
is launched.The services key also allows you to specify dependencies on sources, packages, and files
so that if a restart is needed due to files being installed, Elastic Beanstalk takes care of the service restart.
Syntax
services:
windows:
API Version 2010-12-01
452
Elastic Beanstalk Developer Guide
Services

<name of service>:
enabled: true
ensureRunning: true
files: "<file name>"
sources: "<directory>"
packages:
<name of package manager>:
<package name>: <version>
commands:
<name of command>:
Options
The following table lists the supported keys.
DescriptionKey
Set to true to ensure that the service is running after Elastic Beanstalk fin-
ishes.
Set to false to ensure that the service is not running after Elastic Beanstalk
finishes.
Omit this key to make no changes to the service state.
ensureRunning
Set to true to ensure that the service is started automatically upon boot.
Set to false to ensure that the service is not started automatically upon boot.
Omit this key to make no changes to this property.
enabled
A list of files. If Elastic Beanstalk changes one directly via the files block, the
service is restarted.
files
A list of directories. If Elastic Beanstalk expands an archive into one of these
directories, the service is restarted.
sources
A map of the package manager to a list of package names. If Elastic Beanstalk
installs or updates one of these packages, the service is restarted.
packages
A list of command names. If Elastic Beanstalk runs the specified command,
the service is restarted.
commands
Example Snippet
The following is an example snippet:
services:
windows:
myservice:
enabled: true
ensureRunning: true
API Version 2010-12-01
453
Elastic Beanstalk Developer Guide
Services

Option_settings
Option_settings enables you to modify the Elastic Beanstalk configuration and define variables that
can be retrieved from your application.The following table displays the namespaces that are supported.
Some namespaces allow you to extend the number of parameters, and specify the parameter names.
For a list of configuration settings, see Option Values (p. 707).
Syntax
option_settings:
- namespace: <namespace>
option_name: <option name>
value: <option value>
- option_name: <option name>
value: <option value>
Options
ExtendNamespaceContainer
Yes
No
aws:elasticbeanstalk:applica-
tion:environment
aws:elasticbeanstalk:contain-
er:net:apppool
.NET
Note
If you do not specify a namespace, the default used is
aws:elasticbeanstalk:application:environment.
Example Snippet
The following is an example snippet.
option_settings:
- option_name: MYPARAM
value: myvalue
Accessing Environment Variables
The parameters specified in the option_settings section of the configuration file are passed in and
used as application settings.
You might have a code snippet that looks similar to the following to access the keys and parameters:
NameValueCollection appConfig = ConfigurationManager.AppSettings;
string param1 = appConfig["PARAM1"];
API Version 2010-12-01
454
Elastic Beanstalk Developer Guide
Option_settings

Example: Using Custom Amazon CloudWatch
Metrics
Amazon CloudWatch is a web service that enables you to monitor, manage, and publish various metrics,
as well as configure alarm actions based on data from metrics.You can define custom metrics for your
own use, and Elastic Beanstalk will push those metrics to Amazon CloudWatch. Once Amazon CloudWatch
contains your custom metrics, you can view those in the Amazon CloudWatch console.
The Amazon CloudWatch Monitoring Scripts for Windows are available to demonstrate how to produce
and consume Amazon CloudWatch custom metrics.The scripts comprise a fully functional example that
reports memory, swap, and disk space utilization metrics for an Amazon Elastic Compute Cloud (Amazon
EC2) Windows instance. For more information about the Amazon CloudWatch Monitoring Scripts, go to
Amazon CloudWatch Monitoring Scripts for Windows in the Amazon CloudWatch Developer Guide.
This section walks you through how to deploy a sample application to Elastic Beanstalk using the AWS
Toolkit for Visual Studio, and then add custom Amazon CloudWatch metrics using a configuration file.
Step 1: Deploy a Sample Application
First, let's get a sample application running in an Elastic Beanstalk environment using the AWS Toolkit
for Visual Studio. For instructions, see Develop, Test, and Deploy (p. 134).
Once your environment is ready and green, you are ready to create a configuration file and update your
application.
Step 2: Update the Application
After you have deployed a sample application, you can update your Elastic Beanstalk environment to
push your custom metrics to Amazon CloudWatch. In this step, we create a configuration file, and then
add it to our project.
To update the Elastic Beanstalk environment with Amazon CloudWatch metrics
1. Create an .ebextensions directory in your project directory.
2. Create a file with the .config extension (e.g., cw.config) and place it in the .ebextensions
directory. For more information about configuration files, see Customizing the Software on EC2
Instances Running Windows (p.447).The following snippet installs the Amazon CloudWatch monitoring
scripts on to the EC2 instance, creates a file for the AWS security credentials and a batch file.The
batch file contains the command that runs the monitoring script to report memory utilization and
memory available to Amazon CloudWatch.The container command creates a scheduled task to run
the batch file every 5 minutes.
sources:
"c:/scripts": "https://s3.amazonaws.com/ec2-downloads-windows/cloudwatch-
samples/AmazonCloudWatchMonitoringWindows.zip"
files:
"c:/scripts/monitoring_creds.conf":
content: |
AWSAccessKeyId=AKIAIOSFODNN7EXAMPLE
AWSSecretKey=wJalrXUtnFEMI/K7MDENG/bPxRfiCYEXAMPLEKEY
"c:/scripts/metrics_job.bat":
content: |
chdir "c:/scripts"
powershell.exe -ExecutionPolicy Unrestricted .\AmazonCloudWatchMonit
oringWindows\mon-put-metrics-mem.ps1 -aws_credential_file monitor
API Version 2010-12-01
455
Elastic Beanstalk Developer Guide
Example: Using Custom Amazon CloudWatch Metrics

ing_creds.conf -mem_util -mem_avail > metrics.log 2>&1
container_commands:
01-schtask:
command: schtasks /create /sc minute /mo 5 /f /ru System /tn "Put Metrics"
/tr "\"C:\scripts\metrics_job.bat\""
3. Redeploy your application to Elastic Beanstalk. Using the AWS Toolkit for Visual Studio, you can
right-click on your project, and select Republih to Environment 'your environment name'.
4. When your environment is green and ready, check the Amazon CloudWatch console to view your
metrics. Custom metrics will have the prefix System/Windows in the Viewing list.You should see
something similar to the following.
Customizing Environment Resources
You may also want to customize your environment resources that are part of your Elastic Beanstalk
environment. For example, you may want to add an Amazon SQS queue and an alarm on queue depth,
or you might want to add an Amazon ElastiCache cluster.You can easily customize your environment
at the same time that you deploy your application version by including a configuration file with your source
bundle.
This section describes the type of information you can include in a configuration file to customize your
AWS resources. For general information on customizing and configuring your Elastic Beanstalk
environments, see Customizing and Configuring Elastic Beanstalk Environments (p. 430).
Note
Elastic Beanstalk requires you to use IAM roles to launch an environment and to manage
environments and applications. An instance profile is associated with an IAM role that can be
API Version 2010-12-01
456
Elastic Beanstalk Developer Guide
Customizing Environment Resources

configured to provide applications and services access to AWS resources using temporary
security credentials. If you are unsure whether you have deployed your application using an
instance profile, click Instances on the Configuration page in the Elastic Beanstalk console.
For instructions, see Configuring Amazon EC2 Server Instances with Elastic Beanstalk (p. 352).
To learn more about instance profiles, see Using Elastic Beanstalk with AWS Identity and Access
Management (IAM) (p. 561) and Using IAM Roles with Elastic Beanstalk (p. 568).
Resources
You can use the Resources key to create and customize AWS resources in your environment. For a
complete reference, see Customizing AWS Resources (p. 802).
Syntax
When defining the values for the properties for your resource, there are three different methods you can
use to define the values for the properties for a resource:
• Pass the value
• Pass a list of values
• Pass the option name and the value
There are two different functions you can use to retrieve the values for the properties:
• Use Fn::GetAtt to return the value of an attribute from a resource. For more information, see
Fn::GetAtt (p. 812).
• Use Ref to return the value of a specified parameter or resource. For more information, see Ref (p.814).
Resources:
<name of resource>:
Type: <resource type identifier>
Properties:
# Example syntax of a property that takes in the actual value
<property name>: <literal string>
# Example syntax of a property that takes a list of strings
<property name>: ["<literal string>", "<literal string>"]
# Example syntax of a property that takes the option name and the value
<property name>:
- Name: <option name>
Value: <literal string>
# Example syntax showing how to use Fn::GetAtt to return the value of an
attribute from a resource in the configuration file
<property name>:
- Name: <option name>
Value : { "Fn::GetAtt" : [ "<logicalNameOfResource>", "<attribute
Name>"] }
# Example syntax showing how to use Ref to return the value of a specified
parameter or resource. You can use Ref for single property values and lists.
<property name>:
Ref: <parameter reference>
API Version 2010-12-01
457
Elastic Beanstalk Developer Guide
Resources

Options
This table shows the available keys and descriptions for the Resources key.
DescriptionKey
The name for what you want to create your resource. Each resource must
have a logical name unique within the configuration file.This is the name you
use elsewhere in the configuration file to reference the resource.
<name of resource>
This table shows the available keys and descriptions for each resource name you provide.
DescriptionKey
This is the resource type identifier. For a list of resource type identifiers, see
AWS Resource Types Reference (p. 802).
Type
Optional. A Properties section is declared for each resource immediately
after the resource Type declaration. Property values can be literal strings,
lists of strings, parameter references, pseudo references, or the value returned
by a function. If a resource does not require any properties to be declared,
you can omit the Properties section of that resource.
Properties
Elastic Beanstalk Resource Names
Elastic Beanstalk provides fixed resource names for the AWS resources that it creates for you when you
deploy your application.You will need to know these resource names when you reference them in your
configuration file.
DescriptionResource Name
The name of the Auto Scaling group that Elastic Beanstalk
uses when it launches EC2 instances.
AWSEBAutoScalingGroup
The name for the launch configuration settings that Elastic
Beanstalk uses when it launches EC2 instances.
AWSEBAutoScalingLaunchConfigur-
ation
The name of the Elastic Beanstalk environment.AWSEBEnvironmentName
The name of the elastic load balancer used in the Elastic
Beanstalk environment.
AWSEBLoadBalancer
The name of the Amazon RDS database.AWSEBRDSDatabase
The name for the EC2 security group that Elastic Beanstalk
uses when it launches EC2 instances.
AWSEBSecurityGroup
The Amazon SQS queue from which the daemon in a worker
environment tier pulls requests that need to be processed.
AWSEBWorkerQueue
The Amazon SQS queue that stores messages that cannot
be delivered or otherwise were not successfully processed
by the daemon in a worker environment tier.
AWSEBWorkerDeadLetterQueue
API Version 2010-12-01
458
Elastic Beanstalk Developer Guide
Resources

DescriptionResource Name
The Amazon DynamoDB table that is the internal registry
used by the daemon in a worker environment tier for periodic
tasks.
AWSEBWorkerCronLeaderRegistry
Example Snippets: ElastiCache
The following samples add an Amazon ElastiCache cluster to EC2-Classic and EC2-VPC (both default
VPC and nondefault VPC) platforms. For more information about these platforms and how you can
determine which ones EC2 supports for your region and your AWS account, see http://
docs.aws.amazon.com/AWSEC2/latest/UserGuide/ec2-supported-platforms.html.Then refer to the section
in this topic that applies to your platform.
• EC2-Classic Platforms (p. 459)
• EC2-VPC (Default) (p. 461)
• EC2-VPC (Nondefault) (p. 463)
Note
Elastic Beanstalk requires you to use IAM roles to launch an environment and to manage
environments and applications. An instance profile is associated with an IAM role that can be
configured to provide applications and services access to AWS resources using temporary
security credentials. If you are unsure whether you have deployed your application using an
instance profile, click Instances on the Configuration page in the Elastic Beanstalk console.
For instructions, see Configuring Amazon EC2 Server Instances with Elastic Beanstalk (p. 352).
To learn more about instance profiles, see Using Elastic Beanstalk with AWS Identity and Access
Management (IAM) (p. 561) and Using IAM Roles with Elastic Beanstalk (p. 568).
EC2-Classic Platforms
This sample adds an Amazon ElastiCache cluster to an environment with instances launched into the
EC2-Classic platform. All of the properties that are listed in this example are the minimum required
properties that must be set for each resource type.You can download the example at ElastiCache
Example.
Note
This example creates AWS resources, which you may be charged for. For more information
about AWS pricing, go to http://aws.amazon.com/pricing/. Some services are part of the AWS
Free Usage Tier. If you are a new customer, you may test drive these services for free. Go to
http://aws.amazon.com/free/ for more information.
To use this example, do the following:
1. Create an .ebextensions directory in the top-level directory of your source bundle.
2. Create two configuration files with the .config extension and place them in your .ebextensions
directory. One configuration file defines the resources, and the other configuration file defines the
options.
3. Deploy your application to Elastic Beanstalk.
Note
Configuration files should conform to YAML or JSON formatting standards. For example,
indentation is critical to the proper interpretation of YAML. For more information, go to http://
www.yaml.org/start.html or http://www.json.org, respectively. For more information about
using configuration files to deploy an application to Elastic Beanstalk, see Using Configuration
Files (p. 431).
API Version 2010-12-01
459
Elastic Beanstalk Developer Guide
Example Snippets: ElastiCache

Create a configuration file (e.g., elasticache.config) that defines the resources. In this example, we
create the ElastiCache cluster by specifying the name of the ElastiCache cluster resource
(MyElastiCache), declaring its type, and then configuring the properties for the cluster. The example
references the name of the ElastiCache security group resource that gets created and defined in this
configuration file. Next, we create an ElastiCache security group. We define the name for this resource,
declare its type, and add a description for the security group. Finally, we set the ingress rules for the
ElastiCache security group to allow access only from instances inside the ElastiCache security group
(MyCacheSecurityGroup) and the Elastic Beanstalk security group (AWSEBSecurityGroup). The
parameter name, AWSEBSecurityGroup, is a fixed resource name provided by Elastic Beanstalk.You
must add AWSEBSecurityGroup to your ElastiCache security group ingress rules in order for your Elastic
Beanstalk application to connect to the instances in your ElastiCache cluster.
#This sample requires you to create a separate configuration file that defines
the custom option settings for CacheCluster properties.
Resources:
MyElastiCache:
Type: AWS::ElastiCache::CacheCluster
Properties:
CacheNodeType:
Fn::GetOptionSetting:
OptionName : CacheNodeType
DefaultValue: cache.m1.small
NumCacheNodes:
Fn::GetOptionSetting:
OptionName : NumCacheNodes
DefaultValue: 1
Engine:
Fn::GetOptionSetting:
OptionName : Engine
DefaultValue: memcached
CacheSecurityGroupNames:
- Ref: MyCacheSecurityGroup
MyCacheSecurityGroup:
Type: AWS::ElastiCache::SecurityGroup
Properties:
Description: "Lock cache down to webserver access only"
MyCacheSecurityGroupIngress:
Type: AWS::ElastiCache::SecurityGroupIngress
Properties:
CacheSecurityGroupName:
Ref: MyCacheSecurityGroup
EC2SecurityGroupName:
Ref: AWSEBSecurityGroup
For more information about the resources used in this example configuration file, see the following
references:
• AWS::ElastiCache::CacheCluster
• AWS::ElastiCache::SecurityGroup
• AWS::ElastiCache:SecurityGroupIngress
Create a separate configuration file called options.config and define the custom option settings.
API Version 2010-12-01
460
Elastic Beanstalk Developer Guide
Example Snippets: ElastiCache

option_settings:
"aws:elasticbeanstalk:customoption":
CacheNodeType : cache.m1.small
NumCacheNodes : 1
Engine : memcached
These lines tell Elastic Beanstalk to get the values for the CacheNodeType, NumCacheNodes, and
Engine properties from the CacheNodeType, NumCacheNodes, and Engine values in a config file
(options.config in our example) that contains an option_settings section with an
aws:elasticbeanstalk:customoption section that contains a name-value pair that contains the actual
value to use. In the example above, this means cache.m1.small, 1, and memcached would be used for
the values. For more information about Fn::GetOptionSetting, see Fn::GetOptionSetting (p. 813).
EC2-VPC (Default)
This sample adds an Amazon ElastiCache cluster to an environment with instances launched into the
EC2-VPC platform. Specifically, the information in this section applies to a scenario where EC2 launches
instances into the default VPC. All of the properties in this example are the minimum required properties
that must be set for each resource type. For more information about default VPCs, see Your Default VPC
and Subnets.
Note
This example creates AWS resources, which you may be charged for. For more information
about AWS pricing, go to http://aws.amazon.com/pricing/. Some services are part of the AWS
Free Usage Tier. If you are a new customer, you may test drive these services for free. Go to
http://aws.amazon.com/free/ for more information.
To use this example, do the following:
1. Create an .ebextensions directory in the top-level directory of your source bundle.
2. Create two configuration files with the .config extension and place them in your .ebextensions
directory. One configuration file defines the resources, and the other configuration file defines the
options.
3. Deploy your application to Elastic Beanstalk.
Note
Configuration files should conform to YAML or JSON formatting standards. For example,
indentation is critical to the proper interpretation of YAML. For more information, go to http://
www.yaml.org/start.html or http://www.json.org, respectively. For more information about
using configuration files to deploy an application to Elastic Beanstalk, see Using Configuration
Files (p. 431).
Now name the resources configuration file elasticache.config.To create the ElastiCache cluster,
this example specifies the name of the ElastiCache cluster resource (MyElastiCache), declares its type,
and then configures the properties for the cluster.The example references the ID of the security group
resource that we create and define in this configuration file.
Next, we create an EC2 security group. We define the name for this resource, declare its type, add a
description, and set the ingress rules for the security group to allow access only from instances inside
the Elastic Beanstalk security group (AWSEBSecurityGroup). (The parameter name,
AWSEBSecurityGroup, is a fixed resource name provided by Elastic Beanstalk.You must add
AWSEBSecurityGroup to your ElastiCache security group ingress rules in order for your Elastic Beanstalk
application to connect to the instances in your ElastiCache cluster.)
The ingress rules for the EC2 security group also define the IP protocol and port numbers on which the
cache nodes can accept connections. For Redis, the default port number is 6379.
API Version 2010-12-01
461
Elastic Beanstalk Developer Guide
Example Snippets: ElastiCache

#This sample requires you to create a separate configuration file that defines
the custom option settings for CacheCluster properties.
Resources:
MyCacheSecurityGroup:
Type: "AWS::EC2::SecurityGroup"
Properties:
GroupDescription: "Lock cache down to webserver access only"
SecurityGroupIngress :
- IpProtocol : "tcp"
FromPort :
Fn::GetOptionSetting:
OptionName : "CachePort"
DefaultValue: "6379"
ToPort :
Fn::GetOptionSetting:
OptionName : "CachePort"
DefaultValue: "6379"
SourceSecurityGroupName:
Ref: "AWSEBSecurityGroup"
MyElastiCache:
Type: "AWS::ElastiCache::CacheCluster"
Properties:
CacheNodeType:
Fn::GetOptionSetting:
OptionName : "CacheNodeType"
DefaultValue : "cache.t1.micro"
NumCacheNodes:
Fn::GetOptionSetting:
OptionName : "NumCacheNodes"
DefaultValue : "1"
Engine:
Fn::GetOptionSetting:
OptionName : "Engine"
DefaultValue : "redis"
VpcSecurityGroupIds:
-
Fn::GetAtt:
- MyCacheSecurityGroup
- GroupId
Outputs:
ElastiCache:
Description : "ID of ElastiCache Cache Cluster with Redis Engine"
Value :
Ref : "MyElastiCache"
For more information about the resources used in this example configuration file, see the following
references:
• AWS::ElastiCache::CacheCluster
• AWS::EC2::SecurityGroup
Next, name the options configuration file options.config and define the custom option settings.
API Version 2010-12-01
462
Elastic Beanstalk Developer Guide
Example Snippets: ElastiCache

option_settings:
"aws:elasticbeanstalk:customoption":
CacheNodeType : cache.t1.micro
NumCacheNodes : 1
Engine : redis
CachePort : 6379
These lines tell Elastic Beanstalk to get the values for the CacheNodeType, NumCacheNodes, Engine,
and CachePort properties from the CacheNodeType, NumCacheNodes, Engine, and CachePort values
in a config file (options.config in our example). That file includesan
aws:elasticbeanstalk:customoption section (under options_settings) that contains name-value
pairs with the actual values to use. In the preceding example, cache.t1.micro, 1, redis, and 6379
would be used for the values. For more information about Fn::GetOptionSetting, see
Fn::GetOptionSetting (p. 813).
EC2-VPC (Nondefault)
If you create a nondefault VPC on the EC2-VPC platform and specify it as the VPC into which EC2
launches instances, the process of adding an Amazon ElastiCache cluster to your environment differs
from that of a default VPC.The main difference is that you must create a subnet group for the ElastiCache
cluster. All of the properties in this example are the minimum required properties that must be set for
each resource type.
Note
This example creates AWS resources, which you may be charged for. For more information
about AWS pricing, go to http://aws.amazon.com/pricing/. Some services are part of the AWS
Free Usage Tier. If you are a new customer, you may test drive these services for free. Go to
http://aws.amazon.com/free/ for more information.
To use this example, do the following:
1. Create an .ebextensions directory in the top-level directory of your source bundle.
2. Create two configuration files with the .config extension and place them in your .ebextensions
directory. One configuration file defines the resources, and the other configuration file defines the
options.
3. Deploy your application to Elastic Beanstalk.
Note
Configuration files should conform to YAML or JSON formatting standards. For example,
indentation is critical to the proper interpretation of YAML. For more information, go to http://
www.yaml.org/start.html or http://www.json.org, respectively. For more information about
using configuration files to deploy an application to Elastic Beanstalk, see Using Configuration
Files (p. 431).
Now name the resources configuration file elasticache.config.To create the ElastiCache cluster,
this example specifies the name of the ElastiCache cluster resource (MyElastiCache), declares its type,
and then configures the properties for the cluster.The properties in the example reference the name of
the subnet group for the ElastiCache cluster as well as the ID of security group resource that we create
and define in this configuration file.
Next, we create an EC2 security group. We define the name for this resource, declare its type, add a
description, the VPC ID, and set the ingress rules for the security group to allow access only from instances
inside the Elastic Beanstalk security group (AWSEBSecurityGroup). (The parameter name,
AWSEBSecurityGroup, is a fixed resource name provided by Elastic Beanstalk.You must add
AWSEBSecurityGroup to your ElastiCache security group ingress rules in order for your Elastic Beanstalk
application to connect to the instances in your ElastiCache cluster.)
API Version 2010-12-01
463
Elastic Beanstalk Developer Guide
Example Snippets: ElastiCache

The ingress rules for the EC2 security group also define the IP protocol and port numbers on which the
cache nodes can accept connections. For Redis, the default port number is 6379. Finally, this example
creates a subnet group for the ElastiCache cluster.We define the name for this resource, declare its type,
and add a description and ID of the subnet in the subnet group.
Note
We recommend that you use private subnets for the ElastiCache cluster. For more information
about a VPC with a private subnet, see http://docs.aws.amazon.com/AmazonVPC/latest/
UserGuide/VPC_Scenario2.html.
#This sample requires you to create a separate configuration file that defines
the custom option settings for CacheCluster properties.
Resources:
MyElastiCache:
Type: "AWS::ElastiCache::CacheCluster"
Properties:
CacheNodeType:
Fn::GetOptionSetting:
OptionName : "CacheNodeType"
DefaultValue : "cache.t1.micro"
NumCacheNodes:
Fn::GetOptionSetting:
OptionName : "NumCacheNodes"
DefaultValue : "1"
Engine:
Fn::GetOptionSetting:
OptionName : "Engine"
DefaultValue : "redis"
CacheSubnetGroupName:
Ref: "MyCacheSubnets"
VpcSecurityGroupIds:
- Ref: "MyCacheSecurityGroup"
MyCacheSecurityGroup:
Type: "AWS::EC2::SecurityGroup"
Properties:
GroupDescription: "Lock cache down to webserver access only"
VpcId:
Fn::GetOptionSetting:
OptionName : "VpcId"
SecurityGroupIngress :
- IpProtocol : "tcp"
FromPort :
Fn::GetOptionSetting:
OptionName : "CachePort"
DefaultValue: "6379"
ToPort :
Fn::GetOptionSetting:
OptionName : "CachePort"
DefaultValue: "6379"
SourceSecurityGroupId:
Ref: "AWSEBSecurityGroup"
MyCacheSubnets:
Type: "AWS::ElastiCache::SubnetGroup"
Properties:
Description: "Subnets for ElastiCache"
SubnetIds:
Fn::GetOptionSetting:
API Version 2010-12-01
464
Elastic Beanstalk Developer Guide
Example Snippets: ElastiCache

OptionName : "CacheSubnets"
Outputs:
ElastiCache:
Description : "ID of ElastiCache Cache Cluster with Redis Engine"
Value :
Ref : "MyElastiCache"
For more information about the resources used in this example configuration file, see the following
references:
• AWS::ElastiCache::CacheCluster
• AWS::EC2::SecurityGroup
• AWS::ElastiCache::SubnetGroup
Next, name the options configuration file options.config and define the custom option settings.
Note
In the following example, replace the example CacheSubnets and VpcId values with your own
subnets and VPC.
option_settings:
"aws:elasticbeanstalk:customoption":
CacheNodeType : cache.t1.micro
NumCacheNodes : 1
Engine : redis
CachePort : 6379
CacheSubnets:
- subnet-1a1a1a1a
- subnet-2b2b2b2b
- subnet-3c3c3c3c
VpcId: vpc-4d4d4d4d
These lines tell Elastic Beanstalk to get the values for the CacheNodeType, NumCacheNodes, Engine,
CachePort, CacheSubnets, and VpcId properties from the CacheNodeType, NumCacheNodes, Engine,
CachePort, CacheSubnets, and VpcId values in a config file (options.config in our example).That
file includes an aws:elasticbeanstalk:customoption section (under options_settings) that
contains name-value pairs with sample values. In the example above, cache.t1.micro, 1, redis,
6379, subnet-1a1a1a1a, subnet-2b2b2b2b, subnet-3c3c3c3c, and vpc-4d4d4d4d would be used
for the values. For more information about Fn::GetOptionSetting, see Fn::GetOptionSetting (p.813).
Example Snippet: SQS, CloudWatch, and SNS
This example adds an Amazon SQS queue and an alarm on queue depth to the environment.The
properties that you see in this example are the minimum required properties that you must set for each
of these resources.You can download the example at SQS, SNS, and CloudWatch.
Note
Elastic Beanstalk requires you to use IAM roles to launch an environment and to manage
environments and applications. An instance profile is associated with an IAM role that can be
configured to provide applications and services access to AWS resources using temporary
security credentials. If you are unsure whether you have deployed your application using an
instance profile, click Instances on the Configuration page in the Elastic Beanstalk console.
For instructions, see Configuring Amazon EC2 Server Instances with Elastic Beanstalk (p. 352).
To learn more about instance profiles, see Using Elastic Beanstalk with AWS Identity and Access
Management (IAM) (p. 561) and Using IAM Roles with Elastic Beanstalk (p. 568).
API Version 2010-12-01
465
Elastic Beanstalk Developer Guide
Example Snippet: SQS, CloudWatch, and SNS

Note
This example creates AWS resources, which you may be charged for. For more information
about AWS pricing, go to http://aws.amazon.com/pricing/. Some services are part of the AWS
Free Usage Tier. If you are a new customer, you may test drive these services for free. Go to
http://aws.amazon.com/free/ for more information.
To use this example, do the following:
1. Create an .ebextensions directory in the top-level directory of your source bundle.
2. Create two configuration files with the .config extension and place them in your .ebextensions
directory. One configuration file defines the resources, and the other configuration file defines the
options.
3. Deploy your application to Elastic Beanstalk.
Note
Configuration files should conform to YAML or JSON formatting standards. For example,
indentation is critical to the proper interpretation of YAML. For more information, go to http://
www.yaml.org/start.html or http://www.json.org, respectively. For more information about
using configuration files to deploy an application to Elastic Beanstalk, see Using Configuration
Files (p. 431).
Create a configuration file (e.g., sqs.config) that defines the resources. In this example, we create an
SQS queue and define the VisbilityTimeout property in the MySQSQueue resource. Next, we create
an SNS Topic and specify that email gets sent to [email protected] when the alarm is fired.
Finally, we create a CloudWatch alarm if the queue grows beyond 10 messages. In the Dimensions
property, we specify the name of the dimension and the value representing the dimension measurement.
We use Fn::GetAtt to return the value of QueueName from MySQSQueue.
#This sample requires you to create a separate configuration file to define the
custom options for the SNS topic and SQS queue.
Resources:
MySQSQueue:
Type: AWS::SQS::Queue
Properties:
VisibilityTimeout:
Fn::GetOptionSetting:
OptionName: VisibilityTimeout
DefaultValue: 30
AlarmTopic:
Type: AWS::SNS::Topic
Properties:
Subscription:
- Endpoint:
Fn::GetOptionSetting:
OptionName: AlarmEmail
DefaultValue: "[email protected]"
Protocol: email
QueueDepthAlarm:
Type: AWS::CloudWatch::Alarm
Properties:
AlarmDescription: "Alarm if queue depth grows beyond 10 messages"
Namespace: "AWS/SQS"
MetricName: ApproximateNumberOfMessagesVisible
Dimensions:
- Name: QueueName
Value : { "Fn::GetAtt" : [ "MySQSQueue", "QueueName"] }
API Version 2010-12-01
466
Elastic Beanstalk Developer Guide
Example Snippet: SQS, CloudWatch, and SNS

Statistic: Sum
Period: 300
EvaluationPeriods: 1
Threshold: 10
ComparisonOperator: GreaterThanThreshold
AlarmActions:
- Ref: AlarmTopic
InsufficientDataActions:
- Ref: AlarmTopic
Outputs :
QueueURL:
Description : "URL of newly created SQS Queue"
Value : { Ref : "MySQSQueue" }
QueueARN :
Description : "ARN of newly created SQS Queue"
Value : { "Fn::GetAtt" : [ "MySQSQueue", "Arn"]}
QueueName :
Description : "Name newly created SQS Queue"
Value : { "Fn::GetAtt" : [ "MySQSQueue", "QueueName"]}
For more information about the resources used in this example configuration file, see the following
references:
• AWS::SQS::Queue (p. 809)
• AWS::SNS::Topic (p. 808)
• AWS::CloudWatch::Alarm (p. 803)
Create a separate configuration file called options.config and define the custom option settings.
option_settings:
"aws:elasticbeanstalk:customoption":
VisibilityTimeout : 30
AlarmEmail : "[email protected]"
These lines tell Elastic Beanstalk to get the values for the VisibilityTimeout and Subscription Endpoint
properties from the VisibilityTimeout and Subscription Endpoint values in a config file (options.config
in our example) that contains an option_settings section with an aws:elasticbeanstalk:customoption
section that contains a name-value pair that contains the actual value to use. In the example above, this
means 30 and "[email protected]" would be used for the values. For more information about
Fn::GetOptionSetting, see Fn::GetOptionSetting (p. 813)
Example: DynamoDB, CloudWatch, and SNS
This section walks you through deploying a sample application to Elastic Beanstalk using eb (an updated
command line interface) and Git, and then updating your Elastic Beanstalk to add an DynamoDB table
to the Elastic Beanstalk environment.The configuration file sets up the DynamoDB table as a session
handler for a PHP-based application using the AWS SDK for PHP 2.To use this example, you must have
an IAM instance profile, which is added to the instance(s) in your environment and used to access the
DynamoDB table. If you are unsure whether you have deployed your application using an instance profile,
click Instances on the Configuration page in the Elastic Beanstalk console. For instructions, see
Configuring Amazon EC2 Server Instances with Elastic Beanstalk (p. 352).To learn more about instance
profiles, see Using Elastic Beanstalk with AWS Identity and Access Management (IAM) (p.561) and Using
IAM Roles with Elastic Beanstalk (p. 568). To see an example creating a custom policy for DynamoDB
API Version 2010-12-01
467
Elastic Beanstalk Developer Guide
Example: DynamoDB, CloudWatch, and SNS

using instance profiles, see Example: Granting Permissions to Elastic Beanstalk Applications to Access
DynamoDB (p. 571).
Note
This example creates AWS resources, which you may be charged for. For more information
about AWS pricing, go to http://aws.amazon.com/pricing/. Some services are part of the AWS
Free Usage Tier. If you are a new customer, you may test drive these services for free. Go to
http://aws.amazon.com/free/ for more information.
Step 1: Set Up Your Git Repository
Eb is a command line interface that you can use with Git to deploy applications quickly and more easily.
Eb is available as part of the Elastic Beanstalk command line tools package. Follow the steps below to
install eb and initialize your Git repository.
To install eb, its prerequisite software, and initialize your Git repository
1. Install the following software onto your local computer:
a. Linux/Unix/Mac
• Download and unzip the Elastic Beanstalk command line tools package at the AWS Sample
Code & Libraries website.
• Git 1.6.6 or later.To download Git, go to http://git-scm.com/.
• Python 2.7 or 3.0.
b. Windows
• Download and unzip the Elastic Beanstalk command line tools package at the AWS Sample
Code & Libraries website.
• Git 1.6.6 or later.To download Git, go to http://git-scm.com/.
• PowerShell 2.0.
Note
Windows 7 and Windows Server 2008 R2 come with PowerShell 2.0. If you are
running an earlier version of Windows, you can download PowerShell 2.0.Visit http://
technet.microsoft.com/en-us/scriptcenter/dd742419.aspx for more details.
2. Initialize your Git repository.
git init .
Step 2: Configure Elastic Beanstalk
Elastic Beanstalk needs the following information to deploy an application:
• AWS access key ID
• AWS secret key
• Service region
• Application name
API Version 2010-12-01
468
Elastic Beanstalk Developer Guide
Example: DynamoDB, CloudWatch, and SNS

• Environment name
• Solution stack
Use the init command, and Elastic Beanstalk will prompt you to enter this information. If a default value
is available, and you want to use it, press Enter.
Before you use eb, set your PATH to the location of eb. The following table shows an example for
Linux/UNIX and Windows.
In WindowsIn Linux and UNIX
C:\> set PATH=%PATH%;<path to unzipped
eb CLI package>\eb\windows\
$ export PATH=$PATH:<path to unzipped
eb CLI package>/eb/linux/python2.7/
If you are using Python 3.0, the path will include
python3 rather than python2.7.
To configure Elastic Beanstalk
1. From the directory where you created your local repository, type the following command:
eb init
2. When you are prompted for the access key ID, type your access key ID.To get your access key ID,
see How Do I Get Security Credentials? in the AWS General Reference.
Enter your AWS Access Key ID (current value is "AKIAIOSFODNN7EXAMPLE"):
3. When you are prompted for the secret access key, type your secret access key.To get your secret
access key, see How Do I Get Security Credentials? in the AWS General Reference.
Enter your AWS Secret Access Key (current value is "wJalrXUtnFEMI/K7MDENG/bPxR
fiCYEXAMPLEKEY"):
4. When you are prompted for the Elastic Beanstalk region, type the number of the region. For information
about this product's regions, go to Regions and Endpoints in the Amazon Web Services General
Reference. For this example, we'll use US West (Oregon).
5. When you are prompted for the Elastic Beanstalk application name, type the name of the application.
Elastic Beanstalk generates an application name based on the current directory name if an application
name has not been previously configured. In this example, we use HelloWorld.
Enter an Elastic Beanstalk application name (auto-generated value is "win
dows"): HelloWorld
Note
If you have a space in your application name, make sure you do not use quotation marks.
6. When you are prompted for the Elastic Beanstalk environment name, type the name of the
environment. Elastic Beanstalk automatically creates an environment name based on your application
name. If you want to accept the default, press Enter.
API Version 2010-12-01
469
Elastic Beanstalk Developer Guide
Example: DynamoDB, CloudWatch, and SNS

Enter an Elastic Beanstalk environment name (current value is "HelloWorld-
env"):
Note
If you have a space in your application name, make sure you do not have a space in your
environment name.
7. When you are prompted for the solution stack, type the number of the solution stack you want. For
more information about solution stacks, see Supported Platforms (p. 19). For this example, we'll use
64bit Amazon Linux running PHP 5.4.
8. When you are prompted to create an Amazon RDS database, type y or n. For more information
about using Amazon RDS, see Using Elastic Beanstalk with Amazon RDS (p.528). For this example,
we'll type n.
Create RDS instance? [y/n]: n
9. When you are prompted to enter your instance profile name, you can choose to create a default
instance profile or use an existing instance profile. Using an instance profile enables IAM users and
AWS services to gain access to temporary security credentials to make AWS API calls. Using instance
profiles prevents you from having to store long-term security credentials on the EC2 instance. For
more information about instance profiles, see Granting Permissions to Users and Services Using
IAM Roles (p. 562). For this example, we'll use Create a default instance profile.
You should see a confirmation that your AWS Credential file was successfully updated.
After configuring Elastic Beanstalk, you are ready to deploy a sample application.
If you want to update your Elastic Beanstalk configuration, you can use the init command again.When
prompted, you can update your configuration options. If you want to keep any previous settings, press
the Enter key.
Step 3: Create an Application
Next, you need to create and deploy a sample application. For this step, you use a sample application
that is already prepared. Elastic Beanstalk uses the configuration information you specified in the previous
step to do the following:
• Create an application using the application name you specified.
• Launch an environment using the environment name you specified that provisions the AWS resources
to host the application.
• Deploy the application into the newly created environment.
Use the start command to create and deploy a sample application.
To create the application
• From the directory where you created your local repository, type the following command:
eb start
API Version 2010-12-01
470
Elastic Beanstalk Developer Guide
Example: DynamoDB, CloudWatch, and SNS

It may take several minutes to complete this process. Elastic Beanstalk provides status updates during
the process. If at any time you want to stop polling for status updates, press Ctrl+C.When the environment
status is Green, Elastic Beanstalk outputs a URL for the application.
Step 4:View the Application
In the previous step, you created an application and deployed it to Elastic Beanstalk. After the environment
is ready and its status is Green, Elastic Beanstalk provides a URL to view the application. In this step,
you can check the status of the environment to make sure it is set to Green and then copy and paste the
URL to view the application.
Use the status command to check the environment status, and then use the URL to view the application.
To view the application
1. From the directory where you created your local repository, type the following command:
eb status --verbose
Elastic Beanstalk displays the environment status. If the environment is set to Green, Elastic Beanstalk
displays the URL for the application. If you attached an Amazon RDS DB instance to your environment,
your Amazon RDS DB information is displayed.
2. Copy and paste the URL into your web browser to view your application.
Step 5: Update the Application
Next, we add the files for the sample application and configuration files that will set up AWS resources
that the application depends on.
• The sample application, index.php
• A configuration file, dynamodb.config, to create and configure a DynamoDB table and other AWS
resources as well as install software on the EC2 instances that host the application in an Elastic
Beanstalk environment
• An options setting file, options.config, that overrides the defaults in dynamodb.config with specific
settings for this particular installation
Note
Configuration files should conform to YAML or JSON formatting standards. For example,
indentation is critical to the proper interpretation of YAML. For more information, go to http://
www.yaml.org/start.html or http://www.json.org, respectively. For more information about using
configuration files to deploy an application to Elastic Beanstalk, see Using Configuration
Files (p. 431).
You can download the sample that we'll use in this step at DynamoDB Session Support Example.
To update the application
1. In the directory where you created your local repository, use your favorite text editor to create an
index.php file and paste the following PHP code.
<?php
// Include the SDK using the Composer autoloader
require '../vendor/autoload.php';
API Version 2010-12-01
471
Elastic Beanstalk Developer Guide
Example: DynamoDB, CloudWatch, and SNS

use Aws\DynamoDb\DynamoDbClient;
// Grab the session table name and region from the configuration file
list($tableName, $region) = file(__DIR__ . '/../sessiontable');
$tableName = rtrim($tableName);
$region = rtrim($region);
// Create a DynamoDB client and register the table as the session handler
$dynamodb = DynamoDbClient::factory(array('region' => $region));
$handler = $dynamodb->registerSessionHandler(array('table_name' => $tableName,
'hash_key' => 'username'));
// Grab the instance ID so we can display the EC2 instance that services
the request
$instanceId = file_get_contents("http://169.254.169.254/latest/meta-
data/instance-id");
?>
<h1>Elastic Beanstalk PHP Sessions Sample</h1>
<p>This sample application shows the integration of the Elastic Beanstalk
PHP
container and the session support for DynamoDB from the AWS SDK for PHP 2.
Using DynamoDB session support, the application can be scaled out across
multiple web servers. For more details, see the
<a href="http://aws.amazon.com/php/">PHP Developer Center</a>.</p>
<form id="SimpleForm" name="SimpleForm" method="post" action="index.php">
<?php
echo 'Request serviced from instance ' . $instanceId . '<br/>';
echo '<br/>';
if (isset($_POST['continue'])) {
session_start();
$_SESSION['visits'] = $_SESSION['visits'] + 1;
echo 'Welcome back ' . $_SESSION['username'] . '<br/>';
echo 'This is visit number ' . $_SESSION['visits'] . '<br/>';
session_write_close();
echo '<br/>';
echo '<input type="Submit" value="Refresh" name="continue" id="continue"/>';
echo '<input type="Submit" value="Delete Session" name="killsession"
id="killsession"/>';
} elseif (isset($_POST['killsession'])) {
session_start();
echo 'Goodbye ' . $_SESSION['username'] . '<br/>';
session_destroy();
echo 'Username: <input type="text" name="username" id="username"
size="30"/><br/>';
echo '<br/>';
echo '<input type="Submit" value="New Session" name="newsession"
id="newsession"/>';
} elseif (isset($_POST['newsession'])) {
session_start();
$_SESSION['username'] = $_POST['username'];
$_SESSION['visits'] = 1;
echo 'Welcome to a new session ' . $_SESSION['username'] . '<br/>';
session_write_close();
echo '<br/>';
API Version 2010-12-01
472
Elastic Beanstalk Developer Guide
Example: DynamoDB, CloudWatch, and SNS

echo '<input type="Submit" value="Refresh" name="continue" id="continue"/>';
echo '<input type="Submit" value="Delete Session" name="killsession"
id="killsession"/>';
} else {
echo 'To get started, enter a username.<br/>';
echo '<br/>';
echo 'Username: <input type="text" name="username" id="username"
size="30"/><br/>';
echo '<input type="Submit" value="New Session" name="newsession"
id="newsession"/>';
}
?>
</form>
2. Create an .ebextensions directory in the top-level directory of your source bundle.
3. Create a configuration file named dynamodb.config, paste the code in the listing below, and save
the file in the .ebextensions top-level directory of your source bundle.
Resources:
SessionTable:
Type: AWS::DynamoDB::Table
Properties:
KeySchema:
HashKeyElement:
AttributeName:
Fn::GetOptionSetting:
OptionName : SessionHashKeyName
DefaultValue: "username"
AttributeType:
Fn::GetOptionSetting:
OptionName : SessionHashKeyType
DefaultValue: "S"
ProvisionedThroughput:
ReadCapacityUnits:
Fn::GetOptionSetting:
OptionName : SessionReadCapacityUnits
DefaultValue: 1
WriteCapacityUnits:
Fn::GetOptionSetting:
OptionName : SessionWriteCapacityUnits
DefaultValue: 1
SessionWriteCapacityUnitsLimit:
Type: AWS::CloudWatch::Alarm
Properties:
AlarmDescription: { "Fn::Join" : ["", [{ "Ref" : "AWSEBEnvironmentName"
}, " write capacity limit on the session table." ]]}
Namespace: "AWS/DynamoDB"
MetricName: ConsumedWriteCapacityUnits
Dimensions:
- Name: TableName
Value: { "Ref" : "SessionTable" }
Statistic: Sum
Period: 300
EvaluationPeriods: 12
API Version 2010-12-01
473
Elastic Beanstalk Developer Guide
Example: DynamoDB, CloudWatch, and SNS

Threshold:
Fn::GetOptionSetting:
OptionName : SessionWriteCapacityUnitsAlarmThreshold
DefaultValue: 240
ComparisonOperator: GreaterThanThreshold
AlarmActions:
- Ref: SessionAlarmTopic
InsufficientDataActions:
- Ref: SessionAlarmTopic
SessionReadCapacityUnitsLimit:
Type: AWS::CloudWatch::Alarm
Properties:
AlarmDescription: { "Fn::Join" : ["", [{ "Ref" : "AWSEBEnvironmentName"
}, " read capacity limit on the session table." ]]}
Namespace: "AWS/DynamoDB"
MetricName: ConsumedReadCapacityUnits
Dimensions:
- Name: TableName
Value: { "Ref" : "SessionTable" }
Statistic: Sum
Period: 300
EvaluationPeriods: 12
Threshold:
Fn::GetOptionSetting:
OptionName : SessionReadCapacityUnitsAlarmThreshold
DefaultValue: 240
ComparisonOperator: GreaterThanThreshold
AlarmActions:
- Ref: SessionAlarmTopic
InsufficientDataActions:
- Ref: SessionAlarmTopic
SessionThrottledRequestsAlarm:
Type: AWS::CloudWatch::Alarm
Properties:
AlarmDescription: { "Fn::Join" : ["", [{ "Ref" : "AWSEBEnvironmentName"
}, ": requests are being throttled." ]]}
Namespace: AWS/DynamoDB
MetricName: ThrottledRequests
Dimensions:
- Name: TableName
Value: { "Ref" : "SessionTable" }
Statistic: Sum
Period: 300
EvaluationPeriods: 1
Threshold:
Fn::GetOptionSetting:
OptionName: SessionThrottledRequestsThreshold
DefaultValue: 1
ComparisonOperator: GreaterThanThreshold
AlarmActions:
- Ref: SessionAlarmTopic
InsufficientDataActions:
- Ref: SessionAlarmTopic
SessionAlarmTopic:
Type: AWS::SNS::Topic
API Version 2010-12-01
474
Elastic Beanstalk Developer Guide
Example: DynamoDB, CloudWatch, and SNS

Properties:
Subscription:
- Endpoint:
Fn::GetOptionSetting:
OptionName: SessionAlarmEmail
DefaultValue: "[email protected]"
Protocol: email
files:
"/var/app/sessiontable":
mode: "000444"
content: |
`{"Ref" : "SessionTable"}`
`{"Ref" : "AWS::Region"}`
"/var/app/composer.json":
mode: "000744"
content:
{
"require": {
"aws/aws-sdk-php": "*"
}
}
container_commands:
"1-install-composer":
command: "cd /var/app; curl -s http://getcomposer.org/installer | php"
"2-install-dependencies":
command: "cd /var/app; php composer.phar install"
"3-cleanup-composer":
command: "rm -Rf /var/app/composer.*"
In the sample configuration file, we first create the DynamoDB table and configure the primary key
structure for the table and the capacity units to allocate sufficient resources to provide the requested
throughput. Next, we create CloudWatch alarms for WriteCapacity and ReadCapacity.We create
an SNS topic that sends email to "[email protected]" if the alarm thresholds are breached.
After we create and configure our AWS resources for our environment, we need to customize the
EC2 instances.We use the files key to pass the details of the DynamoDB table to the EC2 instances
in our environment as well as add a "require" in the composer.json file for the AWS SDK for PHP
2. Finally, we run container commands to install composer, the required dependencies, and then
remove the installer.The example snippet looks like the following.
For more information about the resources used in this example, see the following references:
• AWS::DynamoDB::Table (p. 805)
• AWS::CloudWatch::Alarm (p. 803)
• AWS::SNS::Topic (p. 808)
4. Create a configuration file named options.config. Replace <email here> with the email where
you want alarm notifications sent, and save the file in the .ebextensions top-level directory of your
source bundle.
API Version 2010-12-01
475
Elastic Beanstalk Developer Guide
Example: DynamoDB, CloudWatch, and SNS

option_settings:
"aws:elasticbeanstalk:customoption":
SessionHashKeyName : username
SessionHashKeyType : S
SessionReadCapacityUnits : 1
SessionReadCapacityUnitsAlarmThreshold : 240
SessionWriteCapacityUnits : 1
SessionWriteCapacityUnitsAlarmThreshold : 240
SessionThrottledRequestsThreshold : 1
SessionAlarmEmail : <email here>
After you've made your changes, your file should look like the following.
option_settings:
"aws:elasticbeanstalk:customoption":
SessionHashKeyName : username
SessionHashKeyType : S
SessionReadCapacityUnits : 1
SessionReadCapacityUnitsAlarmThreshold : 240
SessionWriteCapacityUnits : 1
SessionWriteCapacityUnitsAlarmThreshold : 240
SessionThrottledRequestsThreshold : 1
SessionAlarmEmail : <email here>
The options.config file contains the values used for some of the variables defined in
dynamodb.config. For example, dynamodb.config contains the following lines.
Subscription:
- Endpoint:
Fn::GetOptionSetting:
OptionName: SessionAlarmEmail
DefaultValue: "[email protected]"
These lines that tell Elastic Beanstalk to get the value for the Endpoint property from the
SessionAlarmEmail value in a config file (options.config in our sample application) that contains
an option_settings section with an aws:elasticbeanstalk:customoption section that contains a
name-value pair that contains the actual value to use. In the example above, this means
SessionAlarmEmail would be assigned the value [email protected].
5. Add your files to your local Git repository, and then commit your change.
git add .
git commit -m "eb configuration"
Note
For information about Git commands, go to Git - Fast Version Control System.
6. Create an application version matching your local repository and deploy to the Elastic Beanstalk
environment if specified.
git aws.push
API Version 2010-12-01
476
Elastic Beanstalk Developer Guide
Example: DynamoDB, CloudWatch, and SNS

7. Use the eb status --verbose command to check your environment status.When your environment
is green and ready, refresh your web browser to view your updated application.
Example Snippets
The following is a list of example configuration files that you can use to customize your Elastic Beanstalk
environments:
• DynamoDB, CloudWatch, and SNS
• Elastic Load Balancing and CloudWatch
• ElastiCache
• RDS and CloudWatch
• SQS, SNS, and CloudWatch
Note
Configuration files should conform to YAML or JSON formatting standards. For example,
indentation is critical to the proper interpretation of YAML. For more information, go to http://
www.yaml.org/start.html or http://www.json.org, respectively. For more information about using
configuration files to deploy an application to Elastic Beanstalk, see Using Configuration
Files (p. 431).
API Version 2010-12-01
477
Elastic Beanstalk Developer Guide
Example Snippets

Using Custom Domains with
Elastic Beanstalk
You can use a custom domain for your Elastic Beanstalk application, such as example.com.
There are two ways you can use custom domains with Elastic Beanstalk:
• Create a CNAME with your Domain Name System (DNS) provider.
• Use Amazon Route 53 to create an alias record.
Using a Domain Hosted by a Third Party
If you host a domain name with a third party, you can use that domain name for your Elastic Beanstalk
application. Because the IP address of the elastic load balancer is not fixed, you should not associate
your domain name with your load balancer's IP address. Instead, you should create a CNAME with your
DNS provider, and then map the CNAME to your Elastic Beanstalk URL. Make sure you also forward
your unqualified domain name, (i.e., example.com), to your qualified domain name (i.e., www.example.com)
so that when users type example.com and www.example.com, they both map to your Elastic Beanstalk
application. Check your DNS provider's instructions for mapping your domain name to your Elastic
Beanstalk URL.
For example, if your Elastic Beanstalk URL is http://foobar.elasticbeanstalk.com, then you would do
the following high level steps:
1. Create a CNAME for your www record that maps to foobar.elasticbeanstalk.com.
2. Forward example.com to www.example.com.
To view the Elastic Beanstalk URL for your application
1. Open the Elastic Beanstalk console at https://console.aws.amazon.com/elasticbeanstalk/.
2. From the region list, select the region that includes the environment that you want to work with.
3. From the Elastic Beanstalk console applications page, click the name of the environment that you
want to view the URL for.
API Version 2010-12-01
478
Elastic Beanstalk Developer Guide
Using a Domain Hosted by a Third Party

In the environment dashboard, the URL for the environment is displayed next to the name of the
environment.
Using a Domain Hosted by Amazon Route 53
Amazon Route 53 is a highly available and scalable DNS web service. If you host a domain name using
Amazon Route 53, you can use that domain name for your Elastic Beanstalk application. Given how the
DNS protocol works, there is no way to refer your elastic load balancer or Amazon EC2 instance from
the root (also known as the apex) of the domain. For instance, you can create a DNS entry that maps
http://www.example.com to an elastic load balancer or EC2 instance, but you cannot do the same for
http://example.com. Amazon Route 53 enables you to map the apex (such as example.com) of a hosted
zone to your elastic load balancer or EC2 instance using an alias record. When Amazon Route 53
encounters an alias record, it looks up the records associated with the target DNS name in the alias, and
returns the IP addresses from that name. The following procedures walk you through mapping your root
domain and subdomains to your elastic load balancer or EC2 instance in your Elastic Beanstalk
environment.
To map your root domain and subdomains to your Elastic Load Balancing load balancer
1. Follow the Amazon Route 53 Getting Started Guide instructions to sign up for Route 53, create a
hosted zone, and then update your name server records with your registrar.
2. Get the value of the hosted zone ID for your load balancer.
a. Open the Amazon EC2 console at https://console.aws.amazon.com/ec2/.
b. From the region list, select a region.
c. In the Navigation pane, click Load Balancers .
d. Select the load balancer associated with your Elastic Beanstalk application. Depending on your
container type, the load balancer will appear in one of the following formats:
• Legacy container — awseb-<your app environment name>
API Version 2010-12-01
479
Elastic Beanstalk Developer Guide
Using a Domain Hosted by Amazon Route 53

• Nonlegacy container — contains awseb in the load balancer name. To verify you have the
correct load balancer for your environment, check the instance name in the Instances tab.
The instance name should be your environment name.
Your hosted ID will appear in the Load Balancer details pane on the Description tab. Make a
note of your hosted ID.
3. Create alias resource record sets in your hosted zone for your root domain and subdomain. For
instructions, go to How to Create an Alias Resource Record Set in the Amazon Route 53 Developer
Guide.
4. Your root domain and subdomain are now mapped to your Elastic Beanstalk elastic load balancer.
Type your domain name in your web browser to verify it worked.
If you rebuild your environment, launch a new environment, or swap your environment URL, you will need
to map your root domain to the load balancer in your new environment.
To map your root domain and subdomains to a single Amazon EC2 instance
1. Follow the instructions to sign up for Route 53 and create a hosted zone in Getting Started: Creating
a Domain that Uses Route 53 in the Amazon Route 53 Developer Guide.
2. Get the Elastic IP for your EC2 instance.
a. Open the Amazon EC2 console at https://console.aws.amazon.com/ec2/.
b. From the region list, select a region.
c. In the Navigation column, click Instances.
API Version 2010-12-01
480
Elastic Beanstalk Developer Guide
Using a Domain Hosted by Amazon Route 53

d. Select the instance associated with your Elastic Beanstalk application.
Your Elastic IP address will appear in the details pane on the Description tab. Make a note of
your Elastic IP address.
3. Create resource record sets in your hosted zone for your root domain and subdomains. For a single
EC2 instance, create an A record by specifying the Elastic IP address of the instance. For instructions,
see Step 4: Create Resource Record Sets in your Route 53 Hosted Zone in the Amazon Route 53
Developer Guide.
4. Update your registrar's name server records. For instructions, see Step 5: Update the Registrar's
Name Server Records in the Amazon Route 53 Developer Guide.
5. Your root domain and subdomain are now mapped to the Elastic IP of your EC2 instance in Elastic
Beanstalk.Type your domain name in your web browser to verify it worked.
API Version 2010-12-01
481
Elastic Beanstalk Developer Guide
Using a Domain Hosted by Amazon Route 53

Configuring HTTPS for your Elastic
Beanstalk Environment
You can configure your Elastic Beanstalk environment to use HTTPS for your application. Configuring
HTTPS ensures traffic encryption for client connections to the load balancer in load-balancing autoscaling
environments.
Note
For single-instance environments, see Configuring SSL for Single-Instance Environments (p. 489).
To configure HTTPS, you will need to do the following high-level steps:
1. Create a custom domain with your DNS provider.
2. Create and upload an SSL certificate to AWS Identity and Access Management (AWS IAM).
3. Update your Elastic Beanstalk environment to use HTTPS.
This section walks you through the necessary steps to configure HTTPS for your Elastic Beanstalk
application.This section assumes you have already deployed an Elastic Beanstalk application. If you
have not already deployed an Elastic Beanstalk application, do this now. For instructions, see Getting
Started Using Elastic Beanstalk (p. 4).
Step 1: Create a Custom Domain
You must create a custom domain name to obtain a digitally signed SSL certificate. When obtaining a
signed SSL certificate, the Certificate Authority (CA) checks the domain name to ensure that you are the
owner of that domain. Because your Elastic Beanstalk URL contains elasticbeanstalk.com, you will not
be able to obtain a certificate for this domain name.
To create a custom domain name, you can use Amazon Route 53 or a third party. For instructions, see
Using Custom Domains with Elastic Beanstalk (p. 478).
API Version 2010-12-01
482
Elastic Beanstalk Developer Guide
Step 1: Create a Custom Domain

Step 2: Create and Upload an SSL Certificate to
AWS IAM
After you have created your custom domain, you use AWS Identity and Access Management (AWS IAM)
to create and upload your certificate.This enables you to use your certificate with AWS services such as
Elastic Beanstalk.The following steps walk you through an example of how to create and upload your
SSL certificate to AWS IAM. For more information, go to Creating and Uploading Server Certificates in
the AWS Identity and Access Management Using IAM User Guide.
Install and Configure OpenSSL
Creating and uploading server certificates requires a tool that supports the SSL and TLS protocols.
OpenSSL is an open-source tool that provides the basic cryptographic functions necessary to create an
RSA token and sign it with your private key.
The following procedure assumes that your computer does not already have OpenSSL installed.
To install OpenSSL
• Get the package from www.ssl.org:
On Linux and UNIX:
1. Go to OpenSSL: Source, Tarballs (http://www.openssl.org/source/).
2. Download the latest source.
3. Build the package.
On Windows:
1. Go to OpenSSL: Binary Distributions (http://www.openssl.org/related/binaries.html).
2. Click OpenSSL for Windows.
A new page displays with links to the Windows downloads.
3. If not already installed on your system, select the Microsoft Visual C++ 2008 Redistributables
link appropriate for your environment and click Download. Follow the instructions provided by
the Microsoft Visual C++ 2008 Redistributable Setup Wizard.
4. After you have installed the Microsoft Visual C++ 2008 Redistributables, select the appropriate
version of the OpenSSL binaries for your environment and save the file locally. The OpenSSL
Setup Wizard launches.
5. Follow the instructions described in the OpenSSL Setup Wizard. Save the OpenSSL binaries
to a folder in your working directory.
You must create an environment variable that points to the OpenSSL install point.
To set the OpenSSL_HOME variable
• Enter the path to the OpenSSL installation:
API Version 2010-12-01
483
Elastic Beanstalk Developer Guide
Step 2: Create and Upload an SSL Certificate to AWS
IAM

On WindowsOn Linux and UNIX
c:\ set
OpenSSL_HOME=path_to_your_OpenSSL_in-
stallation
& export
OpenSSL_HOME=path_to_your_OpenSSL_in-
stallation
Note
Any changes you make to the environment variables are valid only for the current
command-line session.
You must add the path to the OpenSSL binaries to your computer's path variable.
To include OpenSSL in your path
• Open a terminal or command interface and enter the appropriate command for your operating system:
On WindowsOn Linux and UNIX
c:\ set Path=OpenSSL_HOME\bin;%Path%& export PATH=$PATH:$OpenSSL_HOME/bin
Note
Any changes you make to the environment variables are valid only for the current
command-line session.
Create a Private Key
You need a unique private key to create your Certificate Signing Request (CSR).
To create a private key
• Use the genrsa command to create a key:
PROMPT>openssl genrsa 2048 > privatekey.pem
Create a Certificate Signing Request
A Certificate Signing Request (CSR) is a file sent to a Certificate Authority (CA) to apply for a digital server
certificate.
To create a CSR
• Use the req command to create a CSR:
PROMPT>openssl req -new -key privatekey.pem -out csr.pem
The output will look similar to the following example:
API Version 2010-12-01
484
Elastic Beanstalk Developer Guide
Create a Private Key

You are about to be asked to enter information that will be incorporated
into your certificate request.
What you are about to enter is what is called a Distinguished Name or a
DN.
There are quite a few fields but you can leave some blank
For some fields there will be a default value,
If you enter '.', the field will be left blank.
The following table can help you create your certificate request.
ExampleDescriptionName
US = United StatesThe two-letter ISO abbreviation for your country.Country Name
WashingtonThe name of the state or province where your
organization is located.This name cannot be
abbreviated.
State or Province
SeattleThe name of the city where your organization is
located.
Locality Name
CorporationXThe full legal name of your organization. Do not
abbreviate your organization name.
Organization Name
MarketingOptional, for additional organization information.Organizational Unit
www.example.comThe fully qualified domain name for your CNAME.
You will receive a certificate name check warning
if this is not an exact match.
Common Name
someone@example.comThe server administrator's email addressEmail address
Note
The Common Name field is often misunderstood and is completed incorrectly.The common
name is typically your host plus domain name. It will look like "www.example.com" or
"example.com".You need to create a CSR using your correct common name.
Submit the CSR to Certificate Authority
Normally, at this stage you would submit your CSR to a Certificate Authority (CA) to apply for a digital
server certificate. However, you can also generate a self-signed certificate for testing purposes only. For
this example, you'll generate a self-signed certificate.
To generate a self-signed certificate
• Use the req command to create a CSR:
PROMPT>openssl x509 -req -days 365 -in csr.pem -signkey privatekey.pem -out
server.crt
The output will look similar to the following example:
API Version 2010-12-01
485
Elastic Beanstalk Developer Guide
Submit the CSR to Certificate Authority

Loading 'screen' into random state - done
Signature ok
subject=/C=us/ST=washington/L=seattle/O=corporationx/OU=marketing/CN=ex
ample.com/[email protected]
Getting Private key
Upload the Signed Certificate
Next, upload the certificate along with the private key to IAM. After you upload the certificate to IAM, the
certificate is available for other AWS services to use.You use the AWS Command Line Interface (AWS
CLI) to upload your certificate.
To upload a signed certificate
• Use the IAM upload-server-certificate command to upload a signed certificate:
PROMPT>aws iam upload-server-certificate --server-certificate-name certific
ate_object_name --certificate-body file://public_key_certificate_file -
-private-key file://privatekey.pem --certificate-chain file://certific
ate_chain_file
Note
If you are uploading a self-signed certificate and it's not important that browsers implicitly
accept the certificate, you can omit the --certificate-chain option and upload just the
server certificate and private key. For more information about the
upload-server-certificate command, see upload-server-certificate in the AWS
Command Line Interface Reference.
You should see an Amazon Resources Name (ARN) for your SSL certificate, which you will use when
you update your load balancer configuration settings to use HTTPS. The ARN should look similar to the
following:
arn:aws:iam::123456789012:server-certificate/cert
If you have a certificate that results in an error when you upload it, ensure that it meets the criteria, and
then try uploading it again.
To see sample certificates that are valid with IAM, go to Sample Certificates in the AWS Identity and
Access Management Using IAM User Guide.
Step 3: Update Your Elastic Beanstalk
Environment to Use HTTPS
After you receive your Amazon Resources Name (ARN), you need to update your load balancer
configuration settings in your Elastic Beanstalk environment with the following information:
• HTTP port — set this port to OFF or 80
• HTTPS port — set this port to 443 or 8443
API Version 2010-12-01
486
Elastic Beanstalk Developer Guide
Upload the Signed Certificate

Note
If you are using Amazon VPC with Elastic Beanstalk, you must set your HTTPS port to 443
instead of 8443.
• SSL certificate ID — set this to your ARN
You must also add a rule to your security group that allows inbound traffic from 0.0.0.0/0 to port 443.You
do this by using the resources key in the configuration file to add the AWSEBSecurityGroup to your
Amazon EC2 security group ingress rules. For more information about security groups and ingress rules,
see Amazon EC2 Security Groups.
Important
If at any point you decide to redeploy your application using a load-balanced environment, you
risk opening port 443 to all incoming traffic from the Internet. In that case, delete the configuration
file from your .ebextensions directory.Then create a load-balanced environment and set up
SSL using the Load Balancer section of the Configuration page of the Elastic Beanstalk
management console.
The following snippet opens port 443 on Amazon EC2 instances in the EC2-Classic platform by specifying
the GroupName of the (non-VPC) Amazon EC2 security group:
Example .ebextensions snippet opening port 443 for EC2-Classic
Resources:
sslSecurityGroupIngress:
Type: AWS::EC2::SecurityGroupIngress
Properties:
GroupName: {Ref : AWSEBSecurityGroup}
IpProtocol: tcp
ToPort: 443
FromPort: 443
CidrIp: 0.0.0.0/0
The following snippet opens port 443 on Amazon EC2 instances in the EC2-VPC platform by specifying
the GroupID of the VPC security group. For security groups that are in a VPC, you must use the GroupId
property. For instructions to open port 443 using the VPC console, see Adding and Removing Rules in
the Security Groups for Your VPC topic in the Amazon Virtual Private Cloud User Guide.
Example .ebextensions snippet opening port 443 for EC2-VPC
Resources:
sslSecurityGroupIngress:
Type: AWS::EC2::SecurityGroupIngress
Properties:
GroupId: {Ref : AWSEBSecurityGroup}
IpProtocol: tcp
ToPort: 443
FromPort: 443
CidrIp: 0.0.0.0/0
There are several methods you can use to update your environment.The following list provides links to
the relevant instructions.
• Elastic Beanstalk console, CLI, or API
• Eb
• AWS Toolkit for Eclipse
API Version 2010-12-01
487
Elastic Beanstalk Developer Guide
Step 3: Update Your Elastic Beanstalk Environment to
Use HTTPS

• AWS Toolkit for Visual Studio
It will take a few minutes to update your Elastic Beanstalk environment. Once your environment is Green
and Ready, type your https address in your web browser to verify it worked. For instructions on how to
check your environment status, see Monitoring Your Environment (p. 330). For this example, we type the
following:
https://www.example.com
Note
Because you used a self-signed certificate and your web browser does not recognize you as a
CA, you will see a warning message asking you if you want to proceed to the website. Choose
to proceed, and then you can view your application.
API Version 2010-12-01
488
Elastic Beanstalk Developer Guide
Step 3: Update Your Elastic Beanstalk Environment to
Use HTTPS

Configuring SSL for
Single-Instance Environments
You can configure SSL for single-instance environments that have applications running on the following:
• Docker
• Java (Apache Tomcat 6, Apache Tomcat 7, and Apache Tomcat 8)
• Node.js
• PHP 5.3, PHP 5.4, and PHP 5.5
• Python
• Ruby
To configure SSL for a single-instance environment, you must create a custom configuration file. (For
Ruby containers, there is an additional required JSON file.) Elastic Beanstalk does not currently support
the configuration of SSL for a single-instance environment using the management console or the API.
The process has four steps:
• Step 1: Create an SSL Certificate and Private Key (p. 489)
• Step 2: Create an SSL Configuration File (p. 490)
• Step 3: Open Port 443 (p. 490)
• Step 4: Complete the Configuration File for Your Container Type (p. 491)
Step 1: Create an SSL Certificate and Private
Key
Before creating your custom configuration file, you need to create an SSL certificate and RSA private key
for the file to reference.
For information about creating a private key and certificate request using OpenSSL, follow the steps for
configuring HTTPS beginning with Install and Configure OpenSSL (p. 483) and ending with Submit the
CSR to Certificate Authority (p. 485).
API Version 2010-12-01
489
Elastic Beanstalk Developer Guide
Step 1: Create an SSL Certificate and Private Key

Note
For testing purposes, you can use a self-signed certificate, but do not use one in a production
environment. For a production environment, you need a certificate from an external Certification
Authority (CA), such as Verisign or Entrust.
Step 2: Create an SSL Configuration File
Next, using a text editor, create a configuration file with the extension .config (e.g., singlessl.config) and
place it in the .ebextensions directory at the top level of your source bundle.You can have multiple
configuration files in your .ebextensions directory. For information about the file format of configuration
files, see Using Configuration Files (p. 431). For information about the contents of configuration files, see
Customizing the Software on EC2 Instances Running Linux (p. 431). For information about source bundles,
see Creating an Application Source Bundle (p. 294).
Note
Configuration files should conform to YAML or JSON formatting standards. For example,
indentation is critical to the proper interpretation of YAML. For more information, go to http://
www.yaml.org/start.html or http://www.json.org, respectively. For more information about using
configuration files to deploy an application to Elastic Beanstalk, see Using Configuration
Files (p. 431).
In the following step, you add to the contents of the file to allow incoming traffic to port 443. In the step
after that, you specify additional information in the configuration file according to the guidance for your
container type.
Step 3: Open Port 443
In order for your Elastic Beanstalk application to connect to the Amazon EC2 instance, you must allow
incoming traffic to port 443.You do this by using the resources key in the configuration file to add the
AWSEBSecurityGroup to your Amazon EC2 security group ingress rules. For more information about
security groups and ingress rules, see Amazon EC2 Security Groups.
Important
Using SSL with load-balanced environments involves different steps. If at any point you decide
to redeploy your application using a load-balanced environment, you risk opening port 443 to
all incoming traffic from the Internet. In that case, delete the configuration file from your
.ebextensions directory.Then create a load-balanced environment and set up SSL using the
Load Balancer section of the Configuration page of the Elastic Beanstalk management console.
The following snippet opens port 443 on Amazon EC2 instances in the EC2-Classic platform by specifying
the GroupName of the (non-VPC) Amazon EC2 security group:
Example .ebextensions snippet opening port 443 for EC2-Classic
Resources:
sslSecurityGroupIngress:
Type: AWS::EC2::SecurityGroupIngress
Properties:
GroupName: {Ref : AWSEBSecurityGroup}
IpProtocol: tcp
ToPort: 443
FromPort: 443
CidrIp: 0.0.0.0/0
API Version 2010-12-01
490
Elastic Beanstalk Developer Guide
Step 2: Create an SSL Configuration File

The following snippet opens port 443 on Amazon EC2 instances in the EC2-VPC platform by specifying
the GroupID of the VPC security group. For security groups that are in a VPC, you must use the GroupId
property.
Example .ebextensions snippet opening port 443 for EC2-VPC
Resources:
sslSecurityGroupIngress:
Type: AWS::EC2::SecurityGroupIngress
Properties:
GroupId: {Ref : AWSEBSecurityGroup}
IpProtocol: tcp
ToPort: 443
FromPort: 443
CidrIp: 0.0.0.0/0
You'll find this code in each of the examples in the next step.
Step 4: Complete the Configuration File for Your
Container Type
The contents of the configuration file are specific to the container type. Use the following examples to get
guidance for your container type:
• SSL on Single-Instances of Docker (p. 491)
• SSL on Single-Instances of Java/Apache Tomcat 6, Apache Tomcat 7, and Apache Tomcat 8 (p. 494)
• SSL on Single-Instances of Node.js (p. 496)
• SSL on Single-Instances of PHP 5.3, PHP 5.4, and PHP 5.5 (p. 500)
• SSL on Single-Instances of Python (p. 502)
• SSL on Single-Instances of Ruby (p. 506)
SSL on Single-Instances of Docker
For Docker containers, you edit the configuration file (p. 490) in the .ebextensions directory to enable
the Nginx server to use SSL. The following example performs four tasks:
• Enables port 443
• Creates an ssl.conf file in your nginx/conf.d directory
• Configures Nginx server preferences
• References the SSL certificate and RSA private key that you installed with your application
The snippet opens port 443 on Amazon EC2 instances in the EC2-Classic platform by specifying the
name of the Amazon EC2 security group. For security groups that are in a VPC, you must replace the
text GroupName with GroupId. The files key creates files on the Amazon EC2 instances. In this
example, the files are the certificate files. For more information about the contents of configuration files,
see Customizing the Software on EC2 Instances Running Linux (p. 431).
Note
Configuration files should conform to YAML or JSON formatting standards. For example,
indentation is critical to the proper interpretation of YAML. For more information, go to http://
API Version 2010-12-01
491
Elastic Beanstalk Developer Guide
Step 4: Complete the Configuration File for Your
Container Type


Example .ebextensions snippet configuring SSL for Docker
Resources:
sslSecurityGroupIngress:
Type: AWS::EC2::SecurityGroupIngress
Properties:
GroupName: {Ref : AWSEBSecurityGroup}
IpProtocol: tcp
ToPort: 443
FromPort: 443
CidrIp: 0.0.0.0/0
files:
/etc/nginx/conf.d/ssl.conf:
mode: "000755"
owner: root
group: root
content: |
# HTTPS Server
server {
listen 443;
server_name localhost;
ssl on;
ssl_certificate /etc/pki/tls/certs/server.crt;
ssl_certificate_key /etc/pki/tls/certs/server.key;
ssl_session_timeout 5m;
ssl_protocols TLSv1 TLSv1.1 TLSv1.2;
ssl_ciphers ALL:!ADH!EXPORT56:RC4+RSA:+HIGH:+MEDIUM:+LOW:+SSLv2:+EXP;
ssl_prefer_server_ciphers on;
location / {
proxy_pass http://docker;
proxy_http_version 1.1;
proxy_set_header Connection "";
proxy_set_header Host $host;
proxy_set_header X-Real-IP $remote_addr;
proxy_set_header X-Forwarded-For $proxy_add_x_forwarded_for;
}
}
/etc/pki/tls/certs/server.crt:
mode: "000400"
owner: root
group: root
content: |
-----BEGIN CERTIFICATE-----
your-certificate-here
-----END CERTIFICATE-----
/etc/pki/tls/certs/server.key:
mode: "000400"
owner: root
group: root
API Version 2010-12-01
493
Elastic Beanstalk Developer Guide
SSL on Docker

content: |
-----BEGIN RSA PRIVATE KEY-----
your-key-here
-----END RSA PRIVATE KEY-----
SSL on Single-Instances of Java/Apache Tomcat
6, Apache Tomcat 7, and Apache Tomcat 8
For Java container types, you edit the configuration file (p. 490) in your .ebextensions directory to
enable the Apache HTTP Server to use SSL when acting as the reverse proxy for Apache Tomcat 6,
Apache Tomcat 7, and Apache Tomcat 8.The following example performs four tasks:
• Enables port 443
• Uses yum to install mod_ssl
• Creates an ssl.conf file in your httpd/conf.d directory
• References the SSL certificate and RSA private key that you installed with your application
Note
For some HTTPS clients, such as those running on Android devices, you must configure the
Apache HTTP Server with an intermediate CA bundle and add the following to your SSL
configuration file (p. 490):
• In the files key, SSLCertificateChainFile
"/etc/pki/tls/certs/gd_bundle.crt"
• In the files key, the contents of the intermediate certificate file
• In the list of files in the services key, the path to the intermediate certificate file
The snippet also uses the services key to run a script that restarts the httpd service after everything is
configured so that it will use the new ssl.conf file and certificate.
The snippet opens port 443 on Amazon EC2 instances in the EC2-Classic platform by specifying the
name of the Amazon EC2 security group. For security groups that are in a VPC, you must replace the
text GroupName with GroupId. The files key creates files on the Amazon EC2 instances. In this
example, the files are the certificate files. For more information about the contents of configuration files,
see Customizing the Software on EC2 Instances Running Linux (p. 431).
Note
Configuration files should conform to YAML or JSON formatting standards. For example,
indentation is critical to the proper interpretation of YAML. For more information, go to http://
www.yaml.org/start.html or http://www.json.org, respectively. For more information about using
configuration files to deploy an application to Elastic Beanstalk, see Using Configuration
Files (p. 431).
API Version 2010-12-01
494
Elastic Beanstalk Developer Guide
SSL on Java/Apache Tomcat

Example .ebextensions snippet configuring SSL for Java
Resources:
sslSecurityGroupIngress:
Type: AWS::EC2::SecurityGroupIngress
Properties:
GroupName: {Ref : AWSEBSecurityGroup}
IpProtocol: tcp
ToPort: 443
FromPort: 443
CidrIp: 0.0.0.0/0
packages:
yum:
mod_ssl : []
files:
/etc/httpd/conf.d/ssl.conf:
mode: "000755"
owner: root
group: root
content: |
LoadModule ssl_module modules/mod_ssl.so
Listen 443
<VirtualHost *:443>
<Proxy *>
Order deny,allow
Allow from all
</Proxy>
SSLEngine on
SSLProtocol All -SSLv2 -SSLv3
SSLCertificateFile "/etc/pki/tls/certs/server.crt"
SSLCertificateKeyFile "/etc/pki/tls/certs/server.key"
ProxyPass / http://localhost:8080/ retry=0
ProxyPassReverse / http://localhost:8080/
ProxyPreserveHost on
LogFormat "%h (%{X-Forwarded-For}i) %l %u %t \"%r\" %>s %b \"%{Refer
er}i\" \"%{User-Agent}i\""
ErrorLog /var/log/httpd/elasticbeanstalk-error_log
TransferLog /var/log/httpd/elasticbeanstalk-access_log
</VirtualHost>
/etc/pki/tls/certs/server.crt:
mode: "000400"
owner: root
group: root
content: |
-----BEGIN CERTIFICATE-----
your-certificate-here
-----END CERTIFICATE-----
/etc/pki/tls/certs/server.key:
mode: "000400"
owner: root
group: root
content: |
API Version 2010-12-01
495
Elastic Beanstalk Developer Guide
SSL on Java/Apache Tomcat

-----BEGIN RSA PRIVATE KEY-----
your-key-here
-----END RSA PRIVATE KEY-----
services:
sysvinit:
httpd:
enabled: true
ensureRunning: true
files : [/etc/httpd/conf.d/ssl.conf,/etc/pki/tls/certs/serv
er.key,/etc/pki/tls/certs/server.crt]
SSL on Single-Instances of Node.js
For Node.js container types, you edit the configuration file (p. 490) in the .ebextensions directory to
enable the Nginx HTTP Server to use SSL.The following example performs three tasks:
• Enables port 443
• Creates an ssl.conf file in your nginx/conf.d directory
• References the SSL certificate and RSA private key you installed with your application
Intermediate Certificates
For some HTTPS clients, such as those running on Android devices, intermediate certificates
must be included in order for the client to trust the connection. Concatenate intermediate
certificates onto your web site's certificate and add the entire bundle to your configuration
file (p.490) in the files key. Intermediate certificates should be concatenated in order starting
with the one immediately above your site's.
For example, the following command concatenates multiple certificates to create a bundle
from the Linux command line:
$ cat YourWebserverCert.crt FirstIntermediateCert.crt SecondIntermedi
ateCert.crt > bundle.crt
The snippet opens port 443 on Amazon EC2 instances in the EC2-Classic platform by specifying the
name of the Amazon EC2 security group. For security groups that are in a VPC, you must replace the
text GroupName with GroupId. The files key creates files on the Amazon EC2 instances. In this
example, the files are the certificate files. For more information about the contents of configuration files,
see Customizing the Software on EC2 Instances Running Linux (p. 431).
Note
Configuration files should conform to YAML or JSON formatting standards. For example,
indentation is critical to the proper interpretation of YAML. For more information, go to http://
www.yaml.org/start.html or http://www.json.org, respectively. For more information about using
configuration files to deploy an application to Elastic Beanstalk, see Using Configuration
Files (p. 431).
API Version 2010-12-01
496
Elastic Beanstalk Developer Guide
SSL on Node.js

Example .ebextensions snippet configuring SSL for Node.js
Resources:
sslSecurityGroupIngress:
Type: AWS::EC2::SecurityGroupIngress
Properties:
GroupName: {Ref : AWSEBSecurityGroup}
IpProtocol: tcp
ToPort: 443
FromPort: 443
CidrIp: 0.0.0.0/0
files:
/etc/nginx/conf.d/ssl.conf:
mode: "000755"
owner: root
group: root
content: |
# HTTPS server
server {
listen 443;
server_name localhost;
ssl on;
ssl_certificate /etc/pki/tls/certs/server.crt;
ssl_certificate_key /etc/pki/tls/certs/server.key;
ssl_session_timeout 5m;
ssl_protocols TLSv1 TLSv1.1 TLSv1.2;
ssl_ciphers ALL:!ADH:!EXPORT56:RC4+RSA:+HIGH:+MEDIUM:+LOW:+SSLv2:+EXP;
ssl_prefer_server_ciphers on;
location / {
proxy_pass http://nodejs;
proxy_set_header Connection "";
proxy_http_version 1.1;
proxy_set_header Host $host;
proxy_set_header X-Real-IP $remote_addr;
proxy_set_header X-Forwarded-For $proxy_add_x_forwarded_for;
}
}
/etc/pki/tls/certs/server.crt:
mode: "000400"
owner: root
group: root
content: |
-----BEGIN CERTIFICATE-----
your-certificate-here
-----END CERTIFICATE-----
/etc/pki/tls/certs/server.key:
mode: "000400"
owner: root
group: root
API Version 2010-12-01
497
Elastic Beanstalk Developer Guide
SSL on Node.js

content: |
-----BEGIN RSA PRIVATE KEY-----
your-key-here
-----END RSA PRIVATE KEY-----
If SSL does not work after you configure it with the preceding configuration file, then you might need to
include additional information to configure an upstream Node.js server. The following example includes
the upstream directive to the Nginx server to proxy requests to port 443 on the Node.js server with IP
address 127.0.0.1.
API Version 2010-12-01
498
Elastic Beanstalk Developer Guide
SSL on Node.js

Example .ebextensions snippet configuring SSL for Node.js (with upstream directive)
Resources:
sslSecurityGroupIngress:
Type: AWS::EC2::SecurityGroupIngress
Properties:
GroupName: {Ref : AWSEBSecurityGroup}
IpProtocol: tcp
ToPort: 443
FromPort: 443
CidrIp: 0.0.0.0/0
files:
/etc/nginx/conf.d/ssl.conf:
mode: "000755"
owner: root
group: root
content: |
# HTTPS server
upstream nodejs {
server 127.0.0.1:8443;
keepalive 256;
}
server {
listen 443;
server_name localhost;
ssl on;
ssl_certificate /etc/pki/tls/certs/server.crt;
ssl_certificate_key /etc/pki/tls/certs/server.key;
ssl_session_timeout 5m;
ssl_protocols TLSv1 TLSv1.1 TLSv1.2;
ssl_ciphers ALL:!ADH:!EXPORT56:RC4+RSA:+HIGH:+MEDIUM:+LOW:+SSLv2:+EXP;
ssl_prefer_server_ciphers on;
location / {
proxy_pass http://nodejs;
proxy_set_header Connection "";
proxy_http_version 1.1;
proxy_set_header Host $host;
proxy_set_header X-Real-IP $remote_addr;
proxy_set_header X-Forwarded-For $proxy_add_x_forwarded_for;
}
}
/etc/pki/tls/certs/server.crt:
mode: "000400"
owner: root
group: root
content: |
-----BEGIN CERTIFICATE-----
your-certificate-here
-----END CERTIFICATE-----
API Version 2010-12-01
499
Elastic Beanstalk Developer Guide
SSL on Node.js

/etc/pki/tls/certs/server.key:
mode: "000400"
owner: root
group: root
content: |
-----BEGIN RSA PRIVATE KEY-----
your-key-here
-----END RSA PRIVATE KEY-----
SSL on Single-Instances of PHP 5.3, PHP 5.4,
and PHP 5.5
For PHP container types, you edit the configuration file (p.490) in the .ebextensions directory to enable
the Apache HTTP Server to use SSL. The following example performs four tasks:
• Enables port 443
• Uses yum to install mod_ssl
• Creates an ssl.conf file in your httpd/conf.d directory
• References the SSL certificate and RSA private key that you installed with your application
Note
For some HTTPS clients, such as those running on Android devices, you must configure the
Apache HTTP Server with an intermediate CA bundle and add the following to your SSL
configuration file (p. 490) in the files key:
• SSLCertificateChainFile "/etc/pki/tls/certs/gd_bundle.crt"
• The contents of the intermediate certificate file
The snippet opens port 443 on Amazon EC2 instances in the EC2-Classic platform by specifying the
name of the Amazon EC2 security group. For security groups that are in a VPC, you must replace the
text GroupName with GroupId. The files key creates files on the Amazon EC2 instances. In this
example, the files are the certificate files. For more information about the contents of configuration files,
see Customizing the Software on EC2 Instances Running Linux (p. 431).
Note
Configuration files should conform to YAML or JSON formatting standards. For example,
indentation is critical to the proper interpretation of YAML. For more information, go to http://
www.yaml.org/start.html or http://www.json.org, respectively. For more information about using
configuration files to deploy an application to Elastic Beanstalk, see Using Configuration
Files (p. 431).
API Version 2010-12-01
500
Elastic Beanstalk Developer Guide
SSL on PHP

Example .ebextensions snippet configuring SSL for PHP
Resources:
sslSecurityGroupIngress:
Type: AWS::EC2::SecurityGroupIngress
Properties:
GroupName: {Ref : AWSEBSecurityGroup}
IpProtocol: tcp
ToPort: 443
FromPort: 443
CidrIp: 0.0.0.0/0
packages:
yum:
mod24_ssl : []
files:
/etc/httpd/conf.d/ssl.conf:
mode: "000755"
owner: root
group: root
content: |
LoadModule ssl_module modules/mod_ssl.so
Listen 443
<VirtualHost *:443>
<Proxy *>
Order deny,allow
Allow from all
</Proxy>
SSLEngine on
SSLProtocol All -SSLv2 -SSLv3
SSLCertificateFile "/etc/pki/tls/certs/server.crt"
SSLCertificateKeyFile "/etc/pki/tls/certs/server.key"
ProxyPass / http://localhost:80/ retry=0
ProxyPassReverse / http://localhost:80/
ProxyPreserveHost on
RequestHeader set X-Forwarded-Proto "https" early
LogFormat "%h (%{X-Forwarded-For}i) %l %u %t \"%r\" %>s %b \"%{Refer
er}i\" \"%{User-Agent}i\""
ErrorLog /var/log/httpd/elasticbeanstalk-error_log
TransferLog /var/log/httpd/elasticbeanstalk-access_log
</VirtualHost>
/etc/pki/tls/certs/server.crt:
mode: "000400"
owner: root
group: root
content: |
-----BEGIN CERTIFICATE-----
your-certificate-here
-----END CERTIFICATE-----
/etc/pki/tls/certs/server.key:
mode: "000400"
owner: root
group: root
API Version 2010-12-01
501
Elastic Beanstalk Developer Guide
SSL on PHP

content: |
-----BEGIN RSA PRIVATE KEY-----
your-key-here
-----END RSA PRIVATE KEY-----
SSL on Single-Instances of Python
For Python container types using Apache HTTP Server with the WSGI interface, you edit the configuration
file (p. 490) in the .ebextensions directory to enable SSL.The following example performs five tasks:
• Enables port 443
• Uses yum to install mod_ssl
• Creates an ssl.conf file in your httpd/conf.d directory
• Creates a daemon process for WSGI to communicate with the application over SSL on port 443
• References the SSL certificate and RSA private key you installed with your application
Note
For some HTTPS clients, such as those running on Android devices, you must configure the
Apache HTTP Server with an intermediate CA bundle and add the following to your SSL
configuration file (p. 490) in the files key:
• SSLCertificateChainFile "/etc/pki/tls/certs/gd_bundle.crt"
• The contents of the intermediate certificate file
The snippet also uses the container_commands key to stop the httpd service after everything is
configured so that it will use the new ssl.conf file and certificate.
The snippet opens port 443 on Amazon EC2 instances in the EC2-Classic platform by specifying the
name of the Amazon EC2 security group. For security groups that are in a VPC, you must replace the
text GroupName with GroupId. The files key creates files on the Amazon EC2 instances. In this
example, the files are the certificate files. For more information about the contents of configuration files,
see Customizing the Software on EC2 Instances Running Linux (p. 431).
Note
Configuration files should conform to YAML or JSON formatting standards. For example,
indentation is critical to the proper interpretation of YAML. For more information, go to http://
www.yaml.org/start.html or http://www.json.org, respectively. For more information about using
configuration files to deploy an application to Elastic Beanstalk, see Using Configuration
Files (p. 431).
API Version 2010-12-01
502
Elastic Beanstalk Developer Guide
SSL on Python

Example .ebextensions snippet configuring SSL for Python 2.6
Resources:
sslSecurityGroupIngress:
Type: AWS::EC2::SecurityGroupIngress
Properties:
GroupName: {Ref : AWSEBSecurityGroup}
IpProtocol: tcp
ToPort: 443
FromPort: 443
CidrIp: 0.0.0.0/0
packages:
yum:
mod24_ssl : []
files:
/etc/httpd/conf.d/ssl.conf:
mode: "000755"
owner: root
group: root
content: |
LoadModule ssl_module modules/mod_ssl.so
Listen 443
<VirtualHost *:443>
<Proxy *>
Require all granted
</Proxy>
SSLEngine on
SSLProtocol All -SSLv2 -SSLv3
SSLCertificateFile "/etc/pki/tls/certs/server.crt"
SSLCertificateKeyFile "/etc/pki/tls/certs/server.key"
Alias /static /opt/python/current/app/
<Directory /opt/python/current/app/>
Order allow,deny
Allow from all
</Directory>
WSGIScriptAlias / /opt/python/current/app/application.py
<Directory /opt/python/current/app/>
Order allow,deny
Allow from all
</Directory>
WSGIDaemonProcess wsgi-ssl processes=1 threads=15 display-name=%{GROUP}
\
python-path=/opt/python/current/app:/opt/python/run/venv/lib/py
thon2.6/site-packages user=wsgi group=wsgi \
home=/opt/python/current/app
WSGIProcessGroup wsgi
</VirtualHost>
/etc/pki/tls/certs/server.crt:
mode: "000400"
owner: root
group: root
API Version 2010-12-01
503
Elastic Beanstalk Developer Guide
SSL on Python

content: |
-----BEGIN CERTIFICATE-----
your-certificate-here
-----END CERTIFICATE-----
/etc/pki/tls/certs/server.key:
mode: "000400"
owner: root
group: root
content: |
-----BEGIN RSA PRIVATE KEY-----
your-key-here
-----END RSA PRIVATE KEY-----
container_commands:
01killhttpd:
command: "killall httpd"
02waitforhttpddeath:
command: "sleep 3"
API Version 2010-12-01
504
Elastic Beanstalk Developer Guide
SSL on Python

Example .ebextensions snippet configuring SSL for Python 2.7
Resources:
sslSecurityGroupIngress:
Type: AWS::EC2::SecurityGroupIngress
Properties:
GroupName: {Ref : AWSEBSecurityGroup}
IpProtocol: tcp
ToPort: 443
FromPort: 443
CidrIp: 0.0.0.0/0
packages:
yum:
mod24_ssl : []
files:
/etc/httpd/conf.d/ssl.conf:
mode: "000755"
owner: root
group: root
content: |
LoadModule wsgi_module modules/mod_wsgi.so
WSGIPythonHome /opt/python/run/baselinenv
WSGISocketPrefix run/wsgi
WSGIRestrictEmbedded On
Listen 443
<VirtualHost *:80>
ServerName myserver
Redirect permanent / https://myserver
</VirtualHost>
<VirtualHost *:443>
ServerName myserver
SSLEngine on
SSLCertificateFile "/etc/pki/tls/certs/server.crt"
SSLCertificateKeyFile "/etc/pki/tls/certs/server.key"
Alias /static/ /opt/python/current/app/static/
<Directory /opt/python/current/app/static>
Order allow,deny
Allow from all
</Directory>
WSGIScriptAlias / /opt/python/current/app/application.py
<Directory /opt/python/current/app>
Require all granted
</Directory>
WSGIDaemonProcess wsgi-ssl processes=1 threads=15 display-name=%{GROUP}
\
python-path=/opt/python/current/app:/opt/python/run/venv/lib/py
thon2.7/site-packages user=wsgi group=wsgi \
home=/opt/python/current/app
WSGIProcessGroup wsgi-ssl
API Version 2010-12-01
505
Elastic Beanstalk Developer Guide
SSL on Python

</VirtualHost>
/etc/pki/tls/certs/server.crt:
mode: "000400"
owner: root
group: root
content: |
-----BEGIN CERTIFICATE-----
your-certificate-here
-----END CERTIFICATE-----
/etc/pki/tls/certs/server.key:
mode: "000400"
owner: root
group: root
content: |
-----BEGIN RSA PRIVATE KEY-----
your-key-here
-----END RSA PRIVATE KEY-----
container_commands:
01killhttpd:
command: "killall httpd"
02waitforhttpddeath:
command: "sleep 3"
SSL on Single-Instances of Ruby
For Ruby container types, if you use Puma as your application and web server, you edit the configuration
file (p. 490) in the .ebextensions directory to enable the Nginx HTTP Server to use SSL. For Ruby
container types that use Passenger as the application server and Nginx as the HTTP server, you edit the
configuration file (p. 490) and a separate JSON file. Both files belong in the .ebextensions directory.
Ruby with Puma
The following example performs four tasks:
• Enables port 443
• Creates an ssl.conf file in your nginx/conf.d directory
• References the SSL certificate and RSA private key you installed with your application
• Restarts the Nginx server after everything is configured so that it will use the new ssl.conf file and
certificate
The snippet opens port 443 on Amazon EC2 instances in the EC2-Classic platform by specifying the
name of the Amazon EC2 security group. For security groups that are in a VPC, you must replace the
text GroupName with GroupId. The files key creates files on the Amazon EC2 instances. In this
example, the files are the certificate files. For more information about the contents of configuration files,
see Customizing the Software on EC2 Instances Running Linux (p. 431).
Note
Configuration files should conform to YAML or JSON formatting standards. For example,
indentation is critical to the proper interpretation of YAML. For more information, go to http://
www.yaml.org/start.html or http://www.json.org, respectively. For more information about using
API Version 2010-12-01
506
Elastic Beanstalk Developer Guide
SSL on Ruby


Example .ebextensions snippet configuring SSL for Ruby with Puma
Resources:
sslSecurityGroupIngress:
Type: AWS::EC2::SecurityGroupIngress
Properties:
GroupName: {Ref : AWSEBSecurityGroup}
IpProtocol: tcp
ToPort: 443
FromPort: 443
CidrIp: 0.0.0.0/0
files:
/etc/nginx/conf.d/ssl.conf:
content: |
# HTTPS server
server {
listen 443;
server_name localhost;
ssl on;
ssl_certificate /etc/pki/tls/certs/server.crt;
ssl_certificate_key /etc/pki/tls/certs/server.key;
ssl_session_timeout 5m;
ssl_protocols TLSv1 TLSv1.1 TLSv1.2;
ssl_ciphers ALL:!ADH:!EXPORT56:RC4+RSA:+HIGH:+MEDIUM:+LOW:+SSLv2:+EXP;
ssl_prefer_server_ciphers on;
location / {
proxy_pass http://my_app;
proxy_set_header Host $host;
proxy_set_header X-Forwarded-For $proxy_add_x_forwarded_for;
}
location /assets {
alias /var/app/current/public/assets;
gzip_static on;
gzip on;
expires max;
add_header Cache-Control public;
}
location /public {
alias /var/app/current/public;
gzip_static on;
gzip on;
expires max;
add_header Cache-Control public;
}
}
/etc/pki/tls/certs/server.crt:
content: |
API Version 2010-12-01
508
Elastic Beanstalk Developer Guide
Ruby with Puma

-----BEGIN CERTIFICATE-----
your-certificate-here
-----END CERTIFICATE-----
/etc/pki/tls/certs/server.key:
content: |
-----BEGIN RSA PRIVATE KEY-----
your-key-here
-----END RSA PRIVATE KEY-----
container_commands:
01restart_nginx:
command: "service nginx restart"
Ruby with Passenger
When you use Passenger as your application server and Nginx as your web server, you use both the
configuration file and a JSON file to configure SSL on a single instance.The following example JSON
file snippet configures Nginx to use 443 as a listening port and references the SSL certificate and private
key. (You use the JSON file instead of using the files key in the configuration file to create an ssl.conf
file with this information.) Put the JSON file at the root of your application bundle.
Example JSON file snippet configuring SSL for Ruby with Passenger
{
"ssl": true,
"ssl_port": 443,
"ssl_certificate": "/var/app/current/server.crt",
"ssl_certificate_key": "/var/app/current/server.key"
}
You use the configuration file to open port 443 on Amazon EC2 instances in the EC2-Classic platform
by specifying the name of the Amazon EC2 security group. For security groups that are in a VPC, you
must replace the text GroupName with GroupId.The files key creates files on the Amazon EC2
instances. In this example, the files are the certificate files. For more information about the contents of
configuration files, see Customizing the Software on EC2 Instances Running Linux (p. 431).
Note
Configuration files should conform to YAML or JSON formatting standards. For example,
indentation is critical to the proper interpretation of YAML. For more information, go to http://
www.yaml.org/start.html or http://www.json.org, respectively. For more information about using
configuration files to deploy an application to Elastic Beanstalk, see Using Configuration
Files (p. 431).
Example .ebextensions snippet configuring SSL for Ruby with Passenger
Resources:
sslSecurityGroupIngress:
Type: AWS::EC2::SecurityGroupIngress
Properties:
GroupName: {Ref : AWSEBSecurityGroup}
IpProtocol: tcp
ToPort: 443
FromPort: 443
CidrIp: 0.0.0.0/0
API Version 2010-12-01
509
Elastic Beanstalk Developer Guide
Ruby with Passenger

Troubleshooting
Topics
• Understanding Environment Launch Events (p. 512)
• Troubleshooting Docker Containers (p. 518)
This section provides a table of the most common Elastic Beanstalk issues and how to resolve or work
around them.
WorkaroundIssue
To connect RDS to your Elastic Beanstalk application, do the
following:
• Make sure RDS is in the same Region as your Elastic
Beanstalk application.
• Make sure the RDS security group for your instance has
an authorization for the Amazon EC2 security group you
are using for your Elastic Beanstalk environment. For in-
structions on how to find the name of your EC2 security
group using the AWS Management Console, see Amazon
EC2 Security Groups (p. 354). For more information about
configuring your EC2 security group, go to the "Authorizing
Network Access to an Amazon EC2 Security Group" section
of Working with DB Security Groups in the Amazon Rela-
tional Database Service User Guide.
• For Java, make sure the MySQL JAR file is in your WEB-
INF/lib. See Using Amazon RDS and MySQL Connect-
or/J (p. 105) for more details.
Unable to connect to Amazon RDS from
Elastic Beanstalk.
Because Elastic Beanstalk uses a drop-in upgrade process,
there might be a few seconds of downtime.There is no
workaround at this time.
Experiencing a couple of seconds of
downtime when updating the version of
my application.
Create a CNAME record and point this to the public DNS of
the Amazon EC2 instance.
Unable to connect to another Amazon
EC2 instance using the Amazon EC2
security group for your Elastic Beanstalk
environment.
API Version 2010-12-01
510
Elastic Beanstalk Developer Guide

WorkaroundIssue
Register in a DNS server a CNAME record such as:
www.mydomain.com CNAME mydomain.elasticbeanstalk.com.
How can I change my application URL
from myapp.elasticbeanstalk.com to
www.myapp.com?
You can pick specific AZs using the APIs, CLI, Eclipse plug-
in, or Visual Studio plug-in. For instructions about using the
AWS Management Console to specify an Availability Zone,
see Configuring Auto Scaling with Elastic Beanstalk (p. 367).
Unable to specify a specific Availability
Zone for my Elastic Beanstalk applica-
tion.
The default settings for Elastic Beanstalk do not incur any
additional charges. However, if you modified the default set-
tings by changing the Amazon EC2 instance type or adding
additional Amazon EC2 instance, charges may be accrued.
For information about the free tier, see http://aws.amazon.com/
free. If you have questions about your account, contact our
customer service team directly.
Getting charged for my Elastic Beanstalk
application.
If you specify an SMS email address, such as one constructed
on http://www.makeuseof.com/tag/email-to-sms, you will re-
ceive the notifications by SMS.To subscribe to more than
one email address, you can use the Elastic Beanstalk com-
mand line to register an SNS topic with an environment.
How can I receive notifications by SMS?
You can upgrade your instance type to an m1.large by
launching a new environment using a 64-bit container. Once
your environment is launched, you can select Edit Configur-
ation to select m1.large. See Launching New Environ-
ments (p.299) for instructions on launching a new environment.
See Configuring Amazon EC2 Server Instances with Elastic
Beanstalk (p.352) for instructions for editing your configuration.
How do I upgrade my instance type to
an m1.large?
Try one of the following:
• Make sure you are running the latest distribution of Eclipse.
• Make sure you've signed up your account for Elastic
Beanstalk (and have received an email confirmation).
• Check the "Error Log" view in Eclipse to see if there's any
additional information or stack traces.
Unable to connect to Elastic Beanstalk
when deploying using the AWS Toolkit
for Eclipse.
The default AMIs are EBS-backed; however, the root volume
is deleted upon termination of the instance.You can alter the
delete on termination behavior by using: $ ec2-modify-
instance-attribute -b '/dev/sdc=<vol-id>:false
as described in the EC2 Command Line Reference.
How can I get Amazon EBS to work with
Elastic Beanstalk?
You can manually import servers by following the instructions
at Importing Existing Environments into Eclipse (p. 102).
Servers that were created in the AWS
Management Console do not appear in
the Toolkit for Eclipse
You can increase the command timeout period. For more in-
formation, see Launch and Update Environment Operations
Succeeded but with Command Timeouts (p. 517).
Environments are launched, but with
command timeout errors
API Version 2010-12-01
511
Elastic Beanstalk Developer Guide

WorkaroundIssue
You may have received the following event:
You cannot configure an AWS Elastic Beanstalk environ-
ment with values for both the Elastic Load Balancing
Target option and Application Healthcheck URL option
This indicates that, Elastic Beanstalk received an option set-
ting that conflicts with the value you provided for the Applic-
ation Healthcheck URL option setting in the aws:elastic-
beanstalk:application namespace. Remove the Target
option (in the aws:elb:healthcheck namespace) from the
option_settings key in the .ebextensions configuration
file and then try updating your environment again. For more
information about configuration files, see Customizing and
Configuring Elastic Beanstalk Environments (p. 430).
Unable to update an environment
Understanding Environment Launch Events
Topics
• HTTP HEAD Request to Your Elastic Beanstalk URL Fails (p. 512)
• CPU Utilization Exceeds 95.00% (p. 513)
• Elastic Load Balancer Has Zero Healthy Instances (p. 513)
• Elastic Load Balancer Cannot Be Found (p. 513)
• Instance Fails to Respond to Status Health Check (p. 515)
• Environment Launch Fails (p. 515)
• Amazon EC2 Instance Launch Fails (p. 515)
• Application Does Not Enter the Ready State Within the Timeout Period (p. 515)
• Environment Launches but with Issues (p. 516)
• Amazon EC2 Instances Fail to Launch within the Wait Period (p. 516)
• Launch and Update Environment Operations Succeeded but with Command Timeouts (p. 517)
Elastic Beanstalk monitors the environment launch process to ensure your application is healthy.To
determine your application’s health, Elastic Beanstalk sends periodic requests to the application’s health
check URL (by default root or ‘/’). If your application experiences problems and does not respond to the
health check, a variety of launch events are published.This section describes the most common launch
events, why they happen, and how to address environment launch-related problems. For instructions on
how to view your events, see Viewing Events (p. 333). For more information about health check URL, see
Health Checks (p. 362).
HTTP HEAD Request to Your Elastic Beanstalk
URL Fails
"Failed to Perform HTTP HEAD Request to http://<yourapp>.elasticbeanstalk.com:80"
Elastic Beanstalk sends periodic HTTP HEAD requests to the health check URL.This event fires when
the health check URL does not respond successfully (with HTTP code 200).
If you receive this event, try one or both of the following:
API Version 2010-12-01
512
Elastic Beanstalk Developer Guide
Launch Events

• Make sure that your application’s health check URL exists. For example, if Elastic Beanstalk makes a
health check request to
http://healthcheckrocks.elasticbeanstalk.com:80/myapp/index.jsp, ensure that
/myapp/index.jsp exists and is accessible. Similarly, for PHP, if you have
http://healthcheckrocks.elasticbeanstalk.com:80/myapp/index.php, make sure that
/myapp/index.php exists and is accessible. For ASP.NET, if you have
http://healthcheckrocks.elasticbeanstalk.com:80/myapp/default.aspx, make sure
that /myapp/default.aspx exists and is accessible.
• Inspect previous events on the Events page in the AWS Management Console to ensure that your
environment is healthy. For example, if instances of your environments are running at close to 100
percent CPU utilization, they may become unresponsive. Elastic Beanstalk will alert you via an event
that reads Instance <instance id> is experiencing CPU Utilization greater than 95.00%. Consider
adjusting auto-scaling settings or upgrading to an instance type larger than a <instance type>.
See CPU Utilization Exceeds 95.00% (p. 513) for more information about this event.
CPU Utilization Exceeds 95.00%
"CPU Utilization Greater Than 95.00%"
If you receive an event that reads Instance <instance id> is experiencing CPU utilization greater
than 95.00%. Consider adjusting auto-scaling settings or upgrading to an instance type larger
than a <instance type>., this means an instance is using the CPU for more than 95 percent of the time.
If your application can be parallelized across multiple instances, you can adjust auto-scaling settings by
increasing the maximum number of instances and adjusting your scaling trigger. For instructions, see
Configuring Auto Scaling with Elastic Beanstalk (p. 367).
If your application requires higher computing needs, you can upgrade the Amazon EC2 instance type for
your environment. For instructions, see Configuring Amazon EC2 Server Instances with Elastic
Beanstalk (p. 352).
Elastic Load Balancer Has Zero Healthy Instances
"Elastic Load Balancer awseb-<yourapp> Has Zero Healthy Instances"
When the health status of all of your instances changes from green to red, Elastic Beanstalk alerts you
that your application has become unavailable. Make sure that your application’s health check URL exists.
For example, if Elastic Beanstalk makes a health check request to
http://healthcheckrocks.elasticbeanstalk.com:80/myapp/index.jsp, ensure that
/myapp/index.jsp exists and is accessible. Similarly, for PHP, if you have
http://healthcheckrocks.elasticbeanstalk.com:80/myapp/index.php, make sure that
/myapp/index.php exists and is accessible. For ASP.NET, if you have
http://healthcheckrocks.elasticbeanstalk.com:80/myapp/default.aspx, make sure that
/myapp/default.aspx exists and is accessible.
Elastic Load Balancer Cannot Be Found
"Elastic Load Balancer awseb-<yourapp> Cannot Be Found"
If you receive an Elastic Load Balancer awseb-yourapp cannot be found. If this problem persists,
try rebuilding your environment event, the Elastic Load Balancer for your environment has been
removed.This event usually occurs when an account owner or other authorized user manually removes
the Elastic Load Balancer.To resolve this issue, you need to rebuild your environment.
API Version 2010-12-01
513
Elastic Beanstalk Developer Guide
CPU Utilization Exceeds 95.00%

To rebuild your environment
1. From the Elastic Beanstalk console applications page, click the environment name that you want to
rebuild.
2. Click Actions and the select Rebuild Environment.
API Version 2010-12-01
514
Elastic Beanstalk Developer Guide
Elastic Load Balancer Cannot Be Found

Instance Fails to Respond to Status Health Check
"Failed to Retrieve Status of Instance <instance id> 4 Consecutive Time(s)"
This event occurs when Elastic Beanstalk is not getting a response from the health check URL. Elastic
Beanstalk will try to reach the health check URL 10 times over 10 minutes. If this event occurs, try one
or both of the following:
• Make sure that your application’s health check URL exists. For example, if Elastic Beanstalk makes a
health check request to
http://healthcheckrocks.elasticbeanstalk.com:80/myapp/index.jsp, ensure that
/myapp/index.jsp exists and is accessible. Similarly, for PHP, if you have
http://healthcheckrocks.elasticbeanstalk.com:80/myapp/index.php, make sure that
/myapp/index.php exists and is accessible. For ASP.NET, if you have
http://healthcheckrocks.elasticbeanstalk.com:80/myapp/default.aspx, make sure
that /myapp/default.aspx exists and is accessible.
• Inspect previous events on the Events page on the AWS Management Console to ensure that your
environment is healthy. For example, if instances of your environments are running at close to 100
percent CPU utilization, they may become unresponsive. Elastic Beanstalk will alert you via an event
that reads Instance <instance id> is experiencing CPU Utilization greater than 95.00%. Consider
adjusting auto-scaling settings or upgrading to an instance type larger than a <instance type>.
For more information, see CPU Utilization Exceeds 95.00% (p. 513).
Environment Launch Fails
"Failed to Launch Environment"
This event occurs when Elastic Beanstalk attempts to launch an environment and encounters failures
along the way. Previous events on the Events page will alert you to the root cause of this issue.
Amazon EC2 Instance Launch Fails
"EC2 Instance Launch Failure.Waiting for a New EC2 Instance to Launch..."
This event occurs when an Amazon EC2 instance launch fails. If this event occurs, try one or both of the
following:
• Check the service health dashboard to ensure that the Elastic Compute Cloud (Amazon EC2) service
is green.
• Make sure that you are not over the Amazon EC2 instance limit for your account (the default is 10
instances).To request an increase to the Amazon EC2 instances, complete the form available at https://
console.aws.amazon.com/support/home#/case/
create?issueType=service-limit-increase&limitType=service-code-ec2-instances.
Application Does Not Enter the Ready State Within
the Timeout Period
"Exceeded Maximum Amount of Time to Wait for the Application to Become Available. Setting
Environment Ready"
During the launch of a new environment, Elastic Beanstalk monitors the environment to make sure that
the application is available. If the application is still unavailable after 6 minutes have passed, the
API Version 2010-12-01
515
Elastic Beanstalk Developer Guide
Instance Fails to Respond to Status Health Check

environment enters the ready state; this allows you to take action and make configuration changes. If this
event occurs, try one or both of the following:
• Make sure that your application’s health check URL exists. For example, if Elastic Beanstalk makes a
health check request to
http://healthcheckrocks.elasticbeanstalk.com:80/myapp/index.jsp, ensure that
/myapp/index.jsp exists and is accessible. Similarly, for PHP, if you have
http://healthcheckrocks.elasticbeanstalk.com:80/myapp/index.php, make sure that
/myapp/index.php exists and is accessible. For ASP.NET, if you have
http://healthcheckrocks.elasticbeanstalk.com:80/myapp/default.aspx, make sure
that /myapp/default.aspx exists and is accessible.
• Make sure you have uploaded a valid .war file or a .zip file.
Environment Launches but with Issues
"Launched Environment: <environment id>. However,There Were Issues During Launch. See
Event Log for Details"
During the launch of a new environment, Elastic Beanstalk monitors the environment to make sure that
the application is available. If the application is still unavailable after 6 minutes have passed, the
environment enters the ready state; this allows you to take action and make configuration changes. If this
event occurs, try one or both of the following:
• Make sure that your application’s health check URL exists. For example, if Elastic Beanstalk makes a
health check request to
http://healthcheckrocks.elasticbeanstalk.com:80/myapp/index.jsp, ensure that
/myapp/index.jsp exists and is accessible. Similarly, for PHP, if you have
http://healthcheckrocks.elasticbeanstalk.com:80/myapp/index.php, make sure that
/myapp/index.php exists and is accessible. For ASP.NET, if you have
http://healthcheckrocks.elasticbeanstalk.com:80/myapp/default.aspx, make sure
that /myapp/default.aspx exists and is accessible.
• Make sure you have uploaded a valid .war file or .zip file.
• Check previous events on the Events page.
Amazon EC2 Instances Fail to Launch within the
Wait Period
"'CREATE_FAILED' Reason:The following resource(s) failed to create:
[AWSEBInstanceLaunchWaitCondition]"
If you receive an event that indicates Stack named 'awseb-stack-name' aborted operation. Current
state: 'CREATE_FAILED' Reason:The following resource(s) failed to create:
[AWSEBInstanceLaunchWaitCondition], this means the Amazon EC2 instances did not communicate
to Elastic Beanstalk that they were launched successfully.
If you use Amazon VPC with Elastic Beanstalk, Amazon EC2 instances deployed in a private subnet
cannot communicate directly with the Internet. Amazon EC2 instances must have Internet connectivity
to communicate to Elastic Beanstalk that they were successfully launched.To provide EC2 instances in
a private subnet with Internet connectivity, you must add a load balancer and NAT to the public subnet.
You must create the appropriate routing rules for inbound and outbound traffic through the load balancer
and NAT.You must also configure the default Amazon VPC security group to allow traffic from the Amazon
EC2 instances to the NAT instance. For more information, see Example: Launching a Load-Balancing,
Autoscaling Environment with Public and Private Resources in a VPC (p. 536).
API Version 2010-12-01
516
Elastic Beanstalk Developer Guide
Environment Launches but with Issues

Launch and Update Environment Operations
Succeeded but with Command Timeouts
"'Create environment operation is complete, but with command timeouts.Try increasing the
timeout period.'"or "Update environment operation is complete, but with command timeouts.Try
increasing the timeout period.'
This event message appears when an environment is successfully created or updated, but some commands
were not completed on the Amazon EC2 instances in the environment within the expected time period.
In this situation, check the event stream or logs for details about which on-instance commands were not
completed. For more information about viewing events, see Viewing Events (p.333). For more information
about logging, see Working with Logs (p. 415).Then try increasing the command timeout period by doing
one of the following:
• Include the following option setting in the Options.txt file to configure the command timeout period
to 900 seconds (or 15 minutes).
[
{"Namespace": "aws:elasticbeanstalk:command",
"OptionName": "Timeout",
"Value": 900}
]
• Add the following to a configuration file with the extension .config that you place in an .ebextensions
top-level directory of your source bundle. For more information, see Customizing the Software on EC2
Instances Running Linux or Customizing the Software on EC2 Instances Running Windows.
option_settings:
- namespace: aws:elasticbeanstalk:command
option_name: Timeout
value: 900
• Call CreateEnvironment or UpdateEnvironment with the following parameters:
• EnvironmentName = SampleAppEnv2
• VersionLabel = Version2
• SolutionStackName = 32bit Amazon Linux running Tomcat 6
• ApplicationName = SampleApp
• OptionSettings.member.1.Namespace = aws:elasticbeanstalk:command
• OptionSettings.member.1.OptionName = Timeout
• OptionSettings.member.1.Value = 900
API Version 2010-12-01
517
Elastic Beanstalk Developer Guide
Launch and Update Environment Operations Succeeded
but with Command Timeouts

Example
https://elasticbeanstalk.us-west-2.amazon.com/?ApplicationName=SampleApp
&VersionLabel=Version2
&EnvironmentName=SampleAppEnv2
&SolutionStackName=32bit%20Amazon%20Linux%20running%20Tomcat%206
&Operation=CreateEnvironment
&OptionSettings.member.1.Namespace=aws%3Aelasticbeanstalk%3Acommand
&OptionSettings.member.1.OptionName=Timeout
&OptionSettings.member.1.Value=900
&AuthParams
Troubleshooting Docker Containers
This section lists the most common Elastic Beanstalk error messages related to Docker containers, the
cause of the errors, and how to resolve or work around them.These errors cause your environment to
fail to enter a healthy, Green status. Error messages can appear as events on the Elastic Beanstalk
console Events page or in the tail logs.
Dockerfile Syntax Errors
Error Messages
The Events page displays the following sequence of error messages:
[Instance: <instance ID> Module: AWSEBAutoScalingGroup ConfigSet: null] Command failed on
instance. Return code: 1 Output: Error occurred during build: Command hooks failed.
Failed to pull Docker image :latest: <date and timestamp> Invalid repository name (), only
[a-z0-9-_.] are allowed.Tail the logs for more details.
Script /opt/elasticbeanstalk/hooks/appdeploy/enact/01build.sh failed with returncode 1
Additionally, the tail log displays the following series of error messages:
cat: Dockerrun.aws.json: No such file or directory
<date and timestamp> Invalid repository name (), only [a-z0-9-_.] are allowed
<date and timestamp> [ERROR] (1938 MainThread) [directoryHooksExecutor.py-33] [root
directoryHooksExecutor error] Script /opt/elasticbeanstalk/hooks/appdeploy/enact/01build.sh failed
with returncode 1
Cause
The dockerfile is syntactically incorrect.
Solution
Check the syntax of the dockerfile using a JSON validator. Also verify the dockerfile contents against
the requirements described in Single Container Docker Configurations (p. 68).
Dockerrun.aws.json Syntax Errors
Error Messages
The Events page displays the following sequence of error messages:
API Version 2010-12-01
518
Elastic Beanstalk Developer Guide
Docker Containers

[Instance: <instance ID> Module: AWSEBAutoScalingGroup ConfigSet: null] Command failed on
instance. Return code: 1 Output: Error occurred during build: Command hooks failed.
Script /opt/elasticbeanstalk/hooks/appdeploy/enact/01build.sh failed with returncode 1
Failed to pull Docker image :latest: <date and timestamp> Invalid repository name (), only
[a-z0-9-_.] are allowed.Tail the logs for more details.
Additionally, the tail logs display the following sequence of error messages:
parse error: Invalid numeric literal
<date and timestamp> Invalid repository name (), only [a-z0-9-_.] are allowed
[ERROR] (1942 MainThread) [directoryHooksExecutor.py-33] [root directoryHooksExecutor error]
Script /opt/elasticbeanstalk/hooks/appdeploy/enact/01build.sh failed with returncode 1
Cause
The dockerrun.aws.json file is syntactically incorrect.
Solution
Check the syntax of the dockerfile using a JSON validator. Also verify the dockerfile contents against
<topic with dockerfile requirements>.
No EXPOSE Directive Found in Dockerfile
Error Messages
The Events page includes the following error message:
No EXPOSE directive found in Dockerfile, abort deployment
Cause
The dockerfile or the dockerrun.aws.json file does not declare the container port.
Solution
Do one of the following to declare the port exposed on the image:
• In the dockerfile, include an EXPOSE instruction. For example:
EXPOSE 80
• In the dockerrun.aws.json file, include the Ports key. For example:
{
"Ports": [
{
"ContainerPort": "80"
}
]
}
Note
When the dockerfile exists and includes the EXPOSE instruction, Elastic Beanstalk ignores
the Ports key and value in the dockerrun.aws.json file.
API Version 2010-12-01
519
Elastic Beanstalk Developer Guide
No EXPOSE Directive Found in Dockerfile

Invalid EC2 Key Pair and/or S3 Bucket in
Dockerrun.aws.json
Error Messages
The Events page displays the following sequence of error messages:
[Instance: <instance ID> Module: AWSEBAutoScalingGroup ConfigSet: null] Command failed on
instance. Return code: 1 Output: Error occurred during build: Command hooks failed.
Failed to download authentication credentials <repository> from <bucket name>
Script /opt/elasticbeanstalk/hooks/appdeploy/enact/01build.sh failed with returncode 1
Cause
The dockerrun.aws.json provides an invalid EC2 key pair and/or S3 bucket for the .dockercfg
file. Or, the instance profile does not have GetObject authorization for the S3 bucket.
Solution
Verify that the .dockercfg file contains a valid S3 bucket and EC2 key pair. Grant permissions for
the action s3:GetObject to the IAM role in the instance profile. For an example policy, go to Using
IAM Roles with Elastic Beanstalk (p. 568)
API Version 2010-12-01
520
Elastic Beanstalk Developer Guide
Invalid EC2 Key Pair and/or S3 Bucket in
Dockerrun.aws.json

Using Elastic Beanstalk with Other
AWS Services
Topics
• Architectural Overview (p. 521)
• Using Elastic Beanstalk with Amazon CloudFront (p. 522)
• Using Elastic Beanstalk with AWS CloudTrail (p. 522)
• Using Elastic Beanstalk with Amazon CloudWatch (p. 523)
• Using Elastic Beanstalk with Amazon CloudWatch Logs (p. 523)
• Using Elastic Beanstalk with DynamoDB (p. 527)
• Using Elastic Beanstalk with Amazon ElastiCache (p. 527)
• Using Elastic Beanstalk with Amazon RDS (p. 528)
• Using Elastic Beanstalk with Amazon Route 53 to Map Your Domain to Your Load Balancer (p. 528)
• Using Elastic Beanstalk with Amazon S3 (p. 531)
• Using Elastic Beanstalk with Amazon VPC (p. 531)
• Using Elastic Beanstalk with AWS Identity and Access Management (IAM) (p. 561)
This topic discusses the integration of Elastic Beanstalk with other AWS services.
Architectural Overview
The following diagram illustrates an example architecture of Elastic Beanstalk across multiple Availability
Zones working with other AWS products such as Amazon CloudFront, Amazon Simple Storage Service
(Amazon S3), and Amazon Relational Database Service (Amazon RDS). For a more detailed discussion
about Amazon Route 53, Elastic Load Balancing, Amazon Elastic Compute Cloud (Amazon EC2) and
host manager (HM), see Architectural Overview (p. 16).
API Version 2010-12-01
521
Elastic Beanstalk Developer Guide
Architectural Overview

To plan for fault-tolerance, it is advisable to have N+1 Amazon EC2 instances and spread your instances
across multiple Availability Zones. In the unlikely case that one Availability Zone goes down, you will still
have your other Amazon EC2 instances running in another Availability Zone.You can adjust Auto Scaling
to allow for a minimum number of instances as well as multiple Availability Zones. For instructions on
how to do this, see Launch Configuration (p. 369). For more information about building fault-tolerant
applications, go to Building Fault-Tolerant Applications on AWS.
The following sections discuss in more detail integration with Amazon CloudFront, Amazon CloudWatch,
Amazon DynamoDB Amazon ElastiCache, Amazon RDS, Amazon Route 53, Amazon Simple Storage
Service, Amazon VPC , and IAM.
Using Elastic Beanstalk with Amazon CloudFront
Amazon CloudFront distributes your web content (such as images, video, and so on) using a network of
edge locations around the world. End users are routed to the nearest edge location, so content is delivered
with the best possible performance. CloudFront works seamlessly with Amazon S3. After you create and
deploy your Elastic Beanstalk you can sign up for Amazon CloudFront and start using Amazon CloudFront
to distribute your content. Create your distribution from a custom origin, and use an Elastic Beanstalk
domain name.To get started using Amazon CloudFront, go to the Amazon CloudFront Developer Guide.
Using Elastic Beanstalk with AWS CloudTrail
AWS CloudTrail is an AWS service that logs the history of API calls from other AWS services. CloudTrail
can identify which users and accounts called which APIs, each call's source IP address, and when the
calls occurred.You turn on CloudTrail after you deploy your application to Elastic Beanstalk.
CloudTrail delivers log files to a new or existing Amazon S3 bucket.You can then use Amazon S3 to
view the encrypted log files.You can store log files in your bucket indefinitely for as long as you want or
define Amazon S3 lifecycle rules to archive or delete log files automatically.
Other AWS services can enhance your use of CloudTrail. For example, you can configure Amazon SNS
to notify you when CloudTrail delivers new log files to your Amazon S3 bucket. Or use IAM to explicitly
specify who can perform various CloudTrail tasks.These include creating, configuring, or deleting CloudTrail
trails, starting and stopping logging, and accessing buckets with log files.
To get started using CloudTrail, go to the CloudTrail User Guide.
API Version 2010-12-01
522
Elastic Beanstalk Developer Guide
Amazon CloudFront

Using Elastic Beanstalk with Amazon
CloudWatch
Amazon CloudWatch enables you to monitor, manage, and publish various metrics, as well as configure
alarm actions based on data from metrics. Amazon CloudWatch monitoring enables you to collect, analyze,
and view system and application metrics so that you can make operational and business decisions more
quickly and with greater confidence.You can use Amazon CloudWatch to collect metrics about your
Amazon Web Services (AWS) resources—such as the performance of your Amazon EC2 instances.You
can also publish your own metrics directly to Amazon CloudWatch. Amazon CloudWatch alarms help
you implement decisions more easily by enabling you to send notifications or automatically make changes
to the resources you are monitoring, based on rules that you define. For example, you can create alarms
that initiate Auto Scaling and Amazon Simple Notification Service (Amazon SNS) actions on your behalf.
Elastic Beanstalk automatically uses Amazon CloudWatch to help you monitor your application and
environment status.You can navigate to the Amazon CloudWatch console to see your dashboard and
get an overview of all of your resources as well as your alarms.You can also choose to view more metrics
or add custom metrics. For more information about Amazon CloudWatch, go to the Amazon CloudWatch
Developer Guide. For an example of how to use Amazon CloudWatch with Elastic Beanstalk, see Example:
Using Custom Amazon CloudWatch Metrics (p. 441).
For an example walkthrough using custom Amazon CloudWatch metrics, see Example: Using Custom
Amazon CloudWatch Metrics (p. 441).
Using Elastic Beanstalk with Amazon
CloudWatch Logs
You can integrate Elastic Beanstalk with Amazon CloudWatch Logs. CloudWatch Logs is available to
environments in the US East (Northern Virginia) region (us-east-1), US West (Oregon) region (us-west-2),
EU (Ireland) region (eu-west-1), EU (Frankfurt) region (eu-central-1), Asia Pacific (Singapore) region
(ap-southeast-1), Asia Pacific (Sydney) region (ap-southeast-2), and Asia Pacific (Tokyo) region
(ap-northeast-1).With CloudWatch Logs, you can monitor and archive your Elastic Beanstalk application,
system, and custom log files. Furthermore, you can configure alarms that make it easier for you to take
actions in response to specific log stream events that your metric filters extract.The CloudWatch Logs
agent installed on each Amazon EC2 in your environment publishes metric data points to the CloudWatch
service for each log group you configure. Each log group applies its own filter patterns to determine what
log stream events to send to CloudWatch as data points. Log streams that belong to the same log group
share the same retention, monitoring, and access control settings. For more information about CloudWatch
Logs, including terminology and concepts, go to Monitoring System, Application, and Custom Log Files.
The following figure displays graphs on the Monitoring page for an environment that is configured with
CloudWatch Logs integration.The example metrics in this environment are named CWLHttp4xx and
CWLHttp5xx. In the image, the CWLHttp4xx metric has triggered an alarm according to conditions
specified in the configuration files.
API Version 2010-12-01
523
Elastic Beanstalk Developer Guide
Amazon CloudWatch

The following figure displays graphs on the Alarms page for the example alarms named
AWSEBCWLHttp4xxPercentAlarm and AWSEBCWLHttp5xxCountAlarm that correspond to the
CWLHttp4xx and CWLHttp5xx metrics, respectively.
API Version 2010-12-01
524
Elastic Beanstalk Developer Guide
Amazon CloudWatch Logs

Granting IAM Permissions for the CloudWatch
Logs Agent
Before you can configure integration with CloudWatch Logs, you must set up IAM permissions to use
with the CloudWatch Logs agent.You can attach the following custom action policy to the IAM role that
you use to launch your environment:
{
"Version": "2012-10-17",
"Statement": [
{
"Effect": "Allow",
"Action": [
"logs:CreateLogGroup",
"logs:CreateLogStream",
"logs:GetLogEvents",
"logs:PutLogEvents",
"logs:DescribeLogGroups",
"logs:DescribeLogStreams"
],
"Resource": [
"arn:aws:logs:us-west-2:*:*"
]
}
API Version 2010-12-01
525
Elastic Beanstalk Developer Guide
Granting IAM Permissions

]
}
Setting Up CloudWatch Logs Integration with
Configuration Files
When you create or update an environment, you can use the sample configuration files in the following
list to set up and configure integration with CloudWatch Logs.You can include the .zip file that contains
following configuration files or the extracted configuration files in the .ebextensions directory at the
top level of your application source bundle. Use the appropriate files for the web server for your container
type. For more information about the web server used by each container type, see Supported
Platforms (p. 19).
Note
You cannot configure CloudWatch Logs integration with Elastic Beanstalk applications created
in .NET containers.
You can download the configuration files at the following locations:
• Tomcat (Java) configuration files
• Apache (PHP and Python) configuration files
• Nginx (Ruby, Node.js, and Docker) configuration files
Each .zip file contains the following configuration files:
• cwl-setup.config – This file installs the CloudWatch Logs agent on each Amazon EC2 instance in
your environment and then configures the agent.This file also creates the general.conf file when
Elastic Beanstalk launches the instance.You can use the cwl-setup.config file without any
modifications.
If you prefer, you can manually set up the CloudWatch Logs agent on a new instance as explained in
either Quick Start: Install and Configure the CloudWatch Logs Agent on a New EC2 Instance (for new
instances) or Quick Start: Install and Configure the CloudWatch Logs Agent on an Existing EC2 Instance
(for existing instances) in the Amazon CloudWatch Developer Guide.
• cwl-webrequest-metrics.config – This file specifies which logs the CloudWatch Logs agent
monitors.The file also specifies the metric filters the CloudWatch Logs agent applies to each log that
it monitors. Metric filters include filter patterns that map to the space-delimited entries in your log files.
(If you have custom logs, update or replace the example filter patterns in this example configuration
file as needed.)
Metric filters also include metric transformations that specify what metric name and value to use when
the CloudWatch Logs agent sends metric data points to the CloudWatch service.The CloudWatch
Logs agent sends metric data points based on whether any entries in the web server access log file
match the filter patterns.
Finally, the configuration file also includes an alarm action to send a message to an Amazon Simple
Notification Service topic, if you created one for your environment, when the alarm conditions specified
in the cwl-setup.config file are met. For more information about filter patterns, see Filter and Pattern
Syntax in the Amazon CloudWatch Developer Guide. For more information about Amazon SNS, go to
the Amazon Simple Notification Service Developer Guide. For more information about managing alarms
from the Elastic Beanstalk management console, see Managing Alarms (p. 331).
Note
CloudWatch costs are applied to your AWS account for any alarms that you use.
API Version 2010-12-01
526
Elastic Beanstalk Developer Guide
Setting Up CloudWatch Logs Integration with
Configuration Files

• eb-logs.config – This file sets up the CloudWatch Logs log files for the CloudWatch Logs agent.
This configuration file also ensures that log files are copied to Amazon S3 as part of log rotation.You
can use this file without any modifications.
Troubleshooting CloudWatch Logs Integration
If Elastic Beanstalk cannot launch your environment when try to integrate Elastic Beanstalk with
CloudWatch Logs, you can investigate the following common issues:
• Your IAM role lacks the required IAM permissions.
• You attempted to launch an environment in a region where CloudWatch Logs is not supported.
• Access logs do not exist at the path specified in the cwl-webrequest-metrics.config file
(/var/log/httpd/elasticbeanstalk-access_log).
Using Elastic Beanstalk with DynamoDB
DynamoDB is a fully managed NoSQL database service that provides fast and predictable performance
with seamless scalability. If you are a developer, you can use DynamoDB to create a database table that
can store and retrieve any amount of data, and serve any level of request traffic. DynamoDB automatically
spreads the data and traffic for the table over a sufficient number of servers to handle the request capacity
specified by the customer and the amount of data stored, while maintaining consistent and fast
performance. All data items are stored on Solid State Disks (SSDs) and are automatically replicated
across multiple Availability Zones in a Region to provide built-in high availability and data durability.
If you are a database administrator, you can launch a new DynamoDB database table, scale up or down
your request capacity for the table without downtime or performance degradation, and gain visibility into
resource utilization and performance metrics, all through the AWS Management Console.With DynamoDB,
you can offload the administrative burdens of operating and scaling distributed databases to AWS, so
you don’t have to worry about hardware provisioning, setup and configuration, replication, software
patching, or cluster scaling.
For more information about DynamoDB, go to the DynamoDB Developer Guide. For an example
walkthrough using DynamoDB with Elastic Beanstalk, see Example: DynamoDB, CloudWatch, and
SNS (p. 467). For information about a project that builds on the AWS SDK for Java to use DynamoDB as
a session-state provider for Apache Tomcat applications, see Manage Tomcat Session State with
DynamoDB in the AWS SDK for Java documentation.
Using Elastic Beanstalk with Amazon
ElastiCache
Amazon ElastiCache is a web service that makes it easy to set up, manage, and scale distributed
in-memory cache environments in the cloud. It provides a high performance, resizable, and cost-effective
in-memory cache, while removing the complexity associated with deploying and managing a distributed
cache environment. Amazon ElastiCache is protocol-compliant with Memcached, so the code, applications,
and most popular tools that you use today with your existing Memcached environments will work seamlessly
with the service. For more information about Amazon ElastiCache, go to the Amazon ElastiCache product
page.
To use Elastic Beanstalk with Amazon ElastiCache
1. Create an ElastiCache cluster. For instructions on how to create an ElastiCache cluster, go to Create
a Cache Cluster in the Amazon ElastiCache Getting Started Guide.
API Version 2010-12-01
527
Elastic Beanstalk Developer Guide
Troubleshooting CloudWatch Logs Integration

2. Configure your Amazon ElastiCache Security Group to allow access from the Amazon EC2 security
group used by your Elastic Beanstalk application. For instructions on how to find the name of your
EC2 security group using the AWS Management Console, see Amazon EC2 Security Groups (p.354).
For more information, go to Authorize Access in the Amazon ElastiCache Getting Started Guide.
If you are using a non-legacy container, you can also use configuration files to customize your Elastic
Beanstalk environment to use Amazon ElastiCache. For information on supported container types and
customizing your environment, see Customizing and Configuring Elastic Beanstalk Environments (p.430).
For an example snippet using Amazon ElastiCache with Elastic Beanstalk, see Example Snippets:
ElastiCache (p. 459).
Using Elastic Beanstalk with Amazon RDS
Amazon Relational Database Service (Amazon RDS) is a web service that makes it easy to set up,
operate, and scale a relational database in the cloud. It provides cost-efficient and resizable capacity
while managing time-consuming database administration tasks, freeing you to focus on your applications
and business.
If you plan to use Amazon RDS, it is advisable to configure Amazon RDS across multiple Availability
Zones.This enables a synchronous standby replica of your database to be provisioned in a different
Availability Zone.To keep both databases in sync, updates to your database instance are synchronously
replicated across Availability Zones. In case of a failover scenario, the standby is promoted to be the
primary and will handle the database operations. Running your database instance in multiple Availability
Zones safeguards your data in the unlikely event of a database instance component failure or service
health disruption in one Availability Zone.
The instructions for configuring your Elastic Beanstalk application with Amazon RDS depend on the
programming language you use.
• Java — Using Amazon RDS and MySQL Connector/J (p. 105)
• .NET (SQL Server) — Get Started (p. 126)
• .NET (MySQL Server) — Using Amazon RDS (p. 152)
• Node.js — Using Amazon RDS with Node.js (p. 216)
• PHP — Using Amazon RDS with PHP (p. 237)
• Python — Using Amazon RDS with Python (p. 258)
• Ruby — Using Amazon RDS with Ruby (p. 275)
Using Elastic Beanstalk with Amazon Route 53
to Map Your Domain to Your Load Balancer
Due to the way the DNS protocol works, there is no way to refer your Elastic Load Balancer from the root
(also known as the apex) of the domain. For instance, you can create a DNS entry that maps
http://www.example.com to an Elastic Load Balancer, but you cannot do the same for http://example.com.
Amazon Route 53 enables you to map the apex of a hosted zone to your Elastic Load Balancer using an
Alias record. When Amazon Route 53 encounters an Alias record, it looks up the A records associated
with the target DNS name in the Alias, and returns the IP addresses from that name.The following
procedure steps you through how to use Amazon Route 53 to map your root domain to your Elastic Load
Balancer.
API Version 2010-12-01
528
Elastic Beanstalk Developer Guide
Amazon RDS

To map your root domain and subdomains to your Elastic Load Balancing load balancer
1. Follow the Amazon Route 53 Getting Started Guide instructions to sign up for Route 53, create a
hosted zone, and then update your name server records with your registrar.
2. Get the value of the hosted zone ID for your load balancer.
a. Open the Amazon EC2 console at https://console.aws.amazon.com/ec2/.
b. From the region list, select a region.
c. In the Navigation pane, click Load Balancers .
d. Select the load balancer associated with your Elastic Beanstalk application. Depending on your
container type, the load balancer will appear in one of the following formats:
• Legacy container — awseb-<your app environment name>
• Nonlegacy container — contains awseb in the load balancer name. To verify you have the
correct load balancer for your environment, check the instance name in the Instances tab.
The instance name should be your environment name.
Your hosted ID will appear in the Load Balancer details pane on the Description tab. Make a
note of your hosted ID.
3. Create alias resource record sets in your hosted zone for your root domain and subdomain. For
instructions, go to How to Create an Alias Resource Record Set in the Amazon Route 53 Developer
Guide.
4. Your root domain and subdomain are now mapped to your Elastic Beanstalk elastic load balancer.
Type your domain name in your web browser to verify it worked.
API Version 2010-12-01
529
Elastic Beanstalk Developer Guide
Amazon Route 53

If you rebuild your environment, launch a new environment, or swap your environment URL, you will need
to map your root domain to the load balancer in your new environment.
To map your root domain to your new Elastic Load Balancer
1. Get the value of the hosted zone ID for your old Elastic Load Balancer.
a. Open the Amazon EC2 console at https://console.aws.amazon.com/ec2/.
b. In the navigation pane, click Load Balancers.
c. Select the load balancer associated with your Elastic Beanstalk application. Depending on your
container type, the load balancer will appear in one of the following formats:
• Legacy container — awseb-<your app environment name>
• Non-legacy container — contains awseb in the load balancer name. To verify you have the
correct load balancer for your environment, check the instance name in the Instances tab.
The instance name should be your environment name.
Your hosted ID will appear in the Load Balancer details pane on the Description tab. Make a
note of your hosted ID.
2. Change an alias resource record set in your hosted zone. For instructions, go to Creating, Changing,
and Deleting Resource Record Sets Using the Route 53 Console in the Amazon Route 53 Developer
Guide.
3. Your root domain and subdomain are now mapped to your Elastic Beanstalk elastic load balancer.
Type your domain name in your web browser to verify it worked.
API Version 2010-12-01
530
Elastic Beanstalk Developer Guide
Amazon Route 53

4. After you have confirmed that the changes completed successfully, you can terminate your old
environment. For instructions on how to terminate an environment, see Terminating an
Environment (p. 423).
Using Elastic Beanstalk with Amazon S3
Amazon S3 is a simple web service that provides highly durable, fault-tolerant data storage. Behind the
scenes, Amazon S3 stores objects redundantly on multiple devices across multiple facilities in an Amazon
S3 Region. In the unlikely event of a failure in an Amazon Web Service data center, you will still have
access to your data. Elastic Beanstalk automatically signs you up for Amazon S3 when you sign up for
Elastic Beanstalk. When you create your application and deploy it to Elastic Beanstalk your application
will be automatically uploaded to an Amazon S3 bucket. To learn more about Amazon S3, go to the
Amazon Simple Storage Service (Amazon S3) product page. For code samples that demonstrate how
to retrieve objects directly from S3, see Getting Objects.
Using Elastic Beanstalk with Amazon VPC
Amazon Virtual Private Cloud (Amazon VPC) enables you to define a virtual network in your own isolated
section within the Amazon Web Services (AWS) cloud, known as a virtual private cloud (VPC). Using
VPC, you can deploy a new class of web applications on Elastic Beanstalk, including internal web
applications (such as your recruiting application), web applications that connect to an on-premise database
(using a VPN connection), as well as private web service back-ends. Elastic Beanstalk launches your
AWS resources, such as instances, into your VPC.Your VPC closely resembles a traditional network,
with the benefits of using AWS's scalable infrastructure.You have complete control over your VPC; you
can select the IP address range, create subnets, and configure routes and network gateways.To protect
the resources in each subnet, you can use multiple layers of security, including security groups and
network access control lists. For more information about Amazon VPC, go to the Amazon VPC User
Guide.
You can deploy an Elastic Beanstalk application inside a Amazon VPC with any of the following container
types:
• Docker
• Node.js
• PHP 5.3, PHP 5.4, and PHP 5.5
• Python
• Ruby 1.8.7, 1.9.3, 2.0.0, and 2.1.2
• Apache Tomcat 6, 7, and 8
• Windows Server 2008 R2 running IIS 7.5 and Windows Server 2012 running IIS 8 or IIS 8.5
Elastic Beanstalk supports legacy and nonlegacy containers for PHP 5.3, Windows Server 2008 R2
running IIS 7.5, Windows Server 2012 running IIS 8, and Apache Tomcat 6 or 7. If you are not sure if you
are using a legacy container, check the Elastic Beanstalk console. For instructions, see To check if you
are using a legacy container type (p. 426).
What VPC Configurations Do I Need?
When you use Amazon VPC with Elastic Beanstalk, you can launch Elastic Beanstalk resources, such
as Amazon EC2 instances, in a public or private subnet.The subnets that you require depend on your
Elastic Beanstalk application environment type and whether the resources you launch are public or private.
The following scenarios discuss sample VPC configurations that you might use for a particular environment.
API Version 2010-12-01
531
Elastic Beanstalk Developer Guide
Amazon S3

Single-instance environments
For single-instance environments, Elastic Beanstalk assigns an Elastic IP address (a static, public
IP address) to the instance so that it can communicate directly with the Internet. No additional network
interface, such as a network address translator (NAT), is required for a single-instance environment.
If you have a single-instance environment without any associated private resources, such as a
back-end Amazon RDS DB instance, create a VPC with one public subnet and include the instance
in that subnet. For more information, see Example: Launching a Single-Instance Environment without
Any Associated Private Resources in a VPC (p. 533).
If you have resources that you don't want public, create a VPC with one public subnet and one private
subnet. Add all your public resources like the single Amazon EC2 instance in the public subnet, and
add private resources like a back-end Amazon RDS DB instance in the private subnet. If you do
launch an Amazon RDS DB instance in a VPC, you must create at least two different private subnets
that are in different Availability Zones (an Amazon RDS requirement).
Load-balancing, autoscaling environments
For load-balancing, autoscaling environments, you can either create a public and private subnet for
your VPC or use a single public subnet. In the case of a load-balancing, autoscaling environment
with both a public and private subnet, Amazon EC2 instances in the private subnet require Internet
connectivity. Consider the following scenarios.
If you want your Amazon EC2 instances to have a private IP address, create a public and private
subnet for your VPC in each Availability Zone (an Elastic Beanstalk requirement).Then add your
public resources, like the load balancer and NAT, to the public subnet. That way, Elastic Beanstalk
assigns them unique Elastic IP addresses (a static, public IP address). Launch your Amazon EC2
instances in the private subnet so that Elastic Beanstalk assigns them nonrouteable private IP
addresses.
Without a public IP address, an Amazon EC2 instance can't directly communicate with the Internet.
Although Amazon EC2 instances in a private subnet can't send outbound traffic by default, neither
can they receive unsolicited inbound connections from the Internet.
To enable communication between the private subnet and the public subnet and the Internet beyond
the public subnet, create routing rules that do the following:
• Route all inbound traffic to an Amazon EC2 instance through a load balancer.
• Route all outbound traffic from an Amazon EC2 instance through a NAT.
If you have associated resources that are private, such as a back-end Amazon RDS DB instance,
launch the DB instance in the private subnet. If you do launch an Amazon RDS DB instance in a
VPC, you must create at least two different private subnets that are in different Availability Zones (an
Amazon RDS requirement). For more information, see Example: Launching an Elastic Beanstalk in
a VPC with Amazon RDS (p. 550).
If you don't have any private resources associated with your Amazon EC2 instances, you can
create a single public subnet for your VPC. If you want to use a single public subnet, you must choose
the Associate Public IP Address option to add the load balancer and your Amazon EC2 instances
to the public subnet. Elastic Beanstalk assigns an public IP address to each Amazon EC2 instance
and eliminates the need for a NAT for the instances to communicate with the Internet.
For more information, see Example: Launching a Load-Balancing, Autoscaling Environment with
Public and Private Resources in a VPC (p. 536).
If you require direct access to your Amazon EC2 instances in a private subnet (for example, if
you want to use SSH to sign in to an instance), create a bastion host in the public subnet that proxies
requests from the Internet. From the Internet, you can connect to your instances by using the bastion
host. For more information, see Example: Launching an Elastic Beanstalk Application in a VPC with
Bastion Hosts (p. 542).
API Version 2010-12-01
532
Elastic Beanstalk Developer Guide
What VPC Configurations Do I Need?

Extend your own network into AWS
If you want to extend your own network into the cloud and also directly access the Internet from your
VPC, create a VPN gateway. For instructions on creating a VPN Gateway, see Scenario 3:VPC with
Public and Private Subnets and Hardware VPN Access.
Example: Launching a Single-Instance
Environment without Any Associated Private
Resources in a VPC
You can deploy an Elastic Beanstalk application in a public subnet. Use this configuration if you just have
a single instance without any private resources that are associated with the instance, such as an Amazon
RDS DB instance that you don't want publicly accessible. Elastic Beanstalk assigns an Elastic IP address
to the instance so that it can access the Internet through the VPC Internet gateway.
Step 1: Create a VPC with a Public Subnet
To create a VPC
1. Sign in to the Amazon VPC console.
2. In the navigation pane, click VPC Dashboard, locate the Resources area, and then click Start VPC
Wizard.
3. Select VPC with a Single Public Subnet and then click Select.
API Version 2010-12-01
533
Elastic Beanstalk Developer Guide
Example: Launching a Single-Instance Environment
without Any Associated Private Resources in a VPC

The next page shows the CIDR block used for the VPC and subnet, the subnet name, and the
Availability Zone associated with the subnet.There is no default name for a VPC, but you can specify
one. On this page, you can also enable DNS hostnames and choose the instance tenancy attribute
for instances that are launched in the VPC
Note
If you choose Default instance tenancy, instances run on shared hardware. If you choose
Dedicated instance tenancy, instances run on single-tenant hardware.You can't change
the instance tenancy of a VPC after you create it.
.
4. After you review settings and make changes as needed, click Create VPC.
AWS creates your VPC, subnet, Internet gateway, and route table. Click Close to end the wizard.
The VPC is assigned a VPC ID after AWS successfully creates it.You need the VPC ID for the next
step. To view your VPC ID, click Your VPCs in the navigation pane of the Amazon VPC console.
API Version 2010-12-01
534
Elastic Beanstalk Developer Guide
Example: Launching a Single-Instance Environment
without Any Associated Private Resources in a VPC
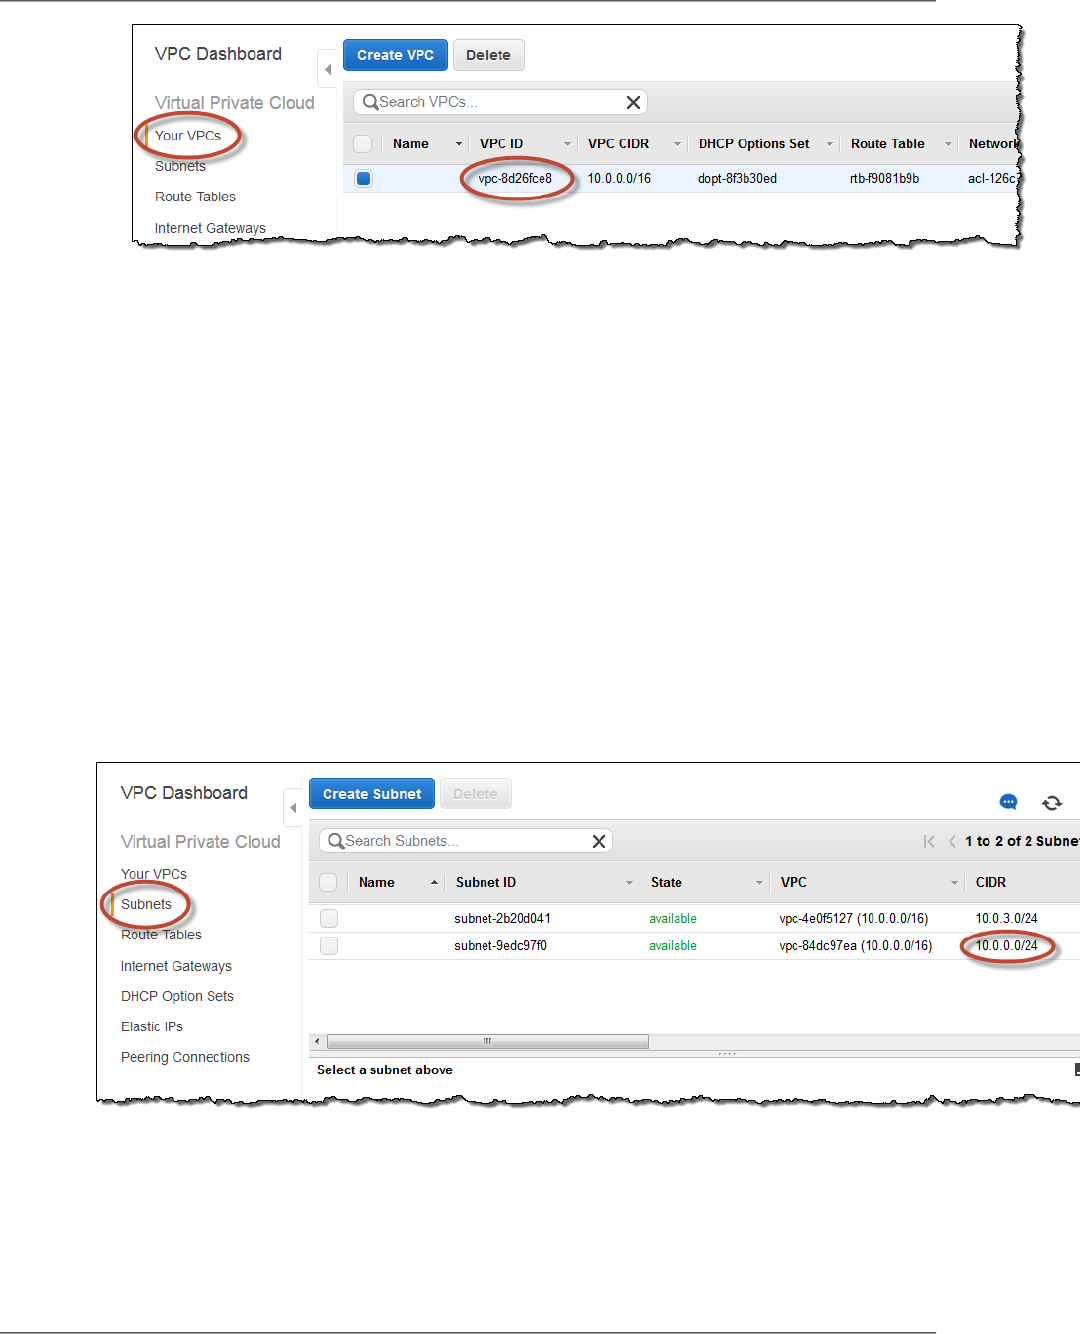
Step 3: Deploy to Elastic Beanstalk
After you set up your VPC, you can deploy your application to Elastic Beanstalk and create your
environment inside your VPC.You can do this using the Elastic Beanstalk console, or you can use the
AWS toolkits, eb, API-based command line interface (CLI), or API. If you use the Elastic Beanstalk console,
you just need to upload your .war or .zip file and select the VPC settings inside the wizard. Elastic
Beanstalk then creates your environment inside your VPC and deploys your application. Alternatively,
you can use the AWS Toolkit, eb, CLI, or API to deploy your application.To do this, you need to define
your VPC option settings in a configuration file and deploy this file with your source bundle.This topic
provides instructions for both methods.
Deploying with the Elastic Beanstalk Console
When you create an Elastic Beanstalk application or launch an environment, the Elastic Beanstalk console
walks you through creating your environment inside a VPC. For more information, see Creating New
Applications (p. 279).
You'll need to select the VPC ID and subnet ID for your instance. By default, VPC creates a public subnet
using 10.0.0.0/24.You can view your subnet IDs by clicking Subnets in the Amazon VPC console.
Deploying with the AWS Toolkits, Eb, CLI, or API
When deploying your application to Elastic Beanstalk using the AWS toolkits, eb, CLI, or API, you need
to specify your VPC option settings in a file and deploy it with your source bundle. To deploy your
application using a toolkit or eb, create a configuration file with a .config extension (e.g.,
myconfig.config) and place it inside a directory named .ebextensions in the top-level directory of
your source bundle. If you use the CLI or API, you can specify these settings in a file name and pass the
API Version 2010-12-01
535
Elastic Beanstalk Developer Guide
Example: Launching a Single-Instance Environment
without Any Associated Private Resources in a VPC

file name in as a parameter. Deploy your application to Elastic Beanstalk using one of the following
methods:
• Java — Creating and Deploying Elastic Beanstalk Applications in Java Using AWS Toolkit for
Eclipse (p. 93)
• Eb — Getting Started with Eb (p. 672)
• CLI or API — Creating New Applications (p. 279) (see the CLI or API section)
• CLI or API — Launching New Environments (p. 299) (see the CLI or API section)
When you create your configuration file, you will need to specify at least the following:
• VPCId — Contains the ID of the VPC.
• Subnets — Contains the ID of the public subnet that contains the instance.
The following is an example of the settings you could set when deploying your Elastic Beanstalk application
inside a VPC. For more information about VPC option settings (including examples for how to specify
them, default values, and valid values), see the aws:ec2:vpc namespace table in Option Values (p. 707).
option_settings:
- namespace: aws:ec2:vpc
option_name: VPCId
value: vpc-170647c
- namespace: aws:ec2:vpc
option_name: Subnets
value: subnet-4f195024
Example: Launching a Load-Balancing,
Autoscaling Environment with Public and Private
Resources in a VPC
You can deploy an Elastic Beanstalk application in a load balancing, autoscaling environment in a VPC
that has both a public and private subnet. Use this configuration if you want Elastic Beanstalk to assign
private IP addresses to your Amazon EC2 instances. In this configuration, the Amazon EC2 instances in
the private subnet require a load balancer and a network address translation (NAT) instance in the public
subnet.The load balancer routes inbound traffic from the Internet to the Amazon EC2 instances.You
need to launch a NAT instance to route outbound traffic from the Amazon EC2 instances to the Internet.
You also need to configure the default VPC security group to allow traffic from the Amazon EC2 instances
to the NAT instance.Your infrastructure will look similar to the following diagram.
API Version 2010-12-01
536
Elastic Beanstalk Developer Guide
Example: Launching a Load-Balancing, Autoscaling
Environment with Private Instances in a VPC

To deploy an Elastic Beanstalk application inside a VPC using a NAT instance, you need to do the
following:
• Step 1: Create a VPC with a Public and Private Subnet (p. 537)
• Step 2: Configure the Default VPC Security Group for the NAT Instance (p. 539)
• Step 3: Deploy to Elastic Beanstalk (p. 540)
Step 1: Create a VPC with a Public and Private Subnet
You can use the Amazon VPC console to create a VPC.
To create a VPC
1. Sign in to the Amazon VPC console.
2. In the navigation pane, click VPC Dashboard. Then click Start VPC Wizard.
3. Click VPC with Public and Private Subnets and then click Select.
API Version 2010-12-01
537
Elastic Beanstalk Developer Guide
Example: Launching a Load-Balancing, Autoscaling
Environment with Private Instances in a VPC

4. Your Elastic Load Balancing load balancer and your Amazon EC2 instances must be in the same
Availability Zone so they can communicate with each other. Choose the same Availability Zone from
each Availability Zone list.
5. Click Create VPC.
API Version 2010-12-01
538
Elastic Beanstalk Developer Guide
Example: Launching a Load-Balancing, Autoscaling
Environment with Private Instances in a VPC
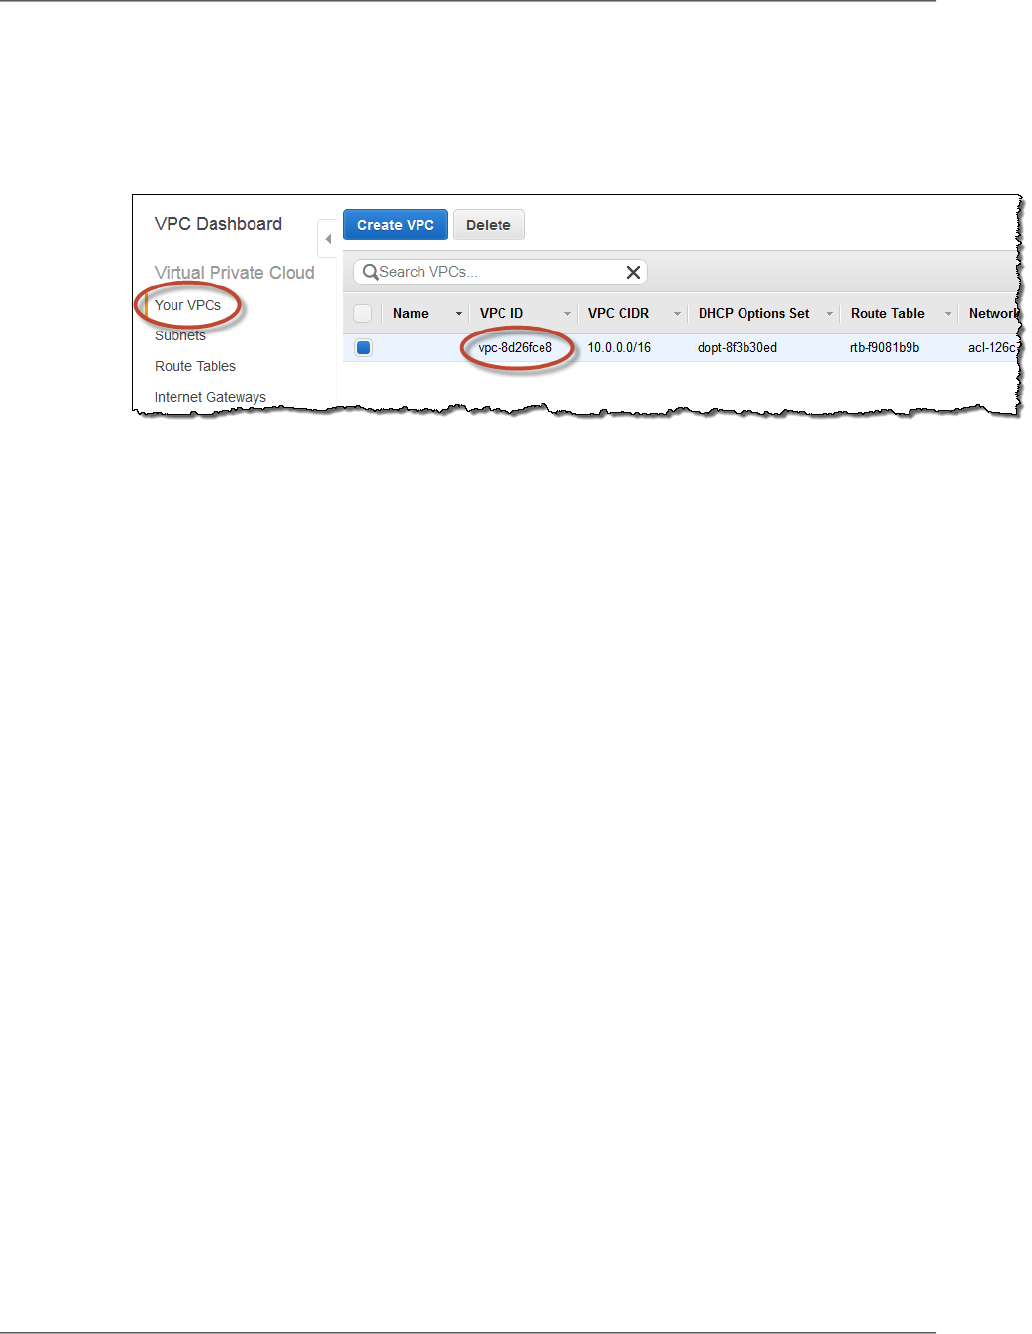
The wizard begins to create your VPC, subnets, and Internet gateway. It also updates the main route
table and creates a custom route table. Finally, the wizard launches a NAT instance in the public
subnet and prepares it for use.This preparation includes disabling the source/destination check on
the instance and assigning the instance an Elastic IP address.
After the VPC is successfully created, you will get a VPC ID.You will need this for this for the next
step. To view your VPC ID, click Your VPCs in the left pane of the Amazon VPC console.
Step 2: Configure the Default VPC Security Group for the
NAT Instance
You will need to update the default VPC security group to allow traffic from the EC2 instances to the NAT
instance.To do this, you will first create a new security group, and then update your default security group
to allow traffic from this new security group.
To create a security group
1. Open the Amazon VPC console at https://console.aws.amazon.com/vpc/.
2. In the navigation pane, click Security Groups.
3. Click Create Security Group.
4. Enter the security group name, a description of the group, and select the ID for your VPC.You may
also enter a tag for the group (optional).Then click Yes, Create.
The security group is created and appears on the Security Groups page. Notice that it has an ID
(e.g., sg-xxxxxxxx).You might have to turn on the Group ID column by clicking Show/Hide in the
top right corner of the page.
To update the default VPC security group for the NAT instance
1. In the list of security groups, select the check box for the default VPC security group for the NAT
instance.
2. Add a rule to allow all traffic access to the group from the security group you just created.
a. On the Inbound Rules tab, click Edit.
b. Under Type, select All Traffic.
c. Under Source, type the ID (e.g., sg-xxxxxxxx) of the security group, and then click Save.
API Version 2010-12-01
539
Elastic Beanstalk Developer Guide
Example: Launching a Load-Balancing, Autoscaling
Environment with Private Instances in a VPC

Step 3: Deploy to Elastic Beanstalk
After you set up your VPC, you can deploy your application to Elastic Beanstalk and create your
environment inside your VPC.You can do this using the Elastic Beanstalk console, or you can use the
AWS toolkits, eb, API-based command line interface (CLI), or API. If you use the Elastic Beanstalk console,
you just need to upload your .war or .zip file and select the VPC settings inside the wizard. Elastic
Beanstalk then creates your environment inside your VPC and deploys your application. Alternatively,
you can use the AWS Toolkit, eb, CLI, or API to deploy your application.To do this, you need to define
your VPC option settings in a configuration file and deploy this file with your source bundle.This topic
provides instructions for both methods.
Deploying with the Elastic Beanstalk Console
The Elastic Beanstalk console walks you through creating your new environment inside your VPC.You
need to provide a .war file (for Java applications) or a .zip file for all other applications.The Elastic
Beanstalk console asks you for the IDs for your VPC and VPC security group you created in the previous
steps as well as the subnet IDs for your load balancer and EC2 instances. If you created a private subnet
for your EC2 instances and a public subnet for your load balancer, make sure you select the public subnet
ID for the load balancer, and the private subnet ID for your EC2 instances. By default, VPC creates a
public subnet using 10.0.0.0/24 and a private subnet using 10.0.1.0/24.You can view your subnet IDs
by clicking Subnets in the Amazon VPC console.
API Version 2010-12-01
540
Elastic Beanstalk Developer Guide
Example: Launching a Load-Balancing, Autoscaling
Environment with Private Instances in a VPC

Deploying with the AWS Toolkits, Eb, CLI, or API
When deploying your application to Elastic Beanstalk using the AWS toolkits, eb, CLI, or API, you need
to specify your VPC option settings in a file and deploy it with your source bundle. To deploy your
application using a toolkit or eb, create a configuration file with a .config extension (e.g.,
myconfig.config) and place it inside a directory named .ebextensions in the top-level directory of
your source bundle. If you use the CLI or API, you can specify these settings in a file name and pass the
file name in as a parameter. Deploy your application to Elastic Beanstalk using one of the following
methods:
• Java — Creating and Deploying Elastic Beanstalk Applications in Java Using AWS Toolkit for
Eclipse (p. 93)
• Eb — Getting Started with Eb (p. 672)
• CLI or API — Creating New Applications (p. 279) (see the CLI or API section)
• CLI or API — Launching New Environments (p. 299) (see the CLI or API section)
When you create your configuration file with your option settings, you will need to specify at least the
following:
• VPCId — Contains the ID of the VPC.
• Subnets — Contains the ID of the Auto Scaling group subnet. In this example, this is the ID of the
private subnet.
• ELBSubnets — Contains the ID of the subnet for the elastic load balancer. In this example, this is the
ID of the public subnet.
• SecurityGroups — Contains the ID of the security groups. In this example, you'll use the ID of the
new security group you created in Step 2: Configure the Default VPC Security Group for the NAT
Instance (p. 539).
API Version 2010-12-01
541
Elastic Beanstalk Developer Guide
Example: Launching a Load-Balancing, Autoscaling
Environment with Private Instances in a VPC

Optionally, you can also specify the following information:
• ELBScheme — Specify internal if you want to create an internal load balancer inside your VPC so
that your Elastic Beanstalk application cannot be accessed from outside your VPC.
• DBSubnets — Contains the ID of the DB subnets.This is only used if you want to add an Amazon
RDS DB Instance as part of your application. For an example, see Example: Launching an Elastic
Beanstalk in a VPC with Amazon RDS (p. 550).
Note
When using DBSubnets, you need to create additional subnets in your VPC to cover all the
Availability Zones in the region.
The following is an example of the option settings you could set when deploying your Elastic Beanstalk
application inside a VPC. For more information about VPC option settings (including examples for how
to specify them, default values, and valid values), see the aws:ec2:vpc namespace table in Option
Values (p. 707).
option_settings:
- namespace: aws:autoscaling:launchconfiguration
option_name: EC2KeyName
value: ec2keypair
- namespace: aws:ec2:vpc
option_name: VPCId
value: vpc-170647c
- namespace: aws:ec2:vpc
option_name: Subnets
value: subnet-4f195024
- namespace: aws:ec2:vpc
option_name: ELBSubnets
value: subnet-fe064f95
- namespace: aws:autoscaling:launchconfiguration
option_name: InstanceType
value: m1.small
- namespace: aws:autoscaling:launchconfiguration
option_name: SecurityGroups
value: sg-7f1ef110
Example: Launching an Elastic Beanstalk
Application in a VPC with Bastion Hosts
If your Amazon EC2 instances are located inside the private subnet, you will not be able to connect to
them directly.To connect to your instances, you need to create and connect to a bastion host in your
public subnet.This section provides an example of how to create a VPC with a private and public subnet.
The instances are located inside the private subnet, and the bastion host, NAT instance, and Elastic Load
Balancing load balancer are located inside the public subnet.Your infrastructure will look similar to the
following diagram:
API Version 2010-12-01
542
Elastic Beanstalk Developer Guide
Example: Bastion Hosts

In this walkthrough, you'll add a bastion host to your VPC.
1. Step 1: Create a VPC with a Public and Private Subnet (p. 543)
2. Step 2: Configure the Security Groups (p. 545)
3. Step 3: Create a Bastion Host (p. 548)
4. Step 4: Define the Option Settings (p. 549)
5. Step 5: Deploy to Elastic Beanstalk (p. 550)
Step 1: Create a VPC with a Public and Private Subnet
You can use the Amazon VPC console to create a VPC.
To create a VPC
1. Sign in to the Amazon VPC console.
2. In the navigation pane, click VPC Dashboard. Then click Start VPC Wizard.
3. Click VPC with Public and Private Subnets and then click Select.
API Version 2010-12-01
543
Elastic Beanstalk Developer Guide
Example: Bastion Hosts

4. Your Elastic Load Balancing load balancer and your Amazon EC2 instances must be in the same
Availability Zone so they can communicate with each other. Choose the same Availability Zone from
each Availability Zone list.
5. Click Create VPC.
API Version 2010-12-01
544
Elastic Beanstalk Developer Guide
Example: Bastion Hosts

The wizard begins to create your VPC, subnets, and Internet gateway. It also updates the main route
table and creates a custom route table. Finally, the wizard launches a NAT instance in the public
subnet and prepares it for use.This preparation includes disabling the source/destination check on
the instance and assigning the instance an Elastic IP address.
After the VPC is successfully created, you will get a VPC ID.You will need this for this for the next
step. To view your VPC ID, click Your VPCs in the left pane of the Amazon VPC console.
Step 2: Configure the Security Groups
You'll need to create two new security groups: one for your bastion host so you can connect to the Amazon
EC2 instances, and the other so that your instances can connect to the NAT instance.Then you'll need
to update your security group for the NAT instance so that your Amazon EC2 instances can connect to
the NAT instance.
First, create two new security groups.
To create a security group
1. Open the Amazon VPC console at https://console.aws.amazon.com/vpc/.
2. In the navigation pane, click Security Groups.
3. Click Create Security Group.
4. Enter the security group name, a description of the group, and select the ID for your VPC.You may
also enter a tag for the group (optional).Then click Yes, Create.
The security group is created and appears on the Security Groups page. Notice that it has an ID
(e.g., sg-xxxxxxxx).You might have to turn on the Group ID column by clicking Show/Hide in the
top right corner of the page.
Next, update your security group for the bastion host to enable SSH access.
To update the security group for the bastion host
1. In the list of security groups, select the check box for the security group you just created for your
bastion host.
2. On the Inbound Rules tab, click Edit.
3. Under Type, select SSH.
4. Click Source. For this exercise, type 0.0.0.0/0, and then click Save.This allows access to the
host from everyone.
API Version 2010-12-01
545
Elastic Beanstalk Developer Guide
Example: Bastion Hosts

5. On the Outbound Rules tab, click Edit.
6. In the row below the existing rule for ALL Traffic, which comes with your VPC by default, for Type,
select SSH,
7. Click Destination, type 10.0.1.0/24 (which is your private subnet), and then click Save.This
allows access to the Amazon EC2 instances from your bastion host.
API Version 2010-12-01
546
Elastic Beanstalk Developer Guide
Example: Bastion Hosts

Next, update your security group for your NAT instance.
To update the default VPC security group for the NAT instance
1. In the list of security groups, select the check box for the default VPC security group for the NAT
instance.
2. Add a rule to allow all traffic access to the group from the security group you just created.
a. On the Inbound Rules tab, click Edit.
b. Under Type, select All Traffic.
c. Under Source, type the ID (e.g., sg-xxxxxxxx) of the security group, and then click Save.
API Version 2010-12-01
547
Elastic Beanstalk Developer Guide
Example: Bastion Hosts

Step 3: Create a Bastion Host
Next, you'll need to launch an EC2 instance in your public subnet, and assign an Elastic IP address so
that you can connect to it.We'll use the Amazon EC2 console for this step.
Launch an EC2 instance inside a VPC
1. Open the Amazon EC2 console at https://console.aws.amazon.com/ec2/.
2. From the Amazon EC2 console dashboard, click Launch Instance.
3. On the Choose an Amazon Machine Image (AMI) page, the Quick Start tab displays a list of basic
configurations called Amazon Machine Images (AMI). Choose the AMI that you want to use and click
its Select button. In this example, we'll use an Amazon Linux AMI.
4. For this exercise, on the Choose an Instance Type page, accept the default value, t1.micro, to
launch a single micro instance into your subnet. Click Next: Configure Instance Details.
5. On the Configure Instance Details page, next to Network, select your VPC ID.
6. Confirm that Subnet displays your public subnet ID, and then click Next: Add Storage.
7. On the Add Storage page, click Next:Tag Instance to accept the defaults for the purposes of this
exercise.
8. On the Tag Instance page, click Next: Configure Security Group. (You do not need tags for the
purposes of this exercise.)
9. On the Configure Security Group page, next to Assign a security group, click Select an existing
security group.
10. Select the security group you created for your bastion host, and then click Review and Launch.
11. On the Review Instance Launch page, review your settings.When you're satisfied with your
selections, click Launch.
API Version 2010-12-01
548
Elastic Beanstalk Developer Guide
Example: Bastion Hosts

12. In the Select an existing key pair or create a new key pair dialog box, you can select an existing
key pair or create a new one. For this exercise, we'll create a key pair.
a. Click Create a new key pair.
b. Enter a name for your key pair (for example, VPC_Keypair), and then click Download Key
Pair.You need the contents of the private key to connect to your instance after the instance
launches. Amazon Web Services doesn't keep the private portion of key pairs.
Note
EC2 uses this name to also name the private key file (with a .pem extension) associated
with the pair.
When prompted, save the private key in a safe place on your system.
Next, create an Elastic IP address for your EC2 instance.When you assign an Elastic IP address to your
running instance, it provides your instance, which is private by default, with a public IP address so that it
can be reached from the Internet.
To assign a VPC Elastic IP address to an instance
1. Open the Amazon VPC console at https://console.aws.amazon.com/vpc/.
2. In the navigation pane, click Elastic IPs.
3. Click Allocate New Address.
4. In the Allocate New Address dialog box, for EIP used in:, select VPC, and then click Yes, Allocate.
5. Select the new IP address from the list and click Associate Address.
6. In the Associate Address dialog box, select the instance to associate the address with, and then
click Yes, Associate.
Your instance now has an Elastic IP address associated with it that makes it accessible from the Internet.
You can also access it using SSH from your home network, specifying the Elastic IP address of the
instance as the address to connect to. Follow the next steps to define your option settings and deploy to
Elastic Beanstalk. After you deploy to Elastic Beanstalk you can connect to your EC2 instances from your
bastion host.
Step 4: Define the Option Settings
When you update the option settings, you will specify the following:
• VPCId–Contains the ID of the VPC.
• Subnets–Contains the ID of the Auto Scaling group subnet. In this example, this is the ID of the private
subnet.
• ELBSubnets–Contains the ID of the subnet for the Elastic Load Balancing load balancer. In this
example, this is the ID of the public subnet.
• SecurityGroups–Contains the ID of the security groups. In this example, you'll use the IDs of the new
security groups you created in Step 2: Configure the Security Groups (p. 545).
SSHSourceRestriction is an optional setting if you want to lock down SSH access to an environment.
In this example, we use it to lockdown SSH access to the EC2 instances so that only the bastion host
can access the instances in the private subnet. For more information, see General Option Values (p. 707).
The following is an example of the option settings you could use when deploying your Elastic Beanstalk
application inside a VPC. For more information about VPC option settings (including examples for how
API Version 2010-12-01
549
Elastic Beanstalk Developer Guide
Example: Bastion Hosts

to specify them, default values, and valid values), see the aws:ec2:vpc namespace table in Option
Values (p. 707).
option_settings:
- namespace: aws:autoscaling:launchconfiguration
option_name: EC2KeyName
value: bastionhostkeypair
- namespace: aws:ec2:vpc
option_name: VPCId
value: vpc-170647c
- namespace: aws:ec2:vpc
option_name: Subnets
value: subnet-4f195024
- namespace: aws:ec2:vpc
option_name: ELBSubnets
value: subnet-fe064f95
- namespace: aws:autoscaling:launchconfiguration
option_name: InstanceType
value: m1.small
- namespace: aws:autoscaling:launchconfiguration
option_name: SecurityGroups
value: sg-7f1ef110
- namespace: aws:autoscaling:launchconfiguration
option_name: SecurityGroups
value: sg-9h0lc223
Step 5: Deploy to Elastic Beanstalk
Next, you will deploy your Elastic Beanstalk using the option settings you created in the previous step.
To deploy your Elastic Beanstalk application with your options settings, you need to create an
.ebextensions directory at the top-level directory of your source bundle, place your configuration file
(e.g., myapp.config) inside the .ebextensions directory, and deploy your source bundle to Elastic
Beanstalk using the Elastic Beanstalk console. Alternatively, you can also use eb, the CLI, or the API.
To learn how to deploy your source bundle to Elastic Beanstalk using the Elastic Beanstalk console, see
Creating New Applications (p. 279).
Now that you have deployed to Elastic Beanstalk you can connect to your EC2 instances from your bastion
host.
Example: Launching an Elastic Beanstalk in a VPC
with Amazon RDS
This topic walks you through deploying an Elastic Beanstalk application with Amazon RDS in a VPC using
a NAT instance.Your infrastructure will look similar to the following diagram:
API Version 2010-12-01
550
Elastic Beanstalk Developer Guide
Example: Amazon RDS

To deploy an Elastic Beanstalk application with Amazon RDS inside a VPC using a NAT instance, you
need to do the following:
1. Step 1: Create a VPC with a Public and Private Subnet (p. 551)
2. Step 2: Configure the Default VPC Security Group for the NAT Instance (p. 553)
3. Step 3: Create a DB Subnet Group (p. 554)
4. Step 4: Deploy to Elastic Beanstalk (p. 555)
Step 1: Create a VPC with a Public and Private Subnet
You can use the Amazon VPC console to create a VPC.
To create a VPC
1. Sign in to the Amazon VPC console.
2. In the navigation pane, click VPC Dashboard. Then click Start VPC Wizard.
3. Click VPC with Public and Private Subnets and then click Select.
API Version 2010-12-01
551
Elastic Beanstalk Developer Guide
Example: Amazon RDS

4. Your Elastic Load Balancing load balancer and your Amazon EC2 instances must be in the same
Availability Zone so they can communicate with each other. Choose the same Availability Zone from
each Availability Zone list.
5. Click Create VPC.
API Version 2010-12-01
552
Elastic Beanstalk Developer Guide
Example: Amazon RDS

The wizard begins to create your VPC, subnets, and Internet gateway. It also updates the main route
table and creates a custom route table. Finally, the wizard launches a NAT instance in the public
subnet and prepares it for use.This preparation includes disabling the source/destination check on
the instance and assigning the instance an Elastic IP address.
After the VPC is successfully created, you will get a VPC ID.You will need this for this for the next
step. To view your VPC ID, click Your VPCs in the left pane of the Amazon VPC console.
Step 2: Configure the Default VPC Security Group for the
NAT Instance
You will need to update the default VPC security group to allow traffic from the EC2 instances that Elastic
Beanstalk creates to the NAT instance.To do this, you will first create a new security group, and then
update your default security group to allow traffic from this new security group.
To create a security group
1. Open the Amazon VPC console at https://console.aws.amazon.com/vpc/.
2. In the navigation pane, click Security Groups.
3. Click Create Security Group.
4. Enter the security group name, a description of the group, and select the ID for your VPC.You may
also enter a tag for the group (optional).Then click Yes, Create.
The security group is created and appears on the Security Groups page. Notice that it has an ID
(e.g., sg-xxxxxxxx).You might have to turn on the Group ID column by clicking Show/Hide in the
top right corner of the page.
To update the default VPC security group for the NAT instance
1. In the list of security groups, select the check box for the default VPC security group for the NAT
instance.
2. Add a rule to allow all traffic access to the group from the security group you just created.
a. On the Inbound Rules tab, click Edit.
b. Under Type, select All Traffic.
c. Under Source, type the ID (e.g., sg-xxxxxxxx) of the security group, and then click Save.
API Version 2010-12-01
553
Elastic Beanstalk Developer Guide
Example: Amazon RDS

Step 3: Create a DB Subnet Group
A DB Subnet Group for a VPC is a collection of subnets (typically private) that you may want to designate
for your back-end RDS DB Instances. Each DB Subnet Group should have at least one subnet for every
Availability Zone in a given region.
Create a DB subnet group
1. Open the Amazon RDS console at https://console.aws.amazon.com/rds/.
2. In the navigation pane, click Subnet Groups.
3. Click Create DB Subnet Group.
4. Click Name, and then type the name of your DB Subnet Group.
5. Click Description, and then describe your DB Subnet Group.
6. Next to VPC ID, select the ID of the VPC that you created.
7. Click the add all the subnets link in the Add Subnet(s) to this Subnet Group section.
API Version 2010-12-01
554
Elastic Beanstalk Developer Guide
Example: Amazon RDS

8. When you are finished, click Yes, Create.
9. In the confirmation window, click Close.
Your new DB Subnet Group appears in the DB Subnet Groups list of the RDS console.You can click
it to see details, such as all of the subnets associated with this group, in the details pane at the bottom
of the window.
Step 4: Deploy to Elastic Beanstalk
After you set up your VPC, you can deploy your application to Elastic Beanstalk and create your
environment inside your VPC.You can do this using the Elastic Beanstalk console, or you can use the
AWS toolkits, eb, API-based command line interface (CLI), or API. If you use the Elastic Beanstalk console,
you just need to upload your .war or .zip file and select the VPC settings inside the wizard. Elastic
Beanstalk then creates your environment inside your VPC and deploys your application. Alternatively,
you can use the AWS Toolkit, eb, CLI, or API to deploy your application.To do this, you need to define
your VPC option settings in a configuration file and deploy this file with your source bundle.This topic
provides instructions for both methods.
Deploying with the Elastic Beanstalk Console
The Elastic Beanstalk console walks you through creating your new environment inside your VPC.You
need to provide a .war file (for Java applications) or a .zip file for all other applications.The Elastic
Beanstalk console asks you for the IDs for your VPC and VPC security group you created in the previous
steps as well as the subnet IDs for your load balancer and EC2 instances. If you created a private subnet
for your EC2 instances and a public subnet for your load balancer, make sure you select the public subnet
ID for the load balancer, and the private subnet ID for your EC2 instances. By default, VPC creates a
public subnet using 10.0.0.0/24 and a private subnet using 10.0.1.0/24.You can view your subnet IDs
by clicking Subnets in the Amazon VPC console.
API Version 2010-12-01
555
Elastic Beanstalk Developer Guide
Example: Amazon RDS

Deploying with the AWS Toolkits, Eb, CLI, or API
When deploying your application to Elastic Beanstalk using the AWS toolkits, eb, CLI, or API, you need
to specify your VPC option settings in a file and deploy it with your source bundle. To deploy your
application using a toolkit or eb, create a configuration file with a .config extension (e.g.,
myconfig.config) and place it inside a directory named .ebextensions in the top-level directory of
your source bundle. If you use the CLI or API, you can specify these settings in a file name and pass the
file name in as a parameter. Deploy your application to Elastic Beanstalk using one of the following
methods:
• Java — Creating and Deploying Elastic Beanstalk Applications in Java Using AWS Toolkit for
Eclipse (p. 93)
• Eb — Getting Started with Eb (p. 672)
• CLI or API — Creating New Applications (p. 279) (see the CLI or API section)
• CLI or API — Launching New Environments (p. 299) (see the CLI or API section)
When you update the option settings, you will need to specify at least the following:
• VPCId–Contains the ID of the VPC.
• Subnets–Contains the ID of the Auto Scaling group subnet. In this example, this is the ID of the private
subnet.
• ELBSubnets–Contains the ID of the subnet for the elastic load balancer. In this example, this is the
ID of the public subnet.
• SecurityGroups–Contains the ID of the security groups. In this example, you'll use the ID of the new
security group you created in Step 2: Configure the Default VPC Security Group for the NAT
Instance (p. 553).
• DBSubnets–Contains the ID of the DB subnets.
API Version 2010-12-01
556
Elastic Beanstalk Developer Guide
Example: Amazon RDS

Note
When using DBSubnets, you need to create additional subnets in your VPC to cover all the
Availability Zones in the region.
Optionally, you can also specify the following information:
• ELBScheme — Specify internal if you want to create an internal load balancer inside your VPC so
that your Elastic Beanstalk application cannot be accessed from outside your VPC.
The following is an example of the option settings you could use when deploying your Elastic Beanstalk
application inside a VPC. For more information about VPC option settings (including examples for how
to specify them, default values, and valid values), see the aws:ec2:vpc namespace table in Option
Values (p. 707).
option_settings:
- namespace: aws:autoscaling:launchconfiguration
option_name: EC2KeyName
value: ec2keypair
- namespace: aws:ec2:vpc
option_name: VPCId
value: vpc-170647c
- namespace: aws:ec2:vpc
option_name: Subnets
value: subnet-4f195024
- namespace: aws:ec2:vpc
option_name: ELBSubnets
value: subnet-fe064f95
- namespace: aws:ec2:vpc
option_name: DBSubnets
value: subnet-fg148g78
- namespace: aws:autoscaling:launchconfiguration
option_name: InstanceType
value: m1.small
- namespace: aws:autoscaling:launchconfiguration
option_name: SecurityGroups
value: sg-7f1ef110
Note
When using DBSubnets, make sure you have subnets in your VPC to cover all the Availability
Zones in the region.
Example: Launching a Load-Balancing,
Autoscaling Environment with Public Instances in
a VPC
You can deploy an Elastic Beanstalk application in a load balancing, autoscaling environment in a single
public subnet. Use this configuration if you have a single public subnet without any private resources
API Version 2010-12-01
557
Elastic Beanstalk Developer Guide
Example: Launching a Load-Balancing, Autoscaling
Environment with Public Instances in a VPC

associated with your Amazon EC2 instances. In this configuration, Elastic Beanstalk assigns public IP
addresses to the Amazon EC2 instances so that each can directly access the Internet through the VPC
Internet gateway.You do not need to launch a network address translation (NAT) instance or configure
the default VPC security group to allow traffic from the Amazon EC2 instances to the NAT instance.
Step 1: Create a VPC with a Public Subnet
To create a VPC
1. Sign in to the AWS Management Console and open the Amazon VPC console at https://
console.aws.amazon.com/vpc/.
2. In the navigation pane, click VPC Dashboard, locate the Your Virtual Private Clouds area, and
then click Start VPC Wizard.
API Version 2010-12-01
558
Elastic Beanstalk Developer Guide
Example: Launching a Load-Balancing, Autoscaling
Environment with Public Instances in a VPC

3. Select VPC with a Single Public Subnet and then click Select.
A confirmation page shows the CIDR blocks used for the VPC and subnet.The page also shows the
subnet and the associated Availability Zone.
4. Click Create VPC.
AWS creates your VPC, subnet, Internet gateway, and route table. Click Close to end the wizard.
After AWS successfully creates the VPC, it assigns the VPC a VPC ID.You will need this for this for
the next step.To view your VPC ID, click Your VPCs in the left pane of the Amazon VPC console.
API Version 2010-12-01
559
Elastic Beanstalk Developer Guide
Example: Launching a Load-Balancing, Autoscaling
Environment with Public Instances in a VPC

Step 3: Deploy to Elastic Beanstalk
After you set up your VPC, you can deploy your application to Elastic Beanstalk and create your
environment inside your VPC.You can do this using the Elastic Beanstalk console, or you can use the
AWS toolkits, eb, API-based command line interface (CLI), or API. If you use the Elastic Beanstalk console,
you just need to upload your .war or .zip file and select the VPC settings inside the wizard. Elastic
Beanstalk then creates your environment inside your VPC and deploys your application. Alternatively,
you can use the AWS Toolkit, eb, CLI, or API to deploy your application.To do this, you need to define
your VPC option settings in a configuration file and deploy this file with your source bundle.This topic
provides instructions for both methods.
Deploying with the Elastic Beanstalk Console
When you create an Elastic Beanstalk application or launch an environment, the Elastic Beanstalk console
walks you through creating your environment inside a VPC. For more information, see Creating New
Applications (p. 279).
You'll need to select the VPC ID and subnet ID for your instance. By default, VPC creates a public subnet
using 10.0.0.0/24.You can view your subnet ID by clicking Subnets in the Amazon VPC console.
Deploying with the AWS Toolkits, Eb, CLI, or API
When deploying your application to Elastic Beanstalk using the AWS toolkits, eb, CLI, or API, you need
to specify your VPC option settings in a file and deploy it with your source bundle. To deploy your
application using a toolkit or eb, create a configuration file with a .config extension (e.g.,
myconfig.config) and place it inside a directory named .ebextensions in the top-level directory of
your source bundle. If you use the CLI or API, you can specify these settings in a file name and pass the
file name in as a parameter. Deploy your application to Elastic Beanstalk using one of the following
methods:
• Java — Creating and Deploying Elastic Beanstalk Applications in Java Using AWS Toolkit for
Eclipse (p. 93)
• Eb — Getting Started with Eb (p. 672)
API Version 2010-12-01
560
Elastic Beanstalk Developer Guide
Example: Launching a Load-Balancing, Autoscaling
Environment with Public Instances in a VPC

• CLI or API — Creating New Applications (p. 279) (see the CLI or API section)
• CLI or API — Launching New Environments (p. 299) (see the CLI or API section)
When you create your configuration file, you will need to specify at least the following:
• VPCId — Contains the ID of the VPC.
• Subnets — Contains the ID of the public subnet that contains the load balancer and the instances.
• AssociatePublicIpAddress — Specifies whether to launch instances with public IP addresses in your
VPC. Instances with public IP addresses do not require a NAT instance to communicate with the
Internet.You must set the value to true if you want to include your load balancer and instances in a
single public subnet.
The following is an example of the settings you could set when deploying your Elastic Beanstalk application
inside a VPC. For more information about VPC option settings (including examples for how to specify
them, default values, and valid values), see the aws:ec2:vpc namespace table in Option Values (p. 707).
option_settings:
- namespace: aws:ec2:vpc
option_name: VPCId
value: vpc-8d26fce8
- namespace: aws:ec2:vpc
option_name: Subnets
value: subnet-db3408af
- namespace: aws:ec2:vpc
option_name: AssociatePublicIpAddress
value: true
Using Elastic Beanstalk with AWS Identity and
Access Management (IAM)
AWS Identity and Access Management (IAM) helps you securely control access to your AWS resources.
IAM can also keep your account credentials private.With IAM, you can create multiple IAM users under
your AWS account. In some cases, you can also enable access to resources across AWS accounts.
Without IAM, however, you must either create multiple AWS accounts, or users must share the security
credentials of a single AWS account. In addition, without IAM, you cannot control the tasks a particular
user or system can do and what AWS resources they can use. For more information about IAM, see
Getting Started in Using IAM.
IAM is available with Elastic Beanstalk.You do not need to sign up separately to use IAM.
Granting Permissions to IAM Users
An IAM user can be an individual, system, or application that interacts with AWS.You can grant permissions
to users by using attaching a policy to each user or by using a group policy. For more information, see
IAM Users and Groups in Using IAM.To learn how to use policies to control access to specific resources,
see Using Policies to Control Access to Resources (p. 563).
API Version 2010-12-01
561
Elastic Beanstalk Developer Guide
IAM

Granting Permissions to Users and Services Using
IAM Roles
IAM roles have permissions that you can delegate to another entity, such as an IAM user or AWS service.
The entity who assumes the role gets temporary security credentials with the same permissions as the
role to make AWS API calls. By using roles, you temporarily grant entities permissions to access resources
in your AWS account without sharing your long-term credentials or defining permissions for those entities.
Elastic Beanstalk requires you to use an IAM to launch an environment and manage your environments
and applications.The following are examples of how Elastic Beanstalk uses IAM roles to access other
AWS resources:
• Allow Elastic Beanstalk to rotate your logs to Amazon S3. Elastic Beanstalk can create a default instance
profile for you when you create or update your environment.You can also use a custom instance profile
if it is associated with an IAM role that has a policy that grants permissions to your application to access
AWS resources. For instructions using the Elastic Beanstalk console, see Managing and Configuring
Applications and Environments Using the Console, CLI, and APIs (p. 278). For instructions using eb,
see Getting Started with Eb (p. 672).
• Grant permissions to applications running on Amazon EC2 instances access to AWS resources (such
as DynamoDB).
To grant permissions to applications running in Elastic Beanstalk, do the following:
1. Create an IAM role or use the default role provided by Elastic Beanstalk when you deploy your
application.
2. Write a policy that defines who can assume the role (the trusted entities). For Elastic Beanstalk, grant
Amazon EC2 permission to assume the role.
3. Attach a policy to the role that grants or denies the application permission to perform certain actions
on specific AWS resources.
4. Launch your Elastic Beanstalk environment using the instance profile associated with the role.
Note
To launch an environment with a role, you must have permission to perform the IAM passrole
action.
Note
If you use the AWS Management Console to create and manage roles, instance profiles are
automatically managed for you. If you use the IAM API or CLI to create and manage roles, you
must create instance profiles for each role. A role can be associated with many instance profiles,
but an instance profile can be associated with only one role. For more information about instance
profiles, go to Instance Profiles in the AWS Identity and Access Management Using IAM.
You can use IAM roles with any of the following non-legacy container types:
• Docker
• Node.js
• PHP 5.3, PHP 5.4, and PHP 5.5
• Python
• Ruby 1.8.7, 1.9.3, 2.0.0, and 2.1.2
• Apache Tomcat 6, 7, and 8
• Windows Server 2008 R2 running IIS 7.5 and Windows Server 2012 running IIS 8 or IIS 8.5
API Version 2010-12-01
562
Elastic Beanstalk Developer Guide
Granting Permissions to Users and Services Using IAM
Roles

Elastic Beanstalk supports legacy and nonlegacy containers for PHP 5.3, Windows Server 2008 R2
running IIS 7.5, Windows Server 2012 running IIS 8, and Apache Tomcat 6 or 7. If you are not sure if you
are using a legacy container, check the Elastic Beanstalk console. For instructions, see To check if you
are using a legacy container type (p. 426).
For more information about roles and how they differ from users or groups, see Roles in Using IAM.To
learn how to use policies to control access to resources, see Using Policies to Control Access to
Resources (p. 563).
Using Policies to Control Access to Resources
There are two ways to control access to AWS resources:
• Use a policy template.
• Create a custom policy that allows or denies permissions to perform specific actions on specific
resources. A custom policy gives you the flexibility to specify exactly what actions can be performed
on what resources.
To learn how to apply a Elastic Beanstalk policy template to a user or group, see Using Policy Templates
to Control Access to All Elastic Beanstalk Resources (p. 563).
To learn more about custom policies, and how to allow or deny permissions to perform specific actions
on Elastic Beanstalk resources, see Creating Policies to Control Access to Specific Elastic Beanstalk
Resources (p. 564).
To learn how to use IAM roles with Elastic Beanstalk, see Using IAM Roles with Elastic Beanstalk (p. 568).
For more information about permissions, see Permissions and Policies in Using IAM.
Using Policy Templates to Control Access to All
Elastic Beanstalk Resources
Elastic Beanstalk provides two policy templates that enable you to assign full access or read-only access
to all Elastic Beanstalk resources.You can attach the policy templates to users or groups.You should
use these templates if you want to grant broad permissions for all Elastic Beanstalk in your AWS account.
If you want to control permissions for specific resources, you need to create the policy.
The following table describes each policy template.
DescriptionTemplate
This template allows the user to create, modify,
and delete applications, application versions, con-
figuration settings, environments, and their under-
lying resources, including access required by
Elastic Beanstalk to provision and manage under-
lying resources (Elastic Load Balancing, Auto
Scaling, Amazon EC2, Amazon SNS, CloudWatch,
Amazon S3, Amazon RDS, and AWS CloudForm-
ation (for non-legacy container types)) used by an
environment. For a list of supported non-legacy
container types, see Why are some container types
marked legacy? (p. 426).
Elastic Beanstalk Full Access
API Version 2010-12-01
563
Elastic Beanstalk Developer Guide
Using Policies to Control Access to Resources

DescriptionTemplate
This template allows the user to view applications
and environments but not to perform any operations
on them. It provides read-only access to all applic-
ations, application versions, events, and environ-
ments.
Elastic Beanstalk Read Only Access
To apply a policy template to a user or group
1. Sign in to the AWS Management Console and open the IAM console at https://
console.aws.amazon.com/iam/.
2. In the left pane, click Users or Groups, as appropriate.
3. In the Users or Groups pane, click the user or group that you want to apply the policy template to.
Or, click Create New Users or Create New Group to create new users or a group.
4. Under the user or group name, click the Permissions tab.
5. Click Attach User Policy for a user or Attach Policy for a group, as appropriate.
6. On the Manage Policy page, click Select Policy Template.
7. Locate the policy that you want to assign, and then click the corresponding Select button.
8. Review the policy document, and then click Apply Policy.
Creating Policies to Control Access to Specific
Elastic Beanstalk Resources
You can create your own IAM policy to allow or deny specific Elastic Beanstalk API actions on specific
Elastic Beanstalk resources.To put the policy into effect, you attach it to a user or group using the IAM
console, command line interface, or API. For more information about attaching a policy to a user or group,
see Managing IAM Policies in Using AWS Identity and Access Management.
API Version 2010-12-01
564
Elastic Beanstalk Developer Guide
Creating Policies to Control Access to Specific
Resources

Note
If you use the AWS Management Console to create and manage roles, instance profiles are
automatically managed for you. If you use the IAM API or CLI to create and manage roles, you
must create instance profiles for each role. A role can be associated with many instance profiles,
but an instance profile can be associated with only one role. For more information about instance
profiles, go to Instance Profiles in the AWS Identity and Access Management Using IAM.
An IAM policy contains policy statements that describe the specific permissions you want to grant.When
you create a policy statement for Elastic Beanstalk, there are four parts of a statement that you need to
know how to use:
• Effect specifies whether to allow or deny the actions in the statement.
• Action specifies the actions you want to control.To specify Elastic Beanstalk actions, the action name
must be prefixed with the lowercase string elasticbeanstalk.You use wildcards to specify all actions
related to Elastic Beanstalk.The wildcard "*" matches zero or multiple characters. For example, to
grant all create action permissions, you can specify elasticbeanstalk:create* in your IAM policy.
Note
If your policy uses a wildcard to specify all actions instead of explicitly listing each action, be
aware that if an update to Elastic Beanstalk were to add any new actions, this policy would
automatically give the grantee access to those new actions.
For a complete list of Elastic Beanstalk actions, see the API action names in the Elastic Beanstalk API
Reference. For more information about permissions and policies, go to Permissions and Policies in
Using AWS Identity and Access Management.
Users with permission to use specific Elastic Beanstalk API actions can perform those actions. Certain
operations, such as creating an environment, may require additional permissions to perform those
actions.To check if an API action depends on permissions to other actions and to ensure all required
permissions are assigned, use the information in section Resources and Conditions for Elastic Beanstalk
Actions (p. 581).
• Resource specifies the resources that you want to control access to. To specify Elastic Beanstalk
resources, you list the Amazon Resource Name (ARN) of each resource. For more information, see
Amazon Resource Name (ARN) Format for Elastic Beanstalk (p. 579). Each Elastic Beanstalk action
operates on a specific resource. For example, the UpdateApplicationVersion action operates on
application versions, which you would specify as one or more version resources. For more information,
see Amazon Resource Name (ARN) Format for Elastic Beanstalk (p. 579).To specify multiple ARNs,
you can list each resource's ARN or use the "*" wildcard, which matches zero or multiple characters.
• Condition specifies restrictions on the permission granted in the statement. As discussed earlier, an
action operates on a specific resource. However, that action may have dependencies on other Elastic
Beanstalk resources such as where the action occurs (for example, creating an environment within an
application) or which other resources the action needs access to in order to complete its operation (for
example, updating an environment from a configuration template or application version). For more
information, see Resources and Conditions for Elastic Beanstalk Actions (p. 581).
IAM policies are expressed in JSON format. For information about the structure of IAM policies and
statements, see Basic Policy Structure in Using AWS Identity and Access Management. The following
example policy contains three sets of statements that enable a user who has this policy to call the
CreateEnvironment action to create an environment whose name begins with Test in the application
My First Elastic Beanstalk Application using the application version First Release.The
policy also allows the user to perform actions on the resources required to create the environment.The
CreateEnvironmentPerm statement allows the elasticbeanstalk:CreateEnvironment action to
create an environment with the constraints specified above.The AllNonResourceCalls statement
allows elasticbeanstalk:CreateEnvironment to perform the Elastic Beanstalk actions required to
create the environment.The OtherServicePerms statement allows
elasticbeanstalk:CreateEnvironment to call the appropriate actions to create resources in other
AWS services to complete the creation of the environment.
API Version 2010-12-01
565
Elastic Beanstalk Developer Guide
Creating Policies to Control Access to Specific
Resources

Note
The following policy is an example. It gives a broad set of permissions to the AWS products that
Elastic Beanstalk uses to manage applications and environments. For example, ec2:* allows
an IAM user to perform any action on any Amazon EC2 resource in the AWS account. These
permissions are not limited to the resources that you use with Elastic Beanstalk. As a best
practice, you should grant individuals only the permissions they need to perform their duties.
{
"Version": "2012-10-17",
"Statement": [
{
"Sid":"CreateEnvironmentPerm",
"Action": [
"elasticbeanstalk:CreateEnvironment"
],
"Effect": "Allow",
"Resource": [
"arn:aws:elasticbeanstalk:us-east-1:123456789012:environment/My First
Elastic Beanstalk Application/Test*"
],
"Condition": {
"StringEquals": {
"elasticbeanstalk:InApplication": ["arn:aws:elasticbeanstalk:us-east-
1:123456789012:application/My First Elastic Beanstalk Application"],
"elasticbeanstalk:FromApplicationVersion": ["arn:aws:elasticbean
stalk:us-east-1:123456789012:applicationversion/My First Elastic Beanstalk Ap
plication/First Release"]
}
}
},
{
"Sid":"AllNonResourceCalls",
"Action":[
"elasticbeanstalk:CheckDNSAvailability",
"elasticbeanstalk:CreateStorageLocation"
],
"Effect":"Allow",
"Resource":[
"*"
]
},
{
"Sid":"OtherServicePerms",
"Effect":"Allow",
"Action":[
"ec2:*",
"elasticloadbalancing:*",
"autoscaling:*",
"cloudwatch:*",
"s3:*",
"sns:*",
"rds:*",
"cloudformation:*"
],
"Resource":"*"
}
]
}
API Version 2010-12-01
566
Elastic Beanstalk Developer Guide
Creating Policies to Control Access to Specific
Resources

Note that the policy above enables the user to create an environment using the Elastic Beanstalk
CreateEnvironment API and the elastic-beanstalk-create-environment (p.744) command. However, if you
want that user to be able to use the Elastic Beanstalk console to create an environment, you must also
add the following policy to the user. When the user creates an environment in the Elastic Beanstalk
console, the user must be able to navigate to the application My First Elastic Beanstalk
Application (elasticbeanstalk:DescribeApplications). When the user clicks Launch New
Environment, the Elastic Beanstalk console needs to get information about existing environments
(elasticbeanstalk:DescribeEnvironments), the application version to use
(elasticbeanstalk:DescribeApplicationVersions), and solution stacks
(elasticbeanstalk:ListAvailableSolutionStacks and
elasticbeanstalk:DescribeConfigurationOptions). If you want to enable specific actions within
the Elastic Beanstalk console, you need to consider the types of dependencies described in this example.
{
"Version": "2012-10-17",
"Statement": [
{
"Action": [
"elasticbeanstalk:DescribeApplications"
],
"Effect": "Allow",
"Resource": [
"arn:aws:elasticbeanstalk:us-east-1:155363561088:application/My First
Elastic Beanstalk Application"
]
},
{
"Action": "elasticbeanstalk:DescribeEnvironments",
"Effect": "Allow",
"Resource": [
"arn:aws:elasticbeanstalk:us-east-1:123456789012:environment/My First
Elastic Beanstalk Application/Test*"
]
},
{
"Action": "elasticbeanstalk:DescribeApplicationVersions",
"Effect": "Allow",
"Resource": [
"arn:aws:elasticbeanstalk:us-east-1:123456789012:applicationversion/My
First Elastic Beanstalk Application/First Release"
]
},
{
"Action": [
"elasticbeanstalk:ListAvailableSolutionStacks"
],
"Effect": "Allow",
"Resource": "arn:aws:elasticbeanstalk:us-east-1::solutionstack/*"
},
{
"Action": "elasticbeanstalk:DescribeConfigurationOptions",
"Effect": "Allow",
"Resource": [
"arn:aws:elasticbeanstalk:us-east-1::solutionstack/*"
]
}
API Version 2010-12-01
567
Elastic Beanstalk Developer Guide
Creating Policies to Control Access to Specific
Resources

]
}
Using IAM Roles with Elastic Beanstalk
IAM roles control what actions and AWS services your Elastic Beanstalk application can access.With
roles, you don't have to share long-term credentials or define permissions for each entity that requires
access to a resource.To allow your application access to AWS resources, you attach a custom action
policy to the IAM role and use the instance profile associated with that role to launch your Amazon EC2
instances. Examples of when Elastic Beanstalk uses IAM roles include when your application requires
access to AWS resources such as DynamoDB or if you want Elastic Beanstalk to rotate your logs to
Amazon S3.
This document describes how to configure your Elastic Beanstalk application to access AWS services
using IAM roles. For more information about using IAM roles with temporary security credentials to access
the Elastic Beanstalk API, see Creating Temporary Security Credentials for Delegating API Access in
the AWS Security Token Service User Guide.
You can use IAM roles with any of the following container types (unless they are designated as legacy):
• Docker
• Node.js
• PHP 5.3, PHP 5.4, and PHP 5.5
• Python
• Ruby 1.8.7, 1.9.3, 2.0.0, and 2.1.2
• Apache Tomcat 6, 7, and 8
• Windows Server 2008 R2 running IIS 7.5 and Windows Server 2012 running IIS 8 or IIS 8.5
Elastic Beanstalk supports legacy and nonlegacy containers for PHP 5.3, Windows Server 2008 R2
running IIS 7.5, Windows Server 2012 running IIS 8, and Apache Tomcat 6 or 7. If you are not sure if you
are using a legacy container, check the Elastic Beanstalk console. For instructions, see To check if you
are using a legacy container type (p. 426).
For an overview of the steps required to grant permissions to applications running in Elastic Beanstalk
using IAM roles, see Granting Permissions to Users and Services Using IAM Roles (p. 562).
The following sections provides examples for using IAM roles with Elastic Beanstalk, including sample
action policies.
• Example: Granting Permissions to Elastic Beanstalk Applications to Access DynamoDB (p. 571)
• Example: Granting Elastic Beanstalk Permission to Rotate Logs to Amazon S3 (p. 576)
Granting IAM Users Permissions to Create and Pass IAM
Roles
You need to have the appropriate permissions so that Elastic Beanstalk can create a default role and
instance profile for you, or to view the list of instance profiles available in your environment. If you tried
to create or update your environment to use an instance profile, but you received an error, the error might
have occurred because you do not have the correct permissions.Your account administrator should allow
the following actions:
API Version 2010-12-01
568
Elastic Beanstalk Developer Guide
Using IAM Roles

"iam:AddRoleToInstanceProfile",
"iam:CreateInstanceProfile",
"iam:CreateRole",
"iam:PassRole",
"iam:ListInstanceProfiles"
You require the create role, create instance profile, and add to instance profile actions in order to create
a role.The list instance profiles actions allows you to list the instance profiles in the AWS account, and
the pass role action allows you to associate a role to an environment.
The following example shows one statement that gives a broad set of permissions to AWS products that
Elastic Beanstalk uses to manage applications and environments and includes permissions to create an
instance profile and view a list of available instance profiles.
{
"Version": "2012-10-17",
"Statement": [
{
"Effect": "Allow",
"Action": [
"elasticbeanstalk:*",
"ec2:*",
"elasticloadbalancing:*",
"autoscaling:*",
"cloudwatch:*",
"s3:*",
"sns:*",
"cloudformation:*",
"rds:*",
"iam:AddRoleToInstanceProfile",
"iam:CreateInstanceProfile",
"iam:CreateRole",
"iam:PassRole",
"iam:ListInstanceProfiles"
],
"Resource": "*"
}
]
}
Granting IAM Role Permissions for Worker Environment
Tiers
The following example statement gives permissions to the IAM role in your instance profile to run the
aws-sqsd daemon in the worker environment tier, and publish metrics to CloudWatch. For worker
environment tiers with an application that performs periodic tasks, the statement also includes permissions
to access DynamoDB.
{
"Version": "2012-10-17",
"Statement": [
{
"Sid": "QueueAccess",
"Action": [
"sqs:ChangeMessageVisibility",
API Version 2010-12-01
569
Elastic Beanstalk Developer Guide
Using IAM Roles

"sqs:DeleteMessage",
"sqs:ReceiveMessage",
"sqs:SendMessage"
],
"Effect": "Allow",
"Resource": "*"
},
{
"Sid": "MetricsAccess",
"Action": [
"cloudwatch:PutMetricData"
],
"Effect": "Allow",
"Resource": "*"
},
{
"Sid": "BucketAccess",
"Action": [
"s3:Get*",
"s3:List*",
"s3:PutObject"
],
"Effect": "Allow",
"Resource": [
"arn:aws:s3:::elasticbeanstalk-*-your-account-ID-without-hyphens/*",
"arn:aws:s3:::elasticbeanstalk-*-your-account-ID-without-hyphens-*/*"
]
},
{
"Sid": "DynamoPeriodicTasks",
"Action": [
"dynamodb:BatchGetItem",
"dynamodb:BatchWriteItem",
"dynamodb:DeleteItem",
"dynamodb:GetItem",
"dynamodb:PutItem",
"dynamodb:Query",
"dynamodb:Scan",
"dynamodb:UpdateItem"
],
"Effect": "Allow",
"Resource": [
"arn:aws:dynamodb:*:your-account-ID-without-hyphens:table/*-stack-
AWSEBWorkerCronLeaderRegistry*"
]
}
]
}
If you are using a different account with an unmanaged Amazon SQS queue, you must also edit the policy
on the queue to grant access to the queue to other accounts, such as the one that you use with the worker
tier. For an example statement, see Example: Using a resource-based policy to delegate access to an
Amazon SQS queue in another account in the AWS Identity and Access Management User Guide.
API Version 2010-12-01
570
Elastic Beanstalk Developer Guide
Using IAM Roles

Granting IAM Role Permissions to Access an Amazon S3
Bucket
The following example policy grants read-only permission to the Amazon S3 bucket "my-bucket" to the
IAM role with the role name "janedoe". In IAM, this policy is called a resource-based policy.The resource
in the example is the Amazon S3 bucket. (In Amazon S3, this is referred to as a bucket policy.) You can
use the IAM management console to create your own policy from scratch. Give the policy the name
"S3ReadOnlyPerms" and replace the text "your-account-ID-without-hyphens" with your own account ID.
For more information, see Creating Customer Managed Policies.
{
"Version": "2012-10-17",
"Statement": [
{
"Sid": "S3ReadOnlyPerms",
"Effect": "Allow",
"Principal": {
"AWS": "arn:aws:iam::your-account-ID-without-hyphens{:role/janedoe"
},
"Action": [
"s3:ListBucketVersions",
"s3:GetObjectVersion",
"s3:ListBucket",
"s3:GetObject"
],
"Resource": [
"arn:aws:s3:::my-bucket/*",
"arn:aws:s3:::my-bucket"
]
}
]
}
Example: Granting Permissions to Elastic Beanstalk
Applications to Access DynamoDB
This walkthrough shows you how to use IAM roles with Elastic Beanstalk to control access to DynamoDB
and assumes that you have the necessary IAM permissions to create and pass roles.To learn more
about developing applications with DynamoDB, see the Amazon DynamoDB Developer Guide. In this
walkthrough, you will do the following:
1. Create and configure an IAM role for Elastic Beanstalk.
2. Update your application to obtain temporary security credentials to make AWS API calls to DynamoDB.
3. Deploy your application to Elastic Beanstalk.
In this walkthrough, you use the IAM console to create an IAM role. However, Elastic Beanstalk can also
create a default instance profile for you when you launch or update your Elastic Beanstalk environment.
To allow your application access to other AWS resources, you simply attach a new custom policy to the
default role. For instructions on creating a new application using the Elastic Beanstalk console with a
default instance profile, see Creating New Applications (p. 279). For instructions on updating an existing
environment, see Instance Profiles (p. 355). For instructions using eb, see Getting Started with Eb (p.672).
API Version 2010-12-01
571
Elastic Beanstalk Developer Guide
Using IAM Roles

Step 1: Create and Configure an IAM Role for Elastic Beanstalk
When you create and configure an IAM role, you are creating a role and defining the policies for who can
assume the role and granting permissions to perform actions on Elastic Beanstalk resources.There are
two ways you can create and configure an IAM role:
• Elastic Beanstalk can create a default role when you deploy your application and attach an action
policy.
• Use the IAM console to create an IAM role and attach an action policy.
This section walks you through both methods. If you use Elastic Beanstalk to create a default role, then
Elastic Beanstalk will automatically update the Amazon S3 bucket policy to allow log rotation. If you use
a custom role, you need to attach a policy that grants Elastic Beanstalk permissions to rotate logs. For
more information about the policy, see Using a Custom Instance Profile (p. 577).
In this procedure, we use the Elastic Beanstalk to create a default role and then attach a custom policy
for DynamoDB.
To attach an action policy to the Elastic Beanstalk default role
1. Deploy a sample application to Elastic Beanstalk using one of the following methods.When prompted,
select to create a default instance profile.
• Elastic Beanstalk console — Creating New Applications (p. 279)
• Eb — Getting Started with Eb (p. 672)
• AWS Toolkit for Eclipse — Develop, Test, and Deploy (p. 93)
• AWS Toolkit for Visual Studio — Develop, Test, and Deploy (p. 134)
Elastic Beanstalk creates an IAM role called aws-elasticbeanstalk-ec2-role.
2. Attach an action policy to the aws-elasticbeanstalk-ec2-role role.
a. Sign in to the AWS Management Console and open the IAM console at https://
console.aws.amazon.com/iam/.
b. In the left pane, click Roles.
c. From the Roles pane, click the aws-elasticbeanstalk-ec2-role role.
d. Inside the Permissions tab, click Attach Role Policy.
e. Click Custom Policy and then type the following action policy to give Elastic Beanstalk permission
to get data from items in the AWS Account's tables.
Note
In the Amazon Resource Name (ARN), replace the example region us-west-2 with
the region that has the tables with the data you need. Similarly, replace the example
account number 123456789012 with your AWS account ID.
To find your AWS account number, go to the AWS Management Console and click My
Account.Your AWS account number is shown in the upper right portion of the Manage
Your Account page. Do not include dashes in your AWS account ID in the ARN in the
policy document.
{
"Version": "2012-10-17",
"Statement": [
{
"Effect": "Allow",
"Action": [
API Version 2010-12-01
572
Elastic Beanstalk Developer Guide
Using IAM Roles

"dynamodb:GetItem",
"dynamodb:BatchGetItem"
],
"Resource": "arn:aws:dynamodb:us-west-2:123456789012:table/*"
}
]
}
f. Click Apply Policy.
For more information on managing policies, go to Managing IAM Policies in Using AWS Identity and
Access Management.
In this procedure, we use the IAM console to create an IAM role and a custom policy for DynamoDB.
To create a role and attach an action policy to the role
1. Sign in to the AWS Management Console and open the IAM console at https://
console.aws.amazon.com/iam/.
2. In the left pane, click Roles.
3. In the Roles pane, click Create New Role to launch the Create Role Wizard.
4. On the Configure Role page, in the Role Name box, enter the name of the role. Click Continue.
5. On the next Configure Role page, click Amazon EC2 to allow EC2 instances to call AWS services
on your behalf.
6. On the Set Permissions page, click Custom Policy.
7. Type the name of the policy and the policy information, and click Continue.The following diagram
shows an example policy that gives Elastic Beanstalk permission to get data from items in the AWS
Account's tables.
API Version 2010-12-01
573
Elastic Beanstalk Developer Guide
Using IAM Roles

For more example policies for DynamoDB, go to Example Policies for Amazon DynamoDB in Amazon
DynamoDB Developer Guide .
8. On the Review page, click Create Role.
An IAM role and an instance profile associated with that role are created.The name of the instance profile
is the same as the role.This instance profile allows your applications running on the EC2 instances to
gain access to temporary security credentials so that it can make AWS API requests.
Step 2: Update Your Application to Access Temporary Credentials
Now that you have created and configured an IAM role, your application can use the instance profile
associated with that role to obtain temporary security credentials to make AWS API calls.When you
deploy your application to Elastic Beanstalk, Elastic Beanstalk launches the EC2 instances using the
instance profile you specify.Your application uses the role credentials that are available on the EC2
instance.Your application retrieves the role credentials from the Instance Meta Data Service (IMDS), and
then makes API calls to DyanmoDB using those credentials. For more information about using IAM roles
with EC2, go to Granting Applications that Run on Amazon EC2 Instances Access to AWS Resources in
the AWS Identity and Access Management Using IAM.
If you use the AWS SDKs, the software constructs a client object for an AWS service, using an overload
of the constructor that does not take any parameters. When this parameterless constructor executes, it
searches the "credentials provider chain." The credentials provider chain is the set of places where the
constructor attempts to find credentials if they are not specified explicitly as parameters.The sequence
of places where the constructor will attempt to check varies depending on the programming language.
Check the corresponding SDK documentation for details.You can also have the SDK automatically use
the IAM role credentials from the IMDS by specifying a parameter. In this section, we provide code
examples using the SDKs to obtain role credentials.
Java
API Version 2010-12-01
574
Elastic Beanstalk Developer Guide
Using IAM Roles

AmazonDynamoDB client = new AmazonDynamoDBClient(new InstanceProfileCreden
tialsProvider());
For more information, go to Using IAM Roles for EC2 Instances with the SDK for Java in the AWS SDK
for Java Developer Guide.
.NET
AmazonDynamoDBClient client = new AmazonDynamoDBClient(new InstanceProfileAWSCre
dentials());
For more information, go to Using IAM Roles for EC2 Instances with the SDK for .NET in the AWS SDK
for .NET Developer Guide.
PHP
$dynamoDB = new AmazonDynamoDB(array(
'default_cache_config' => '/tmp/secure-dir'
));
For more information, go to Using IAM Roles for EC2 Instances with the SDK for PHP in the AWS SDK
for PHP Developer Guide.
Python
import boto
conn = boto.connect_dynamodb()
For more information, go to boto: A Python interface to Amazon Web Services.
Ruby
Example for specifying role credentials:
AWS.config(:credential_provider => AWS::Core::CredentialProviders::EC2Pro
vider.new)
For Ruby, the credentials provider chain is static credentials in AWS.config, environment variables, and
then the IMDS.
Example without specifying role credentials:
ddb = AWS::DynamoDB.new
For more information, go to Using IAM Roles for Amazon EC2 Instances with the AWS SDK for Ruby in
the AWS SDK for Ruby Developer Guide.
Step 3: Deploy to Elastic Beanstalk
After you update your application, you can deploy it to Elastic Beanstalk using your instance profile.
If you used Elastic Beanstalk to create a default instance profile, then you can redeploy your updated
application to your environment. For instructions, see one of the following:
API Version 2010-12-01
575
Elastic Beanstalk Developer Guide
Using IAM Roles

• Elastic Beanstalk console — Creating New Application Versions (p. 292)
• Eb — Getting Started with Eb (p. 672)
• AWS Toolkit for Eclipse — Edit the Application and Redeploy (p. 101)
• AWS Toolkit for Visual Studio — Edit the Application and Redeploy (p. 143)
If you used the IAM console to create the role, the IAM console automatically creates and manages the
instance profile for you.The instance profile has the same name as the role you created. Use one of the
following methods to deploy your application to Elastic Beanstalk.When prompted, select the instance
profile you just created.
• Elastic Beanstalk console — Creating New Applications (p. 279)
• Eb — Getting Started with Eb (p. 672)
• AWS Toolkit for Eclipse — Develop, Test, and Deploy (p. 93)
• AWS Toolkit for Visual Studio — Develop, Test, and Deploy (p. 134)
Example: Granting Elastic Beanstalk Permission to Rotate
Logs to Amazon S3
Elastic Beanstalk can copy the log files for your application's Amazon EC2 instances to the Amazon S3
bucket associated with your application. Elastic Beanstalk requires permissions to access this Amazon
S3 bucket.To grant Elastic Beanstalk permission to rotate logs, you can do one of two things:
• Create a default instance profile using the Elastic Beanstalk console or eb.
• Use a custom IAM role and attach an action policy to grant permission to Elastic Beanstalk.
This topic walks you through granting Elastic Beanstalk permission to rotate logs using both methods
and assumes that you have the necessary IAM permissions to create and pass roles.
Creating a Default Instance Profile
When you deploy your application to Elastic Beanstalk, Elastic Beanstalk can create a default instance
profile for you. Elastic Beanstalk creates a default instance profile called
aws-elasticbeanstalk-ec2-role and updates the Amazon S3 bucket policy to allow log rotation.
When Elastic Beanstalk creates the default instance profile, it creates a trust policy with no action policies
attached. If your application requires access to other AWS resources, you can attach action policies to
the default instance profile.
Note
You must have permission to create a default profile when deploying your application using
Elastic Beanstalk. For more information, see Granting IAM Users Permissions to Create and
Pass IAM Roles (p. 568).
You can use the Elastic Beanstalk console, eb, or the AWS Toolkits to create a default instance profile
when you deploy your application. For instructions, see one of the following:
• Elastic Beanstalk console — Creating New Applications (p. 279)
• Eb — Getting Started with Eb (p. 672)
• AWS Toolkit for Eclipse — Develop, Test, and Deploy (p. 93)
• AWS Toolkit for Visual Studio — Develop, Test, and Deploy (p. 134)
API Version 2010-12-01
576
Elastic Beanstalk Developer Guide
Using IAM Roles

If you already deployed your application to Elastic Beanstalk, you can also update your environment to
use the default instance profile. For instructions, see Configuring Amazon EC2 Server Instances with
Elastic Beanstalk (p. 352).
Using a Custom Instance Profile
If you want to create an IAM role or use an existing IAM role where EC2 is the trusted entity, you can use
that when deploying your application to Elastic Beanstalk.To enable log rotation, you will need to attach
a policy to your IAM role to grant Elastic Beanstalk permission to rotate logs. When you deploy your
application to Elastic Beanstalk, you use the instance profile associated with the IAM role. If you use the
IAM console to create the IAM role, the instance profile is the same name as the role.
To grant Elastic Beanstalk permission to rotate logs using a new IAM role
1. Sign in to the AWS Management Console and open the IAM console at https://
console.aws.amazon.com/iam/.
2. In the left pane, click Roles.
3. In the Roles pane, click Create New Role to launch the Create Role Wizard.
4. On the Configure Role page, in the Role Name box, enter the name of the role. Click Continue.
5. On the next Configure Role page, click Amazon EC2 to allow EC2 instances to call AWS services
on your behalf.
6. On the Set Permissions page, click Custom Policy.
7. Type the name of the policy and the policy information, and click Continue.The following example
policy grants Elastic Beanstalk permission to rotate logs.
Note
Replace the example Amazon S3 bucket name with your Amazon S3 bucket name for
Elastic Beanstalk.The Amazon S3 bucket name will be elasticbeanstalk–region–your
account ID.The region is the region where you launched your Elastic Beanstalk
environment.
API Version 2010-12-01
577
Elastic Beanstalk Developer Guide
Using IAM Roles

{
"Version": "2012-10-17",
"Statement": [
{
"Effect": "Allow",
"Action": "s3:PutObject",
"Resource": "arn:aws:s3:::elasticbeanstalk-us-west-2-012345678901/re
sources/environments/logs/*"
}
]
}
8. On the Review page, click Create Role.
An IAM role and an instance profile associated with that role are created.The name of the instance
profile is the same as the role.This instance profile allows your applications running on the EC2
instances to gain access to temporary security credentials so that it can make AWS API requests.
9. Deploy your application to Elastic Beanstalk using one of the following, and when prompted, select
the instance profile you just created.
• Elastic Beanstalk console — Creating New Applications (p. 279)
• Eb — Getting Started with Eb (p. 672)
• AWS Toolkit for Eclipse — Develop, Test, and Deploy (p. 93)
• AWS Toolkit for Visual Studio — Develop, Test, and Deploy (p. 134)
If you already deployed your application to Elastic Beanstalk, you can also update your environment
to use the default instance profile. For instructions, see Configuring Amazon EC2 Server Instances
with Elastic Beanstalk (p. 352).
To grant Elastic Beanstalk permission to rotate logs using an existing IAM role
1. Make sure you created an IAM role where EC2 is the trusted entity.You can check your trusted
entities using the IAM console at https://console.aws.amazon.com/iam/. Click the IAM role in the
Roles pane, and then click the Trust Relationships tab. If you do not see ec2.amazonaws.com,
then you need to update your trust policy.To update your trust policy, do the following:
a. From the Trust Relationships tab, click Edit Trust Relationship.
b. Update the trust policy to include ec2.amazonaws.com like in the following snippet.
{
"Version": "2012-10-17",
"Statement": [
{
"Sid": "",
"Effect": "Allow",
"Principal": {
"Service": [
"ec2.amazonaws.com"
]
},
"Action": "sts:AssumeRole"
}
]
}
API Version 2010-12-01
578
Elastic Beanstalk Developer Guide
Using IAM Roles

c. Click Update Trust Relationship.
2. Attach an action policy to the IAM role that grants Elastic Beanstalk permission to rotate logs.
a. In the IAM console, from the Roles pane, click the IAM role.
b. Inside the Permissions tab, click Attach Policy or Attach Another Policy.
c. Click Custom Policy and then type the following action policy to set the following action on
Amazon S3.
Note
Replace the example Amazon S3 bucket name with your Amazon S3 bucket name for
Elastic Beanstalk.The Amazon S3 bucket name will be elasticbeanstalk–region–your
account ID.The region is the region where you launched your Elastic Beanstalk
environment.
{
"Version": "2012-10-17",
"Statement": [
{
"Effect": "Allow",
"Action": "s3:PutObject",
"Resource": "arn:aws:s3:::elasticbeanstalk-us-west-2-
012345678901/resources/environments/logs/*"
}
]
}
d. Click Apply Policy.
For more information on managing policies, go to Managing IAM Policies in Using AWS Identity and
Access Management.
3. Deploy your application to Elastic Beanstalk using one of the following, and when prompted, select
the instance profile.
• Elastic Beanstalk console — Creating New Applications (p. 279)
• Eb — Getting Started with Eb (p. 672)
• AWS Toolkit for Eclipse — Develop, Test, and Deploy (p. 93)
• AWS Toolkit for Visual Studio — Develop, Test, and Deploy (p. 134)
If you already deployed your application to Elastic Beanstalk, you can also update your environment
to use the default instance profile. For instructions, see Configuring Amazon EC2 Server Instances
with Elastic Beanstalk (p. 352).
Amazon Resource Name (ARN) Format for Elastic
Beanstalk
You specify a resource for an IAM policy using that resource's Amazon Resource Name (ARN). For
Elastic Beanstalk, the ARN has the following format.
arn:aws:elasticbeanstalk:region:accountid:resourcetype/resourcepath
API Version 2010-12-01
579
Elastic Beanstalk Developer Guide
Amazon Resource Name (ARN) Format

Where:
• region is the region the resource resides in (for example, us-west-2).
• accountid is the AWS account ID, with no hyphens (for example, 123456789012)
• resourcetype identifies the type of the Elastic Beanstalk resource—for example, environment. See
the table below for a list of all Elastic Beanstalk resource types.
• resourcepath is the portion that identifies the specific resource. An Elastic Beanstalk resource has
a path that uniquely identifies that resource. See the table below for the format of the resource path
for each resource type. For example, an environment is always associated with an application.The
resource path for the environment myEnvironment in the application myApp would look like this:
myApp/myEnvironment
Elastic Beanstalk has several types of resources you can specify in a policy. The following table shows
the ARN format for each resource type and an example.
Format for ARNResource
Type
arn:aws:elasticbeanstalk:region:accountid:application/application-
name
Example: arn:aws:elasticbeanstalk:us-west-2:123456789012:applica-
tion/My App
application
arn:aws:elasticbeanstalk:region:accountid:applicationversion/ap-
plicationname/versionlabel
Example: arn:aws:elasticbeanstalk:us-west-2:123456789012:applica-
tionversion/My App/My Version
application-
version
arn:aws:elasticbeanstalk:region:accountid:environment/application-
name/environmentname
Example: arn:aws:elasticbeanstalk:us-west-2:123456789012:environ-
ment/My App/MyEnvironment
environment
arn:aws:elasticbeanstalk:region::solutionstack/solutionstackname
Example: arn:aws:elasticbeanstalk:us-west-2::solutionstack/32bit
Amazon Linux running Tomcat 7
solution-
stack
arn:aws:elasticbeanstalk:region:accountid:template/application-
name/templatename
Example:arn:aws:elasticbeanstalk:us-west-2:123456789012:template/My
App/My Template
template
An environment, application version, and configuration template are always contained within a specific
application.You'll notice that these resources all have an application name in their resource path so that
they are uniquely identified by their resource name and the containing application. Although solution
stacks are used by configuration templates and environments, solution stacks are not specific to an
application or AWS account and do not have the application or AWS account in their ARNs.
API Version 2010-12-01
580
Elastic Beanstalk Developer Guide
Amazon Resource Name (ARN) Format

Resources and Conditions for Elastic Beanstalk
Actions
Topics
• Policy Information for Elastic Beanstalk Actions (p. 581)
• Condition Keys for Elastic Beanstalk Actions (p. 601)
This section describes the resources and conditions that you can use in policy statements to grant
permissions that allow specific Elastic Beanstalk actions to be performed on specific Elastic Beanstalk
resources.
Note
Some Elastic Beanstalk actions may require permissions to other AWS services. For example,
the following policy gives permissions for all Auto Scaling, Amazon S3, Amazon EC2, CloudWatch,
Amazon SNS, Elastic Load Balancing, Amazon RDS, and AWS CloudFormation (for non-legacy
container types) actions required to complete any Elastic Beanstalk action. Elastic Beanstalk
relies on these additional services to provision underlying resources when creating an
environment. For a list of supported non-legacy container types, see Why are some container
types marked legacy? (p. 426).
The following policy is an example. It gives a broad set of permissions to the AWS products that
Elastic Beanstalk uses to manage applications and environments. For example, ec2:* allows
an IAM user to perform any action on any Amazon EC2 resource in the AWS account. These
permissions are not limited to the resources that you use with Elastic Beanstalk. As a best
practice, you should grant individuals only the permissions they need to perform their duties.
{
"Version": "2012-10-17",
"Statement": [
{
"Effect": "Allow",
"Action": [
"ec2:*",
"elasticloadbalancing:*",
"autoscaling:*",
"cloudwatch:*",
"s3:*",
"sns:*",
"rds:*",
"cloudformation:*"
],
"Resource": "*"
}
]
}
Policy Information for Elastic Beanstalk Actions
The following table lists all Elastic Beanstalk actions, the resource that each action acts upon, and the
additional contextual information that can be provided using conditions.
Conditions enable you to specify permissions to resources that the action needs to complete. For example,
when you can call the CreateEnvironment action, you must also specify the application version to
deploy as well as the application that contains that application name.When you set permissions for the
CreateEnvironment action, you specify the application and application version that you want the action
API Version 2010-12-01
581
Elastic Beanstalk Developer Guide
Resources and Conditions for Actions

to act upon by using the InApplication and FromApplicationVersion conditions. In addition, you
can specify the environment configuration with a solution stack (FromSolutionStack) or a configuration
template (FromConfigurationTemplate).The following policy statement allows the
CreateEnvironment action to create an environment with the name myenv (specified by Resource)
in the application My App (specified by the InApplication condition) using the application version My
Version (FromApplicationVersion) with a 32bit Amazon Linux running Tomcat 7 configuration
(FromSolutionStack):
{
"Version": "2012-10-17",
"Statement": [
{
"Action": [
"elasticbeanstalk:CreateEnvironment"
],
"Effect": "Allow",
"Resource": [
"arn:aws:elasticbeanstalk:us-west-2:123456789012:environment/My
App/myenv"
],
"Condition": {
"StringEquals": {
"elasticbeanstalk:InApplication": ["arn:aws:elasticbeanstalk:us-west-
2:123456789012:application/My App"],
"elasticbeanstalk:FromApplicationVersion": ["arn:aws:elasticbean
stalk:us-west-2:123456789012:applicationversion/My App/My Version"],
"elasticbeanstalk:FromSolutionStack": ["arn:aws:elasticbeanstalk:us-
west-2::solutionstack/32bit Amazon Linux running Tomcat 7"]
}
}
}
]
}
As you can see in the preceding example, resources are specified using their Amazon Resource Name
(ARN). For more information about the ARN format for Elastic Beanstalk resources, see Amazon Resource
Name (ARN) Format for Elastic Beanstalk (p. 579).
The Comments column contains a simple example statement that grants permission to use the action on
a specific resource with the appropriate contextual information provided through one or more conditions.
The Comments column also lists dependencies that the action may have on permissions to perform other
actions or to access other resources.
Note
If you set a policy on elasticbeanstalk:Describe* actions, those actions return only values
that are permitted through the policy. For example, the following policy allows the
elasticbeanstalk:DescribeEvents action to return a list of event descriptions for the
environment myenv in the application My App. If you applied this policy to a user, that user could
successfully perform the elasticbeanstalk:DescribeEvents action using myenv for the
EnvironmentName parameter to get the list of events for myenv. However, if the user used
another environment name for EnvironmentName or specified different parameters such as
one for a specific application version, the action would return no event descriptions because the
user has permission to view onlymyenv events. If the user specified no parameters for
elasticbeanstalk:DescribeEvents, the action would return only the events for myenv
because that is the only resource the user has permissions for.
API Version 2010-12-01
582
Elastic Beanstalk Developer Guide
Resources and Conditions for Actions

{
"Version": "2012-10-17",
"Statement": [
{
"Action": "elasticbeanstalk:DescribeEvents",
"Effect": "Allow",
"Resource": [
"arn:aws:elasticbeanstalk:us-west-2:123456789012:environment/My
App/myenv"
],
"Condition": {
"StringEquals": {
"elasticbeanstalk:InApplication": ["arn:aws:elasticbeanstalk:us-
west-2:123456789012:application/My App"]
}
}
}
]
}
Policy information for Elastic Beanstalk actions, including resources, conditions, examples,
and dependencies
CommentsConditionsResource
Action: CheckDNSAvailability
This example allows the CheckDNSAvailability action
to check if a CNAME is available. Note that permission to
a resource is not required for this action and the resource
should be specified by "*".
{
"Version": "2012-10-17",
"Statement": [
{
"Action": [
"elasticbeanstalk:CheckDNSAvailabil
ity"
],
"Effect": "Allow",
"Resource": "*"
}
]
}
N/A"*"
Action: CreateApplication
API Version 2010-12-01
583
Elastic Beanstalk Developer Guide
Resources and Conditions for Actions

CommentsConditionsResource
This example allows the CreateApplication action to
create applications whose names begin with DivA:
{
"Version": "2012-10-17",
"Statement": [
{
"Action": [
"elasticbeanstalk:CreateApplication"
],
"Effect": "Allow",
"Resource": [
"arn:aws:elasticbeanstalk:us-west-
2:123456789012:application/DivA*"
]
}
]
}
N/Aapplication
Action: CreateApplicationVersion
This example allows the CreateApplicationVersion
action to create application versions with any name (*) in
the application My App:
{
"Version": "2012-10-17",
"Statement": [
{
"Action": [
"elasticbeanstalk:CreateApplication
Version"
],
"Effect": "Allow",
"Resource": [
"arn:aws:elasticbeanstalk:us-west-
2:123456789012:applicationversion/My App/*"
],
"Condition": {
"StringEquals": {
"elasticbeanstalk:InApplication":
["arn:aws:elasticbeanstalk:us-west-
2:123456789012:application/My App"]
}
}
}
]
}
InApplicationapplicationver-
sion
Action: CreateConfigurationTemplate
API Version 2010-12-01
584
Elastic Beanstalk Developer Guide
Resources and Conditions for Actions

CommentsConditionsResource
This example allows the CreateConfigurationTemplate
action to create configuration templates whose name begins
with My Template (My Template*) in the application My
App:
{
"Version": "2012-10-17",
"Statement": [
{
"Action": [
"elasticbeanstalk:CreateConfiguration
Template"
],
"Effect": "Allow",
"Resource": [
"arn:aws:elasticbeanstalk:us-west-
2:123456789012:configurationtemplate/My
App/My Template*"
],
"Condition": {
"StringEquals": {
"elasticbeanstalk:InApplication":
["arn:aws:elasticbeanstalk:us-west-
2:123456789012:application/My App"],
"elasticbeanstalk:FromSolution
Stack": ["arn:aws:elasticbeanstalk:us-west-
2::solutionstack/32bit Amazon Linux running
Tomcat 7"]
}
}
}
]
}
InApplication
FromApplication
FromApplication-
Version
FromConfigura-
tionTemplate
FromEnvironment
FromSolution-
Stack
configuration-
template
Action: CreateEnvironment
API Version 2010-12-01
585
Elastic Beanstalk Developer Guide
Resources and Conditions for Actions

CommentsConditionsResource
This example allows the CreateEnvironment action to
create an environment whose name is myenv in the applic-
ation My App and using the solution stack 32bit Amazon
Linux running Tomcat 7:
{
"Version": "2012-10-17",
"Statement": [
{
"Action": [
"elasticbeanstalk:CreateEnvironment"
],
"Effect": "Allow",
"Resource": [
"arn:aws:elasticbeanstalk:us-west-
2:123456789012:environment/My App/myenv"
],
"Condition": {
"StringEquals": {
"elasticbeanstalk:InApplication":
["arn:aws:elasticbeanstalk:us-west-
2:123456789012:application/My App"],
"elasticbeanstalk:FromApplication
Version": ["arn:aws:elasticbeanstalk:us-west-
2:123456789012:applicationversion/My App/My
Version"],
"elasticbeanstalk:FromSolution
Stack": ["arn:aws:elasticbeanstalk:us-west-
2::solutionstack/32bit Amazon Linux running
Tomcat 7"]
}
}
}
]
}
InApplication
FromApplication-
Version
FromConfigura-
tionTemplate
FromSolution-
Stack
environment
Action: CreateStorageLocation
API Version 2010-12-01
586
Elastic Beanstalk Developer Guide
Resources and Conditions for Actions

CommentsConditionsResource
This example allows the CreateStorageLocation action
to create an Amazon S3 storage location. Note that permis-
sion to an Elastic Beanstalk resource is not required for this
action, and the resource should be specified by "*".
{
"Version": "2012-10-17",
"Statement": [
{
"Action": [
"elasticbeanstalk:CreateStorageLoca
tion"
],
"Effect": "Allow",
"Resource": "*"
}
]
}
N/A"*"
Action: DeleteApplication
This example allows the DeleteApplication action to
delete the application My App:
{
"Version": "2012-10-17",
"Statement": [
{
"Action": [
"elasticbeanstalk:DeleteApplication"
],
"Effect": "Allow",
"Resource": [
"arn:aws:elasticbeanstalk:us-west-
2:123456789012:application/My App"
]
}
]
}
N/Aapplication
Action: DeleteApplicationVersion
API Version 2010-12-01
587
Elastic Beanstalk Developer Guide
Resources and Conditions for Actions

CommentsConditionsResource
This example allows the DeleteApplicationVersion
action to delete an application version whose name is My
Version in the application My App:
{
"Version": "2012-10-17",
"Statement": [
{
"Action": [
"elasticbeanstalk:DeleteApplication
Version"
],
"Effect": "Allow",
"Resource": [
"arn:aws:elasticbeanstalk:us-west-
2:123456789012:applicationversion/My App/My
Version"
],
"Condition": {
"StringEquals": {
"elasticbeanstalk:InApplication":
["arn:aws:elasticbeanstalk:us-west-
2:123456789012:application/My App"]
}
}
}
]
}
InApplicationapplicationver-
sion
Action: DeleteConfigurationTemplate
This example allows the DeleteConfigurationTemplate
action to delete a configuration template whose name is My
Template in the application My App. Specifying the applic-
ation name as a condition is optional.
{
"Version": "2012-10-17",
"Statement": [
{
"Action": [
"elasticbeanstalk:DeleteConfiguration
Template"
],
"Effect": "Allow",
"Resource": [
"arn:aws:elasticbeanstalk:us-west-
2:123456789012:configurationtemplate/My
App/My Template"
]
}
]
}
InApplication
(Optional)
configuration-
template
API Version 2010-12-01
588
Elastic Beanstalk Developer Guide
Resources and Conditions for Actions

CommentsConditionsResource
Action: DeleteEnvironmentConfiguration
This example allows the DeleteEnvironmentConfigur-
ation action to delete a draft configuration for the environ-
ment myenv in the application My App. Specifying the ap-
plication name as a condition is optional.
{
"Version": "2012-10-17",
"Statement": [
{
"Action": [
"elasticbeanstalk:DeleteEnvironment
Configuration"
],
"Effect": "Allow",
"Resource": [
"arn:aws:elasticbeanstalk:us-west-
2:123456789012:environment/My App/myenv"
]
}
]
}
InApplication
(Optional)
environment
Action: DescribeApplicationVersions
This example allows the DescribeApplicationVersions
action to describe the application version My Version in
the application My App. Specifying the application name
as a condition is optional.
{
"Version": "2012-10-17",
"Statement": [
{
"Action": [
"elasticbeanstalk:DescribeApplication
Versions"
],
"Effect": "Allow",
"Resource": [
"arn:aws:elasticbeanstalk:us-west-
2:123456789012:applicationversion/My App/My
Version"
]
}
]
}
InApplication
(Optional)
applicationver-
sion
Action: DescribeApplications
API Version 2010-12-01
589
Elastic Beanstalk Developer Guide
Resources and Conditions for Actions

CommentsConditionsResource
This example allows the DescribeApplications action
to describe the application My App.
{
"Version": "2012-10-17",
"Statement": [
{
"Action": [
"elasticbeanstalk:DescribeApplica
tions"
],
"Effect": "Allow",
"Resource": [
"arn:aws:elasticbeanstalk:us-west-
2:123456789012:application/My App"
]
}
]
}
N/Aapplication
Action: DescribeConfigurationOptions
This example allows the DescribeConfigurationOp-
tions action to describe the configuration options for the
environment myenv in the application My App. Specifying
the application name as a condition is optional.
{
"Version": "2012-10-17",
"Statement": [
{
"Action": "elasticbeanstalk:DescribeCon
figurationOptions",
"Effect": "Allow",
"Resource": [
"arn:aws:elasticbeanstalk:us-west-
2:123456789012:environment/My App/myenv"
]
}
]
}
InApplication
(Optional)
environment,
configuration-
template, solu-
tionstack
Action: DescribeConfigurationSettings
API Version 2010-12-01
590
Elastic Beanstalk Developer Guide
Resources and Conditions for Actions

CommentsConditionsResource
This example allows the DescribeConfigurationSet-
tings action to describe the configuration settings for the
environment myenv in the application My App. Specifying
the application name as a condition is optional.
{
"Version": "2012-10-17",
"Statement": [
{
"Action": "elasticbeanstalk:DescribeCon
figurationSettings",
"Effect": "Allow",
"Resource": [
"arn:aws:elasticbeanstalk:us-west-
2:123456789012:environment/My App/myenv"
]
}
]
}
InApplication
(Optional)
environment,
configuration-
template
Action: DescribeEnvironmentResources
This example allows the DescribeEnvironmentRe-
sources action to return list of AWS resources for the en-
vironment myenv in the application My App. Specifying the
application name as a condition is optional.
{
"Version": "2012-10-17",
"Statement": [
{
"Action": "elasticbeanstalk:DescribeEn
vironmentResources",
"Effect": "Allow",
"Resource": [
"arn:aws:elasticbeanstalk:us-west-
2:123456789012:environment/My App/myenv"
]
}
]
}
InApplication
(Optional)
environment
Action: DescribeEnvironments
API Version 2010-12-01
591
Elastic Beanstalk Developer Guide
Resources and Conditions for Actions

CommentsConditionsResource
This example allows the DescribeEnvironments action
to describe the environments myenv and myotherenv in
the application My App. Specifying the application name
as a condition is optional.
{
"Version": "2012-10-17",
"Statement": [
{
"Action": "elasticbeanstalk:DescribeEn
vironments",
"Effect": "Allow",
"Resource": [
"arn:aws:elasticbeanstalk:us-west-
2:123456789012:environment/My App/myenv",
"arn:aws:elasticbeanstalk:us-west-
2:123456789012:environment/My App2/myother
env"
]
}
]
}
InApplication
(Optional)
environment
Action: DescribeEvents
This example allows the DescribeEvents action to list
event descriptions for the environment myenv and the ap-
plication version My Version in the application My App.
{
"Version": "2012-10-17",
"Statement": [
{
"Action": "elasticbeanstalk:Descri
beEvents",
"Effect": "Allow",
"Resource": [
"arn:aws:elasticbeanstalk:us-west-
2:123456789012:environment/My App/myenv",
"arn:aws:elasticbeanstalk:us-west-
2:123456789012:applicationversion/My App/My
Version"
],
"Condition": {
"StringEquals": {
"elasticbeanstalk:InApplication":
["arn:aws:elasticbeanstalk:us-west-
2:123456789012:application/My App"]
}
}
}
]
}
InApplicationapplication, ap-
plicationver-
sion, configura-
tiontemplate,
environment
API Version 2010-12-01
592
Elastic Beanstalk Developer Guide
Resources and Conditions for Actions

CommentsConditionsResource
Action: ListAvailableSolutionStacks
This example allows the ListAvailableSolutionStacks
action to return only the solution stack 32bit Amazon
Linux running Tomcat 7.
{
"Version": "2012-10-17",
"Statement": [
{
"Action": [
"elasticbeanstalk:ListAvailableSolu
tionStacks"
],
"Effect": "Allow",
"Resource": "arn:aws:elasticbean
stalk:us-west-2::solutionstack/32bit Amazon
Linux running Tomcat 7"
}
]
}
N/Asolutionstack
Action: RebuildEnvironment
This example allows the RebuildEnvironment action to
rebuild the environment myenv in the application My App.
{
"Version": "2012-10-17",
"Statement": [
{
"Action": [
"elasticbeanstalk:RebuildEnvironment"
],
"Effect": "Allow",
"Resource": [
"arn:aws:elasticbeanstalk:us-west-
2:123456789012:environment/My App/myenv"
],
"Condition": {
"StringEquals": {
"elasticbeanstalk:InApplication":
["arn:aws:elasticbeanstalk:us-west-
2:123456789012:application/My App"]
}
}
}
]
}
InApplicationenvironment
Action: RequestEnvironmentInfo
API Version 2010-12-01
593
Elastic Beanstalk Developer Guide
Resources and Conditions for Actions

CommentsConditionsResource
This example allows the RequestEnvironmentInfo action
to compile information about the environment myenv in the
application My App.
{
"Version": "2012-10-17",
"Statement": [
{
"Action": [
"elasticbeanstalk:RequestEnviron
mentInfo"
],
"Effect": "Allow",
"Resource": [
"arn:aws:elasticbeanstalk:us-west-
2:123456789012:environment/My App/myenv"
],
"Condition": {
"StringEquals": {
"elasticbeanstalk:InApplication":
["arn:aws:elasticbeanstalk:us-west-
2:123456789012:application/My App"]
}
}
}
]
}
InApplicationenvironment
Action: RestartAppServer
API Version 2010-12-01
594
Elastic Beanstalk Developer Guide
Resources and Conditions for Actions

CommentsConditionsResource
This example allows the RestartAppServer action to re-
start the application container server for the environment
myenv in the application My App.
{
"Version": "2012-10-17",
"Statement": [
{
"Action": [
"elasticbeanstalk:RestartAppServer"
],
"Effect": "Allow",
"Resource": [
"arn:aws:elasticbeanstalk:us-west-
2:123456789012:environment/My App/myenv"
],
"Condition": {
"StringEquals": {
"elasticbeanstalk:InApplication":
["arn:aws:elasticbeanstalk:us-west-
2:123456789012:application/My App"]
}
}
}
]
}
InApplicationenvironment
Action: RetrieveEnvironmentInfo
API Version 2010-12-01
595
Elastic Beanstalk Developer Guide
Resources and Conditions for Actions

CommentsConditionsResource
This example allows the RetrieveEnvironmentInfo
action to retrieve the compiled information for the environ-
ment myenv in the application My App.
{
"Version": "2012-10-17",
"Statement": [
{
"Action": [
"elasticbeanstalk:RetrieveEnviron
mentInfo"
],
"Effect": "Allow",
"Resource": [
"arn:aws:elasticbeanstalk:us-west-
2:123456789012:environment/My App/myenv"
],
"Condition": {
"StringEquals": {
"elasticbeanstalk:InApplication":
["arn:aws:elasticbeanstalk:us-west-
2:123456789012:application/My App"]
}
}
}
]
}
InApplicationenvironment
Action: SwapEnvironmentCNAMEs
This example allows the SwapEnvironmentCNAMEs action
to swap the CNAMEs for the environments mysrcenv and
mydestenv.
{
"Version": "2012-10-17",
"Statement": [
{
"Action": [
"elasticbeanstalk:SwapEnvironmentC
NAMEs"
],
"Effect": "Allow",
"Resource": [
"arn:aws:elasticbeanstalk:us-west-
2:123456789012:environment/My App/mysrcenv",
"arn:aws:elasticbeanstalk:us-west-
2:123456789012:environment/My App/mydestenv"
]
}
]
}
InApplication
(Optional)
FromEnvironment
(Optional)
environment
API Version 2010-12-01
596
Elastic Beanstalk Developer Guide
Resources and Conditions for Actions

CommentsConditionsResource
Action: TerminateEnvironment
This example allows the TerminateEnvironment action
to terminate the environment myenv in the application My
App.
{
"Version": "2012-10-17",
"Statement": [
{
"Action": [
"elasticbeanstalk:TerminateEnviron
ment"
],
"Effect": "Allow",
"Resource": [
"arn:aws:elasticbeanstalk:us-west-
2:123456789012:environment/My App/myenv"
],
"Condition": {
"StringEquals": {
"elasticbeanstalk:InApplication":
["arn:aws:elasticbeanstalk:us-west-
2:123456789012:application/My App"]
}
}
}
]
}
InApplicationenvironment
Action: UpdateApplication
This example allows the UpdateApplication action to
update properties of the application My App.
{
"Version": "2012-10-17",
"Statement": [
{
"Action": [
"elasticbeanstalk:UpdateApplication"
],
"Effect": "Allow",
"Resource": [
"arn:aws:elasticbeanstalk:us-west-
2:123456789012:application/My App"
]
}
]
}
N/Aapplication
Action: UpdateApplicationVersion
API Version 2010-12-01
597
Elastic Beanstalk Developer Guide
Resources and Conditions for Actions

CommentsConditionsResource
This example allows the UpdateApplicationVersion
action to update the properties of the application version
My Version in the application My App.
{
"Version": "2012-10-17",
"Statement": [
{
"Action": [
"elasticbeanstalk:UpdateApplication
Version"
],
"Effect": "Allow",
"Resource": [
"arn:aws:elasticbeanstalk:us-west-
2:123456789012:applicationversion/My App/My
Version"
],
"Condition": {
"StringEquals": {
"elasticbeanstalk:InApplication":
["arn:aws:elasticbeanstalk:us-west-
2:123456789012:application/My App"]
}
}
}
]
}
InApplicationapplicationver-
sion
Action: UpdateConfigurationTemplate
API Version 2010-12-01
598
Elastic Beanstalk Developer Guide
Resources and Conditions for Actions

CommentsConditionsResource
This example allows the UpdateConfigurationTemplate
action to update the properties or options of the configura-
tion template My Template in the application My App.
{
"Version": "2012-10-17",
"Statement": [
{
"Action": [
"elasticbeanstalk:UpdateConfiguration
Template"
],
"Effect": "Allow",
"Resource": [
"arn:aws:elasticbeanstalk:us-west-
2:123456789012:configurationtemplate/My
App/My Template"
],
"Condition": {
"StringEquals": {
"elasticbeanstalk:InApplication":
["arn:aws:elasticbeanstalk:us-west-
2:123456789012:application/My App"]
}
}
}
]
}
InApplicationconfiguration-
template
Action: UpdateEnvironment
API Version 2010-12-01
599
Elastic Beanstalk Developer Guide
Resources and Conditions for Actions

CommentsConditionsResource
This example allows the UpdateEnvironment action to
update the environment myenv in the application My App
by deploying the application version My Version.
{
"Version": "2012-10-17",
"Statement": [
{
"Action": [
"elasticbeanstalk:UpdateEnvironment"
],
"Effect": "Allow",
"Resource": [
"arn:aws:elasticbeanstalk:us-west-
2:123456789012:environment/My App/myenv"
],
"Condition": {
"StringEquals": {
"elasticbeanstalk:InApplication":
["arn:aws:elasticbeanstalk:us-west-
2:123456789012:application/My App"],
"elasticbeanstalk:FromApplication
Version": ["arn:aws:elasticbeanstalk:us-west-
2:123456789012:applicationversion/My App/My
Version"]
}
}
}
]
}
InApplication
FromApplication-
Version
FromConfigura-
tionTemplate
environment
Action: ValidateConfigurationSettings
API Version 2010-12-01
600
Elastic Beanstalk Developer Guide
Resources and Conditions for Actions

CommentsConditionsResource
This example allows the ValidateConfigurationSet-
tings action to validates configuration settings against the
environment myenv in the application My App.
{
"Version": "2012-10-17",
"Statement": [
{
"Action": [
"elasticbeanstalk:ValidateConfigura
tionSettings"
],
"Effect": "Allow",
"Resource": [
"arn:aws:elasticbeanstalk:us-west-
2:123456789012:environment/My App/myenv"
],
"Condition": {
"StringEquals": {
"elasticbeanstalk:InApplication":
["arn:aws:elasticbeanstalk:us-west-
2:123456789012:application/My App"]
}
}
}
]
}
InApplicationtemplate, envir-
onment
Condition Keys for Elastic Beanstalk Actions
Keys enable you to specify conditions that express dependencies, restrict permissions, or specify
constraints on the input parameters for an action. Elastic Beanstalk supports the following keys.
InApplication
Specifies the application that contains the resource that the action operates on.
The following example allows the UpdateApplicationVersion action to update the properties of
the application version My Version.The InApplication condition specifies My App as the
container for My Version.
{
"Version": "2012-10-17",
"Statement": [
{
"Action": [
"elasticbeanstalk:UpdateApplicationVersion"
],
"Effect": "Allow",
"Resource": [
"arn:aws:elasticbeanstalk:us-west-2:123456789012:applicationversion/My
App/My Version"
],
API Version 2010-12-01
601
Elastic Beanstalk Developer Guide
Resources and Conditions for Actions

"Condition": {
"StringEquals": {
"elasticbeanstalk:InApplication": ["arn:aws:elasticbeanstalk:us-
west-2:123456789012:application/My App"]
}
}
}
]
}
FromApplicationVersion
Specifies an application version as a dependency or a constraint on an input parameter.
The following example allows the UpdateEnvironment action to update the environment myenv in
the application My App.The FromApplicationVersion condition constrains the VersionLabel
parameter to allow only the application version My Version to update the environment.
{
"Version": "2012-10-17",
"Statement": [
{
"Action": [
"elasticbeanstalk:UpdateEnvironment"
],
"Effect": "Allow",
"Resource": [
"arn:aws:elasticbeanstalk:us-west-2:123456789012:environment/My
App/myenv"
],
"Condition": {
"StringEquals": {
"elasticbeanstalk:InApplication": ["arn:aws:elasticbeanstalk:us-
west-2:123456789012:application/My App"],
"elasticbeanstalk:FromApplicationVersion": ["arn:aws:elasticbean
stalk:us-west-2:123456789012:applicationversion/My App/My Version"]
}
}
}
]
}
FromConfigurationTemplate
Specifies a configuration template as a dependency or a constraint on an input parameter.
The following example allows the UpdateEnvironment action to update the environment myenv in
the application My App.The FromConfigurationTemplate condition constrains the TemplateName
parameter to allow only the configuration template My Template to update the environment.
{
"Version": "2012-10-17",
"Statement": [
{
"Action": [
"elasticbeanstalk:UpdateEnvironment"
],
"Effect": "Allow",
API Version 2010-12-01
602
Elastic Beanstalk Developer Guide
Resources and Conditions for Actions

"Resource": [
"arn:aws:elasticbeanstalk:us-west-2:123456789012:environment/My
App/myenv"
],
"Condition": {
"StringEquals": {
"elasticbeanstalk:InApplication": ["arn:aws:elasticbeanstalk:us-
west-2:123456789012:application/My App"],
"elasticbeanstalk:FromConfigurationTemplate": ["arn:aws:elastic
beanstalk:us-west-2:123456789012:configurationtemplate/My App/My Template"]
}
}
}
]
}
FromEnvironment
Specifies an environment as a dependency or a constraint on an input parameter.
The following example allows the SwapEnvironmentCNAMEs action to swap the CNAMEs in My
App for all environments whose names begin with mysrcenv and mydestenv but not those
environments whose names begin with mysrcenvPROD* and mydestenvPROD*.
{
"Version": "2012-10-17",
"Statement": [
{
"Action": [
"elasticbeanstalk:SwapEnvironmentCNAMEs"
],
"Effect": "Allow",
"Resource": [
"arn:aws:elasticbeanstalk:us-west-2:123456789012:environment/My
App/mysrcenv*",
"arn:aws:elasticbeanstalk:us-west-2:123456789012:environment/My
App/mydestenv*"
],
"Condition": {
"StringNotLike": {
"elasticbeanstalk:FromEnvironment": ["arn:aws:elasticbeanstalk:us-
west-2:123456789012:environment/My App/mysrcenvPROD*"],
"elasticbeanstalk:FromEnvironment": ["arn:aws:elasticbeanstalk:us-
west-2:123456789012:environment/My App/mydestenvPROD*"
]
}
}
}
]
}
FromSolutionStack
Specifies a solution stack as a dependency or a constraint on an input parameter.
This example allows the CreateConfigurationTemplate action to create configuration templates
whose name begins with My Template (My Template*) in the application My App.The
API Version 2010-12-01
603
Elastic Beanstalk Developer Guide
Resources and Conditions for Actions

FromSolutionStack condition constrains the solutionstack parameter to allow only the solution
stack 32bit Amazon Linux running Tomcat 7 as the input value for that parameter.
{
"Version": "2012-10-17",
"Statement": [
{
"Action": [
"elasticbeanstalk:CreateConfigurationTemplate"
],
"Effect": "Allow",
"Resource": [
"arn:aws:elasticbeanstalk:us-west-2:123456789012:configurationtem
plate/My App/My Template*"
],
"Condition": {
"StringEquals": {
"elasticbeanstalk:InApplication": ["arn:aws:elasticbeanstalk:us-
west-2:123456789012:application/My App"],
"elasticbeanstalk:FromSolutionStack": ["arn:aws:elasticbeanstalk:us-
west-2::solutionstack/32bit Amazon Linux running Tomcat 7"]
}
}
}
]
}
Example Policies Based on Policy Templates
This section walks through a use case for controlling user access to Elastic Beanstalk and sample policies
that support the use case.These policies use the Elastic Beanstalk policy templates as a starting point.
For information about attaching policies to users and groups, go to Managing IAM Policies in Using AWS
Identity and Access Management.
In our use case, Example Corp. is a software company with three teams responsible for their website:
administrators who manage the infrastructure, developers who build the software for the website, and a
QA team that tests the website.To help manage permissions to their Elastic Beanstalk assets, Example
Corp. creates groups that contain the members of each team: Admins, Developers, and Testers. Example
Corp. wants to enable the Admins group to have full access to all applications, environments, and their
underlying resources so that they can create, troubleshoot, and delete all of their Elastic Beanstalk assets.
Developers require permissions to view all Elastic Beanstalk assets and to create and deploy application
versions. Developers should not be able to create new applications or environments and cannot terminate
running environments since they are not part of the Admins group. Testers need to view all Elastic
Beanstalk resources in order to monitor and test applications so that they can run automated tests and
access the web application. However, the Testers group should not be able to make changes to any
Elastic Beanstalk resources.
API Version 2010-12-01
604
Elastic Beanstalk Developer Guide
Example Policies Based on Policy Templates

Example 1: Allow the Admins group to use all Elastic Beanstalk and related service APIs
The following policy gives permissions for all actions required to use Elastic Beanstalk.This policy includes
actions for Auto Scaling, Amazon S3, Amazon EC2, CloudWatch, Amazon SNS, Elastic Load Balancing,
Amazon RDS, and AWS CloudFormation (for non-legacy container types), as well as for all Elastic
Beanstalk actions. Elastic Beanstalk relies on these additional services to provision underlying resources
when creating an environment. For a list of supported non-legacy container types, see Why are some
container types marked legacy? (p. 426).
Note
The following policy is an example. It gives a broad set of permissions to the AWS products that
Elastic Beanstalk uses to manage applications and environments. For example, ec2:* allows
an IAM user to perform any action on any Amazon EC2 resource in the AWS account. These
permissions are not limited to the resources that you use with Elastic Beanstalk. As a best
practice, you should grant individuals only the permissions they need to perform their duties.
{
"Version": "2012-10-17",
"Statement": [
{
"Effect": "Allow",
"Action": [
"elasticbeanstalk:*",
"ec2:*",
"elasticloadbalancing:*",
"autoscaling:*",
"cloudwatch:*",
"s3:*",
"sns:*",
"rds:*",
"cloudformation:*"
],
"Resource": "*"
}
]
}
API Version 2010-12-01
605
Elastic Beanstalk Developer Guide
Example Policies Based on Policy Templates

Example 2: Allow the Developers group to do all actions except highly privileged operations
such as creating applications and environments
The following policy denies permission to create applications and environments but allows all other Elastic
Beanstalk actions.
Note
The following policy is an example. It gives a broad set of permissions to the AWS products that
Elastic Beanstalk uses to manage applications and environments. For example, ec2:* allows
an IAM user to perform any action on any Amazon EC2 resource in the AWS account. These
permissions are not limited to the resources that you use with Elastic Beanstalk. As a best
practice, you should grant individuals only the permissions they need to perform their duties.
{
"Version": "2012-10-17",
"Statement":[
{
"Action":["elasticbeanstalk:CreateApplication",
"elasticbeanstalk:CreateEnvironment",
"elasticbeanstalk:DeleteApplication",
"elasticbeanstalk:RebuildEnvironment",
"elasticbeanstalk:SwapEnvironmentCNAMEs",
"elasticbeanstalk:TerminateEnvironment"],
"Effect":"Deny",
"Resource":"*"
},
{
"Action":["elasticbeanstalk:*",
"ec2:*",
"elasticloadbalancing:*",
"autoscaling:*",
"cloudwatch:*",
"s3:*",
"sns:*",
"rds:*",
"cloudformation:*"],
"Effect":"Allow",
"Resource":"*"
}
]
}
API Version 2010-12-01
606
Elastic Beanstalk Developer Guide
Example Policies Based on Policy Templates

Example 3: Allow the Testers group to view all Elastic Beanstalk assets but not to perform
any actions.
The following policy allows read-only access to all applications, application versions, events, and
environments.
{
"Version": "2012-10-17",
"Statement": [
{
"Effect": "Allow",
"Action": [
"elasticbeanstalk:Check*",
"elasticbeanstalk:Describe*",
"elasticbeanstalk:List*",
"elasticbeanstalk:RequestEnvironmentInfo",
"elasticbeanstalk:RetrieveEnvironmentInfo",
"ec2:Describe*",
"elasticloadbalancing:Describe*",
"autoscaling:Describe*",
"cloudwatch:Describe*",
"cloudwatch:List*",
"cloudwatch:Get*",
"s3:Get*",
"s3:List*",
"sns:Get*",
"sns:List*",
"rds:Describe*",
"cloudformation:Describe*",
"cloudformation:Get*",
"cloudformation:List*",
"cloudformation:Validate*",
"cloudformation:Estimate*"
],
"Resource": "*"
}
]
}
Example Policies Based on Resource Permissions
This section walks through a use case for controlling user permissions for Elastic Beanstalk actions that
access specific Elastic Beanstalk resources.We'll walk through the sample policies that support the use
case. For more information policies on Elastic Beanstalk resources, see Creating Policies to Control
Access to Specific Elastic Beanstalk Resources (p.564). For information about attaching policies to users
and groups, go to Managing IAM Policies in Using AWS Identity and Access Management.
In our use case, Example Corp. is a small consulting firm developing applications for two different
customers. John is the development manager overseeing the development of the two Elastic Beanstalk
applications, app1 and app2. John does development and some testing on the two applications, and only
he can update the production environment for the two applications. These are the permissions that he
needs for app1 and app2:
• View application, application versions, environments, and configuration templates
• Create application versions and deploy them to the staging environment
• Update the production environment
API Version 2010-12-01
607
Elastic Beanstalk Developer Guide
Example Policies Based on Resource Permissions

• Create and terminate environments
Jill is a tester who needs access to view the following resources in order to monitor and test the two
applications: applications, application versions, environments, and configuration templates. However,
she should not be able to make changes to any Elastic Beanstalk resources.
Jack is the developer for app1 who needs access to view all resources for app1 and also needs to create
application versions for app1 and deploy them to the staging environment.
Joe is the administrator of the AWS account for Example Corp. He has created IAM users for John, Jill,
and Jack and attaches the following policies to those users to grant the appropriate permissions to the
app1 and app2 applications.
API Version 2010-12-01
608
Elastic Beanstalk Developer Guide
Example Policies Based on Resource Permissions

Example 1: Policies that allow John to perform his development, test, and deployment
actions on app1 and app2
We have broken down John's policy into three separate policies so that they are easier to read and
manage.Together, they give John the permissions he needs to perform the Elastic Beanstalk actions on
the two applications.
The first policy specifies actions for Auto Scaling, Amazon S3, Amazon EC2, CloudWatch, Amazon SNS,
Elastic Load Balancing, Amazon RDS, and AWS CloudFormation (for non-legacy container types). Elastic
Beanstalk relies on these additional services to provision underlying resources when creating an
environment. For a list of supported non-legacy container types, see Why are some container types
marked legacy? (p. 426).
Note
The following policy is an example. It gives a broad set of permissions to the AWS products that
Elastic Beanstalk uses to manage applications and environments. For example, ec2:* allows
an IAM user to perform any action on any Amazon EC2 resource in the AWS account. These
permissions are not limited to the resources that you use with Elastic Beanstalk. As a best
practice, you should grant individuals only the permissions they need to perform their duties.
{
"Version": "2012-10-17",
"Statement":[
{
"Effect":"Allow",
"Action":[
"ec2:*",
"elasticloadbalancing:*",
"autoscaling:*",
"cloudwatch:*",
"s3:*",
"sns:*",
"rds:*",
"cloudformation:*"
],
"Resource":"*"
}
]
}
The second policy specifies the Elastic Beanstalk actions that John is allowed to perform on the app1
and app2 resources.The AllCallsInApplications statement allows all Elastic Beanstalk actions
("elasticbeanstalk:*") performed on all resources within app1 and app2 (for example,
elasticbeanstalk:CreateEnvironment).The AllCallsOnApplications statement allows all
Elastic Beanstalk actions ("elasticbeanstalk:*") on the app1 and app2 application resources (for
example, elasticbeanstalk:DescribeApplications, elasticbeanstalk:UpdateApplication,
etc.).The AllCallsOnSolutionStacks statement allows all Elastic Beanstalk actions
("elasticbeanstalk:*") for solution stack resources (for example,
elasticbeanstalk:ListAvailableSolutionStacks).
{
"Version": "2012-10-17",
"Statement":[
{
"Sid":"AllCallsInApplications",
"Action":[
API Version 2010-12-01
609
Elastic Beanstalk Developer Guide
Example Policies Based on Resource Permissions

"elasticbeanstalk:*"
],
"Effect":"Allow",
"Resource":[
"*"
],
"Condition":{
"StringEquals":{
"elasticbeanstalk:InApplication":[
"arn:aws:elasticbeanstalk:us-west-2:123456789012:applica
tion/app1",
"arn:aws:elasticbeanstalk:us-west-2:123456789012:applica
tion/app2"
]
}
}
},
{
"Sid":"AllCallsOnApplications",
"Action":[
"elasticbeanstalk:*"
],
"Effect":"Allow",
"Resource":[
"arn:aws:elasticbeanstalk:us-west-2:123456789012:application/app1",
"arn:aws:elasticbeanstalk:us-west-2:123456789012:application/app2"
]
},
{
"Sid":"AllCallsOnSolutionStacks",
"Action":[
"elasticbeanstalk:*"
],
"Effect":"Allow",
"Resource":[
"arn:aws:elasticbeanstalk:us-west-2::solutionstack/*"
]
}
]
}
The third policy specifies the Elastic Beanstalk actions that the second policy needs permissions to in
order to complete those Elastic Beanstalk actions.The AllNonResourceCalls statement allows the
elasticbeanstalk:CheckDNSAvailability action, which is required to call
elasticbeanstalk:CreateEnvironment and other actions. It also allows the
elasticbeanstalk:CreateStorageLocation action, which is required for
elasticbeanstalk:CreateApplication, elasticbeanstalk:CreateEnvironment, and other
actions.
API Version 2010-12-01
610
Elastic Beanstalk Developer Guide
Example Policies Based on Resource Permissions

{
"Version": "2012-10-17",
"Statement":[
{
"Sid":"AllNonResourceCalls",
"Action":[
"elasticbeanstalk:CheckDNSAvailability",
"elasticbeanstalk:CreateStorageLocation"
],
"Effect":"Allow",
"Resource":[
"*"
]
}
]
}
API Version 2010-12-01
611
Elastic Beanstalk Developer Guide
Example Policies Based on Resource Permissions

Example 2: Policies that allow Jill to test and monitor app1 and app2
We have broken down Jill's policy into three separate policies so that they are easier to read and manage.
Together, they give Jill the permissions she needs to perform the Elastic Beanstalk actions on the two
applications.
The first policy specifies Describe*, List*, and Get* actions on Auto Scaling, Amazon S3, Amazon
EC2, CloudWatch, Amazon SNS, Elastic Load Balancing, Amazon RDS, and AWS CloudFormation (for
non-legacy container types) so that the Elastic Beanstalk actions are able to retrieve the relevant information
about the underlying resources of the app1 and app2 applications.
{
"Version": "2012-10-17",
"Statement":[
{
"Effect":"Allow",
"Action":[
"ec2:Describe*",
"elasticloadbalancing:Describe*",
"autoscaling:Describe*",
"cloudwatch:Describe*",
"cloudwatch:List*",
"cloudwatch:Get*",
"s3:Get*",
"s3:List*",
"sns:Get*",
"sns:List*",
"rds:Describe*",
"cloudformation:Describe*",
"cloudformation:Get*",
"cloudformation:List*",
"cloudformation:Validate*",
"cloudformation:Estimate*"
],
"Resource":"*"
}
]
}
The second policy specifies the Elastic Beanstalk actions that Jill is allowed to perform on the app1 and
app2 resources.The AllReadCallsInApplications statement allows her to call the Describe*
actions and the environment info actions.The AllReadCallsOnApplications statement allows her
to call the DescribeApplications and DescribeEvents actions on the app1 and app2 application
resources.The AllReadCallsOnSolutionStacks statement allows viewing actions that involve solution
stack resources (ListAvailableSolutionStacks, DescribeConfigurationOptions, and
ValidateConfigurationSettings).
{
"Version": "2012-10-17",
"Statement":[
{
"Sid":"AllReadCallsInApplications",
"Action":[
"elasticbeanstalk:Describe*",
"elasticbeanstalk:RequestEnvironmentInfo",
"elasticbeanstalk:RetrieveEnvironmentInfo"
],
API Version 2010-12-01
612
Elastic Beanstalk Developer Guide
Example Policies Based on Resource Permissions

"Effect":"Allow",
"Resource":[
"*"
],
"Condition":{
"StringEquals":{
"elasticbeanstalk:InApplication":[
"arn:aws:elasticbeanstalk:us-west-2:123456789012:applica
tion/app1",
"arn:aws:elasticbeanstalk:us-west-2:123456789012:applica
tion/app2"
]
}
}
},
{
"Sid":"AllReadCallsOnApplications",
"Action":[
"elasticbeanstalk:DescribeApplications",
"elasticbeanstalk:DescribeEvents"
],
"Effect":"Allow",
"Resource":[
"arn:aws:elasticbeanstalk:us-west-2:123456789012:application/app1",
"arn:aws:elasticbeanstalk:us-west-2:123456789012:application/app2"
]
},
{
"Sid":"AllReadCallsOnSolutionStacks",
"Action":[
"elasticbeanstalk:ListAvailableSolutionStacks",
"elasticbeanstalk:DescribeConfigurationOptions",
"elasticbeanstalk:ValidateConfigurationSettings"
],
"Effect":"Allow",
"Resource":[
"arn:aws:elasticbeanstalk:us-west-2::solutionstack/*"
]
}
]
}
The third policy specifies the Elastic Beanstalk actions that the second policy needs permissions to in
order to complete those Elastic Beanstalk actions.The AllNonResourceCalls statement allows the
elasticbeanstalk:CheckDNSAvailability action, which is required for some viewing actions.
API Version 2010-12-01
613
Elastic Beanstalk Developer Guide
Example Policies Based on Resource Permissions

{
"Version": "2012-10-17",
"Statement":[
{
"Sid":"AllNonResourceCalls",
"Action":[
"elasticbeanstalk:CheckDNSAvailability"
],
"Effect":"Allow",
"Resource":[
"*"
]
}
]
}
API Version 2010-12-01
614
Elastic Beanstalk Developer Guide
Example Policies Based on Resource Permissions

Example 3: Policies that allow Jack to access app1 to test, monitor, create application
versions, and deploy to the staging environment
We have broken down Jack's policy into three separate policies so that they are easier to read and
manage.Together, they give Jack the permissions he needs to perform the Elastic Beanstalk actions on
the app1 resource.
The first policy specifies the actions on Auto Scaling, Amazon S3, Amazon EC2, CloudWatch, Amazon
SNS, Elastic Load Balancing, Amazon RDS, and AWS CloudFormation (for non-legacy container types)
so that the Elastic Beanstalk actions are able to view and work with the underlying resources of app1.
For a list of supported non-legacy container types, see Why are some container types marked
legacy? (p. 426).
Note
The following policy is an example. It gives a broad set of permissions to the AWS products that
Elastic Beanstalk uses to manage applications and environments. For example, ec2:* allows
an IAM user to perform any action on any Amazon EC2 resource in the AWS account. These
permissions are not limited to the resources that you use with Elastic Beanstalk. As a best
practice, you should grant individuals only the permissions they need to perform their duties.
{
"Version": "2012-10-17",
"Statement":[
{
"Effect":"Allow",
"Action":[
"ec2:*",
"elasticloadbalancing:*",
"autoscaling:*",
"cloudwatch:*",
"s3:*",
"sns:*",
"rds:*",
"cloudformation:*"
],
"Resource":"*"
}
]
}
The second policy specifies the Elastic Beanstalk actions that Jack is allowed to perform on the app1
resource.
{
"Version": "2012-10-17",
"Statement":[
{
"Sid":"AllReadCallsAndAllVersionCallsInApplications",
"Action":[
"elasticbeanstalk:Describe*",
"elasticbeanstalk:RequestEnvironmentInfo",
"elasticbeanstalk:RetrieveEnvironmentInfo",
"elasticbeanstalk:CreateApplicationVersion",
"elasticbeanstalk:DeleteApplicationVersion",
"elasticbeanstalk:UpdateApplicationVersion"
],
"Effect":"Allow",
API Version 2010-12-01
615
Elastic Beanstalk Developer Guide
Example Policies Based on Resource Permissions

"Resource":[
"*"
],
"Condition":{
"StringEquals":{
"elasticbeanstalk:InApplication":[
"arn:aws:elasticbeanstalk:us-west-2:123456789012:applica
tion/app1"
]
}
}
},
{
"Sid":"AllReadCallsOnApplications",
"Action":[
"elasticbeanstalk:DescribeApplications",
"elasticbeanstalk:DescribeEvents"
],
"Effect":"Allow",
"Resource":[
"arn:aws:elasticbeanstalk:us-west-2:123456789012:application/app1"
]
},
{
"Sid":"UpdateEnvironmentInApplications",
"Action":[
"elasticbeanstalk:UpdateEnvironment"
],
"Effect":"Allow",
"Resource":[
"arn:aws:elasticbeanstalk:us-west-2:123456789012:environ
ment/app1/app1-staging*"
],
"Condition":{
"StringEquals":{
"elasticbeanstalk:InApplication":[
"arn:aws:elasticbeanstalk:us-west-2:123456789012:applica
tion/app1"
]
},
"StringLike":{
"elasticbeanstalk:FromApplicationVersion":[
"arn:aws:elasticbeanstalk:us-west-2:123456789012:application
version/app1/*"
]
}
}
},
{
"Sid":"AllReadCallsOnSolutionStacks",
"Action":[
"elasticbeanstalk:ListAvailableSolutionStacks",
"elasticbeanstalk:DescribeConfigurationOptions",
"elasticbeanstalk:ValidateConfigurationSettings"
],
"Effect":"Allow",
"Resource":[
API Version 2010-12-01
616
Elastic Beanstalk Developer Guide
Example Policies Based on Resource Permissions

"arn:aws:elasticbeanstalk:us-west-2::solutionstack/*"
]
}
]
}
The third policy specifies the Elastic Beanstalk actions that the second policy needs permissions to in
order to complete those Elastic Beanstalk actions.The AllNonResourceCalls statement allows the
elasticbeanstalk:CheckDNSAvailability action, which is required to call
elasticbeanstalk:CreateEnvironment and other actions. It also allows the
elasticbeanstalk:CreateStorageLocation action, which is required for
elasticbeanstalk:CreateEnvironment, and other actions.
{
"Version": "2012-10-17",
"Statement":[
{
"Sid":"AllNonResourceCalls",
"Action":[
"elasticbeanstalk:CheckDNSAvailability",
"elasticbeanstalk:CreateStorageLocation"
],
"Effect":"Allow",
"Resource":[
"*"
]
}
]
}
IAM Roles for Elastic Beanstalk Environment Tiers
Elastic Beanstalk recommends as a best practice an IAM role with permissions that an application must
have when the application makes calls to other AWS resources.When Elastic Beanstalk launches Amazon
EC2 instances, it uses the instance profile associated with an IAM role. All applications that run on the
instances can use the role credentials to sign requests. Because role credentials are temporary and
rotated automatically, you don't have to worry about long-term security risks.
When you create an application in a web server environment tier, you choose an existing IAM role.When
you create an application in a worker environment tier, you can choose an existing IAM or create a new
one. Each type of environment tier requires different permissions.
Note
This topic assumes that you have the necessary IAM permissions to create and instance profile
and pass roles. For more information, see Granting IAM Users Permissions to Create and Pass
IAM Roles (p. 568).
For an overview of the steps required to grant permissions to applications running in Elastic Beanstalk
using IAM roles, see Granting Permissions to Users and Services Using IAM Roles (p. 562).
The following sections provide example policies for using IAM roles with Elastic Beanstalk environment
tiers.
• Granting IAM Role Permissions for Web Server Environment Tiers (p. 618)
• Granting IAM Role Permissions for Worker Environment Tiers (p. 618)
API Version 2010-12-01
617
Elastic Beanstalk Developer Guide
IAM Roles for Environment Tiers

Granting IAM Role Permissions for Web Server Environment
Tiers
The first time you launch an Elastic Beanstalk environment on a web server environment tier, Elastic
Beanstalk creates a default IAM role called aws-elasticbeanstalk-ec2-role in a default instance
profile. If this is not your first deployment, the default instance profile already exists and you can choose
it during application deployment.
The following statement shows an action policy with the permissions that Elastic Beanstalk grants to the
default role to rotate logs to Amazon S3. If you use a different instance profile, ensure that it has these
permissions. For more information about log rotation, see Elastic Beanstalk Environment
Configurations (p. 389).
{
"Version": "2012-10-17",
"Statement": [
{
"Effect": "Allow",
"Action": "s3:PutObject",
"Resource": "arn:aws:s3:::elasticbeanstalk-us-east-1-012345678901/re
sources/environments/logs/*"
}
]
}
Note
Replace the example Amazon S3 bucket name with your Amazon S3 bucket name for Elastic
Beanstalk.The Amazon S3 bucket name will be elasticbeanstalk–region–your-account-ID.
The region is the region where you launched your Elastic Beanstalk environment.
Granting IAM Role Permissions for Worker Environment
Tiers
The following statement shows the permissions for the default
aws-elasticbeanstalk-ec2-worker-role IAM role for worker environment tiers that you can create
and attach to your instance profile. If this is not your first deployment, this instance profile already exists.
The permissions enable you to run the aws-sqsd daemon in the worker environment tier, and publish
metrics to CloudWatch. For worker environment tiers with an application that performs periodic tasks,
the statement also includes permissions to access DynamoDB.
{
"Version": "2012-10-17",
"Statement": [
{
"Sid": "QueueAccess",
"Action": [
"sqs:ChangeMessageVisibility",
"sqs:DeleteMessage",
"sqs:ReceiveMessage",
"sqs:SendMessage"
],
"Effect": "Allow",
"Resource": "*"
},
API Version 2010-12-01
618
Elastic Beanstalk Developer Guide
IAM Roles for Environment Tiers

{
"Sid": "MetricsAccess",
"Action": [
"cloudwatch:PutMetricData"
],
"Effect": "Allow",
"Resource": "*"
},
{
"Sid": "BucketAccess",
"Action": [
"s3:Get*",
"s3:List*",
"s3:PutObject"
],
"Effect": "Allow",
"Resource": [
"arn:aws:s3:::elasticbeanstalk-*-your-account-ID-without-hyphens/*",
"arn:aws:s3:::elasticbeanstalk-*-your-account-ID-without-hyphens-*/*"
]
},
{
"Sid": "DynamoPeriodicTasks",
"Action": [
"dynamodb:BatchGetItem",
"dynamodb:BatchWriteItem",
"dynamodb:DeleteItem",
"dynamodb:GetItem",
"dynamodb:PutItem",
"dynamodb:Query",
"dynamodb:Scan",
"dynamodb:UpdateItem"
],
"Effect": "Allow",
"Resource": [
"arn:aws:dynamodb:*:your-account-ID-without-hyphens:table/*-stack-
AWSEBWorkerCronLeaderRegistry*"
]
}
]
}
If you are using a different account with an unmanaged Amazon SQS queue, you must also edit the policy
on the queue to grant access to the queue to other accounts, such as the one that you use with the worker
tier. For an example statement, see Example: Using a resource-based policy to delegate access to an
Amazon SQS queue in another account in the AWS Identity and Access Management User Guide.
API Version 2010-12-01
619
Elastic Beanstalk Developer Guide
IAM Roles for Environment Tiers

Tools
Topics
• EB and Eb Command Line Interfaces (p. 620)
• AWS Command Line Interface (p. 698)
• Elastic Beanstalk API Command Line Interface (p. 704)
• AWS DevTools (p. 785)
Eb and EB CLI are command line interface (CLI) tools for Elastic Beanstalk that you can use to deploy
applications quickly and more easily by answering a series of questions. Elastic Beanstalk uses your
answers to create applications and environments. For information about using supported versions of eb
and EB CLI, see EB and Eb Command Line Interfaces (p. 620).
The AWS Command Line Interface (CLI) replaces the API-based Command Line Interface (CLI). With
the AWS CLI, you download and configure one tool to manage multiple AWS services from the command
line and automate management of those services through scripts. For more information about supported
services and to download the AWS Command Line Interface, see AWS Command Line Interface. For
information about how API-based CLI commands and AWS CLI commands correspond to each other,
see AWS Command Line Interface (p. 698).
With the API-based Command Line Interface (CLI), you can control Elastic Beanstalk from the command
line and automate deployment and management of the service through scripts.We recommend that you
use the AWS CLI because the API-based CLI for Elastic Beanstalk will no longer be updated. For
information about how API-based CLI commands and AWS CLI commands correspond to each other,
see AWS Command Line Interface (p. 698).
EB and Eb Command Line Interfaces
Topics
• EB CLI 3.x (p. 621)
• Eb CLI 2.6.x (p. 672)
EB and Eb are command line interface (CLI) tools for Elastic Beanstalk that you can use to deploy
applications quickly and more easily. The most recent tool that Elastic Beanstalk supports is EB CLI 3.x.
Elastic Beanstalk also supports eb 2.6.x for customers who previously installed and continue to use it.
You can use EB CLI 3.x to manage environments that you launched using eb 2.6.x or earlier versions of
API Version 2010-12-01
620
Elastic Beanstalk Developer Guide
EB and Eb Command Line Interfaces

eb. EB CLI will automatically retrieve settings from an environment created using eb if the environment
is running. Unlike eb, EB CLI does not store option settings locally.
EB CLI introduces the commands eb create, eb deploy, eb open, eb console, eb scale, eb
setenv, eb config, eb terminate, eb clone, eb list, eb use, eb printenv, and eb ssh. In
EB CLI 3.1 or later, you can also use the eb swap command. In EB CLI 3.2 only, you can use the eb
abort, eb platform, and eb upgrade commands. In addition to these new commands, EB CLI 3.x
commands differ from eb 2.6.x commands in several cases:
• eb init – You use eb init to create an .elasticbeanstalk directory in an existing project
directory and create a new Elastic Beanstalk application for the project. Unlike with eb, running eb
init with EB CLI does not prompt you to create an environment.
• eb start – EB CLI does not include the command eb start. Instead, you use eb create to create
an environment.
• eb stop – EB CLI does not include the command eb stop. Instead, you use eb terminate to
completely terminate an environment and clean up.
• eb push and git aws.push – EB CLI does not include the commands eb push or git aws.push.
The commands have been replaced with the command eb deploy.
• eb update – EB CLI does not include the command eb update.You use the command eb config
to update an environment.
• eb branch – EB CLI does not include the command eb branch.
For more information about using EB CLI 3.x commands to create and manage an application, go to EB
CLI 3.x Operations (p. 630). For a command reference for eb 2.6.x, see Eb Operations (p. 680). For a
walkthrough of how to deploy a sample application using EB CLI 3.x, see Getting Started with EB CLI
3.x (p. 627). For a walkthrough of how to deploy a sample application using eb 2.6.x, see Getting Started
with Eb (p. 672). For a walkthrough of how to use eb 2.6.x to map a Git branch to a specific environment,
see Deploying a Git Branch to a Specific Environment (p. 677).
EB CLI 3.x
This section describes how to set up EB CLI 3.x and create a sample application using EB CLI 3.x.This
section also includes a command reference for EB CLI 3.x.
Topics
• Getting Set Up with EB Command Line Interface (CLI) 3.x (p. 621)
• Providing AWS Credentials to the EB CLI (p. 625)
• Getting Started with EB CLI 3.x (p. 627)
• EB CLI 3.x Common Options (p. 630)
• EB CLI 3.x Operations (p. 630)
Getting Set Up with EB Command Line Interface (CLI) 3.x
This topic describes how to install EB Command Line Interface (CLI) 3.x by using Pip. Pip is a Python-based
tool that offers convenient ways to install, upgrade, and remove Python packages and their dependencies.
Pip is the recommended method of installing the CLI on Mac and Linux. Before you can start using EB
CLI 3.x, you must sign up for an AWS account (if you don't already have one) and set up your environment.
Topics
• Sign Up (p. 622)
• Install EB CLI Using pip (Windows, Linux, OS X, or Unix) (p. 623)
• Test the EB CLI Installation (p. 624)
API Version 2010-12-01
621
Elastic Beanstalk Developer Guide
EB CLI 3.x

Sign Up
To access AWS, you will need to sign up for an AWS account. If you already have an AWS account, you
can skip to the next section.
To sign up for an AWS account
1. Open http://aws.amazon.com/, and then click Sign Up.
2. Follow the on-screen instructions.
Part of the sign-up procedure involves receiving a phone call and entering a PIN using the phone
keypad.
AWS sends you a confirmation email after the sign-up process is complete. At any time, you can view
your current account activity and manage your account by going to http://aws.amazon.com and clicking
My Account/Console.
To get your access key ID and secret access key
Access keys consist of an access key ID and secret access key, which are used to sign programmatic
requests that you make to AWS. If you don't have access keys, you can create them by using the AWS
Management Console. We recommend that you use IAM access keys instead of AWS root account
access keys. IAM lets you securely control access to AWS services and resources in your AWS account.
Note
To create access keys, you must have permissions to perform the required IAM actions. For
more information, see Granting IAM User Permission to Manage Password Policy and Credentials
in Using IAM.
1. Open the IAM console.
2. From the navigation menu, click Users.
3. Select your IAM user name.
4. Click User Actions, and then click Manage Access Keys.
5. Click Create Access Key.
Your keys will look something like this:
• Access key ID example: AKIAIOSFODNN7EXAMPLE
• Secret access key example: wJalrXUtnFEMI/K7MDENG/bPxRfiCYEXAMPLEKEY
6. Click Download Credentials, and store the keys in a secure location.
Your secret key will no longer be available through the AWS Management Console; you will have
the only copy. Keep it confidential in order to protect your account, and never email it. Do not share
it outside your organization, even if an inquiry appears to come from AWS or Amazon.com. No one
who legitimately represents Amazon will ever ask you for your secret key.
Related topics
• What Is IAM? in Using IAM
• AWS Security Credentials in AWS General Reference
API Version 2010-12-01
622
Elastic Beanstalk Developer Guide
EB CLI 3.x

Install EB CLI Using pip (Windows, Linux, OS X, or Unix)
Pip is a Python-based tool that offers convenient ways to install, upgrade, and remove Python packages
and their dependencies.
Note
Starting with version 2015.03, Amazon Linux comes with all of the prerequisites for the EB CLI,
including Python 2.7 and pip. Use the following command to install the EB CLI in one step on
Amazon Linux:
$ sudo pip install awsebcli
Prerequisites
• Windows, Linux, OS X, or Unix
• Python 2.7 or later
Note
We recommend that you use Python 3.4 on Windows.
• pip
First, check to see if you have Python installed with python --version:
$ python --version
Python 2.7.9
Linux
If you already have python installed, you may need to install the python-dev package in order
to get the headers and libraries required to compile extensions and install the EB CLI. Install
python-dev using your package manager.
To see if you have pip installed, type pip at the command prompt and press enter
$ pip
Usage:
pip <command> [options]
Commands:
install Install packages.
uninstall Uninstall packages.
...
Install Python
Install Python if you don't have it installed, or you want to install a different version.
To install Python on Windows or OS X, download and run the installer from the Python Software Foundation
at python.org.
To install Python on Linux, use your distribution's package manager. For example, to install Python 2.7
on an RPM-based distribution of Linux such as Amazon Linux, use Yum:
$ sudo yum install python27
On a Debian based distribution such as Ubuntu, use APT:
API Version 2010-12-01
623
Elastic Beanstalk Developer Guide
EB CLI 3.x

$ sudo apt-get install python2.7
Install pip
Python for Windows and OS X comes with pip installed starting with versions 2.7.9 and 3.4.0. If you
installed Python on Linux and don't have pip installed, follow this procedure.
To install pip on Linux
1. Download and run the installation script from the pip website.
$ curl https://bootstrap.pypa.io/get-pip.py -o get-pip.py
$ sudo python get-pip.py
2. Verify your pip installation with pip --version:
$ pip --version
pip 6.0.8 from /usr/lib/python2.7/dist-packages (python 2.7)
Note
If you are using Windows, you must update your path with the directory where pip was installed,
which defaults to the Scripts subdirectory of the Python installation directory. For example, if
you installed Python 3.4 to C:\Python34, you would add the path C:\Python34\Scripts to
your PATH environment variable.
Install or Upgrade the EB CLI Using pip
With Python and pip installed, you can use pip install to install the EB CLI.
Linux
$ sudo pip install awsebcli
Windows
> pip install awsebcli
To upgrade to the newest version, simply use the --upgrade option.
$ sudo pip install --upgrade awsebcli
Test the EB CLI Installation
To ensure that EB CLI is installed and set up correctly, type the following EB CLI command at a command
prompt:
eb --help
If the test is successful, you will see the help displayed.
API Version 2010-12-01
624
Elastic Beanstalk Developer Guide
EB CLI 3.x

After an upgrade, to verify that you installed the most recent version of EB CLI, type the following EB CLI
command at a command prompt:
eb --version
Providing AWS Credentials to the EB CLI
You must provide the EB CLI with a set of AWS credentials—an access key ID and a secret key. The
credentials must have permissions that allow the EB CLI to act on your behalf to create the AWS resources
for your application's environment, such as Amazon EC2 instances and Amazon S3 buckets.You can
use an existing set of credentials if they have appropriate permissions, or you can create a new IAM user
and attach a policy that grants the necessary permissions. For more information, see Using Elastic
Beanstalk with AWS Identity and Access Management (IAM) (p. 561).
Important
For security reasons, we strongly recommend that you do not provide the EB CLI with your
account's root credentials. Instead, grant an IAM user the appropriate permissions and provide
those credentials to the EB CLI. For more information on managing AWS credentials, see Best
Practices for Managing AWS Access Keys.
You can provide credentials to the EB CLI in either of the following ways.
• Store the credentials on your system, as described later.
When you use the EB CLI to create an environment, it automatically uses stored credentials if they
exist and have the correct permissions.You can also explicitly specify a particular set of stored
credentials.
• Provide the credentials to the EB CLI on the command line.
If you do not have stored credentials, or the stored credentials lack the required permissions, the EB
CLI prompts you for credentials when you create your first environment. For an example, see Getting
Started with EB CLI 3.x (p. 627).
Note
You are usually prompted for credentials only once.The EB CLI then stores those credentials
so you don't need to explicitly provide them again.This means that you will usually use the EB
CLI with stored credentials, as described in the following sections.
Topics
• Storing Credentials (p. 625)
• Using Stored Credentials (p. 626)
Storing Credentials
The EB CLI uses the same credentials storage as the AWS CLI and AWS SDKs.The following summarizes
the available storage options:
• The AWS_ACCESS_KEY_ID and AWS_SECRET_ACCESS_KEY environment variables.
You can use these variables to store a single set of credentials.
• An AWS credentials file, which is located at ~/.aws/credentials on Linux and OS X systems
or at C:\Users\USERNAME\.aws\credentials on Windows systems.
This file can contain multiple sets of credentials, called profiles, which are identified by name. The
default EB CLI profile is named eb-cli.
API Version 2010-12-01
625
Elastic Beanstalk Developer Guide
EB CLI 3.x

• An AWS CLI config file, which is typically ~/.aws/config on Linux and OS X systems or
C:\Users\USERNAME\.aws\config on Windows systems.
The config file can also contain multiple profiles, and the default EB CLI profile is also named eb-cli.
A config profile can include additional CLI-specific configuration settings. For example, you can use
the region setting to specify a default region.
Note
We recommend storing new credentials using one of the preceding approaches. However, if
you have an existing EB CLI config file (~/.elasticbeanstalk/config), the EB CLI 3.x
can also obtain credentials from that file, as described later. It then creates a profile for those
credentials in the AWS CLI config file for use by all subsequent commands.
Using Stored Credentials
If you do not specify a profile, the EB CLI uses the following procedure to obtain credentials. Note that if
you are familiar with the AWS CLI, the search procedure is similar but not identical.
1. Look for environment variables
Look for AWS_ACCESS_KEY_ID and AWS_SECRET_ACCESS_KEY environment variables.
• If the variables are not defined, go to Step 2.
• If the variables are defined and the credentials have the required permissions, use them to create
the environment.
• If the variables are defined but the credentials lack the required permissions, terminate the search
and prompt for credentials (Step 5).
2. Look in the credentials file
Look for the credentials file.The credentials must be stored as an eb-cli or default profile.
• If the credentials file does not exist, or exists but does not include an eb-cli or default profile,
go to Step 3.
• If the file contains an eb-cli profile and the credentials have the required permissions, use them
to create the environment.
• If the file lacks an eb-cli profile but includes a default profile, and the default credentials
have the required permissions, use them to create the environment.
• If either or both profiles exist, but neither has credentials with the required permissions, terminate
the search and prompt for credentials (Step 5).
3. Look in the AWS CLI config file
Look for the AWS CLI config file.The credentials must be stored as an eb-cli or default profile.
Use the same procedure as Step 2 to evaluate the file.
4. Look for a legacy EB CLI config file
Look for a legacy config file (~/.elasticbeanstalk/config).
• If this file contains credentials with the required permissions, use them to create the environment.
• Create an eb-cli profile with these credentials in the AWS CLI config file for use by all
subsequent commands.
5. Display a command-line prompt
If the attempt to find appropriate stored credentials fails, the EB CLI prompts for credentials, as
follows:
You have not yet set up your credentials or your credentials are incorrect
You must provide your credentials.
(aws-access-id): AKIAIOSFODNN7EXAMPLE
(aws-secret-key): wJalrXUtnFEMI/K7MDENG/bPxRfiCYEXAMPLEKEY
• Use these credentials to create the environment.
API Version 2010-12-01
626
Elastic Beanstalk Developer Guide
EB CLI 3.x

• Create an eb-cli profile with these credentials in the AWS CLI config file for use by all
subsequent commands.
Tip
If you store your credentials as a profile in a credentials or config file, you can use the
--profile (p. 630) option to explicitly specify a profile. For example, the following command
creates a new application using the user2 profile.
eb init --profile user2
If both files have a profile with the same name, the one in credentials takes precedence. If
neither file includes the specified profile or the credentials do not have the required permissions,
the command prompts for credentials.
Getting Started with EB CLI 3.x
EB CLI is a command line interface (CLI) tool that asks you a series of questions and uses your answers
to deploy and manage Elastic Beanstalk applications.This section provides an end-to-end walkthrough
using eb to launch a sample application, view it, update it, and then delete it.
To complete this walkthrough, you will need administrator/sudo privileges (unless you install into a
virtualenv).
Before you begin, you must sign up for an AWS account, install Python, Pip, and the EB CLI. For more
information, see Getting Set Up with EB Command Line Interface (CLI) 3.x (p. 621).
To create a sample application using EB CLI 3.x
1. Create a new directory for your project.
For Linux/UNIX, type the following:
mkdir my-hello-app
cd my-hello-app
For Windows, type the following:
md my-hello-app
cd my-hello-app
2. Create an index.html file for EB CLI to use as your sample application.
echo 'Hello World!' > index.html
Note
In Windows, do not include quotes in the command.
3. Set up your directory with EB CLI.
eb init -p php
The command will prompt you for a variety of configuration settings.To accept the default value,
press Enter.
API Version 2010-12-01
627
Elastic Beanstalk Developer Guide
EB CLI 3.x

Note
If you have an appropriate set of stored AWS credentials, the command uses them
automatically. Otherwise, it will prompt you for an access key ID and secret access key,
which must have appropriate permissions. For more information, see Using Elastic Beanstalk
with AWS Identity and Access Management (IAM) (p.561) and Providing Credentials (p. 625).
4. Create the environment dev-env and deploy the sample application.
eb create dev-env
Wait for Elastic Beanstalk to finish creating the environment.When it is done, your application is live
in a load-balancing, autoscaling environment.
5. View the sample application.
eb open
To deploy a new application version
1. Update the sample application to create a new application version to deploy.
echo " - Sincerely Elastic Beanstalk" >> index.html
Note
In Windows, do not include quotes in the command.
2. When you are ready to launch your new application version, type the following:
eb deploy
3. View the updated application version in the environment.
eb open
To shut down your running environment
1. Shut down your environment by typing the following:
eb terminate
2. Confirm that this is the environment that you want to terminate by typing the environment name.
To completely remove your application
1. Remove your application and the local project directory by typing the following:
eb terminate --all
2. Confirm that this is the environment that you want to terminate by typing the environment name.
API Version 2010-12-01
628
Elastic Beanstalk Developer Guide
EB CLI 3.x

Using Git with EB CLI
EB CLI 3.x provides integration with Git.This section provides an overview of how to use Git with EB CLI.
To install Git and initialize your Git repository
1. Download the most recent version of Git by going to http://git-scm.com
2. Initialize your Git repository by typing the following:
git init
EB CLI will now recognize that your application is set up with Git.
3. If you haven't already run eb init, do that now:
eb init
To use different Git branches
• You can associate your environment with different branches of your code so that when you work in
a new branch, your default environment also uses that branch. For example, you can type the following
to associate the running environment with your master and develop branches:
git checkout master
eb use prod
git checkout develop
eb use dev
To assign Git tags to your application version
• You can use a Git tag as your version label to identify what application version is running in your
environment. For example, type the following:
git tag -a v1.0 -m "My version 1.0"
Note
If you have already deployed this version, EB CLI will deploy that version to your environment
instead of uploading a new application version.
To use Git with EB CLI to deploy only code under source control
1. Make any change to your code, and then type the following:
git commit
Note
EB CLI uses your commit ID and message as the application version label and description,
respectively.
2. Deploy your updated code.
API Version 2010-12-01
629
Elastic Beanstalk Developer Guide
EB CLI 3.x

Note
Now, when you run eb deploy, EB CLI will deploy only the code that was under source
control.
EB CLI 3.x Common Options
This section describes options common to all EB CLI 3.x operations.
DescriptionName
Print information for debugging.--debug
Show the Help message.
Type: String
Default: None
-h, --help
Use a specific profile from your AWS credentials file.--profile
Suppress all output from the command.--quiet
Use the specified region.--region
Display verbose information.-v, --verbose
EB CLI 3.x Operations
You can use the EB Command Line Interface (EB CLI) 3.x to perform a variety of operations to deploy
and manage your Elastic Beanstalk applications and environments. EB CLI integrates with Git if you want
to deploy application source code that is under Git source control. For more information, see EB and Eb
Command Line Interfaces (p. 620) and Using Git with EB CLI (p. 629).
Topics
• abort (p. 632)
• clone (p. 633)
• config (p. 636)
• console (p. 639)
• create (p. 640)
• deploy (p. 646)
• events (p. 648)
• init (p. 650)
• list (p. 653)
• logs (p. 654)
• open (p. 655)
• platform (p. 656)
• printenv (p. 659)
• scale (p. 660)
• setenv (p. 661)
• ssh (p. 662)
• status (p. 664)
• swap (p. 666)
API Version 2010-12-01
630
Elastic Beanstalk Developer Guide
EB CLI 3.x


abort
Description
Cancels an upgrade when environment configuration changes to instances are still in progress.
Note
If you have more than two environments that are undergoing a update, you are prompted to
select the name of the environment for which you want to roll back changes.
Syntax
eb abort [environment_name]
Note
The environment_name is the environment that is currently being updated. Environment names
must be between 4 and 23 characters long and can only contain letters, numbers, and hyphens.
Environment names can't begin or end with a hyphen. If you don't provide environment_name
as a command line parameter, EB CLI uses the default environment.
Options
RequiredDescriptionName
NoFor more information, see EB CLI 3.x Common Op-
tions (p. 630).
Common options
Output
The command shows a list of environments currently being updated and prompts you to choose the
update that you want to abort. If only one environment is currently being updated, you do not need to
specify the environment name. If successful, the command reverts environment configuration changes.
The rollback process continues until all instances in the environment have the previous environment
configuration or until the rollback process fails.
Example
The following example cancels the platform upgrade.
PROMPT> eb abort
Aborting update to environment "tmp-dev".
<list of events>
API Version 2010-12-01
632
Elastic Beanstalk Developer Guide
EB CLI 3.x

clone
Description
Clones an environment to a new environment so that both have identical environment settings.
Note
By default, regardless of the solution stack version of the environment from which you create
the clone, the eb clone command creates the clone environment with the most recent solution
stack.You can suppress this by including the --exact option when you run the command.
Syntax
eb clone [environment_name]
Note
The environment_name is the environment from which you you want to create a clone.
Environment names must be between 4 and 23 characters long and can only contain letters,
numbers, and hyphens. Environment names can't begin or end with a hyphen. If you don't provide
environment_name as a command line parameter, EB CLI uses the default environment.
Options
RequiredDescriptionName
NoDesired name for the cloned environment.-n string
or
--clone_name string
NoDesired CNAME prefix for the cloned environment.-c string
or
--cname string
NoEnvironment variables in a comma-separated list with the
format name=value.
Type: String
Constraints:
• Key-value pairs must be separated by commas.
• Keys and values can contain any alphabetic character
in any language, any numeric character, white space,
invisible separator, and the following symbols: _ . : / + \
- @
• Keys can contain up to 128 characters.Values can
contain up to 256 characters.
• Keys and values are case sensitive.
• Values cannot match the environment name.
• Values cannot include either aws: or elasticbean-
stalk:.
--envvars
API Version 2010-12-01
633
Elastic Beanstalk Developer Guide
EB CLI 3.x

RequiredDescriptionName
NoPrevents Elastic Beanstalk from updating the solution stack
version for the new clone environment to the most recent
version available (for the original environment's platform).
--exact
(for EB CLI 3.1 only)
NoThe number of instances to run in the clone environment
when it is launched.
--scale number
NoAmazon EC2 tags for the environment in a comma-separ-
ated list with the format name=value.
Type: String
Constraints:
• Key-value pairs must be separated by commas.
• Keys and values can contain any alphabetic character
in any language, any numeric character, white space,
invisible separator, and the following symbols: _ . : / + \
- @
• Keys can contain up to 128 characters.Values can
contain up to 256 characters.
• Keys and values are case sensitive.
• Values cannot match the environment name.
• Values cannot include either aws: or elasticbean-
stalk:.
--tags name=value
NoThe number of minutes before the command times out.--timeout
(for EB CLI 3.1 only)
NoFor more information, see EB CLI 3.x Common Op-
tions (p. 630).
Common options
Output
If successful, the command creates an environment that has the same settings as the original environment
or with modifications to the environment as specified by any eb clone options.
Example
The following example clones the specified environment.
PROMPT> eb clone
Enter name for Environment Clone
(default is tmp-dev-clone):
Enter DNS CNAME prefix
(default is tmp-dev-clone):
Environment details for: tmp-dev-clone
Application name: tmp
Region: us-west-2
Deployed Version: app-141029_144740
Environment ID: e-vjvrqnn5pv
Platform: 64bit Amazon Linux 2014.09 v1.0.9 running PHP 5.5
API Version 2010-12-01
634
Elastic Beanstalk Developer Guide
EB CLI 3.x

Tier: WebServer-Standard-1.0
CNAME: tmp-dev-clone.elasticbeanstalk.com
Updated: 2014-10-29 22:00:23.008000+00:00
Printing Status:
INFO: createEnvironment is starting.
INFO: Using elasticbeanstalk-us-west-2-888214631909 as Amazon S3 storage bucket
for environment data.
INFO: Created load balancer named: awseb-e-v-AWSEBLoa-4X0VL5UVQ353
INFO: Created security group named: awseb-e-vjvrqnn5pv-stack-AWSEBSecurityGroup-
18AV9FGCH2HZM
INFO: Created Auto Scaling launch configuration named: awseb-e-vjvrqnn5pv-stack-
AWSEBAutoScalingLaunchConfiguration-FDUWRSZZ6L3Z
INFO: Waiting for EC2 instances to launch. This may take a few minutes.
INFO: Created Auto Scaling group named: awseb-e-vjvrqnn5pv-stack-AWSEBAutoScal
ingGroup-69DN6PO5TISM
INFO: Created Auto Scaling group policy named: arn:aws:autoscaling:us-west-
2:11122223333:scalingPolicy:addb18d0-7088-402f-90ae-43be7c8d40cb:autoScalingGroup
Name/awseb-e-vjvrqnn5pv-stack-AWSEBAutoScalingGroup-69DN6PO5TISM:policy
Name/awseb-e-vjvrqnn5pv-stack-AWSEBAutoScalingScaleDownPolicy-I8GFGQ8T8MOV
INFO: Created Auto Scaling group policy named: arn:aws:autoscaling:us-west-
2:11122223333:scalingPolicy:fdcee817-e687-4fce-adc3-376995b3fef5:autoScalingGroup
Name/awseb-e-vjvrqnn5pv-stack-AWSEBAutoScalingGroup-69DN6PO5TISM:policy
Name/awseb-e-vjvrqnn5pv-stack-AWSEBAutoScalingScaleUpPolicy-1R312293DFY24
INFO: Created CloudWatch alarm named: awseb-e-vjvrqnn5pv-stack-AWSEBCloud
watchAlarmLow-1M67HXZH1U9K3
INFO: Created CloudWatch alarm named: awseb-e-vjvrqnn5pv-stack-AWSEBCloud
watchAlarmHigh-1K5CI7RVGV8ZJ
INFO: Added EC2 instance 'i-cf30e1c5' to Auto Scaling Group 'awseb-e-vjvrqnn5pv-
stack-AWSEBAutoScalingGroup-69DN6PO5TISM'.
INFO: Successfully launched environment: tmp-dev-clone
API Version 2010-12-01
635
Elastic Beanstalk Developer Guide
EB CLI 3.x

config
Description
Changes the environment configuration settings. For EB CLI 3.1, this command saves the environment
configuration settings as well as uploads, downloads, or lists saved configurations.
Syntax
eb config [environment_name]
Note
The environment_name is the environment that you want to configure. Environment names
must be between 4 and 23 characters long and can only contain letters, numbers, and hyphens.
Environment names can't begin or end with a hyphen. If you don't provide environment_name
as a command line parameter, EB CLI changes settings for the default environment.
The following describes the syntax for using the eb config command to work with saved configurations.
For examples, see the see the Examples (p. 637) section later in this topic.
• eb config delete filename – Deletes the named saved configuration.
• eb config get filename – Downloads the named saved configuration.
• eb config list – Lists the saved configurations that you have in Amazon S3.
• eb config put filename – Uploads the named saved configuration to an Amazon S3 bucket.The
filename must have the file extension .cfg.yaml.To specify the file name without a path, you can
save the file to the .elasticbeanstalk folder or to the .elasticbeanstalk/saved_configs/
folder before you run the command. Alternatively, you can specify the filename by providing the full
path.
• eb config save – Saves the environment configuration settings for the current running environment
to .elasticbeanstalk/saved_configs/ with the filename [configuration-name].cfg.yml.
By default, EB CLI 3.1 saves the configuration settings with a configuration-name based on the
environment name.You can specify a different configuration name by including the --cfg option with
your desired configuration name when you run the command.
Options
RequiredDescriptionName
NoThe name to use for a saved configuration (which you can
later specify to create or update an environment from a
saved configuration).
--cfg
NoThe number of minutes before the command times out.--timeout
(for EB CLI 3.1 only)
NoFor more information, see EB CLI 3.x Common Op-
tions (p. 630).
Common options
Output
If the command runs successfully with no parameters, the command displays your current option settings
in the text editor that you configured as the EDITOR environment variable. (If you have not configured
an EDITOR environment variable, then EB CLI displays your option settings in your computer's default
editor for YAML files.) When you save changes to the file and close the editor, the environment is updated
with the option settings in the file.
API Version 2010-12-01
636
Elastic Beanstalk Developer Guide
EB CLI 3.x

If the command runs successfully with the get parameter, the command displays the location of the local
copy that you downloaded.
If the command runs successfully with the save parameter, the command displays the location of the
saved file.
Examples
This section describes how to change the text editor that you use to view and edit your option settings
file.
For Linux/UNIX, the following example changes the editor to vim:
export EDITOR=vim
For Linux/UNIX,the following example changes the editor to what is installed at /usr/bin/kate.
export EDITOR=/usr/bin/kate
For Windows, the following example changes the editor to Notepad++.
set EDITOR="C:\Program Files\Notepad++\Notepad++.exe
This section provides examples for the eb config command when it is run with parameters.
The following example deletes the saved configuration named app-tmp.
eb config delete app-tmp
The following example downloads the saved configuration with the name app-tmp from your Amazon S3
bucket.
eb config get app-tmp
The following example lists the names of saved configurations that are stored in your Amazon S3 bucket.
eb config list
The following example uploads the local copy of the saved configuration named app-tmp to your Amazon
S3 bucket.
eb config put app-tmp
The following example saves configuration settings from the current running environment. If you do not
provide a name to use for the saved configuration, then Elastic Beanstalk names the configuration file
according to the environment name. For example, an environment named tmp-dev would be called
tmp-dev.cfg.yml. Elastic Beanstalk saves the file to the folder
/.elasticbeanstalk/saved_configs/.
eb config save
API Version 2010-12-01
637
Elastic Beanstalk Developer Guide
EB CLI 3.x

The following example shows how to use the --cfg option to save the configuration settings from the
environment tmp-dev to a file called v1-app-tmp.cfg.yml. Elastic Beanstalk saves the file to the folder
/.elasticbeanstalk/saved_configs/. If you do not specify an environment name, Elastic Beanstalk
saves configuration settings from the current running environment.
eb config save tmp-dev --cfg v1-app-tmp
API Version 2010-12-01
638
Elastic Beanstalk Developer Guide
EB CLI 3.x

console
Description
Opens a browser to display the environment configuration dashboard in the Elastic Beanstalk Management
Console.
Syntax
eb console [environment_name]
Note
The environment_name is the environment that you want to view in the Elastic Beanstalk
management console. Environment names must be between 4 and 23 characters long and can
only contain letters, numbers, and hyphens. Environment names can't begin or end with a hyphen.
If you don't provide environment_name as a command line parameter, EB CLI opens the
default environment.
Options
RequiredDescriptionName
NoFor more information, see EB CLI 3.x Common Op-
tions (p. 630).
Common options
API Version 2010-12-01
639
Elastic Beanstalk Developer Guide
EB CLI 3.x

create
Description
Creates a new environment and deploys the current application or the sample application to the
environment.
Syntax
eb create [environment_name]
Note
The environment_name is the environment in which you want to create or start the application.
Environment names must be between 4 and 23 characters long and can only contain letters,
numbers, and hyphens. Environment names can't begin or end with a hyphen. If you don't provide
environment_name as a command line parameter, EB CLI prompts you for the environment
name you want to use.
If you include this parameter in the command line, then EB CLI does not prompt you to provide
a CNAME. Instead, EB CLI autogenerates a CNAME.
Options
None of these options are required. If you run eb create without any options, you are prompted to enter
or select a value for each setting.
RequiredDescriptionName
NoSets the environment as the default environment.-d
or
--branch_default
NoCreates an environment by using a saved configuration
from either the .elasticbeanstalk/saved_configs/
folder or your Amazon S3 bucket as a template for the
new environment's configuration settings.
--cfg
(for EB CLI 3.1 only)
NoThe prefix for the CNAME.
Type: String
Default: The environment name
-c CNAME_prefix
or
--cname CNAME_prefix
NoAttaches a database to the environment. If you run eb
create with the --database option, but without the
--database.username and --database.password
options, then EB CLI prompts you for the master database
user name and password.
-db
or
--database
NoThe database engine type. If you run eb create with this
option, then EB CLI launches the environment with a
database attached even if you didn't run the command
with the --database option.
Type: String
-db.engine engine
or
--database.engineen-
gine
API Version 2010-12-01
640
Elastic Beanstalk Developer Guide
EB CLI 3.x

RequiredDescriptionName
NoAllows you to specify the database engine version. If this
flag is present, the environment will launch with a database
with the specified version number, even if the --database
flag is not present.
--database.engine.ver-
sion
NoThe type of Amazon EC2 instance to use for the database.
If you run eb create with this option, then EB CLI
launches the environment with a database attached even
if you didn't run the command with the --database option.
Type: String
Valid values: See Option Values.
-db.i instance_type
or
--database.instance
instance_type
NoThe password for the database. If you run eb create
with this option, then EB CLI launches the environment
with a database attached even if you didn't run the com-
mand with the --database option.
-db.pass password
or
--database.password
password
NoThe number of gigabytes (GB) to allocate for database
storage. If you run eb create with this option, then EB
CLI launches the environment with a database attached
even if you didn't run the command with the --database
option.
Type: Number
Valid values:
• MySQL – 5 to 1024.The default is 5.
• Oracle – 10 to 1024.The default is 10.
• Microsoft SQL Server Express Edition – 30.
• Microsoft SQL Server Web Edition – 30.
• Microsoft SQL Server Standard Edition – 200.
-db.size num-
ber_of_gigabytes
or
--database.size num-
ber_of_gigabytes
NoThe user name for the database. If you run eb create
with this option, then EB CLI launches the environment
with a database attached even if you didn't run the com-
mand with the --database option. If you run eb create
with the --database option, but without the --data-
base.username and --database.password options,
then EB CLI prompts you for the master database user
name and password.
-db.user username
or
--database.username
username
API Version 2010-12-01
641
Elastic Beanstalk Developer Guide
EB CLI 3.x

RequiredDescriptionName
NoEnvironment variables in a comma-separated list with the
format name=value.
Type: String
Constraints:
• Key-value pairs must be separated by commas.
• Keys and values can contain any alphabetic character
in any language, any numeric character, white space,
invisible separator, and the following symbols: _ . : / =
+ \ - @
• Keys can contain up to 128 characters.Values can
contain up to 256 characters.
• Keys and values are case sensitive.
• Values cannot match the environment name.
• Values cannot include either aws: or elasticbean-
stalk:.
--envvars
NoThe instance profile with the IAM role with the temporary
security credentials that your application needs to access
AWS resources.
-ip profile_name
or
--instance_profile
profile_name
NoThe type of Amazon EC2 instance to use in the environ-
ment.
Type: String
Valid values: See Option Values.
-i
or
--instance_type
NoThe name of the Amazon EC2 key pair to use with the
Secure Shell (SSH) client to securely log in to the Amazon
EC2 instances running your Elastic Beanstalk application.
If you include this option with the eb create command,
the value you provide overwrites any key name that you
might have specified with eb init.
Type: String
Valid values: An existing key name that is registered with
Amazon EC2
-k key_name
or
--keyname key_name
API Version 2010-12-01
642
Elastic Beanstalk Developer Guide
EB CLI 3.x

RequiredDescriptionName
NoThe default platform (also known as the solution stack). If
you specify this option with the eb create command, the
value you provide overwrites any platform that you might
have specified with eb init. If you do not specify a ver-
sion, EB CLI uses the most recent container type. If you
run eb init without this option, you are prompted to
choose from a list of supported platforms. Names for con-
tainer types for each supported platform change when
AMIs are updated.
Type: String
Default: None
Valid values: See Supported Platforms.
-p platform (for example,
php, PHP, php5.5, PHP
5.5, 64bit Amazon
Linux 2014.03 v1.0.7
running PHP 5.5)
or
--platform platform
NoThe AWS region in which you want to deploy the applica-
tion. If you include this option with the eb create com-
mand, the value you provide overwrites any region that
you might have specified with eb init.
For the list of values you can specify for this option, see
AWS Elastic Beanstalk in the Regions and Endpoints
topic in the Amason Web Services General Reference.
-r region
or
--region region
NoLaunches the Elastic Beanstalk sample application for the
platform you select instead of using the application source
code in the local project directory.
--sample
NoLaunches a single-instance environment. If not specified,
EB CLI launches a load-balancing environment.
--single
NoThe number of instances to run when the environment
launches.
--size number_of_in-
stances
NoAmazon EC2 tags for the environment, in a comma-separ-
ated list in the format name=value.
Type: String
Constraints:
• Key-value pairs must be separated by commas.
• Keys and values can contain any alphabetic character
in any language, any numeric character, white space,
invisible separator, and the following symbols: _ . : / =
+ \ - @
• Keys can contain up to 128 characters.Values can
contain up to 256 characters.
• Keys and values are case sensitive.
• Values cannot match the environment name.
• Values cannot include either aws: or elasticbean-
stalk:.
--tags name=value
API Version 2010-12-01
643
Elastic Beanstalk Developer Guide
EB CLI 3.x

RequiredDescriptionName
NoSpecifies the environment tier. If you don't specify the en-
vironment tier, EB CLI uses the most recent version of the
webserver tier.
Type: String
Default: webserver
Valid values: worker or webserver
-t
or
--tier
NoThe number of minutes before the command times out.--timeout
(for EB CLI 3.1 only)
NoSpecifies the application version that you want deployed
to the environment instead of the application source code
in the local project directory.
Type: String
Valid values: An existing application version label
--versionversion_la-
bel
No, unless
you included
the
--vpc.id
option with
the command
Specifies subnets for database instances in a VPC.--vpc.dbsubnets sub-
net1,subnet2
No, unless
you included
the
--vpc.id
option with
the command
Specifies subnets for Amazon EC2 instances in a VPC.--vpc.ec2subnets sub-
net1,subnet2
NoSpecifies subnets for the Elastic Load Balancing load bal-
ancer in a VPC.
--vpc.elbsubnets sub-
net1,subnet2
No, unless
you want to
launch your
environment
in a VPC
Launches your environment in the specified VPC.--vpc.id ID
No, unless
you included
the
--vpc.id
option with
the command
Specifies the security group ID or security group name.--vpc.securitygroups
securitygroup1,secur-
itygroup2
NoLaunches your Amazon EC2 instances in a public subnet
in your VPC.
--vpc.publicip
NoLaunches your Elastic Load Balancing load balancer in a
public subnet in your VPC.
--vpc.elbpublic
API Version 2010-12-01
644
Elastic Beanstalk Developer Guide
EB CLI 3.x

RequiredDescriptionName
NoFor more information, see EB CLI 3.x Common Op-
tions (p. 630).
Common options
Output
If successful, the command prompts you with questions and then returns the status of the create operation.
If there were problems during the launch, you can use the events (p. 648) operation to get more details.
Example 1
The following example creates an environment.
PROMPT> eb create
Enter Environment Name
(default is tmp-dev):
Enter DNS CNAME prefix
(default is tmp-dev):
Environment details for: tmp-dev
Application name: tmp
Region: us-west-2
Deployed Version: app-141029_145448
Environment ID: e-um3yfrzq22
Platform: 64bit Amazon Linux 2014.09 v1.0.9 running PHP 5.5
Tier: WebServer-Standard-1.0
CNAME: tmp-dev.elasticbeanstalk.com
Updated: 2014-10-29 21:54:51.063000+00:00
Printing Status:
INFO: createEnvironment is starting.
INFO: Using elasticbeanstalk-us-west-2-888214631909 as Amazon S3 storage bucket
for environment data.
INFO: Created load balancer named: awseb-e-u-AWSEBLoa-AS5T4LHMG62Z
INFO: Created security group named: awseb-e-um3yfrzq22-stack-AWSEBSecurityGroup-
10MV688E4994W
INFO: Created Auto Scaling launch configuration named: awseb-e-um3yfrzq22-stack-
AWSEBAutoScalingLaunchConfiguration-LAYGQA7S0WLB
INFO: Waiting for EC2 instances to launch. This may take a few minutes.
INFO: Created Auto Scaling group named: awseb-e-um3yfrzq22-stack-AWSEBAutoScal
ingGroup-NAOJALR7EVNB
INFO: Created Auto Scaling group policy named: arn:aws:autoscaling:us-west-
2:11122223333:scalingPolicy:2642e591-3ce9-4b05-94c2-2defe59fe362:autoScalingGroup
Name/awseb-e-um3yfrzq22-stack-AWSEBAutoScalingGroup-NAOJALR7EVNB:policy
Name/awseb-e-um3yfrzq22-stack-AWSEBAutoScalingScaleDownPolicy-186ZHALUU40NL
INFO: Created Auto Scaling group policy named: arn:aws:autoscaling:us-west-
2:11122223333:scalingPolicy:a2f0135c-a87d-47c8-b02f-f91e8ba01cc2:autoScalingGroup
Name/awseb-e-um3yfrzq22-stack-AWSEBAutoScalingGroup-NAOJALR7EVNB:policy
Name/awseb-e-um3yfrzq22-stack-AWSEBAutoScalingScaleUpPolicy-ALX8R1PE048
INFO: Created CloudWatch alarm named: awseb-e-um3yfrzq22-stack-AWSEBCloud
watchAlarmLow-F054729P40PL
INFO: Created CloudWatch alarm named: awseb-e-um3yfrzq22-stack-AWSEBCloud
watchAlarmHigh-VIH77T5YPDPP
INFO: Added EC2 instance 'i-4d133742' to Auto Scaling Group 'awseb-e-um3yfrzq22-
stack-AWSEBAutoScalingGroup-NAOJALR7EVNB'.
INFO: Adding instance 'i-4d133742' to your environment.
INFO: Successfully launched environment: tmp-dev
API Version 2010-12-01
645
Elastic Beanstalk Developer Guide
EB CLI 3.x

deploy
Description
Deploys the application source bundle from the initialized project directory to the running application.
Note
If git is installed, EB CLI uses the git archive command to create a .zip file from the contents
of the most recent git commit command.
Syntax
eb deploy [environment_name]
Note
The environment_name is the environment in which you want to deploy your application source
code. Environment names must be between 4 and 23 characters long and can only contain
letters, numbers, and hyphens. Environment names can't begin or end with a hyphen. If you
don't provide environment_name as a command line parameter, EB CLI deploys your application
to the default environment.
Options
RequiredDescriptionName
NoThe version label for the application version that EB CLI
deploys.
Type: String
-l version_label
or
--label version_label
NoThe description for the application version, enclosed in
double quotation marks.
Type: String
-m "version_descrip-
tion"
or
--message "version_de-
scription"
NoThe number of minutes before the command times out.--timeout
(for EB CLI 3.1 only)
NoAn existing application version to deploy.
Type: String
--version version_la-
bel
NoFor more information, see EB CLI 3.x Common Op-
tions (p. 630).
Common options
Output
If successful, the command returns the status of the deploy operation.
Example
The following example deploys the current application.
API Version 2010-12-01
646
Elastic Beanstalk Developer Guide
EB CLI 3.x

PROMPT> eb deploy
INFO: Environment update is starting.
INFO: Deploying new version to instance(s).
INFO: New application version was deployed to running EC2 instances.
INFO: Environment update completed successfully.
API Version 2010-12-01
647
Elastic Beanstalk Developer Guide
EB CLI 3.x

events
Description
Returns the most recent events for the environment.
Syntax
eb events [environment_name]
Note
The environment_name is the environment for which you want to view events. Environment
names must be between 4 and 23 characters long and can only contain letters, numbers, and
hyphens. Environment names can't begin or end with a hyphen. If you don't specify
environment_name as a command line parameter, EB CLI returns events for the default
environment.
Options
RequiredDescriptionName
NoStreams events. To cancel, press CTRL+C.-f
or
--follow
Output
If successful, the command returns recent events.
Example
The following example returns the most recent events.
PROMPT> eb events
2014-10-29 21:55:39 INFO createEnvironment is starting.
2014-10-29 21:55:40 INFO Using elasticbeanstalk-us-west-2-169465803350
as Amazon S3 storage bucket for environment data.
2014-10-29 21:55:57 INFO Created load balancer named: awseb-e-r-AWSEBLoa-
NSKUOK5X6Z9J
2014-10-29 21:56:16 INFO Created security group named: awseb-e-rxgrhjr9bx-
stack-AWSEBSecurityGroup-1UUHU5LZ20ZY7
2014-10-29 21:56:20 INFO Created Auto Scaling launch configuration
named:awseb-e-rxgrhjr9bx-stack-AWSEBAutoScalingLaunchConfiguration-AG68JQHE9NWO
2014-10-29 21:57:18 INFO Waiting for EC2 instances to launch. This may
take a few minutes.
2014-10-29 21:57:18 INFO Created Auto Scaling group named: awseb-e-rx
grhjr9bx-stack-AWSEBAutoScalingGroup-1TE320ZCJ9RPD
2014-10-29 21:57:22 INFO Created Auto Scaling group policy named:
arn:aws:autoscaling:us-west-2:11122223333:scalingPolicy:2cced9e6-859b-421a-be63-
8ab34771155a:autoScalingGroupName/awseb-e-rxgrhjr9bx-stack-AWSEBAutoScalingGroup-
1TE320ZCJ9RPD:policyName/awseb-e-rxgrhjr9bx-stack-AWSEBAutoScalingScaleUpPolicy-
1I2ZSNVU4APRY
2014-10-29 21:57:22 INFO Created Auto Scaling group policy named:
arn:aws:autoscaling:us-west-2:11122223333:scalingPolicy:1f08b863-bf65-415a-b584-
b7fa3a69a0d5:autoScalingGroupName/awseb-e-rxgrhjr9bx-stack-AWSEBAutoScalingGroup-
API Version 2010-12-01
648
Elastic Beanstalk Developer Guide
EB CLI 3.x

1TE320ZCJ9RPD:policyName/awseb-e-rxgrhjr9bx-stack-AWSEBAutoScalingScaleDown
Policy-1E3G7PZKZPSOG
2014-10-29 21:57:25 INFO Created CloudWatch alarm named: awseb-e-rx
grhjr9bx-stack-AWSEBCloudwatchAlarmLow-VF5EJ549FZBL
2014-10-29 21:57:25 INFO Created CloudWatch alarm named: awseb-e-rx
grhjr9bx-stack-AWSEBCloudwatchAlarmHigh-LA9YEW3O6WJO
2014-10-29 21:58:50 INFO Added EC2 instance 'i-c7ee492d' to Auto Scal
ingGroup 'awseb-e-rxgrhjr9bx-stack-AWSEBAutoScalingGroup-1TE320ZCJ9RPD'.
2014-10-29 21:58:53 INFO Successfully launched environment: tmp-dev
2014-10-29 21:59:14 INFO Environment health has been set to GREEN
2014-10-29 21:59:43 INFO Adding instance 'i-c7ee492d' to your environment.
API Version 2010-12-01
649
Elastic Beanstalk Developer Guide
EB CLI 3.x

init
Description
Sets default values for Elastic Beanstalk applications created with EB CLI by prompting you with a series
of questions.
Note
The values you set with init apply only to the current directory and repository. Until you run
the init command, the current running environment is unchanged. Each time you run the init
command, new settings get appended to the config file.
Syntax
eb init -i [application_name]
Note
If you don't specify application_name as a command line parameter when you run eb init,
EB CLI prompts you for the application name that you want to use.
Options
None of these options are required. If you run eb init without any options, you are prompted to enter
or select a value for each setting.
RequiredDescriptionName
NoForces EB CLI to prompt you to provide a value for every
eb init command option.
Note
The init command prompts you to provide val-
ues for eb init command options that do not
have a (default) value. After the first time you run
the eb init command in a directory, EB CLI
might not prompt you about any command op-
tions.Therefore, use the --interactive option
when you want to change a setting that you pre-
viously set.
-i
or
--interactive
NoThe name of the Amazon EC2 key pair to use with the
Secure Shell (SSH) client to securely log in to the Amazon
EC2 instances running your Elastic Beanstalk application.
-k keyname
or
--keyname keyname
API Version 2010-12-01
650
Elastic Beanstalk Developer Guide
EB CLI 3.x

RequiredDescriptionName
NoThe default platform (also known as the solution stack). If
you do not specify a version, EB CLI uses the most recent
container type. If you run eb init without this option, you
are prompted to choose from a list of supported platforms.
Names for container types for each supported platform
change when AMIs are updated.
Note
If you specify this option, then EB CLI does not
prompt you for values for any other options. In-
stead, it assumes default values for each option.
You can specify options for anything for which
you do not want to use default values.
Type: String
Default: None
-p platform (for example,
php, PHP, php5.5, "PHP
5.5", node.js, "64bit
Amazon Linux 2014.03
v1.0.7 running PHP
5.5")
or
--platform platform
NoFor more information, see EB CLI 3.x Common Op-
tions (p. 630).
Common options
Output
If successful, the command guides you through setting up a new AWS Elastic Beanstalk application
through a series of prompts.
Example
The following example request initializes EB CLI and prompts you to enter information about your
application. Replace the red placeholder text with your own values.
PROMPT> eb init -i
Select a default region
1) us-east-1 : US East (N. Virginia)
2) us-west-1 : US West (N. California)
3) us-west-2 : US West (Oregon)
4) eu-west-1 : EU (Ireland)
5) eu-central-1 : EU (Frankfurt)
6) ap-southeast-1 : Asia Pacific (Singapore)
7) ap-southeast-2 : Asia Pacific (Sydney)
8) ap-northeast-1 : Asia Pacific (Tokyo)
9) sa-east-1 : South America (Sao Paulo)
(default is 3): 3
Select an application to use
1) HelloWorldApp
2) NewApp
3) [ Create new Application ]
(default is 3): 3
Enter Application Name
(default is "tmp"):
Application tmp has been created.
It appears you are using PHP. Is this correct?
API Version 2010-12-01
651
Elastic Beanstalk Developer Guide
EB CLI 3.x

(y/n): y
Select a platform version.
1) PHP 5.5
2) PHP 5.4
3) PHP 5.3
(default is 1): 1
Do you want to set up SSH for your instances?
(y/n): y
Select a keypair.
1) aws-eb
2) [ Create new KeyPair ]
(default is 2): 1
API Version 2010-12-01
652
Elastic Beanstalk Developer Guide
EB CLI 3.x

list
Description
Lists all environments in the current application or all environments in all applications, as specified by the
--all option.
Syntax
eb list
Options
RequiredDescriptionName
NoLists all environments from all applications.-a
or
--all
NoProvides more detailed information about all environments,
including instances.
-v
or
--verbose
NoFor more information, see EB CLI 3.x Common Op-
tions (p. 630).
Common options
Output
If successful, the command returns a list of environment names in which your current environment is
marked with an asterisk (*).
Example 1
The following example lists your environments and indicates that tmp-dev is your default environment.
PROMPT> eb list
* tmp-dev
Example 2
The following example lists your environments with additional details.
PROMPT> eb list --verbose
Region: us-west-2
Application: tmp
Environments: 1
* tmp-dev : ['i-c7ee492d']
API Version 2010-12-01
653
Elastic Beanstalk Developer Guide
EB CLI 3.x

logs
Description
Returns logs for the specified or default environment. Relevant logs vary by container type.
Syntax
eb logs [environment_name]
Note
The environment_name is the environment for which you want to view logs. Environment
names must be between 4 and 23 characters long and can only contain letters, numbers, and
hyphens. Environment names can't begin or end with a hyphen. If you don't specify
environment_name as a command line parameter, EB CLI returns logs for the default
environment.
Options
RequiredDescriptionName
NoRetrieves all logs and saves them to the .elasticbean-
stalk/logs directory.
-a
or
--all
NoRetrieves all logs, compresses them into a .zip file, and
then saves the file to the .elasticbeanstalk/logs
directory.
--all_zip
NoFor more information, see EB CLI 3.x Common Op-
tions (p. 630).
Common options
Output
If successful, the command returns environment logs.
API Version 2010-12-01
654
Elastic Beanstalk Developer Guide
EB CLI 3.x

open
Description
Opens the application in the default browser at the environment CNAME.
Syntax
eb open [environment_name]
Note
The environment_name is the environment that you want to view in a browser. Environment
names must be between 4 and 23 characters long and can only contain letters, numbers, and
hyphens. Environment names can't begin or end with a hyphen. If you don't provide
environment_name as a command line parameter, EB CLI opens the default environment.
Options
RequiredDescriptionName
NoFor more information, see EB CLI 3.x Common Op-
tions (p. 630).
Common options
Output
The command eb open does not have output. Instead, it opens the application in a browser window.
API Version 2010-12-01
655
Elastic Beanstalk Developer Guide
EB CLI 3.x

platform
Description
Lists supported platforms and enables you to set the default platform and platform version to use when
you launch an environment.
Note
This command is available with EB CLI 3.2.
Syntax
eb platform option_name
Note
You must include one of the options in the Options (p.656) section of this topic when you run the
command.
Options
RequiredDescriptionName
No, unless
you include
no other op-
tions with the
command
Shows a list of supported platforms.
Note
For more information about supported platforms,
see Supported Platforms (p. 19).
--list
No, unless
you include
no other op-
tions with the
command
Prompts you to specify the default platform and platform
version to use for future environments.
Note
This command does not change the platform for
any environments that are currently in service.
--select
No, unless
you include
no other op-
tions with the
command
Shows information regarding the default platform or inform-
ation about the current environment.
--show
NoFor more information, see EB CLI 3.x Common Op-
tions (p. 630).
Common options
Example 1
The following example provides the full name of containers for all platforms that Elastic Beanstalk currently
supports.
PROMPT> eb platform --list
docker-1.0.0
docker-1.2.0
docker-1.5.0
glassfish-4.0-java-7-(preconfigured-docker)
glassfish-4.1-java-8-(preconfigured-docker)
go-1.3-(preconfigured-docker)
go-1.4-(preconfigured-docker)
iis-7.5
API Version 2010-12-01
656
Elastic Beanstalk Developer Guide
EB CLI 3.x

iis-8
iis-8.5
multi-container-docker-1.3.3-(generic)
node.js
php-5.3
php-5.4
php-5.5
python
python-2.7
python-3.4-(preconfigured-docker)
ruby-1.9.3
ruby-2.0-(passenger-standalone)
ruby-2.0-(puma)
ruby-2.1-(passenger-standalone)
ruby-2.1-(puma)
ruby-2.2-(passenger-standalone)
ruby-2.2-(puma)
tomcat-6
tomcat-7
tomcat-7-java-6
tomcat-7-java-7
tomcat-8-java-8
Example 2
The following example prompts you to choose from a list of platforms and the version that you want to
deploy for the specified platform.
PROMPT> eb platform --select
Select a platform.
1) PHP
2) Node.js
3) IIS
4) Tomcat
5) Python
6) Ruby
7) Docker
8) Multi-container Docker
9) GlassFish
10) Go
(default is 1): 5
Select a platform version.
1) Python 2.7
2) Python
3) Python 3.4 (Preconfigured - Docker)
Example 3
The following example lists your current default platform and the default platform that Elastic Beanstalk
will launch by default for environments that you create later.
PROMPT> eb platform --show
Current default platform: Python 2.7
New environments will be running: 64bit Amazon Linux 2014.09 v1.2.0 running
Python 2.7
API Version 2010-12-01
657
Elastic Beanstalk Developer Guide
EB CLI 3.x

Platform info for environment "tmp-dev":
Current: 64bit Amazon Linux 2014.09 v1.2.0 running Python
Latest: 64bit Amazon Linux 2014.09 v1.2.0 running Python
API Version 2010-12-01
658
Elastic Beanstalk Developer Guide
EB CLI 3.x

printenv
Description
Prints all the environment variables in the command window.
Syntax
eb printenv [environment_name]
Note
The environment_name is the environment for which you want to see environment variables.
Environment names must be between 4 and 23 characters long and can only contain letters,
numbers, and hyphens. Environment names can't begin or end with a hyphen. If you don't provide
environment_name as a command line parameter, EB CLI displays environment variables for
the default environment.
Options
RequiredDescriptionName
NoFor more information, see EB CLI 3.x Common Op-
tions (p. 630).
Common options
Output
If successful, the command returns the status of the printenv operation.
Example
The following example prints environment variables for the specified environment.
PROMPT> eb printenv
Environment Variables:
PARAM1 = None
PARAM4 = None
PARAM2 = None
PARAM5 = None
AWS_ACCESS_KEY_ID = None
ExampleVar = ExampleValue
AWS_SECRET_KEY = None
PARAM3 = None
API Version 2010-12-01
659
Elastic Beanstalk Developer Guide
EB CLI 3.x

scale
Description
Scales the environment to always run on a specified number of instances, setting both the minimum and
maximum number of instances to the specified number.
Syntax
eb scale number [environment_name]
Note
You can include environment_name as an optional command line parameter if you want to
scale a specific environment. Environment names must be between 4 and 23 characters long
and can only contain letters, numbers, and hyphens. Environment names can't begin or end with
a hyphen. If you don't provide environment_name as a command line parameter, EB CLI
applies the scaling settings to the default environment.
Options
RequiredDescriptionName
NoThe number of minutes before the command times out.--timeout
(for EB CLI 3.1 only)
NoFor more information, see EB CLI 3.x Common Op-
tions (p. 630).
Common options
Output
If successful, the command updates the number of minimum and maximum instances to run to the
specified number.
Example
The following example sets the number of instances to scale to as 2.
PROMPT> eb scale 2
INFO: Environment update is starting.
INFO: Updating environment tmp-dev's configuration settings.
INFO: Added EC2 instance 'i-5fce3d53' to Auto Scaling Group 'awseb-e-2cpfjbra9a-
stack-AWSEBAutoScalingGroup-7AXY7U13ZQ6E'.
INFO: Successfully deployed new configuration to environment.
INFO: Environment update completed successfully.
API Version 2010-12-01
660
Elastic Beanstalk Developer Guide
EB CLI 3.x

setenv
Description
Sets environment variables for the default environment.
Syntax
eb setenv key=[value]
You can include as many variables as you want.You can delete a variable by leaving the value blank.
Options
RequiredDescriptionName
NoThe number of minutes before the command times out.--timeout
(for EB CLI 3.1 only)
NoFor more information, see EB CLI 3.x Common Op-
tions (p. 630).
Common options
Output
If successful, the command displays that the environment update succeeded.
Example
The following example sets the environment variable ExampleVar.
PROMPT> eb setenv ExampleVar=ExampleValue
INFO: Environment update is starting.
INFO: Updating environment tmp-dev's configuration settings.
INFO: Successfully deployed new configuration to environment.
INFO: Environment update completed successfully.
The following command sets multiple environment variables. It adds the environment variable named
foo and sets its value to bar, changes the value of the JDBC_CONNECTION_STRING variable, and deletes
the PARAM4 and PARAM5 variables.
eb setenv foo=bar JDBC_CONNECTION_STRING=hello PARAM4= PARAM5=
API Version 2010-12-01
661
Elastic Beanstalk Developer Guide
EB CLI 3.x

ssh
Description
Connects to an Amazon EC2 instance in your environment using Secure Shell (SSH). If an environment
has multiple running instances, EB CLI prompts you to specify which instance you want to connect to.
Note
Elastic Beanstalk does not enable remote connections to Amazon EC2 instances in a Windows
container by default except for legacy Windows containers. (Elastic Beanstalk configures Amazon
EC2 instances in legacy Windows containers to use port 3389 for RDP connections.) You can
enable remote connections to your EC2 instances running Windows by adding a rule to a security
group that authorizes inbound traffic to the instances. We strongly recommend that you remove
the rule when you end your remote connection.You can add the rule again the next time you
need to log in remotely. For more information, see Adding a Rule for Inbound RDP Traffic to a
Windows Instance and Connect to Your Windows Instance in the Amazon Elastic Compute
Cloud User Guide for Microsoft Windows.
You must have SSH installed in your system PATH environment variable. All SSH keys must
be located in the HOME/.ssh folder. By default, SSH closes port 22 for your instance's security
group when you disconnect.
Syntax
eb ssh [environment_name]
Note
The environment_name is the environment in which you want to connect using SSH.
Environment names must be between 4 and 23 characters long and can only contain letters,
numbers, and hyphens. Environment names can't begin or end with a hyphen. If you don't provide
environment_name as a command line parameter, EB CLI connects to the default environment.
Options
RequiredDescriptionName
NoSpecifies which instance (that you choose from a list of all
instances) that you want to use SSH to connect to.
-n
or
--number
NoSpecifies the instance ID of the instance to which you
connect. We recommend that you use this option.
-i
or
--instance
NoSpecifies that EB CLI should not close port 22 after the
SSH session ends.
-o
or
--keep_open
API Version 2010-12-01
662
Elastic Beanstalk Developer Guide
EB CLI 3.x

RequiredDescriptionName
NoSets up the specified environment to use SSH. (This is an
alternative to the eb init command that sets up SSH for
all future environments.)
Note
Because Amazon EC2 keys cannot be changed,
if you run this command, your environment will
be restarted with all new instances.Your environ-
ment will be unavailable while this command is
being executed.
--setup
NoFor more information, see EB CLI 3.x Common Op-
tions (p. 630).
Common options
Output
If successful, the command opens an SSH connection to the instance.
Example
The following example connects you to the specified environment.
PROMPT> eb ssh
Select an instance to ssh into
1) i-96133799
2) i-5931e053
(default is 1): 1
INFO: Attempting to open port 22.
INFO: SSH port 22 open.
The authenticity of host '54.191.45.125 (54.191.45.125)' can't be established.
RSA key fingerprint is ee:69:62:df:90:f7:63:af:52:7c:80:60:1b:3b:51:a9.
Are you sure you want to continue connecting (yes/no)? yes
Warning: Permanently added '54.191.45.125' (RSA) to the list of known hosts.
__| __|_ )
_| ( / Amazon Linux AMI
___|\___|___|
https://aws.amazon.com/amazon-linux-ami/2014.09-release-notes/
No packages needed for security; 1 packages available
Run "sudo yum update" to apply all updates.
[ec2-user@ip-172-31-8-185 ~]$ ls
[ec2-user@ip-172-31-8-185 ~]$ exit
logout
Connection to 54.191.45.125 closed.
INFO: Closed port 22 on ec2 instance security group
API Version 2010-12-01
663
Elastic Beanstalk Developer Guide
EB CLI 3.x

status
Description
Provides information about the status of the environment.
Syntax
eb status [environment_name]
Note
The environment_name is the environment for which you want status. Environment names
must be between 4 and 23 characters long and can only contain letters, numbers, and hyphens.
Environment names can't begin or end with a hyphen. If you don't provide environment_name
as a command line parameter, EB CLI provides information about the status of the default
environment.
Options
RequiredDescriptionName
NoProvides more information about individual instances, such
as their status with the Elastic Load Balancing load balan-
cer.
-v
or
--verbose
NoFor more information, see EB CLI 3.x Common Op-
tions (p. 630).
Common options
Output
If successful, the command returns the following information about the environment:
• Environment name
• Application name
• Deployed application version
• Environment ID
• Platform
• Environment tier
• CNAME
• Time the environment was last updated
• Status
• Health
If you use verbose mode, EB CLI also provides you with the number of running Amazon EC2 instances.
Example
The following example shows the status for the environment tmp-dev.
PROMPT> eb status
Environment details for: tmp-dev
Application name: tmp
Region: us-west-2
API Version 2010-12-01
664
Elastic Beanstalk Developer Guide
EB CLI 3.x

Deployed Version: None
Environment ID: e-2cpfjbra9a
Platform: 64bit Amazon Linux 2014.09 v1.0.9 running PHP 5.5
Tier: WebServer-Standard-1.0
CNAME: tmp-dev.elasticbeanstalk.com
Updated: 2014-10-29 21:37:19.050000+00:00
Status: Launching
Health: Grey
API Version 2010-12-01
665
Elastic Beanstalk Developer Guide
EB CLI 3.x

swap
This command is supported for EB CLI 3.1 only.
Description
Swaps the environment's CNAME with the CNAME of another environment (for example, to avoid downtime
when you update your application version).
Note
If you have more than two environments, you are prompted to select the name of the environment
that is currently using your desired CNAME from a list of environments.To suppress this, you
can specify the name of the environment to use by including the -n option when you run the
command.
Syntax
eb swap [environment_name]
Note
The environment_name is the environment for which you want a different CNAME. If you don't
specify environment_name as a command line parameter when you run eb swap, EB CLI
updates the CNAME of the default environment. Environment names must be between 4 and
23 characters long and can only contain letters, numbers, and hyphens. Environment names
can't begin or end with a hyphen.
Options
RequiredDescriptionName
NoSpecifies the name of the environment with which you
want to swap CNAMEs. If you run eb swap without this
option, then EB CLI prompts you to choose from a list of
your environments.
-n
or
--destination_name
NoFor more information, see EB CLI 3.x Common Op-
tions (p. 630).
Common options
Output
If successful, the command returns the status of the swap operation.
Examples
The following example swaps the environment tmp-dev with live-env.
PROMPT> eb swap
Select an environment to swap with.
1) staging-dev
2) live-env
(default is 1): 2
INFO: swapEnvironmentCNAMEs is starting.
INFO: Swapping CNAMEs for environments 'tmp-dev' and 'live-env'.
INFO: 'tmp-dev.elasticbeanstalk.com' now points to 'awseb-e-j-AWSEBLoa-
API Version 2010-12-01
666
Elastic Beanstalk Developer Guide
EB CLI 3.x

M7U21VXNLWHN-487871449.us-west-2.elb.amazonaws.com'.
INFO: Completed swapping CNAMEs for environments 'tmp-dev' and 'live-env'.
The following example swaps the environment tmp-dev with the environment live-env but does not prompt
you to enter or select a value for any settings.
PROMPT> eb swap tmp-dev --destination_name live-env
INFO: swapEnvironmentCNAMEs is starting.
INFO: Swapping CNAMEs for environments 'tmp-dev' and 'live-env'.
INFO: 'tmp-dev.elasticbeanstalk.com' now points to 'awseb-e-j-AWSEBLoa-
M7U21VXNLWHN-487871449.us-west-2.elb.amazonaws.com'.
INFO: Completed swapping CNAMEs for environments 'tmp-dev' and 'live-env'.
API Version 2010-12-01
667
Elastic Beanstalk Developer Guide
EB CLI 3.x

terminate
Description
Terminates the running environment so that you do not incur charges for unused AWS resources.
Note
You can always launch a new environment using the same version later. If you have data from
an environment that you would like to preserve, create a snapshot of your current database
instance before you terminate the environment.You can later use it as the basis for new DB
instance when you create a new environment. For more information, see Creating a DB Snapshot
in the Amazon Relational Database Service User Guide.
Syntax
eb terminate [environment_name]
Note
The environment_name is the environment you want to terminate. Environment names must
be between 4 and 23 characters long and can only contain letters, numbers, and hyphens.
Environment names can't begin or end with a hyphen. If you don't provide environment_name
as a command line parameter, EB CLI terminates the default environment.
Options
RequiredDescriptionName
NoTerminates the environment, application, and all resources.--all
NoProceeds with termination without requiring you to confirm
the environment name and that you want to proceed.
--force
NoThe number of minutes before the command times out.--timeout
(for EB CLI 3.1 only)
Output
If successful, the command returns the status of the terminate operation.
Example
The following example request terminates the environment tmp-dev.
PROMPT> eb terminate
The environment "tmp-dev" and all associated instances will be terminated.
To confirm, type the environment name: tmp-dev
INFO: terminateEnvironment is starting.
INFO: Deleted CloudWatch alarm named: awseb-e-2cpfjbra9a-stack-AWSEBCloud
watchAlarmHigh-16V08YOF2KQ7U
INFO: Deleted CloudWatch alarm named: awseb-e-2cpfjbra9a-stack-AWSEBCloud
watchAlarmLow-6ZAWH9F20P7C
INFO: Deleted Auto Scaling group policy named: arn:aws:autoscaling:us-west-
2:11122223333:scalingPolicy:5d7d3e6b-d59b-47c5-b102-3e11fe3047be:autoScalingGroup
Name/awseb-e-2cpfjbra9a-stack-AWSEBAutoScalingGroup-7AXY7U13ZQ6E:policy
Name/awseb-e-2cpfjbra9a-stack-AWSEBAutoSca
lingScaleUpPolicy-1876U27JEC34J
INFO: Deleted Auto Scaling group policy named: arn:aws:autoscaling:us-west-
API Version 2010-12-01
668
Elastic Beanstalk Developer Guide
EB CLI 3.x

2:11122223333:scalingPolicy:29c6e7c7-7ac8-46fc-91f5-cfabb65b985b:autoScalingGroup
Name/awseb-e-2cpfjbra9a-stack-AWSEBAutoScalingGroup-7AXY7U13ZQ6E:policy
Name/awseb-e-2cpfjbra9a-stack-AWSEBAutoSca
lingScaleDownPolicy-SL4LHODMOMU
INFO: Waiting for EC2 instances to terminate. This may take a few minutes.
INFO: Deleted Auto Scaling group named: awseb-e-2cpfjbra9a-stack-AWSEBAutoScal
ingGroup-7AXY7U13ZQ6E
INFO: Deleted Auto Scaling launch configuration named: awseb-e-2cpfjbra9a-stack-
AWSEBAutoScalingLaunchConfiguration-19UFHYGYWORZ
INFO: Deleted security group named: awseb-e-2cpfjbra9a-stack-AWSEBSecurityGroup-
XT4YYGFL7I99
INFO: Deleted load balancer named: awseb-e-2-AWSEBLoa-AK6RRYFQVV3S
INFO: Deleting SNS topic for environment tmp-dev.
INFO: terminateEnvironment completed successfully.
API Version 2010-12-01
669
Elastic Beanstalk Developer Guide
EB CLI 3.x

upgrade
Description
Upgrades the platform of your environment to the most recent version of the solution stack it is currently
running.
Syntax
eb upgrade [environment_name]
Note
The environment_name is the environment for which you want to use a newer platform. If you
don't specify environment_name as a command line parameter when you run eb upgrade,
EB CLI updates the platform version of the default environment. Environment names must be
between 4 and 23 characters long and can only contain letters, numbers, and hyphens.
Environment names can't begin or end with a hyphen.
Options
RequiredDescriptionName
NoUpgrades without requiring you to confirm the environment
name before starting the upgrade process.
--force
NoUpdates all instances without using rolling updates to keep
some instances in service during the upgrade.
--noroll
NoFor more information, see EB CLI 3.x Common Op-
tions (p. 630).
Common options
Output
The command shows an overview of the change and prompts you to confirm the upgrade by typing the
environment name. If successful, your environment is updated and then launched with the most recent
version of the platform.
Example
The following example upgrades the current platform version of the specified environment to the most
recently available platform version.
PROMPT> eb upgrade
Current platform: 64bit Amazon Linux 2014.09 v1.0.9 running Python 2.7
Latest platform: 64bit Amazon Linux 2014.09 v1.2.0 running Python 2.7
WARNING: This operation replaces your instances with minimal or zero downtime.
You may cancel the upgrade after it has started by typing "eb abort".
You can also change your platform version by typing "eb clone" and then "eb
swap".
To continue, type the environment name:
API Version 2010-12-01
670
Elastic Beanstalk Developer Guide
EB CLI 3.x

use
Description
Sets the specified environment as the default environment.
Syntax
eb use environment_name
Note
The environment_name is the environment you want to set as the default environment.
Environment names must be between 4 and 23 characters long and can only contain letters,
numbers, and hyphens. Environment names can't begin or end with a hyphen.You must provide
an environment name with the eb use command.
Options
RequiredDescriptionName
NoFor more information, see EB CLI 3.x Common Op-
tions (p. 630).
Common options
API Version 2010-12-01
671
Elastic Beanstalk Developer Guide
EB CLI 3.x

Eb CLI 2.6.x
Important
This tool, eb, and its documentation have been replaced with EB CLI 3.x and will no longer be
updated. EB CLI 3.x has similar commands, but superior capabilities. For equivalent EB CLI
information on this section, see EB CLI 3.x (p. 621). This documentation is for customers who
previously installed and continue to use eb 2.6.x.
This section describes how to set up eb 2.6.x and how to create a sample application using eb. This
section also includes a command reference for eb 2.6.x.
Topics
• Getting Started with Eb (p. 672)
• Deploying a Git Branch to a Specific Environment (p. 677)
• Eb Common Options (p. 680)
• Eb Operations (p. 680)
Getting Started with Eb
Important
This tool, eb, and its documentation have been replaced with EB CLI 3.x and will no longer be
updated. EB CLI 3.x has similar commands, but superior capabilities. For equivalent EB CLI
information on this section, see EB CLI 3.x (p. 621). This documentation is for customers who
previously installed and continue to use eb 2.6.x.
Eb is a command line interface (CLI) tool that asks you a series of questions and uses your answers to
deploy and manage Elastic Beanstalk applications.This section provides an end-to-end walkthrough
using eb to launch a sample application, view it, update it, and then delete it.
To complete this walkthrough, you will need to download the command line tools at the AWS Sample
Code & Libraries website. For a complete CLI reference for more advanced scenarios, see
Operations (p. 736), and see Getting Set Up (p. 704) for instructions on how to get set up.
Step 1: Initialize Your Git Repository
Eb is a command line interface that you can use with Git to deploy applications quickly and more easily.
Eb is available as part of the Elastic Beanstalk command line tools package. Follow the steps below to
install eb and initialize your Git repository.
To install eb, its prerequisite software, and initialize your Git repository
1. Install the following software onto your local computer:
a. Linux/Unix/Mac
• Download and unzip the Elastic Beanstalk command line tools package at the AWS Sample
Code & Libraries website.
• Git 1.6.6 or later.To download Git, go to http://git-scm.com/.
• Python 2.7 or 3.0.
b. Windows
• Download and unzip the Elastic Beanstalk command line tools package at the AWS Sample
Code & Libraries website.
• Git 1.6.6 or later.To download Git, go to http://git-scm.com/.
API Version 2010-12-01
672
Elastic Beanstalk Developer Guide
Eb CLI 2.6.x

• PowerShell 2.0.
Note
Windows 7 and Windows Server 2008 R2 come with PowerShell 2.0. If you are
running an earlier version of Windows, you can download PowerShell 2.0.Visit http://
technet.microsoft.com/en-us/scriptcenter/dd742419.aspx for more details.
2. Initialize your Git repository.
git init .
Step 2: Configure Elastic Beanstalk
Elastic Beanstalk needs the following information to deploy an application:
• AWS access key ID
• AWS secret key
• Service region
• Application name
• Environment name
• Solution stack
When you use the init command, Elastic Beanstalk will prompt you to enter this information. If a default
value or current setting is available, and you want to use it, press Enter.
Before you use eb, set your PATH to the location of eb. The following table shows an example for
Linux/UNIX and Windows.
In WindowsIn Linux and UNIX
C:\> set PATH=%PATH%;<path to unzipped
eb CLI package>\eb\windows\
$ export PATH=$PATH:<path to unzipped
eb CLI package>/eb/linux/python2.7/
If you are using Python 3.0, the path will include
python3 rather than python2.7.
To configure Elastic Beanstalk
Note
The EB CLI stores your credentials in a file named credentials in a folder named .aws in
your user directory.
1. From the directory where you created your local repository, type the following command:
eb init
2. When you are prompted for the access key ID, type your access key ID.To get your access key ID,
see How Do I Get Security Credentials? in the AWS General Reference.
API Version 2010-12-01
673
Elastic Beanstalk Developer Guide
Eb CLI 2.6.x

Enter your AWS Access Key ID (current value is "AKIAIOSFODNN7EXAMPLE"):
3. When you are prompted for the secret access key, type your secret access key.To get your secret
access key, see How Do I Get Security Credentials? in the AWS General Reference.
Enter your AWS Secret Access Key (current value is "wJalrXUtnFEMI/K7MDENG/bPxR
fiCYEXAMPLEKEY"):
4. When you are prompted for the Elastic Beanstalk region, type the number of the region. For information
about this product's regions, go to Regions and Endpoints in the Amazon Web Services General
Reference. For this example, we'll use US West (Oregon).
5. When you are prompted for the Elastic Beanstalk application name, type the name of the application.
Elastic Beanstalk generates an application name based on the current directory name if an application
name has not been previously configured. In this example, we use HelloWorld.
Enter an AWS Elastic Beanstalk application name (auto-generated value is
"windows"): HelloWorld
Note
If you have a space in your application name, make sure you do not use quotation marks.
6. When you are prompted for the Elastic Beanstalk environment name, type the name of the
environment. Elastic Beanstalk automatically creates an environment name based on your application
name. If you want to accept the default, press Enter.
Enter an AWS Elastic Beanstalk environment name (current value is "HelloWorld-
env"):
Note
If you have a space in your application name, make sure you do not have a space in your
environment name.
7. When you are prompted, choose an environment tier. For more information about environment tiers,
see Architectural Overview (p. 16). For this example, we'll use 1.
Available environment tiers are:
1) WebServer::Standard::1.0
2) Worker::SQS/HTTP::1.0
8. When you are prompted for the solution stack, type the number of the solution stack you want. For
more information about solution stacks, see Supported Platforms (p. 19). For this example, we'll use
64bit Amazon Linux running PHP 5.4.
9. When you are prompted, choose an environment type. For this example, we'll use 2.
Available environment types are:
1) LoadBalanced
2) SingleInstance
10. When you are prompted to create an Amazon RDS DB instance, type y or n. For more information
about using Amazon RDS, see Using Elastic Beanstalk with Amazon RDS (p.528). For this example,
we'll type y.
API Version 2010-12-01
674
Elastic Beanstalk Developer Guide
Eb CLI 2.6.x

Create an Amazon RDS DB Instance? [y/n]:
11. When you are prompted to create the database from scratch or a snapshot, type your selection. For
this example, we'll use No snapshot.
12. When you are prompted to enter your RDS user master password, type your password containing
8 to 16 printable ASCII characters (excluding /, \, and @).
Enter an Amazon RDS DB master password:
Retype password to confirm:
13. When you are prompted to create a snapshot if you delete the Amazon RDS DB instance, type y or
n. For this example, we'll type n. If you type n, then your RDS DB instance will be deleted and your
data will be lost if you terminate your environment.
By default, eb sets the following default values for Amazon RDS.
• Database engine — MySQL
• Default version: — 5.5
• Database name: — ebdb
• Allocated storage — 5GB
• Instance class — db.t1.micro
• Deletion policy — delete
• Master username — ebroot
14. When you are prompted to enter your instance profile name, you can choose to create a default
instance profile or use an existing instance profile. Using an instance profile enables IAM users and
AWS services to gain access to temporary security credentials to make AWS API calls. Using instance
profiles prevents you from having to store long-term security credentials on the EC2 instance. For
more information about instance profiles, see Granting Permissions to Users and Services Using
IAM Roles (p. 562). For this example, we'll use Create a default instance profile.
You should see a confirmation that your AWS Credential file was successfully updated.
After configuring Elastic Beanstalk, you are ready to deploy a sample application.
If you want to update your Elastic Beanstalk configuration, you can use the init command again.When
prompted, you can update your configuration options. If you want to keep any previous settings, press
the Enter key. If you want to update your Amazon RDS DB configuration settings, you can update your
optionsettings file in the .elasticbeanstalk directory, and then use the eb update command
to update your Elastic Beanstalk environment.
Note
You can set up multiple directories for use with eb—each with its own Elastic Beanstalk
configuration—by repeating the preceding two steps in each directory: first initialize a Git
repository, and then use init to configure eb.
Step 3: Create the Application
Next, you need to create and deploy a sample application. For this step, you use a sample application
that is already prepared. Elastic Beanstalk uses the configuration information you specified in the previous
step to do the following:
API Version 2010-12-01
675
Elastic Beanstalk Developer Guide
Eb CLI 2.6.x

• Create an application using the application name you specified.
• Launch an environment using the environment name you specified that provisions the AWS resources
to host the application.
• Deploy the application into the newly created environment.
Use the start command to create and deploy a sample application.
To create the application
• From the directory where you created your local repository, type the following command:
eb start
It may take several minutes to complete this process. Elastic Beanstalk provides status updates during
the process. If at any time you want to stop polling for status updates, press Ctrl+C.When the environment
status is Green, Elastic Beanstalk outputs a URL for the application.
Step 4:View the Application
In the previous step, you created an application and deployed it to Elastic Beanstalk. After the environment
is ready and its status is Green, Elastic Beanstalk provides a URL to view the application. In this step,
you can check the status of the environment to make sure it is set to Green and then copy and paste the
URL to view the application.
Use the status command to check the environment status, and then use the URL to view the application.
To view the application
1. From the directory where you created your local repository, type the following command:
eb status --verbose
Elastic Beanstalk displays the environment status. If the environment is set to Green, Elastic Beanstalk
displays the URL for the application. If you attached an Amazon RDS DB instance to your environment,
your Amazon RDS DB information is displayed.
2. Copy and paste the URL into your web browser to view your application.
Step 5: Update the Application
After you have deployed a sample application, you can update the sample application with your own
application. In this step, we'll update the sample PHP application with a simple HelloWorld application.
To update the sample application
1. Create a simple PHP file that displays "Hello World" and name it index.php.
<html>
<head>
<title>PHP Test</title>
</head>
<body>
<?php echo '<p>Hello World</p>'; ?>
API Version 2010-12-01
676
Elastic Beanstalk Developer Guide
Eb CLI 2.6.x

</body>
</html>
Next, add your new program to your local Git repository, and then commit your change.
git add index.php
git commit -m "initial check-in"
Note
For information about Git commands, go to Git - Fast Version Control System.
2. Deploy to Elastic Beanstalk.
eb push
3. View your updated application. Copy and paste the same URL in your web browser as you did in
Step 4: View the Application (p. 676).
Step 6: Clean Up
If you no longer want to run your application, you can clean up by terminating your environment and
deleting your application.
Use the stop command to terminate your environment and the delete command to delete your
application.
To terminate your environment and delete the application
1. From the directory where you created your local repository, type the following command:
eb stop
This process may take a few minutes. Elastic Beanstalk displays a message once the environment
has been successfully terminated.
Note
If you attached an Amazon RDS DB instance to your environment, your Amazon RDS DB
will be deleted, and you will lose your data.To save your data, create a snapshot before
you delete the application. For instructions on how to create a snapshot, go to Creating a
DB Snapshot in the Amazon Relational Database Service User Guide.
2. From the directory where you installed the command line interface, type the following command:
eb delete
Elastic Beanstalk displays a message once it has successfully deleted the application.
Deploying a Git Branch to a Specific Environment
Important
This tool, eb, and its documentation have been replaced with EB CLI 3.x and will no longer be
updated. EB CLI 3.x has similar commands, but superior capabilities. For equivalent EB CLI
API Version 2010-12-01
677
Elastic Beanstalk Developer Guide
Eb CLI 2.6.x

information on this section, see EB CLI 3.x (p. 621). This documentation is for customers who
previously installed and continue to use eb 2.6.x.
Developers often use branching in a project to manage code intended for different target environments.
For example, you might have a test branch where you perform component or integration testing and a
prod branch where you manage the code for your live or production code. With version 2.3 and later of
the eb command line interface and AWS DevTools, you can use the eb init command to configure the
eb push command to push your current git branch to a specific Elastic Beanstalk environment.
To set up a Git branch to deploy to a specific environment
1. Make sure you have version 2.3 of the Elastic Beanstalk command line tools installed.
To check what version you have installed, use the following command:
eb --version
To download the command line tools, go to Elastic Beanstalk Command Line Tool page and follow
the instructions in the README.txt file in the .zip file.
2. From a command prompt, change directories to the location of the local repository containing the
code you want to deploy.
If you have not set up a Git repository, you need to create one to continue. For information about
how to use Git, see the Git documentation.
3. Make sure that the current branch for your local repository is the one you want to map to an Elastic
Beanstalk environment.
To switch to a branch, you use the git checkout command. For example, you would use the
following command to switch to the prod branch.
git checkout prod
For more information about creating and managing branches in Git, see the Git documentation.
4. If you have not done so already, use the eb init command to configure eb to use Elastic Beanstalk
with a specific settings for credentials, application, region, environment, and solution stack.The
values set with eb init will be used as defaults for the environments that you create for your
branches. For detailed instructions, see Step 2: Configure Elastic Beanstalk (p. 673).
5. Use the eb branch command to map the current branch to a specific environment.
1. Type the following command.
eb branch
2. When prompted for an environment name, enter the name of the environment that you want to
map to the current branch.
The eb command will suggest a name in parentheses and you can accept that name by pressing
the Enter key or type the name that you want.
The current branch is "myotherbranch".
Enter an Elastic Beanstalk environment name (auto-generated value is
"test-myotherbranch-en"):
API Version 2010-12-01
678
Elastic Beanstalk Developer Guide
Eb CLI 2.6.x

You'll notice that eb displays the current branch in your Git repository so you know which branch
you're working with.You can specify an existing environment or a new one. If you specify a new
one, you'll need to create it with the eb start command.
3. When prompted about using the settings from the default environment, type y unless you explicitly
don't want to use the optionsettings file from the default environment for the environment for
this branch.
Do you want to copy the settings from the default environment "main-env"
for the new branch? [y/n]: y
6. If you specified a new environment for your branch, use the eb start command to create and start
the environment.
When this command is successful, you're ready for the next step.
7. Use the eb push command to deploy the changes in the current branch to the environment that you
mapped to the branch.
API Version 2010-12-01
679
Elastic Beanstalk Developer Guide
Eb CLI 2.6.x

Eb Common Options
This tool, eb, and its documentation have been replaced with EB CLI 3.x and will no longer be updated.
EB CLI 3.x has similar commands, but superior capabilities. For equivalent EB CLI information on this
topic, see EB CLI 3.x Common Options (p. 630).
This section describes options common to all eb operations.
DescriptionName
Skip the confirmation prompt.-f, --force
Show the Help message.
Type: String
Default: None
- h, --help
Display verbose information.--verbose
Show the program's version number and exit.--version
Eb Operations
This tool, eb, and its documentation have been replaced with EB CLI 3.x and will no longer be updated.
EB CLI 3.x has similar commands, but superior capabilities. For equivalent EB CLI information on this
section, see EB CLI 3.x Operations (p. 630).
You can use the eb command line interface to perform a wide variety of operations.
Topics
• branch (p. 682)
• delete (p. 684)
• events (p. 685)
• init (p. 687)
• logs (p. 690)
• push (p. 691)
• start (p. 692)
• status (p. 694)
• stop (p. 696)
• update (p. 698)
Eb stores environment settings in the .elasticbeanstalk/optionsettings file for the repository.
It is designed to read only from local files.When you run eb start or eb update, Elastic Beanstalk
reads the .elasticbeanstalk/optionsettings file and provides its contents as parameters to the
CreateEnvironment or UpdateEnvironment API actions.
You can use a configuration file in an .ebextensions/*.conf directory to configure some of the same
settings that are in an .elasticbeanstalk/optionsettings file. However, the values for the settings
in .elasticbeanstalk/optionsettings will take precedence over anything in
.ebextensions/*.conf if the settings are configured in both. Additionally, any option setting that is
API Version 2010-12-01
680
Elastic Beanstalk Developer Guide
Eb CLI 2.6.x

specified using the API, including through eb, cannot later be changed in an environment using
.ebextensions configuration files.
When you run eb branch, Elastic Beanstalk will either add a section to the values in
.elasticbeanstalk/optionsettings or create a new one for a new environment.The command
does not affect any running environments.
To view your current settings, run eb status --verbose.You might also want to use eb in conjunction
with the Elastic Beanstalk console to get a complete picture of your applications and environments.
API Version 2010-12-01
681
Elastic Beanstalk Developer Guide
Eb CLI 2.6.x

branch
This tool, eb, and its documentation have been replaced with EB CLI 3.x and will no longer be updated.
EB CLI 3.x has similar commands, but superior capabilities. EB CLI 3.x does not support this command.
For equivalent EB CLI information on this section, see Using Git with EB CLI (p.629) and create (p.640).
Description
Maps a Git branch to a new or existing Elastic Beanstalk environment and configures the mapped
environment through a series of prompts.You must first create the Git branch. If no branches exist in the
Git repository, eb displays a message that prompts you to run the branch command. Eb then attempts
to start the application specified in the default settings in the optionsettings file.
To map a Git branch, first run git checkout <branch>, specifying the name of the Git branch you
want to map.Then run eb branch. If the branch has never been mapped to an Elastic Beanstalk
environment, you'll have the option to copy the most current environment settings to the new environment.
Consider the following additional information about using branch:
• If you run eb init on an existing repository and change the application name, region, or solution
stack, the command resets all existing branch mappings. Run branch again to map each branch to
an environment.
• You can map different Git branches to the same Elastic Beanstalk environment but in most cases
maintain one-to-one relationships between branches and environments.
For a tutorial that describes how to use eb to deploy a Git branch to Elastic Beanstalk, see Deploying a
Git Branch to a Specific Environment (p. 677).
Syntax
eb branch
Options
RequiredDescriptionName
NoThe environment to which you want to
map the current Git branch. If you do not
use this option, you'll be prompted to ac-
cept the autogenerated environment
name or enter a new one.
Type: String
Default: <Git-branch-name>-env
-e
or
--environment name ENVIRONMENT_NAME
NoFor more information, see Eb Common
Options (p. 680).
Common options
Output
None
API Version 2010-12-01
682
Elastic Beanstalk Developer Guide
Eb CLI 2.6.x

Example
The following example maps the Git branch master to a new environment called MyApp-env-test, using
the same settings as a previously created environment called Myapp-env. Replace the red placeholder
text with your own values.
PROMPT> eb branch
The current branch is "master".
Enter an AWS Elastic Beanstalk environment name (auto-generated value is "MyApp-
master-env"): MyApp-env-test
Do you want to copy the settings from environment "MyApp-env" for the new branch?
[y/n]: y
PROMPT> eb status
Environment "MyApp-env-test" is not running.
API Version 2010-12-01
683
Elastic Beanstalk Developer Guide
Eb CLI 2.6.x

delete
This tool, eb, and its documentation have been replaced with EB CLI 3.x and will no longer be updated.
EB CLI 3.x has similar commands, but superior capabilities. EB CLI 3.x does not support this command.
For equivalent EB CLI information on this section, see terminate (p. 668).
Description
Deletes the current application, or an application you specify, along with all associated environments,
versions, and configurations. For a tutorial that includes a description of how to use eb delete to delete
an application, see Getting Started with Eb (p. 672).
Note
The delete operation applies to an application and all of its environments.To stop only a single
environment rather than an entire application, use eb stop (p. 696).
Syntax
eb delete
Options
RequiredDescriptionName
NoThe application that you want to delete. If you
do not use this option, eb will delete the ap-
plication currently specified in .elasticbean-
stalk/optionsettings.To verify your
current settings, run eb init (the current
values will be displayed; press Enter at each
prompt to keep the current value).
Type: String
Default: Current setting
-a
or
--application-nameAPPLIC-
ATION_NAME
NoFor more information, see Eb Common Op-
tions (p. 680).
Common options
Output
If successful, the command returns confirmation that the application was deleted.
Example
The following example request deletes the specified application and all of its environments. Replace the
red placeholder text with your own values.
PROMPT> delete -a MyApp
Delete application? [y/n]: y
Deleted application "MyApp".
API Version 2010-12-01
684
Elastic Beanstalk Developer Guide
Eb CLI 2.6.x

events
This tool, eb, and its documentation have been replaced with EB CLI 3.x and will no longer be updated.
EB CLI 3.x has similar commands, but superior capabilities. For equivalent EB CLI information on this
section, see events (p. 648).
Description
Returns the most recent events for the environment.
Syntax
eb events
Options
RequiredDescriptionName
YesThe number of events to return.Valid values range from
1 to 1000.
Type: Integer
Default: 10
[number] NUMBER
Output
If successful, the command returns the specified number of recent events.
Example
The following example returns the 15 most recent events.
PROMPT> eb events 15
2014-05-19 08:44:51 INFO terminateEnvironment completed successfully.
2014-05-19 08:44:50 INFO Deleting SNS topic for environment MyApp-test-
env.
2014-05-19 08:44:38 INFO Deleted security group named: awseb-e-
fEXAMPLEre-stack-AWSEBSecurityGroup-1DEXAMPLEKI
2014-05-19 08:44:32 INFO Deleted RDS database named: aa1k8EXAMPLEdxl
2014-05-19 08:38:33 INFO Deleted EIP: xx.xx.xxx.xx
2014-05-19 08:37:04 INFO Waiting for EC2 instances to terminate. This
may take a few minutes.
2014-05-19 08:36:45 INFO terminateEnvironment is starting.
2014-05-19 08:27:54 INFO Adding instance 'i-fEXAMPLE7' to your environ
ment.
2014-05-19 08:27:50 INFO Successfully launched environment: MyApp-test-
env
2014-05-19 08:27:50 INFO Application available at MyApp-test-en
vmEXAMPLEst.elasticbeanstalk.com.
2014-05-19 08:24:04 INFO Waiting for EC2 instances to launch. This may
take a few minutes.
2014-05-19 08:23:21 INFO Created RDS database named: aa1k8EXAMPLEdxl
2014-05-19 08:17:07 INFO Creating RDS database named: aa1k8EXAMPLEdxl.
API Version 2010-12-01
685
Elastic Beanstalk Developer Guide
Eb CLI 2.6.x

This may take a few minutes.
2014-05-19 08:16:58 INFO Created security group named: awseb-e-
fEXAMPLEre-stack-AWSEBSecurityGroup-1D6HEXAMPLEKI
2014-05-19 08:16:54 INFO Created EIP: 50.18.181.66
API Version 2010-12-01
686
Elastic Beanstalk Developer Guide
Eb CLI 2.6.x

init
This tool, eb, and its documentation have been replaced with EB CLI 3.x and will no longer be updated.
EB CLI 3.x has similar commands, but superior capabilities. For equivalent EB CLI information on this
section, see init (p. 650).
Description
Sets various default values for AWS Elastic Beanstalk environments created with eb, including your AWS
credentials and region.The values you set with init apply only to the current directory and repository.
You can override some defaults with operation options (for example, use -e or --environment-name
to target branch (p. 682) to a specific environment).
Note
Until you run the init command, the current running environment is unchanged. Each time you
run the init command, new settings get appended to the config file.
For a tutorial that shows you how to use eb init to deploy a sample application, see Getting Started
with Eb (p. 672).
Syntax
eb init
Options
None of these options are required. If you run eb init without any options, you will be prompted to enter
or select a value for each setting.
RequiredDescriptionName
NoThe application managed by the current repository.
Type: String
Default: None
-a
or
--application-name
APPLICATION_NAME
NoThe file location where your AWS credentials are saved.
(You can use the environment variable AWS_CREDEN-
TIAL_FILE to set the file location.)
Type: String
Default: None
--aws-credential-file
FILE_PATH_NAME
NoThe environment on which you want to perform operations.
Type: String
Default: <application-name>-env
-e
or
--environment-name
ENVIRONMENT_NAME
NoYour AWS access key ID.
Type: String
Default: None
-I
or
--access-key-id AC-
CESS_KEY_ID
API Version 2010-12-01
687
Elastic Beanstalk Developer Guide
Eb CLI 2.6.x

RequiredDescriptionName
NoYour AWS secret access key.
Type: String
Default: None
-S
or
--secret-key
SECRET_ACCESS_KEY
NoThe solution stack used as the application container type.
If you run eb init without this option, you will be
prompted to choose from a list of supported solution
stacks. Solution stack names change when AMIs are up-
dated.
Type: String
Default: None
-s
or
--solution-stack
SOLUTION_STACK_LABEL
NoFor more information, see Eb Common Options (p. 680).Common options
Output
If successful, the command guides you through setting up a new AWS Elastic Beanstalk application
through a series of prompts.
Example
The following example request initializes eb and prompts you to enter information about your application.
Replace the red placeholder text with your own values.
PROMPT> eb init
C:\>eb init
For information about your AWS access key ID and secret access key,
go to http://docs.aws.amazon.com/general/latest/gr/getting-aws-sec-creds.html.
Enter your AWS Access Key ID (current value is "AKIAI*****5ZB7Q"):
Enter your AWS Secret Access Key (current value is "DHSAi*****xKPo6"):
Select an AWS Elastic Beanstalk service region (current value is "US East
(Virginia)".
Available service regions are:
1) US East (Virginia)
2) US West (Oregon)
3) US West (North California)
4) EU West (Ireland)
5) Asia Pacific (Singapore)
6) Asia Pacific (Tokyo)
7) Asia Pacific (Sydney)
8) South America (Sao Paulo)
Select (1 to 8): 2
Enter an AWS Elastic Beanstalk application name (current value is "MyApp"):
MyApp
Enter an AWS Elastic Beanstalk environment name (current value is "MyApp-env"):
MyApp-env
Select a solution stack (current value is "64bit Amazon Linux running Python").
Available solution stacks are:
1) 32bit Amazon Linux running PHP 5.4
API Version 2010-12-01
688
Elastic Beanstalk Developer Guide
Eb CLI 2.6.x

2) 64bit Amazon Linux running PHP 5.4
3) 32bit Amazon Linux running PHP 5.3
4) 64bit Amazon Linux running PHP 5.3
5) 32bit Amazon Linux running Node.js
6) 64bit Amazon Linux running Node.js
7) 64bit Windows Server 2008 R2 running IIS 7.5
8) 64bit Windows Server 2012 running IIS 8
9) 32bit Amazon Linux running Tomcat 7
10) 64bit Amazon Linux running Tomcat 7
11) 32bit Amazon Linux running Tomcat 6
12) 64bit Amazon Linux running Tomcat 6
13) 32bit Amazon Linux running Python
14) 64bit Amazon Linux running Python
15) 32bit Amazon Linux running Ruby 1.8.7
16) 64bit Amazon Linux running Ruby 1.8.7
17) 32bit Amazon Linux running Ruby 1.9.3
18) 64bit Amazon Linux running Ruby 1.9.3
[...]
Select (1 to 70): 60
Select an environment type (current value is "LoadBalanced").
Available environment types are:
1) LoadBalanced
2) SingleInstance
Select (1 to 2): 1
Create an RDS DB Instance? [y/n] (current value is "Yes"): y
Create an RDS BD Instance from (current value is "[No snapshot]"):
1) [No snapshot]
2) [Other snapshot]
Select (1 to 2): 1
Enter an RDS DB master password (current value is "******"):
Retype password to confirm:
If you terminate your environment, your RDS DB Instance will be deleted and you
will lose your data.
Create snapshot? [y/n] (current value is "Yes"): y
Attach an instance profile (current value is "aws-elasticbeanstalk-ec2-role"):
1) [Create a default instance profile]
2) AppServer-AppServerInstanceProfile-TK2exampleHP
3) AppServer-AppServerInstanceProfile-1G2exampleK8
4) aws-opsworks-ec2-role
5) aws-elasticbeanstalk-ec2-role
6) [Other instance profile]
Select (1 to 6): 5
Updated AWS Credential file at "C:\Users\YourName\.elasticbeanstalk\aws_creden
tial_file".
API Version 2010-12-01
689
Elastic Beanstalk Developer Guide
Eb CLI 2.6.x

logs
This tool, eb, and its documentation have been replaced with EB CLI 3.x and will no longer be updated.
EB CLI 3.x has similar commands, but superior capabilities. For equivalent EB CLI information on this
section, see logs (p. 654).
Description
Returns logs for the environment. Relevant logs vary by container type.
Syntax
eb logs
Options
RequiredDescriptionName
NoFor more information, see Eb Common Options (p. 680).Common options
Output
If successful, the command returns environment logs.
API Version 2010-12-01
690
Elastic Beanstalk Developer Guide
Eb CLI 2.6.x

push
This tool, eb, and its documentation have been replaced with EB CLI 3.x and will no longer be updated.
EB CLI 3.x has similar commands, but superior capabilities. EB CLI 3.x does not support this command.
For equivalent EB CLI information on this section, see deploy (p. 646).
Description
Deploys the current application to the AWS Elastic Beanstalk environment from the Git repository.
Note
• The eb push operation does not push to your remote repository, if any. Use a standard git
push or similar command to update your remote repository.
• The -e or --environment-name options are not not valid for eb push.To push to a different
environment from the current one (based on either the eb init default settings or the Git
branch that is currently checked out), run eb branch before running eb push.
Syntax
eb push
Options
RequiredDescriptionName
NoFor more information, see Eb Common Options (p. 680).Common options
Output
If successful, the command returns the status of the push operation.
Example
The following example deploys the current application.
PROMPT> eb push
Pushing to environment: MyApp-env
remote:
To https://AKI
AXXXXXXXX5ZB7Q:2013092XXXXXXXXXXXXf502a780888b0a49899798aa6cbeaef690c0b
525d0f090c7338cbead589bf14f@git.elasticbeanstalk.us-west-2.amazonaws.com/v1/re
pos/417
0705XXXXXXXX23632303133/commitid/336264353663396262306463326563663763393EX
AMPLExxxxx5
3165643137343939EXAMPLExx036/environment/417070536570743236323031332d6d6173EX
AMPLEx65
2013-09-26 17:35:37 INFO Adding instance 'i-5EXAMPLE' to your environment.
2013-09-26 17:36:12 INFO Deploying new version to instance(s).
2013-09-26 17:36:20 INFO New application version was deployed to running
EC2 instances.
2013-09-26 17:36:20 INFO Environment update completed successfully.
Update of environment "MyApp-env" has completed.
API Version 2010-12-01
691
Elastic Beanstalk Developer Guide
Eb CLI 2.6.x

start
This tool, eb, and its documentation have been replaced with EB CLI 3.x and will no longer be updated.
EB CLI 3.x has similar commands, but superior capabilities. EB CLI 3.x does not support this command.
For equivalent EB CLI information on this section, see create (p. 640).
Description
Creates and deploys the current application into the specified environment. For a tutorial that includes a
description of how to deploy a sample application using eb start, see Getting Started with Eb (p.672).
Syntax
eb start
Options
RequiredDescriptionName
NoThe environment into which you want to create or start the
current application.
Type: String
Default: Current setting
-e
or
--environment-name
ENVIRONMENT_NAME
NoFor more information, see Eb Common Options (p. 680).Common options
Output
If successful, the command returns the status of the start operation. If there were issues during the launch,
you can use the events (p. 685) operation to get more details.
Example 1
The following example starts the environment.
PROMPT> start
Starting application "MyApp".
Waiting for environment "MyApp-env" to launch.
2014-05-13 07:25:33 INFO createEnvironment is starting.
2014-05-13 07:25:39 INFO Using elasticbeanstalk-us-west-2-8EXAMPLE3 as Amazon
S3 storage bucket for environment data.
2014-05-13 07:26:07 INFO Created EIP: xx.xx.xxx.xx
2014-05-13 07:26:09 INFO Created security group named: awseb-e-vEXAMPLErp-stack-
AWSEBSecurityGroup-1GCEXAMPLEG0
2014-05-13 07:26:17 INFO Creating RDS database named: aavcEXAMPLE5y. This may
take a few minutes.
2014-05-13 07:32:36 INFO Created RDS database named: aavcEXAMPLE5y
2014-05-13 07:34:08 INFO Waiting for EC2 instances to launch. This may take a
few minutes.
2014-05-13 07:36:24 INFO Application available at MyApp-env-z4vsuuxh36.elastic
beanstalk.com.
2014-05-13 07:36:24 INFO Successfully launched environment: MyApp-env
Application is available at "MyApp-env-z4EXAMPLE6.elasticbeanstalk.com"
API Version 2010-12-01
692
Elastic Beanstalk Developer Guide
Eb CLI 2.6.x

Example 2
The following example starts the current application into an environment called MyApp-test-env.
PROMPT> start -e MyApp-test-env
Starting application "MyApp".
Waiting for environment "MyApp-test-env" to launch.
2014-05-13 07:25:33 INFO createEnvironment is starting.
2014-05-13 07:25:39 INFO Using elasticbeanstalk-us-west-2-8EXAMPLE3 as Amazon
S3 storage bucket for environment data.
2014-05-13 07:26:07 INFO Created EIP: xx.xx.xxx.xx
2014-05-13 07:26:09 INFO Created security group named: awseb-e-vEXAMPLErp-stack-
AWSEBSecurityGroup-1GCEXAMPLEG0
2014-05-13 07:26:17 INFO Creating RDS database named: aavcEXAMPLE5y. This may
take a few minutes.
2014-05-13 07:32:36 INFO Created RDS database named: aavcEXAMPLE5y
2014-05-13 07:34:08 INFO Waiting for EC2 instances to launch. This may take a
few minutes.
2014-05-13 07:36:24 INFO Application available at MyApp-test-envz4vsuuxh36.
elasticbeanstalk.com.
2014-05-13 07:36:24 INFO Successfully launched environment: MyApp-test-env
Application is available at "MyApp-test-env-z4EXAMPLE6.elasticbeanstalk.com"
API Version 2010-12-01
693
Elastic Beanstalk Developer Guide
Eb CLI 2.6.x

status
This tool, eb, and its documentation have been replaced with EB CLI 3.x and will no longer be updated.
EB CLI 3.x has similar commands, but superior capabilities. For equivalent EB CLI information on this
section, see status (p. 664).
Description
Describes the status of the specified environment. For a tutorial that includes a description of how to view
an environment's status using eb status, see Getting Started with Eb (p. 672).
Syntax
eb status
Options
You might want to use the --verbose option with status.
RequiredDescriptionName
NoThe environment for which you want to display status.
Type: String
Default: Current setting
-e
or
--environment-name
ENVIRONMENT_NAME
NoFor more information, see Eb Common Options (p. 680).Common options
Output
If successful, the command returns the status of the environment.
Example 1
The following example request returns the status of the environment.
PROMPT> eb status --verbose
Retrieving status of environment "MyNodeApp-env".
URL : MyNodeApp-env-tnEXAMPLEcf.elasticbeanstalk.com
Status : Ready
Health : Green
Environment Name: MyNodeApp-env
Environment ID : e-vmEXAMPLEp
Environment Tier: WebServer::Standard::1.0
Solution Stack : 64bit Amazon Linux 2014.02 running Node.js
Version Label : Sample Application
Date Created : 2014-05-14 07:25:35
Date Updated : 2014-05-14 07:36:24
Description :
RDS Database: AWSEBRDSDatabase | aavcEXAMPLEd5y.clak1.us-west-2.rds.amazon
aws.com:3306
Database Engine: mysql 5.5.33
Allocated Storage: 5
API Version 2010-12-01
694
Elastic Beanstalk Developer Guide
Eb CLI 2.6.x

Instance Class: db.t1.micro
Multi AZ: False
Master Username: ebroot
Creation Time: 2014-05-15 07:29:39
DB Instance Status: available
Example 2
The following example request returns the status of an application named MyNodeApp in an environment
called MyNodeApp-test-env.
PROMPT> eb status -e MyNodeApp-test-env -a MyNodeApp
Retrieving status of environment "MyNodeApp-test-env".
URL : MyNodeApp-test-env-tnEXAMPLEcf.elasticbeanstalk.com
Status : Ready
Health : Green
RDS Database: AWSEBRDSDatabase | aavcEXAMPLEd5y.clak1.us-west-2.rds.amazon
aws.com:3306
API Version 2010-12-01
695
Elastic Beanstalk Developer Guide
Eb CLI 2.6.x

stop
This tool, eb, and its documentation have been replaced with EB CLI 3.x and will no longer be updated.
EB CLI 3.x has similar commands, but superior capabilities. EB CLI 3.x does not support this command.
For equivalent EB CLI information on this section, see terminate (p. 668).
Description
Terminates the environment. For a tutorial that includes a description of how to terminate an environment
using eb stop, see Getting Started with Eb (p. 672).
Note
The stop operation applies to environments, not applications.To delete an application along
with its environments, use eb delete.
Syntax
eb stop
Options
RequiredDescriptionName
NoThe environment you want to terminate.The environment
must contain the current application; you cannot specify
an application other than the one in the repository you're
currently working in.
Type: String
Default: Current setting
-e
or
--environment-name
ENVIRONMENT_NAME
NoFor more information, see Eb Common Options (p. 680).Common options
Output
If successful, the command returns the status of the stop operation.
Example1
The following example request terminates the environment.
PROMPT> eb stop
If you terminate your environment, your RDS DB Instance will be deleted and you
will lose your data.
Terminate environment? [y/n]: y
Stopping environment "MyApp-env". This may take a few minutes.
2014-05-13 07:18:10 INFO terminateEnvironment is starting.
2014-05-13 07:18:17 INFO Waiting for EC2 instances to terminate. This may take
a few minutes.
2014-05-13 07:19:43 INFO Deleted EIP: xxx.xxx.xxx.xx
2014-05-13 07:19:43 INFO Deleted security group named: awseb-e-zEXAMPLEng-stack-
AWSEBSecurityGroup-MEEXAMPLENHQ
2014-05-13 07:19:51 INFO Deleting SNS topic for environment MyApp-env.
API Version 2010-12-01
696
Elastic Beanstalk Developer Guide
Eb CLI 2.6.x

2014-05-13 07:19:52 INFO terminateEnvironment completed successfully.
Stop of environment "MyApp-env" has completed.
Example 2
The following example request terminates the environment named MyApp-test-env.
PROMPT> eb stop -e MyApp-test-env
If you terminate your environment, your RDS DB Instance will be deleted and you
will lose your data.
Terminate environment? [y/n]: y
Stopping environment "MyApp-test-env". This may take a few minutes.
2014-05-15 17:27:09 INFO terminateEnvironment is starting.
2014-05-15 17:27:16 INFO Waiting for EC2 instances to terminate. This
may take a few minutes.
2014-05-15 17:27:42 INFO Deleted EIP: xxx.xxx.xxx.xx
2014-05-15 17:27:42 INFO Deleted security group named: awseb-e-zEXAMPLEngstack-
AWSEBSecurityGroup-MEEXAMPLENHQ
2014-05-15 17:34:50 INFO Deleting SNS topic for environment MyApp-testenv.
2014-05-15 17:34:51 INFO terminateEnvironment completed successfully.
2013-05-15 17:29:55 INFO Deleted Auto Scaling group named: awseb-e-
mqmp6mmcpk-stack-AWSEBAutoScalingGroup-QALO012HZJVJ
2013-05-15 17:29:56 INFO Deleted Auto Scaling launch configuration named:
awseb-e-mqmp6mmcpk-stack-AWSEBAutoScalingLaunchConfiguration-1DBGPQ99YFX08
2013-05-15 17:34:11 INFO Deleted RDS database named: aauel5gap2gqb4
2013-05-15 17:34:16 INFO Deleted security group named: awseb-e-mqmp6mmcpk-
stack-AWSEBSecurityGroup-1LDYFT0256P0B
2013-05-15 17:34:17 INFO Deleted load balancer named: awseb-e-m-AWSEBLoa-
CT74SPXN541T
2013-05-15 17:34:29 INFO Deleting SNS topic for environment MyOtherApp-
env.
2013-05-15 17:34:30 INFO terminateEnvironment completed successfully.
Stop of environment "MyApp-test-env" has completed.
API Version 2010-12-01
697
Elastic Beanstalk Developer Guide
Eb CLI 2.6.x

update
This tool, eb, and its documentation have been replaced with EB CLI 3.x and will no longer be updated.
EB CLI 3.x has similar commands, but superior capabilities. EB CLI 3.x does not support this command.
For equivalent EB CLI information on this section, see config (p. 636).
Description
Updates the specified environment by reading the .elasticbeanstalk/optionsettings. (Setting
values in .elasticbeanstalk/optionsettings take precedence over the values specified for the
same settings specified in .ebextensions/*.conf if the settings are configured in both places.) Use
this operation after making changes to your settings (for example, via init or branch).
Syntax
eb update
Options
RequiredDescriptionName
NoThe environment you want to update.
Type: String
Default: Current setting
-e
or
--environment-name
ENVIRONMENT_NAME
NoFor more information, see Eb Common Options (p. 680).Common options
Output
If successful, the command returns the status of the update operation.
Example
The following example request updates the environment.
PROMPT> eb update
Update environment? [y/n]: y
Updating environment "MyApp-env". This may take a few minutes.
2014-05-15 17:10:34 INFO Updating environment MyApp-env's configuration
settings.
2014-05-15 17:11:12 INFO Successfully deployed new configuration to en
vironment.
2014-05-15 17:11:12 INFO Environment update completed successfully.
Update of environment "MyApp-env" has completed.
AWS Command Line Interface
Amazon Web Services (AWS) now offers the AWS Command Line Interface (CLI) as the new, unified
API-based command line tool to manage multiple AWS services, including Elastic Beanstalk.The AWS
API Version 2010-12-01
698
Elastic Beanstalk Developer Guide
AWS Command Line Interface

CLI replaces the Elastic Beanstalk API-based command line tool. For information about setting up and
configuring the AWS CLI, see What is the AWS Command Line Interface?, For information about the
Elastic Beanstalk commands in the AWS CLI, see elasticbeanstalk in the AWS Command Line Interface
Reference. The prior API-based command tool continues to be available, but we recommend that you
use the AWS CLI because the prior tool will no longer be updated. If you need information about the prior
API-based command line tool, see Elastic Beanstalk API Command Line Interface (p. 704).
Migrating Elastic Beanstalk API CLI Commands to
AWS Command Line Interface Commands
The following table lists the Elastic Beanstalk API-based CLI commands and their equivalent commands
in the AWS CLI.
AWS
Tools
for
Win-
dows
Power-
Shell
AWS CLIElastic Beanstalk API CLI
Get-
EBDNSAvail-
ab-
il-
ity
check-dns-availabilityelastic-beanstalk-check-dns-avail-
ability
New-
EBAp-
plic-
a-
tion
create-applicationelastic-beanstalk-create-applica-
tion
New-
EBAp-
plic-
a-
tion-
Ver-
sion
create-application-versionelastic-beanstalk-create-applica-
tion-version
New-
EB-
Con-
fig-
ur-
a-
tion-
Tem-
plate
create-configuration-templateelastic-beanstalk-create-configur-
ation-template
API Version 2010-12-01
699
Elastic Beanstalk Developer Guide
Migrating to the AWS CLI

AWS
Tools
for
Win-
dows
Power-
Shell
AWS CLIElastic Beanstalk API CLI
New-
EBEn-
vir-
on-
ment
create-environmentelastic-beanstalk-create-environ-
ment
New-
EB-
Stor-
age-
Lo-
ca-
tion
create-storage-locationelastic-beanstalk-create-storage-
location
Re-
move-
EBAp-
plic-
a-
tion
delete-applicationelastic-beanstalk-delete-applica-
tion
Re-
move-
EBAp-
plic-
a-
tion-
Ver-
sion
delete-application-versionelastic-beanstalk-delete-applica-
tion-version
Re-
move-
EB-
Con-
fig-
ur-
a-
tion-
Tem-
plate
delete-configuration-templateelastic-beanstalk-delete-configur-
ation-template
API Version 2010-12-01
700
Elastic Beanstalk Developer Guide
Migrating to the AWS CLI

AWS
Tools
for
Win-
dows
Power-
Shell
AWS CLIElastic Beanstalk API CLI
Re-
move-
EBEn-
vir-
on-
ment-
Con-
fig-
ur-
a-
tion
delete-environment-configurationelastic-beanstalk-delete-environ-
ment-configuration
Get-
EBAp-
plic-
a-
tion-
Ver-
sion
describe-application-versionselastic-beanstalk-describe-applic-
ation-versions
Get-
EBAp-
plic-
a-
tion
describe-applicationselastic-beanstalk-describe-applic-
ations
Get-
EB-
Con-
fig-
ur-
a-
tion-
Op-
tion
describe-configuration-optionselastic-beanstalk-describe-config-
uration-options
Get-
EB-
Con-
fig-
ur-
a-
tion-
Set-
ting
describe-configuration-settingselastic-beanstalk-describe-config-
uration-settings
API Version 2010-12-01
701
Elastic Beanstalk Developer Guide
Migrating to the AWS CLI

AWS
Tools
for
Win-
dows
Power-
Shell
AWS CLIElastic Beanstalk API CLI
Get-
EBEn-
vir-
on-
men-
tRe-
source
describe-environment-resourceselastic-beanstalk-describe-environ-
ment-resources
Get-
EBEn-
vir-
on-
ment
describe-environmentselastic-beanstalk-describe-environ-
ments
Get-
EBEvent
describe-eventselastic-beanstalk-describe-events
Get-
EBAvail-
ableS-
ol-
u-
tion-
Stack
list-available-solution-stackselastic-beanstalk-list-available-
solution-stacks
Start-
EBEn-
vir-
on-
men-
tRe-
build
rebuild-environmentelastic-beanstalk-rebuild-environ-
ment
Re-
quest-
EBEn-
vir-
on-
mentInfo
request-environment-infoelastic-beanstalk-request-environ-
ment-info
Re-
start-
EBAppServ-
er
restart-app-serverelastic-beanstalk-restart-app-
server
API Version 2010-12-01
702
Elastic Beanstalk Developer Guide
Migrating to the AWS CLI

AWS
Tools
for
Win-
dows
Power-
Shell
AWS CLIElastic Beanstalk API CLI
Get-
EBEn-
vir-
on-
mentInfo
retrieve-environment-infoelastic-beanstalk-retrieve-environ-
ment-info
Set-
EBEn-
vir-
on-
mentC-
NAME
swap-environment-cnameselastic-beanstalk-swap-environment-
cnames
Stop-
EBEn-
vir-
on-
ment
terminate-environmentelastic-beanstalk-terminate-envir-
onment
Up-
date-
EBAp-
plic-
a-
tion
update-applicationelastic-beanstalk-update-applica-
tion
Up-
date-
EBAp-
plic-
a-
tion-
Ver-
sion
update-application-versionelastic-beanstalk-update-applica-
tion-version
Up-
date-
EB-
Con-
fig-
ur-
a-
tion-
Tem-
plate
update-configuration-templateelastic-beanstalk-update-configur-
ation-template
API Version 2010-12-01
703
Elastic Beanstalk Developer Guide
Migrating to the AWS CLI

AWS
Tools
for
Win-
dows
Power-
Shell
AWS CLIElastic Beanstalk API CLI
Up-
date-
EBEn-
vir-
on-
ment
update-environmentelastic-beanstalk-update-environ-
ment
Test-
EB-
Con-
fig-
ur-
a-
tion-
Set-
ting
validate-configuration-settingselastic-beanstalk-validate-config-
uration-settings
Elastic Beanstalk API Command Line Interface
Topics
• Getting Set Up (p. 704)
• Common Options (p. 706)
• Option Values (p. 707)
• Operations (p. 736)
You can use the command line to create and deploy applications to Elastic Beanstalk.This section
contains a complete reference for the API command line interface. If you want a quick and easy way to
deploy your applications without needing to know which command line operations to use, you can use
eb. Eb and EB are command line interface tools for Elastic Beanstalk that are interactive and ask you
the necessary questions to deploy your application. For more information, see Getting Started with EB
CLI 3.x (p. 627). This section discusses how to set up the API command line interface and the common
options. For a complete reference list, see Operations (p. 736).
Getting Set Up
Elastic Beanstalk provides a command line interface (CLI) to access Elastic Beanstalk functionality without
using the AWS Management Console or the APIs.This section describes the prerequisites for running
the CLI tools (or command line tools), where to get the tools, how to set up the tools and their environment,
and includes a series of common examples of tool usage.
API Version 2010-12-01
704
Elastic Beanstalk Developer Guide
API Command Line Interface

Prerequisites
This document assumes you can work in a Linux/UNIX or Windows environment.The Elastic Beanstalk
command line interface also works correctly on Mac OS X (which resembles the Linux and UNIX command
environment), but no specific Mac OS X instructions are included in this guide.
As a convention, all command line text is prefixed with a generic PROMPT> command line prompt.The
actual command line prompt on your machine is likely to be different. We also use $ to indicate a
Linux/UNIX-specific command and C:\> for a Windows-specific command.The example output resulting
from the command is shown immediately thereafter without any prefix.
The command line tools used in this guide require Ruby (version 1.8.7+ or 1.9.2+) and Python version
2.7 to run.To view and download Ruby clients for a range of platforms, including Linux/UNIX and Windows,
go to http://www.ruby-lang.org/en/. Python is available at python.org.
Note
If you are using Linux with a system version of Linux lower than 2.7, install Python 2.7 with your
distribution's package manager and then modify the eb script under eb/linux/python2.7/eb
to refer to the Python 2.7 executable:
#!/usr/bin/env python2.7
Additionally, you will need to install the boto module with pip:
$ sudo /usr/bin/easy_install-2.7 pip
$ sudo pip install boto
Getting the Command Line Tools
The command line tools are available as a .zip file on the AWS Sample Code & Libraries website.These
tools are written in Ruby, and include shell scripts for Windows 2000, Windows XP, Windows Vista,
Windows 7, Linux/UNIX, and Mac OS X.The .zip file is self-contained and no installation is required;
simply download the .zip file and unzip it to a directory on your local machine.You can find the tools in
the api directory.
Providing Credentials for the Command Line Interface
The command line interface requires the access key ID and secret access key.To get your access keys
(access key ID and secret access key), see How Do I Get Security Credentials? in the AWS General
Reference.
You need to create a file containing your access key ID and secret access key.The contents of the file
should look like this:
AWSAccessKeyId=Write your AWS access ID
AWSSecretKey=Write your AWS secret key
Important
On UNIX, limit permissions to the owner of the credential file:
$ chmod 600 <the file created above>
With the credentials file set up, you'll need to set the AWS_CREDENTIAL_FILE environment variable so
that the Elastic Beanstalk CLI tools can find your information.
API Version 2010-12-01
705
Elastic Beanstalk Developer Guide
Getting Set Up

To set the AWS_CREDENTIAL_FILE environment variable
• Set the environment variable using the following command:
On WindowsOn Linux and UNIX
C:\> set AWS_CREDENTIAL_FILE=<the
file created above>
$ export AWS_CREDENTIAL_FILE=<the
file created above>
Set the Service Endpoint URL
By default, the AWS Elastic Beanstalk uses the US-East (Northern Virginia) Region (us-east-1) with the
elasticbeanstalk.us-east-1.amazonaws.com service endpoint URL.This section describes how to specify
a different region by setting the service endpoint URL. For information about this product's regions, go
to Regions and Endpoints in the Amazon Web Services General Reference.
To set the service endpoint URL
• Set the environment variable using the following command:
On WindowsOn Linux and UNIX
C:\> set ELASTICBEANSTALK_URL=<ser-
vice_endpoint>
$ export ELASTICBEANSTALK_URL=<ser-
vice_endpoint>
For example, on Linux, type the following to set your endpoint to us-west-2:
export ELASTICBEANSTALK_URL="https://elasticbeanstalk.us-west-2.amazonaws.com"
For example, on Windows, type the following to set your endpoint to us-west-2:
set ELASTICBEANSTALK_URL=https://elasticbeanstalk.us-west-2.amazonaws.com
Common Options
The command line operations accept the set of optional parameters described in the following table.
DescriptionOption
Displays help text for the command.You can also use help command-
name.This option applies to eb and the original command line interface.
Default: off
--help
-h
Displays the raw JSON response.This option applies only to the original
command line interface.
Default: off
--show-json
-j
API Version 2010-12-01
706
Elastic Beanstalk Developer Guide
Common Options

Option Values
This section covers the possible option values that can be specified in the options file that is passed in
as the options-file parameter.
Topics
• General Option Values (p. 707)
• Docker Container Options (p. 728)
• Java Container Options (p. 728)
• .NET Container Options (p. 729)
• Node.js Container Options (p. 730)
• PHP Container Options (p. 731)
• Python Container Options (p. 732)
• Ruby Container Options (p. 734)
This options file can be passed in with the following command line operations:
• elastic-beanstalk-create-configuration-template (p. 741)
• elastic-beanstalk-create-environment (p. 744)
• elastic-beanstalk-describe-configuration-options (p. 757)
• elastic-beanstalk-update-configuration-template (p. 779)
• elastic-beanstalk-update-environment (p. 781)
• elastic-beanstalk-validate-configuration-settings (p. 784)
General Option Values
Namespace: aws:autoscaling:asg
Valid ValuesDefaultDescriptionName
Any 1
Any 2
Any 1Availability Zones are distinct locations
within a region that are engineered to be
isolated from failures in other Availability
Zones and provide inexpensive, low-
latency network connectivity to other
Availability Zones in the same region.
Choose the number of Availability Zones
for your instances.
Availability
Zones
0 to 10000360Cooldown periods help to prevent Auto
Scaling from initiating additional scaling
activities before the effects of previous
activities are visible.
Cooldown
API Version 2010-12-01
707
Elastic Beanstalk Developer Guide
Option Values

Namespace: aws:autoscaling:asg
us-east-1a
us-east-1b
us-east-1c
us-east-1d
us-east-1e
eu-central-1
n/aDefine the Availability Zones for your in-
stances.
Custom
Availability
Zones
1 to 100001Minimum number of instances you want
in your Auto Scaling group.
MinSize
1 to 100004Maximum number of instances you want
in your Auto Scaling group.
MaxSize
Namespace: aws:autoscaling:launchconfiguration
Valid ValuesDefaultDescriptionName
n/an/aA key pair enables you to securely log into
your Amazon EC2 instance.
EC2Key-
Name
n/an/aAn instance profile enables IAM users and
AWS services to access temporary secur-
ity credentials to make AWS API calls.
Specify the profile name or the ARN.
Example: ElasticBeanstalkProfile
Example:
arn:aws:iam::123456789012:in-
stance-profile/ElasticBeanstalk-
Profile
IamInstance-
Profile
n/an/aYou can override the default Amazon Ma-
chine Image (AMI) by specifying your own
custom AMI ID.
Example: ami-cbab67a2
ImageId
API Version 2010-12-01
708
Elastic Beanstalk Developer Guide
Option Values

Namespace: aws:autoscaling:launchconfiguration
32-bit: t1.micro
64-bit: t1.micro
Choose from a number of different in-
stance types to meet your computing
needs. Each instance provides a predict-
able amount of dedicated compute capa-
city.
The instance types available depend on
whether you are using a legacy container.
If you are unsure if you are running a leg-
acy container, check the Elastic Beanstalk
console. For instructions, see To check if
you are using a legacy container type.
Instance-
Type
API Version 2010-12-01
709
Elastic Beanstalk Developer Guide
Option Values

Namespace: aws:autoscaling:launchconfiguration
In the following lists,
instance types
marked with an as-
terisk (*) indicate
those not supported
by .NET containers.
Instance types sup-
ported by the eu-
central-1 region are
listed separately
from all other lists.
32-bit containers
(all regions,
except
eu-central-1):
• t1.micro
• m1.small
• m1.medium
• c1.medium
64-bit containers
(all regions,
except
eu-central-1):
• t1.micro
• t2.micro
• t2.small
• t2.medium
• m1.small
• m1.medium
• m1.large
• m1.xlarge
• c1.medium
• c1.xlarge
• m2.xlarge
• m2.2xlarge
• m2.4xlarge
• m3.medium*
• m3.large*
• m3.xlarge*
• m3.2xlarge*
• c3.large
• c3.xlarge
• c3.2xlarge
• c3.4xlarge
API Version 2010-12-01
710
Elastic Beanstalk Developer Guide
Option Values

Namespace: aws:autoscaling:launchconfiguration
c3.8xlarge•
Additional 64-bit
containers (all
regions, except
eu-central-1 and
sa-east-1):
• c4.large*
• c4.xlarge*
• c4.2xlarge*
• c4.4xlarge*
• c4.8xlarge*
Additional 64-bit
containers (for
specific regions)
API Version 2010-12-01
711
Elastic Beanstalk Developer Guide
Option Values

Namespace: aws:autoscaling:launchconfiguration
• cc1.4xlarge,
cc2.8xlarge,
cg1.4xlarge,
hi1.4xlarge,
hs1.8xlarge,
cr1.8xlarge,
g2.2xlarge*,
i2.xlarge*,
i2.2xlarge*,
i2.4xlarge*,
i2.8xlarge*,
r3.large,
r3.xlarge,
r3.2xlarge,
r3.4xlarge, and
r3.8xlarge in
us-east-1
• cc2.8xlarge,
cg1.4xlarge,
hi1.4xlarge,
hs1.8xlarge,
cr1.8xlarge,
g2.2xlarge*,
i2.xlarge*,
i2.2xlarge*,
i2.4xlarge*,
i2.8xlarge*,
r3.large,
r3.xlarge,
r3.2xlarge,
r3.4xlarge, and
r3.8xlarge in
eu-west-1
• cc2.8xlarge,
hi1.4xlarge,
hs1.8xlarge,
cr1.8xlarge,
g2.2xlarge*,
i2.xlarge*,
i2.2xlarge*,
i2.4xlarge*,
i2.8xlarge*,
r3.large,
r3.xlarge,
r3.2xlarge,
r3.4xlarge, and
r3.8xlarge in
us-west-2
• cc2.8xlarge,
hi1.4xlarge,
hs1.8xlarge,
cr1.8xlarge,
g2.2xlarge,
i2.xlarge*,
API Version 2010-12-01
712
Elastic Beanstalk Developer Guide
Option Values

Namespace: aws:autoscaling:launchconfiguration
i2.2xlarge*,
i2.4xlarge*,
i2.8xlarge*,
r3.large,
r3.xlarge,
r3.2xlarge,
r3.4xlarge, and
r3.8xlarge in
ap-northeast-1
• i2.xlarge*,
i2.2xlarge*,
i2.4xlarge*,
i2.8xlarge*,
r3.large,
r3.xlarge,
r3.2xlarge,
r3.4xlarge, and
r3.8xlarge in
ap-southeast-1
• i2.xlarge*,
i2.2xlarge*.
i2.4xlarge*,
i2.8xlarge*,
r3.large,
r3.xlarge,
r3.2xlarge,
r3.4xlarge, and
r3.8xlarge in
ap-southeast-2
• g2.2xlarge*,
i2.xlarge*,
i2.2xlarge*,
i2.4xlarge*,
i2.8xlarge*,
r3.large,
r3.xlarge,
r3.2xlarge,
r3.4xlarge, and
r3.8xlarge in
us-west-1
32-bit legacy
containers:
• t1.micro
• m1.small
• c1.medium
64-bit legacy
containers:
API Version 2010-12-01
713
Elastic Beanstalk Developer Guide
Option Values

Namespace: aws:autoscaling:launchconfiguration
• t1.micro
• m1.small
• c1.medium
• m1.medium
• m1.large
• m1.xlarge
• c1.xlarge
• m2.xlarge
• m2.2xlarge
• m2.4xlarge
32-bit containers
(eu-central-1
region):
• c3.large
64-bit containers
(eu-central-1
region), except
.NET containers:
• t2.micro,
t2.small,
t2.medium,
m3.medium,
m3.large,
m3.xlarge,
m3.2xlarge,
c3.large,
c3.xlarge,
c3.2xlarge,
c3.4xlarge,
c3.8xlarge,
hs1.8xlarge,
i2.xlarge,
i2.2xlarge,
i2.4xlarge,
i2.8xlarge,
r3.large,
r3.xlarge,
r3.2xlarge,
r3.4xlarge,
r3.8xlarge
64-bit .NET
containers
(eu-central-1
region):
API Version 2010-12-01
714
Elastic Beanstalk Developer Guide
Option Values

Namespace: aws:autoscaling:launchconfiguration
• t2.medium,
m3.large,
m3.xlarge,
m3.2xlarge,
c3.large,
c3.xlarge,
c3.2xlarge,
c3.4xlarge,
c3.8xlarge,
hs1.8xlarge,
i2.xlarge,
i2.2xlarge,
i2.4xlarge,
i2.8xlarge,
r3.large,
r3.xlarge,
r3.2xlarge,
r3.4xlarge,
r3.8xlarge
1 minute
5 minutes
5 minutesInterval at which you want Amazon
CloudWatch metrics returned.
MonitoringIn-
terval
n/aelasticbeanstalk-
default
Lists the Amazon EC2 security groups to
assign to the Amazon EC2 instances in
the Auto Scaling group in order to define
firewall rules for the instances.
You can provide a single string of comma-
separated values that contain the name of
existing Amazon EC2 security groups or
references to AWS::EC2::SecurityGroup
resources created in the template. If you
use Amazon VPC with Elastic Beanstalk
so that your instances are launched within
a virtual private cloud (VPC), specify secur-
ity group IDs instead of a security group
name.
Security-
Groups
API Version 2010-12-01
715
Elastic Beanstalk Developer Guide
Option Values

Namespace: aws:autoscaling:launchconfiguration
n/an/aUsed to lock down SSH access to an en-
vironment. For instance, you can lock
down SSH access to the EC2 instances
so that only a bastion host can access the
instances in the private subnet.
protocol–the allowed values for a secur-
ity group ingress rule
fromPort–the starting port for the firewall
rule
toPort–the end port for the firewall rule
sourceRestriction–can be either an
IP address or a security group name fol-
lowed by an optional security group owner
(e.g., OhterBastionSGName,otheraccoun-
tid)
Example: tcp, 22, 22,
54.240.196.185
SSH-
SourceRes-
triction
n/an/aUsed to attach additional Amazon Elastic
Block Store volumes or instance store
volumes on all the instances in the auto-
scaling group. When you map Amazon
EBS volumes, you can specify either a
volume size or a snapshot ID. When you
map instance store volumes, you specify
the virtual device name. (Previously, you
could only use instance store volumes by
using custom AMIs.)
Example:
/dev/sdj=:100,/dev/sdh=snap-
51eef269,/dev/sdb=ephemeral0
The format of the mapping is device
name=volume where the device mappings
are specified as a single string with map-
pings separated by a comma. This ex-
ample attaches to all instances in the
autoscaling group an empty 100-GB
Amazon EBS volume, an Amazon EBS
volume with the snapshot ID snap-
51eef269, and an instance store volume.
Block-
DeviceMap-
pings
API Version 2010-12-01
716
Elastic Beanstalk Developer Guide
Option Values

Namespace: aws:autoscaling:launchconfiguration
standard, which is
a Magnetic storage
volume
gp2, which is a
General Purpose
(SSD) storage
volume
io1, which is a Pro-
visioned IOPS
(SSD) storage
volume
n/aType of storage volume to attach to
Amazon EC2 instances in your environ-
ment.
RootVolume-
Type
10 to 1024 gibibytes
for Provisioned
IOPS (SSD) root
volumes
8 to 1024 gibibytes
for Magnetic
volumes and Gener-
al Purpose (SSD)
volumes
n/a
Note
There is no
default root
volume size
for Provi-
sioned IOPS
(SSD)
volumes. For
Magnetic
and General
Purpose
(SSD)
volumes, if
you do not
specify your
own value,
Elastic Bean-
stalk will use
the default
volume size
for the stor-
age volume
type.The de-
fault volume
size varies
according to
the AMI of
the solution
stack on
which your
environment
is based.
Size of the storage volume that you spe-
cified as the RootVolumeType.
Note
You must specify your desired
root volume size if you choose
Provisioned IOPS (SSD) as the
root volume type.
Root-
VolumeSize
API Version 2010-12-01
717
Elastic Beanstalk Developer Guide
Option Values

Namespace: aws:autoscaling:launchconfiguration
100 to 4000
Note
The maxim-
um ratio of
IOPS to
your
volume
size is 30
to 1. For
example, a
volume
with 3000
IOPS must
be at least
100 GiB.
n/aDesired input/output operations per second
(IOPS) for a Provisioned IOPS (SSD) root
volume.
Root-
VolumeIOPS
Namespace: aws:autoscaling:trigger
Valid ValuesDefaultDescriptionName
1 to 6005Amount of time a metric can be beyond
its defined limit (as specified in the Upper-
Threshold and LowerThreshold) be-
fore the trigger fires.
BreachDuration
n/a-1How many Amazon EC2 instances to re-
move when performing a scaling activity.
LowerBreachScaleIn-
crement
0 to 200000002000000If the measurement falls below this num-
ber for the breach duration, a trigger is
fired.
LowerThreshold
CPUUtilization
NetworkIn
NetworkOut
DiskWriteOps
DiskReadBytes
DiskReadOps
DiskWriteBytes
Latency
RequestCount
HealthyHostCount
UnhealthyHost-
Count
Net-
workOut
Metric used for your auto scaling trigger.MeasureName
API Version 2010-12-01
718
Elastic Beanstalk Developer Guide
Option Values

Namespace: aws:autoscaling:trigger
n/a5Specifies how frequently Amazon Cloud-
Watch measures the metrics for your
trigger.
Period
Minimum
Maximum
Sum
Average
AverageStatistic the trigger should use, such as
Average.
Statistic
Seconds
Percent
Bytes
Bits
Count
Bytes/Second
Bits/Second
Count/Second
None
BytesUnit for the trigger measurement, such
as Bytes.
Unit
n/a1How many Amazon EC2 instances to add
when performing a scaling activity.
UpperBreachScaleIn-
crement
0 to 200000006000000If the measurement is higher than this
number for the breach duration, a trigger
is fired.
UpperThreshold
Namespace: aws:autoscaling:updatepolicy:rollingupdate
Valid ValuesDefaultDescriptionName
1 to 10000One-third of the
minimum size of the
autoscaling group,
rounded to the next
highest integer
The number of instances
included in each batch
of the rolling update.
MaxBatchSize
0 to 9999Equal to either the
minimum size of the
autoscaling group or
one less than the
maximum size of
the autoscaling
group, whichever
number is lower
The minimum number of
instances that must be
in service within the
autoscaling group while
other instances are ter-
minated.
MinInstancesInService
API Version 2010-12-01
719
Elastic Beanstalk Developer Guide
Option Values

Namespace: aws:autoscaling:updatepolicy:rollingupdate
PT0S (0 seconds) to
PT1H (1 hour)
The value must be in
ISO8601 duration
format, in the form:
PT#H#M#S where
each # is the number
of hours, minutes,
and/or seconds, re-
spectively.
Automatically com-
puted based on in-
stance type and
container
The amount of time the
Elastic Beanstalk ser-
vice will wait after it has
completed updates to
one batch of instances
before it continues on to
the next batch.
PauseTime
true
false
falseIf true, enables rolling
updates for an environ-
ment. Rolling updates
are useful when you
need to make small, fre-
quent updates to your
Elastic Beanstalk soft-
ware application and
you want to avoid applic-
ation downtime.
Note
Setting this
value to true
automatically
enables the
MaxBatchS-
ize, MinIn-
stancesIn-
Service, and
PauseTime
options. Setting
any of those
options also
automatically
sets the Rol-
lingUp-
dateEnabled
option value to
true. Setting
this option to
false disables
rolling updates.
RollingUpdateEnabled
API Version 2010-12-01
720
Elastic Beanstalk Developer Guide
Option Values

Namespace: aws:autoscaling:updatepolicy:rollingupdate
Time
Health
TimeWhether to apply rolling
updates (of environment
configuration changes)
to a batch of instances
according to one of the
following:
• Wait the specified
amount of time
(PauseTime) after
completing updates to
one batch of in-
stances before apply-
ing updates to the
next batch.
• Begin applying rolling
updates to a new
batch of instances
after receiving reports
that the current batch
of instances being up-
dated is healthy.
Note
Only load-bal-
anced web
server environ-
ments can use
health-based
rolling updates.
Single-instance
web server en-
vironments and
worker environ-
ments can ap-
ply rolling up-
dates only ac-
cording to time-
based criteria.
RollingUpdateType
PT15M (15 minutes) to
PT1H (1 hour)
The value must be in
ISO8601 duration
format, in the form:
PT#H#M#S where
each # is the number
of hours, minutes,
and/or seconds, re-
spectively.
PT30M (30 minutes)Maximum amount of
time to wait for all in-
stances in a batch of in-
stances to report healthy
status before canceling
the update and rolling
back to the previous en-
vironment configuration
settings.
Timeout
API Version 2010-12-01
721
Elastic Beanstalk Developer Guide
Option Values

Namespace: aws:ec2:vpc
Valid Val-
ues
DefaultDescriptionName
n/an/aThe ID for your VPC.VPCId
n/an/aThe ID of the Auto Scaling group subnet or subnets. If you
have multiple subnets, specify the value of the option name
as a single comma-delimited string of subnet IDs (for ex-
ample, subnet-11111111,subnet-22222222).
Subnets
n/an/aThe ID of the subnet for the elastic load balancer.ELBSubnets
internaln/aSpecify internal if you want to create an internal load
balancer in your VPC so that your Elastic Beanstalk applic-
ation cannot be accessed from outside your VPC.
ELBScheme
n/an/aContains the ID of the DB subnets.This is only used if you
want to add an Amazon RDS DB Instance as part of your
application.
DBSubnets
true
false
null
n/aSpecifies whether to launch instances with public IP ad-
dresses in your VPC. Instances with public IP addresses
do not require a NAT instance to communicate with the In-
ternet.You must set the value to true if you want to include
your load balancer and instances in a single public subnet.
AssociatePub-
licIpAddress
Note
VPC is not available for legacy containers. The namespace aws:ec2:vpc is supported for the
following container types:
• Docker
• Node.js
• PHP 5.3, PHP 5.4, and PHP 5.5
• Python
• Ruby 1.8.7, 1.9.3, 2.0.0, and 2.1.2
• Apache Tomcat 6, 7, and 8
• Windows Server 2008 R2 running IIS 7.5 and Windows Server 2012 running IIS 8 or IIS 8.5
Namespace: aws:elasticbeanstalk:application
Valid ValuesDe-
fault
DescriptionName
A blank string is treated as
/, or specify a string start-
ing with /.
/The URL the Elastic Load Balancer uses
to query for instance health.
Application
Healthcheck URL
Namespace: aws:elasticbeanstalk:command
Valid Val-
ues
DefaultDescriptionName
API Version 2010-12-01
722
Elastic Beanstalk Developer Guide
Option Values

Namespace: aws:elasticbeanstalk:command
"1" to
"1800"
"480"Number of seconds to wait for an instance to
complete executing commands.
For example, if source code deployment tasks
are still running when you reach the configured
timeout period, Elastic Beanstalk displays the
following error: "Some instances have not re-
sponded to commands. Responses were not
received from <instance id>." You can in-
crease the amount of time that the Elastic
Beanstalk service waits for your source code to
successfully deploy to the instance.
Timeout
For Per-
centage, 1
to 100. For
Fixed, a
number that
is less than
or equal to
the maxim-
um number
of instances
to run at any
given time in
the autoscal-
ing group.
(The maxim-
um number
of instances
that you can
run in an
autoscaling
group is
10000.)
100Percentage or fixed number of Amazon EC2
instances in the Auto Scaling group on which
to simultaneously deploy an application version.
BatchSize
Fixed
Percent-
age
PercentageThe type of number that is specified in BatchS-
izeType.
BatchSizeType
Namespace: aws:elasticbeanstalk:environment
Valid ValuesDefaultDescriptionName
SingleIn-
stance
LoadBal-
anced
LoadBal-
anced
The type of environment, either a load-balanced
and auto-scaled environment or a single-instance
environment.
EnvironmentType
Namespace: aws:elasticbeanstalk:monitoring
Valid ValuesDefaultDescriptionName
API Version 2010-12-01
723
Elastic Beanstalk Developer Guide
Option Values

Namespace: aws:elasticbeanstalk:monitoring
true
false
trueSpecify if you want to terminate
unhealthy instances automatically.
Automatically Terminate
Unhealthy Instances
Namespace: aws:elasticbeanstalk:sns:topics
Valid ValuesDefaultDescriptionName
n/an/aEndpoint where you want to be notified
of important events affecting your ap-
plication.
Notification End-
point
http
https
email
email-json
sqs
emailProtocol used to send notifications to
your endpoint.
Notification Pro-
tocol
n/an/aAmazon Resource Name for the topic
you subscribed to.
Notification Topic
ARN
n/an/aName of the topic you subscribed to.Notification Topic
Name
Namespace: aws:elasticbeanstalk:sqsd
Valid ValuesDefaultDescriptionName
Note
If you don’t specify a
value, then Elastic
Beanstalk automatic-
ally creates a queue.
automatic-
ally gener-
ated
The URL of the queue from which the
daemon in the worker environment tier
reads messages
Worker-
QueueURL
/The relative path to the application to
which HTTP POST messages are sent
HttpPath
application/json
application/x-www-form-
urlencoded
application/xml
text/plain
Note
You can create your
own MIME type.
applica-
tion/json
The MIME type of the message sent
in the HTTP POST request
MimeType
API Version 2010-12-01
724
Elastic Beanstalk Developer Guide
Option Values

Namespace: aws:elasticbeanstalk:sqsd
1 to 10015The maximum number of concurrent
connections to any application(s)
within an Amazon EC2 instance
HttpConnections
1 to 605The amount of time, in seconds, to
wait for successful connections to an
application
ConnectTimeout
1 to 1800180The amount of time, in seconds, to
wait for a response on an existing
connection to an application
Note
The message is reprocessed
until the daemon receives a
200 OK response from the
application in the worker en-
vironment tier or the Reten-
tionPeriod expires.
InactivityTimeout
0 to 4320030 (for
worker en-
vironment
tiers cre-
ated before
May 27,
2014)
300 (for
worker en-
vironment
tiers cre-
ated after
May 27,
2014)
The amount of time, in seconds, an
incoming message from the Amazon
SQS queue is locked for processing.
After the configured amount of time
has passed, then the message is
again made visible in the queue for
any other daemon to read.
Note
If you configure this value, it
overrides the SQS Visibility-
Timeout setting.
VisibilityTimeout
60 to 1209600345600The amount of time, in seconds, a
message is valid and will be actively
processed
RetentionPeriod
1 to 100010The maximum number of attempts that
Elastic Beanstalk attempts to send the
message to the web application that
will process it before moving the mes-
sage to the dead letter queue.
MaxRetries
0 to 43200 seconds2 secondsThe amount of time, in seconds, that
elapses before Elastic Beanstalk re-
turns a message to the Amazon SQS
queue after a processing attempt fails
with an explicit error.
ErrorVisibility-
Timeout
(for version
worker environ-
ment tiers cre-
ated after Febru-
ary 17, 2015)
API Version 2010-12-01
725
Elastic Beanstalk Developer Guide
Option Values

Namespace: aws:elb:healthcheck
Valid Val-
ues
DefaultDescriptionName
2 to 103Consecutive successful URL probes before Elastic Load
Balancing changes the instance health status.
HealthyThreshold
5 to 30030Define the interval at which Elastic Load Balancing will check
the health of your application's Amazon EC2 instances.
Interval
2 to 605Number of seconds Elastic Load Balancing will wait for a
response before it considers the instance nonresponsive.
Timeout
2 to 105Consecutive unsuccessful URL probes before Elastic Load
Balancing changes the instance health status.
Un-
healthyThreshold
Namespace: aws:elb:loadbalancer
Valid ValuesDefaultDescriptionName
true
false
falseSpecifies whether the load balancer routes
traffic evenly across all instances in all Availab-
ility Zones rather than only within each zone.
CrossZone
OFF
80
80External facing port used by the listener.LoadBalancerHTTP-
Port
HTTP
TCP
HTTPProtocol used by the listener (not available for
legacy container types).
LoadBalancerPortPro-
tocol
OFF
443
8443
OFFExternal facing port used by the secure listener.LoadBalancerHTTPS-
Port
HTTPS
SSL
HTTPSProtocol used by the secure listener (not avail-
able for legacy container types).
LoadBalancerSSLPort-
Protocol
n/an/aAmazon Resource Name (ARN) for the SSL
certificate you've uploaded for AWS Access and
Identity Management.
SSLCertificateId
Namespace: aws:elb:policies
Valid ValuesDefaultDescriptionName
true
false
falseSpecifies whether the load balancer maintains
existing connections to instances that have
become unhealthy or deregistered to complete
in-progress requests.
ConnectionDrainingEn-
abled
API Version 2010-12-01
726
Elastic Beanstalk Developer Guide
Option Values

Namespace: aws:elb:policies
1 to 360020Maximum number of seconds that the load
balancer maintains existing connections to an
instance during connection draining before
forcibly closing the connections.
ConnectionDraining-
Timeout
0 to 10000000Duration of validity for each cookie.Stickiness Cookie Ex-
piration
true
false
falseBinds a user's session to a specific server in-
stance so that all requests coming from the
user during the session will be sent to the same
server instance.
Stickiness Policy
Namespace: aws:rds:dbinstance
Valid ValuesDefaultDescriptionName
MySQL: 5-1024
Oracle: 10-1024
sqlserver: cannot be
modified
MySQL: 5
Oracle: 10
sqlserver-se:
200
sqlserver-ex:30
sqlserver-web:
30
The allocated database storage size, specified
in gigabytes.
DBAllocated-
Storage
Delete
Snapshot
DeleteDecides whether to delete or snapshot the DB
instance on environment termination.
Warning
Deleting a DB instance results in per-
manent data loss.
DBDeletion-
Policy
mysql
oracle-se1
oracle-se
oracle-ee
sqlserver-ee
sqlserver-ex
sqlserver-web
sqlserver-se
postgres
mysqlThe name of the database engine to use for
this instance.
DBEngine
n/a5.5The version number of the database engine.DBEngineVer-
sion
API Version 2010-12-01
727
Elastic Beanstalk Developer Guide
Option Values

Namespace: aws:rds:dbinstance
Go to DB Instance
Class in the
Amazon Relational
Database Service
User Guide.
db.t1.microThe database instance type.DBInstance-
Class
n/an/aThe name of master user password for the
database instance.
DBPassword
n/an/aThe identifier for the DB snapshot to restore
from.
DBSnap-
shotIdentifier
n/aebrootThe name of master user for the DB Instance.DBUser
true
false
falseSpecifies whether a database instance Multi-
AZ deployment needs to be created. For more
information about Multi-AZ deployments with
Amazon Relational Database Service (RDS),
go to Regions and Availability Zones in the
Amazon Relational Database Service User
Guide.
MultiAZData-
base
Docker Container Options
Namespace: aws:elasticbeanstalk:application:environment
Valid ValuesDefaultDescriptionName
n/an/aYour secret access key.AWS_SECRET_KEY
n/an/aYour access key ID.AWS_AC-
CESS_KEY_ID
n/an/aPass in key-value pairs.PARAM1 – PARAM5
Namespace: aws:elasticbeanstalk:hostmanager
Valid ValuesDefaultDescriptionName
true
false
falseCopy the log files for your application's Amazon EC2
instances to the Amazon S3 bucket associated with
your application.
LogPublicationCon-
trol
Note
You can extend the number of parameters and specify the parameter names in the
aws:elasticbeanstalk:application:environment namespace.
Java Container Options
Namespace: aws:elasticbeanstalk:application:environment
Valid Val-
ues
DefaultDescriptionName
API Version 2010-12-01
728
Elastic Beanstalk Developer Guide
Option Values

Namespace: aws:elasticbeanstalk:application:environment
n/an/aYour secret access key.AWS_SECRET_KEY
n/an/aYour access key ID.AWS_ACCESS_KEY_ID
n/an/aConnection string to an external database.JDBC_CONNEC-
TION_STRING
n/an/aSystem properties passed in to the JVM at startup.
You can use any number of parameters you want
and you can specify any name you want.
PARAM1 – PARAM5
Namespace: aws:elasticbeanstalk:container:tomcat:jvmoptions
Valid Val-
ues
DefaultDescriptionName
n/an/aPass command-line options to the JVM at startup.JVM Options
n/a256mMaximum JVM heap sizes.Xmx
n/a64mSection of the JVM heap that is used to store class
definitions and associated metadata.
XX:MaxPermSize
n/a256mInitial JVM heap sizes.Xms
Namespace: aws:elasticbeanstalk:hostmanager
Valid Val-
ues
DefaultDescriptionName
true
false
falseCopy the log files for your application's Amazon
EC2 instances to the Amazon S3 bucket associated
with your application on an hourly basis.
LogPublicationCon-
trol
Note
You can extend the number of parameters and specify the parameter names in the
aws:elasticbeanstalk:container:tomcat:jvmoptions and
aws:elasticbeanstalk:application:environment namespaces.
.NET Container Options
Namespace: aws:elasticbeanstalk:application:environment
Valid ValuesDefaultDescriptionName
n/an/aYour secret access key.AWS_SECRET_KEY
n/an/aYour access key ID.AWS_AC-
CESS_KEY_ID
n/an/aPass in key-value pairs.PARAM1 – PARAM5
API Version 2010-12-01
729
Elastic Beanstalk Developer Guide
Option Values

Namespace: aws:elasticbeanstalk:container:dotnet:apppool
Valid ValuesDefaultDescriptionName
2.0
4.0
4.0You can choose the version of .NET Framework
for your application.
Target Runtime
True
False
FalseEnable 32-bit applications.Enable 32-bit Applica-
tions
Namespace: aws:elasticbeanstalk:hostmanager
Valid ValuesDefaultDescriptionName
true
false
falseCopy the log files for your application's Amazon EC2
instances to the Amazon S3 bucket associated with
your application.
LogPublicationCon-
trol
Note
You can extend the number of parameters and specify the parameter names in the
aws:elasticbeanstalk:application:environment namespace.
Node.js Container Options
Namespace: aws:elasticbeanstalk:application:environment
Valid ValuesDefaultDescriptionName
n/an/aYour access secret key.AWS_SECRET_KEY
n/an/aYour access key ID.AWS_ACCESS_KEY_ID
n/an/aPass in key-value pairs as environment
variables.
PARAM1 – PARAM5
Namespace: aws:elasticbeanstalk:container:nodejs
Valid ValuesDefaultDescriptionName
n/a""Command used to start the Node.js application.
If an empty string is specified, app.js is used,
then server.js, then "npm start" in that order.
NodeCom-
mand
Triple dotted version string:
• 0.8.26
• 0.8.28
• 0.10.21
• 0.10.26
• 0.10.31
0.10.31Version of Node.js.NodeVer-
sion
API Version 2010-12-01
730
Elastic Beanstalk Developer Guide
Option Values

Namespace: aws:elasticbeanstalk:container:nodejs
true
false
falseSpecifies if gzip compression is enabled. If
ProxyServer is set to "none", then gzip com-
pression will be disabled.
GzipCom-
pression
apache
nginx
none
nginxSpecifies which web server should be used to
proxy connections to Node.js. If ProxyServer is
set to "none", then static file mappings will not
take affect and gzip compression will be dis-
abled.
ProxyServer
Namespace: aws:elasticbeanstalk:container:nodejs:staticfiles
Valid ValuesDefaultDescriptionName
n/an/aThe directory that contains static content.
If ProxyServer is set to "none", then the
static file mappings will not take affect.
Example: /public
/public (this can be any arbit-
rary name)
Namespace: aws:elasticbeanstalk:hostmanager
Valid ValuesDefaultDescriptionName
true
false
falseCopy the log files for your application's Amazon
EC2 instances to the Amazon S3 bucket associ-
ated with your application.
LogPublicationCon-
trol
Note
You can extend the number of parameters and specify the parameter names in the
aws:elasticbeanstalk:container:nodejs:staticfiles and
aws:elasticbeanstalk:application:environment namespaces.
PHP Container Options
Namespace: aws:elasticbeanstalk:application:environment
Valid ValuesDefaultDescriptionName
n/an/aYour access secret key.AWS_SECRET_KEY
n/an/aYour access key ID.AWS_AC-
CESS_KEY_ID
n/an/aPass in key-value pairs as environment
variables.
PARAM1 – PARAM5
Namespace: aws:elasticbeanstalk:container:php:phpini
Valid ValuesDefaultDescriptionName
API Version 2010-12-01
731
Elastic Beanstalk Developer Guide
Option Values

Namespace: aws:elasticbeanstalk:container:php:phpini
A blank string is treated
as /, or specify a string
starting with /
/Specify the child directory of your project that
is treated as the public-facing web root.
document_root
n/a128MAmount of memory allocated to the PHP
environment.
memory_limit
true
false
falseSpecifies whether or not PHP should use
compression for output.
zlib.output_com-
pression
true
false
trueSpecifies if PHP's file functions are allowed
to retrieve data from remote locations, such
as websites or FTP servers.
allow_url_fopen
On
Off
stderr
OffSpecifies if error messages should be part
of the output.
display_errors
PHP_INT_MAX:
• 0 to
9223372036854775807
(64-bit)
• 0 to 2147483647 (32-
bit)
30Sets the maximum time, in seconds, a script
is allowed to run before it is terminated by
the environment.
max_execu-
tion_time
n/an/aSets custom options to use when installing
dependencies using Composer through
composer.phar install. For more information
including available options, go to http://get-
composer.org/doc/03-cli.md#install.
composer_op-
tions
Namespace: aws:elasticbeanstalk:hostmanager
Valid ValuesDefaultDescriptionName
true
false
falseCopy the log files for your application's Amazon
EC2 instances to the Amazon S3 bucket asso-
ciated with your application.
LogPublicationControl
Note
You can extend the number of parameters and specify the parameter names in the
aws:elasticbeanstalk:application:environment namespace.
Python Container Options
Namespace: aws:elasticbeanstalk:application:environment
Valid ValuesDefaultDescriptionName
API Version 2010-12-01
732
Elastic Beanstalk Developer Guide
Option Values

Namespace: aws:elasticbeanstalk:application:environment
n/an/aYour access secret key.AWS_SECRET_KEY
n/an/aYour access key ID.AWS_ACCESS_KEY_ID
n/an/aSpecifies which settings file to use.DJANGO_SET-
TINGS_MODULE
n/an/aPass in key-value pairs as environment
variables.
Any arbitrary parameter
name, such as "applica-
tion_stage"
n/an/aPass in key-value pairs as environment
variables.
PARAM1 – PARAM5
Namespace: aws:elasticbeanstalk:container:python
Valid Val-
ues
DefaultDescriptionName
n/aapplica-
tion.py
The file that contains the WSGI application.This file must
have an "application" callable.
WSGIPath
n/a1The number of daemon processes that should be started
for the process group when running WSGI applications.
NumPro-
cesses
n/a15The number of threads to be created to handle requests in
each daemon process within the process group when run-
ning WSGI applications.
Num-
Threads
Namespace: aws:elasticbeanstalk:container:python:staticfiles
Valid Val-
ues
DefaultDescriptionName
n/an/aA mapping of the URL to a local
directory.
Example: static/
This would map files in your dir-
ectory on your EC2 instance
(/opt/python/cur-
rent/app/static/*) to <your
domain>/static/*
/static/ (this can be any
arbitrary name)
Namespace: aws:elasticbeanstalk:hostmanager
Valid ValuesDefaultDescriptionName
true
false
falseCopy the log files for your application's Amazon EC2
instances to the Amazon S3 bucket associated with
your application.
LogPublicationCon-
trol
API Version 2010-12-01
733
Elastic Beanstalk Developer Guide
Option Values

Note
You can extend the number of parameters and specify the parameter names in the
aws:elasticbeanstalk:application:environment and the
aws:elasticbeanstalk:container:python:staticfiles namespaces using a
configuration file. For instructions, see Customizing and Configuring a Python Container (p.256).
The parameters will be passed in as environment variables on your Amazon EC2 instances.
Ruby Container Options
Namespace: aws:elasticbeanstalk:application:environment
Valid Val-
ues
DefaultDescriptionName
n/an/aYour access secret key.AWS_SECRET_KEY
n/an/aYour access key ID.AWS_ACCESS_KEY_ID
true
false
falseSpecifies whether to run `rake db:mi-
grate` on behalf of the users' applications;
or whether it should be skipped.This is only
applicable to Rails 3.x applications.
RAILS_SKIP_MIGRA-
TIONS
true
false
falseSpecifies whether the container should run
`rake assets:precompile` on behalf
of the users' applications; or whether it
should be skipped.This is also only applic-
able to Rails 3.x applications.
RAILS_SKIP_ASSET_COM-
PILATION
n/atest:devel-
opment
A colon (:) separated list of groups to ignore
when installing dependencies from a Gem-
file.
BUNDLE_WITHOUT
n/an/aPass in key-value pairs as environment
variables.
PARAM1 – PARAM5
n/aproductionSpecifies what environment stage an applic-
ation can be run in. Examples of common
environments include development, produc-
tion, test.
RACK_ENV
n/aproductionSpecifies what environment stage an applic-
ation can be run in. Examples of common
environments include development, produc-
tion, test.
RAILS_ENV
n/an/aPass in key-value pairs as environment
variables.
Any arbitrary parameter
name, such as "applica-
tion_stage"
Namespace: aws:elasticbeanstalk:hostmanager
Valid ValuesDefaultDescriptionName
true
false
falseCopy the log files for your application's Amazon
EC2 instances to the Amazon S3 bucket associ-
ated with your application.
LogPublicationCon-
trol
API Version 2010-12-01
734
Elastic Beanstalk Developer Guide
Option Values

Note
You can extend the number of parameters and specify the parameter names in the
aws:elasticbeanstalk:application:environment namespace using a configuration
file. For instructions, see Customizing and Configuring a Ruby Environment (p. 273). The
parameters will be passed in as environment variables on your Amazon EC2 instances.
API Version 2010-12-01
735
Elastic Beanstalk Developer Guide
Option Values

Operations
Topics
• elastic-beanstalk-check-dns-availability (p. 737)
• elastic-beanstalk-create-application (p. 738)
• elastic-beanstalk-create-application-version (p. 739)
• elastic-beanstalk-create-configuration-template (p. 741)
• elastic-beanstalk-create-environment (p. 744)
• elastic-beanstalk-create-storage-location (p. 748)
• elastic-beanstalk-delete-application (p. 749)
• elastic-beanstalk-delete-application-version (p. 750)
• elastic-beanstalk-delete-configuration-template (p. 752)
• elastic-beanstalk-delete-environment-configuration (p. 753)
• elastic-beanstalk-describe-application-versions (p. 754)
• elastic-beanstalk-describe-applications (p. 756)
• elastic-beanstalk-describe-configuration-options (p. 757)
• elastic-beanstalk-describe-configuration-settings (p. 759)
• elastic-beanstalk-describe-environment-resources (p. 761)
• elastic-beanstalk-describe-environments (p. 762)
• elastic-beanstalk-describe-events (p. 764)
• elastic-beanstalk-list-available-solution-stacks (p. 766)
• elastic-beanstalk-rebuild-environment (p. 767)
• elastic-beanstalk-request-environment-info (p. 768)
• elastic-beanstalk-restart-app-server (p. 769)
• elastic-beanstalk-retrieve-environment-info (p. 770)
• elastic-beanstalk-swap-environment-cnames (p. 772)
• elastic-beanstalk-terminate-environment (p. 773)
• elastic-beanstalk-update-application (p. 775)
• elastic-beanstalk-update-application-version (p. 777)
• elastic-beanstalk-update-configuration-template (p. 779)
• elastic-beanstalk-update-environment (p. 781)
• elastic-beanstalk-validate-configuration-settings (p. 784)
API Version 2010-12-01
736
Elastic Beanstalk Developer Guide
Operations

elastic-beanstalk-check-dns-availability
Description
Checks if the specified CNAME is available.
Syntax
elastic-beanstalk-check-dns-availability -c [CNAMEPrefix]
Options
RequiredDescriptionName
YesThe name of the CNAME to check.
Type: String
Default: None
-c
--cname-prefix CNAMEPrefix
Output
The command returns a table with the following information:
• Available—Shows true if the CNAME is available; otherwise, shows false.
• FullyQualifiedCNAME—Shows the fully qualified CNAME if it is available; otherwise shows N/A.
Examples
Checking to Availability of a CNAME
This example shows how to check to see if the CNAME prefix "myapp23" is available.
PROMPT> elastic-beanstalk-check-dns-availability -c myapp23
API Version 2010-12-01
737
Elastic Beanstalk Developer Guide
Operations

elastic-beanstalk-create-application
Description
Creates an application that has one configuration template named default and no application versions.
Note
The default configuration template is for a 32-bit version of the Amazon Linux operating system
running the Tomcat 6 application container.
Syntax
elastic-beanstalk-create-application -a [name] -d [desc]
Options
RequiredDescriptionName
YesThe name of the application.
Constraint:This name must be unique within your
account. If the specified name already exists, the
action returns an InvalidParameterValue error.
Type: String
Default: None
-a
--application-name name
NoThe description of the application.
Type: String
Default: None
-d
--description desc
Output
The command returns a table with the following information:
• ApplicationName—The name of the application. If no application is found with this name, and
AutoCreateApplication is false, Elastic Beanstalk returns an InvalidParameterValue error.
• ConfigurationTemplates—A list of the configuration templates used to create the application.
• DateCreated—The date the application was created.
• DateUpdated—The date the application was last updated.
• Description—The description of the application.
• Versions—The versions of the application.
Examples
Creating an Application
This example shows how to create an application.
PROMPT> elastic-beanstalk-create-application -a MySampleApp -d "My description"
API Version 2010-12-01
738
Elastic Beanstalk Developer Guide
Operations

elastic-beanstalk-create-application-version
Description
Creates an application version for the specified application.
Note
Once you create an application version with a specified Amazon S3 bucket and key location,
you cannot change that Amazon S3 location. If you change the Amazon S3 location, you receive
an exception when you attempt to launch an environment from the application version.
Syntax
elastic-beanstalk-create-application-version -a [name] -l [label] -c -d [desc]
-s [location]
Options
RequiredDescriptionName
YesThe name of the application. If no application is
found with this name, and AutoCreateApplica-
tion is false, Elastic Beanstalk returns an Inval-
idParameterValue error.
Type: String
Default: None
Length Constraints: Minimum value of 1. Maximum
value of 100.
-a
--application-name name
NoDetermines how the system behaves if the spe-
cified application for this version does not already
exist:
• true: Automatically creates the specified applic-
ation for this release if it does not already exist.
• false: Throws an InvalidParameterValue
if the specified application for this release does
not already exist.
Type: Boolean
Valid Values: true | false
Default: false
-c
--auto-create
NoThe description of the version.
Type: String
Default: None
Length Constraints: Minimum value of 0. Maximum
value of 200.
-d
--description desc
API Version 2010-12-01
739
Elastic Beanstalk Developer Guide
Operations

RequiredDescriptionName
YesA label identifying this version.
Type: String
Default: None
Constraint: Must be unique per application. If an
application version already exists with this label for
the specified application, Elastic Beanstalk returns
an InvalidParameterValue error.
Length Constraints: Minimum value of 1. Maximum
value of 100.
-l
--version-label label
NoThe name of the Amazon S3 bucket and key that
identify the location of the source bundle for this
version, in the format bucketname/key.
If data found at the Amazon S3 location exceeds
the maximum allowed source bundle size, Elastic
Beanstalk returns an InvalidParameterCombin-
ation error.
Type: String
Default: If not specified, AWS Elastic Beanstalk
uses a sample application. If only partially specified
(for example, a bucket is provided but not the key)
or if no data is found at the Amazon S3 location,
AWS Elastic Beanstalk returns an InvalidPara-
meterCombination error.
-s
--source-location location
Output
The command returns a table with the following information:
• ApplicationName—The name of the application.
• DateCreated—The date the application was created.
• DateUpdated—The date the application was last updated.
• Description—The description of the application.
• SourceBundle—The location where the source bundle is located for this version.
• VersionLabel—A label uniquely identifying the version for the associated application.
Examples
Creating a Version from a Source Location
This example shows create a version from a source location.
PROMPT> elastic-beanstalk-create-application-version -a MySampleApp -d "My
version" -l "TestVersion 1" -s amazonaws.com/sample.war
API Version 2010-12-01
740
Elastic Beanstalk Developer Guide
Operations

elastic-beanstalk-create-configuration-template
Description
Creates a configuration template.Templates are associated with a specific application and are used to
deploy different versions of the application with the same configuration settings.
Syntax
elastic-beanstalk-create-configuration-template -a [name] -t [name] -E [id] -d
[desc] -s [stack] -f [filename] -A [name] -T [name]
Options
RequiredDescriptionName
YesThe name of the application to associate with this
configuration template. If no application is found
with this name, Elastic Beanstalk returns an Inval-
idParameterValue error.
Type: String
Default: None
-a
--application-name name
YesThe name of the configuration template. If a config-
uration template already exists with this name,
Elastic Beanstalk returns an InvalidParameter-
Value error.
Type: String
Default: None
Constraint: Must be unique for this application.
Length Constraints: Minimum value of 1. Maximum
value of 100.
-t
--template-name name
NoThe environment ID of the configuration template.
Type: String
Default: None
-E
--environment-id id
NoThe description of the configuration.
Type: String
Default: None
-d
--description desc
API Version 2010-12-01
741
Elastic Beanstalk Developer Guide
Operations

RequiredDescriptionName
NoThe name of the solution stack used by this config-
uration.The solution stack specifies the operating
system, architecture, and application server for a
configuration template. It determines the set of
configuration options as well as the possible and
default values.
Use elastic-beanstalk-list-available-
solution-stacks to obtain a list of available
solution stacks.
A solution stack name or a source configuration
parameter must be specified; otherwise, Elastic
Beanstalk returns an InvalidParameterValue
error.
If a solution stack name is not specified and the
source configuration parameter is specified, Elastic
Beanstalk uses the same solution stack as the
source configuration template.
Type: String
Length Constraints: Minimum value of 0. Maximum
value of 100.
-s
--solution-stack stack
NoThe name of a JSON file that contains a set of key-
value pairs defining configuration options for the
configuration template.The new values override
the values obtained from the solution stack or the
source configuration template.
Type: String
-f
--options-file filename
NoThe name of the application to use as the source
for this configuration template.
Type: String
Default: None
-A
--source-application-name
name
NoThe name of the template to use as the source for
this configuration template.
Type: String
Default: None
-T
--source-template-name name
Output
The command returns a table with the following information:
• ApplicationName—The name of the application associated with the configuration set.
• DateCreated—The date (in UTC time) when this configuration set was created.
• DateUpdated—The date (in UTC time) when this configuration set was last modified.
• DeploymentStatus—If this configuration set is associated with an environment, the deployment status
parameter indicates the deployment status of this configuration set:
• null: This configuration is not associated with a running environment.
• pending: This is a draft configuration that is not deployed to the associated environment but is in
the process of deploying.
API Version 2010-12-01
742
Elastic Beanstalk Developer Guide
Operations

• deployed:This is the configuration that is currently deployed to the associated running environment.
• failed: This is a draft configuration that failed to successfully deploy.
• Description—The description of the configuration set.
• EnvironmentName—If not null, the name of the environment for this configuration set.
• OptionSettings—A list of configuration options and their values in this configuration set.
• SolutionStackName—The name of the solution stack this configuration set uses.
• TemplateNamel—If not null, the name of the configuration template for this configuration set.
Examples
Creating a Basic Configuration Template
This example shows how to create a basic configuration template. For a list of configuration settings, see
Option Values (p. 707).
PROMPT> elastic-beanstalk-create-configuration-template -a MySampleApp -t mycon
figtemplate -E e-eup272zdrw
Related Operations
• elastic-beanstalk-describe-configuration-options (p. 757)
• elastic-beanstalk-describe-configuration-settings (p. 759)
• elastic-beanstalk-list-available-solution-stacks (p. 766)
API Version 2010-12-01
743
Elastic Beanstalk Developer Guide
Operations

elastic-beanstalk-create-environment
Description
Launches an environment for the specified application using the specified configuration.
Syntax
elastic-beanstalk-create-environment -a [name] -l [label] -e [name] [-t [name]
| -s [stack]] -c [prefix] -d [desc] -f[filename] -F [filename]
Options
RequiredDescriptionName
YesThe name of the application that contains the ver-
sion to be deployed. If no application is found with
this name, Elastic Beanstalk returns an Invalid-
ParameterValue error.
Type: String
Default: None
Length Constraints: Minimum value of 1. Maximum
value of 100.
-a
--application-name name
NoThe name of the application version to deploy.
If the specified application has no associated ap-
plication versions, Elastic Beanstalk UpdateEnvir-
onment returns an InvalidParameterValue
error.
Default: If not specified, Elastic Beanstalk attempts
to launch the the sample application in the contain-
er.
Type: String
Default: None
Length Constraints: Minimum value of 1. Maximum
value of 100.
-l
--version-label label
YesA unique name for the deployment environment.
Used in the application URL.
Constraint: Must be from 4 to 23 characters in
length.The name can contain only letters, numbers,
and hyphens. It cannot start or end with a hyphen.
This name must be unique in your account. If the
specified name already exists, Elastic Beanstalk
returns an InvalidParameterValue.
Type: String
Default: If the CNAME parameter is not specified,
the environment name becomes part of the
CNAME, and therefore part of the visible URL for
your application.
-e
--environment-name name
API Version 2010-12-01
744
Elastic Beanstalk Developer Guide
Operations

RequiredDescriptionName
ConditionalThe name of the configuration template to use in
the deployment. If no configuration template is
found with this name, Elastic Beanstalk returns an
InvalidParameterValue error.
Conditional:You must specify either this parameter
or a solution stack name, but not both. If you spe-
cify both, Elastic Beanstalk returns an Invalid-
ParameterValue error. If you do not specify
either, Elastic Beanstalk returns a MissingRe-
quiredParameter.
Type: String
Default: None
Constraint: Must be unique for this application.
-t
--template-name name
ConditionalThis is the alternative to specifying a configuration
name. If specified, Elastic Beanstalk sets the con-
figuration values to the default values associated
with the specified solution stack.
Condition:You must specify either this or a Tem-
plateName, but not both. If you specify both,
Elastic Beanstalk returns an InvalidPara-
meterCombination error. If you do not specify
either, Elastic Beanstalk returns MissingRe-
quiredParameter error.
Type: String
Default: None
-s
--solution-stack stack
NoIf specified, the environment attempts to use this
value as the prefix for the CNAME. If not specified,
the environment uses the environment name.
Type: String
Default: None
Length Constraints: Minimum value of 4. Maximum
value of 23.
-c
--cname-prefix prefix
NoThe description of the environment.
Type: String
Default: None
-d
--description desc
NoThe name of a JSON file that contains a set of key-
value pairs defining configuration options for this
new environment.These override the values ob-
tained from the solution stack or the configuration
template.
Type: String
-f
--options-file filename
NoThe name of a JSON file that contains configuration
options to remove from the configuration set for
this new environment.
Type: String
Default: None
-F
--options-to-remove-file
value
API Version 2010-12-01
745
Elastic Beanstalk Developer Guide
Operations

Output
The command returns a table with the following information:
• ApplicationName—The name of the application associated with this environment.
• CNAME—The URL to the CNAME for this environment.
• DateCreated—The date the environment was created.
• DateUpdated—The date the environment was last updated.
• Description—The description of the environment.
• EndpointURL—The URL to the LoadBalancer for this environment.
• EnvironmentID—The ID of this environment.
• EnvironmentName—The name of this environment.
• Health—Describes the health status of the environment. Elastic Beanstalk indicates the failure levels
for a running environment:
• Red: Indicates the environment is not responsive. Occurs when three or more consecutive failures
occur for an environment.
• Yellow: Indicates that something is wrong. Occurs when two consecutive failures occur for an
environment.
• Green: Indicates the environment is healthy and fully functional.
• Gray: Default health for a new environment.The environment is not fully launched and health checks
have not started or health checks are suspended during an UpdateEnvironment or
RestartEnvironmentrequest.
• Resources—A list of AWS resources used in this environment.
• SolutionStackName—The name of the solution stack deployed with this environment.
• Status—The current operational status of the environment:
• Launching: Environment is in the process of initial deployment.
• Updating: Environment is in the process of updating its configuration settings or application version.
• Ready: Environment is available to have an action performed on it, such as update or terminate.
• Terminating: Environment is in the shut-down process.
• Terminated: Environment is not running.
• TemplateName—The name of the configuration template used to originally launch this environment.
• VersionLabel—The application version deployed in this environment.
Examples
Creating an Environment Using a Basic Configuration Template
This example shows how to create an environment using a basic configuration template as well as pass
in a file to edit configuration settings and a file to remove configuration settings. For a list of configuration
settings, see Option Values (p. 707).
PROMPT> elastic-beanstalk-create-environment -a MySampleApp -t myconfigtemplate
-e MySampleAppEnv -f options.txt -F options_remove.txt
Options.txt
API Version 2010-12-01
746
Elastic Beanstalk Developer Guide
Operations

[
{"Namespace": "aws:autoscaling:asg",
"OptionName": "MinSize",
"Value": "2"},
{"Namespace": "aws:autoscaling:asg",
"OptionName": "MaxSize",
"Value": "3"}
]
Options_remove.txt
[
{"Namespace": "aws:elasticbeanstalk:sns:topics",
"OptionName": "PARAM4"}
]
API Version 2010-12-01
747
Elastic Beanstalk Developer Guide
Operations

elastic-beanstalk-create-storage-location
Description
Creates the Amazon S3 storage location for the account. This location is used to store user log files and
is used by the AWS Management Console to upload application versions.You do not need to create this
bucket in order to work with Elastic Beanstalk.
Syntax
elastic-beanstalk-create-storage-location
Examples
Creating the Storage Location
This example shows how to create a storage location.
PROMPT> elastic-beanstalk-create-storage-location
This command will output the name of the Amazon S3 bucket created.
API Version 2010-12-01
748
Elastic Beanstalk Developer Guide
Operations

elastic-beanstalk-delete-application
Description
Deletes the specified application along with all associated versions and configurations.
Note
You cannot delete an application that has a running environment.
Syntax
elastic-beanstalk-delete-application -a [name] -f
Options
RequiredDescriptionName
YesThe name of the application to delete.
Type: String
Default: None
Length Constraints: Minimum value of 1. Maximum
value of 100.
-a
--application-name name
NoDetermines if all running environments should be
deleted before deleting the application.
Type: Boolean
Valid Values: true | false
Default: false
-f
--force-terminate-env
Output
The command returns the string Application deleted.
Examples
Deleting an Application
This example shows how to delete an application.
PROMPT> elastic-beanstalk-delete-application -a MySampleApp
API Version 2010-12-01
749
Elastic Beanstalk Developer Guide
Operations

elastic-beanstalk-delete-application-version
Description
Deletes the specified version from the specified application.
Note
You cannot delete an application version that is associated with a running environment.
Syntax
elastic-beanstalk-delete-application-version -a [name] -l [label] -d
Options
RequiredDescriptionName
YesThe name of the application to delete releases
from.
Type: String
Default: None
-a
--application-name name
YesThe label of the version to delete.
Type: String
Default: None
Length Constraints: Minimum value of 1. Maximum
value of 100.
-l
--version-label
NoIndicates whether to delete the associated source
bundle from Amazon S3.
true: An attempt is made to delete the associated
Amazon S3 source bundle specified at time of
creation.
false: No action is taken on the Amazon S3
source bundle specified at time of creation.
Type: Boolean
Valid Values: true | false
Default: false
-d
--delete-source-bundle
Output
The command returns the string Application version deleted.
Examples
Deleting an Application Version
This example shows how to delete an application version.
PROMPT> elastic-beanstalk-delete-application-version -a MySampleApp -l MyAppVer
sion
API Version 2010-12-01
750
Elastic Beanstalk Developer Guide
Operations

Deleting an Application Version and Amazon S3 Source Bundle
This example shows how to delete an application version.
PROMPT> elastic-beanstalk-delete-application-version -a MySampleApp -l MyAppVer
sion -d
API Version 2010-12-01
751
Elastic Beanstalk Developer Guide
Operations

elastic-beanstalk-delete-configuration-template
Description
Deletes the specified configuration template.
Note
When you launch an environment using a configuration template, the environment gets a copy
of the template.You can delete or modify the environment's copy of the template without affecting
the running environment.
Syntax
elastic-beanstalk-delete-configuration-template -a [name] -t [name]
Options
RequiredDescriptionName
YesThe name of the application to delete the configur-
ation template from.
Type: String
Default: None
Length Constraints: Minimum value of 1. Maximum
value of 100.
-a
--application-name name
YesThe name of the configuration template to delete.
Type: String
Default: None
Length Constraints: Minimum value of 1. Maximum
value of 100.
-t
--template-name
Output
The command returns the string Configuration template deleted.
Examples
Deleting a Configuration Template
This example shows how to delete a configuration template.
PROMPT> elastic-beanstalk-delete-configuration-template -a MySampleApp -t MyCon
figTemplate
API Version 2010-12-01
752
Elastic Beanstalk Developer Guide
Operations

elastic-beanstalk-delete-environment-configuration
Description
Deletes the draft configuration associated with the running environment.
Note
Updating a running environment with any configuration changes creates a draft configuration
set.You can get the draft configuration using
elastic-beanstalk-describe-configuration-settings while the update is in progress
or if the update fails.The deployment status for the draft configuration indicates whether the
deployment is in process or has failed.The draft configuration remains in existence until it is
deleted with this action.
Syntax
elastic-beanstalk-delete-environment-configuration -a [name] -e [name]
Options
RequiredDescriptionName
YesThe name of the application the environment is
associated with.
Type: String
Default: None
Length Constraints: Minimum value of 1. Maximum
value of 100.
-a
--application-name name
YesThe name of the environment to delete the draft
configuration from.
Type: String
Default: None
Length Constraints: Minimum value of 4. Maximum
value of 23.
-e
--environment-name name
Output
The command returns the string Environment configuration deleted.
Examples
Deleting a Configuration Template
This example shows how to delete a configuration template.
PROMPT> elastic-beanstalk-delete-environment-configuration -a MySampleApp -e
MyEnvConfig
API Version 2010-12-01
753
Elastic Beanstalk Developer Guide
Operations

elastic-beanstalk-describe-application-versions
Description
Returns information about existing application versions.
Syntax
elastic-beanstalk-describe-application-versions -a [name] -l [labels [,label..]]
Options
RequiredDescriptionName
NoThe name of the application. If specified, Elastic
Beanstalk restricts the returned descriptions to only
include ones that are associated with the specified
application.
Type: String
Default: None
Length Constraints: Minimum value of 1. Maximum
value of 100.
-a
--application-name value
NoComma-delimited list of version labels. If specified,
restricts the returned descriptions to only include
ones that have the specified version labels.
Type: String[]
Default: None
-l
--version-label labels
Output
The command returns a table with the following information:
• ApplicationName—The name of the application associated with this release.
• DateCreated—The date the application was created.
• DateUpdated—The date the application version was last updated.
• Description—The description of the application version.
• SourceBundle—The location where the source bundle is located for this version.
• VersionLabel—A label uniquely identifying the version for the associated application.
Examples
Describing Application Versions
This example shows how to describe all application versions for this account.
PROMPT> elastic-beanstalk-describe-application-versions
Describing Application Versions for a Specified Application
This example shows how to describe application versions for a specific application.
API Version 2010-12-01
754
Elastic Beanstalk Developer Guide
Operations

PROMPT> elastic-beanstalk-describe-application-versions -a MyApplication
Describing Multiple Application Versions
This example shows how to describe multiple specified application versions.
PROMPT> elastic-beanstalk-describe-application-versions -l MyAppVersion1,
MyAppVersion2
API Version 2010-12-01
755
Elastic Beanstalk Developer Guide
Operations

elastic-beanstalk-describe-applications
Description
Returns descriptions about existing applications.
Syntax
elastic-beanstalk-describe-applications -a [names [,name..]]
Options
RequiredDescriptionName
NoThe name of one or more applications, separated
by commas. If specified, Elastic Beanstalk restricts
the returned descriptions to only include those with
the specified names.
Type: String[]
Default: None
-a
--application-names name
Output
The command returns a table with the following information:
• ApplicationName—The name of the application.
• ConfigurationTemplates—A list of the configuration templates used to create the application.
• DateCreated—The date the application was created.
• DateUpdated—The date the application was last updated.
• Description—The description of the application.
• Versions—The names of the versions for this application.
Examples
Describing the Applications
This example shows how to describe all applications for this account.
PROMPT> elastic-beanstalk-describe-applications
Describing a Specific Application
This example shows how to describe a specific application.
PROMPT> elastic-beanstalk-describe-applications -a MyApplication
API Version 2010-12-01
756
Elastic Beanstalk Developer Guide
Operations

elastic-beanstalk-describe-configuration-options
Description
Describes the configuration options that are used in a particular configuration template or environment,
or that a specified solution stack defines. The description includes the values, the options, their default
values, and an indication of the required action on a running environment if an option value is changed.
Syntax
elastic-beanstalk-describe-configuration-options -a [name] -t [name] -e [name]
-s [stack] -f [filename]
Options
RequiredDescriptionName
NoThe name of the application associated with the
configuration template or environment. Only needed
if you want to describe the configuration options
associated with either the configuration template
or environment.
Type: String
Default: None
Length Constraints: Minimum value of 1. Maximum
value of 100.
-a
--application-name name
NoThe name of the configuration template whose
configuration options you want to describe.
Type: String
Default: None
Length Constraints: Minimum value of 1. Maximum
value of 100.
-t
--template-name name
NoThe name of the environment whose configuration
options you want to describe.
Type: String
Length Constraints: Minimum value of 4. Maximum
value of 23.
-e
--environment-name name
NoThe name of the solution stack whose configuration
options you want to describe.
Type: String
Default: None
Length Constraints: Minimum value of 0. Maximum
value of 100.
-s
--solution-stack stack
NoThe name of a JSON file that contains the options
you want described.
Type: String
-f
--options-file filename
API Version 2010-12-01
757
Elastic Beanstalk Developer Guide
Operations

Output
The command returns a table with the following information:
• Options—A list of the configuration options.
• SolutionStackName—The name of the SolutionStack these configuration options belong to.
Examples
Describing Configuration Options for an Environment
This example shows how to describe configuration options for an environment.
PROMPT> elastic-beanstalk-describe-configuration-options -a MySampleApp -t my
configtemplate -e MySampleAppEnv
API Version 2010-12-01
758
Elastic Beanstalk Developer Guide
Operations

elastic-beanstalk-describe-configuration-settings
Description
Returns a description of the settings for the specified configuration set, that is, either a configuration
template or the configuration set associated with a running environment.
When describing the settings for the configuration set associated with a running environment, it is possible
to receive two sets of setting descriptions. One is the deployed configuration set, and the other is a draft
configuration of an environment that is either in the process of deployment or that failed to deploy.
Syntax
elastic-beanstalk-describe-configuration-settings -a [name] [-t [name] | -e
[name]]
Options
RequiredDescriptionName
YesThe application name for the environment or con-
figuration template.
Type: String
Default: None
Length Constraints: Minimum value of 1. Maximum
value of 100.
-a
--application-name name
ConditionalThe name of the configuration template to describe.
If no configuration template is found with this name,
Elastic Beanstalk returns an InvalidParameter-
Value error.
Conditional:You must specify either this parameter
or an environment name, but not both. If you spe-
cify both, Elastic Beanstalk returns an Invalid-
ParameterValue error. If you do not specify
either, Elastic Beanstalk returns a MissingRe-
quiredParameter error.
Type: String
Default: None
Length Constraints: Minimum value of 1. Maximum
value of 100.
-t
--template-name name
ConditionalThe name of the environment to describe.
Type: String
Default: None
Length Constraints: Minimum value of 4. Maximum
value of 23.
-e
--environment-name name
Output
The command returns a table with the following information:
• ConfigurationSettings—A list of the configuration settings.
API Version 2010-12-01
759
Elastic Beanstalk Developer Guide
Operations

Examples
Describing Configuration Settings for an Environment
This example shows how to describe the configuration options for an environment.
PROMPT> elastic-beanstalk-describe-configuration-settings -a MySampleApp -e
MySampleAppEnv
Related Operations
• elastic-beanstalk-delete-environment-configuration (p. 753)
API Version 2010-12-01
760
Elastic Beanstalk Developer Guide
Operations

elastic-beanstalk-describe-environment-resources
Description
Returns AWS resources for this environment.
Syntax
elastic-beanstalk-describe-environment-resources [-e [name] | -E [id]]
Options
RequiredDescriptionName
ConditionalThe name of the environment to retrieve AWS re-
source usage data.
Type: String
Default: None
Length Constraints: Minimum value of 4. Maximum
value of 23.
-e
--environment-name name
ConditionalThe ID of the environment to retrieve AWS resource
usage data.
Type: String
Default: None
-E
--environment-id id
Output
The command returns a table with the following information:
• AutoScalingGroups—A list of AutoScalingGroups used by this environment.
• EnvironmentName—The name of the environment.
• Instances—The Amazon EC2 instances used by this environment.
• LaunchConfigurations—The Auto Scaling launch configurations in use by this environment.
• LoadBalancers—The LoadBalancers in use by this environment.
• Triggers—The AutoScaling triggers in use by this environment.
Examples
Describing Environment Resources for an Environment
This example shows how to describe environment resources for an environment.
PROMPT> elastic-beanstalk-describe-environment-resources -e MySampleAppEnv
API Version 2010-12-01
761
Elastic Beanstalk Developer Guide
Operations

elastic-beanstalk-describe-environments
Description
Returns descriptions for existing environments.
Syntax
elastic-beanstalk-describe-environments -e [names [,name...]] -E [ids [,id...]]
-a [name] -l [label] -d -D [timestamp]
Options
RequiredDescriptionName
NoA list of environment names.
Type: String[]
Default: None
-e
--environment-names names
NoA list of environment IDs.
Type: String[]
Default: None
-E
--environment-ids ids
NoA list of descriptions associated with the application.
Type: String
Default: None
Length Constraints: Minimum value of 1. Maximum
value of 100.
-a
--application-name name
NoA list of descriptions associated with the application
version.
Type: String
Default: None
Length Constraints: Minimum value of 1. Maximum
value of 100.
-l
--version-label label
NoIndicates whether to include deleted environments.
true: Environments that have been deleted after
--include-deleted-back-to are displayed.
false: Do not include deleted environments.
Type: Boolean
Default: true
-d
--include-deleted
NoIf --include-deleted is set to true, then a list of
environments that were deleted after this date are
displayed.
Type: Date Time
Default: None
-D
--include-deleted-back-to
timestamp
Output
The command returns a table with the following information:
API Version 2010-12-01
762
Elastic Beanstalk Developer Guide
Operations

• ApplicationName—The name of the application associated with this environment.
• CNAME—The URL to the CNAME for this environment.
• DateCreated—The date the environment was created.
• DateUpdated—The date the environment was last updated.
• Description—The description of the environment.
• EndpointURL—The URL to the LoadBalancer for this environment.
• EnvironmentID—The ID of this environment.
• EnvironmentName—The name of this environment.
• Health—Describes the health status of the environment. Elastic Beanstalk indicates the failure levels
for a running environment:
• Red: Indicates the environment is not responsive. Occurs when three or more consecutive failures
occur for an environment.
• Yellow: Indicates that something is wrong. Occurs when two consecutive failures occur for an
environment.
• Green: Indicates the environment is healthy and fully functional.
• Gray: Default health for a new environment.The environment is not fully launched and health checks
have not started or health checks are suspended during an UpdateEnvironment or
RestartEnvironmentrequest.
• Resources—A list of AWS resources used in this environment.
• SolutionStackName—The name of the SolutionStack deployed with this environment.
• Status—The current operational status of the environment:
• Launching: Environment is in the process of initial deployment.
• Updating: Environment is in the process of updating its configuration settings or application version.
• Ready: Environment is available to have an action performed on it, such as update or terminate.
• Terminating: Environment is in the shut-down process.
• Terminated: Environment is not running.
• TemplateName—The name of the configuration template used to originally launch this environment.
• VersionLabel—The application version deployed in this environment.
Examples
Describing Environments
This example shows how to describe existing environments.
PROMPT> elastic-beanstalk-describe-environments
API Version 2010-12-01
763
Elastic Beanstalk Developer Guide
Operations

elastic-beanstalk-describe-events
Description
Returns a list of event descriptions matching criteria up to the last 6 weeks.
Note
This action returns the most recent 1,000 events from the specified NextToken.
Syntax
elastic-beanstalk-describe-events -a [name] -e [name] -E [id] -l [label] -L
[timestamp] -m [count] -n [token] -r [id] -s [level] -S [timestamp] -t [name]
Options
RequiredDescriptionName
NoThe name of the application.
Type: String
Default: None
Length Constraints: Minimum value of 1. Maximum
value of 100.
-a
--application-name name
NoThe name of the environment.
Type: String
Default: None
Length Constraints: Minimum value of 4. Maximum
value of 23.
-e
--environment-name name
NoThe ID of the environment.
Type: String
Default: None
-E
--environment-id id
NoThe application version.
Type: String
Default: None
Length Constraints: Minimum value of 1. Maximum
value of 100.
-l
--version-label label
NoIf specified, a list of events that occurred up to but
not including the specified time is returned.
Type: Date Time
Default: None
-L
--end-time timestamp
NoSpecifies the maximum number of events that can
be returned, beginning with the most recent event.
Type: Integer
Default: None
-m
--max-records count
NoPagination token. Used to return the next batch of
results.
Type: String
Default: None
-n
--next-token token
API Version 2010-12-01
764
Elastic Beanstalk Developer Guide
Operations

RequiredDescriptionName
NoThe request ID.
Type: String
Default: None
-r
--request-id id
NoIf specified, a list of events with the specified
severity level or higher is returned.
Type: String
Valid Values:TRACE | DEBUG | INFO | WARN | ERROR
| FATAL
Default: None
-s
--severity level
NoIf specified, a list of events that occurred after the
specified time is returned.
Type: Date Time
Default: None
-S
--start-time timestamp
NoThe name of the configuration template.
Type: String
Default: None
Length Constraints: Minimum value of 1. Maximum
value of 100.
-t
--template-name name
Output
The command returns a table with the following information:
• ApplicationName—The name of the application associated with the event.
• EnvironmentName—The name of the environment associated with the event.
• EventDate—The date of the event.
• Message—The event's message.
• RequestID—The web service request ID for the activity of this event.
• Severity—The severity level of the event.
• TemplateName—The name of the configuration associated with this event.
• VersionLabel—The release label for the application version associated with this event.
Examples
Describing Events for an Environment with a Security Level
This example shows how to describe events that have a severity level of WARN or higher for an
environment.
PROMPT> elastic-beanstalk-describe-events -e MySampleAppEnv -s WARN
API Version 2010-12-01
765
Elastic Beanstalk Developer Guide
Operations

elastic-beanstalk-list-available-solution-stacks
Description
Returns a list of available solution stack names.
Syntax
elastic-beanstalk-list-available-solution-stacks
Output
The command returns of available solution stack names.
Examples
Listing the Available Solution Stacks
This example shows how to get the list of available solution stacks.
PROMPT> elastic-beanstalk-list-available-solution-stacks
API Version 2010-12-01
766
Elastic Beanstalk Developer Guide
Operations

elastic-beanstalk-rebuild-environment
Description
Deletes and recreates all of the AWS resources (for example: the Auto Scaling group, LoadBalancer,
etc.) for a specified environment and forces a restart.
Syntax
elastic-beanstalk-rebuild-environment [-e [name] | -E [id]]
Options
RequiredDescriptionName
ConditionalA name of the environment to rebuild.
Type: String
Default: None
Length Constraints: Minimum value of 4. Maximum
value of 23.
-e
--environment-name name
ConditionalThe ID of the environment to rebuild.
Type: String
Default: None
-E
--environment-id id
Output
The command outputs Rebuilding environment.
Examples
Rebuilding an Environment
This example shows how to rebuild an environment.
PROMPT> elastic-beanstalk-rebuild-environment -e MySampleAppEnv
API Version 2010-12-01
767
Elastic Beanstalk Developer Guide
Operations

elastic-beanstalk-request-environment-info
Description
Initiates a request to compile the specified type of information of the deployed environment.
Setting the InfoType to tail compiles the last lines from the application server log files of every Amazon
EC2 instance in your environment. Use RetrieveEnvironmentInfo to access the compiled information.
Syntax
elastic-beanstalk-request-environment-info [-e [name] | -E [id]] -i [type]
Options
RequiredDescriptionName
ConditionalThe name of the environment of the requested
data.
Type: String
Default: None
Length Constraints: Minimum value of 4. Maximum
value of 23.
-e
--environment-name name
ConditionalThe ID of the environment of the requested data.
Type: String
Default: None
-E
--environment-id id
YesThe type of information to request.
Type: String
Valid Values: tail
Default: None
-i
--info-type type
Examples
Requesting Environment Information
This example shows how to request environment information.
PROMPT> elastic-beanstalk-request-environment-info -e MySampleAppEnv -i tail
Related Operations
• elastic-beanstalk-retrieve-environment-info (p. 770)
API Version 2010-12-01
768
Elastic Beanstalk Developer Guide
Operations

elastic-beanstalk-restart-app-server
Description
Causes the environment to restart the application container server running on each Amazon EC2 instance.
Syntax
elastic-beanstalk-restart-app-server [-e [name] | -E [id]]
Options
RequiredDescriptionName
ConditionalThe name of the environment to restart the server
for.
Type: String
Default: None
Length Constraints: Minimum value of 4. Maximum
value of 23.
-e
--environment-name name
ConditionalThe ID of the environment to restart the server for.
Type: String
Default: None
-E
--environment-id id
Examples
Restarting the Application Server
This example shows how to restart the application server.
PROMPT> elastic-beanstalk-restart-app-server -e MySampleAppEnv
API Version 2010-12-01
769
Elastic Beanstalk Developer Guide
Operations

elastic-beanstalk-retrieve-environment-info
Description
Retrieves the compiled information from a RequestEnvironmentInfo request.
Syntax
elastic-beanstalk-retrieve-environment-info [-e [name] | -E [id]] -i [type]
Options
RequiredDescriptionName
ConditionalThe name of the data's environment. If no environ-
ments are found, Elastic Beanstalk returns an In-
validParameterValue error.
Type: String
Default: None
Length Constraints: Minimum value of 4. Maximum
value of 23.
-e
--environment-name name
ConditionalThe ID of the data's environment.
The name of the data's environment. If no environ-
ments are found, Elastic Beanstalk returns an In-
validParameterValue error.
Type: String
Default: None
-E
--environment-id id
YesThe type of information to retrieve.
Type: String
Valid Values: tail
Default: None
-i
--info-type type
Output
The command returns a table with the following information:
• EC2InstanceId—The Amazon EC2 instance ID for this information.
• InfoType—The type of information retrieved.
• Message—The retrieved information.
• SampleTimestamp—The time stamp when this information was retrieved.
Examples
Retrieving Environment Information
This example shows how to retrieve environment information.
PROMPT> elastic-beanstalk-retrieve-environment-info -e MySampleAppEnv -i tail
API Version 2010-12-01
770
Elastic Beanstalk Developer Guide
Operations


elastic-beanstalk-swap-environment-cnames
Description
Swaps the CNAMEs of two environments.
Syntax
elastic-beanstalk-swap-environment-cnames [-s [name] | -S [desc]] [-d [desc] |
-D [desc]]
Options
RequiredDescriptionName
ConditionalThe name of the source environment.
Type: String
Default: None
-s
--source-environment-name
name
ConditionalThe ID of the source environment.
Type: String
Default: None
-S
--source-environment-id id
ConditionalThe name of the destination environment.
Type: String
Default: None
-d
--destination-environment-
name name
ConditionalThe ID of the destination environment.
Type: String
Default: None
-D
--destination-environment-id
id
Examples
Swapping Environment CNAMEs
This example shows how to swap the CNAME for two environments.
PROMPT> elastic-beanstalk-swap-environment-cnames -s MySampleAppEnv -d
MySampleAppEnv2
API Version 2010-12-01
772
Elastic Beanstalk Developer Guide
Operations

elastic-beanstalk-terminate-environment
Description
Terminates the specified environment.
Syntax
elastic-beanstalk-terminate-environment [-e [name] | -E [id]] -t
Options
RequiredDescriptionName
ConditionalThe name of the environment to terminate.
Type: String
Default: None
Length Constraints: Minimum value of 4. Maximum
value of 23.
-e
--environment-name name
ConditionalThe ID of the environment to terminate.
Type: String
Default: None
-E
--environment-id id
NoIndicates whether the associated AWS resources
should shut down when the environment is termin-
ated:
• true: The specified environment as well as the
associated AWS resources, such as Auto Scaling
group and LoadBalancer, are terminated.
• false: Elastic Beanstalk resource management
is removed from the environment, but the AWS
resources continue to operate.
Type: Boolean
Valid Values: true | false
Default: true
Note
You can specify this parameter (-t) only
for legacy environments because only
legacy environments can have resources
running when you terminate the environ-
ment.
-t
--terminate-resources
Output
The command returns a table with the following information:
• ApplicationName—The name of the application associated with this environment.
• CNAME—The URL to the CNAME for this environment.
API Version 2010-12-01
773
Elastic Beanstalk Developer Guide
Operations

• DateCreated—The date the environment was created.
• DateUpdated—The date the environment was last updated.
• Description—The description of the environment.
• EndpointURL—The URL to the LoadBalancer for this environment.
• EnvironmentID—The ID of this environment.
• EnvironmentName—The name of this environment.
• Health—Describes the health status of the environment. Elastic Beanstalk indicates the failure levels
for a running environment:
• Red: Indicates the environment is not responsive. Occurs when three or more consecutive failures
occur for an environment.
• Yellow: Indicates that something is wrong. Occurs when two consecutive failures occur for an
environment.
• Green: Indicates the environment is healthy and fully functional.
• Gray: Default health for a new environment.The environment is not fully launched and health checks
have not started or health checks are suspended during an UpdateEnvironment or
RestartEnvironmentrequest.
• Resources—A list of AWS resources used in this environment.
• SolutionStackName—The name of the SolutionStack deployed with this environment.
• Status—The current operational status of the environment:
• Launching: Environment is in the process of initial deployment.
• Updating: Environment is in the process of updating its configuration settings or application version.
• Ready: Environment is available to have an action performed on it, such as update or terminate.
• Terminating: Environment is in the shut-down process.
• Terminated: Environment is not running.
• TemplateName—The name of the configuration template used to originally launch this environment.
• VersionLabel—The application version deployed in this environment.
Examples
Terminating an Environment
This example shows how to terminate an environment.
PROMPT> elastic-beanstalk-terminate-environment -e MySampleAppEnv
API Version 2010-12-01
774
Elastic Beanstalk Developer Guide
Operations

elastic-beanstalk-update-application
Description
Updates the specified application to have the specified properties.
Note
If a property (for example, description) is not provided, the value remains unchanged.To
clear these properties, specify an empty string.
Syntax
elastic-beanstalk-update-application -a [name] -d [desc]
Options
RequiredDescriptionName
YesThe name of the application to update. If no such
application is found, Elastic Beanstalk returns an
InvalidParameterValue error.
Type: String
Default: None
Length Constraints: Minimum value of 1. Maximum
value of 100.
-a
--application-name name
NoA new description for the application.
Type: String
Default: If not specified, Elastic Beanstalk does not
update the description.
Length Constraints: Minimum value of 0. Maximum
value of 200.
-d
--description desc
Output
The command returns a table with the following information:
• ApplicationName—The name of the application.
• ConfigurationTemplate—The names of the configuration templates associated with this application.
• DateCreated—The date the environment was created.
• DateUpdated—The date the environment was last updated.
• Description—The description of the environment.
• Versions—The names of the versions for this application.
Examples
Updating an Application
This example shows how to update an application.
API Version 2010-12-01
775
Elastic Beanstalk Developer Guide
Operations

PROMPT> elastic-beanstalk-update-application -a MySampleApp -d "My new descrip
tion"
API Version 2010-12-01
776
Elastic Beanstalk Developer Guide
Operations

elastic-beanstalk-update-application-version
Description
Updates the specified application version to have the specified properties.
Note
If a property (for example, description) is not provided, the value remains unchanged.To
clear these properties, specify an empty string.
Syntax
elastic-beanstalk-update-application-version -a [name] -l [label] -d [desc]
Options
RequiredDescriptionName
YesThe name of the application associated with this
version. If no such application is found, Elastic
Beanstalk returns an InvalidParameterValue
error.
Type: String
Default: None
Length Constraints: Minimum value of 1. Maximum
value of 100.
-a
--application-name name
YesThe name of the version to update.
If no application version is found with this label,
Elastic Beanstalk returns an InvalidParaemter-
Value error.
Type: String
Length Constraints: Minimum value of 1. Maximum
value of 100.
-l
--version-label
NoA new description for the release.
Type: String
Default: If not specified, Elastic Beanstalk does not
update the description.
Length Constraints: Minimum value of 0. Maximum
value of 200.
-d
--description
Output
The command returns a table with the following information:
• ApplicationName—The name of the application associated with this release.
• DateCreated—The creation date of the application version.
• DateUpdated—The last modified date of the application version.
• Description—The description of this application version.
• SourceBundle—The location where the source bundle is located for this version.
• VersionLabel—A label identifying the version for the associated application.
API Version 2010-12-01
777
Elastic Beanstalk Developer Guide
Operations

Examples
Updating an Application Version
This example shows how to update an application version.
PROMPT> elastic-beanstalk-update-application-version -a MySampleApp -d "My new
version" -l "TestVersion 1"
API Version 2010-12-01
778
Elastic Beanstalk Developer Guide
Operations

elastic-beanstalk-update-configuration-template
Description
Updates the specified configuration template to have the specified properties or configuration option
values.
Note
If a property (for example, ApplicationName) is not provided, its value remains unchanged.
To clear such properties, specify an empty string.
Syntax
elastic-beanstalk-update-configuration-template -a [name] -t [name] -d [desc]
-f [filename] -F [filename]
Options
RequiredDescriptionName
YesThe name of the application associated with the
configuration template to update. If no application
is found with this name, Elastic Beanstalk returns
an InvalidParameterValue error.
Type: String
Default: None
Length Constraints: Minimum value of 1. Maximum
value of 100.
-a
--application-name name
YesThe name of the configuration template to update.
If no configuration template is found with this name,
UpdateConfigurationTemplate returns an Invalid-
ParameterValue error.
Type: String
Default: None
Length Constraints: Minimum value of 1. Maximum
value of 100.
-t
--template-name name
NoA new description for the configuration.
Type: String
Default: None
Length Constraints: Minimum value of 0. Maximum
value of 200.
-d
--description desc
NoThe name of a JSON file that contains option set-
tings to update with the new specified option value.
Type: String
-f
--options-file filename
NoThe name of a JSON file that contains configuration
options to remove.
Type: String
Default: None
-F
--options-to-remove-file
value
API Version 2010-12-01
779
Elastic Beanstalk Developer Guide
Operations

Output
The command returns a table with the following information:
• ApplicationName—The name of the application associated with this configuration set.
• DateCreated—The date (in UTC time) when this configuration set was created.
• DateUpdated—The date (in UTC time) when this configuration set was last modified.
• DeploymentStatus—If this configuration set is associated with an environment, the DeploymentStatus
parameter indicates the deployment status of this configuration set:
• null: This configuration is not associated with a running environment.
• pending: This is a draft configuration that is not deployed to the associated environment but is in
the process of deploying.
• deployed:This is the configuration that is currently deployed to the associated running environment.
• failed: This is a draft configuration that failed to successfully deploy.
• Description—The description of the configuration set.
• EnvironmentName—If not null, the name of the environment for this configuration set.
• OptionSettings—A list of configuration options and their values in this configuration set.
• SolutionStackName—The name of the solution stack this configuration set uses.
• TemplateName—If not null, the name of the configuration template for this configuration set.
Examples
Updating a Configuration Template
This example shows how to update a configuration template. For a list of configuration settings, see
Option Values (p. 707).
PROMPT> elastic-beanstalk-update-configuration-template -a MySampleApp -t mycon
figtemplate -d "My updated configuration template" -f "Options.txt"
Options.txt
[
{"Namespace": "aws:elasticbeanstalk:application:environment",
"OptionName": "my_custom_param_1",
"Value": "firstvalue"},
{"Namespace": "aws:elasticbeanstalk:application:environment",
"OptionName": "my_custom_param_2",
"Value": "secondvalue"}
]
Related Operations
• elastic-beanstalk-describe-configuration-options (p. 757)
API Version 2010-12-01
780
Elastic Beanstalk Developer Guide
Operations

elastic-beanstalk-update-environment
Description
Updates the environment description, deploys a new application version, updates the configuration settings
to an entirely new configuration template, or updates select configuration option values in the running
environment.
Attempting to update both the release and configuration is not allowed and Elastic Beanstalk returns an
InvalidParameterCombination error.
When updating the configuration settings to a new template or individual settings, a draft configuration
is created and DescribeConfigurationSettings for this environment returns two setting descriptions
with different DeploymentStatus values.
Syntax
elastic-beanstalk-update-environment [-e [name] | -E [id]] -l [label] -t [name]
-d [desc] -f [filename] -F [filename]
Options
RequiredDescriptionName
ConditionalThe name of the environment to update. If no en-
vironment with this name exists, Elastic Beanstalk
returns an InvalidParameterValue error.
Type: String
Default: None
Length Constraints: Minimum value of 4. Maximum
value of 23.
-e
--environment-name name
ConditionalThe ID of the environment to update. If no environ-
ment with this ID exists, Elastic Beanstalk returns
an InvalidParameterValue error.
Type: String
Default: None
-E
--environment-id id
NoIf this parameter is specified, Elastic Beanstalk
deploys the named application version to the envir-
onment. If no such application version is found,
Elastic Beanstalk returns an InvalidParameter-
Value error.
Type: String
Default: None
Length Constraints: Minimum value of 1. Maximum
value of 100.
-l
--version-label label
API Version 2010-12-01
781
Elastic Beanstalk Developer Guide
Operations

RequiredDescriptionName
NoIf this parameter is specified, Elastic Beanstalk
deploys this configuration template to the environ-
ment. If no such configuration template is found,
Elastic Beanstalk returns an InvalidParameter-
Value error.
Type: String
Default: None
Length Constraints: Minimum value of 1. Maximum
value of 100.
-t
--template-name name
NoIf this parameter is specified, Elastic Beanstalk
updates the description of this environment.
Type: String
Default: None
Length Constraints: Minimum value of 0. Maximum
value of 200.
-d
--description desc
NoA file containing option settings to update. If spe-
cified, Elastic Beanstalk updates the configuration
set associated with the running environment and
sets the specified configuration options to the re-
quested values.
Type: String
Default: None
-f
--options-file filename
NoA file containing options settings to remove. If
specified, Elastic Beanstalk removes the option
settings from the configuration set associated with
the running environment.
Type: String
Default: None
-F
--options-to-remove-filefi-
lename
Output
The command returns a table with the following information:
• ApplicationName—The name of the application associated with this environment.
• CNAME—The URL to the CNAME for this environment.
• DateCreated—The date the environment was created.
• DateUpdated—The date the environment was last updated.
• Description—The description of the environment.
• EndpointURL—The URL to the LoadBalancer for this environment.
• EnvironmentID—The ID of this environment.
• EnvironmentName—The name of this environment.
• Health—Describes the health status of the environment. Elastic Beanstalk indicates the failure levels
for a running environment:
• Red: Indicates the environment is not responsive. Occurs when three or more consecutive failures
occur for an environment.
API Version 2010-12-01
782
Elastic Beanstalk Developer Guide
Operations

• Yellow: Indicates that something is wrong. Occurs when two consecutive failures occur for an
environment.
• Green: Indicates the environment is healthy and fully functional.
• Gray: Default health for a new environment.The environment is not fully launched and health checks
have not started or health checks are suspended during an UpdateEnvironment or
RestartEnvironmentrequest.
• Resources—A list of AWS resources used in this environment.
• SolutionStackName—The name of the SolutionStack deployed with this environment.
• Status—The current operational status of the environment:
• Launching: Environment is in the process of initial deployment.
• Updating: Environment is in the process of updating its configuration settings or application version.
• Ready: Environment is available to have an action performed on it, such as update or terminate.
• Terminating: Environment is in the shut-down process.
• Terminated: Environment is not running.
• TemplateName—The name of the configuration template used to originally launch this environment.
• VersionLabel—The application version deployed in this environment.
Examples
Updating an Existing Environment
This example shows how to update an existing environment. It passes in a file called Options.txt that
updates the size of the instance to a t1.micro and sets two environment variables. For a list of possible
configuration settings, see Option Values (p. 707).
PROMPT> elastic-beanstalk-update-environment -e MySampleAppEnv -f "Options.txt"
Options.txt
[
{"Namespace": "aws:autoscaling:launchconfiguration",
"OptionName": "InstanceType",
"Value": "t1.micro"},
{"Namespace": "aws:elasticbeanstalk:application:environment",
"OptionName": "my_custom_param_1",
"Value": "firstvalue"},
{"Namespace": "aws:elasticbeanstalk:application:environment",
"OptionName": "my_custom_param_2",
"Value": "secondvalue"}
]
API Version 2010-12-01
783
Elastic Beanstalk Developer Guide
Operations

elastic-beanstalk-validate-configuration-settings
Description
Takes a set of configuration settings and either a configuration template or environment, and determines
whether those values are valid.
This action returns a list of messages indicating any errors or warnings associated with the selection of
option values.
Syntax
elastic-beanstalk-validate-configuration-settings -a [name] -t [name] -e [name]
-f [filename]
Options
RequiredDescriptionName
YesThe name of the application that the configuration
template or environment belongs to.
Type: String
Default: None
Length Constraints: Minimum value of 1. Maximum
value of 100.
-a
--application-name name
NoThe name of the configuration template to validate
the settings against.
Condition:You cannot specify both this and the
environment name.
Type: String
Default: None
Length Constraints: Minimum value of 1. Maximum
value of 100.
-t
--template-name name
NoThe name of the environment to validate the set-
tings against.
Type: String
Default: None
Length Constraints: Minimum value of 4. Maximum
value of 23.
-e
--environment-name name
YesThe name of a JSON file that contains a list of op-
tions and desired values to evaluate.
Type: String
-f
--options-file filename
Output
The command returns a table with the following information:
• Message—A message describing the error or warning.
• Namespace
• OptionName
API Version 2010-12-01
784
Elastic Beanstalk Developer Guide
Operations

• Severity—An indication of the severity of this message:
• error: This message indicates that this is not a valid settings for an option.
• warning: This message provides information you should take into account.
Examples
Validating Configuration Settings for an Environment
This example shows how to validate the configuration settings for an environment.
PROMPT> elastic-beanstalk-validate-configuration-settings -a MySampleApp -e
MySampleAppEnv -f MyOptionSettingsFile.json
AWS DevTools
Topics
• Getting Set Up (p. 785)
• Develop, Test, and Deploy (p. 788)
This section provides step by step instructions for deploying your PHP web application to Elastic Beanstalk
using AWS DevTools, a Git client extension. For more information on prerequisites and installation
instructions for AWS DevTools, see Getting Set Up (p. 785).You can also use the AWS Management
Console, CLIs, or APIs to upload your PHP files using a .zip file. For more information, see Managing
and Configuring Applications and Environments Using the Console, CLI, and APIs (p. 278).
After you deploy your Elastic Beanstalk application, you can use the AWS Management Console, CLIs,
or the APIs to manage your Elastic Beanstalk environment. For more information, see Managing and
Configuring Applications and Environments Using the Console, CLI, and APIs (p. 278).
Getting Set Up
AWS DevTools is a Git client extension that enables you to deploy applications to Elastic Beanstalk
quickly. This section describes the prerequisites for running AWS DevTools, where to get it, and how to
set it up. For an example of how to configure your Git environment and deploy your Elastic Beanstalk
application using AWS DevTools, see Develop, Test, and Deploy (p. 788).
Linux/Unix and Mac
The AWS DevTools works on Linux, Unix, and Mac OS X operating systems.This document assumes
you can work in one of these environments.You can set up AWS DevTools in a few basic steps:
• Install the prerequisite software
• Download AWS DevTools
• Create a Git repository directory
• Run the AWS DevTools setup script
Note
Versions 2.6.1 and later of the AWS DevTools use Python. Version 2.6.0 uses Ruby. Follow the
instructions that apply to your setup.
API Version 2010-12-01
785
Elastic Beanstalk Developer Guide
AWS DevTools

To set up AWS DevTools 2.6.1 or later on a Linux/Unix or Mac computer
1. Install the following software onto your local computer:
• Git – To download Git, go to http://git-scm.com/. Make sure you have at least version 1.6.6 or later.
To determine whether Git is already installed, type the following command at the command prompt:
git
If Git is installed, you should get a list of the most commonly used commands.
• Boto 2.27.0 or later – To view and download Boto, go to https://github.com/boto/boto.
2. Download AWS DevTools, which is part of the command line interface package, from the AWS
Sample Code & Libraries website. Simply download the .zip file for version 2.6.1, and unzip it to a
directory on your local machine.
3. If you haven't already set up a Git repository, you'll need to first create one. If you have an application
in a directory, you can change to that directory and then type the following command to initialize your
Git repository.
git init .
4. From your Git repository directory, run AWSDevTools-RepositorySetup.sh.You can find
AWSDevTools-RepositorySetup.sh in the AWS DevTools/Linux directory.You need to run this
script for each Git repository.
To learn how to create and deploy an application using AWS DevTools, see AWS DevTools (p. 785).
5. If you previously installed an earlier version of the AWS DevTools, go to your existing source directory
and then type the following command to complete the update to the new version.
eb init
To set up AWS DevTools 2.6.0 on a Linux/Unix or Mac computer
1. Install the following software on to your local computer:
• Git – To download Git, go to http://git-scm.com/. Make sure you have at least version 1.6.6 or later.
To determine whether Git is already installed, type the following command at the command prompt:
git
If Git is installed, you should get a list of the most commonly used commands.
• Ruby version 1.8.7 or later – To view and download Ruby clients, go to http://www.ruby-lang.org/
en/.
To determine whether Ruby is already installed, type the following command at the command
prompt:
ruby -v
API Version 2010-12-01
786
Elastic Beanstalk Developer Guide
Getting Set Up

If Ruby responds, and if it shows a version number at or above 1.8.7, then you have the correct
version installed.
2. Download AWS DevTools, which is part of the command line interface package, from the AWS
Sample Code & Libraries website. Simply download the .zip file for version 2.6.0, and unzip it to a
directory on your local machine.
3. If you haven't already set up a Git repository, you'll need to first create one. If you have an application
in a directory, you can change to that directory and then type the following command to initialize your
Git repository.
git init .
4. From your Git repository directory, run AWSDevTools-RepositorySetup.sh.You can find
AWSDevTools-RepositorySetup.sh in the AWS DevTools/Linux directory.You need to run this
script for each Git repository.
To learn how to create and deploy an application using AWS DevTools, see AWS DevTools (p. 785).
Windows
The AWS DevTools works on Windows operating systems.This document assumes you can work in a
Windows environment.You can set up AWS DevTools in a few basic steps:
• Install the prerequisite software
• Download AWS DevTools
• Run the setup script
• Create a Git repository directory
• Run the repository setup script
To set up AWS DevTools on a Windows computer
1. Install the following prerequisites:
• Git.To download Git, go to http://git-scm.com/. Make sure you have version 1.6.6 or later.
• PowerShell 2.0. Windows 7 and Windows Server 2008 R2 comes with PowerShell 2.0. For earlier
versions of Windows, you can download PowerShell 2.0.Visit http://technet.microsoft.com/en-us/
scriptcenter/dd742419.aspx for more details.
Note
You can check Control Panel | Programs | Programs and Features to verify if you have
previously installed these applications.
2. Download AWS DevTools, which is part of the command line interface package, at the AWS Sample
Code & Libraries website. Simply download the .zip file, and unzip it to a directory on your local
machine.
3. Double-click AWSDevTools-OneTimeSetup.bat.You can find AWSDevTools-OneTimeSetup.bat
in the AWS DevTools/Windows directory. The setup script installs all of the necessary pieces for
pushing AWS Elastic Beanstalk applications.You need to run this setup script only once.
4. If you haven't already set up a Git repository, you'll need to first create one. If you have an application
in a directory, you can change to that directory and then type the following command to initialize your
Git repository.
API Version 2010-12-01
787
Elastic Beanstalk Developer Guide
Getting Set Up

git init .
Note
You need to run the PowerShell commands from an environment that has access to Git. If
you installed Git as a native Windows program, that would be cmd.exe. If you installed Git
wrapped inside Git Bash, that would be Git Bash.
5. Copy the AWSDevTools-RepositorySetup.bat from the AWS DevTools/Windows directory to your
Git repository directory, and then double-click AWSDevTools-RepositorySetup.bat.You need to
run this script for each Git repository.
Note
If you receive an error, try running the AWSDevTools-OneTimeSetup.bat file again.
To learn how to create and deploy an application using AWS DevTools, see AWS DevTools (p. 785).
Develop,Test, and Deploy
Topics
• Develop Locally (p. 789)
• Test Locally (p. 789)
• Deploy to AWS Elastic Beanstalk (p. 789)
• Debug/View Logs (p. 792)
• Edit the Application and Redeploy (p. 792)
• Deploy to Production (p. 792)
• Deploy an Existing Application Version to an Existing Environment (p. 793)
The following diagram illustrates a typical software development life cycle including deploying your
application to Elastic Beanstalk.
Typically, after developing and testing your application locally, you will deploy your application to Elastic
Beanstalk. At this point, your application will be live at a URL such as
http://myexampleapp-wpams3yrvj.elasticbeanstalk.com. Because your application will be live, you should
consider setting up multiple environments, such as a testing environment and a production environment.
You can point your domain name to the Amazon Route 53 (a highly available and scalable Domain Name
System (DNS) web service) CNAME <yourappname>.elasticbeanstalk.com. Contact your DNS provider
to set this up. For information about how to map your root domain to your Elastic Load Balancer, see
Using Elastic Beanstalk with Amazon Route 53 to Map Your Domain to Your Load Balancer (p. 528). After
you remotely test and debug your Elastic Beanstalk application, you can then make any updates and
redeploy to Elastic Beanstalk. After you are satisfied with all of your changes, you can upload your latest
version to your production environment.The following sections provide more details explaining each
stage of the software development life cycle.
API Version 2010-12-01
788
Elastic Beanstalk Developer Guide
Develop,Test, and Deploy

Develop Locally
After installing AWS DevTools on your local computer, you use the Git command line as you normally
would to create your local repository and add and commit changes. (For more information about installing
AWS DevTools, see Getting Set Up.) You create your PHP application as you normally would with your
favorite editor. If you don't already have a PHP application ready, you can use a simple "Hello World"
application.Type the following program into your favorite editor, and save it as a PHP file.
<html>
<head>
<title>PHP Test</title>
</head>
<body>
<?php echo '<p>Hello World</p>'; ?>
</body>
</html>
Next, create a new local repository, add your new program, and commit your change.
git add .
git commit -m "initial check-in"
Note
For information about Git commands, go to Git - Fast Version Control System.
Test Locally
Normally, at this point you would test your application locally before deploying to Elastic Beanstalk.
Suppose you find a few issues you would like to fix. Using the above "Hello World" application, add a "!"
after "Hello World" and check in your changes. Update your index.php file, and then type the following
commands to check in your updated file.
git add .
git commit -m "my second check-in"
After you commit your changes, you should see a response similar to the following:
[master 0535814] my second check-in
1 files changed, 1 insertions(+), 1 deletions(-)
Note the commit ID that is generated. AWS DevTools will use this ID to generate a version label for your
application.
Deploy to AWS Elastic Beanstalk
After testing your application, you are ready to deploy it to Elastic Beanstalk. Deploying requires the
following steps:
• Use the AWS Management Console, CLI, or APIs to create a sample application.
• Configure your Git environment. AWS DevTools is configured through the git aws.config command.
• Update the sample application with your application.
API Version 2010-12-01
789
Elastic Beanstalk Developer Guide
Develop,Test, and Deploy

When you update the sample application with your application, Elastic Beanstalk replaces the existing
sample application version with your new application version in the existing environment.
To create a sample application
1. Follow the instructions at Creating New Applications (p. 279) to create a sample Elastic Beanstalk
application using the AWS Management Console, CLI, or APIs. When selecting a solution stack,
select any of the PHP containers.
2. Verify that your Elastic Beanstalk environment is healthy (green).
After you have created a sample application to Elastic Beanstalk, you need to configure your Git
environment.
To configure your Git environment
1. Make sure you have version 2.3 of the Elastic Beanstalk command line tools installed.
Before you use eb, set your PATH to the location of eb. The following table shows an example for
Linux/UNIX and Windows.
In WindowsIn Linux and UNIX
C:\> set PATH=%PATH%;<path to un-
zipped eb CLI package>\eb\windows\
$ export PATH=$PATH:<path to unzipped
eb CLI package>/eb/linux/python2.7/
If you are using Python 3.0, the path will include
python3 rather than python2.7.
To check what version you have installed, use the following command.
eb --version
2. From your Git repository directory, type the following command.
git aws.config
3. When you are prompted for the access key ID, type your access key ID.To get your access key ID,
see How Do I Get Security Credentials? in the AWS General Reference.
AWS Access Key: AKIAIOSFODNN7EXAMPLE
Note
If you see an error instead of being prompted for configuration information, there may be
an issue with your setup. Try installing AWS DevTools again. For instructions, see Getting
Set Up (p. 785).
4. When you are prompted for the secret access key, type your secret access key.To get your secret
access key, see How Do I Get Security Credentials? in the AWS General Reference.
AWS Secret Key: wJalrXUtnFEMI/K7MDENG/bPxRfiCYEXAMPLEKEY
API Version 2010-12-01
790
Elastic Beanstalk Developer Guide
Develop,Test, and Deploy

5. When you are prompted for the Elastic Beanstalk region, type the region or press Enter to accept
the default region. For information about this product's regions, go to Regions and Endpoints in the
Amazon Web Services General Reference.
AWS Region [default to us-east-1]:
6. When you are prompted for the Elastic Beanstalk application name, type the name of the application.
The application name should match the application name that you used when you created your
sample application in Creating New Applications (p. 279). In this example, we use HelloWorld.
AWS Elastic Beanstalk Application: HelloWorld
Note
If you have a space in your application name, make sure you do not use quotes.
7. When you are prompted for the Elastic Beanstalk environment name, type the name of the
environment.The environment name should match the environment name you used when you created
your sample application in Creating New Applications (p.279). In this example, we use HelloWorldEnv.
AWS Elastic Beanstalk Environment: HelloWorldEnv
After configuring your Git environment, you are ready to update the sample application with your application.
If you want to update your Git environment, you can use the git aws.config command.When prompted,
you can update your configuration options. If you want to keep any previous settings, press the Enter
key.
To remove the settings created by the repository setup, issue the following commands:
git config --remove-section alias.aws
git config --remove-section alias.aws.elasticbeanstalk
rm .git/AWSDevTools
Note
AWS DevTools is write-only.You cannot clone a Git repository using AWS DevTools.
To update the sample application with your local application
1. Type the following command.
git aws.push
2. If everything worked as expected, you should see something similar to the following:
Counting objects: 5, done.
Delta compression using up to 4 threads.
Compressing objects:100% (2/2), done.
Writing objects: 100% (3/3), 298 bytes, done.
Total 3 (delta 1), reused 0 (delta 0)
To https://<some long string>@git.elasticbeanstalk.us-east-
1.amazon.com/helloworld/helloworldenv
44c7066..b1f11a1 master -> master
API Version 2010-12-01
791
Elastic Beanstalk Developer Guide
Develop,Test, and Deploy

3. Verify that your application has been updated by refreshing your web browser. In the AWS Elastic
Beanstalk Console applications page, view the running version of the environment.When updated,
the running version begins with the commit ID from your last commit.
Debug/View Logs
You can configure your environment so that the logs from the Amazon EC2 instances running your
applications are copied by Elastic Beanstalk to the Amazon S3 bucket associated with your application.
For instructions on how to view these logs from the AWS Management Console to help with debugging,
see Working with Logs (p. 415). If you need to test remotely, you can connect to your Amazon EC2
instances. For instructions on how to connect to your instance, see Listing and Connecting to Server
Instances (p. 413).
Edit the Application and Redeploy
Now that you have tested your application, it is easy to edit your application, redeploy, and see the results
in moments. First, make changes to your application and commit your changes. Then deploy a new
application version to your existing Elastic Beanstalk environment.
git add .
git commit -m "my third check-in"
git aws.push
A new application version will be uploaded to your Elastic Beanstalk environment.
You can use the AWS Management Console, CLIs, or APIs to manage your Elastic Beanstalk environment.
For more information, see Managing and Configuring Applications and Environments Using the Console,
CLI, and APIs (p. 278).
Deploy to Production
When you are satisfied with all of the changes you want to make to your application, you can deploy it to
your production environment. First, you'll need to create a new production environment using the AWS
Management Console, CLIs, or APIs.Then you can update your application in your production environment
using AWS DevTools. When you update your application using AWS DevTools, Elastic Beanstalk will
create a new application version. For information on how to deploy an already existing application version
to a new environment, see Launching New Environments (p. 299). The following steps walk you through
creating a new environment, and then updating your application in that environment with a new application
version using AWS DevTools.
To deploy to production using AWS DevTools
1. To launch a new environment, follow the steps at Launching New Environments (p. 299).
2. Check in final changes.
git add .
git commit -m "final check-in"
3. Deploy your application to production.
git aws.push --environment my-production-env
API Version 2010-12-01
792
Elastic Beanstalk Developer Guide
Develop,Test, and Deploy

You can also configure Git to push from a specific branch to a specific environment. For more
information, see Deploying a Git Branch to a Specific Environment (p. 677).
Deploy an Existing Application Version to an Existing
Environment
If you need to deploy an existing application to an existing environment, you can do so using the AWS
Management Console, CLI, or APIs.You may want to do this if, for instance, you need to roll back to a
previous application version. For instructions on how to deploy an existing application version to an
existing environment, see Deploying Versions to Existing Environments (p. 313).
API Version 2010-12-01
793
Elastic Beanstalk Developer Guide
Develop,Test, and Deploy

Elastic Beanstalk Resources
The following related resources can help you as you work with this service.
• Elastic Beanstalk API Reference s A comprehensive description of all SOAP and Query APIs.
Additionally, it contains a list of all SOAP data types.
• Elastic Beanstalk Sample Code and Libraries – A link to the command line tool as well as a sample
Java web application. See the links below for additional sample applications.
• Elastic Beanstalk Technical FAQ – The top questions developers have asked about this product.
• Elastic Beanstalk Release Notes – A high-level overview of the current release.This document
specifically notes any new features, corrections, and known issues.
• AWS Developer Tools – Links to developer tools and resources that provide documentation, code
samples, release notes, and other information to help you build innovative applications with AWS.
• AWS Support Center – The hub for creating and managing your AWS Support cases. Also includes
links to other helpful resources, such as forums, technical FAQs, service health status, and AWS
Trusted Advisor.
• AWS Support – The primary web page for information about AWS Support, a one-on-one, fast-response
support channel to help you build and run applications in the cloud.
• Contact Us – A central contact point for inquiries concerning AWS billing, account, events, abuse, and
other issues.
• AWS Site Terms – Detailed information about our copyright and trademark; your account, license, and
site access; and other topics.
Sample Applications
The following are download links to the sample applications that are deployed as part of Getting Started
Using Elastic Beanstalk (p. 4).
• Docker – https://s3.amazonaws.com/elasticbeanstalk-samples-us-east-1/docker-sample-v3.zip
• Preconfigured Docker (Glassfish) – https://s3.amazonaws.com/elasticbeanstalk-samples-us-east-1/
glassfish-sample.war
• Preconfigured Docker (Python 3.x) – http://elasticbeanstalk-samples-us-east-1.s3.amazonaws.com/
python3-sample.zip
API Version 2010-12-01
794
Elastic Beanstalk Developer Guide
Sample Applications

• Preconfigured Docker (Go) – http://elasticbeanstalk-samples-us-east-1.s3.amazonaws.com/
golang-sample.zip
• Java – https://elasticbeanstalk-samples-us-east-1.s3.amazonaws.com/elasticbeanstalk-sampleapp.war
• .NET – https://elasticbeanstalk-samples-us-east-1.s3.amazonaws.com/FirstSample.zip
• Node.js – http://s3.amazonaws.com/elasticbeanstalk-samples-us-east-1/nodejs-sample.zip
• PHP – http://s3.amazonaws.com/elasticbeanstalk-samples-us-east-1/php-newsample-app.zip
• Python – http://s3.amazonaws.com/elasticbeanstalk-samples-us-east-1/basicapp.zip
• Ruby (Passenger Standalone) – http://s3.amazonaws.com/elasticbeanstalk-samples-us-east-1/
ruby-sample.zip
• Ruby (Puma) – http://s3.amazonaws.com/elasticbeanstalk-samples-us-east-1/ruby2PumaSampleApp.zip
API Version 2010-12-01
795
Elastic Beanstalk Developer Guide
Sample Applications

Document History
The following table describes the important changes to the documentation since the last release of Elastic
Beanstalk.
API version: 2010-12-01
Latest documentation update: March 30th, 2015
Date ChangedDescriptionChange
30 March 2015Added information about:
• Support for canceling environment configuration updates
and application version deployments.
• Upgrading an environment's platform.
• Instance health as criteria for how rolling updates are applied.
New and updated
content
24 March 2015Added new topics describing the Multicontainer Docker plat-
form, version 2 of Dockerrun.aws.jsonfile format, and a
tutorial describing their use under Deploying Elastic Beanstalk
Applications from Docker Containers (p. 61)
New pages for Mul-
ticontainer Docker
platform
17 February
2015
Added information about:
• version 1.2 of worker environment tiers, including new sup-
port for periodic tasks
• new and updated commands for version 3.1 of EB CLI
• cloning an environment to use a newer solution stack version
New and updated
content
6 February
2015
Added content about using preconfigured Docker containers
for Go applications.
New content
28 January
2015
Updated Supported Platforms (p. 19) tables with detailed in-
formation related to new container types released on January
28, 2015 that address CVE-2015-0235 Advisory (Ghost).
Updated content
API Version 2010-12-01
796
Elastic Beanstalk Developer Guide

Date ChangedDescriptionChange
12 December
2014
Updated Supported Platforms (p. 19) tables with detailed in-
formation related to new container types released on December
12, 2014 that address ALAS-2014-461.
Updated content
25 November
2014
Updated Supported Platforms (p. 19) tables with detailed in-
formation related to new container types released on November
25, 2014.
Updated content
5 November
2014
Added content about using preconfigured Docker containers
to deploy Elastic Beanstalk applications.
Updated Supported Platforms (p. 19) tables with detailed in-
formation related to new container types released on November
5, 2014, including preconfigured Docker containers.
New and updated
content
30 October
2014
Updated Supported Platforms (p. 19) tables with detailed in-
formation related to new container types released on October
30, 2014.
Updated content
29 October
2014
Added and updated content about using EB Command Line
Interface (CLI) 3.x to deploy and manage Elastic Beanstalk
applications.
New and updated
content
28 October
2014
• Added content about deploying application versions in
batches of instances.
• Updated content about creating Launch Now URLs.
New and updated
content
23 October
2014
Updated table for aws:autoscaling:launchconfigura-
tion namespace in General Option Values (p. 707) to include
valid instance types for newly supported eu-central-1 region.
Updated content
16 October
2014
Updated Supported Platforms (p. 19) tables with detailed in-
formation related to new container types released on October
15, 2014 that address CVE-2014-3566 Advisory.
Updated content
9 October
2014
Updated Supported Platforms (p. 19) tables with detailed in-
formation related to new container types released on October
9, 2014.
Updated content
8 October
2014
Added procedures for editing Amazon RDS database instance
settings for your environment to Configuring Databases with
Elastic Beanstalk (p. 384).
Updated content
7 October
2014
Added Eb Operations (p. 680) reference for eb command line
interface.
New content
26 September
2014
Updated Supported Platforms (p. 19) tables with detailed in-
formation related to new 32-bit container types released on
September 26, 2014 that address ALAS-2014-419.
Updated content
26 September
2014
Updated Supported Platforms (p. 19) tables with detailed in-
formation related to new container types released on
September 25, 2014 that address ALAS-2014-419.
Updated content
25 September
2014
Updated Supported Platforms (p. 19) tables with detailed in-
formation related to new container types released on
September 24, 2014 that address CVE-2014-6271 Advisory.
Updated content
API Version 2010-12-01
797
Elastic Beanstalk Developer Guide

Date ChangedDescriptionChange
27 August
2014
• Added information about new support for Elastic Load Bal-
ancing cross-zone availability and connection draining.
• Updated Working with Logs (p.415) to describe new bundle
logs option.
Updated content
14 August
2014
• Updated Supported Platforms (p.19) Ruby section with new
versions of Ruby container types released on 14 August
2014.
• Updated Deploying a Rails Application to Elastic Bean-
stalk (p.262) with information pertaining to new Ruby contain-
er types.
Updated content
6 August 2014Updated Supported Platforms (p. 19) Windows and .NET
section with new versions of .NET container types released
on 6 August 2014.
Updated content
10 July 2014Added content to support new integration with Amazon
CloudWatch Logs.
New content
3 July 2014Updated Supported Platforms (p.19) tables with new versions
of container types released on 30 June 2014.
Updated content
30 June 2014New support for t2 instance types for all regions.Updated content
16 June 2014Added information about Docker 1.0 containers to Supported
Platforms (p. 19).
Updated content
5 June 2014• Updated Supported Platforms (p. 19) tables with detailed
information related to new container types that address the
June 5, 2014 OpenSSL Security Advisory.
• New support for g2 instance types in the ap-northeast-1 re-
gion.
• Support for c3 instance types in all regions.
Updated content
27 May 2014Added information about version 1.1 of worker environment
tiers.
New content
23 April 2014Added information about support for Docker containers as a
new solution stack.
New content
22 April 2014Added information about support for tagging environments.New content
9 April 2014Added information about support for a new VPC configuration
that does not require a NAT instance, including a new setting
that associates Amazon EC2 instances with public IP ad-
dresses.
New content
2 April 2014• Updated Supported Platforms (p. 19) tables with detailed
information related to new support for Ruby 2.0
• Added information about new support for Launch Now URLs
New and updated
content
API Version 2010-12-01
798
Elastic Beanstalk Developer Guide

Date ChangedDescriptionChange
18 March 2014Updated Supported Platforms (p. 19) tables with detailed in-
formation related to:
• new support for Amazon Linux 2014.02 container types
• new support for Tomcat 7.0.47 and Apache 2.2.26 for
Amazon Linux 2014.02 container types running Java 7 and
Java 6 with Tomcat 7 platforms
• new support for Nginx 1.4.3 for Amazon Linux 2013.09
container types running Node.js
• new support for g2, i2, and m3 instance types
Updated content
11 December
2013
Added new content to support the concept of environment
tiers, particularly a new type of environment tier called a
worker tier that performs background-processing tasks.
New content
8 November
2013
Updated Supported Platforms (p. 19) tables with detailed in-
formation related to:
• new support for Amazon Linux AMI version 2013.09
• new support for Python 2.7 and Java 7 with Tomcat 7 plat-
forms
• changes to container names
Added new content to support using rolling updates to manage
changes in your environment.
New and updated
content
25 October
2013
Added tables with detailed information about supported plat-
forms, including new container names and AMI versions.
New content
23 October
2013
Added content about new setting that supports customizing
timeout for commands.
New content
20 September
2013
Added content about configuring SSL on single-instance envir-
onments.
New content
21 August
2013
• Added content about mapping instance store volumes.
• Updated content about RDS password-restricted characters.
• Updated information about most recent supported version
of Node.js.
New and updated
content
17 July 2013• Added content about environment types (load balanced,
autoscaled and single instance).
• Added content about creating environments in a VPC by
using the AWS management console.
• Updated content to support the new Elastic Beanstalk con-
sole.
New and updated
content
17 April 2013Updated content to support instance profiles.Updated content
API Version 2010-12-01
799
Elastic Beanstalk Developer Guide

Date ChangedDescriptionChange
8 April 2013Updated .NET section for support for VPC, RDS, and Config-
uration Files.
Updated content
11 March 2013Updated content for Node.js container support.Updated content
18 December
2012
Updated PHP section for non-legacy container support. Added
content for customizing environment resources.
Updated content
19 November
2012
Added support for Windows Server 2012 running IIS 8.New container type
01 November
2012
Added content to support Ruby and Amazon VPC.New content
02 October
2012
Added content for customizing container types. Added content
for migrating applications using legacy container types to non-
legacy container types.
New content
04 September
2012
Added content to support Asia Pacific (Singapore) Region.New content
19 August
2012
Added content for deploying Python applications and Amazon
RDS integration.
New content
10 July 2012Added content to support US West (Oregon) Region and US
West (Northern California) Region.
New content
27 June 2012Added Get Started section for command line interface.New content
29 May 2012Added content for deploying .NET applications using the
standalone deployment tool.
New content
16 May 2012Added content to support the EU West (Ireland) Region.New content
08 May 2012Added new section for deploying .NET applications.New content
23 April 2012Added content to support the Asia Pacific (Tokyo) Region.New content
20 March 2012Added new section for deploying PHP applications using Git.New content
06 March 2012You can create a policy that allows or denies permissions to
perform specific AWS Elastic Beanstalk actions on specific
AWS Elastic Beanstalk resources.
New content
10 August
2011
Added new section for managing and configuration application
and environments using the AWS Toolkit for Eclipse.
New content
29 June 2011Combined AWS Elastic Beanstalk Getting Started Guide and
AWS Elastic Beanstalk User Guide into one guide: AWS
Elastic Beanstalk Developer Guide. Added new content for
saving and editing environment configuration settings as well
as swapping environment URLs. Added new section for CLI
reference.
New content
21 April 2011This is the added support of Java Tomcat 7 for Elastic Bean-
stalk.
New container type
04 March 2011Added new topic Using Amazon RDS and MySQL Connect-
or/J (p. 105).
New content
API Version 2010-12-01
800
Elastic Beanstalk Developer Guide

Date ChangedDescriptionChange
17 February
2011
Updated some topics for new console user interface. Added
new topics Customizing Your Elastic Beanstalk Environ-
ments (p.425) and Using Custom Environment Properties with
Elastic Beanstalk (p. 102).
New content
18 January
2011
This is the initial release of Elastic Beanstalk.New service
API Version 2010-12-01
801
Elastic Beanstalk Developer Guide

Appendix
Topics
• Customizing AWS Resources (p. 802)
• Using Amazon RDS with PHP (Legacy Container Types) (p. 815)
• Using Amazon RDS and MySQL Connector/J (Legacy Container Types) (p. 816)
• Using Custom AMIs (p. 817)
Customizing AWS Resources
This section details the supported resources and type names available for customizing Elastic Beanstalk
environments.
Topics
• AWS Resource Types Reference (p. 802)
• Resource Property Types Reference (p. 810)
• Intrinsic Function Reference (p. 812)
• Updating AWS CloudFormation Stacks (p. 814)
AWS Resource Types Reference
The following table lists the supported AWS resources and API versions used with Elastic Beanstalk
applications.
As we add support for more resources, resource type identifiers will take the following form:
AWS::aws-product-name::data-type-name
Supported API Ver-
sion
Resource Type IdentifierAWS Resource
2010-05-15AWS::CloudWatch::Alarm (p. 803)Amazon CloudWatch
2010-05-15AWS::DynamoDB::Table (p. 805)DynamoDB Table
API Version 2010-12-01
802
Elastic Beanstalk Developer Guide
Customizing AWS Resources

Supported API Ver-
sion
Resource Type IdentifierAWS Resource
2011-07-15AWS::ElastiCache::CacheCluster (p. 805)Amazon ElastiCache
Cache Cluster
2011-07-15AWS::ElastiCache::SecurityGroup (p. 807)Amazon ElastiCache Se-
curity Group
2011-07-15AWS::ElastiCache::SecurityGroupIngress (p. 808)Amazon ElastiCache Se-
curity Group Ingress
2010-03-31AWS::SNS::Subscription (p. 811)Amazon SNS Subscrip-
tion
2010-03-31AWS::SNS::Topic (p. 808)Amazon SNS Topic
2009-02-01AWS::SQS::Queue (p. 809)Amazon SQS Queue
Use AWS::Region to get the value of the region for the Elastic Beanstalk environment. Use this with the
Ref function to retrieve the value.
AWS::CloudWatch::Alarm
The AWS::CloudWatch::Alarm type creates an Amazon CloudWatch alarm.
This type supports updates. For more information about updating this resource, see PutMetricAlarm.
When you specify an AWS::CloudWatch::Alarm type as an argument to the Ref function, the value of
the AlarmName is returned.
Properties
NotesRe-
quired
TypeProperty
Indicates whether or not actions should be executed
during any changes to the alarm's state. Either true
or false.
NoStringActionsEnabled
The list of actions to execute when this alarm trans-
itions into an ALARM state from any other state. Each
action is specified as an Amazon Resource Number
(ARN). Currently the only action supported is publish-
ing to an Amazon SNS topic or an Amazon Auto
Scaling policy.
NoList of StringAlarmActions
The description for the alarm.NoStringAlarmDescription
The arithmetic operation to use when comparing the
specified Statistic and Threshold.The specified
Statistic value is used as the first operand.
Valid Values: GreaterThanOrEqualToThreshold
| GreaterThanThreshold | LessThanThreshold
| LessThanOrEqualToThreshold
YesStringComparisonOperator
API Version 2010-12-01
803
Elastic Beanstalk Developer Guide
AWS Resource Types

NotesRe-
quired
TypeProperty
The dimensions for the alarm's associated metric.NoList of Metric
Dimen-
sion (p. 810)
type
Dimensions
The number of periods over which data is compared
to the specified threshold.
YesStringEvaluationPeriods
The list of actions to execute when this alarm trans-
itions into an INSUFFICIENT_DATA state from any
other state. Each action is specified as an Amazon
Resource Number (ARN). Currently the only action
supported is publishing to an Amazon SNS topic or
an Amazon Auto Scaling policy.
NoList of StringInsufficientDataActions
The name for the alarm's associated metric.YesStringMetricName
The namespace for the alarm's associated metric.YesStringNamespace
The list of actions to execute when this alarm trans-
itions into an OK state from any other state. Each
action is specified as an Amazon Resource Number
(ARN). Currently the only action supported is publish-
ing to an Amazon SNS topic or an Amazon Auto
Scaling policy.
NoList of StringOKActions
The period in seconds over which the specified stat-
istic is applied.
YesStringPeriod
The statistic to apply to the alarm's associated metric.
Valid Values: SampleCount | Average | Sum | Min-
imum | Maximum
YesStringStatistic
The value against which the specified statistic is
compared.
YesStringThreshold
The unit for the alarm's associated metric.
Valid Values: Seconds | Microseconds | Milliseconds
| Bytes | Kilobytes | Megabytes | Gigabytes | Tera-
bytes | Bits | Kilobits | Megabits | Gigabits | Terabits
| Percent | Count | Bytes/Second | Kilobytes/Second
| Megabytes/Second | Gigabytes/Second | Tera-
bytes/Second | Bits/Second | Kilobits/Second |
Megabits/Second | Gigabits/Second | Terabits/Second
| Count/Second | None
NoStringUnit
Return Values
DescriptionTypeFunction
mystack-myalarm-3AOHFRGOXR5TNameRef (p. 814)
API Version 2010-12-01
804
Elastic Beanstalk Developer Guide
AWS Resource Types

AWS::DynamoDB::Table
Creates an DynamoDB table.
Syntax
Properties
KeySchema
The primary key structure for the table, consisting of a required HashKeyElement and an optional
RangeKeyElement, required only for composite primary keys. For more information about primary
keys, see DynamoDB Primary Key (p. 810).
Required:Yes
Type: DynamoDB Primary Key (p. 810)
Update requires: replacement (p. 814)
ProvisionedThroughput
New throughput for the specified table, consisting of values for ReadCapacityUnits and
WriteCapacityUnits. For more information about the contents of a Provisioned Throughput structure,
see DynamoDB Provisioned Throughput (p. 811).
Required:Yes
Type: DynamoDB Provisioned Throughput (p. 811)
Update requires: replacement (p. 814)
Return Value
When this resource's logical ID is provided to the Ref intrinsic function, it will return the resource's Amazon
Resource Name (ARN). For example:
{ "Ref": "MyResource" }
For the resource with the logical ID "MyResource", Ref will return the AWS resource name.
For more information about using the Ref function, see Ref (p. 814).
Template Examples
Example Simple DynamoDB Template
AWS::ElastiCache::CacheCluster
The AWS::ElastiCache::CacheCluster type creates an Amazon ElastiCache cache cluster.
Properties
AutoMinorVersionUpgrade
Indicates that minor engine upgrades will be applied automatically to the cache cluster during the
maintenance window.
Required: No
API Version 2010-12-01
805
Elastic Beanstalk Developer Guide
AWS Resource Types

Type: Boolean
Default: true
Update requires: replacement (p. 814)
CacheNodeType
The compute and memory capacity of nodes in a cache cluster.
Required:Yes
Type: String
Update requires: replacement (p. 814)
CacheParameterGroupName
The name of the cache parameter group associated with this cache cluster.
Required: No
Type: String
Update requires: no interruption (p. 814)
CacheSecurityGroupNames
A list of cache security group names associated with this cache cluster.
Required:Yes
Type: List of Strings
Update requires: no interruption (p. 814)
Engine
The name of the cache engine to be used for this cache cluster.
Required:Yes
Type: String
Update requires: replacement (p. 814)
EngineVersion
The version of the cache engine to be used for this cluster.
Required: No
Type: String
Update requires: no interruption (p. 814)
NotificationTopicArn
The Amazon Resource Name (ARN) of the Amazon Simple Notification Service (SNS) topic to which
notifications will be sent.
Required: No
Type: String
Update requires: no interruption (p. 814)
NumCacheNodes
The number of cache nodes the cache cluster should have.
Required: No
API Version 2010-12-01
806
Elastic Beanstalk Developer Guide
AWS Resource Types

Type: String
Update requires: some interruptions (p. 814)
Port
The port number on which each of the cache nodes will accept connections.
Required: No
Type: Integer
Update requires: no interruption (p. 814)
PreferredAvailabilityZone
The EC2 Availability Zone that the cache cluster will be created in.
Required: No
Type: String
Update requires: replacement (p. 814)
PreferredMaintenanceWindow
The weekly time range (in UTC) during which system maintenance can occur.
Required: No
Type: String
Update requires: no interruption (p. 814)
Return Values
Ref
When this resource's logical ID is provided to the Ref intrinsic function, it will return the resource's Amazon
Resource Name (ARN).
For more information about using the Ref function, see Ref (p. 814).
See Also
• CreateCacheCluster in the Amazon ElastiCache API Reference Guide
• ModifyCacheCluster in the Amazon ElastiCache API Reference Guide
AWS::ElastiCache::SecurityGroup
The AWS::ElastiCache::SecurityGroup type creates a cache security group. For more information about
cache security groups, go to Cache Security Groups in the Amazon ElastiCache User Guide or go to
CreateCacheSecurityGroup in the Amazon ElastiCache API Reference Guide.
When you specify an AWS::ElastiCache::SecurityGroup type as an argument to the Ref function, AWS
CloudFormation returns the CacheSecurityGroupName property of the new cache security group.
NotesRequiredTypeProperty
The description property of the new cache
security group.
YesStringDescription
API Version 2010-12-01
807
Elastic Beanstalk Developer Guide
AWS Resource Types

AWS::ElastiCache::SecurityGroupIngress
The AWS::ElastiCache::SecurityGroupIngress type authorizes ingress to a cache security group from
hosts in specified EC2 security groups. For more information about ElastiCache security group ingress,
go to AuthorizeCacheSecurityGroupIngress in the Amazon ElastiCache API Reference Guide.
When you specify an AWS::ElastiCache::SecurityGroup type as an argument to the Ref function, AWS
CloudFormation returns the value of the CacheSecurityGroupName property.
The following properties are available with the ElastiCache Security Group Ingress type.
NotesRequiredTypeProperty
The name of the Cache Security Group to author-
ize.
YesStringCacheSecurityGroupName
Name of the EC2 Security Group to include in
the authorization.
YesStringEC2SecurityGroupName
Specifies the AWS Account ID of the owner of
the EC2 security group specified in the EC2Se-
curityGroupName property.The AWS Access
Key ID is not an acceptable value.
NoStringEC2SecurityGroupOwn-
erId
AWS::SNS::TopicPolicy
The AWS::SNS::TopicPolicy type applies a policy to SNS topics.
NotesRequiredTypeProperty
A policy document containing permissions to add
to the specified SNS topics.
YesJSONPolicyDocument
The Amazon Resource Names (ARN) of the topics
to which you want to add the policy.You can use
the Ref function (p. 814) to specify an
AWS::SNS::Topic (p. 808) resource.
YesArray of SNS topic
ARNs
Topics
AWS::SNS::Topic
The AWS::SNS::Topic type creates an Amazon SNS topic.
Properties
DisplayName
A developer-defined string that can be used to identify this SNS topic.
Required: No
Type: String
Subscription
The SNS subscriptions (endpoints) for this topic.
Required:Yes
Type: List of SNS Subscriptions (p. 811)
API Version 2010-12-01
808
Elastic Beanstalk Developer Guide
AWS Resource Types

Return Values
Ref
When this resource's logical ID is provided to the Ref intrinsic function, it will return the resource's Amazon
Resource Name (ARN).
For more information about using the Ref function, see Ref (p. 814).
AWS::SQS::Queue
Properties
VisibilityTimeout
The length of time during which the queue will be unavailable once a message is delivered from the
queue.This blocks other components from receiving the same message and gives the initial
component time to process and delete the message from the queue.
Values must be from 0 to 43200 seconds (12 hours). If no value is specified, the default value of 30
seconds will be used.
For more information about SQS Queue visibility timeouts, see Visibility Timeout in the Amazon
Simple Queue Service Developer Guide.
Required: No
Type: Integer
Return Values
Ref
Returns: The queue URL. For example:
https://sqs.us-east-1.amazonaws.com/803981987763/aa4-MyQueue-Z5NOSZO2PZE9.
For more information about using the Ref function, see Ref (p. 814).
Fn::GetAtt
Fn::GetAtt returns a value for a specified attribute of this type.This section lists the available attributes
and corresponding return values.
Arn
Returns the Amazon Resource Name (ARN) of the queue. For example:
arn:aws:sqs:us-east-1:123456789012:mystack-myqueue-15PG5C2FC1CW8
QueueName
Returns the queue name. For example:
mystack-myqueue-1VF9BKQH5BJVI
See Also
• CreateQueue, in the Amazon Web Services Amazon Simple Queue Service API Reference
• What is Amazon Simple Queue Service?, in the Amazon Simple Queue Service Developer Guide.
API Version 2010-12-01
809
Elastic Beanstalk Developer Guide
AWS Resource Types

Resource Property Types Reference
This section details the resource-specific properties for the resources.
Topics
• CloudWatch Metric Dimension Property Type (p. 810)
• DynamoDB Primary Key (p. 810)
• DynamoDB Provisioned Throughput (p. 811)
• SNS Subscription Property Type (p. 811)
CloudWatch Metric Dimension Property Type
The following properties are available with CloudWatch Metric Dimension.
The Metric Dimension is an embedded property of the AWS::CloudWatch::Alarm (p. 803) type.
NotesRequiredTypeProperty
Name of the dimension.YesStringName
The value representing the dimension measurement.YesStringValue
DynamoDB Primary Key
Describes an DynamoDB primary key for an AWS::DynamoDB::Table (p. 805) resource.
There are two types of primary key types:hash type primary keys, and hash and range type primary keys:
• A hash type primary key creates a table that has an unordered hash index based on the AttributeName
of the HashKeyElement.
• A hash and range type primary key creates a table that has both an unordered hash index based on
the AttributeName of the HashKeyElement, and an ordered hash index based on the AttributeName
of the RangeKeyElement.
For a complete discussion of DynamoDB primary keys, see Primary Key in the DynamoDB Developer
Guide.
Syntax
Parameters
Each element type has an AttributeName and AttributeType, defined as follows:
AttributeName
The name of the attribute that will serve as the primary key for this table. Primary key element names
can be 1 – 255 characters long and have no character restrictions.
Required:Yes
Type: String
AttributeType
The type of this attribute.This must be either "S" for string data, or "N" for numeric data.
API Version 2010-12-01
810
Elastic Beanstalk Developer Guide
Resource Property Types

Required:Yes
Type: String
Note
For detailed information about the limits of primary key values in DynamoDB, see Limits in
Amazon DynamoDB in the DynamoDB Developer Guide.
Examples
For an example of a declared primary key, see AWS::DynamoDB::Table (p. 805).
DynamoDB Provisioned Throughput
Describes a set of provisioned throughput values for an AWS::DynamoDB::Table (p. 805) resource.
DynamoDB uses these capacity units to allocate sufficient resources to provide the requested throughput.
For a complete discussion of DynamoDB provisioned throughput values, see Specifying Read and Write
Requirements (Provisioned Throughput) in the DynamoDB Developer Guide.
Parameters
ReadCapacityUnits
Sets the desired minimum number of consistent reads of items (of up to 1KB in size) per second for
the specified table before Amazon DynamoDB balances the load.
Required:Yes
Type: Number
WriteCapacityUnits
Sets the desired minimum number of consistent writes of items (of up to 1KB in size) per second for
the specified table before Amazon DynamoDB balances the load.
Note
For detailed information about the limits of provisioned throughput values in DynamoDB, see
Limits in Amazon DynamoDB in the DynamoDB Developer Guide.
Examples
For an example of declared provisioned throughput values, see AWS::DynamoDB::Table (p. 805).
SNS Subscription Property Type
The SNS Subscription is an embedded property of the AWS::SNS::Topic (p. 808) type.
The following properties are available with the Amazon SNS subscription type.
NotesRequiredTypeProperty
The subscription's endpoint (format depends on the
protocol).
YesStringEndpoint
The subscription's protocol.YesStringProtocol
API Version 2010-12-01
811
Elastic Beanstalk Developer Guide
Resource Property Types

Intrinsic Function Reference
Topics
• Fn::GetAtt (p. 812)
• Fn::Join (p. 812)
• Fn::GetOptionSetting (p. 813)
• Ref (p. 814)
The following are several built-in functions that help you manage your environment resources.
Fn::GetAtt
The intrinsic function Fn::GetAtt returns the value of an attribute from a resource in the configuration
file.
Declaration
"Fn::GetAtt" : [ "logicalNameOfResource", "attributeName" ]
Parameters
logicalNameOfResource
The logical name of the resource that contains the attribute you want.
attributeName
The name of the resource-specific attribute whose value you want. See the resource's reference
page for details about the attributes available for that resource type.
Return Value
The attribute value.
Example
This example returns a string containing the DNS name of the LoadBalancer with the logical name MyLB.
"Fn::GetAtt" : [ "MyLB" , "DNSName" ]
See Also
For more information about the values returned by Fn::GetAtt for a particular resource, see the Return
Values section of the resource's reference page.
Fn::Join
The intrinsic function Fn::Join appends a set of values into a single value, separated by the specified
delimiter. If a delimiter is the empty string, the set of values are concatenated with no delimiter.
Declaration
"Fn::Join" : [ "delimiter", [ comma-delimited list of values ] ]
API Version 2010-12-01
812
Elastic Beanstalk Developer Guide
Intrinsic Functions

Parameters
delimiter
The value you want to occur between fragments.The delimiter will occur between fragments only.
It will not terminate the final value.
listOfValues
The list of values you want combined.
Return Value
The combined string.
Example
"Fn::Join" : [ ":", [ "a", "b", "c" ] ]
This example returns: "a:b:c".
Fn::GetOptionSetting
The intrinsic function Fn::GetOptionSetting returns the value of the specified option name. If no
value is set, then the specified default value is used.To specify the value of the custom option, you create
a separate configuration file with the namespace aws:elasticbeanstalk:customoption.
Note
Configuration files should conform to YAML or JSON formatting standards. For example,
indentation is critical to the proper interpretation of YAML. For more information, go to http://
www.yaml.org/start.html or http://www.json.org, respectively. For more information about using
configuration files to deploy an application to Elastic Beanstalk, see Using Configuration
Files (p. 431).
Declaration
Fn::GetOptionSetting:
OptionName: name of option
DefaultValue: default value to be used
Example
This example returns the value of the ELBAlarmEmail. If no value is set, then it uses
"someone@example.com".
Subscription:
- Endpoint:
Fn::GetOptionSetting:
OptionName: ELBAlarmEmail
DefaultValue: "[email protected]"
You can find more example snippets using Fn::GetOptionSetting at Example Snippets (p. 477).
Create a separate configuration file (e.g., options.config) that sets the value of the custom option. To set
the value for above example, your configuration file would look like the following:
API Version 2010-12-01
813
Elastic Beanstalk Developer Guide
Intrinsic Functions

option_settings:
"aws:elasticbeanstalk:customoption":
ELBAlarmEmail : "[email protected]"
For an example walkthrough using configuration files and Fn::GetOptionSetting, see Example:
DynamoDB, CloudWatch, and SNS (p. 467).
Ref
The intrinsic function Ref returns the value of the specified parameter or resource.
• When you specify a parameter's logical name, it returns the value of the parameter.
• When you specify a resource's logical name, it returns a value that you can typically use to refer to that
resource.
Tip
You can also use Ref to add values to Output messages.
Parameters
logicalName
The logical name of the resource or parameter you want to dereference.
Return Value
The value of the MyInputParameter parameter.
Updating AWS CloudFormation Stacks
When AWS CloudFormation updates a stack, it gets new property settings for the current resources in
the stack by using the template that you submit. AWS CloudFormation updates only the resources that
have changes specified in the template. AWS CloudFormation does not update resources that have no
changes, and those resources will continue to run without disruption during the update process. Updates
to resources are handled differently depending on the type of resource and, in some cases, depending
on the nature of a particular resource property. AWS CloudFormation uses one of the following techniques
to update the resource:
• Update with no interruption. AWS CloudFormation updates the resource without disrupting operation
of that resource and without changing the resource's physical name. For example, if you update any
properties on an AWS::CloudWatch::Alarm (p.803) resource, AWS CloudFormation updates the alarm's
configuration and, during the update, the alarm's operation continues without disruption.
• Reconfiguration with some interruption. AWS CloudFormation updates the resource with some
interruption. Some resources may experience some interruption during the process of applying property
changes to those resources but they will retain their physical names.
• Replacement. AWS CloudFormation updates the resource by recreating the resource. Some resources
require creating a new resource with the property changes and generating a new physical name. AWS
CloudFormation creates the replacement resource first, changes references from other dependent
resources to point to the replacement resource, and then deletes the old resource.
Important
Whether or not a change in a resource causes an interruption in service depends on the resource
itself and on the type of change you're making to it.To learn more about updating a particular
API Version 2010-12-01
814
Elastic Beanstalk Developer Guide
Updating Stacks

resource, see the documentation associated with that resource and in the AWS Resource Types
Reference (p. 802), where the effects of updating a resource are listed per property.You should
be aware of how each resource change will affect your stack before making a change.
Depending on the technique used to modify each updated resource in your stack, you can make good
decisions about when it's best to modify resources to reduce the impact of such changes on your
application. In particular, you should plan carefully when resources must be replaced during an update.
Using Amazon RDS with PHP (Legacy Container
Types)
Amazon Relational Database Service (Amazon RDS) lets you quickly and easily provision and maintain
a MySQL Server instance in the cloud. This topic discusses how you can use Amazon RDS and PHP
with your Elastic Beanstalk application.
Note
For more information on AWS storage options, go to Storage Options in the AWS Cloud.
To use Amazon RDS and PHP from your Elastic Beanstalk application
1. Create an Amazon RDS DB Instance. For instructions on how to do this, go to the Amazon RDS
User Guide.
2. Configure your Amazon RDS DB Security Group to allow access from the Amazon EC2 security
group used by your Elastic Beanstalk application. For instructions on how to find the name of your
EC2 security group using the AWS Management Console, see Amazon EC2 Security Groups (p.354).
For more information, go to the "Authorizing Network Access to an Amazon EC2 Security Group"
section of Working with DB Security Groups in the Amazon Relational Database Service User Guide.
3. If you plan to use PDO, install the PDO drivers. For more information, go to http://www.php.net/
manual/pdo.installation.php.
4. Establish a database connection in your PHP code using your Amazon RDS DB Instance's public
DNS name, port number, and (optionally) database name and login credentials.The following
examples show examples that would connect to the employee database on an RDS Instance at
mydbinstance.abcdefghijkl.us-east-1.rds.amazonaws.com using port 3306, with the user name "sa"
and the password "mypassword".
Example 1. Example using PDO to connect to an RDS database
<?php
$dsn = 'mysql:host=mydbinstance.abcdefghijkl.us-east-1.rds.amazon
aws.com;port=3306;dbname=mydb';
$username = 'sa';
$password = 'mypassword';
$dbh = new PDO($dsn, $username, $password);
?>
For more information about constructing a connection string using PDO, go to http://us2.php.net/
manual/en/pdo.construct.php.
API Version 2010-12-01
815
Elastic Beanstalk Developer Guide
Using Amazon RDS

Example 2. Example using mysql_connect() to connect to an RDS database
<?php
$dbhost = 'mydbinstance.abcdefghijkl.us-east-1.rds.amazonaws.com:3306';
$username = 'sa';
$password = 'mypassword';
$dbname = 'mydb';
$link = mysql_connect($dbhost, $username, $password, $dbname);
mysql_select_db($dbname);
?>
For more information on using mysql_connect(), go to http://www.phpbuilder.com/manual/
function.mysql-connect.php.
Example 3. Example using mysqli_connect() to connect to an RDS database
$link = mysqli_connect('mydbinstance.abcdefghijkl.us-east-1.rds.amazon
aws.com', 'sa', 'mypassword', 'mydb', 3306);
For more information on using mysqli_connect(), go to http://www.phpbuilder.com/manual/
function.mysqli-connect.php.
5. Deploy your application to Elastic Beanstalk. For information on how to deploy your application using
Elastic Beanstalk and the AWS Management Console, see Getting Started Using Elastic
Beanstalk (p. 4). For information on how to deploy your application using AWS DevTools, see
Deploying Elastic Beanstalk Applications in PHP (p. 220).
Using Amazon RDS and MySQL Connector/J
(Legacy Container Types)
Amazon Relational Database Service (Amazon RDS) lets you quickly and easily provision and maintain
a MySQL Server instance in the cloud. This topic discusses how you can use Amazon RDS and the
MySQL Connector/J with your Elastic Beanstalk application.
To use Amazon RDS from your Elastic Beanstalk application, you need to do the following:
• Create an Amazon RDS DB Instance.
• Configure your Amazon RDS DB security group to allow access from the Amazon EC2 security group
used by your Elastic Beanstalk application.
• Create a JDBC connection string using your Amazon RDS DB instance's public DNS name and configure
your Elastic Beanstalk environment to pass the string to your Elastic Beanstalk application as an
environment variable.
• Download and install MySQL Connector/J.
• Retrieve the JDBC connection string from the environment property passed to your server instance
from Elastic Beanstalk and use MySQL Connector/J to access your Amazon RDS database.
To use Amazon RDS with MySQL Connector/J from your Elastic Beanstalk application
API Version 2010-12-01
816
Elastic Beanstalk Developer Guide
Using Amazon RDS and MySQL Connector/J (Legacy
Container Types)

1. Create an Amazon RDS DB Instance. For instructions on how to do this, go to the Amazon Relational
Database Service User Guide.
2. Configure your Amazon RDS DB security group to allow access from the Amazon EC2 security group
used by your Elastic Beanstalk application. For instructions on how to find the name of your Amazon
EC2 security group using AWS Toolkit for Eclipse, see Amazon EC2 Security Groups (p. 114). For
instructions on how to find the name of your Amazon EC2 security group using the AWS Management
Console, see Amazon EC2 Security Groups (p. 354). For more information, go to the "Authorizing
Network Access to an Amazon EC2 Security Group" section of Working with DB Security Groups in
the Amazon Relational Database Service User Guide.
3. Download and install MySQL Connector/J for your development environment. For download and
installation instructions, go to http://dev.mysql.com/downloads/connector/j.
4. Create a JDBC connection string using your Amazon RDS DB Instance's public DNS name, port
number, and (optionally) database name and login credentials.The following example shows a JDBC
connection string that would connect to the employees database on an RDS instance at
mydbinstance.abcdefghijkl.us-east-1.rds.amazonaws.com using port 3306, with the user name "sa"
and the password "mypassword".
jdbc:mysql://mydbinstance.abcdefghijkl.us-east-1.rds.amazonaws.com:3306/em
ployees?user=sa&password=mypassword
5. Configure your Elastic Beanstalk environment to pass the string to your Elastic Beanstalk application
as an environment property. For instructions on how to do this, go to Using Custom Environment
Properties with Elastic Beanstalk (p. 102).
6. Retrieve the JDBC connection string from the environment property passed to your server instance
from Elastic Beanstalk and use MySQL Connector/J to access your Amazon RDS database.The
following code example shows how to retrieve the JDBC_CONNECTION_STRING custom environment
property from a Java Server Page (JSP).
<p>
The JDBC_CONNECTION_STRING environment variable is:
<%= System.getProperty("JDBC_CONNECTION_STRING") %>
</p>
For more information on getting started using the MySQL Connector/J to access your MySQL
database, go to http://dev.mysql.com/doc/connector-j/en/index.html.
7. Copy the MySQL Connector/J JAR file into your Elastic Beanstalk application's WEB-INF/lib directory.
8. Deploy your application to Elastic Beanstalk. For information on how to deploy your application using
Elastic Beanstalk and the AWS Management Console, see Getting Started Using Elastic
Beanstalk (p. 4). For information on how to deploy your application using Eclipse, go to Getting
Started with Elastic Beanstalk Deployment in Eclipse.
Using Custom AMIs
Unless you are deploying your Elastic Beanstalk application with a legacy container type, then you can
use configuration files to customize and configure your environment. Configuration files are supported
for the following container types:
• Docker
• Node.js
API Version 2010-12-01
817
Elastic Beanstalk Developer Guide
Using Custom AMIs

• PHP 5.3, PHP 5.4, and PHP 5.5
• Python
• Ruby 1.8.7, 1.9.3, 2.0.0, and 2.1.2
• Apache Tomcat 6, 7, and 8
• Windows Server 2008 R2 running IIS 7.5 and Windows Server 2012 running IIS 8 or IIS 8.5
Currently, Elastic Beanstalk does not support configuration files for the following legacy container types:
• PHP 5.3
• Tomcat 6 and 7
• Windows Server 2008 R2 running IIS 7.5 and Windows Server 2012 running IIS 8
If you are unsure if you are running a legacy container, check the Elastic Beanstalk console. For
instructions, see To check if you are using a legacy container type (p. 426).
For more information about configuration files, see Customizing and Configuring Elastic Beanstalk
Environments (p. 430).
If you are deploying your Elastic Beanstalk application using a legacy container type, then you need to
create a custom Amazon Machine Image (AMI) that Elastic Beanstalk uses for your applications.You
can also use custom AMIs to improve the speed of deployments for which scaling activities specified in
a configuration file result in a long installation process.To do this, customize the existing Elastic Beanstalk
AMI. When you modify an Elastic Beanstalk AMI, do not replace components included in the solution
stack.This section describes how to create and deploy a customized Amazon Machine Image (AMI) for
use with Elastic Beanstalk.
To create and use a customized AMI
1. Open the Elastic Beanstalk console at https://console.aws.amazon.com/elasticbeanstalk/.
2. From the region list, select a region.
3. Launch your Elastic Beanstalk application. For more information on how to launch an Elastic Beanstalk
application, go to the Getting Started Using Elastic Beanstalk (p. 4).
4. Find the AMI ID used by Elastic Beanstalk to launch your application: Click the environment name,
and then click Configuration in the navigation pane. Next to Instances, click . Copy the value in
the Custom AMI ID box.
5. Use the Amazon EC2 console to launch an instance using that AMI ID:
Note
You must use the Amazon EC2 console to launch an instance with the AMI ID.You cannot
customize an instance that was launched by Elastic Beanstalk.
a. Open the Amazon EC2 console.
b. Click Launch Instance.
c. On the Choose an Amazon Machine Image (AMI) page, do one of the following:
• Click the My AMIs tab to view private AMIs that you own or private AMIs that have been
shared with you.Then, in the navigation pane, under Ownership, select the Owned by me
check box and the Shared with me check box.
• Click the Community AMIs tab to view AMIs provided by the AWS user community.
d. In the Search my AMIs or Search community AMIs text box, paste the AMI ID that Elastic
Beanstalk used to launch your application and press Enter.
API Version 2010-12-01
818
Elastic Beanstalk Developer Guide

e. In the results list, click the Select button next to the AMI that you want to use to create your
customized AMI.
f. On the Choose an Instance Type page, select the hardware configuration and size of the
instance to launch. Larger instance types have more CPU and memory. For more information
about instance families, see Instance Types in the Amazon Elastic Compute Cloud User Guide.
To stay within the free tier, select the t1.micro instance, and then click Next: Configure Instance
Details.
g. On the Configure Instance Details page, click Advanced Details to expand the list of
configuration options.
h. In the User data text box, type the following:
#cloud-config
repo_releasever: <repository version number>
repo_upgrade: none
Note
Specify the value of repo_releasever according to the repository version number of
the AMI for your container. For example, the repository version number of the AMI for
the container with the name 32bit Amazon Linux 2014.02 running Node.js is 2013.09.
For more information about the AMI version number for your container name, see the
AMI column in Supported Platforms (p. 19).
These settings configure the lock-on-launch feature, which causes the AMI to use a fixed, specific
repository version when it launches, and disables the automatic installation of security updates.
Both are required to use a custom AMI with Elastic Beanstalk.
i. Continue using the Amazon EC2 wizard to launch the Elastic Beanstalk AMI that you want to
customize.
Note
When launching the instance using the AWS Management Console, make sure that
you create or specify a key pair and that you select your Amazon EC2 security group
for your Elastic Beanstalk environment.
For additional information on how to launch an Amazon EC2 instance, go to Running an Instance
in the Amazon Elastic Compute Cloud User Guide.
6. Connect to the instance. For more information on connecting to an Amazon EC2 instance, go to
Connecting to Instances in the Amazon Elastic Compute Cloud User Guide.
7. After customizing a windows instance, you need to run the EC2Config service Sysprep. For information
about EC2Config, go to Configuring a Windows Instance Using the EC2Config Service.
8. If you are using an AMI with Apache and Tomcat, you will need to perform your customizations.
Apache and Tomcat are not automatically started when you manually launch the Elastic Beanstalk
AMI using the Amazon EC2 tab on the AWS Management Console. Enter the following commands
at your Amazon EC2 instance's command prompt to start Apache and Tomcat.
sudo -s
cd /etc/init.d
./httpd start
./tomcat7 start
9. From the Amazon EC2 console on the AWS Management Console, select the running instance that
you've just modified and select Create Image (EBS AMI) from the Instance Actions menu. For
more information on how to create an image from a running instance, go to Creating an Image from
API Version 2010-12-01
819
Elastic Beanstalk Developer Guide

a Running Instance in the Amazon Elastic Compute Cloud User Guide.You can also view the Create
Your Own Customized AMI video.
10. To avoid incurring additional AWS charges, terminate the Amazon EC2 instance you used to create
the AMI. For instructions on how to terminate an instance, go to Terminate Your Instance in the
Amazon Elastic Compute Cloud User Guide.
11. To use your custom AMI, specify your custom AMI ID in the Custom AMI ID text box in the Elastic
Beanstalk Edit Configuration dialog box. Existing instances will be replaced with new instances
launched from the new custom AMI.
API Version 2010-12-01
820
Elastic Beanstalk Developer Guide
