
GlassCast® Neon Resin Plank Table
Page 1

GlassCast® Neon Resin Plank Table
Page 2
How to make a Neon
Resin Plank Table
Contents
Introduction 3
Before You Begin 3
Choosing and Sizing your Wood 3
Tools, Materials & Conditions 4
Epoxy Resin for your Neon Resin Plank Table Project 5
Step-by-Step Guide 6
1. Prepare the Wood 6
2. Set up the Baseboard and Barriers 8
3. Measuring and Pigmenting the Resin 9
4. Resin Process for Each Layer 10
5. Stage 1 - Pour the Base Layer 11
6. Stage 2 - Pour the Sealing Layer and Position the Planks 13
7. Stage 3 - Pour the Fill Layer 14
8. Stage 4 - Pour the Surface Layer 16
9. Removing the Barriers 17
10. Finishing 18
11. Aer Care 20
12. Alternative Projects 21
13. Useful Information 22

GlassCast® Neon Resin Plank Table
Page 3
Introduction
The aim of this guide
The aim of this guide is to provide detailed step-by-step instructions that can be easily followed to
help you create your own statement Neon Resin Plank Table using GlassCast® 3 clear epoxy coating
resin. A Neon Resin Plank Table will be the
envy of anyone who sees it and will be the hot
topic in any room! It can transform a room, by
adding a POP of day-glo colour so if you think
your room is crying out for a piece of furniture
like this it can be achieved by anyone from
professionals to keen DIY'ers and requires no
specialist additional equipment and no expe-
rience of furniture making. This encapsulation
process can be used to create side tables,
coee and dining tables or to create bespoke
bar tops, worktops or headboards and the
colour is up to you. Other objects could be
encapsulated in the same way as the planks,
such as records, crushed glass and bottle tops using the same process and techniques, and the
amazing finish will give a hi-gloss, glass like finish to any surface - whilst making the encapsulated
objects look like they are suspended in the resin.
This guide includes all the expert advice you will need to avoid making common mistakes and make
a success of your neon resin plank table project; so if you’re serious about creating a striking piece
like this it is advisable to read this guide and the technical and safety information in full before you
start!
GlassCast® 3 has been specially developed to be the perfect resin for applications like neon resin
plank tables and is self-levelling, has special additives to expel trapped air from the mixture, and
cures to leave a stunning smooth, glossy surface which requires no flatting, polishing or further
finishing - with it's two part mixture it is very easy to use!
Before You Begin
Choosing and Sizing your Wood
The first step in creating your own neon resin
plank table is to choose the wooden planks you
wish to use - this will depend on the size of the
piece you wish to create and the look you wish to
achieve. You may need to cut down some of the
planks to give a balanced mix of long and short
planks, or a mixture of widths.

GlassCast® Neon Resin Plank Table
Page 4
Tools, Materials & Conditions
This project requires very little equipment and the guide assumes the planks are prepared in ad-
vance and the materials, tools and accessories listed will be required to complete the project:
Materials
• GlassCast® 3 Clear Epoxy Coating Resin
• Neon Tinting Pigments
• Wooden planks & your choice of table legs
• Polypropylene Sheet or similar (to act as a base barrier)
• Flash/Release Tape
• Batons (or similar to act as side barriers)
• Polishing Compound (such as Pai Cristal NW1)
Tools
• PPE equipment - safety glasses, dust mask, nitrile gloves (as a minimum)
• Spirit level, planer, screwdriver and blow torch
• Digital scales, tape measure, ruler
Accessories
• Wood Stain
• Buckets, stirrer, spreader, microfibre cloth, brushes
• Tile Spacers
• Abrasive Paper (assorted) and a block
Conditions
A dry, heated environment of ideally 20°C should be maintained when using GlassCast® 3 epoxy
coating resin. It is also essential to ensure you work in a well ventilated and clean space.
The GlassCast® 3 needs to be at (or around)
20°C, if the resin is too cold it will not mix
correctly and may result in a cloudy finish. If the
resin is cold it is very simple to bring it back up
to the correct temperature by submerging the
containers in a bath of hot water for a few hours
prior to use. Do not attempt this project in cold
or damp conditions as this will certainly spoil
the performance and appearance of the resin.

GlassCast® Neon Resin Plank Table
Page 5
Epoxy Resin for your Neon Plank Project
Epoxy is epoxy, right?
GlassCast® 3 is a remarkable clear epoxy resin developed specifically
to provide beautiful, hard-wearing, clear gloss surfaces for tabletops,
bar-tops, decorative floor eects, furniture and creative projects.
GlassCast can be poured at thicknesses from just 1mm to thicker
5mm sections opening up a world of possibilities for embedments
and encapsulations and can be layered to achieve the neon resin
plank table! If you are looking for an epoxy resin suitable for deeper
pours see the GlassCast® 10 and GlassCast® 50 clear epoxy casting
resins available online.
This amazing resin is self-levelling and cures to leave a stunning smooth, glossy surface which
requires no flatting, polishing or further finishing - it's a true ‘pour and leave’ product. If you do
however need to polish the resin, to remove scratches or add a so radiused edge to a cast surface
for example, GlassCast is very easy to polish using simple abrasive paper and polishing compounds
to restore a full gloss.
Special additives in the resin help to expel trapped air aer mixing, meaning that in most circum-
stances there is no need to pop bubbles with a torch or heat-gun. The advanced ‘UV’ formulation
of GlassCast means that it has non-yellowing properties far superior to those conventional epoxies
meaning that it will start beautiful and stay beautiful for years to come.
How much resin will I need?
Working out how much resin you will need for a project like this can be a bit complicated because
you need to allow for the resin layer underneath the planks, in between and around the planks
and for the layer on top of the planks. The GlassCast website can help you accuratley calculate the
amount of resin you need. The table we have created measures 1.28 square metres so will require
approximately 10kg of GlassCast per square metre of table - so for our table we will require just
under 13kg, so three 5kg kits would be more than enough. A simple sum to calculate the area should
be measured approximately in length, width and depth to find the cuboid volume, as follows:
Length(in metres) x Width(in metres) x
Depth(in millimetres)
The resulting number will be the volume of this shape in litres: For example:
1.6m(length) x 0.8m(width) x 10mm(depth) =
12.8litres
In simple terms, 13 litres of resin can be approximated as 13 kilograms of resin. We would always
suggest slightly over estimating the amount of resin you think you will need as it’s always better to
have mixed too much rather than too little to cover the area. In this project we will split the overall
resin quantity into layers as we work ouyr way through the steps.

GlassCast® Neon Resin Plank Table
Page 6
Step-by-Step Guide
The most important advice...
When preparing for and undertaking the resin pours, the key to success is to follow the 5 points
below. By following these simple steps you will avoid many common problems associated with
working with resin.
• Don’t start with cold materials
The working environment and unmixed resin containers should all be at 20°C before you
start (if your resin is delivered cold it can take several hours for the resin to reach room
temperature), resin can easily be brought back up to an ambient temperature by placing
the containers in a bath of hot water until warmed through.
• Maintain temperature during cure
The temperature of 20°C must be maintained throughout the curing time of the resin (at
least 48 hours). You should not allow the room to become cold overnight.
• Work in a dust free environment
Your working environment should be clean, level and as dust free as possible.
• Measure accurately and mix thoroughly
When measuring out the resin and hardener make sure you understand the mix ratio, in
the case of GlassCast 3 the ratio is parts-by-weight - in this case 2 parts resin to 1 part hard-
ener. Measure the two parts as accurately as possible, and never for example ‘add extra
hardener’. Mix the resin thoroughly and always use the ‘double potting’ method.
• Mix and pour the resin in batches
Measure, mix and pour manageable batches of GlassCast® 3 onto the floor starting with
the furthest point from the door and working back towards the point of exit.
1. Prepare the Wood
First decide upon the size of the resin plank table you want to create, allowing for the gaps and bor-
ders. Our table has 8mm gaps inbetween the planks and a 12mm border around the outside and we
will be pouring both the base and the top surfaces at a depth of 3mm each.
For this project we are using a basic redwood
smooth planed timber which is inexpensive
and readily available at your local DIY store or
timber merchants. It is helpful if the planks are
smooth, flat and dry before you begin. You
could utilise recycled wood like old pallets, but
we wanted clean, crisp lines so opted for new
redwood planks already available in dierent
widths for added interest.

GlassCast® Neon Resin Plank Table
Page 7
Arranging the planks
Decide on the layout and design of your table - randomly mix shorter and longer planks and diering
widths if you have them. This may require some cutting down to size so you can achieve a staggered
pattern. Also remember that you need to allow for the gap between the planks and the resin border.
Layout
Lay out all the planks and draw a plan so you
know how the puzzle fits back together. To add
interest you can simply create lighter and dark-
er planks using the techniques below.
Mark up the planks for lightening and darkening
using maksing tape labels.
Lightening the planks
To make some of the planks lighter use a water
based wood stain or dye and brush on all sur-
faces of the planks. Allow it to dry thoroughly
before moving on to the resin stage.
If you want to add more variation to the planks
apply a second coat wood stain. It's important
to use a water based product as oil based
products can leave an oily residue on the
surface.
Darkening the planks
You could use a dark wood stain as above to
achieve the darker planks. But we found that
using a blow torch moving steadily over the
wood really brings out the natural grain in the
wood. Make sure you practise this technique
first on o-cuts. If you do find you darken any of
the planks you can sand them using abrasive
paper to lighten them up again.
Contrast
Lay the planks out according to the plan and
check you are happy with the overall eect. You
can now move on to setting up the baseboard
and barriers ready for the first pour.

GlassCast® Neon Resin Plank Table
Page 8
2. Set up the Baseboard and Barriers
This is one of the most important parts of the project and if done correctly will leave you with very
little in the way of trimming and finishing to do at the end.
Setting up the base barrier
Once you have accuratley calculated the total
table area including the border and gaps
between the planks you need to prepare the
baseboard. Use a sheet of chipboard larger than
the table top to stick the baseboard to. Make
sure it's completely flat and level then stick the
baseboard to the chipboard using double-sided
tape.
Polypropylene sheet
It's very important that you use a suitable
material for the baseboard that epoxy resin will
not stick to. In this project we used polypropyl-
ene sheet which is totally non-stick, can be
reused and will give an adequate finish for the
underside of the table.
Setting up the side barriers
Again using a material that epoxy resin will not
stick to, to create the barriers and secure them
to the baseboard. For this project we use timber
batons and covered them with a special release
tape which epoxy resin does not stick to.

GlassCast® Neon Resin Plank Table
Page 9
3. Measuring and Pigmenting the Resin
Having previously worked out the total amount of resin needed to complete the project we need to
pigment the resin in one batch to ensure a consistent colour throughout. This means measuring out
the total amount of the resin (Part A) and adding the total amount of pigment required which will be
required throughout the 4 steps in the project.
First you will need to measure out the total amount of resin (Part A) in to a clean bucket using digital
scales. The GlassCast 3 resin has an easy to use 2:1 mix ratio by weight - this means you will need
2 parts resin (Part A) and 1 part hardener (Part B). Do not measure out any hardener (Part B) at this
stage, this will be added at each of the 4 stages of the project.
Using the calculation on page 5 we know that we will need 12.8kg GlassCast® 3 in this project so 2
parts resin = 8.54kg.
Weigh out 8.54kg Part A into a clean bucket using digital scales and add the pigment - try and experi-
ment before so you can calcuate the ratio of pigment to get the colour you wish to achieve.
To achieve the eye popping colour in the project which is vivid but still translucent we used the ratio
of 50g pigment to 15kg GlassCast, this worked out at just under 2 bottles of the neon yellow pigment.
Thoroughly mix the pigment into the resin using a stirrer, making sure that you scrape the sides of
the bucket and the mixing stick as the pigment does tend to cling to them. Keep stirring steadily and
folding in any unmixed pigment until the colour is consistent throughout the mix.
Folding the tape
Positioning the tape to leave an overhang then
folding it to create a hinge eect is a really
useful way of sealing the side barrier to the
baseboard. The release tape is available in a
25mm and 50mm widths so is great for covering
the batons and sticking down to the base.
Seal the corners
Make sure that you seal the corners of the
barriers and the baseboard to make the box
watertight to prevent any leaks and to stop the
resin from sticking to the wooden batons.
Make sure you work the tape right into the
corners of the mould to minimise bumps in the
cast resin.

GlassCast® Neon Resin Plank Table
Page 10
Resin and hardener
The success of your GlassCast® 3 project will
come down to the correct measuring, mixing
and pouring procedure.
Weigh out 2 parts of the pigmented resin and 1
part of the hardener using digital scales into a
bucket and mix together.
Remember: only mix up the amount required
for the layer you are working on.
Mixing
Mix the resin and hardener together for a mini-
mum of 3 minutes making sure that you scrape
the sides and bottom of the bucket and mixing
stick.
Slow, steady mixing is very important to mini-
mise air entrapment.
4. Resin Process for each Stage
Measuring and mixing the resin
For each of the 4 stages weigh out the Glasscast® 3 pigmented resin and the correct amount of
hardener for that layer. Be as accurate as possible - using digital scales and sticking to the mix ratio
by weight:
By Weight: 2 (parts resin) and 1 (part hardener)
Best practise for mixing resin and hardener together is to always mix for a minimum of 3 minutes,
making sure that you scrape the side and bottom of the container to ensure a thorough mix before
transfering to a second container to mix again (see double potting method on page 11). Mix in
multiple, smaller batches
Multiple Pours
As well as making thorough mixing more practical, mixing in multiple smaller batches has some
other advantages too. Such as being able to attend to each batch individually, avoiding mixing up
unwanted quantities of resin and ensuring thorough mixes throughout the project.

GlassCast® Neon Resin Plank Table
Page 11
Double-potting
Aer mixing the resin in the first mixing bucket
for three minutes, transfer the mixture into a
second bucket and mix again slowly and
steadily for 3 minutes to ensure a complete mix.
This is known as 'double potting'. It's a good
idea to label the buckets '1' and '2' to avoid
confusion.
IMPORTANT:
Double potting!
To get the best results from the GlassCast® 3 epoxy resin it is advisable to 'double-pot' each mixture. This
means mixing the resin and hardener together steadily and thoroughly in the first bucket, making sure that
you scrape the sides and bottom of the bucket then aer approximately 3 minutes transfer the mixture
into a second bucket without scraping the bucket and mix again for a further 3 minutes. This will ensure no
unmixed resin finds it's way on to the surface being coated.
5. Stage 1 - Pour the Base Layer
Calculate the amount of resin and hardener required for the base layer pour. The base layer (which
will be the underside of the table) needs to be poured at a depth of 3mm. This will form a layer that
the planks will sit upon in stage 2.
Accurately measure out the resin and hardener and mix according to the directions on pages 10-11.
How much resin?
Table area 1.28sqm x 3mm depth = 3.84kg
So, at the 2:1 ratio we will need
3.84 x 0.666 = 2.56kg resin
3.84 x 0.333 = 1.28kg hardener

GlassCast® Neon Resin Plank Table
Page 12
Leave to cure to the B-Stage
Now leave the resin to cure to it's B-stage. This means that the resin is firm enough to sit the planks
on in stage two but still has a tackiness le in it to help the next layer of resin bond properly to it.
In an ambient temperature of 20°C the B-stage will be achieved in approximately 12 hours, but do
check with a gloved finger so you can prepare and pour the 2nd layer while stage 1 is at the B-stage.
If you do miss this stage you can key the surface with abrasive paper and pour on to that. You should
be able to feel the tackiness of the resin but none should stick to your glove.
Spread out the resin
Using a resin spreader move the resin around
the baseboard until full coverage is achieved.
The GlassCast 3 is a specialist coating resin and
has special additives which will help it to settle
completely flat. It also cures to a hi-gloss finish
which in the surface pour will mean we don't
need to flat or polish the surface.
Pouring the resin
Pour the resin directly onto the base board in
one go. We know that the amount calculated is
correct for a 3mm depth.
You may need to help the resin to spread
around the surface area, although GlassCast3 is
specially formulated to self level.
Air bubbles
GlassCast has excellent properties for expelling
air bubbles trapped in the resin from the mixing
and pouring stage. When the resin has been
poured you may notice some tiny air bubbles,
but aer a few minutes you should start to see
them begin to rise to the surface and pop by
themselves. If any bubbles do persist you can
remove them using a heat gun on a low setting.
Using a heat gun to gently warm the surface
will help to break the surface tension and expel
trapped air. Do not overheat the resin.

GlassCast® Neon Resin Plank Table
Page 13
6. Stage 2 - The Sealing Layer
At each resin stage of the project we will use the same process for measuring, mixing and pouring as
described on pages 10-11.
Once all the planks are coated in resin spend some time positioning the planks and securing them
into position using the tile spacers to maintain the 8mm gap while the resin is curing. If required use
some spacers to secure the gap around the outside. This will stop the planks from floating around
on the surface of the resin. Once you are happy with the spacing and are certain all of the surfaces of
the planks are sealed leave the resin to partially cure.
Sealing layer calculation
To seat and seal the planks we will need the
equivalent depth of 1.5mm resin.
Table area 1.28sqm x 1.5mm depth = 1.92kg
So, at the 2:1 ratio we will need
1.92 x 0.666 = 1.28kg resin
1.92 x 0.333 = 0.64kg hardener
Measure, mix, pour & seal
Once measured and mixed pour the resin
straight onto the base layer and using the
spreader move the resin around to cover the
base if necessary.
You are now ready to place the planks onto the
bed of resin. Using the poured out resin and a
brush, paint the resin onto the underside of the
planks to seal them.
As you lower the planks tilt them on the long
edge and lower slowly with a slight rocking mo-
tion until the plank is sitting on the resin. This
will help to prevent air pockets being trapped
on the underside of the planks.
Keep going until all the planks are roughly in
position, then using the brush and the resin
around the planks brush over all surfaces of the
planks until all the wood is sealed.
This sealing stage is very important as it will
stop air bubbles escaping from the wood.
GlassCast® Neon Resin Plank Table
Page 14
Ideally you need to remove the tile spacers when the resin has started to gel whilst it is still easy to
remove them. It can then be le to reach the B-stage again before moving on to stage 3 - the fill layer.
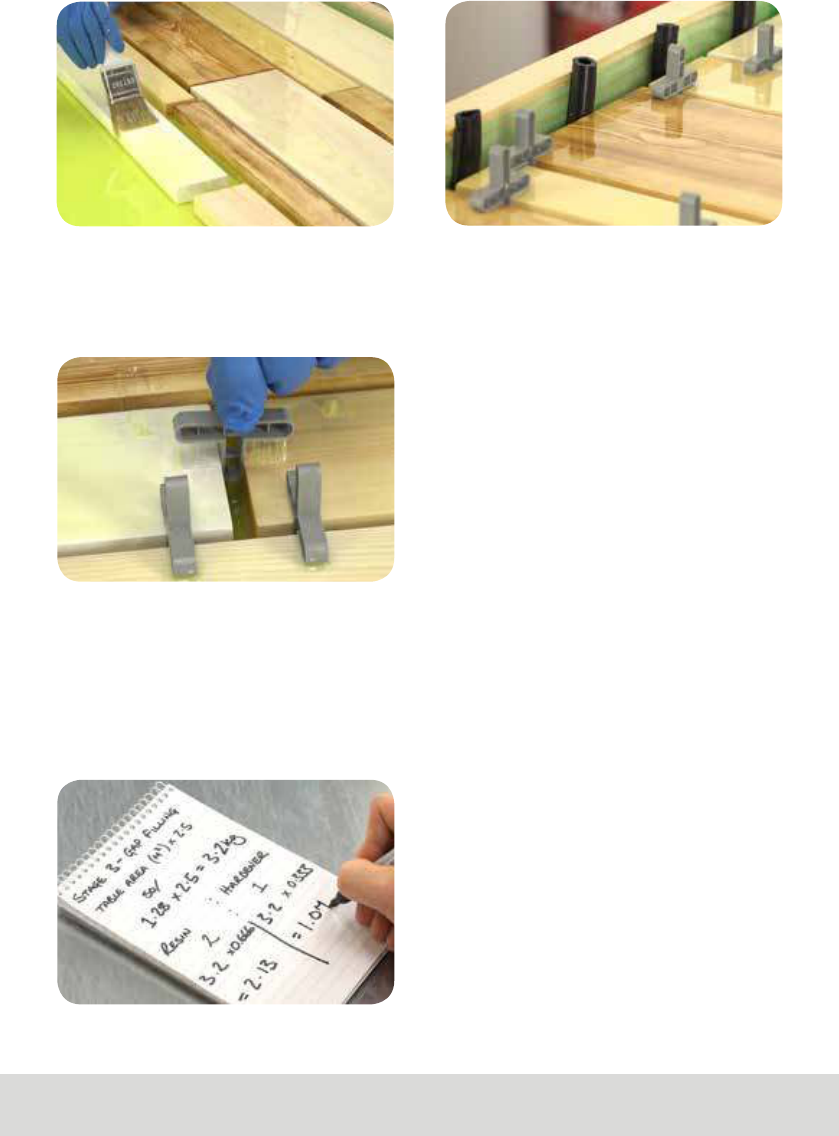
7. Stage 3 - Pour the Fill Layer
In the 3rd stage we want to fill all the gaps between and around the planks until the resin is flush
with the tops of the planks. If you have chosen a dierent depth plank, size gap or border you will
need to adjust your calculation.
Fill layer calculation
To fill the gaps between the planks and fill the
border we will need the equivalent depth of
2.5mm resin.
Table area 1.28sqm x 2.5mm depth = 3.2kg
So, at the 2:1 ratio we will need
3.2 x 0.666 = 2.13kg resin
3.2 x 0.333 = 1.07kg hardener
Removing the tile spacers
When you remove the tile spacers the resin
should be very tacky, but this will be much eas-
ier than trying to remove them at the B-stage.
Reaching this stage should take around 3 hours
and any marks visible in the resin at the B-stage
will be covered on stage 3, the fill layer.

GlassCast® Neon Resin Plank Table
Page 15
Fill the gaps
Remember to follow the resin process on pages
10-11 for stage 3 to prepare the resin. Then pour
half of the mixture in the gaps before pausing
to distribute the resin around the area and
use the heat gun to help to get rid of any air
bubbles that may be clinging on to the sides of
the planks. Take care with this stage as it is the
deepest pour. By pouring in two halves it means
any air bubbles dont have as far to rise up.
Air bubbles
Use the heatgun again to gently expel any air
that may be trapped and leave the resin to cure
to the B-stage.
Take care at this stage to make sure that you
check in all gaps and against all edges as once
the resin is cured you will not be able to remove
any air bubbles.
Then pour the second part of the mixture to fill the resin flush to the top of the planks. Use the resin
spreader to push any excess into the gaps and border and using a paint brush to break the surface
tension paint over the tops of the planks to evenly distribute the resin over the project.
Once the resin has reached the B-stage, test again with a gloved finger to make sure it is tacky then
you can go ahead with the 4th and final stage pour.
This 4th layer will form the shiny surface of our table so you need to take extra time to ensure that
everything in this stage is done perfectly - from the measuring and mixing to the pouring and curing.

GlassCast® Neon Resin Plank Table
Page 16
8. Stage 4 - Pour the Surface Layer
Make sure that the resin process from pages 10-11 is followed exactly for this critical final pour.
Measure and mix the resin and hardener before pouring out the mixture in one go and if required
using a spreader to ensure full coverage. Don't forget to double pot the mixture.
Then prepare a cover for the barrier box to make sure that no tiny particles of dirt or dust that may
be in the air can get on to the curing resin.
Now leave the resin to fully cure. This will take at least 24 hours, but if you can leave it for longer it is
advisable. We le this table for 48 hours before being checked and then demoulded.
Calculation
For the 4th and final pour you need to measure
and mix the same amount of resin and harden-
er as Stage 1 - both the base and surface will be
3mm in depth so that the planks appear to be
suspended in the middle of the resin.
Resin = 2.56kg
Hardener = 1.28kg

GlassCast® Neon Resin Plank Table
Page 17
9. Removing the Barriers
Before removing the barriers make sure that you check using a gloved finger that the 4th and final
stage has fully cured. Be patient at this stage and make sure the resin is fully hardened. If the resin is
fully cured you will not be able to make a mark with your thumbnail no matter how hard you try. You
can then remove the barriers and baseboard.
Removing the baseboard
Turn the table top upside down and you will see
that the base will peel away really easily if you
have used a non-stick material like the polypro-
pylene sheet.
Removing the side barriers
Then turn the table top back over and prise o
the barriers - these should easily pull away if
you have used the non-stick release tape.
You will notice that the sides of the table look
quite good already but there will probably be a
meniscus of resin around the edge of the piece
that needs to be removed and some finishing to
achieve the high gloss.

GlassCast® Neon Resin Plank Table
Page 18
10. Finishing
To remove the sharp meniscus of resin and leave the edges as smooth as possible we used an
electric planer and then used abrasive papers to wet sand the edges and a polishing compound to
bring the edges up to the same hi-gloss as the table top.
When the polishing stage is complete use a clean microfibre cloth and wipe the table surface and
edges to remove any residue. If you realise at this stage that any scratches remain in the resin you
will need to repeat the grit stages of the resin - starting with the 240 grit paper and working up
through increasing fine grits of abrasive paper.
Planing the edges
If you don't own an electric planer it may be a
good investment for this project, you could do
the same job by hand although it will take a
considerable amount more time and eort. The
finish the electric planer leaves is pretty good
on it's own and will not take much further work
to bring up to a full shine to match the surface.
Wet Sanding
Good technique is called for when flatting the
edges. You will need to gradually work your
way up through the grits of paper starting with
240 grit then moving up to 400 grit, 800 grit
and finally 1200 grit. Make sure that you use a
block behind the paper and make sure that you
change the water between each grit. Using the
block will avoid accidentally radiusing the edg-
es and make sure that you only move on to the
next grit when you've removed all the scratches
from the previous grit.
Polishing
We used the Pai Cristal NW1 polishing com-
pound which is a fast cutting compound ideal
for tough plastics like epoxy. The full shine on
the table edges can be reached by hand pol-
ishing or by using a power polisher and can be
achieved quite quickly if done by hand.

GlassCast® Neon Resin Plank Table
Page 19
Fitting the legs
At this point the table top is essentially completed and all that remains is to fit the legs of your
choice. We chose some industrial style legs in black from the Hairpin Leg Co - the legs you choose
depends on your preferred style and the look you are going for.
Follow the manufacturers instructions to fit the legs - which will be a relatively easy process because
the legs can be fastened straight into the planks on the underside of the table.
Once the legs are fittted securely turn the table over
and that's it - your Neon Resin Plank Table project
complete!
For the quality and uniqueness of the finished table,
this has been a relatively simple project to complete.
The amount of hands on labour time was only a few
hours minus the curing times. If you want to produce
a stunning piece of furniture like this and you use the
GlassCast® 3 Clear Epoxy Coating Resin, and follow
the guidance you can expect results every bit as good
as ours!
Fitting the legs
Mark up and then drill through the the resin into
the planks using a spacer so you don't drill too
far into the planks, then follow the manufactur-
ers instructions to secure the legs to the table.

GlassCast® Neon Resin Plank Table
Page 20
11. After Care
Now that your GlassCast® 3 resin plank table project is complete you’ll want to keep it looking great
for years to come.
Here are a few important things to keep in mind when looking aer your GlassCast project:
• Hot Objects - You should not place hot objects directly on to the resin surface (pots, pans, plates or
mugs) as this may mark the surface. Instead use coasters or heat proof mats. If you do find
that hot objects have marked the surface it can be flatted and polished again using the steps on
page 18 to remove any marks.
• UV Light - GlassCast® 3 has been designed to have the best UV stability of any epoxy resin
on the market and should withstand years of indirect sunlight with very little eect. However,
common with just about all materials of this nature, prolonged exposure to UV light,
particularly direct sunlight, can eventually cause some change in the appearance of the
resin. For this reason, finished GlassCast® projects are not recommended for outdoor use
and should be kept away from direct sunlight where possible.
• Scratches and Marks - GlassCast® 3 is a very hard wearing plastic and will hold up to the
rigours of light daily use without marking. However, accidental damage can be caused by
sharp objects scraping over the surface of the resin or from things being dropped onto it. If
this occurs, these can be polished out using the same process that was used for the initial
sanding and polishing ; i.e. abrasive paper (for coarse scratches) followed by polishing
compound to restore the gloss.

GlassCast® Neon Resin Plank Table
Page 21
12. Alternative Projects
GlassCast® 3 is the ideal epoxy resin for this amazing neon plank table and the techniques used to
create this eye-popping table can be used to create bar tops, table tops and headboards and the
look can be changed very simply to give a totally dierent look to suit any style.
Variations on this process could be:
• colouring the planks to be encapsulated with dierent wood stains or paints
• stencilling or shading the planks
• having larger or smaller gaps and borders
• changing the colour of the resin
• changing the layout of the planks to create a pattern - like herringbone
GlassCast® 3 is the ideal epoxy resin for the applications described above and any piece created this
way could be the centrepiece for a designer apartment or modern oice, needing little more than
the GlassCast® 3 resin and neon pigment! This resin is also suitable for use on Penny Floors and is
compatible with the GlassCast Tinting Pigment range and Pearl Ex Metallic Powders.
Also available in the GlassCast range are the:
GlassCast® 10 Casting Resin for Jewellery, Cras, 3D ResinArt, Doming and Encapsulation
GlassCast® 50 Casting Resin for River Tables, Furniture Infills, Knot Filling, Sculpture & Encapsulation

GlassCast® Neon Resin Plank Table
Page 22
Useful Information
Industrial Box Section Table Legs available from the Hairpin Leg Co:
www.thehairpinlegcompany.co.uk
GlassCast 3, Neon Tinting Pigment and ancillary items available from:
http://www.easycomposites.co.uk
Wood Dye available from:
www.liberon.co.uk
Tile Spacers available from DIY stores or Tile Suppliers.
Wooden Planks and Batons can be sourced from your local Timber Merchants or DIY Store.
