
VISUAL
INTEGRITY
GUIDELINES
07 • 19 • 24
For additional assistance, please contact Marketing Operations at [email protected].
To download assets from this guide, visit:
BENCO.COM/VENDOR-RESOURCES

2
Our Belief
We believe dental providers
deserve to have a partner
on their side.
Our Purpose
To make it easy for dental
providers to grow a successful
business and to deliver the
best patient outcomes.
Our Vision
A world where dental
providers and their patients
feel cared for.
Our Values
Partnership
We constantly ask ‘how can we make
our customers’ lives easier?’
Integrity
We assume positive intent
and do the right thing, always.
Excellence
We are committed to earning
our reputation every day.
Innovation
We drive dentistry forward with
our innovative products and solutions.
Community
We give back to the communities
and families we serve.
Driving Dentistry
Forward, Together.
Benco Dental is a national, family-owned dental distributor offering
curated products and solutions and a committed, caring team that
makes it easy for dental providers to grow more successful businesses
and deliver better patient outcomes.
BRAND POSITIONING

3
CLEAR SPACE
TAGLINE USAGE
ONE COLOR VERSIONS
Our logo always appears in two colors: Pantone 541 C and Pantone 360 C.
The artwork shown, at right, is the only authorized graphic or logo to represent Benco.
The Benco Dental logo can only appear in full color, solid black, or solid white. Do not
utilize the logo without the tagline unless below 1.5 inches (144 px) wide.
We prefer to leave clear space around the Benco logo
to protect it from surrounding graphics or typography.
Measure clear space using the height of the “t” in Dental
as a guideline for vertical and horizontal space.
When sized above 1.5 inches (144 px for web) wide, please
utilize the version of the Benco logo with the ‘Driving
Dentistry Forward, Together’ tagline attached.
The Driving Dentistry Forward, Together tagline may also
be used as a logo companion graphic alongside the logo,
but should not be made more prominent than the logo.
When a print job calls for one color, use black. On a black
or dark-colored background, use the logo in white. This
version is also used when reversing the logo out of a
photo. Always make sure the background provides
enough contrast to the logo for ideal visibility.
Solid Blue Exception
The Benco Dental logo can also appear in
solid blue on select projects. All uses of the
solid blue logo should be approved by our
Brand & Communications department.
LOGO USAGE
Logo Usage
Minimum Width: 1.5 inches
Driving
Dentistry
Forward,
Together
Driving
Dentistry
Forward,
Together
Driving Dentistry Forward, Together
Driving Dentistry Forward, Together

4
Benco Dental has several services that need to be externally identified as part of Benco Dental.
The following are the only approved logos to be used for identifying these services. Logos will be
available for departments with external customer interaction.
Internal team dedicated to supporting associates through continuous process
improvement, Lean thinking, change management and the application of proven
technology solutions to streamline day-to-day operations.
The online school of thought leadership. From forward-thinking white papers to
information-packed articles and videos, Benco U curates them all into one center
of knowledge.
Dentistry’s groudbreaking equipment and design showrooms. Browse the biggest
selection of technology and test drive the latest equipment. Plan your interior design.
Get expert advice. All under one roof. Three convenient locations in PA, TX and CA.
The industry’s most powerful solutions, curated. Single-unit chairside or
high-volume. CAD/CAM and 3D. From scan to design to creation, Benco
Dental offers complete, cohesive workflows for every budget and every need.
Onsite equipment installation, maintenance, repair and support. Benco
Dental’s expert team gets practices up and running efficiently—and responds
promptly to ensure business continuity with the absolute minimum downtime.
Experienced support where ROI really matters. Benco offers a wide range of dental
practice coaching services to accommodate every type of practice’s unique needs
and challenges. Armed with state-of-the-art dental practice software, we make it our
goal to ensure success for you and your business.
BRAND EXTENSIONS
Brand Extensions
ONE COLOR VERSIONS
When a project using a brand
extension logo calls for one color
on a light background, use solid black.
On darker backgrounds, use the brand
extensions logos in solid white.
BRAND EXTENSIONS
CONTINUE ON PG. 6
Digital
Dentistry
Digital
Dentistry

5
BENCO FAMILY FOUNDATION
The Benco Family Foundation, the charitable
arm of Benco, looks to support solutions for oral
health or community issues that are innovative,
sustainable, measurable and impactful.
Celebrating women in dentistry. Named for Dr. Lucy Hobbs Taylor who, in 1866, became the first
American woman to earn a degree in dentistry. The Project aims to bring women together from
all facets of the dental profession – dentists, dental assistants, hygienists, receptionists, sales
representatives and others.
Dentistry’s original rewards program, refreshed and more rewarding than ever. Members enjoy free
shipping on qualifying orders, discounts and rebates without asking, our Benco-only pledge that you’ll
spend 15% less than the national average on supplies, and more.
Powerful, affordable, innovative dental practice software and services spanning AI, practice
management, data analytics, website and content development, managed support, patient
engagement and cloud solutions.
BRAND EXTENSIONS
Resources and knowledge to help keep your plans on track and discover an ideal path to success. Buying?
Selling? Partnering? Expanding? Consultation is free, and it’s never too early to get started – from wherever
you are now, to wherever you want to go.
Pioneers in smart, creative, productive practice design. Benco Dental was the industry’s first distributor to offer
space planning all the way back in 1978. Today, our coast-to-coast team is applying in-house concepts and best
practices to deliver America’s most productive dental offices.
Products, technologies and advice for building your business and increasing productivity. Everything you need is right
here, from the latest in scalable 3D printing and CAD/CAM milling, to our comprehensive tooth department stocked with
more than 560,000 teeth. Benco Dental’s dedicated lab team is the ideal partner for today’s fast-changing world.
CONTINUED
FROM PG. 5
Brand Extensions

6
PRIMARY FONT
HEADLINE FONT
Lota Grotesque Alt 2
ABCDEFGHIJKLMNOPQRSTUVWXYZ
abcdefghjiklmnopqrstuvwxyz1234567890!?;@#$&.
ABCDEFGHKLMNOPQRSTUVWXYZ
abcdefghjiklmnopqrstuvwxyz1234567890!?;@#$&.
ABCDEFGHIJKLMNOPQRSTUVWXYZ
abcdefghjiklmnopqrstuvwxyz1234567890!?;@#$&.
Barlow Condensed
Barlow
Our primary font, Lota Grotesque Alt 2, should be
used whenever available to best represent the
Benco Dental brand. This font is approved for
body copy, subheadings, and all situations with
the sole exception of stand-alone headlines.
Barlow is our headline font, and should
be used to catch the attention of the
reader with simple, bold statements.
Barlow Condensed may also be used for
subheadings or on a case by case basis
where necessary.
Barlow and Barlow Condensed are
not approved for body copy use.
Light • Regular • Semibold • Bold
Light • Regular • Medium • Semibold
Light • Regular • Medium • Semibold • Bold
Our fonts offer a variety of weights and styles that enable them to be used in numerous
combinations to meet the communication needs of Benco. This keeps the Benco Dental brand
cohesive and easily identifiable, while also maintaining an appropriate level of consistency. Our fonts
are available upon request, and are only available for use on Benco Dental marketing materials.
DEFAULT FONTS
Arial
Regular • Bold
When Lota Grotesque Alt 2 is unavailable,
Arial may be used in its place. Usage of
default fonts is not preferred, and should
be only used as a last resort.
FONTS
Fonts

7
Color Palette
SECONDARY COLORS
PRIMARY COLORS
ACCENT COLORS
Our primary colors should always be used
when possible, and can add visual interest
when included in longer documents.
Our primary colors can utilize tints
up to 50% and shades up to 20% K.
Our secondary colors complement usage
of the primary color and should be used to
add diversity in design.
Our secondary colors can utilize tints
up to 50% and shades up to 20% K.
Our accent colors provide emphasis, and are
to be used sparingly on designs where the
primary and secondary colors are already being
utilized. These colors are not intended for large
areas, and should not be used without an
accompanying primary and secondary color.
Our accent colors do not utilize tints or shades.
PANTONE
P 130-14 C
C: 80 M: 12 Y: 53 K: 00
R: 00 G: 163 B: 144
HEX: 00A390
C: 00 M: 50 Y: 98 K: 00
R: 247 G: 148 B: 33
HEX: F89420
C: 00 M: 100 Y: 12 K: 00
R: 236 G: 07 B: 126
HEX: EC077E
C: 00 M: 00 Y: 00 K: 10
R: 230 G: 231 B: 232
HEX: E6E7E8
C: 59 M: 00 Y: 90 K: 00
R: 108 G: 194 B: 74
HEX: 6CC24A
C: 87 M: 03 Y: 84 K: 39
R: 00 G: 112 B: 65
HEX: 007041
C: 36 M: 00 Y: 00 K: 00
R: 151 G: 218 B: 248
HEX: 97DAF8
C: 100 M: 61 Y: 00 K: 43
R: 00 G: 60 B: 43
HEX: 003C71
PANTONE
P 20-8 C
PANTONE
P 73-8 C
10% K
PANTONE
541 C
PANTONE
360 C
PANTONE
P 115-4 C
PANTONE
7733 C
COLOR PALETTE

8
Our gradients are created with HEX values
rather than Pantone values. Using HEX
values ensures that our gradients never
appear banded or muddy.
Our gradients are only to be created
with the approved combinations
of primary and secondary colors
shown at right. Leaving out the
accent colors ensures they make
an impact when used, and that
gradient usage stays consistent
with our brand image.
NO ACCENT COLORS
GRADIENTS
Gradients
USE HEX VALUES
SECONDARY GRADIENTS
003C71 - 00A390
Primary Gradient
6CC24A - 00A390
Secondary Gradient
007041 - 00A390
Secondary Gradient
97DAF8 - 00A390
Secondary Gradient
Always consider using the Teal to Blue
primary gradient first to best represent
Benco Dental. Our secondary gradients
are reserved for creating additional
design diversity within established
brand pieces.

9
Benco uses a 13° angle that matches the
Benco Dental logo as a primary design
element. On printed pieces with a bleed,
consider using the angled portion bleeding
off the right side of the piece.
Use thin, horizontal rules to separate
content and draw the viewer’s eye.
When possible, utilize a 0.5 pt weight.
Use graphic elements like vector icons sparingly
to reinforce ideas only when needed. Graphic
elements should not overshadow the content
of the designed piece.
TEXT SPECIFICATIONS
UNIVERSAL ANGLE
THIN, HORIZONTAL RULES
GRAPHIC ELEMENTS
Consider using these few
specifications when creating Benco
Dental printed pieces. While these
specifications won’t work in every
print situation, they are guides to
help achieve a more unified look.
+1.5 PT
10 PT
-20
OR LESS
METRIC
Body Copy Size Leading to Size Ratio Universal Tracking
In body copy, allow
room to breathe with
the leading 1.5 pt larger
than the font size.
In body copy and
headlines, use -20
1/1000 em tracking
when possible.
In body copy, Lota
Grotesque Alt 2
should never exceed
the size 10 pt.
DESIGN ELEMENTS
Design Elements
13°
UNIVERSAL
ANGLE
Allow 25% or more of a designed piece
to be used as white space. When
possible, utilize 0.875” margins.
25% or more
White Space

10
Our people radiate expertise and charisma
tempered by approachability, modesty and
nonchalance. Body posturing should be poised,
but natural. Facial expressions should be warm,
inviting and genuine. Stiff-looking poses or
unnatural expressions should be avoided.
Benco Dental customers are highly intelligent,
driven and passionate. They’re cultured, diverse,
effortlessly stylish and exude naturalness.
DEPICTING ASSOCIATES
DEPICTING CUSTOMERS
PHOTOGRAPHY & VIDEOGRAPHY
Photography & Videography
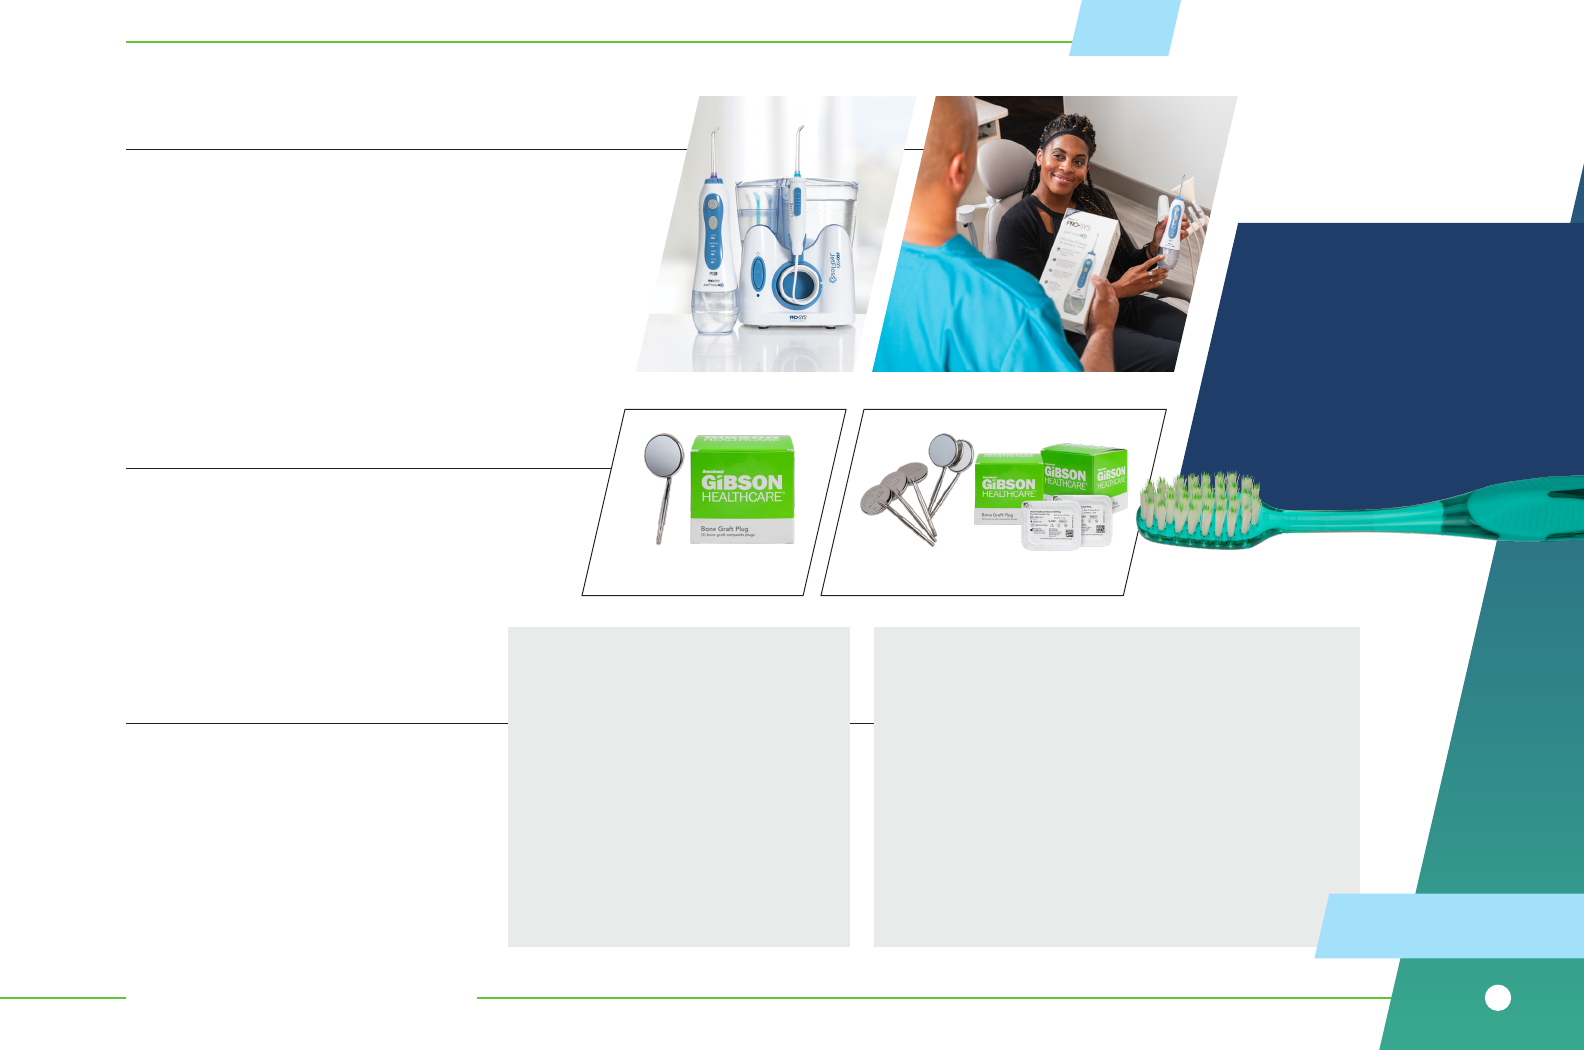
Benco Dental thrives on creating genuine interpersonal interactions and a sense
of partnership through trusted insights and thoughtful solutions that make our
customers’ lives easier. Photography/video, whether stock or custom, should portray
authenticity and confidence with a clear-cut focus. Images are carefully composed
but not conspicuously staged. To accomplish this, we look for imagery that:
• IS RELATIONSHIP DRIVEN
• FEELS WARM AND CARING, NOT COLD AND CLINICAL
• IS UPBEAT, POSITIVE AND OPTIMISTIC
• REPRESENTS ALL SUBJECTS AS ENGAGED AND EQUAL
• FEELS REAL AND EMOTIONALLY CHARGED YET UNDERSTATED
• IS FRESH AND AIRY
• HIGHLIGHTS THOUGHTFUL, ENTHUSIASTIC INTERACTION
• FUNCTIONS AS A SLICE OF LIFE IN OUR BRAND’S LARGER STORY
SUBJECTS SHOULD APPEAR:
• Knowledgeable
• Confident
• Friendly and approachable
• Professional
• Caring
• Comfortable
SUBJECTS SHOULD APPEAR:
• Confident
• Curious: genuinely
interested and invested
• Professional and assured
• Comfortable
• Satisfied
• Collaborative, not superior,
in their interactions with
Benco Dental associates
PHOTOGRAPHY & VIDEOGRAPHY
CONTINUED ON PG. 12
11
Many of our associate-customer interactions revolve
around product because Benco Dental customers count
on us for pinpoint advice on the latest innovations and
how to leverage them. To avoid incorrect depictions of
products or their usage, always ensure products are:
• CURRENT VERSIONS IN CURRENT PACKAGING
• BEING USED IN AN ACCURATE AND BELIEVABLE MANNER
• PLACED IN AN APPROPRIATE ENVIRONMENT
• IN FOCUS AND EASILY IDENTIFIABLE
DEPICTING PRODUCT
PHOTOGRAPHY & VIDEOGRAPHY
Photography & Videography
Product photography should always use off-camera
lighting and maximum aperture. When appropriate,
products should be accompanied by additional
angles and/or family photos. The preferred file
format for product photos is .PNG.
PRODUCT PHOTOGRAPHY
PRODUCT PHOTOS
FAMILY PHOTOS
CONTINUED
FROM PG. 11
TECHNICAL GUIDELINES
Consider using these technical
guidelines when capturing Benco
Dental content. While these guidelines
won’t work in every situation, they help
achieve a more unified look.
• Lighting should appear largely even,
bright and soft with no harsh shadows
or blown highlights. Avoid lighting that
is too direct and artificial and always
diffuse where possible.
• Lead with natural lighting where
possible, using artificial lighting to
balance, for a more natural look.
• Lighting temperature should remain
neutral. Avoid cool lighting that feels
clinical or overly warm lighting that
feels dated.
• Designs should not distract from the subjects, but rather,
create a comfortable and relatable environment customers
would like to be part of.
• Opt for uncluttered and airy spaces.
• Background and sets should always be evenly and well lit.
• Set pieces that enhance the believability of a scene, bring
a feeling of comfort or add balance to a composition are
encouraged, but should never overshadow the subject(s).
• Consider adding pops of primary brand colors where
appropriate, but avoid complicated, repeating patterns and
loud distracting colors.
Lighting Backgrounds & Sets
After photos are taken, the products
should be clipped out using the pen
tool or an equivalent background
removal tool that ensures the edges
of the product are crisp and defined.
Final clipped photos should be checked
on a dark background to ensure the
background is fully removed.
Clipping Photos
PHOTOGRAPHY & VIDEOGRAPHY
CONTINUED ON PG. 13

12
• Take distribution channel
into consideration when
establishing composition.
• When in doubt, compose
for an image that can be
cropped square.
• Consider framing the
subject to the left or right
rather than the center.
Composition
Logo bumps should be used
at the beginning and ending
of customer facing videos.
Logo Bumps Lower Thirds
Lower thirds should be used
to introduce a new person
or speaker.
Title Cards
Title cards should be used to
introduce a new section or to
call out copy heavy information.
PHOTOGRAPHY & VIDEOGRAPHY
Photography & Videography
CONTINUED
FROM PG. 12
CAMERA SETTINGS (VIDEO)
POST PRODUCTION ASSETS
Consider wider apertures for
a softer feel. Subject matter
should remain crisp, but allow
background focus to fall off.
This lends to a less clinical and
more welcoming overall look.
General
• 24 (or 23.976 FPS) for
scenes with dialogue
• 60 FPS for all other scenes
When possible, capture a
second angle that is tighter
than the main composition.
Both cameras should be
synced in white balance
and toning.
Aperture
Frame Rate
Second Angle
Consider using these camera settings
when capturing Benco Dental content.
While these guidelines won’t work in
every situation, they help achieve a
more unified look.
• 4K resolution at minimum
• Neutral toning: in-camera
toning is discouraged
COMING SOON!

13
PHOTO TREATMENTS
Photo Treatments
Reduce the opacity to 70% as to create a
softer, friendlier look that doesn’t obstruct
the image. Do not utilize blending mode
effects. (ex. Multiply, Overlay)
Do not cover the subject’s face for any
reason. When possible, try not to cover
logos, especially the Benco Dental logo.
Use treatments on one side of the photo
or the other, not the center. Only one 13°
angle should be visible in the photo.
Do not cover more than half
of the image with a gradient
overlay. Photo treatments should
emphasize existing visual interest.
Adding an approved gradient in a 13°
angled section to a photo is an easy way
to create brand recognition for Benco
Dental. Use gradients at a 90° angle.
70% OPACITY
VISIBLE FACES
BLEEDING OFF
LESS THAN HALF

14
The following are some examples of our brand in action. This brand
guide also serves as a living example, as it follows all rules within itself.
Please note: These examples are not templates, and are not created
to print size. Rather, consider using these examples for a better
understanding of how different elements of the Benco Dental brand
function together.
Scan here to view
other recent Benco
Dental publications
BRAND IN ACTION
Brand In Action
WEARABLES & MERCHANDISE
Creating wearables and merchandise to
represent Benco Dental requires collabo-
ration with the Brand & Communications
department. Please contact Marketing
Operations to get started.
LAB
VALID: 7/1/24 • 9/30/24
Q3 2024 FLYER
PRODUCTS
Featuring top products
in 3D printing, CAD/CAM,
dental milling, gypsums,
waxes & more.

15
Only Benco Dental and authorized parties may use the Benco Dental
logo in advertising, promotional and sales materials of any kind.
Kitty’s
Kitchen
Do not create your own
brand extension logos.
Do not use the ‘Driving
Dentistry Forward’ tagline.
The following logos are outdated
and are not permitted for use under
any circumstances.
Do not distort or
stretch the logo.
Do not apply effects or
shadows to the logo.
Do not stack elements
of the logo.
Do not change the
color of the logo.
Do not use the full color
logo with full color or low
contrasting backgrounds.
Do not use the all white logo
with light colored or low
contrasting backgrounds.
Do not use the all black logo
with dark colored or low
contrasting backgrounds.
Do not outline or
stroke the logo.
OUTDATED LOGOS
Do not obstruct the visibility
of the logo, behind or in front.
UNAPPROVED USES
Unapproved Uses
Do not utilize the ‘Driving
Dentistry Forward, Together’
tagline below 1.5 inches wide.
Never attempt to alter or recreate the logo for any reason. This includes
(but is not necessarily limited to) the scenarios shown here. Do not add
bursts, violators, type or graphics to the logo or overlap it in any way.
Use the Benco Dental logo only once per page. Do not translate into
another language. Never use only a portion of the logo, always use
the logo in its entirety.

16
Whether you’re a valued Vendor partner or part of the Benco Dental Family,
we are all stewards of the Benco Dental brand. When we use the language
and visual styles that have been defined in this guide to reach our customers,
we’re telling a story that builds loyalty and trust. With this in mind, the
following governance helps bolster our brand integrity.
When submitting ads to include in any publication or owned property, there is a
proofing and approval process done by Benco Dental. We ask that you work with
your Product Manager to solicit approval from Benco Dental’s Creative Team.
VENDORS CAN: Utilize Benco Dental’s visual integrity guidelines for the cobranding
of collateral whether for an advertisement or an event.
VENDORS CANNOT: Create and/or release cobranded assets that have not
gone through Benco Dental’s approval routing process.
Unauthorized use of Benco Dental’s brand is prohibited; creating your
own external-facing collateral is prohibited; use of templates authorized
by Creative is acceptable.
ASSOCIATES CAN: Distribute, share, or repost approved, external-facing
collateral; use authorized templates provided by
Benco Dental’s Creative team.
ASSOCIATES CANNOT: Create their own merchandise, signage or
customer-facing collateral.
All Creative associates are required to adhere to the brand
guidelines. All Creative work is to be proofed for compliance,
and subject to approval routing before assets can be released.
VENDOR PARTNERS
BENCO DENTAL ASSOCIATES
BENCO DENTAL CREATIVE TEAM
GOVERNANCE
Governance

17
Email signatures are part of Benco
Dental’s brand identity. A simple, clean
signature communicates a higher level of
professionalism to anyone who receives it,
and also provides instant brand recognition.
For consistency, we have created a branded
power point template to be used when
communicating internally and externally.
Benco has a variety of virtual backgrounds
for video calls. These allow associates to
cover a distracting background, but can
also be used to provide brand recognition,
especially when communicating with
customers or vendors.
VIRTUAL BACKGROUNDS
EMAIL SIGNATURE
POWERPOINT PRESENTATIONS
ASSOCIATE DIGITAL PRESENCE
Associate Digital Presence
