Yale
Environmental Health & Safety
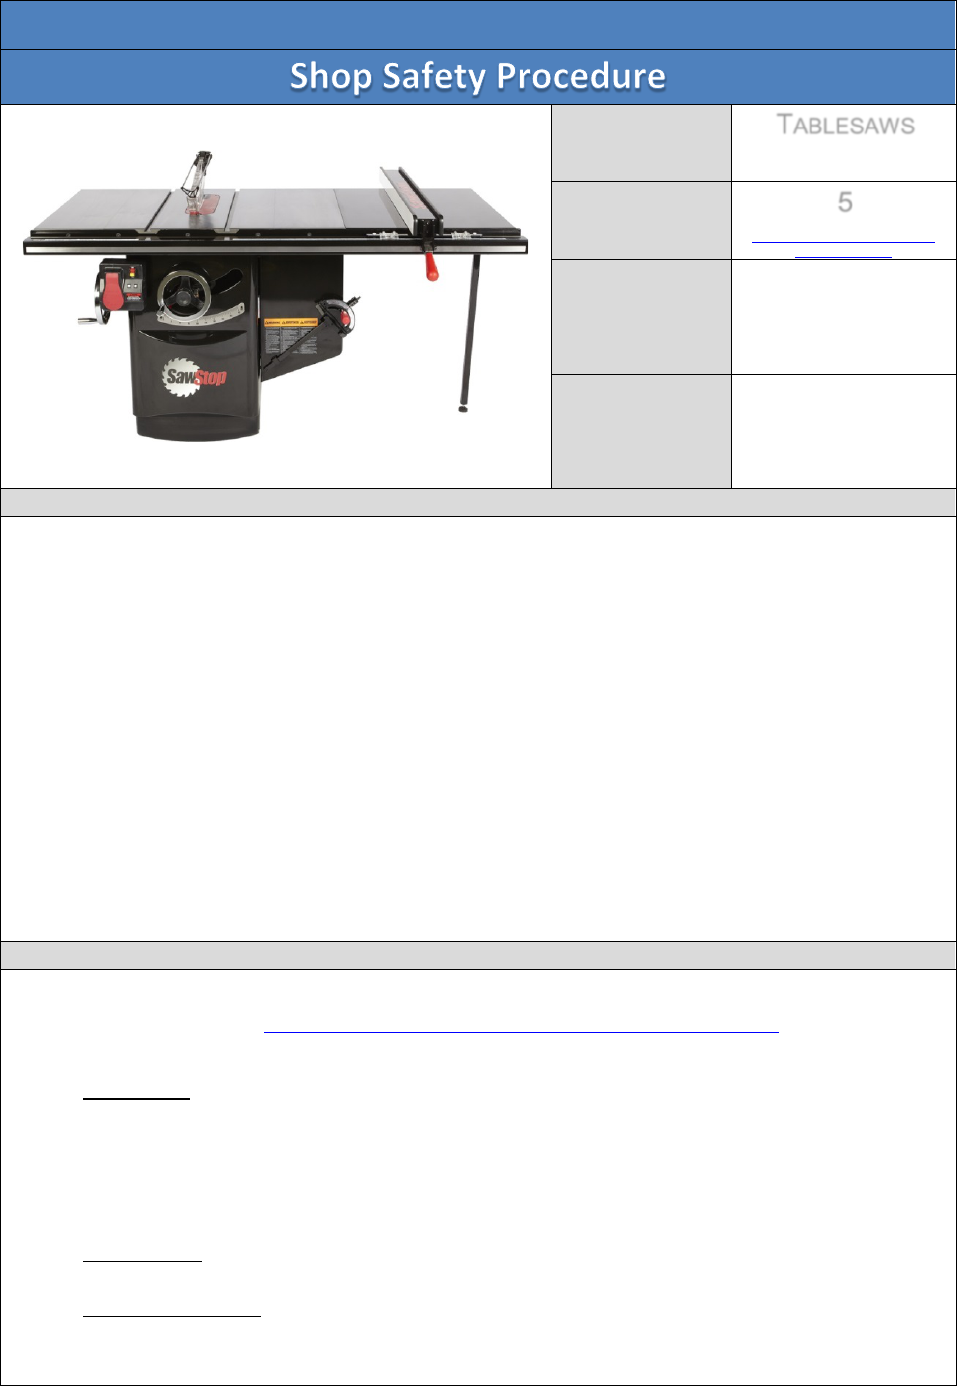
Equipment/Task
Name:
T
ABLESAWS
Equipment/Task
Hazard Class:
5
http://ehs.yale.edu/forms-tools/tool-
classification-matrix
Shop Name:
Shop Hazard
Class:
Purpose
Tablesaws are typically used for making long “rip” cuts, dimensioning sheet goods, creating grooves or
slots, and certain other shaping operations. Like many woodworking tools, the tablesaw can be used
with solid wood, plywood, medium density fiberboard, and certain plastics. It can also be outfitted with
a dado blade that produces an adjustable width groove for jointing. Cuts can be complete through cuts,
partial cuts, or angled cuts.
Tablesaws come in two basic sizes: smaller portable “contractor” tablesaws and larger fixed cabinet
saws. Regardless of size, each consists of an electric motor, blade, flat table top, and an adjustable rip
fence that the workpiece is generally held against and guided to maintain a consistently wide and
straight cut.
Tablesaws used on campus must meet all applicable OSHA safeguarding requirements
. Those in student
use shops must also be a “SawStop”-style tablesaw, with an inherent contact sensing and emergency
stopping system for additional safeguarding of students who are generally less experienced than
professional employee woodworkers. Over time, it is anticipated that even employee-only shops will
switch over to all SawStop style tablesaws.
Hazards
As with all shop tools there are many potential hazards associated with their use and exposure.
Tablesaws are Class 5 tools (http://ehs.yale.edu/forms-tools/tool-classification-matrix
). There are a
number of particular hazards associated with the operation and use of tablesaws:
• Amputation – The high speed large diameter rotating blade poses significant risk of amputation.
Body parts must be kept out of path of blade at all times. No adjustments to cutting angles,
fences or stops should be attempted until the blade has come to a full stop. Although tablesaws
equipped with the SawStop sensing system effectively limit the severity of amputation to minor
cuts and nicks, the potential for serious lacerations is always an issue. And since the sensising
technology can be overridden, the risk of amputation can never be completely discounted.
• Sharp tooling – Saw blade pose risks of cuts, lacerations and puncture wounds during handling,
replacement and setup.
• Workpiece kickback – During a cutting action, a workpiece can bind between the blade and the
fence, resulting in the workpiece being fired back towards the operator at very high speed,
potentially resulting in sharp or blunt object trauma.
Yale Environmental Health & Safety 135 College Street, Suite 100 203-785-3550 ehs.yale.edu Page | 1

Hazards (cont’d)
• Other flying objects – In addition to workpiece kick back, the high speed blade can cause cutoffs,
dust, and chips to also become projectiles. Proper PPE must be worn at all times and do not
make adjustments unless the tool is off and the blade is at a complete stop.
• In-running nip point – The blade cuts in an inward, forward rotation mode which means that the
blade will try to “push” the work piece away from the cut at all times. This has two direct
hazards – workpiece kickback described above and the potential to draw loose clothing or other
items into and around the blade and shaft.
Limitations
• Cross-cutting operations usually require removal of the fence, and then use of either a miter
gauge or, better, a sled that rides in the grooves on the table surface.
• Cutting ends of pieces which are taller than they are long (e.g., tenoning) must be performed
with appropriate jigs and clamps.
• The width of the work piece is generally limited to the maximum opening between the fence
and the blade. Larger workpieces should be handled on a panel saw or rough dimensioned first.
• Workpiece material choices are generally limited to wood, wood products, and composite wood
products. Plastics may require a special blade and, depending upon the cutting work, additional
exhaust ventilation.
Required Personal Protective Equipment
• Refer to the Shop Safety Postings and instructions provided by the Shop Supervisor.
• Safety glasses
Shop specific required PPE:
Required Training
•
Applicable Shop Rules
o Student Shop Rules (http://ehs.yale.edu/forms-tools/shop-rules-student-accessible-shops)
o Professional Shop Rules (http://ehs.yale.edu/forms-tools/guidelines-professional-shops)
• For Class 2 through 5 Student Shops, review and signing of the Yale University Shop/Tool Use
Safety Agreement (http://ehs.yale.edu/forms-tools/shoptool-use-safety-agreement).
• Shop Supervisors or Instructors must evaluate the tool user based on successful demonstration
of the Training Competencies listed below as applicable.
Training Competencies:
□ Identify and describe all controls, adjustments, and functions of the tablesaw.
□ Dress appropriately and wear appropriate personal protective equipment for the cutting
operation.
□ Correctly setup and adjust the tablesaw for all types of required cuts.
□ Apply good judgment in selecting accessories for work piece and accurately position work
piece for cutting operation.
□ Students must be able to reset all saw functions to square, perpendicular cuts and clean up
saw in preparation for next user.
Shop specific training requirements:
Authorized Tool Users
Shop Supervisor, Shop Monitors and those authorized by shop supervision to operate the tool.
Yale
Environmental Health & Safety 135 College Street, Suite 100 203-785-3550 ehs.yale.edu Page | 2

Tool Safety Rules
• Observe and follow all Yale Professional or Student Shop Rules as posted.
• Understand and follow manufacturer operating procedures.
• Inspect the tool for damage prior to use.
• Verify all guards are in place and adjusted properly.
• Do not bypass any safety devices.
• Only use the tool when it is secured to the floor via a pedestal or work bench.
• Always stay at the machine while it is running.
• Clean the tool after use.
• Report any malfunction or damage to the Shop Supervisor after tagging the tool “Out of Service,
do not use”.
• Always disconnect the plug from the power source before making any adjustments, changing, or
physically inspecting the blade.
• Never use another person as a substitute for a table extension or as additional support.
• Do not attempt to cut pieces of stock that are too small to easily hold with your hands.
• Never make free-hand cuts by raising the work piece into the blade.
• Never feed the workpiece into the saw at a rate faster than it can accept.
Shop specific rules:
Proper Setup and Use
Prior to use:
• Evaluate the work piece material type and appropriateness of the saw and saw blade. Inspect
the material for nails, screws, or other foreign objects. Wet/green wood, certain exotic woods,
and many synthetic materials may accidentally trip the SawStop. Review work with such
materials in advance with the shop instructor or supervisor.
• Determine the location and angle(s) of cuts required.
• Determine the required fixturing/tooling/clamping/supports needed.
• Obtain personal protective equipment (safety glasses /shields) hearing protection and remove
all loose clothing, jewelry and securely tie back all long hair/beards.
At the tablesaw:
• With the tool off, inspect the tool. Look for damage, missing guards, and blade condition.
• Inspect the work area and remove any obstructions and trip hazards.
• Adjust and set cutting angle(s) for work piece.
• Adjust blade so that it is only slightly taller than the height of the workpiece.
• Set up fixturing/supports and stops to make required cuts.
• Anticipate the outfeed of materials and provide support, either by properly adjusted roller
supports or an auxiliary outfeed table.
• Ensure that blade guard and riving knife / splitter / pawls are in position and working. The blade
guard should be set up to ride over the workpiece. If this will damage the work, it can be set
higher but no more than ¼” above the workpiece.
• For operations where safeguarding must be removed (e.g., slotting, dado cutting, certain angle
cuts), consult instructor or supervisor first. If permitted, select and use appropriate jig or
cutting aid. Free hand cutting is never permitted.
• Adjust the fence to the proper width. Remember that the fence is always kept to the RIGHT of
the blade.
• Assemble push sticks on table within reaching distance.
• Turn on the dust collection system if available.
Yale
Environmental Health & Safety 135 College Street, Suite 100 203-785-3550 ehs.yale.edu Page | 3

Proper Setup and Use (cont’d)
Rip cutting process:
• Turn the saw on and await attainment of full rotational speed. Listen for any unusual sounds.
• Locate work piece on table closest to operator, while standing to the left of the workpiece.
Place workpiece firmly against fence and prepare to slowly push it into the blade.
• Slowly push workpiece into blade, again listening for any unusual sounds. Excessive rates of
feed are usually noted by a change in pitch of the blade. If so, slow down the rate of feed.
• Keep the workpiece firmly against the fence as you continue to push it through the blade.
Excess deflection from the face of the fence may cause the workpiece to bind, with serious
potential for kick-back. Remember to stand off to the left from the tail of the workpiece.
• As soon as the back end of the workpiece is nearing the tabletop, take the push sticks and use
them, rather than your hands, to continue to feed the workpiece into the blade. Always use
pushsticks when pushing the workpiece all the way through and past the blade.
• Cut-offs should either be dropping to the floor behind the tablesaw or captured on either
another outfeed table or on an outfeed roller support.
• Allow the blade to come to a complete stop before making any adjustments to the tablesaw set
up or to move cut-off pieces away from the blade.
Miter guide use:
• Miter guides are used for cross-cuts and angle cuts in relatively short workpieces. Long pieces
generally require a sled or other special jigs. In many instances, the blade guard, splitter, and
pawl mechanism(s) may need to be removed temporarily.
• Move the fence off to the right, beyond the length of the workpiece to prevent binding.
• Insert the miter guide into the slot. Check angle and be sure it is locked in position.
• Place workpiece onto miter guide. Most workpieces can be safely haled manually, but short or
long pieces, or wide ones, generally must be clamped onto the miter guide. Consult instructor
or supervisor.
• With the motor still OFF, move the miter guide to the blade and ensure accurate positioning for
the intended cut.
• Pull the miter guide back well in front of the blade.
• Turn on blade and proceed. Use a push stick to move or remove cutoffs.
Dado blade use:
• With the saw turned off and the power cord disconnected, replace the regular cutting blade
with a dado head. As these vary from a single fixed width specialty blade to stacking blades
with chip removers, consult instructor or supervisor in advance.
• With dado head installed, raise to needed height.
• Use fence for longitudinal grooves, miter guide or cross-cut sled for perpendicular ones. In both
cases, the riving knife and pawls will generally need to be removed, and the blade guard as well
if it is affixed to the blade assembly or table.
• Perform practice cut(s) to ensure proper cutting depth.
• Even though dado cuts are not meant to completely cut through a workpiece, it is still essential
that pushsticks be used to guide the workpiece through and beyond the blade.
Cross-cut sled use:
• Cross-cut sleds vary in style and type. In general, they use two of the miter guide grooves on
the table top.
• Cross-cut sled work almost always requires removal of the blade guard, riving knife, and pawls.
• Fixture and clamp the workpiece in the sled, following guidance from the instructor or
supervisor.
• With power off, move the sled to the blade to verify position, and then lock down the
workpiece.
Yale Environmental Health & Safety 135 College Street, Suite 100 203-785-3550 ehs.yale.edu Page | 4

Proper Setup and Use (cont’d)
• Proceed with cut, and then immediately replace all safeguards.
Other special cuts:
• Perform tenoning and any other work on tall edge using a jig with clamps to secure the
workpiece and enable safe
• Movement past the blade. Consult instructor or supervisor before beginning this work.
Completion:
• Allow blade to come to a complete stop.
• Disengage or turn off dust collection system (if available and as directed by shop supervisor).
• Clean up and return blade 90 degree angle, below surface of table, and with fence slid over to
side for next user.
• Report any issues to the shop supervisor.
Shop specific procedures:
References and Tool-Specific Instructional Materials
OSHA e-Tool on Tablesaws: https://www.osha.gov/SLTC/etools/woodworking/table_saws.html
SawStop Website: http://www.sawstop.com/
Diagrams/Illustrations
Table Saw Components
Blade and Guard
Motor housing
and base
Table
Miter guide
On/off/E-Stop
Blade height and
angle adjustment
Fence
Yale Environmental Health & Safety 135 College Street, Suite 100 203-785-3550 ehs.yale.edu Page | 5

Common Tablesaw Safeguard Devices
Push sticks in use
Different styles of push
sticks
Blade guard with riving
knife and anti-kickback
pawls
Yale Environmental Health & Safety 135 College Street, Suite 100 203-785-3550 ehs.yale.edu Page | 6

Table Saw Configurations
Creation/Revision Dates:
July 2, 2014
Suggestions, questions, or comments? Please contact your shop supervisor or EHS.
SawStop Tablesaw
Contractor Style
Tablesaw
Traditional Tablesaw
Yale Environmental Health & Safety 135 College Street, Suite 100 203-785-3550 ehs.yale.edu Page | 7
Yale
Environmental Health & Safety 135 College Street, Suite 100 203-785-3550 ehs.yale.edu Page | 8
