
Direct
Workshop Training Guide
Morningstar Direct

Morningstar Direct December 2017
© 2017 Morningstar. All Rights Reserved.
Copyright © 2017 Morningstar, Inc. All rights reserved.
Microsoft and Excel are either registered trademarks or trademarks of Microsoft Corporation in the United States
and/or other countries
The information contained herein: (1) is proprietary to Morningstar and/or its content providers; (2) may not be copied
or distributed; (3) is not warranted to be accurate, complete or timely; and (4) does not constitute advice of any kind.
Neither Morningstar nor its content providers are responsible for any damages or losses arising from any use of this
information. Any statements that are nonfactual in nature constitute opinions only, are subject to change without
notice, and may not be consistent across Morningstar. Past performance is no guarantee of future results

Contents
Morningstar Direct December 2017 3
© 2017 Morningstar. All Rights Reserved.
Contents
Class Overview . . . . . . . . . . . . . . . . . . . . . . . . . . . . . . . . . . . . . . . . . . . . . . . . . . . . . . . . . . . 5
Reviewing Stock Sector Performance . . . . . . . . . . . . . . . . . . . . . . . . . . . . . . . . . . . . . . . . . . . . . 6
Overview . . . . . . . . . . . . . . . . . . . . . . . . . . . . . . . . . . . . . . . . . . . . . . . . . . . . . . . . . . . . . . . . 6
Scenario. . . . . . . . . . . . . . . . . . . . . . . . . . . . . . . . . . . . . . . . . . . . . . . . . . . . . . . . . . . . . . . . . 6
Solution . . . . . . . . . . . . . . . . . . . . . . . . . . . . . . . . . . . . . . . . . . . . . . . . . . . . . . . . . . . . . . . . . 6
Exercise 1: Creating a workbook template in Presentation Studio . . . . . . . . . . . . . . . . . . 7
Exercise 2: Adding the Markets Periodic Chart to the template . . . . . . . . . . . . . . . . . . . . 9
Exercise 3: Modifying the Markets Periodic Chart . . . . . . . . . . . . . . . . . . . . . . . . . . . . . . 10
Exercise 4: Adding a header to the report . . . . . . . . . . . . . . . . . . . . . . . . . . . . . . . . . . . . 13
Exercise 5: Adding a name to the header. . . . . . . . . . . . . . . . . . . . . . . . . . . . . . . . . . . . . 14
Exercise 6: Adding a dynamic date to the header . . . . . . . . . . . . . . . . . . . . . . . . . . . . . . 15
Exercise 7: Generating and saving the report template. . . . . . . . . . . . . . . . . . . . . . . . . . 17
Exercise 8: Saving the stock sector indexes to a list . . . . . . . . . . . . . . . . . . . . . . . . . . . . 19
Evaluating Asset Flow Data in Morningstar Direct. . . . . . . . . . . . . . . . . . . . . . . . . . . . . . . . . . 23
Overview . . . . . . . . . . . . . . . . . . . . . . . . . . . . . . . . . . . . . . . . . . . . . . . . . . . . . . . . . . . . . . . 23
Scenario. . . . . . . . . . . . . . . . . . . . . . . . . . . . . . . . . . . . . . . . . . . . . . . . . . . . . . . . . . . . . . . . 23
Solution . . . . . . . . . . . . . . . . . . . . . . . . . . . . . . . . . . . . . . . . . . . . . . . . . . . . . . . . . . . . . . . . 23
Exercise 9: Search for funds with high exposure to the Energy sector . . . . . . . . . . . . . . 24
Exercise 10: Saving funds to a list . . . . . . . . . . . . . . . . . . . . . . . . . . . . . . . . . . . . . . . . . . . 27
Exercise 11: Examining the asset flows for under-performing funds . . . . . . . . . . . . . . . . 28
Exercise 12: Adding context to the fund flow data . . . . . . . . . . . . . . . . . . . . . . . . . . . . . . 30
Identifying Funds with Consistent Top Performance . . . . . . . . . . . . . . . . . . . . . . . . . . . . . . . . 34
Overview . . . . . . . . . . . . . . . . . . . . . . . . . . . . . . . . . . . . . . . . . . . . . . . . . . . . . . . . . . . . . . . 34
What is involved in creating a performance report? . . . . . . . . . . . . . . . . . . . . . . . . . . . . . 35
Scenario. . . . . . . . . . . . . . . . . . . . . . . . . . . . . . . . . . . . . . . . . . . . . . . . . . . . . . . . . . . . . . . . 36
Solution . . . . . . . . . . . . . . . . . . . . . . . . . . . . . . . . . . . . . . . . . . . . . . . . . . . . . . . . . . . . . . . . 36
Exercise 13: Searching for the cheapest share class of a fund . . . . . . . . . . . . . . . . . . . . . 37
Exercise 14: Create a search by criteria in Performance Reporting. . . . . . . . . . . . . . . . . . 39
Exercise 15: Change the settings for the group . . . . . . . . . . . . . . . . . . . . . . . . . . . . . . . . . 41
Exercise 16: Set the values for the Time Periods tab . . . . . . . . . . . . . . . . . . . . . . . . . . . . . 45
Exercise 17: Set the values for Data Points and Ranks . . . . . . . . . . . . . . . . . . . . . . . . . . . 46
Exercise 18: Select options from the Supplementary Columns window . . . . . . . . . . . . . . 49
Exercise 19: Rename a data column. . . . . . . . . . . . . . . . . . . . . . . . . . . . . . . . . . . . . . . . . . 51
Exercise 20: Save the performance report . . . . . . . . . . . . . . . . . . . . . . . . . . . . . . . . . . . . . 52
Exercise 21: Calculate the performance report . . . . . . . . . . . . . . . . . . . . . . . . . . . . . . . . . 53
Exercise 22: Apply conditional formatting to a performance report . . . . . . . . . . . . . . . . . 54
Exercise 23: Apply conditional formatting to the Morningstar Analyst Rating. . . . . . . . . 55
Exercise 24: Generate a Scorecard for a set of investments . . . . . . . . . . . . . . . . . . . . . . . 59
Exercise 25: Add a summary column for various scores . . . . . . . . . . . . . . . . . . . . . . . . . . 62
Exercise 26: Save investments to a list. . . . . . . . . . . . . . . . . . . . . . . . . . . . . . . . . . . . . . . . 64
Using Portfolio Attribution to Understand Performance. . . . . . . . . . . . . . . . . . . . . . . . . . . . . . 65
Overview . . . . . . . . . . . . . . . . . . . . . . . . . . . . . . . . . . . . . . . . . . . . . . . . . . . . . . . . . . . . . . . 65
Scenario. . . . . . . . . . . . . . . . . . . . . . . . . . . . . . . . . . . . . . . . . . . . . . . . . . . . . . . . . . . . . . . . 65
Solution . . . . . . . . . . . . . . . . . . . . . . . . . . . . . . . . . . . . . . . . . . . . . . . . . . . . . . . . . . . . . . . . 65
Exercise 27: Opening a list in Portfolio Analysis. . . . . . . . . . . . . . . . . . . . . . . . . . . . . . . . . 66
Exercise 28: Viewing attribution data in Portfolio Analysis . . . . . . . . . . . . . . . . . . . . . . . . 67
Exercise 29: Adjusting the benchmark for attribution analysis . . . . . . . . . . . . . . . . . . . . . 68

Contents
4 Morningstar Direct December 2017
© 2017 Morningstar. All Rights Reserved.
Exercise 30: Adjusting the time period reflected in a workspace . . . . . . . . . . . . . . . . . . . 69
Exercise 31: Moving to Analysis mode . . . . . . . . . . . . . . . . . . . . . . . . . . . . . . . . . . . . . . . . 71
Exercise 32: Displaying the Attribution workspace template . . . . . . . . . . . . . . . . . . . . . . 72
Exercise 33: Changing the time period for a template. . . . . . . . . . . . . . . . . . . . . . . . . . . . 73
Exercise 34: Displaying the Attribution Detail table. . . . . . . . . . . . . . . . . . . . . . . . . . . . . . 74
Exercise 35: Changing the time period for the Attribution Detail table . . . . . . . . . . . . . . 75
Exercise 36: Exploring the worst stock selection for the fund . . . . . . . . . . . . . . . . . . . . . . 76
Finding Sustainable Investments in Morningstar Direct Cloud . . . . . . . . . . . . . . . . . . . . . . . . 78
Overview . . . . . . . . . . . . . . . . . . . . . . . . . . . . . . . . . . . . . . . . . . . . . . . . . . . . . . . . . . . . . . . 78
Scenario. . . . . . . . . . . . . . . . . . . . . . . . . . . . . . . . . . . . . . . . . . . . . . . . . . . . . . . . . . . . . . . . 78
Solution . . . . . . . . . . . . . . . . . . . . . . . . . . . . . . . . . . . . . . . . . . . . . . . . . . . . . . . . . . . . . . . . 78
Exercise 37: Accessing Morningstar research on sustainability . . . . . . . . . . . . . . . . . . . . 78
Exercise 38: Create a screen for sustainable investments. . . . . . . . . . . . . . . . . . . . . . . . . 80
Exercise 39: Save the screen and its investments to a list. . . . . . . . . . . . . . . . . . . . . . . . . 88
Managing a Portfolio in Morningstar Direct . . . . . . . . . . . . . . . . . . . . . . . . . . . . . . . . . . . . . . . 91
Overview . . . . . . . . . . . . . . . . . . . . . . . . . . . . . . . . . . . . . . . . . . . . . . . . . . . . . . . . . . . . . . . 91
Scenario. . . . . . . . . . . . . . . . . . . . . . . . . . . . . . . . . . . . . . . . . . . . . . . . . . . . . . . . . . . . . . . . 91
Solution . . . . . . . . . . . . . . . . . . . . . . . . . . . . . . . . . . . . . . . . . . . . . . . . . . . . . . . . . . . . . . . . 91
Exercise 40: Importing a model portfolio from Microsoft Excel . . . . . . . . . . . . . . . . . . . . . 91
Exercise 41: Adjusting a portfolio’s settings for Performance Reporting . . . . . . . . . . . . . 94
Exercise 42: Creating a custom benchmark . . . . . . . . . . . . . . . . . . . . . . . . . . . . . . . . . . . . 95
Exercise 43: Selecting and allocating the weightings for a custom benchmark. . . . . . . . 98
Exercise 44: Assigning a custom benchmark to a model portfolio . . . . . . . . . . . . . . . . . 100
Exercise 45: Adding a holding to a portfolio for comparison . . . . . . . . . . . . . . . . . . . . . . 102
Exercise 46: Creating a new model portfolio from an existing model portfolio. . . . . . . . 104
Using Presentation Studio to Compare Model Portfolios . . . . . . . . . . . . . . . . . . . . . . . . . . . . 110
Overview . . . . . . . . . . . . . . . . . . . . . . . . . . . . . . . . . . . . . . . . . . . . . . . . . . . . . . . . . . . . . . 110
Scenario. . . . . . . . . . . . . . . . . . . . . . . . . . . . . . . . . . . . . . . . . . . . . . . . . . . . . . . . . . . . . . . 110
Solution . . . . . . . . . . . . . . . . . . . . . . . . . . . . . . . . . . . . . . . . . . . . . . . . . . . . . . . . . . . . . . . 110
Exercise 47: Create a template from scratch . . . . . . . . . . . . . . . . . . . . . . . . . . . . . . . . . . 111
Exercise 48: Add the pages for the report template. . . . . . . . . . . . . . . . . . . . . . . . . . . . . 114
Exercise 49: Save the Presentation Studio template and report . . . . . . . . . . . . . . . . . . . 114
Exercise 50: Insert and design the report header and footer . . . . . . . . . . . . . . . . . . . . . 116
Exercise 51: Divide the first page to hold three components . . . . . . . . . . . . . . . . . . . . . 124
Exercise 52: Divide the second page to hold six components . . . . . . . . . . . . . . . . . . . . . 126
Exercise 53: Divide the third page to hold five components . . . . . . . . . . . . . . . . . . . . . . 128
Exercise 54: Duplicate the layout of the third page for the fourth page . . . . . . . . . . . . . 129
Exercise 55: Divide the fifth page to hold four components . . . . . . . . . . . . . . . . . . . . . . 130
Exercise 56: Divide the sixth page to hold three components. . . . . . . . . . . . . . . . . . . . . 131
Exercise 57: Add the label to the first page . . . . . . . . . . . . . . . . . . . . . . . . . . . . . . . . . . . 132
Exercise 58: Add the components to the first page . . . . . . . . . . . . . . . . . . . . . . . . . . . . . 134
Exercise 59: Add the labels to the second page. . . . . . . . . . . . . . . . . . . . . . . . . . . . . . . . 138
Exercise 60: Add the components to the second page . . . . . . . . . . . . . . . . . . . . . . . . . . 142
Exercise 61: Add the label to the third page . . . . . . . . . . . . . . . . . . . . . . . . . . . . . . . . . . 149
Exercise 62: Add the components to the third page . . . . . . . . . . . . . . . . . . . . . . . . . . . . 151
Exercise 63: Add the label to the fourth page . . . . . . . . . . . . . . . . . . . . . . . . . . . . . . . . . 158
Exercise 64: Add the components to the fourth page . . . . . . . . . . . . . . . . . . . . . . . . . . . 159
Exercise 65: Add the label to the fifth page . . . . . . . . . . . . . . . . . . . . . . . . . . . . . . . . . . . 163
Exercise 66: Add the components to the fifth page. . . . . . . . . . . . . . . . . . . . . . . . . . . . . 164
Exercise 67: Add the label to the last page . . . . . . . . . . . . . . . . . . . . . . . . . . . . . . . . . . . 166
Exercise 68: Add the components to the last page . . . . . . . . . . . . . . . . . . . . . . . . . . . . . 167

Morningstar Direct December 2017 5
© 2017 Morningstar. All Rights Reserved.
Viewing the Market through
the Lens of Morningstar Direct
SM
Class OverviewIn this workshop, you will learn how to leverage some of the key features in
Morningstar Direct
SM
in the following lessons:
g Reviewing stock sector performance
g Evaluating asset flow data in Morningstar Direct
g Identifying funds with consistent top performance
g Using portfolio attribution to understand performance
g Managing a portfolio in Morningstar Direct
g Using Presentation Studio to compare model portfolios
In this workshop, you will
work in several Morningstar
Direct modules

Overview Reviewing Stock Sector Performance
6 Morningstar Direct December 2017
© 2017 Morningstar. All Rights Reserved.
Reviewing Stock Sector Performance
Overview You can sometimes find and present the same information in Morningstar Direct in
more than one way. How you deliver the information is both a matter of choice, and the
skills you have with the software. This scenario allows you to find the same set of data
multiple ways, as well as present it in more than one fashion.
Scenario As part of a review of fund flow data, your manager has asked you to identify how the
various Morningstar stock sectors have performed during the trailing one-year period.
Your manager, however, did not specify whether this information should be presented
graphically, or as a set of data.
Solution In Presentation Studio, you will illustrate stock sector performance by creating a
workbook template and including the Markets Periodic Table. You will need to
customize it to show the Morningstar Stock Sectors and only the trailing one-year
time
period.
In the event your manager prefers to see this information as a data set, you will also
use the Workspace module to create a list of indexes tied to the stock sectors, and save
the list in a view showing returns data.
Data presented via
a report may be
more easily
understood than
seeing it in a grid view

Reviewing Stock Sector Performance Exercise 1: Creating a workbook template in Presentation Studio
Morningstar Direct December 2017 7
© 2017 Morningstar. All Rights Reserved.
E x e r c i s e 1 : C r e a t i n g
a workbook template
in Presentation Studio
You need to know how the various Morningstar stock sectors have performed over the
past year,
and show this as a ranking. First, you must decide what will represent the
stock sectors. In Morningstar Direct, no such item as “Stock Sector
returns” exists
natively. Instead, you need find a set of indexes that tracks these
sectors.
The Presentation Studio module has a component that allows you to display sector
index data. You could create either a Workbook or Factsheet template to display this
report; you will have to decide which version of the report you think looks better. The
following instructions guide you through the process of creating a workbook template
to show the trailing one-year performance for the Morningstar stock sectors.
To create a Presentation Studio workbook template, do the following:
1. If a Presentation Studio template is open, close it.
2. From the left navigation pane, select the Presentation Studio module.
3. Click the Workbook icon. The Create New Workbook dialog box opens.
4. The option for New Workbook should be selected. Click OK. The Investments: Settings
dialog box opens.
To click the Workbook
icon, you must first
select the Presentation
Studio module
This option should be
selected automatically

Exercise 1: Creating a workbook template in Presentation Studio Reviewing Stock Sector Performance
8 Morningstar Direct December 2017
© 2017 Morningstar. All Rights Reserved.
5. Click +Add. The Find Investments dialog box opens.
6. From the Find By drop-down field, select Ticker.
7. In the search field, type SLADX, then click Go. Selected American Shares D appears in
the Available Records list.
8. To select the fund, double-click its name (Selected American Shares D). Selected
American Shares D appears in the Selected Records list.
Click +Add to add
investments to a report
When you double-click
a fund name in the
Available Records list,
it appears here (the
Selected Records list)
Be sure to select Ticker
from this drop-down field
before entering a ticker in
the search field

Reviewing Stock Sector Performance Exercise 2: Adding the Markets Periodic Chart to the template
Morningstar Direct December 2017 9
© 2017 Morningstar. All Rights Reserved.
9. Click OK to close the Find Investments dialog box.
10. Click OK to close the Investments: Settings dialog box. The workbook template opens in
a new window.
Exercise 2: Adding
the Markets Periodic
Chart to the template
Now that the blank report template has been created, you can add a component to
depict the stock sectors’ performance. Do the following:
1. If the Home tab at the top of the Presentation Studio window is not selected, select it.
2. From the toolbar, from the Chart drop-down field, select Markets. A set of Markets
charts opens to the right.
3. Drag the Markets Periodic Table to a blank space in the template.
Note the
highlighted selections

Exercise 3: Modifying the Markets Periodic Chart Reviewing Stock Sector Performance
10 Morningstar Direct December 2017
© 2017 Morningstar. All Rights Reserved.
Exercise 3: Modifying the
Markets Periodic Chart
By default, the Markets Periodic Chart shows the performance of four different
US-equity-based indexes for the trailing five-year period. You need to do the following:
g select a different set of indexes, and
g change the time period being to the trailing one-year period.
To accomplish these tasks, do the following:
1. In the bottom-left corner of the Presentation Studio window, click Chart Settings. The
Chart Settings window opens.
2. From the Index Group drop-down field, select Morningstar US Sector Indexes. The
component shown in the template updates to reflect this selection.
Chart Settings is at the
bottom of the Presentation
Studio window

Reviewing Stock Sector Performance Exercise 3: Modifying the Markets Periodic Chart
Morningstar Direct December 2017 11
© 2017 Morningstar. All Rights Reserved.
3. Click Chart Settings again, and this time click the Setup button in the Time Period field.
The Time Period Setup dialog box opens.
4. Because you want to depict only one time period on the chart, start by removing all
time
periods. Near the bottom of the Time Period Setup dialog box, click the Remove
All
button.
Click this button to change
the time period being
reflected on the chart
You do not need to select the time
periods when you remove them by
clicking Remove All

Exercise 3: Modifying the Markets Periodic Chart Reviewing Stock Sector Performance
12 Morningstar Direct December 2017
© 2017 Morningstar. All Rights Reserved.
5. From the Start Date drop-down field, select 1 Year Ago. The End Date should still
display Last
Month End.
6. To the right of the Number of Columns field, click Add Column(s).
7. Click OK. The Time Period Setup dialog box closes. In the template, the Markets Periodic
Table component updates to reflect this choice.
Note the
highlighted selections

Reviewing Stock Sector Performance Exercise 4: Adding a header to the report
Morningstar Direct December 2017 13
© 2017 Morningstar. All Rights Reserved.
Exercise 4: Adding a
header to the report
The report now reflects both the data and the time period you want. You could
generate a PDF from here and send it to your manager, but a header at the top of the
report would help someone who wasn’t involved in creating it understand what the
report is depicting.
To add a header to the report, do the following:
1. At the top of the Presentation Studio window, select the Format tab.
2. From the toolbar, from the Header drop-down field, select Insert Header. A header is
inserted at the top of the page.
3. From the toolbar, from the View drop-down field, select Snap to Grid to turn on
this
feature.
4. Use your mouse to drag the bottom border of the header so the header takes up just
1.00 inch of space.
Be sure to select the correct
tab in order to insert a
header on the report
Snap to Grid makes it
easier to resize and align
components on a page
The location of th header’s bottom border
is shown on the left (vertical) ruler

Exercise 5: Adding a name to the header Reviewing Stock Sector Performance
14 Morningstar Direct December 2017
© 2017 Morningstar. All Rights Reserved.
E x e r c i s e 5 : A d d i n g
a name to the header
To add a report name to the header, do the following:
1. From the toolbar, from the Divide Page drop-down field, select the Two Cell option with
the vertical divider. The header area now has two cells. You will place the report title in
the left cell, and the time period in the right cell.
2. If header cell on the left is not selected, select it. From the toolbar, from the Text
drop-down field, select Custom Text.
Select this option
to divide the
header into two
side-by-side cells
This option
allows you to
enter a title for
the report

Reviewing Stock Sector Performance Exercise 6: Adding a dynamic date to the header
Morningstar Direct December 2017 15
© 2017 Morningstar. All Rights Reserved.
3. Double-click the left header cell and type Morningstar Stock Sector Returns.
4. Select the text you just typed by pressing <CTRL>+<A>. The text is now highlighted.
5. From the toolbar, from the Font Size drop-down field, select 24.
Exercise 6: Adding a
dynamic date
to the header
When entering a time period in the header, if you use a dynamic date here rather than
manually typing the date, the report can be updated without you having to manually
change the date.
To enter a time period for the report without having to manually type the date, do
the
following:
1. Select the header cell to the right of the report title cell.
2. From the toolbar, from the Text drop-down field, select Dynamic Text…Time Period.
The time period for the template is entered in the cell. Note, however, that this is not the
same date being depicted in the component.
Use this
field to
enlarge the
text on the
header
Use this selection to enter
the time period being
reflected in the header

Exercise 6: Adding a dynamic date to the header Reviewing Stock Sector Performance
16 Morningstar Direct December 2017
© 2017 Morningstar. All Rights Reserved.
3. To change the date in the header, select the Home tab at the top of the Presentation
Studio window.
4. Click the Workbook icon. The Workbook Settings: Data window opens.
5. The Data tab should be selected. From the Start Date drop-down field, select
1
Year Ago.
6. Click OK. The Workbook Settings: Data window and the time period date in the header
updates to reflect your choices.
7. Click the date in the right header cell. It changes to display [Time Period].
8. Select the date by pressing <CTRL>+<A>. [Time Period] is now highlighted.
9. Select the Format tab, then from the Font Size drop-down field, select 24.
10. Click outside the cell to see the date displayed in the cell.
Use this field to
change the date
being depicted
in the header

Reviewing Stock Sector Performance Exercise 7: Generating and saving the report template
Morningstar Direct December 2017 17
© 2017 Morningstar. All Rights Reserved.
Exercise 7: Generating
and saving
the report template
When you save a Presentation Studio template, you have the following choices:
g You can save your work as a template. This method allows you to re-use the
template for any investment(s) you want in the future. A report based on a
template does not reflect the investment(s) you selected at the time you created
the template. The downside to saving a Presentation Studio file as a template is
that you will always have to select an investment when opening the file. This will
add some extra clicks to the process of editing the report.
g You can save your work as a report. The file will open much faster because the
system already knows what investment(s) should be associated with the report.
The downside to saving your Presentation Studio file as a report is that if you do
want to change the investments being depicted on the report, you will have to
manually select them.
To see this file as a PDF and save it as a report, do the following:
1. From the toolbar at the top of the Presentation Studio window, from the PDF drop-down
field, select Full Report.
2. From the toolbar at the top of the Presentation Studio window, from the gear drop-down
field, select Save. The Presentation Studio dialog box opens.
This option
immediately
generates a PDF
of the report
Use this option to
save the report

Exercise 7: Generating and saving the report template Reviewing Stock Sector Performance
18 Morningstar Direct December 2017
© 2017 Morningstar. All Rights Reserved.
3. In the Workbook Name field, type Morningstar Stock Sector Returns.
4. Click Save.
5. Close the Presentation Studio window.
Enter the name for
the report here

Reviewing Stock Sector Performance Exercise 8: Saving the stock sector indexes to a list
Morningstar Direct December 2017 19
© 2017 Morningstar. All Rights Reserved.
E x e r c i s e 8 : S a v i n g t h e
stock sector
indexes to a list
The Presentation Studio report is a great asset for depicting the performance of stock
sectors over the past year, but it is possible your manager will ask to see the information
as a list, instead of the graphic representation you created in Presentation Studio.
In order to make the stock sector data available as a list, you will use the Workspace
module. You first have to find the correct indexes, select them, and then save them to a
list. Do the following:
1. In the left navigation pane, select the Workspace module, click the Search Criteria
folder to expand it, then select the My Search Criteria page.
2. From the toolbar above the grid, from the New drop-down field, select
Advanced
Search…Market Index. The search by criteria dialog box opens.
Use the highlighted
selections to begin
building your search

Exercise 8: Saving the stock sector indexes to a list Reviewing Stock Sector Performance
20 Morningstar Direct December 2017
© 2017 Morningstar. All Rights Reserved.
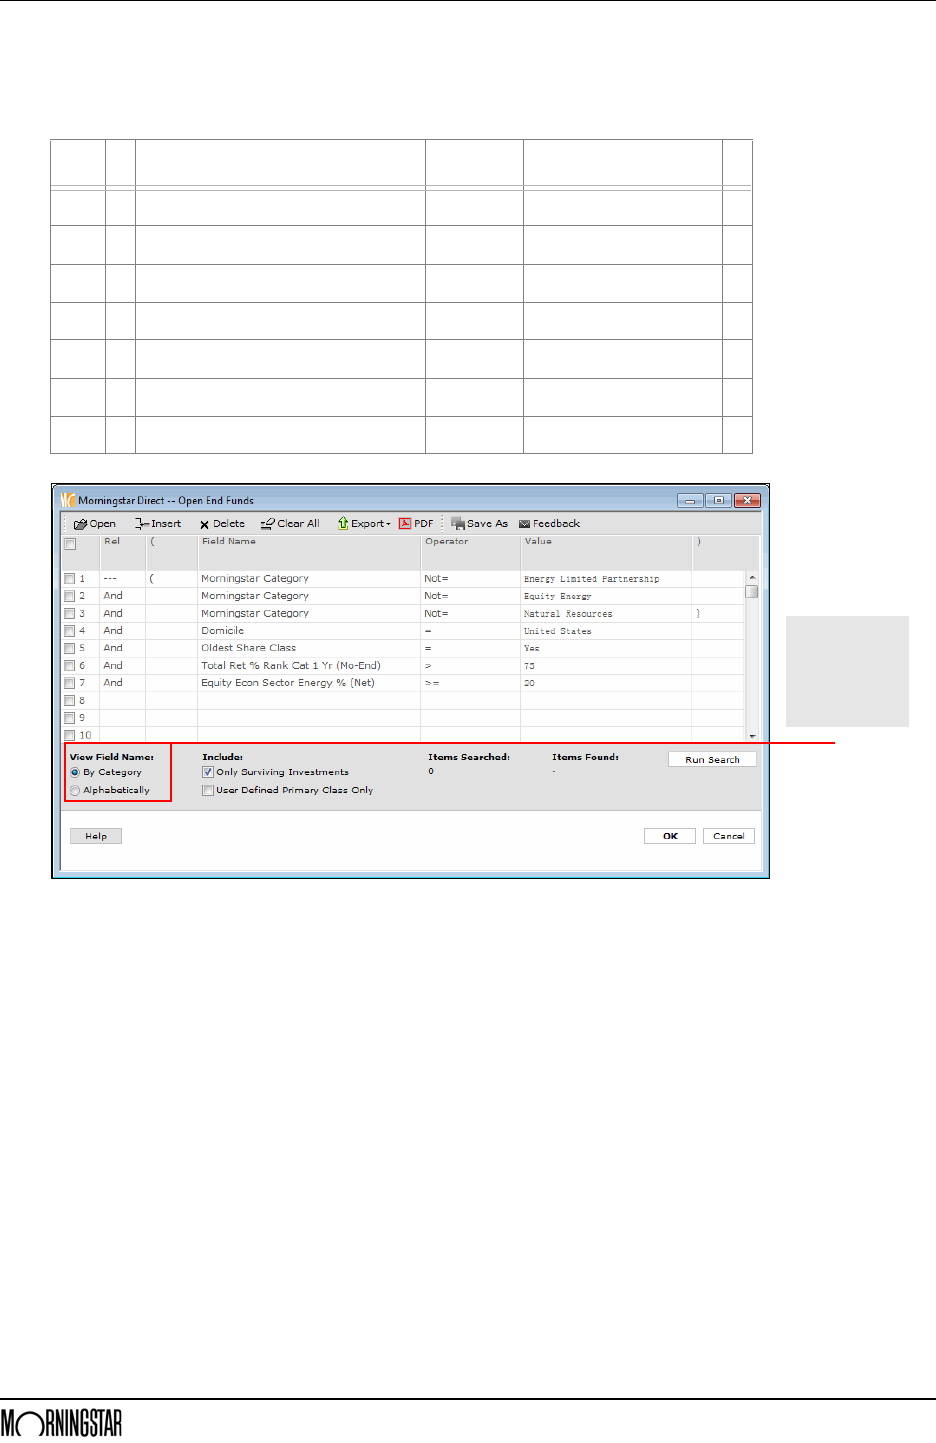
3. Create a search with the following criteria:
Note: Selecting the Alphabetically button in the lower-left corner of the dialog box can help
find the criteria more quickly.
4. After entering the criteria, operators, and values, click OK.
5. From the header row at the top of the grid view, click the checkbox to the left of the
Name column. All rows from the search should now be selected.
6. Uncheck the box next to the following indexes:
7. Confirm all the following rows (11 in total) are still selected:
Rel Field Name Operator Value
-- Series Name = Morningstar US Sector
And Return Type = Total Return
And Base Currency = US Dollar
Select this
option to
look for
criteria
by name
g Morningstar US Bas Mat & Energy TR USD g Morningstar US Energy Capped TR USD
g Morningstar US Commun Svc Capped TR USD g Morningstar US Fin Svc & RE TR USD
g Morningstar US Cyclcl Sup Sec TR USD g Morningstar US Snstve Sup Sec TR USD, and
g Morningstar US Dfnsve Sup Sec TR USD g Morningstar US Tech & Commun Svc TR USD.
g Morningstar US Basic Materials TR USD g Morningstar US Healthcare TR USD
g Morningstar US Commun Svc TR USD g Morningstar US Industrials TR USD
g Morningstar US Consumr Cyclcl TR USD g Morningstar US Real Estate TR USD
g Morningstar US Consumr Dfnsve TR USD g Morningstar US Technology TR USD, and
g Morningstar US Energy TR USD g Morningstar US Utilities TR USD.
g Morningstar US Financial Services TR USD g

Reviewing Stock Sector Performance Exercise 8: Saving the stock sector indexes to a list
Morningstar Direct December 2017 21
© 2017 Morningstar. All Rights Reserved.
8. From the toolbar above the grid view, from the Action drop-down field, select
Save
As…Investment List. The Save As dialog box opens.
9. In the Name field, type Morningstar Stock Sectors, then click OK.
Use the highlighted
selections to save
your search as a list
You can confirm the
number of selected
rows at the bottom of
the window
Enter the name for
the list here

Exercise 8: Saving the stock sector indexes to a list Reviewing Stock Sector Performance
22 Morningstar Direct December 2017
© 2017 Morningstar. All Rights Reserved.
10. From the View drop-down field, select Returns (Month End). You can scroll right to see
the values in the Total Return 1 Yr (Mo-End) USD column.
11. From the toolbar above the grid view, click the Save icon. (Saving ensures that the next
time the list is opened, the Returns view is displayed by default.)
Change the data being
depicted to this view
Use this icon to make
this layout the default
option each time this
list is opened

Evaluating Asset Flow Data in Morningstar Direct Overview
Morningstar Direct December 2017 23
© 2017 Morningstar. All Rights Reserved.
Evaluating Asset Flow Data in Morningstar Direct
OverviewThe Asset Flows module in Morningstar Direct uses data from the SEC N-SAR form, as
well as estimated data (provided by fund families to Morningstar) to understand
changes in asset levels at the fund, category, strategy (active vs. passive), and firm
levels. Not only can you see which items have net inflows vs. outflows, but you can
also evaluate the size of the change relative to a fund itself, and measure investment
trends as individuals and institutions adjust to market conditions.
ScenarioYour manager is interested in learning about the impact to asset flows over the past
year for non-sector-specific funds with significant exposure to the Energy sector. If a
fund has a meaningful allocation to energy stocks and has underperformed in its
category, did it also see large outflows as a consequence?
SolutionYou will use the Workspace and Asset Flows modules to find the funds most likely to
have been affected by their exposure to the Energy sector, and what the impact has
been on the asset flows of those funds.
The Asset Flows
module allows you
to monitor money
moving into and
out of funds

Exercise 9: Search for funds with high exposure to the Energy sector Evaluating Asset Flow Data in Morningstar Direct
24 Morningstar Direct December 2017
© 2017 Morningstar. All Rights Reserved.
E x e r c i s e 9 : S e a r c h f o r
funds with high exposure
to the Energy sector
To evaluate funds with meaningful exposure to the Energy sector that
also
underperformed in their category, you will search for funds that meet the
following
criteria:
g They were in the bottom quartile of their category during the past year, and
g They had meaningful exposure to the Real Estate sector during that time.
(Additionally, you will exclude funds in certain energy-related categories, because
these funds would be expected to under-perform due to high exposure to this sector.)
Do the following:
1. In the left navigation pane, be sure the Workspace module is selected.
2. Click the Search Criteria folder to expand it, then select My Search Criteria.
3. From the toolbar above the grid view, from the New drop-down field, select
Advanced
Search…Open End Fund. The Search Criteria dialog box opens.
Use this page to create
an advanced search
Use these options
to begin the search
Evaluating Asset Flow Data in Morningstar Direct Exercise 9: Search for funds with high exposure to the Energy sector
Morningstar Direct December 2017 25
© 2017 Morningstar. All Rights Reserved.
4. Create a search with the following criteria:
Note: Selecting the option button for Alphabetically in the bottom-left corner can help speed
the search for various field names.
Rel ( Field Name Operator Value )
-- ( Morningstar Category Not= Energy Limited Partnership
And Morningstar Category Not= Equity Energy
And Morningstar Category Not= Natural Resources )
And Domicile = United States
And Oldest Share Class = Yes
And Total Ret % Rank Cat 1 Yr (Mo-End) > 75
And Equity Econ Sector Energy % (Net) >= 20
If you cannot find
the criteria by
category, select
the Alphabetically
option to look for
them by name

Exercise 9: Search for funds with high exposure to the Energy sector Evaluating Asset Flow Data in Morningstar Direct
26 Morningstar Direct December 2017
© 2017 Morningstar. All Rights Reserved.
5. To save the search, from the toolbar near the top of the dialog box, click Save As. The
Save As dialog box opens.
6. In the Name field, type Energy.
7. Click OK. The Save As dialog box closes.
8. Click OK again to close the Search dialog box and see your results.
Enter the name
for the search here
Click this icon
to save a search

Evaluating Asset Flow Data in Morningstar Direct Exercise 10: Saving funds to a list
Morningstar Direct December 2017 27
© 2017 Morningstar. All Rights Reserved.
Exercise 10: Saving
funds to a list
Now that the search has revealed the funds with a significant exposure to the Real
Estate sector that underperformed in their category, you can save these items to a list.
With the funds saved as a list, you can see them in the Asset Flows module; you cannot
open a saved search from Workspace in the Asset Flows module.
Do the following:
1. You should be looking at the results of your search in the Workspace module. To select
all rows, click the box in the column header at the left. All rows are now selected.
2. From the Action drop-down field, select Save As…Investment List. The Save As dialog
box
opens.
3. In the Name field, type Energy Exposure.
4. Click OK.
5. When prompted to save your changes, click No. (This step simply ties the current data
columns to the rows you’ve saved in your list.)
Check this box to
select all rows
Select the
highlighted options

Exercise 11: Examining the asset flows for under-performing funds Evaluating Asset Flow Data in Morningstar Direct
28 Morningstar Direct December 2017
© 2017 Morningstar. All Rights Reserved.
Exercise 11: Examining
the asset flows for
under-performing funds
Once you know the funds whose asset flows you want to evaluate, you can move to
the Asset Flows module and begin the investigation.
Do the following:
1. From the left navigation pane, select the Asset Flows module. The Market Summary tab
at the top is selected by default.
2. At the top of the Asset Flows pane, select the Workspace tab.
3. In the Saved Actions area, select the Inv. List tab.
4. Click the Energy Exposure list. A new window opens.
Select this tab in
the Asset Flows pane
Be sure to
select this tab

Evaluating Asset Flow Data in Morningstar Direct Exercise 11: Examining the asset flows for under-performing funds
Morningstar Direct December 2017 29
© 2017 Morningstar. All Rights Reserved.
5. Click the 1-Yr column header to sort from best to worst.
6. Click the 1-Yr column header again, to sort from worst to best.
7. To see the percentage of the fund’s assets represented by this inflow or outflow, click
the Organic
Growth Rate (TTM) column header to sort from best to worst.
8. To sort from worst to best, click the Organic Growth Rate (TTM) column header again.
Note the correct way
to sort this column

Exercise 12: Adding context to the fund flow data Evaluating Asset Flow Data in Morningstar Direct
30 Morningstar Direct December 2017
© 2017 Morningstar. All Rights Reserved.
Exercise 12: Adding
context to the
fund flow data
The fund with the largest outflow over the past year belonged to the Large Growth
category. How do its outflows compare to other funds in this category? To see the
outflows from a Morningstar Category, do the following:
1. Select the Market Summary tab at the top of the page.
2. Scroll down until you see the grouping for Morningstar Categories.
3. In the Morningstar Categories section, click Large Growth. A new window opens.
Click once on this category
Be sure this
tab is selected

Evaluating Asset Flow Data in Morningstar Direct Exercise 12: Adding context to the fund flow data
Morningstar Direct December 2017 31
© 2017 Morningstar. All Rights Reserved.
4. In the left pane, click Funds.
5. Be sure the Sub-view field reads Estimated Net Flow…Estimated Net Flow (Current).
6. Click the 1-Yr column header to sort from best to worst.
7. Click the 1-Yr column header again, to sort from worst to best. How does the fund with
the largest outflows here compare to the fund from Exercise 11?
Note: In this view, funds are rolled up, and not broken out by share classes as when you were
looking at funds from the list you saved.
8. Close any Asset Flow windows that are open.
If needed, select
this option from
the drop-down field
Be sure this
page is selected
Be sure to sort the data
by the correct column
Be sure to move
to the second page

Exercise 12: Adding context to the fund flow data Evaluating Asset Flow Data in Morningstar Direct
32 Morningstar Direct December 2017
© 2017 Morningstar. All Rights Reserved.
To see how the outflows from this Large Growth fund compare to that of others at its
fund family, do the
following:
1. With the Market Summary tab selected, scroll to the top so you can see the Fund
Families grouping.
2. Click Fidelity Investments. A new window opens.
3. In the left pane, click Funds.
Click this name to
open a new window
Be sure the correct
section displayed
Be sure to
select this page

Evaluating Asset Flow Data in Morningstar Direct Exercise 12: Adding context to the fund flow data
Morningstar Direct December 2017 33
© 2017 Morningstar. All Rights Reserved.
4. From the Sub-view drop-down field in the upper-right corner of the dialog box, be sure
Estimated Net Flow…Estimated Net Flow (Current) is selected.
5. Click the 1-Yr column header to sort from best to worst.
6. Click the 1-Yr column header again, to sort from worst to best. Where is the Large
Growth fund you saw earlier in this exercise?
7. Close any Asset Flow windows that are open.
Note the options
selected here

Overview Identifying Funds with Consistent Top Performance
34 Morningstar Direct December 2017
© 2017 Morningstar. All Rights Reserved.
Identifying Funds with Consistent Top Performance
Overview The Morningstar Rating for a fund is a starting point for evaluating a fund’s
risk-adjusted performance, but it is also important to consider the consistency of a
fund’s performance over time so you understand whether investors can rely on regular
out-performance from the management team.
A performance report, which shows rows of investments and columns of data about
those investments, allows you to show your manager the information being sought
about funds with consistent performance. The Performance Reporting module in
Morningstar Direct not only displays return and category rank data from multiple time
periods more easily than in other parts of the application, but also allows you to use
tools such as grouping, conditional formatting, and a scorecard to calculate results and
present data in an easy-to-understand format.
In this sample
performance report,
you can see
both conditional
formatting and
score columns

Identifying Funds with Consistent Top Performance What is involved in creating a performance report?
Morningstar Direct December 2017 35
© 2017 Morningstar. All Rights Reserved.
What is involved
in
creating a
performance
report?
Creating a performance report consists of the following steps:
1. Select the investments for the report.
2. Decide how the investments will be grouped together, what the investments on the
report should be compared to, and select comparison and calculation benchmarks for
the investments on the report.
3. Choose the time periods (trailing 1-year, rolling window, etc.) to display, and data points
(Return, Category Rank) to display in each time period.
4. Choose supplementary information you want to include outside of the time periods.
5. Apply conditional formatting to call out important information.
6. Use a scorecard to calculate results over time.

Scenario Identifying Funds with Consistent Top Performance
36 Morningstar Direct December 2017
© 2017 Morningstar. All Rights Reserved.
Scenario Your manager wants to understand the consistency of Large Growth open-end funds.
Which of the funds have had truly reliable performance during the past five years?
Your manager wants to you to produce a report identifying consistent Large Growth
funds. Each fund must meet the following criteria:
g still open to new investors
g an above-average Sharpe Ratio for the trailing five-year period when compared to
their category peers
g an expense ratio below the category average
g a Downside Capture Ratio for the five-year period below 100, and
g only the cheapest share class of a fund should be considered.
The report should show returns and category ranks for rolling three-year periods,
starting from five years ago through the most recent month end.
In the following exercises, a fund will be considered a consistent top performer if it has
appeared in the top quarter of its category during all of the 25 time periods being
considered. If a fund has a Morningstar Analyst Rating, your manager wants to see
that, but funds are not required to have an analyst rating in order to be considered a
top performer. Finally, the Sharpe Ratio should also be shown, but only for the most
recent three-year period.
Solution In this performance report, you will search for the investments to consider, then
configure the performance report to retrieve the proper time periods and data points.
Conditional formatting will be used to highlight both funds appearing in the top
quartile for each time period, and the Morningstar Analyst Rating (where available).
Finally, a scorecard will be employed to determine whether funds have consistently
appeared in the top quartile of their respective Morningstar Category.

Identifying Funds with Consistent Top Performance Exercise 13: Searching for the cheapest share class of a fund
Morningstar Direct December 2017 37
© 2017 Morningstar. All Rights Reserved.
Exercise 13: Searching
for the cheapest
share class of a fund
When creating an advanced search to find only one instance of a fund (rather than
seeing all share classes of a fund), you have a number of options, including looking for
the following:
g the oldest share class of a fund
g a specific share class for a fund, such as the A share, or
g the least expensive share class for a fund.
Before conducting an advanced search to look for the cheapest share class for a fund,
you need to set the proper user preference to allow for this. Do the following:
1. From the menu bar at the top of the Morningstar Direct window, select
File…Set
User Preferences. The Set User Preferences window opens.
Select this option
from the File menu

Exercise 13: Searching for the cheapest share class of a fund Identifying Funds with Consistent Top Performance
38 Morningstar Direct December 2017
© 2017 Morningstar. All Rights Reserved.
2. Select the User Defined Primary tab.
3. Select the row for Annual Report Net Expense Ratio, then click the move to top
button. (The move to top button displays two up arrows.) This ensures this criterion takes
precedence when conducting a search.
4. Be sure the word Lowest appears in the Choose column.
5. Click OK. In the next exercise, you will learn to leverage this setting.
Use this button to
move the selected
item to the top of the list
Be sure to select this tab

Identifying Funds with Consistent Top Performance Exercise 14: Create a search by criteria in Performance Reporting
Morningstar Direct December 2017 39
© 2017 Morningstar. All Rights Reserved.
Exercise 14: Create
a search by criteria in
Performance Reporting
The first step in identifying consistently top performing large cap funds is to search for
those open-end funds that meet the following criteria:
g an expense ratio below the category average
g still open to new investors
g an above-average Sharpe Ratio for the trailing five-year period, when compared to
their category peers, and
g a Downside Capture Ratio below 100 for the five-year period.
To create a search by criteria in the Performance Reporting module, do the following:
1. In Morningstar Direct, select the Performance Reporting tab. The Folders page should
be selected by default.
2. From the toolbar above the grid view, click New. The Select Investments dialog box
opens.
3. Select the option for Search Criteria. Be sure the Open End Funds option is selected
from the drop-down field.
4. Click OK. The Search Criteria dialog box opens.
Click this icon to create a
new performance report
Be sure to select this
option to find
investments based on the
parameters you choose
Be sure this option is selected
to find investments based on
the parameters you choose

Exercise 14: Create a search by criteria in Performance Reporting Identifying Funds with Consistent Top Performance
40 Morningstar Direct December 2017
© 2017 Morningstar. All Rights Reserved.
5. Set your criteria as shown in the following table:
Note: At the bottom of the Search Criteria dialog box, be sure to check the checkbox for
User Defined Primary Class Only.
6. Click OK. The Group Settings window opens.
Rel ( Field Name Operator Value )
-- Morningstar Category = US Large Growth
And Annual Report Net Expense Ratio < CAT AVG
And Closed to New Inv Not= Yes
And Sharpe Ratio 5 Yr (Mo-End) > CAT AVG
And Downside Capture Ratio 5 Yr (Mo-End) < 100
And Inception Date <= 10/1/2012
Be sure your search
reflects the inputs
shown here
When looking for
criteria in the Field
Name column, it
helps to have the
Alphabetically option
selected, so you can
see all criteria at once
Be sure to check
this box as well

Identifying Funds with Consistent Top Performance Exercise 15: Change the settings for the group
Morningstar Direct December 2017 41
© 2017 Morningstar. All Rights Reserved.
Exercise 15: Change
the settings for the group
By default, when examining the performance of selected funds in a performance
report, Morningstar Direct compares the funds to each other, rather than all of the
funds in the appropriate Morningstar Category. In this section, you will learn how to
change the peer group for a set of funds.
In a performance report, it is also important to use a relevant benchmark for both the
performance comparison and performance calculations. You can also decide whether
to display only one comparison benchmark (rather than the default two benchmarks).
To change these settings for a performance report, do the following:
1. In the Peer Group column for row 1, click the Peer Group icon. The Peer Group dialog
box
opens.
2. Select the Morningstar Category option.
3. Click OK to close the dialog box.
Click this icon to change the
peer group for the report
This option allows you to
compare the funds from
your search to all other
funds in their category

Exercise 15: Change the settings for the group Identifying Funds with Consistent Top Performance
42 Morningstar Direct December 2017
© 2017 Morningstar. All Rights Reserved.
4. In row 1, from the Display Benchmark 1 drop-down field, select
Morningstar
Category Index.
5. To see what the benchmarks are for each category, from the toolbar, click
Show
Benchmarks.
6. From the toolbar, click Report Settings. The Report Settings dialog box opens. From
here, the second display benchmark can be hidden.
Select this option to assign an
index to the category in the
performance report
This icon allows you to see
the name of each index that
will appear on the report
Use this icon to display just
one comparison benchmark
on the performance report

Identifying Funds with Consistent Top Performance Exercise 15: Change the settings for the group
Morningstar Direct December 2017 43
© 2017 Morningstar. All Rights Reserved.
7. Uncheck the Show display benchmark 2 checkbox.
8. Click OK to close the Report Settings dialog box.
Uncheck this box to
ensure only one
benchmark appears on
the performance report

Exercise 15: Change the settings for the group Identifying Funds with Consistent Top Performance
44 Morningstar Direct December 2017
© 2017 Morningstar. All Rights Reserved.
9. Next, you need to ensure the proper benchmark is used for calculating the data on
the
performance report. From the Calculation Benchmark drop-down field, select
Display
Benchmark 1. This allows you to use the same benchmark for both display
and
calculation. It also ensures a peer-appropriate index is being used for
calculation
purposes.
10. Click OK. The Select Column dialog box opens.
11. Make sure the option for User Defined is selected, then click OK. The Performance
Column Setup window opens.
Note the selection
from this
drop-down field
This option should be
selected by default

Identifying Funds with Consistent Top Performance Exercise 16: Set the values for the Time Periods tab
Morningstar Direct December 2017 45
© 2017 Morningstar. All Rights Reserved.
Exercise 16: Set
the values for
the Time Periods tab
To see if this set of funds has had consistent performance over a set of rolling
three-year periods starting from five years ago, do the following:
1. In the Performance Column Setup, select the Rolling window option.
2. From the Start Date field, select Enter Date, and select the first day of the current month
from five years ago.
3. From the End Date field, select Last Month End.
4. From the Window size drop-down field, select 3 years.
5. From the Moving step drop-down field, select 1 month. The Number of columns field
should read 25.
6. Click Add Columns. The time periods for the report are added to the Selected Time
Periods area.
Note: Do not click OK yet; the Data Points and Ranks tabs still need to be addressed.
Be sure to select this
option for Time Periods
Be sure to select the correct
values for Window size and
Moving step
Note the values for the
Start Date and End Date fields

Exercise 17: Set the values for Data Points and Ranks Identifying Funds with Consistent Top Performance
46 Morningstar Direct December 2017
© 2017 Morningstar. All Rights Reserved.
Exercise 17: Set
the values for
Data Points and Ranks
Remember that your manager requested to see not only the return for each time
period, but also the Sharpe Ratio for only the most recent time period. To set the
values
for the two remaining tabs in the Performance Column Setup window, do
the
following:
1. Select the Data Points tab, and ensure Return is displayed in the Selected Data
Points
list.
Be sure to select
the correct tab
The Return data
point is included
automatically in a
performance report

Identifying Funds with Consistent Top Performance Exercise 17: Set the values for Data Points and Ranks
Morningstar Direct December 2017 47
© 2017 Morningstar. All Rights Reserved.
2. To see the Sharpe Ratio value for the funds, but only for the most recent time period, at the
bottom of the window, uncheck the Apply
add/remove to all time periods checkbox.
3. From the Time Period drop-down field at the top of the window, scroll down to select
the
most recent time period.
4. In the Data Points list, scroll down until you see the Sharpe Ratio data point, then
double-click Sharpe Ratio to add it to the Selected Data Points area.
Be sure to select
the latest time period
Double-click this data point
This box must be
unchecked to ensure the
data point is added only to
the time period you select
at the top

Exercise 17: Set the values for Data Points and Ranks Identifying Funds with Consistent Top Performance
48 Morningstar Direct December 2017
© 2017 Morningstar. All Rights Reserved.
5. Select the Ranks tab, and ensure only Peer group percentile is selected in the Selected
Rank Columns list.
6. In the Selected Rank Columns list, double-click Peer group percentile. The
Display
Setting dialog box opens.
7. In the Display Name field, type Peer group %.
8. Click OK to close the Display Setting dialog box.
9. Click OK to close the Performance Column Setup window. The Supplementary Columns
window opens.
Be sure to select
the correct tab
Only this field is
selected by default on
this tab
Type the new name
for the Display
Setting here

Identifying Funds with Consistent Top Performance Exercise 18: Select options from the Supplementary Columns window
Morningstar Direct December 2017 49
© 2017 Morningstar. All Rights Reserved.
Exercise 18: Select
options from
the Supplementary
Columns window
In addition to seeing the name of a fund on the performance report, it will also be
useful to include the fund’s ticker symbol. Also, your manager asked to see a
Morningstar Analyst Rating if one is assigned to the fund. To include a fund’s ticker
symbol and Analyst Rating on the performance report, do the following:
1. On the Supplementary tab, in the Available Supplementary Columns list, double-click
Ticker to move it to the Selected Supplementary Columns list.
2. In the Selected Supplementary Columns list, select Ticker and click the up arrow to
move it above Name.
Note the position of the
two selected columns

Exercise 18: Select options from the Supplementary Columns window Identifying Funds with Consistent Top Performance
50 Morningstar Direct December 2017
© 2017 Morningstar. All Rights Reserved.
3. Scroll down in the Available Supplementary Columns list, and double-click
Morningstar Analyst Rating.
4. Click OK to close the Supplementary Columns window. The performance report is now
ready to be saved and calculated.
Be sure to double-click the
Morningstar Analyst Rating,
and not the Morningstar Rating

Identifying Funds with Consistent Top Performance Exercise 19: Rename a data column
Morningstar Direct December 2017 51
© 2017 Morningstar. All Rights Reserved.
Exercise 19: Rename
a data column
Only the most recent time period has the correct label for the Peer group percentile
column; the others were not renamed to Peer group %. To correct this for all other time
periods at once, do the following:
1. From the toolbar above the grid, from the Edit drop-down field, select Manage
Columns. The Manage Columns dialog
box opens.
2. Scroll down to the row where Peer group % is shown.
3. Hover your mouse over the Peer group % cell.
4. Click Apply change to all.
Note: You could also click in a row to manually rename “Peer group percentile” to
“Peer group %,” but this would take much more effort.
5. Click OK to close the Manage Columns dialog box.
Select this option from the
Edit drop-down field
When you hover your mouse
over this area, you will be
able to click this option

Exercise 20: Save the performance report Identifying Funds with Consistent Top Performance
52 Morningstar Direct December 2017
© 2017 Morningstar. All Rights Reserved.
Exercise 20: Save the
performance report
Now that the parameters for the report are set, the last step before calculating it is to
save it.
To save the performance report, do the following:
1. From the toolbar above the spreadsheet grid, click Save. The Save Report dialog
box
opens.
2. In the Name field, type Consistent Large Growth Funds.
3. Click OK. The Save Report dialog box closes.
This icon allows you to save
your work when creating
a performance report
Note the name you
should enter for this report

Identifying Funds with Consistent Top Performance Exercise 21: Calculate the performance report
Morningstar Direct December 2017 53
© 2017 Morningstar. All Rights Reserved.
Exercise 21: Calculate
the performance report
To calculate the report, do the following:
1. From the toolbar above the grid view, click Calculate. During the calculation, the Folders
page is displayed.
2. When the Report Calculation Complete message opens, click Yes to view the report. The
spreadsheet grid is now filled with data.
This icon allows you
to generate a
performance report
Note the data now
available in the report

Exercise 22: Apply conditional formatting to a performance report Identifying Funds with Consistent Top Performance
54 Morningstar Direct December 2017
© 2017 Morningstar. All Rights Reserved.
Exercise 22: Apply
conditional formatting
to a performance report
The information in the performance report is great, but it is also a bit difficult to read
without some additional formatting. The conditional formatting feature in the
Performance Reporting module allows you to color each row, cell, or column to aid the
interpretation of the data.
In this exercise, you will apply a color to the Peer group % column to call out the times
when each fund was in the top quartile of its category. To apply conditional formatting
to a performance report, do the following:
1. From the toolbar above the grid view, from the Tools drop-down field, select
Conditional
Format…Conditional Formatting. The Conditional Formatting Rules dialog
box opens.
2. From the Field Name drop-down field, expand the All Time Periods option and select
Return : Peer group %.
Select this
option to
highlight
information on
the report
Be sure to select the
correct option here

Identifying Funds with Consistent Top Performance Exercise 23: Apply conditional formatting to the Morningstar Analyst Rating
Morningstar Direct December 2017 55
© 2017 Morningstar. All Rights Reserved.
3. From the Operator drop-down field, select <=.
4. In the Value field, type 25.
5. From the Cell Color drop-down field, select green in the upper-right corner.
6. Be sure the box for Column Only is checked.
7. Click Preview to ensure the rule is working as expected.
8. Click OK. The Conditional Formatting Rules dialog box closes.
Exercise 23: Apply
conditional formatting
to the Morningstar
Analyst Rating
In addition to highlighting funds when they appeared in the top quartile, you can also
apply conditional formatting to the Morningstar Analyst Rating column, to help these
values stand out. Do the following:
1. From the toolbar above the grid view, from the Tools drop-down field, select
Conditional
Format…Conditional Formatting. The Conditional Formatting Rules
dialog
box opens.
2. Click Add Rule. Rule 2 now appears.
Note all of the highlighted
values for this first rule
Click this button to add
another formatting rule

Exercise 23: Apply conditional formatting to the Morningstar Analyst Rating Identifying Funds with Consistent Top Performance
56 Morningstar Direct December 2017
© 2017 Morningstar. All Rights Reserved.
3. From the Field Name drop-down field, select Morningstar Analyst Rating.
4. The Operator field should show =.
5. From the Value field, select Gold.
6. From the Cell Color drop-down field, click Custom. The Custom Color dialog box opens.
7. Set the following values:
g Red = 250
g Green = 164
g Blue = 29
8. Click OK.
9. Be sure the Column Only box is checked.
Note the values
for this rule
Use this button
to customize
the color
for these cells
Be sure your values
match those shown here

Identifying Funds with Consistent Top Performance Exercise 23: Apply conditional formatting to the Morningstar Analyst Rating
Morningstar Direct December 2017 57
© 2017 Morningstar. All Rights Reserved.
10. To help you create multiple conditional formatting rules for the same column, you can
use the Clone Rule icon. From the Rule 2 heading bar, click the Clone Rule icon. Rule 3
now appears. The Field Name, Operator, and Value fields are populated automatically
based on the rule you cloned.
11. In the Rule 3 section, from the Value drop-down field, select Silver.
12. From the Cell Color drop-down field, click Custom. The Custom Color dialog box opens.
Be sure to click
the Clone Rule icon
for the correct rule
Be sure to change
the value for this field

Exercise 23: Apply conditional formatting to the Morningstar Analyst Rating Identifying Funds with Consistent Top Performance
58 Morningstar Direct December 2017
© 2017 Morningstar. All Rights Reserved.
13. Set the following values:
g Red = 139
g Green = 155
g Blue = 151
14. Click OK to close the Custom Color dialog box.
15. In the Conditional Formatting Rules dialog box, on the Rule 3 heading bar, click the
Clone Rule icon. Rule 4 now appears.
16. In the for Rule 4 section, from the Value drop-down field, select Bronze.
17. From the Cell Color drop-down field, select Custom. The Custom Color dialog box opens.
18. Set the following values:
g Red = 200
g Green = 116
g Blue = 90
19. Click OK to close the Custom Color dialog box.
20. Click OK to close the Conditional Formatting Rules dialog box.
Be sure your values
match those shown here
Be sure your values
match those shown here

Identifying Funds with Consistent Top Performance Exercise 24: Generate a Scorecard for a set of investments
Morningstar Direct December 2017 59
© 2017 Morningstar. All Rights Reserved.
Exercise 24: Generate
a Scorecard for a
set of investments
Conditional formatting is helpful, but it still is not clear which funds have actually
performed consistently well. Remember, your manager stated that to be considered a
top performer, a fund had to be in the top quartile at least 75% of the time over these
time periods. This calculation can be done with the Scorecard feature. A new column
will be added to each time period, as well as to the right side of the report for the Total
Score of each fund across these time periods.
In this instance, each time a fund appears in the top quartile of its category for a time
period, it will be given a score of one point. If it is not in the top quartile, it will not
receive any points. Once you add a scorecard to a performance report, you will need to
recalculate the report.
To create a Scorecard for this set of investments, do the following:
1. From the toolbar above the grid view, from the Edit drop-down field, select Scorecard.
The Investment Scorecard dialog box opens.
2. In the Scoring Type area, select the Custom Scoring option.
Note: When the Performance Reporting warning message opens related to all formatting
being lost, click Yes.
3. In the Performance Factors area, click Add Score. The Custom Score Setting dialog
box
opens.
Select this option from the
Edit icon’s drop-down field
Use this icon to
create your
custom scorecard
Be sure to select
this option to
create your own
scoring rules

Exercise 24: Generate a Scorecard for a set of investments Identifying Funds with Consistent Top Performance
60 Morningstar Direct December 2017
© 2017 Morningstar. All Rights Reserved.
4. The Time Period field should read All Time Periods. From the Data Point/Rank Selected
drop-down field, select Return: Peer group %.
5. In row 1, enter the following values:
6. Click OK to close the Custom Score Setting dialog box.
7. Click OK to close the Investment Scorecard dialog box.
8. From the toolbar above the spreadsheet grid, click Calculate.
Operator Value1 Score Display
<= 25 1 1
Note the
highlighted values
for this rule
Because the parameters of
the report have changed,
you need to recalculate it

Identifying Funds with Consistent Top Performance Exercise 24: Generate a Scorecard for a set of investments
Morningstar Direct December 2017 61
© 2017 Morningstar. All Rights Reserved.
9. When the confirmation message opens, click Yes to view the report.
10. To see only the scores, from the toolbar above the grid view, from the View drop-down
field, select Score Columns. Note
the new Total Score column on the far right side.
Select this option
to see only the
score columns for
the report
The Total Score
column has
been added to
the report

Exercise 25: Add a summary column for various scores Identifying Funds with Consistent Top Performance
62 Morningstar Direct December 2017
© 2017 Morningstar. All Rights Reserved.
Exercise 25: Add a
summary column
for various scores
The information in the score columns is useful, but it would be nice to summarize the
scores, and then analyze the funds. How many have been truly consistent over all 25
time periods? Do the following:
1. From the toolbar above the spreadsheet grid, from the Edit drop-down field, select
Scorecard. The Investment Scorecard window opens.
2. From the toolbar in the Performance Factors section, click Add Score. The Custom Score
Setting dialog box opens.
As before, use this
option to create a
scorecard column
Click this button to
create an additional
score column

Identifying Funds with Consistent Top Performance Exercise 25: Add a summary column for various scores
Morningstar Direct December 2017 63
© 2017 Morningstar. All Rights Reserved.
3. From the Time Period drop-down field, select Score. The Data Point/Rank Selected
drop-down field should show Total Score.
4. In row 1 under Default Display, enter the following values:
5. Click Insert Rule to create the following rule:
6. Click OK to close the Custom Score Setting dialog box.
7. Click OK to close the Investment Scorecard window.
8. From the toolbar above the grid view, click Calculate.
9. When the confirmation message opens, click Yes to view the report.
10. Scroll to the right and double-click the Total Score column header to sort the content
of this column.
Operator Value1 Display
= 25 Consistent Performer
Operator Value1 Display
<25Do Not Consider
Select this option to
summarize the
scores on the report

Exercise 26: Save investments to a list Identifying Funds with Consistent Top Performance
64 Morningstar Direct December 2017
© 2017 Morningstar. All Rights Reserved.
Exercise 26: Save
investments to a list
Now that you know which funds should be considered consistent top performers, you
can do further analysis on the portfolio of each one. The first step is to save these items
to a list. Do the following:
1. For each fund in the Large Growth category marked as a Consistent Top Performer in the
Total Score column, click the checkbox to the left of its row number
2. From the toolbar, from the Save drop-down field, select Save as Investment List. The
Save As dialog box opens.
3. In the Name field, type Large Growth Consistent Performers.
4. Click OK.
You have now successfully generated a Performance Report, and saved the securities
to a list for further analysis. To conduct that analysis, you will use the Portfolio Analysis
module, which is covered in the next section.
Be sure to select
the correct option
to save these
items to an
investment list

Using Portfolio Attribution to Understand Performance Overview
Morningstar Direct December 2017 65
© 2017 Morningstar. All Rights Reserved.
Using Portfolio Attribution to Understand Performance
OverviewNow that you have a list of funds to examine, you can begin to explore how they have
achieved their success, particularly in the past year. Can the funds’ success be credited
to an overexposure to Financial Services and Technology, or being underexposed to
Energy and Real Estate? Maybe both? The Portfolio Analysis module in Morningstar
Direct allows you to conduct this type of attribution exploration.
ScenarioYour manager has asked you to investigate the Large Growth Consistent Performers list
you saved from the performance report you created. Which fund has the highest active
return? What investment decisions can account for this? Did the manager make any
missteps in selecting different stocks or sector investments?
SolutionThe steps to accomplish your assignment are as follows:
1. Use the Portfolio Analysis tool in Morningstar Direct Cloud to analyze the funds on the
list you saved in Performance Reporting.
2. Display the Attribution worksheet on the dashboard view, then drill down on a specific
fund to conduct further attribution analysis.
3. Select, configure, and navigate through the Attribution workspace to investigate the fund
and provide insightful analysis to your manager on the fund’s return over the past year.
A report created in
Performance Reporting
can be analyzed in
Portfolio Analysis

Exercise 27: Opening a list in Portfolio Analysis Using Portfolio Attribution to Understand Performance
66 Morningstar Direct December 2017
© 2017 Morningstar. All Rights Reserved.
Exercise 27: Opening a
list in Portfolio Analysis
Rather than manually re-creating the list of funds in Portfolio Analysis, you can simply
recall the list you saved.
Do the following:
1. Log in to Morningstar Direct Cloud at http://direct.morningstar.com, using the same
credentials you use to log in to the desktop version of Morningstar Direct.
2. On the Portfolio tile, click Monitoring. The dashboard mode of the Portfolio Analysis
tool
opens.
Note: You may be asked to log in again. If necessary, close the Release Notes window once
the Portfolio Analysis tool opens
.
3. From the Investment List drop-down field in the upper-left corner of the screen, select
Investment Lists…Large Growth Consistent Performers. The funds from the list
automatically show in the dashboard.
Select this link to access
the Portfolio Analysis tool
Select the list from the
correct section of
this drop-down field

Using Portfolio Attribution to Understand Performance Exercise 28: Viewing attribution data in Portfolio Analysis
Morningstar Direct December 2017 67
© 2017 Morningstar. All Rights Reserved.
Exercise 28: Viewing
attribution data in
Portfolio Analysis
Now you need to ensure the Attribution workspace is displaying these funds. To see
the attribution analysis for this list of funds, do the following:
1. From the toolbar at the top of the window, from the Column Set drop-down field, select
Open. The Open dialog box opens.
2. In the Morningstar Column Sets list, select Attribution.
3. Click Open. The attribution data points now show in the dashboard.
This option
allows you to
open an existing
set of columns
Be sure to select the correct
option under Morningstar
Column Sets

Exercise 29: Adjusting the benchmark for attribution analysis Using Portfolio Attribution to Understand Performance
68 Morningstar Direct December 2017
© 2017 Morningstar. All Rights Reserved.
Exercise 29: Adjusting
the benchmark for
attribution analysis
One of the keys to conducting Attribution Analysis is to ensure you are using a
comparison benchmark for which you have constituent rights to see the holdings for
the index. If you do not have the rights to see constituent data for an index, the
Attribution data points cannot be calculated for the funds you are reviewing. You can
address this issue the following ways:
g Work with your Morningstar Client Service Consultant to enable those indexes for
which you do have constituent rights in
Morningstar Direct so you can see this
data in the Portfolio Analysis module (and elsewhere, such as Presentation
Studio).
g Use an ETF proxy instead of an index for attribution analysis, or
g Use a Morningstar Index as the comparison benchmark when conducting
attribution analysis. Because you are a Morningstar Direct subscriber, you
automatically have constituent rights to all Morningstar Indexes.
To use the Morningstar index for each fund, do the following:
1. In the header row at the top of the grid view, check the checkbox at the far left. This
selects all rows in the list.
2. From the Benchmark drop-down field for row 1, select Morningstar Index. The
workspace recalculates all rows.
Click this checkbox to
select all rows
Select this option from
the drop-down field

Using Portfolio Attribution to Understand Performance Exercise 30: Adjusting the time period reflected in a workspace
Morningstar Direct December 2017 69
© 2017 Morningstar. All Rights Reserved.
Exercise 30: Adjusting
the time period
reflected in a workspace
By default, the Attribution workspace shows information from the past quarter. To
adjust the time period being considered, do the following:
1. From the toolbar at the top of the window, from the Column Set drop-down field, select
Edit. The Attribution - Column Set dialog box opens.
2. Click the row for Attribution Effects Total. Additional fields appear to the right.
3. From the Start Date drop-down field, select 1 year ago.
4. From the End Date drop-down field, select Last Month End.
Use the
Column Set icon
to select this option
Click this option
to see the
additional fields
on the right
Note the values
of the date fields

Exercise 30: Adjusting the time period reflected in a workspace Using Portfolio Attribution to Understand Performance
70 Morningstar Direct December 2017
© 2017 Morningstar. All Rights Reserved.
5. Double-click the label for Sector Attribution - Last Quarter, and change this text to
Sector
Attribution - Last Year.
6. Click Save. The Save As dialog box opens.
7. In the Data Set Name field, type My Attribution.
8. Click Save.
Double-click the
label to change
its name
Enter this name
for the custom
column set

Using Portfolio Attribution to Understand Performance Exercise 31: Moving to Analysis mode
Morningstar Direct December 2017 71
© 2017 Morningstar. All Rights Reserved.
Exercise 31: Moving
to Analysis mode
In reviewing the Active Return column, which fund has the highest Selection Effect
value over the past year? Click the name of that fund in the
list. The Detail view opens.
You need to click
only once on a
fund’s name to go
to Analysis mode

Exercise 32: Displaying the Attribution workspace template Using Portfolio Attribution to Understand Performance
72 Morningstar Direct December 2017
© 2017 Morningstar. All Rights Reserved.
Exercise 32: Displaying
the Attribution
workspace template
As in the Dashboard view, you need to ensure the Attribution workspace is being
displayed in the Detail view. To display the Attribution workspace template from
Morningstar, do the following:
1. In the bottom-right corner of the screen, click the Content Management icon. The
Content Management dialog box opens.
2. In the left pane, click Morningstar Templates.
3. In the list, click Attribution Highlights. The workspace loads automatically.
Click this icon to
change the content
you see in the
workspace
Select this template to
see Attribution data

Using Portfolio Attribution to Understand Performance Exercise 33: Changing the time period for a template
Morningstar Direct December 2017 73
© 2017 Morningstar. All Rights Reserved.
Exercise 33: Changing
the time period
for a template
By default, components on the Highlights page (and on the other pages in the
Attribution workspace) reflect information for the prior one-month period. You can
change this to the trailing one-year period by doing the following:
1. In the Weight component, click the pen icon to the right of the displayed date. A flyover
panel opens.
2. From the Start Date drop-down field, select 1 year ago. (Leave the End Date field set to
Last Month End).
3. Click the checkbox for Apply Time Period to Template. All the components recalculate.
4. Click OK.
5. Close the Attribution Highlights save message in the upper-right part of the window.
Note the location
of the pen icon
After you change the Start Date
and End Date fields, be sure to
click the checkbox for Apply
Time Period to Template

Exercise 34: Displaying the Attribution Detail table Using Portfolio Attribution to Understand Performance
74 Morningstar Direct December 2017
© 2017 Morningstar. All Rights Reserved.
Exercise 34: Displaying
the Attribution
Detail table
By default, the Attribution page shows a chart, rather than a table. To display the
Attribution Detail table in place of the default chart, do the following:
1. Select the Attribution tab. The Attribution Detail (By Effect) chart component opens.
2. Click the X in the upper-right corner of the component to remove the chart.
Note: When the Confirmation message appears, click OK.
3. From the toolbar at the top of the window, click Components. The Select component(s)
to add pane opens.
4. Under the Select component(s) to add pane on the left, select Portfolio
Analysis…Attribution.
5. Click the Attribution Detail table component to add it to the workspace. The component
appears automatically, but it is not sized correctly.
6. In the upper-right corner of the Select component(s) to add pane, click [X]Close.
7. In the upper-right corner of the Attribution Detail component, click
Maximize
this component to resize the table to take up the entire page.
Click this icon to
hide the chart
component
Click this option to
see the Attribution
components
Click this icon to see
the components you
can add to a page
Click once to add this
component to the page

Using Portfolio Attribution to Understand Performance Exercise 35: Changing the time period for the Attribution Detail table
Morningstar Direct December 2017 75
© 2017 Morningstar. All Rights Reserved.
Exercise 35: Changing
the time period for the
Attribution Detail table
Although you updated the time period for the entire template, components you add to
a page will not reflect that change. To update the data being reflected in the
Attribution Detail table, do the following:
1. In the upper-right corner of the component, click the pen icon to the right of the date. A
dialog box opens.
2. From the Start Date drop-down field, select 1 year ago. (Leave the End Date field set to
Last
Month End).
3. Click OK. The Save Template dialog box opens.
4. Close the Save Template dialog box.
Use the pen icon to
change the date in
the table

Exercise 36: Exploring the worst stock selection for the fund Using Portfolio Attribution to Understand Performance
76 Morningstar Direct December 2017
© 2017 Morningstar. All Rights Reserved.
Exercise 36: Exploring
the worst stock
selection for the fund
In examining the attribution data for this fund, you can see not only where
management made good and bad choices on sectors for exposure, but also where they
made good and poor choices on specific stocks. When a stock was doing poorly, did
management maintain their position in the security? Did they decrease their position in
it? Did they increase their position in the security? If the stock is covered by a
Morningstar Analyst, what does that person think of the stock’s value?
To learn more about the stock decisions for this fund, do the following:
1. In the Attribution Effect tab for the trailing one-year period, click the column header
Selection % to sort by this column.
2. In the section where the management team did the worst job selecting stocks, click the
triangle to the left of the sector’s name to expand this section. Note the stock that has
had the worst performance relative to the index for this fund.
3. To investigate the fund’s history with this stock, select the Holdings tab.
4. In the Buy/Sell component at the bottom of the page, click the pen icon to the right of
Data Column. A flyover panel opens.
Click once on a
column header
to sort in
ascending order
Click once on
the sector’s
triangle to
expand it and
see the stocks
the fund owns
in the sector
Click this icon
Be sure to select
the correct tab

Using Portfolio Attribution to Understand Performance Exercise 36: Exploring the worst stock selection for the fund
Morningstar Direct December 2017 77
© 2017 Morningstar. All Rights Reserved.
5. Check the Buy/Sell checkbox, and uncheck the Weights checkbox.
6. Click OK.
7. Scroll down until you see the stock that had the worst selection effect, then scroll right
to see the buy/sell history for the stock in this fund’s portfolio.
8. Right-click the name of the stock, then select Security Profile…Research. The
Security Profile window opens.
9. Scroll down to the Detailed Reports area to see the Morningstar Analyst’s take on this
stock, and whether it is fairly valued.
10. Close the Security Profile window.
Check the Buy/Sell
checkbox, and
uncheck the
Weights checkbox
Select these options
from the right-click menu

Overview Finding Sustainable Investments in Morningstar Direct Cloud
78 Morningstar Direct December 2017
© 2017 Morningstar. All Rights Reserved.
Finding Sustainable Investments in Morningstar Direct Cloud
Overview Morningstar Direct Cloud offers more than just access to the Portfolio Analysis module.
You can also use this platform to read Morningstar Research (either on specific
investments, methodology, or thematic topics), and conduct investment analysis
similar to what you would do in the Workspace module of the desktop version of
Morningstar Direct. Morningstar Direct Cloud, however, has several data points not
found in the desktop version.
Scenario Your manager is looking for information on Morningstar’s Sustainability Rating, and for
a list of managed investments not invested either directly or indirectly in companies
extracting or using thermal coal. The funds should also have a Morningstar
Sustainability Rating that is at least three globes, and a Morningstar Rating of at least
three stars.
Solution Use the Morningstar Research area in Morningstar Direct Cloud to find documentation
related to sustainable investing, and use the Investment Analysis area to screen for
funds that meet your manager’s criteria.
Exercise 37: Accessing
Morningstar research
on sustainability
To see articles and videos from Morningstar’s Research team related to sustainability,
including the methodology papers related to proprietary statistics, do the following:
1. If you are not already logged in to Morningstar Direct Cloud, log in at
http://direct.morningstar.com, using the same credentials you use to log in to the
desktop version of Morningstar Direct. If you are logged into Morningstar Direct Cloud
and still in the Portfolio Analysis module, click the Home icon in the bottom-left corner.
2. From the Home page, in the Morningstar Research tile, click Topics. The Topics
page
opens.
Click this link to see
Morningstar Research
content grouped by topic

Finding Sustainable Investments in Morningstar Direct Cloud Exercise 37: Accessing Morningstar research on sustainability
Morningstar Direct December 2017 79
© 2017 Morningstar. All Rights Reserved.
3. On the Topics page, click the tile for Sustainable Investing. A list of articles and videos
related to this topic are presented.
4. At the top of the page, you can see links to methodology papers related to sustainable
investing. The articles on the page are listed in reverse chronological order, with the
most recent article available at the top. Click an article’s headline to read it.
5. To receive a notification each time a new article is added to the page, in the upper-right
corner, click the Subscribe button.
Click this tile to see
content related to this topic
Use this button to
subscribe to this topic
Click either of these
headlines to read the
methodology papers
related to Morningstar’s
sustainability metrics
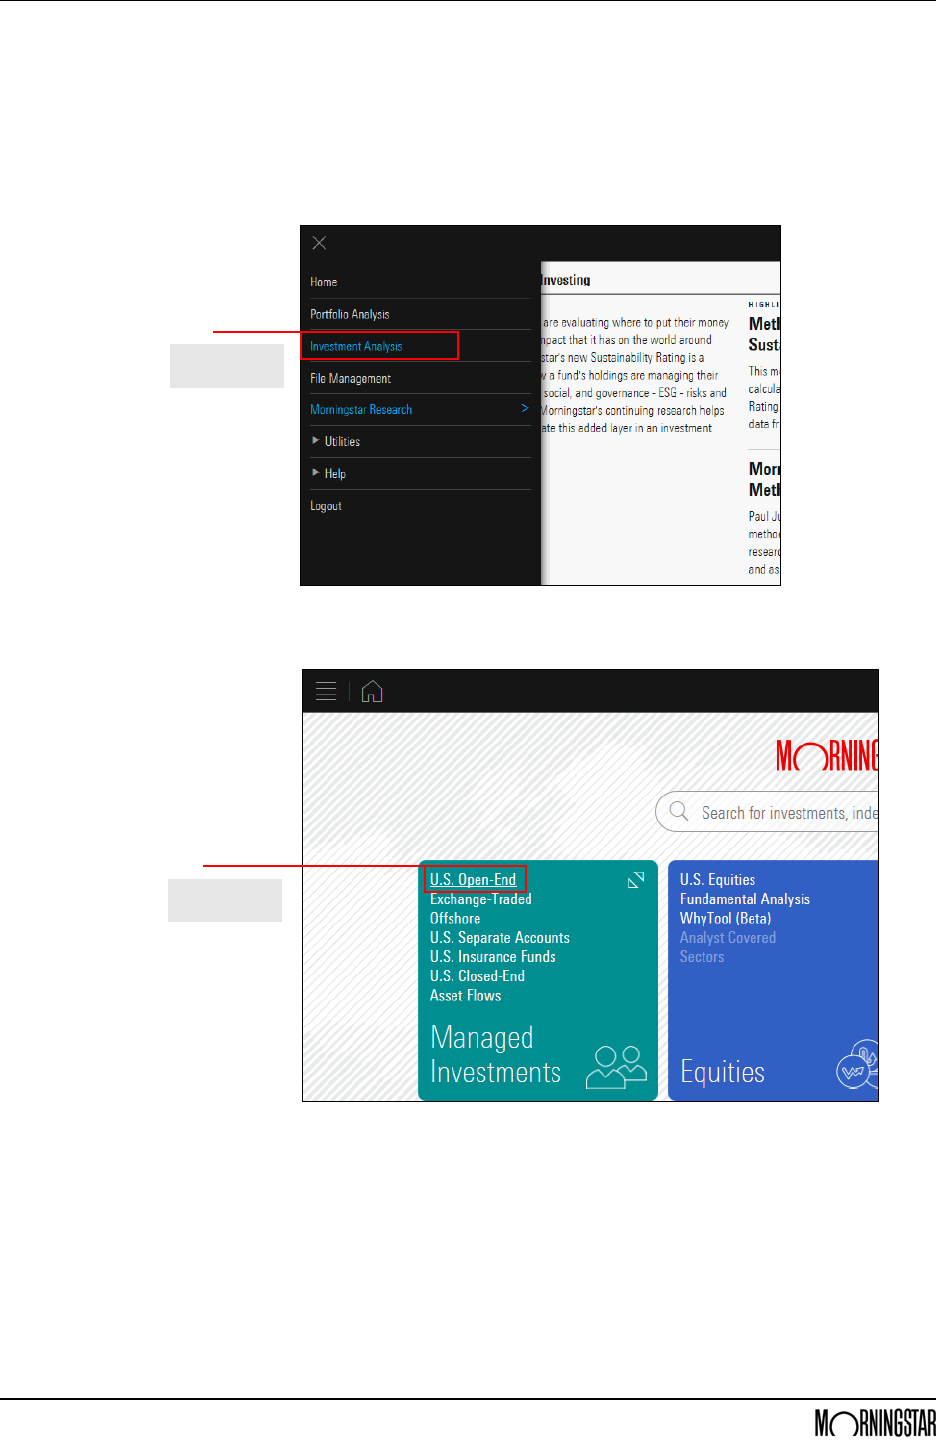
Exercise 38: Create a screen for sustainable investments Finding Sustainable Investments in Morningstar Direct Cloud
80 Morningstar Direct December 2017
© 2017 Morningstar. All Rights Reserved.
Exercise 38: Create a
screen for sustainable
investments
To find investments not owning companies involved with thermal coal, you can create
a screen. The screen will look for both mutual funds and ETFs that are socially
conscious, and will eliminate funds not meeting a certain threshold for both the
Morningstar Sustainability Rating, and the Morningstar Rating. Do the following:
1. To go to the Investment Analysis area, click the menu icon in the upper-left corner of the
screen, then select Investment Analysis. You are returned to the Home page.
2. From the Home page, on the Managed Investments tile, click U.S. Open-End. The
Investment Analysis area opens.
Select this option
from the menu
Click to access
this universe

Finding Sustainable Investments in Morningstar Direct Cloud Exercise 38: Create a screen for sustainable investments
Morningstar Direct December 2017 81
© 2017 Morningstar. All Rights Reserved.
3. By default, all open-end US funds are shown in the grid view. To screen for the funds you
want, click the Open Screener icon. The Screener window opens.
4. At the top of the Screener window, note that the system is already filtering for Open-End
Funds that are domiciled in the United States. To include ETFs as well, click the header
for the Investment Type, then select the option for Exchange-Traded Fund.
5. To close the Investment Type element, click OK.
Use this icon to change the
investments you see in the grid view
Click here to
expand this area…
…then be sure to
select this option

Exercise 38: Create a screen for sustainable investments Finding Sustainable Investments in Morningstar Direct Cloud
82 Morningstar Direct December 2017
© 2017 Morningstar. All Rights Reserved.
6. In the Add Criteria search field, type Social, then select Socially Conscious.
7. The option for Yes should be selected. Click OK.
8. In the Add Criteria search field, type Ethic, then select Ethical Issue Strategy Focus.
Note the search
term to enter,
and the data
point to select
Note the search
term to enter,
and the data
point to select

Finding Sustainable Investments in Morningstar Direct Cloud Exercise 38: Create a screen for sustainable investments
Morningstar Direct December 2017 83
© 2017 Morningstar. All Rights Reserved.
9. Select the options for ESG Focus and Environmental Focus, then click OK.
10. In the Add Criteria search field, type Prod, then select Product Involvement.
Select both options
Note the search
term to enter,
and the data
point to select

Exercise 38: Create a screen for sustainable investments Finding Sustainable Investments in Morningstar Direct Cloud
84 Morningstar Direct December 2017
© 2017 Morningstar. All Rights Reserved.
11. By default, the Product Involvement data point points to Adult Entertainment (because
this alphabetically comes first in the options for this field). To change this, in the Product
Involvement header, click the Settings icon.
12. From the Product Area Type drop-down field, select Thermal Coal, then click OK.
Click this icon to change the value of
the Product Involvement data point
Use this drop-down
field to select this option

Finding Sustainable Investments in Morningstar Direct Cloud Exercise 38: Create a screen for sustainable investments
Morningstar Direct December 2017 85
© 2017 Morningstar. All Rights Reserved.
13. From the Operator area, select Equal to.
14. In the Value field, type 0, then click OK.
15. In the Add Criteria search field, type Old then select Oldest Share Class.
16. The option for Yes should be selected. Click OK.
Note the option to
select, and the
value to enter
Note the search term to enter,
and the data point to select

Exercise 38: Create a screen for sustainable investments Finding Sustainable Investments in Morningstar Direct Cloud
86 Morningstar Direct December 2017
© 2017 Morningstar. All Rights Reserved.
17. In the Add Criteria search field, type Rating then select
Morningstar
Sustainability Rating.
18. Select the options for the 3-, 4-, and 5-globe ratings, then click OK.
Note the search
term to enter,
and the data
point to select
Select these options

Finding Sustainable Investments in Morningstar Direct Cloud Exercise 38: Create a screen for sustainable investments
Morningstar Direct December 2017 87
© 2017 Morningstar. All Rights Reserved.
19. In the Add Criteria search field, type Rating then select Morningstar Rating > Overall.
20. Select the options for the 3-, 4-, and 5-star ratings, then click OK.
21. In the upper-right corner of the Screener window, click Done. You are returned to the
grid view.
Note the search
term to enter,
and the data
point to select
Select these options

Exercise 39: Save the screen and its investments to a list Finding Sustainable Investments in Morningstar Direct Cloud
88 Morningstar Direct December 2017
© 2017 Morningstar. All Rights Reserved.
Exercise 39: Save the
screen and its
investments to a list
Just as with searches and lists in the desktop version of Morningstar Direct, in
Morningstar Direct Cloud, you can save both a screen and a list. To separately save
both this screen, and the results of the screen as a list, do the following:
1. Click the List/Screen menu in the upper-left corner and select Save. The name field is
highlighted, awaiting for you to enter a name.
2. In the name field, type Sustainable ETFs and Funds, then press <ENTER>. The screen
is now saved.
Select this option
to save the screen
Simply type the
name of the screen here

Finding Sustainable Investments in Morningstar Direct Cloud Exercise 39: Save the screen and its investments to a list
Morningstar Direct December 2017 89
© 2017 Morningstar. All Rights Reserved.
3. To save the investments from the screen to a list, start by clicking the Select All option in
the upper-left corner of the grid view.
4. Click the Actions icon above the grid view and select Save As.
Use this option
to select all rows
Use this icon
to save the selected
items to a list

Exercise 39: Save the screen and its investments to a list Finding Sustainable Investments in Morningstar Direct Cloud
90 Morningstar Direct December 2017
© 2017 Morningstar. All Rights Reserved.
5. In the list name field, type Q4 2017 No Coal Funds, then click Done.
6. In the future, you can retrieve the saved screen and list by using the Workspace icon on
the header.
Type the name of the list here
Click this icon to access
your saved screens and lists

Managing a Portfolio in Morningstar Direct Overview
Morningstar Direct December 2017 91
© 2017 Morningstar. All Rights Reserved.
Managing a Portfolio in Morningstar Direct
OverviewThe Portfolio Management module in Morningstar Direct allows you to enter either
accounts or model portfolios of holdings. You can manually enter holdings or import them
from Microsoft® Excel®. When you import a portfolio, you need to evaluate the portfolio
settings (such as the Portfolio Start Date) that could impact the data for the
portfolio
elsewhere in Morningstar Direct. Finally, the Portfolio Management module also allows you
to create and assign custom benchmarks to model portfolios and accounts.
ScenarioYou have been asked to determine whether one Large Growth fund should be replaced
with another in a model portfolio. You need to first create the model portfolio, then
assign a custom benchmark to determine how the portfolio’s comparison to the
benchmark will change if the fund is replaced.
SolutionYou will import the portfolio that has been provided in an Excel file, then configure a
setting for the portfolio. Next, you will create a custom benchmark and assign it to the
portfolio. Finally, you will add a holding to the portfolio so you can compare two
large-cap funds to one another.
Exercise 40: Importing
a model portfolio
from Microsoft Excel
An Excel file (FundPortfolio.xlsx) has been saved to your desktop. Importing a portfolio
into Morningstar Direct uses the following three-step process:
1. Save the portfolio holdings in a properly formatted Excel file.
2. Import the file and review the portfolio’s information in the import blotter.
3. Post the portfolio to Morningstar Direct.
To import and post the Excel file as a model portfolio in Morningstar Direct, do
the
following:
1. From the left navigation pane, select the Portfolio Management module.
2. Select the Model Portfolios page.
3. From the toolbar, click Import. A new dialog box opens.
Click this icon to begin
the import process
Be sure to select the
correct module and page

Exercise 40: Importing a model portfolio from Microsoft Excel Managing a Portfolio in Morningstar Direct
92 Morningstar Direct December 2017
© 2017 Morningstar. All Rights Reserved.
4. Check the row 1 checkbox (Model Portfolio Holdings).
5. From the toolbar, click Import. The Import - Morningstar Direct dialog box opens.
6. In the File Name field, click the magnifying glass icon. The Open dialog box opens.
7. Select the Desktop, then select the FundPortfolio.xlsx file.
8. Click Open.
9. Ensure the Column Code and Column No. fields match each other as shown in the
following table:
Be sure to check this box
Click this icon
This Column Code field… Should be mapped to this Column No.…
Portfolio Date Column A (Portfolio Date)
Portfolio Id Column B (Portfolio ID)
Portfolio Name Column C (Portfolio Name)
Holding Identifier Column D (Ticker or CUSIP)
Holding Description Column E (Name)
Weight Column H (Weight)

Managing a Portfolio in Morningstar Direct Exercise 40: Importing a model portfolio from Microsoft Excel
Morningstar Direct December 2017 93
© 2017 Morningstar. All Rights Reserved.
10. Click Import. The import blotter opens.
11. Ensure no errors exist with the funds you are importing. From the toolbar above the grid
view, click Post.
12. When the confirmation message appears, click OK.
13. Close the import window. The grid view is displayed.
Click here
Click here

Exercise 41: Adjusting a portfolio’s settings for Performance Reporting Managing a Portfolio in Morningstar Direct
94 Morningstar Direct December 2017
© 2017 Morningstar. All Rights Reserved.
14. From the toolbar above the grid view, click Refresh. Your portfolio should now
be
displayed.
Exercise 41: Adjusting a
portfolio’s settings for
Performance Reporting
The portfolio you imported had a date of 10/31/2013. You need to manually set this as
the performance start date for the portfolio. Do the following:
1. In the grid view, double-click the Fund Lineup portfolio. A new window opens, showing
the holdings for the portfolio.
2. In the left navigation pane of the new window, select the General Settings page.
3. Scroll down until you see the Performance calculation start date.
Click here
Double-click the name of
the portfolio you imported

Managing a Portfolio in Morningstar Direct Exercise 42: Creating a custom benchmark
Morningstar Direct December 2017 95
© 2017 Morningstar. All Rights Reserved.
4. From the Performance calculation start date drop-down field, select Earliest Common.
5. Click Save.
6. Close the portfolio window.
Exercise 42: Creating
a custom benchmark
The process for creating a custom benchmark is parallel to that of creating a model
portfolio: you select the items for the benchmark (in this case, indexes, but you can use
Morningstar Categories or securities if you prefer), then assign an allocation to them.
To create a custom benchmark, do the following:
1. With the Portfolio Management module still selected, select the Custom
Benchmarks
page.
2. From the toolbar, click New. The Benchmark Basics dialog box opens.
Note the selection
from this field
Be sure to select the
General Settings page
Click this icon
Be sure this
page is selected

Exercise 42: Creating a custom benchmark Managing a Portfolio in Morningstar Direct
96 Morningstar Direct December 2017
© 2017 Morningstar. All Rights Reserved.
3. In the Name field, type Moderate Aggressive.
4. From the Currency drop-down field, select US Dollar.
Note the name for the
custom benchmark, and
the Currency setting

Managing a Portfolio in Morningstar Direct Exercise 42: Creating a custom benchmark
Morningstar Direct December 2017 97
© 2017 Morningstar. All Rights Reserved.
5. Scroll down to the Performance calculation start date drop-down field, and select
Earliest Common.
6. Click Save. The Holdings Entry window opens.
Note the selection
in this field

Exercise 43: Selecting and allocating the weightings for a custom benchmark Managing a Portfolio in Morningstar Direct
98 Morningstar Direct December 2017
© 2017 Morningstar. All Rights Reserved.
Exercise 43: Selecting
and allocating
the weightings for
a custom benchmark
To select and allocate weightings to the custom benchmark, do the following:
1. In the Holdings Entry window, click the Name field for the first row.
2. Type S&P 500 TR, then from the list that opens, select S&P 500 TR USD.
3. Repeat steps 1-2 for the following indexes:
g MSCI EAFE PR USD, and
g Morningstar US Gov Bd TR USD.
4. In the Percent (%) column, assign the following percentages to each index:
As you type in this field,
matching selections
appear automatically
Index Percent (%)
S&P 500 TR USD 50
MSCI EAFE PR USD 20
Morningstar US Gov Bd TR USD 25
Note the values entered
for each index here

Managing a Portfolio in Morningstar Direct Exercise 43: Selecting and allocating the weightings for a custom benchmark
Morningstar Direct December 2017 99
© 2017 Morningstar. All Rights Reserved.
5. Select the Cash tab.
6. Click the magnifying glass icon in the first row. The Add Holdings dialog box opens.
7. Click Go.
8. In the Available Records list, double-click Default Cash to move it to the Selected
Records list.
9. Click OK to close the Add Holdings dialog box. The Holdings Entry window is displayed.
10. In the Percent (%) column for Default Cash, type 5.
11. Click the Finish>> button. The Training Benchmark window opens. You can now close
this window.
Double-click this option
Be sure to enter the
correct percentage here

Exercise 44: Assigning a custom benchmark to a model portfolio Managing a Portfolio in Morningstar Direct
100 Morningstar Direct December 2017
© 2017 Morningstar. All Rights Reserved.
Exercise 44: Assigning
a custom benchmark
to a model portfolio
To assign a custom benchmark to the model portfolio you created, do the following on
the Model Portfolios page:
1. The Portfolio Management module should still be selected. From the left navigation
pane, select the Model Portfolios page.
2. Double-click the Fund Lineup model portfolio to open it. The Fund Lineup
window
opens.
3. On the navigation pane, select the General Settings page.
4. To the right of the Benchmark 1 field, click the magnifying glass icon. The Select
Benchmark dialog box opens.
Double-click the name of
the portfolio you imported
Click this icon to change
the benchmark assigned
to the portfolio

Managing a Portfolio in Morningstar Direct Exercise 44: Assigning a custom benchmark to a model portfolio
Morningstar Direct December 2017 101
© 2017 Morningstar. All Rights Reserved.
5. At the top of the dialog box, Universes should be selected. From the drop-down field at
the top, select Custom Benchmarks.
6. Click Go.
7. In the Available records list, click Moderate Aggressive.
8. Click OK to close the Select Benchmark dialog box.
9. In the Moderate Aggressive Model window, click Save.
Click once to select the
benchmark you want to
use for the portfolio
Be sure you have the
correct selection here

Exercise 45: Adding a holding to a portfolio for comparison Managing a Portfolio in Morningstar Direct
102 Morningstar Direct December 2017
© 2017 Morningstar. All Rights Reserved.
Exercise 45: Adding
a holding to a
portfolio for comparison
As stated in the introduction for this section, you have been asked to evaluate whether
IronBridge Large Cap (the Large Growth fund in the portfolio) should be replaced by
another Large Growth fund. To add the new fund and generate a report comparing the
two funds, do the following:
1. The portfolio window should still be open. In the left navigation pane, select the
Holdings Summary page.
2. From the toolbar above the grid view, from the Edit drop-down field, select Edit
Portfolio. The Portfolio Date Selection dialog box opens.
3. Click OK. The Holdings Entry window opens.
4. In row 9, type the ticker symbol for the fund you want to consider, and click its name
when it appears. The fund is added to the portfolio.
5. Click Finish>>. (You do not need to assign a value to the fund to be able to compare tit
to the other Large Growth fund.)
Select this option
Enter the ticker symbol
for the fund here, then
select its name to add it
to the portfolio

Managing a Portfolio in Morningstar Direct Exercise 45: Adding a holding to a portfolio for comparison
Morningstar Direct December 2017 103
© 2017 Morningstar. All Rights Reserved.
6. In the grid view, select the following by checking the checkboxes at the beginning of
their rows:
g IronBridge Large Cap and
g the fund you added.
7. From the toolbar above the grid view, from the Action drop-down field, select
Reports…Fund vs. Fund. The Fund vs. Fund report opens in a new window.
8. From the toolbar, click the PDF Report icon. The PDF report opens in a new window.
Select the two funds you
want to compare
Use the Action
drop-down field
to generate this report

Exercise 46: Creating a new model portfolio from an existing model portfolio Managing a Portfolio in Morningstar Direct
104 Morningstar Direct December 2017
© 2017 Morningstar. All Rights Reserved.
Exercise 46: Creating
a new model
portfolio from an
existing model portfolio
After comparing the two Large Growth funds, you are not sure whether the model
would be better off with the Parnassus Endeavor fund or the American Funds AMCAP
fund, but you want to compare the model portfolio with the original fund to a model
portfolio with the new fund. You can easily copy an existing model portfolio and make
a change to the lineup. (You will compare the two models in the next section on
Presentation Studio.)
To copy and edit an existing model portfolio, do the following:
1. With the Fund Lineup portfolio still open, in the header row, check the checkbox above
the grid view; this selects all rows.
2. Uncheck the IronBridge Large Cap checkbox.
Check this box to
select all rows

Managing a Portfolio in Morningstar Direct Exercise 46: Creating a new model portfolio from an existing model portfolio
Morningstar Direct December 2017 105
© 2017 Morningstar. All Rights Reserved.
3. From the Action drop-down field, select Save As…Model Portfolio. The Model
Portfolio Basics dialog box opens.
4. In the Name field, type Alternate Fund Lineup.
5. From the Currency drop-down field, select US Dollar.
6. In the Benchmark 1 field, click the magnifying glass icon. The Select Benchmark dialog
box opens.
Select this option to
save a new portfolio
Note the name for the
alternate model portfolio
Be sure to select the
correct value for Currency
Click this icon to change
the benchmark for the
new portfolio

Exercise 46: Creating a new model portfolio from an existing model portfolio Managing a Portfolio in Morningstar Direct
106 Morningstar Direct December 2017
© 2017 Morningstar. All Rights Reserved.
7. The option button for Universes should be selected. From the drop-down field at the top,
select Custom Benchmarks.
8. Click Go.
9. Click Moderate Aggressive.
10. Click OK to close the Select Benchmark dialog box.
Click once to select the
benchmark you want to
use for the portfolio
Be sure you have the
correct selection here

Managing a Portfolio in Morningstar Direct Exercise 46: Creating a new model portfolio from an existing model portfolio
Morningstar Direct December 2017 107
© 2017 Morningstar. All Rights Reserved.
11. From the Performance calculation start date drop-down field, select
Earliest
Common.
12. Click Save. The Holdings Entry window opens.
Note the selection
for this field
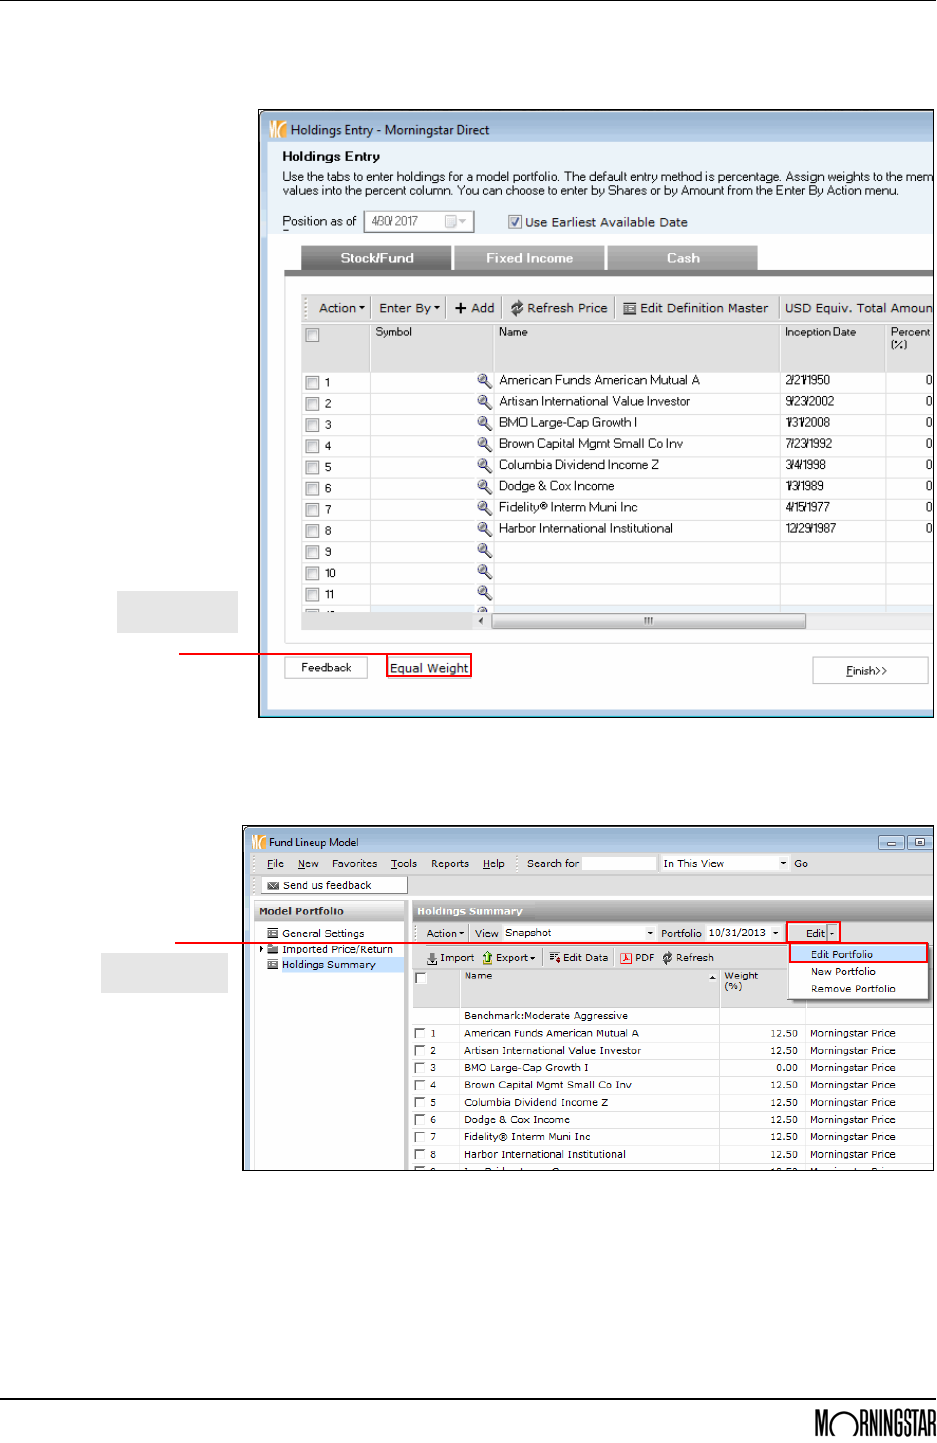
Exercise 46: Creating a new model portfolio from an existing model portfolio Managing a Portfolio in Morningstar Direct
108 Morningstar Direct December 2017
© 2017 Morningstar. All Rights Reserved.
13. At the bottom-left corner of the window, click Equal Weight.
14. Click Finish>>. The Holdings Entry window closes.
15. The Fund Lineup Model portfolio window should still be open. The fund you added can
now be removed from this model portfolio. From the toolbar, from the Edit drop-down
field, select Edit Portfolio. The Portfolio Date Selection dialog box opens.
16. Click OK.
Be sure to
click this button
Select these
options

Managing a Portfolio in Morningstar Direct Exercise 46: Creating a new model portfolio from an existing model portfolio
Morningstar Direct December 2017 109
© 2017 Morningstar. All Rights Reserved.
17. Select the fund you added by clicking the checkbox at the beginning of its row.
18. From the Action drop-down field, select Delete Rows.
19. Click Finish>>.
20. Close the Fund Lineup Model portfolio window.
21. From the toolbar, click Refresh to see the new model you created.
Be sure to select the
fund you want to remove
Select this option to
remove the BMO fund

Overview Using Presentation Studio to Compare Model Portfolios
110 Morningstar Direct December 2017
© 2017 Morningstar. All Rights Reserved.
Using Presentation Studio to Compare Model Portfolios
Overview The Presentation Studio module has a number of templates you can take advantage of
to display the power and diversity of a portfolio of holdings. For example, the Portfolio
Aggregation Factsheet template is the basis for a compact, powerful report containing
almost two dozen components covering asset allocation, geographic distribution,
performance data, holdings intersections, and much more. However, because this is a
Factsheet template, it is designed to reflect information for only one holding at a time.
If you need to compare two model portfolios, rather than simply analyze a single
portfolio of holdings, you can use the Current versus Proposal Portfolio Comparison
workbook
template.
Scenario You’ve decided to create a report comparing the two model portfolios, to illustrate the
similarities and differences between them.
Solution You will use Presentation Studio to create a workbook template from scratch, and
include the two model portfolios as part of the template. The multi-page report you
produce will compare the portfolios in terms of asset allocation, holdings, performance,
and more.
Presentation Studio
includes many
templates developed by
Morningstar experts, or
you can build your own

Using Presentation Studio to Compare Model Portfolios Exercise 47: Create a template from scratch
Morningstar Direct December 2017 111
© 2017 Morningstar. All Rights Reserved.
Exercise 47: Create a
template from scratch
To create a Presentation Studio workbook template from scratch, do the following:
1. If a Presentation Studio template window is open, close it.
2. In Morningstar Direct, select the Presentation Studio module.
3. At the top of the page, click the Workbook tile. The Create New Workbook dialog
box
opens.
4. The option for New Workbook should be selected. Click OK. The Investments: Settings
dialog box opens.
5. Click +Add. The Find Investments dialog box opens.
Click this icon in the
Presentation Studio module
Click this icon to add the
two portfolios to the
template you will create

Exercise 47: Create a template from scratch Using Presentation Studio to Compare Model Portfolios
112 Morningstar Direct December 2017
© 2017 Morningstar. All Rights Reserved.
6. From the Within drop-down field, select Model Portfolios.
7. Click Go.
8. To select both model portfolios at once, click Add All.
9. Click OK to close the Find Investments dialog box.
Model Portfolios is at the top
of the drop-down field
Use the Go button to find all
model portfolios at once
Click this button to include
both model portfolios at once

Using Presentation Studio to Compare Model Portfolios Exercise 47: Create a template from scratch
Morningstar Direct December 2017 113
© 2017 Morningstar. All Rights Reserved.
10. In the Alternate Fund Lineup row, from the Calculation Benchmark drop-down field, be
sure Display Benchmark 1 is displayed for both model portfolios.
11. In the Display Benchmarks area, click the magnifying glass icon in the top row. The
Select Benchmark dialog box opens.
12. From the Within drop-down field, select Custom Benchmarks.
13. Click Go. The Moderate Aggressive benchmark you created should now be displayed in
the Available records list.
14. In the Available records list, click the name of the custom benchmark to select it.
Click this icon to use the
custom benchmark
you created earlier
Click the Go button to
display the custom
benchmark you created
Be sure this option is
selected from this field
Click once on the name
of the custom benchmark

Exercise 48: Add the pages for the report template Using Presentation Studio to Compare Model Portfolios
114 Morningstar Direct December 2017
© 2017 Morningstar. All Rights Reserved.
15. Click OK to close the Select Benchmark dialog box.
16. Click OK to close the Investments: Settings window. The workbook template opens in a
new window.
Exercise 48: Add
the pages for
the report template
Your custom report template will be comprised of six pages. To create additional pages
you need, do the following:
1. In the Presentation Studio window, the Home tab should be selected. From the toolbar,
from the Page drop-down field, select New.
2. Repeat step 1 four more times. The left pane should display a total of six blank pages.
Exercise 49: Save the
Presentation Studio
template and report
When you save a file in Presentation Studio, you have two options:
g Save the file as a template, or
g Save the file as a report.
Saving the workbook as a template allows you to use it with any two portfolios in the
future, not just the two portfolios you selected to help build out the template. However,
when you open the template, you will always need to select the portfolios to associate
with it; the system will not remember portfolios you previously selected.
If you save the report with the two model portfolios you chose in Exercise 47, you will
not have to make that selection again, but if you make changes to that report file, they
will not be saved to a template as well; you will need to save both the report and the
report template if you wish to save your changes in both places.
Use this command to add
a page to a template

Using Presentation Studio to Compare Model Portfolios Exercise 49: Save the Presentation Studio template and report
Morningstar Direct December 2017 115
© 2017 Morningstar. All Rights Reserved.
To save your Presentation Studio template, do the following:
1. In the upper-left corner of the Presentation Studio window, click the gear icon, then
select Save As Template. The Presentation Studio dialog box
opens.
2. In the Template Name field, type Portfolio Comparison.
3. Click Save.
4. When the confirmation message opens, click OK.
To save the report with the portfolios you have selected, do the following:
1. In the upper-left corner of the Presentation Studio window, click the gear icon, then
select Save. The Presentation Studio dialog box opens.
2. In the Workbook Name field, type Model Portfolio Comparison Report.
3. Click Save.
Use this command
to save a template
Enter the name for
your template here

Exercise 50: Insert and design the report header and footer Using Presentation Studio to Compare Model Portfolios
116 Morningstar Direct December 2017
© 2017 Morningstar. All Rights Reserved.
Exercise 50: Insert
and design the
report header and footer
After saving the workbook, you are ready to insert a header and footer on the first
page. This provides a title for the factsheet and also allows you to include a logo. The
footer will display the page number for the report. Once built, the header and footer
will be copied to all other pages.
To insert and style the header and footer on the first page, do the following:
1. In the left pane, be sure the first page is selected.
2. From the toolbar at the top of the window, select the Format tab.
3. From the toolbar above the ruler, click the Header icon and select Insert Header.
4. From the toolbar above the ruler, click the Text icon and select Custom Text.
Be sure the Format tab is
selected when you go to add
a header to the template
Use this command to add
custom text to the header

Using Presentation Studio to Compare Model Portfolios Exercise 50: Insert and design the report header and footer
Morningstar Direct December 2017 117
© 2017 Morningstar. All Rights Reserved.
5. Click the header area, then type Portfolio Comparison Report.
6. To select the text you just typed, press <CTRL>+<A>, then use the font size drop-down
field from the toolbar to select 36.
7. To change the color of the text, with the text still selected, right-click on the text and
select Font Color.
8. Select the dark blue color in the upper-left corner of the color palette.
Use this field to change
the font size of the text in
the header
You must right-click
to see this menu option

Exercise 50: Insert and design the report header and footer Using Presentation Studio to Compare Model Portfolios
118 Morningstar Direct December 2017
© 2017 Morningstar. All Rights Reserved.
9. From the toolbar, use the Align icon to select the second instance of Middle. Note the
new position of the header’s text.
10. To place an image in the header, click the Divide Page icon, then select the option
displaying two side-by-side cells.
11. In the header, select the cell on the left.
12. From the toolbar, from the Image drop-down field, select Insert Image.
13. Navigate to your desktop, select the XYZ Advisor logo and open it. The image now
appears in the right cell of the header.
14. From the toolbar, from the Align drop-down field, select Right.
Use this command to
vertically center the text
in the header’s cell
Select this option to divide
the header vertically
Use this command to add
a logo to the header

Using Presentation Studio to Compare Model Portfolios Exercise 50: Insert and design the report header and footer
Morningstar Direct December 2017 119
© 2017 Morningstar. All Rights Reserved.
15. To create the border on the left header cell, right-click in the cell, then select
Border
Type…Bottom Edge.
You must right-click in
the header to see
these menu options

Exercise 50: Insert and design the report header and footer Using Presentation Studio to Compare Model Portfolios
120 Morningstar Direct December 2017
© 2017 Morningstar. All Rights Reserved.
16. To change the thickness of the border, right-click in the left cell, then select
Border
Style…Thick Line.
You must right-click in
the header to see
these menu options

Using Presentation Studio to Compare Model Portfolios Exercise 50: Insert and design the report header and footer
Morningstar Direct December 2017 121
© 2017 Morningstar. All Rights Reserved.
17. To change the color of the border, right-click in the left cell, then select Border Color
and select the dark blue color in the upper-left corner of the color palette.
18. Repeat steps 14-16 for the cell with the logo image.
19. To insert a page number in the footer, be sure the Format tab is selected.
20. From the toolbar, click the Footer icon and select Insert Footer.
You must right-click in
the header to see
these menu options
Select this option

Exercise 50: Insert and design the report header and footer Using Presentation Studio to Compare Model Portfolios
122 Morningstar Direct December 2017
© 2017 Morningstar. All Rights Reserved.
21. From the toolbar, click the Text icon and select Dynamic Text…Page #.
22. From the toolbar, click the Align icon and select Right.
23. From the toolbar, from the Align icon and select Bottom.
Select this option to
insert the page
number in the footer
Use each of these options
separately to properly
display the page number in
the footer

Using Presentation Studio to Compare Model Portfolios Exercise 50: Insert and design the report header and footer
Morningstar Direct December 2017 123
© 2017 Morningstar. All Rights Reserved.
24. Hover your mouse over the bottom border of the header, then click, hold, and drag up
until the bottom of the header is at the 1.50 mark on the vertical ruler.
25. Hover your mouse over the top border of the footer, then click, hold, and drag down
until the top of the footer is at the 7.75 mark on the vertical ruler.
26. Make sure the footer cell is still selected, then click the Footer icon and select
Apply
Header & Footer to Workbook. A page number now appears in the footer of
each page.
Click and hold to drag
the top border of the
footer to this position
Use this command to
use the same header
and footer on all pages

Exercise 51: Divide the first page to hold three components Using Presentation Studio to Compare Model Portfolios
124 Morningstar Direct December 2017
© 2017 Morningstar. All Rights Reserved.
Exercise 51: Divide
the first page to
hold three components
The first page of the report has two charts and includes a label for the page, so that
needs to be accounted for when designing the page’s layout. To divide the page
accordingly, do the following:
1. Select the main part of page 1 (below the header), then use the Divide Page icon to
select the second Three-Cell option (second from the left).
2. The label does not need to be as tall as the other cells. Click, hold, and drag the bottom
of the top cell until your mouse is at the 2.25 mark on the vertical ruler.
Select this option to
divide the page into
three sections
Click and hold to drag the
bottom border of the top
section to this position

Using Presentation Studio to Compare Model Portfolios Exercise 51: Divide the first page to hold three components
Morningstar Direct December 2017 125
© 2017 Morningstar. All Rights Reserved.
3. To make the remaining two cells equal in width, click, hold, and drag the bottom border
of the middle cell until your mouse is at the 5.00 mark on the vertical ruler.
Click and hold to drag the
bottom border of the top
section to this position

Exercise 52: Divide the second page to hold six components Using Presentation Studio to Compare Model Portfolios
126 Morningstar Direct December 2017
© 2017 Morningstar. All Rights Reserved.
Exercise 52: Divide
the second page
to hold six components
The second page of the report has two charts that are repeated for each portfolio. Each
chart section also needs a label, which means a total of six components. To divide the
page for that content, do the following:
1. On page 2, select the main part.
2. On the Home tab, click the Divide Page icon and select the Four-Cell option that is third
from the left.
3. Select the bottom cell.
4. On the Home tab, click the Divide Page icon and select the Three-Cell option in the
bottom-right corner.
Select this
option to
divide the
second page
Be sure the bottom
cell is selected
before choosing
this option

Using Presentation Studio to Compare Model Portfolios Exercise 52: Divide the second page to hold six components
Morningstar Direct December 2017 127
© 2017 Morningstar. All Rights Reserved.
5. Resize the top cell so the bottom border is at the 2.25 mark on the vertical ruler.
6. Resize the next two cells so the bottom border is at the 5.00 mark on the vertical ruler.
7. Resize the bottom cell so the top border is at the 5.75 mark on the vertical ruler.
Click and hold the bottom
border to drag the top
section to this position
Click and hold each of these
borders to drag them to the
positions shown here

Exercise 53: Divide the third page to hold five components Using Presentation Studio to Compare Model Portfolios
128 Morningstar Direct December 2017
© 2017 Morningstar. All Rights Reserved.
Exercise 53: Divide
the third page to
hold five components
The third page of the report has a table and chart for each portfolio, as well as a label.
To divide the page for that content, do the following:
1. On page 3, select the main part.
2. On the Home tab, click the Divide Page icon and select the Five-Cell option in the
bottom-right corner.
3. Resize the top cell so the bottom border is at the 2.25 mark on the vertical ruler.
4. Resize the next two cells so the bottom border is at the 5.00 mark on the vertical ruler.
Be sure the main
part of the page
is selected
before choosing
this option

Using Presentation Studio to Compare Model Portfolios Exercise 54: Duplicate the layout of the third page for the fourth page
Morningstar Direct December 2017 129
© 2017 Morningstar. All Rights Reserved.
Exercise 54: Duplicate
the layout of the third
page for the fourth page
The fourth page of the report uses the same layout as the third. Rather than manually
recreate the layout, you can simply duplicate page three, and then delete what would
have been page four. Do the following:
1. In the left pane, right-click page 3.
2. From the right-click drop-down field, select Duplicate. An identical page is inserted
immediately after page 3.
3. You now have an extra page in the report. In the left pane, right-click page 5.
4. From the right-click drop-down field, select Delete.
5. When the confirmation message opens, click Yes.
Right-click on page 3,
then select this option

Exercise 55: Divide the fifth page to hold four components Using Presentation Studio to Compare Model Portfolios
130 Morningstar Direct December 2017
© 2017 Morningstar. All Rights Reserved.
Exercise 55: Divide
the fifth page to
hold four components
The fifth page of the report has a label at the top, and three other components in a 2X1
layout. To divide the page for that content, do the following:
1. Select the main part of page 5.
2. On the Home tab, click the Divide Page icon and select the Four-Cell option that is third
from the left.
3. Resize the top cell so the bottom border is at the 2.25 mark on the vertical ruler.
4. Resize the next two cells so the bottom border is at the 5.00 mark on the vertical ruler.
Be sure the
main part of
page 5
is selected
before choosing
this option

Using Presentation Studio to Compare Model Portfolios Exercise 56: Divide the sixth page to hold three components
Morningstar Direct December 2017 131
© 2017 Morningstar. All Rights Reserved.
Exercise 56: Divide
the sixth page to
hold three components
The last page of the report will have a chart for each portfolio, as well as a label. To
divide the page for that content, do the following:
1. On page 6, select the main part.
2. On the Home tab, click the Divide Page icon and select the Three-Cell option in the
bottom-right corner.
3. Resize the top cell so the bottom border is at the 2.25 mark on the vertical ruler.
You are now ready to add the components to each page.
Be sure the main part of
page 6 is selected before
choosing this option

Exercise 57: Add the label to the first page Using Presentation Studio to Compare Model Portfolios
132 Morningstar Direct December 2017
© 2017 Morningstar. All Rights Reserved.
Exercise 57: Add the
label to the first page
To add the component label to the first page of the report, do the following:
1. In the left pane, select page 1.
2. Select the top cell on the page; this is where the label for the page will go.
3. On the Home tab, click the Text icon and select Custom Text.
4. Double-click the top cell, then type Performance.
5. To select the text you just typed, press <CTRL>+<A>, then use the font size drop-down
field to select 24.
Select this option
from the Text
drop-down field
Be sure the correct
page and
component are
selected before
inserting the
custom text
Use this command to
change the font size
of the label

Using Presentation Studio to Compare Model Portfolios Exercise 57: Add the label to the first page
Morningstar Direct December 2017 133
© 2017 Morningstar. All Rights Reserved.
6. Right-click the text, then select Font Color…Light Blue (the second option from the
top on the left side of the color
palette).
7. Be sure the Format tab is selected. From the toolbar, click the Align icon and select the
second Middle option.
Choose this
color for the label
Use this command
to vertically center
the label in the cell

Exercise 58: Add the components to the first page Using Presentation Studio to Compare Model Portfolios
134 Morningstar Direct December 2017
© 2017 Morningstar. All Rights Reserved.
Exercise 58: Add
the components
to the first page
The first page of the report contains two graphical components:
g an Investment Growth chart depicts the performance of each portfolio as well as
the custom benchmark, and
g a histogram shows return values for different time periods for both portfolios and
the custom benchmark.
The Investment Growth chart will be modified to help the three elements visually stand
out from one another. The histogram will be updated to both remove a couple of time
periods shown by default, and to add the values for each bar shown.
To add and configure the components to the first page of the report, do the following:
1. Select the Home tab.
2. From the toolbar, click the Chart icon and select Performance.
3. Drag the Multiple Investment Growth Chart into the cell below the Performance label.
Click and hold to drag this
component into the empty cell
below the label’s cell

Using Presentation Studio to Compare Model Portfolios Exercise 58: Add the components to the first page
Morningstar Direct December 2017 135
© 2017 Morningstar. All Rights Reserved.
4. To improve the readability and presentation of the chart, click Chart Settings in the
bottom-left corner of the screen. The Chart Settings window opens.
5. On the Chart tab of the menu, in the Investments list, from the Fund Lineup Display
drop-down field, select Shaded Area
6. From the Moderate Aggressive Display drop-down field, select Dotted Line.
Note the values
selected for these
two chart elements

Exercise 58: Add the components to the first page Using Presentation Studio to Compare Model Portfolios
136 Morningstar Direct December 2017
© 2017 Morningstar. All Rights Reserved.
7. To change the color of the benchmark throughout the workbook, select the Home tab at
the top of the window.
8. From the toolbar, click the Investments icon. A dialog box opens.
9. In the Display Benchmarks area, in the Moderate Aggressive row, from the color
drop-down field, select the dark red color that is fourth from the
bottom.
10. Click OK to close the dialog box.
11. From the toolbar, click the Chart icon and select Performance.
12. Drag the Trailing Returns Bar Chart into the bottom cell.
Select this color
for the benchmark
Be sure the Home
tab is selected before
you click this icon
Click and hold to
drag this chart
into the bottom
cell on the page

Using Presentation Studio to Compare Model Portfolios Exercise 58: Add the components to the first page
Morningstar Direct December 2017 137
© 2017 Morningstar. All Rights Reserved.
13. To ensure the time periods here match those in the rest of the report, in the bottom-left
corner of the screen, click Chart
Settings. The Chart Settings window opens.
14. In the Time Period field, click Setup. The Time Period Setup dialog box opens.
15. In the Selected Time Periods area, click the 10 Years row, then click Remove.
16. Repeat step 14 for the 15 Years row.
17. Click OK to close the Time Period Setup dialog box.
This button allows you to
change the time periods
displayed on the chart
Click once to highlight a time
period, then click Remove

Exercise 59: Add the labels to the second page Using Presentation Studio to Compare Model Portfolios
138 Morningstar Direct December 2017
© 2017 Morningstar. All Rights Reserved.
18. In the Chart Settings window, click the Values box. The numeric value for the return in
each time period is now shown.
19. Close the Chart Settings window. The first page is now complete.
Exercise 59: Add the
labels to the second page
To add the labels for the two sets of components on the second page of the report, do
the following:
1. In the left pane, select page 2.
2. Select the top cell on the page; this is where the label for the page will go.
3. On the Home tab, click the Text icon and select Custom Text.
Click once here to see
the values above
each bar in the chart
Select this option
from the Text
drop-down field

Using Presentation Studio to Compare Model Portfolios Exercise 59: Add the labels to the second page
Morningstar Direct December 2017 139
© 2017 Morningstar. All Rights Reserved.
4. Double-click the top cell, then type Asset Allocation - Sector Analysis.
5. To select the text you just typed, press <CTRL>+<A>, then from the font size
drop-down field, select 24.
6. Right-click the text, then select Font Color…Light Blue (second option from the top on
the left side).
Use this command to
change the font size
of the label
Choose this color
for the label’s font

Exercise 59: Add the labels to the second page Using Presentation Studio to Compare Model Portfolios
140 Morningstar Direct December 2017
© 2017 Morningstar. All Rights Reserved.
7. Select the third cell from the top on the page; this is where the other label for the page
will go.
8. On the Home tab, click the Text icon and select Custom Text.
Select this option
from the Text
drop-down field
Be sure this cell
is selected

Using Presentation Studio to Compare Model Portfolios Exercise 59: Add the labels to the second page
Morningstar Direct December 2017 141
© 2017 Morningstar. All Rights Reserved.
9. Double-click in the third cell from the top on the page, then type
Broad
Asset Class Lineup.
10. Select the text, then from the font size drop-down field, select 24.
11. Right-click the text, then select Font Color…Light Blue (second option from the top on
the left side).
12. Select the Format tab.
13. From the toolbar, click the Align icon and select the second Middle option.
Select this option to
vertically center the text
Note that the text for this
label matches the size
and color of the label at
the top of the page

Exercise 60: Add the components to the second page Using Presentation Studio to Compare Model Portfolios
142 Morningstar Direct December 2017
© 2017 Morningstar. All Rights Reserved.
Exercise 60: Add
the components to
the second page
On the second page of the report, separate donut charts show the asset allocation for
each portfolio, while the bottom of the page shows separate bar charts for the broad
asset class allocation for each portfolio compared to the custom benchmark. For the
elements on this page, note the following important points:
g The donut charts will start as a pie chart; you will change not only the appearance
of the chart but also the information depicted on it.
g Although this page includes four graphical components, you actually need to
create just one donut chart and one bar chart. You will then see how to copy, paste
and update a component for a separate portfolio. This process will be repeated
elsewhere throughout this report.
To add the components to the second page of the report, do the following:
1. Select the Home tab.
2. Click the Chart icon and select Asset Exposure.
3. Drag the Pie Chart component into the upper-left cell below the label.
4. At the bottom of the window, click Chart Settings. The Chart Settings window opens.
Be sure to select the correct tab
(Home), icon (Chart), and menu
(Asset Exposure) in order to
access the Pie Chart component

Using Presentation Studio to Compare Model Portfolios Exercise 60: Add the components to the second page
Morningstar Direct December 2017 143
© 2017 Morningstar. All Rights Reserved.
5. From the Data Set drop-down field, select Equity Sectors (Morningstar).
6. Close the Chart Settings window.
Select this option
from the Data Set
drop-down field

Exercise 60: Add the components to the second page Using Presentation Studio to Compare Model Portfolios
144 Morningstar Direct December 2017
© 2017 Morningstar. All Rights Reserved.
7. From the toolbar, click the Workbook icon. The Workbook Settings Data window opens.
8. Select the Asset Exposure tab.
9. In the Pie Chart Type area, Select the Donut option.
10. Click OK to close the Workbook Settings Data window.
Be sure to select the correct tab
(Home), icon (Workbook), and
tab (Asset Exposure) in order
to select the option for Donut
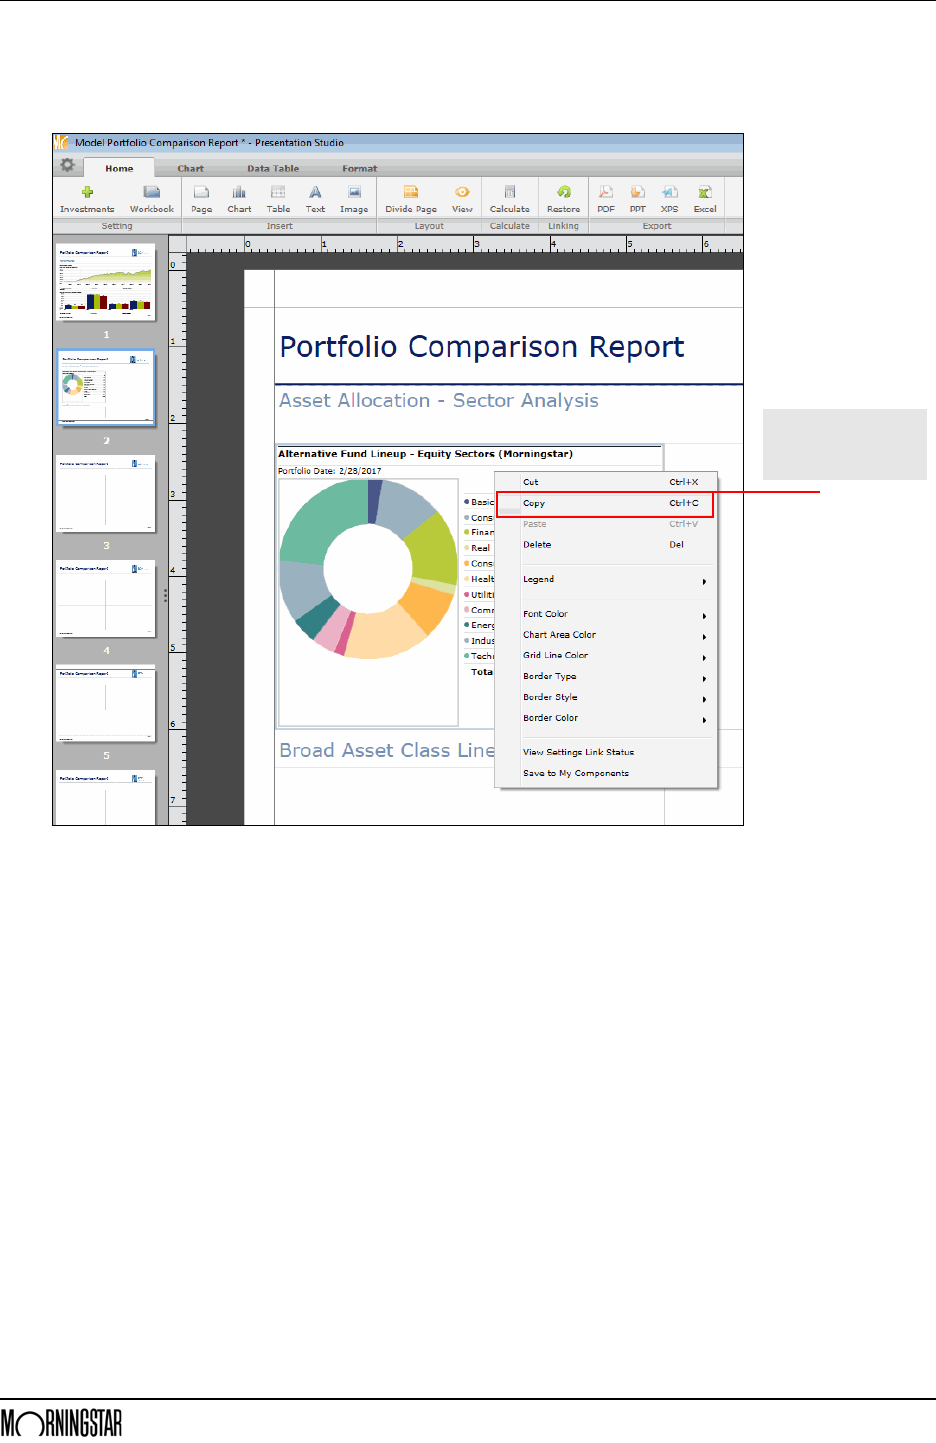
Using Presentation Studio to Compare Model Portfolios Exercise 60: Add the components to the second page
Morningstar Direct December 2017 145
© 2017 Morningstar. All Rights Reserved.
11. Rather than recreate the same chart for the other portfolio, you can simple copy and
paste the one you already have. Right-click the component you just configured in the
upper-left cell and select Copy.
Right-click in the cell with
the component you just
configured to copy it

Exercise 60: Add the components to the second page Using Presentation Studio to Compare Model Portfolios
146 Morningstar Direct December 2017
© 2017 Morningstar. All Rights Reserved.
12. Right-click in the upper-right cell and select Paste.
13. Note that the component you pasted is still showing data from the Alternate Fund
Lineup portfolio. You will change this to reflect the Fund Lineup portfolio. Be sure the
upper-left cell where you just pasted the donut chart is still selected.
14. At the top of the window, the Chart tab should be selected. From the toolbar, click
Investments. A dialog box opens.
15. In the Show column, uncheck the box for Alternate Fund Lineup.
16. Click OK to close the dialog box.
Right-click in the
adjacent cell to paste
the component
you just copied
Note which box should be
unchecked; you can easily
switch this arrangement, and
instead have the Fund Lineup
portfolio appear on the left,
and the Alternate Fund
Lineup portfolio on the right

Using Presentation Studio to Compare Model Portfolios Exercise 60: Add the components to the second page
Morningstar Direct December 2017 147
© 2017 Morningstar. All Rights Reserved.
17. The bar chart can now be added to the cell in the bottom-left corner of the page. At the
top of the window, select the Home tab.
18. Click the Chart icon and select Snapshot.
19. Drag the Supplementary Data Bar Chart component into the lower-left cell on
the
page.
20. The Supplementary Data bar chart depicts both portfolios and the custom benchmark by
default. Only one portfolio and the benchmark should show at once. The Chart tab
should be selected. From the toolbar, click Investments. A dialog box opens.
21. In the Show column, uncheck the box for Fund Lineup.
22. Click OK to close the dialog box.
Be sure to select the correct
tab (Home), icon (Chart),
and menu (Snapshot)
in order to select the
Supplementary Data
Bar Chart component
Be sure to uncheck this box
from the Investments
dialog box on the Chart
tab, and not the Home tab

Exercise 60: Add the components to the second page Using Presentation Studio to Compare Model Portfolios
148 Morningstar Direct December 2017
© 2017 Morningstar. All Rights Reserved.
23. As before, you will copy the component you just created, and paste it into the adjacent
cell. Right-click the Supplementary Data bar chart component you just configured in
the lower-left cell and select Copy.
24. In the lower-right cell, right-click and select Paste.
Right-click in the cell with
the component you just
configured to copy it

Using Presentation Studio to Compare Model Portfolios Exercise 61: Add the label to the third page
Morningstar Direct December 2017 149
© 2017 Morningstar. All Rights Reserved.
25. The last step is to change the portfolio being depicted in the lower-right cell. The Chart
tab should be selected. From the toolbar, click Investments. A dialog box opens.
26. In the Show column, uncheck the box for Alternate Fund Lineup and check the box for
Fund Lineup.
27. Click OK. The second page is now complete.
Exercise 61: Add the
label to the third page
To add the label for the components to the third page of the report, do the following:
1. In the left pane, select page 3.
2. Select the top cell on the page; this is where the label for the page will go.
3. Select the Home tab.
4. Click the Text icon and select Custom Text.
5. Double-click the top cell, then type Asset Allocation - Holdings.
6. Select the text, then use the font size drop-down field from the toolbar to select 24.
Be sure to clear the
checkbox for the
correct portfolio
Be sure to click the
Investments icon on
the Chart tab, and
not the Home tab
Select this option from
the Text drop-down field

Exercise 61: Add the label to the third page Using Presentation Studio to Compare Model Portfolios
150 Morningstar Direct December 2017
© 2017 Morningstar. All Rights Reserved.
7. Right-click the text, then select Font Color…Light Blue (the second option from the
top on the left side).
8. Be sure the Format tab is selected.
9. From the toolbar, click the Align icon and select the second Middle option.
Be sure all of the label text
is selected before
selecting this color from
the right-click menu
Select this option to
vertically center
the text in the cell

Using Presentation Studio to Compare Model Portfolios Exercise 62: Add the components to the third page
Morningstar Direct December 2017 151
© 2017 Morningstar. All Rights Reserved.
Exercise 62: Add
the components
to the third page
As on the previous page, on this page you will add a component (in this case, a table),
manipulate it to show something other than the default data, then copy and paste it
into an adjacent cell. You will then repeat this process for a chart component at the
bottom of the page.
To add the components to the third page of the report, do the following:
1. Select the Home tab.
2. Click the Table icon and select Holdings Analysis.
3. Drag the Portfolio Holdings component into the upper-left cell on the page.
Be sure to select the correct
tab (Home), icon (Table), and
option (Holdings Analysis)
in order to select the
Portfolio Holdings component

Exercise 62: Add the components to the third page Using Presentation Studio to Compare Model Portfolios
152 Morningstar Direct December 2017
© 2017 Morningstar. All Rights Reserved.
4. In the table, click the drop-down header for column C (Position Market Value (mil)). A
dialog box opens.
5. From the top drop-down field, scroll all the way down and select
All
Managed Investments.
6. From the list of available fields, select Morningstar Category.
7. Click Add, then click Close.
Note the selection from
the top drop-down field
for column C in the table
Click once to select this option

Using Presentation Studio to Compare Model Portfolios Exercise 62: Add the components to the third page
Morningstar Direct December 2017 153
© 2017 Morningstar. All Rights Reserved.
8. Now that the table is configured for one portfolio, you can copy and paste it into the
adjacent cell for the other portfolio. Right-click the upper-left cell you just configured,
then from the right-click drop-down field, select Copy.
9. Right-click in the upper-right cell, then select Paste.
Right-click in the cell with
the component you just
configured to copy it
Right-click in the
adjacent cell to paste the
component you just copied

Exercise 62: Add the components to the third page Using Presentation Studio to Compare Model Portfolios
154 Morningstar Direct December 2017
© 2017 Morningstar. All Rights Reserved.
10. Now you need to change the portfolio being displayed in the table you pasted. Be sure
the upper-right cell is selected.
11. At the top of the window, make sure the Data Table tab is selected.
12. From the toolbar, click the Investments icon. A dialog box opens.
13. In the Show column, uncheck the box for Alternate Fund Lineup.
14. Click OK.
15. Select the Home tab.
16. Click the Chart icon select Style Analysis.
17. Drag the Holdings-Based Style Map component into the bottom-left cell on the page.
Be sure to uncheck this box
from the Investments dialog
box on the Data Table tab,
and not the Home tab
Be sure to select the correct
tab (Home), icon (Chart), and
menu (Style Analysis) in order
to select the Holdings-Based
Style Map component

Using Presentation Studio to Compare Model Portfolios Exercise 62: Add the components to the third page
Morningstar Direct December 2017 155
© 2017 Morningstar. All Rights Reserved.
18. In the bottom-left corner of the screen, click Chart Settings.
19. In the Chart Settings window, note the values in the following table for the area at
the
bottom:
20. After making your selections, close the Chart Settings window.
Investments Ownership Zone Detailed Holdings
Alternative Fund Lineup Show Show
Fund Lineup Hide Hide
Moderate Aggressive Show Hide
Note the values assigned
to each item here

Exercise 62: Add the components to the third page Using Presentation Studio to Compare Model Portfolios
156 Morningstar Direct December 2017
© 2017 Morningstar. All Rights Reserved.
21. Right-click the chart you just configured in the lower-left cell, then select Copy.
22. Right-click the lower-right cell, then from the right-click drop-down field,
select
Paste.
23. In the bottom-left corner of the screen, click Chart Settings.
Right-click in the cell with
the component you just
configured to copy it

Using Presentation Studio to Compare Model Portfolios Exercise 62: Add the components to the third page
Morningstar Direct December 2017 157
© 2017 Morningstar. All Rights Reserved.
24. In the Chart Settings window, note the values in the following table for the area at
the
bottom:
25. After making your selections, close the Chart Settings window. The third page is
now
complete.
Investments Ownership Zone Detailed Holdings
Alternative Fund Lineup Hide Hide
Fund Lineup Show Show
Moderate Aggressive Show Hide
Note the new values
assigned to each item here

Exercise 63: Add the label to the fourth page Using Presentation Studio to Compare Model Portfolios
158 Morningstar Direct December 2017
© 2017 Morningstar. All Rights Reserved.
Exercise 63: Add the
label to the fourth page
To add the label for the components on the fourth page of the report, do the following:
1. In the left pane, select page 4.
2. Select the top cell on the page; this is where the label for the page will go.
3. Select the Home tab.
4. Click the Text icon, then select Custom Text.
5. Double-click the top cell, then type Asset Allocation - Equity Breakdown.
6. Select the text, then use the font size drop-down field to select 24.
7. Right-click the text, then select Font Color…Light Blue (the second option from the
top on the left side).
8. Make sure the Format tab is selected.
Select this option
from the Text
drop-down field
Be sure all of the label text
is selected before
selecting this color from
the right-click menu

Using Presentation Studio to Compare Model Portfolios Exercise 64: Add the components to the fourth page
Morningstar Direct December 2017 159
© 2017 Morningstar. All Rights Reserved.
9. From the toolbar, click the Align icon and select the second Middle option.
Exercise 64: Add
the components
to the fourth page
The fourth page is nearly the same as the third, in terms of adding a component,
modifying it, copying it, then adding another component and copying it as well.
To add the components to the fourth page of the report, do the following:
1. Select the Home tab.
2. Click the Chart icon and select Style Analysis.
3. Drag the Morningstar Style Box component into the top-left cell on the page.
4. In the bottom-left corner of the screen, click Chart Settings. The Chart Settings
window
opens.
Select this option to
vertically center
the text in the cell
Be sure to select
the correct tab
(Home), icon
(Chart), and
menu (Style
Analysis) in order
to select the
Morningstar Style
Box component

Exercise 64: Add the components to the fourth page Using Presentation Studio to Compare Model Portfolios
160 Morningstar Direct December 2017
© 2017 Morningstar. All Rights Reserved.
5. From the Data drop-down field, select Equity Style Percentage.
6. Close the Chart Settings window. You can now copy the component and paste it into the
cell on the right.
7. Right-click the upper-left cell, then select Copy.
8. Right-click the upper-right cell, then select Paste.
Select this option from
the Data drop-down field
Right-click in the cell
with the component
you just configured to copy it

Using Presentation Studio to Compare Model Portfolios Exercise 64: Add the components to the fourth page
Morningstar Direct December 2017 161
© 2017 Morningstar. All Rights Reserved.
9. Make sure the upper-right cell is selected.
10. Be sure the Chart tab is selected.
11. From the toolbar, click the Investments icon. A dialog box opens.
12. In the Show column, uncheck the box for Alternate Fund Lineup.
13. Click OK. The next component can now be added to the bottom-left cell on the page.
14. Select the Home tab.
15. Click the Chart icon and select Holdings Analysis.
16. Drag-and-drop the Pie Chart component into the bottom-left cell on the page.
Note: The component appears as a donut chart because you made a change earlier from the
Home tab to convert pie charts to donut charts.
17. In the bottom-left corner of the screen, click Chart Settings. The Chart Settings
window
opens.
Be sure to uncheck this box
from the Investments
dialog box on the Chart
tab, and not the Home tab
Be sure to select the
correct tab (Home),
icon (Chart), and menu
(Holdings Analysis)
in order to select the
Pie Chart component

Exercise 64: Add the components to the fourth page Using Presentation Studio to Compare Model Portfolios
162 Morningstar Direct December 2017
© 2017 Morningstar. All Rights Reserved.
18. From the Data Set drop-down field, select Equity Style.
19. Close the Chart Settings window. You can now copy this component, and paste it into
the cell on the right.
20. Right-click the donut chart you just configured in the bottom-left cell, then select Copy.
21. Right-click in the bottom-right cell, then select Paste.
22. Now it’s time to switch the portfolio being reflected in the bottom-right cell. Make sure
the bottom-right cell is selected.
23. Be sure the Chart tab is selected.
24. Click the Investments icon. A dialog box opens.
25. In the Show column, uncheck the box for Alternate Fund Lineup.
26. Click OK. The fourth page is now complete.
Select this option from the
Data Set drop-down field

Using Presentation Studio to Compare Model Portfolios Exercise 65: Add the label to the fifth page
Morningstar Direct December 2017 163
© 2017 Morningstar. All Rights Reserved.
Exercise 65: Add the
label to the fifth page
To add the label for the components on the fifth page of the report, do the following:
1. In the left pane, select page 5.
2. Select the top cell on the page; this is where the label for the page will go.
3. Select the Home tab.
4. Click the Text icon and select Custom Text.
5. Double-click the top cell, then type Portfolio Risk.
6. To select the text, press <CTRL>+<A>, then use the font size drop-down field from the
toolbar to select 24.
7. Right-click the text, then select Font Color…Light Blue (the second option from the
top on the left side).
8. Select the Format tab.
9. From the toolbar, click the Align icon and select the second Middle option.
Choose this color
for the label’s font

Exercise 66: Add the components to the fifth page Using Presentation Studio to Compare Model Portfolios
164 Morningstar Direct December 2017
© 2017 Morningstar. All Rights Reserved.
Exercise 66: Add
the components
to the fifth page
The fifth page has three components, all of which reflect both portfolios and the
custom benchmark. Therefore, you do not need to copy and paste any components.
To add the components to the fifth page of the report, do the following:
1. Select the Home tab.
2. Click the Chart icon and select Performance.
3. Drag-and-drop the X/Y Scatter Plot Chart component into the top-left cell on
the
page.
4. For the next component, click the Table icon and select Performance.
5. Drag-and-drop the Multiple Investment Risk component into the top-right cell on
the
page.
Be sure to select the
correct tab (Home), icon
(Chart), and menu
(Performance) in order
to select the X/Y Scatter
Plot Chart component
Be sure to select the correct
tab (Home), icon (Table), and
menu (Performance) in order
to select the Multiple
Investment Risk component

Using Presentation Studio to Compare Model Portfolios Exercise 66: Add the components to the fifth page
Morningstar Direct December 2017 165
© 2017 Morningstar. All Rights Reserved.
6. For the component at the bottom of the page, click the Chart icon and
select
Performance.
7. Drag-and-drop the Drawdown Chart component into the bottom cell on the page.
8. In the bottom-left corner of the screen, click Chart Settings.
9. From the Display drop-down field for Fund Lineup, select Shaded Area.
10. From the Display drop-down field for Moderate Aggressive Benchmark, select
Dotted
Line.
11. Close the Chart Settings window. The fifth page is now complete.
Be sure to select the
correct tab (Home),
icon (Chart), and menu
(Performance) in order
to select the
Drawdown Chart
component
Note the values assigned
to each item here

Exercise 67: Add the label to the last page Using Presentation Studio to Compare Model Portfolios
166 Morningstar Direct December 2017
© 2017 Morningstar. All Rights Reserved.
Exercise 67: Add the
label to the last page
To add the label for the components to the sixth page of the report, do the following:
1. In the left pane, select page 6.
2. Select the top cell on the page; this is where the label for the page will go.
3. Select the Home tab.
4. Click the Text icon and select Custom Text.
5. Double-click the top cell, then type Geographic Regions.
6. To select the text, press <CTRL>+<A>, then from the font size drop-down field,
select
24.
7. Right-click the text, then select Font Color…Light Blue (the second option from the
top on the left side).
8. Select the Format tab.
9. From the toolbar, click the Align icon and select the second Middle option.
Be sure all of the label text
is selected before
selecting this color from
the right-click menu

Using Presentation Studio to Compare Model Portfolios Exercise 68: Add the components to the last page
Morningstar Direct December 2017 167
© 2017 Morningstar. All Rights Reserved.
Exercise 68: Add
the components
to the last page
The last page has two components, but you only need to build one, then copy and
paste it into the adjacent cell.
To add the components to the sixth page of the report, do the following:
1. Select the Home tab.
2. Click the Chart icon and select Holdings Analysis.
3. Drag-and-drop the Pie Chart component into the left cell on the page.
4. In the bottom-left corner of the screen, click Chart Settings.
5. From the Data Set drop-down field, select Equity Regional Exposure.
6. Close the Chart Settings window.
Be sure to select the
correct tab (Home),
icon (Chart), and menu
(Holdings Analysis)
in order to select the
Pie Chart component
Select this option from the
Data Set drop-down field

Exercise 68: Add the components to the last page Using Presentation Studio to Compare Model Portfolios
168 Morningstar Direct December 2017
© 2017 Morningstar. All Rights Reserved.
7. You can now copy and paste the pie chart into the cell on the right. Right-click in the
left cell, then select Copy.
8. Right-click in the right cell, then select Paste.
9. Make sure the right cell is selected.
10. Be sure the Chart tab is selected.
11. From the toolbar, click the Investments icon. A dialog box opens.
12. In the Show column, uncheck the box for Alternate Fund Lineup.
13. Click OK. The sixth page is now complete. Be sure to save the report via the gear icon in
the upper-left corner of the window.
Be sure to uncheck this
box from the Investments
dialog box on the Chart
tab, and not the Home tab
