
http://xim.tech
XIM NEXUS
USER GUIDE

http://xim.tech
XIM NEXUS
Welcome!
This guide is designed to give you an in depth understanding of all
the features of XIM NEXUS. If you need any assistance along the
way, please visit Support. We are here to help!
We encourage you to check out and join our very large and active
community of gamers at our Community Forum.
Add a new dimension to your aim with XIM NEXUS high precision motion
aim game controller for Xbox Series X | S, Xbox One, PlayStation 4, and PC!
Thank you for your purchase of XIM NEXUS! Through proprietary aim translation technology, XIM NEXUS is
able to provide a level of motion aim precision unachievable by any other gaming controller available. Gamers
can increase their overall aiming accuracy and speed by enhancing their aim with XIM motion control.
Featuring full wireless configuration through smart phones, tablets, and PCs, it is simple to configure and
easy to use. It’s the perfect companion to even the most demanding gamer.
Welcome to the XIM community!
To jump into gaming as quickly as possible please check out our
Getting Started Guide. For the absolute minimum set of
instructions, look at our Minimum Start Steps.

http://xim.tech
XIM NEXUS
Minimum Start
Jump into gaming with your XIM NEXUS
XIM NEXUS has a wide range of features ready for you to explore.
To get gaming as quickly as possible, follow these steps. For more detail, check out our Getting Started Guide.
CONNECT ADAPTER TO CONSOLE
2
1
Console controller
(included cable)
Xbox steps shown.
Additional steps for PS4 and PC.
ADD CONFIG TO CONTROLLER
1
Download XIM
NEXUS Manager App
2
Connect to
Manager
3
DIAL IN SETTINGS
Add Game Config
and follow app
instructions for in-
game settings
1
Disable
Classic Mode
2
Edit Config
3
Follow app
instructions
to dial in
preferred
settings
For more in-depth information about everything related to XIM NEXUS, please refer to this User
Guide and also visit our Community Support Forum.
3
Press Guide
Plug in
http://xim.tech
XIM NEXUS
Topics
Unboxing
Inputs and Ports
Charging your Controller
Turning On and Off
Upgrading Firmware
Connecting to Xbox
Connecting to PS4
Connecting to PC
Classic Mode
Connecting to Manager
Adding a Config
Heads Up Display (HUD)
Editing your Config
Editing Experience
Hip vs. Aim Down Sight
Editing Pages Overview
Stick Aim Sensitivity
Motion Aim Sensitivity
Motion Aim Smoothing
Custom Motion Smoothing
Motion Aim Activation
Changing Button Mappings
Setting Trigger Mappings
Advanced Triggers: Quick Pull
Advanced Triggers: ADS Sync
True Stick Curves
ADS Activation Delay
Additional Options Menu
Auto Calibration
Manual Calibration
Customizing Classic Mode
Controller Pairing to Adapter
Spectator Broadcast Overlay
Wireless Performance
Quick Links to Topics

http://xim.tech
XIM NEXUS
Unboxing
Your XIM NEXUS comes with several parts
XIM NEXUS Wireless Adapter
Referred to as Adapter throughout
this manual. The Adapter is required to
use the Controller on an Xbox or
PlayStation console.
(Not needed for PCs that have
Bluetooth connectivity.)
XIM NEXUS Controller
Referred to as Controller throughout
this manual.
Cables
Four (4) cables are included:
1) USB A to USB C: To charge and
firmware upgrade your Controller
2) USB C to USB C: To connect Adapter
to an Xbox Series X | S controller.
3) USB C to USB Micro A: To connect
Adapter to other console controllers.
4) USB A extension: For additional
flexibility when connecting Adapter to
upright consoles.

http://xim.tech
XIM NEXUS
Inputs and Ports
Your XIM NEXUS buttons, sticks, triggers, and ports
Get to know all the inputs and ports of your Controller.
ABXY
NEXTPREVIOUS
GUIDE
DPAD
LEFT
TRIGGER
RIGHT
STICK
HEADPHONE
JACK
ENGAGE
MINUS
PLUS
USB C
LEFT
STICK
RIGHT
TRIGGER
LEFT
BUMPER
RIGHT
BUMPER
LP
LQ
P
RESET
RP
RQ

http://xim.tech
XIM NEXUS
Charging
Charging your Controller
Using the included cable, connect your XIM NEXUS to a 5V wall adapter or computer.
While charging, light will slowly
pulse YELLOW.
When charged, light will slowly
blink GREEN.
The battery will take around 3 hours to fully charge.
Under normal use, the battery will last about 12 hours.

http://xim.tech
XIM NEXUS
Turning On/Off
Turning your Controller On and Off
Press and hold GUIDE until the Controller turns ON (around 2
seconds). It will pulse WHITE when on.
Press and hold GUIDE until the Controller turns OFF (around 5
seconds). The light will turn off or display charging status if
plugged in.

http://xim.tech
XIM NEXUS
Upgrade Firmware
Upgrading your Controller’s Firmware
Like all XIM products, XIM NEXUS will be upgraded frequently with new features and fixes based on community feedback.
This means that the firmware that came preloaded on your Controller may be out of date (even if it’s brand new).
You will need a PC or Mac computer in order to upgrade the firmware on your Controller.
Download the latest firmware upgrade tool from xim.tech and follow these steps:
ENTER FLASH MODE
STEP 1 Turn Controller OFF
STEP 2 Press and hold P (back of Controller)
STEP 3 Press GUIDE
STEP 4 Release P
Controller will display BLUE when in FLASH MODE.
RUN FLASH TOOL
STEP 5 Plug Controller into USB on computer
STEP 6 Run Flash Tool
STEP 7 Choose UPGRADE FIRMWARE
STEP 8 Wait for tool to complete
Occasionally your XIM NEXUS Adapter may have also have a firmware upgrade available. The process to upgrade is very similar to
Controller except to enter FLASH mode, PRESS and HOLD Adapter’s button while plugging into your computer’s USB port.

http://xim.tech
XIM NEXUS
Xbox Connection
Connecting to your Xbox Series X | S or Xbox One
Use on an Xbox REQUIRES a genuine Microsoft Xbox Series X | S or One controller be connected to Adapter at all times.
STEP 1 Ensure Controller and Console are powered ON
STEP 2 Connect your Xbox controller to Adapter using the supplied USB cable
STEP 3 Connect your Adapter to your Xbox
STEP 4 Press the GUIDE button on the Xbox controller
Adapter will:
• Notify you that it successfully connected to your Xbox by flashing GREEN quickly 4 times
• Flash RED while is not connected Controller and is waiting to connect
• Flash WHITE while it’s wirelessly connected to Controller
1
2
3
4

http://xim.tech
XIM NEXUS
PS4 Connection
Use on a PlayStation 4 REQUIRES a genuine Sony PlayStation 4 controller be connected to Adapter at all times.
STEP 1 Ensure Controller and Console are powered ON
STEP 2 Connect your PlayStation 4 controller to Adapter using the supplied USB cable
STEP 3 Connect your Adapter to your PlayStation 4
STEP 4 Press the PS button on the PlayStation controller
1
2
3
Connecting to your PlayStation 4
Adapter will:
• Notify you that it successfully connected to your PS4 by flashing GREEN quickly 4 times
• Flash RED while is not connected Controller and is waiting to connect
• Flash WHITE while it’s wirelessly connected to Controller
IMPORTANT: If you are using a DualShock 4 Gen2 console controller, you must enable Wired Communication in your PS4’s Device Settings.

http://xim.tech
XIM NEXUS
PC Connection
Controller can connect directly to a PC either wireless or wired without the use of Adapter. For wireless connections, your
PC requires Bluetooth connectivity.
NOTE: Pairing to a device removes Controller’s prior pairing (such as to Adapter). Learn how to later re-pair to Adapter.
STEP 1 Ensure Controller and PC are powered ON
STEP 2 Press and Hold P on the back of Controller until it starts blinking CYAN (about 3s)
STEP 3 Scan for Bluetooth devices on your PC
STEP 4 Select XIM NEXUS when it shows on the list
1
2
Connecting to your PC
If your PC doesn’t have Bluetooth, or, if your PC’s has poor Bluetooth performance,
you can use Adapter on your PC. Adapter doesn’t require a console controller be
connected to it. It will flash PURPLE when ready.
3
4

http://xim.tech
XIM NEXUS
Classic Mode
Controller Classic Mode
When Controller is turned on (or if it has no Configs on it), it will automatically be in Classic Mode. You will know you are in
this mode if your Controller is pulsing WHITE.
Classic Mode makes the Controller act like a regular console controller:
• No motion control
• No thumbstick curves
• Limited button/trigger mappings
To EXIT Classic Mode, press NEXT+PREVIOUS. Press again to RE-ENTER any time.
Classic Mode is used to make it easier to navigate menus and your console’s dashboard when not in game.
This mode can also be used in games as well. For more information, please see Customizing Classic Mode.

http://xim.tech
XIM NEXUS
Connect To Manager
Connecting to Manager
XIM NEXUS Manager is used to fully configure the Controller.
Download “XIM NEXUS Manager” for Android or iOS from their app stores. For the PC version, download from xim.tech.
Make sure your device’s Bluetooth radio is ON. Do NOT pair using your device’s system pairing interface.
Android users must have LOCATION services ON to pair (this is a requirement of Google, your location information is never used).
Run MANAGER App
ENTER MANAGER SEARCH MODE ON CONTROLLER
• Ensure Controller is ON
• PRESS and HOLD PLUS+MINUS, you will see CYAN blinking
• Continue to HOLD until you see rapid CYAN blinking (about 5s)
• RELEASE PLUS+MINUS and wait until Manager connects
NOTE: After the first connection, when re-connecting it is no
longer required to hold PLUS+MINUS.

http://xim.tech
XIM NEXUS
Adding Configs
Add a Config
Every game you play must have a Config -- which is added through Manager.
A Config holds all your settings for a game such as motion behavior, thumbstick curves and button mappings.
Choose the supported game you are playing and the console. Your Config will be added to your Controller (around 20s).
Blinks WHITE while
communicating with
Manager
XIM NEXUS’ input translation technology requires that your game’s sensitivity is set to MAXIMUM, HIGH, “INSANE”, etc.
Your game may also need additional settings. If not set, you aim will not be optimal.

http://xim.tech
XIM NEXUS
HUD
Heads Up Display
The Heads Up Display (HUD) shows the current status of your Controller. Use it to edit, add, and delete your Configs.
EDIT
CURRENT
CONFIG
ADDITIONAL
OPTIONS
(NEW,
DELETE, etc.)
WIRELESS
PERFORMANCE
BATTERY
LEVEL
CONNECTION
STATUS
REALTIME
CONTROLLER
VISUALIZATION
VIEW
REQUIRED
GAME
SETTINGS
CURRENT
CONFIG

http://xim.tech
XIM NEXUS
Edit Config
Editing your Config
All Configs start with default values, but everyone’s preferences are different. You will want to edit your Config.
STEP 1 Load the game you want to play. Make sure game’s: aim sensitivity is MAXIMUM, and settings are applied
STEP 2 Find a spot that you can spend time in without disruption (such as a private session or training area)
STEP 3 Use Manager to make sure the correct Config is loaded for your game
STEP 4 Pick up your Controller and disable Classic Mode (if needed)
Try moving around the map and aiming with the thumbstick only -- it
may feel too fast (or too slow).
Try engaging motion by holding down the LEFT TRIGGER (default
binding) – it may also feel too slow.
Get an initial feel for things:
It’s time to start tuning your Config to your preferences:

http://xim.tech
XIM NEXUS
Editing Experience
Standard vs. Expert Editing Experience
XIM NEXUS Manager offers two different types of Config editing modes: Standard and Expert
Standard Editing: The default editing experience. Only the most common
settings are available. This mode is intended to be used by beginners.
Expert Editing: When activated, this mode presents all settings
available to the user.
This User Guide covers the complete set of settings and features available to you. When you edit
your Config for the first time, you will need to switch to the Expert editing experience to access all
settings. To do so, scroll down and select the link:
All your settings changes are preserved if you switch between Standard and Expert editing modes.

http://xim.tech
XIM NEXUS
Hip VS. ADS
Hip vs. Aim Down Sight (ADS)
Most shooters have the ability to Aim Down Sight (ADS) (also called “Zoom” or “Scoped”).
When not in ADS, it’s called Hip Aim. Typically, ADS is activated using the LEFT TRIGGER on most games.
For games that have an ADS mode, some change aiming behavior between Hip and ADS (aiming feels different between the modes). For
these you will have the ability to customize Hip Aim and Aim Down Sight independently when you edit your Config:
Aim Down Sight
Hip Aim
For games that don’t have an ADS mode, or they do but share the same aiming behavior between Hip and ADS, you only customize Aim.
If you still prefer to customize ADS separately, you have the choice to enable it:

http://xim.tech
XIM NEXUS
Edit Overview
Edit Config Page Overview
Config editing is divided into sections. Changes to settings occur on Controller in real-time.
These sections include Hip and Aim Down Sight (ADS) settings and button mappings (bindings).
You will only see an ADS section if your game has an ADS mode that has different aiming behavior than Hip.
Config name and color.
Motion activation settings.
Motion and Stick settings
for Hip aim.
Motion and Stick aim
settings for ADS (if game
has unique ADS aim).
Button mapping
customization.

http://xim.tech
XIM NEXUS
Stick Aim
Adjusting Stick Aim Sensitivity
The first thing to do when editing your Config is to get your stick aim sensitivity to feel correct.
Your in-game stick sensitivity should already be set to MAXIMUM. You reduce that speed here.
ADJUST X and Y SENSITIVITY:
Adjust the speed values and test the results
until it feels right to you.
These values will be used automatically for ADS
aiming too. To use different values for ADS, disable
Shared aim settings in the ADS section.

http://xim.tech
XIM NEXUS
Motion Aim
Adjusting Motion Aim Sensitivity
Motion aim provides the gamer with the ability to constantly and rapidly correct their stick aim with motion. It can be used
for micro adjustments to your stick aim, or your primary precision aim where the stick is used for coarse aim. Motion aim
is combined with stick aim (it is additive).
If your game has an ADS aiming
mode and it has different aim
behavior than Hip, then, you will
have an Aim Down Sight section
in your Config.
You will have the ability to set
your Aim Down Sight motion
sensitivity independently from Hip.
When using Aim Down Sight
motion activation, then, this
sensitivity is used.
Hip aim motion sensitivity is used
for motion while Hip aiming.
If the game you are playing
doesn’t have unique aiming
behavior for aiming down sight,
then this is the only sensitivity you
will set for all motion aiming (in
which case, the header title will
be just “Aim”).
By default, motion is only engaged with LEFT TRIGGER for Aiming Down Sight (i.e. “scope”/”zoom”). To change this see Motion Activation.
http://xim.tech
XIM NEXUS
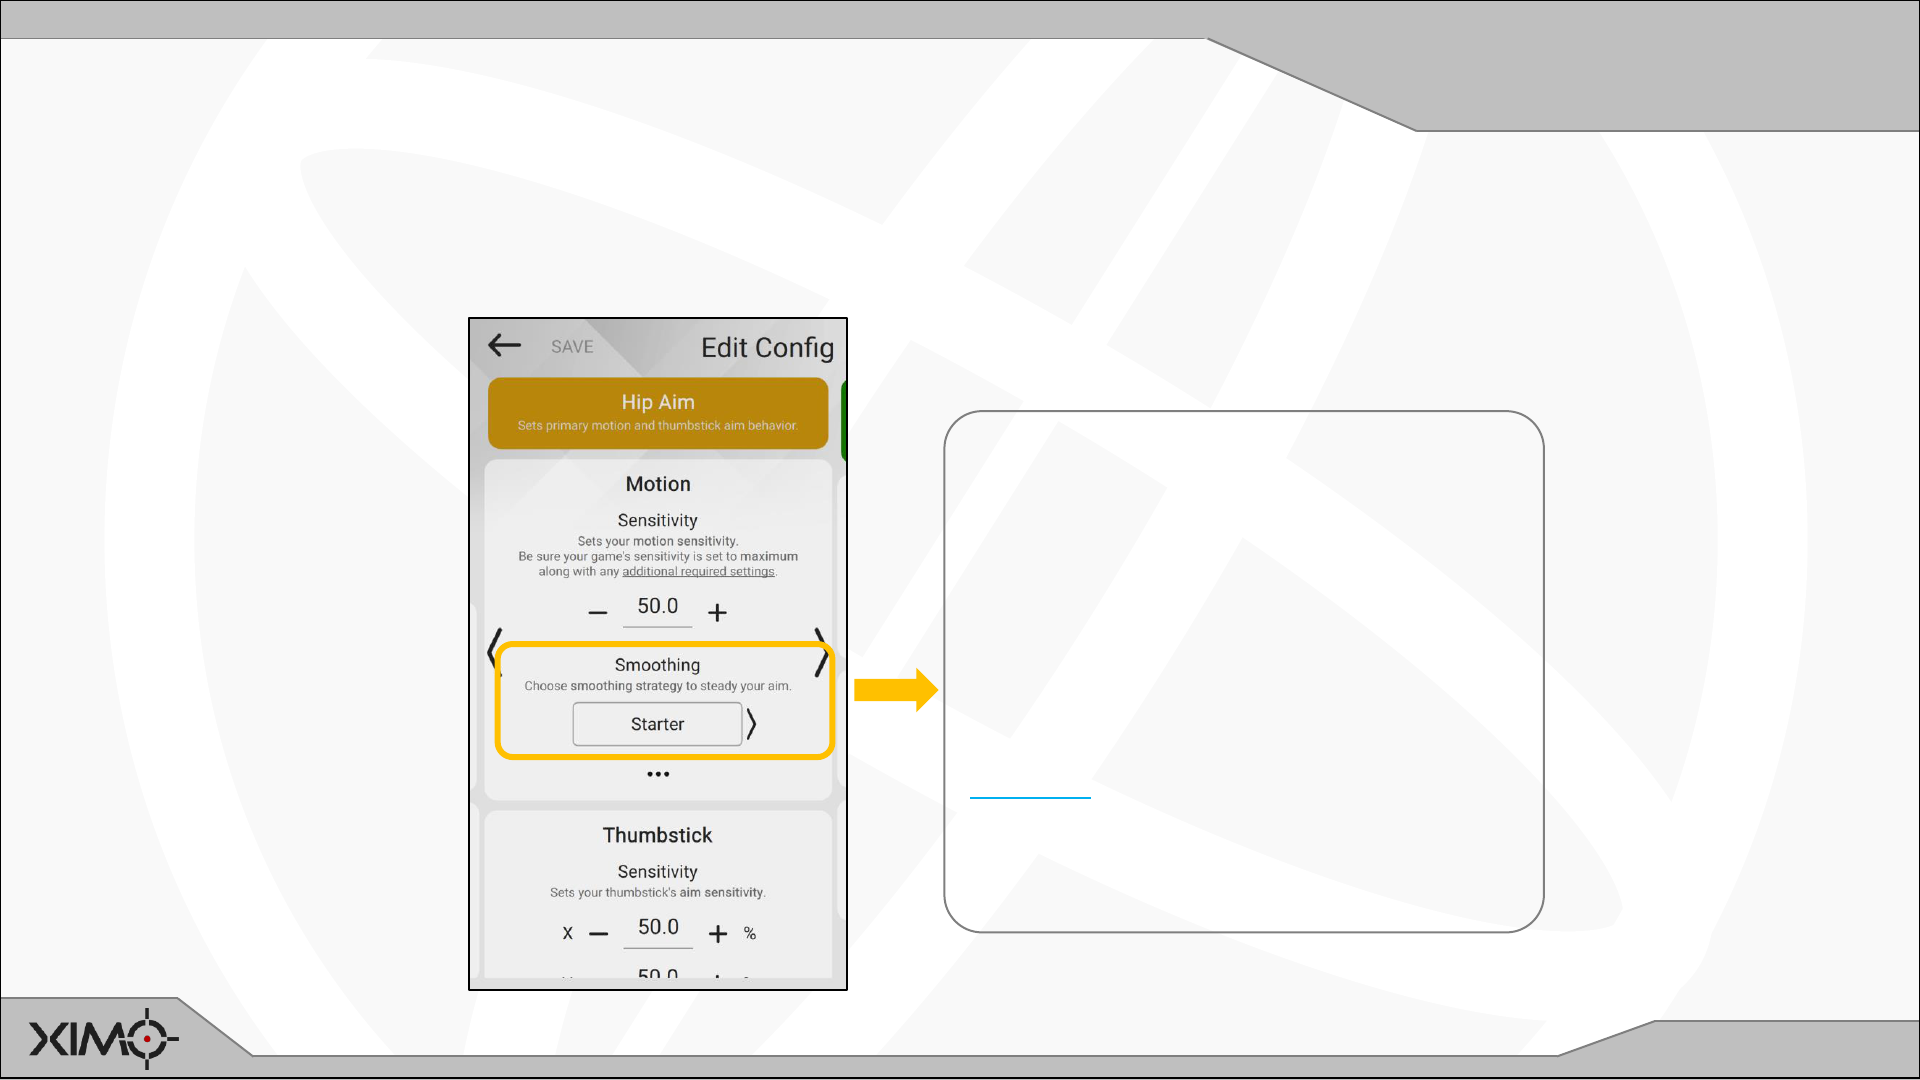
Motion Smoothing
ADJUST SMOOTHING:
Motion smoothing and stability is
available through proprietary filtering
techniques.
Smoothing filter presets are
provided: Starter, Balanced,
Twitchy, Focused, Heavy and
Custom.
Starter is recommended for
beginners.
Tuning Motion Aim Smoothing
XIM NEXUS includes a sophisticated Motion Engine to enable the gamer to tune motion aim response to their preference.
Several presets are included as well as the ability to customize behavior.

http://xim.tech
XIM NEXUS
Custom Smoothing
Custom Motion Aim Smoothing
Custom smoothing enables you to further adjust motion aim beyond the supplied presets.
CHOOSE MOTION SMOOTHING SETTINGS:
There are four settings for customizing motion smoothing.
Start with all settings at 0 and then adjust one at a time
in this order:
Precision: Fine aim behavior. Higher values provide a
smoother result at low aim speeds and increases the
heaviness of the reticle.
Response: Fast aim behavior. Higher values produces a
lighter feeling reticle at faster aim speeds.
Easing: Aim behavior from rest. Higher values result in
smoother transition from rest but lower response time.
Stability: Aim behavior at rest. Increase to provide extra
stability at rest due to hand jitter and instability.

http://xim.tech
XIM NEXUS
Motion Activation
Motion Aim Activation
CHOOSE MOTION ACTIVATION METHOD:
There are four options for activating motion based on your personal
preference.
Aim Down Sight: Motion is enabled when ADS is activated (LEFT
TRIGGER by default). ADS mapping can be changed.
Aim and Fire: Motion is enabled when ADS is activated or whenever
Firing. Includes a configurable hold time to keep motion enabled
during firing.
Engage toggle: Keep motion permanently on or off (for both ADS and
Hip fire) when the ENGAGE button is pressed.
Disabled: Motion is permanently off.
Motion aim can be activated in different selectable ways. As a gamer becomes more proficient with motion, they may
choose to keep it activated at all times while in game.
Buttons that invoke Aim Down Sight and Fire can be changed.

http://xim.tech
XIM NEXUS
Button Mapping
Changing Button Mappings
Button mappings allow you to remap almost every button to a different action (such a pressing a console button). They are
also used to declare which buttons are used for certain actions in game (the role such as Aim Down Sight).
INPUTS:
The set of
buttons,
triggers, and
sticks on your
XIM NEXUS
Controller that
you map actions
and roles to.
ACTIONS:
The action to map the
Controller input. Such as
a console controller
button, engaging motion,
etc.
ROLE:
The in-game role of the
Controller input. Such as
aiming down sight, firing
or brings up a radial
menu.

http://xim.tech
XIM NEXUS
Trigger Mapping
Setting Trigger Mappings
Trigger mapping is a powerful feature in that it’s exactly like button mapping but provides the ability to map actions to 4 different “stops”
(% of pull) per trigger. (Press the picture of the trigger to add additional stops.)
In this example, a partial (light) press
of the trigger can be used to enable
motion before firing occurs. In this
case, 50% XIM NEXUS trigger pull
maps to 0% console controller trigger
(use the slider to set to 0).
Other possible scenarios:
• Making a hair trigger by mapping
1% XIM NEXUS trigger to the
console controller trigger.
• Combining ADS and holding breath
steadying (available in some
shooters).
0%
100%
50%
1%
Game Trigger
Range
(0-100%)
Motion
Activates
The Motion Activation setting will determine which motion engage and toggle actions are currently active in mappings:
Aim Down Sight: Motion will only be engaged when Aim Down Sight is active (even if you place a motion
engage action at a trigger stop before ADS). Only motion engage actions are used.
Aim and Fire: All motion engage actions are used (even non-trigger) as they are defined.
Engage toggle: All motion toggle actions are used as they are defined.

http://xim.tech
XIM NEXUS
Quick Pull
Advanced Triggers: Quick Pull
In addition to the flexibility provided by Trigger Mapping, you can also increase your trigger speed using Quick Pull.
Quick Pull makes it so that you don’t have to fully release your trigger in order to start and complete the next pull. Combine this with hair
triggers to greatly increase your firing speed. Another added benefit of Quick Pull is that it provides additional stability to your aim. The
physical force of fully pressing and releasing your trigger can at times cause your controller to move (thus affecting motion aim). Quick Pull
enables you to fire rapidly just by lightly “wiggling” (oscillating) the trigger mid-pull without aim disruption.
Enable Quick Pull
by choosing the
triggers you
would like to apply
it to.
In this example,
Right Trigger is
chosen since it is
used for firing.
Set Right Trigger
threshold to 1% to
make it a hair trigger.
After this step, along with
Quick Pull enabled, you can
now fire by barely pulling the
trigger at any point along
the trigger pull path.
Try firing quickly by lightly
oscillating the trigger
around mid-pull.

http://xim.tech
XIM NEXUS
ADS Sync
Advanced Triggers: ADS Synchronization
More advanced scenarios are available with the flexibility of Trigger Mapping, such as ADS trigger synchronization.
XIM NEXUS needs to know when your game switches to ADS aiming so it can match its aiming translation. This is done by declaring the ADS Role in one of
your mapped trigger positions. This will typically be mapped to 100% trigger pull of the console controller. However, most games switch to ADS before 100%
so there will be a small period of time through your trigger pull where your game is in ADS before your XIM NEXUS. Generally, most users won’t notice this, but
here is how you would better synchronize your ADS trigger with the game.
Start with 100% pull mapped to
100% in-game.
Slowly pull your trigger until you
see ADS occur in-game and note
the position of the red line.
Set the slider at or just before the
red line and copy the value
displayed under the console
trigger to the threshold.
Your XIM NEXUS will now
transition to ADS aiming more
closely with your game.

http://xim.tech
XIM NEXUS
Stick Curves
True Stick Curves
XIM NEXUS has the ability to provide true customizable stick aiming curves through its proprietary aim translation
technology. Meaning, it’s not applying aim curves on top of the game’s existing curves (producing incorrect and unintuitive
aim behavior like other controllers). Rather, the curves you author will be the aim response you experience in game.
Expand by pressing “…”
Switch from Native Stick
Behavior to Custom
Open Stick Curve Editor
Use controls to customize
aim curve

http://xim.tech
XIM NEXUS
ADS Delay
ADS Activation Delay
Some games that support aiming down sight will switch to that mode after time delay (such as until a zoom-in animation completes).
These settings allow you synchronize your XIM’s ADS transition exactly to that of game’s current aiming state.
NOTE: In most cases, Manager will automatically set these values to match your game when the Config is created. In the event you want to
customize these values, follow the steps below. If you are unsure what values to use, leave them at default.
Under Activation, press the “• • •” to expand and see these advanced options.
Aim Down Sight Delay:
Set the amount of time delay activation
and deactivation your game uses when
transitioning to and from ADS.
• Move the reticle in circles using
motion
• At the same time, enter and exit ADS
repeatedly
• If you are feeling the reticle jump
before settling to its ADS velocity, try
adjusting the delay

http://xim.tech
XIM NEXUS
Options Menu
Additional Options Menu
Access the additional options menu for Loading Configs, Deleting Configs and Global Settings (includes Calibration).

http://xim.tech
XIM NEXUS
Auto Calibration
Auto Calibration
The XIM NEXUS Controller, like all game controllers, contains analog devices and sensors that require calibration. Your controller comes
pre-calibrated so you should rarely to never have to calibrate. But, you are given access to all aspects of calibration so that, if you choose,
you can further customize and refine your experience. Calibrating your Controller incorrectly will never hurt or damage it in any way.
STEP 1 RANGE CALIBRATION determines
the full range of motion of the triggers and
sticks.
Press Calibrate Ranges and then:
• Move your sticks in full circular motions
• Then, press and release your triggers fully
• Repeat until Manager finishes (10
seconds)
STEP 2 SENSOR CALIBRATION determines
base noise levels and offsets of sensors.
Place Controller on a stable surface.
Press Calibrate Sensors and then:
• DON’T TOUCH the Controller
• Wait until Manager finishes (3 seconds)

http://xim.tech
XIM NEXUS
Manual Calibration
Manual Calibration
After Auto Calibration, you can make additional changes such as modification of auto calibrated values and adjustment of stick and
trigger deadzones to your preference. The Manual Calibration interface is to the right of Auto Calibration in Manager.
Stick produces 0 value in
inner deadzone and
maximum in outer.
Modifies coordinate
system of the stick.
Changes which direction is
forward.
Trigger produces 0 value
in inner deadzone and
maximum in outer. Reduce
inner for hair trigger.
Motion sensor gyroscope
noise and offsets.
Generally never need to
adjust.
Changes motion sensor
gravity alignment.

http://xim.tech
XIM NEXUS
Edit Classic Mode
Customizing Classic Mode
Classic Mode makes your XIM NEXUS act like a regular console controller to make it easier to do tasks outside of the
game you are playing (such as navigating menus).
Classic Mode can also be used in games where you prefer standard controller behavior as well. Manager offers
additional customization options for this scenario:
MAP Back Buttons:
Assign console buttons to the
buttons on the back of your
controller.
ENABLE Quick Pull Triggers:
Quick Pull Triggers increase your
firing rate.
IMPORTANT: Remember that these customizations are NOT active if Class Mode isn’t enabled.

http://xim.tech
XIM NEXUS
Adapter Pairing
Controller Pairing to Adapter
If Controller is ever paired directly to a PC, you can re-pair it to your Adapter with these steps.
NOTE: Initiating pairing removes Controller’s existing pairing.
STEP 1 Start with both Controller and Adapter OFF and then turn both ON
STEP 2 Press and Hold P on the back of Controller until it starts blinking CYAN (about 3s)
STEP 3 Press and Hold Adapter’s button until it starts blinking CYAN (about 3s)
STEP 4 Wait for both devices to pair (Adapter will flash WHITE)
1
2
3

http://xim.tech
XIM NEXUS
Spectator
Spectator Broadcast Overlay
If you are running Manager on a PC, Manager features a real-time controller broadcast visualization overlay you can use in streaming
tools like OBS and XSplit. The overlay is used to show your viewers how you are gaming with your XIM NEXUS Controller.
Press the Controller visualization in the HUD to load Spectator mode. Capture the window in your broadcast tool and crop.

http://xim.tech
XIM NEXUS
Wireless
Wireless Performance
Like all wireless devices, XIM NEXUS is susceptible to poor wireless conditions and environments. Use these tips to ensure
you have optimal wireless performance.
TIP 1 Plug Adapter in the front of your console directed towards Controller
TIP 2 Remove any objects between Controller and Adapter
TIP 3 Maintaining Line of Sight between Controller and Adapter is always best
TIP 4 A USB extension cable can be used to better position Adapter for performance
TIP 5 Do not run Controller in Manager Search Mode (it blinks CYAN in that mode)
TIP 6 If Controller is paired directly to a PC, don’t use other Bluetooth devices
